Touch, Audio visual, and Game (TAG) Table
|
|
|
- Lewis Day
- 6 years ago
- Views:
Transcription
1 Touch, Audio visual, and Game (TAG) Table ECE791/792 Final Report Team Members: Michael Perez, Michael McManus, Nicholas Nazarenko, Andreas Wigger Advisor: Dr. Richard Messner

2 McManus, Nazarenko, Perez, Wigger 2 Acknowledgments The TAG table team would like to thank Kevin Roe for helping with the construction of the table. Project Team From left to right: Nicholas Nazarenko, Michael Perez, Andreas Wigger, Michael McManus
3 McManus, Nazarenko, Perez, Wigger 3 Abstract The goal of this project was to create a coffee table that has interactive games, produce audio visual effects in real time that coincide with music, and have touch screen capabilities. Our interactive game called Engineering Hero was made using IR sensors and LED strands. The IR sensor gave touch screen capabilities and allowed for interaction between the player and the table. The audio visual effects were made using an Arduino Uno and an audio input that went through a Fourier Transform program. The program returned the magnitude for different frequency components of the music and was used to produce visual effects through a 10x15 LED array. Electrical circuit design and computer programming was used to implement all design components. The table has a unique design and has commercial potential. Before bringing it to market the design needs to be refined to reduce the cost of construction. Having an interactive coffee table would be great for a party, restaurant, and conversation piece. The table provides entertainment and still can be used as a functional piece of furniture on a daily basis. All of the design goals were met for this project. Future improvements would include a smaller power supply for the audio amplifier and more interactive games.
4 McManus, Nazarenko, Perez, Wigger 4 Table of Contents INTRODUCTION...5 AUDIO AMPLIFIER DESIGN... ERROR! BOOKMARK NOT DEFINED. AUDIO-VISUAL DESIGN...7 IR TOUCH SENSOR DESIGN...9 XBOX CONTROLLER IMPLEMENTATION DESIGN BUDGET SUMMARY... ERROR! BOOKMARK NOT DEFINED. PROJECT TIMELINE... ERROR! BOOKMARK NOT DEFINED. BUILD AND TESTING... ERROR! BOOKMARK NOT DEFINED. RESULTS DISCUSSION AND CONCLUSION REFERENCES AND ACKNOWLEDGEMENTS APPENDIX I:PROJECT PHOTOS APPENDIX II: FINAL ARDUINO CODE... 19
5 McManus, Nazarenko, Perez, Wigger 5 Introduction Background: The TAG table was designed for home entertainment and as a functional piece of furniture. The custom table was integrated with a touch screen, audiovisuals, Xbox controller, and games. Project purpose: The purpose of our project is to create a table that can play games, produce audio-visual effects in real time that coincide with content of an audio signal, and have touch screen capabilities. To complete this goal an Arduino Uno, LED matrix, and raw materials for the table will be used (see budget summary). Electrical circuit design and computer programming will be used to implement all design components. Design Objectives: Create a 10 x 15 array of RGB LEDs which will be controlled by an Arduino (Uno/Mega) Final array will be built into a table Table will have built in speakers powered by audio amplifiers used to play audio inputs Array will have several programs LEDs will respond to touch via IR emitters and detectors Array will display an audio visualizer in response to an audio input Display will be programmed to run several games (tic tac toe, pong, etc.) Xbox 360 controller(s) can be used to switch between display modes as well as to play games LCD screen will display which mode the display is running at any given time Design of our table was split into four categories: 1. Audio Amplification 2. Audio-Visual Effects 3. IR Touch Sensor Capability 4. Xbox Controller Implementation We chose to divide the overall project into four main parts as shown above. Each team member then chose an assignment to be responsible for completing. This division of work was necessary because it allowed for much more time allotted to each particular part of the project. With more time to focus on each part of the project the quality of the project was greatly increased from what it would have been otherwise.

6 McManus, Nazarenko, Perez, Wigger 6 Audio Amplifier Design Figure 1: Overall System Block Diagram Purpose: The purpose of this part of the design is to implement two speaker cones in the table. With the speakers the user will be able to listen to any audio input going into the table while also seeing how the display responds to the same input. Description: The table implements two 4 speaker cones with a 4 ohm Impedance on each cone. Any audio signal put into the table will go through an audio splitter cable to both the Arduino and the speakers. The speakers are powered by a cascaded JFET/op-amp/Class A-B amplifier. The design achieved a maximum gain of approximately 45 db over the audible frequency range (20-20k Hz). To test the frequency response of the amplifier a function generator and oscilloscope were used. The function generator served as a controlled input signal. For the tests a 10mV peak-to-peak signal was used while the frequency was varied over the range specified above. The oscilloscope was used to measure the input and output signals in order to measure the gain of the amplifier. Table 1 below shows the data collected from the testing which is shown on a bode plot in figure 4.


7 McManus, Nazarenko, Perez, Wigger 7 Figure 2: System diagram for speaker implementation Figure 3: Audio Amplifier Schematic Table 1: Amplifier Gain vs. Frequency
 x 10 4 Audio-Visual Design Figure 4: Bode plot for amplifier frequency response Purpose: For the audio visual settings of the table the Arduino and the Arduino s FFT library was")
8 Gain McManus, Nazarenko, Perez, Wigger Amplifier Frequency Response Frequency (Hz) x 10 4 Audio-Visual Design Figure 4: Bode plot for amplifier frequency response Purpose: For the audio visual settings of the table the Arduino and the Arduino s FFT library was used. The table consists of a 10x15 LED array using LEDs that are driven by the LPD channel constantcurrent driver chip. The LEDs came in a strand of 50 and each LED is addressable because of the LPD6803 chip. Figure 5: Strand of LEDs with LPD6803 chip.
9 McManus, Nazarenko, Perez, Wigger 9 Using these strips gave us more time to develop programs and add other features to the table. They require 5v to operate and use two pins on the Arduino for the clock and data. The LPD6803 chip also includes a serial shift register and concatenation driver circuit. Figure 5 shows how two LEDs in the strand are connected. Figure 6: Schematic of two LEDs connected in a strand. Description: Based on the audio frequency the LEDs turn on and off. The pattern shown in figure 7 is the spectrum in real time as an audio signal is being played. Before building the full LED array a 5x10 array was built for programming and testing. This allowed us to become acquainted with the micro-controller and start basic music and light programs. The Arduino s FFT library takes a signal from one of its analog pins and performs a Fast Fourier Transform algorithm. That algorithm outputs the magnitudes at different frequencies in real time. With these magnitudes each LED was programmed to light on or off with different colors. A function to light up different columns was created to show the spectrum of the music that is being played. There are also other programs to light the LEDs to music. Once the programming and testing was completed with the smaller array the final design was constructed and tested.


10 McManus, Nazarenko, Perez, Wigger 10 Figure 7: Block diagram of audio visual design. Figure 8: Spectrum of music in real time. IR Touch Sensor Design Purpose: The touch controls of the LED table will enable user interaction to control modes, games, and other programs in an intuitive and simple manner. The goal is to make is familiar to use as a tablet or smartphone. Description: The touch sensor will be implemented using two infrared LEDs in 15 boxes of the table. One LED will act as the emitter and will be constantly on. The other will act as a detector that s waiting for the reflected infrared light that will cause current to flow through it. That current will then go through a resistor causing a voltage drop. This change in voltage will be detected by the Arduino and it will know that a touch has been initiated in that block. By using a large valued capacitor it was possible to make a more sensitivity sensor. A diagram and circuit schematic of this approach can be seen in figure 8.
11 McManus, Nazarenko, Perez, Wigger 11 Figure 9: Diagram and circuit schematic of infrared touch sensor. To implement a large number of these touch sensors, shift registers were used. Using two 8-bit shift registers it was possible to register the possible 15 touches on the table. By programming the Arduino to rapidly send one bit through the shift registers once a touch sensor is activated it will be registered by the Arduino. The code is then able to determine which block that sensor corresponds to. Because this is happening at a high rate multiple sensors can be triggered and to the naked eye it will look like the Arduino is sensing two touches simultaneously. Even though the program is actually turning on and off each block rapidly as it senses the touch the code had to be slowed down so that a touch could be easily measured. Figure 9 shows this concept. A 1 is being shift quickly through the register and the Arduino knows where the 1 is located at all times. When one of the touch sensors is activated it acts like a switch and delivers a voltage to one of the Arduino s analog inputs. An analog input was used for callibration purposes. When a certain thershold is registered the shifting program is haulted to idetify which touch sensor is activated. This information can then be used to turn on the LED associated with that sensor creating a light touch response on the table.
12 McManus, Nazarenko, Perez, Wigger 12 Figure 10: Shift register implemented with the touch sensors. It should be noted that in a bright room the sensing of touch is reversed. Since there is continuous light hitting the detector LED a touch sense is registered when light is being blocked. So instead of having the code register a high voltage input it now looks for a low input. Xbox Controller Implementation Design Purpose: The purpose of Xbox 360 controller implementation in our senior project is to allow the user to navigate through the subprograms in our code to either run our audio-visual program or our IR touch program. Description:
 and some block elements were not be on the table itself such as the computer.")
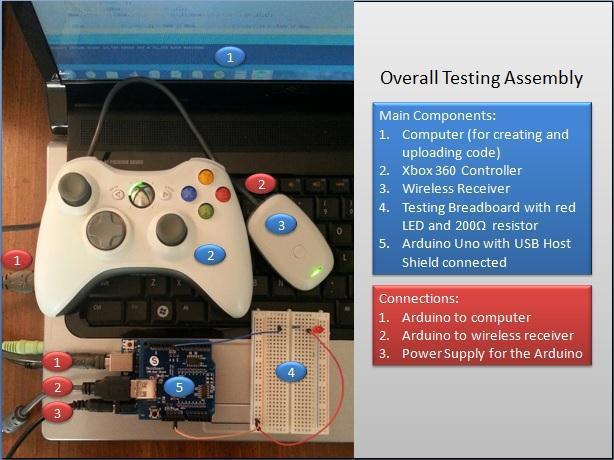
13 McManus, Nazarenko, Perez, Wigger 13 Figure 11: System diagram for Xbox controller implementation Utilizing the system illustrated in Figure 10 above, we can see how the Xbox 360 controller will connect to the main program structure. Note that this is an early structure; as the project progressed certain elements were changed (i.e. the breadboard became the table) and some block elements were not be on the table itself such as the computer. Reference Appendix I for a picture of the testing setup. Budget Summary Table Component: Cost: Description and Purpose: Arduino Uno $20.50 Main project element (microprocessor) Wall Adapter Power Supply (for Arduino Uno) Breadboard jumper wire 75pcs pack Assorted LED Package w/ Resistors (5 Colors, Pack of 25) BB400 Solderless Plug-in BreadBoard, $5.99 Wall adapter power supply for the Arduino Uno. Allows for program testing without computer connection $5.95 Set of wires used to connect the Arduino Uno to the breadboard. $5.58 Package of various LEDs with resistors used in testing created programs. $5.58 Platform used to connect multiple LEDs to the Arduino Uno via jumper wires.
14 McManus, Nazarenko, Perez, Wigger 14 SainSmart USB Host Android ADK Shield 2.0 $23.00 Receives instructions from the Xbox 360 controller gaming receiver and relays these signals to the Arduino Uno via physical pin connections. Mini USB Bluetooth V2.0 Dongle Wireless Adapter (2) Wireless USB Controller Gaming Receiver For XBOX 360 White $5.75 Initially used in testing of wireless Xbox 360 communications with the Arduino Uno (no longer used) $10.16 Receives instructions from the Xbox 360 controller and relays these signals to the USB Host shield via physical USB connection. 3 x 50pcs LED strip $65 Need 3 strips of LEDs to complete array. Audio Jack $1.99 Jack need to connect Ipod and Arduino Uno. 2 x 8 Speakers $26.84 For listening to music. Assortment of Resistors $14.19 For building amplifier and IR circuit. Bipolar Junction Transistors $4.97 For building Amplifier. Darlington Transistors $2.59 For building Amplifier. 2 x 74HC595 Shift Registers $3.50 For IR touch sensors. 30 x IR LEDs $21.00 For IR touch sensors. Components for wiring and $30 For IR touch sensors. mounting of IR touch sensors Plexiglass $60 Will go on top of table. Total Cost: $312.50

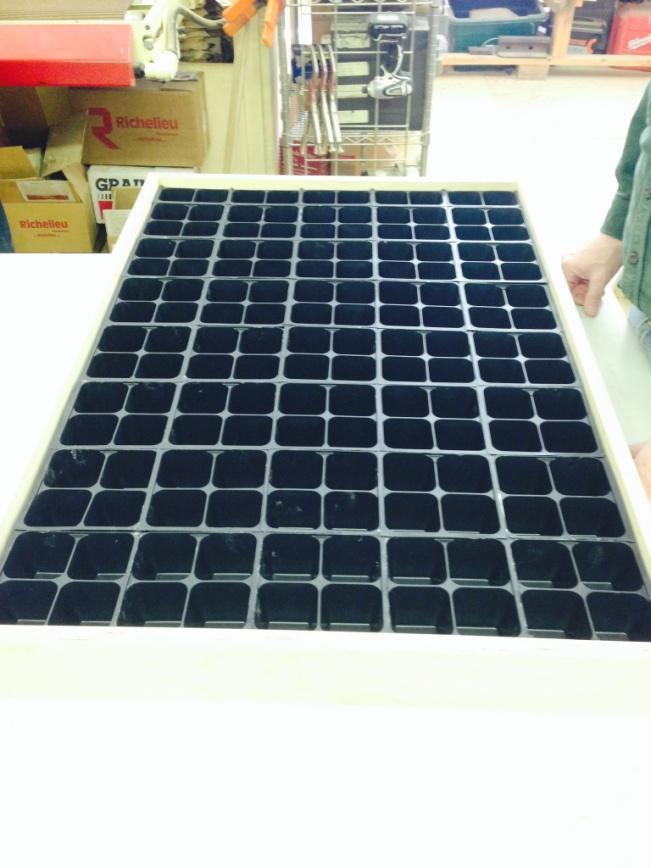
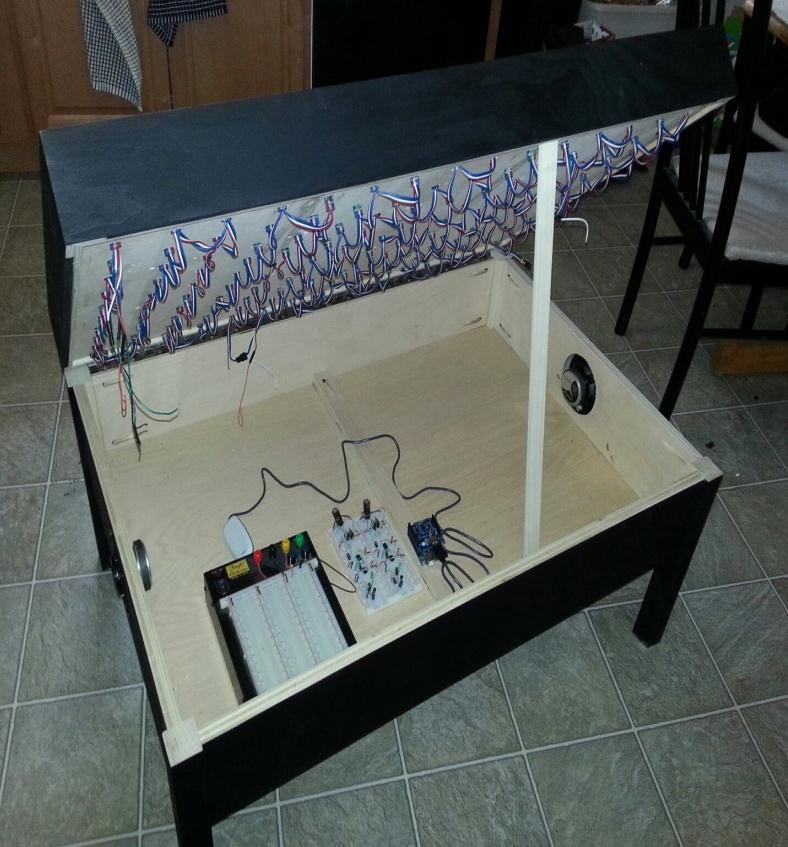
15 McManus, Nazarenko, Perez, Wigger 15 Project Timeline Build and Testing Inside Each Cube: Underneath the plexiglass top there is an array of gardening trays which are separated into 150 two inch cubes. Inside every cube there is one RGB-LED. 15 of the cubes also included an IR emitter and detector. Underneath the Hood : Underneath the hood of the table is where all of the electronic components are stored. For ease of access hinges were built into the table so that the top can fold up. Testing: The first component tested was the RGB LEDs. This was done using the Arduino library for our LEDs by turning each one on and switching between the red, green, and blue colors to ensure proper functionality. Simple Arduino programs were written separately to test the different features of our table. The audio visuals were tested using different audio inputs to insure the same results were achieved for all types of music. Adjustments to the code had to be made to make the code more efficient and light the LEDs faster. Lastly, we tested the audio amplifier first by using a 1kHz sinusoidal
16 McManus, Nazarenko, Perez, Wigger 16 input and observing the output on an oscilloscope. After seeing an output signal that was amplified as expected we connected the speakers and used an audio signal to ensure full functionality. Results Every team member was successful in researching and developing their part of the TAG table. At the end we were able to integrate our components together to create a functional piece of furniture that also serves as home entertainment. We also won Most Creative Design within the ECE department for the design for our table at the Undergraduate Research Conference. Discussion and Conclusion Since there were many components to this project it was important we stayed on task throughout the year. Given that Michael Perez wanted to fund the project so he could keep the table, we had to consistently be aware of the fact that we needed to budget our project, which was an important economic constraint. Another ethical constraint we had to deal with was making sure to reference all of our code appropriately in our reports (see References and Acknowledgements section) since we used some code in our project that was provided online because the Arduino code is opensource. Every team member was successful in researching and developing their part of the TAG table. At the end we were able to integrate our components together to create a functional piece of furniture that also serves as home entertainment and abide by all of the professional standards taught to us in our Engineering Professional Principles course in the spring of last year. References and Acknowledgements Sedra, Adel S., and Kenneth Carless. Smith. Microelectronic Circuits. New York: Oxford UP, Print. "Arduino FFT Library." Open Music Labs. N.p., 09 Feb Web. < "LPD6803 Datasheet." Adafruit Industries, n.d. Web. < "74HC595 Datasheet." Sparkfun.com. Texas Instruments, Feb Web. < "Revision 2.0 of USB Host Library for Arduino." GitHub Inc., n.d. Web. < A special thanks to Kevin Roe for helping with the construction of the table.


17 McManus, Nazarenko, Perez, Wigger 17 Appendices Appendix I: Project Photo

18 McManus, Nazarenko, Perez, Wigger 18


19 McManus, Nazarenko, Perez, Wigger 19
20 McManus, Nazarenko, Perez, Wigger 20 Appendix II: Final Arduino Code Main Program: /* Touch Audio Gaming (TAG) Table Code Nicholas Nazarenko, Andreas Wigger, Michael McManus and Michael Perez */ #define LOG_OUT 1 //use the log output function #define FFT_N 64 //set to 64 point fft // defines for setting and clearing register bits #ifndef cbi #define cbi(sfr, bit) (_SFR_BYTE(sfr) &= ~_BV(bit)) #endif #ifndef sbi #define sbi(sfr, bit) (_SFR_BYTE(sfr) = _BV(bit)) #endif #include <TimerOne.h> //include the library #include <SPI.h> //include the library #include "Neophob_LPD6803.h" //include the library #include <FFT.h> //include the library #include <XBOXRECV.h> // include the library #define LED_MODULES 150 //Define number of LEDs Neophob_LPD6803 strip = Neophob_LPD6803(LED_MODULES); USB Usb; XBOXRECV Xbox(&Usb); //spectrum int k=1; //columms in spectrum program int val=0; //variable for analog read //eye int count=0;//variable to count # then change p,n,m int p=1; //variable to go through RGB colors int n=1; //variable to go through RGB colors int m=1; //variable to go through RGB colors //variable to count through different effects int prgm_count=0; //program flow variables int Main = 0; int STARThit = 0; int DPADhit = 0; //Guitar Hero Variables int IRdet1 = A1; //IR detector on analog pin A1 int IRdet2 = A2; int IRdet3 = A3; int distance; //Variable to record the input of analog pin int randnumber; //Variable to store random number int spdone = 0; int spdtwo = 250; //Speed of blocks moving down int brt = 255; //brightness of touch area int win = 0; int winner = 0; int w = 255; //brightness of wins int cheater = 0; int easy = 0; int touchspd = 3000; //callibration vairables for touch sensor int RED = 150; int GREEN = 150; int BLUE = 150;
21 McManus, Nazarenko, Perez, Wigger 21 int b=0; int r=0; int g=0; int y = 1; int z = 1; void setup() { Serial.begin(9600); pinmode(7, OUTPUT); // Exit Switch if (Usb.Init() == -1) { Serial.print(F("\r\nOSC did not start")); while(1); //halt Serial.print(F("\nCode Successfully Started. Please press START to continue.\n")); void loop() { Usb.Task(); if(xbox.xboxreceiverconnected) { if(xbox.xbox360connected[0]) { if(xbox.getbuttonclick(start)) { if (STARThit == 0) { STARThit = 1; Main = 0; Serial.print(F("\nPlease Select Program to Run Using D-Pad. \n UP for Guitar Hero \n DOWN for Audio-Visual Mode \n")); if(xbox.getbuttonclick(up)) { if(starthit) { Serial.print(F("\r\nPlaying Guitar Hero.\n")); strip.setcpumax(50); strip.begin(spi_clock_div64); //Set up input visuals strip.setpixelcolor(1, 0,brt,0); strip.setpixelcolor(2, 0,brt,0); strip.setpixelcolor(3, 0,brt,0); strip.setpixelcolor(16, 0,brt,0); strip.setpixelcolor(18, 0,brt,0); strip.setpixelcolor(4, 0,0,brt); strip.setpixelcolor(5, 0,0,brt); strip.setpixelcolor(6, 0,0,brt); strip.setpixelcolor(15, 0,0,brt); strip.setpixelcolor(13, 0,0,brt); strip.setpixelcolor(7, brt,0,0); strip.setpixelcolor(8, brt,0,0); strip.setpixelcolor(9, brt,0,0); strip.setpixelcolor(10, brt,0,0); strip.setpixelcolor(12, brt,0,0); //Serial.begin(9600); //initialize serial monitor randomseed(analogread(0)); GH(); STARThit = 0; if(xbox.getbuttonclick(down)) { if(starthit) { Serial.print(F("\r\nRunning Audio Visual Program.\n"));
22 McManus, Nazarenko, Perez, Wigger 22 TIMSK0 = 0; // turn off timer0 for lower jitter DIDR0 = 0x01; // turn off the digital input for adc0 strip.setcpumax(48.5); strip.begin(spi_clock_div32); // set prescale to 16 to get analog pin to sample at 40kHz sbi(adcsra,adps2) ; cbi(adcsra,adps1) ; cbi(adcsra,adps0) ; audio_visual(); STARThit = 0; void audio_visual() { while(1) { // reduces jitter for (int i = 0 ; i < FFT_N*2 ; i += 2) { // save 128 samples int analogpin = 0;//set value for audio input pin on arduino val = analogread(analogpin); fft_input[i] = val; // put real data into even bins fft_input[i+1] = 0; // set odd bins to 0 fft_reorder(); // reorder the data before doing the fft fft_run(); // process the data in the fft fft_mag_log(); // take the output of the fft if (prgm_count<401){ //NEW EFFECT //loop through FFT magnitudes to each column using colm_spectrum function for (int i = 1 ; i < 16 ; i=i+1) { colm_spectrum(fft_log_out[i],fft_log_out[i+1], k); colm_spectrum(1.9*fft_log_out[15],fft_log_out[16], 14); colm_spectrum(1.9*fft_log_out[13],fft_log_out[14], 15); k=k+1; k=1; //Write to LEDs delay(3000); prgm_count=prgm_count+1; //NEW EFFECT //Change column colors if (prgm_count>400 && prgm_count<601){ for (int i = 1 ; i < 16 ; i=i+1) { colm_spect_clr(fft_log_out[i],fft_log_out[i+1], k); colm_spect_clr(1.9*fft_log_out[15],fft_log_out[16], 14); colm_spect_clr(1.9*fft_log_out[13],fft_log_out[14], 15); k=k+1; k=1; //Write to LEDs delay(3000); prgm_count=prgm_count+1; //NEW EFFECT //Show visuals effects (eye) if (prgm_count>600 && prgm_count<701){ center(fft_log_out[1],1.5*fft_log_out[2], 8, n, m, p); center(fft_log_out[3],1.5*fft_log_out[4], 7, n, m, p); center(fft_log_out[3],1.5*fft_log_out[4], 9, n, m, p); center(fft_log_out[5],fft_log_out[6], 6, n, m, p);
23 McManus, Nazarenko, Perez, Wigger 23 center(fft_log_out[5],fft_log_out[6], 10, n, m, p); center(fft_log_out[7],fft_log_out[8], 5, n, m, p); center(fft_log_out[7],fft_log_out[8], 11, n, m, p); center(fft_log_out[9],fft_log_out[10], 4, n, m, p); center(fft_log_out[9],fft_log_out[10], 12, n, m, p); center(fft_log_out[11],fft_log_out[12], 3, n, m, p); center(fft_log_out[11],fft_log_out[12], 13, n, m, p); center(fft_log_out[13],fft_log_out[14], 2, n, m, p); center(fft_log_out[13],fft_log_out[14], 14, n, m, p); center(fft_log_out[15],fft_log_out[16], 1, n, m, p); center(fft_log_out[15],fft_log_out[16], 15, n, m, p); //Write to LEDs delay(3000); count=count+1; //change values of n,m, and p to show different colors. //Increasing count will slow color transitions. if(count==50){ n=n+20; m=m+1; p=p+10; count=1; //Reset n,m, and p once they hit max number if (n==256){ n=1; m=1; p=1; prgm_count=prgm_count+1; if (prgm_count>700){ //NEW EFFECT //Clear all LEDs for (int i = 0 ; i < 151 ; i=i+1) { strip.setpixelcolor(i, 0); delay(3000); //To light each letter of UNH all at once. for (int i = 1 ; i < 16 ; i=i+1) { unh(fft_log_out[1],fft_log_out[2], i); //Write to LEDs delay(3000); prgm_count=prgm_count+1; //Reset program count if (prgm_count>850){ prgm_count=0; //NEW FUNCTION //function to light LEDs (15 columns) //Takes FFT magnitude and the column number. void colm_spectrum(int freq1,int freq2, int colm){ //Function Body //variables to set LED addresses int val1 = 0; int val2 = 0;
24 McManus, Nazarenko, Perez, Wigger 24 int val3 = 0; int val4 = 0; int val5 = 0; int val6 = 0; int val7 = 0; int val8 = 0; int val9 = 0; int val10 = 0; //Set variables to set LED addresses if (colm == 1){ val1 = 0; val2 = 0; val3 = 0; val4 = 0; val5 = 0; val6 = 0; val7 = 0; val8 = 0; val9 = 0; val10 = 0; else if (colm == 2){ val1 = 19; val2 = 17; val3 = 15; val4 = 13; val5 = 11; val6 = 9; val7 = 7; val8 = 5; val9 = 3; val10 = 1; else if (colm == 3){ val1 = 20; val2 = 20; val3 = 20; val4 = 20; val5 = 20; val6 = 20; val7 = 20; val8 = 20; val9 = 20; val10 = 20; else if (colm == 4){ val1 = 39; val2 = 37; val3 = 35; val4 = 33; val5 = 31; val6 = 29; val7 = 27; val8 = 25; val9 = 23; val10 = 21; else if (colm == 5){ val1 = 40; val2 = 40; val3 = 40; val4 = 40; val5 = 40; val6 = 40; val7 = 40; val8 = 40; val9 = 40; val10 = 40;
25 else if (colm == 6){ val1 = 59; val2 = 57; val3 = 55; val4 = 53; val5 = 51; val6 = 49; val7 = 47; val8 = 45; val9 = 43; val10 = 41; else if (colm == 7){ val1 = 60; val2 = 60; val3 = 60; val4 = 60; val5 = 60; val6 = 60; val7 = 60; val8 = 60; val9 = 60; val10 = 60; else if (colm == 8){ val1 = 79; val2 = 77; val3 = 75; val4 = 73; val5 = 71; val6 = 69; val7 = 67; val8 = 65; val9 = 63; val10 = 61; else if (colm == 9){ val1 = 80; val2 = 80; val3 = 80; val4 = 80; val5 = 80; val6 = 80; val7 = 80; val8 = 80; val9 = 80; val10 = 80; else if (colm == 10){ val1 = 99; val2 = 97; val3 = 95; val4 = 93; val5 = 91; val6 = 89; val7 = 87; val8 = 85; val9 = 83; val10 = 81; else if (colm == 11){ val1 = 100; val2 = 100; val3 = 100; val4 = 100; val5 = 100; val6 = 100; val7 = 100; val8 = 100; val9 = 100; McManus, Nazarenko, Perez, Wigger 25
26 McManus, Nazarenko, Perez, Wigger 26 val10 = 100; else if (colm == 12){ val1 = 119; val2 = 117; val3 = 115; val4 = 113; val5 = 111; val6 = 109; val7 = 107; val8 = 105; val9 = 103; val10 = 101; else if (colm == 13){ val1 = 120; val2 = 120; val3 = 120; val4 = 120; val5 = 120; val6 = 120; val7 = 120; val8 = 120; val9 = 120; val10 = 120; else if (colm == 14){ val1 = 139; val2 = 137; val3 = 135; val4 = 133; val5 = 131; val6 = 129; val7 = 127; val8 = 125; val9 = 123; val10 = 121; else if (colm == 15){ val1 = 140; val2 = 140; val3 = 140; val4 = 140; val5 = 140; val6 = 140; val7 = 140; val8 = 140; val9 = 140; val10 = 140; //Lighting LEDs if (freq1 >= 1 freq2 >= 1){ strip.setpixelcolor(9+val10, 51,40,0); else{ strip.setpixelcolor(9+val10, 0); if (freq1 >= 5 freq2 >= 5) { strip.setpixelcolor(8+val9,51,40,0); else{ strip.setpixelcolor(8+val9, 0); if (freq1>= 10 freq2 >= 10){ strip.setpixelcolor(7+val8, 51,40,0); else{ strip.setpixelcolor(7+val8, 0);
27 McManus, Nazarenko, Perez, Wigger 27 if (freq1 >= 15 freq2 >= 15){ strip.setpixelcolor(6+val7, 51,40,0); else{ strip.setpixelcolor(6+val7, 0); if (freq1 >=20 freq2 >=20) { strip.setpixelcolor(5+val6, 51,40,0); else{ strip.setpixelcolor(5+val6, 0); if (freq1 >= 25 freq2 >= 25){ strip.setpixelcolor(4+val5, 51,40,0); else{ strip.setpixelcolor(4+val5, 0); if (freq1 >=30 freq2 >= 30) { strip.setpixelcolor(3+val4,51,40,0); else{ strip.setpixelcolor(3+val4, 0); if (freq1>= 35 freq2 >= 35){ strip.setpixelcolor(2+val3, 0,120,0); else{ strip.setpixelcolor(2+val3, 0); if (freq1 >=40 freq2 >= 40){ strip.setpixelcolor(1+val2, 0,120,0); else{ strip.setpixelcolor(1+val2, 0); if (freq1 >=45 freq2 >=45) { strip.setpixelcolor(0+val1, 0,120,0); else{ strip.setpixelcolor(0+val1, 0); //NEW FUNCTION //function to light LEDs (15 columns) //Takes FFT magnitude, column number, and RGB color assignments. void center(int freq1,int freq2, int colm, int colr1, int colr2, int colr3){ //Function Body int i=0; int k=0; int val1 = 0; int val2 = 0; int val3 = 0; int val4 = 0; int val5 = 0; int val6 = 0; int val7 = 0; int val8 = 0; int val9 = 0; int val10 = 0; //variables to set LED addresses if (colm == 1){ val1 = 0;
28 val2 = 0; val3 = 0; val4 = 0; val5 = 0; val6 = 0; val7 = 0; val8 = 0; val9 = 0; val10 = 0; else if (colm == 2){ val1 = 19; val2 = 17; val3 = 15; val4 = 13; val5 = 11; val6 = 9; val7 = 7; val8 = 5; val9 = 3; val10 = 1; else if (colm == 3){ val1 = 20; val2 = 20; val3 = 20; val4 = 20; val5 = 20; val6 = 20; val7 = 20; val8 = 20; val9 = 20; val10 = 20; else if (colm == 4){ val1 = 39; val2 = 37; val3 = 35; val4 = 33; val5 = 31; val6 = 29; val7 = 27; val8 = 25; val9 = 23; val10 = 21; else if (colm == 5){ val1 = 40; val2 = 40; val3 = 40; val4 = 40; val5 = 40; val6 = 40; val7 = 40; val8 = 40; val9 = 40; val10 = 40; else if (colm == 6){ val1 = 59; val2 = 57; val3 = 55; val4 = 53; val5 = 51; val6 = 49; val7 = 47; val8 = 45; val9 = 43; val10 = 41; else if (colm == 7){ McManus, Nazarenko, Perez, Wigger 28
29 val1 = 60; val2 = 60; val3 = 60; val4 = 60; val5 = 60; val6 = 60; val7 = 60; val8 = 60; val9 = 60; val10 = 60; else if (colm == 8){ val1 = 79; val2 = 77; val3 = 75; val4 = 73; val5 = 71; val6 = 69; val7 = 67; val8 = 65; val9 = 63; val10 = 61; else if (colm == 9){ val1 = 80; val2 = 80; val3 = 80; val4 = 80; val5 = 80; val6 = 80; val7 = 80; val8 = 80; val9 = 80; val10 = 80; else if (colm == 10){ val1 = 99; val2 = 97; val3 = 95; val4 = 93; val5 = 91; val6 = 89; val7 = 87; val8 = 85; val9 = 83; val10 = 81; else if (colm == 11){ val1 = 100; val2 = 100; val3 = 100; val4 = 100; val5 = 100; val6 = 100; val7 = 100; val8 = 100; val9 = 100; val10 = 100; else if (colm == 12){ val1 = 119; val2 = 117; val3 = 115; val4 = 113; val5 = 111; val6 = 109; val7 = 107; val8 = 105; val9 = 103; val10 = 101; McManus, Nazarenko, Perez, Wigger 29
30 McManus, Nazarenko, Perez, Wigger 30 else if (colm == 13){ val1 = 120; val2 = 120; val3 = 120; val4 = 120; val5 = 120; val6 = 120; val7 = 120; val8 = 120; val9 = 120; val10 = 120; else if (colm == 14){ val1 = 139; val2 = 137; val3 = 135; val4 = 133; val5 = 131; val6 = 129; val7 = 127; val8 = 125; val9 = 123; val10 = 121; else if (colm == 15){ val1 = 140; val2 = 140; val3 = 140; val4 = 140; val5 = 140; val6 = 140; val7 = 140; val8 = 140; val9 = 140; val10 = 140; //Lighting LEDs if (freq1 >= 30 freq2 >= 30){ strip.setpixelcolor(9+val10, colr1,colr2,colr3); // else{ strip.setpixelcolor(9+val10, 0); // if (freq1 >= 25 freq2 >= 25) { strip.setpixelcolor(8+val9, colr1,colr2,colr3); // else{ strip.setpixelcolor(8+val9, 0); // if (freq1>= 20 freq2 >= 20){ strip.setpixelcolor(7+val8, colr1,colr2,colr3); // else{ strip.setpixelcolor(7+val8, 0); // //delay(2); if (freq1 >= 15 freq2 >= 15){ strip.setpixelcolor(6+val7, colr1,colr2,colr3); // else{
31 McManus, Nazarenko, Perez, Wigger 31 //delay(5); strip.setpixelcolor(6+val7, 0); // if (freq1 >1 freq2 >=1) { strip.setpixelcolor(5+val6, colr1,colr2,colr3); // else{ //delay(10); strip.setpixelcolor(5+val6, 0); // if (freq1 >= 1 freq2 >= 1){ strip.setpixelcolor(4+val5, colr1,colr2,colr3); // else{ strip.setpixelcolor(4+val5, 0); // if (freq1 >=15 freq2 >= 15) { strip.setpixelcolor(3+val4,colr1,colr2,colr3); // else{ strip.setpixelcolor(3+val4, 0); // if (freq1>= 20 freq2 >= 20){ strip.setpixelcolor(2+val3, colr1,colr2,colr3); // else{ strip.setpixelcolor(2+val3, 0); // //delay(2); if (freq1 >=25 freq2 >=25){ strip.setpixelcolor(1+val2, colr1,colr2,colr3); // else{ //delay(5); strip.setpixelcolor(1+val2, 0); // if (freq1 >=30 freq2 >=30) { strip.setpixelcolor(0+val1, colr1,colr2,colr3); // else{ //delay(10); strip.setpixelcolor(0+val1, 0); // //NEW FUNCTION //function to light LEDs to spell UNH (15 columns) //Takes FFT magnitudes and the column number. void unh(int freq1,int freq2, int colm){ //Function Body int i=0; int k=0;
32 McManus, Nazarenko, Perez, Wigger 32 int val1 = 0; int val2 = 0; int val3 = 0; int val4 = 0; int val5 = 0; int val6 = 0; int val7 = 0; int val8 = 0; int val9 = 0; int val10 = 0; //variables to set LED addresses if (colm == 1){ val1 = 0; val2 = 0; val3 = 0; val4 = 0; val5 = 0; if (freq1 >= 10 freq2 >= 10){ strip.setpixelcolor(4+val5, 255,255,255); strip.setpixelcolor(3+val4, 255,255,255); strip.setpixelcolor(2+val3, 255,255,255); strip.setpixelcolor(1+val2, 255,255,255); strip.setpixelcolor(0+val1, 255,255,255); else{ strip.setpixelcolor(4+val5, 0); strip.setpixelcolor(3+val4, 0); strip.setpixelcolor(2+val3, 0); strip.setpixelcolor(1+val2, 0); strip.setpixelcolor(0+val1, 0); else if (colm == 2){ val5 = 11; if (freq1 >= 10 freq2 >= 10){ strip.setpixelcolor(4+val5, 255,255,255); else{ strip.setpixelcolor(4+val5, 0); else if(colm == 3){ val5 = 20; if (freq1 >= 10 freq2 >= 10){ strip.setpixelcolor(4+val5, 255,255,255); else{ strip.setpixelcolor(4+val5, 0); else if (colm == 4){ val5 = 31; if (freq1 >= 10 freq2 >= 10){ strip.setpixelcolor(4+val5, 255,255,255); else{ strip.setpixelcolor(4+val5, 0); else if (colm == 5){ val1 = 40; val2 = 40; val3 = 40; val4 = 40; val5 = 40;
33 McManus, Nazarenko, Perez, Wigger 33 if (freq1 >= 10 freq2 >= 10){ strip.setpixelcolor(4+val5, 255,255,255); strip.setpixelcolor(3+val4, 255,255,255); strip.setpixelcolor(2+val3, 255,255,255); strip.setpixelcolor(1+val2, 255,255,255); strip.setpixelcolor(0+val1, 255,255,255); else{ strip.setpixelcolor(4+val5, 0); strip.setpixelcolor(3+val4, 0); strip.setpixelcolor(2+val3, 0); strip.setpixelcolor(1+val2, 0); strip.setpixelcolor(0+val1, 0); else if (colm == 6){ val3 = 55; val4 = 53; val5 = 51; val6 = 49; val7 = 47; if (freq1 >= 10 freq2 >= 10){ strip.setpixelcolor(6+val7, 255,255,255); strip.setpixelcolor(5+val6, 255,255,255); strip.setpixelcolor(4+val5, 255,255,255); strip.setpixelcolor(3+val4, 255,255,255); strip.setpixelcolor(2+val3, 255,255,255); else{ strip.setpixelcolor(6+val7, 0); strip.setpixelcolor(5+val6, 0); strip.setpixelcolor(4+val5, 0); strip.setpixelcolor(3+val4, 0); strip.setpixelcolor(2+val3, 0); else if (colm == 7){ val4 = 60; if (freq1 >= 10 freq2 >= 10){ strip.setpixelcolor(3+val4, 255,255,255); else{ strip.setpixelcolor(3+val4, 0); else if (colm == 8){ val5 = 71; if (freq1 >= 10 freq2 >= 10){ strip.setpixelcolor(4+val5, 255,255,255); else{ strip.setpixelcolor(4+val5, 0); else if (colm == 9){ val6 = 80; if (freq1 >= 10 freq2 >= 10){ strip.setpixelcolor(5+val6, 255,255,255); else{ strip.setpixelcolor(5+val6, 0); else if (colm == 10){ val2 = 97; val3 = 95; val4 = 93; val5 = 91; val6 = 89;
34 McManus, Nazarenko, Perez, Wigger 34 val7 = 87; if (freq1 >= 10 freq2 >= 10){ strip.setpixelcolor(6+val7, 255,255,255); strip.setpixelcolor(5+val6, 255,255,255); strip.setpixelcolor(4+val5, 255,255,255); strip.setpixelcolor(3+val4, 255,255,255); strip.setpixelcolor(2+val3, 255,255,255); else{ strip.setpixelcolor(6+val7, 0); strip.setpixelcolor(5+val6, 0); strip.setpixelcolor(4+val5, 0); strip.setpixelcolor(3+val4, 0); strip.setpixelcolor(2+val3, 0); else if (colm == 11){ val4 = 100; val5 = 100; val6 = 100; val7 = 100; val8 = 100; val9 = 100; val10 = 100; if (freq1 >= 10 freq2 >= 10){ strip.setpixelcolor(9+val10, 255,255,255); strip.setpixelcolor(8+val9, 255,255,255); strip.setpixelcolor(7+val8, 255,255,255); strip.setpixelcolor(6+val7, 255,255,255); strip.setpixelcolor(5+val6, 255,255,255); strip.setpixelcolor(4+val5, 255,255,255); else{ strip.setpixelcolor(9+val10, 0); strip.setpixelcolor(8+val9, 0); strip.setpixelcolor(7+val8, 0); strip.setpixelcolor(6+val7, 0); strip.setpixelcolor(5+val6, 0); strip.setpixelcolor(4+val5, 0); else if (colm == 12){ val8 = 105; if (freq1 >= 10 freq2 >= 10){ strip.setpixelcolor(7+val8, 255,255,255); else{ strip.setpixelcolor(7+val8, 0); else if (colm == 13){ val1 = 120; val2 = 120; val3 = 120; val4 = 120; val5 = 120; val6 = 120; val7 = 120; val8 = 120; val9 = 120; val10 = 120; if (freq1 >= 10 freq2 >= 10){ strip.setpixelcolor(7+val8, 255,255,255); else{ strip.setpixelcolor(7+val8, 0); else if (colm == 14){
35 McManus, Nazarenko, Perez, Wigger 35 val8 = 125; if (freq1 >= 10 freq2 >= 10){ strip.setpixelcolor(7+val8, 255,255,255); else{ strip.setpixelcolor(7+val8, 0); else if (colm == 15){ val4 = 140; val5 = 140; val6 = 140; val7 = 140; val8 = 140; val9 = 140; val10 = 140; if (freq1 >= 10 freq2 >= 10){ strip.setpixelcolor(9+val10, 255,255,255); strip.setpixelcolor(8+val9, 255,255,255); strip.setpixelcolor(7+val8, 255,255,255); strip.setpixelcolor(6+val7, 255,255,255); strip.setpixelcolor(5+val6, 255,255,255); strip.setpixelcolor(4+val5, 255,255,255); else{m strip.setpixelcolor(9+val10, 0); strip.setpixelcolor(8+val9, 0); strip.setpixelcolor(7+val8, 0); strip.setpixelcolor(6+val7, 0); strip.setpixelcolor(5+val6, 0); strip.setpixelcolor(4+val5, 0); //NEW FUNCTION //function to light LEDs with colors(15 columns) //Takes FFT magnitude column number. void colm_spect_clr(int freq1,int freq2, int colm){ //Function Body //variables to set LED addresses int val1=0; int val2=0; int val3=0; int val4=0; int val5=0; int val6=0; int val7=0; int val8=0; int val9=0; int val10=0; //variables for colors int clr1=0; int clr2=0; int clr3=0; //Set variables to set LED addresses if (colm == 1){ val1 = 0; val2 = 0; val3 = 0; val4 = 0;
36 val5 = 0; val6 = 0; val7 = 0; val8 = 0; val9 = 0; val10 = 0; clr1=0; clr2=255; clr3=0; else if (colm == 2){ val1 = 19; val2 = 17; val3 = 15; val4 = 13; val5 = 11; val6 = 9; val7 = 7; val8 = 5; val9 = 3; val10 = 1; clr1=0; clr2=255; clr3=5; else if (colm == 3){ val1 = 20; val2 = 20; val3 = 20; val4 = 20; val5 = 20; val6 = 20; val7 = 20; val8 = 20; val9 = 20; val10 = 20; clr1=0; clr2=255; clr3=10; else if (colm == 4){ val1 = 39; val2 = 37; val3 = 35; val4 = 33; val5 = 31; val6 = 29; val7 = 27; val8 = 25; val9 = 23; val10 = 21; clr1=0; clr2=255; clr3=15; else if (colm == 5){ val1 = 40; val2 = 40; val3 = 40; val4 = 40; val5 = 40; val6 = 40; val7 = 40; val8 = 40; val9 = 40; val10 = 40; clr1=0; clr2=255; clr3=20; McManus, Nazarenko, Perez, Wigger 36
37 else if (colm == 6){ val1 = 59; val2 = 57; val3 = 55; val4 = 53; val5 = 51; val6 = 49; val7 = 47; val8 = 45; val9 = 43; val10 = 41; clr1=0; clr2=0; clr3=255; else if (colm == 7){ val1 = 60; val2 = 60; val3 = 60; val4 = 60; val5 = 60; val6 = 60; val7 = 60; val8 = 60; val9 = 60; val10 = 60; clr1=5; clr2=0; clr3=255; else if (colm == 8){ val1 = 79; val2 = 77; val3 = 75; val4 = 73; val5 = 71; val6 = 69; val7 = 67; val8 = 65; val9 = 63; val10 = 61; clr1=10; clr2=0; clr3=255; else if (colm == 9){ val1 = 80; val2 = 80; val3 = 80; val4 = 80; val5 = 80; val6 = 80; val7 = 80; val8 = 80; val9 = 80; val10 = 80; clr1=15; clr2=0; clr3=255; else if (colm == 10){ val1 = 99; val2 = 97; val3 = 95; val4 = 93; val5 = 91; val6 = 89; val7 = 87; val8 = 85; McManus, Nazarenko, Perez, Wigger 37
38 val9 = 83; val10 = 81; clr1=20; clr2=0; clr3=255; else if (colm == 11){ val1 = 100; val2 = 100; val3 = 100; val4 = 100; val5 = 100; val6 = 100; val7 = 100; val8 = 100; val9 = 100; val10 = 100; clr1=255; clr2=0; clr3=0; else if (colm == 12){ val1 = 119; val2 = 117; val3 = 115; val4 = 113; val5 = 111; val6 = 109; val7 = 107; val8 = 105; val9 = 103; val10 = 101; clr1=255; clr2=5; clr3=0; else if (colm == 13){ val1 = 120; val2 = 120; val3 = 120; val4 = 120; val5 = 120; val6 = 120; val7 = 120; val8 = 120; val9 = 120; val10 = 120; clr1=255; clr2=10; clr3=0; else if (colm == 14){ val1 = 139; val2 = 137; val3 = 135; val4 = 133; val5 = 131; val6 = 129; val7 = 127; val8 = 125; val9 = 123; val10 = 121; clr1=255; clr2=15; clr3=0; else if (colm == 15){ val1 = 140; val2 = 140; val3 = 140; McManus, Nazarenko, Perez, Wigger 38
39 McManus, Nazarenko, Perez, Wigger 39 val4 = 140; val5 = 140; val6 = 140; val7 = 140; val8 = 140; val9 = 140; val10 = 140; clr1=255; clr2=20; clr3=0; //Lighting LEDs if (freq1 >= 1 freq2 >= 1){ strip.setpixelcolor(9+val10, clr1,clr2,clr3); else{ strip.setpixelcolor(9+val10, 0); if (freq1 >= 5 freq2 >= 5) { strip.setpixelcolor(8+val9, clr1,clr2,clr3); else{ strip.setpixelcolor(8+val9, 0); if (freq1>= 10 freq2 >= 10){ strip.setpixelcolor(7+val8, clr1,clr2,clr3); else{ strip.setpixelcolor(7+val8, 0); if (freq1 >= 15 freq2 >= 15){ strip.setpixelcolor(6+val7, clr1,clr2,clr3); else{ strip.setpixelcolor(6+val7, 0); if (freq1 >=20 freq2 >=20) { strip.setpixelcolor(5+val6, clr1,clr2,clr3); else{ strip.setpixelcolor(5+val6, 0); if (freq1 >= 25 freq2 >= 25){ strip.setpixelcolor(4+val5, clr1,clr2,clr3); else{ strip.setpixelcolor(4+val5, 0); if (freq1 >=30 freq2 >= 30) { strip.setpixelcolor(3+val4, clr1,clr2,clr3); else{ strip.setpixelcolor(3+val4, 0); if (freq1>= 35 freq2 >= 35){ strip.setpixelcolor(2+val3, clr1,clr2,clr3); else{ strip.setpixelcolor(2+val3, 0); if (freq1 >=40 freq2 >= 40){ strip.setpixelcolor(1+val2, clr1,clr2,clr3); else{ strip.setpixelcolor(1+val2, 0);
40 McManus, Nazarenko, Perez, Wigger 40 if (freq1 >=45 freq2 >=45) { strip.setpixelcolor(0+val1, clr1,clr2,clr3); else{ strip.setpixelcolor(0+val1, 0); ///////////////////////////////////////////////////////////////////////// void GH() { while(1) { Serial.println(winner); if(win==0) { strip.setpixelcolor(0, 0,0,0); strip.setpixelcolor(19, 0,0,0); strip.setpixelcolor(20, 0,0,0); strip.setpixelcolor(39, 0,0,0); strip.setpixelcolor(40, 0,0,0); if(win==1) { strip.setpixelcolor(0, w,w,w); strip.setpixelcolor(19, 0,0,0); strip.setpixelcolor(20, 0,0,0); strip.setpixelcolor(39, 0,0,0); strip.setpixelcolor(40, 0,0,0); if(win==2) { strip.setpixelcolor(0, w,w,w); strip.setpixelcolor(19, w,w,w); strip.setpixelcolor(20, 0,0,0); strip.setpixelcolor(39, 0,0,0); strip.setpixelcolor(40, 0,0,0); /* if(win==3) { strip.setpixelcolor(0, w,w,w); strip.setpixelcolor(19, w,w,w); strip.setpixelcolor(20, w,w,w); strip.setpixelcolor(39, 0,0,0); strip.setpixelcolor(40, 0,0,0); if(win==4) { strip.setpixelcolor(0, w,w,w); strip.setpixelcolor(19, w,w,w); strip.setpixelcolor(20, w,w,w); strip.setpixelcolor(39, w,w,w); strip.setpixelcolor(40, 0,0,0); */ if(win==3) { strip.setpixelcolor(0, w,w,w); strip.setpixelcolor(19, w,w,w); strip.setpixelcolor(20, w,w,w); //strip.setpixelcolor(39, w,w,w); //strip.setpixelcolor(40, w,w,w); //
41 McManus, Nazarenko, Perez, Wigger 41 delay(300); strip.setpixelcolor(0, 0,0,0); strip.setpixelcolor(19, 0,0,0); strip.setpixelcolor(20, 0,0,0); strip.setpixelcolor(39, 0,0,0); strip.setpixelcolor(40, 0,0,0); delay(500); strip.setpixelcolor(0, w,w,w); strip.setpixelcolor(19, w,w,w); strip.setpixelcolor(20, w,w,w); //strip.setpixelcolor(39, w,w,w); //strip.setpixelcolor(40, w,w,w); delay(500); strip.setpixelcolor(0, 0,0,0); strip.setpixelcolor(19, 0,0,0); strip.setpixelcolor(20, 0,0,0); strip.setpixelcolor(39, 0,0,0); strip.setpixelcolor(40, 0,0,0); delay(500); strip.setpixelcolor(0, w,w,w); strip.setpixelcolor(19, w,w,w); strip.setpixelcolor(20, w,w,w); //strip.setpixelcolor(39, w,w,w); //strip.setpixelcolor(40, w,w,w); delay(500); strip.setpixelcolor(0, 0,0,0); strip.setpixelcolor(19, 0,0,0); strip.setpixelcolor(20, 0,0,0); strip.setpixelcolor(39, 0,0,0); strip.setpixelcolor(40, 0,0,0); delay(500); strip.setpixelcolor(0, w,w,w); strip.setpixelcolor(19, w,w,w); strip.setpixelcolor(20, w,w,w); //strip.setpixelcolor(39, w,w,w); //strip.setpixelcolor(40, w,w,w); delay(500); strip.setpixelcolor(0, 0,0,0); strip.setpixelcolor(19, 0,0,0); strip.setpixelcolor(20, 0,0,0); strip.setpixelcolor(39, 0,0,0); strip.setpixelcolor(40, 0,0,0); delay(500); spdtwo=spdtwo-50; win=0; //speed up after 5 wins winner=winner+1; if(winner==5) { strip.setpixelcolor(122, w,w,w); strip.setpixelcolor(117, w,w,w); strip.setpixelcolor(102, w,w,w); strip.setpixelcolor(97, w,w,w); strip.setpixelcolor(82, w,w,w);
42 McManus, Nazarenko, Perez, Wigger 42 strip.setpixelcolor(118, w,w,w); strip.setpixelcolor(98, w,w,w); strip.setpixelcolor(116, w,w,w); strip.setpixelcolor(96, w,w,w); strip.setpixelcolor(124, w,w,w); strip.setpixelcolor(115, w,w,w); strip.setpixelcolor(104, w,w,w); strip.setpixelcolor(95, w,w,w); strip.setpixelcolor(84, w,w,w); strip.setpixelcolor(114, w,w,w); strip.setpixelcolor(94, w,w,w); strip.setpixelcolor(112, w,w,w); strip.setpixelcolor(87, w,w,w); strip.setpixelcolor(128, w,w,w); strip.setpixelcolor(111, w,w,w); strip.setpixelcolor(108, w,w,w); strip.setpixelcolor(91, w,w,w); strip.setpixelcolor(88, w,w,w); strip.setpixelcolor(89, w,w,w); delay(20000); w=0; strip.setpixelcolor(122, w,w,w); strip.setpixelcolor(117, w,w,w); strip.setpixelcolor(102, w,w,w); strip.setpixelcolor(97, w,w,w); strip.setpixelcolor(82, w,w,w); strip.setpixelcolor(118, w,w,w); strip.setpixelcolor(98, w,w,w); strip.setpixelcolor(116, w,w,w); strip.setpixelcolor(96, w,w,w); strip.setpixelcolor(124, w,w,w); strip.setpixelcolor(115, w,w,w); strip.setpixelcolor(104, w,w,w); strip.setpixelcolor(95, w,w,w); strip.setpixelcolor(84, w,w,w); strip.setpixelcolor(114, w,w,w); strip.setpixelcolor(94, w,w,w); strip.setpixelcolor(112, w,w,w); strip.setpixelcolor(87, w,w,w); strip.setpixelcolor(128, w,w,w); strip.setpixelcolor(111, w,w,w); strip.setpixelcolor(108, w,w,w); strip.setpixelcolor(91, w,w,w); strip.setpixelcolor(88, w,w,w); strip.setpixelcolor(89, w,w,w); w=255; winner=0; spdtwo = 250; randnumber = random(1, 4); if(randnumber == 1){ b=0; r=255; g=0; strip.setpixelcolor(142, b,r,g);
43 McManus, Nazarenko, Perez, Wigger 43 strip.setpixelcolor(142, 0,0,0); strip.setpixelcolor(137, b,r,g); strip.setpixelcolor(137, 0,0,0); strip.setpixelcolor(122, b,r,g); strip.setpixelcolor(122, 0,0,0); strip.setpixelcolor(117, b,r,g); strip.setpixelcolor(117, 0,0,0); strip.setpixelcolor(102, b,r,g); strip.setpixelcolor(102, 0,0,0); strip.setpixelcolor(97, b,r,g); strip.setpixelcolor(97, 0,0,0); strip.setpixelcolor(82, b,r,g); strip.setpixelcolor(82, 0,0,0); strip.setpixelcolor(77, b,r,g); strip.setpixelcolor(77, 0,0,0); strip.setpixelcolor(62, b,r,g); strip.setpixelcolor(62, 0,0,0); strip.setpixelcolor(57, b,r,g); strip.setpixelcolor(57, 0,0,0); strip.setpixelcolor(42, b,r,g); strip.setpixelcolor(42, 0,0,0); strip.setpixelcolor(37, b,r,g); if(analogread(irdet1)<red) { cheater=1; strip.setpixelcolor(37, 0,0,0); strip.setpixelcolor(22, b,r,g); strip.setpixelcolor(22, 0,0,0); //Serial.println(analogRead(IRdet1)); for(n=0;n<5000;n++) { if(analogread(irdet1)<red && cheater==0) { //strip.setpixelcolor(140, 255,255,255); // win=win+1; easy=1;
44 McManus, Nazarenko, Perez, Wigger 44 break; if(easy==0) { win=win-1; cheater=0; easy=0; else if(randnumber == 2){ b=0; r=0; g=255; strip.setpixelcolor(145, b,r,g); strip.setpixelcolor(145, 0,0,0); strip.setpixelcolor(134, b,r,g); strip.setpixelcolor(134, 0,0,0); strip.setpixelcolor(125, b,r,g); strip.setpixelcolor(125, 0,0,0); strip.setpixelcolor(114, b,r,g); strip.setpixelcolor(114, 0,0,0); strip.setpixelcolor(105, b,r,g); strip.setpixelcolor(105, 0,0,0); strip.setpixelcolor(94, b,r,g); strip.setpixelcolor(94, 0,0,0); strip.setpixelcolor(85, b,r,g); strip.setpixelcolor(85, 0,0,0); strip.setpixelcolor(74, b,r,g); strip.setpixelcolor(74, 0,0,0); strip.setpixelcolor(65, b,r,g); strip.setpixelcolor(65, 0,0,0); strip.setpixelcolor(54, b,r,g); strip.setpixelcolor(54, 0,0,0); strip.setpixelcolor(45, b,r,g); strip.setpixelcolor(45, 0,0,0); strip.setpixelcolor(34, b,r,g); if(analogread(irdet2)<green) {
45 McManus, Nazarenko, Perez, Wigger 45 cheater=1; strip.setpixelcolor(34, 0,0,0); strip.setpixelcolor(25, b,r,g); strip.setpixelcolor(25, 0,0,0); //Serial.println(analogRead(IRdet2)); for(n=0;n<5000;n++) { if(analogread(irdet2)<green && cheater==0) { //strip.setpixelcolor(140, 255,255,255); // win=win+1; easy=1; break; if(easy==0) { win=win-1; cheater=0; easy=0; else{ b=255; r=0; g=0; strip.setpixelcolor(148, b,r,g); strip.setpixelcolor(148, 0,0,0); strip.setpixelcolor(131, b,r,g); strip.setpixelcolor(131, 0,0,0); strip.setpixelcolor(128, b,r,g); strip.setpixelcolor(128, 0,0,0); strip.setpixelcolor(111, b,r,g); strip.setpixelcolor(111, 0,0,0); strip.setpixelcolor(108, b,r,g); strip.setpixelcolor(108, 0,0,0); strip.setpixelcolor(91, b,r,g); strip.setpixelcolor(91, 0,0,0); strip.setpixelcolor(88, b,r,g); strip.setpixelcolor(88, 0,0,0);
46 McManus, Nazarenko, Perez, Wigger 46 strip.setpixelcolor(71, b,r,g); strip.setpixelcolor(71, 0,0,0); strip.setpixelcolor(68, b,r,g); strip.setpixelcolor(68, 0,0,0); strip.setpixelcolor(51, b,r,g); strip.setpixelcolor(51, 0,0,0); strip.setpixelcolor(48, b,r,g); strip.setpixelcolor(48, 0,0,0); strip.setpixelcolor(31, b,r,g); if(analogread(irdet3)<blue) { cheater=1; strip.setpixelcolor(31, 0,0,0); strip.setpixelcolor(28, b,r,g); strip.setpixelcolor(28, 0,0,0); //Serial.println(analogRead(IRdet3)); for(n=0;n<5000;n++) { if(analogread(irdet3)<blue && cheater==0) { //strip.setpixelcolor(140, 255,255,255); // win=win+1; easy=1; break; if(easy==0) { win=win-1; cheater=0; easy=0; delay(spdone); strip.setpixelcolor( 140, 0,0,0); strip.setpixelcolor(142+(randnumber-1)*3, 0,0,0); if(win<0) { win=0;
47 McManus, Nazarenko, Perez, Wigger 47 UNH Logo Screensaver Code: /*Senior Project UNH Logo "Screen Saver"*/ #include <TimerOne.h> //include the library #include <SPI.h> //include the library #include "Neophob_LPD6803.h" //include the library2 #define LED_MODULES 150 //Define number of LEDs Neophob_LPD6803 strip = Neophob_LPD6803(LED_MODULES); int b = 255; int w = 255; void setup() { strip.setcpumax(50); strip.begin(spi_clock_div64); void loop() { //For loop to light the LEDs more easily //Turn on 1st LED strip.setpixelcolor(0, b,0,0); strip.setpixelcolor(1, b,0,0); strip.setpixelcolor(2, b,0,0); strip.setpixelcolor(3, b,0,0); strip.setpixelcolor(4, b,0,0); strip.setpixelcolor(5, b,0,0); strip.setpixelcolor(6, b,0,0); strip.setpixelcolor(7, b,0,0); strip.setpixelcolor(8, b,0,0); strip.setpixelcolor(9, b,0,0); strip.setpixelcolor(10, b,0,0); strip.setpixelcolor(11, w,w,w); strip.setpixelcolor(12, w,w,w); strip.setpixelcolor(13, w,w,w); strip.setpixelcolor(14, w,w,w); strip.setpixelcolor(15, w,w,w); strip.setpixelcolor(16, w,w,w); strip.setpixelcolor(17, w,w,w); strip.setpixelcolor(18, w,w,w); strip.setpixelcolor(19, b,0,0); strip.setpixelcolor(20, b,0,0); strip.setpixelcolor(21, w,w,w); strip.setpixelcolor(22, b,0,0); strip.setpixelcolor(23, b,0,0); strip.setpixelcolor(24, b,0,0); strip.setpixelcolor(25, b,0,0); strip.setpixelcolor(26, b,0,0); strip.setpixelcolor(27, b,0,0); strip.setpixelcolor(28, w,w,w); strip.setpixelcolor(29, b,0,0); strip.setpixelcolor(30, b,0,0); strip.setpixelcolor(31, w,w,w);
48 McManus, Nazarenko, Perez, Wigger 48 strip.setpixelcolor(32, w,w,w); strip.setpixelcolor(33, w,w,w); strip.setpixelcolor(34, w,w,w); strip.setpixelcolor(35, b,0,0); strip.setpixelcolor(36, b,0,0); strip.setpixelcolor(37, w,w,w); strip.setpixelcolor(38, w,w,w); strip.setpixelcolor(39, b,0,0); strip.setpixelcolor(40, b,0,0); strip.setpixelcolor(41, w,w,w); strip.setpixelcolor(42, w,w,w); strip.setpixelcolor(43, w,w,w); strip.setpixelcolor(44, b,0,0); strip.setpixelcolor(45, b,0,0); strip.setpixelcolor(46, w,w,w); strip.setpixelcolor(47, w,w,w); strip.setpixelcolor(48, w,w,w); strip.setpixelcolor(49, b,0,0); strip.setpixelcolor(50, b,0,0); strip.setpixelcolor(51, w,w,w); strip.setpixelcolor(52, w,w,w); strip.setpixelcolor(53, b,0,0); strip.setpixelcolor(54, b,0,0); strip.setpixelcolor(55, w,w,w); strip.setpixelcolor(56, w,w,w); strip.setpixelcolor(57, w,w,w); strip.setpixelcolor(58, w,w,w); strip.setpixelcolor(59, b,0,0); strip.setpixelcolor(60, b,0,0); strip.setpixelcolor(61, w,w,w); strip.setpixelcolor(62, b,0,0); strip.setpixelcolor(63, b,0,0); strip.setpixelcolor(64, b,0,0); strip.setpixelcolor(65, b,0,0); strip.setpixelcolor(66, b,0,0); strip.setpixelcolor(67, b,0,0); strip.setpixelcolor(68, w,w,w); strip.setpixelcolor(69, b,0,0); strip.setpixelcolor(70, b,0,0); strip.setpixelcolor(71, b,0,0); strip.setpixelcolor(72, w,w,w); strip.setpixelcolor(73, w,w,w); strip.setpixelcolor(74, w,w,w); strip.setpixelcolor(75, w,w,w); strip.setpixelcolor(76, w,w,w); strip.setpixelcolor(77, w,w,w); strip.setpixelcolor(78, b,0,0); strip.setpixelcolor(79, b,0,0); strip.setpixelcolor(80, b,0,0); strip.setpixelcolor(81, b,0,0); strip.setpixelcolor(82, b,0,0); strip.setpixelcolor(83, b,0,0); strip.setpixelcolor(84, w,w,w); strip.setpixelcolor(85, b,0,0); strip.setpixelcolor(86, b,0,0); strip.setpixelcolor(87, b,0,0); strip.setpixelcolor(88, b,0,0); strip.setpixelcolor(89, b,0,0); strip.setpixelcolor(90, b,0,0);
ECE791/792 Project Proposal
 ECE791/792 Project Proposal Project Title: Touch Screen, Gaming, and Audio Visual LED Table Team Members: Michael Perez, Michael McManus, Nicholas Nazarenko, Andreas Wigger Advisor: Dr. Richard Messner
Lab 2.2 Ohm s Law and Introduction to Arduinos
 Lab 2.2 Ohm s Law and Introduction to Arduinos Objectives: Get experience using an Arduino Learn to use a multimeter to measure Potential units of volts (V) Current units of amps (A) Resistance units of
GROUP 14: ESSENCE OF MUSIC. Joshua Garber EE Baron Dolletski-Lazar CpE Nelson Tan - CpE
 GROUP 14: ESSENCE OF MUSIC Joshua Garber EE Baron Dolletski-Lazar CpE Nelson Tan - CpE Motivation Gain experience working with Audio Signals Implementing multiple systems to operate simultaneously (Audio
Lab-3: LCDs Serial Communication Analog Inputs Temperature Measurement System
 Mechatronics Engineering and Automation Faculty of Engineering, Ain Shams University MCT-151, Spring 2015 Lab-3: LCDs Serial Communication Analog Inputs Temperature Measurement System Ahmed Okasha okasha1st@gmail.com
SECOND EDITION. Arduino Cookbook. Michael Margolis O'REILLY- Tokyo. Farnham Koln Sebastopol. Cambridge. Beijing
 SECOND EDITION Arduino Cookbook Michael Margolis Beijing Cambridge Farnham Koln Sebastopol O'REILLY- Tokyo Table of Contents Preface xi 1. Getting Started 1 1.1 Installing the Integrated Development Environment
ECE 511 Project Group 11: MP3 Boombox 12/03/2013. Carlos R Araujo Divya Chinthalapuri Leegia S Jacob Brian D Jarvis Shawn Wilkinson
 ECE 511 Project Group 11: MP3 Boombox 12/03/2013 Carlos R Araujo Divya Chinthalapuri Leegia S Jacob Brian D Jarvis Shawn Wilkinson Motivation A toy in the entertainment genre: With the use of a single
muse Capstone Course: Wireless Sensor Networks
 muse Capstone Course: Wireless Sensor Networks Experiment ADC: Sensing and Analog-to-Digital Conversion Objectives 1. Get familiar with the CLIO wireless sensor node development platform. 2. See how to
5/12/2016 Eamon Wick. Concept: Utilize a pair shoes and a combinations of natural and unnatural gestures to control musical expressions.
 Concept: Utilize a pair shoes and a combinations of natural and unnatural gestures to control musical expressions. The Dubstep s 2.0, the second version of the original Dubstep s, is essentially a MIDI
Blue Point Engineering
 Blue Point Engineering Board - Pro Module (E) Instruction Pointing the Way to Solutions! Controller I Version 2.1 The Board Pro E Module provides the following features: Up to 4 minutes recording time
HARDWARE OPERATIONS MANUAL
 HARDWARE OPERATIONS MANUAL Table of Contents INTRODUCTION... 2 SECTION 1: HARDWARE COMPONENT ASSEMBLIES... 2 MECHANICAL HARDWARE AND CASE... 2 PCB ASSEMBLY... 4 ISD RECORDING CIRCUIT... 5 BREADBOARD ASSEMBLY...
This tutorial will show you how to take temperature readings using the Freetronics temperature sensor and an Arduino Uno.
 This tutorial will show you how to take temperature readings using the Freetronics temperature sensor and an Arduino Uno. Note that there are two different module types: the temperature sensor module and
IME-100 ECE. Lab 4. Electrical and Computer Engineering Department Kettering University. G. Tewolde, IME100-ECE,
 IME-100 ECE Lab 4 Electrical and Computer Engineering Department Kettering University 4-1 1. Laboratory Computers Getting Started i. Log-in with User Name: Kettering Student (no password required) ii.
ECE 189A Senior Capstone December 16, 2014 Team Leader: Will Miller Charles Crain, Isaac Flores, Brian Phan, Sarah Pilkington
 ECE 189A Senior Capstone December 16, 2014 Team Leader: Will Miller Charles Crain, Isaac Flores, Brian Phan, Sarah Pilkington Agenda Project Overview Parts Power Distribution Schematic and Bill of Materials
Christian Brothers University 650 East Parkway South Memphis, TN
 Christian Brothers University 650 East Parkway South Memphis, TN 38103-5813 WIRELESS SMART THERMOSTAT Martin Tribo Student IEEE Membership Number 90671969 Submitted for consideration in Region 3, IEEE
Thank you for purchasing the RGB Multi-MCU base and driver board from SuperTech-IT and TheLEDCube.com
 CONGRATULATIONS Thank you for purchasing the RGB Multi-MCU base and driver board from SuperTech-IT and TheLEDCube.com In this document, MCU means Microcontroller such as the PIC32, ATmega328P, prototype
Spectrum Shield Hookup Guide
 Page 1 of 12 Spectrum Shield Hookup Guide Introduction Have you ever wanted to have your project react to music? Then this is the product for you! The Spectrum Shield enables your Arduino with the capability
AT42QT101X Capacitive Touch Breakout Hookup Guide
 Page 1 of 10 AT42QT101X Capacitive Touch Breakout Hookup Guide Introduction If you need to add user input without using a button, then a capacitive touch interface might be the answer. The AT42QT1010 and
Number Name Description Notes Image 0101 Resistor, 100 ohm. brown-black-browngold. ¼ watt, 5% tolerance, red-red-brown-gold. brown-black-red-gold.
 Passive Components 0101 Resistor, 100 brown-black-browngold. 690620 0102 Resistor, 220 red-red-brown-gold. 690700 0103 Resistor, 1000 brown-black-red-gold. 690865 0104 Resistor, 10k 0201 Capacitor, 1 µf,
AT42QT1010 Capacitive Touch Breakout Hookup Guide
 Page 1 of 7 AT42QT1010 Capacitive Touch Breakout Hookup Guide Introduction If you need to add user input without using a button, then a capacitive touch interface might be the answer. The AT42QT1010 Capacitive
Introduction to Arduino Diagrams & Code Brown County Library
 Introduction to Arduino Diagrams & Code Project 01: Blinking LED Components needed: Arduino Uno board LED Put long lead into pin 13 // Project 01: Blinking LED int LED = 13; // LED connected to digital
IR Communication a learn.sparkfun.com tutorial
 IR Communication a learn.sparkfun.com tutorial Available online at: http://sfe.io/t33 Contents Getting Started IR Communication Basics Hardware Setup Receiving IR Example Transmitting IR Example Resources
keyestudio Keyestudio MEGA 2560 R3 Board
 Keyestudio MEGA 2560 R3 Board Introduction: Keyestudio Mega 2560 R3 is a microcontroller board based on the ATMEGA2560-16AU, fully compatible with ARDUINO MEGA 2560 REV3. It has 54 digital input/output
Introduction to Arduino Diagrams & Code Brown County Library
 Introduction to Arduino Diagrams & Code Project 01: Blinking LED Components needed: Arduino Uno board LED Put long lead into pin 13 // Project 01: Blinking LED int LED = 13; // LED connected to digital
Lab 8. Communications between Arduino and Android via Bluetooth
 Lab 8. Communications between Arduino and Android via Bluetooth Dr. X. Li xhli@citytech.cuny.edu Dept. of Computer Engineering Technology New York City College of Technology (Copyright Reserved) In this
09/05/2014. Engaging electronics for the new D&T curriculum. Geoff Hampson Managing Director of Kitronik. Presentation overview
 Presentation overview Engaging electronics for the new D&T curriculum Geoff Hampson Managing Director of Kitronik What to include Free web resources Electronic project ideas Using programmable components
Delay-Based Digital Audio Effects Module for DJs and Musicians
 Senior Project Report Delay-Based Digital Audio Effects Module for DJs and Musicians Submitted to Dr. David Goodman Engineering Technology Department By Alexander Perr 12/1/2018 pg. 1 Abstract This module
DC - Devices and Controller
 123 DC - Devices and Controller 1 DC-0010 Diode laser controller MK1-HP The diode laser module is connected via the 15 pin HD SubD jacket at the rear of the controller. The controller reads the EEPROM
Arduino Cookbook O'REILLY* Michael Margolis. Tokyo. Cambridge. Beijing. Farnham Koln Sebastopol
 Arduino Cookbook Michael Margolis O'REILLY* Beijing Cambridge Farnham Koln Sebastopol Tokyo Table of Contents Preface xiii 1. Getting Started 1 1.1 Installing the Integrated Development Environment (IDE)
User Guide. Kube Audio Clock II Charging Station with Bluetooth Audio and Alarm Clock
 Kube Audio Clock II Charging Station with Bluetooth Audio and Alarm Clock User Guide Please read these instructions completely before operating this product. INTRODUCTION Getting to Know Your Alarm Clock
GE-INTERNATIONAL JOURNAL OF ENGINEERING RESEARCH VOLUME -3, ISSUE -5 (May 2015) IF ISSN: ( )
 IF ISSN: ( )") DESIGN AND IMPLEMENTATION OF MICROCONTROLLER BASED SPEED DATA LOGGER Kriti Jain *, Prem Chand #, Saad Shamsi #, Dimple Taneja #, Rahul Yadav #, Sanjeev Yadav # *Assistant Professor, ECE Department, Amity
DESIGN AND IMPLEMENTATION OF MICROCONTROLLER BASED SPEED DATA LOGGER Kriti Jain *, Prem Chand #, Saad Shamsi #, Dimple Taneja #, Rahul Yadav #, Sanjeev Yadav # *Assistant Professor, ECE Department, Amity
ROBOTLINKING THE POWER SUPPLY LEARNING KIT TUTORIAL
 ROBOTLINKING THE POWER SUPPLY LEARNING KIT TUTORIAL 1 Preface About RobotLinking RobotLinking is a technology company focused on 3D Printer, Raspberry Pi and Arduino open source community development.
CORRIGENDUM ISSUED FOR NATIONAL COMPETITIVE BIDDING UNDER TEQIP PHASE-II
 CORRIGENDUM ISSUED FOR NATIONAL COMPETITIVE BIDDING UNDER TEQIP PHASE-II The prebid meeting for the packages to be purchased under national competitive bidding for TEQIP Phase II was held on 15/10/2013
SPDM Level 2 Smart Electronics Unit, Level 2
 SPDM Level 2 Smart Electronics Unit, Level 2 Evidence Folder John Johns Form 3b RSA Tipton 1.1 describe the purpose of circuit components and symbols. The candidate can describe the purpose of a range
DEVELOPMENT TEAM: Jeremiah Prousalis: Project Lead Firmware Lead Bluetooth Module Interfacing
 DEVELOPMENT TEAM: Jeremiah Prousalis: Project Lead Firmware Lead Bluetooth Module Interfacing Nathaniel Bradley: Hardware Lead Analog IR Design Power System Design Jesus Castro: Software Lead Android Application
Objectives: Learn how to input and output analogue values Be able to see what the Arduino is thinking by sending numbers to the screen
 Objectives: Learn how to input and output analogue values Be able to see what the Arduino is thinking by sending numbers to the screen By the end of this session: You will know how to write a program to
EXPERIMENT 7 Please visit https://www.arduino.cc/en/reference/homepage to learn all features of arduino before you start the experiments
 EXPERIMENT 7 Please visit https://www.arduino.cc/en/reference/homepage to learn all features of arduino before you start the experiments TEMPERATURE MEASUREMENT AND CONTROL USING LM35 Purpose: To measure
Arduino Programming. Arduino UNO & Innoesys Educational Shield
 Arduino Programming Arduino UNO & Innoesys Educational Shield www.devobox.com Electronic Components & Prototyping Tools 79 Leandrou, 10443, Athens +30 210 51 55 513, info@devobox.com ARDUINO UNO... 3 INNOESYS
Infrared Add-On Module for Line Following Robot
 1 Infrared Add-On Module for Line Following Robot January 3, 2015 Jeffrey La Favre The infrared add-on module allows multiple line following robots to operate on the same track by preventing collisions
INSTRUCTION/INSTALLATION SHEET lyriq Studio High Performance Keypad
 1. Introduction The, P/N AU5010-xx (see Figure 1), is an integral part of the lyriq Multi-Room Audio System. It is a component which, when combined with other essential components (a Source Input Unit,
LX 30 ENGLISH VERSION RADIANT BACKLIGHT TECHNOLOGY
 LX 30 ENGLISH VERSION RADIANT BACKLIGHT TECHNOLOGY 1 PACKAGE CONTENTS» LX30 USB Gaming Headset» USB to Micro-USB cable» 3.5mm-plug cable» Quick installation guide» Software available for download at: www.lioncast.com
Using solderless breadboards
 Page 1 of 9 Using solderless breadboards This document describes how to use the solderless breadboards available in the experimental didactic lab (LED, previously LADISPE) of Politecnico di Torino. 1 Setting
Prototyping & Engineering Electronics Kits Basic Kit Guide
 Prototyping & Engineering Electronics Kits Basic Kit Guide odysseyboard.com Please refer to www.odysseyboard.com for a PDF updated version of this guide. Guide version 1.0, February, 2018. Copyright Odyssey
This is the Arduino Uno: This is the Arduino motor shield: Digital pins (0-13) Ground Rail
 Ground Rail") Reacting to Sensors In this tutorial we will be going over how to program the Arduino to react to sensors. By the end of this workshop you will have an understanding of how to use sensors with the Arduino
Reacting to Sensors In this tutorial we will be going over how to program the Arduino to react to sensors. By the end of this workshop you will have an understanding of how to use sensors with the Arduino
Specification. 1.Power Supply direct from Microcontroller Board. 2.The circuit can be used with Microcontroller Board such as Arduino UNO R3.
 Part Number : Product Name : FK-FA1410 12-LED AND 3-BOTTON SHIELD This is the experimental board for receiving and transmitting data from the port of microcontroller. The function of FK-FA1401 is fundamental
Table of Contents. Table of Contents Microcomputers Microcontroller Technology using the 32-Bit ARM Cortex M3
 Table of Contents Table of Contents Microcomputers Microcontroller Technology using the 32-Bit ARM Cortex M3 1 2 2 Lucas Nülle GmbH Page 1/9 www.lucas-nuelle.com Microcomputers Training systems on microcontroller
Connecting LEDs to the ADB I/O
 Application Note AN-2 By Magnus Pettersson September 26 1996 Connecting LEDs to the I/O Introduction The following notes are for those of you who are a bit inexperienced with hardware components. This
Control4 Audio Products
 Audio Products Life s Better When Everything Works Together Enjoy high-quality multi-room music with easy-to-use audio solutions. Our top-of-the-line audio products enable intelligent audio control throughout
Adapted from a lab originally written by Simon Hastings and Bill Ashmanskas
 Physics 364 Arduino Lab 1 Adapted from a lab originally written by Simon Hastings and Bill Ashmanskas Vithayathil/Kroll Introduction Last revised: 2014-11-12 This lab introduces you to an electronic development
EMCP 4.4 Simulator Manual. Author: Lucas Tolbert CIC Engineering 345 Center Street East Peoria, IL
 EMCP 4.4 Simulator Manual Author: Lucas Tolbert CIC Engineering 345 Center Street East Peoria, IL Date of Origin: 11/23/2010 Overview This document will detail the features and operation of the EMCP 4.4
Layad Circuits Arduino Basic Kit B. Content Summary
 Layad Circuits This kit is a careful selection of sensors, displays, modules, an Arduino Uno, connectors and other essential parts meant to facilitate learning of the hardware and software components of
Audio Enhanced Touch Sensors Build Instructions
 Audio Enhanced Touch Sensors Build Instructions By Matt Oppenheim, Embedded Interactive Systems, InfoLab21, Lancaster University matt.oppenheim@gmail.com https://sites.google.com/site/hardwaremonkey/ I
Lab 0: Wire Wrapping Project: Counter Board
 Lab 0: Wire Wrapping Project: Counter Board September 3, 2008 In this experiment, you will build a simple counter circuit that can be plugged into your breadboard. It will provide a set of TTL output signals
RoboSpecies Technologies Pvt. Ltd.
 Table of Contents Table of Contents... vi Part 1: Introduction to Robotics... 1 1.1 Robotics... 3 1.1.1 House Robots... 4 1.1.2 Industrial Robots... 4 1.1.3 Medical Robots... 6 1.1.4 Space Robots... 7
GUIDE TO SP STARTER SHIELD (V3.0)
") OVERVIEW: The SP Starter shield provides a complete learning platform for beginners and newbies. The board is equipped with loads of sensors and components like relays, user button, LED, IR Remote and
OVERVIEW: The SP Starter shield provides a complete learning platform for beginners and newbies. The board is equipped with loads of sensors and components like relays, user button, LED, IR Remote and
Final Design Report. Team Name: No Rest for the Weary
 EEL 4924 Electrical Engineering Design (Senior Design) Final Design Report 4 August 2009 Project Title: SLEEP Team Name: No Rest for the Weary Team Members: Renard Sumlar lrsum825@ufl.edu Brad Bromlow
PXR 1506 / WATT MIXER AMPLIFIER
 PXR 1506 / 1508 150-WATT MIXER AMPLIFIER Operating Manual www.peavey.com ENGLISH PXR 1506 / 1508 150-Watt, 8-Channel Mixer Amplifier Designed with the latest Peavey technology, the PXR 1506 / 1508 powered
SonusCandleTM. Owners Guide. Chicago, USA tel Fax Candle Light - Music Wireless
 SonusCandleTM Owners Guide Candle Light - Music Wireless Chicago, USA tel. 051-460-4783 Fax 707-597-4484 Introduction SonusCandletm Charging Please charge the sound module before you use it for the first
INSTRUCTION/INSTALLATION SHEET lyriq Studio Keypad
 1. Introduction The Volume Control, P/N AU5009-xx (see Figure 1), is an integral part of the lyriq Multi-Room Audio System. It is a component which, when combined with other essential components (a Source
OLi POWA-5 Active Monitors
 Active Monitors User Manual : English Contents Important Information... 3 Front & Rear Panels... 4 Remote Control... 5 Connecting Your Speakers... 6 Bluetooth Function... 7 Use with ipod / MP3... 8 Use
ISL RGB Sensor Tutorial By: Sabrina Jones
 ISL 25129 RGB Sensor Tutorial By: Sabrina Jones Overview The ISL29125 RGB sensor is a breakout board made to record the light intensity of the general red, green, and blue spectrums of visible light, that
ECE 2036: Lab #3 mbed Hardware Starter Lab Category: Getting Started with MBED ~ 1 week to complete
 ECE 2036: Lab #3 mbed Hardware Starter Lab Category: Getting Started with MBED ~ 1 week to complete ECE2036a - Due Date: Monday September 28 @ 11:59 PM ECE2036b Due Date: Tuesday September 29 @ 11:59 PM
Engineering Design in Education. ECEDHA March 2012
 Engineering Design in Education ECEDHA March 2012 Our Proposition Everystudent should complete significant hands-on design as a part of everyassignment. It s ESEA Every Student, Every Assignment How? 1.Low-cost,
The ICU-Duino Arduino Shield!
 The ICU-Duino Arduino Shield! Brought to you by: ENGINEERINGSHOCK ELECTRONICS FEATURES: On Board PIR (Passive Infra-red) Motion Sensor Red Indicator LED Infra-red (IR) Sensor Large Prototyping Area with
Freeduino USB 1.0. Arduino Compatible Development Board Starter Guide. 1. Overview
 Freeduino USB 1.0 Arduino Compatible Development Board Starter Guide 1. Overview 1 Arduino is an open source embedded development platform consisting of a simple development board based on Atmel s AVR
Physics 120/220 Lab Equipment, Hints & Tips
 Physics 120/220 Lab Equipment, Hints & Tips Solderless Breadboard... 2 Power supply... 4 Multimeters... 5 Function generator... 5 Oscilloscope... 6 10X probe... 7 Resistor color code... 7 Components...
Stellaris LM3S3748 Evaluation Kit README FIRST
 Stellaris LM3S3748 Evaluation Kit README FIRST The Stellaris LM3S3748 Evaluation Kit provides a low-cost way to start designing applications with Stellaris microcontrollers on a compact and versatile evaluation
MP3 Boombox ECE 511 PROJECT GROUP 11 12/03/2013 CARLOS R ARAUJO BRIAN D JARVIS SHAWN WILKINSON DIVYA CHINTHALAPURI LEEGIA S JACOB
 MP3 Boombox ECE 511 PROJECT GROUP 11 12/03/2013 CARLOS R ARAUJO BRIAN D JARVIS SHAWN WILKINSON DIVYA CHINTHALAPURI LEEGIA S JACOB Abstract For this project, the motivation was to create a product which
How to Use an Arduino
 How to Use an Arduino By Vivian Law Introduction The first microcontroller, TMS-1802-NC, was built in 1971 by Texas Instruments. It owed its existence to the innovation and versatility of silicon and the
SigmaFlux Workshops Brochure Contact: Karan Makharia / Karan Kapoor
 SigmaFlux Workshops Brochure-2018 Contact: Karan Makharia - 7021923539 / 9324479670 Karan Kapoor - 7977515030 Internet of Things with Arduino Workshop course Content: 1. Introduction to Internet of Things
Arduino 101 AN INTRODUCTION TO ARDUINO BY WOMEN IN ENGINEERING FT T I NA A ND AW E S O ME ME NTO R S
 Arduino 101 AN INTRODUCTION TO ARDUINO BY WOMEN IN ENGINEERING FT T I NA A ND AW E S O ME ME NTO R S Overview Motivation Circuit Design and Arduino Architecture Projects Blink the LED Switch Night Lamp
Goal: We want to build an autonomous vehicle (robot)
") Goal: We want to build an autonomous vehicle (robot) This means it will have to think for itself, its going to need a brain Our robot s brain will be a tiny computer called a microcontroller Specifically
Goal: We want to build an autonomous vehicle (robot) This means it will have to think for itself, its going to need a brain Our robot s brain will be a tiny computer called a microcontroller Specifically
Alternative Designs and Decision Making for Top Design Selection
 Alternative Designs and Decision Making for Top Design Selection 1 Step 1. Generation of Alternatives (>2 Conceptual Designs) Multiple Alternative conceptual designs Optimal Solution (by balanced capability,
Getting Started with the RN-XV WiFly
 1 Introduction Getting Started with the RN-XV WiFly October, 2018 Revision 3 This guide will introduce you to using the RN-XV (or RN-171-XV) WiFly wireless LAN module with the Arduino UNO via the Wireless
TubeDAC-09. Vacuum Tube Digital-to-Analog Converter & Headphone Amplifier. High End, Not High Priced
 TubeDAC-09 Vacuum Tube Digital-to-Analog Converter & Headphone Amplifier www.grantfidelity.com High End, Not High Priced Sign up Grant Fidelity e-newsletter for future savings! www.grantfidelity.com Page
Grove - 80cm Infrared Proximity Sensor
 Grove - 80cm Infrared Proximity Sensor Introduction 3.3V 5.0V Analog The 80cm Infrared Proximity Sensor is a General Purpose Type Distance Measuring Sensor. This sensor SharpGP2Y0A21YK, boasts a small
More Arduino Programming
 Introductory Medical Device Prototyping Arduino Part 2, http://saliterman.umn.edu/ Department of Biomedical Engineering, University of Minnesota More Arduino Programming Digital I/O (Read/Write) Analog
Schematic Diagram: R2,R3,R4,R7 are ¼ Watt; R5,R6 are 220 Ohm ½ Watt (or two 470 Ohm ¼ Watt in parallel)
") Nano DDS VFO Rev_2 Assembly Manual Farrukh Zia, K2ZIA, 2016_0130 Featured in ARRL QST March 2016 Issue Nano DDS VFO is a modification of the original VFO design in Arduino Projects for Amateur Radio by
Nano DDS VFO Rev_2 Assembly Manual Farrukh Zia, K2ZIA, 2016_0130 Featured in ARRL QST March 2016 Issue Nano DDS VFO is a modification of the original VFO design in Arduino Projects for Amateur Radio by
Arduino Part 2. Introductory Medical Device Prototyping
 Introductory Medical Device Prototyping Arduino Part 2, http://saliterman.umn.edu/ Department of Biomedical Engineering, University of Minnesota More Arduino Programming Digital I/O (Read/Write) Analog
3.The circuit board is composed of 4 sets which are 16x2 LCD Shield, 3 pieces of Switch, 2
 Part Number : Product Name : FK-FA1416 MULTI-FUNCTION 16x2 LCD SHIELD This is the experimental board of Multi-Function 16x2 LCD Shield as the fundamental programming about the digits, alphabets and symbols.
Add-on box for old stereo systems. Team #40: Tong Zhao, Chutian Shao, Ziyang Liu ECE 445 Project Proposal - Spring 2017 TA: Jose Sanchez Vicarte
 Add-on box for old stereo systems Team #40: Tong Zhao, Chutian Shao, Ziyang Liu ECE 445 Project Proposal - Spring 2017 TA: Jose Sanchez Vicarte 1 Introduction 1.1 Objective While online music stores and
AUDIO AMPLIFIER PROJECT
 Intro to Electronics 110 - Audio Amplifier Project AUDIO AMPLIFIER PROJECT In this project, you will learn how to master a device by studying all the parts and building it with a partner. Our test subject:
Final Report Summer 2014 Faculty Research and Creative Works Grant
 Final Report Summer 2014 Faculty Research and Creative Works Grant Project Title: Speaker volume monitor for Parkinson s patients Principal Investigator: Paul Schimpf, Professor, Department of Computer
1/Build a Mintronics: MintDuino
 1/Build a Mintronics: The is perfect for anyone interested in learning (or teaching) the fundamentals of how micro controllers work. It will have you building your own micro controller from scratch on
705 INSTALLATION MANUAL
 705 INSTALLATION MANUAL 2 Table of Contents Features...03 Specifications...04 Quick - Start...05 Remote Control...07 Hardware Installation...10 705 Models Additional Info...14 Owner s Record...15 3 Features
Arduino Internals. Dale Wheat. Apress
 Arduino Internals Dale Wheat Apress Contents About the Authors About the Technical Reviewers Acknowledgments Preface xv xvi xvii xviii Chapter 1: Hardware 1 What Is an Arduino? 1 The Arduino Uno 2 Processor
Microcontrollers for Ham Radio
 Microcontrollers for Ham Radio MARTIN BUEHRING - KB4MG MAT T PESCH KK4NLK TOM PERRY KN4LSE What is a Microcontroller? A micro-controller is a small computer on a single integrated circuit containing a
H.A.P.P.I. Systems. Group 10 University of Central Florida Senior Design Fall 2016
 H.A.P.P.I. Systems Group 10 University of Central Florida Senior Design Fall 2016 Team Members Johnnie Greene Taylor Griffith Philip Bent Sidney Jean-Baptiste Physics & Photonic Science Engineer Computer
HUB-ee BMD-S Arduino Proto Shield V1.1
 HUB-ee BMD-S Arduino Proto Shield V1.1 User guide and assembly instructions Document Version 0.5 Introduction & Board Guide 2 Schematic 3 Quick User Guide 4 Assembly Guide 6 Kit Contents 7 1) Diodes and
Si4703 FM Radio Receiver Hookup Guide
 Page 1 of 5 Si4703 FM Radio Receiver Hookup Guide Introduction This breakout board enables you to tune in to FM radio stations, using the Si4703 FM tuner chip from Silicon Laboratories. This IC also works
Tic-Tac-Toe with mtouch. Version 1.0. June Cytron Technologies Sdn. Bhd.
 Tic-Tac-Toe with mtouch PR28 Version 1.0 June 2010 Cytron Technologies Sdn. Bhd. Information contained in this publication regarding device applications and the like is intended through suggestion only
Propeller Board of Education (#32900)
") Web Site: www.parallax.com Forums: forums.parallax.com Sales: sales@parallax.com Technical: support@parallax.com Office: (916) 624-8333 Fax: (916) 624-8003 Sales: (888) 512-1024 Tech Support: (888) 997-8267
Web Site: www.parallax.com Forums: forums.parallax.com Sales: sales@parallax.com Technical: support@parallax.com Office: (916) 624-8333 Fax: (916) 624-8003 Sales: (888) 512-1024 Tech Support: (888) 997-8267
PANDORA HACKER GUIDE
 PANDORA HACKER GUIDE WARNING: Modifying your PCB is not covered by your warranty and any damage caused as a result will be the sole responsibility of the owner to fix or to have fixed at a fee set by the
2. How do the input wall plates connect to the receiver? UTP or STP cables (cat5e/6). Some wallplates need one and some need 2 Cat5 cables
. Some wallplates need one and some need 2 Cat5 cables") VSA-51 FAQ 1163 Warner Ave Tustin, CA 92780 (714) 641-6607 www.hallresearch.com 1. How many input plates can I connect to the unit? The VSA-51 can handle upto 5 input wall plates. But the type and quantities
VSA-51 FAQ 1163 Warner Ave Tustin, CA 92780 (714) 641-6607 www.hallresearch.com 1. How many input plates can I connect to the unit? The VSA-51 can handle upto 5 input wall plates. But the type and quantities
ZX Distance and Gesture Sensor SMD Hookup Guide
 Page 1 of 16 ZX Distance and Gesture Sensor SMD Hookup Guide Introduction The ZX Distance and Gesture Sensor is a collaboration product with XYZ Interactive. The innovative people at XYZ Interactive have
AXE Stack 18. BASIC-Programmable Microcontroller Kit. An inexpensive introduction to microcontroller technology for all ability levels
 Ltd AXE Stack 18 BASIC-Programmable Microcontroller Kit a division of An inexpensive introduction to microcontroller technology for all ability levels Free Windows interface software Programmable in BASIC
Obtained from Omarshauntedtrail.com
 Getting Started Boombox Amplifier http://www.deathlord.net/boomboxamp/boom.htm BoomBox AmplifiER Difficulty Rating: For years I imagined that my old, broken boom boxes I had laying around could be used
ENGR 40M Project 4b: Displaying ECG waveforms. Lab is due Monday June 4, 11:59pm
 ENGR 40M Project 4b: Displaying ECG waveforms Lab is due Monday June 4, 11:59pm 1 Introduction Last week, you built a circuit that amplified a small 1Hz simulated heartbeat signal. In this week s you will
Pro Trinket Tachometer
 Pro Trinket Tachometer Created by Bill Earl Last updated on 2017-07-19 08:02:09 PM UTC Guide Contents Guide Contents Overview Materials Required: Recommended or Optional Materials Circuit Design Components:
Arduino ADK Rev.3 Board A000069
 Arduino ADK Rev.3 Board A000069 Overview The Arduino ADK is a microcontroller board based on the ATmega2560 (datasheet). It has a USB host interface to connect with Android based phones, based on the MAX3421e
Grove - 80cm Infrared Proximity Sensor User Manual
 Grove - 80cm Infrared Proximity Sensor User Manual Release date: 2015/9/22 Version: 1.0 Wiki: http://www.seeedstudio.com/wiki/index.php?title=twig_-_80cm_infrared_proximity_sensor_v0.9 Bazaar: http://www.seeedstudio.com/depot/grove-80cm-infrared-