Arduino 101 AN INTRODUCTION TO ARDUINO BY WOMEN IN ENGINEERING FT T I NA A ND AW E S O ME ME NTO R S
|
|
|
- Dennis Gardner
- 6 years ago
- Views:
Transcription


1 Arduino 101 AN INTRODUCTION TO ARDUINO BY WOMEN IN ENGINEERING FT T I NA A ND AW E S O ME ME NTO R S
2 Overview Motivation Circuit Design and Arduino Architecture Projects Blink the LED Switch Night Lamp Servo Motor Servo Motor and Potentiometer Additional Resources

3 Why Arduino? Easy to use Open source Inexpensive way to prototype
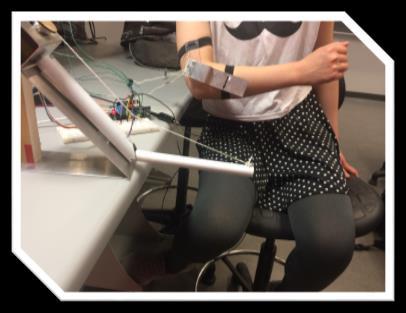
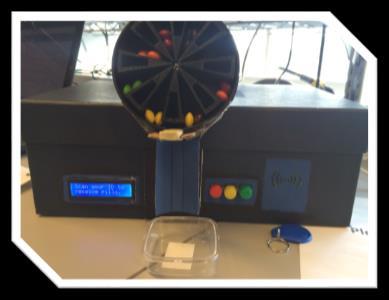
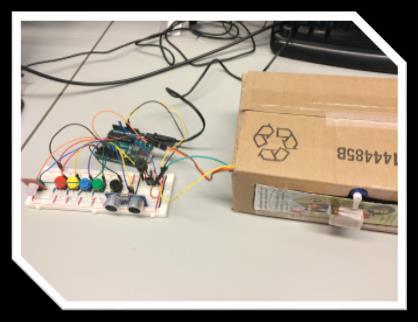
4 Motivation
 components Reset Input/output pins USB Plug Processor /Memory External")
5 Arduino Low-power microcontroller, which is a mini chip containing a processor, memory, and input/output (I/O) components Reset Input/output pins USB Plug Processor /Memory External Battery

6 Embedded Systems Common place where microcontrollers are used Photoresistor, Switch, Potentiometer LEDs, Motor Sketches *in the orange boxes are the examples we will go through today
 Ground (GND on")
7 Breadboard Power (5V on Arduino) Ground (GND on Arduino)
8 Project 1: Blink the LED (Hardware) You will need: 2 jumper wires resistors 1 LED

9 Project 1: Blink the LED (Hardware) LEDs Long leg = +ve terminal Short leg = -ve terminal MUST be used with a resistor to limit the amount of current flowing through the LED, otherwise you might burn it out!

10 Project 1: Blink the LED (Hardware) Resistor (Ω) Can be connected either way What does the colours mean? Note: In this workshop we are using 4-band resistors
11 Project 1: Blink the LED (Hardware) 1. Choose a number between 4-13; connect a jumper wire from that slot 2. Test the circuit with these resistors 150 Ω 1.5 kω 3. Connect the +ve terminal of LED to the same row 4. Ground the circuit

12 Arduino IDE Before we start programming, open Arduino Select the type of microcontroller: Tools >> Board Select Arduino Uno Select the Serial Port in which the Microcontroller is connected to: Tools >> Serial Port Select the serial port which Arduino is connected to
 Called when the sketch starts; only executed once Attach I/O pins (Sometimes) initialize timer, etc 3.")
13 Example Turn on LED Three parts to this example: 1. Global variables: declaration and initialization int for integer boolean (true/false) string 2. setup() Called when the sketch starts; only executed once Attach I/O pins (Sometimes) initialize timer, etc 3. loop() Repeats infinitely as long as the board is powered and memory is available Note: Single line comment = //; block comment = /* */
: initialize the pin as an output pin Syntax: pinmode(variablename, OUTPUT); 3.")
14 Project 1: Blink the LED (Software) 1. Before setup() Declare an integer variable to store the pin connected to LED. Syntax: int variablename = yournumber; 2. setup(): initialize the pin as an output pin Syntax: pinmode(variablename, OUTPUT); 3. loop(): delay(time); //where time is in milliseconds digitalwrite(variablename,state); //STATE = HIGH (5V) or LOW (0V) HIGH = LED on, LOW = LED off 4. Once you are done, press the arrow button to upload your code on Arduino!
15 Break
16 Project 2: Digital Inputs Hardware Components: Red LED, four wires, 150 Ω, and a dip switch Setup 1. Connect one end of the switch to power, and the other end to ground 2. Red LED and the 150 Ω resistor are in series (recall long and short legs) 3. Long leg of red LED in series with resistor is connected to pin 5, and the short leg of the LED is connected to ground

17 Project 2: Digital Inputs Switches Completes the circuit when flip to ON
18 Project 2: Digital Inputs Before we go into the software, switch the connector from 5V to pin 7 Setup(): Initialize the LED pin Initialize pinmode of the switch to INPUT
 { } else if ( condition B ) {} // can have many else if else {} Notice that else does NOT have a condition")
19 Project 2: Digital Inputs if and else Actively checking if the condition specified in () is met If there are 2+ conditions that are related, you can use If ( condition A) { } else if ( condition B ) {} // can have many else if else {} Notice that else does NOT have a condition statement
20 Project 2: Digital Inputs loop(): digitalread( pin# ); Read input pin# and see if it is HIGH or LOW digitalwrite( pin#, STATE ) write STATE, which is either HIGH or LOW, to output pin# Step 2: A) if button is LOW, turn on LED B) otherwise, if the button is HIGH turn off LED Repeat A to B
21 Project 2: Digital Inputs ft Serial Monitor Serial communication to let you know when a button is pressed In setup: Serial.begin(9600); In loop: Serial.printIn( Pressed Button ); //when the button is pressed write this to the serial monitor After uploading your code unto the Arduino Click on the Serial Monitor button (Top right side of the IDE)
22 Project 2: Digital Inputs Pseudo Code Before setup() Initialize the LED and switch pins In setup() Attach pinmode LED = OUTPUT switch = INPUT In loop() If switch is ON LED = ON else LED = OFF

23 Project 3: Put it all together and more! Photoresistor Variable resistor that changes resistance based on light intensity Direction doesn t matter We can use Serial Monitor to check the ambient lighting condition! This will help to pick the thresholds for our project!!
24 Project 3: Circuit 1. Connect Photoresistor to A0 and the other end to 5V 2. Connect a 10k Ω resistor from the rail from 1. to ground 3. Connect 3 pins of your choice to 3 LEDs of different colours 4. Connect the LEDs to ground

25 Project 3: Timer millis() Returns the time since the program started running
26 Project 3: Write your own function Extract code from the main loop to keep it clean Avoid repeating the same line(s) 2 types of functions: void: don t return anything e.g. turnledon() int: function that returns an integer value e.g.: adder()
27 Project 3: Analog input/output Analog pins map input voltages between 0 and 5 volts into integer values between 0 and 1023 Arduino Uno has analog pins A0 A5 Use analogread( pin # ); // to read from the analog pin Use analogwrite (pin #, duty cycle); // to write to the pin
 ); In loop, we generate number by doing random (min#, max")
28 Project 3: Random generator Generate a random number (integer, long, etc) by reading noise from unused analog pin In setup, we need to create a randomseed ( analogread( pin # ) ); In loop, we generate number by doing random (min#, max #);
29 Project 3: Night lamp Pseudo Code variables: int: pins and constants unsigned long timer boolean variable setup(): Set pinmode Serial Motor Random generator
30 Project 3: Night Lamp Pseudo Code loop(): Get the value from the checkbrightness() function If the brightness < threshold If led is on turn on led by calling function Update the Boolean variable Update the timer Else if it is time to change colour Turn the led on again by calling function Else Turn off the LED Update Boolean variable
31 Project 3: Functions Pseudo Code int getbrightness (): return the analog value from the photoresistor void turnledoff() analogwrite( pin #, 0 ); // to turn off the LEDs void turnledon() Generate random values analogwrite( pin #, randomvalue); // to set intensity of the LEDs
32 Switch Gears Let s now look at the servo motor on Diyode CodeShield This piece of hardware handles the wiring for us! Servo motor comes with encoders, which allows us to identify the position of the motor Include these lines before your setup() #define SERVO 5 #include <Servo.h>
33 For loops Used when you need to repeat something for a known number of times
34 Arduino: Servo Class 1. To control a servo using Arduino, we need to import the servo motor class: #include <Servo.h> 2. In our setup(), attach the servo pin to the Arduino myservo.attach(servo); //SERVO is the pin defined in the previous slide: #define SERVO 5 3. In loop(), to tell the motor to turn, use the function myservo.write(position); //position is an int variable, telling the motor how much to turn Stick a delay() function right after write()! delay(15); // in milliseconds
35 Project 4: Turn 180 then switch direction Using the servo class (myservo.attach(), myservo.write()), delay(), and for loop, write a program Turn the motor from 0 to 180 Once reached 180, turn the motor back to 0
36 Project 5: Servo Control - Potentiometer Potentiometer A variable resistor Resistance value changes based on the contact with the rotatable shaft E.g.: volume control, etc On the CodeShield #define POT 2 Potentiometer (POT)

37 Project 5: Map(variable, a, b, c, d); The values from the potentiometer exceeds the range of the servo motor Use map() to scale up/down the range between a-b to fit the range of c-d For our purpose: variable = input (i.e. the analog value from the potentiometer) a = min value from the potentiometer (0 A) b = max value from the potentiometer (1023 A) c = min value to be mapped to (0 for the servo) d = max value to be mapped to (e.g.: 180 )
38 Project 5: Servo Control Pseudo Code Before setup: Include the servo library Create a servo object Create an integer variable to store the input from the potentiometer setup(): Attach servo to the pin loop(): Read the analog input from the potentiometer; store it in the integer Map the input range to the range of the motor Write the position to the motor Delay()!!!
39 Bonus Want to create an Android Application communicate with Bluetooth check this out: Guide on How to Use App Inventor with Arduino App Inventor Want to create a Matlab program/gui using Arduino: Matlab: You want to get the hardware support package Simulink: Get this support package Interested about how the processing core works You want to check out: assembly languages (low-level programming language) Here is a neat tutorial on assembly language
40 Bonus Arduino Built-in Functions: Interested about how the processing core works You want to check out: assembly languages (low-level programming language) Here is a neat tutorial on assembly language
41 Bonus Python with Arduino For those that wanna see how micro-controllers can be used to communicate with the computer. Install Python 2 (in specific Python 2.7.3) On Windows: using Python in the command prompt: 1. Go to the Control panel in the start menu 2. Click on System Properties control 3. Go to Environment Variables 4. Select "Path", and then in the bottom section (Systems Variables) select "Edit" 5. At the end of the Variable Value without deleting any of the text already there, add the text: ";C:\Python27" Install PySerial PySerial allows access to serial ports and automatically selects the appropriate back-end. For information on PySerial is available here. For all OS, download the.tar.gz install package for PySerial 2.6 from This will give you a file called: pyserial-2.6.tar.gz Decompress the folder: Windows: Install 7zip to decompress the file. Mac or Linux: Open a Terminal session, and go to where you've downloaded pyserial-2.6.tar.gz and then issue the following command to unpack the installation folder.
42 Image References phpapp01/95/introduction-to-embedded-systems jpg?cb=
Lab 01 Arduino 程式設計實驗. Essential Arduino Programming and Digital Signal Process
 Lab 01 Arduino 程式設計實驗 Essential Arduino Programming and Digital Signal Process Arduino Arduino is an open-source electronics prototyping platform based on flexible, easy-to-use hardware and software. It's
Robotics/Electronics Review for the Final Exam
 Robotics/Electronics Review for the Final Exam Unit 1 Review. 1. The battery is 12V, R1 is 400 ohms, and the current through R1 is 20 ma. How many ohms is R2? ohms What is the voltage drop across R1? V
Note. The above image and many others are courtesy of - this is a wonderful resource for designing circuits.
 Robotics and Electronics Unit 2. Arduino Objectives. Students will understand the basic characteristics of an Arduino Uno microcontroller. understand the basic structure of an Arduino program. know how
Arduino Programming. Arduino UNO & Innoesys Educational Shield
 Arduino Programming Arduino UNO & Innoesys Educational Shield www.devobox.com Electronic Components & Prototyping Tools 79 Leandrou, 10443, Athens +30 210 51 55 513, info@devobox.com ARDUINO UNO... 3 INNOESYS
IME-100 ECE. Lab 3. Electrical and Computer Engineering Department Kettering University. G. Tewolde, IME100-ECE,
 IME-100 ECE Lab 3 Electrical and Computer Engineering Department Kettering University 3-1 1. Laboratory Computers Getting Started i. Log-in with User Name: Kettering Student (no password required) ii.
IME-100 Interdisciplinary Design and Manufacturing
 IME-100 Interdisciplinary Design and Manufacturing Introduction Arduino and Programming Topics: 1. Introduction to Microprocessors/Microcontrollers 2. Introduction to Arduino 3. Arduino Programming Basics
University of Portland EE 271 Electrical Circuits Laboratory. Experiment: Arduino
 University of Portland EE 271 Electrical Circuits Laboratory Experiment: Arduino I. Objective The objective of this experiment is to learn how to use the Arduino microcontroller to monitor switches and
Prototyping & Engineering Electronics Kits Basic Kit Guide
 Prototyping & Engineering Electronics Kits Basic Kit Guide odysseyboard.com Please refer to www.odysseyboard.com for a PDF updated version of this guide. Guide version 1.0, February, 2018. Copyright Odyssey
Serial.begin ( ); Serial.println( ); analogread ( ); map ( );
; Serial.println( ); analogread ( ); map ( );") Control and Serial.begin ( ); Serial.println( ); analogread ( ); map ( ); A system output can be changed through the use of knobs, motion, or environmental conditions. Many electronic systems in our world
Control and Serial.begin ( ); Serial.println( ); analogread ( ); map ( ); A system output can be changed through the use of knobs, motion, or environmental conditions. Many electronic systems in our world
University of Hull Department of Computer Science C4DI Interfacing with Arduinos
 Introduction Welcome to our Arduino hardware sessions. University of Hull Department of Computer Science C4DI Interfacing with Arduinos Vsn. 1.0 Rob Miles 2014 Please follow the instructions carefully.
EXPERIMENT 7 Please visit https://www.arduino.cc/en/reference/homepage to learn all features of arduino before you start the experiments
 EXPERIMENT 7 Please visit https://www.arduino.cc/en/reference/homepage to learn all features of arduino before you start the experiments TEMPERATURE MEASUREMENT AND CONTROL USING LM35 Purpose: To measure
Smart Objects. SAPIENZA Università di Roma, M.Sc. in Product Design Fabio Patrizi
 Smart Objects SAPIENZA Università di Roma, M.Sc. in Product Design Fabio Patrizi 1 What is a Smart Object? Essentially, an object that: Senses Thinks Acts 2 Example 1 https://www.youtube.com/watch?v=6bncjd8eke0
Arduino Programming and Interfacing
 Arduino Programming and Interfacing Stensat Group LLC, Copyright 2017 1 Robotic Arm Experimenters Kit 2 Legal Stuff Stensat Group LLC assumes no responsibility and/or liability for the use of the kit and
Procedure: Determine the polarity of the LED. Use the following image to help:
 Section 2: Lab Activity Section 2.1 Getting started: LED Blink Purpose: To understand how to upload a program to the Arduino and to understand the function of each line of code in a simple program. This
USER MANUAL ARDUINO I/O EXPANSION SHIELD
 USER MANUAL ARDUINO I/O EXPANSION SHIELD Description: Sometimes Arduino Uno users run short of pins because there s a lot of projects that requires more than 20 signal pins. The only option they are left
Lab 2.2 Ohm s Law and Introduction to Arduinos
 Lab 2.2 Ohm s Law and Introduction to Arduinos Objectives: Get experience using an Arduino Learn to use a multimeter to measure Potential units of volts (V) Current units of amps (A) Resistance units of
More Arduino Programming
 Introductory Medical Device Prototyping Arduino Part 2, http://saliterman.umn.edu/ Department of Biomedical Engineering, University of Minnesota More Arduino Programming Digital I/O (Read/Write) Analog
SPDM Level 2 Smart Electronics Unit, Level 2
 SPDM Level 2 Smart Electronics Unit, Level 2 Evidence Folder John Johns Form 3b RSA Tipton 1.1 describe the purpose of circuit components and symbols. The candidate can describe the purpose of a range
Arduino Part 2. Introductory Medical Device Prototyping
 Introductory Medical Device Prototyping Arduino Part 2, http://saliterman.umn.edu/ Department of Biomedical Engineering, University of Minnesota More Arduino Programming Digital I/O (Read/Write) Analog
Blinking an LED 1 PARTS: Circuit 2 LED. Wire. 330Ω Resistor
 Circuit PIN 3 RedBoard Blinking an LED LED (Light-Emitting Diode) Resistor (33 ohm) (Orange-Orange-Brown) LEDs (light-emitting diodes) are small, powerful lights that are used in many different applications.
FUNCTIONS For controlling the Arduino board and performing computations.
 d i g i t a l R e a d ( ) [Digital I/O] Reads the value from a specified digital pin, either HIGH or LOW. digitalread(pin) pin: the number of the digital pin you want to read HIGH or LOW Sets pin 13 to
cs281: Introduction to Computer Systems Lab03 K-Map Simplification for an LED-based Circuit Decimal Input LED Result LED3 LED2 LED1 LED3 LED2 1, 2
 cs28: Introduction to Computer Systems Lab3 K-Map Simplification for an LED-based Circuit Overview In this lab, we will build a more complex combinational circuit than the mux or sum bit of a full adder
Objectives: Learn how to input and output analogue values Be able to see what the Arduino is thinking by sending numbers to the screen
 Objectives: Learn how to input and output analogue values Be able to see what the Arduino is thinking by sending numbers to the screen By the end of this session: You will know how to write a program to
Halloween Pumpkinusing. Wednesday, October 17, 12
 Halloween Pumpkinusing Blink LED 1 What you will need: 1 MSP-EXP430G2 1 3 x 2 Breadboard 3 560 Ohm Resistors 3 LED s (in Red Color Range) 3 Male to female jumper wires 1 Double AA BatteryPack 2 AA Batteries
Arduino Prof. Dr. Magdy M. Abdelhameed
 Course Code: MDP 454, Course Name:, Second Semester 2014 Arduino What is Arduino? Microcontroller Platform Okay but what s a Microcontroller? Tiny, self-contained computers in an IC Often contain peripherals
Make your own secret locking mechanism to keep unwanted guests out of your space!
 KNOCK LOCK Make your own secret locking mechanism to keep unwanted guests out of your space! Discover : input with a piezo, writing your own functions Time : 1 hour Level : Builds on projects : 1,,3,4,5
IME-100 ECE. Lab 4. Electrical and Computer Engineering Department Kettering University. G. Tewolde, IME100-ECE,
 IME-100 ECE Lab 4 Electrical and Computer Engineering Department Kettering University 4-1 1. Laboratory Computers Getting Started i. Log-in with User Name: Kettering Student (no password required) ii.
Thursday, September 15, electronic components
 electronic components a desktop computer relatively complex inside: screen (CRT) disk drive backup battery power supply connectors for: keyboard printer n more! Thursday, September 15, 2011 integrated
Arduino Uno Microcontroller Overview
 Innovation Fellows Program Arduino Uno Microcontroller Overview, http://saliterman.umn.edu/ Department of Biomedical Engineering, University of Minnesota Arduino Uno Power & Interface Reset Button USB
Adapted from a lab originally written by Simon Hastings and Bill Ashmanskas
 Physics 364 Arduino Lab 1 Adapted from a lab originally written by Simon Hastings and Bill Ashmanskas Vithayathil/Kroll Introduction Last revised: 2014-11-12 This lab introduces you to an electronic development
StenBOT Robot Kit. Stensat Group LLC, Copyright 2018
 StenBOT Robot Kit 1 Stensat Group LLC, Copyright 2018 Legal Stuff Stensat Group LLC assumes no responsibility and/or liability for the use of the kit and documentation. There is a 90 day warranty for the
ARDUINO. By Kiran Tiwari BCT 2072 CoTS.
 ARDUINO By Kiran Tiwari BCT 2072 CoTS www.kirantiwari.com.np SO What is an Arduino? WELL!! Arduino is an open-source prototyping platform based on easy-to-use hardware and software. Why Arduino? Simplifies
Lab-3: LCDs Serial Communication Analog Inputs Temperature Measurement System
 Mechatronics Engineering and Automation Faculty of Engineering, Ain Shams University MCT-151, Spring 2015 Lab-3: LCDs Serial Communication Analog Inputs Temperature Measurement System Ahmed Okasha okasha1st@gmail.com
ROBOTLINKING THE POWER SUPPLY LEARNING KIT TUTORIAL
 ROBOTLINKING THE POWER SUPPLY LEARNING KIT TUTORIAL 1 Preface About RobotLinking RobotLinking is a technology company focused on 3D Printer, Raspberry Pi and Arduino open source community development.
EP486 Microcontroller Applications
 EP486 Microcontroller Applications Topic 6 Step & Servo Motors Joystick & Water Sensors Department of Engineering Physics University of Gaziantep Nov 2013 Sayfa 1 Step Motor http://en.wikipedia.org/wiki/stepper_motor
KNOCK LOCK MAKE YOUR OWN SECRET LOCKING MECHANISM TO KEEP UNWANTED GUESTS OUT OF YOUR SPACE! Discover: input with a piezo, writing your own functions
 125 KNOCK LOCK MAKE YOUR OWN SECRET LOCKING MECHANISM TO KEEP UNWANTED GUESTS OUT OF YOUR SPACE! Discover: input with a piezo, writing your own functions Time: 1 HOUR Level: Builds on projects: 1, 2, 3,
How to Use an Arduino
 How to Use an Arduino By Vivian Law Introduction The first microcontroller, TMS-1802-NC, was built in 1971 by Texas Instruments. It owed its existence to the innovation and versatility of silicon and the
Introduction to Internet of Things Prof. Sudip Misra Department of Computer Science & Engineering Indian Institute of Technology, Kharagpur
 Introduction to Internet of Things Prof. Sudip Misra Department of Computer Science & Engineering Indian Institute of Technology, Kharagpur Lecture - 23 Introduction to Arduino- II Hi. Now, we will continue
MAE106 Laboratory Exercises Lab # 1 - Laboratory tools
 MAE106 Laboratory Exercises Lab # 1 - Laboratory tools University of California, Irvine Department of Mechanical and Aerospace Engineering Goals To learn how to use the oscilloscope, function generator,
Arduino 05: Digital I/O. Jeffrey A. Meunier University of Connecticut
 Arduino 05: Digital I/O Jeffrey A. Meunier jeffm@engr.uconn.edu University of Connecticut About: How to use this document I designed this tutorial to be tall and narrow so that you can read it on one side
Lesson 8: Digital Input, If Else
 Lesson 8 Lesson 8: Digital Input, If Else Digital Input, If Else The Big Idea: This lesson adds the ability of an Arduino sketch to respond to its environment, taking different actions for different situations.
keyestudio Keyestudio MEGA 2560 R3 Board
 Keyestudio MEGA 2560 R3 Board Introduction: Keyestudio Mega 2560 R3 is a microcontroller board based on the ATMEGA2560-16AU, fully compatible with ARDUINO MEGA 2560 REV3. It has 54 digital input/output
1/Build a Mintronics: MintDuino
 1/Build a Mintronics: The is perfect for anyone interested in learning (or teaching) the fundamentals of how micro controllers work. It will have you building your own micro controller from scratch on
Specification. 1.Power Supply direct from Microcontroller Board. 2.The circuit can be used with Microcontroller Board such as Arduino UNO R3.
 Part Number : Product Name : FK-FA1410 12-LED AND 3-BOTTON SHIELD This is the experimental board for receiving and transmitting data from the port of microcontroller. The function of FK-FA1401 is fundamental
RedBoard Hookup Guide
 Page 1 of 11 RedBoard Hookup Guide CONTRIBUTORS: JIMB0 Introduction The Redboard is an Arduino-compatible development platform that enables quick-and-easy project prototyping. It can interact with real-world
INTRODUCTION HARDWARE
 Project Kit Table of Contents INTRODUCTION... 3 HARDWARE... 3 Hardware built-in micro:bit:... 3 Hardware included in this kit:... 4 CODE... 5 Pseudo Code:... 5 Coding Tools:... 5 Running Programs:... 8
Introduction to Arduino
 Introduction to Arduino Paco Abad May 20 th, 2011 WGM #21 Outline What is Arduino? Where to start Types Shields Alternatives Know your board Installing and using the IDE Digital output Serial communication
Analog Input. Sure sure, but how to make a varying voltage? With a potentiometer. Or just pot.
 Analog Input Sure sure, but how to make a varying voltage? With a potentiometer. Or just pot. +5V measure gnd Color coding: red goes to power, blue to ground, purple to measure here (it s a mix, see?)
Introduction to Arduino Diagrams & Code Brown County Library
 Introduction to Arduino Diagrams & Code Project 01: Blinking LED Components needed: Arduino Uno board LED Put long lead into pin 13 // Project 01: Blinking LED int LED = 13; // LED connected to digital
Intro to Arduino. Zero to Prototyping in a Flash! Material designed by Linz Craig and Brian Huang
 Intro to Arduino Zero to Prototyping in a Flash! Material designed by Linz Craig and Brian Huang Overview of Class Getting Started: Installation, Applications and Materials Electrical: Components, Ohm's
Introduction to Arduino Diagrams & Code Brown County Library
 Introduction to Arduino Diagrams & Code Project 01: Blinking LED Components needed: Arduino Uno board LED Put long lead into pin 13 // Project 01: Blinking LED int LED = 13; // LED connected to digital
The Arduino Briefing. The Arduino Briefing
 Mr. Yee Choon Seng Email : csyee@simtech.a-star.edu.sg Design Project resources http://guppy.mpe.nus.edu.sg/me3design.html One-Stop robotics shop A-Main Objectives Pte Ltd, Block 1 Rochor Road, #02-608,
The DTMF generator comprises 3 main components.
 Make a DTMF generator with an Arduino board This article is for absolute beginners, and describes the design and construction of a DTMF generator. DTMF generators are often used to signal with equipment
Digital Pins and Constants
 Lesson Lesson : Digital Pins and Constants Digital Pins and Constants The Big Idea: This lesson is the first step toward learning to connect the Arduino to its surrounding world. You will connect lights
Introduction to Microcontrollers Using Arduino. PhilRobotics
 Introduction to Microcontrollers Using Arduino PhilRobotics Objectives Know what is a microcontroller Learn the capabilities of a microcontroller Understand how microcontroller execute instructions Objectives
Arduino 6: Analog I/O part 1. Jeffrey A. Meunier University of Connecticut
 Arduino 6: Analog I/O part 1 Jeffrey A. Meunier jeffm@engr.uconn.edu University of Connecticut About: How to use this document I designed this tutorial to be tall and narrow so that you can read it on
This is the Arduino Uno: This is the Arduino motor shield: Digital pins (0-13) Ground Rail
 Ground Rail") Reacting to Sensors In this tutorial we will be going over how to program the Arduino to react to sensors. By the end of this workshop you will have an understanding of how to use sensors with the Arduino
Reacting to Sensors In this tutorial we will be going over how to program the Arduino to react to sensors. By the end of this workshop you will have an understanding of how to use sensors with the Arduino
Electronic Brick Starter Kit
 Electronic Brick Starter Kit Getting Started Guide v1.0 by Introduction Hello and thank you for purchasing the Electronic Brick Starter Pack from Little Bird Electronics. We hope that you will find learning
Clark College Electrical Engineering & Computer Science
 Clark College Electrical Engineering & Computer Science slide # 1 http://www.engrcs.com/ecsv5.pdf Electrical Engineering & Computer Science Artificial Intelligent (AI) Bio Medical Computers & Digital Systems
EEG 101L INTRODUCTION TO ENGINEERING EXPERIENCE
 EEG 101L INTRODUCTION TO ENGINEERING EXPERIENCE LABORATORY 1: INTRODUCTION TO ARDUINO IDE AND PROGRAMMING DEPARTMENT OF ELECTRICAL AND COMPUTER ENGINEERING UNIVERSITY OF NEVADA, LAS VEGAS 1. FYS KIT COMPONENTS
Introduction To Arduino
 Introduction To Arduino What is Arduino? Hardware Boards / microcontrollers Shields Software Arduino IDE Simplified C Community Tutorials Forums Sample projects Arduino Uno Power: 5v (7-12v input) Digital
BASIC ARDUINO WORKSHOP. Mr. Aldwin and Mr. Bernardo
 BASIC ARDUINO WORKSHOP Mr. Aldwin and Mr. Bernardo 1 BASIC ARDUINO WORKSHOP Course Goals Introduce Arduino Hardware and Understand Input Software and Output Create simple project 2 Arduino Open-source
Robotics and Electronics Unit 5
 Robotics and Electronics Unit 5 Objectives. Students will work with mechanical push buttons understand the shortcomings of the delay function and how to use the millis function. In this unit we will use
Arduino Programming Part 4: Flow Control
 Arduino Programming Part 4: Flow Control EAS 199B, Winter 2010 Gerald Recktenwald Portland State University gerry@me.pdx.edu Goal Make choices based on conditions in the environment Logical expressions:
Schedule. Sanford Bernhardt, Sangster, Kumfer, Michalaka. 3:10-5:00 Workshop: Build a speedometer 5:15-7:30 Dinner and Symposium: Group 2
 Schedule 8:00-11:00 Workshop: Arduino Fundamentals 11:00-12:00 Workshop: Build a follower robot 1:30-3:00 Symposium: Group 1 Sanford Bernhardt, Sangster, Kumfer, Michalaka 3:10-5:00 Workshop: Build a speedometer
AndyMark Arduino Tutorial
 AndyMark Arduino Tutorial Tank Drive June 2014 Required: Required Software List: - Kit Arduino IDE - Robot Power Cable Kit (am-0975) RobotOpen Arduino Shield Software - Battery Base Package (am-0477) RobotOpen
Arduino - DigitalReadSerial
 arduino.cc Arduino - DigitalReadSerial 5-6 minutes Digital Read Serial This example shows you how to monitor the state of a switch by establishing serial communication between your Arduino or Genuino and
CARTOOINO Projects Book
 1 CARTOOINO Projects Book Acknowledgement Acknowledgement This Cartooino Projects Book is a cartoon based adaptation of the Arduino Projects Book. The Cartooino Project Book was developed by the GreenLab
PDF of this portion of workshop notes:
 PDF of this portion of workshop notes: http://goo.gl/jfpeym Teaching Engineering Design with Student-Owned Digital and Analog Lab Equipment John B. Schneider Washington State University June 15, 2015 Overview
Light Sensor. Overview. Features
 1 Light Sensor Overview What is an electronic brick? An electronic brick is an electronic module which can be assembled like Lego bricks simply by plugging in and pulling out. Compared to traditional universal
Laboratory 1 Introduction to the Arduino boards
 Laboratory 1 Introduction to the Arduino boards The set of Arduino development tools include µc (microcontroller) boards, accessories (peripheral modules, components etc.) and open source software tools
Button Input: On/off state change
 Button Input: On/off state change Living with the Lab Gerald Recktenwald Portland State University gerry@pdx.edu User input features of the fan Potentiometer for speed control Continually variable input
Laboratory of Sensors Engineering Sciences 9 CFU
 Laboratory of Sensors Engineering Sciences 9 CFU Contacts Alexandro Catini catini@ing.uniroma2.it Phone: +39 06 7259 7347 Department of Electronic Engineering First Floor - Room B1-07b Course Outline THEORY
3. The circuit is composed of 1 set of Relay circuit.
 Part Number : Product Name : FK-FA1420 ONE CHANNEL 12V RELAY MODULE This is the experimental module for a relay controller as the fundamental controlling programming. It is adaptable or is able to upgrade
9 Output Devices: Buzzers
 9 Output Devices: Buzzers Project In this project, you will learn how to connect and control LEDs (Light Emitting Diode) and a buzzer with the Raspberry Pi. Components In addition to your Raspberry Pi,
Physical Programming with Arduino
 CTA - 2014 Physical Programming with Arduino Some sample projects Arduino Uno - Arduino Leonardo look-alike The Board Arduino Uno and its cheap cousin from Borderless Electronics Mini - Breadboard typical
ArdOS The Arduino Operating System Quick Start Guide and Examples
 ArdOS The Arduino Operating System Quick Start Guide and Examples Contents 1. Introduction... 1 2. Obtaining ArdOS... 2 3. Installing ArdOS... 2 a. Arduino IDE Versions 1.0.4 and Prior... 2 b. Arduino
Arduino Uno. Arduino Uno R3 Front. Arduino Uno R2 Front
 Arduino Uno Arduino Uno R3 Front Arduino Uno R2 Front Arduino Uno SMD Arduino Uno R3 Back Arduino Uno Front Arduino Uno Back Overview The Arduino Uno is a microcontroller board based on the ATmega328 (datasheet).
Arduino Uno. Power & Interface. Arduino Part 1. Introductory Medical Device Prototyping. Digital I/O Pins. Reset Button. USB Interface.
 Introductory Medical Device Prototyping Arduino Part 1, http://saliterman.umn.edu/ Department of Biomedical Engineering, University of Minnesota Arduino Uno Power & Interface Reset Button USB Interface
Photoresistor, Transistor, and LED s
 PH-1 Photoresistor, Transistor, and LD s Purpose: To introduce photoresistors, LD s, FT s, and transistors used as power switching devices To become familiar with the capability of the Atmega 128 to measure
Arduino Lesson 15. DC Motor Reversing
 Arduino Lesson 15. DC Motor Reversing Created by Simon Monk Last updated on 2017-03-09 04:04:43 PM UTC Guide Contents Guide Contents Overview Parts Part Qty An Experiment In1 In2 Motor Breadboard Layout
SX1509 I/O Expander Breakout Hookup Guide
 Page 1 of 16 SX1509 I/O Expander Breakout Hookup Guide Introduction Is your Arduino running low on GPIO? Looking to control the brightness of 16 LEDs individually? Maybe blink or breathe a few autonomously?
Counter & LED (LED Blink)
") 1 T.R.E. Meeting #1 Counter & LED (LED Blink) September 17, 2017 Contact Info for Today s Lesson: President Ryan Muller mullerr@vt.edu 610-573-1890 Learning Objectives: Learn how to use the basics of Arduino
1 T.R.E. Meeting #1 Counter & LED (LED Blink) September 17, 2017 Contact Info for Today s Lesson: President Ryan Muller mullerr@vt.edu 610-573-1890 Learning Objectives: Learn how to use the basics of Arduino
Designed & Developed By: Ms. Jasleen Kaur, PhD Scholar, CSE. Computer Science & Engineering Department
 Design & Development of IOT application using Intel based Galileo Gen2 board A Practical Approach (Experimental Manual For B.Tech & M.Tech Students) For SoC and Embedded systems in association with Intel
Sensors and Motor Control Lab
 Sensors and Motor Control Lab Individual lab report #1 October 16, 2015 Menghan Zhang TeamA Amit Agarwal Harry Golash Yihao Qian Zihao Zhang Individual progress Challenges Teamwork a) Used potentiometer
Arduino Programming Part 3. EAS 199A Fall 2010
 Arduino Programming Part 3 EAS 199A Fall 2010 Overview Part I Circuits and code to control the speed of a small DC motor. Use potentiometer for dynamic user input. Use PWM output from Arduino to control
Building your own special-purpose embedded system gadget.
 Bare-duino Building your own special-purpose embedded system gadget. Saves a little money. You can configure the hardware exactly the way that you want. Plus, it s fun! bare-duino 1 Arduino Uno reset I/O
Welcome to Apollo. For more information, please visit the website and select Apollo. Default Code
 Welcome to Apollo For more information, please visit the website and select Apollo Arduino Pins Default Code D49 LED Digital Pins digitalwrite digitalread pinmode Analog Pins analogread digitalread D33
Arduino and Matlab for prototyping and manufacturing
 Arduino and Matlab for prototyping and manufacturing Enrique Chacón Tanarro 11th - 15th December 2017 UBORA First Design School - Nairobi Enrique Chacón Tanarro e.chacon@upm.es Index 1. Arduino 2. Arduino
ARDUINO UNO REV3 Code: A000066
 ARDUINO UNO REV3 Code: A000066 The UNO is the best board to get started with electronics and coding. If this is your first experience tinkering with the platform, the UNO is the most robust board you can
Create moving images in forward and reverse with your Arduino when you connect a motor to an H-bridge and some still images BATTERY POTENTIOMETER
 ZOETROPE Create moving images in forward and reverse with your Arduino when you connect a motor to an H-bridge and some still images Discover : H-bridges Time : 30 minutes Level : Builds on projects :
TANGIBLE MEDIA & PHYSICAL COMPUTING MORE ARDUINO
 TANGIBLE MEDIA & PHYSICAL COMPUTING MORE ARDUINO AGENDA RECAP ALGORITHMIC APPROACHES TIMERS RECAP: LAST WEEK WE DID: ARDUINO IDE INTRO MAKE SURE BOARD AND USB PORT SELECTED UPLOAD PROCESS COVERED DATATYPES
Microcontrollers and Interfacing week 8 exercises
 2 HARDWARE DEBOUNCING Microcontrollers and Interfacing week 8 exercises 1 More digital input When using a switch for digital input we always need a pull-up resistor. For convenience, the microcontroller
User Guide v1.0. v1.0 Oct 1, This guide is only available in English Ce manuel est seulement disponible en Anglais
 ROVER ShiELD User Guide v1.0 v1.0 Oct 1, 2014 This guide is only available in English Ce manuel est seulement disponible en Anglais Description The DFRobotShop Rover Shield is the ideal all in one shield
Physical Computing Tutorials
 Physical Computing Tutorials How to install libraries Powering an Arduino Using an MPR121 capacitive touch sensor Using a Sparkfun MP3 Trigger Controlling an actuator with TinkerKit Mosfet Making sounds
Arduino ADK Rev.3 Board A000069
 Arduino ADK Rev.3 Board A000069 Overview The Arduino ADK is a microcontroller board based on the ATmega2560 (datasheet). It has a USB host interface to connect with Android based phones, based on the MAX3421e
Digital Design through. Arduino
 Digital Design through 1 Arduino G V V Sharma Contents 1 Display Control through Hardware 2 1.1 Powering the Display.................................. 2 1.2 Controlling the Display.................................
Adafruit Metro Mini. Created by lady ada. Last updated on :12:28 PM UTC
 Adafruit Metro Mini Created by lady ada Last updated on 2018-01-24 08:12:28 PM UTC Guide Contents Guide Contents Overview Pinouts USB & Serial converter Microcontroller & Crystal LEDs Power Pins & Regulators
Gooligum Electronics 2015
 The Wombat Prototyping Board for Raspberry Pi Operation and Software Guide This prototyping board is intended to make it easy to experiment and try out ideas for building electronic devices that connect
VKey Voltage Keypad Hookup Guide
 Page 1 of 8 VKey Voltage Keypad Hookup Guide Introduction If you need to add a keypad to your microcontroller project, but don t want to use up a lot of I/O pins to interface with it, the VKey is the solution