Fluid Head Specifications... 1 Parts(GH03)... 2 Set up & Use Installing the Pan Handle... 8
|
|
|
- Agnes Hoover
- 5 years ago
- Views:
Transcription

1 User s Manual
2
3 PR LU Thank you for purchasing -M professional heads and tripods. This manual is an important tool for personnel who operate and maintain this equipment. nside, you will find detailed information about -M tripods and heads, and their proper use. We highly recommend you read the manual carefully and familiarize yourself with each section. There is also a section about safety and maintenance to help you keep your equipment in perfect condition and extend its life. Please keep this manual for reference while operating and maintaining your equipment. The -M NTN Series is an upgraded generation of -mage fluid heads with international influences, innovative designs, and more advanced functions. We refined the counterbalance and drag systems, making balancing faster and simpler. This new series can handle a wider payload range, from 8.8 to 55 pounds, and works with many different styles of camera. Pan handles with rubber grips are included for precise camera movements and are extendable in some models. ach head also has an installed bubble level, and advanced heads have an L light installed for making adjustments in the dark.
4 ONTNTS ONTNTS luid ead Specifications Parts(03)... 2 Set up & Use nstalling the Pan andle Removing the Quick Release Plate djusting Tilt Position djusting Pan Position rag djustment for Pan and Tilt Mounting the amera xtra functions of the P1 Quick Release Plate... 6 Parts(06-25)...7 Set Up & Use(06-25) nstalling the Pan andle Mounting to a Tripod Removing the Quick Release Plate Mounting a amcorder Mounting a amera djusting the ounterbalance Settings djusting the Tilt rag djusting the Pan rag hanging the atteries (08/08L/10/10L ) hanging the atteries (15,25).. 14 Tripod Specifications Parts(T7402)...17 Use T Releasing and Locking the Legs djusting Tripod eight nti-Slip Rubber eet olding the Tripod for Storage Parts(/101)...20 Parts(/102)...21 Parts(/751 /752) Use(/751 /752 /101 /102) Releasing and Locking the Legs djusting the Mid-Level Spreader djusting the round Spreader Removing the Mid-Level Spreader nstalling and Removing a round Spreader olding the Tripod for Storage Maintenance...25 Notices & Warnings... 26
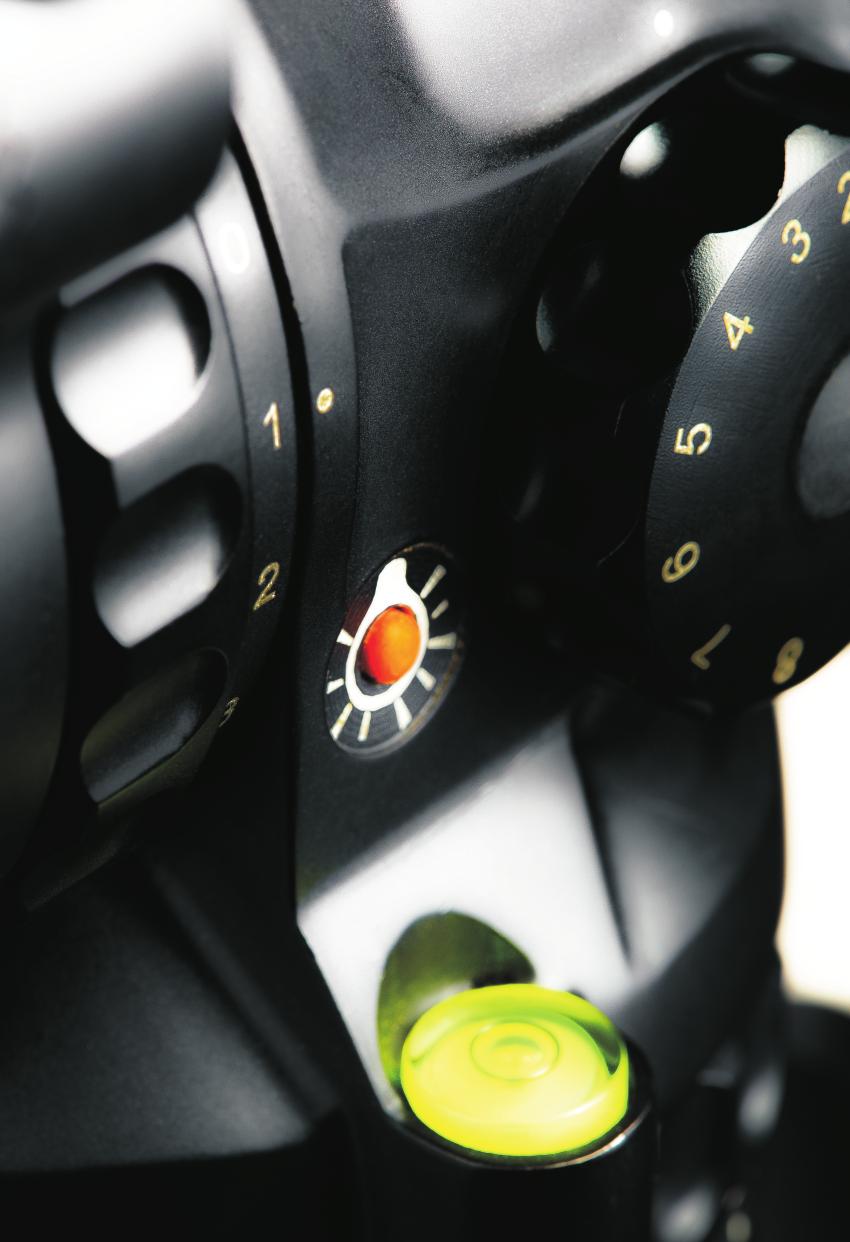
5 SPTONS PRTS(03) Model No. owl size Net weight Load capacity ead No. luid ead rades of drag -M No. ounterbalance Tilt range Temperature range 01 65mm 1.3kg 5kg ixed ixed +80 ~ ~ mm 1kg 4kg Variable (Tilt) ixed +90 ~ ~ mm 1.7kg 3-8kg ixed ~ ~ mm 1.6kg 6kg ~ ~80 K 08 75mm 1.7kg 8kg ixed ~ ~ mm 1.9kg 10kg ~ ~80 10L 100mm 2kg 10kg ~ ~ mm 3.7kg 15kg ~ ~ mm 3.8kg 20kg ixed ~ ~ mm 4kg 25kg ~ ~80 K Quick elease late Quick Release Plate Release utton Pan andle Locking Thumb Screw Pan andle Pan andle Mounting Rosette Tilt Locking Knob Tilt rag djustment Knob owl Locking Knob 1 2
6 ST UP & US (03) 1.nstall Pan andle Place the pan handle in the desired position on the pan handle mounting rosette, then secure it by tightening pan handle ing thumb screw. 3.djusting Tilt Position Loosen the tilt ing knob to change tilt position. Tighten the knob to the tilt position. 4.djusting Pan Position Loosen the pan ing knob to change the pan position. Tighten the knob to the pan position. 2. Removing the Quick Release Plate Loosen the quick release plate ing knob, then press the quick release plate release button while sliding the plate towards the back of the head. 5.Tilt rag djustment ncrease tilt drag by turning the tilt drag adjustment knob cwise (as if tightening a screw). Reduce the tilt drag by turning the knob counter-cwise (as if ning a screw). ncrease Reduce 3 4
7 MOUNTN T MR XTR UNTONS O 03,06 PLT 6. To mount a camera or camcorder, remove the quick release plate from the tripod head. ttach the plate to the camera using the included ¼ -20 or 3/6-16 screw. Take care not to over-tighten the screw. Q 8.xtra unctions of 03, 06 plate The 03 and 06 fluid heads have a special clip that allows the P1 quick release plate to be pressed down into place. Press one side of the plate against the normal side of the quick release plate track, then press the other side down against the spring clip until the clip clicks, and the plate is secured in place. 7. With the pan and tilt ed on the head, slide the camera plate onto the head, moving from the back to the front of the head, until the ing button clicks. alance the camera by placing the camera s center of gravity as close to the center of the head as possible, then tighten quick release plate. 5 6
8 PRTS(06~25) ST UP & US(06-25) 1. nstalling Pan andle Place the pan handle in the desired position on the rosette M and tighten the ing thumb screw, making sure the ing washer T is in place between the handle and rosette. Loosen the length adjustment knob on the pan handle to adjust the length of the handle. Length adjustment is only available on 2 and 3 pan handles. M K 2. nstalling the luid ead on a Tripod djust the tripod to the desired height, and place the ball of the head into the bowl of the tripod. Level the head using the bubble level R, and secure the bowl ing knob onto the bottom of the head on the underside of the tripod bowl. Q S M N R L T K L M N Q R S T Pan andle Pan andle Length djustment Knob Pan andle Locking Thumb Screw Quick Release Plate amera Locking Screw Quick Release Plate Locking Knob owl Locking Knob Quick Release Plate Release utton Tilt Locking Knob ounterbalance djustment ial Tilt rag djustment ial Pan Locking Knob Pan rag djustment ial Pan andle Mounting Rosette ubble Level L Power utton Quick Release Plate ubble Level Rubber Washer Pan andle Locking Washer 3. Removing the Quick Release Plate Loosen ing knob and hold the release button while sliding the plate toward the rear of the head. 7 8
9 MOUTN T MORR V PTR 4.Mounting a Large amera with the PS- VT-14 dapter 4.1 ttach the quick release plate to the bottom of the VT-14 mounting adapter (part no. PS-) using the ¼ -20 or 3/8-16 screws included with the head. Take care not to over-tighten the screws when mounting the plate. MOUNTN T MR 5.Mounting the amera to the Quick Release Plate 5.1 ttach the quick release plate to the bottom of the camera using the included ¼ -20 or 3/8-16 screws. Take care not to over-tighten the screw when mounting the camera. Q 4.2 Slide the quick release plate onto the tripod head. The plate release button will click when it is in place. 5.2 Make sure the head s pan and tilt axis are ed, then slide the quick release plate onto the head, moving from the rear to the front. The plate release button will click when the plate is in place. Slide the plate along the track until you find the center of balance, then the plate in place with the ing knob. 4.3 Make sure the head s pan and tilt axis are ed, and attach the camera s VT-14 wedge to the PS- adapter. t will click when it is ed in place. Loosen the quick release plate and adjust the position of the camera to find the desired center of balance. 9 10
10 USTN OUNTRLN & R USTN PN R 6.djusting ounterbalance Settings Loosen the tilt ing knob and hold the head steady with the pan handle. Turn the counterbalance dial to a setting that allows the camera to remain in position without operator assistance. Lower numbers mean less tension; higher numbers use more tension to balance loads. 8. djusting Pan rag Loosen the pan ing knob K. Use the pan drag adjustment dial L to set the desired amount of pan drag. Lower numbers give less drag; higher numbers offer more resistance. 7. djusting Tilt rag Loosen the tilt ing knob. Turn the tilt drag adjustment dial to the desired setting. Lower numbers give less resistance; higher numbers offer more resistance. L 11 12
11 N TTRY O LLUMNT LVLN UL (08 08L 10 10L) 9.hanging the attery on the ubble Level L Light (08, 08L,10,10L) 9.1 Test the light by pressing button N to turn it on. f the light turns on, the batteries are still good. The light will turn itself off automatically after 25 seconds. N TTRY O LLUMNT LVLN UL (15 25) 10. hanging atteries (15,25) 10.1 heck the battery using the L activation button N N 9.2 To change the batteries, begin by reducing tilt drag and counterbalance to their lowest settings and make sure the tilt axis is uned. Tilt the head all the way back to expose the battery compartment, and the head in place with the compartment exposed f the battery must be changed, reduce tilt drag and counterbalance to their lowest settings and un the tilt axis. Tilt the head all the way back to expose the battery chamber, and the tilt axis. 9.3 Remove the battery compartment cover with a flat head screwdriver to access the battery chamber. The 08, 08L, 10, and 10L heads use 2x LR41 button batteries. Once the batteries are replaced screw on the battery cover and carefully release the tilt to return the head to its normal position Use a Phillips head screwdriver to remove the battery cover. The 15 and 25 heads use style batteries. Replace the old batteries with two new ones, and re-install the battery cover. arefully un the tilt axis to restore the head to its normal position
12 TRPOS SPTONS Section owl Size Material -M No. The -M NTN series is a new generation of -M tripods. These tripod legs are all made of high-grade aluminum or carbon fiber materials. The newly designed system and patented ing mechanisms provide smooth, quick, and secure ing and uning. quipped with standard 65mm, 75mm, and 100mm bowl systems, -M legs will work with any standard video heads. ach tripod can be fitted with mid-level and/or ground spreaders for added stability, or paired with an assortment of dollies for mobility. These tripods are compact when closed, and easy to transport with an assortment of available Model No. T mm Two stage mm 695mm 3.3kg 40kg luminum Single stage mm mm 820mm 2.9kg 40kg luminum Single stage mm mm 820mm 2.6kg 40kg carbon fiber mm Two stage mm 720mm 3.5kg 40kg luminum Two stage mm mm 720mm 3.2kg 40kg carbon fiber Single stage mm mm 845mm 4.4kg 60kg luminum 101 owl Size 100mm escrition Single stage carbon fiber eight Range Transport length Weight Payload mm 845mm 3.7kg 60kg mm Two stage mm 730mm 4.9kg 60kg luminum Two stage mm mm 730mm 4.4kg 60kg carbon fiber carrying cases
13 PRTS(T7402) US T7402 owl ase Leg Tube Locking Knob Retractable asy ook Mid-Level spreader Spiked Tripod oot nti-slip Rubber Pad (Part no. 3) Rubber oot Securing Tab 1.Lock and Un Leg Stages To Loosen: Turn counter-cwise To Lock: Turn cwise Special Note: t is a best practice to un, adjust, and re- the tripod legs before the legs are unfolded. 2.djusting Tripod eight Loosen the ing knobs on the leg or legs needing adjustment, set them to the desired height, then re- the leg stages. 3. nti-slip Rubber eet To remove the rubber feet, pull the foot-securing tab up and over the lip of the foot, then lift the foot off of the tab. Special Note: The spiked foot is used for shooting outdoors
14 US T7402 PRTS(101/101) 4. olding Tripod a: Loosen the ing knobs for all extended leg stages and reduce them to their minimum length, then re- all of the knobs owl ase Leg Tube Patented Leg Lock (Mono-Lock) for Leg Stages Retractable asy ook round Spreader Locking Knob round Spreader Pull Ring round Spreader Spiked Tripod oot nti-slip Rubber oot Rubber oot Securing Tab b: olding the tripod by the bowl, lift up on the center of the mid-level spreader and fold the legs together. Pull out the retractable easy hook, wrap it around the legs, and secure the hook to a leg tube to secure the legs
15 PRTS(102/102) PRTS(/751 /752) owl ase Leg Tube Patented Leg Lock (Mono-Lock) for Leg Stages Retractable asy ook round Spreader Locking Knob round Spreader Pull Ring round Spreader Spiked Tripod oot nti-slip Rubber oot Rubber oot Securing Tab K owl ase Leg Tube Patented Leg Lock (Mono-Lock) for Leg Stages Retractable asy ook Mid-Level Spreader Locking Knob Mid-Level Spreader Pull Ring Mid-Level Spreader Spiked Tripod oot nti-slip Rubber oots Rubber oot Securing Tab Mid-Level Spreader Removal Pin K 21 22
16 US(/751 /752 /101 /102) 1.Loosening and Locking Tripod Legs To Loosen: Turn ing knob counter-cwise To Tighten: Turn ing knob cwise US(/751 /752 /101 /102) 4. To remove the mid-level spreader, remove the retaining pin K located where the spreader attaches to the leg. K Special Note: t is a best practice to un, adjust, and re- the tripod legs before the legs are unfolded. 2.djusting the Mid-Level Spreader To make adjustments to the mid-level spreader, n the ing knob and reposition the leg attached to that section of the spreader. When the adjustment is made, tighten the knob to re-secure the spreader. 3.djusting the round Spreader To make adjustments to the ground spreader, n the ing knob and reposition the leg attached to that section of the spreader. When the adjustment is made, tighten the knob to re-secure the spreader. 5. nstalling a round Spreader To install the ground spreader, remove the rubber tripod feet using the pull-tab, placed the spiked tripod feet on the ground spreader, and secure them with the rubber tab on the spreader. 6. olding the Tripod a. Loosen the leg s and collapse each leg to its minimum length, then the knobs. b. Un and reduce the all attached spreaders to their minimum size. c. Securing the tripod by the bowl, pull up on the spreader pull ring and fold the legs, then pull out the easy hook and wrap it around the legs, securing the hook to a leg tube
17 Maintenance Notice & Warning lways engage safety devices like s and easy hooks when applicable. aily maintenance: Storage and Transport: When head is not in use, n all s and reduce drag and counterbalance to minimum settings. When tripod is not in use, do not store it vertically to avoid it falling and being broken. When tripod is not in use or is being transported, keep it safe in the carrying bag. nspection of unctions: heck the recommended payload and verify s are functional before mounting anything on a tripod or head to avoid accidental damage. To prolong the life of a tripod and head, check and adjust s, dials, and hardware on a regular basis. o not use -M tripods and fluid heads at temperatures less than -30 or more than 60. lean with a mild detergent and soft cloth, a semi-stiff brush, or a vacuum. heck for dust, sand, and other debris in all moving parts. ry after use in wet conditions. mportant: Products in this manual are not recommended for use in seawater. f you have any questions during use, consult this manual or contact your local distributor for the fastest service. n the event that an -M product proves defective, contact the nearest authorized -M service agent or distributor leaning & Storage: Use a lint-free cloth to clean tripods, heads, and their individual components. Keep the tripod and head in a carrying case when they are not in use. Use a semi-stiff brush to remove debris and grime that cannot be easily wiped away
18
AVT Model Tripod.
 AVT Model Tripod www.ravelliphoto.com Product Overview: The Ravelli AVT professional tripod is a high performance, fluid drag tripod that provides smooth continuous drag control and operates on both pan
Product Overview. Features
 APCF1 Model Tripod Product Overview The Ravelli APCF1 is a Professional Quality Carbon Fiber Tripod providing a solid base for high-end photographic equipment. This model is a mix of carbon fiber and magnesium
Operators Guide. Pozi-Loc Tripods. Vinten Camera Control Solutions
 Operators Guide Pozi-Loc Tripods Vinten Camera Control Solutions Vision Pozi-Loc Tripods Publication Part No. 3770-8 Issue 3 Copyright Vinten Broadcast Limited 2005 All rights reserved throughout the world.
Features and Controls
 Fluid Head OPERATOR S MANUAL 1090 Compassx 2 Fluid Head 1092 Compassx 6 Fluid Head 1093 Compassx 8 Fluid Head 1096 Compassx 10 Fluid Head 1098 Compassx 18 Fluid Head Features and Controls Spare Camera
Operators Guide. Vision 8 Pan & Tilt Head. Vinten Camera Control Solutions
 Operators Guide Vision 8 Pan & Tilt Head Vinten Camera Control Solutions Vision 8 Pan and Tilt Head Publication Part No. 3441-8 Issue 4 Copyright Vinten Broadcast Limited 2004 All rights reserved throughout
skyline 70 Fluid Head OPERATOR S MANUAL #1050 Skyline 70 Fluid Head
 skyline 70 Fluid Head OPERATOR S MANUAL #1050 Skyline 70 Fluid Head Features and Controls Sliding Plate Lock Sliding Plate Pan Handle Clamp Tilt Lock Pan Handle Safety Lock Knob Pan Lock Threaded Stud
Operators Guide. Vision 11 Pan & Tilt Head. Vinten Camera Control Solutions
 Operators Guide Vision 11 Pan & Tilt Head Vinten Camera Control Solutions Vision 11 Pan and Tilt Head Publication Part No. 3442-8 Issue 1 Copyright Vinten Broadcast Limited 2001 All rights reserved throughout
Operators Guide. Vision 100 Pan & Tilt Head. Vinten Camera Control Solutions
 Operators Guide Vision 100 Pan & Tilt Head Vinten Camera Control Solutions Vision 100 Pan and Tilt Head Publication Part No. 3431-8 Issue 3 Copyright Vinten Broadcast Limited 2004 All rights reserved throughout
Tripod System. With fluid Head USER S GUIDE
 Tripod System With fluid Head USER S GUIDE ATTENTION To ensure the best performance of your EVO PRO Fluid Head, each time you set it up, dial back the Pan and Tilt Drag knobs to their lowest resistance
CTT Section Carbon-Fiber Tabletop Tripod. You re on steady ground 1
 CTT-1000 3-Section Carbon-Fiber Tabletop Tripod You re on steady ground 1 INTRODUCTION Thank you for choosing Oben! The Oben CTT tripod is a sturdy and high-quality carbon-fiber tabletop tripod that provides
3001 SYSTEM AIR 3005 SYSTEM AIR C/F Fluid Head + Tripod. Operators Manual
 3001 SYSTEM AIR 3005 SYSTEM AIR C/F Fluid Head + Tripod Operators Manual q t o w y a e u s r i d ENGLISH EN Introduction Thank you for purchasing the Miller System AIR. The Miller System AIR is a professional
3500 Series Tripod Kit
 3500 Series Tripod Kit You re on steady ground 1 INTRODUCTION Thank You for choosing Oben! This versatile and durable Oben tripod and ballhead is a compact and lightweight kit that sets up quickly, folds
Operators Guide. Vision 3 Pan & Tilt Head. Vinten Camera Control Solutions
 Operators Guide Vision 3 Pan & Tilt Head Vinten Camera Control Solutions Vision 3 Pan and Tilt Head Publication Part No. 3543-8 Issue 4 Copyright Vinten Broadcast Limited 2004 All rights reserved throughout
PROFESSIONAL CAMERA SUPPORT
 PROFESSIONAL CAMERA SUPPORT CARTONI / All rights reserved User Manual Version: 2.0 Issue date: May 2016 CARTONI S.p.A. Via di Portonaccio, 33/B 00159 - Rome (Italy) phone. +39 06 4382002 fax. +39 06 43588293
DS5/DS10/DS20 Fluid Head Operator s Manual. #180 DS5 Fluid Head #182 DS10 Fluid Head #184 DS20 Fluid Head
 DS5/DS10/DS20 Fluid Head Operator s Manual #180 DS5 Fluid Head #182 DS10 Fluid Head #184 DS20 Fluid Head Features and Controls 1/4 and pin carriage Sliding camera plate Slide lock Tilt lock Tilt drag Pan
Power Series Camera Support
 Power Series Camera Support Power Jib Power Column Power Dolly Power Series Camera Support Equipment Assembly Manual Remark: Before assemble the jib, please check the inventory and read this manual carefully
PROFESSIONAL CAMERA SUPPORT
 PROFESSIONAL CAMERA SUPPORT CARTONI / All rights reserved User Manual Version: 2.1 Issue date: Feb 2017 CARTONI S.p.A. Via di Portonaccio, 33/B 00159 - Rome (Italy) phone. +39 06 4382002 fax. +39 06 43588293
Cross over to the new dimension of film making.
 BRIDGING TECHNOLOGY The Manfrotto video solution combines ergonomics and exclusive design with professional performances for extra smooth shooting control. Cross over to the new dimension of film making.
VZ-SnapCrane-12 Professional Modular Camera Crane Instruction Manuall
 VZ-SnapCrane-12 Professional Modular Camera Crane Instruction Manuall WEIGHTS NOT INCLUDED STANDARD 1 -HOLE BARBELL WEIGHTS ARE AVAILABLE AT MOST SPORTING GOODS STORES For a video tutorial SnapCrane Build,
VZ-SnapCrane-16 Professional Modular Camera Crane Instruction Manuall
 VZ-SnapCrane-16 Professional Modular Camera Crane Instruction Manuall WEIGHTS NOT INCLUDED STANDARD 1 -HOLE BARBELL WEIGHTS ARE AVAILABLE AT MOST SPORTING GOODS STORES For a video tutorial SnapCrane Build,
The Ridgeview Tripod. Your Ridgeview TM tripod is a mid-size field-packing tripod with a ball head for fast operation. Quick-Release Plate
 The Ridgeview Tripod Your Ridgeview TM tripod is a mid-size field-packing tripod with a ball head for fast operation. Plate Center Column Collar Compact Ball Head Bubble Level Compass Foam Padding Leg
PROFESSIONAL CAMERA SUPPORT
 PROFESSIONAL CAMERA SUPPORT CARTONI / All rights reserved User Manual Version: 2.1 Issue date: Feb 2017 CARTONI S.p.A. Via di Portonaccio, 33/B 00159 - Rome (Italy) phone. +39 06 4382002 fax. +39 06 43588293
SKYLINE TRIPOD KIT. Micro-Fluid Head. Adjustable Quick-Release Plate. Center Column Height Adjustment Knob. Leg Angle Release Tabs.
 Your Skyline TM tripod features rugged anodized legs and a smooth, precise, micro-fluid head for rock-solid performance in the most demanding situations. Adjustable Quick-Release Leg Angle Release Tabs
cineline 70 Fluid Head OPERATOR S MANUAL #1055 Cineline 70 Fluid Head
 cineline 70 Fluid Head OPERATOR S MANUAL #1055 Cineline 70 Fluid Head Features and Controls Side Load Lock Lever Pan Handle Clamp Tilt Lock Pan Handle Pan Lock Safety Lock Knob Front Box Mounting Threaded
Fluid Heads & Tripods.
 Fluid Heads & Tripods www.panther.tv Good to know Panther GmbH Established as a family business in 1986 by the former camera operator Erich Fitz, Panther has more than twenty years of tradition and experience.
Assembly and Usage Instructions. Product # Instruction # Revision A
 Assembly and Usage Instructions Product #488029 Instruction #1046698 Revision A Read these instructions in their entirety before using this product. Failure to follow this warning could result in property
The video industry is crossing over to a new dimension!
 SYSTEMS Video industry technology has radically changed over the past few years, introducing even lighter and more compact cameras. The latest cameras have created a new way to film, often one person is
Fluid heads perform best when installed on a tripod fitted with a 75mm or 100mm video bowl with leveling base.
 FH-350 Fluid Head FH-350 Fluid Head SPECIFICATIONS: FH-350 Counterbalance Range*...1.6-10 pounds (0.7-4.5kg) Sinusoidal Restoring Torque...Infinite Adjustment, 8-50 inch-pounds Tilt Range... ±90º Damping
PD Way Pan/Tilt Head. You re on steady ground
 PD-117 3-Way Pan/Tilt Head You re on steady ground 1 Introduction Thank You for choosing Oben! This sturdy Oben PD-117 3-Way Pan and Tilt Head offers precise, smooth operation, with independent control
ALS Model Light Stand
 ALS Model Light Stand Product Overview: The completely redesigned Ravelli ALS model light stand is 10' tall. It is comprised of one stand with a reversible adapter and includes a heavy duty carry bag.
Pros demand of Tripods, Heads and Support Accessories. And INDURO delivers with a wide and growing range
 Tripods, Monopods, Heads and more 2 INDUROGEAR.COM INDURO. ROCK SOLID, NO MATTER WHAT these are the perfect words to define the performance that today s Pros demand of Tripods, Heads and Support Accessories.
RS-600AF RS-850AF RS-1200AF. Camera. Track Slider. With Adjustable Feet
 Camera Track Slider With Adjustable Feet RS-600AF RS-850AF RS-00AF Congratulations on your purchase of the Revo Camera Track Slider. Revo s camera track slider is a sturdy, portable, and lightweight mini
C-pan arm USERS INSTRUCTIONS
 C-pan arm USERS INSTRUCTIONS Designed 1 of 12 and made in Denmark Thanks for purchasing a 9.Solutions product. With great passion, we design our products to be as versatile as possible. We hope that our
You only get one shot so make it count
 You only get one shot so make it count Ace is a dependable tripod system for daily use. Johnnie Behiri, DP, Vienna It s all about professionalism! We know you are dedicated to your profession so we have
Advanced Camcorder Support System. Instruction Manual
 Advanced Camcorder Support System Instruction Manual PAG ORBITOR Advanced Camcorder Support System Instruction Manual CONTENTS SECTION PAGE 1 SAFETY 2 2 ASSEMBLY & OPERATION 3 3 PARTS AND ASSEMBLIES 9
BA Series. Single Action Ballhead. You re on steady ground 1
 BA Series Single Action Ballhead You re on steady ground 1 INTRODUCTION Thank You for choosing Oben! This Oben BA Series ballhead is a compact and lightweight head that provides nimble, reliable operation.
Broadcast & Studio fluid Heads
 Broadcast & Studio fluid Heads Compact versatile the MASTER MK2 counterbalances very light cameras from 3 Kg (. lbs) all the way to 3 Kg ( lbs) making the Mk2 suitable from the smallest camera to fully
Freeing your creativity.
 The Vision blue Range Combining perfect balance with precisely adjustable drag to match your style. Freeing your creativity www.vinten.com New bluebridge Introducing the new Vision blue Range... The award
Rob Pleas Photography. GH-13r Gimbal Head. User s Manual
 Rob Pleas Photography GH-13r Gimbal Head ----------------------------- User s Manual INTRODUCTION Thank you for purchasing the GH-13r "retrofit" Gimbal Tripod Head from Rob Pleas Photography. This model
TAKAMA FLIP-ZIP INTRODUCTION. KEY FEATURES (Illustration - 1) MULTI-FUNCTIONAL TRIPOD MONOPOD KIT. Thanks for choosing Takama!
 MULTI-FUNCTIONAL TRIPOD MONOPOD KIT. Thanks for choosing Takama!") FLIP-ZIP TAKP4H58 TAKAMA FLIP-ZIP MULTI-FUNCTIONAL TRIPOD MONOPOD KIT INTRODUCTION Thanks for choosing Takama! The perfect hybrid accessory for photo and video cameras, this unique tripod will bring stability
FLIP-ZIP TAKP4H58 TAKAMA FLIP-ZIP MULTI-FUNCTIONAL TRIPOD MONOPOD KIT INTRODUCTION Thanks for choosing Takama! The perfect hybrid accessory for photo and video cameras, this unique tripod will bring stability
V40 Videoboom MAIN OPERATING INSTRUCTIONS INDEX 5. SPECIFICATIONS V40 1. INTRODUCTION 2. LIST OF FUNCTIONS AND PARTS
 MAIN OPERATING INSTRUCTIONS V40 Videoboom INDEX 1. INTRODUCTION 2. LIST OF FUNCTIONS AND PARTS 3. INSTRUCTIONS V40 3.1 ASSEMBLY & SETTING UP 3.2 WEIGHT SYSTEM 3.3 MOUNTING THE VIDEO CAMERA 4. USING THE
Introduction. Features and Highlights
 Introduction The Nodal Ninja Ultimate M2 Giga (M2G) manual pano head is an ideal solution for capturing high resolution Gigapixel or mosaic type imagery. The M2G will accommodate telephoto lenses up to
 Photography tripod Why do I Need a Tripod? http://www.bhphotovideo.com/explora/video/buying-guides/what-look-when-you-are-looking-videotripod Tripod Tricks? http://vimeo.com/videoschool/lesson/110/tripod-tricks
RS-600AF-V2 RS-850AF-V2. Camera. Track Slider. with Adjustable Feet
 RS-600AF-V RS-850AF-V Camera Track Slider with Adjustable Feet Warnings Please read and follow these instructions, and keep this manual in a safe place. Handle the unit with care. The camera sliding rail
GH-30. Gimbal Head. You re on steady ground
 GH-30 Gimbal Head You re on steady ground 1 INTRODUCTION Thank You for choosing Oben! The Oben GH-30 is a gimbal-type tripod head designed to balance a lens along its vertical and horizontal axes. The
GH-50. Gimbal Head. You re on steady ground
 GH-50 Gimbal Head You re on steady ground 1 INTRODUCTION Thank You for choosing Oben! The Oben GH-50 is a gimbal-type tripod head designed to balance a lens along its vertical and horizontal axes. Ideal
Two legendary brands ONE REVOLUTIONARY TRIPOD. Introducing. Two legendary brands ONE REVOLUTIONARY TRIPOD. flowtech-tripod.com
 Two legendary brands ONE REVOLUTIONARY TRIPOD Introducing Two legendary brands ONE REVOLUTIONARY TRIPOD flowtech-tripod.com The Next Evolution in Tripod Technology flowtech 75 technology Presenting flowtech
BE Series. Dual Action Ballhead. You re on steady ground
 BE Series Dual Action Ballhead You re on steady ground 1 Introduction Thank You for choosing Oben! This sturdy Oben BE Series Dual-Action ballhead provides smooth, effortless operation. Two locks provide
Beholder FHS Flex Handle Stabilizer
 Beholder FHS Flex Handle Stabilizer V1.0 2017.07 Before using the product, please read manual carefully. Be sure to keep this manual in a safe place so that you can check it at anytime in the future. Table
THE FINEST TRIPODS AVAILABLE ANYWHERE PHOTOGRAPHIC GEAR DESIGNED TO BE DIFFERENT
 THE FINEST TRIPODS AVAILABLE ANYWHERE PHOTOGRAPHIC GEAR DESIGNED TO BE DIFFERENT Designed by Induro in the USA The Induro product line is designed by their US team with valuable input from photographers,
Breeze Film Shooting Equipment (P-W5P-BRZ) I N STR UC TI ON MANUAL
 I N STR UC TI ON MANUAL") Breeze Film Shooting Equipment (P-W5P-BRZ) I N STR UC TI ON MANUAL All rights reserved No part of this document may be reproduced, stored in a retrieval system, or transmitted by any form or by any means,
Breeze Film Shooting Equipment (P-W5P-BRZ) I N STR UC TI ON MANUAL All rights reserved No part of this document may be reproduced, stored in a retrieval system, or transmitted by any form or by any means,
SIRUI Video & Broadcast. Tripods Heads Slider Rigs Cages Accessories
 SIRUI Video & Broadcast Tripods Heads Slider Rigs Cages Accessories SIRUI Video & Broadcast Product Catalogue 2017 SIRUI Broadcasting for Professionals SIRUI Video & Broadcast Catalogue Contents Tripods
FlowPod Stabilizer / MonoPod / Low Mode
 FlowPod Stabilizer / MonoPod / Low Mode FlowPod Operating Manual Thank you for purchasing the versatile FlowPod, our patented stabilizer/support. The FlowPod offers several shooting options that will help
INTRODUCTION. Key Features
 INTRODUCTION Thank you for purchasing the GH-13 Gimbal Tripod Head from Rob Pleas Photography. To get the most out of your tripod head, please read this user's manual thoroughly before use. This user's
FG-02 FG-02 LR PICTURED
 FG-02 Fluid-Gimbal Head FG-02 LR PICTURED FG-02 Fluid-Gimbal Head VERTICAL ARM HORIZONTAL BAR SPECIFICATIONS: FG-02 Load Capacity...50 pounds (23kg) Damped Load Capacity...15 pounds (6.8kg) Pan & Tilt
PROFESSIONAL VIDEO SUPPORTS 2005/06 (SUPPLEMENT)
") PROFESSIONAL VIDEO SUPPORTS 2005/06 (SUPPLEMENT) THE LATEST CAMERA TECHNOLOGY REQUIRES MATCHING INNOVATIVE SUPPORT Today s video cameras come equipped with the latest technology packed into an ever-decreasing
PROFESSIONAL VIDEO SUPPORTS 2005/06 (SUPPLEMENT) THE LATEST CAMERA TECHNOLOGY REQUIRES MATCHING INNOVATIVE SUPPORT Today s video cameras come equipped with the latest technology packed into an ever-decreasing
LIGHTWEIGHT TRIPOD 190D, 190CL, 190PRO, 190NAT3, 190MF3, 190MF4 SUGGESTED HEADS. Ball Head. Two way Head. Three Way Head. Geared Head 390RC2 460MG
 Harry De Zitter LIGHTWEIGHT TRIPOD 190D, 190CL, 190PRO, 190NAT3, 190MF3, 190MF4 SUGGESTED HEADS Ball Head Three Way Head Geared Head Two way Head 484 460MG 410 390RC2 484RC2 056 390RC2NAT 486 115 700RC2
Spread-Loc. Operators Guide. Spreader. Vinten Camera Control Solutions
 Operators Guide Spread-Loc Spreader Vinten Camera Control Solutions Vision Spread-Loc Spreader Publication Part No. 3781-8 Issue 3 Copyright Vinten Broadcast Limited 2004 All rights reserved throughout
Removal and Installation8
 8 Screw Types 8-4 Top Cover Assembly 8-5 Left Hand Cover 8-6 Right Hand Cover 8-10 Front Panel Assembly 8-14 Left Rear Cover 8-15 Right Rear Cover 8-16 Extension Cover (60" Model only) 8-17 Media Lever
DX-M. Owner s Manual. Photo Tripod
 DX-M Owner s Manual Photo Tripod Thank you for choosing Magnus. Congratulations on the purchase of your new Magnus tripod. This tripod features a rapid center column that detaches to serve as an adjustable
Handheld Video Stabilizer
 Handheld Video Stabilizer INSTRUCTION MANUAL For Demonstration only All rights reserved No part of this document may be reproduced, stored in a retrieval system, or transmitted by any form or by any means,
PORTA-JIB EXPLORER. Jib Arm details and assembly instructions
 Our lightest, most versatile Jib for camera systems with front weight of 22 lbs (10 kg.) or less. Canon 7D Camera with matte box, follow focus, external battery, Marshall monitor, balanced monitor bracket,
Cat# Description List (EUR) 1637 DS5 (180) Solo DV 2-St Alloy Tripod (1630) Pan Handle (680) Solo DV Softcase (1518) 884,00
 1637 DS5 (180) Solo DV 2-St Alloy Tripod (1630) Pan Handle (680) Solo DV Softcase (1518) 884,00") DV SYSTEMS DS5 Systems *Balance portable camera payloads from 0-2.5kg 1637 DS5 (180) Solo DV 2-St Alloy Tripod (1630) Pan Handle (680) Solo DV Softcase (1518) 884,00 DS10 Systems *Balance portable camera
DV SYSTEMS DS5 Systems *Balance portable camera payloads from 0-2.5kg 1637 DS5 (180) Solo DV 2-St Alloy Tripod (1630) Pan Handle (680) Solo DV Softcase (1518) 884,00 DS10 Systems *Balance portable camera
MAIN OPERATING INSTRUCTIONS
 MAIN OPERATING INSTRUCTIONS VPS-1 Pedestal Including Dolly options & accessories 1. INTRODUCTION You have bought a Pedestal out of the expanding new Cambo range of Video products. We expect that you will
simply better. Tripods and Accessories SIRUI Product Catalogue 2016
 simply better. Tripods and Accessories SIRUI Product Catalogue 2016 SIRUI Story Development and Philosophy Development and philosophy of the SIRUI brand Every day, SIRUI strives for the highest quality
At Induro, our mission is simple. To earn the respect, admiration and ongoing loyalty of evolving image-makers.
 At Induro, our mission is simple. To earn the respect, admiration and ongoing loyalty of evolving image-makers. Designed by Induro in the USA GRAND INDURO GRAND INDURO is for those seeking the highest
BC Series. Dual Action Ballhead. You re on steady ground
 BC Series Dual Action Ballhead You re on steady ground 1 Introduction Thank You for choosing Oben! This sturdy Oben BC Series Dual-Action ballhead provides smooth, precise operation. Two locks provide
Tripod Product Guide.
 Tripod Product Guide www.rollei.com Tripod Table of Contents 03 Professional Video Equipment Mini Crane M1...04 Mogopod 1...06 Wild Cat Stabilizer...08 facebook.com/rollei.foto.de facebook.com/rollei.photo.en
PRESS RELEASE Page 1/5. Improved premium quality: The advanced NANOMAX tripod series from CULLMANN
 Page 1/5 Improved premium quality: The advanced NANOMAX tripod series from Langenzenn (Germany), 12 February 2014 The new NANOMAX series convinces with an even higher quality and operation. The new NANOMAX
DSLR NANO Camera Steadycam
 DSLR NANO Camera Steadycam MF-DSLR-NANO-QR I N S T R U C T I O N M A N U A L Copyright Flyboyfilms NV. All rights Reserved Green Hill I Hoge Wei 16 I 1930 Zaventem I Belgium info@movofilms.be I www.movofilms.be
Workshop manual X-COM R. English
 Workshop manual X-OM R English 893-001 - ontents 1 Introduction 1.1 Product information... 3 1.2 Document description... 3 1.3 Revisions...3 1.4 Safety... 3 1.5 Servicing tools...3 2 Safety 2.1 Safety
DSLR Nano Handheld Steadycam (DSLR-NANO-QR-BL)
") DSLR Nano Handheld Steadycam (DSLR-NANO-QR-BL) INSTRUCTION MANUAL All rights reserved No part of this document may be reproduced, stored in a retrieval system, or transmitted by any form or by any means,
DSLR Nano Handheld Steadycam (DSLR-NANO-QR-BL) INSTRUCTION MANUAL All rights reserved No part of this document may be reproduced, stored in a retrieval system, or transmitted by any form or by any means,
Self-leveling Laser Marker (4V1HXL)
") Self-leveling Laser Marker (4V1HXL) Congratulations on your choice of this Self-leveling Laser Marker. For the purpose of long-term use of this instrument, we suggest you to read this instruction manual
Self-leveling Laser Marker (4V1HXL) Congratulations on your choice of this Self-leveling Laser Marker. For the purpose of long-term use of this instrument, we suggest you to read this instruction manual
Shoulder Support System
 SR-500 Video Shoulder Support System Thank you for choosing Revo and congratulations on your purchase of the Revo SR-500 Video Shoulder Support System. The Revo Video Shoulder Support System is a lightweight,
MANUAL. Set-up and Operations Guide Glidecam Industries, Inc. 23 Joseph Street, Kingston, MA Customer Service Line
 MANUAL Set-up and Operations Guide Glidecam Industries, Inc. 23 Joseph Street, Kingston, MA 02364 Customer Service Line 1-781-585-7900 Manufactured in the U.S.A. COPYRIGHT 2015 GLIDECAM INDUSTRIES,Inc.
PV Series. Owner s Manual. Photo Tripod
 PV Series Owner s Manual Photo Tripod Thank you for choosing Magnus. Congratulations on the purchase of your new Magnus tripod. This tripod features an adjustable center column for smooth and precise camera
Mk II 3DR MULTI-LINE LASER INSTRUCTION MANUAL
 Mk II 3DR MULTI-LINE LASER INSTRUCTION MANUAL SAFETY Read the following safety instructions before attempting to operate this product. Keep these instructions in a safe place or store in the carry case
DSLR Nano HD Camera Stabilizer (FLCM-DN-HD-QT)
") DSLR Nano HD Camera Stabilizer (FLCM-DN-HD-QT) I NSTRUC TI ON MANUA L For Demonstration Only All rights reserved No part of this document may be reproduced, stored in a retrieval system, or transmitted
DSLR Nano HD Camera Stabilizer (FLCM-DN-HD-QT) I NSTRUC TI ON MANUA L For Demonstration Only All rights reserved No part of this document may be reproduced, stored in a retrieval system, or transmitted
Manual 04 - Logic Board
 Manual 04 - Logic Board Written By: Josh Patterson 2017 guides.cellphonesandbox.com Page 1 of 16 TOOLS: Technician Starter Package (1) 2017 guides.cellphonesandbox.com Page 2 of 16 Step 1 Removal 1 - Battery
JIB EPT USER MANUAL. Please read this manual carefully before using the Alphatron JIB ETP unit! JIB & MOTORISED PAN AND TILT UNIT
 JIB EPT JIB & MOTORISED PAN AND TILT UNIT USER MANUAL EN Please read this manual carefully before using the Alphatron JIB ETP unit! Thank you for purchasing a Alphatron product The EPT head is developed
Vision AS range. pan and tilt heads. Vinten. Operators Guide V simply perfection
 Vision AS range pan and tilt heads Operators Guide V4045-4980 Vinten simply perfection Vision AS range Pan and Tilt Heads Original Instructions Issue 1 Copyright Vitec Group plc 2009 All rights reserved
StealthyPro Instructions
 StealthyPro Instructions 3-point Shooter Mode / Handheld Mode / Monopod Mode Place the black piece between the handle and the silver ring (as pictured). Stabilizer Mode In stabilizer mode, thread the handle
MAIN OPERATING INSTRUCTIONS
 MAIN OPERATING INSTRUCTIONS MPT-9 Mechanical Pan Tilt Unit 1. INTRODUCTION You have bought an MPT-9 Mechanical Pan Tilt Unit out of the wide range of Cambo Video products. We expect that you will achieve
Installation Guide Philips MP20/30/40/50/60/70 IntelliVue M-Series Arm Rail Mount Kit
 Installation Guide Philips MP20/30/40/50/60/70 IntelliVue M-Series Arm Rail Mount Kit The purpose of this guide is to: 1. Describe attachment of Table Top Mount to Mounting Adapter on Arm (page 2). 2.
Meet the New and Improved GorillaPod Line! In 2006, JOBY revolu2onized crea2vity with the first ever flexible tripod, the GorillaPod.
 Meet the New and Improved GorillaPod Line! In 2006, JOBY revolu2onized crea2vity with the first ever flexible tripod, the GorillaPod. Now, with over 10 million sold, we ve made them even beier with new
MBX INSTRUCTION MANUAL. Please read this manual carefully before using the MBX! Mid-range studio stand
 MBX Mid-range studio stand INSTRUCTION MANUAL EN Please read this manual carefully before using the MBX! CAMBO Thank you for purchasing a Cambo product. This new classed Mid-range studio stand will suit
Thank you for your purchase of a NAUTICAM digital camera housing.
 0 Thank you for your purchase of a NAUTICAM digital camera housing. At NAUTICAM, we pride ourselves on the ability to recognise the requirements of professional as well as amateur underwater photographers
Providing the accessories you need from quality brands you can rely on.
 www.gentec-intl.com Providing the accessories you need from quality brands you can rely on. Imaging Accessories Electronic Accessories Mobile Phone Accessories Everything you need is at your fingertips
Installing imac Intel 27" EMC 2390 Dual HDD or
 Installing imac Intel 27" EMC 2390 Dual HDD or SSD Drive Installing a secondary HDD or SSD in the mid 2010 27" imac EMC 2390. Written By: Brett Hartt ifixit CC BY-NC-SA www.ifixit.com Page 1 of 23 INTRODUCTION
Table of Contents: TOPIC: Safe Operation: READ THIS FIRST Page: 3 Warranty 4 Specifications 4 Installation 5-7 Operating Instructions 8 Parts Diagram
 INSTALLATION & OPERATIONS MANUAL FlexArm B-19 FlexArm Inc. Division of Midwest Specialties, Inc. 851 Industrial Drive Wapakoneta, Ohio 45895 419-738-8147 Book Part No 360740 12/2014 1 Table of Contents:
Manfrotto Video Supports. manfrotto.com
 Manfrotto Video Supports manfrotto.com Manfrotto Video Supports Technological evolution is profoundly changing videography. Camcorder performance improves, even as camcorders themselves shrink in size
Replacing the Billboard Diagnostic Camera
 Replacing the illboard Diagnostic Camera (PN 1109502701SP) The billboard diagnostic camera is a compact camera used to transmit live video streams with high image rates that can be viewed from a remote
Vacuum Maintenance Manual (EXCERPT Tim Benedict)
") 1. Position a ladder, scaffold, or work stand, on the right side of Vacuum Skid where the blower motors are installed. 2. Locate the six (6) vacuum hoses connecting the blower motors to the HEPA housings
1. Position a ladder, scaffold, or work stand, on the right side of Vacuum Skid where the blower motors are installed. 2. Locate the six (6) vacuum hoses connecting the blower motors to the HEPA housings
Quick Start Guide. Basic set-up for your Axis360 system
 Quick Start Guide Basic set-up for your Axis360 system Table of Contents 1 Setting up Slide slider assembly attach belt to cart attach ballhead to cart connect motor to controller attach slider to tripod(s)
Installation and Assembly: 2 x 2 Video Wall Ceiling Mount for 40" - 55" flat Panel Displays
 Installation and Assembly: 2 x 2 Video Wall Ceiling Mount for 40" - 55" flat Panel Displays Model: DS-VWT955-2X2 EXTENSION COLUMN (SOLD SEPARATELY) COMPATIBILITY Display width must be a minimum of 36"
2 x Dynamic Arms on 135 Post with C-Clamp
 Installation Guide AWMS-2-D13-C 2 x Dynamic Arms on 135 Post with C-Clamp COMPONENT CHECKLIST RANGE A AWM-LC Post Clamp B AWM-AD Dynamic Arm (x2) C AWM-P13 135 Post D AWM-FC C-Clamp CONTENTS C-Clamp Page
Polarization Microscope. Omano OM349P Series. User Guide
 Polarization Microscope Omano OM349P Series User Guide Table of Contents Getting Started... 3 Components... 3 Technical Specifications... 5 Setup Instructions... 6 Basic Operation... 7 Changing the Light
Installation Guide Mounting Kit for Mounting Philips Avalon CTS Cordless Fetal Transducer System on Wall, 2'' Post, Rail, or Slide-on Mounting Plate
 Installation Guide Mounting Kit for Mounting Philips Avalon CTS Cordless Fetal Transducer System on Wall, 2'' Post, Rail, or Slide-on Mounting Plate The purpose of this guide is to: 1. Describe mounting
IBM. Rack Installation Instructions
 IBM Rack Installation Instructions Review the documentation that comes with your rack cabinet for safety and cabling information. When installing your server in a rack cabinet, consider the following:
Rack Installation Instructions
 Rack Installation Instructions Review the documentation that comes with your rack cabinet for safety and cabling information. When installing your server in a rack cabinet, consider the following: v Two