User Manual AC-MX9XHDL-HDBT
|
|
|
- Elaine Whitney Webster
- 6 years ago
- Views:
Transcription
1 User Manual AC-MX9XHDL-HDBT 9x9 seamless HDBaseT matrix with quadview, multiview, instant switching. Expandable to 9xUnlimited Matrix configurations. pg. 1


2 Built For Cascading! pg. 2

3 Specifications: pg. 3
4 AVProConnect Presents a stable alternative to HDMI over IP with Cloud 9. The AC-MX9XHDL-HDBT is a unique piece of technology that allows you to take 9 inputs and distribute them to almost limitless outputs by adding or stacking additional units. Get all of the stuff you love from AV over IP and more with none of the headaches, including Matrixing Quad-View, 9-Source Multiview, Actual Instant Matrix Switching (AIMS), IR & RS232 control of the displays, and more. Utilizing uncompressed HDBaseT Technology, this system will truly shine and give you actual lossless images on screen and perform more reliably, making it ideal for low-no maintenance setups. No network switch is required, making this solution a very quick and efficient installation option in larger AV systems. In addition, you will have access to dual, front panel, color screens to further simplify the setup process. One screen is for Source Preview and the other is used for Settings. For control, the Could 9 features a host of ready made 3rd party control drivers (C4, RTI, Crestron, ELAN) along with a robust API for universal implementation. Additionally, with Routable IR & RS232 you can control the displays (Power on, power off) with by using same HDBaseT CAT cable runs already in place. Features: Easy to use: Instant Matrix Switching w/ AIMS Technology 9-Source, Unlimited Outputs Robust HDBaseT Technology Matrixable Quad View 9-Source Multiview Dynamic Video Walls (W/ DigiBird) Dual Color LCD Screens for Setup Instantly jump form Multiview/Quadview to Single image IR, RS-232, or Ethernet Control IR, RS-232 Passthrough to Displays/Projectors Feature rich AIMS Seamless Switching Dual Color screens Preview Screen IR Remote IR & RS-232 Control LAN Control IR & RS-232 Pass Through In The Box: AC-MX9XHDL-HDBT Matrix IR Remote Control IR Extension Cable 12V/3A Locking Power Supply 48V Power Supply for PoE Rack Ears & Phoenix Connectors Instruction Manual Applications: Bars and Restaurants are absolutely perfect. Low downtime and robust implementation make for happy owners and repeat work. In medical facilities for multiview point to point training environments For classrooms with lots of displays and presenters For security applications to view 4-9 HD video cameras For transportation management systems for monitoring camera feeds in hi-def. Large homes that want the ultimate control experience pg. 4

5 Device Feature Overview: AIMS: "Actual Instant Matrix Switching" allows the Cloud 9 to instantly display any of the sources on any display with no delay from button push to switch. Additionally, AIMS allows you to switch in and out of multiview mode instantly. MATRIXABLE QUAD-VIEW: This function allows you to utilize a larger display or projector to show either one source at a time or 4 sources at a time. In this mode you can matrix each quadrant individually or display one source full screen...all instantly. 9-SOURCE MULTIVIEW: View all 9 sources on any display, ideal for large projectors, confidence monitors and eye catching dynamic video walls with a DigiBird Processor. IR & RS-232 MATRIX & DISPLAY CONTROL: Not only can you control the matrix itself with these protocols, you have the ability to control the displays/projectors for things like power on/off without running extra wires. This often overlooked feature is fully implemented in the Cloud 9. CASCADE: Increase the size of you matrix to limitless proportions by simply adding additional units. They only take up 1U rack space and each unit adds 9 more outputs to your system. FPGA BACKBONE: We get asked all the time how is this possible with traditional HDMI distribution methods, and the answer is simple. While it feels simple to the installer, tons of things are happening at once behind the scenes. The signal is managed by our FPGA Modules which make for very robust mission critical installations. Our FPGA Engineers are among the best in the world and the Cloud 9 reflects this. ISOLATED POE: Isolated PoE allows this unit to function reliably by isolating high voltage away from sensitive components Preview Screen Control Screen IR Receiver for Switch Control Control Pad Used w/ Control Screen Input (Source) Select (Choose after output) Set to Multiview Power IR Rx (x4) (Rout to HDBT Rx) IR Tx (From HDBT Rx) RS232 Ports LAN for Control Output (Sink) Select (Choose before input) Independent Audio Matrix (PCM Only) These HDMI Outputs are a fixed mirrored output to the corresponding incoming source. These are used for Cascading to add additional matrixes to expand the system size, or can be used to fill in displays with a fixed source. HDMI Inputs These HDBaseT Outputs are for going out to the displays, they are fully matrixable and can be set to Multiview (or Quad View) Independently pg. 5
6 Basic Setup: Quick Setup: 1. Connect the HDMI input sources (Blu-ray, Set Top Box, etc...) to the AC-MX9XHDL-HDBT 2. Connect the HDMI output devices (AVR, Display, Distribution Amplifier, Extender) to the AC-MX9XHDL- HDBT 3. Power on the sources 4. Connect the power supply's into the AC-MX9XHDL-HDBT (You need to plug in both supply's) 5. Turn on output devices/displays 6. You may now use the front panel controls, supplied IR remote or free PC software to control the switch. Front Panel Control Switching: The AC-MX9XHDL-HDBT can be switched from the front panel by selecting the OUTPUT first then selecting the INPUT: 1. Press the button (1 through 9) on the bottom row that corresponds with the OUTPUT (Display, or Sink Device) you would like to send a source. 2. Now select the desired INPUT on the top row (1 through 9 or MV) 3. The route is now set. 4. NOTE: MV stands for Multiview and can be matrixed to any output - Press and hold MV button to toggle between Quad View and 3x3 (9-image) view. This button sets Multivew mode to the selected OUTPUT. Think of this as another "INPUT". It can be matrixed to any output Select INPUT Second Select OUTPUT first Figure 1 Switching with the front panel controls. NOTE: Select the OUTPUT and then the INPUT or MV pg. 6
7 Navigating the Control Screen: You can use the control screen to setup/control several key features including: Matrix Switch Routing ~ Control switching or view the current routing Signal Monitor ~ View live video feed from the active sources EDID Management ~ View, adjust EDID Configuration IR Routing Management ~ Rout the IR signal path for the IR inputs on the 9x9 to the HDBT Receivers RS232 Routing Management ~ Route RS-232 Signals to particular displays Network Setup ~ Setup IP Address, DHCP, Subnet, Etc... Home Screen To navigate the control screen you have a 6-button control panel that control the "Control" Screen. "Menu" area consists of UP, DOWN, LEFT and RIGHT - These are your navigation buttons. Press these buttons to move through them menus to your desired selections. Your desired selection will be bordered or highlighted "Enter" Selects the highlighted item and advances to the next set of options or sets your selection "Cancel" Stops what you are doing and takes you back one menu or to the home screen. Control Screen Navigation Buttons Control Screen Control Screen - Switch Routing: Once you select the "Switch" option, you have 2 primary functions: 1. View the current rout settings so you can verify that your system is working properly and the routes are correct 2. Set new matrix routes. You can change the matrix routes here as well, this is good for demonstrating switching or setting a Multiview confidence screen. NOTE: When setting a new route, select OUTPUT first then INPUT Select "Switch" Then Choose Input Select Output First pg. 7

 Control Screen - EDID Management: Instantly and easily set and manage EDID functions right from the front screen.")
8 Control Screen - Signal Monitor: The Signal Monitor feature allows you see your live source for each input. This screen allows you to toggle instantly through all sources. This function is a useful tool for the integrator because you can: 1. See that all of your sources are live and active 2. Verify that the correct input is receiving the correct source. 3. Cuts troubleshooting time in half - If you can verify that all of your sources are successfully being routed through the switch you only need to troubleshoot half of the system if problem arise. Select "Monitor" Watch Preview Screen Toggle INPUTS (Left/Right Arrows) Control Screen - EDID Management: Instantly and easily set and manage EDID functions right from the front screen. EDID management will help you get the right signal from the source device adding additional security that nothing unsupported will be mistakenly fed into the system. EDID effectively tells the source what the system is capable of handling, devices without robust EDID control just have to hope the source behaves how we want it to. With the AC-MX9XHDL-HDBT you control the sources: To Set the EDID, just choose EDID from the "Home Screen" and then select the INPUT you want to set. Finally toggle through the EDIDs until you get the one you want. For the most plug and play compatibility, we recommend using "1080P 2CH". This is ideal for bars, restaurants, and homes. There is also the ability to upload a custom EDID is desired (Has to be done in Serial Control Software). Available EDID Options: 1080P 2CH (Default), 1080P 6CH, USER1 (Custom), USER2 (Custom), USER3 (Custom) Additionally, you can copy an EDID from a display using Serial (more later in this manual) - But this is recommended for advanced users only. Select "EDID" Choose Input To Apply EDID to Select the desired EDID pg. 8
9 Control Screen - IR Routing (Passthrough to HDBaseT Receivers): IR routing allows you to customize the signal path for IR signals. IR Routing control on the front panel refers to the route from the IR RX Extension ports on the back of the matrix to the remote HDBaseT Receiver IR OUT port. This is primarily for sending power off or power on commands to display devices. IR can be routed to one or to many HDBaseT receivers (Displays) at a the same time Each of the four IR RX Extensions port can be routed to one or many outputs IR Commands can be "stacked" for multiple display types, etc... using the same route. *For more information on IR, or direct wire cable there is an IR Routing section later in the manual 1 IR signals go in here (back of 2 3 Matrix) Select IR TX IR Receiver Eyes, or Choose "IR" Control System Direct in these ports 4 5 Select the OUTPUT you want to set IR Port route for. Set the IR Port (1-4) Example IR Route to sink: pg. 9


10 Control Screen - IR Routing (Return Channel to IR Tx Port): The IR Return Channel allows you to rout IR Signals from a HDBaseT Receiver back to the Martix for control of the Matrix. In addition IR signals are passed through the IR OUT on the back of the Matrix. IR can be routed back from the remote Rx for Matrix Control IR can be routed back from the remote Rx out of the IR OUT on the matrix You can select what HDBaseT receiver can send IR through IR return channel *For more information on IR, there is an IR Routing section later in the manual IR Signals come out here. (Plug Emitter Here) Select IR RX Choose "IR" 4 5 Select with Remote HDBaseT Rx you want to turn on/off Turn it On or Off Example IR Return Route: pg. 10
 2.")
 Turn On/Off Select \"Usart\" RS232 Broadcast Mode: RS232")

11 Control Screen - USART (RS232 Route Setup) & Broadcast Mode Here you can set up the RS232 broadcast route - You can enable or disable remote HDBaseT Rx's ability to receive & transmit RS232 signals. Some key point to remember: 1. By default all HDBT Rx's will receive and forward RS232 commands (ON) 2. IR Signals that go into the RS232 HDBT IN on the matrix get broadcast to all active (ON) output ports. 3. If you plan to do custom routed (non-broadcast) RS232 signals these must remain (ON) 4. NOTE: For more info on advanced RS232 Routing, see that section later in the manual Select the port you want to disable/enable (HDBT Side) Turn On/Off Select "Usart" RS232 Broadcast Mode: RS232 Broadcast Mode is a very simply way to implement things like "ALL ON" and "ALL OFF" for displays in a system. Broadcast Mode allows you simply pass RS232 signals through without having to use advanced routing details like baud rate. To send broadcast RS232 commands you must: 1. Set up the routes you want active (above). 2. Plug your RS232 Cable into the HDBT Serial Port (Pictured Right) 3. Send RS232 commands like you are sending them DIRECTLY TO THE DEVICE 4. Commands will route to ALL ports you have on. NOTE: For Broadcast Mode baud rate does not matter, this will be set by the device sending the RS232 Signal (i.e Control Processor) - RS232 command is sent to ALL open ports. For Advanced RS232 Routing see the RS232 section later in the manual Send RS232 Broadcast Signals Here RS232 Broadcast Mode Sample Diagram: pg. 11
 Set static Device IP (Device Default is 192.168.001.239) Set Static Net Mask (Default is 255.")
12 Control Screen - Network (IP) Setting Here you can setup the Matrix with your preferred network settings. From the front panel you can: View the current IP Settings and MAC address Set static Route IP (Default is ) Set static Device IP (Device Default is ) Set Static Net Mask (Default is ) Change the TCP/IP Port (Default is Port 23) Toggle DHCP (Default condition is DHCP OFF) (0=OFF, 1=ON) To navigate the IP Setting Screen: 1. Navigate up and down to select (Use Enter Button) the option you want to address (RIP, IP, Mask, TCP.IP, DHCP) 2. Once selected you can use up and down to to change the first number or press enter to skip it and continue to the next. 3. Once you set the last possible number (Or complete the IP) it will back you to the main screen to make another selection NOTE: You can send Telnet commands to the machine by IP, the commands are the same commands used for RS232 listed in the "Command List" Route IP Device IP Address Subnet Mask TCP/IP Port DHCP Toggle (0=OFF, 1=ON) MAC Address pg. 12

13 IR Details: The IR PIN-OUT's below are consistent for the HDBaseT Receivers and for the Matrix. To plug directly into the "IR RX EXTENTION" port from a control system you will need a cable created as pictured below - We can provide these upon request: pg. 13


14 Using IR When Cascading: When using IR in a cascaded system, you must keep the following in mind: Each switch has its own IR routes etc...so for example you can route IR from switch "#1" only the the Rx's connected to it. Then likewise for switch number "#2" and so on. It is a good practice in a commercial application to make similar displays connected to the same switch, this can save the number of connections from you control system to the Cloud 9 System. IR Cascading Diagram: pg. 14
 3.")

15 IR Control of the Marix: The Matrix can be switched with IR Commands (Remote or other) in several ways: 1. IR Receiver on the front of the matrix 2. From any HDBaseT Receiver (You can select which ones) 3. From the IR Ext ports on the back of the matrix Use the PC Software so set up the "ports" you want to open for IR control of the Matrix itself. By Default, ALL ports are open for Matrix Control. Matrix IR Control - Choose where you can receive and IR Signal From and have those signals control the Matrix Switch pg. 15

16 RS232 Details: Here is a sample cable. in this example you can see how to connect or build and RS232 cable to use to control the Cloud 9. The pin configuration is shown here as well. There are three RS232 ports on the Cloud 9, please see the image below for their purpose: LOOP: For looping/ cascading RS232 Signals to concurrent Cloud 9's HDBT: For sending broadcast RS232 commands to the HDBT Rx's (RS232 Extension) MATRIX: For controlling the Cloud 9 and sending advanced direct RS232 to HDBT RX's Basic RS232 Broadcast: See Page 9 - Continue for Advanced RS232 settings, routing and control. pg. 16

17 RS232 Details: HDBaseT Receiver Pin Out pg. 17
 even if it is default \"A00\".")
18 Device Addresses When Using Serial Communication: NOTE: Only set device address when cascading multiple units together and using RS232 as your control method! You also have to send the device address when doing advanced routing while sending commands by serial (next page) even if it is default "A00". You NEVER use device addresses when using IP control or TELNET When using serial communication it is good to be aware of the devices "Address" You will want to know the device address as this will determine which Cloud 9 will receive a command. All of the drivers are built so that if you use serial communication you will use ONE instance of the driver and select the size. i.e 9x18, 9x27 etc... All Cloud 9's are address "A00" by default and if you are using just one device you do not need to place this in front of the serial command. EX1: If you have a standalone unit and are using serial control you can just send a command without the address: "SET OUT5 VS IN3" ----This will set Output 5 to Input 3 EX2: If you have two units in a "stack" you have to label them A01 and A02, so a command will look like: "A02SET OUT5 VS IN3" ----This will set Output 5 to Input 3 ON SWITCH TWO. Also, please note that there is no "space" between the address and the command To set and device address you can use the PC Control Software or send the command "SET ADDR xx" (xx = 01 through 99) Advanced RS232 Routing: In addition to doing RS232 "Broadcast" (Described in the beginning of the manual) you can route RS232 commands to a single specific output. This allow for finite control of displays and the ability to create specific zones. You can send advanced routing commands: 1. By directly plugging a serial cable into the "Matrix" port on the Cloud 9 2. Sending Telnet commands via the LAN Port. OR To do Advanced Routing, send RS232 signals here Send TELNET Commands through LAN pg. 18


19 How to route RS232 Commands when using serial: The routing command is very straight forward but you have to take care to make sure you format it correctly. The main thing to consider before you begin: 1. You are actually sending 2 commands (route & device command) so depending on what you are using to send the command the format varies slightly - We show some examples below. 2. You have to know the baud rate of the device you are sending the command to. 3. For "hybrid" ASCII commands, you may have to convert the numbers to the decimal value. The Command: Ex: If the command is "ka 00 01" you only send "ka 0 1" The fist command is your "route" and it looks like this: AxxSET RS PTH OUTx LENx BRx A = Device Address (use this even if using a single unit, just put 00) OUT = The Output you want to rout the forthcoming command to LEN = Forthcoming command length - for ASCII this includes EVERY character including spaces. For HEX it includes only the BYTE count. Ex1: If the ASCII command is "ka 0 1" the length is 6. Count spaces. NOTE: You can exceed the length by 2 if unsure. If you exceed the length by more than 2 it will not work. Ex2: If HEX command is "6B " the length is 6. Do not count spaces. Again, you can exceed by 2. BR = Baud Rate of the device you are sending to - You use a single digit to replace "x" and they are: There is a carriage return immediately following this command. After this command you immediately follow it with the command you want to send to the device (no spaces). That command it then followed by another carriage return. pg. 19

20 Command Examples: Using A Terminal Program (RS232): In the following example we are using a program called MYUART Assist. We make this program freely available form You will notice in the example that it is on 2 lines. This is because you have to separate the commands with a return. The command below was sent through the HDBaseT Rx on Output 5 to successfully "Power On" a LG TV. The firmware will send a command acknowledgment at to the extender. This shows up as "RS DEV MUX , if the end device is receiving at The Matrix itself also sends an acknowledgment commands SET RS PTH OUT5 LEN10 to confirm the rout was set and command sent. Using TELNET (IP): You can also send these commands by TELNET. Wen sending TELNET you do not send the "Axx" portion of the command. Here is an example command that has been tested: Green = Route Command Red = Command to be sent to device "\rset RS PTH OUT3 LEN10 BR0\r\n\rka 0 1\n\r\r This example will send the string \n\rka 0 1\n\r at 9600 baud to the extender on output #3. Note that \n" and \r" need to be replaced by the literal newline (\n) and carriage-return (\r) characters (hex 0x0a 0x0d). How this is done is dependent on what the control system does, later you see examples form On Controls that uses HEX for commands. The leading and trailing \r are for the 9x9 firmware to be able to sync and parse the command correctly. The leading and trailing \n\r are for the end device to be able to parse the command. Because we added 2 characters on each end of the string, I also added 4 to the overall length. The firmware will send a command acknowledgment at to the extender. This shows up as "RS DEV MUX , if the end device is receiving at The Matrix itself also sends an acknowledgment commands SET RS PTH OUT5 LEN10 to confirm the rout was set and command sent. pg. 20
21 Using TELNET (IP): On Controls Examples Green = Route Command Red = Command to be sent to device This first example is when sending an ASCII Command \x0da01set RS PTH OUT1 LEN17 BR4\x0D\x0A\x0DSET OUT4 VS IN5\x0A\x0D\x0D You can also convert to pure HEX and send a command this way: \x0a\x41\x30\x31\x53\x45\x54\x20\x52\x53\x20\x50\x54\x48\x20\x4f\x55\x54\x31\x20\x4c\x45\x4e \x31\x37\x20\x42\x52\x34\x0d\x0a\x53\x45\x54\x20\x4f\x55\x54\x32\x20\x56\x53\x20\x49\x4e\x32 \x0d\x0a A hybrid ascii-hex combo: Notice one less carriage return at the end of the string - because the device we were sending to did not require a carriage return at the end of the command: \x0dset RS PTH OUT1 LEN13 BR5\x0D\x0A\x0D\xAA\x02\x00\x07\x00\x00\x00\x00\x10\x03\x00\x3A \x0a\x0d pg. 21


22 Cascading with RS232 Control: When cascading and using RS232 you have to enable the device address in the following fashion, the example have four Cloud 9's: Device with OUTPUT's 1-9 = A01 Device with OUTPUT's = A02 Device with OUTPUT's = A03 Device with OUTPUT's = A04 To set and device address you can use the PC Control Software or send the command "SET ADDR xx" (xx = 01 through 99) Check with your sales rep, this is normally done if the units were purchased for a specific project. If you are using a control driver, you can use a single instance of the driver, but you have to choose the size - 9x9, 9x18, etc... Cascading with RS232 Control Diagram: pg. 22 AVProConnect ~ 3518 N Casco Ave. Sioux Falls, SD 57104~ ~ ~ support@avproconnect.com


23 Cascading with IP Control: With IP you have to have a direct IP connection to each unit, and regard them as individual 9x9 matrixes. So for a 9x81 matrix with IP control, you have to connect ethernet to all 9 matrixes. If you are using a 3rd party control driver, install 9 instances of the drivers, and regard them all as individual 9x9 matrixes. When using IP DO NOT use serial system addresses, as the IP addresses will serve the same purpose. While it can be done if one so desires, it complicates the programming. A best practice is to set a static IP address for each unit, rather than DHCP. Cascading with IP Control Diagram: pg. 23
24 Command List & Settings Settings: Baud Rate 57600, Data Bits 8, No Parity, 1 Stop Bit All Commands start by Prefix System Address zz, if [01-99] If it is default (A00), no prefix is necessary = = = = H : Help = = STA : Show Global System Status = = SET RST : Reset to Factory Defaults = = SET ADDR xx : Set System Address to xx {xx=[00-99](00=single)} = = SET CAS EN/DIS : Set Cascade Mode Enable/Disable = = SET LCD DP MODEx : Set LCD Display Mode{x=[0~2](0=Always ON,1=Auto,2=Always OFF)} = = SET LCD ON Tx : Set LCD Remain On Time{x=[0~3](0=Always ON,1=15,2=30,3=60Sec)} = = SET KEY LOCK ON/OFF : Set Key Lock On/Off = = SET PVW INx : Set Preview Channel x{x=[1-9]} = = GET ADDR : Get System Address = = GET STA : Get System System Status = = GET CAS : Get Cascade Mode Status = = GET LCD DP MODE : Get LCD Display Mode = = GET LCD ON T : Get LCD Remain On Time = = GET KEY LOCK : Get Key Lock Status = = GET PVW IN : Get Preview Channel = = = =Output Setup Commands: = = SET OUTx VS INy : Set Output x To Input y{x=[0-9](0=all), y=[1-10](10=multiview)} = = SET OUTx EXA EN/DIS : Set Ex-Audio Output Enable/Disable{x=[0-9](0=ALL)} = = SET EXA MODEy : Set Ex-Audio Output Mode{y=[0-2](0=From Input,1=From output,2=independent)} = = SET OUTx EAS INy : Set Ex-Audio Output x To Input y{x=[0-9](0=all), y=[1-9]} = = SET OUTx MAS INy : Set HDMI Audio Output x To Input y In Multiview Mode{x=[0-9](0=ALL), y=[1-10] (10=Mute)} = = GET OUTx VS : Get Output x Video Route{x=[0-9](0=ALL)} = = GET OUTx EDID DATA : Get Output x EDID DATA{x=[1-9]} = = GET OUTx EXA : Get Ex-Audio Output Enable/Disable Status{x=[0-9](0=ALL)} = = GET EXA MODE : Get Ex-Audio Output Mode = = GET OUTx EAS : Get Ex-Audio Output x Audio Route = = GET OUTx MAS : Get HDMI Audio Output x Audio Route In Multiview Mode} = = = =Input Setup Commands: = = SET INx EDID y : Set Input x EDID{x=[0-9](0=ALL), y=[0-4]} = = 0:1080P_2CH 1:1080P_6CH 2:USER1_EDID 3:USER2_EDID 4:USER3_EDID = = SET INx EDID CY OUTy : Copy Output y EDID To Input x(user1 BUF){x=[0-9](0=ALL), y=[1-9]} = = SET INx EDID Uy DATAz : Write EDID To User y Buffer of Input x{x=[0-9](0=all), y=[1-3],z=[edid Data]} = = GET INx EDID : Get Input x EDID Index{x=[0-9](0=ALL)} = = GET INx EDID y DATA : Get Input x EDID y Data{x=[1-9],y=[0-4]} = = = pg. 24
25 Command List cont: =Multiview Setup Command: = = SET BLW z : Set Border Line Width by z {z = [0-15](0=None, 1-15Pixels)} = = SET BLC rrr.ggg.bbb : Set Border Line Color by RED/GREEN/BLUE{rrr=[ ], ggg=[ ],bbb=[ ]} = SET MVW MODEx : Set Multiview Mode x{x=[0-1](0=3x3,1=quad)} = = SET QVW VS x.x.x.x : Set Quad Video Source (x1-x4 = [1-9]) (0 leaves quadrant unchanged) = = GET BLW : Get Border Line Width = = GET BLC : Get Border Line Color = = GET MVW MODE : Get Multiview Mode = = GET QVW VS : Get Quad Video Source = = = =Network Setup Command: ( xxx=[ ], zzzz=[ ] = = SET RIP xxx.xxx.xxx.xxx : Set Route IP Address to xxx.xxx.xxx.xxx = = SET HIP xxx.xxx.xxx.xxx : Set Host IP Address to xxx.xxx.xxx.xxx = = SET NMK xxx.xxx.xxx.xxx : Set Net Mask to xxx.xxx.xxx.xxx = = SET TIP zzzz : Set TCP/IP Port to zzzz = = SET DHCP y : Set DHCP {y=[0-1](0=dis,1=enable)} = = GET RIP : Get Route IP Address = = GET HIP : Get Host IP Address = = GET NMK : Get Net Mask = = GET TIP : Get TCP/IP Port = = GET DHCP : Get DHCP Status = = GET MAC : Get MAC Address = = = =IR Route Setup Command: = = SET IRC MUX x1.x2.x3.x4.x5.x6.x7.x8.x9 : Set the IR return Channel MUX{x1~x9=[0-1](0=Disable,1=Enable)} = SET IRT OUTx IS INy : Set Output x IR Route{x=[0-9](0=all),y=[1-4]} = = SET IR EXT SW x1.x2.x3.x4.x5.x6.x7.x8 : Set IR Extender Switch{x1~x9,y1~y4=[0-1](0=Disable,1=Enable)} = =.x9.y2.y3.y4 : = = GET IRC MUX : Get the IR MUX Status = = GET IRT OUTx IS : Get Output x IR Route{x=[0-9](0=all)} = = GET IR EXT SW : Get IR Extender Switch Status = = = =RS232 Route Setup Command: = = SET RS MUX x1.x2.x3.x4.x5.x6.x7.x8.x9 : Set the RS232 MUX{x1~x9=[0-1](0=Disable,1=Enable)} = = SET RS PTH OUTx LENy BRz : Set RS232 Pass Through to Outputx = = {x=[0-9](0=all),y=[1~800],z=[0~5](0=9600,1=14400,2=19200,3=38400,4=57600,5=115200)} = = GET RS MUX : Get the RS232 MUX Status = = = =IR Code Setup Command: = = SET IR SYS xx.yy : Set IR Custom Code{xx=[00-FFH],yy=[00-FFH]} = = SET IR OUTx INy CODE zz : Set IR Data Code{x=[1-9],y=[1-10],zz=[00-FFH]} = = GET IR SYS : Get IR Custom Code = = GET IR OUTx INy CODE : Get IR Data Code = = = pg. 25


26 Extracted Audio: The extracted audio ports have distinct operating modes. Your desired mode can be set to suite your particular installation. The 3 modes are: From Input ~ This is the default configuration. In this mode the audio port number corresponds to the INPUT signal. This is ideal for systems where audio is matrixed separately in a zoned amplifier. From Output ~ This configuration will automatically have the audio follow OUTPUT, so the audio from the extracted port always matches the HDMI output. This is ideal for systems that use local AVR's for some of the zones. Independent ~ This mode allows you matrix the extracted audio outputs independent of HDMI. In this mode a new set of commands becomes available to be able to route audio however you want. This can be used as a separate zoned audio matrix with only using an amplifier. Setting up Extracted Audio Routing: You can set up Extracted Audio Routing in the PC Software, Driver or by sending the following command: SET EXA MODEy -- Where (y=0-2) 0=From Input, 1=From Output, 2=Independent. If you set to "Independent" a new set of commands is available to you to matrix the ports: SET OUTx EAS INy -- Where (x=0-9) 0=ALL, 1-9=Desired Output & (y=1-9) 1-9=Desired Input NOTE: Extracted Audio Ports are PCM 2CH audio up to LPCM 6 CH, Dolby Digital 5.1 & DTS. No down-mix. Audio Diagrams: pg. 26


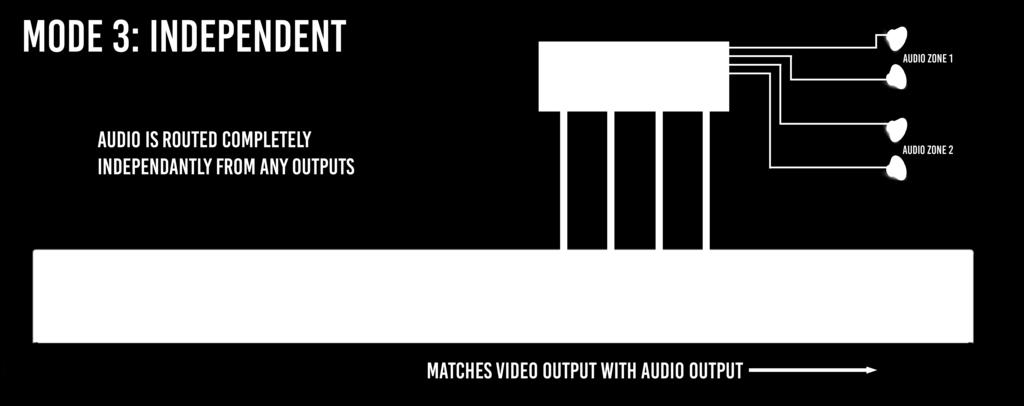
27 Extracted Audio cont: Audio Diagrams: pg. 27
28 Multiview Setup and Usage: The Multiview display can be matrixed just like a "source". Actually it is easiest to think of the Multiview as your "10th" source. The Multiview function on the Cloud 9 has 2 distinct operating modes, the Cloud 9 is capable of EITHER 3x3 View OR Quad View: 3x3 Mode ~ In this mode all 9 sources will show on a single display Quad View Mode ~ In this mode 4 sources will show on one screen. The Cloud 9 is capable of switching instantly between 3x3 & Quad View. Here are the default configurations: 3x3 Multiview Mode (Fixed) Quad View (Matrixable) Quad View Matrix: After you set the Cloud 9 to Quad View Mode, you can set each quadrant using the command showed here: SET QVW VS This will set Quad 1 to IN 5, Quad 2 to IN 3, Quad 3 to IN 1, and Quad 4 to IN 4. Doing it this way is ideal for having preset modes. Additionally, you can matrix or address one quadrant independently by just sending it with 0 to not change a quadrant. So it would look like this example: SET QVW VS This will set Quad 3 to IN 5 and leave the other 1,2 and 4 unchanged. This makes a true real-time matrix for each Quadrant. The logic on the Quad View mode work in a way that wont allow you to put 2 things up at the same time so, for example, if you set Quad 1 to IN 1 and Quad 4 is already on IN 1, they will swap. This is available in the PC Software and most drivers as well, please check with your representative for the most current information on drivers. pg. 28
29 Multiview cont: HDMI Audio When in Multiview: The audio from HDMI can also be switched when in Multiview mode (3x3 or Quad View). You can do this easily from the PC software, driver or using the command here: SET OUTx MAS INy -- x=0-9 (0=ALL OUTPUTS IN MULTIVIEW, 1-9=Desired Output) & y=1-10 (1-9=Desired Input, 10=Mute) Multiview with a serial cascade: If you are using serial (RS232) control to cascade multiple units together, you will have one multiview configuration, so this means that every display that switches to "MV" it will receive the same image, no matter what unit the output is connected to. See diagram on next page. Multiview with a IP cascade: IP Cascading give you another unique element with Multiview mode. You can have separate multiview configurations per Cloud 9. Sources connected to specific Cloud 9's can behave differently when switched to "MV": Outputs 1-9 (Connected to matrix 1) can have a 3x3 when switched to "MV" Outputs (Connected to matrix 2) can have a Quad View (wit independent quadrant control) Outputs Connected to matrix 3) can have a separate Quad View (with independent control) See Diagram on next page. Additional Multiview Functionality: You can also do some mild customization of the appearance of the multiview screen. You can: Set the boarder line pixel width between the images Set the color of the boarder line with a R-G-B color coordinate By default the boarder width is 1 px and the color is white. Consult the command list for setting options, or use the Free PC Software pg. 29


30 Multiview Examples: RS232: IP Control pg. 30


31 Video Wall: The Cloud 9 has proprietary FPGA technology built in that allows it to do the robust multiviewing (described above). This can be paired with the DigiBird video wall processor, offering a low cost highly roust video walls in these systems. While a video wall is only limited by your own creativity, there are 2 simple ways to do it: 2x2 Dynamic video Wall: 3x3 Switchable Video Wall: pg. 31

32 Video Wall cont: Using the DigiBird also offers you the ability to do stylized video walls with very little effort. The processing power the Cloud 9 and the simple programming of the DigiBird make for a compelling video wall that you don't need to make custom content for. To learn how simple it is to create a video wall like this contact us or download the software from Again, you are only limited by your creativity, but hre are some popular examples: pg. 32

33 PC Control Software - Side Bar: Note: PC Control Software can be used when connected to the "Matrix" port using RS232. Connection Area - Use the drop down to select the COM Port or press "Search Machine" to search your computer for open COM Ports. The light will be red if there is a successful connection. Select/Manage Addresses - Use the drop down to select the Address of the device you want to control (If cascading multiple units). Press "Address Management" to set the Addresses. View "Address Management' Tab later for more. Toggle Multiview Mode Setting - Click this button to toggle between 3x3 Multiview and Quad view. Quad View Matrix Control - Use this section to set the source for individual quadrants when in Quad View. First select the Quad you want (Red, Green Blue or Yellow), then choose the input. Audio Selection in Multiview - Use this section to select the audio you want to hear in multiview mode. This is for the HDMI audio. First drop down selects the Output, the second one selects the audio source. pg. 33
 and the color. For color use a RGB color mixture. Click update to make the change.")
34 PC Control Software - Video Tab: Note: PC Control Software can be used when connected to the "Matrix" port using RS232. Switching - Simply choose the INPUT radio button you want to see on each output. MV = Multiview Set Multiview Border Color/Width- Use this area to set the multiview border line width (1-15 Pixels) and the color. For color use a RGB color mixture. Click update to make the change. pg. 34

35 PC Control Software - EDID Tab: Note: PC Control Software can be used when connected to the "Matrix" port using RS232. Set EDID - Choose the EDID you want to use from the drop down and press "Apply to Input x" to set it. Load EDID- This allows you to load a previously saved EDID File and store it to a "User" Memory. Read EDID and save as file- Select the Output from the drop-down and click the button to save the EDID as a file, you can upload the EDID later and apply it to one of the "USER" EDIDs. You can then apply that USER EDID to one or more of the inputs. EDID Information- This box shows basic EDID information from the output chosen in the drop-down on the left. pg. 35

36 PC Control Software - IP Config Tab: Note: PC Control Software can be used when connected to the "Matrix" port using RS232. Reset to default Toggle DHCP Set IP Settings Save Settings pg. 36
37 PC Control Software - Settings Tab: Extracted Audio mode- Choose audio routing configuration on the extracted ports. HDBT IR Rout - Select the IR Port the Rx receives from. Matrix IR Control - Choose where you can receive and IR Signal From and have those signals control the Matrix Switch Load EDID- This allows you to load a previously saved EDID File and store it to a "User" Memory. Read EDID and save as file- Select the Output from the drop-down and click the button to save the EDID as a file, you can upload the EDID later and apply it to one of the "USER" EDIDs. You can then apply that USER EDID to one or more of the inputs. IR Emitter From - Choose what IR Signals come out of the IR TX Port on the Martix RS232 Routed To - Choose which HDBT Rx receives a "Broadcast" IR Signal pg. 37

38 PC Control Software - Address Management: Read/Set Address- You can read the address of the current connected device and write a new one here. NOTE: When reading and writing address only connect one device at a time! Address Table - This is RS232 Command Routing, after you give the addresses, you can make labels in this table for quick recall on the "Side Bar" Tab. THIS TABLE DOES NOT SET ADDRESSES. It is strictly for labeling & routing within this software. This can be helpful if you want to use multiple units and PC Control. It Automatically puts the Address command in for correct routing, also you can send"00" to manage ALL Matrixes at once Save Button pg. 38

39 Web Interface: Sense Switch To access the Web Interface, simply type in the IP address of the device. The default IP address , if you have setup a different IP or are not sure simply view the "Net" section on the control screen on the front panel. The Sense Switch page is the main page of the Web Interface. Here you can easily control switching of the matrix. With this screen you can also see the current routes and also set Multiview for a specific output. NOTE: The inputs and outputs can be labeled in the "System Config" Tab. pg. 39

40 Web Interface: Audio Setting The Audio Setting tab allows to to ENABLE or DISABLE the extracted audio ports. ON means that audio will play out of the SPDIF Coax port. OFF means that that port will NOT play audio. pg. 40

41 Web Interface: EDID Manage The EDID Manage tab allows you to set the EDID for each input. To set the EDID: 1. Select the desired EDID form the drop down menu of the input you want. 2. Press Apply Available EDID Options: 1080P 2CH (Default), 1080P 6CH, USER1 (Custom), USER2 (Custom), USER3 (Custom) pg. 41
42 Web Interface: RS232 Config The RS232 Setting tab allows you to ENABLE or DISABLE with HDBASET outputs will get a broadcast RS232 command. NOTE: These ports must be ON if you are using advanced routing. For more on RS232 routing please see the RS232 sections above. pg. 42

43 Web Interface: IR Config The IR Config tab allows you to set up 2 basic IR Routes: 1. Routing IR Inputs on the matrix to the HDBT receivers 2. Which HDBaseT Receivers can send commands back to the IR out on the Matrix For more advanced information of IR routing please see the IR section of the Manual. Set IR routes TO the HDBT Receivers. A single IR signal can go to one or many. Sets what HDBT Receivers can route back to the Matrix pg. 43
 settings 2.")
44 Web Interface: System Config The System Config tab let you achieve two functions. 1. Setting up your network (IP) settings 2. Labeling the Inputs and Outputs for the "Sense Switch" Tab pg. 44
45 Cascading with IP Control: With IP you have to have a direct IP connection to each unit, and regard them as individual 9x9 matrixes. So for a 9x81 matrix with IP control, you have to install 9 instances of the drivers, and regard them all as individual 9x9 matrixes. In this case, it is best NOT to use system addresses, as the IP addresses will serve the same purpose. A best practice is to set a static IP address for each unit, rather than DHCP. Cascading with IP Control Diagram: pg. 45

46 AC-MX88-AUHD Thank you for choosing AVProConnect! Please contact us with any questions, we are happily at your service! AVProConnect 3518 N Casco Avenue ~ Sioux Falls, SD ~ pg. 46
User Manual AC-MX88-AUHD
 User Manual AC-MX88-AUHD 18 GBPS True 4K60 4:4:4 8 x8 HDMI Matrix w/ Dual Audio De-Embedding, Scaling & Delay. pg. 1 The AC-MX88-AUHD is a true 4K60 4:4:4 8x8 HDMI matrix switch. Supporting HDMI 2.0, HDCP
4x4 HDMI Matrix w/ Audio De-Embedding 4K 60Hz, HDMI 2.0 and HDCP 2.2 Compatible
 4x4 HDMI Matrix w/ Audio De-Embedding 4K 60Hz, HDMI 2.0 and HDCP 2.2 Compatible AVProConnect 3518 N Casco Avenue ~ Sioux Falls, SD 57104 1-877-886-5112 ~ 605-274-6055 support@avproconnect.com The is a
User Manual AC-MX88-AUHD-GEN2 & AC-MX44-AUHD
 User Manual AC-MX88-AUHD-GEN2 & AC-MX44-AUHD 18 Gbps True 4K60 4:4:4 8 x8 HDMI Matrix w/ Dual Audio De-Embedding, Scaling & Delay. pg. 1 The is a true 4K60 4:4:4 8x8/4x4 HDMI matrix switch. Supporting
HDMI 8x8 Matrix Switch, 4K/60
 500443 Muxlab Inc. 2017 94-000849-A / SE-000849-A SAFETY PRECAUTIONS To insure the best performance from the product, please read all instructions carefully before using the device. Save this manual for
Installation Guide SY-HDBT-282-S. HDMI to HDBaseT Splitter with Audio De-Embedder
 Installation Guide SY-HDBT-282-S HDMI to HDBaseT Splitter with Audio De-Embedder SY Electronics Ltd., Unit 7 Worrall Street, Salford, Greater Manchester, M5 4TH Tel: +44 (0)161 868 3450 Fax: +44 (0)161
User Manual. AC-MX44-UHD and AC-MX88-UHD
 User Manual AC-MX44-UHD and AC-MX88-UHD 4x4 HDMI 4K Matrix 8x8 HDMI 4K Matrix Tel:877-866-5112 Fax:877-303-6944 The AC-MX44-UHD & AC-MX88-UHD are 4x4 and 8x8 true HDMI matrix switchers respectively, supporting
SM-4X4-4K18GBA-LC. 4x4 HDMI2.0 Matrix Support YUV4:4:4, 18Gbps, HDR. Operating Instruction
 SM-4X4-4K18GBA-LC 4x4 HDMI2.0 Matrix Support 4K@60hz YUV4:4:4, 18Gbps, HDR Operating Instruction 1 Thank you for purchasing this product. For optimum performance and safety, please read these instructions
SY-MUHD-44 and SY-MUHD-88
 User Manual SY-MUHD-44 and SY-MUHD-88 4x4 HDMI 4K Matrix 8x8 HDMI 4K Matrix SY Electronics Ltd, Unit 7, Worrall Street, Salford, Greater Manchester, M5 4TH, United Kingdom Tel: +44 (0) 161 868 3450 Fax:
mhub 4K 4x4 HDMI over Cat Matrix Manual Product Code: MHUB4K44
 mhub 4K 4x4 HDMI over Cat Matrix Manual Contents Contents, Introduction and 5 minute quick setup guide 2 System features and central hub diagram 3-4 Display receivers and setting up IR control 5 Standard
Video Flux User Manual AC-MXMV122-UHD
 Video Flux User Manual AC-MXMV122-UHD Video Flux features 16 available (12 at a time) input options including composite, component, VGA, and HDMI. It also has the ability to do 4K Quad View or completely
8x8 4K/UHD HDMI to HDMI Matrix Switcher
 8x8 K/UHD HDMI to HDMI Matrix witcher AT-UHD-HH-88M Installation Guide Please check http://www./product/at-uhd-hh- 88M for the most recent firmware update or manual. The Atlona 8x8 K/UHD HDMI to HDMI Matrix
HDTVMT0404VL1 User Manual
 HDTVMT0404VL1 User Manual HDTVMT0404VL1 User Manual Contact: support@hdtvsupply.com 1 Thank you for purchasing this product. For optimum performance and safety, please read these instructions carefully
User Manual. AC-SW411-AUHD 18 GBPS 4x1+1 Switcher with 100 Meter HDBaseT Receiver
 User Manual AC-SW411-AUHD 18 GBPS 4x1+1 Switcher with 100 Meter HDBaseT Receiver AC-SW411-AUHD & AC-EX100-UHD-R USER MANUAL Ver. 1.0 pg. 1 Introduction The SW411 is an HDMI 2.0(a) 18 GBPS HDMI POE switch
Installation Guide AT-HDR-H2H-44M
 4K HDR 4 4 HDMI to HDMI Matrix Switcher The Atlona is a 4 4 HDMI matrix switcher for high dynamic range (HDR) formats. It is HDCP 2.2 compliant and supports 4K/UHD video @ 60 Hz with 4:4:4 chroma sampling,
4x4 4K HDMI 2.0 Matrix - HDCP 2.2 MX44AB-V2. User Manual
 4x4 4K HDMI 2.0 Matrix - HDCP 2.2 MX44AB-V2 User Manual Thank you for purchasing this product. For optimum performance and safety, please read these instructions carefully before connecting, operating
XT-HDBT-MX44-4K-KIT. Introduction. User Manual. Key Features XT-HDBT-MX44-4K-KIT USER MANUAL
 XT-HDBT-MX44-4K-KIT User Manual Introduction Our XT-HDBT-MX44-4K-KIT 4x4 HDBaseT Matrix offers unprecedented performance and value for the custom installation market. The XT- HDBT-MX44-4K-KIT is a 4K HDCP
RTI Driver Guide - Just Add Power RTI DRIVER GUIDE. Revised
 RTI Driver Guide - Just Add Power RTI DRIVER GUIDE Revised 2018-06-26 2018 Just Add Power All rights reserved Unauthorized use or disclosure prohibited Last updated Jun-18 RTI Driver Guide ii Just Add
SM-4X4-4K18GB-LC. Low Cost 4K HDMI Video Matrix Switch: 4x4. Operating Instruction
 SM-4X4-4K18GB-LC Low Cost 4K HDMI Video Matrix Switch: 4x4 Operating Instruction 1 Thank you for purchasing this product. For optimum performance and safety, please read these instructions carefully before
Quick Start Guide. Support 3D. Features
 Quick Start Guide HDMI Matrix 4x CAT5e/6 Extender Features Incorporates HD Base-T technology. Any Four Sources to Any Four Displays,Each port supports HDMI or DVI inputs. The four outputs are all include
Website: Toll Free: [US]
![Website: Toll Free: [US]](/thumbs/78/78295871.jpg "Website: Toll Free: [US]") Operating Instructions Website: www.jtechdigital.com Toll Free: 1-888-610-2818[US] Email: Support@jtechdigital.com J-Tech Digital 4K HDMI Distribution Hub JTD-ID: 435 SAFETY AND NOTICE The JTECH-4K88-EX
Operating Instructions Website: www.jtechdigital.com Toll Free: 1-888-610-2818[US] Email: Support@jtechdigital.com J-Tech Digital 4K HDMI Distribution Hub JTD-ID: 435 SAFETY AND NOTICE The JTECH-4K88-EX
HDMI (HDBaseT) Matrix Switcher Series
 Matrix Switcher Series") HDMI (HDBaseT) Matrix Switcher Series ITEM NO.: HE04M 4 x 4 HDMI + HDBaseT Matrix Switcher With the latest and more affordable HDBaseT technology extend HDMI sources up to 100M at 1080p or 1920x1200. HE04M
HDMI (HDBaseT) Matrix Switcher Series ITEM NO.: HE04M 4 x 4 HDMI + HDBaseT Matrix Switcher With the latest and more affordable HDBaseT technology extend HDMI sources up to 100M at 1080p or 1920x1200. HE04M
Quick Start Guide. Features
 Quick Start Guide HDMI Matrix 4x4Group(HDMI&HDBaseT) Features Incorporates HD Base-T technology. Any Four Sources to Any Four Displays,Each port supports HDMI or DVI inputs. The four outputs are all include
6x2 Classroom/Conference Room Multiformat Matrix w/ HDBaseT Input and Output
 AC-SW62-UHD 6x2 Classroom/Conference Room Multiformat Matrix w/ HDBaseT Input and Output AVProConnect 3518 N Casco Avenue ~ Sioux Falls, SD 57104 1-877-886-5112 ~ 605-274-6055 support@avproconnect.com
4K/UHD 4-Output HDMI to HDBaseT Extended Distance Distribution Amplifier
 K/UHD -Output to Extended Distance Distribution Amplifier AT-UHD-CAT-ED Installation Guide Please check http://www./product/at-uhd-cat- ED for the most recent firmware update or manual. The Atlona AT-UHD-CAT-ED
Atlona products will be preconfigured for plug-n-play compatibility with Bang & Olufsen systems
 Atlona and B&O ATLONA / BANG & OLUFSEN GLOBAL PARTNERSHIP Atlona products will be preconfigured for plug-n-play compatibility with Bang & Olufsen systems Bang & Olufsen dealers can purchase Atlona products
SM-8X8-4K18GB-LC. Low-Cost 4K HDMI Video Matrix Switch: 8x8. Operating Instruction
 SM-8X8-4K18GB-LC Low-Cost 4K HDMI Video Matrix Switch: 8x8 Operating Instruction 1 Thank you for purchasing this product. For optimum performance and safety, please read these instructions carefully before
PROJECT PLANNING GUIDE
 Project Planning Guide Just Add Power HD over IP Page 1 PROJECT PLANNING GUIDE Revised 2014-10-20 Project Planning Guide Just Add Power HD over IP Page 2 Table of Contents How the Just Add Power Solution
HDBaseT 4 4 HDMI Matrix over CAT5e/6/7 Cable with PoE # 15281
 HDBaseT 4 4 HDMI Matrix over CAT5e/6/7 Cable with PoE # 15281 Operation Manual Introduction Features Applications The HDBaseT 4 by 4 HDMI Matrix over CAT5e/6/7 supports the transmission of video (resolutions
4x4 4K HDBaseT Matrix - HDCP 2.2. HMXL44-KIT V2 User Manual
 4x4 4K HDBaseT Matrix - HDCP 2.2 HMXL44-KIT V2 User Manual Thank you for purchasing this product. For optimum performance and safety, please read these instructions carefully before connecting, operating
SPLITMUX-4X4-HDVWC 4x4 HDMI Multiviewer / Video Matrix Switch / Video Wall Processor Installation and Operation Manual
 SPLITMUX-4X4-HDVWC 4x4 HDMI Multiviewer / Video Matrix Switch / Video Wall Processor Installation and Operation Manual MAN307 3/27/18 4x4 HDMI Multiviewer/Video Matrix Switch/Video Wall Processor This
Edition:2A ODM- 88. DVI Matrix Router USER MANUAL
 Edition:2A ODM- 88 DVI Matrix Router USER MANUAL ODM-88 Manual Page 2 ODM-88 Manual Page 3 Table of Contents 1 Introduction and Installation. 6 1.1 Key features... 6 1.2 ODM-88 Shipping Content... 6 1.3
& AC-EX100-UHD-R (v1 & v2)
") AC-EX100-UHD-T & AC-EX100-UHD-R (v1 & v2) 100M HDMI 2.0 Extender With HDCP 2.2 Ethernet, Audio Extraction, EDID Management AVProConnect 3518 N Casco Avenue ~ Sioux Falls, SD 57104 1-877-886-5112 ~ 605-274-6055
AC-EX100-UHD-T & AC-EX100-UHD-R (v1 & v2) 100M HDMI 2.0 Extender With HDCP 2.2 Ethernet, Audio Extraction, EDID Management AVProConnect 3518 N Casco Avenue ~ Sioux Falls, SD 57104 1-877-886-5112 ~ 605-274-6055
4K-WALL HDMI/DVI Video Wall Controller and 4x4 Switch Matrix. User Manual
 4K-WALL HDMI/DVI Video Wall Controller and 4x4 Switch Matrix. User Manual Integrated 2x2 Video Wall Controller and 4x4 Port HDMI, Real Time Switch Matrix with On Screen Display Control & No Software Required.
4K/UHD 4/8-Output HDMI to HDBaseT Distribution Amplifiers
 K/UHD /8-Output to Distribution Amplifiers AT-UHD-CAT- / AT-UHD-CAT-8 Installation Guide Please check http://www./product/at-uhd-cat- and http://www./product/at-uhd-cat-8 for the most recent firmware update
4x4 HDMI2.0 Matrix Support YUV4:4:4, 18Gbps, HDR. Operating Instruction
 4x4 HDMI2.0 Matrix Support 4K@60hz YUV4:4:4, 18Gbps, HDR Operating Instruction 1 Thank you for purchasing this product. For optimum performance and safety, please read these instructions carefully before
Quick Start Guide. Features
 Quick Start Guide HDMI Matrix 8x8 built-in WiFi Features Any eight Sources to Any eight Displays,Each port supports HDMI or DVI inputs. Transmission distance up to 50m under 1080P@60Hz over Single Cat5e
-TECH DIGITAL Explore The High DefinitionWorld
 -TECH DIGITAL Explore The High DefinitionWorld Website: www.jtechdigital.com Hot Line: 1-888-610-2818[US] USER MANUAL J-Tech Digital ProAV Seamless 4x4 HDMI Matrix Switch and Four Picture Multiviewer RoHS
4x4 4K HDBaseT Matrix HMXL44AB. User Manual
 4x4 4K HDBaseT Matrix HMXL44AB User Manual Contents Thank you for purchasing this product. For optimum performance and safety, please read these instructions carefully before connecting, operating or adjusting
4K HDBase-T Matrix Kit
 4K HDBase-T Matrix Kit Simple set up guide HDMI8X8MC Important Safety Notice Thank you for purchasing this Antiference HDMI distribution product. Please read the following instructions carefully and retain
Installation Guide. for SY-HDBT-14S
 Installation Guide for SY-HDBT-14S 4K HDBT Splitter 1x4 with PoC SY Electronics Ltd, Unit 7, Worrall Street, Salford, Greater Manchester, M5 4TH, United Kingdom Tel: +44 (0) 161 868 3450 Fax: +44 (0) 161
HDMI 8 8 Matrix. Operating Instructions LM-HD808-4K
 HDMI 8 8 Matrix Operating Instructions LM-HD808-4K Introduction LM-HD808-4K is an 8-by-8 HDMI matrix. It allows any of the eight Input Channels (HDMI) to be routed to any of the eight Output Channels (HDMI),
Quick Start Guide. Features
 Quick Start Guide HDMI Matrix 8x8 built-in WiFi Features Any eight Sources to Any eight Displays,Each port supports HDMI or DVI inputs. The HDMI input is compensated, clock/phase adjusted and jitter free
ELE9096 USER MANUAL 4K x 2K HDMI 10x10 Matrix Switch
 ELE9096 USER MANUAL 4K x 2K HDMI 10x10 Matrix Switch page 1 1.0 INTRODUCTION ELE9096 10x10 HDMI Matrix Switch allows you to route 10 HD sources to any 10 HD displays! The 10x10 HDMI Matrix switch is a
HDMI Matrix Switcher Series
 HDMI Matrix Switcher Series February 3rd., 2016 Firm. Version 1.18 ITEM NO.: EL-MX-H004 4 x 4 HDMI Matrix Switcher EL-MX-H004 4x4 HDMI Matrix Switch allows you to route 4 HD sources to any 4 HD displays.
RC-SV Configuration Guide Revision 3
 Kramer Electronics, Ltd. RC-SV Configuration Guide Revision 3 Software Version 2.1.2.32 Intended for Kramer Technical Personnel or external System Integrators. To check that you have the latest version,
User Manual. Multiview KVM Processor
 User Manual Multiview KVM Processor Contents 1. Overview... 2 2. Features... 2 3. Specifications... 3 4. Hardware Descriptions... 4 4.1 Product Appearance... 4 4.2 Front Panel... 5 4.3 Rear Panel...
RS-232 / TCP/IP Port Hardware. RS-232 / TCP/IP Port Hardware. TCP/IP Overview
 RS-232 / TCP/IP Port Hardware RS-232 / TCP/IP Port Hardware TCP/IP Overview The Serial and TCP/IP port share the same protocol. The TCP/IP connection is a very simple socket, sometimes referred to as Raw
User Manual. Multiview KVM Processor
 User Manual Multiview KVM Processor Contents 1. Overview... 2 2. Features... 2 3. Specifications... 3 4. Hardware Descriptions... 4 4.1 Product Appearance... 4 4.2 Front Panel... 5 4.3 Rear Panel... 6
DL-HDM44A-H2 Quick Install Guide
 DL-HDM44A-H2 Quick Install Guide This guide is for quick installation only. For complete owners manual go to www.libav.com or use a QR reader to access the manual via QR code below. Scan QR Code with your
AV-IP System & Components
 Product Guide AV-IP System & Components Cost-Effective AV Distribution Systems for Classrooms and Boardrooms We re at the Intersection of AV and IT AV over IP (AV-IP) is the transmission of audio-visual
Zigen HDBaseT Receiver (330 ft.), POE, 4K UHD Scaler, 20W per channel Amplifier, Ethernet ports, Relays, IR and RS-232
, POE, 4K UHD Scaler, 20W per channel Amplifier, Ethernet ports, Relays, IR and RS-232") Zigen HDBaseT Receiver (330 ft.), POE, 4K UHD Scaler, 20W per channel Amplifier, Ethernet ports, Relays, IR and RS-232 ZIG-POE-RXAV USER MANUAL Ver. 1.0 Table of Contents Copyright and Trademark 3 Introduction
Zigen HDBaseT Receiver (330 ft.), POE, 4K UHD Scaler, 20W per channel Amplifier, Ethernet ports, Relays, IR and RS-232 ZIG-POE-RXAV USER MANUAL Ver. 1.0 Table of Contents Copyright and Trademark 3 Introduction
SC35.MX HDMI 18Gbps Over HDBaseT Matrix VER 1.1
 SC35.MX44 4 4 HDMI 8Gbps Over HDBaseT Matrix VER. Thank you for purchasing this product For optimum performance and safety, please read these instructions carefully before connecting, operating or adjusting
HDMI Matrix. Model: HDMIMX44RS. Operating Instruction
 HDMI Matrix Model: HDMIMX44RS Operating Instruction 1 Thank you for purchasing this product. For optimum performance and safety, please read these instructions carefully before connecting, operating or
Usermanual. Multiview KVM Processor
 Usermanual Multiview KVM Processor Contents 1. Overview... 1 2. Features... 1 3. Specifications... 2 4. Hardware Descriptions... 3 4.1 Product Appearance... 3 4.2 Front Panel... 4 4.3 Rear Panel... 5 5.
TEK-MHD44TP x4 HDMI Matrix with HDBaseT Lite Outputs
 TEK-MHD44TP 79055 4x4 HDMI Matrix with HDBaseT Lite Outputs TEK-TPHD402PR User s Manual December 30, 2013 Please read this manual carefully before using the system. Attention: This manual only includes
Installation Guide. 4K/UHD Two-Output HDMI to HDBaseT Distribution Amplifier AT-UHD-CAT-2. Package Contents
 4K/UHD Two-Output HDMI to HDBaseT Distribution Amplifier Installation Guide The Atlona is a 4K/UHD HDMI to HDBaseT distribution amplifier featuring passthrough HDMI input connections, two HDBaseT outputs,
HMXL66. User Manual HMXL66. Menu Up Esc All. Out EDID. In 6x6 4K HDBaseT Matrix PTP. Select Down Enter. IR Output.
 IR Power 1 2 3 4 5 6 All Menu Up Esc Out EDID In 6x6 4K HDBaseT Matrix Lock 1 2 3 4 5 6 PTP Select Down Enter TCP/IP RS232 HMXL66 IR Input IR Output IR Ext. HDBT Ouput 0 1 EDID POH 24V Power 12V On/Off
DVI-3580a. 4K MultiViewer Switcher / Scaler. Quick Start Guide. Introduction
 Quick Start Guide DVI-580a K MultiViewer Switcher / Scaler Introduction Presentation Powerhouse The DVI-580a is a high-performance K MultiViewer, Presentation Switcher and Scaler. This unit is an ideal
8 8 HDMI over CAT5e/6/7 Matrix - ID# 15122
 8 8 HDMI over CAT5e/6/7 Matrix - ID# 15122 Operation Manual Introduction Features Applications The HDBaseT Lite 8 by 8 HDMI Matrix over CAT5e/6/7 supports the transmission of video (resolutions up to 1080p
KD-MLV4x2Pro. Operating Instructions
 KD-MLV4x2Pro 4 Inputs to 2 Outputs POH/HDBaseT/HDMI/VGA Multi-View Seamless Presentation Matrix Switcher. Includes 1 Power over HDBaseT/HDMI Rx Extender. Operating Instructions Screen Modes The Experts
AVG-CS4K-44 V2. Features. Supports HDMI 1.4 & HDCP 2.2, is compliant with lower standards. Supports manual HDCP management and autodetection
 Features Supports HDMI 1.4 & HDCP 2.2, is compliant with lower standards. This product is a professional 4K HDBaseT Home Distribution Matrix Kit, which consists of a 4K HDBaseT Matrix Switcher, 3 HDBaseT
HDMI (HDBaseT) Matrix Switcher Series Ed.B July 2013 Elpro Video Labs
 Matrix Switcher Series Ed.B July 2013 Elpro Video Labs") HDMI (HDBaseT) Matrix Switcher Series Ed.B July 2013 Elpro Video Labs ITEM NO.: 4 x 4 HDMI + HDBaseT Matrix Switcher With the latest and more affordable HDBaseT technology extend HDMI sources up to 100M
HDMI (HDBaseT) Matrix Switcher Series Ed.B July 2013 Elpro Video Labs ITEM NO.: 4 x 4 HDMI + HDBaseT Matrix Switcher With the latest and more affordable HDBaseT technology extend HDMI sources up to 100M
SURGE PROTECTION DEVICE RECOMMENDED
 4x4 HDMI2.0 Matrix Support 4K@60hz YUV4:4:4, 18Gbps, HDR Operating Instruction 1 Thank you for purchasing this product. For optimum performance and safety, please read these instructions carefully before
AVG-UHD4K-44. Features
 Features The AVG-UHD4K-44 4x4 HDMI Matrix Switcher is a professional 4x4 HDMI Matrix Switcher that is capable of receiving up to 4 HDMI 2.0 & HDCP 2.2 compliant signals and outputting 4 HDMI 1.4 & HDCP
AVG-UHD4K-44 V2. Features
 Features The AVG-UHD4K-44 V2 is a professional 4K 4x4 HDMI Matrix Switcher with 4 HDMI inputs, 4 HDMI outputs, 4 SPDIF audio outputs and 4 analogue audio outputs. This unit is designed to switch HDMI 2.0
AVG-TMX44PRO Features:
 The TMX44PRO is a professional 4K 4x4 HDBaseT Matrix Switcher that accommodates 4 HDMI IN, 4 HDBT with 2 mirrored HDMI outputs, 4 Digital Audio outputs and 4 Analogue audio outputs. HDMI inputs are selected
MX -800 Owner s Manual
 MX -800 Owner s Manual 8 x 8 Digital Modular Matrix Router PureLink TM 535 East Crescent Ave Ramsey, NJ 07446 Tel: 201.488.3232 Fax: 201.621.6118 Website : www.purelinkav.com E-mail : info@purelinkav.com
CSW-HD44014K Pro AV/IT 4K 4x4 HDMI Matrix, 18Gbps (YUV:444), HDCP 2.2 Operation Manual
, HDCP 2.2 Operation Manual") CSW-HD44014K Pro AV/IT 4K 4x4 HDMI Matrix, 18Gbps (YUV:444), HDCP 2.2 Operation Manual Page 1 of 19 Thank you for purchasing this product. For optimum performance and safety, please read the instruction
CSW-HD44014K Pro AV/IT 4K 4x4 HDMI Matrix, 18Gbps (YUV:444), HDCP 2.2 Operation Manual Page 1 of 19 Thank you for purchasing this product. For optimum performance and safety, please read the instruction
HDMI Matrix Switcher Series ITEM NO.: HS10MD 10 x 10 HDMI Matrix Switcher
 HDMI Matrix Switcher Series ITEM NO.: HS10MD 10 x 10 HDMI Matrix Switcher HS10MD 10x10 HDMI Matrix Switch allows you to route 10 HD sources to any 10 HD displays! The 10x10 HDMI Matrix switch is a complete
18 Gbps (4K60 4:4:4, and HDR) Audio Down-mixer, with video downscaling. Dolby Digital and DTS Support
 Audio Down-mixer, with video downscaling. Dolby Digital and DTS Support") AC-AVDM-AUHD 18 Gbps (4K60 4:4:4, and HDR) Audio Down-mixer, with video downscaling. Dolby Digital and DTS Support AVProEdge 2222 E 52nd Street N~ Sioux Falls, SD 57104 1-877-886-5112 ~ 605-274-6055 support@avproedge.com
AC-AVDM-AUHD 18 Gbps (4K60 4:4:4, and HDR) Audio Down-mixer, with video downscaling. Dolby Digital and DTS Support AVProEdge 2222 E 52nd Street N~ Sioux Falls, SD 57104 1-877-886-5112 ~ 605-274-6055 support@avproedge.com
4K / UHD HDMI to HDBaseT Distribution Amplifier
 4K / UHD HDMI to HDBaseT Distribution Amplifier Application Programming Interface AT-UHD-CAT-2 Atlona Manuals Distribution Amplifiers Version Information Version Release Date Notes 1 11/18 Initial release
Model : ATZ HDMI-V2-44B Description: 4x4 HDMI2.0 Matrix Switch 18Gbps (4:4:4) 1. Introduction
 1. Introduction") 1. Introduction The HDMI 4x4 matrix switcher features four HDMI inputs and four HDMI outputs. It provides true matrix routing for HDMI signals. It supports the transmission of video (resolutions up to
1. Introduction The HDMI 4x4 matrix switcher features four HDMI inputs and four HDMI outputs. It provides true matrix routing for HDMI signals. It supports the transmission of video (resolutions up to
Setup Guide KD-HDFIX22
 Rev 1 July 2015 KD-HDFIX22 Key Digital, led by digital video pioneer Mike Tsinberg, develops and manufactures high quality, cutting-edge technology solutions for virtually all applications where high quality
4 x 4 HDMI Matrix Switcher With HDBaseT PoC Outputs
 Installation Guide 4 x 4 HDMI Matrix Switcher With HDBaseT PoC Outputs 4 HDMI in to 4 HDBaseT + 2 mirrored HDMI out SY Electronics Ltd, Unit 7, Worrall Street, Salford, Greater Manchester, M5 4TH, United
Just Add Power Video System Overview. Friday, December 16, 11
 Just Add Power Video System Overview HD over IP - What is it? Provides an economical and scalable method of distributing video Can send multiple HD video sources to multiple HD video screens Easily scalable
VitBest MM3-0808/MM Multi Format Matrix Switcher
 VitBest MM3-0808/MM3-1616 Multi Format Matrix Switcher User Manual Introduction MM3 is the new 4K series modular matrix from VitBest. It s available in 8x8, 16x16, 36x36 and 72x72 matrix card based frame
User Manual AC-MXMV122-UHD
 User Manual AC-MXMV122-UHD Multi-format Seamless 4 x 2 Matrix with 4K Quad Split and PIP Tel:877-866-5112 Fax:877-303-6944 Introduction The AC-MXMV122-UHD is a sophisticated HD/ UHD Quad Multi-view Video
ZIG-DA14-UHD HDMI MHz HDMI Distribution Amplifier w/hdcp 2.2 & WebOS
 ZIG-DA14-UHD HDMI 2.0 600 MHz HDMI Distribution Amplifier w/hdcp 2.2 & WebOS ZIG-DA14-UHD-UHD USER MANUAL Ver. 1.0 August 2015 Table of Contents Copyright and Trademark 3 Introduction 4 Package Contents
HDMI to HDMI Matrix Switcher
 4K HDR 4 4 HDMI to HDMI Matrix Switcher Application Programming Interface AT-HDR-H2H-44M API Version Information Version Release Date Notes 1 02/22 Initial release AT-HDR-H2H-44M API 2 Table of Contents
HSM-44-BX. 4K 4X4 HDMI Matrix Switch with HDBaseT and HDMI Outputs
 User s Manual HSM-44-BX 4K 4X4 HDMI Matrix Switch with HDBaseT and HDMI Outputs Supports 4K UHD resolution HDCP 2.2 and 1.4 compliant with EDID Management Extends HDMI, IR, RS-232, IP, and Power over HDBaseT
RC Configuration and Installation Guide
 Kramer Electronics, Ltd. RC Configuration and Installation Guide Revision 8 Intended for Kramer Technical Personnel or external System Integrators. To check that you have the latest version, go to the
8x8 HDMI2.0 Matrix Support YUV4:4:4, 18Gbps, HDR. Operating Instruction
 8x8 HDMI2.0 Matrix Support 4K@60hz YUV4:4:4, 18Gbps, HDR Operating Instruction 1 Thank you for purchasing this product. For optimum performance and safety, please read these instructions carefully before
Website: Toll Free: [US] USER MANUAL
![Website: Toll Free: [US] USER MANUAL](/thumbs/89/98815032.jpg "Website: Toll Free: [US] USER MANUAL") Website: www.jtechdigital.com Toll Free: 1-888-610-2818[US] Email:Support@jtechdigital.com USER MANUAL J-Tech Digital ProAV HDMI2.0 8X8 matrix with IP RS232 Coaxial RoHS JTD-ID:279 1 Thank you for purchasing
Website: www.jtechdigital.com Toll Free: 1-888-610-2818[US] Email:Support@jtechdigital.com USER MANUAL J-Tech Digital ProAV HDMI2.0 8X8 matrix with IP RS232 Coaxial RoHS JTD-ID:279 1 Thank you for purchasing
KD-2X2CS. Setup Guide. 2 Inputs to 2 Outputs HDMI Matrix Switcher
 Rev 0 Jan 2013 Key Digital, led by digital video pioneer Mike Tsinberg, develops and manufactures high quality, cutting-edge technology solutions for virtually all applications where KD-2X2CS 2 to 2 Outputs
HDBaseT 8x8 HDMI Matrix over CAT5e/6/7 with LAN Serving Operation Manual
 HDBaseT 8x8 HDMI Matrix over CAT5e/6/7 with LAN Serving Operation Manual DISCLAIMERS The information in this manual has been carefully checked and is believed to be accurate. Network Technologies Inc
HDMI 8x8 Matrix Switch UHD-4K
 HDMI 8x8 Matrix Switch UHD-4K 500441 Muxlab Inc. 2015 94-000791-A / SE-000791-A SAFETY PRECAUTIONS To insure the best performance from the product, please read all instructions carefully before using the
Setup Guide. KD-CATHD500Pro. HDBT/HDMI via Single CAT6/STP (Tx/Rx) Extenders with EDID Control, RS-232, IR, HDMI Pass-through and Ethernet
 Extenders with EDID Control, RS-232, IR, HDMI Pass-through and Ethernet") Rev 0 May 2013 Key Digital, led by digital video pioneer Mike Tsinberg, develops and manufactures high quality, cutting-edge technology solutions for virtually all applications where high quality video
Rev 0 May 2013 Key Digital, led by digital video pioneer Mike Tsinberg, develops and manufactures high quality, cutting-edge technology solutions for virtually all applications where high quality video
HDMI v1.4 4x2 Matrix 4k2k ID# 15153
 HDMI v1.4 4x2 Matrix 4k2k ID# 15153 Operation Manual Introduction The 4 by 2 HDMI Matrix with 4K 2K Support is capable of switching and routing an HDMI signal from any of its four sources to either of
AVG-CS4K-44. Features. Supports HDMI 1.4 & HDCP 2.2, is compliant with lower standards. Supports manual HDCP management and autodetection
 Features Supports HDMI 1.4 & HDCP 2.2, is compliant with lower standards. This product is a professional 4K HDBaseT Home Distribution Matrix Kit, which consists of a 4K HDBaseT Matrix Switcher, 3 HDBaseT
RC-SV Configuration Guide (Rev 4)
") Kramer Electronics, Ltd. RC-SV Configuration Guide (Rev 4) Software Version 2.1.2.69 Intended for Kramer Technical Personnel or external System Integrators. To check that you have the latest version, go
Kramer Electronics, Ltd. RC-SV Configuration Guide (Rev 4) Software Version 2.1.2.69 Intended for Kramer Technical Personnel or external System Integrators. To check that you have the latest version, go
4K-WALL HDMI/DVI Video Wall Controller and 4x4 Switch Matrix. User Manual
 4K-WALL HDMI/DVI Video Wall Controller and 4x4 Switch Matrix. User Manual Integrated 2x2 Video Wall Controller and 4x4 Port HDMI, Real Time Switch Matrix with On Screen Display Control & No Software Required.
HDMI Matrix Switcher Series
 HDMI Matrix Switcher Series ITEM NO.: HE10M 10 x 10 HDMI Matrix Switcher HE10M 10x10 HDMI Matrix Switch allows you to route 10 HD sources to any 10 HD displays! The 10x10 HDMI Matrix switch is a complete
Website: Toll Free: [US] USER MANUAL
![Website: Toll Free: [US] USER MANUAL](/thumbs/79/79314971.jpg "Website: Toll Free: [US] USER MANUAL") Website: www.jtechdigital.com Toll Free: 1-888-610-2818[US] Email:Support@jtechdigital.com USER MANUAL J-Tech Digital ProAV HDMI2.0 8X8 matrix with IP RS232 Coaxial RoHS JTD-ID:279 1 Thank you for purchasing
Website: www.jtechdigital.com Toll Free: 1-888-610-2818[US] Email:Support@jtechdigital.com USER MANUAL J-Tech Digital ProAV HDMI2.0 8X8 matrix with IP RS232 Coaxial RoHS JTD-ID:279 1 Thank you for purchasing
Two-Input Wallplate Switcher for HDMI with Ethernet- Enabled HDBaseT Output
 Two-Input Wallplate Switcher for HDMI with Ethernet- Enabled HDBaseT Output Installation Guide The Atlona is a 2x1 switcher and HDBaseT transmitter with two HDMI inputs. It features a US one-gang, Decora-style
4K Video Tiler & Presentation Scaler Switcher
 4K Video Tiler & Presentation Scaler Switcher Supports both models: HDBT- VTSC72-4K HDVTSC72-4K All rights reserved 2016 User Manual V0.5 1 / 67 Intro to HDBT- VTSC72-4K & HD- VTSC72-4K The KanexPro HDBT-
EMX-AMP / EMX-I-AMP 4K HDMI Audio Extractor with Power Amplifier. GUI User s Manual CUSTOMER SUPPORT INFORMATION
 GUI User s Manual EMX-AMP / EMX-I-AMP 4K HDMI Audio Extractor with Power Amplifier UMA1244 GUI Insert, Rev NC CUSTOMER SUPPORT INFORMATION Order toll-free in the U.S. 800-959-6439 FREE technical support,
HDMI (HDBaseT) Matrix Switcher Series
 Matrix Switcher Series") HDMI (HDBaseT) Matrix Switcher Series February 3rd., 2016 Firm. Version 1.18 ITEM NO.: EL-MX-B004 4 x 4 HDMI + HDBaseT Matrix Switcher With the latest and reliable HDBaseT technology this matrix extends
HDMI (HDBaseT) Matrix Switcher Series February 3rd., 2016 Firm. Version 1.18 ITEM NO.: EL-MX-B004 4 x 4 HDMI + HDBaseT Matrix Switcher With the latest and reliable HDBaseT technology this matrix extends
4x4 HDMI Matrix with Simultaneous CAT and HDMI Outputs
 4x4 HDMI Matrix with Simultaneous CAT and HDMI Outputs Thank you for purchasing this product For optimum performance and safety, please read these instructions carefully before connecting, operating or
AVG-MS-44HDBT. Features. Support for & 1080p 3D. HDCP Compliant and DVI compatible, supporting HDMI 1.4a & DVI1.0.
 Features MS-44HDBT includes 4 HDMI inputs, 4 HDBaseT outputs, 2 local HDMI outputs, 4 de-embedded stereo audio & 4 de-embedded digital audio outputs. Support for 1080P@60Hz & 1080p 3D. HDCP Compliant and
4K-WALL User Manual. HDMI/DVI Video Wall Controller and 4x4 Switch Matrix.
 4K-WALL User Manual HDMI/DVI Video Wall Controller and 4x4 Switch Matrix. Integrated 2x2 Video Wall Controller and 4x4 Port HDMI, Real Time Switch Matrix with On Screen Display Control & No Software Required.