6.0 CUSTOMERS. 6.1 Create and Edit Contact Details Memos
|
|
|
- Erik Hutchinson
- 5 years ago
- Views:
Transcription
, which is added to the customer s account. When they pay the account, you record the receipt against the customer s account.")

![1 Create and Edit You can enter a new customer in any section of the program by clicking on the [New] button located at the top of the customer list. Click on the [Customers] toolbar.](/docs-images/95/124835171/images/1-2.jpg "Click on [Customers]. Click on [New] and a new customer s screen will appear. 6.1.")
1 6.0 CUSTOMERS Invoices, receipts and adjustment notes cover the customer s side of your business ledger. The concept is easy to grasp. You send a bill for goods and services (a tax invoice), which is added to the customer s account. When they pay the account, you record the receipt against the customer s account. At any time you can print out a Customer s Monthly Balances Report, which will tell you how much each customer owes the business. There are few general ledger accounts involved and Payperwork takes care of these. They are the sales account, the bank and trade debtors. 6.1 Create and Edit You can enter a new customer in any section of the program by clicking on the [New] button located at the top of the customer list. Click on the [Customers] toolbar. Click on [Customers]. Click on [New] and a new customer s screen will appear Contact Details Enter the details for the customer s, pressing [Tab] or clicking the mouse to select the required line. Account Number: (Up to 5 characters). The program uses the next number available. Leave unchanged unless you would like to use your own numbering system. This number cannot be changed at a later date. See also [Setup/Preferences/General]. Make sure the box next to Use the smallest available number for new accounts is ticked. Key: (Up to 6 characters). If required, the key can be used to group and report on different types of customers. E.g. Maintenance s, Domestic, Commercial etc. Name: (Up to 45 characters). Enter the customer s name. This is the first line as addressed on invoices, statements etc. A.B.N: Enter the customer s A.B.N. number if available. If this field is left blank you will receive a warning message when you select the customer in Invoices. The prompt is a reminder to check the GST status for that customer. Attention: (Up to 45 characters). This does not appear on invoices, statements etc. Address Lines: (3 lines of up to 25 characters each). There is a section for billing address and default job address/delivery address. This enables you to store a postal address (PO Box) and a delivery address (Physical address). Or alternatively if the customer requires majority of their work to be done at a different address to their billing address, you can enter this address in here. So when you create a job/invoice, you can retrieve this information easily. Please see page 128. Telephone 1, 2, Mobile and Fax: (Up to 20 characters in each field). 1, 2, and 3: (Up to 60 characters). The address you enter into the field will be the default address for when you invoices, statements etc. from Payperwork. If you have more than one address in the customer information, you will be given the choice of which address you would like to send to. For example if you have one contact for invoices and one contact for statements, it allows you to store both addresses and depending on what you want to will change which contact you choose to send it to. WWW: The WWW field is for storing the customer s web site address (you do not need to type the www. as Payperwork has already stored that for you). By pressing the globe button it will automatically take you to that web site Memos Free typing field for longer details about the customer. Each time you type a note in the memos section, Payperwork will record the date the note was made and the user that made the note. So if you see a note in there that you need more information on you can speak to the user that made the note. If you have an important note regarding the customer that you want all users to be able to see or be reminded of when they are creating invoices, quotes etc. then you can put this in the note section on the Memo s screen (As shown below). Page 116 of 301

. OR Click on the [Customers] toolbar. Click on [Discounts].")
2 6.1.3 Group Discounts You can set up item discounts by group for each customer. These are stored in the individual customer records. When you are entering the items into an invoice or quote, the discount for that customer for items of that group will be applied automatically. The discount can of course be deleted OR changed at the time of the entry. This feature will then allow you to print out personalised individual price lists for your customers. Group discounts are also available for custom price lists (Reece, Tradelink, L&H and MMEM). OR Click on the [Customers] toolbar. Click on [Discounts]. Select the customer you would like to give the discount to. Click on the [Customers] toolbar. Select the customer from the list. Click on the [Edit] button. Click on the [Invoices] tab. Click on [Group Discounts]. Group: These are the groups for the items that are in your records. Discount%: Enter the discount by percentage that you want applied off the billing price to items in each group for that customer. When you are in an invoice or quote, the discount will be inserted by default into the discount field. This can be changed if required Terms and Overprinting Terms: Enter the number of days (from the invoice date), that your customer has to pay the invoice. Messages will display when payment is due and the customer s monthly balances report will print the Due date for each purchase. The number of days entered into the Terms value here is also used to calculate the Pay By date in the terms overprinting on an invoice. Overprinting: As shown in the setup notes, you can insert overprinting into an invoice. This can be a general overprinting for all customers or alternatively you can have overprinting for each individual customer. To do this you would enter the overprinting into this section of the customer s details. Then when you are in creating the invoice for this customer, you will select customer default Banking Details Enter in the customers banking details that you would use for EFT transactions. When you are entering in a payment for this customer (if you need to return money to then due to overcharging etc.) and you select internet transfer as the payment method, the customer s bank account details will automatically be populated in these fields. Click on: [Save and Exit] to save the details and exit. [Save and Add New] to save the details and add a new supplier. [Cancel and Exit] if you do not wish to save the details. Page 117 of 301
3 6.2 Quotes Producing a quote in Payperwork follows the same procedure as entering an invoice. As in invoices, you can produce a simple quote, with a description and value or you can fully itemise and produce a costing. Again you have the opportunity to replace the fully itemised and costed quote with a retyped descriptive quote for the customer, while retaining the fully itemised quote on file. Should the quote be successful, it can be copied into a purchase order for easy ordering and it can be turned into a W.I.P. for quick and easy invoicing. The options are: You can produce a simple quote with a description and value. OR A fully itemised quote using standard, custom price list items and/or unit rate items with the costing and with the profitability displayed. Copy details from an existing quote for fast quoting on small jobs. Use cost and section codes along with subtotals to gain more flexibility in print options. A Descriptive quote to replace the fully itemised quote with a description and total to present to the customer. Copy items from the quote into a purchase order for accurate and quick ordering of the materials. Unit rate items will be expanded into component parts in the order. Turn the quote into W.I.P. for prompt invoicing. Compare the costing on the job to the costing on the quote. The [Copy From] option in quoting allows any quote to be copied into a new quote, with the update prices feature. This means that old quotes can be easily produced or updated with the latest prices on file. A quote that has been copied from another quote can be changed, added to and printed as required. Master quotes can also be kept on file to be copied over as and when required. Copy From also enables you to copy information from any existing invoice or job Create and Edit a Quote Refer also to the section on Entering Invoices for more detailed information. Only the major differences between entering an invoice and entering a quote are outlined here in detail. Below is a summary of the steps taken to enter a quote. Click on the [Customers] tool bar. Click on [Quotes]. Select the customer: Search the list for an existing customer by using either the mouse or the up and down keys. You can search by Short Name, Name, Account Number or Telephone number etc. Double click on required customer in the list or click on the [New] button to enter in new customer s details. Remember that you can use the cash sales customer as set up in [Setup/Preferences], for small quotes to one-off customers. The quote screen will appear which lists previous quotes for this customer. To view or enter an existing quote: Double click on the quote in the list. To delete an existing quote: Click once on the quote in the list and then click once on the [Delete] button on the screen. If the quote has a descriptive quote, you will need to go to [End-of-Day/Clean-up/Descriptive Invoices & Quotes] to delete the descriptive quote before you will be permitted to delete the original quote. Note: A quote cannot be deleted if the user does not have permission to delete quotes in [Setup/User Names and Passwords]. To change the next quote number in the series: Refer: [Set-Up/Initialisation]. To enter a new quote: Click on [New or R mouse and L mouse on [New Transaction] Quote Header Details Enter the header details for the quote. Date and Reference: Enter the date for the quote and reference. Job Address Tab: Enter the job address and details. You have four options when it comes to entering the job address: Billing Address: If the job is located at the same location as the customers billing address, select this option. Default Job Address: If the job is located at the default job address stored in the customer s account information, select this option. Please see page 116 for storing a default job address. Page 118 of 301
4 New Job Address: If the job is located at a new address, just select this option and enter the address in manually. Saved Job Address: This option is for when you have previously saved the job and you go back into the job and change the address by selecting new address, you have the option to convert back to the previous address by selecting this option. Job Details Tab: By clicking on the Job Details tab you are able to enter in the contact, telephone number and details of the job. Contacts Tab: By clicking on the contact tab you are able to see the contact and contact details stored in the customer s account information Templates / Copy From In any quote you have the ability to bring over the contents from another quote. Whenever you are producing a quote that is the same or just similar to another quote, click on the [Copy From] button and select the quote to be copied. The full quote will be copied and you can change and add items as required, without affecting the original invoice. Similarly, complicated quote formats can be set-up as masters to be copied over when required, saving time and eliminating errors. Commonly used phrases can also be set up as quotes to be copied over and edited as required. Any number of quotes can be copied into one. Click on the [Copy From] button. A list of all quotes will be displayed. You can either double click on the quote you would like to copy or alternatively if you would like to copy from an invoice, job etc. Click the down arrow where it says quotes and select from the list. If you have Display Costing and Profit details checked on in [Setup/Preferences] as outlined on page 25, whenever you select Copy From in customer transactions (for example when copying from an existing quote to a new quote), you will see the Update Prices screen. On this screen you will be asked to select the method you want used for the Costing. Copy over Cost Prices from the Source Transaction: The program will use the costs that are in the transaction you are copying from, even if the cost prices in the actual items have changed since the original transaction (quote, invoice). Use Item Default Cost Prices: The program will use the prices that are current in each item for the costing. If there are items that have no cost (such as Category items or account lines) these costs will be left at zero. You can edit these lines and enter a value after the Copy From is done. Use Item Default Cost Price, PROMPT where cost information is not available: This is the most likely choice. The costing will use the current prices for the items, and will stop during the copy and display any items that have no cost stored with the item and you will be able to enter a new cost. PROMPT for each Cost: Use this one if you do not maintain the costs in your standard items or you do not update your Suppliers price list regularly. You can of course use it if you would like to check EACH cost in each line. You can set the default selection in Setup/Preferences/Costing. Page 119 of 301
5 6.2.3 Adding Text and Images using Word Processor Add Text To enter a description of the work that is proposed, use the word-processor by click in the [Text] button and click on [OK] to save. Add Image You also have the option to insert an image in the word processor. To do this click on the picture of a camera as shown Adding Value to your Quote Add $ Value use one or a combination of the four methods of entering a value as in Invoicing: 1. Add a value using a Category Item. Click on [Items] or right mouse click and select [Add Item]. These are items that have no unit of sale. 2. Add a value using a General ledger account. Click on [Accounts] or right mouse click and select [Add Accounts]. Accounts are NOT updated with values in a quote. 3. Fully itemised and costed using items from your list(s) or your Custom Price List. Click on the [Items] or the [Add Custom Price List Items] button. You may like to change your billing price to cost in [Set-up/Stock] or [Set-up/Custom Price List Items/Stock] while entering quotes. You can then add a mark-up on the entire quote rather than per item. 4. Fully itemised and costed using Unit Rate Items. Click on the [Unit Rate Items] button. These will be expanded into their component items when copied into an order. Sub-Totals can be added or inserted to separate sections of the quote. Page 120 of 301
6 6.2.5 Quote Costing Analysis The costing of the items in a fully itemised quote is displayed progressively at the foot of the screen. Click on the [Costing] tab in the bottom left hand corner of the screen. To print or view more detail of the costing click on the down arrow next to [Print] and select [Costing]. For more information on Costing Analysis please see the section called Invoice Costing on page Linking external files to a quote You can link a file from another folder on your local hard disk or a shared folder on the network to a quote, job, contract or invoice. The file will not be saved into the Payperwork data. If the file is later changed and saved, the new version will be opened when it is accessed from the link in Payperwork. If the linked file is deleted from its linked location is cannot be viewed from within the transaction. If the file is moved to another folder, you will need to change the link in the transaction to direct it to the new (correct) folder. When you open a file from the link, the associated program (if it is available on your computer) will be used to open the file. Examples:.jpg files - Picture Manager.doc and dcx files MS Word..pdf Adobe reader..xls MS Excel. Open an existing quote and click on the [Link] button. You can search the local computer and the network and select the file to link to the Quote. If you select a file on your local disk from a folder that is not shared on the network, you can proceed and link the file but you will notified that it will not be available to be viewed by the other users on the network Re-typed Quote A re-typed quote is also referred to as a descriptive quote. Re-typing a quote is an option that allows a quote to be replaced in a format to send to the customer. Sections of the original quote can be copied onto the replacement if desired or the quote can be re-typed entirely. The final value of the re-typed quote CAN be different to the value of the original itemised quote. A descriptive quote can be used in many ways, the most common being when you do not wish the customer to see the individual prices of a fully itemised quote, or you wish to change the wording of the copy that is being sent to the customer. When the fully itemised quote is complete, click on the [Retype] button located at the top of the page. For full details on typing, copying and deleting descriptive quotes refer to the section called Re-type Invoices in the invoices section of this manual located on page 157. Page 121 of 301
![6.2.8 Finishing and Saving Quotes To progressively save the quote without exiting click on [Save].](/docs-images/95/124835171/images/7-0.jpg "To save the finished quote without printing it, click on [Finish] and you will be asked if you wish to save the changes to the transaction.")
7 6.2.8 Finishing and Saving Quotes To progressively save the quote without exiting click on [Save]. To save the finished quote without printing it, click on [Finish] and you will be asked if you wish to save the changes to the transaction. The quote is automatically saved when [Print Quote] is selected Marking Quotes as Inactive or as a Template You can mark quotes as Inactive or as Templates in order to narrow down to (or to filter out) certain quotes in transactions lists and quotes reports. All quotes are marked as Active unless the user removes the check from the Active box in the full quote transaction list thereby making the quote Inactive. Quotes that have the Active check removed: Will NOT carry over to the new year unless they are linked to a contract. Can be excluded from the list of quotes in the transaction list and from the list in the quotes report. Quotes that have the Active check removed will not carry over to the new year. Quotes marked as a Template: Can be excluded from the list of quotes in the transaction list and from the list in the Quotes report. You can ask for Templates Only when using Copy From Quotes marked as a Template will carry over to the new year even if it is over 12 months old. Page 122 of 301
![6.2.10 Printing Quotes and Picking Slips 6.2.10.1 Printing Options The name of the printer currently selected in [Set-up/Print] is displayed. Type: Refers to the type of stationery to be used.](/docs-images/95/124835171/images/8-0.jpg "Form: This option will fit paper that is slightly shorter than standard Australian A4 form. Form A4: The default option that will fit on standard Australian A4 paper.")
8 Printing Quotes and Picking Slips Printing Options The name of the printer currently selected in [Set-up/Print] is displayed. Type: Refers to the type of stationery to be used. Form: This option will fit paper that is slightly shorter than standard Australian A4 form. Form A4: The default option that will fit on standard Australian A4 paper. That is 210mm x 297mm Letter: Single Sheet (A4 210mm x 297mm). Select this type if you want to print quotes on your existing company letterhead that already has the company details printed across the top of the letterhead. TOP TAB Pre-Printed Stationery: Click to tick if you have had stationery pre printed with your company information to match Payperworks Form A4 template. If you tick this option Payperwork will not print the graphic or the User details on the header or the remittance advice. Print Graphic: Click to tick of you want the user details replaced with the graphic that you have preloaded in the overall printer settings. This option will not be available if you have not loaded a graphic. Page Break: If turned off the quote header details are not printed on subsequent pages of multiple page quotes. This is useful for draft and office copies of long quotes. Print Contact Details: If checked the Attention and phone number fields from the customer record will print under the customer s name and address on the quote. Print Attention: If checked the Attention line from the customers record will print as the first line of the customers address on the quote. Description Title Line: Switches on or off printing the line Item Description Price etc. across the top of the contents. Inc Discount in Title Line: This omits of the word Disc when printing the title line. Print Service Details: If you have turned on service management, use this check to print the details of the item on the quote. When you are using the automotive version of Payperwork this will print the Vehicle details. Page 123 of 301
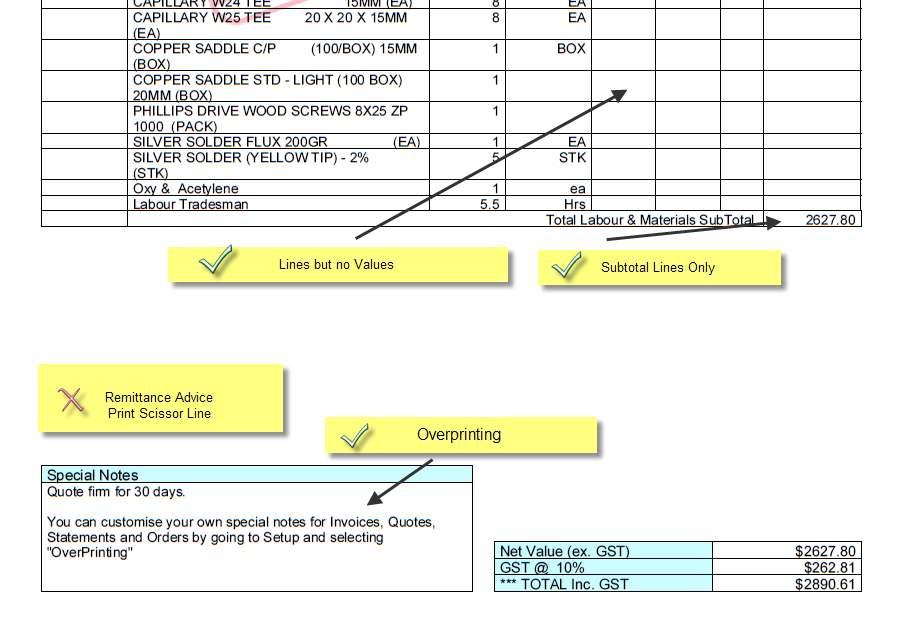
9 Body Tab Print Ex.GST Values: With this option checked, ex GST values will print for each line item and the GST will be printed after the Net Value at the bottom of the quote. If you find that a number of your customers pay just the ex GST value of a quote, try removing this check. Print Item Numbers: Printing item numbers on or off. If this option is on you have the option to print either the Item number or the Item ID. Print User Descriptions: For price list items you have the option to enter an alternative description for the supplier s items. This check is an option to print these descriptions on the quote in place of the suppliers item description. Print Quantities: Remove this check to only print the total value of the line and not the quantities. Summary: Check this box to print a Section summary at the bottom of the quote. Sub-Total Lines only: For fully itemised quotes with sub totals. No other Lines: Prints the Text and the subtotal lines only. Lines but NO Values: Prints the text, the item lines (no individual prices or line totals) and the subtotals. Print Unit Price accurate to Decimal Places: When markups or discounts are applied to items in Payperwork, it uses up to 6 decimal places to calculate the price per each and the total price. It then rounds the total and displays to 2 decimal places. When the rounded figure is multiplied by the quantity it may appear that the result is not accurate (i.e. the same value as was calculated in the quote). Depending on the type of item, discounts, markups and quantities that you use, you may need to print more decimal places on the quote Bottom Tab Terms: Option to print the customers terms. See [Setup/Overprinting] Overprinting: Option to turn off the overprinting. See [Set-up/Overprinting]. Remittance Advice: Turns the remittance advice on or off. Print Scissor Line: This shows your customer where to detach the remittance advice. Stamp: You can have Payperwork print a watermark stamp across your quote with options such as Office Copy Quote Estimate etc. Click the down arrow and select the required stamp. Print as Quote: You can select Quote, Estimate or Variation. Number of Copies: Enter the number of copies required. This will print duplicate copies for filing. Save Settings: Click on [Save Settings] when you have selected all your preferred options. The selected options will be saved until you change and option and select save settings again. Click on [Print Preview] to view the finished result on the screen or check number of pages. Click on [OK] to print the quote or [Cancel] to return to the quote. For an example of what the quote should look like please see the next page. Page 124 of 301

10 Page 125 of 301
![6.2.10.2 Quotes When you are ready to print, email or fax your quote, click on the [Print] button in the top left hand corner of the quote screen. The Print Quote options will be displayed.](/docs-images/95/124835171/images/11-0.jpg "Payperwork comes with its own preset template and all you need to do is select (or remove) the fields you want on the printed quote.")

11 Quotes When you are ready to print, or fax your quote, click on the [Print] button in the top left hand corner of the quote screen. The Print Quote options will be displayed. Payperwork comes with its own preset template and all you need to do is select (or remove) the fields you want on the printed quote. Each type of form (quote, invoice, job card, remittance etc) has its own Print Settings. This means that you can select your preferred settings and save each of them separately. These options need to be used in conjunction with the overall print and settings in the setup menu. [Setup/Print and Settings]. There you can load the graphic into your data, set the overall print settings, fonts and background colors that are common to all forms Picking Slip A picking slip is a list of all the items required for a job with boxes that can be marked as they are checked off as being taken or ordered. The picking slip option will: Expand the Unit Rate Items meaning all the components of any unit rate items will be listed as well as the individual items in the quote Consolidate all the items in the quote. This means that if an item appears more than once in the quote, it will be consolidated into one item line with the quantities of each item added together. Any account lines or category items will NOT be included on a Picking Slip. Only inventory and non-inventory standard and price list items. Click on [Picking] and select your print options. Click on [Picking] and select the print options required. Click on [Print Preview]. Click on [Print], [Fax] or [ ]. Page 126 of 301
![6.2.11 To Convert a Quote into a W.I.P./Job To copy the details of a successful quote into a W.I.P. for costing and easy invoicing, go back into the quote and tick the box next to [Make a WIP] which stands for Work In Progress or Job.](/docs-images/95/124835171/images/12-0.jpg "If you are using numeric job numbering, the quote will be allocated the next job number in the series, otherwise you will be prompted to enter your own job number.")
12 To Convert a Quote into a W.I.P./Job To copy the details of a successful quote into a W.I.P. for costing and easy invoicing, go back into the quote and tick the box next to [Make a WIP] which stands for Work In Progress or Job. If you are using numeric job numbering, the quote will be allocated the next job number in the series, otherwise you will be prompted to enter your own job number. Click on [Finish] and the quote will be saved as a job. The quote remains on file under the customer s account. When a quote has been turned into a job, a picture of a man with a hammer appears in the column under Job No. in the list of quotes for the customer. If you click on the down arrow as shown below, a table showing the job number(s) and date of conversion will be displayed. Page 127 of 301

13 6.3 Jobs A job is also known as a W.I.P. (Work In Progress). Jobs are used to track profitability There are two ways of creating a job: 1. Creating a job by converting a quote into a Job. 2. Creating a job from scratch Creating and editing a job Click on the [Customers] tool bar. Click on [Jobs]. Select a customer from the list. Click on [New]. Start by entering a reference for the job. E.g. A purchase order number supplied by the customer. Enter the date the job started. Job Address Tab: Enter the job address and details. You have four options when it comes to entering the job address: Billing Address: If the job is located at the same location as the customers billing address, select this option. Default Job Address: If the job is located at the default job address stored in the customer s account information, select this option. Please see page 116 for storing a default job address. New Job Address: If the job is located at a new address, just select this option and enter the address in manually. Saved Job Address: This option is for when you have previously saved the job and you go back into the job and change the address by selecting new address, you have the option to convert back to the previous address by selecting this option. Job Details Tab: By clicking on the Job Details tab you are able to enter in the contact, telephone number and details of the job. Contacts Tab: By clicking on the contact tab you are able to see the contact and contact details stored in the customer s account information. Click on [Save]. This will now save the job under the customer s account. If you were to tick the box next to Job Finished it would then convert the job into an invoice. At this stage we do not want to do this as you will not be able to allocate labour and materials to the job and therefore not be able to track the profitability of the job. To edit the job: Click on the [Customers] tool bar. Click on [Jobs]. Select a customer from the list. Select the job from the list. This will then open the job allowing you to change all details except the customer the job was created under and the job number Deleting Jobs Click on the job in the list of jobs in the customer and click on [Delete]. A job cannot be deleted if the user does not have permission to delete jobs and contracts as set up in [Setup/User Names and Passwords] Convert Quote to a Job For information on converting a quote to a job please see previous page. Page 128 of 301
![6.3.4 Adding Text and images to the Job using Word Processor Add Text To enter a description of the work that is proposed, use the word-processor by click in the [Text] button and click on [OK] to](/docs-images/95/124835171/images/14-1.jpg "save. Add Image You also have the option to insert an image in the word processor. To do this click on the picture of a camera as shown. 6.3.")
14 6.3.4 Adding Text and images to the Job using Word Processor Add Text To enter a description of the work that is proposed, use the word-processor by click in the [Text] button and click on [OK] to save. Add Image You also have the option to insert an image in the word processor. To do this click on the picture of a camera as shown Posting Scheduled and Un-scheduled labour to a Job For information on how to post scheduled labour from the job scheduler to the job please see page 142. For information on how to add labour to a job manually please see page Allocating Materials purchased to a Job For information on how to allocate materials purchased from suppliers please see page Printing Job Cards and Picking Slips In regards to jobs, there are two types of documents you can print: 1. Job Cards: Which can be given to employees to provide them with all the information they need to do the job. 2. Picking Slips: If you have created a job by converting a quote into a job, you can print a picking slip that will provide you with a list of all the materials needed Job Cards A job card can be printed for Jobs or W.I.P. These can be used to give to the contractors or employees that are doing the job to take on site or to see the costs to date. Click on the [Customers] tool bar. Click on [Jobs]. Select a customer from the list. Select the job from the list. Click on the [Job Card] button located in the top left hand corner of the job screen Job Card Print Options Type: You have the option of choosing Form, Form (A4) or Letter. For the standard paper in Australia you should choose Form (A4). Item Numbers: If you job contains items from either your standard item list or from your custom price list, you have the option to print either the Item number you used when creating the item or the Item ID being the part number of the item from your supplier. When printing items from your custom price list it does not matter which option you pick as either way the part number from the supplier will be printed. Labour Description: You have the option to print the item details, employee details or line details. Include Billing Rate: If you have labour allocated to the job, you have the option of including the billing rate or hiding the billing rate, depending on whether you would like the person receiving the job card to know the billing rate s for your employees. Include Labour date: When you are allocating labour to the job you have to select the date the labour was done on. So you have the option to print that date or to exclude the date. With Net Value: Select this option if you would like to include the net value of the job on the job card. Without Net Value: Select this option if you would like to exclude the net value of the job on the job card. Page 129 of 301


15 Print Blank Lines: Select this option if you would like the lines that have no materials or labour on them to be printed. Print Outline Lines: Select this option if you would like outline lines around your item and labour lines. # Job hour lines: This option allows you to change the amount of available lines to print on your job card. So if you know the job will take three days, you could leave this as 3. But if you think it will take approximately 10 days, you can change this to 10, and 10 lines will print. See picture below. Print Finish Times and Print Posted Hours: This option allows you to print the details of the hours you have posted from the job scheduler. For an example please see below Printing a blank job card in jobs or contracts You can print a job card for both jobs and contracts that have no material or labour listed. This would mainly be used larger ongoing jobs and contracts. That is those that have already had multiple lines of materials and labour allocated to them. A blank job card will include the job number, job details and job address but there are a few options that may be relevant to you. Options: Number of Labour Lines. Include the scheduler data on the job card. The Word Processing will be included or excluded according to the option previously set on the Body Tab. Page 130 of 301


16 Picking Slip A picking slip is a list of all the items required for a job with boxes that can be marked as they are checked off as being taken or ordered. The picking slip option will: Expand the Unit Rate Items meaning all the components of any unit rate items will be listed as well as the individual items from the job. Consolidate all the items in the job. This means that if an item appears more than once in the job, it will be consolidated into one item line with the quantities of each item added together. Any account lines or category items will NOT be included on a Picking Slip. Only inventory and non-inventory standard and price list items. Click on [Picking] and select your print options. Click on [Print Preview]. Click on [Print], [Fax] or [ ] Linking external files to a job You can link a file from another folder on your local hard disk or a shared folder on the network to a quote, job, contract or invoice. The file will not be saved into the Payperwork data. If the file is later changed and saved, the new version will be opened when it is accessed from the link in Payperwork. If the linked file is deleted from its linked location is cannot be viewed from within the transaction. If the file is moved to another folder, you will need to change the link in the transaction to direct it to the new (correct) folder. When you open a file from the link, the associated program (if it is available on your computer) will be used to open the file. Examples:.jpg files - Picture Manager.doc and dcx files MS Word..pdf Adobe reader..xls MS Excel. Open an existing job and click on the [Link] button. You can search the local computer and the network and select the file to link to the Job. If you select a file on your local disk from a folder that is not shared on the network, you can proceed and link the file but you will notified that it will not be available to be viewed by the other users on the network. Page 131 of 301

17 6.3.9 Compare a job or contract with a quote Following on from the addition of the Section option in Jobs, Quotes, Contracts etc (See the section called Section Codes). You can now view or print a report that compares the original quote with the job (or contract). When the quote is prepared, each line item is assigned a cost AND a section code. E.g.: Code M for Materials and Section 1 (Rough In) As the contract or Job has its costs allocated either manually, directly into the job, or via allocations from purchases, each line is also assigned a cost and a section code. Then, from within the Job or Contract: Click on [Utilities]. Click on [Compare Contract (or Job) to Quote]. Select [Compare by Sections and Costcodes. You will be able to see for example the quoted price of materials for Section 1 against the actual price for the same cost and section code in the Job Marking Jobs as Active or as a Template You can mark jobs as Inactive or as Templates in order to narrow down to (or to filter out) certain jobs or in transactions lists, WIP reports and in the job scheduler. When they are created, all jobs are marked as Active and remain so unless the user removes the check from the Active box. Jobs that have the Active check removed: Will not be included in the list of Jobs in the Job Scheduler. Can be excluded from the WIP report. Can be excluded from the list of jobs in the WIP report. Will not carry over to the New Year on rollover unless they are linked to a contract. Jobs marked as a Template: Will be carried over to the new financial year. Can be excluded from the WIP report. Can be excluded from the list of jobs in the transaction lists. You can ask for Templates Only when using Copy From Page 132 of 301

18 6.4 Job Scheduler Overview The Payperwork Job Scheduling module is designed to assist in the management of multiple employee schedules. The visual nature of the calendar allows the user to quickly and efficiently track employees, as well as assign, remove or edit current jobs. The Payperwork Job Scheduler is easy to use. Drag any active job or contract to the desired start time, for the preferred technician, and the job has been scheduled. To increase the amount of time allowed, stretch the appointment to the estimated finish time. Utilising a centralised schedule can greatly affect the proficiency of the business. Administration staff, technicians and management are able to access one single source of information. Which means communications are improved without saying a word, while greatly reducing the risk of double booking jobs. Any service business can benefit from the efficiencies that using Job Scheduling generates. Say goodbye to diaries, whiteboards and shuffling job cards around the desk. The advantages of using job scheduling Job scheduling assists you to manage the daily schedule of your field staff, technicians, tradesmen, workers and any other employees. Easily recognise staff availability on the visual calendar. This enables you to respond to customer requests promptly thereby increasing customer satisfaction. Easily re-schedule and move jobs from employee to employee or from one day to another. Features: Easy to implement. Simply setup your employees, start a job and you are ready to go. Set your own preferred increments from 5 minutes to 1 hr. View scheduler by employee, job or day. Access schedule calendar directly from the job or from the home page. Print technicians daily work schedule. Post labour directly to jobs. Set Normal hours so you can recognise after hours rates easily. Clearly identify hours scheduled and not charged. Compare scheduled vs. billed hours. Set employee availability to prevent scheduling workers on days they are not available. E.g.: RDO s, holidays, trade school, public holidays. Multi User. SMS the job details to the employees phone. Page 133 of 301
19 6.4.2 Scheduler Settings The scheduler comes with default settings for the available options. These can be changed now or later as you become more familiar with the program. Click on the [Job Scheduler] tab. Click on the [Settings] tab on the right. Options Increments: Click the down arrow and select the desired increments. From 5 minutes to 60 minutes. This can be changed at any time. Columns: The number of vertical columns on the screen at one time. The less columns the wider the view for information. Schedule View You can change the view at any time. However the default view will change back to the setting that you had when you last clicked on the [Save Settings]. Single Employee Multiple Days: With this view you can see an employee s calendar for up to a week at a time. This depends on the number of columns chosen above. The drag and drop option will show jobs and they can be dropped into the employee s calendar. Single Job Multiple Days: In this setting you can select a single job and view which employees have been scheduled for up to a week at a view. The drag and drop option will show a list of employees that can be dropped into the jobs. Single Day Multiple Employees: Here you can see a general overview of all employees on the selected day. The drag and drop option will list jobs and these can be dropped into the employees. Single Contract Multiple Days: In this setting you can select a single contract and view which employees have been scheduled for up to a week at a view. The drag and drop option will show a list of employees that can be dropped into the contracts. Week View: View which jobs or contracts all employees have been scheduled to, viewing a week at a time. Legend Hours Posted: When you select the hours posted view the colours on the scheduler s grid will display whether they have been posted or allocated to a job(s). Employee Assigned: The colours on the grid displays the colour assigned to the employee that has been scheduled. Normal Hours Select the hours and days that normal charge out rates apply. The program will prompt you when you are posting scheduled hours to a job(s) if those hours are outside these times. Refresh Rate This option is a time in seconds that the program will automatically refresh the screen. This is relevant in multiple user mode to reduce the risk of other users overwriting each other s allocations. Print Options Time Range: The scheduler covers 24 hours and to avoid printing times when no jobs are scheduled and likely to be wasting space, set the time range for the report to begin and end. Columns: The maximum number of columns across a page. The fewer columns you have across a page the more information you will see for each individual job. If you want to keep these settings as default, click on the [Save Settings] button. Page 134 of 301

![Click on the [Today] button to instantly return to the current or default date. [<] [>] You can jump forward and back a day using the single arrow buttons.](/docs-images/95/124835171/images/20-1.jpg "[<<] [>>] In single day mode clicking on this button jumps forward or back seven days.")
20 Dates Once you are using the scheduler on a day to day basis, you will be swapping forward and back in time as you check out the jobs, schedules and available times. It is a good idea to familiarise yourself with how to move around the dates efficiently. When you open the scheduler you will always default to the current date. Click on the [Today] button to instantly return to the current or default date. [<] [>] You can jump forward and back a day using the single arrow buttons. [<<] [>>] In single day mode clicking on this button jumps forward or back seven days. In employee or job mode, clicking on this button jumps forward or back the number of columns selected in the Settings/Options as described in the section called Scheduler Settings. [ > ] The forward to end arrow takes you forward four financial years. [ < ] The back to beginning arrow takes you back one financial year. Using the date button you can view and select from the annual calendar. Page 135 of 301
![6.4.3 Scheduling Jobs and Contracts You can access the scheduler from inside a job or from the Payperwork main screen by clicking on the [Scheduler] button.](/docs-images/95/124835171/images/21-0.jpg "Whether you drop jobs (to assign) into employees or vice versa (drop employees into jobs) depends on the option you have selected in the Schedule View as outlined in the section called Scheduler")

21 6.4.3 Scheduling Jobs and Contracts You can access the scheduler from inside a job or from the Payperwork main screen by clicking on the [Scheduler] button. Whether you drop jobs (to assign) into employees or vice versa (drop employees into jobs) depends on the option you have selected in the Schedule View as outlined in the section called Scheduler Settings Single Job Mode Single Job Multiple Days: In this setting you can select a single job and view which employees have been scheduled on that job for up to a week at a view. The drag and drop option will show a list of employees that can be dropped into the jobs. Assigning an Employee to the job using Drag & Drop When you access the Scheduler in this mode you will need to select the particular job you want to view first. Any employee can be dragged in from the list by pointing the mouse to the employee in the list and dropping it into the schedule grid. Drop the employee onto the start time. This can be extended, by dragging the box down to the required time or by editing as described below. The actual times will display when you run the mouse over the appointment. You can drop several employees into the one Job. Page 136 of 301
![Editing an Appointment Click R Mouse and select [Edit] or Double Click on the appointment in the Scheduler and the editing window will be displayed.](/docs-images/95/124835171/images/22-0.jpg "Appointment Date: The Job can be changed to another date. Appointment Start and End Times: You can enter and change times using the up and down arrows.")
.")
22 Editing an Appointment Click R Mouse and select [Edit] or Double Click on the appointment in the Scheduler and the editing window will be displayed. Appointment Date: The Job can be changed to another date. Appointment Start and End Times: You can enter and change times using the up and down arrows. For example a job cannot start at the same time as the previous job finished. If you want the next job to start immediately after the last one, you could change the start time for the next job to a minute earlier (or of course make the next job start a minute later). Details: You can add more text directly to the scheduler. This will not be added to the job card. To Remove an Employee from a Job in the Scheduler Click R Mouse and select [Delete]. To View the Job with all materials and hours allocated so far Click R Mouse and select [View]. This can be done either on the scheduled job on the calendar or by pointing to the job in the job list on the right of the screen Single Employee Mode Single Employee Multiple Days: With this view you can see a single employee s calendar for up to a week at a time. This depends on the number of columns chosen. The drag and drop option will show the jobs and they can be dropped into the employee s calendar. Assigning a Job to the employee using Drag & Drop. If you have accessed the scheduler from the Job the current Job button will be displayed. This can be dropped directly into an employee on the schedule grid. Any other job can be dragged in from the list by pointing the mouse to the job in the list and dropping it into the schedule grid. Drop the job onto the start time. This can be extended, by dragging the box down to the required time or by editing as described below. The actual times will display when you run the mouse over the appointment. Editing an Appointment Click R Mouse and select [Edit] or Double Click on the appointment in the Scheduler and the editing window will be displayed. Appointment Date: The Job can be changed to another date. Appointment Start and End Times: You can enter and change times using the up and down arrows. For example a job cannot start at the same time as the previous job finished. If you want the next job start immediately after the last one, you could change the start time for the next job to a minute earlier (or of course make the next job start a minute later). Details: You can add more text directly to the Scheduler. This will not be added to the Job card. To Remove a Job from the Scheduler: Click R Mouse and select [Delete]. To View the Job with all materials and hours allocated so far: Click R Mouse and select [View]. This can be done either on the job in the grid or by pointing to the job in the job list on the right of the screen. Page 137 of 301

23 Single Day Mode Drag & Drop Job, Contract or Employee into the Grid Single Day Multiple Employees: Here you can see a general overview of all employees on the selected day. The drag and drop option will list jobs and contracts and these can be dropped into the employees. Assigning a Job to the employee using Drag & Drop If you have accessed the scheduler from the job, the current job button will be displayed. This can be dropped directly into an employee on the schedule grid. Any other job can be dragged in from the list by pointing the mouse to the job in the list and dropping it into the schedule grid. Drop the job onto the start time. This can be extended by dragging the box down to the required time or by editing as described below. The actual times will display when you run the mouse over the appointment. To exclude certain jobs or contracts from the drag and drop list of jobs, mark them as Inactive by removing the check under Active in the contract or job transaction lists. Editing an Appointment Click R Mouse and select [Edit] or Double Click on the appointment in the scheduler and the editing window will be displayed. Appointment Date: The job can be changed to another date. Appointment Start and End Times: You can enter and change times using the up and down arrows. For example a job cannot start at the same time as the previous job finished. If you want the next job start immediately after the last one, you could change the start time for the next job to a minute earlier (or of course make the next job start a minute later). Details: You can add more text directly to the scheduler. This will not be added to the Job card. To Remove a Job from the Scheduler Click R Mouse and select [Delete]. To View the Job with all materials and hours allocated so far Click R Mouse and select [View]. Page 138 of 301

24 6.4.4 Employee Availability Now that you have your employees set up, it is time to go to the scheduler. This can be accessed from the main menu or from within a job. By setting up the employee availability you can prevent scheduling employees on days they are not available. E.g.: RDO s, holidays, trade school and public holidays. You can set up, add to or edit this at any time. Click on the Employee Availability tab at the top of the Job Scheduler Settings Click on the [Settings] tab for your method of viewing the availability features. Calendar Format: Select [Weekly View] or [Monthly View]. Icon Size: Select [Small icons] or [Large icons]. Click on [Save Settings] to keep these settings. Page 139 of 301
![6.4.4.2 To add a type of unavailability Click on the [Drag and Drop] tab. Select an employee using the magnify button to search.](/docs-images/95/124835171/images/25-0.jpg "Change the date to the required month: This can be done by using the [Date] button at the top left of the screen or by using the scroll bar. Notice as you scroll down, the approximate date is shown.")

25 To add a type of unavailability Click on the [Drag and Drop] tab. Select an employee using the magnify button to search. Change the date to the required month: This can be done by using the [Date] button at the top left of the screen or by using the scroll bar. Notice as you scroll down, the approximate date is shown. Drag and Drop an unavailability icon (e.g. Holiday, Birthday, Christmas etc. Pictured on the right) into the relevant day on the calendar and the Edit Messages window will be displayed. Employee Unavailable: This is checked by default and can be unchecked if required. Birthdays are unchecked by default. Apply to ALL Employees: You can apply this date(s) to ALL employees if required for example public holidays and RDO s. Frequency: Most occurrences would be Single. Select annual for Birthdays and days like Anzac day. With RDO s you would select fortnightly To Delete or Edit an event Point to the event on the calendar. Click the Right Mouse button. Select [Edit Event] or [Delete Event]. You will be prompted as to whether you want to edit or delete all occurrences of this event for this employee only or for all employees. CAUTION! The CLEAR button on the top of the Job Scheduling screen applies to ALL calendar entries for that employee. Do not mistake this button with the Edit Event or Delete Event. Page 140 of 301
, supplier(s), or customer(s) mobile phones.")

26 6.4.5 SMS Job Notification The SMS facility in Payperwork gives you the ability to SMS job details from the job scheduler to the employee that has been scheduled or to single or multiple employees from a new or an existing job. You can also type and send any message to SMS employee(s), supplier(s), or customer(s) mobile phones. Typing a message on the keyboard is much easier than creating a message on a mobile phone. Keep in mind that the maximum number of characters that can be sent or received via SMS is 160 characters Accessing the SMS You can access the SMS feature from many places within Payperwork: In a Job: Click on the SMS button on the toolbar. In the Scheduler: Right click on the scheduled job and select SMS Employee. From an employees, customers or suppliers details: Click on the SMS button beside the Mobile number. From the Messages Toolbar: Click on the SMS button From the Job or Scheduler If you select the SMS from inside a job or from the scheduler, the job and contact details will be automatically added to the SMS message. This includes: The Job number, Date of the Job, Contact name and Contact Phone, Job Street, Job Town, (No state or Postcode), Map reference and the Job Details. If the information exceeds 160 characters the message will be truncated at 160 characters. You can edit the details that are pasted into the message prior to sending. Phone Number: If you have selected the SMS from a job scheduled to an employee in the Job Scheduler, the mobile number of the employee will already be inserted into this field. If you have accessed the scheduler from the Job, you can either type the mobile number in or you can click on the [Employee] button and select an employee from the list. Click on the [Send] button when you are ready and if the message was sent OK you will see this in the Response field. Click on [Finish] to exit the SMS Messaging Multiple Employees or Customers If you want to send the same message to more than one employee or to a selection of suppliers or customers, you can select those recipients from the list of employees, customers or suppliers. Click on the [Messages] toolbar. Click on the [SMS] button. Click on the [Employees] button (Or customers or supplier s button). While holding down the [Ctrl] button on the keyboard, click to the left of the required employees, customers or suppliers to highlight them. Position the mouse pointer over the employees list and R Click and then L Click on Select Employee. (Or customer or supplier). All mobile numbers available will be inserted into the phone number field in the message. If any of those employees, customers or suppliers does not have a mobile number in their records, you will see these in the result box of the message. Page 141 of 301


27 6.4.6 Allocating and Posting Labour You can add labour directly to a job by selecting the employee s button inside the job and adding the hours just as you would if you were not using the job scheduler at all. However by allocating the labour to the jobs from the scheduler you get the added benefit of being reminded when you attempt to complete a job that still has un-posted hours in the scheduler. This can be done either from the scheduler or from inside the job itself To allocate from the Scheduler Right click on the job in the grid. Left click on [Post Labour to Job]. The Labour item entry screen is displayed. Here you can: Select the rate that applies. (E.g. Normal Time). Change the number of hours if required. Edit the cost. Change the details. Click [OK] to accept and add the hours to the job. Click [Cancel] to exit without allocating. If you have not allocated the total hours scheduled on this appointment, you will be prompted to continue posting the remaining hours. Perhaps the actual hours were different to those scheduled or you wanted to charge this at a different rate. If the appointment s hours fall outside the Normal Hours (as per the settings) you will be reminded of this with a message. This gives you the opportunity to choose a different rate (e.g. Weekend Rate) To allocate from the Job Click on the [Post Hours] button and the labour item entry screen will display for each occurrence of the job in the scheduler. By changing the legend from Employee Assigned to Hours Posted in the Settings Tab as described in section Scheduler Settings, you can view whether scheduled jobs have been posted fully or partially to jobs. Page 142 of 301

28 6.4.7 Memos You can add a memo to the scheduler. These can be used to make an employee unavailable for some part of a day. Doctor s appointments, meetings and other reminders can be added via memo. They could also be used to book an employee to attend a site to do a quote. quot To add a memo to the Scheduler From the scheduler, Drag & Drop the memo onto the required employee and time in the grid. Type in the required information such as reason, client name and address. Drop the memo onto the start time. This can be extended, by dragging the box down to the required time or by editing as described below. The actual times will display when you run the mouse over the appointment Editing a Memo You can edit and delete memos in the same way as you edit and delete jobs from the scheduler Reports You can print reports for particular days from the scheduler. Select the required report from the drop down next to the [Print] [Prin button Scheduler This will print the information on the screen and in the same format acc according ording to the number of columns selected in the print setup in settings Daily Work Sheet This prints a daily work sheet per employee with or without OH & S checkboxes. It is presumed the employee yee will also have a job card for each job he is scheduled for. This report can be printed, faxed or ed. Print options for the daily work sheet includes options of changing JSA to SWMS Allocated Report This reports all hours scheduled vs.. all hours allocated by employee or by job Unscheduled Jobs This report tells you all the jobs and contracts that do not have any times scheduled against them in the job scheduler Page 143 of 301
29 6.5 Invoices Payperwork allows you to enter details of work that you have done and the materials that you have supplied to your customers to produce an invoice. Invoices can have some description and a value or you can do a fully itemised invoice of all materials from a custom price list. A combination of these is also available. Your profit on the job is displayed as you go. You choose the way you want to invoice. The main styles of invoicing are: 1. Invoice with text and value (using a sales account or a category item). 2. Itemised invoice using standard or Custom Price List Inventory and Non-Inventory items or unit rate items made up of both types of items. 3. Work in Progress (unfinished invoices). The options are: 1. Costing on a job or invoice with the profitability displayed. 2. Copy details from an existing invoice or job. 3. Use cost and section codes along with subtotals to gain more flexibility in print options. 4. A descriptive invoice to replace the fully itemised invoice with a job description and total to present to the customer. 5. Compare the costing on the job to the costing on the quote. An unfinished invoice remains a work in progress, allowing you to build an invoice as the job progresses. The [Copy From] option in invoicing allows any job, invoice or common phrase to be copied into another job, quote or invoice, without having to retype it. This means those repetitive or similar invoices; jobs or quotes can be set up once and simply coped into a new invoice when required Creating a New Invoice Entering Invoices Click on the [Customers] toolbar. Click on [Invoices]. The customer list will be displayed. Select the required customer by double clicking on the customer in the list. Click on the [New] button to enter a new customers details. The screen now lists previous invoices for this customer. To view or edit a previous invoice: Double click on the invoice in the list. To delete an existing invoice: Click once on the invoice in the list and then click once on the [Delete] button on the toolbar. To change the next invoice number in the series: Refer [Setup/Initialisation]. To enter a new invoice: Click on the [New] button. Deleting Invoices An invoice can NOT be deleted if: It has been fully or partially receipted. If it is not in the current financial year. If it has been locked in the GST report. (Accrual only). If the user does not have permission to delete invoices and credit notes enabled in [Setup/User Names and Passwords]. IF the invoice has a descriptive invoice attached, you will need to go to [End of Day/Clean Up/Description Invoice and Quotes]. Once the descriptive invoice has been deleted, you will be able to delete the invoice itself. Page 144 of 301

30 Invoice Header Details The current invoice number is displayed at the top of the screen. Reference: The reference is a useful area, as it shows in the customer enquiry screen. E.g. Customer Order No. / Or persons name. The reference will also print on an invoice. Date: Change the date, if required by clicking on the date button and selecting a date from the calendar. Job Address: The first 4 lines of the job address are printed on the invoice or job card. The first 2 lines display on the customer enquiry screen. The first line will display in the [Copy From] utility. The word Job can be replaced if required. Eg: Deliver to or Insured. To view the customer s record click on the [Adjust] button in the customer details area, and the customer s full details will display. Here you can edit the customer s details such as name or address. Motor Vehicle and Automotive Trades: If your business requires you to record details of motor vehicles, go to [Setup/Preferences/Business] to select [Automotive]. Extra tabs will then appear for you to enter the full details of the vehicle. Service Management: If your business requires you to record details of your customers equipment or appliances, go to [Setup/Preferences/Business] to select [Other Service & Repair Industry]. Extra tabs will appear for you to enter the details of the equipment or appliances. Contact and Phone: Enter any relevant details e.g. Site manager or tenant s name. Job Number: In the example shown, the job number has been set up to increase by one each time an invoice is saved as a job. It will only hold the job number if left as an unfinished job. You can also select to enter your own individual job number each time or to have the job number to be the same as the invoice number. See [Setup/Preferences/Invoices]. Page 145 of 301

![To insert a line: Click once on the line directly below the position that the line or space is to be inserted, then press the [Insert] key on the keyboard. This creates a blank line.](/docs-images/95/124835171/images/31-1.jpg "To add information, click once on the blank line and select add text, accounts or items to be inserted at that position in the invoice.")
31 6.5.2 Editing and Saving Invoices To change a line: E.g. the quantity or price. Double click on the line to be edited and the text, account or item details for that line will be displayed. Change as required. To delete a line: Click once on the line to be deleted and press the [Delete] key on the keyboard. To insert a line: Click once on the line directly below the position that the line or space is to be inserted, then press the [Insert] key on the keyboard. This creates a blank line. To add information, click once on the blank line and select add text, accounts or items to be inserted at that position in the invoice. To change the positions of lines: You can move the lines in the invoice into a different order on the screen, by dragging and dropping with your mouse. For example to list all material items or labour items together. An item line with a ribbon symbol denotes a certificate item. You will be prompted for the certificate details when the invoice is saved. See [Setup/Preferences/Certificates] Convert Job to Invoice Invoice OR Job (W.I.P.)? If the invoice is finished, i.e.: If you are now ready to turn the job into an invoice, click on the [Job Finished] box prior to saving. If you do not click on the [Job Finished] box, the invoice will remain a job or work in progress. If you do accidently tick the [Job Finished] box (and save it), you can still return to the job (which is now an invoice) to add and make changes. However you will not be able to add materials by allocating from purchases. Also it will not be available in the scheduler. To progressively save the job or invoice without exiting click on [Utilities/Save]. When [Finish] is selected you are asked if you wish to save the changes that were made. The job or invoice is automatically saved when [Print] is selected. Page 146 of 301

32 6.5.4 Templates / Copy From Copy an Invoice or Job to new Invoice or Job In any invoice or job you have the ability to copy a finished invoice or job into a new invoice or job. Whenever you are entering an invoice that is the same or even similar to an invoice on file, you can copy the full invoice over into the new invoice. The contents can then be edited to alter any details, item quantities or prices without affecting the original invoice. Similarly, complicated invoice formats can be set-up as masters to be copied over when required, saving time and eliminating errors. Commonly used phrases can also be set up as jobs to be copied over and edited as required. Any number of invoices or jobs can be copied into one invoice or job. Right mouse and select [Copy From] OR Click once on the [Copy From] button. You will be taken to a list of jobs. Select the job you require from the list. If you want to copy from an Invoice. Click the down arrow next to Jobs and select Invoices. Select the Invoice from the list. If you have Display Costing and Profit details checked on in [Setup/Preferences/Costing and Copy From] as outlined on page 25, whenever you select Copy From in customer transactions (for example when copying from an existing invoice to a new invoice), you will see the Update Prices screen. On this screen you will be asked to select the method you want used for the Costing. Copy over Cost Prices from the Source Transaction: The program will use the costs that are in the transaction you are copying from, even if the cost prices in the actual items have changed since the original transaction (quote, invoice). Use Item Default Cost Prices: The program will use the prices that are current in each item for the costing. If there are items that have no cost (such as Category items or account lines) these costs will be left at zero. You can edit these lines and enter a value after the Copy From is done. Use Item Default Cost Price, PROMPT where cost information is not available: This is the most likely choice. The costing will use the current prices for the items, and will stop during the copy and display any items that have no cost stored with the item and you will be able to enter a new cost. PROMPT for each Cost: Use this one if you do not maintain the costs in your standard items or you do not update your Suppliers price list regularly. You can of course use it if you would like to check EACH cost in each line. You can set the default selection in [Setup/Preferences/Costing and Copy From]. Page 147 of 301


33 6.5.5 Adding Text using Word Processor The text in an invoice can be a brief or a detailed description of the work carried out, or details of the reported fault in a job or W.I.P. The text carries across the width of the invoice and there is no limit to the number of lines that can be typed. Text can also be added repeatedly and at any stage of entering the invoice contents. For e.g.: Type a description of one section of the job, list the items and value relating to that stage and then type a description for the next stage of the job. Right mouse click and scroll down to [Add Text]. Or Click on the text button Type in the required description and click on [OK] to save. Values added in text will not add to the total value at the bottom of the screen. Values must be added using items or accounts. Spell Checker: To turn off the automatic spell checker go to [Setup/Preferences/Invoices]. Fonts: To change the default font and sizes go to [Setup/Preference/Screen] Adding Image in Word Processor You also have the option to insert a small image in the word processor. To do this click on the picture of a camera as shown below. Add Image Posting Labour Hours from Scheduler Labour hours can be manually entered into the invoice by selecting the Labour button or by posting the hours from the Job Scheduler. For a detailed description of how to do this please see page 142. Page 148 of 301

![Add labour using labour items (Employees). 6.5.7.1 Add a value using a Category Item Click on [Items] button or right mouse button and click on [Add Item].](/docs-images/95/124835171/images/34-1.jpg "(For full details of entering and maintaining standard items refer to the full section on items). The item list will be displayed.")
34 6.5.7 Adding Value to your Invoice There are 4 methods of entering a value into the contents of the invoice. You can use one method or a combination of all four. Value only using a category item e.g.: Labour and Materials. Value only using a general ledger account e.g.: Sales. Fully itemised using inventory or non-inventory items from your standard price list or custom price list. Value using unit rate items. Add labour using labour items (Employees) Add a value using a Category Item Click on [Items] button or right mouse button and click on [Add Item]. (For full details of entering and maintaining standard items refer to the full section on items). The item list will be displayed. Select the item: Search the list for an existing category item or create a new item. A category item has no unit of sale. Details: Leave as the name of the item or click to highlight and change as required. E.g.: Labour and Materials could be changed to As Quoted. Cost Code: Use this to group items for costing and sub-totals. Enter a letter (A-Z). E.g. L for Labour or M for Material. These codes can be preset in [Adjustments/Cost Codes]. Section Code: Use this to break the invoice, quote or job into sections or stages. Enter a number from 01 to 99, or use the browse button to select a section from the list. The sections can be given relevent headings such as Rough In, Sewerage, Fit-Off or Switchboard. Go to [Adjustments/Section Codes] to predifine the headings. Click on [OK]. The item has now been added to the invoice. Select more items if required then click on [Close] to close the item list and return to the invoice contents. Price: You can either enter the price ex GST and have the program calculate the inclusive of GST price. Or you can enter the RRP or price inclusive of GST and the program will back calculate the GST Page 149 of 301
![6.5.7.2 Add a value using a General Ledger account Click on the [Accounts] button or right mouse button and click on [Add Account]. The account list will be displayed.](/docs-images/95/124835171/images/35-0.jpg "Select the account: Search the list for the main sales account or other sales account if you wish to break down types of sales in your General Ledger. Double click on the required account.")

35 Add a value using a General Ledger account Click on the [Accounts] button or right mouse button and click on [Add Account]. The account list will be displayed. Select the account: Search the list for the main sales account or other sales account if you wish to break down types of sales in your General Ledger. Double click on the required account. Value: Click on and enter value required. Details: The name of the account will be in the detail box by default. Change this to a description that would be suitable to appear on the invoice. For e.g.: Sales of Materials could be changed to As Quoted Cost Code: Use this to group items for costing and sub-totals. Enter a letter (A-Z). E.g. L for Labour or M for Material. These codes can be pre-set in [Adjustments/Cost Codes]. Section Code: Use this to break the invoice, quote or job into sections or stages. Enter a number from 01 to 99, or use the browse button to select a section from the list. The sections can be given relevent headings such as Rough In, Sewerage, Fit-Off or Switchboard. Go to [Adjustments/Section Codes] to predifine the headings. GST: If you enter the GST inclusive price into the Value box, click on Value includes GST. Or if you enter the ex GST price into the Value box, do not check the Value Includes GST and the program will add the GST. Click on [OK]. The details and value have now been added to the invoice. Select more accounts to add to the invoice if required. Page 150 of 301
![6.5.7.3 Fully itemised invoice using standard items from your list Click on [Items] button or right mouse button and click on [Add Item]. The item list will be displayed.](/docs-images/95/124835171/images/36-0.jpg "Select the item: Search the list for an existing inventory, non-inventory or category item. An inventory item requires a quantity on hand.")
36 Fully itemised invoice using standard items from your list Click on [Items] button or right mouse button and click on [Add Item]. The item list will be displayed. Select the item: Search the list for an existing inventory, non-inventory or category item. An inventory item requires a quantity on hand. Sales Account: The default sales account, for this item in the General Ledger, is displayed. Leave this unchanged unless you require sales analysis. Click on the magnifying glass button to select another sales account if this item is to be posted to a different sales account in this invoice only. Details: The name of the item can be changed for this invoice only. To change the item name permanently, go to [Adjustments/ Items/Names & Details]. Price: The box displays the default billing price as set in [Setup/Stock]. The price can be changed by clicking on the down arrow and selecting Cost, Trade or List price. Alternatively click on the actual price and alter it. Any changes made to item prices during invoicing will not change the prices in the item details. To change these prices permanently you need to edit the item details. Discount: Enter a percentage figure to discount. The discounted price is displayed. GST: The GST status of the item that was set up when the item was created is used here by default. The current GST percentage rate that is set up in [Setup/GST Details] is used to calculate the inclusive GST or RRP price. RRP Price: This can be changed and the program will back-calculte the GST to arrive at the ex-gst price. For example say you wanted to round the final price of the J Box in the example to $6.00, simply change the RRP price and the program will back calculate the ex GST price to $5.74 allowing for the discount. Quantity Required: Enter the quantity to be sold on this invoice. Cost Code: Use this to group items for costing and sub-totals. Enter a letter (A-Z). Eg L for Labour or M for Material.These codes can be pre-set in [Adjustments/Cost Codes]. Section Code: Use this to break the invoice, quote or job into sections or stages. Enter a number from 01 to 99, or use the browse button to select a section from the list. The sections can be given relevent headings such as Rough In, Sewerage, Fit-Off or Switchboard. Go to [Adjustments/Section Codes] to predifine the headings. Click on [OK]. The item has now been added to the invoice. Select more items if required then click on [Close] to close the item list and return to the invoice contents. Page 151 of 301


37 Fully Itemised invoice using items from the Custom Price List You can also add items from your Reece, Tradelink, MMEM or Lawrence and Hanson Custom Price List. For the full details on how to use these price lists in the program see the following pages: Reece is on Page 85. Tradelink is on Page 94. MMEM is on Page 76. Lawrence and Hanson is on Page Itemised invoice using Unit Rate Items Unit Rate items are items made up of more than one standard and or custom price list item. Click on [Unit Rate Items] button or right mouse and click on [Add Unit Rate Item]. The list of unit rate items will be displayed. For more information refer to the Unit Rate Item Section on page 103. Select the item: Search the list and select the required Unit Rate Item. You can view the contents of an existing unit rate item by clicking on it. Quantity Required: Enter the quantity of this unit required. Component items of the unit rate that are marked as constant will not be multiplied by the quantity required. Discount: Enter any discount that is to be applied to the total price of the item. Each item in the Unit Rate Item will be discounted by this percentage. Approx Total: This is used when you wish to round off the total price of the quantity of the Unit Rate items. Enter the approximate value (Ex-GST) for the items and the program will then calculate the nearest discount that this total represents. Do not enter an approximate total that is more than the input price as it cannot be used to calculate a markup percentage. As unit rate items are made up of more than one item, it is unlikely that an approximate total will calculate to a discount that will equal the approximate total entered. A balancing entry of a few cents may be required when you use this method. Click on [OK] to add the item to the invoice. Continue to select items from the list or click on [Close] to return to the invoice. Section Code: Use this to break the invoice, quote or job into sections or stages. Enter a number from 01 to 99, or use the browse button to select a section from the list. The sections can be given relevent headings such as Rough In, Sewerage, Fit-Off or Switchboard. Go to [Adjustments/Section Codes] to predifine the headings Allocating Materials from Supplier Purchases To allocate material from your supplier purchases please see section called Suppliers/Purchases/Allocations to Jobs and Contracts on Page Linking External Files to Invoices For information on how to link external files to Invoices, please see section on linking external files to quotes located on page 121. Page 152 of 301


38 6.5.9 Cost Code and Section Codes Cost Codes A cost code is a single letter of the alphabet that can be used in Invoices, Jobs, Contracts and Quotes to group like item lines together for subtotals and costing. For example you may have a quote that has several lines of material items amongst several lines of labour items and you want to break it down into separate totals for labour and materials. By giving each line of the quote a letter of the alphabet you can ask for a subtotal for all lines with the same code and also print a costing which will tell you the cost, trade and invoiced value of all items within each code. You can predefine the description of any codes you want to use for the subtotals. Go to [Adjustments/Cost Codes]. Enter a title for the cost codes that you use in invoicing for grouping lines of the invoice together and to use in subtotals. When you select Subtotal and select a group cost code, the title you have given to the code will be used as the default for the description. The easiest way to use cost codes is to enter a default code for each standard item. If you need to, you can change the code when you are entering the item into a transaction. Unit rate items which will also use the codes that are set up in each if the items that are components of the Unit Rate item. Price List items (Reece,Tradelink, L&H and MMEM) will use code M (Materials) by default. Using Cost Codes in Quotes, Jobs, Invoices and Contracts. Whenever you enter an item or account line into a relevant transaction, enter the code for the line. Make sure that you enter a cost code for EVERY line. Page 153 of 301


![Click on [Specific Cost Code]. Click on the magnify glass button and select the cost code you want the subtotal for.](/docs-images/95/124835171/images/39-3.jpg "If you have not setup code descriptions, enter a description or title for the Repeat this for each code that is contained in the invoice. Now you can see the breakdown of the invoice lines.")
39 Using the Cost Codes in Subtotals You can add a subtotal at any stage of an invoice. In this example we have added the subtotals at the end of the transaction. Click on the [Subtotal] button or R mouse and Add Subtotal. Subtotal: Lists everything above where the subtotal was requested and then clears that subtotal so that if the same subtotal is requested again, it will not include the values that are in the first subtotal. For example if you request a subtotal of Labour and then 4 lines later request a subtotal of Labour again, the later subtotal will not include the labour that was in the first subtotal, however it will be included if a later subtotal asks for Labour in Section 1. Total: Lists everything above where the subtotal was requested and clears that total so that if that same total is requested again. Click on [Specific Cost Code]. Click on the magnify glass button and select the cost code you want the subtotal for. If you have not setup code descriptions, enter a description or title for the subtotal. Repeat this for each code that is contained in the invoice. Now you can see the breakdown of the invoice lines. Invoice Print Options for Subtotals The following also applies for Quotes, Jobs and Contracts. If you add subtotals to an invoice, these will be included on the invoice print. You can opt to print just the subtotal lines. This means that you can make up a fully itemised invoice for calculation and costing purposes and then print an invoice for the customer with just the final price broken down into the analysis that you want. So prepare your invoice, add a cost code to EVERY line, add your subtotals and go to PRINT. On the Print Options screen tick the Sub-Total Lines Only box. Note: If it prints with any values listed under Miscellaneous it means that there are lines in the invoice that do not have a cost code. Simply return to the invoice, add the required codes and then reprint. Page 154 of 301

, but using them together allows for a breakdown within the sections.")
40 Section Codes Section Codes are used to break the invoice, quote or job into sections or stages. Enter a number from 01 to 99, or use the browse button to select a section from the list. The sections can be given relevent headings such as Rough In, Sewerage, Fit-Off or Switchboard. Go to [Adjustments/Section Codes] to predifine the headings. Cost and section codes can be used independently of one another. You do not need to use cost codes in order to use section codes (and vice versa), but using them together allows for a breakdown within the sections. For example: Section 01 = Rough In Section 02 = Sewer Total Labour $ Labour $ Total Labour $ Materials $ Materials $ Total Materials $ Total Section 01 $ Total Section 02 $ Total for Job $ Cost Codes: Refer to the Cost Code fact sheet for full details about predefining the cost code headings, adding a default cost code to standard items and using cost codes in invoices, quotes and jobs. Section Code Descriptions To predefine the title or description of the Section Codes for the program to use in headings, subtotals and reports, Go to [Adjustments/Section Codes]. Using Section Codes in Quotes, Jobs, Invoices and Contracts Whenever you enter an item or account line into a relevant transaction, enter the section code for the line. Enter a section code or browse and select the code from the list. The section code field is available in accounts, standard items, unit rate items and custom price list items and in allocations from purchases. For breakup reports it is not necessary to have all the line items for each section together. Page 155 of 301
![Breakup Report From within the job, quote, contract, invoice etc, click the down arrow beside the [Breakup] button and click on by Section & Costcodes.](/docs-images/95/124835171/images/41-1.jpg "This will give you a separate report with the breakup totals only.")

41 Breakup Report From within the job, quote, contract, invoice etc, click the down arrow beside the [Breakup] button and click on by Section & Costcodes. This will give you a separate report with the breakup totals only. Summary on invoices, quotes, jobs and contracts You can also add a summary of the section and cost codes to the bottom of your invoices, jobs etc. On the Print Options screen, click on the Body tab and tick Summary. This will add a summary of the totals for each section broken down into the individual cost codes. This will print in the body of the transaction after the list of line items. Page 156 of 301


42 Section Codes in the Subtotals You can use subtotals to customise your breakup totals. Subtotal: Lists everything above where the subtotal was requested and then clears that subtotal so that if the same subtotal is requested again, it will not include the values that are in the first subtotal. For example if you request a subtotal of Labour and then 4 lines later request a subtotal of Labour again, the later subtotal will not include the labour that was in the first subtotal, however it will be included if a later subtotal asks for Labour in Section 1. Total: Lists everything above where the subtotal was requested and clears that total so that if that same total is requested again. Printing Subtotal Lines only: With the ability to add subtotals for cost codes and/or section codes and totals, it is very likely that some items will be included in more than one total or subtotal. Therefore if you select the option to print Sub Total Lines Only when you print the invoice, the lines will not equal the total value of the invoice, quote, job etc. Payperwork will need to print an adjusting line called Miscellaneous. You need to either print the invoice without this option checked, or change the subtotal and total requests. Another option is to click on Summary in place of Sub Total Lines Only. To avoid the miscellaneous figure: It is recommended that when using the sub-total lines only option when printing your transaction, you have subtotals/totals for either cost codes or sections. Not a mixture of both Re-typed Invoices Re-typed Invoices is also known as typing a descriptive invoice. It is an option that allows an invoice or quote to be replaced in a format to send to the customer. Sections of the original invoice can be copied onto the replacement or the invoice can be retyped entirely. The final value of the invoice must equal the original invoice. The most common use for a descriptive or retyped invoice or quote is when you do not wish the customer to see the individual prices of a fully itemised invoice. Inserting sub totals into the original itemised invoice and then, when printing, using the option Sub Total Lines only is an alternative to using the Type Descriptive option. When the fully itemised invoice is complete click on [Job Finished]. Then Click on the [Retype] button. Text: Click on [Text] or right mouse and click [Add Text] to access the word processor to type in a free description. The word-processor is used in a similar manner to the text in invoicing. Any values entered into the word processor will not be added into the value of the invoice. Copy: This will display the contents of the original invoice. Click and drag to highlight blocks of text and item lines that you would like transferred to the descriptive invoice. To enter a value into a descriptive Invoice Double click on the Value column at the position you wish to enter a value. Or right mouse click and select the [Add Value] button. You can enter several value lines, as long as the final total matches the original invoice value. The descriptive invoice cannot be printed until this is the case. You will receive an Unable to Print error message as shown below. If you need to change a value, simply double click on the value again and make the necessary changes. This also applies to the GST component. If this differs by a cent or two you can change the GST by double clicking on the GST value and entering a figure to adjust the final GST. Page 157 of 301
![6.5.11 Print and Emailing Invoices 6.5.11.1 Invoices When you are ready to print, email or fax your invoice, click on the [Print] button in the top left hand corner of the invoice screen.](/docs-images/95/124835171/images/43-0.jpg "The Print Invoice options will be displayed. Payperwork comes with its own preset template and all you need to do is select (or remove) the fields you want on the printed invoice.")
43 Print and ing Invoices Invoices When you are ready to print, or fax your invoice, click on the [Print] button in the top left hand corner of the invoice screen. The Print Invoice options will be displayed. Payperwork comes with its own preset template and all you need to do is select (or remove) the fields you want on the printed invoice. Each type of form (invoice, quote, job card, remittance etc) has its own Print Settings. This means that you can select your preferred settings and save each of them separately. These options need to be used in conjunction with the overall print and settings in the setup menu. [SetUp/Print and Settings]. There you can load the graphic into your data, set the overall print settings, fonts and background colors that are common to all forms Invoice Print Options The name of the printer currently selected in [Set-up/Print] is displayed. The invoice print options are listed under 4 tabs, divided into: 1. General: Overall Settings 2. Top: Lists the header and title settings at the top of the invoice. 3. Body: Lists the settings relating to the actual contents if the invoice. 4. Bottom: Displays the options for the remittance advice and footer of the invoice. Page 158 of 301
44 General Tab Settings Number of Copies: Enter the number of copies required. This will print duplicate copies for filing. See also [Reports/Batched Invoices] to print office copies on plain paper. Type: Refers to the type of stationery to be used. Form: This option will fit paper that is slightly shorter than standard Australian A4 form. Form A4: The default option that will fit on standard Australian A4 paper. (Which is 210mm x 297mm). Letter: Single Sheet (A4 210mm x 297mm). Select this type if you want to print invoices on your existing company letterhead that already has the company details pre-printed across the top of the letterhead. This option can also be used when you are using a graphic. In this case the graphic is stretched across the top of the form and the invoice number and date printed above the title/description line. Date Style: You can change format that the date prints in. The default is ddmmyy which prints 19aug11. This can be changed to for example dd/mm/yyyy to print 17/08/2011. If your choice increases the number of characters this may force the date to print over 2 lines. Go to [Setup/Print & ] settings to reduce the font size for the date field. Stamp: You can have Payperwork print a watermark stamp across your invoice with options such as Office Copy Friendly Reminder etc. Click the down arrow and select the required stamp Top Tab Settings Pre-Printed Stationery: Click to tick if you have had stationery pre printed with your company information to match Payperworks Form A4 template. If you tick this option Payperwork will not print the graphic or the User details on the header or the remittance advice. Print Graphic: Click to tick of you want the user details replaced with the graphic that you have preloaded in the overall printer settings. This option will not be available if you have not loaded a graphic. Page Break: If turned off, the invoice header details are not printed on subsequent pages of multiple page invoices. This is useful for draft and office copies of long invoices. Print Contact Details: If checked the Attention and phone number fields from the customer record will print under the customer s name and address on the invoice. Print Attention: If checked the Attention line from the customers record will print as the first line of the customers address on the invoice. Description Title Line: Switches on or off printing the line Item Description Price etc. across the top of the contents. Inc Discount in Title Line: This omits of the word Disc when printing the title line. Print Service Details: If you have turned on service management, use this check to print the details of the item on the invoice. If you are using the automotive version of Payperwork this will print the Vehicle details Body Tab Settings Print Ex.GST Values: With this option checked, ex GST values will print for each line item and the GST will be printed after the Net Value at the bottom of the invoice. If you find that a number of your customers pay just the ex GST value of an invoice, try removing this check. Print Item Numbers: Printing item numbers on or off. If this option is on you have the option to print either the Item number or the Item ID. Print User Descriptions: For price list items you have the option to enter an alternative description for the supplier s items. This check is an option to print these descriptions on the invoice in place of the suppliers item description. Print Quantities: Remove this check to only print the total value of the line and not the quantities. Print Certificate Numbers: If the invoice contains a certificate item(s), you can choose to have the certificate number printed on the invoice. Page 159 of 301
45 Summary: Check this box to print a Section summary at the bottom of the invoice. Sub-Total Lines only: For fully itemised invoices with sub totals. No other Lines: Prints the Text and the subtotal lines only. Lines but NO Values: Prints the text, the item lines (no individual prices or line totals) and the subtotals. Print Unit Price accurate to Decimal Places: When markups or discounts are applied to items in Payperwork, it uses up to 6 decimal places to calculate the price per each and the total price. It then rounds the total and displays to 2 decimal places. When the rounded figure is multiplied by the quantity it may appear that the result is not accurate (i.e. the same value as was calculated in the invoice). Depending on the type of item, discounts, markups and quantities that you use, you may need to print more decimal places on the invoice. Labour Description: If the invoice contains items that have been entered using the Labour item facility, you have options as to how you want those labour items printed on the invoice. Refer to the section on adding labour items to jobs for more information Bottom Tab Settings Terms: Option to print the customers terms. See [Setup/Overprinting] Overprinting: Option to turn off the overprinting. See [Set-up/Overprinting]. Print Amount Paid: If this is selected the amount paid and amount outstanding on this invoice is printed at the bottom of the invoice. Remittance Advice: Turns the remittance advice on or off. Print Scissor Line: This shows your customer where to detach the remittance advice. Payment Methods: Check to print the payment methods on the remittance advice. To select the payments methods that your company accepts go to [Setup/Preferences/Invoices]. Credit card Details: Check to print the accepted credit cards with the check boxes for your customer to complete with their credit card details. To include the credit cards that you company accepts go to [Setup/Preferences/ Invoices]. Save Settings: Click on [Save Settings] when you have selected all your preferred options. The selected options will be saved until you change and option and select save settings again. Click on [Print Preview] to view the finished result on the screen or check number of pages. Click on [OK] to print the invoice or [Cancel] to return to the invoice Customising your Invoice and Quote Print You have the option to customise your invoices and quotes. Examples of what you can customise are: Font Font style Font size Font colour Background colour You can add you company logo Add shading and lines See [Setup/Print & Options]. For more information please refer to page 33. Page 160 of 301

![Right click on the customer in the list and Left click on [Edit]. Click on the In the Invoice Details tab enter the customer s terms in days and click [OK]. 6.5.11](/docs-images/95/124835171/images/46-1.jpg ".1.8 BPay Details If your company accepts BPay as a payment method you can have Payperwork print the following information on the bottom of each of your invoices: Your BPay biller")
![code. The Customers individual BPay reference. The BPay logo. To set this up: Go to [Setup/Preferences/Invoices] and check the BPay box under the accepted payment methods.](/docs-images/95/124835171/images/46-2.jpg "Go to Setup/Overprinting and click on the BPay tab.")

46 To Print the Pay By Date in the Terms box at the bottom of invoices Step 1 You need to change the Terms Overprinting. Go to [Setup/Overprinting] and Click on the Terms Tab. Step 2 Each customer will need to have individual terms set up in their details. Right click on the customer in the list and Left click on [Edit]. Click on the In the Invoice Details tab enter the customer s terms in days and click [OK] BPay Details If your company accepts BPay as a payment method you can have Payperwork print the following information on the bottom of each of your invoices: Your BPay biller code. The Customers individual BPay reference. The BPay logo. To set this up: Go to [Setup/Preferences/Invoices] and check the BPay box under the accepted payment methods. Go to Setup/Overprinting and click on the BPay tab. Insert your company s BPay number and type the required text such as Contact your bank to make this payment from your cheque or savings account etc You will need to enter each customer s individual BPay reference in their record. Right click on the customer in the list and Left click on [Edit]. Click on the Banking Tab and enter the customers BPay reference. You can use the customer number but you will need to include the leading zeros. In the Invoice Print Settings, click on the Bottom Tab and check BPay details. For an example of how an invoice should look, please see next page. Page 161 of 301


47 Page 162 of 301


48 Invoice Costing Overview Imagine you have just done an invoice (or quote) and you have added several material items as well as your labour. Would you like to know how much the materials cost you and how much profit you have made on the invoice and perhaps how much profit of that profit was on the materials as opposed to the labour? In quotes, would you like to see where you have a margin to move to increase or decrease the total price? You can do this very easily in PayPerWork. The principles outlined below also apply to Quotes, Jobs & Contracts. Where does the program get the costs from? PayPerWork gets the costs from the item records: Standard items: From the costs that are stored with each items and maintained by you by either manually adjusting each item, via item price adjustments or from the last purchase price if you are purchasing in each item. Price List Items: From the costs of these items that are maintained by ensuring that you use the price updates that are supplied by your supplier. Unit Rate Items: From the cost price of the individual component items. Labour Items: From the cost price of the standard item that is linked to each employee Setup 1. Firstly, check that the option is turned on. Go to [Setup/Preferences/Costing & Copy From]. Click on the Costing & Copy from Tab and put a tick in the check box beside Display Costing & Profit Detail. Don t worry about the Cost Prices to use in Copy from option. We will come back to that later. 2. Enter a Cost for each line of the transaction. When you enter an item into an invoice, the Line Cost has the cost price for the item inserted into the field. Check this price. If your standard item and price list items are up to date, you can leave it at this value or you can change this if you need to. For example, this may have been a special purchase where you purchased at a special price. In the case of Category items, where you are using the same item and changing the description, you can put in a different cost each time you use the category item. Page 163 of 301

![To print the individual invoice Costing Report To see a more detailed breakdown of the individual invoice, open the invoice and click on the down arrow next to [Print] then select [Costing].](/docs-images/95/124835171/images/49-2.jpg "Select your preference as to whether you want the report based on a dollar or percentage value and click on [Print Preview].")

49 Costing Analysis Display Invoice Costing Details As the items are entered into the invoice, the Costing Tab at the bottom of the invoice is updated with the Cost and Total (Invoiced Total). Your profit is displayed as a $dollar value as well as a percentage value. These prices are all ex GST. To print the individual invoice Costing Report To see a more detailed breakdown of the individual invoice, open the invoice and click on the down arrow next to [Print] then select [Costing]. Select your preference as to whether you want the report based on a dollar or percentage value and click on [Print Preview]. When used in conjunction with cost codes, you can see the breakdown of the proportion of the profit on materials and labour. You can also see the quantity of code L telling you the total number of hour s labour that is in the invoice or quote. Invoice Costing Summary Report To get a summary of the costing information for all invoices go to [Reports/Costings/Invoices]. Select the date range. You can report for a particular month, a range of months or a range of day. For a particular day make the From and to range the date required. An example of what the report should look like is located on the next page. Page 164 of 301

50 Costing in Copy From Once you have become used to using the Costing options, where you can check the costs as you enter each item, you will not want to forego the convenience of using the Copy From features of PayPerWork. So you have a decision to make about what you want the program to do about the costing when you do use Copy From. If you have Display Costing and Profit details checked on in Setup/Preferences as outlined earlier, whenever you select Copy From in customer transactions (for example when copying from an existing quote to a new quote), you will see the Update Prices screen. On this screen you will be asked to select the method you want used for the Costing. Copy over Cost Prices from the Source Transaction: The program will use the costs that are in the transaction you are copying from, even if the cost prices in the actual items have changed since the original transaction (quote, invoice). Use Item Default Cost Prices: The program will use the prices that are current in each item for the costing. If there are items that have no cost (such as Category items or account lines) these costs will be left at zero. You can edit these lines and enter a value after the Copy From is done. Use Item Default Cost Price, PROMPT where cost information is not available: This is the most likely choice. The costing will use the current prices for the items, and will stop during the copy and display any items that have no cost stored with the item and you will be able to enter a new cost. PROMPT for each Cost: Use this one if you do not maintain the costs in your standard items or you do not update your Suppliers price list regularly. You can of course use it if you would like to check EACH cost in each line. You can set the default selection in [Setup/Preferences/Costing] Comparing the Costing on a Job to a Quote A Job (W.I.P.) can be compared to a quote on file at any stage before the job is completed or turned into an invoice. This function is an extension of the using section AND cost codes in quotes and invoices. This report which can be viewed or printed compares the original quote with the job (or contract). When the quote is prepared, each line item is assigned a cost AND a section code. E.g.: Code M for Materials and Section 1 (Rough In). As the contract or job has its costs allocated either manually directly into the job or via allocations from purchases, each line is also assigned a cost and a section code. Then, from within the Job or Contract go to: [Utilities/Compare Contract (or Job) to Quote]. Select: Compare by Sections and Costcodes. You will be able to see for example the quoted price of materials for Section 1 against the actual price paid for the materials in Section 1. Page 165 of 301


51 Certificates Certificates are used when invoicing and can be used for recording; Certificates of Electrical Safety. Plumbing Guarantees. Warranty on equipment. When you use a nominated certificate item in a customer invoice, you can save the details of the certificate. PayPerWork will automatically request the certificate details when the invoice is saved. This will record: Certificate Number or Serial Number. Certificate Type. License Number. Date of Certificate. Expiry Date. Notepad for Details. Advantages You can print the certificate number on the invoice. You can search for an invoice by certificate number. Page 166 of 301
 3 standard Inventory or Non Inventory items that, if used in an invoice, are to be treated as")
. Plumbing Compliance Certificate. 2. Second Click on the [Setup] toolbar.")
52 Setup Certificate Item 1. First Create (up to) 3 standard Inventory or Non Inventory items that, if used in an invoice, are to be treated as certificate items. Some examples: Certificate of Electrical Safety (Prescribed). Certificate of Electrical Safety (Non-Prescribed). Plumbing Compliance Certificate. 2. Second Click on the [Setup] toolbar. Click on [Preferences]. Click on [Certificates]. Insert the Item number(s) or browse to locate the item(s). Click on [OK]. Page 167 of 301
 the item(s) will have a symbol in the left column of the invoice grid.")
53 Adding Certificate to Transaction Add the certificate item (that is the item in the standard list) to the invoice as normal. If this item has been set up to be a certificate item (as described on the previous page) the item(s) will have a symbol in the left column of the invoice grid. When you save a job or save and finish an invoice that contains one of the certificate items, you will be prompted for the details of the certificate. You can only add a quantity of 1 (one) for each certificate line in an invoice. If you want to add more than one certificate to a job or invoice, do this by adding the certificate item to multiple lines. The program will ask for the certificate details for each occurrence of a certificate line in the invoice or job when it is saved. You will be warned if the certificate number is a duplicate of one previously entered. The program will allow you do this because in some cases (as in Non-Prescribed Certificates of Electrical Safety) more than one job or invoice can be covered by the one certificate. Note: that in this case the invoice will be listed in the transaction lists the same number of times. This is so that all certificate jobs can be found when you are searching by certificate number. Page 168 of 301
![6.5.13.3 Printing the Certificate number on the invoice When you have the Print Options displayed: Click on the [Body] tab Check the [Print Certificate No s] box.](/docs-images/95/124835171/images/54-0.jpg "Note that the number will NOT print if you have selected Subtotal Lines Only and No Other Lines.")

54 Printing the Certificate number on the invoice When you have the Print Options displayed: Click on the [Body] tab Check the [Print Certificate No s] box. Note that the number will NOT print if you have selected Subtotal Lines Only and No Other Lines. If you want to print using the Sub Total Lines Only, you will need to also select Lines but NO Values. This will print all the items on the invoice but without any individual item prices. The certificate number will print on a fully itemised invoice Certificate Report You can print a report of certificates by month. Go to [Reports/Certificates] and select your printing options. Page 169 of 301


55 Transaction Invoice Overprinting The overprinting on an invoice refers to the special message located in the bottom left hand corner of the invoice which can be added to every invoice Payperwork produces. The Overprinting has 3 options: General Default as set up in [Setup/Overprinting/Invoices]. For more information on this please see page 28. Customer Defaults that are set up in an individual customers details. For more information on this please see page 117. Or either of the above changed or replaced completely at the time of the invoice. An example of when you would need to change or replace the overprinting on an invoice is if you sent out an invoice in July and saved individual overprint for that invoice only, such as This is a special price as quoted for 7 day payment. Then in December you change your general default to Have a Happy Christmas. Then the customer with the July invoice asks for a copy of his invoice. You want the original overprint, not the Happy Christmas one. The overprint appears at the bottom left hand corner of the invoice screen inside the actual invoice. Saved: To revert to the saved overprint. For example if you went into an old invoice and started changing the overprint and changed your mind. Customer default: If the individual overprinting has been set up in this particular customer, the program will use this overprinting. General default: If there is no individual overprint for this customer, the program will use the general default from [Setup/Overprinting]. New Overprinting: Click on this and type separate overprint for this invoice only Immediate Receipting of Invoices This will be of interest to anyone using Payperwork in a retail situation OR if you need to print or receipt an invoice showing how much has been paid and how much is outstanding on that invoice. It can also be used if the customer asks for a receipt. To activiate the ability to enter receipts through invoices, go to [Setup/Preferences] and click on the [Invoices] tab. Click in the box next to [Allow immediate receipt on new Invoice]. For more information please see page 20. When you have finished entering an invoice and before printing or ing it, click on the [Receipt] button, which now appears at the top of the invoice screen. The program will swap to the receipt screen, with the invoice details already entered. If the customer is paying the full value of the invoice only, all you need to so is to click on [Finish] and [Yes] to save the changes and you will return to the invoice screen. When printing the invoice you will need to ask it to print the amount paid by marking the box in the [Bottom] tab. Page 170 of 301

56 Progressive Invoicing You can progressively invoice out part(s) of a job that has not been completed. This is done by selecting the lines in the job to copy over to a new or an existing invoice. You can cost a job or contract by adding items or labour directly to it or by allocating materials from purchases. Selected lines can then be copied to an invoice. Part of the job or contract can be invoiced out without closing off the job. You can select a particular line or a block of lines to copy to an invoice. The job or contract will show you which lines have previously been invoiced and you can easily see those lines that still need to be invoiced. All the line items remain in the source job or contract and are included in the costing in the costing tab. When all lines have been invoiced, you can delete the job or mark it as inactive and then delete it in the next financial year. Once you have part invoiced a job, you would not return to the job and click on job finished. Remaining lines should be copied to a new invoice. There is an option to hide inactive jobs, so that the completed jobs are not displayed in the job list. You can copy the lines to a NEW invoice or to an existing invoice. The invoice (whether new or existing) is updated instantly. After you have copied the lines to an invoice, you will need to open the invoice to edit, add any further text or information and print it. You cannot copy lines to an invoice that is in a previous financial year, has been receipted or that has been locked in a GST report. You will receive a warning if you try to copy to an existing invoice if it has been printed (but not receipted or locked in a GST report). In contracts this can be used as an alternative to progress claims. If you are using full inventory, using progressive invoicing can be used to update the stock levels. If you use the progressive invoicing option you must be aware of what is happening so you need to turn on this feature. When you initially turn on this feature you will need to enter a password. This is to prevent inadvertent use by unaware or unauthorised users To turn on Progressive Invoicing Single User: (Not using User Names and Passwords). Go to [Setup/Preferences]. Click on the [Single User Prefs] tab. Check the [Copy Lines to Invoices] box. You will be asked for a password which is KEEPINGTRACK. Click on [OK]. Multi User: (Or using User Names and Passwords). Log in using an administrator password and go to single user mode. Go to [Setup/User Names and Passwords]. Click on the user that you want to allow access to progressive invoicing. Click on [Edit Transactions] tab. Check the [Copy Lines to Invoices] box. You will be asked for a password which is KEEPINGTRACK. Click on [Update] Copying Lines to Invoices Page 171 of 301
![6.5.16.2.1 To copy one line to an invoice Open the Job or Contract. Right mouse click on the line in the job. Left mouse click on [Copy line to Invoice]. 6.5.16.2.2 To copy multiple lines to an invoice Hold down the [Ctrl] key on the keyboard.](/docs-images/95/124835171/images/57-0.jpg "Left mouse click on the required lines in the far left column. This will highlight the lines.")
![Take your finger off the [Ctrl] key and Right mouse click in the middle of the highlighted section and Left mouse click on [Copy line to Invoice]. A list of invoices for this customer is displayed.](/docs-images/95/124835171/images/57-1.jpg "You can select an existing* invoice or you can click on [New] to create a new invoice.")
57 To copy one line to an invoice Open the Job or Contract. Right mouse click on the line in the job. Left mouse click on [Copy line to Invoice] To copy multiple lines to an invoice Hold down the [Ctrl] key on the keyboard. Left mouse click on the required lines in the far left column. This will highlight the lines. Take your finger off the [Ctrl] key and Right mouse click in the middle of the highlighted section and Left mouse click on [Copy line to Invoice]. A list of invoices for this customer is displayed. You can select an existing* invoice or you can click on [New] to create a new invoice. The new invoice that is created uses the next invoice number available and will have the same job number, reference and job address and as the source job. In the source job the copied lines will be in faded print. To see which invoice the line was copied to, left click on the line and you will see the invoice details in the top right of the screen To delete a line To delete the line from the target invoice before the source job has been saved. For e.g. if you have selected the wrong lines or included some lines that you did not want copied, Right mouse click on the line in the top right of the screen and Left mouse click on [Delete Link]**. Alternatively say No to Save the Changes when you close the job Exit the job Exit the job Save Changes: [Yes] to Save the changes which will leave the lines copied to the invoice and the lines marked as copied in the job. [No] to Save the changes will remove the lines from the target invoice and unlink the lines in the job. Note: If the lines were linked to a new target invoice, the invoice will not be removed. You can either delete the invoice or retain and use to copy the lines to in the future. Page 172 of 301
58 Print the Invoice At this stage, the new invoice has been created or the target invoice has been altered. The customer s balances have been updated. The invoice now needs to be printed and sent to the customer. Locate the invoice, add any further text or information (yes you can add more items to the invoice) and print, , fax or save as a PDF Notes on Progressive Invoicing If you delete any of the copied lines from the target invoice (or you delete the target invoice), the copied lines will be unmarked in the job as well. You cannot copy a line to an invoice that has been paid or is included in a GST report. If you attempt to copy a line to an invoice and the invoice has previously been printed, ed, faxed or saved as a PDF, you will see 2 warnings that this is the case. Once, when you copy the line to the invoice, and once when you save the job. It is up to you to be aware that you are changing the value of the target invoice and the amount that the customer owes. The program will let you copy these lines and change the value of the invoice because it is envisaged that you may have noticed that you missed lines to be copied when you printed the invoice and you want to change it before you send the final invoice to the customer. If you have already sent the customer a copy of the invoice with the original figures, you should probably copy any extra lines to a new invoice. If the job has already been saved and therefore the line has already been updated in the invoice, the Delete Link option will not be available. You will need to remove a line from the invoice, open the target invoice and delete the line. This will unlink the line in the Job and will be available to be copied to another invoice at another time. You cannot change any lines in a job that has been linked to an invoice. You can delete a line in the source job or contract that has been invoiced and you will be warned that this is the case. Deleting a line in a job will not remove it from the target invoice. Once you have part invoiced a job, you would not return to the job and click on the job finished. Remaining lines should be copies to a new invoice. You can only use this function to copy lines to an invoice. The lines cannot be copied to a new job Labour Items You can copy the labour item lines to an invoice. In this case the Employee Time Analysis report will not include the labour lines in the source job if they have been copied to an invoice. Page 173 of 301

 This is separate to claims. To keep track of your inventory items, you can select lines to copy to an invoice.")
59 Job List The job list will help you with the status of the current jobs. Jobs that have no lines allocated to an invoice are white. Jobs that have some lines allocated to an invoice are teal. Jobs that have all lines allocated to an invoice are grey. You can either remove the Active check from these jobs or delete them Hiding Inactive Jobs When you use progressive invoicing, you can mark the completed jobs as inactive by removing the Active check and use the Hide Inactive Jobs option when viewing the job lists Using progressive invoice in contracts when using inventory items (Stock Control) This is separate to claims. To keep track of your inventory items, you can select lines to copy to an invoice. You will need to open the created invoice and insert a reversing entry to the sales account Inventory Items (Using Payperwork for Stock Control) Any inventory items in jobs that have been linked to an invoice will not be included in the Allocated figure in the item records. Insufficient Stock on Hand: When you link an inventory item that has insufficient stock on hand to update the invoice, you will be warned that this is the case. The item will be removed from the invoice and the link removed from the job Contracts and Inventory If you are using full inventory and contracts in Payperwork, the progressive invoicing function gives you a much easier method of updating your stock on hand figures. In the contract you will be able to see which lines have not been copied to an invoice and therefore still need to be copied so that you can update your stock. Previously you needed to copy the entire contract into an invoice and then keep track yourself of which lines you have previously deleted or wait until the contract was completed before doing this entry. Regularly copy the unallocated lines in the contract to a new invoice. Open the invoice and enter a balancing entry to the sales account to make the target invoice a zero value and save the invoice. Any inventory items in contracts that have been linked to an invoice will not be included in the Allocated figure in the item records. Page 174 of 301

60 6.6 Adjustment Notes Adjustment Notes are an important element of the GST. We have to work to a strict set of rules in our bookkeeping procedures. Not only are there requirements to fulfil our own record keeping obligations, but rules to follow in order that our customers can fulfil their obligations. An adjustment note has the reverse accounting effect of an invoice. You will need to issue an Adjustment Note to the customer if: All or part of a supply that you invoiced is cancelled. The price for a supply is altered (such as where you provide a discount for early settlement) Create Click on the [Customers] tool bar and select [Adjust]. Search and select the required customer from the list. Click on [New]. Credit Invoice #: For GST reporting purposes, the program needs to know the invoice number that this Adjustment Note relates to. If you know the invoice number, enter it in here. If you need to look for the invoice number, select the grey button as shown above. A list of all the invoices (paid and unpaid) for this customer will be displayed. Select the invoice the adjustment note relates to from the list. If the adjustment note covers several invoices, select one invoice from the same month that has a greater value than the adjustment. For example, if this is a settlement discount for $21.50 for March sales, select a March invoice that has a value of more than $ Reference: Enter a reference for the Adjustment Note. Date: Enter the date of the Adjustment Note. (The value will be deducted from the month of the adjustment note. Text: Insert text as done in invoicing. Depending on how you invoiced the customer originally, select the respective method to credit [Accounts], [Items], [Unit Rate] or [Custom]. If the adjustment note is for goods being returned and you are running full inventory on Payperwork you will need to use the items that were returned so that correct levels are maintained Applying the Adjustment Note Adjustment Notes, like invoices, remain outstanding until they are selected in the receipt section of the program. This will also set the 30, 60, 90 day ageing of the invoice and adjustment note correctly. When you select the adjustment note from the Invoice list in receipts, the value of the adjustment note will be deducted from the total value of the receipt. If you are reporting for GST on a cash basis, it is at this stage that the value of GST is deducted from the GST that you are liable to pay. If the Adjustment Note offsets the full value of an existing invoice, it is still necessary to go to receipts and select both the original invoice and the Adjustment Note thus creating a Zero value receipt. This will mark both the transactions as paid so they will no longer appear on statements and in the Invoices list as outstanding. You will also need to tag this zero value receipt in the bank reconciliation Deleting Adjustment Notes To delete an adjustment note: Click on the [Adjust] button and select the customer that has the adjustment note you would like to delete. A list of adjustment notes will be listed for that customer. Locate and select the correct adjustment note. R mouse on the transaction and select [Delete Transaction]. Page 175 of 301
61 6.7 Contracts A contract job is a type of job that links together and reports on; The original quoted price for the works. Costs to date entered against that contract. Variations to the original contract price. Claims made via invoices or jobs. Money received and; Retentions held against that contract. Contracts can be added to the Job Scheduler. Labour can be allocated to the contracts (directly or via the Job Scheduler) using the employees labour. This can be date stamped and will be included in the employees time analysis report. You can add a date due to retentions so that you can get a report of all retentions due up to a particular month. When you are preparing your claims, you can import the contract status (original contract price, variations and previous claims) into the text of the claim for fast preparation of your claims. Follow the step-by-step instructions on how to set up a new contract and how to maintain it. Take care not to miss any steps. Like the links in a chain, the final result will depend upon the strength and accuracy of the each step Create and Setup Click on the [Customers] toolbar and then click on [Contracts]. Select your customer or create a new customer. Click on the [New] button or R mouse and [New Transaction]. Enter a reference if required and change the date if necessary. Job Address: Enter the address of the contract. Job Number: See [Setup/Preferences/Invoices]. If you have this set to Numeric Job Numbering, the job number will be the next in the sequence. If not, you can enter your own job number (14 characters). Contract Tab: Click on the Contract tab at the bottom of the screen. Contract Price: Enter the original or quoted price directly into the contract price field. Page 176 of 301


62 6.7.2 Maintaining Contract Setting up the default prices for contracts It is recommended that you enter value lines in at cost price, however, you may opt to enter them in at list price or a marked up price. You can set a different default price to use for contract jobs. Go to [Setup/Stock]. Billing Price: This is the default price for use in invoices, jobs and quotes - NOT contract jobs. Price in W.I.P.: This is the default price for use when allocating items from purchases to jobs - NOT Contract Jobs. Price in Contract: The default price to use when entering items either directly into contract jobs or when allocating items from purchases into contract jobs. This includes standard items as well as custom prices list items such as L & H, MM, Reece and Tradelink items Entering costs into the contract As various costs for the contract are incurred (materials and labour costs), enter them into the main contract. This can be done directly into the contract by using GL accounts, or by using standard, labour and custom price list items. Costs can also be added to the contract indirectly by allocating them from purchases. You can combine the way you add the values to the contract. For example, you can allocate the materials from purchases and directly add labour costs. You can also add text blocks at any stage of the contract, to describe stages of works etc. To assist in organising the various parts of the contract you can also use cost codes and subtotals. For more information on this please see page 153. Cost Codes: Cost codes are a single letter assigned to a value line. Combining cost codes with subtotals allows you to group together various types of costs. The most common codes used are L (for labour) and M (for materials). You can set up default headings in [Adjustments/Cost Codes], or you can add different headings each time. By adding a cost code to each line item, you will be able to; i. Get a subtotal for each code used. ii. View a costing report to get the total units of each cost code used (i.e. number of labour hours used to date). Sub Totals: You can add a subtotal at any stage. For example, after you have entered all the costs for July, insert a subtotal and future subtotals will not include that figure. Remember that if you want a group subtotal and a subtotal of all the groups, you will need to do the group subtotal before the all subtotal. Inventory Items: If you are running a full stock inventory system that is the items you are using in the contract are inventory items as opposed to non-inventory items, the items entered into a contract job are not included as allocated quantities in the items records. If you are using inventory items, please see page 50 for more information. Page 177 of 301

63 6.7.3 Allocating Material For more information on Allocating Material from purchases to contracts please see page Variations Variations are extra costs added to the original contract price. Variations could be due to a request for extra works, repair works or extras over in labour hours, etc. A combination of methods can be used to add variations, but each variation should only be added in any one of three ways: a) Linking a quote to the contract as a variation. b) Manual variation via the contracts tab. c) Linking a job or invoice as a variation. a) Linking a quote to the contract. When a variation needs to be quoted before any works commence, link the quote as a variation. Prepare the quote in the usual manner including GST. To link the quote to the contract. As a Variation If the works have already been carried out, you can link the quote as a variation. Click on the Contract Link tab at the bottom of the quote screen and the customers list of contracts will be displayed. Double click on the contract that you want to link this quote to. Then click on the drop down box to link the quote as a variation. Click to tick and note if the variation has been approved. Leaving this unchecked will note on reports that the variation is unapproved. You can return to the quote at a later date to change from unapproved to approved. As a Quote Click on the [Contract] button (as above) Leave the quote linked as a quote until the variation works have been carried out, at which time, return to the quote and change the link from quote to variation. When reporting on a contract, quotes are not included until they are saved as linked as a variation. b) Manual variation via the contracts tab. You can add a variation to a contract by entering the value directly into the contract. This method is used when you do not need to send a quote for approval and you would like the variation added to the original contract price to be claimed with your regular monthly claim invoice. That is when you do not need to issue a separate invoice for your variations. From the contract itself, click on the magnifying glass button next to variations. Page 178 of 301
![A list of transactions that make up the variations value on the contract tab will be displayed. Click the [Add] button to enter a manual variation. A blank variation line will be added.](/docs-images/95/124835171/images/64-0.jpg "Enter a transaction number, some details and the value. Click to tick if the variation has been approved. Click [Finish] to exit variations and return to the contracts screen.")

![job or invoice. Inside the job or invoice, select the Contract tab at the bottom of the screen. Click the [Contract] button. Select the relevant contract from the list of contracts.](/docs-images/95/124835171/images/64-3.jpg "From the drop down box change Claim to Variation. Click to Tick if the variation has been approved. Finish, Save and Print as required.")
64 A list of transactions that make up the variations value on the contract tab will be displayed. Click the [Add] button to enter a manual variation. A blank variation line will be added. Enter a transaction number, some details and the value. Click to tick if the variation has been approved. Click [Finish] to exit variations and return to the contracts screen. c) Linking a job or invoice as a variation. When the work for the variation has already been performed and the client or builder requires that you invoice any variations separately to claims, you can link the variation to the contract from the job or invoice. Inside the job or invoice, select the Contract tab at the bottom of the screen. Click the [Contract] button. Select the relevant contract from the list of contracts. From the drop down box change Claim to Variation. Click to Tick if the variation has been approved. Finish, Save and Print as required. WARNING Care must be taken that variations are not duplicated in the contract. If a quote was provided and linked to the contract (for the works just invoiced), remove the link to the contract in the Quote. Likewise, if you entered the variation manually directly into the contract you need to delete the manual variation. The contract report will highlight unapproved variations with an asterisk as shown below. Page 179 of 301

65 6.7.5 Progress Claims Progress Claims are entered by raising a separate invoice. Some PayPerWork users have a master claim format that they have saved as a job and use this to copy from when they are entering the first claim for a contract. The first claim can be copied into subsequent claims and the figures altered to suit the next claim. Alternatively you can let Payperwork import the contract details directly into the text of the claim. (See below) Linking the claim to the contract Click on the Contract Link tab at the bottom of the invoice. Click on the [Contracts] button. Select the relevant contract from the list of contracts. Leave as a Claim. Whether a claim is left as a job or turned into an invoice, it is included in the claims value for the contract. Accrual GST Reporting If you are reporting for GST on an accruals basis, leave the invoice as a job. When you print the job, check the Print Job as Claim box in the print options. This way the claim will not be included in the GST report and you will not be liable to pay the GST at this stage. When you know how much of the claim has been allowed by the builder, go back into the job, change the value to the actual accepted claim value and then click on Job Finished to turn the job into an invoice. Cash GST Reporting If you are reporting for GST on a cash basis, you should also leave the invoice as a job. When you print the job, check the Print Job as Claim box in the print options. If you issue a tax invoice and the claim is only partly allowed, you would need to send an adjustment note for the shortfall. However by leaving the invoice as a job you can just return to the job and change the value of the claim to the value that has been allowed (including any retention held) and then click on Job finished to turn the job into an invoice Automatically import contract details into the Text of a claim This screen shot shows you how to create your detailed claim very quickly. Page 180 of 301
 select Print Job (or Invoice) as a Claim from the drop down box in the invoice")

66 Printing the Claim To print the Claim as a claim (rather than an invoice) select Print Job (or Invoice) as a Claim from the drop down box in the invoice print options. You can present the claim details in the claim/invoice. Alternatively you can cut and paste the details into a word document and present it to the customer as a separate report. Unapproved Variations are highlighted To view the list of claims on the contract To view the claims making up the amount shown in the contract job; Go into the contract job. On the contract tab, at the bottom of the screen, click on the claims detail button. Page 181 of 301

![The retentions are held in the Retentions Held control account (as set up in [Setup/Accounts]). WARNING!](/docs-images/95/124835171/images/67-1.jpg "To keep the figures in the Retentions held control account reliable, it is essential you understand the following instructions & that you remain consistent when you are entering your information.")
67 6.7.6 Retentions A retention on a contract is a value withheld from the PAYMENT of a claim or invoice by the client, for a specified amount of time. Therefore the value of the claim includes the amount retained. Do not reduce the claim by the retention amount. The retentions are held in the Retentions Held control account (as set up in [Setup/Accounts]). WARNING! To keep the figures in the Retentions held control account reliable, it is essential you understand the following instructions & that you remain consistent when you are entering your information. If you have any queries, please call the support desk To enter a receipt for a claim that has retention Go to receipts and select the customer. In the invoice list, click to tick the Pay box for the relevant claim/invoice. Click ONCE in the Paid this Receipt column and type in the value received. Click ONCE in the Retention column. The program presumes that the difference between the invoice total and the amount you received is the retention. The customer s balance will be credited with the full value of the invoice and the retention amount will be moved (excluding GST) to the retentions held control account. Whether you are reporting for GST on Cash or Accruals basis you are not liable to pay the GST on retentions until the retentions are actually received. Page 182 of 301

68 What happens in the bookkeeping with the GST on retentions? Part Payments on contract jobs are rare. If part of a claim has been disallowed, you need to adjust the value of the actual claim invoice. If you just enter a part payment to the customer, you are in danger of never receiving the money and leaving part of the contract outstanding. As far as the builder is concerned he has fully paid that invoice. If you do not change the invoice to the amount allowed on the claim the value will not go back onto the to be claimed value in the contract for you to include in a future claim. If the short payment was for some reason other than described above (such as I will pay you $5000 today and the balance of the claim on Friday ), you can change the amount in the retention held box to the actual retention value, or to zero if there is no retention. The program will leave the difference between the amount received and the retention amount in the customer as well as unpaid against the invoice. Remember that in this case the unpaid proportion will still be in the job contract reports under the claims column Due date on Retentions You can add a due date to retentions that have been withheld on contract claims. To add this date, you need to return to the contract. You will find a field for retentions at the bottom of the screen. Click on the search button next to the Retentions box to view the full list of retentions for the contract and to enter or change the due dates Retentions Due Report Go to Reports/Work in Progress/Contract Retentions. You can ask for a report that will also include the date the Retention is due. Select Include live Contracts. Print unpaid retentions only. Print retentions due as at: Page 183 of 301


69 Retentions entered as a minus value in a claim or invoice A retention is an amount that is withheld by the builder when they pay the invoice. Payperwork does not allow you to select the retentions control account from within an invoice because it is not strictly correct. We cannot prevent you from entering a negative value to another account but you should check with your accountant before you send out an invoice in this format. An invoice or claim should be for the full value of the sale which should include the retention. If you do use another account to enter a minus value retention into an invoice, the retentions report in Payperwork will not include this retention. Therefore you will lose the ability to keep track of your retentions and when they are due to be claimed. You will be relying on some other method (or your memory) to know when the retention is due Claiming Retentions Just as entering a negative line for retention into a claim invoice is not strictly a correct procedure, it is also not recommended to issue an invoice to claim the retention when it is due. Remember! When you invoiced the full value of the claim (and then deducted the retention from the payment) the retention amount was posted to your sales account. You do not want to enter the amount to sales again or you will end up overstating your sales and paying extra tax. However, some builders insist upon an invoice as the method of claiming retention when it is due to be paid, so we suggest the following method: Raise an invoice as normal using the sales account. Do not use the retentions control account and do not link it to the contract. Then immediately enter an adjustment note, also to the sales account, do not link it to the contract either. Then enter a zero value receipt selecting both the invoice and the adjustment note. When the invoice (retention) is received, enter it as described on the following page Retentions Received When the retention is eventually received, it is entered through a receipt to the Retentions Held control account. When the final claim/invoice was receipted, the retention amount was moved to the retentions held control account. When receipting the retention, the control account must be used and not the customer. Click on [Receipts]. Enter the date and other details. Click on the [Accounts] button on the toolbar. Search and locate the Retentions Held control account. Click to tick the retention being paid. The GST boxes have been checked for you. If the retention has only been part paid, click ONCE in the Paid this Receipt column and type the amount received. Page 184 of 301

70 6.7.7 Contract Reports Listed below are a few reports relating to contracts and retentions. For more information on other reports you can print from Payperwork please see page Contract Status Report The Contract Status report displays the activity of the contract. It compares the original contracted price, variations added, claims issued and payments made, leaving you with balances left to be claimed. From within the contract itself; Click on the drop down arrow next to the [Print] button on the toolbar and select [Contract Status] ]. Or Press the print button in the Contract tab at the bottom of the screen. Select [Print],[Fax], [ ]. Press [Finish] to exit back to the contract. Note: To print the Job Status report with excluding GST figures, you need to: 1. Go to [Setup/Preferences/Invoices] and remove the check from Print Contracts Including GST. 2. Enter the Original Contract Sum as an EX GST value. 3. Enter any Manual variations (i.e. those NOT entered via quotes) as an EX GST value Contract Job Card This can be used to give the contractors or employees that are doing the job. The job card prints the contract number, address and contact details with blank lines for labour items and description. No values or existing items will print on the job card Costing Report The Costing report gives you a breakdown of the costs in the contract according to the cost codes you allocated to each line item. For example, if you placed an L against each labour line (when you were entering the quantity), this report will give you the total number of hours used to date on this contract. Page 185 of 301
71 Contract Report This report lists all the text and line items that you have added to the contract. Tip: When printing a large contract, remove the tick from Page Break in the print options. You will use less paper because the letterhead & remittance advice will only print on the first page Retentions Report Go to [Reports/Work in Progress/Contract Retentions]. Select the options required and print Validating your retentions totals If you print a full list of retentions including alive and dead contracts and you do not select the retentions due as at option, the total on the last page of the report should be equal to the balance of the Retentions Held control account Linking external files to Contracts You can link a file from another folder on your local hard disk or a shared folder on the network to a quote, job, contract or invoice. The file will not be saved into the Payperwork data. If the file is later changed and saved, the new version will be opened when it is accessed from the link in Payperwork. If the linked file is deleted from its linked location is cannot be viewed from within the transaction. If the file is moved to another folder, you will need to change the link in the transaction to direct it to the new (correct) folder. When you open a file from the link, the associated program (if it is available on your computer) will be used to open the file. Examples:.jpg files - Picture Manager.doc and dcx files MS Word..pdf Adobe reader..xls MS Excel. Open an existing contract and click on the [Link] button. You can search the local computer and the network and select the file to link to the Contract. If you select a file on your local disk from a folder that is not shared on the network, you can proceed and link the file but you will notified that it will not be available to be viewed by the other users on the network Contracts and Stock Control If you are using full stock control and you have inventory items in the contract, these will be included in the allocated quantity in the item. However the quantity will not be taken off the QOH (Quantity on hand). To update the stock levels you can periodically: Close progressive invoicing to copy all the lines in the contract over to a new invoice. Open the invoice that was created and enter a balancing entry to the sales account to bring the value of the invoice back to zero and save it. If more items are allocated to the contract after this, you can repeat the above procedure as often as necessary until the contract is completed. For more information on Progressive Invoicing please see page 171. Page 186 of 301
72 6.8 Receipts Receipts are the revenue you receive from your customers in payment for invoices you have issued for materials or services. Less frequently, you receive income from other sources such as apprentice rebates, bank interest, insurance recoveries and rent received. All receipts into the business should be entered into the program. Receipts from customers are only entered once as the General Ledger entries are updated automatically to the cashbook and relevant General Ledger accounts. Other income is only entered via receipts to accounts. The Cash at Bank Control Account will be debited with the total value of the receipt. Source of Information for receipts Bank Deposit Book - For Values. Remittance slip or copy invoice from customers - for invoice numbers. Bank Statements - For interest received and direct deposits. Entering receipts uses the mouse and requires very few keystrokes. The keyboard is only needed if you want to: Enter a cheque total for a batch of cheque receipts. Change the amount of the receipt. Enter the banking details for the program to print a bank deposit slip Entering Receipts from Customers Click on the [Customers] toolbar. Click on the [Receipts] button Receipts Header Date and Cheque Details: The information entered in the Cheque Details box is saved for the bank deposit listings, bank reconciliation and cashbooks. Bank Account: The default Cash at Bank account will be used unless you change this to another account. If you operate just the one main bank account, leave this unchanged. If you are using multiple bank accounts, change this to the bank account that this receipt is being deposited into. To change the bank account, click on the magnifying glass and select the required account from the list of bank accounts. The Bank Account selected applies to ALL lines in the receipt. Changing the bank account halfway through the transaction will not cause some lines to be posted to one bank account and the rest to another. Whichever bank account number appears at the bottom of the screen at the time of saving or finishing the receipt or payment is the bank account that will be updated with the final value. Date: The date the receipt was banked. Do not use the date that the cheque was received from the customer or the date presented on the bank statement. You will find the bank reconciliation much easier if you use the deposit date. Click on the date button to bring up to select the date from the calendar. Page 187 of 301

73 Deposit Type: This refers strictly to the bank deposit listing. Cheques will be listed individually. Cash will be added together under cash. Credit Card will be added together under Merchant Summary. Direct Deposits will not be listed but you have the option to include them when you go to print the report. EFTPos will not be listed but you have the option to include them when you go to print the report. Bank Statement will not be listed at all. Cheque Details: If you require Payperwork to produce a bank deposit listing to present to the bank, enter the Name, Bank and Branch from the cheque. If the receipt is from a customer and you are entering details from your bank deposit book (i.e. you do not require Payperwork to produce a bank deposit listing), leave the field blank. Payperwork will fill in the customer s name later. Cheque Total: (Optional) Enter the full value of the cheque. This is used as a double check that the total value of the invoices matches the cheque amount Selecting Invoices relating to the receipt Click on [Customers] button. The list of customers will be displayed. Search and select the required customer. To search for a particular invoice, click on the transactions tab and search by invoice number. Invoice(s) being paid in full: Select the invoice(s) that the customer paid by ticking the box under Pay. Invoice(s) being part paid: If an invoice has been part paid click the box under Paid this Receipt and enter the amount the customer paid for this invoice. The total value should equal the amount the customer paid. Page 188 of 301
74 Receipts and the GST Cash mode: The GST value is displayed in the same way as in invoices. The GST value in most cases would equal the Total divided by eleven. Part Payment of Invoices When reporting on a cash basis you are only liable to pay the GST when you receive the money. When you enter a part payment, the program looks at the amount of GST that was on the invoice. It then calculates the GST based on the percentage that this receipt is of the total value and transfers GST in the same proportion. Accrual (non-cash) mode: The total value of the selected invoices is displayed as before in the top section of the screen. When you enter a receipt to a customer, no GST is displayed at the bottom of the screen as the GST became payable at the time of the invoice Saving and Finishing Receipts Save: Click on [Save] between each cheque to enter the details of a new cheque. DO NOT BULK PROCESS. Enter each receipt individually. If you enter several receipts without saving or finishing, all the receipts will be listed as a bulk figure on reports and bank reconciliation. Should one receipt need deleting, you will have to delete and reenter all the receipts for that day. If the amount of the receipt differs from the cheque total you will get a warning message before it updates. You will then have the opportunity to return to the details and change the figures before you save the receipt. The value that updates the customer and bank is the Total at the foot of the screen. Not the value in the cheque total box at the top of the screen Deposits from Customers When you enter a receipt from a customer you need to select the invoices that the receipt relates to and either fully or part-pay those invoices. This keeps the amount outstanding on the customer s account equal to the value of the outstanding invoices. However there are situations where you need to enter an amount to a customer s account when you have no corresponding invoices. Common examples: When you take a deposit on work to be done and you will not be entering the invoice until the work has been completed. When the customer has overpaid an invoice or paid an invoice twice. You can enter this by using the Allow Deposits button in receipts Entering Deposits from Customers Click on [Receipts]. Select the [Customer]. Click on the [Allow Deposits] button. Using the next available invoice number (dated 1st July of the current financial year), Payperwork will create a zero value invoice that you will see immediately in the invoice list. Click to tick in the [Pay] box. Click ONCE in the [Paid this Receipt] column and enter the amount of the deposit or overpayment. A screen grab with instructions on how to do this is located on the next page. Page 189 of 301


75 The deposit will stay in the customer s account and the show as outstanding because it has been overpaid. When you have an invoice to allocate the overpayment or deposit to, go back to receipts, select the invoice it is going to be allocated to and enter a positive value into the Paid this Receipt column. Also tick the Pay box on the deposit invoice. If you are only allocating part of the deposit to another invoice, click in the Paid this Receipt column and enter a MINUS (negative value) for that part Refunding the Customer In the case where the customer has overpaid their account and you opt to send them back payment for the value rather than wait to offset to a later invoice, you can still enter the overpayment as Allow Deposit. Then to enter the payment for the refund, go to Receipts, select the customer and tick the Deposit invoice. A negative receipt has the same effect as a positive payment on the bank GST and Deposits from Customers The deposit will be included in the GST report for the period that the receipt was received because you are required to pay the GST when you receive consideration for goods or services. Cash Basis When the job is done and you raise an invoice for the services that the deposit is paying (either in part of in full), this invoice will not be included in the GST report because this happens when you receive the money in. Therefore if you do not allocate the deposits to the invoices when they are raised you are still not paying the GST twice. However we do recommend allocating these as soon as you raise the invoice so that the deposit is no longer listed as outstanding and the invoice has the correct amount paid allocated to it. Accruals Basis When you enter the deposit, the GST on that deposit will be included on the GST report for the period that you received the deposit. When the job is done and you raise an invoice for the services that the deposit is paying (either in part of in full), this invoice will be included in the GST report as well. Therefore if you do not allocate the deposit to the invoice when it has been raised you will be paying the GST twice. Page 190 of 301


76 6.8.3 Receipts to General Ledger Accounts Most receipts that you enter will be from customers for invoices. Occasionally you will receive income from other sources that needs to be entered directly to the General Ledger account. Examples are Rent received, Insurance recoveries, Capital introduced, Workcare rebates, Sale of capital equipment and Interest. You should check with your accountant as to whether you should pay GST on this income. It is important that you know when GST is to be paid on income. The general rule is that if the income is consideration (Payment for) a taxable supply or service then GST must be paid. Click on [Accounts] button on the tool bar and select the required account from the list. The detail screen appears. Details: Enter the details E.g.: Interest Investment Account. Value: Enter Value of the Deposit. GST Payable: When you select an account in receipts, this box is checked or not checked according to the setting in the account. If this box is not checked, no GST will be calculated on the receipt. If you want GST to be calculated on this occasion, click on the box and GST will be calculated. The default setting for the account can be changed at any time through [Adjustments/Accounts/Name & Group]. Click [OK] if correct. If the receipt covers income that requires splitting over other accounts click on the [Account] button again and repeat until the full value if the cheque has been entered Receipts with Discounts Follow the procedure for receipts from customers through to the end, leaving the value as the full amount of the invoice being paid. Select the [Account] button. Select the ledger account for Discounts allowed to customers or use the Sales account. Details: Enter the details as required. These details will appear in the account enquiries and on account activity reports. Page 191 of 301
77 GST: Check both GST boxes so that the GST is also calculated on the discount. Value: Enter as a negative (minus) before the value. Click on [OK]. This method should only be used for minor discounts (for example when the customer has rounded off the cents). According to ATO requirements, an Adjustment Note should be printed and sent to the customer for any variations to the original Tax Invoice that was issued. Click on [Save] or [Finish] to update Contra with Supplier Account What is a contra entry? E.g. One of your customers owes you money, but you in turn also owe money to them. By mutual agreement you may decide to take the money you owe them out of the money they owe you without actually exchanging cheques. Contra entries between customers and suppliers can be entered easily through payments and receipts and is the prefered method as invoices and purchases are marked as paid and the ageing of the customers and suppliers accounts is maintained correctly. It is also the right way to enter the information in order to keep the balance of the GST Payable and Input Tax Credit, in line with the GST report. An example of this is: We have an electrician on our books and recently he required us to install a new hot water unit and a pump on his recycled system. I sent him an invoice for $ We then used him to test and tag our equipment as required by law every 3 months. He sent us an invoice for $ and then deposited the the difference of $ into our bank account. How would I handle this? 1. Enter the invoice you received from the electrician in purchases. 2. Enter a payment to the electrician as usual, selecting the purchase from the list. Click on the Suspense account and enter a balancing negative value (using the figure that includes GST but DO NOT click on ITC Claimable). The total of the payment is $0.00 (Zero) as no payment is made to the bank. 3. Enter a receipt from the electrician, selecting the invoice(s) from the list to be fully or part paid. Click on the Suspense account and enter a balancing negative value (using the figure that includes GST but DO NOT click on ITC Claimable). The total of the payment should be $ which is the amount that the electrician paid into your account. 4. There will now be two transactions in the bank rec. One receipt for $ and one payment for $0.00. Tag both these transactions when you are doing the bank reconciliation. Page 192 of 301
78 6.8.6 Receipts for Customers from a Debt Collection Agency When a Debt Collection Agency collects from a customer on your behalf, they will deduct their fees and send you the balance. To enter this you need to do both a receipt and a payment using the suspense account. The agency s fees include GST, which you are entitled to claim as an ITC. First go to [Receipts]. Line 1: Select the customer and the invoice from the list. Enter the full value of the invoice. Line 2: Select Accounts and using the Suspense account, enter the amount deducted by the collection agency as a Negative. Check no GST boxes. When reporting for GST on a cash basis, the GST displayed is equal to the GST collected on the original invoice. The Total of the receipt will be the amount you received from the debt collection agency. Now go to Payments Line 1: Enter a positive value to the account Debt Collecting Fees for the amount of the fees. Check Claim ITC. Line 2: Select Accounts and using the Suspense account, enter the amount deducted by the collection agency as a Negative. No ITC Whether reporting for GST on Cash or Accrual basis, 1/11 th of the fees charged by the agency is claimed as ITC. Ensure that you receive a Tax Invoice from the agency if the value is over $50. The Total Value here should be Zero as there is no affect on the bank. Always check that the Suspense account is back to Zero after doing entries of this type Receipts and Accounting for Customers that Overpay Whether you are reporting for GST on a Cash or Accrual Basis, you become liable to pay the GST once you have received consideration for Goods and Services. This includes the case of when a customer overpays an invoice or pays an invoice twice. You have two options: 1. Provided the time between the receipt of the overpayment and you sending a return cheque do not span reporting periods, you can send a cheque back to the customer. Post both the receipt of the overpayment and the payment for the refund to the suspense account, making sure that NO GST or ITC boxes are checked. This way the money does not enter the GST net at all. 2. If you keep the receipt as a deposit on future work, you will need to follow the same procedure that is described above for Deposits from Customers. Page 193 of 301

79 6.8.8 Zero Value Receipts For information on zero value receipts please see page Receipt Printing Payperwork gives you the option to print the receipt after processing. Once you have entered the receipt, click [Save]. The Print Receipt screen appears. Address of Payer: The name and address of the customer is shown in this section. Print Options: You have the option to print the receipt on pre-printed stationary or if you would prefer plain paper, do not tick this box. You can include or exclude the print headings, date and your company graphic. Once you have selected the options, click [Print Preview] to view a copy of your receipt. Click [Print], [Fax], [ ] or [Save PDF]. Click [Finish]. Page 194 of 301
80 6.9 Service Management Overview With this Payperwork feature you can keep a record of the all the details of your customers individual items of equipment or appliances that you have installed, that you service or that you maintain. The service fields are designed by you. This means that you can customise them to record the type of detail about an item of that is of importance to you. This information can be retrieved quickly when it is needed. By linking the item to jobs you can build up full history of any service and maintenance that was carried out on the particular items of your customer s equipment. Helpful when ordering spare parts. You have a record of all the warranty details. You can print the details of the unit on each job card or invoice. By giving the customer a detailed report on the service job, you are not only giving the customer the information he needs, but you are also generating a detailed history of a particular appliance. It is easy to check and print the maintenance history of all work performed on a particular item or appliance. You can create a job into the future for the next service if you need to perform regular maintenance. If you use the Job Scheduler in Paperwork, you can even forward schedule the job. You can search by any fields to locate certain equipment. You can print a history with all the details of any past invoices done on this unit. This shows all past comments, services and parts that you used. You can use this feature to generate repeat business by contacting your customers when they are due for your services again such as drain cleaning, gas appliance check, test and tagging, filter replacement, safety point checks on buildings. How does it work? When you create a job, invoice or quote for the initial installation or service call for a specific unit, record all the details about the unit. From then on the unit and its details are permanently attached to that customer s record. The details of the equipment can be printed on the job card so that the technician can see in advance the precise appliance on site and the purpose of his visit. You can print the full history of previous services on plain paper to accompany the job card if you need to. When the job is complete, type a full description of the service, enter the parts and labour used on the job and then turn the job into an invoice for the customer. This not only tells the customer what was done on the job but ensures that the service history of the job or appliance is complete. At this time you can enter the The Next Service Date for which a job can be created and forward scheduled if you want. You can generate a report (e.g. for a month) of all services that are due. You can create your reminder letters in MS word and use this report to mail merge the customer s details. Page 195 of 301
![6.9.2 Setup In these notes we have used an air conditioner in the examples but as you will see you can nominate the names of the fields to suit your business. 6.9.2.1 Define the fields Go to the [Setup] Menu and click on [Preferences].](/docs-images/95/124835171/images/81-0.jpg "Click on the [Business] Tab. Check to tick the [Other Service & Repair Industry]. This will expose all the fields for you to define your own headings. 6.9.2.1.1 Service Tab WARNING!")

81 6.9.2 Setup In these notes we have used an air conditioner in the examples but as you will see you can nominate the names of the fields to suit your business Define the fields Go to the [Setup] Menu and click on [Preferences]. Click on the [Business] Tab. Check to tick the [Other Service & Repair Industry]. This will expose all the fields for you to define your own headings Service Tab WARNING! You will not get this right first time. It is easy to come back and change the fields. We would suggest that you set up the fields as you think fit and then go and link it to a customer. Create a dummy job and then view and print your job card and invoice. Don t enter lots of information and then decide that you want to change the fields because it you will have to fix all the units you have already entered. Heading: The heading for the front tab needs to be entered first. In the illustration above we have used the word Service. It could be Appliance or Unit or Asset. This is the heading that will be on the tab when you are using the program. Fields 1 4. These are fields where you will just enter text. Using the above illustration as a guide, enter the names for the fields that you would like to use. If you don t need a particular field leave it blank and the program will skip these places. Field 5. This is a dropdown field where you can also define the type of information that you would add. Click the down arrow and you can add the type of information that you want in this field. It helps users to select the type of information that is particularly important to have. Month and Year Fields: Again use the illustration as a guide. Remember you can come back and change these fields around if it does not suit you. Show Field 5 Contents Sorted: Tick if you want the contents sorted numerically then alphabetically in the drop down box. Page 196 of 301


82 Details Tab Now click on the [Details] Tab where there are more fields that you can give names to and use to record the details that you want to keep about your customer s equipment or the service that you are attending to Service Due Tab Click on the [Service Due] tab and enter the unit for service frequency. Page 197 of 301
![6.9.3 To enter a new appliance or service unit You can enter a new unit either on the fly when you start a new job or through adjustments. 6.9.3.1 Through Adjustments Go to [Adjustments/Service Register].](/docs-images/95/124835171/images/83-0.jpg "Click on [New]. Enter the details of the equipment and click on [Save]. To edit an existing appliance click on [Edit]. To delete an existing appliance click on [Delete].")
![You cannot delete a unit that has existing transaction. 6.9.3.2 Through Jobs Go to [Jobs], select your customer and start a [New] transaction.](/docs-images/95/124835171/images/83-1.jpg "In the top right of your screen, you will see the extra tabs that you use to enter the details of the appliance or equipment that is to be repaired or serviced.")
83 6.9.3 To enter a new appliance or service unit You can enter a new unit either on the fly when you start a new job or through adjustments Through Adjustments Go to [Adjustments/Service Register]. Click on [New]. Enter the details of the equipment and click on [Save]. To edit an existing appliance click on [Edit]. To delete an existing appliance click on [Delete]. You cannot delete a unit that has existing transaction Through Jobs Go to [Jobs], select your customer and start a [New] transaction. In the top right of your screen, you will see the extra tabs that you use to enter the details of the appliance or equipment that is to be repaired or serviced. ID: The ID must be individual to this particular unit or service. It is used when you are searching and when the program is forming the history. If you repeat any ID, the history for all the units with the same ID will all be in together and therefore of not much use. One way of making the ID different for each customer is to start the ID with the customer number. Tabbing to each field, complete the information on both the main tab (headed service in the illustration but you may have nominated a different heading). Click on [Save] to save the unit details. To select an existing unit, click the drop down box next to ID. Don t forget to complete the Job Address and Job details tabs as well. The Service Due tab is not needed until this service has been completed and you are about to turn the Job into an Invoice. Page 198 of 301
![6.9.4 To change the Customer linked to an item To move an existing unit from one customer to another, go into the item register through [Adjustments/Service Register] and click on [Edit].](/docs-images/95/124835171/images/84-0.jpg "Search to locate the new customer and click on [Save]. Previous invoices will remain in the original customer s record. The unit will no longer be available in the original customer for new jobs.")

![Here you can change the ID, once this is done click on [Save]. You will see the prompt: Click on [Replace] if you are just wanting to edit the ID itself.](/docs-images/95/124835171/images/84-2.jpg "(Note: This will move the history to the new ID). Click on [New] to leave the existing unit as it is and create a duplicate unit.")
84 6.9.4 To change the Customer linked to an item To move an existing unit from one customer to another, go into the item register through [Adjustments/Service Register] and click on [Edit]. Search to locate the new customer and click on [Save]. Previous invoices will remain in the original customer s record. The unit will no longer be available in the original customer for new jobs. The unit and all previous history will be available in the new customer To change an ID of an existing unit To change an ID of an existing unit, go into the item register through [Adjustments/Service Register] and click on [Edit]. Here you can change the ID, once this is done click on [Save]. You will see the prompt: Click on [Replace] if you are just wanting to edit the ID itself. (Note: This will move the history to the new ID). Click on [New] to leave the existing unit as it is and create a duplicate unit. For example a customer may have multiple air conditioning units that you are entering that are all similar. This would save time entering the information Printing the Appliance details on the Job Card or Invoice When you print the Job Card or invoice, you can choose whether to print the details or not. Page 199 of 301


85 Once the details of the particular unit have been entered, you will not need to enter these details again. The next time that you start a job to service that item, select the customer, start a new job and click the down arrow in the ID and choose the required unit from the list. All the details about the equipment will be retrieved History The details of all invoices ever entered against that unit (according to ID), and current jobs are available in the history. This can be viewed when you click on the [History] tab. This can be printed on plain paper. For example to give to the technician with the job card Scheduling Maintenance You can: Record the date that the next service is due without creating a forward job and without adding the job to the job scheduler. Record the date of the next service and create a job for that service even if it is in a later financial year. Record the date of the next service, create the future job and add that job to the job scheduler Before you turn the completed job into an invoice, click on the [Service Due] tab. Click on the [Calendar] button in the Next Service field. Select the required date from the calendar. You can pick a date in the next financial year using the forward arrow at the top right of the calendar. Page 200 of 301
![After you select the date you will be asked if you want to create a Job for the service. To record the Next Service due date only: Click on [No].](/docs-images/95/124835171/images/86-2.jpg "To record the next service due date and create the forward job: Click on [Yes].")
86 After you select the date you will be asked if you want to create a Job for the service. To record the Next Service due date only: Click on [No]. To record the next service due date and create the forward job: Click on [Yes]. Next Service Job No: If you are using Numeric Job Numbering or Job Numbering on Creation the next available job number will be inserted into this field. If you are on free job numbering (that is when you insert your own number each time you save a job) enter the required job number into the Job Number box. Note: If you do not have any employees set up in the labour items, the Scheduler information will not be available on this tab. To record the date of the next service, create the future job and add that job to the job scheduler. If you have employees in the labour items you will have the option available to forward schedule the job that you have created. Select the Next Service date. Allocate a Next Service Job Number. The job will be assigned to the Unassigned Employee by default. Click the search button and select another employee if required. Unassigned worker: You can assign the future job to a particular employee in the scheduler or you can create an Unassigned worker and assign some or all your future jobs to that employee. Later the job can be moved to another employee from within the scheduler itself. Just setup an employee called Unassigned worker and then set that employee as the default employee for unassigned jobs in the scheduler settings. Future Jobs In the Job transaction listing the future jobs (that is those that are not dated in the current or previous financial years) will be highlighted in pale green. You can choose to hide these transactions by checking the Hide Future Service Jobs check box. Page 201 of 301
![6.9.9 Reports You can report on all services that are due for a particular month or a range of months. Go to [Reports/Service].](/docs-images/95/124835171/images/87-1.jpg "Suggestion The report can also be exported to a comma delimited text file that you could use to mail merge with a word document.")
87 6.9.9 Reports You can report on all services that are due for a particular month or a range of months. Go to [Reports/Service]. Suggestion The report can also be exported to a comma delimited text file that you could use to mail merge with a word document. You could contact your customers reminding them that they should call you to have their drains cleaned before the winter or their air conditioner serviced before the summer. Page 202 of 301
88 6.10 Motor Vehicle Management Overview With this Payperwork feature you can keep a record of the all the details of your customers motor vehicles that you have sold or serviced. You record all the details of each vehicle. As well as registration, make, model, build date etc. you also have a full record of the engine and VIN numbers. This information can be retrieved quickly when it is needed. Then by linking the vehicle to jobs and invoices, you quickly build up a full service history of your customers vehicles. Helpful when ordering spare parts. You can print the details of the vehicle on each job card or invoice. By giving the customer a detailed report on the service job, you are not only giving the customer the information he needs, but you are also generating a detailed history of the vehicle. It is easy to check and print the maintenance history of all work performed on any vehicle. You can create a job into the future for the next service if you need to perform regular maintenance. If you use the Job Scheduler in Paperwork, you can even forward schedule the job. You can search by any fields to locate certain vehicles. You can print a history with all the details of any past invoices done on this vehicle. This shows all past comments, services and parts that you used. You can use this feature to generate repeat business by contacting your customers when the vehicle is next due for a service. How does it work? When you create a job, invoice or quote for the initial service for a specific vehicle, record all the details about the vehicle. From then on the vehicle and its details are permanently attached to that customer s record. The details of the vehicle can be printed on the job card so that the mechanic can see in advance the precise vehicle and the purpose of the service. You can print the full history of previous services on plain paper to accompany the job card if you need to. When the job is complete, type a full description of the service, enter the parts and labour used on the job and then turn the job into an invoice for the customer. This not only tells the customer what was done on the job but ensures that the service history of the vehicle is complete. At this time you can enter the The Next Service Date for which a job can be created and forward scheduled if you want. You can generate a report (e.g. for a month) of all services that are due. You can create your reminder letters in MS word and use this report to mail merge the customer s details. Page 203 of 301
![6.10.2 Setup Go to the [Setup] Menu and click on [Preferences]. Click on the [Business] Tab. Check to tick the [Automotive Industry]. 6.10.3 To enter a new motor vehicle You can enter a new vehicle either on the fly when you start a new job or through adjustments.](/docs-images/95/124835171/images/89-0.jpg "6.10.3.1 Through Adjustments Go to [Adjustments/Motor Vehicle Register]. Click on [New]. Enter the vehicle details and click on [Save].")
![To edit an existing vehicle: Click on [Edit]. To delete an existing vehicle: Click on [Delete].](/docs-images/95/124835171/images/89-1.jpg "You cannot delete a vehicle that has existing transaction. Page 204 of 301")
89 Setup Go to the [Setup] Menu and click on [Preferences]. Click on the [Business] Tab. Check to tick the [Automotive Industry] To enter a new motor vehicle You can enter a new vehicle either on the fly when you start a new job or through adjustments Through Adjustments Go to [Adjustments/Motor Vehicle Register]. Click on [New]. Enter the vehicle details and click on [Save]. To edit an existing vehicle: Click on [Edit]. To delete an existing vehicle: Click on [Delete]. You cannot delete a vehicle that has existing transaction. Page 204 of 301
![6.10.3.2 Through Jobs Go to [Jobs], select your customer and start a [New] transaction.](/docs-images/95/124835171/images/90-0.jpg "In the top right of your screen, you will see the extra tabs that you use to enter the details of the vehicle that is to be serviced. Rego: The Rego must be individual.")

90 Through Jobs Go to [Jobs], select your customer and start a [New] transaction. In the top right of your screen, you will see the extra tabs that you use to enter the details of the vehicle that is to be serviced. Rego: The Rego must be individual. It is used when you are searching and when the program is forming the history. If you repeat any Rego, the history for all the vehicles with the same Rego will all be in together and therefore of not much use. Tabbing to each field, complete the information on both the Registration tab and the Auto Details tab. Click on [Save] to save the vehicle details. To select an existing vehicle, click the drop down box in the rego field and select the vehicle from the list. Don t forget to complete the Job Address and Job details tabs as well. The Service Due tab is not needed until this service has been completed and you are about to turn the Job into an Invoice To change the Customer linked to a vehicle To move an existing vehicle from one customer to another, go into the vehicle register through [Adjustments/Motor Vehicle Register] and click on [Edit]. Search to locate the new customer and click on [Save]. Previous invoices will remain in the original customer s record. The vehicle will no longer be available in the original customer for new jobs. The vehicle and all previous history will be available in the new customer To change an Rego of an existing vehicle To change the rego of an existing vehicle, go into the vehicle register through [Adjustments/Motor Vehicle Register] and click on [Edit]. Here you can change the Rego, once this is done click on [Save]. You will see the prompt: Click on [Replace] if you are just want to edit the Rego itself. (Note: This will move the history to the new Rego). Click on [New] to leave the existing vehicle as it is and create a duplicate vehicle. For example a customer may have multiple vehicles in a fleet where many of the details are similar. This would save time entering the information. Page 205 of 301


91 Printing the vehicle details on the Job Card or Invoice Once the details of the particular vehicle have been entered, you will not need to enter these details again. The next time that you start a job to service that vehicle, select the customer, start a new job and click the down arrow in the Rego and choose the required vehicle from the list. All the details about the vehicle will be retrieved. Job Details: Click on the Job Details tab and enter some brief details about theservice such as Full Service, Check engine timing, Engine stalling. Click on [Print/Job Card], select your print options and click on [Print Preview] History The details of all invoices ever entered against that vehicle (according to Rego), and current jobs are available in the history. This can be viewed when you click on the [History] tab. You can print this on plain paper and attach it to the job card. Page 206 of 301

92 Scheduling Maintenance You can: Record the date that the next service is due without creating a forward job and without adding the job to the job scheduler. Record the date of the next service and create a job for that service even if it is in a later financial year. Record the date of the next service, create the future job and add that job to the job scheduler Before you turn the completed job into an invoice, click on the [Service Due] tab. Click on the [Calendar] button in the Next Service field. Select the required date from the calendar. You can pick a date in the next financial year using the forward arrow at the top right of the calendar. After you select the date you will be asked if you want to create a Job for the service. To record the Next Service due date only: Click on [No]. To record the Next Service due date and create the forward job: Click on [Yes]. Next Service Job No: If you are using Numeric Job Numbering or Job Numbering on Creation the next available job number will be inserted into this field. If you are on free job numbering (that is when you insert your own number each time you save a job) enter the required job number into the Job Number box. Note: If you do not have any employees set up in the labour items, the Scheduler information will not be available on this tab. To record the date of the next service, create the future job and add that job to the job scheduler. If you have employees in the labour items you will have the option available to forward schedule the job that you have created. Select the Next Service date. Allocate a Next Service Job Number. The job will be assigned to the Unassigned Employee by default. Click the search button and select another employee if required. Unassigned worker: You can assign the future job to a particular employee in the scheduler or you can create an Unassigned worker and assign some or all your future jobs to that employee. Later the job can be moved to another employee from within the scheduler itself. Just setup an employee called Unassigned worker and then set that employee as the default employee for unassigned jobs in the scheduler settings. Page 207 of 301

93 Future Jobs In the Job transaction listing the future jobs (that is those that are not dated in the current or previous financial years) will be highlighted in pale green. You can choose to hide these transactions by checking the Hide Future Service Jobs check box Reports You can report on all services that are due for a particular month or a range of months. Go to [Reports/Motor Vehicle]. Suggestion The report can also be exported to a comma delimited text file that you could use to mail merge with a word document. You could contact your customers reminding them that they should call you to have their vehicle booked in for a service. To create this file, select the options such as date or month and click on [Export]. Page 208 of 301

94 6.11 Customer Reports Batch Invoice Printing Invoices can be printed individually from inside each invoice. This can be done at the time of creating or completing the invoice or you can return to that screen and reprint the invoice at any time. Alternatively you can use batch printing and select all or certain invoices to print in a batch run. You can use batched invoices to: Send multiple invoices in one to a particular customer. Print all the invoices that you raise in the day, week or month in one run at the end of the period without the need to open each invoice. Print office or file copies of your invoices on plain paper or without your colour graphic. Click on the [Customers] toolbar and then click the down arrow on Reports. Left click on [Batch Invoices]. Invoice Filter: First you need to select the range that you want to select invoices to print from. You can select a particular month or a range of Invoice numbers. Click on [Set] and all the invoices in the selected range will be displayed in the Select Invoices to Print list. Now you need to select the invoices from that list that you want to print in the batch. You can select: [Unprinted] that selects any invoices that have not been printed, faxed or ed to date. [Select All] to print all the invoices in the list. [Unpaid] will highlight just the invoices that are still unpaid. Page 209 of 301
, and L click")

95 The invoices that are going to print are highlighted in Red and Selected shows the number of invoices that you have highlighted to print in this batch. To select or deselect certain invoices to print: While holding down the [Ctrl] key on the keyboard, point the mouse to the left of the Customer number (where the small black arrow shows), and L click the required invoices. Release the Ctrl key Batch Printing Options The batch invoice printing options are the same as the options for printing individual invoices except for extra options relating to the Overprinting and Terms. Overprinting and terms are saved with each individual invoice. Originally these may have been the general default overprinting and terms that may or may not have been changed for the individual invoice. However you may have changed your general default overprinting since the invoices were entered (for example you may have changed your bank account details) and naturally you would want the new general default to print on the batch invoices. Set these options and the other print options and click on the [Save Settings] button and those settings will hold when you print batch invoices in future. Click on [Print Preview]. You can only fax or if all the invoices in the batch are for the same customer number. Click on [Print], [Fax] or [ ]. Page 210 of 301


96 Customer Monthly Balances Report This report lists all the customers or suppliers and their balances. You have the option to list the unpaid invoices. Go to [Reports/Customers/Monthly Balances]. Month to Report: Click the down arrow to select a month from the list. Sort Criteria: You have the option to sort by customer or balances. Range: For a range of customers or suppliers, click the Magnifying Glass button to view and select from the list. For a single account, set range e.g.: White to White. Options: Inactive Accounts: This option lists all customers. If you only require a list of customers that owe money, do not tick this box. List Unpaid Invoices: This option will list all the outstanding invoices that make up the customers balance. If you just require the balance then do not tick this box. List Claims to be invoiced: This option lists all the claims that still need to be invoiced which will give you an idea of income coming in, in the future. Print Diving Lines: This option removes the black dividing lines from in between each customer. Click on [Print Preview]. Select [Print],[Fax], [ ],[Save PDF] Customer Year to Date Sales Report Click on the [Customers] toolbar. Click on the arrow next to [Reports]. Click on [YTD Sales]. Month to report - Select the month for the report. Sort By Citeria Select to sort by customer or YTD Sales Top Select if you want the top customers on the report. Click on [Print Preview]. Click on [Print], [Fax], [ ] or [Save as PDF]. Page 211 of 301
![6.11.4 Customer Statements Statements are printed on the same forms as those used for invoices. Select [Reports/Customers/Statements]. Month Ending: Select the required month.](/docs-images/95/124835171/images/97-0.jpg "Invoices raised after this month will not be included on the statement. Range of Accounts: To print statements for all customers leave unchanged, OR select the range of customers.")

97 Customer Statements Statements are printed on the same forms as those used for invoices. Select [Reports/Customers/Statements]. Month Ending: Select the required month. Invoices raised after this month will not be included on the statement. Range of Accounts: To print statements for all customers leave unchanged, OR select the range of customers. Click the Magnifying Glass button to view and select from the list of customers. E.g.: For a single customer, White to White. Type: Select Form A4 for single sheet 210x297mm. Statement Format: Outstanding Invoices. Prints the outstanding invoices only. Brought Forward. Prints all activity for the customers for a range of months. Small A/Cs: Enter a value to be the minimum value to print statements for. This avoids sending out Nil Balance Statements. Stamp: You have the option of putting a stamp on your statement. Click the arrow on the drop down box to select a stamp. Age Balances: (x) prints the Customers balances as 90, 60, 30 days and Current (x) Adds the 90,60 and 30 day balances and prints them as overdue. Overprinting: Tick this box if you would like to print the default overprinting you applied in [Setup/Overprinting]. Remittance Advice: Tick this box if you would like to print the remittance advice. Terms: Tick this box if you would like to print the default terms that was applied in [Setup/Overprinting/Terms]. Print Graphic: Tick this box if you would like your company logo to be printed on the statement. Click [Print Preview] to view the statement(s). Click [Print] to print and mail the statements. Click [ ] to the statements to the customer. Please note to the statements, each statement will have to be done individually so that you send the appropriate statement to the correct customer. Click [Fax] if you have set up your fax options and would like to fax your customer their statement. This option will also have to be done individually. Once all the statements have been printed, ed or faxed, click on [Finish] Customer Address Labels Adhesive labels can be produced on a range of laser and bubble jet printers. The single sheet labels for laser and bubble jet printers are: A4 sheets, two across, 105mm x 37mm. (Try Unistat Laser/Inkjet/Copier Labels. Item number 38932). Click on the [Customers] toolbar. Click on the arrow next to [Reports]. Click on [Lables]. Select the range of customers. Click the magnifying glass button to view and select from the list of customers. Leave as the default, for a list that includes all customers on file. Include Inactive Accounts Click to tick the box if you require a label for all customers on file. Remove the tick if you require lables for customers with balances only. Print Bottom Label Several printers these days have a deep bottom margin. If when you do a test print, the last label is printed by itself on a seperate page, remove the tick in this option. Print Attention If you would like the information that is in the attention field in the customer information to be printed on the top line of the label, tick this box. Click on [Test] to print a test page for aligning the labels and [Print] to start printing the labels. Click on [Save Settings] when your labels are printing correctly. Page 212 of 301
 www.payperwork.com.au The installation of the program and how to copy the data over to PayPerWork is covered below. While the installation of the program is straight forward, copying over the Tradesman
Keep It Easy Software Cloud User Manual
 Keep It Easy Software Cloud User Manual 2015 Keep It Easy Software 1 CONTENTS How to Login... 5 Functions... 5 System Preferences... 6 General... 7 Receipt Categories... 9 Expense Categories... 10 Service
Once you click on the Enterprise Icon found on your desktop you will be asked for your password. This Default Code Is
 Once you click on the Enterprise Icon found on your desktop you will be asked for your password. This Default Code Is You should now see the main screen which is called the main screen or menu screen.
Accounts Payable MODULE USER S GUIDE
 Accounts Payable MODULE USER S GUIDE INTEGRATED SOFTWARE SERIES Accounts Payable MODULE USER S GUIDE Version 3.1 Copyright 2005 2009, Interactive Financial Solutions, Inc. All Rights Reserved. Integrated
Chapter 2: Clients, charts of accounts, and bank accounts
 Chapter 2: Clients, charts of accounts, and bank accounts Most operations in BankLink Practice are client specific. These include all work on coding transactions, reporting, and maintaining chart of accounts
WorkflowMax & Xero Month-end Process
 WorkflowMax & Xero Month-end Process Glennis glennis@katalyst.co.nz, 027 Katalyst/0275 282 597 Support support@katalyst.co.nz Please note, cloud software is constantly updated, we try to keep up, but from
WorkBook release note
 WorkBook version: 8.3.0 Release date: 01/10/2013 Author: René Praestholm rp@workbook.net DOWNLOAD AS PDF HIGHLIGHTS IN THIS RELEASE Collaboration Many new improvements added in collaboration between team
*+"'+,-&./!"#$%&'#() Standard Accounts. June 2011 Version 6.3 HansaWorld Ltd.
 Standard Accounts. June 2011 Version 6.3 HansaWorld Ltd.") *+"'+,-&./!"#$%&'#() Standard Accounts June 2011 Version 6.3 HansaWorld Ltd. Table Of Contents Introduction & Installation...6 System Requirements...6 Installation...6 Configuring a New Database...7 Start
*+"'+,-&./!"#$%&'#() Standard Accounts June 2011 Version 6.3 HansaWorld Ltd. Table Of Contents Introduction & Installation...6 System Requirements...6 Installation...6 Configuring a New Database...7 Start
PACS. Installation & Going Live. User Guide. pacs1.4
 PACS Installation & Going Live User Guide pacs1.4 Tribal SchoolEdge Level 1, 17 Madden Grove RICHMOND VIC 3121 Support Centre: Web: https://support.schooledge.com.au/ Email: support.schooledge@tribalgroup.com
CAPITAL V8. Capital Business Software Tutorial Series. Supplier Accounts Using Capital Business Manager V8 1.0
 CAPITAL V8 Capital Business Software Tutorial Series Supplier Accounts Using Capital Business Manager V8 1.0 C A P I T A L O F F I C E B U S I N E S S S O F T W A R E Capital Business Software Tutorial
PRINTER S PLAN New Features and Improvements
 Addendum to User s Guide 2003.51 1 PRINTER S PLAN 2003.51 New Features and Improvements New Data Entry and Pricing Options Defaults / Options / Data Entry: There are three new options for updating the
User Guide. Copyright 2014 Electrika Ltd. All Rights Reserved.
 User Guide Copyright 2014 Electrika Ltd. All Rights Reserved. Electrika Ltd, P.O Box 129, Manchester M22 4XG Tel: 0161 945 5124 Fax: 0161 945 3681 E-mail: info@electrika.com Website: www.electrika.com
Job Workflow. A step by step guide to
 A step by step guide to getting started with BEAMS Page 2 of 51 So you ve installed and setup your new copy of BEAMS what next? This process is designed to give you guidance on how to create, manage and
2016 Autosoft, Inc. All rights reserved.
 Copyright 2016 Autosoft, Inc. All rights reserved. The information in this document is subject to change without notice. No part of this document may be reproduced, stored in a retrieval system, or transmitted
BUSINESS SYSTEM PLUS (MODULAR)
") BUSINESS SYSTEM PLUS (MODULAR) PC APPLICATION System setup The system provides full business Accounting, CRM, Organizer and Inventory control support typically needed for a small business. The system can
BUSINESS SYSTEM PLUS (MODULAR) PC APPLICATION System setup The system provides full business Accounting, CRM, Organizer and Inventory control support typically needed for a small business. The system can
AccountsIQ Tips and Tricks. Updated 20/10/2008. Purpose. 1. List and describe what heading and text will be containing in each of the Tip s and tricks
 AccountsIQ Tips and Tricks Updated 20/10/2008 Purpose 1. List and describe what heading and text will be containing in each of the Tip s and tricks 2. Outline what FAQ s will be released on the System
Version Operator Orientation. TIMMS Client. A guide to using the TIMMS System. Training & Navigation Notes
 Version 7.2.4 Operator Orientation TIMMS Client A guide to using the TIMMS System Training & Navigation Notes Disprax Pty Ltd 2015 WHAT IS TIMMS? TIMMS Stands for: Total Industry Management and Marketing
Transactions: Transaction List
 Transactions Transactions: Transaction List Purpose The Transaction List allows you to view transactions for selected dates; create new transactions; open, edit or delete existing transactions; open client
User Guide. Copyright 2012 Electrika Ltd. All Rights Reserved.
 User Guide Copyright 2012 Electrika Ltd. All Rights Reserved. Electrika Ltd, P.O Box 129, Manchester M22 4XG Tel: 0161 945 5124 Fax: 0161 945 3681 E-mail: info@electrika.com Website: www.electrika.com
New Features... 4 Add-on Modules Cheat Sheet... 15
 1 2 Table of Contents New Features... 4 Favourites option... 4 New Icons... 4 Windows theme integration... 5 Forms Assistant... 6 Forms designer enhancements... 7 User Access Report... 8 User Notifications
Inventory Module & Wireless Device. User Quick Start Guide
 Inventory Module & Wireless Device User Quick Start Guide Published on: 3/14/2007 Copyright and Disclaimer Copyright 2007 Pace Systems Group, Inc., 1902 2 nd Avenue North, Jacksonville Beach, Florida,
BLUEBIRD QUESTIONS. Basics Patient Data 4 5. Appointments 5. Service Codes 5 6. Invoice Creation 6 7. Invoice Advance 7 8. Payment Basics 8 9
 BLUEBIRD QUESTIONS 1 Basics 2 3 4 Patient Data 4 5 Appointments 5 Service Codes 5 6 Invoice Creation 6 7 Invoice Advance 7 8 Payment Basics 8 9 Money Basics 9 10 Assets 10 11 Bank Deposits 11 Buy vs. Lease
MultiSite Suite: General Ledger
 MultiSite Suite: General Ledger User s Manual version 2.2.97 Copyright & Trademarks Copyright Notice and Trademarks 2003 by Brent Lawrence, LLC. All rights reserved. Reprinted and edited by MultiSite Systems,
Table of Contents General Information Table Maintenance Top Ten Reports
 Table of Contents General Information 1 Windows Print Manager 1 Print Button for Documents 1 Print Spooling 1 Print Spool Buttons 2 Report Destination 2 Single document 3 All Documents 3 Delete 3 Clear
Webmail Plus Tutorial
 Webmail Plus Tutorial Created by: Welby Seely, TAC Co-Chair Webmail Plus Calendar The Webmail Plus calendar is an important tool to help you manage your time, audit time sheets, and verify the database.
PRACTICE MANAGEMENT SYSTEMS
 PRACTICE MANAGEMENT SYSTEMS P.O. Box 102 Ivanhoe, Victoria, 3079 T: 1300 784 908 F: 1300 784 906 www.ppmp.com.au Pag 1 of 124 Table of Contents PROGRAM SETUP WIZARD... 4 INSTALLATION & ACTIVATION OF HICAPS...
Client-Account Receivable
 Nexsure Training Manual - Accounting Client-Account Receivable In This Chapter Client Accounts Receivable Entity Definition Receive Payments from Clients Relating to Policies Allocation of Payment Leave
WorkBook release note
 WorkBook version: 8.2.67 Release date: 01/10/2012 Author: René Præstholm rp@workbook.net General notice As new views, tab s and reports are not automatically added to each user due to access rights controls
Copyrights and Trademarks. Copyrights and Trademarks. Sage One Invoicing Getting Started Guide 1
 Copyrights and Trademarks Copyrights and Trademarks Sage One Invoicing Getting Started Guide 1 Copyrights and Trademarks Copyright 2002-2017 by Us. We hereby acknowledge the copyrights and trademarks of
Document Imaging User Guide
 Release 4.9 IMAGING TECHNOLOGY GROUP Document Imaging Systems Document Imaging User Guide IMAGING TECHNOLOGY GROUP IMIGIT tm Document Imaging User Guide Release 4.91 March 2007 Imaging Technology Group
STX & ios Devices. Setting up and using STX iphone, ipad, ipod touch
 STX & ios Devices Setting up and using STX iphone, ipad, ipod touch STX for ios provides more flexibility and efficiency for you and your staff. With all the most often used features of STX desktop built-in,
LESSON 10 Accounts Payable Setup
 LESSON 10 Learning Objectives In this lesson you will: 1. activate the module 2. access the A/P Transactions Visual Process Flow 3. set up the Options 4. enter account sets 5. enter distribution codes
Sage One Accountant Edition. User Guide. Professional user guide for Sage One and Sage One Accountant Edition. Banking. Invoicing. Expenses.
 Banking Invoicing Professional user guide for and Canadian Table of contents 2 2 5 Banking 8 Invoicing 15 21 22 24 34 35 36 37 39 Overview 39 clients 39 Accessing client books 46 Dashboard overview 48
SECTION 5 USING STUDENT
 SECTION 5 USING STUDENT EMAIL 5. USING STUDENT EMAIL On enrolling at the University all students automatically have an email account created. Account creation depends on a student successfully enrolling
Receiving Payments on House Accounts
 18 The billing functionality in FTD Mercury allows you to set up an automated billing system, complete with aging cycles, finance charges, and statements for your customers. You can bill your customers
web po user guide Supplier
 web po user guide Supplier web po user guide table of contents supplier section 1 before you begin section 2 getting started and the basics section 3 Web PO Supplier Administration section 4 Viewing Purchase
Welcome to our online Web Help for the Activity Fund Accounting System software.
 Welcome to our online Web Help for the Activity Fund Accounting System software. Version 1.2 LOCAL GOVERNMENT CORPORATION ALL RIGHTS RESERVED 2010-2018 REV. 02/06/2018 Portions copyright 1988 - Acucorp,
Table of Contents. Enhancements provided at no additional charge as part of your annual support program
 Table of Contents The EZ-CARE2 Makeover (page 2) Accounts Receivable (page 3) Audit (page 4) Backup & Restore (page 4) Data Entry (page 4) Email (page 5) EZ-Viewer (page 5) Reports (page 6) Staff (page
Release Features CASH v2018.3
 Release Features CASH v2018.3 Document issue history Date Issue 01/10/2018 Draft 1.0 C J M Farrar Page 1 of 16 Table of Contents 1 Global... 3 1.1 CASH Launcher... 3 1.1.1 CF29004920 Changes to the Cashforwindows.exe
Data Import Guide DBA Software Inc.
 Contents 3 Table of Contents 1 Introduction 4 2 Data Import Instructions 5 3 Data Import - Customers 10 4 Data Import - Customer Contacts 16 5 Data Import - Delivery Addresses 19 6 Data Import - Suppliers
SCHOOL ACCOUNTS 2017 QUICK START GUIDE
 SCHOOL ACCOUNTS 2017 QUICK START GUIDE Tel: +353 1 9603220 Mobile: +353 86 2329472 Company Reg No: 535403 Email: schools@odoherty.biz www.odoherty.biz VAT Reg No: IE3234776BH School Accounts 2016 INSTALLATION
Caterease User Training Guide
 Caterease User Training Guide Copyright: 2016 Table of Contents Unit 1: Introducing Event Manager 15 Entering General Event Information 17 Searching for Events 19 Using the Event Finder 20 Reviewing and
Exact General Ledger Setup and Operation
 Exact General Ledger Setup and Operation In order to set up the General Ledger in EXACT you need to have already decided on how you want to operate your ledger and the format that the codes for the ledger
Corporate Online. Using Accounts
 Corporate Online. Using Accounts About this Guide About Corporate Online Westpac Corporate Online is an internet-based electronic platform, providing a single point of entry to a suite of online transactional
NorthStar Club Management System
 NorthStar Club Management System The Version 3.2.0 GL- 03252008 March 25, 2008 CONTENTS OVERVIEW OF THE GL (GENERAL LEDGER) MODULE... 5 ACCESSING THE GL MODULE... 6 GL INTRODUCTION:... 8 Inquiry... 8 Admin...
Machine and Contract Setup
 Machine and Contract Setup Updated July 2016 Contents About Machine and Contract Setup...3 Machine Detail...3 Machine Depreciation...4 Creating Database Records...5 Printing the Depreciation Report...5
BASIC NAVIGATION & VIEWS...
 Content Overview VISUAL TOUR... 5 NEW FEATURES IN OUTLOOK 2010... 6 BASIC NAVIGATION & VIEWS... 7 SETTING PREFERENCES... 7 Creating an Outlook Shortcut... 7 Choosing a Startup View... 7 CUSTOMIZING INBOX
OUTLOOK WEB ACCESS UOW USER GUIDE INDEX
 OUTLOOK WEB ACCESS UOW USER GUIDE INDEX ACCESSING MAIL... 2 SETTING UP... 2 OPTIONS... 3 VIEWING... 4 ARRANGE MESSAGES... 4 CREATING/SENDING A NEW MESSAGE... 5 REPLYING TO MESSAGES... 5 FORWARDING MESSAGES...
Evolution M Core Training Contract, Sales & Cash Book Issue 2
 Evolution M Core Training Contract, Sales & Cash Book Issue 2 Contents Training............................................................................................ 1 Contract Ledger........................................................................................
Nexsure Training Manual - Accounting. Chapter 13
 Tax Authority In This Chapter Tax Authority Definition Reconciling Tax Authority Payables Issuing Disbursement for Tax Authority Payables Paying the Tax Authority Prior to Reconciling Tax Authority Definition
Millennium Termite Software Chapter 1-1 Property Maintenance
 Millennium Termite Software Chapter 1-1 Property Maintenance Adding a Property To Add a new property to Millennium Termite you need to begin by selecting the Properties tag from the Main Menu Bar by placing
NHSP:Online. Flexible Worker User Guide. NHSP:Online. FW Training Manual July 2015 Page 1 of 26
 Flexible Worker User Guide Page 1 of 26 Contents Page Number Contents... 2 1. Getting Started... 3 2. Available Shifts... 7 3. Booking a Shift... 8 4. Refusing (Cancelling) Shifts... 9 5. Entering Availability...
Published by Reckon Limited
 Projects Workbook Published by Reckon Limited All Rights Reserved Copyright Reckon Limited Copyright No part of these materials may be reproduced, stored in or introduced into a retrieval system, or transmitted
Topics Covered. Web Address / Popup Blockers. How to Sign On. Main Toolbar Overview. Order Guides / Placing Orders. Confirmations.
 Topics Covered Web Address / Popup Blockers How to Sign On Main Toolbar Overview Order Guides / Placing Orders Confirmations Reports User / Admin Options Custom Order Guides Web Address What is the web
1. About AP Invoice Wizard
 1. About AP Invoice Wizard Welcome to AP Invoice Wizard. We have developed this tool in response to demand from Oracle Payables users for a user friendly and robust spreadsheet tool to load AP Invoices
Using reports to analyse your business
 Using reports to analyse your business Using reports to analyse your business 2 Using reports to analyse your business Your MYOB company file stores lots of information about the key areas of your business,
MYOB Exo CRM. User Guide
 MYOB Exo CRM User Guide 2018.1 Table of Contents Outlook Integration... 1 Quick Add Widgets... 2 Licensing... 2 Available Functions... 5 Contacts in Exo Business CRM... 6 Contacts Master... 7 Contacts
2.1 Logging on to FieldManager Software
 2 Getting Started The main window displays all statewide contracts. Please note that you have access to ALL contracts and functionality is based on permission level. These contracts are imported into FieldManager
PEACHTREE COMPLETE 2008 AN INTRODUCTION TO PEACHTREE COMPLETE ACCOUNTING
 PEACHTREE COMPLETE 2008 AN INTRODUCTION TO PEACHTREE COMPLETE ACCOUNTING Opening a Company Database To change the open company in Peachtree, click File on the main menu and select Open Company. If the
Chapter A2: BankLink Books clients
 Chapter A2: BankLink Books clients This chapter is aimed at BankLink Administrators This Chapter covers the options available for processing in BankLink Books. The BankLink Service Agreement permits you
Copyrights and Trademarks. Copyrights and Trademarks. Accounting Getting Started Guide 1
 Copyrights and Trademarks Copyrights and Trademarks Accounting Getting Started Guide 1 Copyrights and Trademarks Copyright 2002-2018 by Us. We hereby acknowledge the copyrights and trademarks of all terms
EXO BUSINESS CRM. User Guide EXO BUSINESS M YO B ENT ERPRI S E S O L U T I O N S
 EXO BUSINESS CRM User Guide EXO BUSINESS M YO B ENT ERPRI S E S O L U T I O N S Important Notices This material is copyright. It is intended only for MYOB Enterprise Solutions Business Partners and their
This Page Left Blank Intentionally
 Chapter 2 Receipts This Page Left Blank Intentionally CTAS User Manual 2-1 Receipts: Introduction Issuing the receipt is the first step in the collection of payments. This should be done immediately upon
Autosoft, Inc. All rights reserved.
 Copyright 2007-2014 Autosoft, Inc. All rights reserved. The information in this document is subject to change without notice. No part of this document may be reproduced, stored in a retrieval system, or
PlanWell 4.0 User Guide
 PlanWell 4.0 User Guide Contents Finding Planwell and Logging On 2 Planwell Access Portals 2 Document Selection 3 Build a Set 4 Most Current Set 4 Custom Packages 4 Issue Tree 5 Standard Order Process
CONNECTED 8.3 Release Notes
 CONNECTED 8.3 Release Notes Introduction... 3 Minimum System Requirements for Connected 8.3... 3 Connected 8.3 Installation... 3 Enhancements... 4 General Enhancements... 4 Advanced Email Templates...
Eclipse Forms. Release 8.7.2
 Eclipse Forms Release 8.7.2 Legal Notices 2011 Epicor Software Corporation. All rights reserved. Unauthorized reproduction is a violation of applicable laws. Epicor and the Epicor logo are registered trademarks
Customer Maintenance
 7 FTD Mercury makes maintaining customers easy. If you use house accounts for your customers, after setting up these accounts, the customer billing process is automated (using the Accounts Receivable Billing
2 New Company Setup OBJECTIVES:
 2 New Company Setup In Chapter 2 of Accounting Fundamentals with QuickBooks Online Essentials Edition, you will learn how to use the software to set up your business. New Company Setup includes selecting
Table of Contents. Part I WageLoch Control 3. Part II WageLoch Roster 20. Contents. Foreword 0. 4 Deleting... a previous roster
 Contents 1 Table of Contents Foreword 0 Part I WageLoch Control 3 1 Staff members... 4 Creating a staff... member 4 Terminating an... employee 5 Re-activating... a terminated employee 6 2 Pay levels...
Release Notice. Version Release Date: June 12, (440)
") Release Notice Version 5.7.57 Release Date: June 12, 2017 www.sedonaoffice.perennialsoftware.com (440) 247-5602 Table of Contents About this Document... 5 Overview... 5 Applications Enhancements/Improvements...
Release Notice Version 5.7.57 Release Date: June 12, 2017 www.sedonaoffice.perennialsoftware.com (440) 247-5602 Table of Contents About this Document... 5 Overview... 5 Applications Enhancements/Improvements...
Isi Net User Manual for Bank customers
 1 Table of Contents 1 Introduction and overview... 4 1.1 Isi Net User Types... 4 1.2 Accessing the Isi Net service... 5 1.2.1 User Login... 5 1.2.2 User Logout... 7 1.3 User Interface... 7 1.3.1 Menus...
 www.farmplan.co.uk 01594 545022 support@farmplan.co.uk Page 2 Contents Installation Instructions... 4 Business Manager Enhancements... 5 Version 3.37 January 2017... 5 Repeating Transactions... 5 Other...
Husky Energy Inc. Services Supplier Guide
 Cortex Desktop Husky Energy Inc. Services Supplier Guide April 2016 Document Version L1 Version L of the Services Supplier Guide corresponds to the Cortex Desktop update released on May 26, 2015. Contents
User's Guide. Alpha Five Accounting. Accounting Made Easy. Version 3.0. Copyright BetaSoft LLC - All Rights Reserved
 User's Guide Alpha Five Accounting Copyright 1995-2002 BetaSoft LLC - All Rights Reserved Accounting Made Easy Version 3.0 Alpha Five is a trademark of Alpha Software Corp. i ii Table of Contents INTRODUCTION...1
Infusion Business Software Update 8.203
 Infusion Business Software Update 8.203 These instructions are for v8.203 of Infusion software and are designed to give an oversight into upgrading an existing installation on a standalone workstation,
Outlook Web App User s Guide
 Outlook Web App User s Guide The new Outlook Web App will be replacing your old Outlook Web Access. This upgrade includes many new features that were only previously available through Microsoft Outlook.
IBM Notes Client V9.0.1 Reference Guide
 IBM Notes Client V9.0.1 Reference Guide Revised 05/20/2016 1 Accessing the IBM Notes Client IBM Notes Client V9.0.1 Reference Guide From your desktop, double-click the IBM Notes icon. Logging in to the
 Getting Started with the Custom Intranet Sales & General Business Phone: 978-499-1897 Fax: 636-444-1897 Email: sales@intranetconcepts.com Intranet Concepts, Inc. P.O. Box 1139 Newburyport, MA 01950-6139
Chapter 2 Receipts June 2012
 Chapter 2 Receipts This Page Left Blank Intentionally CTAS User Manual 2-1 Receipts: Introduction Issuing the receipt is the first step in the recording of receipts and should be done immediately upon
ADVANCED GroupWise 7.0
 ADVANCED GroupWise 7.0 Distributed by the Administrative Technology User Support Department under the Direction of Dr. Russell Clukey, Executive Director, Support Services. Feel free to contact the AT
Accounts Receivable. Billing Functions. Establishing House Accounts
 18 The billing functionality in FTD Mercury allows you to set up an automated billing system, complete with aging cycles, finance charges, and statements for your customers. You can bill your customers
Table of Contents COURSE OVERVIEW... 3 LESSON 1: OUTLOOK 2010 CALENDAR INTERFACE... 5
 Table of Contents COURSE OVERVIEW... 3 LESSON 1: OUTLOOK 2010 CALENDAR INTERFACE... 5 OPEN OUTLOOK CALENDAR... 5 Ribbon... 6 Navigation Pane... 6 Appointment Area... 6 Task Pane... 6 To-Do Bar... 6 THE
My Tennis making membership easy. My Tennis. Club Administration User Manual Version 3.0. Making membership easy
 My Tennis Club Administration User Manual Version 3.0 Making membership easy i Preface This document describes Information Processing Corporation (IPC) and Sports Marketing Australia (SMA) software and
Furniture Wizard Security Introduction
 Furniture Wizard Security Introduction In this section, we will introduce you to the new security features of Furniture Wizard. Furniture Wizard s security will allow you to set permissions for different
Outlook 2007 Web Access User Guide
 Outlook 2007 Web Access User Guide Table of Contents Page i TABLE OF CONTENTS OUTLOOK 2007 MAIL... 1 Launch Outlook Web Access... 1 Screen Elements... 2 Inbox... 3 Read Mail... 3 Delete a Message... 3
Table Of Contents Version 3.6.6
 Table Of Contents Version 3.6.6 Release Notes: Version 3.6.6... 3 Overview... 3 Reports... 3 Receipts... 3 Supplier Invoices Paid... 3 Employee Accrued Entitlements Liability... 4 Roadworthy Report...
Office365 End User Training & Self-Service Migration Manual Simplified
 Office365 End User Training & Self-Service Migration Manual Simplified Version 1.0 University Systems and Security 5/25/2016 1 P a g e Table of Contents 2 P a g e Table of Contents Introduction to Office365...
Vendor Inquiry and Reports Munis Version 11.2
 Objective This document gives you step by step instructions for using the Vendor Inquiry/Reports program to query the vendor master table for information regarding a specific vendor(s) and how to produce
Supplier Quick Reference and How To Guide
 and How To Guide For Help or Support support@primerevenue.com Toll Free USA & Canada: 1 800 557 8047 Toll Free Europe: 00800 7746 3000 Toll Free Asia: 001 800 7746 3000 Toll Free Australia: 1 800 217 718
Furniture Reporting Updated July 2016
 Updated July 2016 Contents About Furniture Reports...3 Open P/Os Not Acknowledged Report...3 O/E Third Party Gross Profit Report...4 P/O Expected Ship Report...5 Quotes Outstanding...6 Vendor Open P/O
User Guide. Customer Self Service (CSS) Web Application Progress Software Corporation. All rights reserved.
 Web Application Progress Software Corporation. All rights reserved.") User Guide Customer Self Service (CSS) Web Application 1993-2017 Progress Software Corporation. Version 2.1 March 2017 Table of Contents Welcome... 3 Accessing the Customer Self Service (CSS) Web Application...
User Guide Customer Self Service (CSS) Web Application 1993-2017 Progress Software Corporation. Version 2.1 March 2017 Table of Contents Welcome... 3 Accessing the Customer Self Service (CSS) Web Application...
Basware Invoice Processing Procedure Manual
 Basware Invoice Processing Procedure Manual TERMINOLOGY... 2 HOW TO ACCESS BASWARE INVOICE PROCESSING THIN CLIENT... 2 CHAPTER 1 RECEIVED INVOICES WINDOW... 2 CHAPTER 2 HOW TO CODE A STANDARD INVOICE...
Copyright 2018 MakeUseOf. All Rights Reserved.
 The Beginner s Guide to Microsoft Excel Written by Sandy Stachowiak Published April 2018. Read the original article here: https://www.makeuseof.com/tag/beginners-guide-microsoftexcel/ This ebook is the
USER S GUIDE (Fleets and mobile workforce)
") (Fleets and mobile workforce) Summary Contacts Module... 3 Vehicle Module... 5 Odometer update... 7 Trip Module... 8 Expense Module... 14 Management and tax reports Module... 16 Management Reports... 17
(Fleets and mobile workforce) Summary Contacts Module... 3 Vehicle Module... 5 Odometer update... 7 Trip Module... 8 Expense Module... 14 Management and tax reports Module... 16 Management Reports... 17
RESOLV EDI CONTROL. User Guide Version 9.2 for HANA PRESENTED BY ACHIEVE IT SOLUTIONS
 RESOLV EDI CONTROL User Guide Version 9.2 for HANA PRESENTED BY ACHIEVE IT SOLUTIONS Copyright 2011-2016 by Achieve IT Solutions These materials are subject to change without notice. These materials are
Microsoft Office Outlook 2010
 Starting Microsoft Outlook 2010 with XP Click on Start, E-mail Microsoft Outlook or Start, All Programs, Microsoft Office, Microsoft Outlook. Starting Microsoft Outlook 2010 with Windows 7 Click on the
The data files on the Data DVD were prepared using the Windows 7 operating CHAPTER ONE. Objectives. Getting Started. Data Files
 CHAPTER ONE Objectives After completing this chapter, you should be able to: use the QuickBooks data files on the Data DVD access QuickBooks data files update your QuickBooks company fi le understand the
Index. Getting Started Creating a New Vehicle... 5 Transferring Vehicles to a New Customer 6
 1 Index Getting Started... 4 Creating a New Vehicle... 5 Transferring Vehicles to a New Customer 6 Creating a New Customer... 7 Customer Database Additional Fields. 7 Creating a New Document... 8 The Document
ShelbyNext Financials: Accounts Payable Best Practices (Course #N210)
") ShelbyNext Financials: Accounts Payable Best Practices (Course #N210) Presented by: Carmen Dea, Shelby Consultant 2017 Shelby Systems, Inc. Other brand and product names are trademarks or registered trademarks
ShelbyNext Financials: Accounts Payable Best Practices (Course #N210) Presented by: Carmen Dea, Shelby Consultant 2017 Shelby Systems, Inc. Other brand and product names are trademarks or registered trademarks