1. Introduction Initial setup Configure your SpotBot User Management Regulatory Compliance...
|
|
|
- Roderick Marshall
- 6 years ago
- Views:
Transcription

1
2 CONTENTS 1. Introduction Initial setup Configure your SpotBot How to use your SpotBot a. Start a Trip b. Stop a Trip c. Other information about batteries and settings d. Login and password recovery e. The Dashboard f. Asset (SpotBot Page) g. Change the Date Range h. Set notification s i. Change asset name User Management Managing Data recorded in your SpotBot a. Access a PDF or CSV report in your SpotBot b. Clear the Trip data Regulatory Compliance
3 1. INTRODUCTION Every year more than $12B in goods are lost and over $100B are damaged during transport. SpotBot is a reliable solution that allows you to keep track of your shipment and how it is being handled. Get immediate alerts in case of mishandling with the impact level and location. Keep track of your shipment with hourly location updates. Control your cargo environment with hourly temperature readings. And, you can access all this information - wherever you are - through our web based SpotSee platform. SPOTBOT BETA MAIN SPECIFICATIONS Dimensions x x or x x 3.5 cm Weight Impact detection Other features Temperature range Power Supply Battery life in normal cellular coverage conditions Communication lbs or 590 gr with batteries, lbs or 500 gr without batteries 3-Axis, ±200 g Digital MEMS Accelerometer up to ±200 g Location information -40 C to 85 C or -40 F to 185 F Batteries: 6 x 1.5V Lithium AA Batteries (will work with 1.5 Alkaline AA Batteries although they are not recomended) 1 (summary / event) per day 243 Days 1 (summary / event) per hour 95 Days (if Alkaline batteries are used a lower battery life is expected) Global cellular network 3
 Indicates if a trip is started/stopped.")
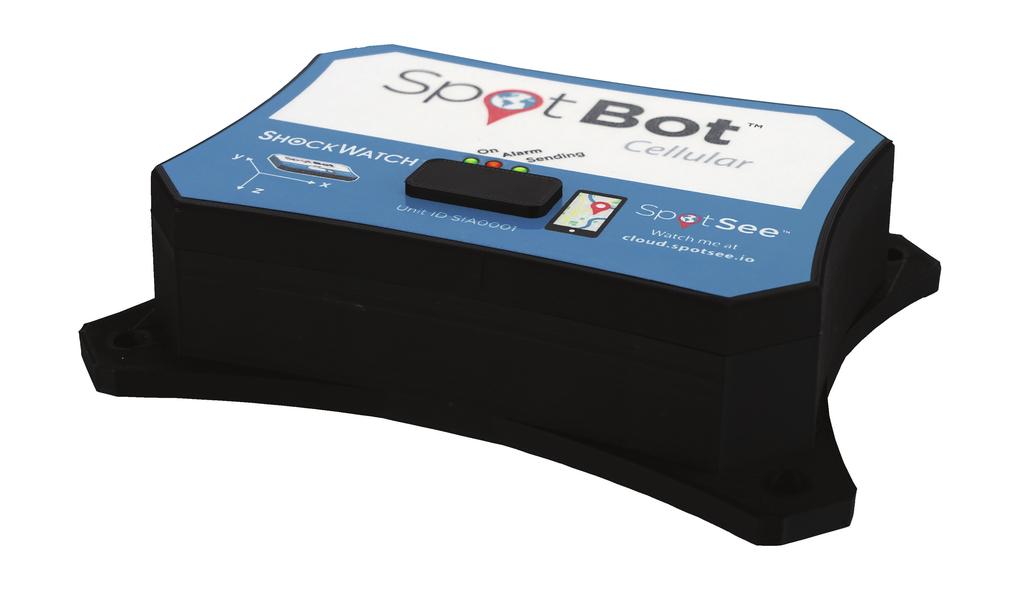
4 2. INITIAL SETUP First, familiarize yourself with your new SpotBot. On the front of the device you will see 3 LED indicators, 2 buttons and a USB port. Green LED Trip on/off Red LED Alarm Detected Green LED Unit transmitting Button A Start/stop Button B Clear trip data USB Port Left LED (ON) Indicates if a trip is started/stopped. A trip is started when the LED flashes once per minute. This LED will be yellow when battery power is low. Middle LED (ALARM) Red LED indicates that an alarm impact has been detected. Right LED (SENDING) Green LED flashes when the unit is sending data to the SpotSee Cloud. Button A Enables start and stop of a Trip. Button B This recessed button will delete all data in the SpotBot (insert a pin in the hole to access the button). USB Port To connect the SpotBot to a computer for configuration and download, via micro USB cable. Included with your SpotBot are 5 no tamper stickers for your use. We recommend you use the stickers over the rubber cover as an added guarantee that no one will tamper with the SpotBot during a trip. Remove the battery cover at the bottom of the SpotBot. Place the batteries in the correct position. Once the batteries are inserted properly, close the battery compartment and make sure the screws are tight without applying excessive force. 4

5 ACTIVATION Go to activate.spotsee.io to activate the unit. The unit ID and Customer No. are required to complete this task. The Unit ID can be found on your SpotBot label and Customer No. is located on the invoice. If it is the first time you have activated a unit, follow the prompts to create the admin user. A valid is required. Once completed you will get an to create your password on the SpotSee Cloud. 5

6 ACCOUNT SETUP First, locate your user account information that was sent to you via and follow the instructions to retrieve your password. If you can t find the , please make sure to check your Clutter or Spam folders. Then, use the password with your address to login into the SpotSee platform at Cloud.Spotsee.io 6
7 INSTALLING DRIVERS The first time you use the SpotBot portal on your computer, you may need to install some drivers if using Windows 7. Click Configure Device from the menu options on the left side of the home screen. INITIAL SETUP Then, select Initial Setup as indicated below. 7
 and follow all the steps in the platform.")
8 Choose the web browser you are using (i.e. IE, Edge, Chrome or Firefox) and follow all the steps in the platform. We do not currently support Safari. 8

9 3. CONFIGURE YOUR SPOTBOT DEVICE SETUP Next, go to cloud.spotsee.io -> configure device and select Launch Configuration Application. You should see a small application launcher window popup. Once the requirements are verified, the SpotBot Settings App should open.* *If your app fails to open, please go back to Initial Setup and repeat those steps carefully. 9
.")
10 Next, plug the SpotBot into your computer using the USB cable provided with your SpotBot. Your SpotBot should show up under Scanned Assets (if it does not automatically show press the Start/Stop - Button A on the SpotBot). Select your SpotBot device from the left column. 10
 3.")
11 1. Select the alarm threshold (minimum G level in which the SpotBot will start sending alerts) 2. Select the summary time (frequency in which the SpotBot will communicate its location and alarm count) 3. Press Save There is a tradeoff between the battery life and the summary time, if you need longer battery life the summary time should be set to higher values. Please refer to the SpotBot main features for an indication of expected battery life. After you press Save the SpotBot will send a summary message with the new settings to the Spotsee platform, via the cellular network Finally, unplug the USB cable. Your SpotBot is ready to start a Trip. 11

12 Before you start a Trip, check to make sure you can see your SpotBot in the SpotSee platform. Login to your account at cloud.spotsee.io and you should be able to identify your SpotBot within the dashboard. 12
13 4. HOW TO USE YOUR SPOTBOT A. START A TRIP Now that your SpotBot is configured, you can begin a Trip by holding Button A (Start/Stop) down for 1 sec. You should see 2 green LEDs (On and Sending) light up. The Left LED indicates the Trip is ON, while the Right LED indicates the device is transmitting information. The SpotBot will send a message (Sending green LED flashing) to inform the SpotSee platform that a Trip has started. A new Trip fails to start if: You see a red LED when trying to start a Trip. (This means something is wrong with the device configuration. Please refer to Configure your SpotBot section and follow the steps carefully.) OR You see only one green LED (On) or green and red (Alarm) if an alarm was issued on a previous Trip. (this means a Trip is already started, you can choose to stop it or leave it on) TIP A good way to verify if the Trip is active is to produce an alarm. Place a notepad on your desk and drop the SpotBot from 2-3 above the notepad. You will see all 3 LEDs flash if the Trip is started and no LEDs if the Trip is not started. 13

14 B. STOP A TRIP Stop a trip by pressing and holding Button A until the all three LEDs are solid then release Button A. The On and Alarm LEDs will flash multiple times while Button A is held. After Button A is released, the sending LED will illuminate solid or flash as the device sends a trip stop message to the SpotSee platform. The reason you need to hold the button to stop the trip is to prevent people from stopping the trip while in transit with a simple push of the button. This way, stopping the trip is a deliberate action. Also, as long as there is cellular coverage notice will be sent to the SpotSee user if the trip has been stopped or the device has been reset, so you know immediately if someone has tampered with the device. If you stop a trip while the Spotbot is transmitting a message, both On and Alarm LEDs will go solid and Sending will keep flashing. C. OTHER INFORMATION ABOUT BATTERIES AND SETTINGS When replacing the batteries make sure you have all you need on hand. The SpotBot will keep settings for 5 min without batteries so you can swap batteries. If the device goes longer than 5 min without batteries, or if the SpotBot s batteries become depleted during a trip, you must repeat step 3. Configure your SpotBot. The SpotBot will not start a Trip without the correct settings, please refer to step 4. How to use your SpotBot, a. Start a Trip, for more information. If you want to change SpotBot settings for a new Trip please refer to step 3. Configure your SpotBot. The SpotSee Platform enables you to monitor and control your assets from any location. 14
15 D. LOGIN AND PASSWORD RECOVERY Go to cloud.spotsee.io and enter your user and password. If you forgot your password, click Forgot Password to receive a password reset . Enter your and click reset password. Follow the link provided in the to reset your password. If you can t find the please check in the Spam or clutter folders. 15
,")


16 E. THE DASHBOARD Upon logging into the platform you will first see your dashboard. This page will show the last known location of all your SpotBot units (referred to as Assets), a list of all your active Assets and the most recent alarm for each one. By clicking in the units on a specific area it will zoom in until you can see individual units. You can access each individual SpotBot by clicking on the location icon or on the Asset Name in any of the lists. If units are positioned in the same exact location, it will show the number of units in that location. 16

 clustered by proximity.")

17 F. ASSET (SPOTBOT) PAGE THE MAP When you drill down into an individual SpotBot page, you will be able to access more detailed information about the specific SpotBot. On the Map at the top left, you will see all the locations your SpotBot reported to the platform. The map with show the location pin (alarms and summaries) clustered by proximity. By clicking the numbers on the map will zoom in until you can see individual Pins. The red heat map around the numbers indicates there is at least one alarm within that cluster, the heat map grows with the number of alarms in that location or area. 17
. A Red pin represents an alarm issued by the SpotBot.")


18 A Blue pin represents a summary (with location and count of all alarms registered by the unit since last data reset). A Red pin represents an alarm issued by the SpotBot. The SpotBot will issue an alarm if the G level is higher than the alarm threshold defined in step 3. Configure your SpotBot. If you prefer to see only the alarms, click on the summary label (under the list). The summaries will be removed from that map and from the list and only the alarms will show You can also do the same to the alarm label if you wish to only see summaries. 18

. Unit Stop Time indicates the last time a unit was stopped (as describe")
19 The platform will trace the trip path by default when you open the unit page, if you do not wish to see the path you can remove it by clicking the lines icon. The map will then show all the location points without the path. Below the map is a tab with relevant current information about the unit. Unit start time indicates last time a trip was started in a unit (as described in 4.a.). Unit Stop Time indicates the last time a unit was stopped (as described in 4.b.) Unit reset time indicates last time the unit s data was reset (see more in chapter 7) Largest event module largest impact module received by the platform since the unit was reset. Alarm count number of alarms recorded by the unit since it was reset. Summary frequency the frequency in which the unit will send the alarm (as described in step 3) Time since last message this field indicates the last time a message was received from the Spotbot. In case this value is larger than the summary frequency, this field works as warning of lack of cellular coverage or mishandling of the Spotbot. Battery level indicates the battery level of your unit, when this level reaches lower percentages it is advised to change batteries before sending the unit on a trip (please refer to the main specifications for a reference to battery life) 19
.")


20 To guarantee data integrity, the SpotBot has a batteries preservation feature that will turn off the radio at 25% battery life but will still record the events in the unit (please refer to chapter 7 for more information). At 15% battery, the unit will stop the trip but the data will remain stored in the unit. Bellow the tab you can find a graph of impacts over time with X,Y,Z and Modulus, representing the G levels of all the alarms issued by the SpotBot. X,Y and Z axes directions can be found in the front label of the unit: Modulus takes the X, Y and Z directional impacts into consideration and summarizes the combined result of all 3 impacts. Modulus = Hovering the cursor over the bars in the chart will allow you to see the individual values for each impact over time. This is true for all the graphs represented on the web page. 20

21 Scrolling down a little further, you will find the Impact Histogram. This chart tells you how many impacts you had over a certain G Level.This graph divides the G values into intervals called bins, each bar on the histogram represents the number of observations falling within a bin. In this example, most impacts fall within the <10 G we can also see the unit had one impact in each of the higher G. Also on this page, the temperature is recorded by the SpotBot. 21


22 G. CHANGE DATE RANGE By selecting the calendar icon positioned on the Top right of the page you can select to view data for a different date range. The default date range is the last 7 days. Select the desired Start and End dates and then click Update. New data might take a few moments to load. H. SET NOTIFICATION S You can set multiple s to receive alarm notifications. Click on the notification icon to set the s. SpotSee allows you to define multiple s to receive notifications. Write the new address and click the + sign to add it to the list, you can add several s, once you are done listing the s click update to save the list. The s you choose to receive notifications will receive an every time the platform receives an alarm from that specific SpotBot. Please make sure to check the Spam and Clutter folders and add no-reply@shockwatch.com to avoid the Spam and clutter folders. 22


23 I. CHANGE ASSET NAME While on the Asset page you can edit the Asset s Name by clicking the pencil icon close to the unit name. Write the chosen name and click update. 23

24 5. USER MANAGEMENT The Admin will be able to view and manage other users and assets inside your company. Clicking Users on the left side of the screen brings up a list of all the existing users for your account. EDITING OR ADDING USERS You can edit a user by clicking on the pencil icon or add a user by clicking the Plus (+) sign. Once you are finished making changes to an existing user, be sure to click the save button. Once you are finished inputting all the fields for a new user, click the add button. 24
25 6. MANAGING DATA RECORDED IN YOUR SPOTBOT A. ACCESS A PDF OR CSV REPORT IN YOUR SPOTBOT In addition to the SpotSee platform you can download a PDF report of the Trip directly from the device using the USB port. This report is saved on the unit in case cellular transmission is poor or there is no network when an impact occurs. This way, you never miss an event. To retrieve this report, simply plug the SpotBot into the computer with the USB cable provided. A drive will open on your computer (if the drive doesn t open automatically, press Button A). 25
26 Open the new drive and copy the PDF file called Report. The events are also available on the Excel or CSV files as well. The PDF report will summarize the entire Trip - including a list of the 10 highest events recorded as well as a histogram of all the alerts recorded by the SpotBot - even if cellular transmission was not available or was limited during any part of the journey. In the report, you will notice that events above alarm threshold will show in red. 26
27 The file LargestEvents.xls will have the 50 largest recorded impacts, this can also be a good source of information. The remaining files are system files and have no Trip related information. We recommend downloading the PDF report from the device directly after each Trip. If damage occurs to your asset during the Trip but there is no alert showing in the SpotSee Platform, the device may have recorded an impact that it was unable to send due to limited cellular reception (i.e. on a ship or in a rural area) and will be included in this PDF report direct from the device. 27

28 B. CLEAR THE TRIP DATA Once you have downloaded the PDF Report and before starting a new Trip, you can clear the Trip data by pressing Button B (recessed button). You may need a pen or pencil to press this button. It is designed to be recessed so the button is not pressed during transit. This action will clean all the data on the device and in the report tables, allowing you to start monitoring a new Trip from the beginning. NOTE: All cellular data from the trip will still be stored in the cloud. 28
29 7. REGULATORY COMPLIANCE Federal Communication Commission Interference Statement This equipment has been tested and found to comply with the limits for a Class B digital device, pursuant to part 15 of the FCC Rules. These limits are designed to provide reasonable protection against harmful interference in a residential installation. This equipment generates, uses and can radiate radio frequency energy and, if not installed and used in accordance with the instructions, may cause harmful interference to radio communications. However, there is no guarantee that interference will not occur in a particular installation. If this equipment does cause harmful interference to radio or television reception, which can be determined by turning the equipment off and on, the user is encouraged to try to correct the interference by one or more of the following measures: - Reorient or relocate the receiving antenna. - Increase the separation between the equipment and receiver. - Connect the equipment into an outlet on a circuit different from that to which the receiver is connected. - Consult the dealer or an experienced radio/tv technician for help. U.S./Canada Regulatory Compliance Information To satisfy FCC RF exposure requirements for mobile and base station transmission devices, a separation distance of 20 cm or more should be maintained between the antenna of this device and persons during operation. To ensure compliance, operation at closer than this distance is not recommended. The antenna(s) used for this transmitter must not be co-located or operating in conjunction with any other antenna or transmitter. Industry Canada Statements This device complies with Industry Canada license-exempt RSS standard(s). Operation is subject to the following two conditions: (1) this device may not cause interference, and (2) this device must accept any interference, including interference that may cause undesired operation of the device. To reduce potential radio interference to other users, the antenna type and its gain should be so chosen that the equivalent isotropically radiated power (e.i.r.p.) is not more than that permitted for successful communication. 29
HPC RETROFIT FACE PANEL FOR PRO-C CONTROLLERS. Hydrawise Ready. Quick Start Guide. hunterindustries.com
 HPC RETROFIT FACE PANEL FOR PRO-C CONTROLLERS Hydrawise Ready Quick Start Guide hunterindustries.com TABLE OF CONTENTS Installation 3 Connecting Sensors or Flow Meters 4 Connecting to a Wi-Fi Network 5
ThinkPad Bluetooth Laser Mouse User Manual
 ThinkPad Bluetooth Laser Mouse User Manual About this manual Thank you for your purchase of this Bluetooth mouse set. This topics covered in this manual are listed as following. (This mouse will be sold
Monnit Wireless Sensors. and Ethernet Gateway Quick Start Guide
 Monnit Wireless Sensors and Ethernet Gateway Quick Start Guide Inside the Box You should find the following items in the box: Monnit Wireless Sensors MonnitLink Wireless Ethernet Gateway Power Supply Antenna
Wireless Sensors and Ethernet Gateway Manual
 Wireless Sensors and Ethernet Gateway Manual - 1 - Contents Creating An Account...5 Setting Up the Hardware...8 Setting Up and Using the Ethernet Gateway Understanding the Ethernet Gateway Lights Ethernet
MivaTek IPC2202 WiFi Home Camera
 MivaTek IPC2202 WiFi Home Camera User Manual Names of Parts LED Indicator Lens Mode Button microsd Card Slot Stand Speaker Reset Button Micro USB Port English 1 Getting Started Mobile device connects to
Lyric C1 Wi-Fi Security Camera
 Lyric C1 Wi-Fi Security Camera Home Quick Installation Guide Download the Honeywell Lyric app NOTE: Have your Wi-Fi password available and confirm your router communicates at 2.4 GHz before installation.
Bluetooth Micro Dongle User s Guide. Rating: 5V DC 80mA Made in China
 Bluetooth Micro Dongle User s Guide Rating: 5V DC 80mA Made in China Introduction Package Contents USB Bluetooth adapter x 1 Installation CD x 1 (includes Bluetooth software and User s Guide) User s Guide
Wireless Bluetooth Music Receiver
 Wireless Bluetooth Music Receiver Quick Start Guide Model: BTM300 Package Contents: Diamond Bluetooth Music Receiver (BTM300) x 1 Quick Installation Guide x 1 3.5mm to 3.5mm stereo cable x 1 3.5mm to RCA
User s Manual NETVUE II Model Number: NI-1300, NI-1301, NI-1302
 User s Manual NETVUE II Model Number: NI-1300, NI-1301, NI-1302 NetView Technologies keeps the right of the document updated with the new service offer or the service change Version:1.2 Basic installation
Operation Manual for Cloud 3700F Version 0
 Operation Manual for Cloud 3700F Version 0 Version: 0 Page 1 of 5 Document History Version Date Description of Change Author 0.0 06 May 2014 Initial version Sarav Version: 0 Page 2 of 5 Table of Contents
Q U I C K S T A R T G U I D E
 QUICKSTART GUIDE 2 Top 4 5 6 3 13 14 18 19 16 17 12 1 20 7 8 9 10 15 Left Side Front Right Side Back 11 Bottom 1 Power Button 2 Earphone Connector 3 Front-Facing Camera 4 Speaker 5 Ambient Light Sensor
a. Access the link b. Touch INSTALL to start c. OPEN the APP
 Quick Start Guide for Energy Lights 2.0 Bluetooth 1. Fundmental function of the shoe Charging Port Press Button 1.1 Refer to above picture, turn on the shoe by pressing the button on tongue; 1.2 Change
Streaming Smart Stick. Quick Start Guide
 Streaming Smart Stick Quick Start Guide GETTING STARTED 1.1 Inside the Box 1 1.2 Equiso Streaming Smart Stick 2 1.3 Equiso Remote 3 1.4 Using Your Equiso Remote 4 1.5 What You Need 5 1.6 Charging the Remote
QUICK START GUIDE. Welcome to the Amcrest Family! LET US KNOW WHAT YOU THINK. Simple. Reliable. Secure. WI-FI CAMERA INITIAL SETUP
 LET US KNOW WHAT YOU THINK We sincerely thank you for your business and are committed to ensuring your full satisfaction. If you are not entirely satisfied for whatever reason, please reach out to us and
User Manual. Daffodil. 2.4GHz Wireless Mouse Souris Sans Fil 2.4GHz 2.4GHz Wireless Maus Mouse senza fili da 2.4 GHz Ratón Inalámbrica 2.
 Daffodil User Manual 2.4GHz Wireless Mouse Souris Sans Fil 2.4GHz 2.4GHz Wireless Maus Mouse senza fili da 2.4 GHz Ratón Inalámbrica 2.4GHz Model No. : UT-M3 User Manual Please follow the instructions
Let s get started. Need more help getting started?
 Need more help getting started? www.zencam.com/support Let s get started. We hope you love your new Zencam Camera. If you have any questions, we're here for you. M1. M2. E1. E2 Series support@zencam.com
4MP WI-FI PAN TILT CAMERA QUICK START GUIDE ENGLISH
 4MP WI-FI PAN TILT CAMERA QUICK START GUIDE ENGLISH WELCOME! Congratulations on your latest purchase and welcome to the Q-See family. This guide will help get your camera up and running. WHAT S INCLUDED
Bluetooth Mini Keyboard. User s Manual. Version /05 ID NO: PAKL-231B
 Bluetooth Mini Keyboard User s Manual Version 1.0 20010/05 ID NO: PAKL-231B1501-00 0 About This Manual This manual is designed to assist you in installing and using the Bluetooth Keyboard Information in
PowerView. Hub QUICK START GUIDE
 PowerView Hub QUICK START GUIDE When prompted, scan or type the Accessory Setup Code below. Table of Contents Kit Contents. 3 Connections. 5 Home Automation Integration. 13 Troubleshooting. 15 2018 Hunter
Hardware Installation 1. Install two AA batteries in the mouse. Pairing Process in Vista and Windows XP SP2
 Hardware Installation 1. Install two AA batteries in the mouse. Pairing Process in Vista and Windows XP SP2 1. Open the Windows control panel, then select Bluetooth devices. 2. Click Add.. 3. Select My
User Manual. Product Name: LED Spot Light. Model:Q01BM SOLAR PROJECTION SPOTLIGHT SET BLUETOOTH CONTROLLED. Instruction Manual
 User Manual SOLAR PROJECTION SPOTLIGHT SET BLUETOOTH CONTROLLED Product Name: LED Spot Light Model:Q01BM1740-08 Manufacture: Quanxin Lighting & Electrical (USA) Inc Instruction Manual Model: Q01BM1740-08
Dealer Account Request: Needed Information Admin First/Last Name Admin Address If available, list of PROSVR device IMEIs
 PROSVR Dealer Guide How Login to and get URL a PROSVR Dealer Account Dealer account requests will be sent to: mlynch@voxxintl.com Dealer Account Request: Needed Information Admin First/Last Name Admin
KE2 Edge Manager KE2-EM35. Q April Chamber Drive. Washington, MO ke2connect.io
 KE2 Edge Manager KE2-EM35 Q.5.56 - April 2018 12 Chamber Drive. Washington, MO. 63090 ke2connect.io 636.266.4466 KE2 Edge Manager KE2-EM35 Q.5.56 - April 2018 12 Chamber Drive. Washington, MO. 63090 ke2connect.io
Touchstone WR2100 Wireless Repeater
 Touchstone WR2100 Wireless Repeater Quick Installation Guide i Package Contents The following items should be included: If any of these items are damaged or missing, please contact your service provider
Hi! Let s get started. Streaming Stick
 Hi! Let s get started. Streaming Stick 1 Know your Streaming Stick 1 2 3 4 2 1 2 3 4 [HDMI CONNECTOR] Plugs into the HDMI port on the back of your TV [STATUS LIGHT] Indicates it is on when lit, or activity
NA502S Multiple RF Home Gateway
 NA502S Multiple RF Home Gateway User Guide i Table of Contents CHAPTER 1 INTRODUCTION... 1 Package Contents... 1 Features... 1 LEDs... 2 CHAPTER 2 INITIAL INSTALLATION... 5 Requirements... 5 Procedure...
PILOT QUICK START GUIDE
 PILOT QUICK START GUIDE www.hipstreet.com Getting started Device Layout Camera Touch screen App Menu 01 Back Button Home Button Menu Button History Button Volume -/+ Buttons Power Button Volume Buttons
NA502 Multiple RF Home Gateway
 NA502 Multiple RF Home Gateway User Guide i Table of Contents CHAPTER 1 INTRODUCTION... 1 Package Contents... 1 Features... 1 LEDs... 2 CHAPTER 2 INITIAL INSTALLATION... 4 Requirements... 4 Procedure...
Deluxe In/Out Remote Thermometer with Trend Chart
 Deluxe In/Out Remote Thermometer with Trend Chart MODEL: JTR-168LR USER'S MANUAL INTRODUCTION Congratulations on your purchase of the JTR-168LR Deluxe In/ Out Remote Thermometer. The basic package comes
Prime bolt User Manual
 GSM Tracker Prime bolt User Manual Revision: 1.00 Document Title Prime bolt User manual Version 1.00 Finale Date 2015-5-20 Status Released Document Control ID TRACKER Prime bolt 1 Contents 1 Introduction...3
Quick Start. PowerLEAP WiFi 1000 Quick Start Guide
 Quick Start PowerLEAP WiFi 1000 Quick Start Guide Package Contents In some regions, a resource CD is included with your product. 2 Getting Started Powerline adapters give you an alternative way to extend
Chicony Standard Bluetooth Keyboard Users Manual. Model No.: KT-1063
 Chicony Standard Bluetooth Keyboard Users Manual Model No.: KT-1063 Issue: Jan. 03, 2011 Scope Getting Start Thank you for choosing this ultrathin keyboard with Bluetooth technology to ensure no hinder
Touchstone WECB460 Wi-Fi MoCA Bridge
 Touchstone WECB460 Wi-Fi MoCA Bridge Installation Guide ARRIS Enterprises, Inc. 2014 All rights reserved. No part of this publication may be reproduced in any form or by any means or used to make any derivative
Wireless Smart Pad And Mini Keyboard User s Manual
 Wireless Smart Pad And Mini Keyboard User s Manual Version 1.0 2010/08 ID NO: About This Manual This manual is designed to assist you in installing and using the Wireless Touchpad Keyboard. Information
User Manual. BandLuxe. P530 Series. LTE/HSPA+/GPRS WLAN Mobile Router
 User Manual BandLuxe P530 Series LTE/HSPA+/GPRS WLAN Mobile Router Introduction Thank you for your purchase of the P530 Series LTE/HSPA+/GPRS WiFi Mobile Router. This device is designed to access the
DICKSON WiZARD Wireless Monitoring Solutions STOP
 DICKSON WiZARD Wireless Monitoring Solutions STOP You have just purchased a precision data logger system To ensure proper installation of the WiZARD Wireless System, please read this manual in its entirety
PRO-HC IRRIGATION CONTROLLER
 PRO-HC IRRIGATION CONTROLLER Hydrawise Ready Quick Start Guide hunterindustries.com TABLE OF CONTENTS Installation 3 Connecting AC Power 5 Connecting Station Wires 7 Connecting Sensors or Flow Meters 8
EAGLE-200. Intelligent Control Gateway. User Manual
 Intelligent Control Gateway Version 1.00 Oct 2017 Copyright 2017 by RAINFOREST AUTOMATION, INC ( RFA ). All rights reserved. No part of this manual may be reproduced or transmitted in any from without
W10 PRO QUICK START GUIDE
 W10 PRO QUICK START GUIDE GETTING STARTED Thank you for purchasing a Hipstreet product and we hope you enjoy using it. Please visit our website at www.hipstreet.com IMPORTANT SAFETY PRECAUTIONS Always
InTemp CX500 Series Temperature Logger Manual
 InTemp CX500 Series Temperature Logger Manual (CX501 model shown) InTemp CX500 series loggers measure temperature in transportation monitoring applications. These Bluetooth Low Energy-enabled loggers are
Appearance. Before installation, please read the whole instruction below, and operate. as the instruction. 1. WiFi indicator. 2.
 Appearance Before installation, please read the whole instruction below, and operate as the instruction. 1. WiFi indicator 2. 3G indicator 3. Power indicator 4. Microphone 5. WiFi button 6. Power button
Quick Installation Guide
 Quick Installation Guide For Network Attached Storage Ver.1.1.0.0320 Table of Contents Notices... 3 Safety Precautions... 4 1. Package Contents... 5 2. Hardware Installation Guide... 6 2.1. Hard Disk Installation...
EYE N TIF. NotifEye. Wireless Sensors and Gateway Instructions. Contents. Confirm Your Kit. Creating an Account. Setting Up the Hardware
 TM N TIF EYE POWERED BY TEMPTRAK NotifEye Wireless Sensors and Gateway Instructions 1 2 3 Contents Creating an Account Creating An Account...2 Setting Up the Hardware Setting Up and Using the Gateway...3
User Guide. Contents
 1 L5 User Guide Contents Welcome.2 1. Package Contents:... 3 2. Keypad Layout and Display Indicator Lamps... 4 3. Preparing to Use the Product:... 4 4. Charging the Device:... 4 5. About this Device...
Quick Start Guide. Powerline Wireless Extender GPLWE150 PART NO. Q1337.
 Quick Start Guide Powerline Wireless Extender GPLWE150 PART NO. Q1337 www.iogear.com Package Contents 1 x GPLWE150 Powerline Wireless Extender 1 x Ethernet Cable (5ft) 1 x Quick Start Guide 1 x Warranty
Window Shadings RemoteLift. Remote Control. Guide
 Window Shadings RemoteLift Remote Control Guide Control Like Never Before This guide shows you how to set up and operate motorized window shadings using the RemoteLift remote control. In this guide, you
User Guide of AU-4612
 1 User Guide of AU-4612 Installing the software of AU-4612...3 Configuring your wireless network (with Microsoft Zero Configuration Tool)...12 Wi-Fi Protect Setup (WPS)...14 Pin Input Config (PIN)...15
MiraScreen Duo Powered by EZCast
 MiraScreen Duo Powered by EZCast Quick Start Guide Rev. 2.00 Introduction Thanks for choosing MiraScreen! The MiraScreen Duo contains the cutting-edge MiraScreen technology, and firmware upgrade will be
When Not in Use: Remove the batteries if this device is to be left unattended or unused for a long period of time.
 HUB USER GUIDE Safety Instructions You must keep safety in mind while using this device. Keep these and any other instructions for future reference. Observe Warnings: Carefully follow all warnings on the
EYE N TIF. NotifEye. Wireless Sensors and Gateway Instructions. Contents. Identify Your Kit. Creating an Account. Setting Up the Hardware
 TM N TIF EYE POWERED BY TEMPTRAK NotifEye Wireless Sensors and Gateway Instructions 1 2 3 Contents Creating an Account Creating An Account...2 Setting Up the Hardware Setting Up and Using the Gateway...3
Wireless Sensors and Ethernet Gateway User s Guide
 Wireless Sensors and Ethernet Gateway User s Guide For Use With Online Software and Express PC Software Ethernet Gateway Quick Start Create a user account with assigned wireless gateways and sensors. Attach
Getting Started What s included Setting up Fitbit Ultra on a computer Mac & PC Requirements... 2
 User Manual Table of Contents Getting Started... 1 What s included... 1 Setting up Fitbit Ultra on a computer... 2 Mac & PC Requirements... 2 Installing Fitbit software on your computer... 2 Installing
BLUETOOTH KEYBOARD & SPEAKER CASE
 BRYDGE BLUETOOTH KEYBOARD & SPEAKER CASE For ipad BR-101/102 BR-200 Please read the instructions carefully before using: The Brydge Bluetooth Keyboard &Speaker Case for ipad has been designed to provide
Wireless Wall Switch Guide
 Wireless Wall Switch Guide Battery-Powered Window Coverings Control Like Never Before This guide shows you how to set up and operate Battery-Powered motorized products using the wireless wall switch. The
QUICK START GUIDE IP3M-943 / IPM-723
 Simple. Reliable. Secure. Welcome to the Amcrest Family! QUICK START GUIDE IP3M-943 / IPM-723 You can view this guide and others online by visiting: www.amcrest.com/support www.amcrest.com Table of Contents
Set Up...2 Download Application...2 Connect your D1 spa...2 Connect your spa with your home Internet network...2 Start the D1 Spa Connect App...
 D1 Spa Connect Table of Contents D1 Spa Connect...1 Compatibility requirements...1 Compatible devices...1 Installation...1 Models Not Equipped with the D1 Spa Connect Option...1 Installation Tips...1 General
PnP IP/Network Camera
 PnP IP/Network Camera Quick Installation Guide Pangolin T series VStarcam, IP Camera Expert 一. Hardware installation Please connect the IP camera and router via network cable. And make sure that the Power
TRUSHARE User's Manual. Version:1.0
 TRUSHARE User's Manual Version:1.0 1 Table of Contents 1 OVERVIEW... 3 2 PACKAGE CONTENTS... 4 3 PHYSICAL DETAILS... 4 4 WHAT YOU NEED... 5 5 TRUSHARE PAIRING... 5 5.1 AUTO PAIRING... 5 5.2 MANUAL PAIRING...
Control Panel. Power LED indicator
 Control Panel Power LED indicator Mode LED indicator 1. Power button: Long press for three seconds to power off Short press for one second to check the battery capacity 2. Preset button(under Wi-Fi mode):
H560N. Quick Start Guide
 H560N Quick Start Guide Wireless Router Package Contents: ZXHN H560N Wireless Router, Power Adapter, Quick Start Guide, Warranty Card This product is a low Low-power product mainly used to extend the Wi-Fi
Quick Start Guide.
 Quick Start Guide www.remoplus.co WHAT S IN THE BOX REMOBELL S WALL MOUNT 15 ANGLE MOUNT 5 WEDGE MOUNT MOUNT FOAM POWER KIT (WITH WIRE HARNESS) EXTENSION WIRES SCREWDRIVER MOUNTING SCREWS AND ANCHORS
wepresent SharePod User's Manual Version: 0.5
 wepresent SharePod User's Manual Version: 0.5 1 Table of Contents 1 OVERVIEW... 3 2 PACKAGE CONTENTS... 4 3 PHYSICAL DETAILS... 4 4 WHAT YOU NEED... 5 5 WEPRESENT SHAREPOD PAIRING... 5 5.1 AUTO PAIRING...
User Guide CentrePoint Insight Watch
 User Guide CentrePoint Insight Watch Activity Monitor: CentrePoint Insight Watch Revision: 0 Released: 0/9/08 User Guide CentrePoint Insight Watch Activity Monitor: CentrePoint Insight Watch Revision:
U-Bell. Quick Start Guide. Two-way Audio. 180 Field of View. Motion Activated. 1080p Full HD. Night Vision. Wireless Video Doorbell DB1
 U-Bell Wireless Video Doorbell Quick Start Guide 1080p Full HD Two-way Audio Motion Activated 180 Field of View Night Vision U-Bell includes Lifetime Warranty DB1 Regulatory Information FCC Information
User ManUal ADURO BTA2
 User Manual ADURO BTA2 ADURO BTA2 Bluetooth Audio Receiver with Mic/Call Support Features and Functions The Aduro Bluetooth Audio Receiver features a small and round design, allowing you to place it on
Get to Know Your Tablet
 Get to Know Your Tablet 1 8 My Verizon You re now connected to Verizon 4G LTE. Lightning fast, Lightning strong. For more information, visit verizonwireless.com/4glte. REGISTER at verizonwireless.com/myverizon
LPWWS Smart Wi-Fi Wall Station
 Manufactured by: GTO Access Systems, LLC (844) 256-3130 www.gtoaccess.com LPWWS Smart Wi-Fi Wall Station Programming / Installation Instructions This Wall Station allows operation of the light and door
TV WIRELESS HEADPHONES
 TV WIRELESS HEADPHONES Item No. 206077 Owner s Manual Thank you for purchasing the Sharper Image TV Wireless Headphones. This updated version has a new design with new features, including a digital audio
USER MANUAL. Store the sun. Power your phone. Blast your tunes.
 USER MANUAL Store the sun. Power your phone. Blast your tunes. Francais/Español/Deutsch/Nederlands @ www.solgaard.co/manual Solarbank Package Contains: Solarbank by Solgaard 2.0A Micro USB Cable AUX Cable
Quick Start Guide. Layout. A Camera Two Megapixels. B Stylus. Earphone Jack. Micro SD Slot E F. E Microphone F RESET. Keyboard H LED.
 Quick Start Guide 1 Layout A Camera Two Megapixels B Stylus M L A B C D C Micro SD Slot E Microphone D Earphone Jack F RESET J I K E F G G Keyboard H LED H I HDMI Jack J USB/Charger Jack K ON/OFF Key L
free internet receiver Quick Start Guide
 free internet receiver Quick Start Guide Table of Contents Included With Your WebGrabber... 3 Compatibility & Features... 4 Installing WebGrabber Software... 5 Windows Installation... 6 Mac Installation...
TABLE OF CONTENTS Folding the Jacket Case into a Stand... 2 FCC Information... 3 Location of Parts and Controls... 4 Charging the Keyboard...
 TABLE OF CONTENTS Folding the Jacket Case into a Stand........................................ 2 FCC Information............................................................ 3 Location of Parts and Controls..............................................
APC-100. IEEE g Wireless USB Adapter. User s Guide v1.0
 APC-100 IEEE 802.11g Wireless USB Adapter User s Guide v1.0 FCC Certifications Federal Communication Commission Interference Statement This equipment has been tested and found to comply with the limits
Toucan Surveillance Kit Camera & Smart Socket. User s Manual Model: TSK100KU
 Toucan Surveillance Kit Camera & Smart Socket User s Manual Model: TSK100KU Table of Contents 1. Key Features... 3 2. What Is Included... 6 3. Toucan Camera & Socket Installation... 8 4. Getting The Kuna
56-A11A Plantronics Calisto Headset with Bluetooth USB Adapter. User Guide
 56-A11A-10511 Plantronics Calisto Headset with Bluetooth USB Adapter User Guide ii Table of Contents Package Contents... 1 Product Features... 2 Wearing The Headset... 3 Powering... 4 Charging... 4 Indicator
IT S NOT JUST A RANDOM
 IT S NOT JUST A RANDOM WHAT S IN THE BOX When you open this awesome box, inside you will find: One HELLO Device One Remote Control H D M I H D M I One Adapter 220V and 110V + 3 different plugs (Europe,
Quick Start Guide. Reolink Argus 2. Technical Support QG2_A. For more troubleshooting, please go to FAQs on our website: https://reolink.
 Reolink Argus 2 Quick Start Guide Technical Support For more troubleshooting, please go to FAQs on our website: https://reolink.com/faqs/ For other technical support, please contact us at support@reolink.com
SMARTPLUG. Quick Start Guide. Model: isp6x. Intelligent Home Solutions. Control your SmartPlug from anywhere with your smartphone WHAT YOU LL NEED
 Model: isp6x Intelligent Home Solutions Quick Start Guide SMARTPLUG Control your SmartPlug from anywhere with your smartphone WHAT YOU LL NEED WiFi network transmitting at 2.4GHz 1 Apple device running
Package Contents Bluetooth Keyboard Charging Cable (If using the Apple 30 pin charging interface, this is not needed)
") Package Contents Bluetooth Keyboard Charging Cable (If using the Apple 30 pin charging interface, this is not needed) SPECIFICATIONS Executive Standard: Bluetooth V3.0 Working Distance: 10 metres Modulation
Package Contents Bluetooth Keyboard Charging Cable (If using the Apple 30 pin charging interface, this is not needed) SPECIFICATIONS Executive Standard: Bluetooth V3.0 Working Distance: 10 metres Modulation
Quick Installation Guide
 Quick Installation Guide For Network Attached Storage Ver.1.1.0.0517 Table of Contents Notices... 3 Safety Precautions... 4 1. Package Contents... 5 2. Hardware Installation Guide... 6 2.1. Hard Disk Installation...
USER MANUAL FOR MF0200 GATEWAY BOX VERSION 2.0
 USER MANUAL FOR MF0200 GATEWAY BOX VERSION 2.0 COPYRIGHT & TRADEMARKS 2016 Mentor Graphics Corporation, all rights reserved. This document contains information that is proprietary to Mentor Graphics Corporation
Power on: Long press the multifunction button for 3 seconds until the blue light flashes 5 times and voice prompt startup is given.
 User Manual Product list: Microphone, Power/Multifunction button, Volume up/previous track, Volume down/next track, Silicone ear tips, cable clip, USB charging line. Basic operation Power on: Long press
8 WiFi Digital Photo Frame with Touchscreen LCD Display Instructional Manual
 8 WiFi Digital Photo Frame with Touchscreen LCD Display Instructional Manual aluratek.com mnl M10438 model AWDMPF8BB Copyright 2017 Aluratek, Inc. All Rights Reserved. Table of Contents Frame Features...
mart atch B502 User Manual
 mart watch B502 User Manual Congratulations on your new ownership of a Polaroid smart watch. Please read the manual carefully for full understanding of all operations and functions of your new smart watch.
OVERVIEW. *Press and release. *Hold for 5 seconds. *Charging port
 User Manual OVERVIEW *Press and release *Hold for 5 seconds *Press and release *Charging port TLink only has three buttons with three basic functions. However, updates may be released through the application
BTK-A21 Bluetooth Headset User Manual
 BTK-A21 Bluetooth Headset User Manual Thank you for purchasing the Mini Bluetooth Headset BTK-A21, we hope you will be delighted with its operation. Please read this user's guide to get started, and to
Wireless Palm Style Keyboard with Touchpad PKA-1720A. User s Manual. Version /08 ID NO:
 Wireless Palm Style Keyboard with Touchpad PKA-1720A User s Manual Version 1.0 2013/08 ID NO: About This Manual This manual is designed to assist you in installing and using the Wireless palm style Keyboard.
Congratulations on choosing the No.1 brand in HD camera/ light combos. The tips below are essential for all Fly12 users.
 Quick Start Guide Congratulations on choosing the No.1 brand in HD camera/ light combos. The tips below are essential for all Fly12 users. TIPS Fly12 comes pre-installed with a class 10 microsd card Once
Wireless Entertainment Smart Pad Keyboard User s Manual
 Wireless Entertainment Smart Pad Keyboard User s Manual Version 1.0 2008/12 ID NO: PAKL-231B2001-00 0 About This Manual This manual is designed to assist you in installing and using the Wireless Touchpad
MXHP-H500 (Hub) Owner s Manual v.1.0
 Owner s Manual v.1.0") MXHP-H500 (Hub) Owner s Manual v.1.0 MX-HomePro MXHP-H500 Owner s Manual 2016 Universal Remote Control, Inc. all rights reserved. The information in this manual is copyright protected. No part of this
MXHP-H500 (Hub) Owner s Manual v.1.0 MX-HomePro MXHP-H500 Owner s Manual 2016 Universal Remote Control, Inc. all rights reserved. The information in this manual is copyright protected. No part of this
Quick Installation Guide
 Quick Installation Guide Applicable Models: AS6004U Ver.3.0.0 (2017-4-13) Table of Contents Notices... 3 Safety Precautions... 4 1. Package Contents... 5 2. Optional Accessories... 6 3. Hardware Installation
14 Notebook PC WINBOOK CW140
 14 Notebook PC WINBOOK CW140 Quick Start Guide 1 I.System Layout Front Camera Charge/Power light Keyboard Touch Pad 2 Charge Indicator Charge Port USB Type-C Port USB Port SD Card Reader Power Button Headphone
Anker Portable Bluetooth Speaker. Instruction Manual. Specifications. Model No: A7908
 Anker Portable Bluetooth Speaker Model No: A7908 Instruction Manual Package Contents Anker Portable Bluetooth Speaker Micro USB cable 3.5mm audio cable Travel pouch Instruction manual Product Features
Introduction. See page #6 for device requirements.
 W-FI CAMERA USER MANUAL Contents Introduction 4 Camera LED Indicators 5 Wi-Fi Requirements 6 Mobile Device Requirements 6 Download the Momentum App 7 Create an Account 8 Setup 10 Pairing 10 Connecting
Wireless Optical Mouse Instruction Manual
 Wireless Optical Mouse Instruction Manual HO97990 / 98150 For technical support, contact Jasco at 1-800-654-8483 or www.jascoproducts.com Revision 5 TABLE OF CONTENTS FEATURE DESCRIPTIONS -------------------------------------------
Labtec Wireless Optical Desktop. Getting Started Guide
 Labtec Wireless Optical Desktop Getting Started Guide Important Ergonomic Information Long periods of repetitive motions using an improperly set-up workspace, incorrect body position, and poor work habits
BLUETOOTH RECEIVER (RX) FOR IPOD DOCKING SPEAKER
 FOR IPOD DOCKING SPEAKER") BLUETOOTH RECEIVER (RX) FOR IPOD DOCKING SPEAKER iskin CE-RX1000 USER GUIDE 1. Introduction Bluetooth wireless technology is a short-range communications technology intended to replace the cables connecting
BLUETOOTH RECEIVER (RX) FOR IPOD DOCKING SPEAKER iskin CE-RX1000 USER GUIDE 1. Introduction Bluetooth wireless technology is a short-range communications technology intended to replace the cables connecting
iziggi Wireless Document Camera User Manual
 iziggi Wireless Document Camera User Manual Table of Contents Package Contents... 1 Basics... 1 Getting to know your iziggi-hd... 2 Setting up your iziggi-hd... 4 Using iziggi-hd with IPEVO software...
ZigBee Server USER GUIDE
 ZigBee Server USER GUIDE Version: 1.0 Issued Date: For Models: ZS211H / ZS212H / UBIQ520 1 Contents Chapter 1: Introduction 1 Welcome 1 Chapter 2: Installing 2 Chapter 3: Using the ZigBee Server 3 3.1
Quick Installation Guide
 Quick Installation Guide Applicable Models: AS3102T/AS3104T/AS3202T/AS3204T Ver.2.5.0128 (2016-1-28) Table of Contents Notices... 3 Safety Precautions... 4 1. Package Contents... 5 2. Optional Accessories...