WPS GHA Transactional Portal Manual
|
|
|
- Joseph Stafford
- 6 years ago
- Views:
Transcription
1 WPS GHA Transactional Portal Manual Wisconsin Physicians Service Insurance Corporation TABLE OF CONTENTS WPS GHA PORTAL OVERVIEW WPS GHA Portal Overview...2 USER RESPONSIBILITIES, ACCESS, & MANAGEMENT USER RESPONSIBILITIES Reporting a Security Incident...2 Sharing WPS GHA Portal User Login IDs...3 ACCESS TO WPS GHA PORTAL Register as a WPS GHA Portal Administrator...3 Request Access through Your Administrator...8 Requesting Access for Additional Administrators...10 Logging In...10 Multi-Factor Authentication...12 Logout...20 Recertification...20 USERNAME/PASSWORD MANAGEMENT Initial Password...23 Password Requirements...23 Auto Created Password...24 Expired Password...24 Forgot Username/Password...25 Locate Administrator...28 MY ACCOUNT TOOLS MY DASHBOARD User Dashboard Windows...33 Pending Access Request (Administrator Only)...33 Registration Approvals (Administrator Only)...34 Blackout National Provider Identifiers (NPIs)...36 User Search (Administrators Only)...37 Quick Links...38 New Messages...38 MY PROFILE Change My Password...39 Change Security Q&As...40 Disable My Account...41 My Service Locations...42 MESSAGE CENTER Send a Secure Message...43 Check Secure Message Status...45 USER ADMINISTRATION (ADMINISTRATORS ONLY) User Administration...47 Add New User...48 Find and Administer Current Users...49 MY TRANSACTIONS ELIGIBILITY Eligibility Check...51 Available Eligibility Information...55 MEDICARE BENEFICIARY IDENTIFIER (MBI) Medicare Beneficiary Identifier (MBI) Lookup PRIOR AUTHORIZATION (J8 PART A MICHIGAN ONLY) Search Prior Authorization Records...61 Initial Request...63 Subsequent Request...68 CLAIMS (PART B PAPER CLAIMS SUBMITTERS ONLY) Register for Online Claim Entry...69 Submit New Claim...70 Specialty Claim Fields...78 CLAIM INQUIRY Claim Status...81 Claim Details...82 Claim Actions...87 CLERICAL ERROR REOPENING (CER) Submitting a Clerical Error Reopening (CER)...87 Common Error Messages and Their Causes...89 OVERPAYMENTS (OCA) Overpayment Claim Adjustments (OCA)...90 MEDICAL DOCUMENTATIONS Search Documentation...93 Additional Documentation Request (ADR) Response...95 ADR Response Using Claim Inquiry...97 Post-Payment Review Tab REMITTANCE ADVICE Obtain a Full Duplicate from Remittance Search Obtain a Duplicate from Claim Search MEDICARE EREFUNDS Searching for Previous erefunds Submitting an erefund APPEAL SEARCH (REDETERMINATIONS) Submitting a Part B Redetermination Appeal Status Part B Appeal Responses TROUBLESHOOTING Clearing Cache and Internet Cookies WPS GHA Portal Eligibility Discrepancy QMB Helpful Information Recertification Requirements WPS GHA Portal Appeal Statuses Frequently Asked Questions (FAQs) REVISION HISTORY Revision History Current Procedural Terminology (CPT) is copyright 2017 American Medical Association. All Rights Reserved. No fee schedules, basic units, relative values, or related listings are included in CPT. The AMA assumes no liability for the data contained herein. Applicable FARS/DFARS restrictions apply to government use. Current Dental Terminology copyright 2002, 2005 American Dental Association. All rights reserved. June
2 WPS GHA Portal Overview WPS GHA PORTAL OVERVIEW The WPS GHA Portal is a comprehensive and secure alternative to obtain Medicare patient eligibility and claim status. Partnered with the Centers for Medicare & Medicaid Services (CMS), who governs the security regulations and policies of the Portal, WPS Government Health Administrators is pleased to be able to provide this convenient and efficient tool to our Medicare Providers. The Portal offers many functions detailed below in this user manual. The most frequently accessed functions are eligibility and claim status. The Portal uses the CMS HIPAA Eligibility Transaction System (HETS) 270/271 transaction to obtain the most current patient eligibility while the claim status function uses the Claims Processing Shared Systems. In addition, the Portal offers the ability to do the following: Send secure messages to WPS GHA staff Submit a Part B Redetermination Check status on any redetermination submitted to WPS GHA Enter a Part B claim Submit a Part B clerical error reopening Submit an overpayment claim adjustment Submit medical documentation Request duplicate remittances Request prior authorization for Hyperbaric Oxygen (HBO) services Submit electronic refunds The Medicare Number field will accept either Health Insurance Claim Number (HICN) or a Medicare Beneficiary Identifier (MBI). User Responsibilities, Access, and Management User Responsibilities (All Users) REPORTING A SECURITY INCIDENT Users shall immediately report any known or suspected: Activity that violates the CMS Information Security Policies, Standards, and Procedures Activity that compromises information security Other suspicious activity Please contact WPS GHA Customer Service with the following information: User Information: o User Login ID o National Provider Identifier (NPI) o Provider Transaction Access Number (PTAN) o Tax Identification Number (TIN/EIN) Date and Time the incident was identified Specific details of the security incident 2
3 What steps, if any, have been taken by the User since the incident was identified Please contact WPS GHA Customer Service at a number listed below: MAC J5 Part A/B (IA, KS, MO, NE) and J5 National (866) MAC J8 Part A/B (IN, MI) (866) SHARING WPS GHA PORTAL USER LOGIN IDS Every portal user must have their own User Login ID that is registered under their own name to adhere to privacy laws. Portal users cannot share their User Login ID. This means employers may not create a Master login and have all employees share that account. Each user must have their own account registered in their own name. Access to WPS GHA Portal 1. Register as an NPI Administrator for a Medicare provider (by NPI). Be prepared with authentication criteria required through the registration process. As an administrator, you will be responsible for creating, approving, and maintaining the standard and eligibility accounts under you. 2. Register as a non-administrator portal user and request access and approval by your NPI Administrator. Existing NPI Administrators can also create an account on your behalf. REGISTER AS A WPS GHA PORTAL ADMINISTRATOR FOR A MEDICARE PROVIDER Only two Administrators may self-register. If the NPI you are attempting to self-register for already has two or more administrators, or you will not be an administrator, please follow the instructions Request Access through your NPI Administrator below to request access, then follow the instructions Requesting Access for Additional Administrators if you require Administrator level access. 1. Access the portal at: 2. If you do not have an account, select the Login/Register button at the top right side of the page, then choose Create Account on the left-hand side. 3
4 3. Read the details of the Transactional and General Areas of the User Agreement and select I Accept then select I have read statement to continue the registration process then select Next. Selecting Cancel terminates the registration process and reverts back to the Home Page. 4

5 4. On the Provider Credentials page enter the National Provider Number (NPI), Provider Transaction Access Number (PTAN) and Provider Tax Identification Number (TIN/EIN) for the NPI you are requesting access for. When done select Next. 5. On the Financial Information screen read the details and select either Yes or No if you are the appropriate person to be the Administrator for this NPI. If No is selected, continue on in the registration process if there is already at least one administrator. If Yes is selected, click the Next, button and a pop-up with the WPS GHA 5
6 Portal Administrator Role Responsibilities will display. o Review the Administrator Role responsibilities and select Accept or Decline. o Selecting Accept will take you to the Financial Information screen to enter data to confirm authorized access to a Service Location. o Selecting Decline will revert back to the Financial Information page to select No and continue with the Registration process. NOTE: If there are no NPI Administrators for the NPI and you decline you will not be able to complete registration. Only two NPI Administrators can self-register for a user account and gain immediate access to the portal. It is the responsibility of the Administrator to create and approve access for additional users under their NPI. If Accept was selected, the second page requests that you select one of the three tabs to verify your access to the service location. Enter the required data of your choosing (Patient Lookup, Medicare Check # or Medicare Claim #), then select Next. NOTE: Selecting the Back button will revert back to the Provider Credentials page and selecting Cancel will cancel out the entire registration process and revert back to the Login/Registration page. 6. On the About You page, enter all required data to create a user account and then select Next when done. Provider Name Your Name 6
7 Address/Confirm Address Phone Number Work Location Name Work Location Address (must be a street address, not a P.O. Box) 7. Create a permanent User Login ID. User Login IDs are 5-16 characters in length. (Spaces are not allowed) Allowable characters include: o A-Z o 0-9 o Dollar ($) o Underscore (_) o Hyphen (-) 8. Review password rules prior to creating the password. To create a password, enter the password in New Password and enter the same password in Confirm Password. Portal password requirements i. Passwords can only be changed once in a 24-hour time period ii. Passwords will automatically expire after 60 days iii. Passwords must be 8-20 characters in length iv. Passwords must contain at least: 1. One upper case alphabetic letter: A - Z 2. One lower case alphabetic letter: a - z 3. One numeric digit: One special character (only the characters listed below are valid): a. Hashtag (#) b. Dollar ($) c. Percent (%) d. Ampersand (&) v. Passwords cannot contain any of the following information: 1. First or Last name 2. Any special characters that are not listed above 3. User Login ID 4. Security question answers 5. Words (words consisting of four or more letters) Please note: This is the requirement most often overlooked and causes the most difficulty for users. To successfully create a password, please avoid dictionary words. (EXAMPLES: Book, Tree, Water, etc.). vi. Newly created passwords must be different than the previous 24 passwords used. vii. Newly created passwords must differ from the previous password by at least four characters. 9. You may also choose to have the portal auto-generate a password for you. If the Generate Password link is selected, the portal will generate a password and will auto fill in the New Password and Confirm Password fields. Please remember the generated password as this will be needed the next time you log in. 7

8 10. For a second level of security (E-Signature) enter your date of birth and select and answer three questions, select Next. The only time you will use your date of birth and security questions are when you are using the Forgot User Login ID/Password feature and for recertification of your portal account. 11. You will receive Confirmation showing that registration was successful, and you can log in to the portal by selecting the Login button. REQUEST ACCESS THROUGH YOUR NPI ADMINISTRATOR 1. Repeat steps 1 through 4 above. 2. On the Financial Information page, if it states there are already two or more Administrators, or there is only one, but you do not hold that responsibility and choose the option for No, you will be requesting access through the current NPI Administrator. Choose Next. Note: If there are no current Administrators and you will not become one, someone who will be an administrator must register first. 3. On the About You page, enter all required data to create a user account and then select Next when done. Provider Name Your Name Address Confirm Address Phone Number 8
9 Work Location Name Work Location Address (must be a street address, not a P.O. Box) 4. Next, create a permanent User Login ID. User Login IDs are 5-16 characters in length. (Spaces are not allowed) Allowable characters include: o A-Z o 0-9 o Dollar ($) o Underscore (_) o Hyphen (-) 5. Review password rules prior to creating the password. To create a password, enter the password in New Password and enter the same password in Confirm Password. Portal password requirements i. Passwords can only be changed once in a 24-hour time period ii. Passwords will automatically expire after 60 days iii. Passwords must be 8-20 characters in length iv. Passwords must contain at least: 1. One upper case alphabetic letter: A - Z 2. One lower case alphabetic letter: a - z 3. One numeric digit: One special character (only the characters listed below are valid): a. Hashtag (#) b. Dollar ($) c. Percent (%) d. Ampersand (&) v. Passwords cannot contain any of the following information: 1. First or Last name 2. Any special characters that are not listed above 3. User Login ID 4. Security question answers 5. Words (words consisting of four or more letters) Please note: This is the requirement most often overlooked and causes the most difficulty for users. To successfully create a password, please avoid dictionary words. (EXAMPLES: Book, Tree, Water, etc.). vi. Newly created passwords must be different than the previous 24 passwords used. vii. Newly created passwords must differ from the previous password by at least four characters. 6. You may also choose to have the portal auto-generate a password for you. If the Generate Password link is selected, the portal will generate a password and will auto fill in the New Password and Confirm Password fields. Please remember the password as this will be needed the next time you login. 7. For a second level of security (E-Signature) enter your date of birth and select and answer three questions, select Next. The only time you will use your date of birth and security questions are when you are using the Forgot User Login ID/Password feature 9
10 and for recertification of your portal account. 8. You will receive Confirmation showing that registration was successful, and you can log in to the portal by selecting the Login button. 9. If you attempt to log in before approval has been granted by the NPI Administrator, you will receive the message Your account is currently pending approval by the NPI administrator. You can go to the help center for more information or continue in the public site. REQUESTING ACCESS FOR ADDITIONAL ADMINISTRATORS (MORE THAN TWO) Only two individuals may self-register as an NPI administrator. If there is need for additional administrators, the person requesting administrator access must first register for a regular user account if they do not currently have any access. After registration and approval, send a secure message requesting that the specific user be brought to the administrator level. You need to include the User Login ID, User s full name and what NPI they should be Administrator for. LOGGING IN 1. Access the WPS GHA Portal at: 2. Click on the My Account tab or the Login/Register button. 3. Enter your User Login ID, password, Date of Birth, and answer to the Secret Question. 4. Select Login. 5. User s Dashboard page is presented to begin approved portal activity. 10

11 Logging in after X ing out of WPS GHA Portal versus selecting Log out If a WPS GHA Portal user selects the x in the top right-hand corner of the webpage to log out of the WPS GHA Portal they may encounter the following error when trying to log back in: DPWNS1056W You are already logged in from another client. Do you want to terminate your existing login or cancel this new login request? The user will have two links available to choose from Terminate existing login, and Cancel this new login. The User should select Terminate existing login. This will terminate the previous session that was not properly logged out of and allow the User to sign in again. To properly log out of the portal, click on the gear icon next to your name and then click Logout. Logging Back in After Timeout Issues Many times, when a WPS GHA Portal user has been logged out after inactivity, they report difficulty logging back into the Portal. One of the simplest fixes for this issue is for the WPS GHA Portal user to do the following steps: 1. Close all open website browsers (not just the WPS GHA Portal site). 2. Reopen the website browser and manually enter the link: 3. If the login still gives an error, on the logout link (if available), and if that is not showing, then follow the Clearing Cache steps above, close all browsers and try again. 11
12 MULTI-FACTOR AUTHENTICATION Multi-Factor Authentication (MFA): a CMS requirement that provides an additional form of security to safe guard your doctor and patient information. When logging into the portal, you will request and enter a MFA Verification code that you will obtain one of three ways: Phone Call (cannot use a phone number that has an extension) Google Authenticator Application. Note: Your Date of Birth and Secret Questions are still an integral part of the WPS GHA portal. These will be needed when using features such as Forgot User ID, Forgot Password and Recertification. Please assure you remember the selections you make as you use the portal. The MFA process will auto populate the and telephone with values that are currently listed on your profile page. Even though both and Telephone options are populated on the MFA set-up page, you are not required to use both or verify both options. If you choose to verify only one option, that is fine, but verifying both gives you a backup in case you can t get the code thru one option. Follow the steps below to get set-up for MFA. 1. Click Continue. 2. Initially, you will be able to set up and phone to receive the MFA verification code. Click on the Setup & Telephone box 12
13 Steps Set up your 3. Enter your address in the appropriate box (or verify the address pre-loaded is the one you want to use to receive the MFA code). Click the Send Code button. 4. Obtain the MFA Verification code from the sent to the address you indicated above. Be aware, this code will expire 1 hour after being sent, so you must log in to use the code within 1 hour otherwise you will need to request a new code. Once you enter the code in the Verification Code box and click Verify Code, the code will be valid for 8 hours. Once it has been verified you will see a check mark next to the address. 13
14 5. If you are having trouble receiving the , or the code did not work, and you want to try a new code, click on the Back to Previous Step link. This will take you back to Step 5 of this manual. Step 6-9 Set up your telephone Number 6. We encourage you to set up the phone option as well as a backup to . If you also choose to set up for Phone verification, enter the phone number that you will use to receive the Verification code. If the phone number pre-loaded is not the one you want to use update the field with a new phone number. Please note that this cannot be a phone with an extension. It must be a direct dial number and can be a cell phone number. Click the Send Code button if you are ready to validate the phone number. (If you do not want to validate your phone number now and only use as your verification, click on the Continue button and skip to Step 11 of this Manual.) 14

15 7. An automated phone call will be made from WPS GHA with the following message: Hello. Thank you for using the WPS GHA Multi-Factor Authentication phone verification option. Your code is: [randomly generated six-digit number] Again your code is: [repeat of six-digit number]. Remember, you should not share this code with anyone else, and no one from WPS GHA will ever ask for this code. Goodbye. Enter the code obtained in the phone call in the Verification Code box and click Verify Code. Once the code is verified you will see a check mark next to the telephone number. As with the option, please be aware, this code will expire 1 hour after being sent, so you must log in to use the code within 1 hour otherwise you will need to request a new code. Once you enter the code in the Verification Code box and click Verify Code, the code will be valid for 8 hours. Once it has been verified you will see a check mark next to the Telephone number. 8. Click Continue to set up your primary (default) option. 15
16 9. Choose which option you want to use as your default or primary choice. You can change this selection at any time. If you did not verify the phone number, the address will be pre-selected as the default. Once you selected your default, click Finish. 10. You will receive a message at the top of the screen that you have successfully set up your Multi-Factor Authentication. 11. A third option to receive an MFA Verification code is use of Google Authenticator. Google Authenticator is an application that implements two-step verification and is an app typically installed on a smart phone. This is not a required method but is a very useful method for meeting the Multi-Factor Authentication requirement. To use Google Authenticator, first download the app via Google Play or the App Store. Follow the steps on the app to download to your phone. 16
17 12. Once you have installed Google Authenticator to your phone, use the application to scan the Bar Code in the WPS GHA portal (shown below). You will receive a Verification Code on your phone. Enter that code in the Verification Code box and click Verify. If you choose to use this method as your Default, select the box. Please note: the code must be entered within 30 seconds from the time it is displayed in the Authenticator app. 13. You will receive a message that you have successfully enabled the Google Authenticator app. 17
18 14. Once you have set up your Multi-Factor Authentication you will be taken to your Dashboard. 15. The next time that you log into the portal, you will enter your User Login ID, Password. Obtain and enter a new authentication code using any of your validated choices. You will no longer enter your date of birth and Secret Question to log in. 16. Once you have logged in using your Verification code, if you log out and need to log in again, remember, you will not have to request or enter your code again. You will see the below screen. 18
19 Changing Default option to Google Authenticator When your MFA default option is , or Phone and you want to change it to Google Authenticator follow the below steps: 1. Login to the portal and go to My Profile page. 2. Click on MFA button. 3. Click on Setup Google Authenticator box 4. Click on Set as Default box. How to Change your Address or Phone Number for MFA You are able to change your address and/or phone number any time after setting up your MFA access. Follow the below steps to change/update. 1. Log into the portal with your User Login ID and password. 2. You will need to request a code be sent to either your or Telephone. 19

20 3. After you obtain your code and log into the portal and are on your Dashboard, a. Click on the My Profile link in the left-hand navigation b. On the My Profile page, click on the MFA tab at the top of the screen. c. On the Multi-Factor Authentication page select the option that you are changing d. Enter in the correct value ( address or Phone number) e. Click Send Code f. Obtain the verification code from either your or Telephone g. Enter Code and click Verify and Finish. h. Once it is changed you will receive message at the top of the page You have successfully updated your Multi-Factor Authentication methods Logout To logout of the portal select the gear icon at the top of the page next to your name. A dropdown box will display, click Logout. RECERTIFICATION Annually, users must recertify all active User Login IDs that have access to the portal. Notifications are presented in the portal 90 days prior to the recertification date to allow adequate time to complete the recertification steps. The recertification process is very similar to registration. If a User fails to complete the portal recertification process timely, access is disabled. Once access is disabled a user will need to complete the registration process as a new user. 1. Access the portal at: 2. Once Recertification is due within 90 days, the user will receive the Recertify pop-up window on the My Dashboard page. Choose Recertify from the pop-up, or, from the My Dashboard page click on your username in the top right, and if Recertification is due, there will be an option for Recertification. 20

21 3. Read and accept the transactional and general terms of use. Then choose Next. 4. The WPS GHA portal requires all users to attest that you have or will be completing your company s annual security awareness training. If you select no, your account will be permanently disabled. Then choose Next. 21

22 5. Enter the provider credentials for any one of the Service Locations (NPIs) you currently have access to. Then choose Next. 6. Enter your choice of financial information, from the last 90 days. Then choose Next. You can enter: o Patient Medicare number and Date of Service o Medicare Check Number o Medicare Claim Number 22

23 7. Review and update your personal information, then choose Next. 8. E-Signature Verification o In order to recertify, three new security questions must be selected and answered. o Once complete, select Next. 9. Recertify Admin Role o Administrators must recertify NPI Administrator Role Responsibilities. Only NPI Administrator Users will need to reaccept the Admin role. Verify the listed NPIs and review the Administrator responsibilities. Select Reaccept Admin Role to continue recertification. o If you choose to modify your access to any NPI, go to My Service Locations. Once this is done, the Re-Certification process will need to be done again and Finish must be selected when completed. 10. You will receive a Recertification complete message. Select OK. Username/Password Management INITIAL PASSWORD User passwords are created during the registration process. Both an administrator and selfregistering user will create their own passwords, however, a user account that is created by an administrator will get a temporary password ed to them to the address on file within the Portal. The initial password is a one-time use only password valid for 21 days. Once it has been entered, a new password will need to be created. If the password is not used within the 21 days, the new account will no longer be valid, and a new account will need to be created. PASSWORD REQUIREMENTS The Centers for Medicare & Medicaid Services (CMS) and WPS GHA are committed to protecting the health information of Medicare beneficiaries. To ensure this level of protection, 23
24 WPS GHA is dedicated to meeting the CMS security requirements. Portal password requirements 1. Passwords can only be changed once in a 24-hour time period 2. Passwords will automatically expire after 60 days 3. Passwords must be 8-20 characters in length 4. Passwords must contain at least: a. One upper case alphabetic letter: A - Z b. One lower case alphabetic letter: a - z c. One numeric digit: 0-9 d. One special character (only the characters listed below are valid): i. Hashtag (#) ii. Dollar ($) iii. Percent (%) iv. Ampersand (&) 5. Passwords cannot contain any of the following information: a. First or Last name b. Any special characters that are not listed above c. User Login ID d. Security question answers e. Words (words consisting of four or more letters) Please note: This is the requirement most often overlooked and causes the most difficulty for users. To successfully create a password, please avoid dictionary words. (EXAMPLES: Book, Tree, Water, etc.). 6. Newly created passwords must be different than the previous 24 passwords used. 7. Newly created passwords must differ from the previous password by at least four characters. Some helpful suggestions to assist you in the creation of your new password are listed below or see next section about auto-creating a password. 1. Choose a smaller password and repeat it: Ab#1Ab#1 2. Use the $ sign instead of the letter S : Pa$$1Pa$$1 3. Use the number zero instead of the letter O : w0rd1w0rd1 4. Use the number one instead of the letter I : Wh1te$Wh1te$ AUTO CREATED PASSWORD You may elect to have the Portal create a password for you by selecting Generate Password. Once selected, the password will auto fill in both the New password and Confirm Password boxes. Please remember the password as this will be needed the next time you log in. EXPIRED PASSWORD If the User password has expired, the Password Expired page will display upon login. 1. Enter the expired password in the Current Password field. 2. Enter a newly created password in the New Password field. 3. Enter the newly created password again in the Confirm Password field. 4. Select Save my password in the bottom right hand corner. Please remember the password as this will be needed the next time you log in. 24
25 FORGOT USERNAME/PASSWORD Usernames are created during the registration process. If you have forgotten your Username or Password, follow the below steps: 1. From the main Portal page select the Forgot User Login ID/Password? link. 25
26 2. Select either I don t know my User Login ID or I don t know my Password, whichever is appropriate for the situation? 26
27 3. Enter the requested information: For User Login ID enter: o Address o NPI number o Date of Birth o Secret Question o Secret Answer o Choose Retrieve User Login ID For Password enter: o User Login ID o Choose Lookup My ID Next Enter: o Date of Birth o Secret Question o Answer to Secret Question o Choose Reset Password 27
28 Once Retrieve User Login ID or Reset Password has been selected, a message will display stating Please check your for your User Login and/or temporary password. This is the User s address that is currently on file within the portal. o Please ensure you check your spam and junk folders as well. 4. Login to the WPS GHA Portal with your User login ID and/or the temporary password from the . If you reset your password, the Password Expired page will display upon login. 1. Enter the temporary password in the Current Password field. 2. Enter a newly created password in the New Password field. 3. Enter the newly created password again in the Confirm Password field. 4. Select Save my password in the bottom right hand corner. 5. The temporary password is a one-time use only password valid for 21 days. Once it has been entered, a new password will need to be created. If the password is not used within the 21 days another password reset will need to be done. Please remember the password as this will be needed the next time you log in. LOCATE ADMINISTRATOR TO UPDATE YOUR ACCOUNT Occasionally there may be a need to contact your NPI Administrator for various tasks, such as resetting your password or secret Q&As, or updating your profile in some way. To find your Administrator(s), follow the steps below. 1. When logged in: a. Click on the My Service Locations link in the left navigation. b. Scroll to My Service Locations (NPIs). c. Find the NPI in question. d. Click on the blue Find My Admin button under the Admin? Heading. e. Pop-up will appear with the Location NPI, PTAN and TIN and Display the Name, Phone and for the Administrator. 28


29 2. If not logged in, on the Secure Login page, go to the NPI Administrator Search box and enter the full NPI, PTAN, and Tax ID, then choose Submit to perform the search or Clear to start over. 3. If you have not received approval to a location request and need to know who the NPI Administrator is: a. Click on the My Service Locations link in the left navigation b. Scroll to My Pending Access Requests. c. Find the NPI in question. d. Click on the blue Find My Admin button under the Admin? Heading. e. Pop-up will appear with the Location NPI, PTAN and TIN and Display the Name, Phone and for the Administrator. 29

30 30

31 4. A list of all active NPI Administrators for the NPI information you entered will be returned. The information will include their name, phone number, and address on file. Use this information to contact them to make your request. Login Error If you are already logged into the portal and just x out to close and then try to log in again, you will receive the below error. You will need to choose to either terminate the existing login or cancel the new one. My Account Tools MY DASHBOARD When you log in, you will always land on the My Dashboard page. You will see a left navigation section, as well as some dashboard windows. Both the left navigation bar as well as the My Dashboard windows may vary upon your access level. Administrators have full access, standard users have access to the non-admin functions of the portal, while eligibility users can 31

32 only access their own account and the Eligibility Check transaction. 32

 This window will display the number of pending access requests that you have waiting for approval.")
33 USER DASHBOARD WINDOWS Depending on what level of access you have (Administrator, Standard user, Eligibility only user) there will be different features on your dashboard. Users at the Administrator level will have all four dashboard windows, Pending Access Requests, Registration Approvals, and Blackout NPIs. Users at the Standard or Eligibility only level will be able to access only one of the Dashboard windows, Blackout NPIs. PENDING ACCESS REQUEST (ADMINISTRATORS ONLY) This window will display the number of pending access requests that you have waiting for approval. These are requests for access to NPIs that you administer. 1. If there are requests in the Pending Access Requests window, select Go to User Requests. 2. Select the Pending Access Requests tab. 3. Scroll to the request and select Show Request. 33

34 4. Grant access to all NPIs that have been requested. Use the Change all NPIs to radio buttons along the top to give the same access to all NPIs or use the radio buttons to the right of each individual NPI to customize the access for each NPI. Select Eligibility, Standard, or No Access (Deny Access) for the user. a. Click Save changes. 5. On the Confirmation, verify information and then select Save. A message at the top of the page will be received stating Service Locations (NPIs) successfully updated. REGISTRATION APPROVALS (ADMINISTRATOR ONLY) This window will display the number of pending registration requests that you have waiting for approval. These are requests for first time registrations. 34

35 1. If there are requests in the Registration Approvals window, select Go to User Requests. 2. Select the Registration Approvals tab. 3. Scroll to the requests and select Show Request 4. On this page, you can grant access to all NPIs that have been requested. Use the radio buttons to the right of the NPI to customize the access for each NPI. Select Eligibility, Standard, or No Access (Deny Access) for the user. a. Click Save changes. 35


36 5. On the Confirmation, verify information and then select Save. A message at the top of the page will be received stating User successfully approved. BLACKOUT NPIS This window will display the number of NPIs in Blackout status. There must be an NPI Administrator for each NPI location. If all Administrators for an NPI lose or remove their access to an NPI, the NPI will go into Blackout status. If there is not a user willing or able to become the Administrator, all users under that NPI will lose access to that NPI after 30 days of being in blackout status. 1. If there are NPIs in the Blackout NPIs window, select Go to My Service Locations. 2. When there is not an NPI Administrator you will receive the following message: a. The following Service Locations (NPIs) have a Blackout Status. This means that they don t have an active Administrator on record. If you want to become an Administrator, click on the Accept Role button and provide the appropriate financial information. 3. Scroll to the NPI that is listed as not having an Administrator, select Accept Role if you will assume Administrator responsibility. 36
 Administration, select one of the three options for")
 For NPI Administrators only, below the Dashboard windows, there is a User Search")

37 4. Read and accept the WPS GHA Portal Administrator Role Responsibilities by selecting Accept Role button. 5. On the Confirm Financial Access for Service Location (NPI) Administration, select one of the three options for providing financial data. Once entered, select Confirm. USER SEARCH (ADMINISTRATORS ONLY) For NPI Administrators only, below the Dashboard windows, there is a User Search area. In this section, you will be able to do a search for any users that you administer under your NPI(s). If you know the User Login ID for the user you can enter that, select Go to User Profile, and be taken to their Profile page. You may also select Find More Users to bring up additional options for searching. 37
38 QUICK LINKS On the Dashboard page, there are Quick Links that will take you directly to a function. Your links may vary depending on your access. NEW MESSAGES On the Dashboard page, there is a New Messages section that gives you a quick overview of new messages. You may go directly to the Message Center or open the individual messages by clicking the Case # link. 38
39 My Profile Your Profile page consists of your User Login ID, personal information and the Billing Provider Credentials that you used during registration. There are several Profile Actions that can be performed from the My Profile page. CHANGE MY PASSWORD To change your password at any time (limit of once per 24 hours): 1. Choose My Profile from the left navigation. 2. Select Change My Password. 39
40 3. Enter the current password in the Current Password field. 4. Enter a newly created password in the New Password field. 5. Enter the newly created password again in the Confirm Password field. 6. You may also opt to have the portal auto-generate a password by choosing the Generate Password link. This will auto-fill the password into the required fields. Please remember the password as this will be needed the next time you log in. 7. Select Save my password in the bottom right hand corner. CHANGE SECURITY Q&AS To change your security questions at any time: 1. Choose My Profile from the left navigation 2. Select Change Security Q&As 3. Choose and answer three new questions 4. Select Save Changes 5. After the changes have been saved, a message will be received stating Your security questions have been successfully updated. 40

41 DISABLE MY ACCOUNT To disable your account at any time: 1. Choose My Profile from the left navigation. 2. Select the Disable My Account button 3. On the Disable My Account pop-up box select Disable. Otherwise select Cancel to return to your My Profile page. 4. The page will refresh and display a message indicating the account has been disabled successfully. 41


 section either by scrolling through the NPIs or enter")
42 MY SERVICE LOCATIONS Use this page to view, manage, and modify the Service Locations (NPIs) that you have access to. If Blackout or Pending Locations are available, they will display on this page. You can also request access to a Service Location (NPI) that you do not have access to. Request Access to additional NPI locations with the Request Access button. o The NPI location s current Administrator will receive your request and decide whether to approve and at what level of access, or to deny access altogether. o If there are is no current administrator, you will be prompted to accept the role. Find current NPIs under My Service Locations (NPIs) section either by scrolling through the NPIs or enter the NPI in the Filter box. Modify access if your access is currently at an Administrator level for that NPI Remove the access Select Save Changes when finished. 42

43 Message Center The Message Center is a secured communications channel that allows users to submit confidential inquiries directly to the Provider Contact Center. Examples of inquiries include complex policy questions or claim denials. Inquiries sent via secure message are considered written inquiries and Medicare has up to 45 business days to respond to your inquiry. Responses will be available in the Portal. SEND A SECURE MESSAGE Select the link Message Center on the left-hand navigation bar On the Message Center page, select + New Message 1. Enter the required fields marked with an asterisk (*): Registrant Name Address Service Location NPI that pertains to our inquiry. Provider Transaction Access Number (PTAN) 43
44 Last 5 digits of the Provider Tax Identification Number (TIN/EIN) Telephone Number Select the Type of Question Technical A question or issue that pertains directly to the use or functionality of the WPS GHA Portal. Examples include adding or removing locations, adding or removing users, site navigation, and understanding screen information. Non-Technical A question or issue that does not directly pertain to the WPS GHA Portal. Examples include policy questions or clarification on claim denials. Enter Subject (We suggest a subject that will allow you to easily locate the response in the Portal) Enter your question in the Description area in as much detail as possible to allow for adequate research of your inquiry. You may enter up to 10,000 characters. Include details such as the ICN, date of service, beneficiary information, etc. The Portal is a secure environment, so you are allowed to include PHI/PII in your inquiry. Select Continue Once submitted, a confirmation page will display the details of the inquiry. To make corrections select Cancel or to submit the request select Save. 44

45 Once saved, you will receive a Secure Message Confirmation screen that provides a Case number for the inquiry. o Please keep this Case number for future use or print this page for reference as the case number is needed to go back and view the response. CHECK SECURE MESSAGE STATUS Select the link Message Center from the left navigation Messages can be Sent or Received status. Sent status indicates that a secure message has been sent, but WPS GHA customer service has not yet responded to that message. Received status indicates that a secure message has been submitted and now has Received an answer from WPS GHA customer service. On the Message Center page, select the case number link to view the responses from the Customer Service department. Once you have read the message you can either select Print Message or X out of the page. 45

46 User Administration (Administrators only) As a WPS GHA Portal Administrator, you agree to perform the following activities within WPS GHA Portal. Identity Proofing - the Administrator must verify the identity of all WPS GHA Portal User Account applicants within their NPI using a government issued identification document containing a photograph (e.g., driver license, passport, State ID card, etc.). Registration - New accounts can be created by the NPI Administrator or by the User through the registration process. All new User access must be approved by an NPI Administrator. Requesting Additional NPI Administrators The Administrator is required to request access for additional NPI Administrators through the Secure Message functionality within the WPS GHA Portal. Please submit the following information: Indicate that you would like the user to have the NPI WPS GHA Portal Administrator access. WPS GHA Portal User Login ID (User must have a current ID) User s First and Last Name NPI(s) the user should have Administrative access to Access Requests - the Administrator must approve/deny requests for access to PII/PHI data within their NPI. 46
47 Re-Certification - the Administrator must ensure that all User Accounts under their NPI complete annual re-certification within 358 days. Maintenance - the Administrator is responsible for maintaining user currency within their NPI as it applies to WPS GHA Portal User accounts. Add a new user account for new employee Remove location access for terminated employee. Disabling is not allowed. Adding/removing NPI location access per User Modifying user access level (Standard, Eligibility only, Administrator) Profile updates Password reset Clear Secret Questions and Answers The NPI Administrator is also responsible for completing thorough user review every 90 days to assure all active accounts are in compliance. The NPI Administrator s user review shall include the following steps: Verifying all active user accounts listed for each of the NPI s he/she administers have appropriate Portal role access (Standard or Eligibility Only) and correcting if necessary. Verifying all active user accounts are current employees or members of the NPI organization and that the user should still have access to the WPS GHA Portal. If a user is no longer employed for the associated NPI, disabling the user account or removing the NPI location access immediately. Inactivity - the Administrator must be aware that inactive User Accounts will automatically age off of WPS GHA Portal and become disabled. Once disabled, the User will need a new account to access the WPS GHA Portal. New accounts can be created by the NPI Administrator or by the User through the registration process. All new User access must be approved by an NPI Administrator. User Administration Please use this tool to find users that have access to the Service Locations (NPIs) that you administer, or to add a new user to one or more of the Service Locations (NPIs) that you administer. Click User Administration from the left navigation to begin, then use the drop-down and choose Find Users to locate current users or Add New User to add a new user for the first time. 47

48 ADD NEW USER As an NPI Administrator, you may want to create new user accounts for employees or contractors without making them go through the registration process themselves. 1. Choose User Administration from the left navigation, then choose Add New User. 2. Create a user login ID for the new user. 3. Enter billing provider credentials. 4. Enter the new user s personal information. Ensure you have confirmed their identity. 48
49 5. Grant access to specific NPI Practice Locations, or all of them at once. When finished, click Save Changes to complete the process or Cancel to end the process without saving. The new user will receive an with a temporary password to access the portal. They will need to change the password upon first login. FIND AND ADMINISTER CURRENT USERS Administrators are responsible for the users under their account. This includes updating the user s account information, resetting passwords as well as secret questions and answers, and removing access when someone no longer needs it. 1. Choose User Administration from the left navigation panel. Use the dropdown to find users that match search criteria, have access to a specific service location, or all users you administer. Then choose Find Users. If you choose users that match search criteria 49
50 or users that have access to a specific service location, you will be presented with a popup where you must also enter the criteria and/or choose the service location. 2. Once selections have been made, a list of users you administer that fit the criteria will be presented. Click on their User ID to land on the Edit User page. From here you can choose Reset Password, or Reset Q&As to perform those actions. A confirmation popup will appear confirming that you actually want to perform the action. You may also choose User Service Locations (NPIs) to see and edit a list of the locations this user has access to. 3. From the Edit User page, you may also edit details of the user s personal information; for example, if the user had a change in name, work address, phone number, or . Choose Save Changes to complete the edits or Cancel to cancel the changes. 50

51 My Transactions Eligibility ELIGIBILITY CHECK Accessible by all portal users, this page allows providers to check for eligibility data for the beneficiaries they represent. This section is used to verify, not to determine, Medicare eligibility. The Portal provides beneficiary eligibility information 24 hours a day, 7 days a week. The eligibility data is considered accurate at the time of the request. Questions regarding eligibility/benefit date for Medicare Part A and Part B should be directed to the appropriate Medicare Administrative Contractor (MAC). Eligibility/benefit questions about Medicare Advantage (MA) and Medicare Secondary Payer (MSP) needs to be directed to the appropriate plan. Eligibility/benefit questions concerning Qualified Medicare Beneficiary (QMB) eligibility needs to be directed to the State online Medicaid eligibility system. Also reference Medicaid Identification cards and documents issued by the state proving QMB eligibility. To perform an Eligibility search, follow the below steps: Select Eligibility Check from the left side navigation bar of the account dashboard. Choose the NPI Service Location (and region, if applicable) o Enter Patient s Medicare Number o Last Name o Suffix (if applicable) AND one of the following o First Name OR o Date of Birth o Date of Service (optional) To submit the request, select Check Eligibility. If you would like to start over, select Clear Form. 51
52 If any element is not correct, users will receive an error message in red at the top of the page explaining which element is incorrect. If all elements are correct, users will be presented with the Eligibility Summary page that offers high-level eligibility information. Additional details are displayed in boxed categories located at the top of the page. If additional information is available the category box will be blue, if no additional information is available, the category box will be grey. Category box order will vary depending on availability. If you need to print this information, click on the blue Print button, it will print a summary of the information for all eligibility tabs at one time. 52

53 53
54 54
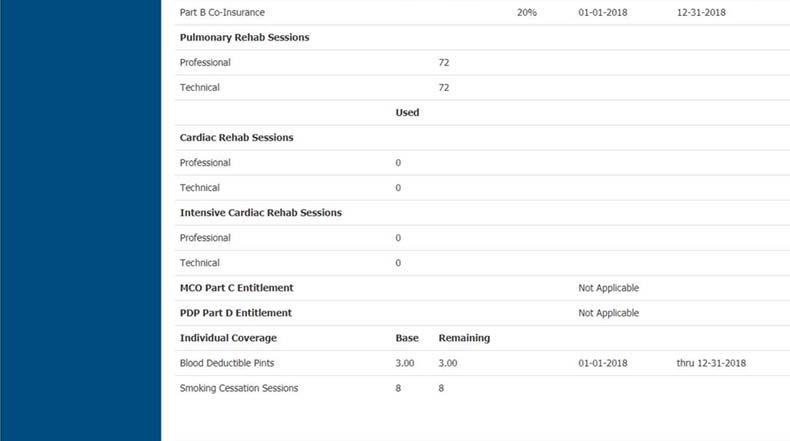
55 AVAILABLE ELIGIBILITY INFORMATION Summary o Date of Death o Part A/B Entitlement Dates o Previous Part A/B Entitlement Date o Yearly Part A/B Benefit Information o Part A/B Ineligible Dates o Part A Lifetime Reserve Days o Part A Lifetime Reserve Co-Payment Amount o Part A Lifetime Psychiatric Days o Part A Hospital Days o Part A Hospital Co-Payment Day and Amount o Part A Skilled Nursing Facility (SNF) Days o Part A Skilled Nursing Facility (SNF) Co-Payment Days and Amount o Part B Pulmonary Rehabilitation Sessions o Part B Cardiac Rehabilitation Sessions o Part B Intensive Cardiac Rehabilitation Sessions o Blood Deductibles o Smoking Cessation Sessions Part A Deductible o Part A Individual Hospital Spell Dates and Co-Payments o Part A SNF Individual Spell Dates and Co-Payments Part B Deductible o Coverage Year o Deductible Base o Deductible Remaining Medicare Secondary Payer (MSP) o Enrollment and Termination Dates o Type Code and Description 55
56 o o Name Address Preventative Service Information o Procedure Code o Professional/Technical Modifier o Next Eligible Date Preventive services information displays current information only. No inference about historical eligibility can be made based on the returned next eligible dates. The next eligible date is the date on which the Medicare Beneficiary is/was eligible to receive services specified by the Health Care Procedure Coding System (HCPCS) based on the HETS 270/271 application. If the technical and professional components of a HCPCS code have different next eligible dates, then the HETS 270/271 application will return separate dates for each. 1. Annual Depression Screening includes code G Annual Wellness Visit (AWV) includes codes G0438 and G Cardiovascular Disease Screening (CARD) includes codes 80061, 82465, 83718, and Colorectal Cancer Screening (COLO) includes codes G0104, G0105, G0106, G0120 and G Computed Tomography Bone Mineral Density Study includes code Diabetes Screening Tests (DIAB) includes codes 82947, 82950, and Dual Energy X-ray Absorptiometry (DXA) Bone Density Study; axial skeleton includes code DXA Bone Density Study; appendicular skeleton includes code Fecal Occult Blood Test (FOBT) includes codes G0328 and Glaucoma Screening (GLAU) includes codes G0117 and G Intensive Behavioral Counseling for Obesity includes code G Intensive Behavioral Therapy (IBT) for Cardiovascular Disease (CVD) includes code G Initial Preventive Physical Examination (IPPE) includes codes G0402, G0403, G0404, and G Pneumococcal Vaccine (PPV) includes codes 90669, and Prostate Cancer Screening (PROS) includes codes G0102 and G Screening and High Intensive Behavioral Counseling (HIBC) to prevent STIs includes code G Screening Mammography (MAMM) includes codes G0202 and Screening Pap Test (PAPT) includes codes Q0091, P3000, G0123, G0143, G0144, G0145, G0147, and G Screening Pelvic Exam (PCBE) includes code G Single Energy X-ray Study includes code G Ultrasound Bone Density Measurement and Interpretation includes code Ultrasound Screening for Abdominal Aortic Aneurysm (AAA) includes code
57 (effective 01/01/2017). Prescription Drug Plan (PDP) Information o Enrollment and Termination Dates o Contract and Plan o Name o Address o Telephone Number o Web Address (if available) Therapy Cap Information o Occupational Therapy Cap o Year o Dollar Amount Used o Physical/Speech Therapy Cap o Year o Dollar Amount Used Managed Care Organization (MCO/HMO) Information (also known as Medicare Part C or Medicare Advantage ) o Enrollment and Termination Dates o Contract and Plan o Name o Address o Telephone Number o Web Address (if available) o Enrollment Plan Type o Bill Option Code End Stage Renal Disease (ESRD) Information 57
58 o o o Effective Date Method Code and Description Transplant Hospital Discharge Date Home Health Information o Home Health Periods Start and End Dates o Date of Earliest and Latest Billing o Provider NPI o Contractor Number and Name Hospice Information o Hospice Periods Start and End Dates o Provider NPI o Revocation Code o Total number of Hospice Occurrences QMB Information o QMB Enrollment Period A Qualified Medicare Beneficiary (QMB) is eligible for both Medicare and Medicaid. Medicare providers and suppliers may not bill people in the QMB program for Medicare deductibles, coinsurance, or copays, but state Medicaid programs may pay for those costs. Under some circumstances, federal law lets states limit how much they pay providers for Medicare costsharing. Even when that's the case, people in the QMB program have no legal obligation to pay Medicare providers for Medicare Part A or Part B cost-sharing. Look at the patient s Medicare, Medicaid or QMB card to see if the patient is enrolled in a QBM. MDPP Information o MDPP Effective Date o MDPP Termination Date o Inactive Coverage 58
59 o Active Coverage Medicare Diabetes Prevention Program (MDPP) a structured intervention with the goal of preventing type 2 diabetes in individuals with an indication of pre-diabetes. The MDPP tab displays when a beneficiary is enrolled in MDPP within the date of service range you requested on your eligibility search. If you are an MDPP provider, only limited eligibility containing the Part B eligibility date on the Summary page, the MCO, MSP and ESRD tabs will display any data (if applicable). Please note: The Effective Date for Active Coverage only displays the starting date of service that was submitted on the eligibility request. It is NOT the actual start date for the beneficiary s MDPP. If the beneficiary s MDPP enrollment is not active, it will display the starting date of service that was submitted on the eligibility request on the Inactive Coverage line. Medicare Beneficiary Identifier (MBI) Lookup This tool is to be used only when a Medicare patient doesn t or can t give you his/her Medicare Beneficiary Identifier (MBI). The patient s first name, last name, date of birth, and social security number are required to get a unique match. The MBI is confidential so you ll have to protect it as Personally Identifiable Information and use it only for Medicare-related business. On the MBI Lookup Search page, select the dropdown arrow for the Service Location (NPI). Find and select your NPI and click Continue. If you have a single NPI, the program will default the selection. Enter the patient s Social Security Number (SSN) Enter the patient s First Name Enter the patient s Last Name Enter the patient s Suffix (if there is one) Enter the patient s date of birth and Click Submit Possible messages that you will see in this search feature: If the patient is deceased and has been for more than 13 months in the past, you will see Date of Death xx/xx/xxxx exceeds timely claim filing requirement. If the patient has not been mailed a new Medicare card with the MBI you will see New Medicare card with MBI not yet mailed. 59


60 If an MBI is found with the information submitted you will be taken to the MBI Results page with the patient s new MBI. You can perform additional actions on this page: Click on the Search button. This will take you back to the MBI Lookup Search page with all previous entered data still populated in the fields. Click on the New Lookup button. This will take you back to the MBI Lookup Search page with all previous data cleared from the fields. Click Check Eligibility and this will take you to the patient s Eligibility Summary page for the current date. (For further eligibility information please see that section of the manual). Print the MBI Results page by clicking the Print button. 60

61 Prior Authorization (J8 Part A Michigan only) SEARCH PRIOR AUTHORIZATION RECORDS On the My Dashboard homepage select Prior Authorization on the left-hand navigation pane. On the Prior Authorization Request page select the Search Prior Authorization Records button. You can sort the columns by Confirmation Number, Facility NPI, Submitted By, Submitted Date, Patient s Medicare Number, UTN, and Status by clicking on the up and down arrows next to the heading (1) or by entering information into the Filter field (2). View the documentation by clicking on the Confirmation Number link. 61


62 Once the record populates: o The 2 tabs on this screen are Current Record and Record History. Current Record will show the current record. Record History will show the history if there is any to show. You can print the screen that populates by clicking the Print button. 62


63 INITIAL REQUEST Providers can still submit prior authorization requests for services performed on or before 2/28/18, however, providers should not submit requests for services on or after 3/1/18. Any requests received for dates of service on or after 3/1/18 will be rejected. 63
64 J8 Michigan Part A providers can submit a request for an initial or subsequent prior authorization for Hyperbaric Oxygen (HBO) Services in the Portal. Once the determination has been made, you will also receive the response in the WPS GHA Portal. To submit an Initial Prior-Authorization Request: Select Prior Authorization from the left-hand navigation bar. Next, select the Initial Request tab. You will be brought to the Prior Authorization Request page. Click in the appropriate Prior Authorization Type radial button o If there is only one type available, it will be auto selected Complete the remaining required information o In the Expedited Request field select the Yes or No radial button. o If No, continue to next step. If Yes, enter the Reason for the Expedited Request in the text box. o Select the NPI that you are requesting the prior authorization for in the Service Location field. o Enter the corresponding PTAN for the NPI you selected. o In the Beneficiary Information section enter the following: Beneficiary s First and Last Name Beneficiary s Medicare Number Date of Birth Gender 64
65 o In the Requester Information section enter the following: Requester s First and Last Name Requester s Title Requester Confirmation Requester s Phone Number (extension optional) o In the Rendering Provider Information section enter the following: At least one Rendering Provider is required (attending provider optional) Provider s First and Last Name NPI Address There are two address fields, only one is required City, State, and Zip Code (four-digit extension optional) 65
66 o In the Additional Information section enter the following if not auto populated: Number of Sessions (30-minute intervals requested per treatment) Number of HBO Treatments Type of Bill (13x auto-populates) HCPCS (G0277 auto-populates) Pricing Modifiers (optional) Select the appropriate ICD Indicator radial button ICD Diagnosis Codes (at least one is required) 66
67 o Under the Documentation section follow the steps below: Click Browse Find the file to upload in the Choose File to Upload box Highlight file Click Open The file should now show in the File box Click Continue The following document types can be uploaded via the Portal: o.docx,.xlsx,.gif,.jpg,.jpeg,.tif,.tiff,.pdf,.zip o File sizes cannot exceed 15 MB (15,360 KB). o If a document is uploaded for a single request, all documents are required to be in a single.zip file that does not exceed 60 files. 67
68 Once Continue is selected, you will be brought back to the Prior Authorization Verification page to verify all of the information is correct. o If it is not, click Back to return to the previous page. There is a Back button at the bottom of the page for each step. Continue to click the button until you return to the step that needs the correction. NOTE: You will always have to re-attach documentation whenever you go back from the verification page. If all information is correct on the verification page, click Submit. You will be brought to the Prior Authorization Confirmation page. o This page will display the submission status of the Prior Authorization and the Confirmation Number for the transaction. o Please make note of this number for future reference, if needed. o You also have the option to print this page by clicking Print. Select Finish and you will be taken back to My Dashboard. SUBSEQUENT REQUEST On the My Dashboard Homepage select Prior Authorization from the left-hand navigation bar. On the Prior Authorization Request page select the Subsequent Request tab. A new set of fields will display for you to help us locate the original Prior Authorization you submitted. Enter either the Confirmation Number (from a previous Prior Authorization submission that is in Completed status), or the Unique Tracking Number (UTN), NPI, PTAN, or Patient Medicare Number. o Make sure any alpha characters are in all CAPS o Click Search If you did not have the information but you wish to still submit a Prior Authorization request, click the I don t have the above information button. 68
69 o This will bring you to the Prior Authorization Request page as we are unable to link it to the original request. Go to the Initial Request heading and follow the instructions. If you have the information, enter, then select Continue. o The system will look for a match to the information you provided. o o o If a match is found, you will be brought to the Prior Authorization Search page. Select the Confirmation Number link, the Prior Authorization Record page will be displayed. This page will show the Status and Decision of the Prior Authorization and will show the Current Record s data. The Record History TAB can be selected to review other data (if it exists) for this record. To continue submitting the subsequent prior authorization, select the Resubmit Request button. NOTE: If the Prior Authorization Decision was Affirmed you cannot submit a subsequent request for this record. Claims (Part B Paper Claims Submitters Only) REGISTER FOR ONLINE CLAIM ENTRY On the My Dashboard homepage select Claims from the left-hand navigation bar. On the Claims page select the Claim Entry Registration button. The Claim Entry Registration page will open in a new tab, containing instructions on how to complete the EDI self-service registration will open. o Make sure to read all of the instructions on the form. Submitter ID, Submitter name field and selecting Professional Claim Inbound on the registration page is critical. o Click on the Register here for online claim submission link. A tab will open loading the Provider EDI Self-Registration page. Enter your address and select Medicare as your division. Then finish entering the rest of the information on this page as required and remember to follow the instructions Complete the information on this page, selecting Medicare as your Division and remembering the special instructions in the Claim Entry Registration tab. The EDI department will be in touch with you via to obtain your WPS GHA Portal User ID, so they can update your account for claim entry submission. NOTE: Please allow up to 30 calendar days for the EDI Department to receive, review and setup the NPI you listed for claim entry with your account. NOTE: If at any time your Portal User Login ID ever becomes disabled and you registered for a new Portal User Login ID, you will need to re-enroll any NPIs again for online claim entry as described above so that you will again be able to submit claims online. 69
70 SUBMIT NEW CLAIM NOTE: Please note that currently the Claim Entry functionality does not accept Medigap, MSP, Hospice (place of service 34), or Purchased Service claims. Any fields denoted with an asterisk (*) are required fields. All others are optional. On the My Dashboard Homepage select Claims from the left-hand navigation bar. On the Claims page select the Submit New Claim button 70
. Enter the Patient's Medicare Number as shown on the patient's Medicare card. Enter the patient's name exactly as shown on the patient's Medicare card.")
71 Select the NPI Service Location from the list that the claim will be filed under. Enter the Federal Tax ID Number (if the provider bills under Social Security Number, enter SSN). Select the appropriate bullet (SSN or EIN). Enter the Patient's Medicare Number as shown on the patient's Medicare card. Enter the patient's name exactly as shown on the patient's Medicare card. First Name, Middle Initial (if any), and Last name. Enter the patient's 8-digit Birth Date. Select the bullet to the left of the correct gender for the patient. 71
72 Enter the patient's full mailing address including street information, City, State, and ZIP Code. Accept Assignment - Select the bullet to the left of the correct assignment to indicate whether or not the Provider accepts assignment. If you know the specific specialty you are billing for, select I am billing charges for from the expanded drop-down list. If none apply, select None of the following apply to my claim. Hospitalization Date - If billing a Place of Service (21, 51, or 61 only) enter the current service Admission and Discharge dates. 72
73 Service Facility Location: o Enter Location Name o NPI (if available) o Address of facility where services were performed. Referring Provider or Other Source Name: o Enter the Name of the referring or ordering physician if the service or item was ordered or referred by a physician. o When a claim involves multiple referring and/or ordering physicians, a separate claim form shall be used for each ordering/referring physician. o Enter the NPI of the referring/ordering physician listed in the Referring Provider or Other Source Name field. All Physicians who order services or refer Medicare beneficiaries must report this data. Enter any necessary narrative comment, you may include up to 80 characters maximum. Enter the Investigation Device Exception # when an investigational device is used in an FDA approved clinical trial. Patient s Account # - Enter the patient's account number assigned by the provider of service or supplier accounting system. Patient Paid Amount $ - Enter the total amount the patient paid towards this claim on the covered services only. 73
74 Diagnosis or Nature of Illness or Injury: o Select the bullet to the left of the ICD version that applies 9 or 10. o In field 1, enter the primary diagnosis code that applies to the claim. o Any additional diagnosis codes for this claim should be entered in the additional 2-12 fields in priority order of importance. Do not enter any decimal points. Number of Lines: o Select the number of lines from the dropdown box. Date of Service: o Enter from date and to date(s) of service for the first line item. Procedure: 74
75 o Enter the 5-digit procedure (HCPCS or CPT) code for this line item. o When reporting an unlisted procedure code or a Not Otherwise Classified (NOC) code, the NOC Description field is required. Place of Service: o Enter the 2-digit Place of Service code. Modifier: o Enter any applicable 2-character procedure code modifier in field 1. o Any additional applicable modifiers should be entered in field 2, then 3, then 4. Diagnosis Pointer: o This is a Diagnosis Pointer field that corresponds to the previous Diagnosis section. o Enter '1' if the first diagnosis code you entered is the main diagnosis for this line item. o Enter '2' if the second diagnosis code you entered is the main diagnosis for this line item, etc. o Do not enter 01, 02, 03, etc. Charges: o Enter the dollar amount you are billing for this line item. Is this anesthesia? o Check the bullet to the left of 'Yes' if this is an anesthesia service. o Check the bullet to the left of 'No' if this is not an anesthesia service. Units: o (If No was selected for Is this anesthesia question) o Enter the number of 'units' or 'like services' for this line item. Units cannot be zero. Minutes: o (If Yes was selected for Is this anesthesia question) o Enter the total number of minutes for that line item. Minutes cannot be zero Rendering Provider: o Enter the First Name, Last Name, and NPI of the provider that performed the service, if different from the billing provider. NOC Description: o If you reported an unlisted procedure code or a not otherwise classified (NOC) code as the procedure, you will need to enter the description of service into this field. It can be up to 80 characters. If you have additional service lines to enter and you did not select from the Number of Lines dropdown box, select in the Add new line button. o This will expand the screen to include Claim Line 2 information to be entered. o You will be able to enter up to 12 claim service lines. o If you selected to add additional lines but need to delete one, a red Delete Line button will appear on every line starting at line 2. 75
76 76

77 When all claim lines have been entered, select Review. o Edit and Submit buttons will now appear. If errors exist a message will display at the top of the Claims page indicating what needs to be corrected. You will need to correct the errors prior to submitting the claim. o If you find errors, select Edit to make changes. o If you are satisfied the claim is entered correctly select Submit If no errors are presented review your claim. If you selected Submit a message will display at the top of the New Claim screen with a confirmation number. Once completed you have the option to print a copy of the confirmation screen by selecting Print. To begin entering another claim select Start New Claim to be taken back to a blank Claim Entry Screen. o It is recommended that you print this confirmation page for your records. o If for any reason a claim is rejected from the Medicare front end system, the receipt number will be referenced in the educational contact to you. 77
78 SPECIALTY CLAIMS FIELDS Ambulance Services Pick up Location Address: Enter the No., Street, City, State and Zip Code at the location the patient was picked up. Drop-off Location Name: Enter the Name of the facility at the location the patient was dropped off. Address: Enter the No., Street, City, State and Zip Code at the location the patient was dropped off. Reason for Transport: Select the bullet left to the appropriate reason for the transport. Only one may be chosen. When selecting the reason for transport, you must also include the Transport Distance in Miles field. Purpose of Round Trip: Free form description explaining the reason for round trip. Stretcher Purpose Description: Free form description explaining the purpose of stretcher. Transport Distance in Miles: Enter the distance of the transport in miles. When entering information in this field, you must also select the reason for transport. Condition of patient: Select the bullet left to the appropriate condition of patient. You may select more than one condition. 78
79 Chiropractic Services Initial Treatment Date: Enter the Initial Treatment Date (initiation of the course of treatment). Global Surgery Services Assumed Care Date: Enter the assumed care date for global surgery when providers share postoperative care. Relinquished Care Date: Enter the relinquished care date for global surgery when providers share postoperative care. Inpatient Services Admit Date: Enter the date the patient was admitted. Discharge Date: Enter the date the patient was discharged if known. Laboratory Services CLIA#: Enter the 10-digit Clinical Laboratory Improvement Act (CLIA) certification number for laboratory services billed by an entity performing CLIA covered procedures. Referring CLIA#: Required for any laboratory that referred tests to another laboratory covered by the CLIA Act that is billed. Enter the 10-digit CLIA certification number for the referral laboratory. 79
80 Occupational/Physical Therapy Services Date Last Seen: Enter the Date Last Seen by the supervising provider. Supervising Physician Name: Enter the First Name and Last Name of the patient s attending physician. Supervising Physician NPI: Enter the NPI of the patient's attending physician. NOTE: Name and NPI are optional. If you enter one of these three fields, you must enter all three. Mammography Services Mammography Certification #: Enter the 6-digit FDA approved Mammography Certification number. Routine Foot Care Date Last Seen: Enter the date the patient was last seen by their attending physician. Supervising Physician Name: Enter the First Name and Last Name of the patient's attending physician. Supervising Physician NPI: Enter the NPI of the patient's attending physician. 80
 that you are requesting claim status for from the dropdown. 3.")
81 Claim Inquiry CLAIM STATUS - PART A AND PART B 1. Choose the Claim Inquiry link on the left-hand navigation panel. 2. Choose the NPI Service Location (and region, if applicable) that you are requesting claim status for from the dropdown. 3. Enter the following: o Patient s Medicare Number o First Initial o Last Name o Start and End date of service 4. Select Search 5. If a claim is on file for the information you entered, you will be brought to the Claim Results page, which gives high level claim information. Scroll to the bottom of the page and select the link under the Claim Number to obtain claim details. Alternatively, and if applicable, you can begin the process of submitting medical documentation (MR), a reopening (CER) or an overpayment (OCA), by clicking the appropriate box under the Actions heading. 81
 will appear at the top of the screen. 8.")
82 6. To return to the main Claims screen select Refine Search (this will retain all previously entered data) or select New Search (this will clear the form and you can begin a new claim status search). 7. If no claims are on file based on the information provided the message No claims found for search criteria in (region selected) will appear at the top of the screen. 8. If a Part A claim has been archived, you must call the Provider Contact Center (the appropriate number to call will be displayed). CLAIM DETAILS The claim details page provides a more in-depth view of how a claim processed. If there are underlined lines similar to links, you may hover or click on them with your mouse to show more information. The following information can be found on this page, if applicable: Status (i.e. Adjusted/Replaced, Processed, Finalized/Paid, In Process, Denied, Cancelled) Date Received Processed Date Check/Electronic Funds Transfer (EFT) Number Check Date Allowed Amount Payment Amount American National Standards Institute (ANSI) Group Codes 82
83 Claim Adjustment Reason Codes Remittance Advice Remark Codes Remittance Advice (RA Date) Pay Codes Rendering NPI Rendering Provider name Claim line details Document Control Number (DCN) Type of Bill Status/Location Remark Codes Reason Codes Discharge Status Blood Deductible After you are finished viewing the claim details you can select the Back to Claims Results link to return to the previous Claim Results page. 83


84 In the Claim Details table, information under the grey bar on the left half of the section includes information received from the provider. The information on the right half of the section under the blue bar, is information generated by WPS GHA and reflects information included on the remittance advice, as well as a More Info button. Information available under the More Info button (If applicable to the claim line): Rendering Provider Rendering NPI 84

85 ANSI Reason and Remarks codes Related Claim Link Provides a link to a claim that may be duplicative of your claim. Patient Eligibility Information Enhanced denial information is available for some denials. It will provide the information available for all claim lines with a More Info button, and will also include if available: Additional information explaining the denial reason Tips and suggestions if you believe the claim was not submitted correctly Links to other web pages or web sites if additional information is available Claim actions such as Resubmit Claim (New) or Reopen (Clerical Error) if appropriate (Claim actions may not be available for all denials) 85

, where enhanced denial information is available, eligibility can be verified")
86 For claims denied due to a policy, if the enhanced denial information is available, there will be a link to the policy housed at the CMS website. For claims denied because of an eligibility issue (MSP, MCO/HMO, Hospice, etc.), where enhanced denial information is available, eligibility can be verified from the enhanced denial 86
 Download Remit (to obtain remittance) Reopen Clerical Error (to perform a reopening) Report Overpayment")
87 script. CLAIM ACTIONS On the Claim Details page, there is a section of buttons or links of available actions you can take on a claim. Not all actions will be available on every claim. These actions include: Add Documentation (Medical Documentation for ADR requests) Download Remit (to obtain remittance) Reopen Clerical Error (to perform a reopening) Report Overpayment (Overpayments) Request Redetermination (Appeal) Check Patient s Eligibility (Eligibility) Click the applicable button to start the process. See the specific manual section for details and step by step instructions on each of these items. Clerical Error Reopening (CER) SUBMITTING A CLERICAL ERROR REOPENING (CER) Clerical Error Reopen (CER) submission enables Providers to enter revised claim information that will be transmitted through the WPS GHA Portal to the Multi-Carrier System (MCS). The CER feature will allow for changes to specific claim information on a denied claim and immediate notification that the claim adjustment has been accepted into MCS. If you have one of the following situations, request a CER through the Portal. If the situation does not fall under one of these options a redetermination will need to be submitted: Change Rendering Provider National Provider Identifier (NPI) Add/Change/Delete Diagnosis Code(s) Change Date(s) of Service (DOS) Change Procedure Code Add/Change/Delete Claim Modifier(s) Change Billed Amount Related to Fee Schedule Change Change Billed Amount NOT Related to Fee Schedule Change Change Units of Service Billed Additionally, the Portal can only accept one component change per claim. Example: If you need to change the date of service and the billed amount, this cannot be done through the Portal. Claims can only be adjusted once via the Portal. Example: If a date of service change is submitted through the Portal, you cannot adjust the claim a second time in the Portal when the claim finalizes. 87


88 To submit a CER please follow the below steps: 1. From the My Dashboard homepage select the link for Claim Inquiry. 2. Follow steps 1 6 in the Claim Status Part A and Part B instructions to get to the claim details page. 3. On the claim details page, under Claim Actions, if your claim is eligible for a reopening the Reopen (Clerical Error) button will be in dark blue. Select Reopen (Clerical Error) to proceed. 4. On the Edit Claim - Clerical Error Reopening screen select the reason for your reopening. 5. Based on the reason for the reopening, additional applicable fields will display for the correction(s) entry. Once correction(s) have been entered, select the Review button on the bottom of the screen. 6. The Edit Claim Clerical Error Reopening screen will display a message stating Your information has been successfully reviewed, to finalize your adjustment request, click the Submit button. o To finalize select Submit o To edit your former entry, select Edit to make changes and select Review o again. To cancel the request entirely select the Cancel button, this will return you to the Claims page. 7. On the Clerical Error Reopening Confirmation screen, please take note of the new Claim Number which you will need to search for claim status or to use the Appeal Status 88

89 feature. This Confirmation page containing your new Claim Number can be printed for your records by selecting Print. COMMON ERROR MESSAGES AND THEIR CAUSES Claim processed more than 1 year ago. Reopening not allowed unless good cause can be established. Please see IOM Chapter 34 Section to determine if good cause exists. If so submit request in writing with good cause documentation. o Cause: Initial claim processed more than one year ago. Claim has been previously adjusted, please submit a redetermination request. o Cause: Claim has been previously adjusted. Place of Service is not valid for Procedure code - reopening not allowed for this change. o Cause: The place of service does not match the procedure code billed. Since the information would cause the claim to deny again, a reopening cannot be completed. Due to complex nature of the requested change this request cannot be handled as a reopening. Please submit redetermination request. o Cause: If the information you are trying to add is a 22,55,62,66, GY, or AT modifier. In these situations, we must review additional documentation to process the claim. For this reason, the request is too complex, and you will need to resubmit a redetermination request with the appropriate documentation. Requested diagnosis code is invalid, please recheck diagnosis code. No reopening allowed for invalid diagnosis code. o Cause: An invalid diagnosis code will cause the adjustment to deny. Due to the complex nature of this claim, you must submit a redetermination request. o Cause: The claim is for a CPT procedure code ending with a 99. These codes are generally not otherwise classified. A claim determination for these procedure codes requires medical review of documentation. This cannot be done as a reopening since we must review the medical documentation to determine coverage and payment. 89
 or a claim is still in pending status.")

90 Claim cannot be reopened because there is no initial determination for this claim. Please submit a new corrected claim or wait until the claim in process has finalized. o Cause: The initial claim denied with no appeal rights (unprocessable denial) or a claim is still in pending status. If the claim denied with the MA- 130 message, you need to submit a corrected claim. You can use the claim status feature to determine if there is a claim pending which is preventing you from requesting a reopening. Overpayments (OCA) OVERPAYMENT CLAIM ADJUSTMENTS (OCA) Medicare Part B providers can submit Medicare Secondary Payer (MSP) and Non-MSP overpayment adjustments via the Portal. Please follow the below steps: Follow steps 1 6 in the Claim Status Part A and Part B instructions. On the claims page under Claim Actions if your claim is eligible for an overpayment request the $ Report Overpayment button will be in dark blue. Select $ Report Overpayment to proceed. o You may also select the OCA button under Actions. An Overpayment Claim Adjustment box will display. Select the Non-MSP or the MSP reason for the overpayment from the dropdown box. 90


91 Based on your selection additional applicable fields will display. For this example, Services not Rendered was selected. o To proceed with the request, check the Deny This Claim Line check box o Select Review o To cancel your request, select Cancel to be taken back the Claim Details. 91


92 A message will display on the page indicating to select Submit to finalize the adjustment request. Select Submit if you are ready to finalize the overpayment request. An Overpayment Claim Confirmation screen will display providing you with your new Claim Number. You can print this page for your records. NOTE: Before an adjustment for HMO/MCO, SNF, Home Health, Hospice, and all of the MSP can be completed, the Portal will check Medicare s files for a valid matching record. 92
 status.")
93 Medical Documentation 1. Choose the Medical Documentation link from the left navigation pane. A. Choose Search Documentation to search for previously uploaded medical documentation. See the Search Documentation instructions below. B. Choose the Prepayment Review tab to upload medical documentation for claims that have an Additional Documentation Required (ADR) status. See the Prepayment Review Tab instructions below. C. Choose the Post-payment Review tab to respond to a probe. See the Postpayment Review Tab instructions below. D. There is also an option to submit an ADR response through Claims Inquiry. This is the most accurate method. See the ADR Response using Claim Inquiry instructions below. SEARCH DOCUMENTATION 1. After choosing Medical Documentation from the left navigation pane, choose Search Documentation. If there is documentation available, the medical documentation search results page will load with a list. A. Use the My Submissions Only button to show only documents you have submitted. B. Use the Show entries dropdown to increase the results per page. C. Sort using the arrows next to the headings. D. Filter using the Filter box. E. Use the page buttons at the bottom to move between pages. F. Click on a confirmation number link to pull up that specific documentation 93

94 information. 2. After clicking on the confirmation number link, the Medical Documentation Detail page will load. This pop-up will include the details of the documentation, as well as links to the files themselves. A. Use the Show entries dropdown to increase the results per page. B. Use the Filter box to filter the results. C. Click on the file name link to open the specific document. D. Use the Print button to print the document for your records or the Ok button to return to the search results page. 94
, enter the Provider Number (PTAN), Patient s Medicare Number, Claim Number, and the Start and End Date of Service.")
95 ADR RESPONSE 1. After choosing Medical Documentation from the left navigation pane, choose the Prepayment Review tab. Select the NPI Service Location (and region, if applicable), enter the Provider Number (PTAN), Patient s Medicare Number, Claim Number, and the Start and End Date of Service. Choose a file to upload with the Browse button. Choose Submit to move to the next step, or Clear Form to start over. 95

96 2. After successfully submitting, you will be brought to the Medical Documentation Detail page. This page will include: A. Submission information section, which will include a confirmation number. B. Information provided section, which will include provided details. C. Attached documentation section, which will include any submitted documentation. D. Use the Show entries dropdown to show additional entries per page. E. Use the Filter box to filter results. F. Use the Print button to print for your records, select Ok to finish and return to the previous screen. 96
97 ADR RESPONSE USING CLAIM INQUIRY 1. The most accurate way to submit an ADR response is using the Claim Inquiry option. After choosing Medical Documentation from the left navigation, from the ADR Response tab, choose the Claims Inquiry link located in the paragraph below the ADR Response/Probe Response tabs, or simply click the Claim Inquiry link from the left navigation. 97
98 2. Find the claim in question. See Claim Inquiry instructions for full instructions on claim inquiry. 3. Choose the appropriate claim by choosing the claim number link from the claim results to get to the claim details page. 4. On the details page under Claim Actions, look for the Add Documentation button. If an ADR was requested/available, it will be clickable and darker blue. If it is not available/an ADR was not requested, it will not be clickable and lighter blue. 5. A pop-up will appear allowing you to add the necessary files. Choose Browse to add the file, then choose Review to continue, or Cancel to end the process. 98

99 6. The confirmation pop-up box will appear where you can review the information for accuracy and completeness. Choose Submit to finalize, Edit to make changes, or Cancel to end the process. 7. A final submission confirmation will pop-up with an informational message and a confirmation number. Take note of the confirmation number or print for your records using the Print button. Use the Close button when finished to return to the claim detail page. 99

100 100
, enter the Provider Number (PTAN), Probe Number, Patient s Medicare Number, Claim Number (ICN/DCN), and the Start and End Date of Service.")
101 POST-PAYMENT REVIEW TAB 1. After choosing Medical Documentation from the left navigation pane, choose the Postpayment Review tab. Choose the NPI Service Location (and region, if applicable), enter the Provider Number (PTAN), Probe Number, Patient s Medicare Number, Claim Number (ICN/DCN), and the Start and End Date of Service. Choose a file to upload with the Browse button. Choose Save and Submit another File if there is another file to submit for the same probe. Choose Submit and Finish once all claim numbers for the probe have been completed. Choose Clear Form to clear the current form. 2. After successfully submitting, you will be brought to the Medical Documentation Detail page. This page will include: A. Submission information section, which will include a confirmation number. B. Information provided section, including provided details such as probe number. C. Attached documentation section, which will include any submitted documentation. D. Use the Show entries dropdown to show additional entries per page. E. Use the Filter box to filter results. F. Use the Print button to print for your records, select Ok to finish and return to the previous screen. 101

102 102

103 Remittance Advice There are two ways to obtain a duplicate remittance using the portal: 1. To access a full remittance, use the Remittance Search option from the left navigation panel; follow the How to obtain a full duplicate remittance from Remittance Search instructions below. 2. To retrieve a remittance from a specific claim, use the Claim Inquiry option from the left navigation panel; follow the Obtain Remittance from Claim Search instructions below. NOTE: The remittance obtained will be a full remittance, regardless of how it is accessed. OBTAIN A FULL DUPLICATE REMITTANCE FROM REMITTANCE SEARCH 1. Choose Remittance Advice from the left navigation panel. Choose the NPI service location (and region, if applicable). Duplicates are available up to 13 months from the remittance advice date. Only remittances of 250 pages or less are available through the portal. Incentive/bonus pay remittances are unavailable through the portal. 103
, check/eft number, or ICN/DCN. C. Lastly you can search by patient information. D.")
104 2. There are multiple ways to search for a duplicate remittance: A. To obtain all remittances from the last 30 days, use the checkbox at the top of the criteria groups. B. You can also search using remittance date or date range, remittance number (Part A only), check/eft number, or ICN/DCN. C. Lastly you can search by patient information. D. Once criteria are entered, select Search Remittances to perform search or Clear Form to clear all data and start over. 3. The remittance results, if any, will be displayed. Information such as region, check/eft #, amount, advice number (if applicable), advice date, and actions will be shown. A. Choose Refine Search to refine the current search or New Search to start a new search. B. Use the Show entries dropdown to expand the number of entries viewable onscreen. C. Use the Filter box to filter results. 104

105 D. The arrows next to the headings can be used to sort the fields. E. Choose the View Remittance link to view a copy of the remittance advice. Note: The browser must not block pop-ups for the website, or you may have issues loading the remittance. If that cannot be changed, and you experience issues, right-click on the View Remit link and select Open in New Tab or Open in New Browser. OBTAIN REMITTANCE FROM CLAIM SEARCH 1. Use the claim inquiry link from the left-hand navigation panel to find the claim (See claim status instructions for full instructions on claim inquiry). 2. Choose the appropriate claim by choosing the claim number link from the claim results to get to the claim details page. 3. On the details page under Claim Actions, look for the Download Remit or No Remittance Available button. If one is available, select it to view the remittance. If one is not available, it will not be clickable and will say No Remittance Available. NOTE: The remittance retrieved will be the full remittance. How to Find an Offset 1. Follow the above steps to find a duplicate remittance 105

106 Drop the first two digits of the FCN and enter that number in the ICN/DCN field. The WPS GHA portal will display all remits associated to that ICN. Medicare erefunds There are two erefund options: 1. Search for previously submitted erefunds. See the Searching for previous erefunds instructions below. 2. Submit a request to electronically withdraw funds from your account for any balance owed to Medicare. See the Submitting an Electronic Refund instructions below. SEARCHING FOR PREVIOUS EREFUNDS 1. Choose Medicare erefunds from the left navigation pane, then choose Search Entries near the top. Select the NPI (and region if applicable) and enter the PTAN and Tax ID into the appropriate fields. 106
107 2. Enter at least one of the search criteria items (Date Range, Demand Letter Number, Accounts Receivable Number, Refund Amount, TCN (Tracking Control Number), or Beneficiary s information). Choose Search Entries to begin search or Clear Form to start over. 107
 Number, Patient First/Last Name, Service Date, Claim Number, and Patient Medicare Number. You can: A.")

108 3. The Search Medicare erefunds results page will load, showing any results that matched the search. The list will always display the TCN, Refund Date, Refund Amount, and Status. If applicable, it will also display the Demand Letter, AR (Accounts Receivable) Number, Patient First/Last Name, Service Date, Claim Number, and Patient Medicare Number. You can: A. Choose New Search to perform a new search, Refine Search to refine the current search, or Submit New Medicare erefund to submit a new erefund. B. Choose Export to Excel to export the list to Excel for download. C. Use the Show entries dropdown to expand the number of viewable entries onscreen. D. Use the arrows next to the categories to sort. E. Use the Filter box to filter. F. Click directly on a TCN number link in the list to see additional details. The Medicare erefund Details pop-up will display and provide the information about that specific erefund. Select Close to exit the pop-up. G. Use the page numbers/ Next page button to move between pages SUBMITTING AN ELECTRONIC REFUND 1. Choose Medicare erefunds from the left navigation panel. If you prefer to mail the refund request, use the appropriate link to obtain a hardcopy form. To continue with the electronic process, choose the NPI (and region if applicable), and enter the matching PTAN and Tax ID, then choose Continue to go to the next step or Cancel to exit the 108


109 erefund process. 2. Fill in the Bank Withdrawal Information with the full routing number, full account number, and refund amount. You must use the same account information that is currently on file with Medicare, from the most recent form CMS-588. To protect your information, the system will lock users out of the erefund option for 24 hours if 3 incorrect entries are made. Choose Continue to go onto the next step, or Cancel to exit the erefund process. 3. Indicate whether or not Medicare requested this refund. If yes, continue to step A. If no, continue to step B. 109
110 A. If yes was chosen, indicate if the refund is MSP (Medicare is Secondary Payer) or non-msp. Next, enter the demand letter number or the accounts receivable number, and/or any additional comments if applicable. Choose Continue to move to the Confirmation stage or Cancel to exit the erefund process. B. If no was chosen, indicate reason for refund, enter patient and claim data, indicate if the refund is MSP or non-msp, use the dropdown to give specific MSP and non-msp reasons, and add any additional comments if applicable. Choose Continue to go onto the Confirmation stage or Cancel to exit the erefund process. 110
111 C. If continue was chosen, a pop-up confirmation window will appear. Please review all details for accuracy. Choose Save to accept, Modify to go back and make changes/additions/deletions, or Cancel to exit the erefund process. 111
 SUBMITTING A PART B REDETERMINATION 1.")
112 4. If saved successfully, a confirmation message will appear that includes the Payment TCN and Refund Receipt information and will also include a summary of the refund. Choose the New erefund Entry button to create another erefund, or the Print button to print confirmation for your records. Appeal Search (Redeterminations) SUBMITTING A PART B REDETERMINATION 1. To submit a redetermination, a specific claim must be used. Use the claim inquiry link from the left-hand navigation panel to find the claim (See claim status instructions for full instructions on claim inquiry). 2. After identifying the claim and clicking on the claim number to view the claim details, there will be additional actions listed under Claim Actions. Choose Request 112
.")

113 Redetermination to begin the submittal process. 3. The Request Redetermination File an Appeal pop-up form appears. The top of the form displays the claim information, to help ensure this is the correct claim. 4. You will be required to complete all fields that have an asterisk (*). Please indicate if the request will involve an overpayment. All procedure codes that are on the claim will be listed at the top of the box. Select all procedure codes that apply. Fill in all required and/or applicable fields, including reason(s) for disagreement with determination, reason(s) for filing late, if applicable, and any additional information Medicare should consider. 113
114 5. Fill in requester s information, including name, relationship to beneficiary, address, and phone number. 6. If there is evidence, records, or documentation to submit, select the Yes radio button, then click the Browse button. If there is nothing additional to submit, select the No 114
, and if you are uploading multiple document files for a single request, we require all documents in a single.zip file not to exceed 20 files. 8.")

115 radio button. 7. The following document types can be uploaded via the WPS GHA Portal:.docx,.xlsx,.pdf,.jpg,.jpeg,.gif,.tif,.tiff,.zip. File sizes cannot exceed 15 MB (15,360 KB), and if you are uploading multiple document files for a single request, we require all documents in a single.zip file not to exceed 20 files. 8. To attach documentation, follow the below steps: Click on the Browse button In the Choose File to Upload box, find the file to upload Highlight document Click Open The Upload box will disappear and the WPS GHA Portal will show the file you selected in the File box 9. Read the electronic signature agreement and select either the I Agree or I Do Not Accept radio button. After accepting, select the Review button to move on to the review/confirmation stage. By not accepting, the redetermination request will not be able to be submitted. Otherwise select the Cancel button to cancel and return to the claim detail page, or the Clear button to clear the form and start over. 115


116 10. Review all redetermination details. After reviewing, select Submit to finalize the redetermination, select Edit to return to the form to make changes, or select Cancel to cancel the redetermination and return to the claim detail page. 11. If Submit was selected, the Request Redetermination Confirmation page will load and also provide a tracking number. Make a note of the number for your records or, if you wish to have a printed copy of the redetermination, press the Print button. To close the Confirmation pop up box, select the Close button and the claim detail page will reload. APPEAL STATUS 1. Use the Appeal Status search to locate the status of previously submitted Part A or Part B redeterminations, regardless of how they were submitted. Status information is normally available within 15 days of the received date. Click Appeals from the left-hand navigation bar. 116
117 2. On the Appeal Search page, two tabs will be available. Choose the Appeal Status tab. 117
 OR date of service, not both.")
118 3. Select the Service Location (NPI), add the patient s Medicare number, first initial of patient s first name, and patient s full last name. 4. For Part A claims, enter only a valid date of service range. For Part B claims, enter EITHER a valid claim number (ICN) OR date of service, not both. Then click Search. 118
 or sorted by clicking the small arrows next to the headings (2).")
 drop down to change the number of results shown. 6. For Part B only, after clicking the claim number for more information, the Part B Appeal Status page is displayed.")
119 5. The Appeals Results page appears and will display the details that were entered as well as any claim results found. The results can be filtered by beginning to type in the Filter box (1) or sorted by clicking the small arrows next to the headings (2). For Part A, the results page includes all status information available. For Part B only, click on the claim number link to view the appeal status (3). Use the show entries (4) drop down to change the number of results shown. 6. For Part B only, after clicking the claim number for more information, the Part B Appeal Status page is displayed. The details will again be displayed, with any appeal status information listed below that, including correspondence control number (CCN), adjustment claim number if applicable, correspondence type, receipt date, status, decision date, and decision. This is also sortable and filterable. 119

120 PART B APPEAL RESPONSES 1. Use the Part B Appeal Responses search to locate status and responses to Part B appeals that were submitted directly through the WPS GHA portal. To begin, click Appeals from the left-hand navigation bar. 120
121 2. On the Appeal Search page, two tabs will be available. Choose the Part B Appeal tab. 3. The Part B Appeal Responses page includes informational links and a Reconsideration form link above, and two ways to search below. You can search by entering a valid CCN, ICN/DCN, or Tracking number. Alternatively, you can search with details from the appeal. Click Search to move to the next step or Clear Form to clear all data from form. 121
 or filtered by using the filter box (2).")
122 4. After submitting, you will be brought to the Appeal Results (Part B Appeal) page. The details entered will be at the top, along with results, if any, at the bottom. The results will include Tracking Number, Subject, ICN, Status, and Submit Date. The list can be sorted using the arrows next to the headings (1) or filtered by using the filter box (2). Click on the tracking number or subject link (3) to view the Appeal Response Detail pop-up page. Use the show entries (4) drop down to change the number of results shown. 122


123 5. The Appeal Response Detail page is made up of 3 sections: I. The Appeal Response Detail section, which includes details of the claim and appeal, along with the current status of the appeal. 123
Part B. NGSConnex User Guide. https:/www.ngsconnex.com. Visit our YouTube Channel to view all of our videos! https://www.youtube.com/user/ngsmedicare
 NGSConnex User Guide Part B This guide provides information for our Part B providers on the different options available within our self-service portal, NGSConnex. https:/www.ngsconnex.com Visit our YouTube
MyRRMed User Manual. User Manual. Rev. October Rev. October
 Rev. October 2017 Rev. October 2017 1 Contents Table of Figures... 3 Revision History... 4 Glossary and Acronyms... 5 1.0 General Information... 6 1.1 What is MyRRMed?... 6 1.2 Contacting Technical Support...
Colorado Access Provider Portal Guide
 Colorado Access Provider Portal Guide coaccess.com 1 CONTENTS INTRODUCTION... 3 SYSTEM REQUIREMENTS... 3 NEW PROVIDER REGISTRATION... 4 Provider Information... 4 New Provider Registration... 4 New Registration...
NOTE: Should you have landed here as a result of a search engine (or other) link, be advised that these files contain material that is copyrighted by
 link, be advised that these files contain material that is copyrighted by") NOTE: Should you have landed here as a result of a search engine (or other) link, be advised that these files contain material that is copyrighted by the American Medical Association. You are forbidden
NOTE: Should you have landed here as a result of a search engine (or other) link, be advised that these files contain material that is copyrighted by the American Medical Association. You are forbidden
User Manual Rev. February 2019
 Rev. February 2019 Contents Table of Figures... 7 Revision History... 9 Glossary and Acronyms... 11 1.0 General Information... 12 1.1 What is?... 12 1.2 How much does cost?... 13 1.3 Who can participate
Provider Portal User Guide
 Provider Portal User Guide Updated: January 1, 2019 Table of Contents Introduction... 1 How to Register for the Provider Portal... 3 Manage Your Profile... 5 User Administration... 8 Authorizations & Referrals...
GUIDE REGISTRATION. Overview. Contents CGS ADMINISTRATORS, LLC DME MAC JURISDICTION B & JURISDICTION C PAGE 1
 CGS ADMINISTRATORS, LLC my REGISTRATION GUIDE DME MAC JURISDICTION B & JURISDICTION C Contents Overview 1 SECTION 1: Registration 2 Roles & Definitions 2 Designated Approver Selection and Approval 2 How
User Manual Rev. November 2017
 Rev. November 2017 Contents Table of Figures... 7 Revision History... 9 Glossary and Acronyms... 10 1.0 General Information... 11 1.1 What is eservices?... 11 1.2 How much does eservices cost?... 12 1.3
Assister Portal Manual Updated
 Assister Portal Manual Updated 04-01-2017 Contents MNsure Assister Portal Purpose and Benefits... 3 Features of the Assister Portal... 3 MNsure Roles and Responsibilities... 5 Assister Roles and Responsibilities...
Link 1500 / Online Claims Entry User Guide
 Link 1500 / Online Claims Entry User Guide ABILITY Network Inc Copyright and Trademark Copyright Copyright 2016 ABILITY Network Inc. All Rights Reserved. All text, images, and graphics, and other materials
CAQH Solutions TM EnrollHub TM Provider User Guide Chapter 3 - Create & Manage Enrollments. Table of Contents
 CAQH Solutions TM EnrollHub TM Provider User Guide Chapter 3 - Create & Manage Enrollments Table of Contents 3 CREATE & MANAGE EFT ENROLLMENTS 2 3.1 OVERVIEW OF THE EFT ENROLLMENT PROCESS 3 3.2 ADD PROVIDER
Trading Partner Account (TPA) Registration and Maintenance User Guide. for. State of Idaho MMIS
 Registration and Maintenance User Guide. for. State of Idaho MMIS") Trading Partner Account (TPA) Registration and Maintenance User Guide for State of Idaho MMIS Date of Publication: 3/8/2018 Document Number: RF019 Version: 5.0 This document and information contains proprietary
Trading Partner Account (TPA) Registration and Maintenance User Guide for State of Idaho MMIS Date of Publication: 3/8/2018 Document Number: RF019 Version: 5.0 This document and information contains proprietary
TransUnion Healthcare Solutions Portal User Guide
 TransUnion Healthcare Solutions Portal User Guide HSP.transunion.com February 16, 2018 Version 2.30 2017 TransUnion LLC All Rights Reserved No part of this publication may be reproduced or distributed
Provider Portal User Guide. For the Provider Portal External Use
 Provider Portal User Guide For the Provider Portal External Use IT Department Issued January 2017 mynexus 2017. All rights reserved. Version 1.4 Revised 07122017 Contents Getting Started with the Portal...
CAQH ProView. Dentist Practice Manager Module User Guide
 CAQH ProView Dentist Practice Manager Module User Guide Table of Contents Chapter 1: Introduction... 1 CAQH ProView Overview... 1 System Security... 2 Chapter 2: Registration... 3 Existing Practice Managers...
Railroad Retirement Board Specialty Medicare Administrative Contractor RRB - SMAC
 MACtoberfest Disclaimer The information provided in this presentation was current as of October 23, 2018. Any changes or new information superseding the information in this presentation are provided in
Change Healthcare CLAIMS Provider Information Form *This form is to ensure accuracy in updating the appropriate account
 PAYER ID: SUBMITTER ID: 1 Provider Organization Practice/ Facility Name Change Healthcare CLAIMS Provider Information Form *This form is to ensure accuracy in updating the appropriate account Provider
Aerial iexchange Users Guide
 Aerial iexchange Users Guide 2014.1 How to Run the Util\\\ \user Disclaimer How to reach us Copyright Information contained in this document is subject to change without notice and does not present a commitment
Agency User Manual. Version 2.0
 Agency User Manual Version 2.0 October 2015 Copyright Information 2015 by. All rights reserved. This document is the copyrighted property of the. It should not be duplicated, used, or disclosed in whole
Table of Contents. Page 2 of 49
 Web Portal Quick Reference Guide www.dc-medicaid.com Revised: 12/11/2017 Table of Contents Accessing the Web Portal... 3 Web Account Registration... 4 Inquiry Options... 6 Searching for Ordering/Referring
Provider Portal 3.0 Manual. Health Axis 3.0 Provider Portal User Guide
 Provider Portal 3.0 Manual Health Axis 3.0 Provider Portal User Guide Table of Contents Provider Portal 3.0... 4 How to Access the Provider Portal... 4 Login credentials:... 4 How to Request Access to
Table of Contents. Overview of the TEA Login Application Features Roles in Obtaining Application Access Approval Process...
 TEAL Help Table of Contents Overview of the TEA Login Application... 7 Features... 7 Roles in Obtaining Application Access... 7 Approval Process... 8 Processing an Application Request... 9 The Process
Physician Quality Reporting System (PQRS) Physician Portal
 Physician Portal") The American College of Radiology Physician Quality Reporting System (PQRS) Physician Portal User Guide November 15, 2016 American College of Radiology 1891 Preston White Drive Reston, VA 20191-4397 Copyright
The American College of Radiology Physician Quality Reporting System (PQRS) Physician Portal User Guide November 15, 2016 American College of Radiology 1891 Preston White Drive Reston, VA 20191-4397 Copyright
NetDMR Internal and External User s Guide Version 1
 NetDMR Internal and External User s Guide Version 1 October 17, 2008 CONTENTS i Page 1.0 Introduction to NetDMR Help...1 1.1. Background...1 2.0 Getting Started...2 2.1. Before You Begin...2 2.2. System
Medicare Enrollment Application Submission Options
 The Basics of Internet-based Provider Enrollment, Chain and Ownership System (PECOS) for Durable Medical Equipment, Prosthetics, Orthotics, and Supplies (DMEPOS) Suppliers Beginning October 4, 2010, the
CONTENTS. SETUP SECURITY ENHANCEMENTS Existing User New User (Enrolled by Employer or Self)... 18
... 18") FSA EMPLOYEE WEBSITE GUIDE CONTENTS BROWSER COMPATIBILITY... 2 ONLINE ENROLLMENT... 3 Online Enrollment Process... 3 Online Enrollment Option for Existing Employees... 11 REGISTERING YOUR ACCOUNT FOR ONLINE
FSA EMPLOYEE WEBSITE GUIDE CONTENTS BROWSER COMPATIBILITY... 2 ONLINE ENROLLMENT... 3 Online Enrollment Process... 3 Online Enrollment Option for Existing Employees... 11 REGISTERING YOUR ACCOUNT FOR ONLINE
Quality Payment Program
 Guide for Obtaining a New EIDM Account with a Physician Quality and Value Programs (Registration for the CMS Web Interface and/or CAHPS for MIPS Survey) Role I. Introduction This guide is for users who
Secure Access Manager User Guide December 2017
 Secure Access Manager User Guide December 2017 Copyright 2017 Exostar, LLC All rights reserved. 1 INTRODUCTION... 3 SUMMARY... 3 BASIC FUNCTIONS... 3 LOGIN TO YOUR SAM ACCOUNT... 3 How to Activate your
Attorney Registration System User Guide
 Attorney Registration System User Guide June 1, 2018 Administrative Office of Pennsylvania Courts http://ujsportal.pacourts.us Contents Section 1: Introduction... 1 Section 2: UJS Web Portal Access Accounts...
Provider Portal Administration Guide
 Provider Portal Administration Guide Revision Date: 7/22/2011 Table of Contents Table of Contents Introduction... 3 User Accounts Overview... 3 Tier Structure... 3 Security Roles... 4 Guide Conventions...
NetDMR External User s Guide Version 1
 NetDMR External User s Guide Version 1 October 17, 2008 CONTENTS i Page 1.0 Introduction to NetDMR Help...1 1.1. Background...1 2.0 Getting Started...2 2.1. Before You Begin...2 2.2. System Requirements...2
EDI ENROLLMENT AGREEMENT INSTRUCTIONS
 EDI ENROLLMENT AGREEMENT INSTRUCTIONS The Railroad EDI Enrollment Form (commonly referred to as the EDI Agreement) should be submitted when enrolling for electronic billing. It should be reviewed and signed
Meritain Connect User Manual. for Employees. 1 Meritain Connect User Guide for Employees
 Meritain Connect User Manual for Employees 1 Meritain Connect User Guide for Employees Contents Introduction... 4 Accessing Meritain Connect... 5 Logging In... 5 Forgot Password... 6 Registration Process...
CMS Enterprise Portal User Manual
 Centers for Medicare & Medicaid Services CMS expedited Life Cycle (XLC) 11/13/2017 Document Number: Enterprise_Portal_User_Manual_v6 Table of Contents Table of Contents 1. Introduction... 1 2. Overview...
CHAP LinQ User Guide. CHAP IT Department Community Health Accreditation Partner 1275 K Street NW Suite 800 Washington DC Version 1.
 2015 CHAP LinQ User Guide CHAP IT Department Community Health Accreditation Partner 1275 K Street NW Suite 800 Washington DC 2005 Version 1.1 CHAP LINQ USER GUIDE - OCTOBER 2015 0 Table of Contents ABOUT
IDRP Portal User Guide for Providers and Plans
 IDRP Portal User Guide for Providers and Plans Version 1.0, September 2017 Controlled electronic version prevails over printed copy of this document. Provided by MAXIMUS Federal Services, Folsom, CA. Work
Provider TouCHPoint Training Guide
 Provider TouCHPoint Training Guide Feb 1, 2018 Contents Registration 3 Registration 3 Adding additional users 7 Eligibility 9 Locating a StarKids Service Coordinator 12 Claims/Code Lookup 13 Claims 13
PROVIDER WEBSITE SITE ADMINISTRATOR GUIDE » PATIENT INQUIRY» CLAIM CENTER» FIND A DOCTOR» CLAIMS EDITING SYSTEM (CES)
") PROVIDER WEBSITE SITE ADMINISTRATOR GUIDE» PATIENT INQUIRY» CLAIM CENTER» FIND A DOCTOR» CLAIMS EDITING SYSTEM (CES) 2018 WPS Health Plan, Inc. 1 All rights reserved. JO7048 28898-085-1801 ADMINISTRATIVE
PROVIDER WEBSITE SITE ADMINISTRATOR GUIDE» PATIENT INQUIRY» CLAIM CENTER» FIND A DOCTOR» CLAIMS EDITING SYSTEM (CES) 2018 WPS Health Plan, Inc. 1 All rights reserved. JO7048 28898-085-1801 ADMINISTRATIVE
How to Utilize the Provider Portal
 How to Utilize the Provider Portal TO REGISTER: please go to: www.memberbenefitsonline.com New Provider registration: Please click on the Sign Up. This is required for all new Users. This is a one time
mycgs User Manual Version 4.3 Contents
 Contents mycgs Overview 2 What Is mycgs? 2 Who Can Use mycgs? 2 Logging In to mycgs 3 mycgs Interface Overview 4 Switching Between Jurisdictions 4 Change NPI/PTAN 5 HICN & MBI 5 Locked Menus 6 Beneficiary
Revision History. Document Version. Date Name Comments /26/2017 Training and Development Initial Creation
 Pharmaceutical Assistance Contract for the Elderly (PACE)/ Pharmaceutical Assistance Contract for the Elderly Needs Enhancement Tier (PACENET)Web Provider Enrollment/Provider Management Corporate User
Provider Secure Portal User Manual
 Provider Secure Portal User Manual Copyright 2011 Centene Corporation. All rights reserved. Operational Training 2 August 2011 Table of Contents Provider Secure Portal... 5 Registration... 6 Provider -
Xifin Client Portal User s Guide Version 1.0. January 2018
 Xifin Client Portal User s Guide Version 1.0 January 2018 Table of Contents Getting Started... 3 Contacting Allina Health Laboratory Billing... 3 Xifin Client Portal Information... 3 Logging in to Xifin
How to Navigate the AHIP Medicare Course
 How to Navigate the AHIP Medicare Course This document is for reference only. It is a guide provided to help answer any questions you may have about the AHIP site and its coursework. It is provided as
Exostar Identity Access Platform (SAM) User Guide July 2018
 User Guide July 2018") Exostar Identity Access Platform (SAM) User Guide July 2018 Copyright 2018 Exostar, LLC All rights reserved. 1 Version Impacts Date Owner Identity and Access Management Email Verification (Email OTP) July
Exostar Identity Access Platform (SAM) User Guide July 2018 Copyright 2018 Exostar, LLC All rights reserved. 1 Version Impacts Date Owner Identity and Access Management Email Verification (Email OTP) July
Supplier Reference Guide (QRG) Table of Contents
 Table of Contents") Supplier Onboarding Supplier Reference Guide (QRG) Table of Contents Supplier Checklist... 2 New Supplier Onboarding Steps... 3 Introduction... 4 Registration... 6 Certification... 16 Acceptance... 35
Supplier Onboarding Supplier Reference Guide (QRG) Table of Contents Supplier Checklist... 2 New Supplier Onboarding Steps... 3 Introduction... 4 Registration... 6 Certification... 16 Acceptance... 35
Center for Medicare Management (CM) Clinical Lab Fee Schedule (CLFS) CLFS User Manual
 Clinical Lab Fee Schedule (CLFS) CLFS User Manual") Centers for Medicare & Medicaid Services Center for Medicare Management (CM) 7500 Security Blvd Baltimore, MD 21244-1850 Center for Medicare Management (CM) Clinical Lab Fee Schedule (CLFS) Version: 3.0
Centers for Medicare & Medicaid Services Center for Medicare Management (CM) 7500 Security Blvd Baltimore, MD 21244-1850 Center for Medicare Management (CM) Clinical Lab Fee Schedule (CLFS) Version: 3.0
Railroad Medicare Electronic Data Interchange Application
 Electronic Data Interchange Application Action Requested: Add New EDI Provider(s) Change/Update Submitter Information Apply for New Submitter ID Apply for New Receiver ID Delete Date: Submitter ID: ERN
Universal Health Record Patient Access v17.3 User Guide
 Allscripts FollowMyHealth Universal Health Record Patient Access v17.3 User Guide Copyright 2017 Allscripts Healthcare, LLC and/or its affiliates. All Rights Reserved. www.allscripts.com Published Date:
Exostar Identity Access Platform (SAM) User Guide September 2018
 User Guide September 2018") Exostar Identity Access Platform (SAM) User Guide September 2018 Copyright 2018 Exostar, LLC All rights reserved. 1 INTRODUCTION... 4 SUMMARY... 4 Exostar IAM Platform (SAM) Organization and User Types...
Exostar Identity Access Platform (SAM) User Guide September 2018 Copyright 2018 Exostar, LLC All rights reserved. 1 INTRODUCTION... 4 SUMMARY... 4 Exostar IAM Platform (SAM) Organization and User Types...
Change Healthcare CLAIMS Provider Information Form *This form is to ensure accuracy in updating the appropriate account
 PAYER ID: SUBMITTER ID: 1 Provider Organization Practice/ Facility Name Change Healthcare CLAIMS Provider Information Form *This form is to ensure accuracy in updating the appropriate account Provider
EZ Net Authorization Inquiry
 EZ Net Authorization Inquiry 1. Go to portal.humboldtipa.com You will see a login screen that should look similar to this: 2. Go to the Login area and type in the Username and Password you were provided
MyHealthRecord. Patient User Guide. Top of Page Table of Contents
 MyHealthRecord Patient User Guide 1 P a g e Information Technology Department MyHealthRecord Patient User Guide Copyright 2014 Family Health Centers of San Diego, Inc. 823 Gateway Center Way San Diego,
TEXAS MEDICARE (TRAILBLAZERS) CHANGE FORM MR085
 CHANGE FORM MR085") TEXAS MEDICARE (TRAILBLAZERS) CHANGE FORM MR085 HOW LONG DOES PRE-ENROLLMENT TAKE? Standard processing time is 20 days WHAT PROVIDER NUMBERS DO I USE? Six digit Medicare legacy provider ID NPI Number WHAT
TEXAS MEDICARE (TRAILBLAZERS) CHANGE FORM MR085 HOW LONG DOES PRE-ENROLLMENT TAKE? Standard processing time is 20 days WHAT PROVIDER NUMBERS DO I USE? Six digit Medicare legacy provider ID NPI Number WHAT
Welcome to ProviderNet. ProviderNet Molina Registration Instructions Revised: January 2015
 Welcome to ProviderNet ProviderNet Molina Registration Instructions Revised: January 2015 1 Introduction Alegeus Technologies is pleased to provide the following registration instructions for the ProviderNet
Table of Contents 1. ABOUT THE GIS PANGEA SYSTEM 5 2. HOME DASHBOARD OVERVIEW MANAGER DASHBOARD OVERVIEW 66
 Table of Contents 1. ABOUT THE GIS PANGEA SYSTEM 5 PANGEA SYSTEM REQUIREMENTS 5 PANGEA MOBILE COMPATIBILITY 6 LOGGING IN TO PANGEA 6 MANAGING USER ACCOUNT SECURITY AND DELEGATE INFORMATION 13 ABOUT SESSION
BBP Admin Participant Portal. Simplify your healthcare finances with convenient, online access to your tax-advantaged benefit account
 BBP Admin Participant Portal Simplify your healthcare finances with convenient, online access to your tax-advantaged benefit account 1 BBP Admin Participant Portal Contents Getting started... 2 Registration...
mycoresource.com Member User Guide
 mycoresource.com Member User Guide January 2017 i Table of Contents Portal Overview... 1 Create Account - Member... 2 Sign In... 8 Forgot Password or Username... 10 Home Page... 13 View My Expenses...
A Fiscal Intermediary/Medicare Administrative Contractor (FI/MAC) can only have one PS&R Role and only one STAR role for the same MAC.
 can only have one PS&R Role and only one STAR role for the same MAC.") PS&R/STAR Backup Security Official, PS&R/STAR Admin and PS&R/STAR User Registration for Fiscal Intermediary/Medicare Administrative Contractor (FI/MAC) PS&R/STAR Backup Security Official, PS&R/STAR Admin
PS&R/STAR Backup Security Official, PS&R/STAR Admin and PS&R/STAR User Registration for Fiscal Intermediary/Medicare Administrative Contractor (FI/MAC) PS&R/STAR Backup Security Official, PS&R/STAR Admin
LHC GROUP HCHB PROVIDER LINK PHYSICIAN WEB PORTAL
 LHC GROUP HCHB PROVIDER LINK PHYSICIAN WEB PORTAL LHC Group 6/27/2011 2 Table of Contents WELCOME TO PROVIDER LINK... 3 Login... 4 HOW TO ACCESS THE PHYSICIAN PORTAL WEB SITE... 4 Home Page... 4 Order
Benefit Tracker. User Manual
 Benefit Tracker User Manual 2017 www.modahealth.com Revised 10/20/2017 Table of Contents Introduction Page 3 Benefit Tracker Overview Page 3 Security and Password Protection Page 3 Passwords Page 4 Getting
How to Navigate the AHIP Medicare Course. Subject Page #
 How to Navigate the AHIP Medicare Course Table of Contents Subject Page # Introduction 2 AHIP Registration Process 3 AHIP Login Process 8 Course Parts 14 Final Exam 17 Certificate and Transmit Score to
MEDICARE IDAHO PRE ENROLLMENT INSTRUCTIONS MR003
 MEDICARE IDAHO PRE ENROLLMENT INSTRUCTIONS MR003 HOW LONG DOES PRE ENROLLMENT TAKE? Standard Processing time is 3 4 weeks WHERE SHOULD I SEND THE FORMS? Fax the form to Office Ally at 360 896 2151, or;
NextGen Patient Portal. User Guide.
 2.4.3 NextGen Patient Portal User Guide www.nextgen.com Copyright 2014-2017 QSI Management, LLC. All Rights Reserved. The registered trademarks listed at http://www.qsii.com/legal_notices.shtml are the
Your NetCare Provider Website
 Your NetCare Provider Website Your NetCare Provider Website The NetCare Provider Website offers Providers a user-friendly web experience, including account information and various other tools in a secure
Oracle Banking Digital Experience
 Oracle Banking Digital Experience Checking Account Originations User Manual Release 18.2.0.0.0 Part No. E97823-01 June 2018 Checkings Account Originations User Manual June 2018 Oracle Financial Services
icare s Provider Portal Guide
 icare s Provider Portal Guide 2 CONTENTS New Provider Registration... 4 New Registration...5 Login Page 9 Sign In 9 Forget Your Password...10 Provider Home Page 12 Track Request 12 Contact Us.. 14 Provider
Regions OnePassSM USER GUIDE. It s time to expect more. Regions Bank Member FDIC Revised
 Regions OnePassSM USER GUIDE Regions Bank Member FDIC Revised 110614 It s time to expect more. Regions OnePass User Guide Table of Contents Section I. OnePass Basics 3 What Is OnePass? 3 Minimum Browser
Mobile Banking Frequently Asked Questions
 Mobile Banking Frequently Asked Questions What types of Mobile Banking does Midwest BankCentre offer? We offer three types of Mobile Banking: Mobile Apps allows you to easily connect to Midwest BankCentre
eenroll Member User Guide
 eenroll Member User Guide 2013 Table of Contents Accessing the System... 3 Logging In - HR Administrator Provides Credentials... 3 Resetting Your Account... 4 Changing Your Password... 7 Making First-
Nebraska Provider Screening and Enrollment New Group Member New Group Member Profile
 Nebraska Provider Screening and Enrollment New Group Member New Group Member Profile The steps below will guide you through filling out or updating a Group Member Profile. All applications must be submitted
Electronic Payments & Statements (EPS) Frequently Asked Questions (FAQs)
 Frequently Asked Questions (FAQs)") Electronic Payments & Statements (EPS) Frequently Asked Questions (FAQs) As of August 25, 2014, your PAF reimbursements can be made by direct deposit. How do I enroll for direct deposit? You can enroll
Electronic Payments & Statements (EPS) Frequently Asked Questions (FAQs) As of August 25, 2014, your PAF reimbursements can be made by direct deposit. How do I enroll for direct deposit? You can enroll
Register for a HCQIS Access Roles and Profile (HARP) Account
 Account") Register for a HCQIS Access Roles and Profile (HARP) Account Table of Contents Introduction Register for a HARP Account: Instructions and Screenshots Navigate to HARP HARP Account Registration o o o o
Register for a HCQIS Access Roles and Profile (HARP) Account Table of Contents Introduction Register for a HARP Account: Instructions and Screenshots Navigate to HARP HARP Account Registration o o o o
Provider Portal User Guide
 November 2, 2017 Table of Contents 1 Login to Provider Portal...6 1.1 Login Page... 6 1.1.1 "Click here to register" link... 7 1.1.1.1 "Providers click here" button (Provider Self-Registration)... 8 1.1.2
A Message From Your MAC
 A Message From Your MAC Presented for Iowa HFMA/AAHAM 6 th Annual Payer Panel November 15, 2017 wpsgha.litmos.com Disclaimer This program was designed for informational purposes only. The current Medicare
Managed Access Gateway. User Guide
 Managed Access Gateway User Guide Version 2.2 Exostar, LLC November 3, 2011 Table of Contents Table of Contents... ii Purpose... 1 Log-in to your MAG Account... 2 Additional MAG Login Options... 2 First
Affinity Provider Portal Training Manual
 Training Manual Login This page enables a user to either login and/or register if he/she is not already a regstered user (ie. Providers and Staff users). The following are the functionalities which can
How to Navigate the AHIP Medicare Course
 How to Navigate the AHIP Medicare Course This document is for reference only. It is a guide provided to help answer any questions you may have about the AHIP site and its coursework. It is provided as
PS&R Security Official Registration
 PS&R Security Official Registration PS&R Security Official Registration The following walk-thru explains how a User registers as a Security Official for their organization to gain access to the PS&R application.
(EHR) Incentive Program
 Incentive Program") REGISTRATION USER GUIDE For Eligible Professionals Medicare Electronic Health Record (EHR) Incentive Program JULY 2012 (07.02.12 ver8) CONTENTS Step 1...Getting started 3 Step 2... Login 5 Step 3...Welcome
REGISTRATION USER GUIDE For Eligible Professionals Medicare Electronic Health Record (EHR) Incentive Program JULY 2012 (07.02.12 ver8) CONTENTS Step 1...Getting started 3 Step 2... Login 5 Step 3...Welcome
JURISDICTION 11 EDI CONTRACT INSTRUCTIONS
 JURISDICTION 11 EDI CONTRACT INSTRUCTIONS Submit the completed form to: ABILITY Network, ATTN: Enrollment FAX: 888.837.2232 EMAIL: setup@abilitynetwork.com INSTRUCTIONS Refer to these instructions as you
mycgs User Manual Version Contents
 Contents mycgs Overview 2 What Is mycgs? 2 Who Can Use mycgs? 2 Logging In to mycgs 3 mycgs Interface Overview 4 Switching Between Jurisdictions 4 Change NPI/PTAN 4 Locked Menus 5 Beneficiary Information
Provider User Guides
 Provider User Guides Table of Contents What's New... 1 Overview of Changes:... 1 User Interface Changes... 2 Data Model Changes... 2 First Time Logging In... 5 SmartCare Basics... 9 Open a Client... 13
Patient Portal User Guide The Patient s Guide to Using the Portal
 2014 Patient Portal User Guide The Patient s Guide to Using the Portal Table of Contents: What is the Patient Portal?...3 Enrolling in the Patient Portal.......... 4-19 A. Enrollment Option #1: First-Time
MEDICARE Texas (TRAILBLAZERS) PRE-ENROLLMENT INSTRUCTIONS 00900
 PRE-ENROLLMENT INSTRUCTIONS 00900") MEDICARE Texas (TRAILBLAZERS) PRE-ENROLLMENT INSTRUCTIONS 00900 HOW LONG DOES PRE-ENROLLMENT TAKE? Standard processing time is 5 business days after receipt. WHAT FORM(S) SHOULD I COMPLETE? EDI Provider
MEDICARE Texas (TRAILBLAZERS) PRE-ENROLLMENT INSTRUCTIONS 00900 HOW LONG DOES PRE-ENROLLMENT TAKE? Standard processing time is 5 business days after receipt. WHAT FORM(S) SHOULD I COMPLETE? EDI Provider
Odyssey File & Serve. Firm Administrator User Guide Release 3.14
 Odyssey File & Serve Firm Administrator User Guide Release 3.14 OFS-FS-220-3680 v.1 April 2016 COPYRIGHT AND CONFIDENTIALITY Copyright 2016 Tyler Technologies, Inc. All rights reserved. Use of these materials
Part A/Part B/HHH EDI Enrollment (Agreement) Form and Instructions
 Form and Instructions") Part A/Part B/HHH EDI Enrollment (Agreement) Form and Instructions The EDI Enrollment Form (commonly referred to as the EDI Agreement) should be submitted when enrolling for electronic billing. It should
Part A/Part B/HHH EDI Enrollment (Agreement) Form and Instructions The EDI Enrollment Form (commonly referred to as the EDI Agreement) should be submitted when enrolling for electronic billing. It should
Managed Access Gateway. User Guide
 Managed Access Gateway User Guide Version 3.0 Exostar, LLC April 20, 2013 Table of Contents Table of Contents...ii Purpose... 1 Log-in to your MAG Account... 2 Additional MAG Login Options... 2 First Time
E X O S T A R, LLC D A T E : M AY V E R S I O N : 4.0
 SECURE ACCESS MAN AG E R USER GUI DE E X O S T A R, LLC D A T E : M AY 2 0 1 7 V E R S I O N : 4.0 1 S E C U R E AC C E S S M A N A G E R 1 INTRODUCTION... 3 1.1 SUMMARY... 3 2 BASIC FUNCTIONS... 3 2.1
User s Guide. (Virtual Terminal Edition)
") User s Guide (Virtual Terminal Edition) Table of Contents Home Page... 4 Receivables Summary... 4 Past 30 Day Payment Summary... 4 Last 10 Customer Transactions... 4 View Payment Information... 4 Customers
User s Guide (Virtual Terminal Edition) Table of Contents Home Page... 4 Receivables Summary... 4 Past 30 Day Payment Summary... 4 Last 10 Customer Transactions... 4 View Payment Information... 4 Customers
Registering for the epa Portal One Authorized Entity/Provider per Practice to Complete
 epa Training Guide Registering for the epa Portal One Authorized Entity/Provider per Practice to Complete 1. To get started, please visit www.caremark.com/epa and follow the link to register. The CVS
Oracle Banking Digital Experience
 Oracle Banking Digital Experience Checking Account Originations User Manual Release 17.2.0.0.0 Part No. E88573-01 July 2017 Checkings Account Originations User Manual July 2017 Oracle Financial Services
Regions OnePass USER GUIDE. It s time to expect more. Regions Bank Member FDIC Revised
 Regions OnePass USER GUIDE It s time to expect more. Regions Bank Member FDIC Revised 051616 User Guide Table of Contents Section I. Regions OnePass Basics 3 What Is Regions OnePass? 3 Minimum Browser
Employee User Guide What Employees Need to Know About Using the Burnham & Flower Wealthcare
 Employee User Guide What Employees Need to Know About Using the Burnham & Flower Wealthcare Table of Contents Getting started...2 My accounts...3 My expenses...13 Communications...15 Enrollment...17 Resources...21
PS&R Backup Security Official, Admin, or User Registration PS&R Backup Security Official, Admin, or User Registration
 PS&R Backup Security Official, Admin, or User Registration PS&R Backup Security Official, Admin, or User Registration The following walk-thru explains how a User registers as Backup Security Official,
Plan Central Member Portal Learning Guide
 Plan Central Member Portal Learning Guide Plan Central Member Guide, April 2015 Table of Contents Introduction... 2 Accessing Plan Central... 3 Plan Central Welcome Page... 3 New to Plan Central... 4 Member
User Guide for the CORE Certification Application Portal
 User Guide for the CORE Certification Application Portal Table of Contents Introduction... 3 Section I: Registration Walkthrough... 3 Entity Details... 4 Primary Contact Details... 4 C-Level Contacts...
If the provider is paid by Social Security Number, follow the registration procedure on pages 2-5.
 2014 ecqm Reporting Guide Clinical quality measures, or CQMs, are statistics that track the quality of services performed by health care providers and hospitals. These statistics involve data related to
Provider Portal Claim Features Training MHO
 Provider Portal Claim Features Training MHO-2585 0119 MOLINA HEALTHCARE S PROVIDER PORTAL The Provider Portal is secure and available 24 hours a day, seven days a week. Register for access to our Provider
Molina's 2019 Medicare Agent Certification Program is now available to Brokers who have completed their 2019 AHIP!
 Dear Broker, Molina's 2019 Medicare Agent Certification Program is now available to Brokers who have completed their 2019 AHIP! If you do not have your 2019 AHIP and plan on using Sentinel Elite's Core