eadvice Communications and Follow-Ups 33 Communication and follow-up context 33 Communication 34 Follow-up 35
|
|
|
- Camron Young
- 5 years ago
- Views:
Transcription
1 Star System Solutions Pty Ltd eadvice User Guide
2 eadvice About This Guide 2 Before you begin 3 Configuration 5 Attachment Printer 16 System Test 17 Maintain Contact Codes 18 Maintain Advice Forms 19 Contacts Bulk Maintenance 26 Maintain AR Contacts 27 Maintain AP Contacts 29 Audit Log 30 Re-Send eadvice 31 Transmission Audit Report 32 eadvice Communications and Follow-Ups 33 Communication and follow-up context 33 Communication 34 Follow-up 35 Chapter 2: eadvice Reports 37 Accounts Payable Reports 38 Task 1: Printing Remittance Advices 39 Task 2: Printing Purchase Orders 41 Accounts Receivable Reports 43 Task 1: Printing Sales Order Acknowledgements 44 Task 2: Printing AR Credits 46 Task 3: Printing AR Invoices 49 Task 4: Printing Distribution Credits 52 Task 5: Printing Distribution Invoices 54 Task 6: Printing Statements 56 Task 7: Printing Customer Aging Report 57 Chapter 3: eadvice Security 59 Maintain Users 59 Maintain User Access 60 Appendix 1 61 Maintaining Contacts & Distribution 62 Additional Information for Subject and Message 63 eadvice User Guide 1
3 About This Guide Overview Introduction eadvice has been developed for companies who would like to take advantage of the ability to communicate electronically to their customers and suppliers. eadvice enables you to efficiently and cost effectively send and / or fax correspondence to customers and suppliers. Use eadvice to fax or documents such as: EFT Remittance Advices Purchase Orders Sales Order Invoices / Credits Sales Order Acknowledgements Accounts Receivable Invoices / Credits Customer Statements Customer Aging Report Star Projects Invoices About this user guide Prerequisite This user guide explains how to setup and use eadvice. It is designed to be used with the other documents that ship with Epicor products. You should have a working knowledge of personal computers and a working knowledge of Microsoft Windows. eadvice User Guide 2
4 Before you begin Overview Introduction Before installing eadvice there are some applications that will need to be installed and configured on the appropriate workstation. Each of the items below will have their own installation, configuration and registration guidelines: Applications: Epicor ebackoffice financial software 4.2a or higher Epicor ebackoffice EFT module (optional) OR Star Projects Database: Microsoft SQL Server 7.0 or higher PDF writer program: Adobe PDF Writer version 5 and prior OR Star PDF Writer which is distributed with eadvice (recommended) component: Connection to a MAPI or SMTP compliant system. Fax component: The fax transport can be either: - Symantec WinFAX PRO version 10 - faxing software that is integrated to your system. - Venali faxing services - Interfax faxing services - ActiveFax Please refer to your documentation supplied with these products to determine their suitability and details for installation and configuration. Please read eadvice installation instructions.pdf file before installing or upgrading eadvice. eadvice User Guide 3
5 Chapter 1: eadvice Utilities Overview Introduction This chapter explains the utilities available in the application and how each are used. In this chapter This chapter contains the following topics: Topic Page Configuration 5 Attachment Printer 16 System Test 17 Maintain Contact Codes 18 Maintain Advice Forms 19 Contacts Bulk Maintenance 26 Maintain AR Contacts 27 Maintain AP Contacts 29 Audit Log 30 Re-Send eadvice 31 Task 7: Printing Customer Aging Report 32 eadvice User Guide 4
 Currency, (OPER) Currency, (NAT) Currency Applies to")
6 Configuration The Configuration Utility is used to define the way that eadvice will behave given certain situations. Main tab Configuration options related to Main tab Field ARAGING_PRINT_CURRENCY CDA_AUTO_SIGNATURE_PATH Print AR Aging Report in either (HOME) Currency, (OPER) Currency, (NAT) Currency Applies to Crystal Report form only. Path where auto signature BMP files are located for all users. Used for Customs Forms. eadvice User Guide 5
7 CDA_BATCH_NO CRYSTAL_USE_RM CUST_STATEMENT_AGING Last Customs Documentation Batch number. Used for Customs Forms. Allow calling Crystal Reports vie Report Manager. Default is N. Should only be used if Report Manager has been installed. Default Customer Statement Transaction Aging Date option to either - AGE, DOC, DUE or APP EBILL_ACTIVE If you would Like to use eadvice to create the ebill acquisition file Do not wish to use the ebill acquisition file Then Type Y in the value column Type N in the value column EBILL_BILLER_ID EBILL_CONTACT_CODE EBILL_FILE_TAG EBILL_LAST_DATE EBILL_LAST_RUN_NO If you answered Yes to the above question please enter the ID code provided to you by your ebill supplier. This is the contact code that the system uses to identify ebill transactions. The same code will be used for report setups and processing. The default code is ebill. The value entered here will be used as the tag inside the acquisition file. The default value is EBAQ. The date displayed here is the date the system last performed an ebill report run. This field is maintained by the system. The number displayed here is the number of the last ebill report. This field is maintained by the system. EFT_POSTED_STATUS If you Post EFT payments before printing remittances Do not post EFT payments before printing remittances Then Type P in the value column Type U in the value column eadvice User Guide 6
8 EFT_SHOW_VCHR_CLASS EFT_SHOW_VCHR_COMMENT EFT_SHOW_VCHR_MEMO If Y then Voucher Classification is shown as part of the EFT Remittance Details Applies to Crystal Report form only. If Y then Voucher Comment is shown as part of the EFT Remittance Details Applies to Crystal Report form only. If Y then Voucher Internal Memo is shown as part of the EFT Remittance Details Applies to Crystal Report form only. FILE_ARCHIVE If output files are to be Retained Deleted Then Type Y in the value column Type N in the value column Note: If archiving is set to N, eadvice will delete the original PDF documents created once sent. The PDFs will not be available for viewing in the Audit Log. If Winfax PRO is installed, the value will be overridden with Y when processing. FILE_PATH If you answered Y to the above question a full path will be required to store the files created. The path can include a UNC name, for example: \\Servername\Sharename\FolderName or a drive letter and folder names, eg: c:\eclient\docs\eadvice This path will also be used to hold any temporary files that are created during processing. If you responded N to the above questions the system will use the current path to hold the temporary files. FILE_TIME_OUT Enter the maximum number of seconds the system has to create a file before prompting for action from the user. It is recommended that 10 seconds be entered here. eadvice User Guide 7
9 FOLLOWER_CUST_STATEMENT LOGO_PATH_NAME If Y then eadvice sends follower documents with Statement Advice Enter the full path and file name of the company logo (if required). If this option is used the logo will print on all the electronic documents. Note: The image can be in a BMP, GIF, JPEG, RLE, or WMF format. LOGO_PATH_NAME_2 This option may be used on custom forms. Enter the full path and file name of the additional company logo. Note: The image can be in a BMP, GIF, JPEG, RLE, or WMF format. OUTS_STMNT_TRX_ONLY If statements Are to print with full details Should only print the outstanding balances Then Type N in the value column Type Y in the value column STMNT_AGING_GL_OR_AR SYS_BATCH_NO SYS_COMMUNICATE_NO SYS_FOLLOWUP_NO Print Statement Aging based on: AR - AR brackets GL GL Periods This is an auto-generated number that increases each time a batch of Advices is transmitted. It is system generated and should not be altered. This is an auto-generated number that increases each time a communication is created. It is system generated and should not be altered. This is an auto-generated number that increases each time a follow-up is created. It is system generated and should not be altered. eadvice User Guide 8
10 /Fax tab Configuration options related to /Fax tab Field If recipients exist for fax and If BOTH fax and are set against a Recipient you need to determine which contact option to use. If only fax or is set against a Recipient this configuration would be ignored. This setting can be overridden for the contact code at the Report Maintenance level, if required. Mail protocol SMTP server name or IP address Enter the type of mail system to be used for transmitting s (as well as faxes when faxing vie system). Select either MAPI or SMTP. If SMTP mail protocol is chosen then enter SMTP server name or IP address here eadvice User Guide 9
11 Is SMTP Authentication required SMTP Authentication type SMTP NTLM mode SMTP Log Name If SMTP mail protocol is chosen and SMTP Authentication is required then tick it ON (all users must have valid SMTP accounts). SMTP related. Default is Automatic. Change if required. SMTP related. Default is AUTH LOGIN. Change if required. SMTP related. In case there are problems using SMTP protocol, enter a file name path which will be used by eadvice to create a log file which then can be sent to Support for analysis. Example C:\Test\eAdvice.log BCC to sender Read Receipt If you Need to send a blind copy of the transmission to senders address Do NOT need to send a blind copy of the to senders address If you Need a read receipt notification Do NOT need a read receipt notification Then Check ON Check OFF Then Check ON Check OFF Fax provider Select Fax method your system use for faxing documents Fax cover page If you Need a cover page Do not need a cover page Then Check ON Check OFF Note: If the business is using WinFAX PRO the value set here will override any WinFAX PRO Program Settings. eadvice User Guide 10

12 Venali Faxing Before using Venali services you need to create a Venali account at Configuration options related to Venali Faxing Method User ID Password address name Determines which Venali method is to be used when sending faxes. sending faxes by ing to the address registered with Venali. WEB sending faxes using Venali WEB component installed on the computer. Web component can be downloaded from Venali Web site Venali account user ID Venali account password address registered with Venali (required if using method and SMTP protocol) Display name for address registered with Venali(Optional) eadvice User Guide 11
13 Interfax Faxing Configuration options related to Interfax Faxing Method User ID Password address name Determines which Interfax method is to be used when sending faxes. sending faxes by ing to the address registered with Interfax. WEB sending faxes using Interfax WEB services. Interfax account user ID Interfax account password address registered with Interfax (required if using method and SMTP protocol) Display name for address registered with Interfax(Optional) eadvice User Guide 12
14 ActiveFax Faxing Configuration options related to ActiveFax Faxing File Directory Enter directory path where PDF documents will be placed for processing by ActiveFax eadvice User Guide 13
15 System tab Configuration options related to the System tab (read-only) APP_SERVER_VERSION PDF_APPLICATION Displays the current eadvice server version. This version should match the client version. Client version is displayed on the window title. This value is maintained by the Application, and automatically updated via the Database Update Utility. Displays the application that is used to create PDF attachment files. eadvice can use either Adobe PDF Writer (ADOBEPDF) or Star PDF Writer (STARPDF). To change this setting, please refer to Attachment Printer section below. eadvice User Guide 14
16 Local Setup Configuration options related to the Local Setup Crystal Report Version Should be blank unless there are issues when running Crystal Reports. For such cases enter Crystal Report version installed on the computer (example 9.0) eadvice User Guide 15

17 Attachment Printer Overview Introduction The Attachment Printer and PDF type configuration are used to select the software that will be used to create the documents. These documents will then be attached to an or sent to the fax software to be converted to data files. You can use either Star PDF Writer or Adobe Acrobat software for the creation of attachment files. Please refer to the "Before you begin" section on page 3 for supported versions. To select an Attachment Printer With the Configuration screen open, from the utilities menu select Attachment Printer. Field PDF Attachment Select a Printer from the drop down list box. Printer Although the list will show all printers installed on the computer, only a supported PDF printer should be selected. PDF Type NOTE: When using Star PDF Writer, make sure that the printer configuration option 'Print directly to the printer'is set to ON. You can set this option using Control Panel Printers setup. Use the drop down list box to select either the Adobe PDF Writer or Star PDF Writer option. The selected option should match the type of Printer selected in the PDF Attachment Option above. IMPORTANT NOTE: The attachment printer settings are maintained in the Windows registry under HKEY_CURRENT_USER. Therefore, for each eadvice user logging on to each workstation you need to set\maintain the Attachment Printer. eadvice User Guide 16

18 System Test Overview Introduction The system test screen allows you to test that connections from your workstation to your and fax systems are functioning as expected. To test your communications Open the configuration screen and from the utilities menu select eadvice System Test. Field Create Attachment The create attachment checkbox must be ticked to send test or faxes. This is to ensure that the attachment files flow through correctly to your or faxing system. If you Then Fax Would like to send a test Would not like to send a test If you Would like to send a test Fax Would not like to send a test Fax Check the checkbox, press tab and enter the Address then click the Test button Leave the checkbox blank Then Check the Fax checkbox, press tab and enter the Fax number and click the Test button Leave the Fax checkbox blank eadvice User Guide 17
19 Maintain Contact Codes The Maintain Contact Codes are used to create the contact codes which can then be attached to a specific form. Each of the contact codes can be attached to a single form and may also be used on multiple forms, if required. For additional information on the use of Contact Codes in this application please see Maintain Advice Forms on page 19. Setup a new Contact Code To setup a new Contact Code, with the Configuration screen open, select Contact Codes from the utilities menu and click on the insert row button. Make the following entries as required: Field Contact Code Enter a logical code for the contact type as this will be the visible code in the selection list on the Maintain Advice Reports. Enter the description of the contact. The description will be displayed in the Maintain Advice Reports screen. Type Enter or select the contact type. There are available options: AR (Accounts Receivable) AP (Accounts Payable) SP (Salesperson) Note: If your business has a single contact for Accounts Payable or Accounts Receivable it is possible to create a single contact code and then assign that code to all the module s reports. eadvice User Guide 18

20 Maintain Advice Forms The Maintain Advice Forms are used to define the reports communication method(s) as well as the Contact Codes the report will be sent to. Forms can have a number of options set dependant on the contact code, some of these include whether it is a fax or contact, the type of file to be created and the subject and message to be sent to the Contact Code. For additional information on Contact Codes please see Maintain Contact Codes on page 18. Advice Form Categories Forms are accessed from a screen which used a flexible report explorer which categorises the reports into modules. These can be changed to suite the business as required. With the configuration screen open, select Maintain Advice Forms from the utilities menu and scroll to the required report and make the following entries: Field Form Context The report context is the first level of the reporting tree. These branch names can be altered by clicking in the field and overwriting the existing text. The value entered here will be displayed on the Advice Report screen. eadvice User Guide 19
21 Form Section Display The report section is the category directly beneath the report context and is used to further group reports within each report context (or module). The value can be altered by clicking in the field and overwriting existing text. The new value will be displayed on the Advice Report screen. If the form is Then To be displayed on the eadvice Forms screen Ensure the Display check box is checked Default Contact Code Default Print Copy on Reprints Not required on the eadvice Forms screen Ensure the Display check box is unchecked. The contact code selected here will be the only one used when there is no contact code established against the customer / vendor for this form. The contact code entered should be one of those listed in the detail section of this screen. If, when processing, there is no contact found and eadvice uses the default code it will automatically print to a paper printer whether or not the Print if no contact is checked in the detail section. If Copy is Then To be printed on reprinted eadvice Forms Ensure the Default Print Copy check box is checked Not to be printed on re-printed eadvice Forms Ensure the Default Print Copy checkbox is unchecked Note: The Print Copy can be checked when an eadvice form is processed. eadvice User Guide 20
22 Field List Preview The List Preview is a summary of the forms that are going to be printed based on the selection criteria entered. Invoices, for example, will have the customer code, customer name, location, date and monetary value of the invoice. There are 4 setup options to select from: Never - never print the list preview Prompt - asks each time the report is run if you want to view the list. Yes - Default printer - automatically sends the preview list to the users default printer when the report is run (the user will be prompted to 'continue processing Yes/No'when the preview list has finished printing / processing). Yes - Attachment printer - automatically sends the preview list to the users attachment printer (eg: Adobe) when the report is run (you will be prompted to 'continue processing Yes/No'when the Adobe screen has been closed). Transmission Audit The Transmission Audit is a listing of all the forms that were transmitted in a batch. The report contains information such as date / time the report was sent, the delivery, method, vendor / customer code and document numbers. There are 4 setup options to select from: Never - never print the audit Prompt - asks each time the report is completed if you want to view the audit. Yes - Default printer - automatically sends the audit to the users default printer when the report is completed (you will be prompted to 'continue processing Yes/No'when the audit has finished printing / processing). Yes - Attachment printer - automatically sends the audit to the users attachment printer (eg: Adobe) when the report is completed (you will be prompted to 'continue processing Yes/No'when the Adobe screen has been closed). eadvice User Guide 21
23 Field Process Sort Order Icon Override Advice Name Override List Name Print if no contact This option will set the default sort order, on the print selection screen, for the form s output. The option that you would like defaulted may be selected from the list. It may be necessary to look at the form s print selection screen to determine the default they are numbered 1 through 4 from left to right on the selection screen. Some selection screens may not have all four options. This is used to set the graphic you will be see on the eadvice Form screen when selecting a report to process. The file may be of type *.bmp or *.ico. This is used to override the standard eadvice form with a customised one. This is used to override the standard list of recipients with a customised one. Set to ON if you want the document to be printed for contacts where contact or fax has NOT been set. Setup a new Advice Report To setup a new Advice Form, with the Configuration screen open, select Maintain Advice Forms from the utilities menu and scroll through the available reports until you locate the required report. Click on the insert row icon and make the following entries in the detail section as required: Field Contact Code Enter or select the Contact Code to be attached to the report Output Type If you would Then Like the report printed in PDF format Like the report saved in CSV format Select PDF Writer from the drop down list Select CSV Text from the drop down list eadvice User Guide 22

. There will be default text for each of the document types.")
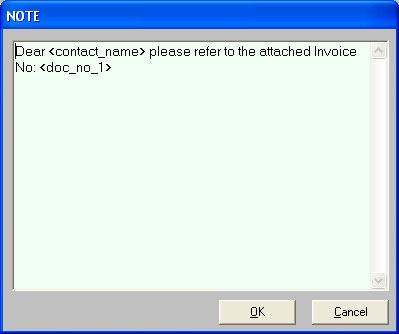
24 Field Subject Message Double click on the box that is underneath the Subject column (one for each of the contact codes). There will be default text for each of the document types however this can be changed to suit the business. The subject may be up to 1,000 characters in length. Note: For additional information on database fields that can be inserted into the subject of the communication, please see Appendix 1 on page 61. Double click on the box that is underneath the Message Column (next to the Subject box for each of the contact codes). There will be default text for each of the document types. Care should be taken when changing the message text where the text is bracketed. <Contact_name> for example, will be replaced with the Contact Name specified in the Maintain Contacts. The message may be up to 2,000 characters in length. Note: For additional information on database fields that can be inserted into the message of the communication, please see Appendix 1 on page 61. eadvice User Guide 23
25 Field Override Report Name Use Crystal This field is used if your business has a customised report for the contact code. The default value for this field is blank however should there be an entry, it should not be altered. Check this box if you want to use Crystal Reports instead of native eadvice reports. NOTE: Crystal Reports would require more time to process and may reduce performance. Crystal RPT full name If Use Crystal checked a Crystal RPT must be specified. Choose the following RPT forms from eadvice installation directory: EFT Remittance Advices star_ad_cr_apeftdet.rpt Purchase Orders star_ad_cr_admpoform.rpt Sales Order Invoices star_ad_cr_admsoinvform.rpt Sales Order Credits star_ad_cr_admsocdtform.rpt Sales Order Acknowledgements star_ad_cr_admsoaform.rpt Accounts Receivable Invoices star_ad_cr_arinvoic.rpt Accounts Receivable Credits star_ad_cr_arcrmem.rpt Customer Statements star_ad_cr_arstmnt.rpt Customer Aging Report star_ad_cr_araging.rpt Example: C:\eAdvice\star_ad_cr_araging.rpt File Relocation If you would Like the files produced when the report is processed copied to alternative location Prefer the files are not relocated / copied Then Click on Copy and enter the path to the alternative location in the to folder field Click on None eadvice User Guide 24
26 Print if No Contact If you would Like the report to be printed to a paper printer if there are no contact details Then Check this box Prefer the report is not printed to a paper printer Fax If the report / contact Is to use faxing as a communication method Is not to be faxed If the report / contact Is to use ing as a communication method Is not to be ed Uncheck this box Then Check this box Uncheck this box Then Check this box Uncheck this box eadvice User Guide 25

27 Contacts Bulk Maintenance The Contacts Bulk Maintenance screen is used to create or update the contact records against a range of customers or vendors. This screen may be used to perform a bulk update or create a new type of contact against a range of customers or vendors. To process Bulk Maintenance To run Bulk Maintenance, click on the Configuration icon to the left of the eadvice window, go to the Utilities Menu and select Contacts Bulk Maintenance. Make the following entries as required: Field Contact Type Select the module which the process is to be run against, Accounts Payable or Accounts Receivable. The first field after will change from Vendor Code to Customer code as you select change you selection in the Contact Type. Vendor/Customer Code Contact Code Process Type Enter or select the Vendor or Customer code range the process is to be run against. Enter or select the contact code range that are to be updated or created against the vendor or customer. If you select Then Update existing Check or uncheck the contacts fields to be updated as Create New/Missing required, the click the Contacts process button Click the process button eadvice User Guide 26
28 Maintain AR Contacts The Maintain AR Contacts is used to setup and maintain contacts that will be used for each of the AR document types (Sales Order Acknowledgements, Invoices and Statements). The information displayed in this screen is determined by whether the Distribution module is installed. Please refer to Appendix 1 on page 61. Setup a new AR Contact To setup a new contact, click on the AR Contacts icon to the left of the eadvice window. Make the following entries as required: Field Contact Code From the drop down list select the contact code. More than one contact code can be established for each customer code however eadvice will only process reports using the contact code with the highest priority. The priority is the number to the left of the Contact Code with one being the highest priority. Contact Name Fax # Enter the title / name of the AR Contact. Enter the fax number, including area codes, for the AR Contact using numerical characters only. Note: The format for the way the fax number is entered in this field may also be affected by the WinfaxPRO settings (eg: dialling 0 or 9 to obtain an outside line). Please refer to the WinfaxPRO user guide for further details. If using Venali faxing then the fax number must have international format Enter the full address for the AR Contact. The address may be up to 50 characters in length. eadvice User Guide 27
29 Note: The contact details can be updated from the customer master file by right clicking on the line or field which you would like to update. Alternatively you may like to bulk update a number of customers, please see Contacts Bulk Maintenance on page 26 for additional information. eadvice User Guide 28
30 Maintain AP Contacts The Maintain AP Contacts is used to setup and maintain contacts that will be used for each of the AP document types (Remittances and Purchase Orders). The information displayed in this screen is determined by whether the Distribution module is installed. Please refer to Appendix 1 on page 61 Setup a new AP Contact To setup a new contact, click on the AP Contacts icon to the left of the eadvice window. Make the following entries as required: Field Contact Code From the drop down list select the contact code. More than one contact code can be established for each vendor code however eadvice will only process reports using the contact code with the highest priority. The priority is the number to the left of the Contact Code with one being the highest priority. Contact Name Fax # Enter the title / name of the AP Contact. Enter the fax number, including area codes, for the AP Contact using numerical characters only. Note: The format for the way the fax number is entered in this field may also be affected by the WinfaxPRO settings (eg: dialling 0 or 9 to obtain an outside line). Please refer to the WinfaxPRO user guide for further details. If using Venali faxing then the fax number must have international format eadvice User Guide 29

31 Enter the full address for the AP Contact. The address may be up to 50 characters in length. Note: The contact details can be updated from the vendor master file by right clicking on the line or field which you would like to update. Alternatively you may like to bulk update a number of vendors, please see Contacts Bulk Maintenance on page 26 for additional information. Audit Log The Audit Log is a listing of all communications that have been sent to the business s customers and vendors or copied to a network drive. Each log will contain information about successful items sent including: vendor / client, delivery method and the attachment file name. Setup view an Audit Log To view an Audit Log click on the Audit Log icon on the toolbar to the left of the eadvice window, then: Step Instruction 1 Double click on the module that contains the information you would like to view. 2 Double click on the contact whose details you would like to view. 3 Double click on the document type you would like to view. 4 Click on the or fax document you would like to eadvice User Guide 30

32 view. Note A: Double clicking on the document will open the original PDF / CSV document (using the default viewer application) provided that archiving is activated. Please refer to the FILE_ARCHIVE section of Configuration on page 5 for additional information. Note B: If you would like to do any of the following for an Audit Record: Open it Print the Attachment Print the Audit Log, or Re-send the attachment Right click on the Audit record and select the action you would like from the menu. Re-Send eadvice The Re-send Advice screen is used to re-send any communications that may not have reached their destination or have been misplaced. Any record in the Audit Log may be re-sent. This screen also allows you to re-send the report to an alternative recipient should the recipient be incorrect on the original. It is recommended that any permanent changes to the recipient be made in the AR or AP Contacts. To Re-send an Advice To re-send a report, click on the Audit Log icon on the toolbar to the left of the eadvice window and navigate to the required report. Right click on the Audit Log record to be re-sent and select Re-Send Advice from the menu, then make the following entries as required: Step Instruction 1 If Sent To is Then Correct Go to Step 2 eadvice User Guide 31

33 Incorrect Type the correct detail and go to Step 2 2 Select the delivery method for the recipient. 3 In the Additional Message box, type any additional details for the communication. The details entered here will be appended to the message on the original communication. 4 Click the OK button. Transmission Audit Report The Transmission Audit report is a list of all the forms that have been processed. The report will list the following information: 1. Process Date 2. Vendor / Customer Code 3. eadvice Contact Code 4. Delivery Details 5. Contact Name 6. Transmission method (fax, , print) 7. Purchase Order / Sales Order number 8. Invoice / Payment number The batch number required for printing / re-printing of the audit report can be located in the Audit log screen. Setup view an Audit Log To print a Transmission Audit report click on the Audit Log icon on the toolbar to the left of the eadvice window, then click reports and select Transmitted Audit Report: Field Batch No. Enter the batch number to be printed / reprinted. If you do not know the batch number, please refer to the Audit Log screen. Note: The transmission audit report can be automatically run at the end of a process, please refer to Maintain Advice Forms on page 19 for additional information. eadvice User Guide 32
34 eadvice Communications and Follow-Ups A user can store additional information against a transmission sent from eadvice through the eadvice Audit Log screen. This can be used for any purpose the business requires, but is particularly useful for storing information relating to the collection of monies owed. Communication and follow-up context Information can be added against either the context of the Customer/Vendor, or against a specific Document. This is determined by whether the user is on a Customer/Vendor or a Document when adding the Communication or Follow-up. When viewing at a Customer/Vendor level, all Communications and Follow-ups which are associated to the Customer/Vendor and their Documents are displayed (see Figure 1). When viewing at the Document level, only the Communications and Follow-ups associated with the selected Document are displayed (see Figure 2). The user can double-click on the Communication or Follow-up record to view the details. An unlimited number of Communications or Follow-Ups can be added against either context. Figure 1. Customer/Vendor Context eadvice User Guide 33


35 Figure 2. Document Context Communication A communication allows freeform notes to be added against a Customer/Vendor or a Document. Figure 3. Communication Maintenance eadvice User Guide 34

36 Follow-up A Follow-Up allows freeform notes to be added against a Customer/Vendor or a Document. It also enables a user to specify a date to follow-up on, and assign a user who should perform the follow-up. Whilst the Follow-up is an Open status, it will be treated as a Task and can be viewed in the Follow-up Tasks utility (see figure 5). Figure 4. Follow-up Maintenance eadvice User Guide 35
37 FOLLOW-UP TASKS The Follow-up Task List allows a user to quickly view a summary of outstanding follow-up tasks for themselves, another user, or those that haven t been assigned to a user. They can double-click on a task to open the record and view details of the Follow-Up. Figure 5. Follow-up Tasks eadvice User Guide 36
38 Chapter 2: eadvice Reports Overview Introduction This chapter explains the basics of creating an eadvice report in your application and how to complete other associated tasks. In this chapter This chapter contains the following topics: Topic Page Accounts Payable Reports 38 Accounts Receivable Reports 43 eadvice User Guide 37

39 Accounts Payable Reports Overview Introduction Some of the functions of the AP Reports are dependant on certain configuration options being setup. For information on setting up the options see Chapter 1: eadvice Utilities on page 4. AP Reports are also dependant on the payments being created and / or the Purchase Orders being raised. See the required User Guide for further information. The AP Reports screen is where the reports are selected for printing. Once the report selection criteria has been entered and the OK button clicked, the reports will automatically commence faxing / ing to the recipients. In this section This section contains information on performing the following tasks: Topic Page Task 1: Printing Remittance Advices 39 Task 2: Printing Purchase Orders 41 eadvice User Guide 38

40 Task 1: Printing Remittance Advices Introduction Remittance Advices can be previewed before they are printed to your fax or device. Remittances will be previewed in PDF file format and can be printed to a paper printer from within PDF if required. To Print Remittance Advice: Click the Reports icon on the toolbar (left side of eadvice window) to access the Reports main window. Double click the Accounts Payable folder, double click the Remittance folder and then double click on the Remittance Advice icon and make the following entries. Field Print Preview Run If remittances are Then to be Check this box Reviewed before they are printed Printed without any review Leave this box unchecked and go to the next step Printed Status If remittances Need to be reprinted Are to be printed for the first time Then Select the Printed option Select the Unprinted option eadvice User Guide 39
41 Field Control Number EFT Batch Code Vendor Code Document Date Posted Status Enter or select the first and last control numbers to be printed. These fields are not mandatory and may be left blank. If left blank, care should be taken if only entering a Vendor Code or Document Date, there may be a number of transactions that are not required for the current process. Enter or select the first and last EFT batch codes to be printed for this process. The EFT code is displayed at the end of the EFT processing. If you require further assistance please refer to the AP / EFT documentation. Enter or select the first and last vendor code to be included in this process. Care should be taken if only entering a vendor code as a single vendor could have a number of remittance advices over a period of time (some of which may be invalid for this process). It is recommended that the Vendor Code is used in conjunction with either the Control Number or the EFT Batch Code. Enter or select the first and last payment date to be included in this process. Care should be taken when only dates are entered as a number of remittance advises could be selected within the date range and all may not be valid for this process. It is recommended that the Document Date be used in conjunction with the Control Number or EFT Batch Code. If remittances are Then Unposted Select the unposted option Process Sort Order Posted Select the posted option Select the order that the forms are to be processed / output. The process order default may be altered of required. Please see Maintain Advice Forms on page 19 for additional information. Note: If a process is started without a control number being entered a warning message will be displayed advising that a control number has not been entered. This warning will not halt the process however all values entered in the print selection criteria should be reviewed. eadvice User Guide 40
42 Task 2: Printing Purchase Orders Introduction Purchase Orders can be previewed before they are printed to your fax or device and a range of Purchase Orders can be printed at any one time. Purchase Orders will be previewed in PDF file format and can be printed to a paper printer from within PDF if required. To Print Purchase Orders: Click the Reports icon on the toolbar (left side of eadvice window) to access the Reports main window. Double click the Accounts Payable folder, double click the Purchase Order folder and then double click on the Purchase Order icon and make the following entries. Field Print Preview If purchase orders Then Run are to be Printed Status Reviewed before they are printed Printed without any review If purchase orders Need to be re-printed Are to be printed for the first time Check this box Leave this box unchecked and go to the next step Then Select the Printed option Select the Unprinted option eadvice User Guide 41
43 Field PO Number Ship to Location Vendor Code PO Type Process Sort Order Enter or select the first and last purchase order numbers to be printed. These fields are not mandatory and may be left blank. If left blank, care should be taken if only entering a Ship to Location or Vendor Code, as there may be a number of transactions that are not required for the current process. Enter or select the first and last Ship to Location codes to be printed for this process. This field may be left blank. Enter or select the first and last vendor code to be included in this process. Care should be taken if only entering a vendor code as a single vendor could have a number of purchase orders over a period of time (some of which may be invalid for this process). It is recommended that the Vendor Code is used in conjunction with either the PO Number or the Ship to Location. Enter the first and last Purchase Order types to be printed for this process. This field may be left blank. Select the order that the forms are to be processed / output. The process order default may be altered of required. Please see Maintain Advice Forms on page 19 for additional information. Note: If a process is started without a purchase order number being entered a warning message will be displayed. This warning will not halt the process however all values entered in the print selection criteria should be reviewed. eadvice User Guide 42
44 Accounts Receivable Reports Overview Introduction Some of the functions of the AR Reports are dependant on certain configuration options being setup. For information on setting up the options see Chapter 1: eadvice Utilities on page 4. AR Reports are also dependant on the Statements being created and / or the Invoices being raised. See the required User Guide for further information. The AR Reports screen is where the reports are selected for printing. Once the report selection criteria has been entered and the OK button clicked, the reports will automatically commence faxing / ing to the recipients. In this section This section contains information on performing the following tasks: Topic Page Task 1: Printing Sales Order Acknowledgements 44 Task 2: Printing AR Credits 46 Task 3: Printing AR Invoices 49 Task 4: Printing Distribution Credits 52 Task 5: Printing Distribution Invoices 54 Task 6: Printing Statements 56 Task 7: Printing Customer Aging Report 57 eadvice User Guide 43
45 Task 1: Printing Sales Order Acknowledgements Introduction Sales Order Acknowledgements can be previewed before they are printed to your fax or device and a range of Acknowledgements can be printed at any one time. Acknowledgements will be previewed in PDF file format and can be printed to a paper printer from within PDF if required. To Print Sales Order Acknowledgement: Click the Reports icon on the toolbar (left side of eadvice window) to access the Reports main window. Double click the Accounts Receivable folder, double click on the Customer Service folder then double click on the Sales Order Acknowledgement icon and make the following entries. Field Print Preview If acknowledgements Then Run are to be Reviewed before they are printed Printed without any review Check this box Leave this box unchecked and go to the next step eadvice User Guide 44
46 Sales Order No Enter or select the first and last sales order numbers to be printed. These fields are not mandatory and may be left blank. If left blank, care should be taken if only entering a Customer as there may be a number of transactions that are not required for the current process. Field Customer Code Date Entered Process Sort Order Enter or select the first and last customer code to be included in this process. Care should be taken if only entering a customer code as a single customer could have a number of sales orders over a period of time (some of which may be invalid for this process). Enter or select a date range for which Acknowledgements are to be printed. Select the order that the forms are to be processed / output. The process order default may be altered of required. Please see Maintain Advice Forms on page 19 for additional information. Note: If a process is started without a sales order number being entered a warning message will be displayed. This warning will not halt the process however all values entered in the print selection criteria should be reviewed. eadvice User Guide 45
47 Task 2: Printing AR Credits Introduction Credits can be previewed before they are printed to your fax or device and a range of Credits can be printed at any one time. Credits will be previewed in PDF file format and can be printed to a paper printer from within PDF if required. To Print AR Credits Click the Reports icon on the toolbar (left side of eadvice window) to access the Reports main window. Double click the Accounts Receivable folder, double click on the Invoice\Credit folder then double click on the AR Credits icon and make the following entries. Field Print Preview If credits are to be Then Run Reviewed before they Check this box are printed Printed Status Printed without any review If credits Need to be re-printed Are to be printed for the first time Leave this box unchecked and go to the next step Then Select the Printed option Select the Unprinted option eadvice User Guide 46
48 Field Print Copy on Reprints Transaction Number Document Number Batch Number Customer Code Document Date Posted Status If reprinted credits are To have Copy printed on them Then Check this box Leave this box unchecked Not to have Copy printed on them Enter or select the first and last transaction numbers to be printed. These fields are not mandatory and may be left blank. If left blank, care should be taken if only entering a Customer, there may be a number of transactions that are not required for the current process. Enter or select the first and last document numbers to be printed. These fields are not mandatory and may be left blank. Enter or select the first and last batch numbers to be printed. These fields are not mandatory and may be left blank. Enter or select the first and last customer code to be included in this process. Care should be taken if only entering a customer code as a single customer could have a number of credits over a period of time (some of which may be invalid for this process). It is recommended that the customer code is used in conjunction with either Transaction, Document or Batch numbers. Enter the first and last document dates to be printed. These fields are not mandatory and may be left blank. If credits are Then Unposted Posted Select the unposted option Select the posted option eadvice User Guide 47
49 Field Process Sort Order Select the order that the forms are to be processed / output. The process order default may be altered of required. Please see Maintain Advice Forms on page 19 for additional information. Note: If a process is started without a transaction or document number being entered a warning message will be displayed. This warning will not halt the process however all values entered in the print selection criteria should be reviewed. eadvice User Guide 48
50 Task 3: Printing AR Invoices Introduction Invoices can be previewed before they are printed to your fax or device and a range of Invoices can be printed at any one time. Invoices will be previewed in PDF file format and can be printed to a paper printer from within PDF if required. To Print AR Invoices: Click the Reports icon on the toolbar (left side of eadvice window) to access the Reports main window. Double click the Accounts Receivable folder, double click on the Invoice\Credit folder then double click on the AR Invoice icon and make the following entries. Field Print Preview Run If invoices are to Then be Check this box Reviewed before they are printed Printed without any review Leave this box unchecked and go to the next step Printed Status If invoices Need to be reprinted Are to be printed for the first time Then Select the Printed option Select the Unprinted option eadvice User Guide 49
51 Field Print Copy on Reprints If reprinted invoices are To have Copy printed on them Then Check this box Transaction Number Document Number Batch Number Customer Code Document Date Posted Status Not to have Copy Leave this box printed on them unchecked Enter or select the first and last transaction numbers to be printed. These fields are not mandatory and may be left blank. If left blank, care should be taken if only entering a Customer, there may be a number of transactions that are not required for the current process. Enter or select the first and last document numbers to be printed. These fields are not mandatory and may be left blank. Enter or select the first and last batch numbers to be printed. These fields are not mandatory and may be left blank. Enter or select the first and last customer code to be included in this process. Care should be taken if only entering a customer code as a single customer could have a number of invoices over a period of time (some of which may be invalid for this process). It is recommended that the customer code is used in conjunction with either Transaction, Document or Batch numbers. Enter the first and last document dates to be printed. These fields are not mandatory and may be left blank. If invoices are Then Unposted Posted Select the unposted option Select the posted option eadvice User Guide 50
52 Field Process Sort Order Select the order that the forms are to be processed / output. The process order default may be altered of required. Please see Maintain Advice Forms on page 19 for additional information. Note: If a process is started without a transaction or document number being entered a warning message will be displayed. This warning will not halt the process however all values entered in the print selection criteria should be reviewed. eadvice User Guide 51
53 Task 4: Printing Distribution Credits Introduction Credits can be previewed before they are printed to your fax or device and a range of Credits can be printed at any one time. Credits will be previewed in PDF file format and can be printed to a paper printer from within PDF if required. To Print Distribution Credits: Click the Reports icon on the toolbar (left side of eadvice window) to access the Reports main window. Double click the Accounts Receivable folder, double click on the Invoice\Credit folder then double click on the Distribution Credit icon and make the following entries. Field Print Preview Run If credits are to Then be Check this box Reviewed before they are printed Printed without any review Leave this box unchecked and go to the next step Printed Status If credits Need to be reprinted Are to be printed for the first time Then Select the Printed option Select the Unprinted option eadvice User Guide 52
54 Field Sales Order No Customer Code Location Code Date Shipped Invoice No Process Sort Order Enter or select the first and last sales order numbers to be printed. These fields are not mandatory and may be left blank. If left blank care should be taken if only entering a Customer and Location Code, there may be a number of transactions that are not required for the current process. Enter or select the first and last customer code to be included in this process. Care should be taken if only entering a customer code as a single customer could have a number of sales order credits over a period of time (some of which may be invalid for this process). It is recommended that the customer code is used in conjunction with either the Sales Order Number or the Location. Enter or select the first and last Location codes to be printed for this process. This field may be left blank. Enter the date range of orders that have been shipped and that require an invoice to be printed or reprinted. This field may be left blank. Enter the Invoice number range to be printed. This field may be left blank. Select the order that the forms are to be processed / output. The process order default may be altered of required. Please see Maintain Advice Forms on page 19 for additional information. Note: If a process is started without a sales order number being entered a warning message will be displayed. This warning will not halt the process however all values entered in the print selection criteria should be reviewed. eadvice User Guide 53
55 Task 5: Printing Distribution Invoices Introduction Invoices can be previewed before they are printed to your fax or device and a range of Sales Orders can be printed at any one time. Invoices will be previewed in PDF file format and can be printed to a paper printer from within PDF if required. To Print Distribution Invoices: Click the Reports icon on the toolbar (left side of eadvice window) to access the Reports main window. Double click the Accounts Receivable folder, double click on the Invoice\Credit folder then double click on the Distribution Invoice icon and make the following entries. Field Print Preview Run If invoices are to Then be Check this box Reviewed before they are printed Printed without any review Leave this box unchecked and go to the next step Printed Status If invoices Need to be reprinted Are to be printed for the first time Then Select the Printed option Select the Unprinted option eadvice User Guide 54
56 Field Sales Order No Customer Code Location Code Date Shipped Invoice No Process Sort Order Enter or select the first and last sales order numbers to be printed. These fields are not mandatory and may be left blank. If left blank care should be taken if only entering a Customer and Location Code, there may be a number of transactions that are not required for the current process. Enter or select the first and last customer code to be included in this process. Care should be taken if only entering a customer code as a single customer could have a number of sales orders over a period of time (some of which may be invalid for this process). It is recommended that the customer code is used in conjunction with either the Sales Order Number or the Location. Enter or select the first and last Location codes to be printed for this process. This field may be left blank. Enter the date range of orders that have been shipped and that require an invoice to be printed or reprinted. This field may be left blank. Enter the Invoice number range to be printed. This field may be left blank. Select the order that the forms are to be processed / output. The process order default may be altered of required. Please see Maintain Advice Forms on page 19 for additional information. Note: If a process is started without a sales order number being entered a warning message will be displayed. This warning will not halt the process however all values entered in the print selection criteria should be reviewed. eadvice User Guide 55
 to access the Reports main window.")
57 Task 6: Printing Statements Introduction Statements can be previewed before they are printed to your fax or device and will be previewed in PDF file format and can be printed to a printer from within PDF if required. To Print Customer Statements: Click the Reports icon on the toolbar (left side of eadvice window) to access the Reports main window. Double click the Accounts Receivable folder, then double click on the Customer Statements folder and double click the Customer Statement icon, then make the following entries. Field Print Preview Run If statements are to Then be Reviewed before they are printed Check this box Customer Code Statement Code Printed without any review Leave this box unchecked and go to the next step Enter or select the first and last customer code to be included in this process. This field may be left blank. Enter or select the first and last statement code to be printed for this process. This field may be left blank. eadvice User Guide 56

58 Balance Over Field Date Process Sort Order Enter or select the dollar value which will be the minimum amount overdue before the statement will be selected for printing. If all statements are to be printed irrespective of the overdue amount, leave this field blank. This is a mandatory field and a date range must be entered. Enter or select the date range for which the statements are to be printed. Select the order that the forms are to be processed / output. The process order default may be altered of required. Please see Maintain Advice Forms on page 19 for additional information. Task 7: Printing Customer Aging Report Introduction Customer Aging Reports can be previewed before they are printed to your fax or device and will be previewed in PDF file format and can be printed to a printer from within PDF if required. Sent to Salesperson contact type (SP). To Print Customer Aging Report: Click the Reports icon on the toolbar (left side of eadvice window) to access the Reports main window. Double click the Accounts Receivable folder, then double click on the Customer Statements folder and double click the Customer Aging Report icon, then make the following entries. eadvice User Guide 57
59 Field Print Preview Run If reports are to be Reviewed before they are printed Then Check this box Salesperson Code Customer Code Price Class Territory Code Transaction Aging Date Printed without any review Leave this box unchecked and go to the next step Select Salesperson range you want to generate reports for. Enter or select the first and last customer code to be included in this process. This field may be left blank. Enter or select the first and last price class code to be printed for this process. This field may be left blank. Enter or select the first and last territory code to be printed for this process. This field may be left blank. Choose the appropriate radio button. eadvice User Guide 58
60 Chapter 3: eadvice Security Overview Introduction This chapter explains how to grant user access to eadvice forms and reports. In this chapter This chapter contains the following topics: Topic Page Maintain Users 59 Maintain User Access 60 Maintain Users The Maintain Users screen is used to create a list of eadvice users. Any valid database user can be added to the list. A user can be granted unlimited access to eadvice forms and reports by checking ON the Super User checkbox. Alternatively a user can be granted access to only certain forms and reports by using the Maintain User Access screen. eadvice User Guide 59

61 Maintain User Access The Maintain User Access screen is used to grant a user access to certain forms and reports. Choose a user name from the drop down box. To add all modules at once use the Add All button. To add a single module, double click on the available module code. To assign appropriate access level to a module, use the Access drop down box. To remove a single module from the list, use Delete menu icon. To remove all the modules use Remove All button. eadvice User Guide 60
62 Appendix 1 Overview Introduction In this chapter This chapter contains additional information that is related to the eadvice module. This chapter contains the following topics: Topic Page Maintaining Contacts & Distribution 62 Additional Information for Subject and Message 63 eadvice User Guide 61

63 Maintaining Contacts & Distribution Overview Introduction There are a number of options associated with the Maintain Contact Screens, dependant on the options you choose when installing eadvice, and to some degree whether you have the Distribution module installed. The contact screens can be maintained either in eadvice or the Distribution module. If there are any existing contacts in the Distribution module they will be displayed in the maintenance screen however they will not be available to be used in eadvice unless the Contact Code is one of the following (or any other contact codes that have been added by the business): Alternatively, the Contact screens may be populated from the AR or AP master tables however this limits the contacts to one per customer / vendor. This may be restrictive if, for example, Purchase Orders are sent to one department but the payments are sent to another or if Customer Invoices are sent to one person while Statements are sent to the Accountant. eadvice User Guide 62
64 Additional Information for Subject and Message Overview Introduction The subject and message of a communication to your client or vendor may need additional information apart from the contact name. Listed below are the additional fields that can be included in either the subject or message. eadvice Code <contact_name> <recipient_code> <transaction_no> <recipient_send_to> <#recipient_send_to> <recipient_fax> <recipient_ > <doc_no_1> Data Representation The contact name as established in eadvice Contact Maintenance. The customer or vendor code for the communication. The transaction control number for the communication. The address or fax number of the recipient. This code is used for faxing where the hash (#) and fax number is required to be in the subject or message body. This may be required for faxing software other than Winfax. Please refer to the documentation of your faxing software. If this code is used, the fax number from the contacts table will always be inserted into the communication regardless of the delivery method selected. If this code is used, the address from the contacts table will always be inserted into the communication regardless of the delivery method selected. Invoice Number or Credit Return Number. Applies to Invoice and Credit Return forms. Please refer to the example below. You can use the above codes in both Subject and Message predefined texts. The codes will be substituted with the actual values when ing. eadvice User Guide 63

65 eadvice User Guide 64
COLLECTIONS MANAGEMENT. Microsoft Dynamics GP 2015 Version
 COLLECTIONS MANAGEMENT Microsoft Dynamics GP 2015 Version 2016.1 August, 2016 CONTENTS CHAPTER 1: INTRODUCTION TO COLLECTIONS MANAGEMENT... 5 COLLECTIONS MANAGEMENT... 5 FEATURES AND BENEFITS... 5 CHAPTER
PDFBlaster Installation Overview
 Page 1 of 51 PDFBlaster Installation Overview Step 1 If you downloaded the PDFBlaster setup file (pdfblaster.exe) from the Internet, locate where you downloaded this file and then double-click on it to
COLLECTIONS MANAGEMENT
 fde COLLECTIONS MANAGEMENT Microsoft Dynamics GP2015, GP2016, GP2018 Version 18.4 November 2018 CONTENTS CHAPTER 1: INTRODUCTION TO COLLECTIONS MANAGEMENT...5 COLLECTIONS MANAGEMENT... 5 FEATURES AND BENEFITS...
COLLECTIONS MANAGEMENT
 fde COLLECTIONS MANAGEMENT Microsoft Dynamics GP2015, GP2016, GP2018 Version 18.1 Feb 1, 2018 CONTENTS CHAPTER 1: INTRODUCTION TO COLLECTIONS MANAGEMENT... 5 COLLECTIONS MANAGEMENT... 5 FEATURES AND BENEFITS...
Invoice 13 Pro Outline
 Invoice 13 Pro Outline Invoice 13 Pro is a feature rich productivity tool for the small business or company from 1 to 30 users. It is notjust an Invoicing software. It is in fact an Invoicing, Accounts
Active Documents User guide Dynamics GP 2013
 Active Documents User guide Dynamics GP 2013 Email customisable HTML documents including Remittances, Statements and Sales Orders, and Purchase Orders containing drill-down functionality using Dynamics
Download installation package and documentation Installation procedure. Network installation Installing updates
 -Manual d-basics I Manual d-basics Table of Contents Chapter I Introduction 1 Chapter II Installation 3 1... Download installation package and documentation 4 2... Installation procedure 4 3... Registration
Forms Printer User Guide
 Forms Printer User Guide for Dynamics GP 2015 Forms Printer Build Version: 14.00.149 System Requirements Microsoft Dynamics GP 2015 (desktop client, web client) Microsoft SQL Server 2005 or Higher Reporting
Get Started. Document Management 9.7.1
 Get Started Document Management 9.7.1 NOTICE This document and the Sage Timberline Office software may be used only in accordance with the accompanying Sage Timberline Office End User License Agreement.
PACS. Installation & Going Live. User Guide. pacs1.4
 PACS Installation & Going Live User Guide pacs1.4 Tribal SchoolEdge Level 1, 17 Madden Grove RICHMOND VIC 3121 Support Centre: Web: https://support.schooledge.com.au/ Email: support.schooledge@tribalgroup.com
Copyrights and Trademarks. Copyrights and Trademarks. Sage One Invoicing Getting Started Guide 1
 Copyrights and Trademarks Copyrights and Trademarks Sage One Invoicing Getting Started Guide 1 Copyrights and Trademarks Copyright 2002-2017 by Us. We hereby acknowledge the copyrights and trademarks of
Paperless Office: Period End Processing LM-1020
 Paperless Office: Period End Processing LM-1020 Overview This Extended Solution allows printing of MAS 90 MAS 200 Period End reports in PDF Format and provides a Viewer utility for the viewing and deleting
MYOB Advanced Business
 MYOB Advanced Business AP Payment Processing Improvements Last Updated: 22 January 2016 Contents AP Payment Processing Improvements 1 Background... 1 1. Matching multiple AP payments to one bank transaction...
Sage Singapore Tax Reports User's Guide. August 2018
 Sage 300 2019 Singapore Tax Reports User's Guide August 2018 This is a publication of Sage Software, Inc. 2018 The Sage Group plc or its licensors. All rights reserved. Sage, Sage logos, and Sage product
Eclipse Forms. Release 8.7.2
 Eclipse Forms Release 8.7.2 Legal Notices 2011 Epicor Software Corporation. All rights reserved. Unauthorized reproduction is a violation of applicable laws. Epicor and the Epicor logo are registered trademarks
Genesis Advantage. Version 7
 Welcome to Genesis Advantage version 7! We have packed many new features and enhancements into this release. Most of these features were suggested by our clients and we appreciate your input. We have included
Paperless Office: Purchase Orders PO-1165
 Paperless Office: Purchase Orders PO-1165 Overview This Extended Solution to the standard MAS 90 MAS 200 Purchase Order module prints purchase orders, both graphical and non graphical forms, to PDF files.
Associated Connect. Quick Reference Guide: Lockbox
 Associated Connect Quick Reference Guide: Lockbox Page 2 of 12 Table of Contents Associated Connect Lockbox Module...3 Getting started...3 Lockbox Menu...3 Dashboard...4 Customer Delivery...4 Profile...4
Nexsure Training Manual - Accounting. Chapter 7
 Nexsure Training Manual - Accounting Vendor Entries In This Chapter Vendor Entries at the Organization and Territory Level Vendor Entity Definition Disbursements to Vendors Line Item Distribution Receiving
A Guide for Customer Accounts
 A Guide for Customer Accounts Introduction This document contains set up and configuration guides for ODDS Customer Accounts. This manual helps to assist customers with the setup of their ODDS account,
Data Import Guide DBA Software Inc.
 Contents 3 Table of Contents 1 Introduction 4 2 Data Import Instructions 5 3 Data Import - Customers 10 4 Data Import - Customer Contacts 16 5 Data Import - Delivery Addresses 19 6 Data Import - Suppliers
How to Navigate UC Berkeley s ebill System
 University of California, Berkeley How to Navigate UC Berkeley s ebill System Step-by-Step Guide for Non-Student Customers 2014 Table of Contents Overview... 2 Getting Access... 2 Initial Login... 2 Log
Enhancements Included in the Wisdom Accounting Suite Software Version
 Enhancements Included in the Wisdom Accounting Suite Software Version 12.3.1 This document lists the enhancements and program corrections in this new release of the accounting software. Listed below are
Enhancements Guide. Applied Business Services, Inc. 900 Wind River Lane Suite 102 Gaithersburg, MD General Phone: (800)
") Enhancements Guide Applied Business Services, Inc. 900 Wind River Lane Suite 102 Gaithersburg, MD 20878 General Phone: (800) 451-7447 Support Telephone: (800) 451-7447 Ext. 2 Support Email: support@clientaccess.com
Enhancements Guide Applied Business Services, Inc. 900 Wind River Lane Suite 102 Gaithersburg, MD 20878 General Phone: (800) 451-7447 Support Telephone: (800) 451-7447 Ext. 2 Support Email: support@clientaccess.com
CK Sales Invoices
 CK Email Sales Invoices A Guide for the Installation and Activation of CK Systems CK Email Sales Invoices for the Pegasus Opera II/3 Accounting System. (Updated 11/09/13) CK Email Sales Invoices Page 1
Macola Enterprise Suite Release Notes: Macola ES
 Page 1 of 8 Macola Enterprise Suite Release Notes: Macola ES9.5.300 Release: version ES9.5.300 Controlled Release Date: October 26, 2009 Mai Cat Sub Ass Rel Doc ID: Dat General Availability Release Date:
Issue dated 25 th July Create Credit Notes
 Create Credit Notes From time to time a business may have to issue a credit note to a customer to cancel an invoice or part of the value of the invoice. Usually, as an Invoice has already been previously
Unit: Financials Topic: Manage the Chart of Accounts
 Solutions Unit: Financials Topic: Manage the Chart of Accounts 1-1 Transactions Which function do you use to change the properties for a G/L account? Financials Chart of Accounts Which function do you
Accounts Payable MODULE USER S GUIDE
 Accounts Payable MODULE USER S GUIDE INTEGRATED SOFTWARE SERIES Accounts Payable MODULE USER S GUIDE Version 3.1 Copyright 2005 2009, Interactive Financial Solutions, Inc. All Rights Reserved. Integrated
TECSYS Streamline Enterprise System Page 1 of 7
 TECSYS Streamline Enterprise System Page 1 of 7 Section 1: Module: A/P Accounts Payable 1. 10.3.1 Enhancement to Interface to Scan and Store A/P Invoice Images Module: A/R Accounts Payable > A/P Invoicing..
Sage ERP Accpac Online 5.5
 Sage ERP Accpac Online 5.5 Integration Resource Guide for Sage ERP Accpac And Sage CRM (Updated: July 11, 2010) Thank you for choosing Sage ERP Accpac Online. This Resource Guide will provide important
CPE for Lunch. Getting More out of Dynamics GP Accounts Payable Webinar. Presented by Fil Schwartz
 02-21-17 CPE for Lunch Getting More out of Dynamics GP Accounts Payable Webinar Presented by Fil Schwartz INTRODUCTION Overview: We re going cover 10 Payables topics today in about 50 minutes with some
Documents User Manual Document Revision: 1
 User Manual Email Documents v1.x For Retail Pro 8-Series v8.52 and Above Overview The Email Docs plugin allows you to email Purchase Orders and Sales Orders. It also allows you to email Receipts as well
Client-Account Receivable
 Nexsure Training Manual - Accounting Client-Account Receivable In This Chapter Client Accounts Receivable Entity Definition Receive Payments from Clients Relating to Policies Allocation of Payment Leave
NCLTEC Accounting User Manual
 NCLTEC Accounting User Manual Latest Update: Feb 6, 0 For information about customer support, please visit our homepage at http://www.ncltec.com on the World Wide Web. Copyright 05 NCL Energy Technology
Nexsure Training Manual - Accounting. Chapter 13
 Tax Authority In This Chapter Tax Authority Definition Reconciling Tax Authority Payables Issuing Disbursement for Tax Authority Payables Paying the Tax Authority Prior to Reconciling Tax Authority Definition
User Manual SL-DD-Collect-1 v2.0.9 (with v2010)
") User Manual SL-DD-Collect-1 v2.0.9 (with v2010) Objective A means to collect money from customer accounts via the Sales Ledger in Sage 200 using Direct Debit mechanisms provided by BACS systems, in a similar
User Manual SL-DD-Collect-1 v2.0.9 (with v2010) Objective A means to collect money from customer accounts via the Sales Ledger in Sage 200 using Direct Debit mechanisms provided by BACS systems, in a similar
Copyrights and Trademarks. Copyrights and Trademarks. Accounting Getting Started Guide 1
 Copyrights and Trademarks Copyrights and Trademarks Accounting Getting Started Guide 1 Copyrights and Trademarks Copyright 2002-2018 by Us. We hereby acknowledge the copyrights and trademarks of all terms
BBVA Compass Spend Net Payables
 User Guide BBVA Compass Spend Net Payables User Guide Vault Services Table of Contents Introduction 2 Technical Requirements 2 Getting started 3 Sign In 3 General Navigation 4 Upload/Create Payment 5
Pepkor webcom Quick Reference Guide. Version Date: 2013/12 Version Number: 1.3
 Pepkor webcom Quick Reference Guide Version Date: 2013/12 Version Number: 1.3 Table of Contents 1 INTRODUCTION... 4 2 LOGGING IN... 4 3 NAVIGATE INSIDE WEBCOM... 5 3.1 MAIN SECTION 5 3.1.1 Home... 5 3.1.2
Getting Around QuickBooks Online
 QuickBooks Online Student Guide Chapter 2 Getting Around QuickBooks Online Chapter 2 Chapter 2 Now that you ve finished your company setup in QuickBooks Online, you re ready to get started. It s a good
APDM. Accounts Payable InstaDocs
 DSD Business Systems Sage 100 Enhancements APDM Accounts Payable InstaDocs Version 6.00 2 A/P InstaDocs Information in this document is subject to change without notice. Copyright 1993-2018, DSD Business
RESOLV EDI CONTROL. User Guide Version 9.2 for HANA PRESENTED BY ACHIEVE IT SOLUTIONS
 RESOLV EDI CONTROL User Guide Version 9.2 for HANA PRESENTED BY ACHIEVE IT SOLUTIONS Copyright 2011-2016 by Achieve IT Solutions These materials are subject to change without notice. These materials are
Copyrights and Trademarks. Copyrights and Trademarks. Accounting Start Getting Started Guide 1
 Copyrights and Trademarks Copyrights and Trademarks Accounting Start Getting Started Guide 1 Copyrights and Trademarks Copyright 2002-2018 by Us. We hereby acknowledge the copyrights and trademarks of
Contents OVERVIEW... 3
 Contents OVERVIEW... 3 Feature Summary... 3 CONFIGURATION... 4 System Requirements... 4 ConnectWise Manage Configuration... 4 Configuration of Manage Login... 4 Configuration of GL Accounts... 5 Configuration
User Guide. Trade Finance Global. For customers using Guarantees. October nordea.com/cm OR tradefinance Name of document 5/8 2015/V1
 User Guide Trade Finance Global For customers using Guarantees October 2015 nordea.com/cm OR tradefinance Name of document 2015/V1 5/8 Table of Contents 1 Trade Finance Global (TFG) - Introduction... 4
IN-HOUSE DISTRICTS Please contact your Technology person for details. Your district tech person will be receiving notice of this release directly.
 SMART Finance Bulletin FY 2019-02 December 5, 2018 SMART Version 18.3 Update RDS DISTRICTS If you are a district using the RDS system, the upgrade will be completed for your database starting at 4:00 PM
PUBLIC. How to Manage Batch Numbers. All Countries. Solutions from SAP. SAP Business One 2007 A and 2007 B. August English
 PUBLIC How to Manage Batch Numbers All Countries Solutions from SAP SAP Business One 2007 A and 2007 B August 2008 English Contents Purpose... 3 Defining General Settings... 4 Procedure... 4 Setting Authorizations...
CFPM Office Management System 2010 New Features Guide
 CFPM Office Management System 2010 New Features Guide Developed by: 1 Table of Contents Table of Contents... 2 Login... 3 Switchboard... 3 Notifications... 3 Reminders... 3 Tasks... 3 Note Pad... 3 Schedule...
Solar Eclipse Trackers, Logs, and Queues. Release 9.0.4
 Solar Eclipse Trackers, Logs, and Queues Release 9.0.4 i Table Of Contents Disclaimer This document is for informational purposes only and is subject to change without notice. This document and its contents,
RG Connect 2015 Microsoft Dynamics GP Tips and Tricks October Prepared by Sheri Carney
 RG Connect 2015 Microsoft Dynamics GP Tips and Tricks October.23.2015 Prepared by Sheri Carney 600 SW 39 th Street, Suite 250 Renton, WA 98057 425.277.4760 www.resgroup.com Contents GLOBAL TIPS... 4 1.
Vendor Inquiry and Reports Munis Version 11.2
 Objective This document gives you step by step instructions for using the Vendor Inquiry/Reports program to query the vendor master table for information regarding a specific vendor(s) and how to produce
Balance Point Technologies, Inc. MAX Toolbar for Microsoft Dynamics GP V2013. User Guide
 Balance Point Technologies, Inc. MAX Toolbar for Microsoft Dynamics GP V2013 User Guide MAX Toolbar for Microsoft Dynamics GP V2013 Copyright Manual copyright 2013 Balance Point Technologies, Inc. All
Workflow and Approvals Guide. For Document Manager Enterprise Edition
 Workflow and Approvals Guide For Document Manager Enterprise Edition 16 July 2013 Trademarks Document Manager and Document Manager Administration are trademarks of Document Logistix Ltd. TokOpen, TokAdmin,
Financial Management 1099 Processing Year-End Update Guide
 Financial Management 1099 Processing - 2016 Year-End Update Guide December 20, 2016 2016 Tyler Technologies. All Rights Reserved. All rights reserved. Information within this document is the sole property
Version 4.62 or Later. Copyright 2013 Interactive Financial Solutions, Inc. All Rights Reserved. ProviderPro System Administration Guide.
 Version 4.62 or Later Copyright 2013 Interactive Financial Solutions, Inc. All Rights Reserved. ProviderPro System Administration Guide. This manual, as well as the software described in it, is furnished
Supplier User Guide for AL Oracle isupplier
 Supplier User Guide for AL Oracle isupplier Version Date March 2017 TABLE OF CONTENTS Table of Contents... 2 OVERVIEW - ISUPPLIER... 4 Help & Support... 4 Definitions... 4 SYSTEM LOGIN & NAVIGATION...
Previous Update: Customer Master Version 6 Release 2, Update Letter dated August 2008.
 Date: February 2009 From: MACC Marketing Communications Re: Version 6 Release 3 The following enhancements have been made to the Customer Master software application. Please take the time to look over
Release Features CASH v2018.3
 Release Features CASH v2018.3 Document issue history Date Issue 01/10/2018 Draft 1.0 C J M Farrar Page 1 of 16 Table of Contents 1 Global... 3 1.1 CASH Launcher... 3 1.1.1 CF29004920 Changes to the Cashforwindows.exe
Financial Services Training Guide. PeopleSoft (9.1): Introduction to Electronic Purchase Orders
: Introduction to Electronic Purchase Orders") Financial Services Training Guide PeopleSoft (9.1): Introduction to Electronic Purchase Orders Page 1 24 May 2016 Table of Contents 1 Create a Purchase Order... 3 2 Switching off GST... 12 3 Search for
Financial Services Training Guide PeopleSoft (9.1): Introduction to Electronic Purchase Orders Page 1 24 May 2016 Table of Contents 1 Create a Purchase Order... 3 2 Switching off GST... 12 3 Search for
Sage What s New. March 2019
 Sage 100 2019 What s New March 2019 2019 The Sage Group plc or its licensors. All rights reserved. Sage, Sage logos, and Sage product and service names mentioned herein are the trademarks of The Sage Group
Series 6 Technical Admin Guide Page 1
 Series 6 Technical Admin Guide Page 1 TABLE OF CONTENTS PRODUCT REGISTRATION... 6 Free Trial Registration and the Wizard...7 How the Trial Works...8 Register Invu Document Management...8 Privileges for
Sappi Ariba Network. Summit Guided Session: Account Configuration
 Sappi Ariba Network Summit Guided Session: Account Configuration 1 Manage invitation letter + 2 Landing Page Sappi 2 1 1 Open the Invitation Letter that you received at your email address from ordersender-prod@ansmtp.ariba.com
10 Minute Demonstration Script
 10 Minute Demonstration Script Table of Contents The Demo... 3 The Interface... 3 Demo Flow... 3 Capture and Indexing... 4 Searches... 6 Integration and Workflow... 8 2 P a g e The Demo Most demonstrations
CMS. QuickBooks Interface Manual
 CMS QuickBooks Interface Manual Copyright 2006 Tailwind Management Systems Inc. All rights reserved. No part of this publication may be reproduced or stored in a retrieval system, in any form or by any
USER GUIDE. June 2012 VERSION 1.0. Supplier Portal. Kimberly-Clark. E-sourcing
 USER GUIDE June 2012 VERSION 1.0 Supplier Portal Kimberly-Clark E-sourcing Copyright 2005, Kimberly-Clark Worldwide, Inc. All rights reserved. This document and its associated training materials are proprietary
CounterPoint SQL and QuickBooks Interface
 CounterPoint SQL and QuickBooks Interface General Ledger CounterPoint account numbers are mapped to corresponding G/L account numbers. Mapping rules can be set up that pertain to all accounts, or on a
Expedient User Manual Getting Started
 Volume 1 Expedient User Manual Getting Started Gavin Millman & Associates Pty Ltd 281 Buckley Street Essendon VIC 3040 Phone 03 9331 3944 Web www.expedientsoftware.com.au Table of Contents Logging In...
Balance Point Technologies, Inc. MAX Toolbar for Microsoft Dynamics GP. For MAX (SQL Server) User Guide
 User Guide") Balance Point Technologies, Inc. www.maxtoolkit.com MAX Toolbar for Microsoft Dynamics GP For MAX (SQL Server) User Guide MAX Toolbar for Microsoft Dynamics GP Copyright Manual copyright 2010 Balance Point
Balance Point Technologies, Inc. www.maxtoolkit.com MAX Toolbar for Microsoft Dynamics GP For MAX (SQL Server) User Guide MAX Toolbar for Microsoft Dynamics GP Copyright Manual copyright 2010 Balance Point
Version Operator Orientation. TIMMS Client. A guide to using the TIMMS System. Training & Navigation Notes
 Version 7.2.4 Operator Orientation TIMMS Client A guide to using the TIMMS System Training & Navigation Notes Disprax Pty Ltd 2015 WHAT IS TIMMS? TIMMS Stands for: Total Industry Management and Marketing
Vendor Maint/Reports Menu Vendor Inquiry/Reports MUNIS Version 7
 Module: Topic: Accounts Payable Vendor Maint/Reports Menu Vendor Inquiry/Reports MUNIS Version 7 Objective This document gives you step by step instructions for using the Vendor Inquiry/Reports program
User Documentation. t-commerce User s Guide
 User Documentation t-commerce User s Guide TRIBUTE INC. USER DOCUMENTATION t-commerce User s Guide Copyright Notice and Trademarks 2000-2007 Tribute, Inc. All rights reserved t-commerce is a registered
AR Collections Manager for Microsoft Dynamics SL. Installation and Set-Up Guide
 AR Collections Manager for Microsoft Dynamics SL Installation and Set-Up Guide 2018 Crestwood Associates LLC All Rights Reserved Revised 12/2018 Page 2 of 33 Table of Contents AR COLLECTIONS MANAGER OVERVIEW...
Administrator Manual. Last Updated: 15 March 2012 Manual Version:
 Administrator Manual Last Updated: 15 March 2012 Manual Version: 1.6 http://www.helpdeskpilot.com Copyright Information Under the copyright laws, this manual may not be copied, in whole or in part. Your
Transform AP for EnterpriseOne User's Guide
 Transform AP for EnterpriseOne User's Guide Transform AP for EnterpriseOne User s Guide Version 1.0 Copyright 2008 Bottomline Technologies, Inc. All rights reserved. Information in this document is subject
Documentation for the new Self Admin
 Documentation for the new Self Admin The following documentation describes the structure of the new Self Admin site along with the purpose of each site section. The improvements that have been made to
Document Capture for Microsoft Dynamics NAV
 Document Capture for Microsoft Dynamics NAV Walkthroughs - Version 4.50 Document Capture - Walkthroughs - Version 4.50 Page 1 / 57 TABLE OF CONTENTS TABLE OF CONTENTS... 2 SETUP AND ADMINISTRATION WALKTHROUGHS...
For Macola Progression Series
 PDFBlaster QuickStart Guide For Macola Progression Series Revised: December 21, 2005 PDFBlaster QuickStart Guide: For Macola Progression Series Page 2 of 21 Installing PDFBlaster Make sure you have already
Basware Invoice Processing Procedure Manual
 Basware Invoice Processing Procedure Manual TERMINOLOGY... 2 HOW TO ACCESS BASWARE INVOICE PROCESSING THIN CLIENT... 2 CHAPTER 1 RECEIVED INVOICES WINDOW... 2 CHAPTER 2 HOW TO CODE A STANDARD INVOICE...
USER GUIDE: SABRE SABRE
 USER GUIDE: SABRE SABRE Stracom Pty Ltd ABN 49 093 115 523 PO Box 142 Stones Corner QLD 4120 t 1300 302 667 f +61 733 242 226 e info@stracom.net w www.stracom.net CONTENTS 1.0 Introduction 4 2.0 Installation
Along the top of the Inbox is a toolbar with icons for commonly used functions within .
 Outlook Inbox Once you log on to Outlook on the Web, the default page is your Outlook Inbox. For detailed information about logging into your account see: Getting Started - Logging On. The Inbox Viewer
SIAM R3.0 USER GUIDE
 SIAM R3.0 USER GUIDE Document Reference: 8295 September 2016 Revision: 3 Version Date Author Changes Number 1 Mar 2015 John Lindsay 2 Jun Sam Unsuspending a SIM card description updated. 2016 Smith 3 Sep
Nexsure Training Manual - Accounting. Chapter 15
 Nexsure Training Manual - Accounting Batch Printing In This Chapter Batch Printing Definition Batch Printing Invoices Batch Printing Checks Ordering Nexsure Checks and Invoices Batch Printing Definition
Application Server Release 2015
 Application Server Release 2015 Disclaimer This document is provided as-is. Information and views expressed in this document, including URL and other Internet Web site references, may change without notice.
New Features... 4 Add-on Modules Cheat Sheet... 15
 1 2 Table of Contents New Features... 4 Favourites option... 4 New Icons... 4 Windows theme integration... 5 Forms Assistant... 6 Forms designer enhancements... 7 User Access Report... 8 User Notifications
User's Guide. Alpha Five Accounting. Accounting Made Easy. Version 3.0. Copyright BetaSoft LLC - All Rights Reserved
 User's Guide Alpha Five Accounting Copyright 1995-2002 BetaSoft LLC - All Rights Reserved Accounting Made Easy Version 3.0 Alpha Five is a trademark of Alpha Software Corp. i ii Table of Contents INTRODUCTION...1
PowerLink CRM User Guide
 PowerLink CRM User Guide Last Updated: February 2009 Version: 2.06000 Contents Contents... 2 Introduction... 4 Quick Start... 5 Using CRM... 6 Searching for Customers... 6 Maintaining Customer Records...
Gift Card Instructions Daxko Spectrum
 Gift Cards Gift card are good to use for a variety of reason: 1. You can track the declining balance on them. 2. You can recharge them; treat it as a cash card. The cards can be attached to a recipient.
Webforms Quick Reference Version 13.0
 Page 1 of 14 Webforms Quick Reference Version 13.0 Background & Overview Webforms is the latest addition to the Woolworths and B2B product range. Ideal for s who are yet to become EDI (Electronic Data
SedonaOffice Users Conference. San Francisco, CA January 21 24, Sedona . Presented by: Jim Mayes Carolyn Johnson
 SedonaOffice Users Conference San Francisco, CA January 21 24, 2018 SedonaEmail Presented by: Jim Mayes Carolyn Johnson This Page Intentionally Left Blank Page 2 of 50 Table of Contents Overview... 4 What
CONNECTED 8.2 Release Notes
 CONNECTED 8.2 Release Notes Introduction... 3 Minimum System Requirements for Connected 8.2... 3 Connected 8.2 Installation... 3 Enhancements... 4 General Enhancements... 4 Advanced Email Templates...
Microsoft Dynamics GP. Localization Chile
 Microsoft Dynamics GP Localization Chile Copyright Copyright 2010 Microsoft. All rights reserved. Limitation of liability This document is provided as-is. Information and views expressed in this document,
RELEASE NOTES: FEBRUARY 23, 2016
 RELEASE NOTES: 2.16.01 FEBRUARY 23, 2016 Highlights from this release Report Criteria Favourites Change Name on WO/LOT/INV with blend Save report criteria so you can run it the same way next time. Read
Defect Repair Report as of 10/10/2014
 27.05 Page 1 of 16 Release Notes By Module Framework The system reports no longer fail due to special characters in certain report names. 27.05-632 Framework The EFI Pace server now includes a patch for
PDFBlaster QuickStart Guide. For Accountmate LAN. Revised: Thursday, February 16,
 PDFBlaster QuickStart Guide For Accountmate LAN Revised: Thursday, February 16, 2006 PDFBlaster QuickStart Guide: For Accountmate LAN Page 2 of 21 Installing PDFBlaster Make sure you have already downloaded
1. About AP Invoice Wizard
 1. About AP Invoice Wizard Welcome to AP Invoice Wizard. We have developed this tool in response to demand from Oracle Payables users for a user friendly and robust spreadsheet tool to load AP Invoices
MYOB Advanced. Release Notes
 MYOB Advanced Release Notes 2017.1.5 Contents Introduction 1... 1 Installing this Release... 1 New Features 2 Payroll Updates... 2 Updates to Payroll Tax... 2 Regenerating Payslips... 3 Improvements to
PRINTER S PLAN New Features and Improvements
 Addendum to User s Guide 2003.51 1 PRINTER S PLAN 2003.51 New Features and Improvements New Data Entry and Pricing Options Defaults / Options / Data Entry: There are three new options for updating the
Voucher Approver Quick Reference
 Approval Concepts Overview In BearBuy, the voucher (created from a supplier invoice sent to Accounts Payable) is routed for department approval when the invoice is $5,000 or greater. Vouchers are created
Oracle isupplier Guide Migrated Suppliers
 Oracle isupplier Guide Migrated Suppliers A guide to getting started Version 2 Inside this guide Logging in and Changing your Password Amending your Address Updating your Contact Details Updating your