Fax Server ISDN Manual
|
|
|
- Archibald Morris
- 6 years ago
- Views:
Transcription
1 Fax Server ISDN Manual V4.1 VC1558
2 2 Fax Server ISDN manual Vidicode
3 The Fax Server ISDN desktop models 1. Menu keys 2. Backlight Display 3. Function keys 4. Speaker 5. Alfa-Numerical keys 6. CryptoCard reader 7. CD Recorder 8. Recorder keys 9. Speakerphone key 10. Volume adjustment Fax Server ISDN manual Vidicode 3


4 The Fax Server ISDN 19" models - Front panel 1. Internal loudspeaker 2. Backlight Display 3. Menu keys 4. Function keys 5. Alfa-Numerical / Recorder keys 4 Fax Server ISDN manual Vidicode

5 Connections Fax Server PRI - on 19 model 1. Loudspeaker 3.5 mm mini jack 2. Microphone 3.5 mm mini jack 3. Ethernet/LAN RJ45 4. RS pin female serial connector 5. ISDN/PRI Out RJ45 6. ISDN/PRI In RJ45 Fax Server ISDN manual Vidicode 5
6 Connections Fax Server ISDN - desktop model 1. Power 2. Loudspeaker 3. Microphone 4. RS 232 serial connection 5. Ethernet/LAN 6. ISDN BRI 4 (lines 7+8) 7. ISDN BRI 3 (lines 5+6) 8. ISDN BRI 2 (lines 3+4) 9. ISDN BRI 1 (lines 1+2) 6 Fax Server ISDN manual Vidicode
 6. ISDN BRI 3 (lines 5+6) 7. ISDN BRI 2 (lines 3+4) 8.")
7 Connections Fax Server ISDN 19 model 1. Loudspeaker 2. Microphone 3. RS 232 serial connection 4. Ethernet/LAN 5. ISDN BRI 4 (lines 7+8) 6. ISDN BRI 3 (lines 5+6) 7. ISDN BRI 2 (lines 3+4) 8. ISDN BRI 1 (lines 1+2) Fax Server ISDN manual Vidicode 7


8 Function-keys on desktop model Function-keys on 19 model 8 Fax Server ISDN manual Vidicode
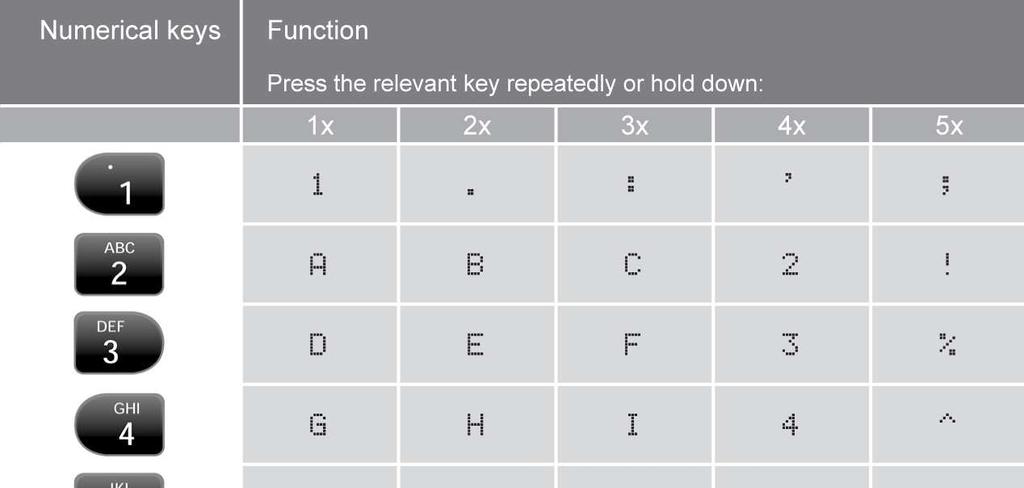

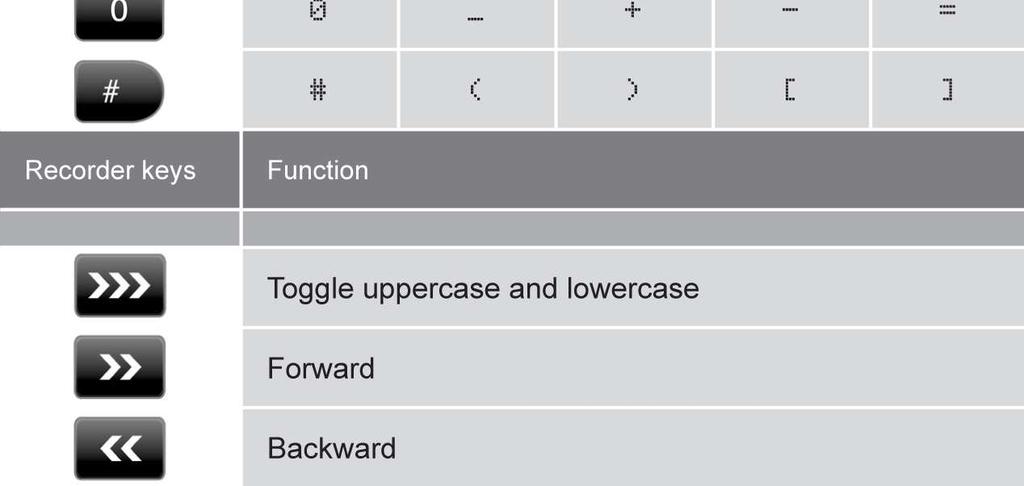
9 Alfa-numerical functions Fax Server ISDN manual Vidicode 9


10 Care and Maintenance Keep the Fax Server dry. If it gets wet, wipe it dry immediately Liquids might contain minerals that can corrode the electronic circuits. Use and store the Fax Server only in normal temperature environments. Temperature extremes can shorten the life of electronic devices and distort or melt plastic parts. Keep the Fax Server away from excessive dust and dirt that can cause premature wear of parts. Do not use harsh chemicals, cleaning solvents or strong detergents to clean the Fax Server. 10 Fax Server ISDN manual Vidicode
11 Contents 1 Introduction Unpacking and installation What is in the box Connecting to power Connecting to E1 primary rate ISDN Connecting to S0 Basic Rate ISDN Without other equipment in Stand Alone mode With other equipment in Stand Alone mode With other equipment in Pass Through mode Configuration and operation Operation basics Frequently used key indicators Save Changes System settings Fax ID Top text Dial prefix Stand Alone Mode Connection (BRI only) Total Lines (BRI only) Max. Fax Lines Max. Rx Fax Lines Max. Tx Fax Lines Tx Retries Tx Retry Time Tx Answer Timeout Tx Start Time Tx Stop Time Fax to printer Protect the Fax Server with a Password Remove Password protection Set the Clock Set the Language LAN settings FTP user FTP password Fax Server ISDN manual Vidicode 11
12 5.3 FTP port DHCP server IP address IP subnet mask Gateway IP name address Reply address SMTP server IP address SMTP server port SMTP Login Domain name DNS server Printer address Printer port Printer queue NTP Server NTP Server Port GMT correction Telnet Service timer The Internal Number List and how faxes are answered Add a new number to the internal number list Delete a number from the fax number list Managing Users Introduction Installation of Fax Server Setup Software updates Setting up a Fax Server The user list Create a new user Edit a user profile In service operation Fax Archive Received faxes Sent faxes queue Send an again Fax Queue Fax Server ISDN manual Vidicode
13 8.3.1 Send a fax again Disk info Acknowledgements Guarantee Liability INDEX...75 Fax Server ISDN manual Vidicode 13
14 14 Fax Server ISDN manual Vidicode
15 1 Introduction The Fax Server is a system with ISDN and Ethernet interfaces. It offers services that can be compared with what the PBX does for voice calls. On top of that it will record and archive all fax communication. The Fax Server has the following functions: Receiving faxes Incoming calls on the fax numbers are answered by the Fax Server. Received faxes are stored on the internal Drive of the Fax Server. PC s have access to the Fax Server via the LAN and can view and print all faxes from the internal Drive of the Fax Server. Distribution of faxes via The preferred method to receive faxes for most people is as internal . Dependant on the fax Number that the Fax Server has answered to it will forward the fax to the address that belongs to this number. Receiving faxes on paper If required all received faxes can be printed out on a network printer. Sending faxes Faxes can be sent from any computer on the network that has SendFax software installed. On the PC the SendFax software behaves as a printer. SendFax software transfers the file over the network to the Fax Server which in turn takes care of the actual fax transmission. All sent faxes remain stored on the Fax Server and can be accessed via the LAN at any time. Archiving faxes The most important function of the Fax Server is to give access to all fax correspondence that took place since it was installed. The Fax Server Access System software supplied is the best tool to access the faxes because they are presented as a database. Several models There are two models of ISDN Fax Servers. This has to do with the different ISDN line types that exist. The types are primary rate (PRI) and basic rate (BRI). The interface to the network is called E1 for primary rate and S0 for basic rate. Fax Server ISDN manual Vidicode 15
16 Basic rate lines carry 2 telephone channels. Primary rate lines can carry a variable number of channels that the user has subscribed to with a maximum of 30. The models for basic rate and for primary rate are different because of the interface to the telephone network. The model for primary rate can send and receive on up to 16 channels simultaneously. It has only one line port. The model for basic rate is available for 2 lines and 4 lines and can work on 4 or 8 channels simultaneously. Identical operation The differences between the Fax Servers for basic rate and for primary rate are only small. In this manual they are treated as one product and differences, if they exist, are mentioned only when needed. 16 Fax Server ISDN manual Vidicode
17 2 Unpacking and installation The various models of the Fax Servers for ISDN are: Fax Server ISDN PRI Fax Server ISDN BRI 2 lines Fax Server ISDN BRI 4 lines There are several options available: Fax channels - from 1 to 16 channels on a ISDN PRI - from 1 to 4 channels on a ISDN BRI 2 lines - from 1 to 8 channels on a ISDN BRI 4 lines frame for 19 rack mounting The minimal configuration is a Fax Server with at least 1 channel. 2.1 What is in the box The Fax Server ISDN PRI desktop model comes with the following parts: Mains power supply adapter and cable. two 8-wire cables with RJ45 connectors CD with software This manual The Fax Server ISDN PRI 19 model comes with the following parts: Mains cable. two 8-wire cables with RJ45 connectors CD with software This manual The Fax Server ISDN (BRI) desktop model comes with the following parts: Mains power supply adapter and cable. Per line a cable kit that contains a short and a long 8-wire cable with RJ45 connectors (4 cables or 8 cables in total) Per line a T-adapter (2 or 4) CD with software This manual Fax Server ISDN manual Vidicode 17
18 The Fax Server ISDN (BRI) 19 model comes with the following parts: Mains cable. Per line a cable kit that contains a short and a long 8-wire cable with RJ45 connectors (4 cables or 8 cables in total) Per line a T-adapter (2 or 4) CD with software This manual Please note: For some countries we do not supply a mains cable with our product (Australia, Switzerland). The reason for this is that the cable with the correct mains plug is not available in the country of manufacture. 18 Fax Server ISDN manual Vidicode


19 2.2 Connecting to power On the desktop model The Fax Server is powered through an external power adapter. It does not have an On/Off switch; the Fax Server is turned on by connecting the power supply. On the 19 model The Fax Server is powered through a line cord. The power supply is internal. The unit does not have an On/Off switch; the Fax Server is turned on by connecting the mains cable. Fax Server ISDN manual Vidicode 19

20 2.3 Connecting to E1 primary rate ISDN This only applies to the model for ISDN primary rate. The Fax Server PRI is connected in series with the PBX. With the Fax Server PRI you have received a cable with two RJ45 connectors. This cable is used to connect the Fax Server PRI to the wall socket. The existing cable can be used to connect the Fax Server PRI to the PBX as is shown in the figure below. It is possible that you do not want to connect the PBX together with the Fax Server on one line because you want to use the line for faxing only. In this case the PBX and the connection to it are not there. It is also possible that you want to use all 30 channels of the E1 line for faxing. In this case a second Fax Server PRI can be connected in place of the PBX. 20 Fax Server ISDN manual Vidicode

21 The figures below are examples of a possible setup of the Fax Server PRI. Fax Server ISDN manual Vidicode 21
22 2.4 Connecting to S0 S Basic Rate ISDN There are three ways to use a Fax Server ISDN Basic Rate: Stand alone on lines that are used for the Fax Server only. Together with other equipment such as the PBX You must always use the supplied T-splitters to connect to the ISDN S0 line. The T-splitter is marked that it is made for a Call Recorder. The reason is that the T-splitter was indeed originally made for the Call Recorder, another product that has the same interface to the network. 22 Fax Server ISDN manual Vidicode


23 The figures below are examples of a possible setup of the Fax Server ISDN Basic Rate. Fax Server ISDN manual Vidicode 23
24 2.4.1 Without other equipment in Stand Alone mode This is how to connect to the ISND S0 bus if you use the line only for the Fax Server. This applies to point-to-point and point-to-multipoint lines. Use the long cable supplied in the box to connect to the TE port of the T-adapter and use the short cable to connect the port ISDN of the T- adapter to Port 1 to 4 of the Fax Server. 24 Fax Server ISDN manual Vidicode
25 2.4.2 With other equipment in Stand Alone mode This only applies to point-to-multipoint ISDN lines. If you doubt whether the line that you have is point to multi point select the next option. This way of connecting has a small advantage over the next option. You do not disconnect other equipment while connecting the Fax Server. The connection is the same as above: Use the long cable supplied in the box to connect to the TE port of the T-splitter and use the short cable to connect the port ISDN of the T-adapter to Port 1 to 4 of the Fax Server. This is the classic way to connect ISDN equipment to point to multi point lines. Fax Server ISDN manual Vidicode 25
26 2.4.3 With other equipment in Pass Through mode This is the most often used method to connect the Fax Server on ISDN basic rate. We call this pass through mode. The difference is that the Fax Server can see and record all communication of connected terminal equipment. This is used for recording fax transmissions of other fax machines. In this case the connection again is the same as above, but all terminal equipment (TE) that must be recorded is connected to the TE port of the adapter. Usually this will be the PBX with one or more fax machines connected to it. 26 Fax Server ISDN manual Vidicode
27 3 Configuration and operation After you have connected the hardware it is time to configure and use the Fax Server. This chapter explains you how the user interface works. In the following chapters we guide you with the configuration. You must: o o o o On the keyboard of the Fax Server, go through the system settings and make changes if required and On the keyboard of the Fax Server, go through the network settings so the Fax Server will fit in with your network and On the keyboard of the Fax Server, edit the number list to enable the fax numbers and attach addresses to them or On the PC of the systems manager, arrange the user profiles and user access to the Fax Server 3.1 Operation basics The Fax Server has a common menu driven user interface. Most functions and operations are initiated by pressing a function key followed by a sequence of menu keys of which the function is determined by the text in the display. The use of function keys and menu keys is as follows: Function keys The most frequently used functions of the Fax Server have been grouped in the function keys. Throughout the entire manual, symbols representing the function keys are used to indicate the function key corresponding to the described function. Menu keys After pressing a function key the available functions are assigned to the four menu keys. The operation of the menu keys is determined by the text in the display right above the corresponding key. Throughout the entire manual figures representing the display with or without the menu keys are used to show the required action corresponding to the described feature. Example: Fax Server ISDN manual Vidicode 27
28 Monday :51 Busy 0 Fax Rx/Tx 0/0 NEXT MENU STOP When you are instructed to press the MENU key in the text it means you are instructed to press the grey key below the text MENU in order to open the System setting menu. 3.2 Frequently used key indicators The following menu key functions are consistently used throughout the manual. MENU in the display indicates the presence of an underlying menu Press MENU to open the underlying menu NEXT in the display indicates the presence of more menu items Press NEXT to jump to the following menu item BACK in the display indicates the presence of an embracing menu Press BACK to return to the embracing menu STOP in the display indicates the absence of an embracing menu Press STOP to return to operating mode of the Fax Server CHANGE will toggle the item in the display between "On" and "Off" In some cases CHANGE is used to increase or decrease a value. 3.3 Save Changes After making settings the user is forced to press YES or NO before returning to operating mode. Press STOP in the menu and the display will show: 28 Fax Server ISDN manual Vidicode
29 YES Save Changes? NO CANCEL YES returns the Fax Server to normal use with changed settings NO returns the Fax Server to normal use without changed settings CANCEL returns to the settings Fax Server ISDN manual Vidicode 29
30 4 System settings When you have connected the Fax Server you can configure it. This chapter is about the system settings. Enter the system settings as follows. On the desktop model: Press the System Settings key. On the 19 model: Press the key. Press System to move to the menu. From here on desktop model and 19 are the same. A sequence of system settings will need to be passed. Every item will have at least three options: Press NEXT to move on to the next menu item. Press CHANGE to enter the value or property of the menu item. Press STOP to exit the menu. Press NEXT repeatedly to scroll through the menu items. The following sequence of menu items will appear: 4.1 Fax ID The Fax ID is the identification of the fax machine. When a fax is transmitted between two fax machines, they both negotiate their Fax ID's. The Fax ID is also displayed in the top line of the fax. The Fax ID that you must enter here is just the default Fax ID that applies when there are no matching user configurations. When the Fax Server is sending or receiving on behalf of one of the users, it will use the Fax ID for that user. 30 Fax Server ISDN manual Vidicode
31 Fax-ID: NEXT CHANGE STOP Set the Fax ID. Press CHANGE to enter the Fax ID. Fax-Id: STORE CANCEL Enter the Fax ID. Press STORE to save the Fax ID. Press NEXT to move on to the next menu item. It is a good practice that a Fax ID is the number that the fax can be reached on. However text can also be entered here. 4.2 Top text The top text is the text that is printed as the top line of the fax. Usually this will be the name of the person or company. Top Text: NEXT CHANGE STOP Set the Top text. Press CHANGE to enter the Top text. Top Text: STORE CANCEL Enter the Top text. Press STORE to save the Top text. Press NEXT to move on to the next menu item. Fax Server ISDN manual Vidicode 31
32 4.3 Dial prefix The dial prefix is a standard number sequence that must be dialed before an external number can be reached. When a Fax Server is connected to an internal extension of a digital PBX a common prefix would be 0. It can also be used to route faxes to the most economical network provider, that sometimes is not the same provider as for telephony because fax transmissions tend to be shorter then telephone calls. Dial Prefix: Off NEXT CHANGE STOP Set the dial prefix. Press CHANGE to enter the Prefix. Dial Prefix: STORE CANCEL Enter the dial prefix. Press STORE to save the dial prefix. Press NEXT to move on to the next menu item. 4.4 Stand Alone A Mode Usually the Fax Server is connected to the line in series with a PBX (Pass Through Mode ode). If this is not the case (Fax Server is the only device on the line) the Stand Alone Mode setting has to be turned On. Stand Alone Mode: Off NEXT CHANGE STOP Set the Stand Alone Mode. Press CHANGE to enable Stand Alone Mode. Please Note: If the Fax Server is in series with a PBX Stand Alone Mode must be turned Off. 32 Fax Server ISDN manual Vidicode
33 Stand Alone Mode: On NEXT CHANGE STOP Set the Stand Alone Mode. Press STORE to save the Stand Alone Mode. Press NEXT to move on to the next menu item. 4.5 Connection (BRI only) This option only applies to ISDN Basic Rate. There are two configurations of Euro ISDN basic rate lines, called Point-to-Point and Point-to- Multipoint. Because the protocol is different the Fax Server must know. In case of doubt you must call your telephony provider. Connection: Multipoint NEXT CHANGE STOP Set the Connection type. Press CHANGE to alter the setting. Connection: nection: Point-to to-point NEXT CHANGE STOP Set the Connection type. Press STORE to save the connection type. Press NEXT to move on to the next menu item. 4.6 Total Lines (BRI only) The Total Lines property determines the number of lines that can be occupied by the Fax Server BRI counted from port 1 to 8 for sending. Lines are counted from port ISDN 1 to ISDN 4. This property is used to keep ISDN BRI lines completely free of outgoing faxes. Fax Server ISDN manual Vidicode 33
34 Total Lines: 8 NEXT - CHANGE + STOP Set the Maximum number of Fax lines. Press + or - to change the number of lines. Press NEXT to move on to the next menu item. 4.7 Max. Fax Lines The Maximum Fax Lines property determines the number of lines that can be occupied by the Fax Server. This property is used to prevent the Fax Server to seize too many lines and to guarantee that a fixed number of lines is available for the PBX. Maximum Fax Lines: : 16 1 NEXT - CHANGE + STOP Set the Maximum number of Fax lines. Press + or - to change the number of lines. Press NEXT to move on to the next menu item. 4.8 Max. Rx Fax Lines The maximum Rx Fax Lines fixes the maximum number of lines that can be used by the Fax Server for Fax reception. Max Rx Fax Lines: 6 NEXT - CHANGE + STOP Set the Maximum Rx Fax Lines number. Press + or - to change the number of lines. Press NEXT to move on to the next menu item. 4.9 Max. Tx Fax Lines The maximum Tx Fax Lines fixes the maximum number of lines that can be used by the Fax Server for Fax transmission. 34 Fax Server ISDN manual Vidicode
35 Max Tx Fax Lines: 6 NEXT - CHANGE + STOP Set the Maximum Tx Fax Lines number. Press + or - to change the number of lines. Press NEXT to move on to the next menu item Tx Retries Tx Retries determines the number of attempts to send a fax. Tx Retries: 5 NEXT - CHANGE + STOP Set the number of attempts. Press + or - to change the number of attempts. Press NEXT to move on to the next menu item Tx Retry Time The TX Send Retry Time determines the interval between the fax transmission attempts. Tx Retry Time: 120s NEXT - CHANGE + STOP Set the Retry Time. Press + or - to change the Retry Time. Press NEXT to move on to the next menu item Tx Answer Timeout The Tx Answer Timeout time determines the time the Fax Server will wait for the remote fax machine to answer the call. Fax Server ISDN manual Vidicode 35
36 Tx Answer Timeout: 60s NEXT - CHANGE + STOP Set the Tx Answer Timeout. Press + or - to change the Tx Answer Timeout. Press NEXT to move on to the next menu item Tx Start Time With Tx Start Time a time of the day can be set for the Fax Server to start sending the faxes in the Fax queue. Please note: Priority will always be sent at once and not wait for the start time. Tx Start Time: 00:00 NEXT - CHANGE + STOP Set the Tx Start Time. Press + or - to change the Tx Start Time or turn Off. Press NEXT to move on to the next menu item Tx Stop Time In conjunction with the Tx Start Time the Tx Stop Time sets a limit to the time the Fax Server is given to handle the Fax queue. If Tx Start Time is set to Off the Tx Stop Time will not appear. Tx Stop Time: 00:00 NEXT - CHANGE + STOP Set the Tx Stop Time. Press + or - to change the Tx Stop Time. Press NEXT to move on to the next menu item Fax to printer Fax to Printer allows for automatic printing of faxes. Network setting of the printer are described in Fax Server ISDN manual Vidicode
37 Fax to Printer: NEXT All CHANGE STOP Set Fax to Printer. Press CHANGE to select All, Rx Only, Tx Only or Off. Press NEXT to move on to the next menu item Protect the Fax Server with a Password The Fax Server can be protected with a password against unauthorized use. When password protection has been enabled all operations are blocked before the correct password has been entered. NEXT Password: Off CHANGE STOP Setting the Password. Press CHANGE enable password protection The display will then prompt for a password. Password: STORE Enter a password. 000 CANCEL Press STORE to enable the entered password. Press STOP to exit the menu. From this point on you will be prompted for the password before entering the menus Remove Password protection On the desktop model press the not already in the menu). System button (if you are Fax Server ISDN manual Vidicode 37
38 On the 19 model press the key and then press SYSTEM. Enter the password and press CONTINUE. Press NEXT 11 x. Password: NEXT On CHANGE STOP Disable the Password. Press CHANGE to disable the password. Press STOP to save and exit the menu. The password protection has now been disabled Set the Clock The clock can be set manually, or if available on the network, NTP can be enabled to retrieve the time from a network server. Clock: Mo :03 NEXT CHANGE STOP Clock: o :03 STORE CANCEL Setting the clock. Press CHANGE to change the setting of the clock. Press key's 1-7 to change the day of the week. The default date and time format is DD-MM-YY and HH:MM (when American has been set as language the format is changed to MM-DD- YY). Use the arrowed keys to move the blinking character left and right. 38 Fax Server ISDN manual Vidicode
39 Press softkey STORE to store the changes or press softkey CANCEL to return to previous values Set the Language You can select the language of your choice. Several languages are available in the Fax Server. Selecting American will also influence the date and time format used. Language: English CHANGE STOP Setting the Language. Press CHANGE to select the preferred language. Press STOP to save and exit the menu. Fax Server ISDN manual Vidicode 39
40 5 LAN settings Enter the LAN settings as follows. On the desktop model: Press the LAN key. On the 19 model: Press the key. Press LAN to move to the LAN settings menu s A sequence of LAN settings will appear. Every item will have at least three options: Press NEXT to move on to the next menu item. Press CHANGE to enter or change the value or property of the menu item. Press STOP to exit the menu. Press NEXT repeatedly to scroll through the menu items. The following sequence of menu items will appear: 5.1 FTP user The FTP user is the administrator user name of the Fax Server. It can be used in the Fax Server Access System and Send Fax to log on to the Fax Server. The administrator with this username and password has all the available authorities. FTP user: 0000 NEXT CHANGE STOP Set the FTP user name. Press CHANGE to change the FTP user name. 40 Fax Server ISDN manual Vidicode
41 FTP user: STORE CANCEL Enter the FTP user name. Use the numerical keys to enter the FTP user name. Press STORE to save the FTP user name. Press NEXT to move on to the next menu item. 5.2 FTP password The FTP password of the Fax Server is the password that goes with the FTP administrator user name of the Fax Server. FTP pwd: 0000 NEXT CHANGE STOP Set the FTP password. Press CHANGE to change the FTP password. FTP pwd: NEXT CHANGE STOP Enter the FTP password. Use the numerical keys to enter the FTP password. Press STORE to save the FTP password. Press NEXT to move on to the next menu item. 5.3 FTP port FTP port is the port number through which the Fax Server Access System and Send Fax log on to the Fax Server. The FTP server port is default set to 21, as is the setting of the port number in the Fax Server Access System and Send Fax. If there is no direct reason to change the FTP server port it is best left unchanged. Fax Server ISDN manual Vidicode 41
42 FTP port: 21 NEXT CHANGE STOP Set the FTP -server port number. Press CHANGE to change the FTP server port number. FTP port: STORE CANCEL Enter the FTP server port number. Use the numerical keys to enter the FTP server port number. Press STORE to save the FTP server port number. Press NEXT to move on to the next menu item. 5.4 DHCP server In case a DHCP server is used on the network the use of the DHCP server must be enabled. In case it is not used it must be disabled. Use DHCP server: No NEXT CHANGE STOP Use of the DHCP server Press CHANGE to enable DHCP server. Use DHCP server: Yes NEXT CHANGE STOP Use of the DHCP server enabled Press NEXT to save and move on to the next menu item. 42 Fax Server ISDN manual Vidicode
43 5.5 IP address As part of the network the Fax Server requires an IP address. In case a DHCP server is used (see previous item) the DHCP server will assign the Fax Server an IP address. In case a DHCP server is not used a static IP address must be given to the Fax Server. IP addr: NEXT CHANGE STOP Set the IP address of the Fax Server. Press CHANGE to enter the IP address of the Fax Server. IP addr: STORE CANCEL Enter the IP address of the Fax Server. Use the numerical keys to enter the IP address of the Fax Server. Press STORE to save the IP address of the Fax Server. Press NEXT to move on to the next menu item. 5.6 IP subnet mask The IP subnet mask is used by the Fax Server if access outside the network is required. In this case the gateway will need to be entered as well. In case the used SMTP server is not on the local network the IP mask and gateway must be entered. IP mask: NEXT CHANGE STOP Set the IP subnet mask of the Fax Server. Press CHANGE to change the IP subnet mask of the Fax Server. Fax Server ISDN manual Vidicode 43
44 IP mask: STORE CANCEL Enter the IP subnet mask of the Fax Server. Use the numerical keys to enter the IP subnet mask of the Fax Server. Press STORE to save the IP subnet mask of the Fax Server. Press NEXT to move on to the next menu item. 5.7 Gateway The Gateway is used by the Fax Server if access from outside the network is required. If so the Gateway and the IP subnet mask will need to be entered. For instance, if the used SMTP server is not on the local network the IP mask and gateway are required. Gateway: NEXT CHANGE STOP Set the Gateway of the Fax Server. Press CHANGE to enter the Gateway of the Fax Server. Gateway: STORE CANCEL Enter the Gateway of the Fax Server. Use the numerical keys to enter the Gateway of the Fax Server. Press STORE to save the Gateway of the Fax Server. Press NEXT to move on to the next menu item. 5.8 IP name Aside from the IP address the Fax Server can also be addressed by an IP name if this function is supported by your DNS server. 44 Fax Server ISDN manual Vidicode
45 IP name: IPFax0001 NEXT CHANGE STOP Set an IP name for the Fax Server. Press CHANGE to enter an IP name for the Fax Server. IP name: IPFax0001 STORE << CLEAR CANCEL Enter an IP name for the Fax Server. Use the numerical keys to enter an IP name for the Fax Server. Press STORE to save the IP name of the Fax Server. Press NEXT to move on to the next menu item address The Fax Server has extensive capabilities. Received faxes will be sent to the address of the owner of the fax number. Sent faxes will be confirmed by to the sender. There is however, a default address that will be used when no other address is known. This might be the address of the person who is responsible for the Fax Server. The address to be filled in here is this default address. NEXT CHANGE STOP Set the address. Press CHANGE to enter an address. Fax Server ISDN manual Vidicode 45
46 STORE CANCEL Enter the address. Use the numerical keys to enter the address. Press STORE to save the address. Press NEXT to move on to the next menu item. Selection of faxes for distribution via can also take place according to remote Fax ID Reply address Because the Fax Server cannot receive the s sent by the Fax Server require another reply address. Reply: NEXT CHANGE STOP Set the reply address. Press CHANGE to enter the reply address. Reply: STORE CANCEL Enter the reply address. Use the numerical keys to enter the reply address. Press STORE to save the reply address. Press NEXT to move on to the next menu item SMTP server IP address The Fax Server uses the IP address of the SMTP server to send . In case a local SMTP server is used the IP number can be entered directly. In 46 Fax Server ISDN manual Vidicode
47 case of an SMTP server outside the network both the Gateway and the Subnet Mask must be set as well. SMTP srv: NEXT CHANGE STOP Set the IP address of the SMTP server. Press CHANGE to enter the IP address of the SMTP server. SMTP-srv: STORE CANCEL Enter the IP address of the SMTP server. Use the numerical keys to enter the IP address of the SMTP server. Both an IP number or IP name are allowed. In case an IP name is used the DNS server needs to be configured. Press STORE to save the IP address of the SMTP server. Press NEXT to move on to the next menu item SMTP server port SMTP server port is the port number through which the Fax Server connection is to be made with the SMTP server. The SMTP-server port of the Fax Server is default set to 25. Do not change the SMTP-server port number when this value is not explicitly changed in the SMTP-server. SMTP-server port: 25 NEXT CHANGE STOP Set the SMTP-server port number. Press CHANGE to change the SMTP-server port number. Fax Server ISDN manual Vidicode 47
48 SMTP-server port: STORE CANCEL Enter the SMTP-server port number. Use the numerical keys to enter the SMTP-server port number. Press STORE to save the SMTP-server port number. Press NEXT to move on to the next menu item SMTP Login Sometimes SMTP-servers are set up to require a login. In this case SMTP Login should be enabled. Note: When SMTP Login is enabled the next questions in the menu will ask for SMTP User name and Password. SMTP Login: NEXT No CHANGE STOP Enable SMTP Login. Press CHANGE to enable SMTP Login Press NEXT to save and move on to the next menu item. When SMTP Login is enabled, the next two items in the menu will be: SMTP user and SMTP password 5.14 Domain name This is the domain name of the SMTP-server. In case the SMTP-server is on the network the network domain is required. In case the SMTP-server is outside the network the domain name of the SMTP-server is required. Contact your provider for more information. Usually the IP-address of the SMTP-server is enough and the domain name is left empty. 48 Fax Server ISDN manual Vidicode
49 Domain: brifax.nl NEXT CHANGE STOP Set the domain of the SMTP-server. Press CHANGE to enter the domain of the SMTP-server. Domain: brifax.nl STORE << CLEAR CANCEL Enter the domain of the SMTP-server. Use the numerical keys to enter the domain of the SMTP-server. Press STORE to save the domain of the SMTP-server. Press NEXT to move on to the next menu item DNS server In case an IP name has been configured for your SMTP-server you must also give the IP number of the Domain Name Server. DNS srv: NEXT CHANGE STOP Set the DNS server Press CHANGE to enter the DNS server. DNS srv: STORE CANCEL Enter the DNS server Use the numerical keys to enter the DNS server. Press STORE to save the DNS server. Press NEXT to save and move on to the next menu item. Fax Server ISDN manual Vidicode 49
50 5.16 Printer address In case automatic printing has been enabled a printer address has to be specified. Printer addr.: NEXT CHANGE STOP Set the Printer address. Press CHANGE to enter the Printer address. Printer addr: STORE << CLEAR CANCEL Enter the Printer address Use the numerical keys to enter the Printer address. Press STORE to save the Printer address. Press NEXT to save and move on to the next menu item Printer port The Printer port is the port number through which the Fax Server connection is to be made with the printer. Printer port: 515 NEXT CHANGE STOP Set the Printer port Press CHANGE to enter the Printer port. 50 Fax Server ISDN manual Vidicode
51 Printer port: 621 STORE CANCEL Enter the the Printer port Use the numerical keys to enter the Printer port. Press STORE to save the Printer port. Press NEXT to save and move on to the next menu item Printer queue In case automatic printing has been enabled a network printer queue name has to be specified. Printer queue: Fax_ISDN NEXT CHANGE STOP Set the Printer queue Press CHANGE to enter the Printer queue. Printer queue: Fax_ISDN STORE << CLEAR CANCEL CEL Enter the Printer queue Use the numerical keys to enter the Printer queue. Press STORE to save the Printer queue. Press NEXT to save and move on to the next menu item NTP Server Network Time Server refers to the IP address of the Network Time Server. Network Time Server is used to synchronize the time of the Fax Server with the time on the Network Time Server. Fax Server ISDN manual Vidicode 51
52 NTP srv: NEXT CHANGE STOP Set the IP address of the NTP server. Press CHANGE to enter the IP address of the NTP server. NTP svr: STORE CANCEL Enter the IP address of the NTP server. Use the numerical keys to enter the IP address of the NTP server. Press STORE to save the IP address of the NTP server. Press NEXT to save and to move on to the next menu item NTP Server Port NTP server port is the port number through which the Fax Server connects to the Network Time Server. The NTP server port is default set to 123, as is the setting of the port number in most NTP servers. If there is no direct reason to change the NTP server port it is best left unchanged. NTP server port: : 123 NEXT CHANGE STOP Set the NTP server port number. Press CHANGE to change the NTP server port number. NTP server port: STORE CANCEL Enter the NTP server port number. Use the numerical keys to enter the NTP server port number. 52 Fax Server ISDN manual Vidicode
53 Press STORE to save the NTP server port number. Press NEXT to save and to move on to the next menu item GMT correction GMT correction property is used to identify the time zone. NTP server normally issues GMT. GMT correction can be set in half hours from - 15:00 to + 15:00. GMT correction: 00:00 NEXT CHANGE STOP Send Start Time. Press CHANGE to set GMT correction. Keep pressing CHANGE to increase the correction. It will start with + 1:00, keep pressing CHANGE to increase. After + 15:00 there will appear - 15:00. Press NEXT to save and move on to the next menu item. GMT correction refers to Winter time. Summer time and Winter time are corrected automatically Telnet Telnet can be used to log on to the Fax Server and configure the Fax Server from your PC. If required contact your supplier for more details. TelNet active: NEXT No N CHANGE STOP Enable TelNet. Press CHANGE to enable TelNet. TelNet active: NEXT Yes CHANGE STOP TelNet enabled. Press NEXT to save and move on to the next menu item. Fax Server ISDN manual Vidicode 53
54 5.23 Service timer The Service timer determines the performance of the network connection. Default the Service timer is set to Automatic. Changing the setting should only be done when advised by a service engineer to solve problems. Service timer: Auto CHANGE STOP Set the Service timer Press CHANGE to change the Service timer. The following settings are available: S1-S5, F1-F4 and U1-U4. Where S stands for Slow, F for Fast and U for Ultra fast. The Service Timer is the last item in the LAN settings menu. Press STOP to exit the LAN menu. 54 Fax Server ISDN manual Vidicode
55 6 The Internal Number List and how faxes are answered The next step in the configuration is to fill in the Internal (Fax ax) Number List. Normally you will have to tell a Fax Server what numbers it should answer. On an ISDN line bundle, PRI or BRI, there are several or many numbers available. The internal fax number list is the list of numbers that the Fax Server will answer to. However, there is an exception to this rule: if the Fax Server is configured to be the only machine on the line(s), then it will answer all incoming calls. This will when: A Fax Sever for ISDN BRI is stand alone on a point to point line. A Fax Server for ISDN PRI is in stand alone mode (a PRI line is always point to point ) In the above two situations the Fax Server will receive faxes and handle them as in the default settings given by you as LAN settings or system settings. In all other cases the Internal Number List will be applied. The Internal Number list is nothing more then a list of numbers that the Fax Server will answer to. These numbers must be supplied to you by the telephony provider. In some instances you get many of numbers for one line or bundle of lines already when you subscribe. In other cases you will have to order more numbers from your provider. In any case the idea is that everyone in your office who needs a direct fax number will get that, just like he has his direct phone number. To every number in the list an address should be added. Faxes received on the fax number are forwarded by to the associated address. In this way everyone in your office will immediately receive the faxes that are sent to his own direct fax number. Important: The internal number list can also be managed on the PC. See the next chapter about managing users. Fax Server ISDN manual Vidicode 55
56 There is also an external number list. The external number list is used to define fax recording numbers. This was only available in older models Add a new number to the internal number list To access the number list on a desktop model: Press No.List function key to open the number list menu. To access the number list on a 19 model: Press the function key Press LIST softkey to open the number list menu. Fax Number Lists INTERN EXTERN STOP The Fax number lists. Press INTERN NEXT faxes@company.com NEW DELETE STOP The Fax number lists. Press NEW to add a new fax number to the list. Number: STORE CLEAR CANCEL Enter the fax number Press STORE to add a new fax number to the list and continue with the address. 56 Fax Server ISDN manual Vidicode
57 Important: When entering fax numbers you can decide to include or exclude the area code. Do not use leading zeros. Keep it the same for all users (include or exclude area code). This will make it easier for the Fax Server to match the numbers with the numbers that are used on the telephone network. mail: STORE CLEAR CANCEL Enter the address. Use the numerical keys to enter the address. Press STORE to save the number and address. Press STOP to leave the number list. If any changes to the list have been made you will be prompted to save the changes. If you choose NO the list will remain unaltered Delete a number from the fax number list Select the Fax Number List menu. Fax Number Lists INTERN EXTERN STOP The Fax number lists. Press INTERN or EXTERN faxes@company.com NEW DELETE STOP The Fax number lists. Use the << and >> keys to scroll through the fax number list. Select the entry you want to delete. Press DELETE to remove the number Press YES to acknowledge. Press STOP to leave the number list. Fax Server ISDN manual Vidicode 57
58 If any changes to the list have been made you will be prompted to save the changes. If you choose NO the list will remain unaltered. 58 Fax Server ISDN manual Vidicode
59 7 Managing Users 7.1 Introduction User access to the Fax Server is for the users on the network who can have access in three ways: To receive faxes via . A fax number must be created and a link must be made between the fax number and an address. To send faxes. The users must be identified, to maintain the database and to prevent unwanted use. To access the database. Users must only be able to see those faxes that they are allowed to see. The access is controlled in the Fax Server as a list of FTP accounts and as the internal number list. The FTP user accounts are not only used to control the access, but also to maintain and personalize the Fax Servers archive. The Fax Server will keep track of who has sent or received a specific fax. The Fax Server will allow a user to view faxes that have been sent by specific users and to view faxes received on specific telephone extension numbers only. The Fax Server Setup application for MS Windows is the tool for the network manager to create the internal number list via the LAN and to manage the FTP accounts. There is no tool on the keyboard of the Fax Server to manage user access. The reason is that it would not be very practical. The Fax Server Setup program on the PC does not keep any records by itself. Every time the application is started a connection to the Fax Server is required to retrieve the user information. This information can then be edited and uploaded to the Fax Server. Important: It is possible to create user accounts without an FTP account. This is the same as the INTERNAL NUMBER LIST. When there is just an Internal Number list and when no user accounts are managed, you get a somewhat simplified installation of the Fax Server. Everyone would use Fax Server ISDN manual Vidicode 59

60 the same access code to send faxes or access the database. This might be perfectly acceptable for smaller organizations. 7.2 Installation of Fax Server Setup Placing the CD-ROM in your computer gives you a choice of installation of Vidicode software. Choose to install the Fax Server Setup software. Follow the instructions on the screen. Part of the instructions is that the software will ask for a registration key that you will find packed with the software. 7.3 Software updates It is always recommended to update your software to the latest revision. The Fax Server Setup application can be updated via internet. Choose Help in the main menu and select Check for update 60 Fax Server ISDN manual Vidicode

61 A new dialog opens where the current version is displayed. Click on the Check update button to check for updates. The program will check on the Vidicode website for updates of the program. If there are updates they will be displayed. Click do update to execute the update. Note: The file that is downloaded is a zipped file that is unpacked by the application itself. Update files are approximately 1 Mb in size. Updates can not be executed while the program is performing other tasks. An open internet connection is required for this operation 7.4 Setting up a Fax Server When the program is started the following dialog appears: Enter the Fax Server IP address. The port setting on the Fax Server is default set to 21. Select the UserID s tab. The Fax Server Setup will now come up with the following dialog for FTP username and password: Fax Server ISDN manual Vidicode 61


62 Enter the administrator FTP username and password. The Fax Server Setup will now make a connection to the Fax Server to retrieve user information. Now select the User ID s tab after the connection has terminated. The user list as on the Fax Server is now displayed. If there is no user list present on the Fax Server the dialog will be blank. 62 Fax Server ISDN manual Vidicode
63 7.5 The user list The user list displays the User ID, The username the address and fax number. The User ID consists of two characters; the user ID is used throughout the Fax Server applications to identify a user. The username is the text that identifies the user for you. The address is the address where faxes received for the user and confirmations of sending faxes are sent. The Fax Number is the telephone number which is used as a fax number of the user. Important: When entering fax numbers you can decide to include or exclude the area code. Do not use leading zero s. Keep it the same for all users (include or exclude area code). This will make it easier for the Fax Server to match the numbers with the numbers that are used on the telephone network. 7.6 Create a new user Click NEW to create a new user. The following dialog appears: Fax Server ISDN manual Vidicode 63

64 Enter the user properties of the new user. For every user there is an option to create an FTP account for the user. With the FTP account a user can setup a connection to the Fax Server with the Fax Server Access System software to view his or her faxes on the Fax Server. For every user access to existing user accounts can be set. Check the checkboxes of existing users in the list to enable access to the faxes of said users. Click OK to finish. 7.7 Edit a user profile A user profile is edited much the same way as creating a new user. Select a user in the list of users and click Edit Edit A new dialog appears with the selected user properties. Now you can edit the user properties. 64 Fax Server ISDN manual Vidicode
65 Click OK to save the changes. At this point the user profile has changed in the user list as displayed on your screen. To save the list on the Fax Server the list needs to be transferred to the Fax Server. Press Update Fax Server to transfer the user profiles to the Fax Server. Fax Server ISDN manual Vidicode 65
66 8 In service operation Under normal circumstances the Fax Server does not need much attention. Operation is through the Fax Server Access System and Send Fax applications. Once the settings have been made the sending and receiving of faxes is automatic. On the keyboard of the desktop model there are 5 function keys, which give access to functions of a Fax Server in operation. The 19 model has three of such function keys. The function keys are described in the following paragraphs. To access the Archives on the desktop model and on the 19 model: Archive or To access the queues on a desktop model: is the fax archive of sent and received faxes. To function key to check the queue and test . fax To Fax Fax queue function key to check the outgoing queue. To access the queues on a 19 model: To go to the Queue menu Then choose with softkeys between the , FAX and PRINT queues 66 Fax Server ISDN manual Vidicode

67 To view the free disk space on a desktop model: Disc function key displays the free disk space. To view the free disk space on a 19 model: function key displays the free disk space. 8.1 Fax Archive Press Archive or to open the Fax Archive. There are two separate archives for Received and Sent faxes. Both archives are operated in the same manner. They are described in the following paragraphs; and Faxes in the archive can be sent again as fax (see 8.3) or through (see 8.2) Received faxes Open the Fax Archive and press RECEIVED to open the received faxes archive. Press the Received key to enter the received faxes menu. DISK Received Faxes STOP The Received faxes menu. Press DISK to open the respective item. Received faxes archive can be searched on time, date and/or Fax ID. Fax Server ISDN manual Vidicode 67
Fax Server ISDN Manual
 Fax Server ISDN Manual Version 3.0 -Vidicode 2006 2 Fax Server ISDN manual -Vidicode 2006 The Fax Server ISDN desktop models 1. Menu keys 2. Backlight Display 3. Function keys 4. Speaker 5. Alfa-Numerical
Call Recorder Octo Quarto. Manual. Version Vidicode 2010
 Call Recorder Octo Quarto Manual Version 1.003.10 Vidicode 2010 Call Recorder Octo 1. CD-Drive 2. Ethernet/LAN 3. USB port (unused) 4. Microphone 5. 8 Channel Start/Stop switches 6. Headset/External Speaker
RMX 4000 Installation & Configuration Guide
 RMX 4000 Installation & Configuration Guide General Safety Precautions Follow these rules to ensure general safety: Keep the area around the Polycom RMX 4000 unit clean and free of clutter and well ventilated.
Fax Server. Blue Line IP ISDN ISDN PRI. Sold by: Toll Free: (877)
") Blue Line IP PRI Blue Line The corporate fax solution The corporate fax solution Communication by fax is essential to business life. Fax has many major advantages over email. It is well accepted, very
Blue Line IP PRI Blue Line The corporate fax solution The corporate fax solution Communication by fax is essential to business life. Fax has many major advantages over email. It is well accepted, very
RMX 2000 Installation & Configuration Guide
 RMX 2000 Installation & Configuration Guide General Safety Precautions Follow these rules to ensure general safety: Keep the area around the Polycom RMX 2000 unit clean and free of clutter and well ventilated.
RMX 1500 Quick Installation & Configuration Guide
 RMX 1500 Quick Installation & Configuration Guide General Safety Precautions Follow these rules to ensure general safety: Keep the area around the Polycom RMX 1500 unit clean and free of clutter and well
ETHM-2. Ethernet Module. SATEL sp. z o.o. ul. Schuberta Gdańsk POLAND tel
 Ethernet Module ETHM-2 Firmware version 1.0 ethm2_en 09/08 SATEL sp. z o.o. ul. Schuberta 79 80-172 Gdańsk POLAND tel. + 48 58 320 94 00 info@satel.pl www.satel.pl SATEL's goal is to continually improve
TCPIPINT-SCMN USER MANUAL. Manufactured by R.V.R ELETTRONICA S.p.A. Italy
 USER MANUAL Manufactured by R.V.R S.p.A. Italy File Name: _ING_1.0.indb Version: 1.0 Date: 15/04/2016 Revision History Date Version Reason Editor 15/04/2016 1.0 First edition J. H. Berti - User Manual
ADSL Router Quick Setup Guide
 ADSL Router Quick Setup Guide RTA300 Important This Guide is intended to get you started quickly. The factory default profile of this Router is customised for New Zealand users. Please follow through the
SCOPIA 100 Gateway Quick Start Version 5.6
 SCOPIA 100 Gateway Quick Start Version 5.6 NOTICE 2000-2008 RADVISION Ltd. All intellectual property rights in this publication are owned by RADVISION Ltd and are protected by United States copyright laws,
INSTALLATION AND USER GUIDE 2800MWB SINGLE LINE BASIC FEATURE TELEPHONE
 INSTALLATION AND USER GUIDE 2800MWB SINGLE LINE BASIC FEATURE TELEPHONE TeleMatrix Copyright 2005 COMPLIANCE AND SAFETY As specified by FCC regulation, we are required to inform you of specific governmental
User s Guide [Network Administrator]
![User s Guide [Network Administrator]](/thumbs/82/86930976.jpg "User s Guide [Network Administrator]") User s Guide [Network Administrator] Table of contents 1 Introduction 1.1 Welcome... 1-2 1.1.1 User's guides... 1-2 1.1.2 User's Guide... 1-2 1.2 Conventions used in this manual... 1-3 1.2.1 Symbols used
User s Guide [Network Administrator] Table of contents 1 Introduction 1.1 Welcome... 1-2 1.1.1 User's guides... 1-2 1.1.2 User's Guide... 1-2 1.2 Conventions used in this manual... 1-3 1.2.1 Symbols used
Part # Quick-Start Guide. SpeedStream 4200 Modem PPPoE Modem Router
 Part # 007-0-00 Quick-Start Guide SpeedStream 00 Modem PPPoE Modem Router Before you begin, Verify that the following items came with your DSL kit: Step > Install Line Filters 7 SpeedStream Device Documentation
Industrial Serial Device Server
 1. Quick Start Guide This quick start guide describes how to install and use the Industrial Serial Device Server. Capable of operating at temperature extremes of -10 C to +60 C, this is the Serial Device
2757 VoIP Phone Users Guide
 2757 VoIP Phone Users Guide Rev. 1.0 Table of Contents 1 Introduction... 5 1.1 Package Contents... 5 1.2 Features... 5 1.3 Basic Setup... 6 2 Network Setup... 8 2.1 Static IP Address... 8 2-2 PPPoE...11
Touch Panel Controller for CONVERGE Pro 2. With Built-in Dialers for VoIP/Telco & Skype for Business User Manual
 Touch Panel Controller for CONVERGE Pro 2 With Built-in Dialers for VoIP/Telco & Skype for Business Notices Technical Support Telephone 801.974.3760 Fax 1.801.303.5711 Email Web tech.support@clearone.com
Nokia Music Stand MD-1User Guide Issue 1
 Nokia Music Stand MD-1User Guide 9235363 Issue 1 DECLARATION OF CONFORMITY We, NOKIA CORPORATION, declare under our sole responsibility that the product MD-1 is in conformity with the provisions of the
ProjectorNetTM Adapter Quick Start Guide
 ProjectorNetTM Adapter Quick Start Guide Adapter networking 1. Quick Start The ProjectorNet Adapter kit contains the following items: ProjectorNet Serial to Ethernet Adapter Cable Adapter, ProjectorNet
INSTALLATION AND USER GUIDE 2800LBY SINGLE LINE HOTEL LOBBY TELEPHONE
 INSTALLATION AND USER GUIDE 2800LBY SINGLE LINE HOTEL LOBBY TELEPHONE TeleMatrix Copyright 2005 COMPLIANCE AND SAFETY As specified by FCC regulation, we are required to inform you of specific governmental
Nortel IP Phone 1120E User Guide
 Nortel IP Phone 1120E User Guide NN10300-022 Document status: Standard Document version: 0103 Document date: 13 April 2007 All Rights Reserved The information in this document is sourced in Canada, the
LocationFree Base Station LocationFree Player for PC
 2-681-469-11(1) LocationFree Base Station LocationFree Player for PC Operating Instructions LF-PK1 LF-B1 LFA-PC2 2006 Sony Corporation Contents What is the LocationFree Base Station?... 4 Identifying Parts
Installation & Configuration Guide
 Installation & Configuration Guide Rel. 2.0 Service Pack 1 Rel. 2.0 Service Pack 1 Vertical Communications, Inc. reserves the right to revise this publication and to make changes in content without notice.
i-series Extender 4000
 i-series Extender 4000 Quick Installation Guide July, 2001 G-4000P-RKM Rev AA Table of Contents Purpose of this Document... 3 Safety Considerations... 3 Support Telephone Number... 3 Introduction... 4
Quick Installation Guide
 Quick Installation Guide BRI Gateway Version 2.1 Table of Contents Hardware Setup... 1 Accessing the WEB GUI... 2 Creating SIP Trunks... 3 Creating BRI Trunks... 4 Call Routing Rules... 4 Hardware Setup
Document Name: User Manual for SC10MK, Modbus RTU to Modbus TCP Converter
 Document Name: User Manual for SC10MK, Modbus RTU to Modbus TCP Converter Login for the first time, please use http://192.168.1.100 To key in user name and password is for identifying authorization. Default
Content 1 OVERVIEW HARDWARE DESCRIPTION HARDWARE INSTALLATION PC CONFIGURATION GUIDE... 5 WEB-BASED MANAGEMENT GUIDE...
 Content 1 OVERVIEW...1 1.1FEATURES...1 1.2 PACKETCONTENTS...3 1.3 SYSTEM REQUIREMENTS... 1.4 FACTORY DEFAULTS...4 1.5 WARNINGS AND CAUTIONS...4 2 HARDWARE DESCRIPTION... 6 3 HARDWARE INSTALLATION...8 4
Initial configuration Vega 400 E1/T1 (SIP)
") Initial configuration Vega 400 E1/T1 (SIP) R7 This document describes how to configure the Vega 400 E1/T1 SIP unit using the web browser interface. The configuration described will allow the Vega to be
Initial configuration Vega 400 E1/T1 (SIP) R7 This document describes how to configure the Vega 400 E1/T1 SIP unit using the web browser interface. The configuration described will allow the Vega to be
Application. Contents of Package. Inspect the CyberSwitch upon receipt. The package should contain the following items:
 Overview CyberPower power manager CyberSwitch is the ultimate power control center to manage multiple network devices via the Internet. After installing the hardware and setting up an IP address, this
InterPBX Quick Installation Guide
 InterPBX Quick Installation Guide Prepare Your Telephone Numbering Plan InterPBX Communication System supports flexible numbering plan with maximum 5 digits of extension number. You need to prepare the
VOIP²ALL SERIES. 4 Channel Gateway User Guide. Version 5.38
 VOIP²ALL SERIES 4 Channel Gateway User Guide Version 5.38 Contents CONTENTS 1. INTRODUCTION TO THE VOIP²ALL GATEWAY... 4 1.1. The VoIP²ALL Gateway Solution Overview... 4 1.2. About this Manual... 5 1.3.
SMM Series 3G and GSM Modems. Quick Start Guide. Document Number: Version: 1.2 (20 October, 2015)
") SMM Series 3G and GSM Modems Quick Start Guide Document Number: 0013-001-000272 () Documentation Control Generation Date: October 20, 2015 Cybertec Pty Limited All rights Reserved. No part of this publication
SMM Series 3G and GSM Modems Quick Start Guide Document Number: 0013-001-000272 () Documentation Control Generation Date: October 20, 2015 Cybertec Pty Limited All rights Reserved. No part of this publication
AVE DR16X / AVE DR8X Quick Installation Guide
 AVE DR16X / AVE DR8X Quick Installation Guide Package Content Inspect the packaging carton. Make sure your AVE DR16X / AVE DR8X is properly delivered. Remove all items from the box and make sure the box
E SERIES USB ANALOG USER GUIDE. For E100 USB, E100LBY USB, E100TRM, E200 USB, E200TRM, E103 USB, E103 RediDock USB, E203 USB, E203 RediDock USB
 E SERIES USB ANALOG USER GUIDE For E100 USB, E100LBY USB, E100TRM, E200 USB, E200TRM, E103 USB, E103 RediDock USB, E203 USB, E203 RediDock USB Table of Contents E100 USB Phone Map.... 3 E103 USB Phone
IP PUBLIC ADDRESS INTERFACE
 AUTHOR DATE REFERENCE L. BRARD 01/10/07 Page 2/16 TABLE OF CONTENTS 1. INTRODUCTION... 3 2. DESCRIPTION... 3 2.1 OPERATING DIAGRAM... 3 2.2 CHARACTERISTICS... 4 3. OPERATION... 4 3.1 CONNECTION TO THE
Cisco Unified IP Phone Installation
 Phone Installation Overview, page 1 Before You Begin, page 1 Cisco Unified IP Phones 7906G and 7911G Components, page 2 Install Cisco Unified IP Phones, page 6 Mount Phone on Wall, page 11 Phone Startup
NET101. RS232 / RS422 / RS485 to Ethernet Converter. User s Manual. Version 1.2
 NET101 RS232 / RS422 / RS485 to Ethernet Converter User s Manual Version 1.2 Copyright Information Copyright 2004-2005, Mega System Technologies, Inc. All rights reserved. Reproduction without permission
RS-232/422/485 to Copper or Fiber. Ethernet Converter. User s Manual
 RS-232/422/485 to Copper or Fiber Ethernet Converter User s Manual Table Of Contents TABLE OF CONTENTS... 1 INTRODUCTION... 3 PRODUCT OVERVIEW... 3 PRODUCT FEATURES... 3 PACKING LIST... 4 LED INDICATORS...
epowerswitch 1G R2 User guide Version
 epowerswitch 1G R2 User guide Version 02 2011 www.neol.com Copyright by NEOL S.A.S - 4 Rue Nationale, 67800 BISCHHEIM, France Printed in France All rights reserved. No part of this documentation, accompanying
IP Softphone 2050 and Mobile Voice Client 2050 User Guide
 Nortel Networks Communication Server 1000 IP Softphone 2050 and Mobile Voice Client 2050 User Guide Revision history Revision history September 2004 Standard 4.00. This document is up-issued for Communication
Unified Office Gateway UMG Quick Installation Guide. Version: 1.0
 Unified ice Gateway UMG-2000 Quick Installation Guide Version: 1.0 Table of Contents 1. Package Contents... 3 2. Overview... 4 3. Hardware Installation... 6 3.1 Unpack the UMG-2000... 6 3.2 Choosing a
GIGABIT COLOR IP PHONE
 GIGABIT COLOR IP PHONE USER GUIDE UC842 Version:1.0.3.59 Nanjing Hanlong Technology Co., Ltd 86-25-84608050 support@hanlongtek.com Notices Information Notices Information Copyright Copyright 2005-2013
BUSINESS LINE COMMPORTAL GUIDE
 wowforbusiness.com BUSINESS LINE COMMPORTAL GUIDE WOW! Business BCSE.U.1505.O Business Line CommPortal Guide Table of Contents Getting Started...3 Dashboard...4 Messages and Calls...5 Messages...5 Missed
User's Guide Applied Functions
 User's Guide Applied Functions Table of contents 1 Using Web Connection 1.1 Web Connection... 1-2 Web Connection...1-2 Operating environment...1-2 1.2 Operations required to use this function... 1-3 1.2.1
Operating Instructions
 Table of Contents Installation Overview General Installation Overview... Setting Up Your Machine Network Configuration... 4 Setting up the Network Configuration... 4 Installation Installing the Printer
Software Upgrade Online Help
 Welcome! Digital Lightwave, Inc. is pleased to present the Network Information Computer (NIC) Software Upgrade Online Help To view and select topics, press the folder icons and topics on the left. Have
ADSL2+ 4-Port Modem Router Quick Setup Guide RTA1335
 ADSL2+ 4-Port Modem Router Quick Setup Guide RTA1335 Important This Guide is intended to get you started quickly. We have made the factory default setting of this router suitable for New Zealand 1. All
Power Switch Cabinet 4-Port New Generation
 May 2011 PSE544-XX Power Switch Cabinet 4-Port New Generation SUPPORT FREE technical support This product carries the CE mark to indicate compliance with the European Directive on Electromagnetic Compatibility
RealPresence Collaboration Server (RMX) 4000 Quick Installation & Configuration Guide General Safety Precautions
 4000 Quick Installation & Configuration Guide General Safety Precautions") RealPresence Collaboration Server (RMX) 4000 Quick Installation & Configuration Guide General Safety Precautions Follow these rules to ensure general safety: Keep the area around the Polycom RealPresence
RealPresence Collaboration Server (RMX) 4000 Quick Installation & Configuration Guide General Safety Precautions Follow these rules to ensure general safety: Keep the area around the Polycom RealPresence
Cisco Unity Express Windows and Menus
 Last updated: June 21, 2007 This chapter describes the windows, menus, and icons available in the Cisco Unity Express voice-mail system and contains the following sections: Navigating Through the Cisco
121000TP227S USER'S MANUAL
 121000TP227S USER'S MANUAL TABLE OF CONTENTS FEATURE LIST SAFETY INSTRUCTIONS INTRODUCTION LOCATION OF CONTROLS FUNCTION BUTTONS MENU SETTINGS CALLER ID INFORMATION DISPLAY MESSAGES CALLER ID SYSTEM OPERATION
CP-EX252N/CP-EX302N/CP-EW302N
 LCD Projector CP-EX252N/CP-EX302N/CP-EW302N User's Manual (detailed) Network Guide Thank you for purchasing this product. This manual is intended to explain only the network function. For proper use of
ALI-HVR3000H Series 4/8/16-Channel 960H HD-TVI Hybrid+ DVR Quick Setup Guide
 ALI-HVR3000H Series 4/8/16-Channel 960H HD-TVI Hybrid+ DVR Quick Setup Guide This quick setup guide provides instructions to initially setup and use the ALI-HVR3000H series digital video recorder (DVR).
Welltech WellGate User Manual
 Welltech WellGate 2626 An Easy to Use PBX Gateway User Manual Copyright 2009 Welltech Computer Co., Ltd. All right reserved Table of Contents Introduction...2 WellGate 2626 - An Easy to Use PBX Gateway...2
CGW-I Cellular Gateway BRI-GSM Interface
 CGW-I Cellular Gateway BRI-GSM Interface Installation and Operation Manual VERSION 3.02 AUGUST, 2006 NOTICE No part of this document may be reproduced or transmitted in any form or by any means (electronic,
QUICK START GUIDE. STEP X - Name of Step DTX1000-T, DTX1000-R, DTX1002-T, DTX1002-R INVISAPC DTX1000/2
 STEP X - Name of Step QUICK START GUIDE DTX1000-T, DTX1000-R, DTX1002-T, DTX1002-R INVISAPC DTX1000/2 24/7 TECHNICAL SUPPORT AT 877.877.2269 OR VISIT BLACKBOX.COM STEP 1A - DTX1000-T Option Transmitter
Trademarks. Statement of Conditions by NETGEAR, Inc. All rights reserved.
 2004 by NETGEAR, Inc. All rights reserved. Trademarks @2004 NETGEAR, Inc. NETGEAR, the Netgear logo, The Gear Guy and Everybody s connecting are trademarks of Netgear, Inc. in the United States and/or
Axxis Biometrics LLC. BioAxxis L113 Fingerprint Door Lock Programming Kit
 Axxis Biometrics LLC BioAxxis L113 Fingerprint Door Lock Programming Kit Revision 0.14 Dec 2005 Table of Contents 1. Introduction... 2 Product Overview... 2 Main Features... 2 Packing Lists... 3 2. Operation
Programming Manual KX-TVA50 KX-TVA200. Voice Processing System. Model
 Voice Processing System Programming Manual Model KX-TVA50 KX-TVA200 Thank you for purchasing a Panasonic Voice Processing System. Please read this manual carefully before using this product and save this
User s Manual PowerPanel Shutdown Service Graceful Shutdown and Notification service to ensure power protection of your computer
 User s Manual PowerPanel Shutdown Service Graceful Shutdown and Notification service to ensure power protection of your computer Version 1.3 TABLE OF CONTENTS INTRODUCTION... 1 INSTALLATION GUIDE... 4
ADSL Gateway QUICK INSTALLATION
 QUICK INSTALLATION ADSL Gateway There are two ways to set up the Gateway, run the Setup CD-ROM or use this Quick Installation. Linksys strongly recommends that you run the Setup CD-ROM. Run the Setup CD-ROM
AP-ENBD User Manual V0.2
 AP-ENBD User Manual V0.2 2015/12 Catolog Catolog... 2 1 Introduction... 1 1.1 Communication Structure... 1 1.2 Internal Principle... 2 2 Installation... 2 2.1 Connect to the Same Router (or Switch )...
User s Manual ADSL Router Modem DB Ethernet Ports
 User s Manual ADSL Router Modem DB 120 4 Ethernet Ports 1. About ADSL ADSL (Asymmetric Digital Subscriber Line) is a technology that allows high-speed data to be transmitted over existing copper telephone
Before you install the hardware, ensure the following components are included in your shipment:
 Tenor AF Quick Start NEW HARDWARE SUPPORT This unit contains new hardware, which requires newer software. This software was installed on the unit prior to leaving the factory. If you must downgrade the
Installation and Configuration Guide
 Installation and Configuration Guide h-series 800-782-3762 www.edgewave.com 2001 2011 EdgeWave Inc. (formerly St. Bernard Software). All rights reserved. The EdgeWave logo, iprism and iguard are trademarks
EAR Installation and Programming Manual
 EAR 5000 Installation and Programming Manual Version 6.0 Release 2.0 June 2002 NOTICE This publication refers to the EAR 5000 Auto Attendant System, Release 2 Additional copies of this manual may be obtained
CONVERTER FOR MONITORING STATION SMET-256
 CONVERTER FOR MONITORING STATION SMET-256 USER MANUAL Program version v1.07 smet256_en 04/11 SATEL's goal is to continually improve the quality of its products, which may lead to alterations in their technical
BiPAC 7404V Series. VoIP/ (802.11g) ADSL2+ (VPN) Firewall Router. Quick Start Guide
 ADSL2+ (VPN) Firewall Router. Quick Start Guide") BiPAC 7404V Series VoIP/ (802.11g) ADSL2+ (VPN) Firewall Router Quick Start Guide Billion BiPAC 7404V Series ADSL2+ Router PLEASE READ THE QUICK START GUIDE AND FOLLOW THE STEPS CAREFULLY. THIS QUICK
BiPAC 7404V Series VoIP/ (802.11g) ADSL2+ (VPN) Firewall Router Quick Start Guide Billion BiPAC 7404V Series ADSL2+ Router PLEASE READ THE QUICK START GUIDE AND FOLLOW THE STEPS CAREFULLY. THIS QUICK
Canlan INSTALLATION MANUAL
 Canlan INSTALLATION MANUAL August 2014 Table of Contents Introduction... 4 Overview... 5 RJ45 Connector and Status LEDs... 5 Power Input... 6 RS232 / RS485 Connectors... 7 Installing the Canlan Software...
Installation & Configuration Guide
 Installation & Configuration Guide Release 2.0 Release 2.0 Vertical Communications, Inc. reserves the right to revise this publication and to make changes in content without notice. 2010 by Vertical Communications,
VME-Pro. Application Notes VERSION 1 JUNE, 2005
 VME-Pro Application Notes VERSION 1 JUNE, 2005 NOTICE No part of this document may be reproduced or transmitted in any form or by any means (electronic, photocopying, recording, or otherwise) without the
Unified Office Gateway UMG-1000 / UMG-1000W. Quick Installation Guide
 Unified Office Gateway UMG-1000 / UMG-1000W Quick Installation Guide Table of Contents 1. Package Contents... 3 2. Overview... 4 3. Hardware Installation... 5 3.1 Removing the Chassis Cover... 5 3.2 The
OneStream Programming Guide
 OneStream Programming Guide Version 7 Document Control Date Document Version Change Oct 2006 Draft 1 First Draft Release of Document Jan 2007 Draft 2 Added Status web page May 2007 3 Added Flexible / Failover
WinCT-Plus Instruction Manual
 WinCT-Plus Instruction Manual (OP-08) Please see the separate document "Manual(for the AD8526)" if the AD8526(Ethernet Converter) is used. Ver.2.01 Mar. 21, 2008 Contents 1. Introduction ---------------------------------------------------------------------------------------------------
USB 2.0 Print Server. User s Manual. Rev. 01 (Jan, 2004) Made In Taiwan
 Made In Taiwan") USB 2.0 Print Server User s Manual Rev. 01 (Jan, 2004) Made In Taiwan TABLE OF CONTENTS ABOUT THIS GUIDE... 4 INTRODUCTION... 5 PACKAGE CONTENTS... 6 SYSTEM REQUIREMENTS... 6 GENERAL FEATURES... 7 PRODUCT
USB 2.0 Print Server User s Manual Rev. 01 (Jan, 2004) Made In Taiwan TABLE OF CONTENTS ABOUT THIS GUIDE... 4 INTRODUCTION... 5 PACKAGE CONTENTS... 6 SYSTEM REQUIREMENTS... 6 GENERAL FEATURES... 7 PRODUCT
User s Guide. Ethernet Module for Barcode Printer
 User s Guide Ethernet Module for Barcode Printer 1. ETHERNET MODULE... 2 1-1. Functions... 2 1-2. General Specifications... 2 2. ETHERNET MODULE INSTALLATION... 3 2-1. Ethernet Module Installation for
LevelOne FBR User s Manual. 1W, 4L 10/100 Mbps ADSL Router. Ver
 LevelOne FBR-1416 1W, 4L 10/100 Mbps ADSL Router User s Manual Ver 1.00-0510 Table of Contents CHAPTER 1 INTRODUCTION... 1 FBR-1416 Features... 1 Package Contents... 3 Physical Details... 3 CHAPTER 2
User s Guide for Polycom HDX Desktop Systems
 User s Guide for Polycom HDX Desktop Systems Version 2.0.1 November 2007 Edition 3725-26470-001/A Version 2.0.1 Trademark Information Polycom, the Polycom logo design, and ViewStation are registered trademarks
Standard H.264 DVR Setup Guide
 Package Content Standard H.264 DVR Setup Guide Inspect the packaging carton. Make sure the Standard H.264 DVR is properly delivered. Remove all items from the box and make sure the box contains the following
PHONE APPLICATION GUIDE
 TX3 Series EMERGENCY PHONE APPLICATION GUIDE Copyright November 2015 Mircom Inc. All rights reserved. Mircom 25 Interchange Way Vaughan, Ontario L4K 5W3 905.660.4655 Fax:905.660.4113 Version 1 TX3 Emergency
Phone Information. IP2061 Quick Reference Guide. ICON Voice Networks REV 1.0. ICON Voice Networks
 Phone Information Extension Number: Passcode / Voice Mail Access Code: IP Address: MAC Address: Serial Number: REV 1.0 IP2061 Quick Reference Guide ICON Voice Networks 8001 Jetstar Drive Irving, TX 75063
Print Server. User s Manual. Rev. 01 (April, 2004) Made In Taiwan
 Made In Taiwan") Print Server User s Manual Rev. 01 (April, 2004) Made In Taiwan TABLE OF CONTENTS ABOUT THIS GUIDE... 4 INTRODUCTION... 5 PACKAGE CONTENTS... 6 SYSTEM REQUIREMENTS... 6 GENERAL FEATURES... 7 PRODUCT VIEW...
Print Server User s Manual Rev. 01 (April, 2004) Made In Taiwan TABLE OF CONTENTS ABOUT THIS GUIDE... 4 INTRODUCTION... 5 PACKAGE CONTENTS... 6 SYSTEM REQUIREMENTS... 6 GENERAL FEATURES... 7 PRODUCT VIEW...
POWER. allows users to interface a third party control system with the devices on a VN Matrix network.
 The Extron VNM Enterprise Controller 00 is a dedicated control device for managing large VN-Matrix systems. The controller allows users to view, manage, and dynamically control multiple VN-Matrix systems
VG5000 Analog Voice Gateway
 VG5000 Analog Voice Gateway Administrator Installation and Configuration Guide 08VG50M.xg2.00g.EN3 DSG, DSG logo, InterPBX, Blaze, Savanna, VG5000, VG6000, VG7000, IP590, IP580, IP500, IP510, InterConsole,
Network Camera. Model No. BB-HCM403A. Troubleshooting... 3
 Network Camera Indoor Ceiling Use Only Model No. BB-HCM403A (PoE Ready) Table of Contents... 3 Indicator Display when using an optional AC Adaptor (Model No. BB-HCA2A)... 3 Indicator Display when using
GRANDSTREAM BUDGE TONE-100 IP PHONE INSTALLATION GUIDE
 pag.1 GRANDSTREAM BUDGE TONE-100 IP PHONE INSTALLATION GUIDE pag.2 SUMMARY SERVIZIO VOIP SKYPHO...3 BUDGE TONE-100 PACKAGE CONTENT...3 DEVICE PHISICAL CONNECTION...4 ACCESS TO THE DEVICE...5 Access to
Wireless-G Router User s Guide
 Wireless-G Router User s Guide 1 Table of Contents Chapter 1: Introduction Installing Your Router System Requirements Installation Instructions Chapter 2: Preparing Your Network Preparing Your Network
EC-11 Ethernet Converter
 EC-11 Ethernet Converter PSTN Contact ID to TCP Converter Installation and Operations Manual Version 8.H3.MID 1 Table of Contents About EC-11 Ethernet Converter... 3 Circuit Board Layout and Wiring Diagram...
SIP Proxy Server. Administrator Installation and Configuration Guide. 06SIPXM.SY1.00a.EN1
 SIP Proxy Server Administrator Installation and Configuration Guide 06SIPXM.SY1.00a.EN1 DSG, DSG logo, InterPBX, InterServer, Blaze Series, Savanna Series, VG5000, IP580, IP500, InterClient, NAT Proxy,
Please follow the steps that are listed here to get started with your Berkshire 10K ippbx telephone system.
 Please follow the steps that are listed here to get started with your Berkshire 10K ippbx telephone system. Step 1 Power-up and log into your PC. Unplug any existing ethernet cable from your PC. Step 2
XN120 PC Pro with Quick Installer Guide Rev 1.2 (September 2005)
") This guide explains the PC programming tool with Quick Installer for the XN120 Telephone System. There is also a separate guide (991425-5 PCPro Getting Started Guide) that explains the operation of PCPro
This guide explains the PC programming tool with Quick Installer for the XN120 Telephone System. There is also a separate guide (991425-5 PCPro Getting Started Guide) that explains the operation of PCPro
General Settings Guide
 Operating Instructions General Settings Guide 1 2 3 4 5 6 7 8 9 Connecting the Machine System Settings Copier Features Fax Features Printer Features Scanner Features Registering Addresses and Users for
Network / IP Camera User Manual
 Network / IP Camera User Manual Preface Congratulations on your purchase of this product. Read this manual carefully and keep it in a safe place for future reference. About this manual This user manual
Industrial PoE Plus Outdoor IR IP Camera ICA-2250VT
 Industrial PoE Plus Outdoor IR IP Camera ICA-2250VT Quick Installation Guide Table of Contents Chapter 1. Introduction... 3 1.1 Before Installation... 3 1.2 System Requirements... 3 Chapter 2. Physical
PTZOptics IP Joystick Controller
 Page1 PTZOptics IP Joystick Controller Second Generation IP Joystick Controller Installation & Operation Manual Please visit www.ptzoptics.com for the most up to date version of this manual Page2 Table
NetBiter Serial Server User Manual
 User Manual IntelliCom Innovation AB Linjegatan 3D SE-302 50 Halmstad SWEDEN Phone +46 35 18 21 70 Fax +46 35 17 29 09 email info@intellicom.se web www.intellicom.se Revision List Revision Date Author
BEC 5200 Series. (802.11g) ADSL2+ Router. Quick Start Guide
 ADSL2+ Router. Quick Start Guide") BEC 5200 Series (802.11g) ADSL2+ Router Quick Start Guide BEC 5200 Series (802.11g) ADSL2+ Router PLEASE READ THE QUICK START GUIDE AND FOLLOW THE STEPS CAREFULLY. THIS QUICK START GUIDE WILL HELP YOU
BEC 5200 Series (802.11g) ADSL2+ Router Quick Start Guide BEC 5200 Series (802.11g) ADSL2+ Router PLEASE READ THE QUICK START GUIDE AND FOLLOW THE STEPS CAREFULLY. THIS QUICK START GUIDE WILL HELP YOU
Two-Line Speakerphone with Caller ID/Call Waiting 992
 0992_CIB_1ATT_FINAL_022105 2/22/04 4:46 PM Page II User's Manual Part 2 Two-Line Speakerphone with Caller ID/Call Waiting 992 In case of difficulty, visit our Service Center at www.telephones.att.com or
Pocket User Guide 480i Phone. for Sphericall
 Pocket User Guide 480i Phone for Sphericall 480i for Sphericall User Guide Revised: May 12, 2004 Sayson Technologies Ltd. will not accept liability for any damages and/or long distance charges, which result
Legal Notes. Regarding Trademarks KYOCERA Document Solutions Inc.
 Legal Notes Unauthorized reproduction of all or part of this guide is prohibited. The information in this guide is subject to change without notice. We cannot be held liable for any problems arising from
Internet Telephony Gateway VGW-402 / VGW-400FS / VGW-400FO. Quick Installation Guide
 Internet Telephony Gateway VGW-402 / VGW-400FS / VGW-400FO Quick Installation Guide Table of Contents 1. Package Contents... 3 2. Hardware Installation... 4 2.1 Safety Instructions... 4 2.2 Physical Introduction...