VirtualViewer V4.10 VirtualViewer HTML5 for Java Client Administrator s Guide
|
|
|
- Roland Richards
- 6 years ago
- Views:
Transcription
1 VirtualViewer V4.10 VirtualViewer HTML5 for Java Client Administrator s Guide An online version of this manual contains information on the latest updates to VirtualViewer. To find the most recent version of this manual, please visit the online version at or download the most recent version from our website at DOC
2 Copyright Information While Snowbound Software believes the information included in this publication is correct as of the publication date, information in this document is subject to change without notice. UNLESS EXPRESSLY SET FORTH IN A WRITTEN AGREEMENT SIGNED BY AN AUTHORIZED REPRESENTATIVE OF SNOWBOUND SOFTWARE CORPORATION MAKES NO WARRANTY OR REPRESENTATION OF ANY KIND WITH RESPECT TO THE INFORMATION CONTAINED HEREIN, INCLUDING WARRANTY OF MERCHANTABILITY AND FITNESS FOR A PURPOSE, NON-INFRINGEMENT, OR THOSE WHICH MAY BE IMPLIED THROUGH COURSE OF DEALING OR CUSTOM OF TRADE. WITHOUT LIMITING THE FOREGOING, CUSTOMER UNDERSTANDS THAT SNOWBOUND DOES NOT WARRANT THAT CUSTOMER S OPERATION OF THE SOFTWARE WILL BE UNINTERRUPTED OR ERROR-FREE, THAT ALL DEFECTS IN THE SOFTWARE WILL BE CORRECTED, OR THAT THE RESULTS OF THE SOFTWARE WILL BE ERROR-FREE. Snowbound Software Corporation assumes no responsibility or obligation of any kind for any errors contained herein or in connection with the furnishing, performance, or use of this document. Software described in Snowbound documents (a) is the property of Snowbound Software Corporation or the third party, (b) is furnished only under license, and (c) may be copied or used only as expressly permitted under the terms of the license. All contents of this manual are copyrighted by Snowbound Software Corporation. The information contained herein is the exclusive property of Snowbound Software Corporation and shall not be copied, transferred, photocopied, translated on paper, film, electronic media, or computer-readable form, or otherwise reproduced in any way, without the express written permission of Snowbound Software Corporation. Microsoft, MS, MS-DOS, Windows, Windows NT, and SQL Server are either trademarks or registered trademarks of Microsoft Corporation in the United States and/or other countries. Adobe, the Adobe logo, Acrobat, and the Acrobat logo are trademarks of Adobe Systems Incorporated. Sun, Sun Microsystems, the Sun Logo, and Java are trademarks or registered trademarks of Sun Microsystems, Inc. in the United States and other countries. itext Copyright (c) itext Group NV, Authors: Bruno Lowagie, Paulo Soares, et al itext is a registered trademark of itext Group NV. Kakadu JPEG2000, is copyrighted by Dr. David Taubman, and is proprietary to NewSouth Innovations, Pty. Ltd, Australia. Aspose, Aspose.Cells (copyrighted 2003), Aspose.Words (copyrighted 2003), and Aspose.Slides (copyrighted 2004), are all proprietary to Aspose Software, Pty. Ltd, Australia. United States Government Restricted Rights The Software is provided with RESTRICTED RIGHTS. Use, duplication or disclosure by the United States Government is subject to restrictions as set forth under subparagraph (c)(1)(ii) of The Rights in Technical Data and Computer Software clause of DFARS or subparagraphs (c)(i) and (2) of the Commercial Computer Software-Restricted Rights at 48 CFR as applicable. The Manufacturer is Snowbound Software Corporation, 309 Waverley Oaks Rd., Suite 401, Waltham, MA 02452, USA. All other trademarks and registered trademarks are the property of their respective holders. Manual Title: Snowbound Software VirtualViewer HTML5 for Java Client Administrator s Guide Part Number: DOC Revision: 10 VirtualViewer HTML5 for Java Release Number: 4.10 VirtualViewer Release Number: 4.10 Printing Date: December 2017 Published by Snowbound Software Corporation. 309 Waverley Oaks Road Suite 401 Waltham, MA USA phone: fax: by Snowbound Software Corporation. All rights reserved. 2
3 Table of Contents About Snowbound Software... 7 VirtualViewer HTML RasterMaster SDK... 8 Major New Features in VirtualViewer VirtualViewer v4.9 New Features and Corrected Issues Getting Started System Requirements Performance Testing Requirements Determining Memory Requirements Licensing What to Expect in an Evaluation Version of VirtualViewer HTML What to Expect in a Production Version of VirtualViewer HTML Installing the Production Version of VirtualViewer HTML Installing Verifying Using VirtualViewer HTML The Image Controls Toolbar Load Local Files with Upload Document Exporting a Document Exporting a Document with Annotations ing a Document Printing Page Controls Fit-to-Page Continuous Scrolling Picture Controls User Preference Display Document and Page Properties The Annotation Toolbar Creating Annotations Editing a Filled Annotation Editing a Line Annotation
4 Copying and Pasting an Annotation Editing a Sticky Note Annotation Using Text Edit Annotations Search Annotation Text Annotation Indicators and Navigation Saving Annotations Deleting Annotations Annotation Information The Pages and Documents Panels Hiding the Pages and Documents Panel Split Screen View Document Notes Watermark Support Select Pages from the Thumbnails Panel Substitute Image Thumbnails Extract and Append Page Ranges Bookmarks Text Searching Pattern Based Text Searching Working with Redactions Page Manipulations Manipulating Page Order using Thumbnails Page Manipulations Across Multiple Browser Sessions System Configuration Servlet Tags for web.xml Customizing the User Interface Config.js Parameters Descriptions of Config.js Parameters Config.js Parameters Hiding the Pages and Documents Panel Disabling Page Manipulations Disabling Copy to New Document Configuring Text Rubber Stamp Annotations Configuring Image Rubber Stamp Annotations Configuring the Magnifier Configuring Default Annotation Values Configuring the Annotations Checkbox Configuring Documents
5 Localization Using Keyboard Shortcuts Customizing VirtualViewer HTML5 through JavaScript API Methods JavaScript API Descriptions Advanced Customization Virtual Documents Loading Virtual Documents Virtual Document Syntax Displaying a Virtual Document Virtual Documents: Save Document As Printing Virtual Documents Annotation Securing: Watermarks and Redactions The Annotation Security Model Permission Levels Level Definitions Retrieving Annotation Layers Key/Value Pairs Saving Redaction Layers Printing Layers DWG Layer Support Annotation Layers Snowbound, FileNet, and Daeja Annotations Configuring Snowbound Annotations Configuring FileNet Annotations Reading Daeja Annotations Annotation Mapping Watermark JSON Files Connecting to Your Document Store What is the Content Handler? FlexSnapSIContentHandlerInterface Authentication CacheValidator Event Notification and Handling Extracting Parameters from ContentHandlerInput Populating Parameters for ContentHandlerInput Populating Parameters for ContentHandlerResult Document Notes Methods
6 Content Handler Methods VirtualViewerContentHandlerInterface Method Detail Tips Changing the Default Directory Documents Slow to Load in Multiple Documents Mode Improving Performance or Quality Recommended JRE Memory Settings Capacity Planning Caching to Improve Performance Troubleshooting Submitting a Support Issue "Please wait while your image is loaded" Message Dis- plays Indefinitely Annotation Text Does Not Appear on Separate Lines Unable to Enter More Text After Using the - Key in an Annotation Getting an Evaluation Period Expired Error Message When Creating a War File Fonts Do Not Display Correctly Excel 2007 XLSX files return -7 Format_not_found error (Obsolete only found in old versions of product) XLS or XLSX Page Content Truncated Overlay Resources Not Pulled into APF or MODCA Document Documents Loading Slowly in Multiple Documents Mode Images Disappear in Internet Explorer 9 when Zooming or Rotating Internet Explorer Limits URLs to 2048 Characters Internet Explorer Defaults to Compatibility View Installing VirtualViewer HTML5 for Java on WebLogic Allowing Relative Paths to Work with Tomcat Displaying a Document as Landscape Getting a ClassNotFoundException Error Supported File Formats Snowbound Error Codes
7 About Snowbound Software For over two decades, Snowbound Software has been the independent leader in document viewing and conversion technology. It plays an integral role in enhancing and speeding document processing for the Fortune Snowbound excels in providing customers with powerful solutions for capturing, viewing, processing, and archiving hundreds of different document and image types. Thanks to its pure HTML5 technology and multi-environment support (including Java and Windows), Snowbound s products operate across all popular platforms and can be easily integrated into new or existing enterprise content management systems. Nine of the 10 largest banks in the United States (seven of 10 in the world), as well as some of the biggest healthcare providers, government agencies, and insurance companies rely on Snowbound for their mission-critical needs. Important Phone Numbers and Links For the most current information, please contact Snowbound Sales at: or or questions@snowbound.com or (sales inquiries only) Release Notes and Product Manuals: Snowbound Use Cases Snowbound s two flagship products VirtualViewer HTML5 (a pure HTML5 document viewer) and RasterMaster SDK (document/image conversion library) help organizations and companies across a variety of industries meet their document viewing and conversion needs: - Medical: Patient record management - Insurance: Insurance & health insurance claim processing - Finance: Mortgage processing & financial statements - Shipping: Full array of shipping documents - Legal: Claims, briefs, and other court documents 7
8 VirtualViewer HTML5 Easy-to-Use in Any Environment VirtualViewer HTML5 is equipped with powerful and sophisticated features and functionality. True cross-platform support: VirtualViewer HTML5 is a universal viewer that operates seamlessly on any platform with both a pure Java solution with Java-based server components or a.net solution. No Downloads: No application download or client-side installation is required, making it a trouble-free solution for users as well as IT administrators. Localized UI: The viewer s intelligent localization capabilities auto-detect browser settings and display in the proper language. High-speed viewing: With advanced server processing, the viewer delivers an extremely high-speed response. Seamless Integration into ECM Applications: VirtualViewer HTML5 integrates into existing back end repositories and homegrown applications. Snowbound also offers a variety of out of the box ECM connectors (Alfresco, IBM FileNet, and Open Text/Documentum) with seamless integration. One Quick & Easy 10 Minute Installation Installation of VirtualViewer HTML5 takes less than 10 minutes for POCs on any desktop, laptop, and virtual machine. After the quick and easy install, VirtualViewer HTML5 is then backed by Snowbound s award-winning and responsive support team. Snowbound s skilled network of system integrators can further enhance the benefits of VirtualViewer HTML5 with custom integration to your existing system. Technical Information Snowbound provides the option of either a 100% Java or a.net (64-bit) server component. The viewer operates in all modern browsers (IE, Firefox, Chrome, Safari and mobile browsers). Server options: - UNIX servers including Linux, Sun, IBM, HP, Mac - Windows servers, including Server 2016, 2012, 2008 and 2003 RasterMaster SDK RasterMaster is the industry s leading document/image conversion and imaging library for Java and.net. It is continually enhanced with new functionality and 8
9 formats and was developed by Snowbound s experts who have nearly a hundred years of combined imaging expertise. High-Speed File Conversion RasterMaster is the fastest file conversion SDK on the market. Users can quickly convert files on the fly for viewing or batch convert large amounts of document types. Special features, including conversion via Byte Array is also available for high performance applications. Extensive Format Support AFP, DWG, JPEG, MO:DCA, PDF, MS Office, TIFF, SVG, PNG, and hundreds more document types are supported. Convert any format to PDF or TIFF to ensure universal compatibility. RasterMaster also includes both PDF/A and SVG output support, enabling long term archiving and high resolution viewing. Technical Information RasterMaster is available for multiple platforms, including Java and.net: - Java: for all computing platforms, including Unix, Linux, Windows, and Mac - NET (x64): for Windows native applications, including Server 2016, 2012, 2010, 2008, and 2007 *** Responsive Support All of Snowbound s products are backed by responsive support. Our expert, responsive internal support team is available to answer your questions and help you install our HTML5 viewer and conversion SDK. A support portal is also available 24x7 for questions and information at 9
10 Major New Features in VirtualViewer v4.9 Watermarks VirtualViewer HTML5 now offers watermarks for users who need to mark page backgrounds with specific notifications such as Private, Confidential, and Do Not Distribute. Users can easily add watermarks to their document via a new button on the left sidebar of the viewer. Additional watermarks functionality includes: The ability to customize the appearance of the watermark (direction, location, and sizing), the text of the watermark, and the opacity of the watermark (transparent or solid). To expedite the process, the viewer provides the user with predefined watermarks such as "Edited by"; "time/date printed"; "page number"; "total pages"; and "document name. Administrators can restrict who has access to the watermarks feature based on user permissions. v4.7 DWG Layer & xref Support Users can easily access the DWG files created by CAD applications such as drawings and blueprints, as well as interact with the layers within those files individually. The user can decide which of those layers to view and which to take out of view, allowing for a streamlined review process where the user is only seeing the information they need and nothing else. Split Screen View The split screen view allows users to launch a lower panel to simultaneously compare documents side-by-side during the review process so they can easily spot differences, as well as display data in one view and manipulate in another. The user no longer needs additional tabs or windows to view multiple pages or documents at once. The result is a cleaner user experience, a streamlined review process, and less memory required on the server. Extract and Append Page Ranges The viewer can extract a range of pages instead of the entire document when saving to PDF, meaning users can save updated, large PDF documents at least 10 times faster than before. This results in dramatic speed improvements (in one instance, 215 seconds before and 3 seconds after) for users with many large, multi-page PDFs. v4.6 Faster Performance Snowbound has made upgrades which allow users to view, convert, and manage Microsoft Office documents - including Microsoft Word, Excel, and PowerPoint - at increased speeds. Benchmark testing showed that the viewer now loads these documents six or more times faster than before. These enhancements are also 10
11 available in the new version of the firm's document conversion SDK, RasterMaster. Pattern-Based Text Searching Snowbound has the ability for users to search for patterns in text, including social security numbers, phone numbers, credit card numbers, and addresses. Users can use this feature to quickly locate, redact, or collaborate on important information within documents. Drag & Drop Functionality Users are able to move individual or multiple pages from a document into a new or existing document by simply dragging the thumbnail(s) into the desired tab. Allowing the user to move and rearrange pages within a single viewer across multiple tabs simplifies document manipulation and creation. Enhanced Annotation Display The viewer displays user information on each annotation, including the date and time stamp for when the annotation was made. v4.5 Drag and Drop Page Manipulations Users can easily reorder pages in a document simply by clicking on the page (or pages) in the thumbnail panel and dragging to the desired location. Batch Redaction Tagging Using the viewer s search and redact feature, users are able to tag an entire batch of redacted search results at the same time, rather than having to individually tag each redaction, expediting the workflow process. Enhanced Cache Capabilities (Java only) VirtualViewer s server caching has been redesigned to further boost performance, allowing users to greatly reduce repository processing times. The larger the document (100+ pages), the more noticeable the performance enhancement. Upload Documents Users have the ability to import local files directly from their computer into the viewer and decide whether to save directly into the repository/backend system or to keep them local. v4.4 Search Annotation Text The viewer provides users the ability to search for text though all text-based annotations in the current document using the Search tab in the Thumbnail panel, making collaboration on documents even easier. Consolidate Annotation Layers Users can consolidate all annotation layers of a document into a single layer so all annotations can be easily viewed. 11
12 Crop Page Selection The viewer gives the user the ability to select a specific portion of a page using a rectangle tool to crop out the rest of the page. The cropped portion outside of the selected area is deleted from the page and the selected area can be saved out using save as or export. Page Rotation Capabilities Users are able to rotate specific pages as needed, making it easy to view documents and images as desired. v4.3 Annotation and Redaction Tagging Annotation and redaction tools allow multiple users to collaborate on a single annotation. Users are able to assign a tag (e.g. "Social Security Number") to each individual annotation or redaction to indicate to other users why the annotation or redaction was placed on the page. Bookmarks The bookmarks feature streamlines navigation within documents by providing users with the ability to create text bookmarks on pages via the thumbnail panel and also jump to a desired page via a bookmarks list. Annotation Indicators and Navigation Indicators ensure more efficient collaboration as users can now navigate through only the annotated pages of a document, skipping pages with no annotations or stamps. Annotation Commenting This workflow collaboration enhancement allows users to communicate about a specific part of the document by allowing comments to be added to existing annotations. Date, time of the comment, and the commenter's name are also listed. v4.1 Redactions Redactions streamline workflow while also ensuring sensitive data such as social security numbers and credit card information remains secure. The viewer provides users with multiple options for making redactions. Users can manually redact any region, highlight a specific selection of text, or search for a specific term. Once the sensitive information has been identified and marked for redaction, the user can then export a redacted version of the document, which is saved back to the document repository. Document Notes Users can add document notes to any document in order to maintain an active dialog and conversation within a specific document with other users. The notes are associated with the entire document (and not with specific pages) so collaborators can quickly review notes and action items. 12
13 User Preferences A framework for viewer preferences allows users to customize VirtualViewer directly to their unique needs by concealing or displaying specific tools and functions. By hiding unused options, the user enjoys a cleaner interface with only the required functions taking up valuable screen real estate. The ability to determine default settings associated with annotations can expedite a workflow process and reduce processing errors. v4.0 DWG Support The addition of DWG and DXF to Snowbound's extensive file format library for VirtualViewer HTML5.NET allows designers and architects to view CAD documents from any device with a web browser regardless of their location. CAD documents are typically used for engineering diagrams and blueprints. SVG Support The release also includes SVG support for the.net viewer so users receive high resolution display at any zoom level when viewing extremely large documents. Snowbound developed its own SVG format conversion technology to improve viewing fidelity as well as improve performance by reducing memory requirements compared to traditional raster documents. 13
14 VirtualViewer v4.9 New Features and Corrected Issues Note that the Release Notes, separately packaged, have the most up to date descriptions of these features. Documentation Corrections VirtualViewer for Java supports JRE 1.8. Previous documentation indicated that JRE 1.7 was supported. For Windows products,.net framework versions and up are now supported. Add Public API for setting Username in User Preferences API: virtualviewer.setusername(string); This was added so that the user can programatically add a username to their instance of VirtualViewer if they so desired. The user can still use the dialog box in the User Preferences. Take advantage of new auto-growing version of IMG_save_bitmap A better method for this function that takes advantage of RasterMaster s (Snowbound s Imaging Libraries that underlie VirtualViewer) new handling of buffer size and size increment values. It makes handling images of various sizes work better. It happens automatically. Remove "Save as PDF" option in VirtualViewer Print Menu This option was removed because it has become a redundant feature that is now handled with the Export feature. Footers for Page and Document thumbnails Page and document thumbnails now display the file name in a footer. This is managed by the displaythumbfooters parameter in the config.js file. It is off by default. Revalidate cache method called for every page This is a short timespan cache to store answers from validatecache for each session/user. Every x minutes the cache will be deleted for each user (with storing and retrieval handled separately). This provides performance benefits to some users. For whatever the specified window is (zero will check every time), we will cache the validation for that amount of time based on sessionid, documentid and HTTP action (GET or PUT). Once that time elapses, we will revalidate. 14
15 The time span value applies to both storage and retrieval. VirtualViewer Java and.net have slightly different parameters: Java: The validation cache is defined in ehcache.xml with the document cache in a section for "vvvalidationcache". By default, validations will expire after five minutes, although that is configurable in ehcache.xml..net: There is a new initialization parameter "validationcacheexpirationminutes" to control validation expiration. The default is five minutes. Add ability to resize magnifier window The ability to resize the Magnifier window vertically or horizontally using the mouse was added. To resize, grab the bottom left corner (a little black triangle) of the box. Original magnifier size is defined in Config.js. Add VirtualViewer Notes indicator A red checkmark Document Notes indicator on the Notes Tab will toggle on if a document contains a document note, otherwise it will be toggled off. 15
16 Add Document Notes templates The ability to create Document Notes templates was added. The user can create a Document Notes template in two ways, either by adding the Document Note templates in User Preference > Notes Templates tab or by adding the template objects to the notetemplates in config.js. Follow the steps below to add a Document Notes template in User Preference: 1. Select the User Preference button. From User Preference dialog box, choose Notes Templates tab. 2. Select Add button to create new Document Notes template. 3. In Template Name field, enter the template name. 4. In Template Text filed, enter the template text. 5. Select Save button to save the template 6. To edit the Notes template, select the template then edit the Template name or Template Text field. Select Save button to save update template or Cancel button to exit. 7. To delete a template, select the template then select Remove button. Select Save button to save change or Cancel button to exit. Document Notes Template workflow: 1. Select Notes Tab 2. Left-click Select Template button 3. Choose a template from the template drop down menu 4. Select Add Note button to add template to the document note. 16
17 Improve text copy/paste by new execcommand (copy) JS API Clicking copy on the context menu now copies text to the clipboard without a modal popup. Ctrl+shift+c does the same (this is the hotkey defined in config to be copy). Old functionality is preserved just in case, as a fallback. Add OCR Integration A Beta version of the OCR option is in VirtualViewer. The final version is expected in the VirtualViewer v4.10 release. It is expected that a choice of OCR recognition engines will be provided in that release. The OCR function allows searching text in an image document (TIFF or PNG initially) as well as selecting text in the VV client after the document has been OCRed. To OCR a document in the VV client, a user must search for text in a nontext document to get the OCR prompt. The OCRed result is cached; while that result is cached the user can search for and select text without a further OCR prompt. Searching is performed using the Search tab in the thumbnail panel. The original image will overlay the OCR ed textual data to maintain the greatest similarity to the original document. The search text string will be highlighted. Previous and Next match buttons will work as normal. Redact and Redact All Matches work as normal. Applying redaction tags to results works as normal. A wait icon will be displayed while the OCR process is running. OCR will not be initiated if the input document is not raster. Saving to a PDF file is an option. Additional language support can be added by the customer. The two new parameters in web.xml (web.config for.net) are: enableocr: Enable OCR for searching and text extraction. Must have a valid OCR configuration and licensing to function correctly. Defaults to false. tesseractdatapath: Absolute or relative path to Tesseract OCR Engine's training data. If using packed WARs in Tomcat, this needs to be changed to an external unpacked folder. Defaults to "/tessdata". Add Watermark Support in VirtualViewer Overview: VirtualViewer now offers watermarks for customers who need to mark page backgrounds with specific notifications such as Private, confidential, Do not distribute and so on. Watermarks can be created that are transparent or solid, of varying fonts and sizes and positions. They can also be restricted to admins versus all users. They can also have dynamic tags for user name, page numbers, print time, and document name. What does the User Interface look like? 17
18 There are a few UI changes. A new watermarks dialog lays out all the watermarks options for creation, deletion and editing. In the "document handling" dialogs (printing, exporting, etc) a new checkbox has been added, so the user may decide whether to burn their watermarks when exporting. If a watermark is marked as admin-created, then the "burn watermarks" option will be checked and disabled, so the admin watermarks burn by default. Similarly, a nonadmin may not edit or delete admin-created watermarks. Those dialogs are the only way to interact with watermarks. You can't select them on the document, move them around, etc--they're not annotations, they're marked into the document once created. Other features Users may add dynamic data into their watermark text. This is easily done in the watermarks dialog by clicking on a tag button above the text box in the watermark dialog. If you inspect the raw text of the JSON, a tag will appear enclosed in signs, which may be escaped by adding a /. When displayed, the tag will be replaced by data. For instance, the user wants a page number to print on each page. They click the tag button in the dialog. In JSON, now the watermark text would say, When displayed on the document, the watermark on page one will read "Page 1", the watermark on page fifty will read "Page 50" and so on. If the user types "If I wanted a page number I would use /@/@pagenumber/@/@", the watermark will now display "If I wanted a page number I would The tag is escaped, and so is not replaced by a dynamic number. Available tags are: Username: the user's username as stored in user preferences. total pages: the number of pages in the document. current page number: the number of the current page. print time: The date & time when the document was exported or printed. When displaying in the viewer, this is just an example date and time, from when the document was opened. document name: The display name of the current document. Watermark JSON Files Watermarks for a document are stored in a json file. Like annotations, the file will be documentkey + suffix. For instance, 6-Pages-1.tif.watermarks.json. The.watermarks.json file is a list of json objects, so it has the format: [ { myjsondata }, { myotherjsondata }]. Each individual watermark is a json object. Each will have the following properties, formatted as seen in the attached example: transparency: A boolean. If true, the watermark will be transparent; if false, 18
19 it will be a solid color. admincreated: A boolean. If false, any user can manage any aspect of the watermark. If true, admin restrictions will apply (as described below). text: A string. This is the text that will appear on the watermark. Multiline watermarks are supported. This is done under the hood in the watermarks dialog, but if a user is manually entering json, they should enter a newline character ("\n") where a line break should be. allpages: A boolean. If this is set, the watermark will appear on every page of a document. pages: An array of page indices, zero-indexed. For instance, to place a watermark on only page one, this property would contain [ 0 ]. This is a key difference between watermarks and annotations. Watermarks are intended to repeat across pages, so an identical watermark will have multiple pages it applies to. widthattenpx: An integer. This is a read-only value used by VirtualViewer to calculate the dimensions of the watermark, representing how wide the watermark is when the font is 10 pixels high. stretch: A double. This defines how far across the page the watermark will stretch. Set to 1.0, the watermark will go across 100% of the page (minus some margin space). Set to 0.5, 50% of the page. The UI allows only a small set of percentages. Diagonal watermarks will always stretch 100% across the diagonal. format: A json sub-object that has font and color information, as follows. -- font: A font name, for instance "Arial". -- color: We currently support only one color, so "000000" would be stored here. position: This is another sub-json object, that defines where the watermark will be placed on the page. There are two defining properties in here: the vertical placement of the watermark (top of the page, middle of the page, or the bottom of the page) and the direction of the text. While these options may open up further, the direction options are currently left-to-right text or diagonal text. The two options combine so that, for instance, top vertical placement & diagonal direction produce a watermark stretching from the top-left to bottom-right corner--while bottom vertical placement & diagonal direction will go from bottom-left to top-right. -- vertical: Use 0 for top, 1 for center, and 2 for bottom. -- direction: Use 0 for left-to-right text, and 2 for diagonal text. Watermark.json file sample [{"widthattenpx":19,"transparency":true,"admincreated":false,"text":"bugs","allpage s":true,"pages":[],"stretchpercent":0.5,"format":{"font":"times New Roman","color":"000000"},"position":{"vertical":0,"direction":0}},{"widthAtTenPx":86,"t ransparency":true,"admincreated":false,"text":"second%20watermark","allpages":fal se,"pages":[0],"stretchpercent":1,"format":{"font":"times New Roman","color":"000000"},"position":{"vertical":2,"direction":2}},{"widthAtTenPx":62,"t ransparency":false,"admincreated":false,"text":"sdadafsadfgsafd","allpages":false,"p ages":[0],"stretchpercent":1,"format":{"font":"times New 19
20 Roman","color":"000000"},"position":{"vertical":2,"direction":0}}] Last minute changes on Watermark feature (will be corrected in a point release soon). Unicode will not be supported in this release. Customer Issues 1. Fixed an issue where an XLSX file caused the viewer hang 2. Fixed an issue where the Created by display name for annotations was set to the last users display name. 3. Fixed an issue where a redaction rectangle did not scrub all of the underlying text. 4. Fixed an issue where exporting a PDF with Filenet annotations caused an Adobe Reader error. 5. Fixed an issue where exporting a PDF with annotations deleted a page. 6. Fixed an issue where the annotation notification icon disappeared when reloaddocumentonsave was set to true. 7. Fixed an issue where downloading an unsupported format would cause a viewer hang. 8. Fixed an issue where an XLSX file posted an error. 9. Fixed an issue where some JPEG file mimetypes were improperly set to PNG. 10. Fixed an issue where a PDF file posted errors. 11. Fixed an issue with manipulating Picture Controls caused the page size to increase. 12. Fixed an issue where portfolio PDF files didn t display properly. 13. Replaced togglesvgsupport with resetsvgsupport. 14. Fixed an issue where the display would flicker while trying to render an image with a large canvas. 15. Fixed an issue where an image wouldn t load because of slow network connectivity. 16. Fixed an issue where Print to PDF would cause Filenet annotations to shift down. 17. Fixed an issue where Daeja annotations were shifted on PDF files. 18. Fixed an issue where a page wouldn t appear until fully on screen while scrolling. 19. Fixed an issue where an image would flicker. 20. Fixed an issue where a logo was missing from a PPTX file. 21. Fixed an issue where PDF files were blurry. 22. Fixed an issue where temporary files were not being deleted. 23. Fixed an issue where a PDF file did not display properly. 24. Fixed an issue where viewing a DOCX file added extra blank space. 25. Fixed an issue with text overlapping within a PDF file. 26. Fixed an issue where Picture Controls didn t work if usebrowserscaling was set to true. 27. Fixed an issue where an XLSX file posted an error. 28. Fixed an issue where an XLSX file displayed a blank page. 29. Fixed an issue where an alert window wasn t appearing properly. 20
21 30. Fixed an issue with character spacing within a PDF file. 31. Fixed a typo in the webviewer.js file. 32. Fixed an issue where an XLSX file caused the viewer to hang. 21
22 Getting Started This section explains the system requirements and how to install and verify VirtualViewer HTML5 on your system. Snowbound Software s VirtualViewer HTML5 for Java viewer works with the latest Java and AJAX technology to create a true zero footprint viewing solution. This section will aid you with setting up and working with the package included in your zip file, VirtualViewerHTML5.zip. This zip file installs all of VirtualViewer HTML5 for Java components. For information on configuring VirtualViewer HTML5 for Java, please see Using VirtualViewer HTML5. System Requirements This section describes the system requirements to run VirtualViewer HTML5 for Java. Content Server VirtualViewer HTML5 for Java requires the VirtualViewer Java Content Server in order to function. The VirtualViewer Java Content Server is included in the VirtualViewerHTML5.zip package. Servlet Container VirtualViewer HTML5 for Java requires a J2SE or J2EE servlet container to run. You may choose any compliant servlet container, although recommended servlet containers include Apache Tomcat 6.x and higher, IBM Websphere 5.1 and higher, and BEA Weblogic 8.1 and higher. Server Java Version VirtualViewer HTML5 for Java requires a JRE of 1.7 or higher. Client Browser Versions The supported browsers are Internet Explorer 11, Microsoft Edge, Firefox 35 through 52, Google Chrome 57 through 42, or Safari 8 through 10. It may also work with other browsers such as Opera, but no testing is done to ensure compatibility. 22
23 Note: VirtualViewer will look, perform, and behave better if it is running outside of compatibility mode in Internet Explorer. For best performance, please configure Internet Explorer to use normal mode when using VirtualViewer. Quirks mode in Internet Explorer is not supported. *Some functionality is limited. Performance Testing Requirements For performance testing, the following minimum server requirements are suggested: Validation Minimum Requirements The following are the validation minimum requirements: Processor Speed Ram Available Memory SSD or HD Space Minimum Requirements 32 bit/64bit 2.4 GHz dual core 16GB 6GB 250GB Performance Minimum Requirements The following are the performance minimum requirements: Processor Speed Ram Available Memory SSD or HD Space Recommended Requirements 64bit 3.2 GHz quad core 32GB 16GB 250GB Performance Recommended Requirements 23
24 The following are the performance recommended requirements: Processor Speed Ram Available Memory SSD or HD Space Recommended Requirements 64bit 3.4 GHz quad core (with hyperthreading) 64GB 32GB 250GB Determining Memory Requirements The amount of memory required to display a document may be significantly larger than the size of the document that is stored on disk. Just like a road map, the document is folded up and compressed when it is stored. In order to see the document, it must be unfolded (decompressed) and spread out so you can see the whole map. The map takes up much more room when open for viewing. The same is true of online documents. When a document is open, a black and white letter size page at 300 dpi takes roughly 1MB of memory to display and a color page takes 25MB. The amount of memory required to view documents varies depending on the size of the documents you are processing and the number of documents you are processing at any one time. The amount of memory needed increases as: You go from black and white, to grayscale, to color documents (bits per pixel increases). You go from compressed to uncompressed document formats (lossy com- pression to raw image data). You go from low resolution to high resolution documents (dots per inch / quality increases). You go from small index card size images to large blueprint size images (number of pixels increases). 24
25 Generally, higher quality documents require more memory to process. Snowbound Software does not have a one-size-fits-all recommendation for memory because our customers have such a variety of documents and different tolerances for the level of output quality. However, you can try doubling the memory available to see if that resolves the issue. Keep increasing memory until you stop getting out of memory errors. If you hit a physical or financial limit on memory, then you can do the following: Decrease the number of documents you have open at any one time. Decrease the quality of the images requested by decreasing bits per pixel, the resolution, or the size. To calculate the amount of memory required for an image, you will need to know the size of the image in pixels and the number of bits per pixel in the image (black and white=1, grayscale=8, color=24). If you do not know the height or width in pixels, but you do know the size in inches and the dpi (dots per inch) of the image, then you can calculate the size in pixels as (width_in_ inches*dots_per_inch) = width_in_pixels. To calculate the amount of memory (in bytes), multiply the height, width and number of bits per pixel. Then, divide by 8 to convert from bits to bytes. See the following example: (height_in_pixels * width_in_pixels * (bits_per_pixel/ 8)) = image_size_in_ bytes This table lists examples of memory requirements based on image sizes. Table 1.1: Memory Requirements Based on Image Size Image Size 24-bit per pixel, 640 x 480 image 1-bit per pixel, 8.5" x 11" image, at 300 dpi (2550 pixels by 3300 pixels) 24-bit per pixel, 8.5" x 11" image, at 300 dpi (2550 pixels by 3300 pixels) Required Memory 640 * 480 * (24 / 8) = bytes 2550 * 3300 * (1 / 8) = bytes 2550 * 3300 * (24 / 8) = bytes (25 megabytes) 25
26 Determining Memory Needed for the Number of Users and Pages Viewed in VirtualViewer HTML5 To calculate the amount of memory needed based on the number of users and potential pages viewed at any given time, use the example below: The number of concurrent users * size per page in MB * 5 pages in view For example, plug in the number of pages (in this case, 5) and the number of users (in this case, 1000): black and white page (100 dpi).1mb per page x 5 pages=.5 mb x 1000 users = 500 mb =~ 0.5 GB black and white page (300 dpi) 1mb per page x 5 pages= 5 mb x 1000 users = 5000 mb =~ 5GB color pages (300 dpi) 25mb per page x 5 pages = 125 mb x 1000 users = mb = ~122 GB Exceptions to Supported File Formats and Platforms We do our best to support product and document specifications and to work in common platform environments. However, there are always exceptions. If you find an exception, please contact Snowbound Support at to let us know about it. Licensing VirtualViewer HTML5 for Java is delivered as a.zip file including the VirtualViewerHTML5.zip installation package. The package may vary depending on your version. Your options are enabled through a simple SnowboundLicense.jar which contains a license.xml file. Your SnowboundLicense.jar is included in your delivery in the VirtualViewerJavaHTML5\WEB-INF\lib directory. You do not need to take any further action. If you order a new option, Snowbound will provide a new SnowboundLicense.jar to replace the one we provided in your original delivery. The most current set of documentation is included with the installation package to assist you in installing and administrating this product. Our online documentation available at is easy to search and has the latest information. The documentation is described below and can be found within the.zip file. 26
27 VirtualViewerHTML5JavaClientAdminGuide.pdf: This guide describes how to use and configure VirtualViewer HTML5 for Java. VirtualViewerHTML5APIUserGuide.pdf: This guide describes how to use and configure VirtualViewer HTML5 for Java APIs. VVJavaHTML5ReleaseNotes.pdf: The release notes describe the latest additions and improvements to VirtualViewer HTML5 for Java. What to Expect in an Evaluation Version of VirtualViewer HTML5 What to Expect in an Evaluation Version of VirtualViewer HTML5 Your evaluation is a full version of the product with the following limitations: You will see a pop up banner when you view or convert your first document. Subsequent documents in the same session will not elicit the banner. You will see large thin Xs across each page after the first 50 pages or thumbnails. After your expiration date you will see a banner stating the evaluation has expired. You will not see any output. Other than that, you will have full use of the product including support for all supported document formats. What to Expect in a Production Version of VirtualViewer HTML5 What to Expect in a Production Version of VirtualViewer HTML5 When you purchase VirtualViewer HTML5 for Java, you will receive a set of fully licensed files. Your license and options are enabled through a simple SnowboundLicense.jar which contains a license.xml file. Your SnowboundLicense.jar is included in your delivery in VirtualViewerHTML5.war. 27
28 You do not need to take any further action. If you order a new option, Snowbound will provide a new SnowboundLicense.jar to replace the one we provided in your original delivery. Please back up your configuration files so that they can be merged into the production version. Installing the Production Version of VirtualViewer HTML5 Installing the Production Version of VirtualViewer HTML5 Install and configure the evaluation version of the product on your target production system. Ensure it is working as you intended. Extract the files from the production version package and use those to replace the same files in the evaluation version that you have installed. Once the production files are in place, you will no longer see banners or Xs. You will only see expiration messages if you try to view a document of a type that you did not purchase. For example: Office or AFP/MO:DCA. The evaluation configuration places VirtualViewer HTML5 for Java and the Content Server into the same directory on the same machine. If your environment requires the two servers to be in different directories or on different machines then please contact us at Installing To install VirtualViewer HTML5 for Java, follow the steps below: 1. Extract the VirtualViewerHTML5.zip file to a directory. 2. The extracted.zip file includes the VirtualViewerHTML5.war file. 3. Save the VirtualViewerHTML5.war file to the location where you want to install it. Please note that the application needs to be added to a web server before it can be run. Open the VirtualViewerHTML5.war file in an archive utility such as 7-zip. 4. In the VirtualViewerHTML5 directory, you will see the extracted files for VirtualViewer HTML5 for Java. If you change the default directory 28
 directory where you want to install the files. For example: C:\Program Files\Apache Software Foundation\Tomcat 7.0\webapps In Tomcat 8.")
29 from VirtualViewerHTML5, please see Changing the Default Directory for more information about how to successfully change the default directory. 5. Find the web application (webapps) directory where you want to install the files. For example: C:\Program Files\Apache Software Foundation\Tomcat 7.0\webapps In Tomcat 8.0, documents will load using absolute path and not relative path. Use the following example for the path for Tomcat 8: C:\Program Files\Apache Software Foundation\Tomcat 8.0\webapps\VirtualViewerJavaHTML5\Sample-Documents 29
30 6. From the extracted zip directory, copy the VirtualViewerHTML5 directory as a new subdirectory under your webapps directory. If you are using a web server other than Tomcat this may be a different location. Note: For other web servers such as WebLogic or WebSphere, you may need to take web application deployment steps that are specific to that type of web server. If you have trouble installing VirtualViewer HTML5 for Java on WebLogic, try exploding the.war file. Uninstall the application. Extract the contents of the.war file and deploy using the root directory VirtualViewerJavaHTML5. 7. Verify that the VirtualViewer HTML5 for Java content server is running by looking at the web server logs and search for VirtualViewer. You should see the start up message. If you do not see VirtualViewer, then search for snow which may be in an error message. If you still do not get a result, then please refer to the web application deployment documentation for your web server for information on troubleshooting web application deployment and start up issues. Note: We suggest that you restart Tomcat or your web application to ensure that your changes have taken effect. Verifying Running VirtualViewer HTML5 in a Browser Once all components have been installed, VirtualViewer HTML5 for Java will start up from any supported browser. No client components are needed on the client machine. To start VirtualViewer HTML5 for Java, open your.html file in a browser. For example, open index.html. Note: Make sure that your web service such as Tomcat is running when you open the viewer in your browser. The following example shows VirtualViewer HTML5 for Java loaded in a browser: 30

31 Verifying that the Sample Documents Work in VirtualViewer HTML5 Snowbound Software provides sample documents in the VirtualViewer HTML5 for Java installation to get you started. The sample files are located in the Sample-Documents subdirectory. The web.xml file delivered with VirtualViewer HTML5 for Java located in VirtualViewerHTML5\WEB-INF specifies the Sample-Documents subdirectory as the default location of the sample files in the filepath parameter. To view the sample documents, enter the URL shown in the Displaying the Sample Documents example below. Replace server and port with your server and port where shown in the example. To view any of the sample 31
32 documents, specify the document name at the end of the URL after documentid with the document name. Displaying the Sample Documents localhost:8080/virtualviewerjavahtml5/index.html?documentid=bostonpermit.tif The default port for VirtualViewer is To configure a different port, set the codebase parameter in the web.xml file located in VirtualViewerHTML5\WEB-INF. For example, change the port 8080 in the example below to your port number. <init-param> <param-name>codebase</param-name> <param-value> </init-param> If you are able to see all of the documents that came in the Sample-Documents directory of your VirtualViewer HTML5 for Java installation, then you have successfully installed it. To view the other documents specify the filename after the documentid in the URL. If you are not able to see the documents in the viewer, please see the Troubleshooting section. If you are still not able to see the documents, please file a ticket with Snowbound Support at Verifying that Your Documents Work in VirtualViewer HTML5 Now you can move on to viewing your documents by placing them in the Sample-Documents directory and then specifying the document's file name after the documentid in the URL. For example, if you want to display the file named test.tif, add that file to your Sample-Documents directory and test.tif after documentid as shown in the following example: Example 1.1: Specifying the Document to Display localhost:8080/virtualviewerjavahtml5/index.html?documentid=test.tif The documentid should be a filename if the default content handler is used. Otherwise, it can be whatever the custom content handler expects for a documentid. For more information, please see Connecting to Your Document Store. 32
33 Using VirtualViewer HTML5 This section describes the available functionality and features in VirtualViewer HTML5. The first three sections describe the functional areas of VirtualViewer HTML5 for Java. The Image Controls Toolbar runs along the top of the screen. The Annotation Toolbar that runs along the left side of the screen. The Pages and Documents Panel on the right side of the screen shows the thumbnails for the current image and for all the documents made available by multiple documents mode. The Image Controls Toolbar The section describes the Image Controls Toolbar that runs along the top of the VirtualViewer HTML5 for Java screen. Load Local Files with Upload Document Load Local Files with Upload Document Follow the steps below to use the load local files feature: 1. Select the Upload Document button. 2. In the Upload Document dialog, select the Choose File button. 3. Select the file that you would like to open. The file name displays in the Upload Document dialog. 4. Select the OK button. 5. A copy of the file is uploaded to the server and is automatically placed in your Sample Documents folder to use in VirtualViewer. 33

34 Exporting a Document To export a document, select the Export Document button. The Export Document function allows regular and virtual documents to be exported. Exporting a Document with Annotations Exporting a Document with Annotations The Export dialog box contains the Include Annotations checkbox to select the option to export a document with annotations. Annotations will only be included when the Include Annotations checkbox is selected. The default is set to include annotations when exporting. When exporting with 34
35 annotations, only the visible layers are included. When the Include Annotations checkbox is selected, the option to export the file as Original will be disabled. The Include Annotations checkbox is only supported when either the PDF or TIFF format is checked. To export the file as Original, un-check Include Annotations to enable and make available the option for Original. Select the Export button to export. On the Include Annotations dialog box, the Text and Non-Text options are hidden from the Export Document, Document, and SaveAs Document sub-option. We still support these options. To re-enable the Text and Non- Text option, change their respective entries from display: none to display :! Important in dialog.css. div#vvexportoptionsannotationstypecheckboxes { display: block!important; } div#vv optionsannotationstypecheckboxes { display: block!important; } div#vvsaveasoptionsannotationstypecheckboxes { display: block!important; } For more information on configuring the Export dialog box to display the Include Annotations checkbox, please see Export Dialog Box: Displaying the Include Annotations Checkbox. 35
36 ing a Document To a document, select the button. The Document dialog box appears. Select the options that you want for your . In the From: field, enter the address of the sender. In the To: field, enter the address where you are sending the document. In the Subject: field, enter the subject for your . In the body field, enter the text of the . In the Format section, select PDF, TIFF or Original for the file format. In the Annotations section, select any of the following check boxes: Include Annotations - Check to include annotations. Select Send to send the . Printing To print, select the Print button. 36
37 The Print dialog box appears. Select the options that you want for your print job. The Save As PDF option was removed because it has become a redundant feature that is now handled with the Export feature. Printing with or without Annotations The print dialog box contains the Include Annotations checkbox to select the option to print with or without annotations. Annotations will only be included when the Included Annotations checkbox is selected. The default is set to not include annotations when printing. When printing with annotations, only the visible layers are included. For more information on configuring the Print dialog box to display the Include Annotations checkbox, please see Displaying the Include Annotations Checkbox. Zooming Zooming To zoom, select one of the Zooming Controls buttons. The available Zooming Controls buttons are: Zoom In and Zoom Out. Rubber Band Zoom To use rubber band zoom, select the Rubber Band Zoom button then drag your mouse to select the area that you want to zoom in on. and 37
38 Magnifier To magnify, select one of the Magifier buttons: Magnifier. When the Magnifier is launched, it appears on the screen based on the default coordinates defined in config.js. Once the Magnifier is displayed, it can be selected and moved just like any annotation. The Magnifier size does not scale with changes to the zoom level of the page and maintains its dimensions as the page zooms but the zoom will scale as a factor of the magnifier zoom level and the page zoom level. The ability to resize the Magnifier window vertically or horizontally using the mouse was added. To resize, grab the bottom left corner (a little black triangle) of the box.the magnifier will not magnify annotations. Page Controls To move from page to page, select one of Page Controls buttons. The available Page Controls buttons are: First Page, Previous Page, Next Page, and Last Page. Fit-to-Page To fit the document to the page, select one of the Fit-to Controls buttons. The available Fit-to Controls buttons are: Fit-to-page, Fit-to-width, and Fit-to-height. Continuous Scrolling The thumbnail panel scrolls as you scroll the document in the image panel. The page in the image panel that has greater than 50% of the available screen is reflected as the active thumbnail. 38
39 As you scroll through the document pages, the viewer automatically highlights the border of the thumbnails after the page has changed. The page number changes to reflect the page selected in the thumbnail. Any page level calls are applied to the active page. For example, if you select to rotate, only the active page is rotated. Any zoom level functions are applied to the entire document. For example, if you select, fit-to-page, every page in the document displays as fit-to-page. Continuous scroll facilitates searching. The found words can be highlighted in all the pages of the document. Picture Controls To adjust image properties (picture controls), select the Picture Controls but- ton. Once the Picture Controls button is selected, VirtualViewer HTML5 for Java displays the Picture Controls window. You can adjust the Brightness, Contrast, and Gamma by sliding the control bar to increase or decrease the brightness, contrast, and gamma. Picture Controls are measured on a range of -125 to 125. Changes made to the Picture Controls properties are page specific and only applied to the page actively in focus. 39
40 Changes made to the Picture Controls properties will be seen in the viewer, in near real time, as the adjustments are made. Crop Page Selection Crop Page Selection You can draw a crop rectangle on a page and crop out to remove the rest of the page. The remaining area is deleted from the page and can be saved out using save as or export. To crop a page, select the Crop Page Selection button. With the Crop Page Selection button, draw a rectangle to select the area that you want to crop from the page. Select OK to confirm the area to crop. The area outside the selection is deleted from the page. Select Cancel to cancel the selection. Select Save to save the cropped area. 40

41 Crop Page will not retain any annotations or pre-burned redactions. 41
42 When entering crop preview mode, cropping will remove all annotations from your page. In order to save the crop, either use export or save as to send it to a new document, or save to overwrite the file. If you crop within a cropped page, the original crop will be backed out. You cannot crop a cropped area. You have to save the original cropped page to crop again. Annotations are not supported on cropped pages. If you try to annotate on a crop preview page, you will see an error message and not be able to annotate the page. You can annotate after saving the cropped page. In config.js, set the enablecrop parameter to true to enable consolidate annotation layers. Set the parameter to false to disable consolidate annotation layers. This parameter is set to false by default. User Preference The User Preferences feature allows you to configure the icons, annotation properties, text stamps, and the default fit-to display in the viewer. Select the User Preferences icon to open the User Preferences window with the following four panels to set the user preferences: Panel 1: Toolbar Configurations sets the ability to show or hide each button on the Image Controls and Annotation toolbar. Check or uncheck the check box for the toolbar button that you want to turn on or off. Check the box to show the button on the toolbar. Uncheck to hide that button from the toolbar. Check or uncheck the top check box to turn on or off toolbar icons. The icons will shift on the toolbar to fill in the space left by icons that are turned off. The changes that you make in User Preferences are saved to your local storage on the browser that you used when making the changes. Your User Preferences settings will only be visible on the browser on the computer where you saved the settings. 42
43 Note: Select the ctrl + ' shortcut key to launch the user preferences dialog box. This is useful if you have turned off the User Preferences icon in the toolbar and want to open the User Preferences window. Panel 2: Annotation Properties sets the default values for the annotation types. This includes the font type and size, font color, and line size. 43
44 Panel 3: Custom Text Stamps defines custom text stamps. Select the [ + ] button to add a custom text stamp. Enter the display name and stamp text. Select the appropriate font color, font type, font size, bold or Italic text. Select the [ - ] button to remove a custom text stamp. The panel shows a real time preview of the custom text stamp. The display name shows the text that displays for the custom text stamp in the toolbar. The stamp text displays the text that is displayed in the custom text stamp annotation. Custom text stamp is disabled by default. To enable custom text stamp, set enabletextrubberstamp config.js parameter to true. Panel 4: General Preferences sets the default fit-to preferences. Select Fit to Window, Fit to Height, or Fit to Width. Select Zoom Percent. From the drop down select the zoom level from the following: 2, 3, 4, 6, 8, 10, 15, 20, 30, 40, 50, 75, 100, 150, 200, 300, 400, 600, 800, In config.js, set the zoomlevels parameter to the desired zoom levels. The default values are 2, 3, 4, 6, 8, 10, 15, 20, 30, 40, 50, 75, 100, 150, 200, 300, 400, 600, 800,
45 Once the level is chosen and saved, the document will automatically switch to the selected zoom level. For example, if you choose 75, the document will zoom to 75%. In the Display Name field, enter the user name to set a user name for Document Notes and Annotation Commenting. Select the Reset button to clear local storage and remove the browser specific, user defined stamps. Select the Save button to save your user preferences in the browser cache. Select the Cancel button to cancel the window. Display Document and Page Properties Select the Image Info icon properties information: to open a window with the following document 45
 Hiding the Information for a document VirtualViewer.prototype.")
46 Use the following API methods to manage the display of document properties: Showing the Information for a document VirtualViewer.prototype.showImageInfo = function() Hiding the Information for a document VirtualViewer.prototype.hideImageInfo = function() Toggling the Information for a document VirtualViewer.prototype.toggleImageInfo = function() The Annotation Toolbar The section describes the Annotation Toolbar that runs along the left side of the VirtualViewer HTML5 for Java screen. Creating Annotations To create annotations, click on the annotation to select it and then click and drag your mouse on the document. Release the mouse when you are done drawing the annotation. The available annotation buttons are: sticky note, text edit, image rubber stamp, highlight rectangle, redaction area, line, arrow, freehand, filled rectangle, filled ellipse, filled polygon, rectangle, ellipse, and polygon. 46

47 Note: Annotations are not supported on the iphone and ipad platforms. To display a contextual annotation box, click on the annotation and then leftclick on your mouse. The contextual annotation box allows you to: Select a color to fill in the annotation. Select a line color. Adjust the line size for a line annotation. Edit the text for a text annotation. Editing a Filled Annotation To select the fill color for a filled annotation, right-click on the annotation. In the contextual annotation box, select the fill color. To display more fill colors, select the color in the Fill Color field. The Fill Color box expands to display more colors to select from: 47

48 In the Custom: field, you can enter a customized color code as the Red Green Blue (RGB) color code. For example, for the color red, enter the customized RGB color code of FE0000. Editing a Line Annotation Editing a Line Annotation To adjust the line color in a line annotation, right-click on the annotation. In the contextual annotation box, select a line color. 48

49 To adjust the line size, right-click on the line annotation. In the contextual annotation box, select the line size from the available line weights of 1 to 9. Copying and Pasting an Annotation Copying and Pasting an Annotation Follow the steps below to copy and paste annotations: 1. Right-click on an annotation. 2. From the dialog box, select the Copy or the Cut button. 3. Right-click on the page where you would like to paste the annotation. Select Paste. 4. The annotation is pasted on the page. 49

50 Editing a Sticky Note Annotation Editing a Sticky Note Annotation Select the Sticky Note text annotation button. Right-click on the text annotation to open the annotation contextual box. Enter text in the text area in the Edit Text field. 50

51 To adjust the text color in a text annotation, select a text color. In the Custom: field, you can enter a customized color code. In the Font field, select the font that you would like for the text. In the Font Size drop down box, select the font size for the text. Select the Bold checkbox for bold text. Select the Italic checkbox for Italic text. Formatting changes are reflected in this text box as well as the text on the annotation. Select the Save button to save any text edit changes. Using Text Edit Annotations A Text Edit annotation allows you to type a text annotation on a document. Select the Text Edit annotation button. Type the text in the Text Edit annotation box. Select the checkmark to save the text annotation. Select the X to close the Text Edit annotation box. You can dynamically resize text annotations. The text annotation box expands horizontally as you type from left to right. 51
52 In config.js, set the autoresizetextannotations parameter to true to dynamically resize annotations. The default value is false. Example: autoresizetextannotations: true, If the autoresizetextannotations parameter is set to true, the text annotation will act as follows: The text annotation automatically resizes to fit the initial text when it is cre- ated. The text annotation extends the right edge of the annotation edit box as you type. The text annotation is resized vertically and does not extend beyond the bottom of the page. The horizontal resizing ends at the end of the page. Search Annotation Text To search annotation text, select the Annotation Search button in the Search tab in the Thumbnail panel. Enter the text that you are searching for in the Search field and select enter. The annotation text is highlighted for the term that you searched. 52
53 Annotation Commenting Annotation commenting allows you to add user comments to an annotation object. This allows multiple users to collaborate on a single annotation object. To use annotation commenting, follow the steps below: User 1 creates an annotation or rubber stamp and saves and closes the document. User 2 loads the document and right-clicks on the annotation or rubber stamp. The user selects the Notes button. The user enters text in the note field and selects Add Annotation Note. The note is displayed with the date and time that it was created. 53
54 User 3 follows the same steps as User 2. Each additional user can add comments. To delete a note, select the x at the upper right of the note. Annotation commenting is display only. Export, Send, and Print will not display the annotation comments on the pages. In config.js, set the enableannotationcommenting parameter to true to enable annotation commenting. Set the parameter to false to disable annotation commenting. To set the user name, select User Preferences and then select the General Preferences tab. In the Username field, enter the user name and select the Save button. Resizing an Annotation To resize an annotation, click on it until it is highlighted and selection squares display on each of the annotation s corners. Drag one of the selection squares, except for the top left one, to resize the annotation to the desired size. The following is the expected behavior for the highlighted annotation and selection squares: Select the top left selection square to drag the annotation to a new location. Dragging on other non-selection square areas of the annotation sets the upper left selection square under the mouse pointer. Select any of the other selection squares other than the top left one to resize the annotation. 54
55 Annotation Indicators and Navigation The annotation indicators and navigation buttons allow you to navigate through a document showing only the annotated pages. Click the Toggle Annotation Navigation button (the grey checkmark on top right corner of the Pages panel) to display the Annotation panel. The Annotation panel shows the Previous Annotation Page button, the Next Annotation Page button, and the Filter button. Use the Next Annotation Page button and the Previous Annotation Page button to navigate from annotated page to annotated page skipping pages with no annotations. 55

56 Select the Filter button to clear the pages view in the thumbnail panel and only display pages that contain an annotation. The Annotation Indicator icon displays as a red check in the upper right corner of a page with an annotation. The annotation navigation buttons are enabled by setting the showannnavtoggle config.js parameter to true. The default value is false. Please see the example below: showannnavtoggle: true, The annotation indicator is enabled by setting the showannindicators config.js parameter to true. The default value is false. Please see the example below: showannindicators: true, 56
57 Saving Annotations To save annotations, select the Save Document button. Deleting Annotations To delete an annotation, right-click on the annotation to display the contextual annotation box. In the Delete Annotation? box, select the Delete button to delete the annotation. Annotation Information To display the User Name and Date and Time, right-click on any annotation in VirtualViewer. The annotation creator s user name and the date and time that the annotation was created display at the bottom of the annotation window. 57

58 Using Image Rubber Stamp Annotations An Image Rubber Stamp is an image annotation from a pre-defined list. Your system administrator has the ability to define a list of pre-configured Image Rubber Stamps through the enablerubberstamp parameter in the web.xml file. For more information on configuring rubber stamp annotation functionality, please see Configuring Image Rubber Stamp Annotations. If the enablerubberstamp parameter is set to true and one or more Rubber Stamps are defined, then clicking on the Text Edit annotation toolbar button as shown below will produce the rubber stamp text menu. Click on the Image Rubber Stamp annotation toolbar button as shown below to see a list of available image rubber stamps defined by the system administrator. Note: If the enablerubberstamp parameter is set to false, then clicking the Text Edit annotation button allows you to select only Add New Text to add a text annotation. 58
59 The Pages and Documents Panels The panel on the right side of the screen shows the thumbnails for the current image and for all the documents made available by multiple documents mode. Select the Pages tab to display the thumbnails for the current image being viewed. Select the Documents tab to display thumbnails for the first page of every document made available by multiple documents mode. Page and document thumbnails now display the file name in a footer. This is managed by the displaythumbfooters parameter in the config.js.file. It is off by default. To select a specific page or document simply click on the corresponding thumbnail and that page or document will load into the main viewing area. Hiding the Pages and Documents Panel The Thumbnail panel provides a convenient way to: Navigate to any page in a document in the Pages panel. Select another document to view from the multiple Documents panel. Create a new document by dragging and dropping pages from another document. However, this convenience does have a price. VirtualViewer HTML5 for Java performance degrades because it is processing every page in the document Pages panel and/or the first page of every document in the Documents panel. If you want to speed up performance, you may want to disable or hide the thumbnail navigation panels. For more information on disabling or hiding the pages and documents panel, please see Hiding the Pages and Documents Panel. To hide or show the Pages and Documents panel, select the Toggle Thumb- nails button. The following shows VirtualViewer HTML5 for Java with the Thumbnail Panel hidden: 59
60 Split Screen View You can launch documents to a lower panel to visually compare documents in one viewer session. The main image panel on the top retains all feature functionality. The lower panel includes all functionality except the magnifier and the thumbnail panel functionality including page manipulations, text search, document notes, and bookmarks. Follow the steps below to use the Split Screen View feature: 1. On the Documents tab, right-click on the document thumbnail for the document that you want to open in the lower panel and select Docu- ment Comparison. 60
61 2. The document in the main image panel appears in the top panel. The document that you selected from the Documents tab appears in the lower panel. 3. Scroll to navigate the pages in the lower panel. 4. To replace the document in the lower panel, right-click on another doc- ument thumbnail in the Documents tab and select Document Com- parison. 5. To undo the Split Screen View, right-click on the document in the top or bottom panel and select Close Document Comparison. In config.js, set the splitscreen parameter to true to enable the Split Screen View feature. If the splitscreen parameter is set to false, the Split Screen View feature is disabled. The default value is true. Example: splitscreen: true, In config.js, set the screensizes parameter to the screen size for panel 1 and panel 2. The first value sets the size of screen panel 1. The second value sets the size of screen panel 2. If the first value is set to 50, the first screen panel is set to 50% of the viewer. If the second value is set 50, the second screen panel is set to 50% of the viewer. Example: screensizes : [ 50, 50], As images are added by selecting Split Image, each new document request replaces the existing document in the lower panel. The following shows the Split Image view: 61

62 The following sections describe the Document Notes, bookmarks, text searching, redaction, and page manipulation features. Document Notes The Document Notes Panel allows you to add notes that are relevant to the active document that you are currently working with. It includes the ability to view, create, edit, and delete notes. The getdocumentnotes(string) function in webviewer.js in the js directory will change the note's author to whatever name is specified in the string.the string will replace "User Unknown" with whatever string is entered in this function. To set the user name in the Document Notes panel, set: 62
63 virtualviewer.getdocumentnotes(" "), For example, if you want to set the user name as Fred: virtualviewer.getdocumentnotes("fred"), The time stamp is set by the server time for the computer of the user who created the note. The time stamp changes for the server time for the computer of the user when edited. Creating Document Notes To create a note, follow the steps below: 63
64 1. Select the Notes Tab. 2. In the Document Notes field, add the text for the note. 3. Select the Add Note to add the note. Document Notes templates The ability to create Document Notes templates was added. The user can create a Document Notes template in two ways, either by adding the Document Note templates in User Preference > Notes Templates tab or by adding the template objects to the notetemplates in config.js. Follow the steps below to add a Document Notes template in User Preference: 1. Select the User Preference button. From User Preference dialog box, choose Notes Templates tab. 2. Select Add button to create new Document Notes template. 3. In Template Name field, enter the template name. 4. In Template Text filed, enter the template text. 5. Select Save button to save the template 6. To edit the Notes template, select the template then edit the Template name or Template Text field. Select Save button to save update template or Cancel button to exit. 7. To delete a template, select the template then select Remove button. Select Save button to save change or Cancel button to exit. Document Notes Template workflow: 1. Select Notes Tab 2. Left-click Select Template button 3. Choose a template from the template drop down menu 4. Select Add Note button to add template to the document note. 64

65 Editing Document Notes To edit a note, follow the steps below: 1. Double-click on a previously created note text to edit it. 2. In the Document Notes field, edit the note. 3. Select the Apply button to save the changes to the note. Printing Document Notes To print a note, follow the steps below: 1. Select the Print button. 2. Check the Print Document Notes check box and select the Print button. The Save As PDF option was removed because it has become a redundant feature that is now handled with the Export feature. 3. The Document Notes print on the last page of the document. 65

66 Document Notes Indicator A red checkmark Document Notes indicator on the Notes Tab will toggle on if a document contains a document note, otherwise it will be toggled off. 66
67 Watermark Support VirtualViewer now offers watermarks for customers who need to mark page backgrounds with specific notifications such as Private, Confidential, Do not distribute and so on. Watermarks can be created that are transparent or solid, of varying fonts and sizes and positions. They can also be restricted to admins versus all users. They can also have dynamic tags for user name, page numbers, print time, and document name. What does the User Interface look like? There are a few UI changes. A new watermarks dialog lays out all the watermarks options for creation, deletion and editing. In the "document handling" dialogs (printing, exporting, etc) a new checkbox has been added, so the user may decide whether to burn their watermarks when exporting. If a watermark is marked as admin-created, then the "burn watermarks" option will be checked and disabled, so the admin watermarks burn by default. Similarly, a non-admin may not edit or delete admin-created watermarks. Those dialogs are the only way to interact with watermarks. You can't select them on the document, move them around, etc--they're not annotations, they're marked into the document once created. Other features Users may add dynamic data into their watermark text. This is easily done in the watermarks dialog by clicking on a tag button above the text box in the watermark dialog. If you inspect the raw text of the JSON, a tag will appear enclosed in signs, which may be escaped by adding a /. When displayed, the tag will be replaced by data. For instance, the user wants a page number to print on each page. They click the tag button in the dialog. In JSON, now the watermark text would say, When displayed on the document, the watermark on page one will read "Page 1", the watermark on page fifty will read "Page 50" and so on. If the user types "If I wanted a page number I would use /@/@pagenumber/@/@", the watermark will now display "If I wanted a page number I would The tag is escaped, and so is not replaced by a dynamic number. Available tags are: Username: the user's username as stored in user preferences. 67
68 total pages: the number of pages in the document. current page number: the number of the current page. print time: The date & time when the document was exported or printed. When displaying in the viewer, this is just an example date and time, from when the document was opened. document name: The display name of the current document. Select Pages from the Thumbnails Panel You can select pages from the Thumbnails panel for Export Pages or Print Page. Follow the steps below to select pages from the Thumbnails panel for Export Pages or Print Pages: 1. Select one or multiple thumbnails from the Thumbnails panel. 2. Right-click to see options for Export Pages or Print Pages. 3. Select Export Pages or Print Pages. 4. On the dialog box, select All Pages, Pages (enter the page range), or the Current Page. The dialog box automatically displays with the page range. The following shows the Export Page or Print Pages option: 68
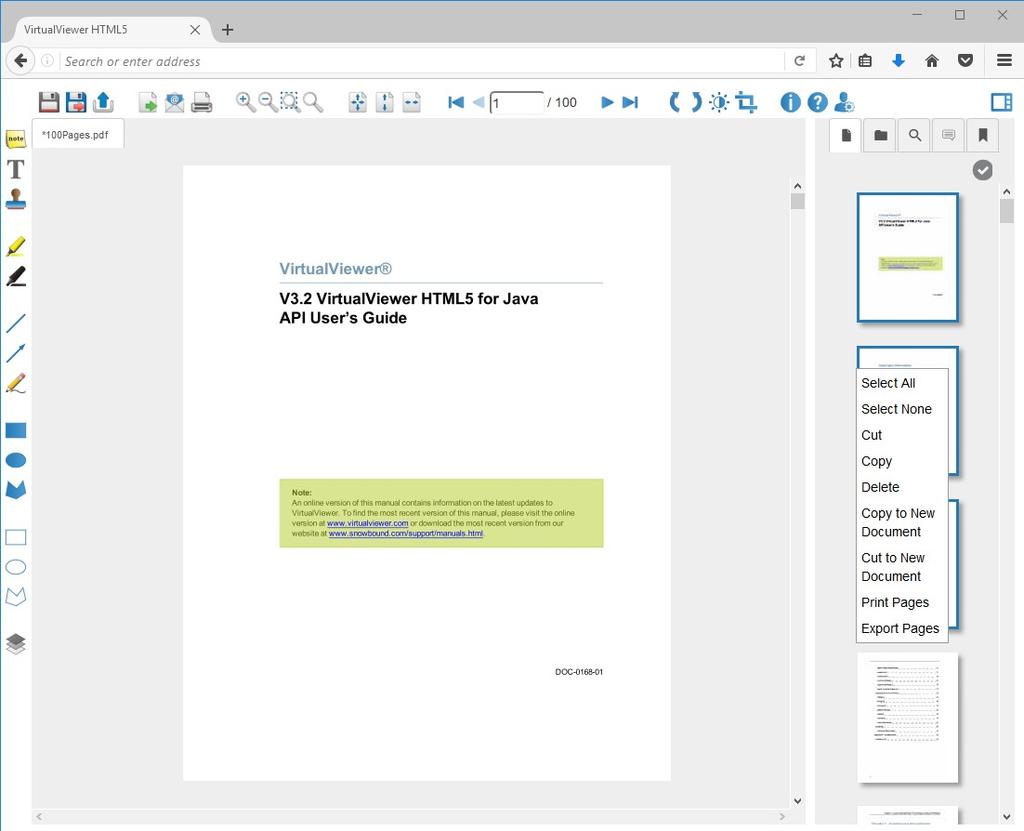
69 69
70 Substitute Image Thumbnails You can add a substitute box instead of image thumbnails. This improves performance because image thumbnails do not need to be created. In config.js, set the donotloadpagethumbs parameter to true to display substitute boxes instead of image thumbnails. The default value is false. If the donotloadpagethumbs parameter is set to true, VirtualViewer will not request thumbnail images. Instead, VirtualViewer displays a box with the page number. Select the substitute thumbnail box as you would an image thumbnail. Example: donotloadpagethumbs: true, Use the thumbpagelabel string to set the page thumbnail tooltip. Please note that it is important to include the trailing space in "Page ". Example: "thumbpagelabel": "Page " 70
71 Extract and Append Page Ranges You can extract and append a range of pages instead of the entire document when saving to PDF. All pages do not have to be processed during saving. This provides a shorter save time for documents with a large number of pages (100+). Bookmarks The Bookmarks feature allows you to add bookmarks that are relevant to the active document that you are currently working with. 71
72 Creating Bookmarks To create a bookmark, right-click on the Pages Tab and select Add Bookmark. In the Create a New Bookmark dialog, add the text for the bookmark and select OK. 72

73 Viewing Bookmarks To view bookmarks, select the Bookmarks tab. The Bookmarks tab displays a list of all bookmarks created in that document. The list of bookmarks display the page number and text entered by the user. For example: Page. 39 This is the signature page. 73

74 The bookmarks feature is not supported in Virtual Documents, Print, Export, Save Document As, and Page Manipulation. Text Searching To search text, select the Search tab. Enter the text that you want to find and select the Search Document button. The text that you entered displays as highlighted in your document. 74

75 The Search tab is enabled by default. The Search tab is enabled by setting the showsearch config.js parameter to true. Set the parameter to false to disable the text searching tab. Please see the example below: var showsearch= true; To determine whether or not text searches should be case sensitive, set the searchcasesensitive config.js parameter to true or false depending if you want case sensitivity turned on or off. The default value is false. See the example below: var searchcasesensitive = false; Setting the Default Colors You can configure the default colors for the first and second search match by setting the values for the searchdefaultcolor and the searchselec- 75
76 tedcolor in the vvdefines.js file found in the js directory. Please see the following example: Setting the Default Colors vvdefines = { searchdefaultcolor: "rgba(255,78,0,0.2)", searchselectedcolor: "rgba(255,255,0,0.2)", Patten Based Text Searching Pattern Based Text Searching You can search for patterns in text including social security numbers, phone numbers, credit card numbers, and addresses. You can use this information to quickly locate, redact, or collaborate on important information within documents. To search pattern based text, follow the steps below: 1. From the Search tab, select from the drop down for the available patterns to search. For example, select a social security pattern. VirtualViewer searches the document for all patterns matching a social security pattern: ###-###-####. 2. VirtualViewer highlights patterns returned by this search as it highlights any text search results. 3. Use navigation arrows to scroll through the patterns results. 4. Use the Redact Current Match button to redact the current pattern search result. Use the Redact All Matches button to redact all pattern results. The available patterns include: Social Security Number: Telephone Number: (617)
77 (617) Credit Card Number: Address: Any string including symbol with characters on either side of the symbol. 77
78 Additional Notes Pattern based text searching works with any format that is supported for searching text. This includes AFP, PCL, PDF, Word and Excel.. A text pattern search result that breaks on two separate lines will not be found.. A text pattern search that contains odd text spacing between characters may not be found. Working with Redactions This section explains the redaction feature and how to work with redactions. It is important to note that any area marked for redaction will not be redacted until a new document is created from the original document by Save Document As or Export Document. The original document will only show the areas that were marked for redaction but those areas will not be permanently redacted until a new document is saved through Save Document As or Export Document. There are three ways to mark an area for redaction: 1. Select the Redaction Area tool from the Annotation tool bar. 2. Select text, right click and then select Redact from the menu. 3. Search and redact: You can step through the search results and mark each redaction by selecting the Redact Current Match button or select the Redact All Matches button to redact all search results. Redaction Information Warning Message A Redaction Information: Read Carefully warning message displays the first time that you select the Redaction Area tool. 78
79 This message is triggered by any of the following events: You select the Redaction Area tool. You select Redaction from the selected text content menu. You select the Mark for Redaction button in Search and Redact. You open a document that contains saved Redaction annotations that have not been burned in. Note: This message shows once per user session when you initially work with a document with areas marked for redaction. Redaction Areas Select the Redaction Area button from the Annotation toolbar to mark an area of your document for redaction. Drag your mouse to create translucent rectangle over the area that you want to mark for redaction. The redaction area is a rectangle with translucency. You can see through the rectangle and read the text behind the annotation. 79

80 To delete the redacted area, right-click on the translucent rectangle covering the text that you have marked for redaction and select the Delete button. In the Delete Annotation? dialog, select the Delete button. Using the Redaction Area tool is the quickest way to mark an area for redaction. Redacting by Selecting Text Select the text that you want to redact. Right click and then select Redact from the menu. To delete the redacted area, right-click on the translucent rectangle covering the text that you have marked for redaction and select the Delete button. In the Delete Annotation? dialog, select the Delete button. 80
81 Using this method to redact select text will only grab the vector text. The advantage is that you can visually see the text selected for redaction and avoid marking the white space. The disadvantage is that each line is marked as a separate block marked for redaction. Each block needs to be edited or deleted separately. Search and Redact Use one of the following two methods for marking redaction areas in search results: Clicking the Redact All Matches button applies redactions to all matches on all pages of the current document. Clicking the Redact Current Match button moves to the next result and requires you to click the Redact button, or skip the match and press the Next Match to move on to the next result. Save Document As, Export Document, Document and Prints The Save Document As, Export Document, Document and Print toolbar options include the Burn Redactions (Permanent) check box. It is important to note that any area marked for redaction will not be redacted until a new document is created from the original document by Save Document As or Export Document. The original document will only show the areas that were marked for redaction but those areas will not be permanently redacted until a new document is saved through Save Document As or Export Document. Page Manipulations with Redactions When copying or cutting to an existing document, page manipulations will act as follows: If pages that are copied/cut to an existing document contain redaction areas, those redaction areas will be copied to the new location, but not burned in. When you select save, the page manipulations will be saved, leaving the redaction areas. 81
82 When copying or cutting to a new document, page manipulations will act as follows: If pages with redactions are copied/cut to a new document, you will see the existing Dialog box to name the new document. The new document is not saved until the user selects save. When you save the newly created document, the document and the redaction areas will be saved. Annotation Redaction Tagging Annotation redaction tagging assigns a categorical value to individual annotations or redaction. The values are reasons why the annotation or redaction exists. For example, a social security number could be tagged with a Social Security Number value. Follow these steps to apply annotation redaction tagging: Draw a redaction object over the item that you wish to redact such as a social security number. Right click on the redaction object when still in highlight mode and select from a predefined list of redaction tags. For Example, Social Security Number. Select Save Document As to burn in the redaction with tag. The new document with the burned in redaction now has the Social Security tag to indicate it was a redacted social security number. To configure your predefined list of annotation redaction tags, add the strings for your tags to the annotationtags array in the config.js file. Please see the example below: annotationtags: ["Confidential","Redaction","Social Security","Credit Info"], 82

83 Tag Search Results Follow the steps below to use the tag search results feature: 1. Load a text searchable document in VirtualViewer. 2. Search for a term. Alln config.js, predefine the list of annotation redac- tion tags by adding strings to the annotationtags array. 3. Example: annotationtags: [ Social Security Number, Review ], 4. results for that term are highlighted in the document. 5. Select Redact All Matches. 83

84 6. Select the Tag All Redactions button. 7. In the Tag All Redactions dialog, select the type of redaction from the Tag(s) drop down and select the OK button. 8. The redactions are now tagged. In config.js, set the searchredactiontags parameter to true to turn on search redaction tags. The default value is true. To configure your predefined list of annotation redaction tags, add the strings for your tags to the annotationtags array in the config.js file. Please see the example below: annotationtags: ["Confidential","Redaction","Social Security","Credit Info"], 84

85 Disabling Redaction Tags for Export, Print, , or Saving As 85
86 You can disable redaction tags when a document is exported, printed, ed, or saved as. Follow the steps below to disable redaction tags when a document is exported, printed, ed, or saved as: 1. Create a redaction on your document. Right-click on the redaction, select Add Tag and select a redaction tag from the drop-down menu to add a redaction tag. 2. Select the Include Redaction Tags checkbox when selecting Export, Print, , or Save Document As. 3. If you select the Include Redaction Tags checkbox, the redaction tags are included. If you uncheck the Include Redaction Tags check box, the redaction tags are not included. The Include Redaction Tags check box defaults to checked. It is disabled if the Burn Redactions check box is unchecked. Page Manipulations 86
87 Manipulating Page Order using Thumbnails VirtualViewer HTML5 for Java allows you to add, remove and reorder pages by cutting and pasting the page thumbnails. This section describes how to enable and use the Page Manipulations feature. Page Manipulations Page manipulations are enabled by default. For more information on disabling page manipulations, please see Disabling Page Manipulations. Selecting a Page To select a page for page manipulation, left click on a page thumbnail in the Pages tab. A gray selection border around the thumbnail indicates that it has been selected for page manipulation. Hold the Ctrl key while selecting multiple page thumbnails to allow the selection of all thumbnails selected for page manipulation. Hold the Shift key and select a single thumbnail while one or more thumbnails are already selected to highlight all pages between the highest page selected before the new selection. Loading the Page Manipulation Context Menu Right-click on a page thumbnail to load the page manipulation context menu. 87
88 Cutting, Copying, Deleting and Inserting Pages You can cut, copy, delete and insert a page from one document into another document in VirtualViewer HTML5 for Java. Dragging and Dropping Pages Follow the steps below to use the drag and drop page manipulations feature: 1. Click and hold on the thumbnail that you wish to move and drag it up or down in the thumbnail panel. 88

89 2. A blue line appears horizontally in the thumbnail toolbar (in between thumbnails) indicating where the page being dragged will be placed in the document. 3. Let the mouse button go where you would like to place the thumbnail. 4. The page being dragged lands in between the two pages where the blue line was indicating the drop would happen. Additional Notes If the desired drop location is near the end of the document, drag the thumbnail to the bottom of the pane. The pane scrolls down as you reach 89
90 the bottom. You can select multiple pages with the Ctrl click and drag those in tan- dem. Dragging and dropping between sessions with two separate windows or browsers is now supported. Dragging and dropping between sessions functions the same way as the Copy feature. Saving Page Manipulations Select Save to save page manipulations, including rotations and inversions, to the file currently being viewed. Copy to New Document To copy to a new document, follow the steps below: 1. Click on the page thumbnail or page thumbnails that you want to copy to the new document. 2. Right-click on the page thumbnail(s) to load the page manipulation context menu. Select Copy to New Document from the Page Manipulations menu. 90
91 3. In the Create New Document window, enter the new document name in the Document ID field and select the OK button. 91
92 The new document is displayed in a tab with the document name that you entered. It contains the pages that you selected. For more information on configuring Copy to New Document, please see Disabling Copy to New Document. Rotate Specific Pages Use the following APIs to rotate specific pages: virtualviewer.rotatepageby(pagenumber, angle) rotates the current page 0, 90, 180 or 270 (positive or negative) degrees from it's current state. So, you call this twice with 90 degrees as the parameter, the final image will be rotated by 180. It returns true if the page is rotated successfully. Otherwise, it throws an error. virtualviewer.rotatepageto(pagenumber, angle) rotates the document 0, 90, 180 or 270 degrees absolutely. Thus, if you call this twice with 90 degrees as the parameter, the final image will only be rotated by 90 degrees only. It returns true if the page is rotated successfully. Otherwise, it throws an error. Page Manipulations Across Multiple Browser Sessions 92
93 You can now to perform Page Manipulations (Copy, Cut, Paste) across multiple browser sessions using local storage. Local storage is browser-specific, which requires the multiple sessions to be within the same browser. 93
94 Customization This section shows how to configure VirtualViewer HTML5 on your system. Note: If you are upgrading to a newer version of VirtualViewer HTML5 for Java, we recommend that you make a list of any customized parameters and files. You will need to apply your customizations to the same files in your newer version. Please make a backup copy of the files including web.xml, index.html, and config.js before you edit them. System Configuration System Configuration Configuring web.xml The web.xml file contains a number of tags that define both servlets and their behavior. The web.xml file is located in the VirtualViewerHTML5\WEB- INF directory. There are two groups of tags. The first group is a pair of <servlet> tags, and the second group is a pair of <servlet-mapping> tags. All of these tags are now added by default to VirtualViewer HTML5 for Java web.xml when the contentservertype parameter is set to integrated. Retrieval Servlet The first <servlet> is the Response Server, which is responsible for handling when data needs to be sent to VirtualViewer HTML5 for Java. Various parameters within its tag define where to retrieve documents from, how it should render and deliver them to VirtualViewer HTML5 for Java, how to cache documents, logging, and more. Retrieval Servlet <servlet> <servlet-name>retrievalservet</servlet-name> <servlet-class> com.snowbound.snapserv.servlet.responseserver </servlet-class> <init-param> <param-name>contenthandlerclass</param-name> <param-value>com.snowbound.snapserv.servlet.filecontenthandler 94
95 </param-value> </init-param> <init-param> <param-name>loglevel</param-name> <param-value>fine</param-value> </init-param> </servlet> Upload Servlet The second <servlet> is the Request Server. It is responsible for handling when data needs to be sent from VirtualViewer HTML5 for Java. Various parameters within its tag define settings for the servlet when saving documents and annotations. Upload Servlet <servlet> <servlet-name>uploadserver</servlet-name> <servlet-class>com.snowbound.snapserv.servlet.requestserver</servlet-class> <init-param> <param-name>saveannotationsasxml</param-name> <param-value>false</param-value> </init-param> <init-param> <param-name>tmpdir</param-name> <param-value>c:/tmp/</param-value> </init-param> </servlet> Defining the Servlet Paths Each servlet has its own <servlet-mapping> tag to define the path it may be found. The default values should not be changed. Servlet Paths <servlet-mapping> <servlet-name>retrievalservlet</servlet-name> <url-pattern>/responseserver</url-pattern> </servlet-mapping> <servlet-mapping> <servlet-name>uploadservlet</servlet-name> <url-pattern>/requestserver</url-pattern> </servlet-mapping> Servlet Tags for web.xml This section lists and describes all servlet tags for web.xml. The web.xml file is located in the VirtualVieweHTML5\WEB-INF directory. 95
96 Note: If you are upgrading to a newer version of VirtualViewer HTML5 for Java, we recommend that you make a list of any customized parameters and files. You will need to apply your customizations to the same files in your newer version. Please make a backup copy of the web.xml file before you edit it. The VirtualViewer HTML5 for Java web.xml will only contain all of the Java content server web.xml parameters described in the appendix when the contentservertype parameter is set to integrated as shown in the following example: Setting contentservertype to Integrated <init-param> <param-name>contentservertype</param-name> <param-value>integrated</param-value> </init-param> This table lists and describes the AJAX Servlet web.xml parameters. Table 3.1: AJAX Servlet Parameters Name Default Description annotationoutputformat snowbound Enables the ability to edit and delete existing FileNet or Snowbound annotations. When set to FileNet, annotations are saved in FileNet XML format. When set to Snowbound, annotations are saved in Snowbound XML format. contentservertype integrated If set to integrated, the VirtualViewer HTML5 for Java servlet will work as its own content server. This table lists and describes the ResponseServer parameters. Table 3.2: ResponseServer 96
97 Name Default Description filepath.\sample-documents The file path the default content handler uses for retrieval and storage. Not needed when using a custom content handler. This table lists and describes the RequiredServlet servlet parameters. Table 3.3: RequiredServlet Parameters Name Default Description tmpdir N/A Specifies a temporary directory for files created during the processing of page manipulation routines on the server. This table lists and describes the RetrievalServlet servlet parameters. Table 3.4: RetrievalServlet Table 3.5: Name Default Description For AFP bit depth, please use modcabitdepth. For AFP DPI, please use modcadpi. For AFP format, please use N/A modcaformat. N/A To set the bit depth for AFP, please use modcabitdepth. Please note that increasing the bit depth may negatively affect the performance. For more information on improving performance, please see Configuring to Maximize Your Performance or Quality. N/ To set the DPI for AFP, please use modcadpi. To set the format for AFP, 97
98 Name Default Description please use modcaformat Access-Control-Allow-Credentials true Set as the header in the response Access-Control-Allow-Headers N/A Set as the header in the response. Access-Control-Allow-Origin N/A Sets a comma separated whitelist of origin URLs. If the client s origin matches one of the URLs on this whitelist, the Access-Control-Allow-Origin header will be added to the response. baseurl N/A An optional parameter that can be set when the contenthandlerclass is set to com.snowbound. snapserv.servlet. FileAndURLRetriever. The assigned value will be prepended to documentids to create the full URL path for documents. For example, if baseurl is set to " and the documentid is "myfile.- tif", the content handler will retrieve the document from /myfile.tif. bitdepth 1 The default bits per pixel for decompression of formats not specified with individual parameters. Please note that increasing the bit depth 98
99 Name Default Description may negatively affect the performance. contenthandlerclass N/A Name of the content handler class to use. defaultbytesize Initial size of the byte array when saving to any format not TIFF or JPEG to send to VirtualViewer. docbitdepth 1 The bit depth to use for Word documents. Valid values are 1 or 24. Must be set to 24 to display color output. Please also see wordbitdepth. Please note that increasing the bit depth may negatively affect the performance. For more information on improving performance, please see Configuring to Maximize Your Performance or Quality. docdpi 300 The DPI to use for Word documents. Must be set to 200 to display color output. Please also see worddpi. docformat PNG The format to convert Word documents to. Valid values are TIFF_G4, JPEG, TIFF_ LZW, PNG. Please also see wordformat. docxbitdepth 1 The bit depth to use for Word 2007 documents. Valid values are 1 or 24. Must be set to 24 to display color output.please note 99
100 Name Default Description that increasing the bit depth may negatively affect the performance. For more information on improving performance, please see Configuring to Maximize Your Performance or Quality. docxdpi 300 The DPI to use for Word 2007 documents. Must be set to 200 to display color output. docxformat PNG The format to convert Word 2007 documents to. Valid values are TIFF_G4, JPEG, TIFF_LZW, PNG. extractjpeg true If true, allows JPEG images to be sent directly to the client without conversion. extractpdfpages true If false, the itext library will be disabled for PDF saving, resulting in raster PDFs. extracttiffjpeg true If true, allows TIFF_JPEG images to be sent directly to the client without conversion. fontmappingpath N/A For AFP font mapping, specifies the directory on the server of an optional snbd_ map.fnt file. htmlheight 11 Specified document height (in inches). Must be used with the htmlwidth parameter. htmlwidth 11 Specifies the document width (in inches). Must be 100
101 Name Default Description used with htmlheight parameter. iocabitdepth 1 The bit depth to use when decompressing IOCA pages. Valid values are 1 or 24. Please note that increasing the bit depth may negatively affect the performance. For more information on improving performance, please see Configuring to Maximize Your Performance or Quality. iocadpi 20 The DPI to use when decompressing IOCA pages. iocaformat TIFF_G4_FAX The format to convert IOCA pages to. Valid values are TIFF_G4_FAX, JPEG, TIFF_LZW, PNG. jpegbytesize Initial size of the byte array when saving to JPEG to send to VirtualViewer. jpegquality 50 Level of quality when a page is converted to JPEG and sent to VirtualViewer. loadvirtualdocumentannotations false Enables the loading of vir- tual document annotations. loglevel Finest Detail of logging. Valid values: Severe, Warning, Info, Config, Fine, Finer, Finest, All, and OFF. modcabitdepth 1 The bit depth to use when decompressing MO:DCA pages. Valid values are 1 or 101
102 Name Default Description 24. Please note that increasing the bit depth may negatively affect the performance. For more information on improving performance, please see Configuring to Maximize Your Performance or Quality. modcadpi 200 The DPI to use when decompressing MO:DCA pages. modcaformat TIFF G4 FAX The format to convert MO:DCA pages to. Valid values are TIFF_G4_FAX, JPEG, TIFF_LZW, PNG. officelicensepath \WEB-INF\ lib\ Office2010.Cells.lic, \WEB-INF\ lib\ Office2010.Words.lic, \WEB-INF\ lib\aspose.slides. lic Specifies the Office 2007 plug-in licenses for Word, Excel, and PowerPoint. overlaypath N/ For AFP and MO:DCA files, specifies the path of overlays. pclbitdepth 1 The bit depth to use when decompressing PCL pages. Valid values are 1 or 24. Please note that increasing the bit depth may negatively affect the performance. For more information on improving performance, please see Configuring to Max- 102
103 Name Default Description imize Your Performance or Quality. pcldpi 20 The DPI to use when decompressing PCL pages. pclformat TIFF_G4_FAX The format to convert PCL pages to. Valid values are TIFF_G4_FAX, JPEG, TIFF_LZW, PNG. pdfbitdepth 24 The bit depth to use when decompressing PDF pages. Valid values are 1 or 24. Please note that increasing the bit depth may negatively affect the performance. For more information on improving performance, please see Configuring to Maximize Your Performance or Quality. pdfdpi 200 The Dots Per Inch to use when decompressing PDF pages. pdfformat JPEG The format to convert PDF pages to. Valid values are TIFF_G4_FAX, JPEG, TIFF_LZW, PNG. pixellimit N/A Configures server-side scaling of large raster images in order to reduce the memory footprint of the image sent to the client. If the product of an image's dimensions are greater than this number (or the product of the numbers), it is scaled to just below that. This can be expressed 103
104 Name Default Description as a single value (i.e " ") or as 2 dimensions ("1000x1000"). pptbitdepth 24 The bit depth to use when decompressing PPT pages. Valid values are 1 or 24. Please note that increasing the bit depth may negatively affect the performance. For more information on improving performance, please see Configuring to Maximize Your Performance or Quality. pptdpi 200 The DPI to use when decompressing PPT pages. pptformat JPEG The format to convert PPT pages to. Valid values are TIFF_G4_FAX, JPEG, TIFF_LZW, PNG. preferencespath N/A Specifies the location of stored client preferences on the server when using the default content handler. rtfbitdepth 24 The bit depth to use when decompressing RTF pages. Valid values are 1 or 24. Please note that increasing the bit depth may negatively affect the performance. For more information on improving performance, please see Configuring to Maximize Your Performance or Quality. rtfdpi 150 The DPI to use when 104
105 Name Default Description decompressing RTF pages. rtfformat TIFF LZW The format to convert RTF pages to. Valid values are TIFF_G4_FAX, JPEG, TIFF_LZW, PNG. savevir- false Enables the saving of virtualdocumentannotations tual document annotations. snowboundlicensepath./web-inf/ Sets the path to the Snowlib/ boundlicense.jar license Snow- file. boundlicense.jar splitannotationlayersbypage false When set to true, annotations will be saved in files by page rather than all in one file. supportredactions false Turns on redaction support. svgexclusions ODT,PCL_1,PCL_ 5,PPTX,ASCII, Exclude any formats from SVG support. This is useful if a formats is misbehaving in SVG and you want to force that format to use the normal, bitmap delivery. The format is a comma-separated list of format names. The following are the valid values for the svgexclusions parameter: AFP, ASCII, DOT, DOTX, HTML, MO:DCA,PCL_1, PCL_5, PDF, PDF_15, PDF_LZW, POWER_ POINT, PPTX, ODS, ODT, RTF, XLS, XLSX, Please note that the format 105
106 Name Default Description names are case sensitive. The user can get the file type name for a given document by using the Image Info button and looking at the File Format value. thumbbyteestimate 6000 The initial byte size of the buffer used on the server to transport thumbnails. thumbnaildpi 60 Specifies the DPI to use when rendering thumbnails for vector formats such as PDF and MS Word. tiffbytesize Initial size of the byte array when saving to TIFF to send to VirtualViewer HTML5 for Java. tiffcompressiontype TIFF_G4_FAX Sets the accepted TIFF file formats. The values are: TIFF_LZW, TIFF_JPEG, TIFF_JPEG7, TIFF_G4_ FAX. The default value is TIFF_LZW. vectorpdf false If true, PDF pages are sent to the client as vector images instead of being converted to a rasterized image. wordbitdepth 24 The bit depth to use when decompressing Word pages. Valid values are 1 or 24. Please note that increasing the bit depth may negatively affect the performance. For more information on improving 106
107 Name Default Description performance, please see Configuring to Maximize Your Performance or Quality. worddpi 200 The DPI to use when decompressing Word pages. wordformat JPEG The format to convert Word pages to. Valid values are TIFF_G4_FAX, JPEG, TIFF_LZW, PNG. The bit depth to use when decompressing XLS pages. Valid values are 1 or 24. xlsbitdepth 24 The bit depth to use when decompressing XLS pages. Valid values are 1 or 24. Please note that increasing the bit depth may negatively affect the performance. For more information on improving performance, please see Configuring to Maximize Your Performance or Quality. xlsdpi 200 The dots per inch to use when decompressing XLS pages. xlsformat JPEG The format to convert XLS pages to. Valid values are TIFF_G4_FAX, JPEG, TIFF_LZW, PNG. xlsheight 11 Specifies document height (in inches). Must be used with the xlswidth parameter. 107
108 Name Default Description xlswidth 14 Specifies the document width (in inches). Must be used with the xlsheight parameter. xlsxheight 11 Specifies document height (in inches). Must be used with xlsxwidth parameter. xlsxwidth 14 Specifies document width (in inches). Must be used with xlsxheight parameter. Table 3.6: Table 3.7: UploadServlet Parameters Name Default Description clearcacheonsave true Clears the server document cache when a document is saved. outputconfigpath N/ Specifies the path and name of the output.properties file which is used to determine the formats used when saving documents. Note: The format that you want to use may not be recognized by the default output properties. To override the default output properties and set the output format, edit the outputconfigpath parameter in your web.xml file as shown in the following example: <init-param> <param-name>outputconfigpath</param-name> <param-value>/whatever/path/to/ output.properties</param-value> </init-param> Then output.properties 108
109 Name Default Description should have the following format: default.format=tiff_lzw permanentannotationlinks true WEBTOP VERSION ONLY. If false, keeps annotations from carrying over to new versions of documents. saveannotationsasxml true If true, saves annotations as XML rather than binary. sessionclass N/A Specifies the session class to use. Table 3.8: ResponseServer Parameters TIFF_LZW.format=TIFF_LZW PDF.format=PDF JPEG.format=JPEG Name Default Description convertpdf JPEG Specifies the format PDF pages should be converted to. (replaced by pdfformat) documentcachecount 1 Number of documents the server will cache in memory. jpegcompression -1 Level of quality when a page is converted to JPEG. (replaced by jpegquality) maxbytemultiplier 20 Maximum number of times the byte array is doubled, if the original estimate is too small, when saving to send to VirtualViewer HTML5 for Java. pngforpdf false Specifies that PDF pages should be converted to PNG. (replaced by convertpdf, and then by pdfformat) Table 3.9: ResponseServer Parameters 109
110 Name Default Description concurrentbwthumbs 500 Limits the number of concurrent 1-bit thumbnail requests processed on the server. concurrentcolorthumbs 10 Limits the number of concurrent color thumbnail requests processed on the server. concurrentimages 500 Limits the number of concurrent image page requests processed on the server. Customizing the User Interface Customizing the User Interface VirtualViewer HTML5 for Java can be customized in many ways. One of the most popular customizations is making it read-only. We provide the VirtualViewer HTML5 for Java client with almost all options turned on. It is easy to turn off options such as Save Document. Edit the index.html file and comment out or remove the savedocument item as shown in the example below: Example 1.1: Customizing What is Displayed in the VirtualViewer HTML5 for Java Client <!-- <div id="savedocument" onclick="javascript:myflexsnap.savedocument()" title="save Document" class="mousedown" alt="save Document"> </div> --> You can do this with other buttons and menus as well. The descriptions of the options are in Using VirtualViewer HTML5 for Java. 110

111 Another trick is to have a different index.html for each type of user, or to have a script generate the HTML on the fly. Configuring the Pages and Document Panel Display You can set the multipledocmode parameter in the config.js file to configure which documents will be shown within the Documents pane of VirtualViewer HTML5 for Java. It can also be used to limit what documents are available to the user. Please see Config.js Parameters for more information on setting the multipledocmode configuration parameter. The multipledocmode configuration parameter supports the following three values as options: 111
VirtualViewer 4.9 New Features and Corrected Issues
 VirtualViewer 4.9 New Features and Corrected Issues November 14, 2017 Documentation Corrections VirtualViewer for Java supports JRE 1.6. Previous documentation indicated that only JRE 1.7 and beyond was
VirtualViewer V4.10 VirtualViewer HTML5 for.net Client Administrator s Guide
 VirtualViewer V4.10 VirtualViewer HTML5 for.net Client Administrator s Guide An online version of this manual contains information on the latest updates to VirtualViewer. To find the most recent version
VirtualViewer V4.11 VirtualViewer HTML5 for.net Client Administrator s Guide
 VirtualViewer V4.11 VirtualViewer HTML5 for.net Client Administrator s Guide An online version of this manual contains information on the latest updates to VirtualViewer. To find the most recent version
VirtualViewer V1.0 Java FileNet for P8 Connector Installation Guide
 VirtualViewer V1.0 Java FileNet for P8 Connector Installation Guide N O T E An online version of this manual contains information on the latest updates to VirtualViewer. To find the most recent version
VirtualViewer Documentum D2 Integration Deployment Guide
 VirtualViewer Documentum D2 Integration Deployment Guide DOC-0200-01 Copyright Information While Snowbound Software believes the information included in this publication is correct as of the publication
VirtualViewer Documentum Connector Integration Guide
 VirtualViewer Documentum Connector Integration Guide DOC-0200-01 Copyright Information While Snowbound Software believes the information included in this publication is correct as of the publication date,
VirtualViewer V2.2 Java AJAX Administrator s Guide
 VirtualViewer V2.2 Java AJAX Administrator s Guide Note: An online version of this manual contains information on the latest updates to VirtualViewer. To find the most recent version of this manual, please
VirtualViewer V3.2.NET AJAX Administrator s Guide
 VirtualViewer V3.2.NET AJAX Administrator s Guide Note: An online version of this manual contains information on the latest updates to VirtualViewer. To find the most recent version of this manual, please
V13.6 Java Content Server Administrator's Guide
 VirtualViewer V13.6 Java Content Server Administrator's Guide Note: An online version of this manual contains information on the latest updates to VirtualViewer. To find the most recent version of this
VirtualViewer
 VirtualViewer 4.11.6 New Features and Corrected Issues Table of Contents May 10, 2018 Important Phone Numbers and Links Filing a Support Ticket Release Notes and Product Manuals Important Information Documentation
VirtualViewer V13.6 Java User's Guide
 VirtualViewer V13.6 Java User's Guide Note: An online version of this manual contains information on the latest updates to VirtualViewer. To find the most recent version of this manual, please visit the
Batch Image Converter V4.2 Programmer's Reference Guide
 SnowBatch Batch Image Converter V4.2 Programmer's Reference Guide Note: An online version of this manual contains information on the latest updates to SnowBatch. To find the most recent version of this
VirtualViewer HTML5 ICN Connector Installation Guide
 VirtualViewer VirtualViewer HTML5 ICN Connector Installation Guide Note: An online version of this manual contains information on the latest updates to VirtualViewer. To find the most recent version of
EMC ApplicationXtender Web Access
 EMC ApplicationXtender Web Access Version 8.1 User Guide EMC Corporation Corporate Headquarters Hopkinton, MA 01748-9103 1-508-435-1000 www.emc.com Legal Notice Copyright 1994 2016 EMC Corporation. All
The viewer makes it easy to view and collaborate on virtually any file, including Microsoft Office documents, PDFs, CAD drawings, and image files.
 Parts of this functionality will only be available in INTERAXO Pro. Introduction The viewer provides users with the capability to load a wide variety of document types online using a web browser. Documents
Working with PDF s. To open a recent file on the Start screen, double click on the file name.
 Working with PDF s Acrobat DC Start Screen (Home Tab) When Acrobat opens, the Acrobat Start screen (Home Tab) populates displaying a list of recently opened files. The search feature on the top of the
VirtualViewer V2.2.NET AJAX Administrator s Guide
 VirtualViewer V2.2.NET AJAX Administrator s Guide Note: An online version of this manual contains information on the latest updates to VirtualViewer. To find the most recent version of this manual, please
Oracle VueLink for Documentum
 Oracle VueLink 19.3.2 for Documentum User s Manual An Integration between Documentum and AutoVue Client/Server Deployment Copyright 1998, 2012, Oracle and/or its affiliates. All rights reserved. The Programs
Release Notes for RasterMaster Release 14.11/19.11
 Release Notes for RasterMaster Release 14.11/19.11 March 6, 2018 Important Notes JRE 1.6 support ended with RM 14.10/19.10 except for special arrangements. RM 14.11/19.11 is built against JRE 1.7. Any
EMC ApplicationXtender Web Access
 EMC ApplicationXtender Web Access Version 8.0 User Guide EMC Corporation Corporate Headquarters Hopkinton, MA 01748-9103 1-508-435-1000 www.emc.com Legal Notice Copyright 1994 2015 EMC Corporation. All
Authorized Send User s Guide Version 4.0
 Canon Authorized Send User s Guide Version 4.0 08011-40-UD1-003 This page is intentionally left blank. 2 Authorized Send User s Guide Contents Preface...5 How to Use This Manual... 5 Symbols Used in This
docalpha Installation Guide
 ARTSYL DOCALPHA INSTALLATION GUIDE 1. docalpha Architecture Overview... 2 1.1. docalpha Server Components... 4 1.2. docalpha Production Environment Stations Overview... 4 1.3. docalpha Setup & Administration
Snowbound Software VirtualViewer HTML5 Viewer Release Notes
 v4.8 Release Notes Snowbound Software VirtualViewer HTML5 Viewer Release Notes v4.8.0 Release Notes This document describes the latest additions and improvements to VirtualViewer HTML5 in July 2017 New
Perceptive Nolij Web. Release Notes. Version: 6.8.x
 Perceptive Nolij Web Release Notes Version: 6.8.x Written by: Product Knowledge, R&D Date: June 2018 Copyright 2014-2018 Hyland Software, Inc. and its affiliates. Table of Contents Perceptive Nolij Web
Vizit Essential for SharePoint 2013 Version 6.x User Manual
 Vizit Essential for SharePoint 2013 Version 6.x User Manual 1 Vizit Essential... 3 Deployment Options... 3 SharePoint 2013 Document Libraries... 3 SharePoint 2013 Search Results... 4 Vizit Essential Pop-Up
Océ Posterizer Pro Designer. POP into retail. User manual Application guide
 - Océ Posterizer Pro Designer POP into retail o User manual Application guide Copyright copyright-2010 Océ All rights reserved. No part of this work may be reproduced, copied, adapted, or transmitted in
PDF Creator Plus 6.0. Version 6.0. User Guide. PEERNET Inc.
 Version 6.0 User Guide PEERNET Inc. Copyright 2004-2012 Updated: 12/12/2012 Table of Contents Welcome... to PDF Creator Plus 1 Legal... Notices 2 System... Requirements 3 Typographic... Conventions 4 Activating...
Authorized Send User s Guide Version 3.5
 Canon Authorized Send User s Guide Version 3.5 08011-35-UD1-004 This page is intentionally left blank. 2 Authorized Send User s Guide Contents Preface...5 How to Use This Manual... 5 Symbols Used in This
ABBYY FineReader 14. User s Guide ABBYY Production LLC. All rights reserved.
 ABBYY FineReader 14 User s Guide 2017 ABBYY Production LLC All rights reserved Information in this document is subject to change without notice and does not bear any commitment on the part of ABBYY The
Oracle AutoVue VueLink 20.0 for ENOVIA
 Oracle AutoVue VueLink 20.0 for ENOVIA User s Manual An Integration between ENOVIA PLM and Oracle AutoVue Copyright 1998, 2010, Oracle and/or its affiliates. All rights reserved. The Programs (which include
Perceptive Nolij Web. Administrator Guide. Version: 6.8.x
 Perceptive Nolij Web Administrator Guide Version: 6.8.x Written by: Product Knowledge, R&D Date: June 2018 Copyright 2014-2018 Hyland Software, Inc. and its affiliates.. Table of Contents Introduction...
AVS4YOU Programs Help
 AVS4YOU Help - AVS Document Converter AVS4YOU Programs Help AVS Document Converter www.avs4you.com Online Media Technologies, Ltd., UK. 2004-2012 All rights reserved AVS4YOU Programs Help Page 2 of 39
Micro Focus. Enterprise View. Installing Enterprise View
 Micro Focus Enterprise View Installing Enterprise View Copyright 2010 Micro Focus (IP) Ltd. All rights reserved. Micro Focus (IP) Ltd. has made every effort to ensure that this book is correct and accurate,
Snowbound Software RasterMaster Imaging SDK
 Snowbound Software RasterMaster Imaging SDK Java v14.9 and.net v19.9 Release Notes These release notes describe the latest additions and improvements to the product. This release focused on correcting
Info Input Express Limited Edition
 Info Input Express Limited Edition User s Guide A-61891 Table of Contents Using Info Input Express to Create and Retrieve Documents... 7 Compatibility... 7 Contents of this Guide... 7 Terminology... 9
Authorized Send User s Guide for imagerunner Machines Version 4.1
 Canon Authorized Send User s Guide for imagerunner Machines Version 4.1 08011-41-UD1-003 This page is intentionally left blank. 2 Authorized Send User s Guide for imagerunner Machines Contents Preface...5
User Guide 701P Wide Format Solution Wide Format Scan Service
 User Guide 701P44865 6204 Wide Format Solution Wide Format Scan Service Xerox Corporation Global Knowledge & Language Services 800 Phillips Road Bldg. 845-17S Webster, NY 14580 Copyright 2006 Xerox Corporation.
Convert to PDF 3.0. User Guide. PEERNET Inc.
 User Guide PEERNET Inc. Copyright 2005-2013 Updated: 1/9/2013 Table of Contents Welcome... to Convert to PDF 1 Legal... Notices 2 System... Requirements 3 Activating... Convert to PDF 4 Launching the Activation
Oracle Fusion Middleware
 Oracle Fusion Middleware Oracle Outside In Technology Release Notes 8.5.3 Release 8.5.3 E74928-01 April 2016 The major goals of this release are improved rendering fidelity in several key target formats,
PDF solution comparison.
 Nuance PDF solution comparison. vs.. Compatibility Microsoft Office style ribbon user interface to minimize learning curve and maximize productivity Compatible with Microsoft Windows 7 (32- and 64-bit),
Export out report results in multiple formats like PDF, Excel, Print, , etc.
 Edition Comparison DOCSVAULT Docsvault is full of features that can help small businesses and large enterprises go paperless. The feature matrix below displays Docsvault s abilities for its Enterprise
Style Report Enterprise Edition
 INTRODUCTION Style Report Enterprise Edition Welcome to Style Report Enterprise Edition! Style Report is a report design and interactive analysis package that allows you to explore, analyze, monitor, report,
Sentences Installation Guide. Sentences Version 4.0
 Sentences Installation Guide Sentences Version 4.0 A publication of Lazysoft Ltd. Web: www.sentences.com Lazysoft Support: support@sentences.com Copyright 2000-2012 Lazysoft Ltd. All rights reserved. The
End User Guide. 2.1 Getting Started Toolbar Right-click Contextual Menu Navigation Panels... 2
 TABLE OF CONTENTS 1 OVERVIEW...1 2 WEB VIEWER DEMO ON DESKTOP...1 2.1 Getting Started... 1 2.1.1 Toolbar... 1 2.1.2 Right-click Contextual Menu... 2 2.1.3 Navigation Panels... 2 2.1.4 Floating Toolbar...
Guide to User Interface 4.3
 Datatel Colleague Guide to User Interface 4.3 Release 18 June 24, 2011 For corrections and clarifications to this manual, see AnswerNet page 1926.37. Guide to User Interface 4.3 All Rights Reserved The
MapMarker Plus Developer Installation Guide
 MapMarker Plus 11.1 Developer Installation Guide Information in this document is subject to change without notice and does not represent a commitment on the part of the vendor or its representatives. No
127 Church Street, New Haven, CT O: (203) E: GlobalSearch ECM User Guide
 E: GlobalSearch ECM User Guide") 127 Church Street, New Haven, CT 06510 O: (203) 789-0889 E: sales@square-9.com www.square-9.com GlobalSearch Table of Contents GlobalSearch ECM... 3 GlobalSearch Security... 3 GlobalSearch Licensing Model...
127 Church Street, New Haven, CT 06510 O: (203) 789-0889 E: sales@square-9.com www.square-9.com GlobalSearch Table of Contents GlobalSearch ECM... 3 GlobalSearch Security... 3 GlobalSearch Licensing Model...
Quick Reference. EMC ApplicationXtender Media Distribution Viewer 5.40 P/N REV A01
 EMC ApplicationXtender Media Distribution Viewer 5.40 Quick Reference P/N 300-005-645 REV A01 EMC Corporation Corporate Headquarters: Hopkinton, MA 01748-9103 1-508-435-1000 www.emc.com Copyright 1994-2007
Business Intelligence Launch Pad User Guide SAP BusinessObjects Business Intelligence Platform 4.1 Support Package 1
 Business Intelligence Launch Pad User Guide SAP BusinessObjects Business Intelligence Platform 4.1 Support Package 1 Copyright 2013 SAP AG or an SAP affiliate company. All rights reserved. No part of this
ARTSYL DOCALPHA INSTALLATION GUIDE
 ARTSYL DOCALPHA INSTALLATION GUIDE 1. docalpha Architecture Overview... 2 1.1. docalpha Server Components... 4 1.2. docalpha Production Environment Stations Overview... 4 1.3. docalpha Setup & Administration
Site User Guide. Oracle Health Sciences InForm CRF Submit Release Part Number:E
 Site User Guide Oracle Health Sciences InForm CRF Submit Release 4.0.2 Part Number:E79080-01 Copyright 2016, 2017, Oracle and/or its affiliates. All rights reserved. This software and related documentation
SimpleView 5.1 MANUAL.
 SimpleView 5.1 MANUAL www.simpleindex.com Revised January, 2013 Table of Contents - 2 - SimpleView Documentation 1 Introduction... 5 1.1 File-Based Document Management with SimpleView... 5 1.2 Image Quality
HotDocs Document Services. Administrator s Guide
 HotDocs Document Services Administrator s Guide Copyright 2014 HotDocs Limited. All rights reserved. No part of this product may be reproduced, transmitted, transcribed, stored in a retrieval system, or
Deltek winsight Analytics Briefing Wizard 8.0. Installation Guide
 Deltek winsight Analytics Briefing Wizard 8.0 Installation Guide December 2014 While Deltek has attempted to verify that the information in this document is accurate and complete, some typographical or
TREENO ELECTRONIC DOCUMENT MANAGEMENT. Administration Guide
 TREENO ELECTRONIC DOCUMENT MANAGEMENT Administration Guide February 2012 Contents Introduction... 8 About This Guide... 9 About Treeno... 9 Managing Security... 10 Treeno Security Overview... 10 Administrator
Recommended Browser Settings
 Recommended Browser Settings August 2015 This document is intended for restricted use only. Infinite Campus asserts that this document contains proprietary information that would give our competitors undue
And program Office to FlipBook Pro is powerful enough to convert your DOCs to such kind of ebooks with ease.
 Note: This product is distributed on a try-before-you-buy basis. All features described in this documentation are enabled. The unregistered version will be added a demo watermark. About Office to FlipBook
AvePoint Permissions Manager
 User Guide Issued July 2017 1 Table of Contents What s New in this Guide...4 About...5 Supported Browsers...7 Submit Documentation Feedback to AvePoint...8 Integrate with AvePoint Online Services...9 AvePoint
TREENO ELECTRONIC DOCUMENT MANAGEMENT
 TREENO ELECTRONIC DOCUMENT MANAGEMENT User Guide February 2012 Contents Introduction... 5 About This Guide... 5 About Treeno... 6 Navigating Treeno EDM... 7 Logging in to Treeno EDM... 7 Changing Your
Symantec ediscovery Platform
 Symantec ediscovery Platform Native Viewer (ActiveX) Installation Guide 7.1.5 Symantec ediscovery Platform : Native Viewer (ActiveX) Installation Guide The software described in this book is furnished
HYPERION SYSTEM 9 BI+ GETTING STARTED GUIDE APPLICATION BUILDER J2EE RELEASE 9.2
 HYPERION SYSTEM 9 BI+ APPLICATION BUILDER J2EE RELEASE 9.2 GETTING STARTED GUIDE Copyright 1998-2006 Hyperion Solutions Corporation. All rights reserved. Hyperion, the Hyperion H logo, and Hyperion s product
Adobe Acrobat DC for Legal Professionals - Quick Reference Guide
 Adobe Acrobat DC for Legal Professionals - Quick Reference Guide Adobe Acrobat is an important tool in the legal field giving you the ability to create, view, and edit PDF (portable document format) documents.
Scan November 30, 2011
 Scan November 30, 2011 2170 Georgina Avenue Santa Monica, CA 90402 800-972-3027 www.rco.com Table of Contents 1 Introduction... 1 2 Document History... 2 3 Install and Uninstall... 3 4 Understanding the
Perceptive Interact for Salesforce Enterprise
 Perceptive Interact for Salesforce Enterprise Installation and Setup Guide Version: 3.x.x Written by: Documentation Team, R&D Date: January 2019 Copyright 2015-2019 Hyland Software, Inc. and its affiliates.
User s Guide to Creating PDFs for the Sony Reader
 User s Guide to Creating PDFs for the Sony Reader 1 Table of Contents I. Introduction Portable Document Format PDF Creation Software Sony Reader screen dimensions and specifications Font recommendations
Preview tab. The Preview tab is the default tab displayed when the pdffactory dialog box first appears. From here, you can:
 Getting Started pdffactory is a printer driver. This means you must print to it from your application, just as you would with any other printer. Most applications have a Print dialog box command available
FLIP CHM. Create your flipping book from CHM files
 WWW.FLIPBUILDER.COM FLIP CHM Create your flipping book from CHM files About Flip CHM Flip CHM is powerful and flexible software which helps you to convert your compiled CHM files to page-flipping flash
PDF Expert for ipad User guide
 PDF Expert for ipad User guide 2011 Readdle Inc. 2 Contents Introduction Chapter 1: Copying documents to PDF Expert USB file transfer using itunes File Sharing Saving attachments from Mail and other ipad
Oracle Fusion Middleware. 1 Introduction. 1.1 Supported Functionality and Intended Use. 1.2 Limitations
 Oracle Fusion Middleware Installation Notes for Oracle Business Intelligence Mobile App Designer Trial Edition 11g Release 1 (11.1.1) E49297-01 September 2013 Welcome to Installation Notes for Oracle Business
Amyuni PDF Converter. User s Manual Updated September 26, 2005
 Amyuni PDF Converter Version 2.50e Version 2.50e Professional For Windows 95, 98, Me, NT4, 2000, XP/2003 32-bits, XP/2003 64-bits User s Manual Updated September 26, 2005 Amyuni Consultants Amyuni Technologies
Deltek winsight Analytics Excel Connect 8.0. Installation Guide
 Deltek winsight Analytics Excel Connect 8.0 Installation Guide December 2014 While Deltek has attempted to verify that the information in this document is accurate and complete, some typographical or technical
USER S GUIDE Software/Hardware Module: ADOBE ACROBAT 7
 University of Arizona Information Commons Training 1 USER S GUIDE Software/Hardware Module: ADOBE ACROBAT 7 Objective: Scan and create PDF Documents using Adobe Acrobat Software p.1 Introduction p.2 Scanning
Enterprise Vault.cloud CloudLink Google Account Synchronization Guide. CloudLink to 4.0.3
 Enterprise Vault.cloud CloudLink Google Account Synchronization Guide CloudLink 4.0.1 to 4.0.3 Enterprise Vault.cloud: CloudLink Google Account Synchronization Guide Last updated: 2018-06-08. Legal Notice
Practice Labs User Guide
 Practice Labs User Guide This page is intentionally blank Contents Introduction... 3 Overview... 3 Accessing Practice Labs... 3 The Practice Labs Interface... 4 Minimum Browser Requirements... 5 The Content
Veritas System Recovery 18 Management Solution Administrator's Guide
 Veritas System Recovery 18 Management Solution Administrator's Guide Documentation version: 18 Legal Notice Copyright 2018 Veritas Technologies LLC. All rights reserved. Veritas and the Veritas Logo are
Colleague by Ellucian Guide to User Interface 4.4 and 4.4.1
 Colleague by Ellucian Guide to User Interface 4.4 and 4.4.1 Colleague Release 18, UI 4.4 and 4.4.1 May 2, 2013 For corrections and clarifications to this manual, see AnswerNet page 1926.37 Banner, Colleague,
HP Records Manager. Kofax Capture Template. Software Version: 8.1. Document Release Date: August 2014
 HP Records Manager Software Version: 8.1 Kofax Capture Template Document Release Date: August 2014 Software Release Date: August 2014 Legal Notices Warranty The only warranties for HP products and services
SecureAware Technical Whitepaper
 SecureAware Technical Whitepaper - requirements and specifications Applies to SecureAware version 4.x Document date: January 2015 About this document This whitepaper provides a detailed overview of the
IMAGE STUDIO LITE. Tutorial Guide Featuring Image Studio Analysis Software Version 3.1
 IMAGE STUDIO LITE Tutorial Guide Featuring Image Studio Analysis Software Version 3.1 Notice The information contained in this document is subject to change without notice. LI-COR MAKES NO WARRANTY OF
Was this document helpful? smarttech.com/docfeedback/ SMART Ink 5.2 USER S GUIDE
 Was this document helpful? smarttech.com/docfeedback/171190 SMART Ink 5.2 USER S GUIDE Trademark notice SMART Ink, SMART Notebook, SMART Meeting Pro, Pen ID, smarttech, the SMART logo and all SMART taglines
DOC TO FLASH MAGAZINE MAC. Create your flipping book from DOC files on Mac
 WWW.EMAGMAKER.COM DOC TO FLASH MAGAZINE MAC Create your flipping book from DOC files on Mac About DOC to Flash Magazine Mac Save DOC, RTF and TXT as a much popular digital e-book with real book page-flipping
PrimoPDF Enterprise User Guide, Version 5.0
 Table of Contents Installation... 3 Reference Links... 3 Uninstallation... 4 Creating PDF Documents... 4 PrimoPDF Document Settings... 5 PDF Creation Profiles... 5 Document Properties... 6 PDF Security...
LizardTech. Express Server 9. ExpressZip Manual
 LizardTech Express Server 9 ExpressZip Manual Copyright 2009 2014 Celartem Inc. d.b.a. LizardTech. All rights reserved. Information in this document is subject to change without notice. The software described
Adlib PDF FileNet Connector Guide PRODUCT VERSION: 5.1
 Adlib PDF FileNet Connector Guide PRODUCT VERSION: 5.1 REVISION DATE: January 2014 Copyright 2014 Adlib This manual, and the Adlib products to which it refers, is furnished under license and may be used
ViewONE User Manual !"##$$$
 ViewONE User Manual!"##$$$ Contents Introduction 3 Features 4 The User interface 5 Toolbars 6 Menus 19 The Keyboard 29 ViewONE is a Java applet that extends your web browser so that you can view, zoom,
Intellicus Getting Started
 Intellicus Getting Started Intellicus Web-based Reporting Suite Version 4.5 Enterprise Professional Smart Developer Smart Viewer Intellicus Technologies info@intellicus.com www.intellicus.com Copyright
Release Notes for RasterMaster Release 14.12/19.12
 Release Notes for RasterMaster Release 14.12/19.12 June 27, 2018 Table of Contents Important Notes Important Phone Numbers and Links New Features for RM 14.12/19.1 2 Closed/Fixed Issues for RM 14.12/19.1
Workstation Configuration Guide
 Workstation Configuration Guide August 13, 2018 Version 9.6.134.78 For the most recent version of this document, visit our documentation website. Table of Contents 1 Workstation configuration 4 1.1 Considerations
Create PDF s. Create PDF s 1 Technology Training Center Colorado State University
 Create PDF s What is a PDF? A Portable Document Format, or PDF, is a file format developed by Adobe that is used to maintain an original document and allow the document to be shared with anyone, no matter
Moving You Forward A first look at the New FileBound 6.5.2
 Moving You Forward A first look at the New FileBound 6.5.2 An overview of the new features that increase functionality and ease of use including: FileBound 6.5.2 Service Pack FileBound Capture 6.6 New
HP Intelligent Management Center SOM Administrator Guide
 HP Intelligent Management Center SOM Administrator Guide Abstract This guide contains comprehensive conceptual information for network administrators and other personnel who administrate and operate the
Solo 4.6 Release Notes
 June9, 2017 (Updated to include Solo 4.6.4 changes) Solo 4.6 Release Notes This release contains a number of new features, as well as enhancements to the user interface and overall performance. Together
BDM (Xtender) 16.3 User Guide. How to Search, Retrieve, & Index Documents With BDM Web Access
 16.3 User Guide. How to Search, Retrieve, & Index Documents With BDM Web Access") BDM (Xtender) 16.3 User Guide How to Search, Retrieve, & Index Documents With BDM Web Access Information Technology Services (ITS) Table of Contents Chapter 1: Introduction... 4 BDM Overview of features...
BDM (Xtender) 16.3 User Guide How to Search, Retrieve, & Index Documents With BDM Web Access Information Technology Services (ITS) Table of Contents Chapter 1: Introduction... 4 BDM Overview of features...
SQL Optimizer for Oracle Installation Guide
 SQL Optimizer for Oracle 9.2.2 Installation Guide Copyright 2017 Quest Software Inc. ALL RIGHTS RESERVED. This guide contains proprietary information protected by copyright. The software described in this
Workstation Configuration
 Workstation Configuration December 12, 2017 - Version 9.4 - - - - - - - - - - - - - - - - - - - - - - - - - - - - - - - - - - - - - - - - - - - - - - - - - - - - - - - - - - - - - - - - - - - - - - - -
EMC Documentum TaskSpace
 EMC Documentum TaskSpace Version 6.7 User Guide EMC Corporation Corporate Headquarters: Hopkinton, MA 01748 9103 1 508 435 1000 www.emc.com EMC believes the information in this publication is accurate
User Manual For SmartRoom Managers
 User Manual For SmartRoom Managers Table of Contents 1.0 Login 2.0 Confidentiality Agreement 3.0 Software Installation 4.0 Dashboard 5.0 Document Review and Index Maintenance 5.1 View by Index 5.1.1 Index
Oracle User Productivity Kit Content Player
 Oracle User Productivity Kit Content Player Oracle User Productivity Kit Content Player Copyright 1998, 2012, Oracle and/or its affiliates. All rights reserved. Oracle and Java are registered trademarks
Perceptive Experience Content Apps
 Perceptive Experience Content Apps Installation and Setup Guide Written by: Product Knowledge, R&D Date: Thursday, September 15, 2016 2014-2016 Lexmark International Technology, S.A. All rights reserved.
What Is In This Guide. Overview Installation/Setup Printers Design Module
 What Is In This Guide Overview Installation/Setup Printers Design Module 2011 2 Unibar ELS Enterprise Quick Start Guide Data Systems International, Inc. 7801 W. 110th Street Overland Park, Kansas 66210