BF-630X/BF-830X WEB SCREEN. Access Control/Time Attendance. User s Manual
|
|
|
- Emery Jackson
- 5 years ago
- Views:
Transcription
1 BF-630X/BF-830X Access Control/Time Attendance WEB SCREEN User s Manual
2 Table of Contents CHAPTER 1 INSTALLATION... 2 Requirement...2 Procedure...2 CHAPTER 2 WEB SETUP DESCRIPTION... 3 Login Web...3 Preparation...3 Use Web Browser...3 Home Screen...4 User Administration...7 Access Log...7 Daily First IN/Last OUT...8 View User List...9 Add Employee...12 Designation List...14 Department List...15 Terminal...16 System Log...16 Terminal Status...17 Administrator Setup...17 Terminal Setup...19 Communication Setting...21 DDNS Setup...22 Clock Setup...24 IN/OUT Trigger Setup...25 Func. Key Setup...26 Access Control...27 Time Setup...27 Time Zone Setup...28 Group List...29 Holiday Setup...30 Door Setup...31 Door Status...33 Door Remote Control...34 Event Handle...35 Tools...36 Attendance Report(XLS)...36 Exports (TXT)...38 Exports (XLS)...39 Backup...41 Restore/Import...41 Device Admin...42 Reboot...42 Upgrade Firmware...43 Reset...44 APPENDIX A INSPECT AND FIX OF BREAKDOWN Overview...45 General Problems...45 Copyright All Rights Reserved. Document Version: 1.0 All trademarks and trade names are the properties of their respective owners. 1
3 Chapter 1 Installation 1 This Chapter covers the summary installation of the BF-630X/BF-830X. Requirement Network cables. Use standard or crossover 10/100BaseT network(utp)cables with RJ-45 connectors. TCP/IP protocol must be installed on PC. Hub needed when PC not connect with BF-630X/BF-830X directly. Procedure 1. PC Connect With BF-630X/BF-830X Directly Use standard or crossover 10/100BaseT network(utp)cables with RJ-45 connectors connect with the network card of PC. 2. PC Connect With BF-630X/BF-830X Through Hub Use standard 10/100BaseT network(utp)cables with RJ-45 connectors connect PC and BF-630X/BF-830X with Hub separately. 3. Power Up Connect DC 12~24 V/ 1 A power adapter with BF-630X/BF-830X. Please be careful of the connection by positive pole and negative pole. Use different specification power adapter may cause hardware damaged or Unstable. 2
4 Chapter 2 Web Setup Description 2 This Chapter provides Web Setup details of BF-630X/BF-830X. Login Web BF-630X/BF-830X contains an HTTP server inside. This enables you to connect and configure it by using your Web browser. Preparation Before setting BF-630X/BF-830X, please make sure of that: PC can establishes a physical connection to BF-630X/BF-830X. PC and BF-630X/BF-830X must be on the same LAN segment. BF-630X/BF-830X must be installed and powered ON. If BF-630X/BF-830X s default IP Address( )already used for another device, the other device must be turn OFF until BF-630X/BF-830X assign a new IP Address. Use Web Browser 1. Start Web browser. 2. In the Address box, enter and the IP Address of BF-630X/BF-830X. For example, which uses the BF-630X/BF-830X s default IP Address: If the connection failure If BF-630X/BF-830X does not respond, check as following: BF-630X/BF-830X installed correct or not, LAN and power connected normal or not. You can test the connection by using the Ping command: Open the MS-DOS window or command prompt window. Enter the command: ping If no response received, it describes either the connection not worked, or your PC s IP Address not compatible with BF-630X/BF-830X s IP Address.(See next item) If your PC used a fixed IP Address, that IP Address must be within the range to or to , than it can be compatible with BF-630X/BF-830X s default IP Also, the Subnet Mask must be set to Ensure that PC and BF-630X/BF-830X are on the same network segment 3

5 Home Screen After finishing installation and connection, you will see the Home screen. This screen will appear during connection in the future. An example screen is shown below. Figure 1:Home Screen DATA - Home Screen You can navigate by using the menu bar on the left of the screen and the Back button on your Browser. Search Employee By Card ID Search employee by card ID. 4
6 By Employee ID By Last Name Search employee by employee ID. Search employee by last name. Operate process: Choose the way to search (card ID/employee ID/last name), move mouse front to the item you want to choose, push the left button of mouse. Enter query number in the column. Push button GO to operate. User Administration Access Log Change to the screen of log browse. Daily First IN/Last OUT Change to the screen of employee first in/last out of today. View User List Add Employee Designation List Department List Terminal System Log Terminal Status Administrator Setup Terminal Setup Communication Setting DDNS Setup Clock Setup Fkey Auto Trigger Func. Key Setup Access Control Time Set Time Zone Setup Group List Holiday Setup Door Setup Door Status Change to the screen of registered user browse, can modify delete active and deactive user. Change to the screen of add user. Change to the screen of designation list. Change to the screen of department list. Change to the screen of system log browse. Change to the screen of terminal information browse (Home Screen). Change to the screen of administrator and user password configuration. Change to the screen of terminal configuration. Change to the screen of communication configuration. Change to the screen of DDNS configuration. Change to the screen of Date/Time configuration. Change to the screen of IN/OUT trigger configuration. Change to the screen of function key configuration. Change to the screen of time configuration. Change to the screen of time zone configuration. Change to the screen of group configuration. Change to the screen of holiday configuration. Change to the screen of door configuration. Change to the screen of door status browse. 5
7 Door Remote Control Event Handle Tools Attendance Report(XLS) Exports(TXT) Exports(XLS) Backup Restore/Import Device Admin Reboot Upgrade Firmware Reset Button SEARCH Change to the screen of security bypass configuration. Change to the screen of event handle. Change to the screen of attendance report.(excel format) Change to the screen of log export.(text format) Change to the screen of log export.(excel format) Change to the screen of user s data backup. Change to the screen of user s data restore/import. Change to the screen of device administration. Change to the screen of reboot. Change to the screen of firmware upgrade. Change to the screen of delete all data. Run employee search and show the result. 6

8 User Administration Access Log Use the Access Log link on the menu bar to reach the Access Log screen. The example screen is shown below. Figure 2:Access Log Screen DATA - Access Log Screen Query User/Card ID Terminal ID Dep. FKey NUM. From/To (mm/dd/yyyy) GO(button) Enter user/card ID to search Enter terminal ID to search Choose the department to search, move mouse to v and push the left button of mouse, it will show all department list for you to choose. Choose the function key to search, move mouse to v and push the left button of mouse, it will show all function key list for you to choose. Choose the function key number to search, move mouse to v and push the left button of mouse, it will show all number key list for you to choose. Enter the date period to search. Operate the log research. 7

9 Operate process: enter and choose the query item in the blank column and list. Push button GO to operate. Column Description of Record No. Card ID Employee ID Name Date Time Terminal IN/OUT Door First Prev 10 Serial number. Card ID, use ID link can reach employee setup screen. If the ID link can t reach employee setup screen, it means the ID was deleted. Employee ID, ----,---- mean user s employee ID does not input in employee setup. User s name, ----,---- mean user s name does not input in employee setup. Date of log. Time of log. Show terminal s name, ---- mean terminal s name does not input in terminal setup. Show the function key which user enter. IN : None or enter F1 OUT : Enter F2 F3 : Enter F3 F4 : Enter F4. The field is also related with IN/OUT Trigger Setup and Function Key Setup. Main means the door control by BF-630X/BF-830X. Link to first page of logs. Move to previous 10 pages of logs N Link to indicate page of logs. Next 10 End Move to next 10 pages of logs. Link to last page of logs. Daily First IN/Last OUT Use the Daily First IN/Last OUT link on the menu bar to reach the Daily First IN/Last OUT screen. The example screen is shown below. Figure 3:Daily First IN/Last OUT Screen 8

10 DATA - Daily First IN/Last OUT Screen Daily First IN/Last OUT No. Card ID Employee ID Name Date First IN Last OUT First Prev 10 Serial number. Card ID, use ID link can reach employee setup screen. If the ID link can t reach employee setup screen, it means the ID was deleted. Employee ID, ----,---- mean user s employee ID does not input in employee setup. User s name, ----,---- mean user s name does not input in employee setup. Date of log. First enter time log. Last out time log. Link to first page of Daily First IN/Last OUT logs. Move to previous 10 pages of Daily First IN/Last OUT logs N Link to indicate page of Daily First IN/Last OUT logs. Next 10 End Move to next 10 pages of Daily First IN/Last OUT logs. Link to last page of Daily First IN/Last OUT logs. View User List Use the View User List link on the menu bar to reach the View User List screen. The example screen is shown below. Figure 4:View User List Screen 9
11 DATA - View User List Screen EMPLOYEE LIST No. Serial number. If you want to active deactive or delete user please click check box on the left of serial number. Card ID Card ID link can reach employee setup screen.(figure 5) Employee ID Last/First Name Active F&P (BF-630X ONLY) F (BF-630X ONLY) P F/P (BF-630X ONLY) C F&C Reg First Prev 10 Employee ID mean user s employee ID does not input in employee setup. Name of user mean user s name does not input in employee setup. State of active. Green:Active Gray:Deactive. Green: Fingerprint + Password verify Gray:Other verify. Green:Fingerprint verify Gray:Other verify. Green:Password verify Gray:Other verify. Green:Fingerprint or Password verify Gray:Other verify. Green:Card verify Gray:Other verify. Green:Using Fingerprint stored in mifare card for verify Gray:Other verify. Show registered data of user. P:Card + Password, C: Card only, F: Card + Fingerprint, FP: Card + Fingerprint + Password. Link to first page of user list. Move to previous 10 pages of user list N Move to indicate pages of user list. Next 10 End Button ACTIVATE DEACTIVATE DELETE Move to next 10 pages of user list. Link to last page of user list. Enable authority of selected user. Disable authority of selected user. Delete selected user. 10
12 Figure 5:Modify Employee Record Screen DATA - Modify Employee Record Screen Employee Data Card/User ID Expire Date Check Valid from to Designation Department Employee ID Last Name First Name Card/user ID, can t be modified Choose to enable or disable employee s expire date. Move mouse icon to V and click left button, it will show year, month, date to choose. Choose the designation Choose the department Enter the employee ID. Last name of user, needs to enter if you want to display employee s last name after verification. First name of user, needs to enter if you want to display employee s first name after verification. 11
13 Group Verify Mode Password Confirm Status Work Time Button Previous Save Delete Next Choose the group. Choose the way to verify user. Move mouse icon to V and click left button, it will show the list for you to choose. F only: fingerprint(bf-630x only), P only: password, F or P: fingerprint or password(bf-630x), F and P: fingerprint+password(bf-630x only), Card, Match on Card:Using Fingerprint stored in mifare card for verify. Enter user s verify password. Confirm user s verify password. Choose to activate or deactivate user s right. Enter the start and end work of employee for attendance report. If the employee s work time from 8AM to 5PM, please enter 08:00 to 17:00. Revise the previous data. Save modify data. Delete the present user. Revise the next data. Add Employee Use the Add Employee link on the menu bar to reach the Add Employee screen. The example screen is shown below. 12

14 Figure 6: Add Employee Screen DATA - Add Employee Screen Employee Data Card/User ID Expire Date Check Valid from to Designation Department Employee ID Last Name First Name Enter the card/user ID you want to add Choose to enable or disable employee s expire date. Move mouse icon to V and click left button, it will show year, month, date to choose. Choose the designation Choose the department Enter the employee ID. Last name of user, needs to enter if you want to display employee s last name after verification. First name of user, needs to enter if you want to display employee s first name after vertification. 13
15 Group Verify Mode Password Confirm Status Work Time Button Save Choose the group. Choose the way to verify user. Move mouse icon to V and click left button, it will show the list for you to choose. F only: fingerprint(bf-630x only), P only: password, F or P: fingerprint or password(bf-630x), F and P: fingerprint+password(bf-630x only), Card, Match on Card:Using Fingerprint stored in mifare card for verify. Enter user s verify password. Confirm user s verify password. Choose to activate or deactivate user s right. Enter the start and end work of employee for attendance report. If the employee s work time from 8AM to 5PM, please enter 08:00 to 17:00. Save add data. Designation List Use the Designation List link on the menu bar to reach the Designation List screen. The example screen is shown below. Figure 7: Designation List Screen DATA - Designation List Screen Designation setup Designation Add New Designation Button Delete Show added designation. Use designation link can check all employees data in that designation. Enter designation which you want to add. Delete added designation. 14

16 Add Add new designation. Department List Use the Department List link on the menu bar to reach the Department List screen. The example screen is shown below. Figure 8: Department List Screen DATA - Department List Screen Deepartment setup Department Add New Department Button Delete Add Show added department. Use department link can check all employees data in that department. Enter department which you want to add. Delete added designation. Add new designation. 15

17 Terminal System Log Use the System Log link on the menu bar to reach the System Log screen. The example screen is shown below. Figure 9: System Log Screen DATA - System Log Screen System Log:Record system operation or parameter alter executed by user No. Serial number. Date Operation Run Date Time Operation Run Time Description Describe Enter system operator WEB logon password. 16

18 Terminal Status Use the Terminal Status link on the menu bar to reach the Terminal Status screen. That screen is home screen, it shows the present status of terminal and the information of network setting. Please see the description of home screen. Administrator Setup Use the Administrator Setup link on the menu bar to reach the WEB Logon Setting screen. The example screen is shown below. Figure 10: Administrator Setup Screen DATA - Administrator Setup Screen Password Configuration Administrator WEB Logon User Name Administrator WEB Logon Password Operator WEB Logon User Name Operator WEB Logon Password Terminal Logon Password Assign Administrator Enter system administrator WEB logon user name. Enter administration web logon password. Enter operator WEB logon user name. Enter system operator WEB logon password. Enter terminal logon password Enter administrator ID.. 17
19 REMARK: If you assign administrator ID, you can not use terminal logon password to enter the management menu of Terminal. Assigned administrator needs to follow the verification method to enter the management menu of Terminal. Button Save Save configure data. Administrator and operator The difference between administrator and operator is the right limit, administrator can execute all functions of web setting, but operator can t execute following function. Administrator Setup, Terminal Setup, Communication Setting, Door Setup, Event Handle, Device Admin, Upgrade Firmware. 18

20 Terminal Setup Use the Terminal Setup link on the menu bar to reach the TERMINAL CONFIGURATION screen. The example screen is shown below. Figure 11: Terminal Configuration Screen DATA - Terminal Configuration Screen Terminal Setting Terminal ID Title On LCD Description Set terminal ID of BF-630X/BF-830X, please notice terminal ID cannot repeat if you set BF-630X as fingerprint reader of BF-660X/BF-670X. Set LCD title of BF-630X/BF-830X. Enter terminal description. 19
21 FP Security Level(BF-630X series) Set BF-630X fingerprint security level. 1 ~ 5 :1(low) > 5(high) Auto Normal(630X only):bf-630x decides security level itself by the total amount of registered users in normal situation. Auto Secure(630X only):bf-630x decides security level itself by the total amount of registered users in security situation. FP Verification Mode Set the fingerprint verification mode of BF-630X 1:N--- user does not need to enter the card ID or verify card before put the fingerprint. 1:1--- user need to enter the card ID or verify card before put the fingerprint. Duplicate FP Enrolled Set if you can register same fingerprint or not. Working Behavior Set BF-630X to work standalone (Verify by itself) or as a fingerprint reader of BF-660X/BF-670X. Wiegand Format Set the format of wiegand input (26 bits or 34 bits). Wiegand output Enable and disable wiegand output and choose output format (26 bits or 34 bits) Maintenance Time Set system maintenance time everyday, possibly set the time that no one using system. Card ID Display Format Choose card ID display format Double Check IN control This function works on Access Control be disable, suitable for Time Attendance and allow verification only one time in specific period. Max. is seconds. Disable Key-in ID Enable or disable to enter card ID by using the keypad. Illegal Access Event Choose if you want to record the log of fail verification. Allowed late IN Limit Allowed the last in limit time, this setting will effect the attendance report. Function Key Trigger Mode 20

22 Manual: keep function status that last user pushed until other function be pushed. For example, the first user press F1 and if the next user also need to press F1, then he does not need to press F1 because the function key status already keep on the last users status. Auto: system can judge itself for the setting of IN/OUT TRIGGER SETUP and Function Key Setup. LCD Sleep Time Set the time to turn off of LCD backlight. Button Save Save configure data. Communication Setting Use the Communication Setting link on the menu bar to reach the Communication Setting screen. The example screen is shown below. Figure 12: Communication Setting Screen 21

23 DATA - Communication Setting Screen Net Mode:Select IP obtain method (Static IP PPPoE DHCP CLIENT) IP Address Subnet Mask Default Gateway IP DNS Server IP Set IP address of BF-630X. Set subnet mask of BF-630X. Needs to enter gateway IP if connects via VPN. Enter DNS server IP. Operation Mode(Software Used) Connection Mode Port Number Web Management Port HTTP Port Management Access Key(Software Used) Set connection mode with software.(tcp Server UDP Server) Set communication port between TCP/IP and software. Revise BF-630X HTTP port. 2000, 5850, 5851 already used for system, please avoid these three numbers and the port number used for windows. If the number what you set not 80, than you need to add : and port number next time. (ex. Enable or Disable Access Key to limit software to access data Button Save Save configuration data. DDNS Setup Use the DDNS Setup link on the menu bar to reach the DDNS Setup screen. The example screen is shown below. About how to sign up a DDNS name please refer to Appendix A. Figure 13: DDNS Setup Screen< 一 > 22

24 Figure 14: DDNS Setup Screen< 二 > DATA - DDNS Setup Screen DDNS SETUP DDNS Server Username Password Device DNS Name Registry IP Address Current Status Button Set Disable DDNS Server or select a DDNS Server Enter user name that you register in DDNS provider Enter password that you register in DDNS provider Enter Domain name that you register in DDNS provider Display current IP that assign to DNS Display current DDNS status Save DDNS setting. 23

25 Clock Setup Use the Clock Setup link on the menu bar to reach the Clock Setup screen. The example screen is shown below. Figure 15: Clock Setup Screen DATA - Clock Setup Screen SYSTEM CLOCK SETUP Time Server Time Zone Button Save Date Time Button Save Enable or Disable adjusting time from Time Server. If enable the function then network timer server is required. BF-630X can adjusts time automatically itself through the network time server. Choose time zone. Save time server and time zone setting. The present date of connected PC. The present time of connected PC. Save new date/time. 24
 Number Choose function key number.")
26 IN/OUT Trigger Setup Use the Fkey Auto Trigger link on the menu bar to reach the IN/OUT Trigger Setup screen. The example screen is shown below. Figure 16: IN/OUT Trigger Setup Screen DATA - IN/OUT Trigger Setup Screen IN/OUT Trigger Setup Function Key Choose function key. (F1~F4) Number Choose function key number. (1~9) IN~OUT IN: enter start time. OUT: enter end time. Description: In/out trigger setup will effect the IN/OUT column of log and the LCD display of BF-630X/BF-830X (The definition of function key also effects IN/OUT column of log.). Button Delete Add Delete configurated time. Add new time. 25
 Number Choose function key number.")
27 Func. Key Setup Use the Func. Key Setup link on the menu bar to reach the Function Key Setup screen. The example screen is shown below. Figure 17: Function Key Setup Screen DATA - Function Key Setup Screen Function Key Setup Function Key Choose function key. (F1-F4) Number Choose function key number. (1-9) Define Enter the description of definition function key. Button Delete Delete configured function key. Set Save definition function key. 26

28 Access Control Time Setup Use the Time Set link on the menu bar to reach the Time Set screen. The example screen is shown below. Figure 18: Time Set Screen DATA - Time Set Screen Time Set Time Set From -To Button Delete Set Choose time number, 000 and 001 are system set inside. Enter start/end time. For example, if you want to set 8am to 5pm, please enter 08:00 to 17:oo. Delete configured time. Add new time period. Description of Time Set This function sets the time of in/out or Time & attendance. 27


29 Time Zone Setup Use the Time Zone Setup link on the menu bar to reach the Time Zone Setup screen. The example screen is shown below. Figure 19: Time Zone Setup Screen DATA - Time Zone Setup Screen Time Zone Setup Time Zone ID Choose time zone number, 000 and 001 are system set inside. Time Zone Name Click time zone Name can link to time zone setup screen. Button Delete Delete configured time zone. Set Enter time zone setup screen. Description of Time Zone Setup This function sets the time to enter from Monday to Sunday and holiday. Figure 20: Time Zone Information Screen 28

30 DATA - Time Zone Information Screen Time Zone Information Time Zone Name Enter time zone name. Day Choose set time everyday, at most set 3 times. Holiday Choose set time on holiday, at most set 3 times. Button Save Save time zone information. Cancel Cancel time zone information set/revise. Group List Use the Group List link on the menu bar to reach the Group List screen. The example screen is shown below. Figure 21: Group List Screen DATA - Group List Screen Group List Group ID Group Name Button Delete Set Choose group number, 000 and 001 are system set inside. Click group name can link to group set up screen. Delete configured group. Enter group setup screen. 29


31 Figure 22: Group Information Screen DATA - Group Information Screen Group Information Group Name Enter group name. Time Zone ID Set time zone of that group. Allow Door Choose the door for that group. Button Save Save group information. Cancel Cancel the setting of group information or revise it. Holiday Setup Use the Holiday Setup link on the menu bar to reach the Holiday Setup screen. The example screen is shown below. Figure 23: Holiday Setup Screen 30

32 DATA - Holiday Setup Screen Holiday Setup Month/Date Holiday Name Button Add Delete Choose holiday. Enter holiday name. Add holiday. Delete configured holiday. Door Setup Use the Door Setup link on the menu bar to reach the Door Setup screen. The example screen is shown below. Figure 24: Door Setup Screen DATA - Door Setup Screen Door Setting Anti pass back Tolerance Time Anti-Duress Anti-Duress password Door Properties Location APB IN/OUT Enable or disable the anti-pass back function. Set the time that the user restricted can enter again next time Enable or disable Anti-Duress function. Enter Anti-Duress password Choose it can link to door Setting screen Description of the door. Show the security level of in/out device on every door. 31

33 Description : Anti pass back: This function restrict to the user in/out by same door Anti-Duress: Enabled this function BF-630X/BF-830 will act the BF-20 s relay set at Event Handle when user enter anti-duress password before verification. Button SET Save the setting data. Figure 25: Main Door Setting Screen Main Door Location Finger+Pin Time Zone Card+Pin Time Zone Relay Trigger Lock Release Time Zone Exit Button Time Zone Double badge control time zone Enter description of main door. Choose time zone to verify by fingerprint + password. Choose time zone to verify by card + password. Choose to use BF-630X/BF-830X built in relay trigger or connect BF-20 outside to control. Choose unlock time zone. Choose exit button time zone. Choose the time zone that needs 2 users to verification. 32

34 Anti Pass Back Level Lock Release Time Door Open Delay Time Access Log Button Set IN: Set this exit level. OUT: Set next exit level. Set lock release time. The default time is 10 seconds. Set door open delay time, need collocate with BF-20. The default time is 10 seconds. Choose to record the access log or not. Save the data Door Status Use the Door Status link on the menu bar to reach the Door Status screen. The example screen is shown below. Figure 26: Door Status Screen DATA - Door Status Screen Door Status Door No. Location Door Sensor Statistic Today The door controlled by BF-630X/BF-830X, choose it can link to door in/out statistics. (Separate from an hour.) Description of the door. Show door status controlled by BF-20. Show the statistic today of the door. 33

35 Figure 27: Door IN/OUT Statistic Screen Door Remote Control Use the Door Remote Control link on the menu bar to reach the Security Bypass screen. The example screen is shown below. Figure 28: Security Bypass Screen DATA - Security Bypass Screen Security Bypass Security ON Security OFF Turn on main door control, only in/out after verify success. Turn off main door control. The door open. 34
 Event Type Door open too long Unauthorized Badge Anti Passback Reject Intruded door Tamper Switch Breakdown Anti Duress Set the relay number and time if the door does not close in")
36 Event Handle Use the Event Handle link on the menu bar to reach the Event Handle screen. The example screen is shown below. Figure 29: Event Handle Screen DATA - Event Trigger on BF-20 s Relay No.(only for BF-20-E) Event Type Door open too long Unauthorized Badge Anti Passback Reject Intruded door Tamper Switch Breakdown Anti Duress Set the relay number and time if the door does not close in specific time. Set the relay number and time if the verification failed. Set the relay number and time if anti pass back rejected. Set the relay number and time if the door opened by force. Set the relay number and time if the tamper switch touched. Set the relay number and time if the user verify with duress. 35
 Screen DATA - Attendance Report(XLS) Screen Operate procedure Choose all employees or specified employee.")
37 Tools Attendance Report(XLS) Use the attendance report (XLS) link on the menu bar to reach the attendance report (XLS) screen. The example screen is shown below. Figure 30: Attendance Report(XLS) Screen DATA - Attendance Report(XLS) Screen Operate procedure Choose all employees or specified employee. If you choose specified employee, please enter employee ID in the column. Enter the time period. Push export button. Choose the location you want to save. Description Choose all employees can only count the data in one day, and choose specified employee can count the attendance date in many days. Figure 31 is the attendance report of card ID No. 1 employee, the work time is 08:30~17:30. 36
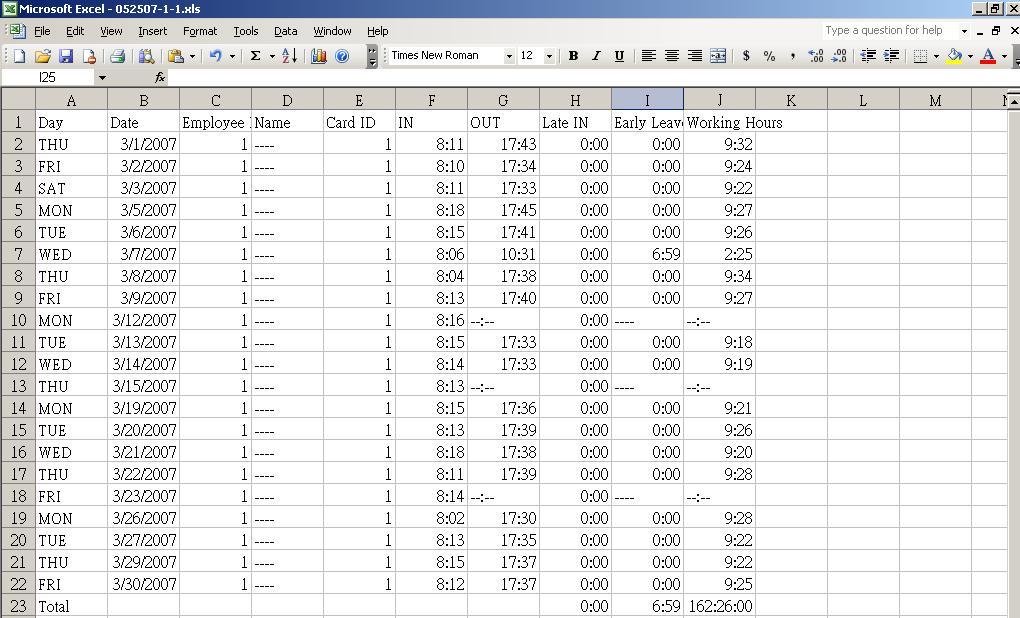
38 Figure 31:Attendance(XLS) 37
39 Exports (TXT) Use the Exports (TXT) link on the menu bar to reach the Exports (TXT) screen. The example screen is shown below. Figure 32: Exports (TXT) Screen DATA - Exports(TXT) Screen Exports Access Log (TXT) User/Card ID Terminal ID Department FKey NUM. From/To Access Log, First IN/Last OUT Include Heading Include Event Output Defined Function Key Button Export Description Query by User/Card ID. Query by terminal ID. Query by department. Query by function key. Choose the function key number. Query by the from/to date. Export all log or just first in/last out log. Export heading or not. Export event or not. Output defined function key or not. Execute export. 38

 link on the menu bar to reach the Exports (XLS) screen. The example screen is shown below.")
40 Figure 33 is the attendance report TXT file of user ID No. 1 employee and by access log without title. Figure 34 is the First IN/Last OUT attendance report TXT file of user ID No. 1 employee and with title. Figure 33: Exports Access Log (TXT) Screen Figure 34: Exports Access Log (TXT) Screen Exports (XLS) Use the Exports (XLS) link on the menu bar to reach the Exports (XLS) screen. The example screen is shown below. Figure 35: Exports (XLS) Screen 39


41 DATA - Exports(XLS) Screen Exports Access Log (XLS FORMAT) User/Card ID Terminal ID Department FKey NUM. From/To Access Log, First IN/Last OUT Include Heading Include Event Output Defined Function Key Button Export Description Query by User/Card ID. Query by terminal ID. Query by department. Query by function key. Choose the function key number. Query by the from/to date. Export all log or just first in/last out log. Export heading or not. Export event or not. Output defined function key or not. Execute export. Figure 36 is the attendance report XLS file of user ID No. 1 employee and by access log with title. Figure 37 is the First IN/Last OUT attendance report XLS file of user ID No. 1 employee and with title. Figure 36: Exports Access Log (XLS) Screen Figure 37: Exports Access Log (XLS) Screen 40

, only backup card ID, employee ID, name, group number. push backup. choose the location you want to save.")
42 Backup Use the Backup link on the menu bar to reach the Backup screen. The example screen is shown below. Figure 38: Backup Screen DATA - Backup Screen Backup procedure Choose the backup format. If you want to backup fingerprint data, need to choose database(database.cfg) format. If you choose user list(userlist.txt), only backup card ID, employee ID, name, group number. push backup. choose the location you want to save. Restore/Import Use the Restore link on the menu bar to reach the Restore screen. The example screen is shown below. Figure 39: Restore Screen 41
, only restore card ID, employee ID, name, group number. Push Browse to choose the file. Push Restore to restore/import the data.")
43 DATA - Restore/Import Screen Restore backup data Choose the restore format. If you want to restore fingerprint data, need to choose database(database.cfg) format. If you choose user list(userlist.txt), only restore card ID, employee ID, name, group number. Push Browse to choose the file. Push Restore to restore/import the data. Device Admin Use the Device Admin link on the menu bar to reach the Device Admin screen. The example screen is shown below. Figure 40: Device Administration Setting Screen DATA - Device Admin Screen Button Factory Default Reset system to factory default. Reboot Use the Reboot link on the menu bar to reach the Reboot screen. The example screen is shown below. Figure 41: Reboot Screen 42

44 DATA - Reboot Screen Button Reboot Reboot BF-630X/BF-830X, just like PC warm up to turn on. Upgrade Firmware Use the Upgrade Firmware link on the menu bar to reach the Reboot screen. The example screen is shown below. Figure 42: Upgrade Firmware Screen DATA - Firmware Upgrade Screen Operate procedure push Browse button to search and choose the firmware. push upgrade button to upgrade the firmware. Notice Different firmware version maybe has the compatible problem, please delete all items. If you want to save the data, please contact with us to confirm the data format or how to save the data before upgrade to avoid the data losing. Please upgrade system code then upgrade web code. 43

45 Reset Use the Reset link on the menu bar to reach the Reset screen. The example screen is shown below. Figure 43: Reset Screen DATA - Reset Screen Button Delete all user data Delete all title Delete all department Delete all function key Delete all log data Delete all time set Delete all time zone Delete all group Delete all holiday Delete all user data of BF-630X/BF-830X. Delete all title setting of BF-630X/BF-830X. Delete all department setting of BF-630X/BF-830X. Delete all function key setting of BF-630X/BF-830X. Delete all log data of BF-630X/BF-830X. Delete all time set of BF-630X/BF-BF-830X. Delete all time zone setting of BF-630X/BF-830X. Delete all group setting of BF-630X/BF-830X. Delete all holiday setting of BF-630X/BF-830X. 44
46 Appendix A Inspect and fix of breakdown A This appendix descripts the possibly problems and solutions. Overview This chapter will describe the possibly problems and many solutions when you use BF-630X/BF-830X. If BF-630X/BF-830X can t work after you follow this chapter to eliminate from breakdown, please contact with supplier to get further instruction. General Problems Question1: Solution1: Question2: Solution2: Question3: Solution3: Question4: Solution4: Question5: Solution5: Question6: Solution6: Can t connect with BF-630X/BF-830X to setup. Please check as follow: BF-630X/BF-830X installed correct or not,lan and power connected normal or not. Ensure that PC and BF-630X/BF-830X are on the same network segment If your PC sets for get IP automatically (DHCP user), please reboot again. If your PC used a fixed IP address, that IP address must be within the range to or to , than it can be compatible with BF-630X/BF-830X s default IP Also, the subnet mask must be set to Forget BF-630X/BF-830X IP. Please execute IP search tool attached to BF-630X/BF-830X and set the correct IP. Forget the password. Please contact with supplier and get further instruction. The ring calls often or the fingerprint scanner can not collect fingerprint. Please check adapter can supply enough voltage. If you make sure that adapter normal but the problem still exists, please contact with supplier and get further instruction. Web screen can not save the value. Firmware incompatibles with web program, please contact with supplier and get further instruction. Unusual of user data or record on web screen. You did not clear all data before upgraded firmware, please delete all 45
47 Question7: Solution7: Question8: Solution8: data and reset to factory default. LCD displays Running in boot. The program of firmware lost, please contact with supplier and get further instruction. BF-630X can t verify fingerprint easily. Please check adapter can supply enough voltage. Check your finger to dry or not, please wet your finger and try again. Maybe the fingerprint log not well, please registers again. Please put finger on the scanner first and push # to collect more clearly registered log. If the problem still exists after you check it, please contact with supplier and get further instruction. 46

48 Appendix B:DDNS Internet actually runs on IP Addresses which are numerical order, for example These IP Address identify the location of each device connected to Internet. However, the human brain does not easily remember this numbering system, so a system that allocate domain name such as provides an easier method. If you type or in the web browser s address bar, the browser will show the same web page. This is because both methods relate to the same web server. The Domain Name Servers used to manage the Internet will translate into the IP Address in order to allow your browser to find the web server and display the correct web page in your browser. If your IP Configuration, as shown in 3.2 section, is PPPoE, or DHCP with dynamic IP address assigned by ISP, your IP address may change each time you initiate the connection to your ISP. The DDNS function will help to map your IP address to your domain name when your ISP assigns a new dynamic IP Address. Note that this DDNS function acts as the client appliance of DDNS service and is only able to be use in conjunction with the service provided by DynDNS.org and TZO.com. Before you begin using this function, you will need to apply to DynDNS.org or TZO.com to be able to use the service. Please visit or for further information. How to register from Dyndns.org Step 1: Enter the web side TUwww.dyndns.orgUT in Browser, click the tab of Account. B 47

49 Step 2: click Create Account. Step 3: Fill the field of Username, and Password. You will receive an containing instructions to activate your account. 48


50 Step 4: Once you receive the confirmed , login with your Username and Password. Step 5: Click the tab of Services, then click Dynamic DNS. 49


51 Step 6: select Add Host in the left side of screen. Step 7: Login again with your Username and Password. Step 8: Enter the Hostname you want to use and select dyndns.org from the drop-down menu, click the button of Add 50


52 Host to finish register. Step 9: now you should enter the Username, Password and Hostname (named Device DNS Name in BF-400 Master into BF-400 Master to enable this function. How to register from TZO.com Step 1: Enter the web side TUwww.tzo.comUT in Browser, select the Order/Renew from top screen. 51


53 Step 2: You can choice what s kind of service you need, here we suggest the Standard TZO with 1 year of service Step 3: Select the first radio button, click Continue button. 52


54 Step 4: Enter the TZO name you want to register, such as chiyu.tzo.com, and your address which can reach you. If you don t have a TZO name yet, please check the box under the field of address, click Continue with order Step 5: complete the form with your information TZO want. Step 6: TZO will send an letter to inform your TZO key, please enter these information including address, TZO key and TZO name (named Device DNS Name in BF-400 Master) into BF-400 Master to enable this service. 53
BioSense II. (T/A System) WEB Configuration Manual
 WEB Configuration Manual") BioSense II (T/A System) WEB Configuration Manual 1.00.00, Jan/28/2014 (HW1.2) BioSense II (TA SYSTEM) Series: Web Ver1.1 Build Date: Jan/28/2014 Contents WEB Configuration...1 WEB Logon...1 Preparation...1
BioSense II (T/A System) WEB Configuration Manual 1.00.00, Jan/28/2014 (HW1.2) BioSense II (TA SYSTEM) Series: Web Ver1.1 Build Date: Jan/28/2014 Contents WEB Configuration...1 WEB Logon...1 Preparation...1
SEMAC-D1. WEB Configuration Manual
 SEMAC-D1 WEB Configuration Manual For SEMAC-D Series Only: 1.00.00,Dec 23 2013(HW1.1) SEMAC Web Ver1.0 / Build Date 12/23/2013 Contents WEB Configuration...1 Logon WEB...1 Premise... 1 WEB IE Browser...1
Warp 3. User s Manual
 Warp 3 User s Manual 28.7 copyright@28 Table of Contents 1 About WARP3 SERIES 2 Features 2.1 Characteristics 2.2 Support Functions 3 Operation window 4 User s Menu 4.1 For fingerprint verify user 4.2 For
Webpass IP Reader. WEB Configuration Manual
 Webpass IP Reader WEB Configuration Manual WEBPASS version : v0.09 Aug-24 th -2009 (HW.1.0) WEBPASS Web version : v1.4 Build date : Aug-18 th -2009 Revision History 1. Newly added Event Type : Alarm and
PL- AC02B6 AZ. WEB Configuration Manual
 PL- AC02B6 AZ WEB Configuration Manual Applied for : 3.00.00,May/15/2013 (HW1.2) PL- AC02B6 AZ Series: Web Ver1.0 Build Date: May/15/2013 Contents -WEB Configuration-... 1 WEB Logon... 1 Preparation...
BF-631W. WEB User Manual
 BF-631W WEB User Manual Applied for : 1.01.02,May/15/2013 (HW1.1) BF-631W Series: Web Ver1.1 Build Date:Jan/30/2013 Contents -WEB Configuration-...1 WEB Logon...1 Preparation...1 How to search BF-631W...1
WebPass IP Reader. WEB Configuration Manual
 WebPass IP Reader WEB Configuration Manual Applied for 1.50.03: May-13rd-2013 (HW1.1) WEBPASS Web Ver4.3 Build Date May-13rd-2013 Contents -WEB Configuration-...1 WEB Logon...1 Preparation...1 How to search
BioSense III. WEB Configuration Manual
 BioSense III WEB Configuration Manual Applied to: 1.00.03,Apr 16 2014(HW1.2) BioSense-III-COMBO Web Ver1.0 Build Date 04/03/2014 Contents -WEB Configuration-...1 WEB Logon...1 Preparation...1 How to search
User s Manual V
 User s Manual V2. 28.1.21 Table of Contents 1 About BF-88X/87X...3 2 Features...3 2.1 Characteristics...3 2.2 Support functions...3 2.2.1 User management...3 2.2.2 System management...4 2.2.3 Door mode...4
USER MANUAL. BioPro SA50 Fingerprint & Palm Terminal. Version: 1.0 Date: August Inch TFT Terminal User Manual 1
 USER MANUAL BioPro SA50 Fingerprint & Palm Terminal Version: 1.0 Date: August. 2017 2.4 Inch TFT Terminal User Manual 1 About This Manual This manual introduces the operation of user interfaces and menu
User s Guide UT-620. RS232/RS485 To TCP/IP Converter Module - 1 -
 User s Guide UT-620 RS232/RS485 To TCP/IP Converter Module 2003-1 - Table of Content 1. Getting to Know your UT-620.......1 1.1 Introduction 1.2 Main features 1.3 Applications for UT-620....2 2. Hardware
Broadband Router DC-202. User's Guide
 Broadband Router DC-202 User's Guide Table of Contents CHAPTER 1 INTRODUCTION... 1 Broadband Router Features... 1 Package Contents... 3 Physical Details...3 CHAPTER 2 INSTALLATION... 5 Requirements...
The GV-I/O Box 16 Ports provides 16 inputs and 16 relay outputs, and supports both DC and AC output voltages.
 GV-I/O Box 16 Ports The GV-I/O Box 16 Ports provides 16 inputs and 16 relay outputs, and supports both DC and AC output voltages. Key Features 16 inputs and 16 outputs are provided. Up to 9 pieces of GV-I/O
QUICK START GUIDE. 2.4 Inch Finger Vein Terminal Time Attendance & Access Control
 QUICK START GUIDE 2.4 Inch Finger Vein Terminal Time Attendance & Access Control Version: 1.0 Date: Apr., 2017 1 2.4-Inch TFT LCD USB Storage Device Port Keypad& Card Reader Doorbell & LED Indicator Fingerprint
GV-AS200 Controller. Hardware Installation Guide
 GV-AS200 Controller Hardware Installation Guide Before attempting to connect or operate this product, please read these instructions carefully and save this manual for future use. 2008 GeoVision, Inc.
Finger Vein Access Control device Quick Start Guide Version: 1.0 Date: June USB slot. USB slot
 Overview Fingerprint & Finger Vein Device Front Left Side: Finger Vein Device Touch screen Card reader Fingerprint reader Finger vein reader Finger vein sensor: During registration, after finger touches
GV-I/O Box 4E. Contents
 GV-I/O Box 4E Contents 1.1 Key Features... 2 1.2 System Requirements... 2 1.3 Packing List... 2 1.4 Overview... 3 1.5 Connecting to PC... 4 1.5.1 RS-485 Wiring... 4 1.6 Assigning Device ID to GV-I/O Box
This document mainly introduces the windows and operations of the F18 model 2.4 inch color TFT product.
 F18 User Manual Version: 1.0 Date: Dec. 2011 Introduction: This document mainly introduces the windows and operations of the F18 model 2.4 inch color TFT product. About this manual 1. Not all the devices
SF200. Installation Guide & Quick Start Guide. 2 TFT AC Terminal Version: 1.0 Date: June 2014
 SF200 Installation Guide & Quick Start Guide 2 TFT AC Terminal Version: 1.0 Date: June 2014 All design and specification declared are subject to change without notice in advance. Contents Safety Precautions
Avantis AXI WEB SERVER MODULE USER MANUAL
 Avantis AXI WEB SERVER MODULE USER MANUAL CONTENTS CHAPTER 1: SYSTEM LOGIN AND WEB PAGE LAYOUT 1.0 ACCESSING THE WEB PAGE 1.1 USER AUTHORITY 1.1.1 MASTER USER 1.1.2 USER/ GUEST SETTING 1.1.3 INSTALLER
CHAPTER 7 ADVANCED ADMINISTRATION PC
 ii Table of Contents CHAPTER 1 INTRODUCTION... 1 Broadband ADSL Router Features... 1 Package Contents... 3 Physical Details... 4 CHAPTER 2 INSTALLATION... 6 Requirements... 6 Procedure... 6 CHAPTER 3 SETUP...
Contents. GV-I/O Box 8 Ports Key Features Compatible Software Packing List Overview DIP Switch...
 Contents GV-I/O Box 8 Ports...2 1. Key Features... 2 2. Compatible Software... 2 3. Packing List... 2 4. Overview... 3 5. DIP Switch... 3 6. Connections to PC... 4 6.1 Installing USB Driver... 5 6.2 Assigning
Broadband Router DC 202
 Broadband Router DC 202 Full Manual Table of Contents DC-202 xdsl/cable Broadband router REQUIREMENTS...4 INTRODUCTION...4 DC-202 Features...4 Internet Access Features...4 Advanced Internet Functions...5
QUICK START GUIDE. 2.4 Inch TFT Terminal Time Attendance & Access Control
 QUICK START GUIDE 2.4 Inch TFT Terminal Time Attendance & Access Control Safety Precautions The following precautions are to keep user safe and prevent any damage. Please read carefully before installation.
PL- AC02B6 AZ Access Control User Manual
 PL- AC2B6 AZ Access Control User Manual 212..26 Content 1 About PL- AC2B6 AZ access controllers... 1 2 Main Features... 1 2.1 Features... 1 2.2 Functionality... 1 2.2.1 User account management... 1 2.2.2
Quick Start Guide. ProBio & ProFAC + ZKBioSecurity 3.0
 Quick Start Guide ProBio & ProFAC + ZKBioSecurity 3.0 CONTENT 1 Safety Precautions...2 On Using Face Recognition Device...3 Device Overview...5 Product Dimensions & Installation...6 Power Connection...7
Security at Fingertips
 Security at Fingertips www.esslsecurity.com Contents 1. Operating Instruction... - 1-1.1 Abbreviated Operating Procedures... - 1-1.2 Introduction to Fingerprint Recognition technology... - 2-1.3 About
LevelOne FBR User s Manual. 1W, 4L 10/100 Mbps ADSL Router. Ver
 LevelOne FBR-1416 1W, 4L 10/100 Mbps ADSL Router User s Manual Ver 1.00-0510 Table of Contents CHAPTER 1 INTRODUCTION... 1 FBR-1416 Features... 1 Package Contents... 3 Physical Details... 3 CHAPTER 2
User Manual. BioTime Web
 BioTime Web Version: 1.0 Date: December 2016 BioTime Web Index 1. Quick Start... 2 1.1. Overview... 2 1.2. Finger Placement... 3 1.3. How to use touch screen... 3 1.4. Recommended Operation Steps... 4
KJ-3300 USER MANUAL. KJTech
 KJ-3300 USER MANUAL KJTech QUICK START Beginning QUICK START When beginning the ADMIN (access control manager) should NOT be registered. When the ADMIN is not registered access the menu by pressing ID
HOME AUTOMATION, INC. Model 93A00-1. Serial Server. User s Manual
 HOME AUTOMATION, INC. Model 93A00-1 Serial Server User s Manual Document Number 93I00-1 Rev. A December, 2009 Introduction The 93A00-1 is a RS232/RS485 to TCP/IP converter integrated with a robust system
VG422R. User s Manual. Rev , 5
 VG422R User s Manual Rev 1.0 2003, 5 CONGRATULATIONS ON YOUR PURCHASE OF VG422R... 1 THIS PACKAGE CONTAINS... 1 CONFIRM THAT YOU MEET INSTALLATION REQUIREMENTS... 1 1. INSTALLATION GUIDE... 2 1.1. HARDWARE
INVISION TM IRIS TIME CLOCK USER GUIDE. InVision Iris Time Clock
 INVISION TM IRIS TIME CLOCK USER GUIDE InVision Iris Time Clock Copyright 2018 Paychex, Inc. All rights reserved. Paychex is a registered trademark and Paychex InVision is a trademark of Paychex, Inc.
UIP1869V User Interface Guide
 UIP1869V User Interface Guide (Firmware version 0.1.8 and later) Table of Contents Opening the UIP1869V's Configuration Utility... 3 Connecting to Your Broadband Modem... 5 Setting up with DHCP... 5 Updating
Downloaded from manuals search engine
 Table of Contents CHAPTER 1 INTRODUCTION... 1 Broadband Router Features... 1 Package Contents... 3 Physical Details... 4 CHAPTER 2 INSTALLATION... 6 Requirements... 6 Procedure... 6 CHAPTER 3 SETUP...
ID
 User Manual 1. Usage Guidelines.... 1 1.1 The recommended procedure... 1 1.2 Button description.... 2 1.3 The initial interface and main menu... 2 1.4 Authentication methods... 3 2. Department set....
Portals 14 What is a portal? 14 Hardware 15 RS232 to RS USB to RS TCP/IP to RS Add a Serial Portal 16 Add a Network portal 16
 PROS LITE User Manual Version 2.0.0 www.visual-plus.com Table of Contents Getting Started 5 Starting PROS Lite 5 Create a Portal 5 Adding a control panel 6 Adding a user 7 Upload users to a controller
2.4 inch Color Screen Series User Manual
 2.4 inch Color Screen Series User Manual Version: 1.3 Date: June 15, 2013 Introduction: This document mainly introduces interface and operation of 2.4 Inches color products. ALARM INTERNATIONAL SYSTEMS
IP806GA/GB Wireless ADSL Router
 IP806GA/GB Wireless ADSL Router 802.11g/802.11b Wireless Access Point ADSL Modem NAT Router 4-Port Switching Hub User's Guide Table of Contents CHAPTER 1 INTRODUCTION... 1 Wireless ADSL Router Features...
ACTAtek. Operation Manual
 ACTAtek TM Operation Manual Last revised: September 19, 2006 For more information and updated Manual, please visit our web site at http://www.hectrix.com OR http://www.actatek.com Information to user:
Wireless-G Router User s Guide
 Wireless-G Router User s Guide 1 Table of Contents Chapter 1: Introduction Installing Your Router System Requirements Installation Instructions Chapter 2: Preparing Your Network Preparing Your Network
SOHO 6 Wireless Installation Procedure Windows XP with Internet Explorer 5.x & 6.0
 SOHO 6 Wireless Installation Procedure Windows XP with Internet Explorer 5.x & 6.0 Before you Begin Before you install the SOHO 6 Wireless, you must have: A computer with a 10/100BaseT Ethernet card installed
OUTDOOR IR NETWORK CAMERA Series
 OUTDOOR IR NETWORK CAMERA Series INSTALLATION GUIDE Please read instructions thoroughly before operation and retain it for future reference. 1. OVERVIEW 1.1 Package Content Network camera Installation
Copyright 2009, NITGEN&COMPANY Co., Ltd. All rights reserved.
 Copyright 2009, NITGEN&COMPANY Co., Ltd. All rights reserved. ` Unauthorized reproduction of part or all of this manual s content in any form is prohibited. Product specifications may change without prior
LevelOne. User's Guide. Broadband Router FBR-1402TX FBR-1403TX
 LevelOne Broadband Router FBR-1402TX FBR-1403TX User's Guide Table of Contents CHAPTER 1 INTRODUCTION... 1 LevelOne Broadband Router Features... 1 Package Contents... 3 Physical Details...4 CHAPTER 2 INSTALLATION...
Installation Procedure Windows 2000 with Internet Explorer 5.x & 6.0
 Installation Procedure Windows 2000 with Internet Explorer 5.x & 6.0 Printer Friendly Version [ PDF 266K ] Before You Begin Before proceeding with the installation of a SOHO 6 appliance, you must have
Zodiac Link QUICKSTART GUIDE
 Zodiac Link QUICKSTART GUIDE May 2014 Table of Contents Step 1 Enroll Administrator... 3 Step 2 Set Mode... 3 Step 3 Set Slaves... 4 Step 4 Map Slaves... 4 Step 5 Set Reader Clock... 4 Step 6 - Synchronize
Video Decoder Setup Guide
 Package Content Video Decoder Setup Guide Inspect the packaging carton. Make sure the Video Decoder is properly delivered. Remove all items from the box and make sure the box contains the following items.
BioStation. Firmware Revision Notes EN BST V1.93. Biometrics & Security. Version 1.93
 BioStation Firmware Revision Notes Version 1.93 Biometrics & Security Firmware Version 1.93 (Build No.1.93_140228) Release: 2014-02-28 1. Save logs when card authentication fails 2. Relay Off log added
Nexus Lite (Web Interface)
") Nexus Lite (Web Interface) QUICK START GUIDE Scope of Document This document gives a brief overview of operation of the Nexus Lite Controller s Web user interface. Document Conventions We use the following
Nexus Lite (Web Interface) QUICK START GUIDE Scope of Document This document gives a brief overview of operation of the Nexus Lite Controller s Web user interface. Document Conventions We use the following
Installation Procedure Windows NT with Netscape 4.x
 Installation Procedure Windows NT with Netscape 4.x Printer Friendly Version [ PDF 232K ] Before You Begin Before proceeding with the installation of a SOHO 6 appliance, you must have the following: A
NET101. RS232 / RS422 / RS485 to Ethernet Converter. User s Manual. Version 1.2
 NET101 RS232 / RS422 / RS485 to Ethernet Converter User s Manual Version 1.2 Copyright Information Copyright 2004-2005, Mega System Technologies, Inc. All rights reserved. Reproduction without permission
5.5 AS Layout. GeoVision Technical Handbook 77
 5.5 AS400 5.5.1 Layout GeoVision Technical Handbook 77 5.5.2 Wiegand Reader Connection AS400 supports up to eight Wiegand 26 ~ 64bit readers Wiegand connection has a distance limitation of 30m (~ 100ft)
LevelOne Broadband Routers
 LevelOne Broadband Routers FBR-1100TX FBR-1400TX FBR-1401TX FBR-1700TX User's Guide TABLE OF CONTENTS CHAPTER 1 INTRODUCTION... 1 Features of your LevelOne Broadband Router... 1 Package Contents... 4
BF-430 User Manual Document Version 1.0 Web Version realcom Firmware Version ,Apr
 BF-430 User Manual Document Version 1.0 Web Version realcom 2009-02-07 Firmware Version 1.13.00,Apr 4 2011 Index Ⅰ Hardware Introduction...1 Ⅱ Product Overview...3 Ⅲ WEB Login...4 Ⅳ Web Instruction...10
Allied Time AT-5000 Fingerprint & RFID Calculating Time Recorder With Built-in Thermal Printer & Battery Backup User Manual
 Allied Time AT-5000 Fingerprint & RFID Calculating Time Recorder With Built-in Thermal Printer & Battery Backup User Manual AT5000 FEATURES OVERVIEW The AT 5000 is a biometric time clock designed for small
A Division of Cisco Systems, Inc. Broadband Router. with 2 Phone Ports. User Guide WIRED RT41P2-AT. Model No.
 A Division of Cisco Systems, Inc. WIRED Broadband Router with 2 Phone Ports User Guide Model No. RT41P2-AT Copyright and Trademarks Specifications are subject to change without notice. Linksys is a registered
ipac Access Controller
 STANLEY MANUFACTURED ACCESS CONTROL ipac Access Controller QUICK START GUIDE QUICK USER GUIDE Contents Standalone Interface...3 ipac at a Glance...3 Button and Functions...4 Screen Display...4 Information
ZKAccess3.5 Security System
 User Manual ZKAccess3.5 Security System Version: 3.5.3 Build0001 and above version Supports Pull SDK V2.2.0.205 and above version Supports Standalone SDK V6.2.5.31 and above version About this manual All
BF-450(M)/BF-430/431 RS232 / RS485 to TCP / IP Converter Module
/BF-430/431 RS232 / RS485 to TCP / IP Converter Module") BF-450(M)/BF-430/431 RS232 / RS485 to TCP / IP Converter Module User s Guide CHIYU TECHNOLOGY CO., LTD e-mail:sales@chiyu-t.com.tw Table of Content 1. Getting to Know your BF-450(M)/BF-430/431 1.1 Introduction
BF-450(M)/BF-430/431 RS232 / RS485 to TCP / IP Converter Module User s Guide CHIYU TECHNOLOGY CO., LTD e-mail:sales@chiyu-t.com.tw Table of Content 1. Getting to Know your BF-450(M)/BF-430/431 1.1 Introduction
ivms-4200 Access Control Client User Manual UD00895N
 ivms-4200 Access Control Client User Manual UD00895N User Manual About this Manual This Manual is applicable to ivms-4200 Access Control Client. The Manual includes instructions for using and managing
Broadband Router. with 2 Phone Ports WIRED. Installation and Troubleshooting Guide RT31P2. A Division of Cisco Systems, Inc. Model No.
 A Division of Cisco Systems, Inc. Broadband Router with 2 Phone Ports WIRED Installation and Troubleshooting Guide Model No. RT31P2 Copyright and Trademarks Specifications are subject to change without
DI-704P Ethernet Broadband Router. Ethernet (Straight Through) Cable. 5V DC Power Adapter
 Cable. 5V DC Power Adapter") 1 This product can be set up using any current Web browser, i.e., Internet Explorer or Netscape Navigator. DI-704P Ethernet Broadband Router and Print Server Before You Begin 1. If you purchased this router
1 This product can be set up using any current Web browser, i.e., Internet Explorer or Netscape Navigator. DI-704P Ethernet Broadband Router and Print Server Before You Begin 1. If you purchased this router
Quick Start Guide 4/8/16/24-Ch DVR
 Quick Start Guide 4/8/16/24-Ch DVR 1.1 Install Hard Drive 4/8/16/24-CH DVR Quick Start Guide Notice: 1.4/3/16-ch DVR supports one SATA hard drive. 24-ch DVR supports three SATA hard drives. Please use
CE APPROVED.4 INTRODUCTION.5 PACKAGE CONTENTS. 6 PRE - INSTALLATION CHECKLIST. 6 SYSTEM REQUIREMENTS. 6 FEATURES AND BENEFITS.11 SETUP WIZARD.
 Web Edition Dec. 2002 Contents CE APPROVED...4 INTRODUCTION...5 PACKAGE CONTENTS... 6 PRE - INSTALLATION CHECKLIST... 6 SYSTEM REQUIREMENTS... 6 FEATURES AND BENEFITS... 7 4 - PORT CABLE/XDSL ROUTER...9
USER MANUAL. Disclaimer
 USER MANUAL Disclaimer The instructions in this document have been carefully checked for accuracy and are presumed to be reliable. Smart I Electronics Systems Pvt. Ltd. and its writers assume no responsibility
User Guide. Avigilon Camera Configuration Tool
 User Guide Avigilon Camera Configuration Tool 2016, Avigilon Corporation. All rights reserved. AVIGILON, the AVIGILON logo and AVIGILON CONTROL CENTER are trademarks of Avigilon Corporation. Other product
Access Control Unit User s Guide
 NetAXS Access Control Unit User s Guide The configurations described in this document have not been reviewed by Underwriters Laboratories Inc. June 2007 2007 Honeywell. All rights reserved. 800-00233,
ANSEL FXS / 1 PSTN. VoIP Telephone Adaptor. User Manual V1.10
 ANSEL 5518 1 FXS / 1 PSTN VoIP Telephone Adaptor User Manual V1.10 Quick Guide Step 1: Broadband (ADSL/Cable Modem) Connections for ANSEL 5518 A. Connect ANSEL 5518 WAN port to ADSL NAT Router as the following
C1002 IP Camera. Quick Installation Guide. Solwise Ltd., 1
 C1002 IP Camera Quick Installation Guide Solwise Ltd., www.solwise.co.uk, sales@solwise.co.uk 1 Trademarks and/or registered trademarks are the property of their respective owners The information presented
ID
 CATLOG 1. Use notice... 1 1.1 the recommended procedure in the first using... 1 1.2 Button description... 2 2. User Management... 3 2.1 User Registration... 3 2.1.1 Fingerprint registration... 4 2.1.2
USER MANUAL. smartengine 30 RELEASE DATE: 15/06/2010
 USER MANUAL smartengine 30 RELEASE DATE: 15/06/2010 Disclaimer The instructions in this document have been carefully checked for accuracy and are presumed to be reliable. Smart I Electronics Systems Pvt
Multi-Function Wireless Router. User's Guide. Wireless Access Point Broadband Internet Access. 4-Port Switching Hub
 Multi-Function Wireless Router Wireless Access Point Broadband Internet Access 4-Port Switching Hub User's Guide Table of Contents CHAPTER 1 INTRODUCTION... 1 Wireless Router Features... 1 Package Contents...
Version: 1.1 Software Version: For Access 4.5.8/5.0.8 and above Version Date: July, 2011
 User Manual Version: 1.1 Software Version: For Access 4.5.8/5.0.8 and above Version Date: July, 2011 About This Manual This document introduces the main function, the user interface and operations of the
User Manual Version 1.1 Date: November 2011
 User Manual Version 1.1 Date: November 2011 Table of contents 1 Getting started 3 1.1 Fingerprint Placement.............3 1.2 Instruction for Card Swipe...........3 1.3 Precautions.................3 2
ZyWALL 10W. Internet Security Gateway. Quick Start Guide Version 3.62 December 2003
 Internet Security Gateway Quick Start Guide Version 3.62 December 2003 Introducing the ZyWALL The is the ideal secure gateway for all data passing between the Internet and the LAN. By integrating NAT,
Upgrading the Server Software
 APPENDIXB This appendix describes how to upgrade or reinstall the Cisco PAM server software, desktop client software, and Gateway module firmware. Contents Upgrade Notes for Release 1.5.0, page B-2 Obtaining
Installation Procedure Windows 95/98/ME with Internet Explorer 5.x & 6.0
 Installation Procedure Windows 95/98/ME with Internet Explorer 5.x & 6.0 Printer Friendly Version [ PDF 240K ] Before You Begin Before proceeding with the installation of a SOHO 6 appliance, you must have
Quick Installation Guide DSL-2540U. ADSL Annex B/Ethernet Router with Built-in Switch
 ADSL Annex B/Ethernet Router with Built-in Switch BEFORE YOU BEGIN Delivery Package Router Power adapter DC 12V/0.5A RJ-11 telephone cable Ethernet cable (CAT 5E) Splitter CD-ROM with User Manual and (brochure).
Facial & Fingerprint Recognition Product
 Facial & Fingerprint Recognition Product Series User Manual Version: 1.1.7 Date: January 2010 About This Manual This document introduces the user interface and menu operations of the Facial & Fingerprint
BF-440/480 4/8 ports serial To TCP/IP Converter Module
 BF-440/480 4/8 ports serial To TCP/IP Converter Module User s Guide 2005 CO., LTD http://www.chiyu-t.com.tw TAIPEI >> TEL:886-2-25491289 CHIAYI >> TEL:886-5-2835460 Table of Content 1. Getting to Know
The Administration Tab - Diagnostics
 The Administration Tab - Diagnostics The diagnostic tests (Ping and Traceroute) allow you to check the connections of your network components. Ping Test. The Ping test will check the status of a connection.
MorphoManager User Manual. Table of Contents
 User Manual Table of Contents Introduction... 4 Support... 4 Overview... 5 What is a client?... 5 What is a server?... 5 What is a fingerprint enrollment device?... 5 What is a MorphoAccess?... 6 What
Quick Start Guide 4/8/16-CH DVR.
 Quick Start Guide 4/8/16-CH DVR 1. Install Hard Drive &DVD Writer 1.1 Install Hard Drive Notice: 1. Support two SATA hard drives. Please use the hard drive the manufacturers recommend specially for security
Contents. Table of Contents
 Table of Contents Contents 1. Web Interface Configuration... 2 1.1 Login Information... 3 1.2 Saving Configuration Changes... 4 1.3 Status Page... 5 1.4 Log... 6 1.4.1 Log Settings... 6 1.4.2 Syslog...
Deployment Guide: Routing Mode with No DMZ
 Deployment Guide: Routing Mode with No DMZ March 15, 2007 Deployment and Task Overview Description Follow the tasks in this guide to deploy the appliance as a router-firewall device on your network with
LevelOne FNS bay/1usb Soho NAS. User s Manual
 LevelOne FNS-1000 1- bay/1usb Soho NAS User s Manual Table of Contents Introduction... 2 The FNS-1000 NAS Server... 2 FNS-1000 Features... 2 Package Contents... 2 System Requirements... 2 Disclaimer...
ACCESS CONTROL SOFTWARE V3.1 REFERENCE MANUAL
 ACCESS CONTROL SOFTWARE V3.1 REFERENCE MANUAL 01/2004 Centaur is a registered trademark of Position Technology INC. Pro-Report, Tracker, FrontGuard and FrontView are trademarks of Position Technology Inc.
Time Reorder Utility User Manual
 Time Reorder Utility User Manual Revisions...3 Introduction...4 Getting Started...5 Running Modes...7 Tray icon menu...7 Enter Password...8 Connections...8 Define Connections...8 Verify Connections...9
Fingerprint Access Standalone User s Manual
 Fingerprint Access Standalone User s Manual V1.1.1 1 Table of Contents 1 Overview... 1 2 Device Structure and Installation... 2 2.1 Device Structure... 2 2.2 Device Installation... 3 3 System Structure...
uface800 Time Clock User Manual uface800
 Innovative Time and Attendance Solutions uface800 Time Clock User Manual Version 3.6.3 uface800 Visit: MidexTimeAndAttendance.com Call: 1-888-544-7878 Email: info@midexsoftware.com /TimeAndAttendanceSoftware
Gigaset Router / en / A31008-E105-B / cover_front_router.fm / s Be inspired
 s Be inspired Table of Contents Table of Contents Safety precautions........................... 3 The Gigaset Router........................... 3 Features and Benefits..................................................
KX GPRS M2M I-NET. User s Guide. Version: 1.0. Date: March 17, KORTEX PSI 3 Bd Albert Camus Tel:
 KX GPRS M2M I-NET User s Guide Version: 1.0 Date: March 17, 2011 KORTEX PSI 3 Bd Albert Camus Tel: +33-1-34043760 e-mail: contact@kortex-psi.fr Revision History Version Date Changes 1.0 March 17, 2011
Programming through Web browser:
 Connection Details Digital Inputs: There are 8 isolated digital inputs. Digital inputs will work from 5V to 24V DC. Every input has LED indications on top. LED will be ON when proper input is provided.
USER MANUAL. 4.3-inch Touch Screen & Palm Attendance Terminal. Version: 1.0 Date: August, 2017
 USER MANUAL 4.3-inch Touch Screen & Palm Attendance Terminal Version: 1.0 Date: August, 2017 I Important Statement Thank you for choosing our product. Please read this manual carefully to avoid damage
USER GUIDE. Preliminary
 USER GUIDE Preliminary Copyright 2009, NITGEN&COMPANY Co., Ltd. All rights reserved. ` Unauthorized reproduction of part or all of this manual s content in any form is prohibited. Product specifications
DI-808HV 8-Port Broadband VPN Router
 This product can be set up using any current web browser, i.e., Internet Explorer 6 or Netscape Navigator 6.2.3. DI-808HV 8-Port Broadband VPN Router 1. Thank you for purchasing this Router to share your
Installation Procedure Red Hat 7 with Netscape 6
 Installation Procedure Red Hat 7 with Netscape 6 Printer Friendly Version [ PDF 285K ] Before You Begin Before proceeding with the installation of a SOHO 6 appliance, you must have the following: A computer
Multi-site Configuration and Installation Guide Port Forwarding Option
 Multi-site Configuration and Installation Guide Port Forwarding Option V1.0 7-24-2006 Overview What this guide covers This guide will assist you in setting up a Wide Area Network (WAN) that allows your
BRIVO ONSITE QUICK START GUIDE 09/14/17
 BRIVO ONSITE QUICK START GUIDE 09/14/17 Welcome to the The intent of this document is to get the Brivo Onsite system up and running as quickly as possible. Please consult the Administrator s Manual for