R. J. O Brien & Associates. RJO WebOE. WebOE User Manual. July 2017 Version 2.4
|
|
|
- Monica Riley
- 5 years ago
- Views:
Transcription
1 R. J. O Brien & Associates RJO WebOE WebOE User Manual July 2017 Version 2.4
2 Contents Getting Started... 2 Tool Bar... 4 The Order Log... 9 Viewing Orders... 9 Quick Cancel... 9 Right Click Context Menu... 9 Viewing Detailed Order Information...11 Risk Summary...13 The Positions and Balances Screens...14 Balances...14 Positions...14 The Quote Grid...15 Option Strike Matrix...18 Theoretical Option Value Calculator...19 Order Entry...20 The Order Form...21 Submitting an order...22 The Market Book...25 The Chart Window...27 Sparklines...36 Settings...37 List of WebOE Keyboard Shortcuts...40 Delayed Market Data Indicators

3 R.J. O Brien WebOE The new RJ O Brien WebOE platform is an exciting new product that we are proud to introduce to our IB community. This program gives you the flexibility and portability of a web based platform, and the account management, order entry, quoting and charting capabilities of a download only platform. We hope that this guide will allow you to get the most of the platform, and help give you the knowledge to make this an important tool in your trading arsenal. Getting Started To get started with WebOE: Contact your RJO Brien broker to start the process of creating a username and password for your account(s). Once your broker provides you with your login information, you can access the platform here: The program is conveniently located in the RJO Portal along with Armor and any other RJO tools you have access to. It can be run using any modern web browser although RJO recommends using Google Chrome. Once you ve logged into the RJO Portal, click on the WEBOE link in the black bar across the top. 2

4 The WebOE Main Screen The main WebOE window is divided into 4 separate areas: The Order Log / Risk Summary Screen This section is located at the top of the screen, and allows you to view different tabs of the order log or risk summary page. Tabs for the ACCOUNT BALANCES screen and ACCOUNT POSITIONS screen can be added by selecting them from buttons on the top to the right of the account field. This is the only screen that can t be collapsed, and is always visible. The Quote Grid By default, the quote grid is located at the bottom of the screen but can be moved to the top from the Settings menu. This section is customizable to show different information dependent on the trader s needs. It also allows easy access to charts, marketbook, and order entry through the right click menu. Notifications Sidebar This section is located on the right hand side of the screen and can be accessed by clicking on the Bell icon to the right of Settings. Notices and Alerts This section is reserved for announcements and alerts from R.J. O Brien regarding margin changes, trading, holiday schedules, etc. Price Alarms This screen is located on the right hand side of the screen under Notices & Alerts and will display any price alarm notifications that the user has set price alerts for. Top Day Activity This screen is located on the right hand side of the screen under Price Alarms and displays current day notifications and timestamps for any top day activity on orders. 3 Sparklines This window is located on the left hand side of the screen small and contains Sparkline charts which give a quick look at the contracts that are listed on your quote page.

5 Tool Bar One other feature of the main screen is the tool bar located at the top of window. This bar contains icons/links to access different features of the platform such as BALANCES AND POSITIONS as well as quick access to SYMBOL LOOKUP, ORDER FORMS, and ORDER TOOLS. The tool bar also contains a Toggle On/Off button for SPARKLINES, QUOTE GRID and the NOTIFICATION SIDEBAR. At the far right, there is a Settings drop down menu. Active Account - Typing an account or selecting one from the drop will populate the corresponding account field in the order entry window. That same account will be used if you click on the BALANCES button or the POSITIONS button. Account Balances - account selected. This button will pull up the ACCOUNT BALANCES screen for the Account Positions - account selected. This button will pull up the ACCOUNT POSITIONS screen for the Symbol Guide - market or exchange. By clicking on the binoculars icon, you can search for a symbol by Order Form dropdown - Gives you access to several order types, your TEMPLATE MANAGER and any templates you have created. Watchlists Gives users the ability to designate which accounts they wish to monitor. Users can toggle between All Orders, My Orders, and custom Watchlists. All Orders will display every order for all accounts the user has access to. My Orders will display only orders the user has entered. Choosing Edit Watchlist will allow users to customize by office, sales code, and/or accounts they d like to view. Note multiple custom Watchlists can be created. 4
")


6 Click on Create New Watchlist Name your Watchlist Enter the Firm, Office and account (if applicable) and click the Add to Watchlist button. You will then see your selection in the grid. Note: this Watchlist is available for your order log and also your Notifications sidebar Watchlist for Top Day Activity. You top day orders watchlist does not need to be the same as your Top Day Activity Watchlist. 5


7 Your new Watchlist is also now available under Print Settings in the Print Watchlist dropdown. If you are selecting this for printing, please be sure to check any other boxes that apply. Refer to the Printing section for more information. 6


8 Tools dropdown Gives you access to the CHART window, SYMBOL GUIDE, OPTION STRIKE MATRIX, THEORETICAL OPTION VALUE CALCULATOR, STATEMENTS & REPORTS, UNPARK ACTIONS AND VARIOUS LINKS. Links will provide access to external websites including proprietary R.J. O Brien websites, various exchanges, regulatory agencies & industry information, the WebOE manual, Margin Guide and Support tools. Toggle Sparkline s Sidebar - Will either open the Sparkline s sidebar on the left side of the screen or close it, depending on the state it s in when you click on this button. Toggle Quote Grid Sidebar - Will either open the Quote Grid sidebar under the order log or close it, depending on the state it s in when you click on this button. Toggle Notifications Sidebar - Will either open the Notices & Alerts/Top Day Activity sidebar on the right side of the screen or close it, depending on the state it s in when you click on this button. Settings - The settings page allows you to change different themes, platform settings, placement of fields on the order ticket, Quote Grid settings and Market Boo settings, among many other settings. Please refer to the Settings section later in the manual for more information. Logout Directly above Settings, you will see your username. If you hover your mouse over it, you will see a menu with LOGOFF being at the bottom of the list. Just click on it to be logged off the platform. Grid Features Please refer to this section for instructions on customizing your grids for the following pages: ALL ORDER LOG TABS RISK SUMMARY QUOTE PAGE POSITIONS All columns on the grid can be relocated, removed, and re-sized. Columns can be sorted by clicking on the column header. 7

9 Float Order Log Order log tabs can be floated by right clicking on any of the tabs and clicking Open Tab as New Window. Each tab can be opened multiple times giving the user the ability to adjust the account watchlist in each screen. Sorting Columns To reverse the sorting order click on the column header. You may also sort columns by hovering your mouse over the column header until a small arrow pointing down appears on the right hand side of the header. Clicking on the triangle will display SORT ASCENDING, SORT DESCENDING Columns, Lock (or Unlock) and Filters. Choosing Lock will lock the columns in place. Filtering Information You can filter the information using the columns by clicking on the dropdown box to the right of the column name. Putting your mouse over the filter option, will open a filter box, allowing you to enter variables for filtering (such as less than, equal than, or equals for numerical variables). If you are filtering a column containing text, check boxes will allow you to select which variables to use for filtering your order log. A quick filter option is also available in the right click context menu, which will give users the ability to filter by the data in the selected field. Multiple quick filters can be added at once. NOTE: If you have any filters on, the name of the column will be underlined on the order log. All filters can be cleared by clicking on the button located in the middle section of the screen between the order log and the quote screen. When no filters are on, the button is disabled. Additional quick Search options are also available on the top of the order log: 8

10 Adding and Removing Columns These grids also have the ability to hide and show columns. TO ADD OR REMOVE COLUMNS FROM YOUR GRID, hover your mouse icon over any column until a small arrow pointing down appears on the right hand side of the header. Clicking on the triangle will show an option for Columns. All column names that have a check next to their name are currently visible on your screen. TO HIDE THESE COLUMNS, click on the checkbox to remove it. To add a column that currently isn t visible, click on the empty check box to add a check. The Order Log The order log will give you access to view the latest order status, as well as the ability to place, modify, cancel and replace orders. The order log now has tabs separating the orders by status for quick viewing. You can still use the All Top Day Orders tab which shows everything on one screen. By default, the order log will give you a list of orders sorted in order of activity time. The latest orders will be displayed on the top of the screen. All columns can be sorted ascending or descending by clicking on the column header. Viewing Orders By default, all orders for accounts you have access to will display in the order log screen and will be arranged by activity time with the most recent at the top. You can sort any column in this screen by clicking on the column header. All columns containing numerical values will be sorted from low to high, columns containing text will be sorted alphabetically. Quick Cancel For working orders, clicking on the red X in the far left column of the order. You can also cancel multiple orders by highlighting them at the same time. To cancel all orders, click on the Select All button located in the middle section of the screen between the order log and the quote screen. Whichever option you choose will pull up a cancel order confirmation screen. You will see the number of highlighted orders in parenthesis next to the Cancel Order text. You can select yes to proceed or no to abort the cancel request. If there are no working orders, this option will be grayed out. Right Click Context Menu Right clicking on the order rows will give you access to many of the WebOE features, as well as giving you options for customizing your order screen. 9

11 Order Actions View Order Details - This pulls up the Order Information Pane for the order selected with the right click. Cancel Order - For working orders, right clicking on the order you wish to cancel will pull up a cancel order confirmation screen. You can select yes to proceed or no to abort the cancel request. You can also cancel multiple orders by highlighting them at the same time. You will see the number of highlighted orders in parenthesis next to the Cancel Order text. If there are no working orders, this option will be grayed out. Replace Order - This pulls up the Order replace screen for the order selected when you right click. If there are no working orders, this option will be grayed out. Unpark Order - This pulls up the unpark order screen for the order selected with the right click. If there are no parked orders, this option will be grayed out. Notify Fill Will mark order as customer notified. Note: this feature is available for brokers only, please contact your administrator to enable. Print Order - This will pull up a drop copy for the order selected with the right click and give you the option to print it. Update FYI Data Allows for user to adjust the FYI data More Actions. Duplicate Order - This creates an exact copy of the highlighted order. Reverse Order - This creates a copy of the order selected except as a sell if the original order was a buy or a buy if the original order was a sell. Continue with the normal entry procedure to send the order in. Account Details (selected account displays in parenthesis) View Positions for Account - This opens the Account Positions screen for the account used in the order selected. View Balances for Account - This opens the Account Balances screen for the account used in the order selected. Quotes & Charts New Market Book - Displays a marketbook for the order you have selected 10

12 Create New Chart - This creates a chart for the product used in the order selected with the right click. Add To Active Quotegrid Tab - This enters a quote for the product used in the order selected with the right click. The quote is entered at the bottom of the current tab, visible in the Quote Grid. Filter Filter Allows users to quick filter whichever field the user has chosen. Note multiple filters can be added through the right click context menu. Refresh Order Log - This will refresh the entire Order Log, pulling the latest information on all orders visible. Viewing Detailed Order Information The Order Information Window While the order screen shows a large amount of order information, orders can be shown at an even more detailed level using the Order Information Pane. TO ACCESS DETAILED ORDER INFORMATION ON A PARTICULAR ORDER, double click on the order s row in the order log screen. You may also right click on any order, and select View Order Details. This page will contain all status updates for a particular order, as well as what time each status change was made. For filled orders, it will also list a breakdown of fill prices. A Fill detail tab is located on the right side of the window to show even further information, including each individual fill price and time of a multi-lot order. Note: if you don t see any details in the right hand pane, you may need to click on the plus sign under Fill Detail. Fill details provides the option to show all fills and group by price for easier view. Note to Brokers: these fills can then be individually notified by highlighting and click notify fill. (Notify fill does not send an alert to a client, it is only as a reference to mark a fill as notified with a timestamp). Rejected orders will show the reject message that was sent from the exchange or the order desk. 11
13 The Order Information window also allows you to modify certain orders. For example, a working order s information window will allow you to cancel or replace orders by clicking on the corresponding buttons. A filled order will give you the option to reverse the order, allowing you to instantly place an order for an offsetting position. A parked order will allow you to un-park the order, sending it into the exchange. You can also cancel a parked order from this screen. Center Screen Menu Bar When you open WebOE for the first time the order log is on the top half of the screen and the quote page is on the bottom half, separated bar a narrow menu bar. There are several features available here. Page This feature displays the page number you re currently viewing. If you have multiple pages on your order log, it will allow you to click through each page one at a time or quickly go to the opposite end. Refresh Clicking the refresh button will refresh your order log Pause Updates The order log is a dynamic, constantly refreshing window. If you ever need to pause the order screen from updating, click on the Pause Updates button located in the middle section of the screen between the order log and the quote screen. To resume, press Resume Updates. Disable Filters If you have any filters on your order log, the button will be red. will disable all filters and the button will be grayed out. Clicking this button Reset Sort By default, the order log is sorted by Activity Time descending and the Reset Sort button is grayed out. If you have a custom sort applied, the Reset Sort button is bright green. T remove the custom sort and go back to the default, click on the button. 12
14 View Order Details If you have a row highlighted in the order log, clicking on this button will bring up the order details. You can also access the order details by double clicking on the row in your order log. Select All Clicking Select All will select all orders on your log. They will all be highlighted gray/ Notify Order Brokers (only) can request this feature be added by contacting rjohelp@rjobrien.com. In order to use this feature, highlight a fill and click on Notify Order. It will mark the order in the database will a timestamp indicating when you called the customer with the fill. It does NOT actually send the fill to the customer. Grid Settings and Order Log Export For your convenience, we have the ability to export your log to a CSV file. This feature is available across all order log tabs. Export CSV (selected columns) will only export the columns you see on your screen. Export CSV (columns) will export every column available in the database. Restore Grid to Default Configuration will remove and settings that you changed and restore it back to the default settings. Risk Summary The risk summary screen gives you a quick view of account margin information. This is a useful tool for Brokers and Clients alike to keep track of and manage account s total cash, risk margin, and the change in accounts value based on current day activity. The screen updates account portfolios and uses current prices and intraday span to calculate risk and mark to market profit loss. Sorting, Filtering, Adding and Removing Columns Please refer to the Grid Features section on page 6 for detailed instructions. 13

15 The Positions and Balances Screens The positions and balances screen allow you to pull up your latest account information without leaving the WebOE window. These screens update as you trade to reflect the latest account data. The screens can be accessed in multiple ways inside the platform. With an active account selected, click on the Account Balances button or the Account Positions button within the tool bar. TO ACCESS THE PAGE THROUGH THE ORDER LOG, right click on an order and select View Positions or View Balances for Account. These options will bring up the positions or balance screen for the account linked to that order. TO ACCESS THROUGH THE RISK SUMMARY PAGE, right click on the account in the risk summary page that you would like to view position or balance information on, and select which screen you would like to appear. A new tab will open, displaying the position or balance data. Opening the positions or balance screens will create a new tab in the order log showing the position or balance information. If you would like to close this screen, click on the X button in the top right hand corner of the Positions or Balances tab. Balances The balances page will display the chosen account s settlement data as well as a real-time current estimate. Please note this page will auto-refresh every 60 seconds and will display a last update in the upper-right hand corner of the screen. Positions The Positions page will display a near to real-time position details on the active account. By clicking on the + to the left of the position, users can view all open trade details contributing to the position. The right click menu bar will allow users to Flatten Positions, Roll Positions or Refresh Positions. Once Flatten Position is clicked, the user will be directed to the order entry box to complete the transaction. Roll Positions will provide available spreads; once user has chosen the spread to roll the contract, the order entry box will populate for the user to complete the 14

16 transaction. Refresh will update the position page. Please note, this display does not autorefresh and the last updated time is displayed in the upper right-hand corner of the page. The Quote Grid Depending on what you subscribed to, the quote grid allows you to access real time or delayed quotes wherever you have an internet connection and a compatible Web Browser. The quote grid is also completely customizable, allowing you access to a personalized quoting system each time you log in. Please refer to the Grid features section of the manual for more information. Adding and Removing Quotes TO ADD A QUOTE TO THE QUOTE PAGE, select future or option from the first menu at the bottom of the quote grid. If you choose option, two additional boxes will be added. Next, select a symbol by using the symbol finder icon (binoculars) or by typing the symbol and contract (month/year) in the second and third drop down menus. If you begin to type the symbol, or the name of the contract, the dropdown menu will filter to only contain results matching what you have typed. If there are multiple pages of results, the buttons at the bottom of the list will help you view the data. If you are entering a futures quote, you can click the add button at this time. For an options quote, you will also need to enter a strike in the fourth column, as well as select put or call in the fifth before clicking on the add button. Any new quotes added through this process will be added to the list below the previously added quotes. 15
17 To roll an existing quote to the next contract month, right click on the quote s row, and select Change Contract. This is an easy way to keep the quote current without having to go through the process of removing the quote and re-adding the new contract in two steps. Like the Order Log, the quote grid can be customized in a number of ways. Adding and Removing Tabs Tabs can be added to your quote grid to group your quotes in ways convenient to you. TO ADD A NEW TAB, click on the green plus sign which is the Add new tab button. A pop-up box will appear allowing you to rename your new tab. Once you have entered a name, click OK. Once the tab is created, you can add quotes to it by selecting it (clicking on the tab) and using the quote adding procedure listed in the adding quotes section. TO REMOVE AN EXISTING TAB, you can click on the X Button located in the upper right hand corner of the tab or right click on the tab itself and select Close tab. TO RENAME A TAB, right click on the tab and select Rename. A pop-up will ask you to type a new name for the tab. Hit ok to select the name entered. TO ROLL AL CONTRACTS ON A SPECIFIC TAB, right click on the tab and select Roll All Tab Contracts. You will be given the option to roll to previous expirations or next expirations. Floating Tabs Quote grid tabs can be floated by right clicking on any of the tabs and clicking Open Tab as New Window. Each tab can be opened into an external window.right Click Menu 16

18 Quote Page Right Click Context Menu Like the order log, right clicking on rows in the quote page will give you access to many of the WebOE features, as well as giving you options for customizing your quote log. Below is a list of different options and features you can access. Create Order - This creates an order screen using the symbol selected with the right-click. Create Order for spreads (single line entry) is also available via right click menu bar Buy On Market - This creates a buy order screen with market order selected, using the symbol selected with the right click. Buy On Bid - This creates an order screen with a limit order selected at the bid price, using the symbol selected with the right click. Sell On Market - This creates a sell order screen with market order selected, using the symbol selected with the right click. Sell At Ask - This creates a sell limit order at the current ask price, using the symbol selected with the right click. New Marketbook - This opens the marketbook using the symbol selected. New Chart - This opens a daily chart using the symbol selected with the right click. New Option Strike Matrix -This will pull up an option strike matrix using the symbol selected with the right click. Add Contract - With a quote selected, hover the mouse over Add Contract and all additional months will be displayed. Select one to add a new quote to the grid. Select a Contract This will open the Symbol Finder which will allow you to select a contract by Market or Exchange, then selecting symbol and the specific Contract Change Contract - With a quote selected, hover the mouse over Change Contract and all available months will be displayed. Select one to change the contract for the row you have highlighted Add Strike - With an option quote selected, hover the mouse over Add Strike and available strikes will be displayed. Select one to add a new quote to the grid. Change Strike - With an option quote selected, hover the mouse over Change Strike and available strikes will be displayed. Select one to update the strike price on that row in the grid. Add Call (or Put) With an option quote selected, hover the mouse over Add Call (or Put) and available strikes will be displayed. Select one to add the new option quote to the grid. Change to Call (or Put) - With an option quote selected, hover the mouse over Change to Call (or Put) and all available months will be displayed. Select one to add to the quote grid. 17

19 Price Alarm Editor Gives users the ability to add a price alert for a contract by designating the price level or range in which the user would like to be alerted. If you have an alarm set, you will see the alarm icon in the far left column for that contract in your quote page. Remove Row - The selected quote will be deleted and all quotes below will move up one row. To remove multiple rows, highlight multiple rows and hit remove row. Insert Empty Row - With one row highlighted select Insert Empty Row and a blank row will be added. Refresh - This will refresh the entire quote screen, pulling the latest quotes from the exchanges. File Export and Grid Settings The Quote Grid export will allow users to export all or selected static data on the quote grid tab to an excel spread sheet by clicking on the gear button on quote page. Restore Grid to Default Configuration will remove and settings that you changed and restore it back to the default settings. Option Strike Matrix The Option Strike Matrix displays the selected futures contract strikes' call and put market data. The window is divided vertically by the Strike Price column where the call data is on the left and the put data is on the right. To access the OSM, select Option Strike Matrix from the Tools menu bar. To add a contract, either enter the future contract and month year or click the symbol lookup icon in the upper left hand corner of the grid. 18
20 Additional column headers including theoretical / Greek values are also available through the column headers menu bar. Additionally, column headers can be rearranged by dragging and dropping the location. The right click context menu provides further options including refresh, quick order entry, the theoretical option value calculator, and opening additional quoting features. Auto-refresh is set on the option strike matrix to automatically refresh every 20 seconds. The Range feature in the upper left hand scorner above the grid will allow users to change the number of strikes that load on the screen. The default is set to 25. The Option Strike Matrix can also be floated and made independent of the Order Log by clicking the Unlock into separate window icon in the upper right-hand corner of the grid or by clicking on the tab itself and selecting Open tab as new window. This option will allow for the OSM to float or pop-out from the web browser and be moved freely between monitors. Note an additional customization is available in the Order Log Settings to always open the OSM as an external window. Please be aware the floating window will not be remembered in the layout after log-off. This setting may be available in a later release. Theoretical Option Value Calculator The Theoretical Option Pricing Calculator can be used to evaluate the dynamic relationships between the value of an option and the factors which affect that value. Once you have entered the parameters of the option evaluation model, the calculator will provide a theoretical value and the option Greeks for the call or put option you are valuing. The calculator can be displayed from the context menu of either the Option Strike Matrix or Quote Page as well as from the Tools menu. 19
 button or it can be manually entered by typing the contract information and clicking the Load button.")
21 When opening this tool from the Order Tools menu, it comes up blank. The Option Contract can be selected by utilizing the Symbol Finder (binoculars) button or it can be manually entered by typing the contract information and clicking the Load button. The calculations are performed using the Future's Last. A custom underlying futures price can also be manually entered into this field. Currently all theoretical calculations are based upon the Black76 model. The other Calculation Parameters are entered by the system depending upon the selected contract. They may be overwritten by entering a value in the corresponding text box. Order Entry The order form is accessible from many areas within the platform, and provides an easy, straightforward way to enter orders. The MARKET BOOK contains a depth of market view that allows trades to be entered quickly using the price ladder. The OPTION STRIKE MATRIX displays market data for all strikes for a specific contract. This section of the manual will reference accessing the order form, MARKET BOOK and the OPTION STRIKE MATRIX through the tool bar across the top of WebOE window. 20

22 The Order Form To open a new order form, click on the Order Form icon located on the tool bar. By default an order form for a single futures day order will be created. Note: There are several ways to customize the order ticket under the Settings menu. The Entry Fields Account - this field is where a user selects an account that he will be using to place an order. The account can be selected by: Clicking the drop down menu, and left-clicking on the account. Starting to type the account number, which will auto fill the account. Once the correct account is highlighted in the dropdown, click on the account number, or press the tab key. It can also be selected using the active account list, located on the toolbar. The account selected there will automatically be entered into the order form when a new one is created. Account Balances - This button will pull up the account balances screen for the account selected. Account Positions - This button will pull up the account positions screen for the account selected. Fut/Opt - From this field, you can select whether the order will be a futures or option order. The default is Future. To select option, left click on the dropdown and select option. Whichever is selected will effect whether certain fields are available. Duration - From this field, you can select whether the order is a day order or a GTC (Good till Cancel) order. 21
23 Single/Spread - This field allows you enter a spread order by selecting how many legs this order contains. If more than one leg is selected, new fields for PREMIUM SIDE and PREMIUM are created. These pertain to spread limit and stop orders. You can select the premium side by left clicking on the drop down menu, and selecting buy, sell or even. If you select buy or sell you will also have to enter a premium in the text box. Note single leg spreads are available for calendar spread order entry. This will also display the quote snapshot in for the spread. Buy/Sell - This field will allow you to select whether the order is a buy or sell order. Quantity - Enter the quantity of the order in this text box. Symbol Guide - If you are not familiar with a products symbol, you may use the binoculars button to find it through a list of products. The products can be sorted by exchange or market. The Symbol Finder also has a Future/Option dropdown in the upper right hand corner. Symbol - This field is for entering the symbol for the product. To select a symbol: You can start to type the product s name or description and the system will attempt to auto fill the requested product, showing you a list of symbols to choose from. Once the correct symbol is highlighted in the menu, click on it or press the tab key. Month/Year - This field will allow you to select the month/year associated with the contract you ve selected. The menu will show only the months available for the contract selected. Order Type - Next, an order type must be selected. Note: the choices in this drop-down will change dynamically based on the permissions of the selected symbol. Price - You can type the price directly into this field, or using the Snap quotes window right below the order fields, click on any of the prices in that box to fill the price field with that number. If you selected market as your order type, this field will not be available. Account NVL Displays the account net liquidating value for the active account. Can be enabled/disabled under Order Form Settings by clicking on the gear icon next to the Reset Form button. Margin Exc/Def Displays the account margin excess or deficit for the active account. Can be enabled/disabled under Order Form Settings by clicking on the gear icon next to the Reset Form button. Submitting an order Once the necessary fields are filled out on the order screen, you have several options to choose from. 22 Reset Form - This will reset all fields to the default value. Order Form Settings By clicking on the gear icon, you have quick access to the Order Placement Settings Create Template - In the process of a given day or period of time, a user may need to execute many fundamentally similar trades. To facilitate this activity, templates for orders

24 can be stored/recalled by the user. With an order ticket partially or fully populated, clicking CREATE TEMPLATE will pop up a SAVE ORDER TEMPLATE box prompting you to name the template. Once you name it and click save, the order forms information is saved to the Order Template Manager. The Order Template Manager can be found under the Order Form menu across the top of the screen. Keyboard shortcuts will also be created for each template you create and can be seen in parenthesis next to the name you gave the template in the Template Manager, i.e. ZSX17 (ctrl+shift+1). Add to Grid The Add to Grid button allows a user to set up multiple orders and then send them in simultaneously at a later time. You can also enter any part of an order to the grid and change it from the grid. Keep in mind that when you add orders to the grid, they have not been submitted and if you log out, the orders on the grid will be erased. Park Order - This will send the order to our server and save it, but not send to the exchange. Parked orders can be seen on your Order Log screen with a status of PRK. To submit the parked order, right click on one or several parked orders in the Order Log and left click Unpark Order. If you have multiple parked orders selected, you will see the number in parenthesis next to UNPARK ORDERS. This will send all the parked orders to the exchange at once. To cancel parked orders, click on the red X in the first column next to the order or right click on the order and select Cancel Order. Parked orders will remain parked until either submitted or cancelled, even after the contract expires. Submit Order - Once the order ticket is filled out, clicking submit order will bring up a SUBMIT CONFIRMATION WINDOW. This gives one more opportunity for reviewing the order before submission. If you want the order to go into the market, click the Submit button or use the F7 to send it. If you would like to cancel the order submission, click Abort. The order is not sent to the exchange until the submit button is clicked. Snapquotes The Snapquotes window will give a current snapshot quote of the contract specified in the order screen. It also allows you to fill in the price box by left clicking on a price listed in the snapquotes screen. This will fill in the price field with that price. 23

25 Template Manager A trader who often places similar orders can use the Order Template Manager to create and save templates for easy access. To create an order template, open a new order form, and fill out any information on the order form that you would like to have saved. For example, you can create a template for 1 lot GBX corn order by entering a quantity of 1 in the Quantity field, ZC GBX CORN in the Symbol field, and clicking the Save Template button. After clicking Save Template, you will be asked to enter a name for this order template. Type a name for this template in this field and click OK. To access the order template manager, click the Order Form drop down menu on the Tool Bar, and select Template Manager from the list. Once you have created order templates, they will be displayed here. You will see a keyboard shortcut at the bottom of the Order Form context menu for each template you created. To use order templates: Once an order template is created, it can be accessed in a few different ways. From the Order Form dropdown menu, the user can click on a template and it will automatically populate a new order with the template you saved. From the Order Template Manager, double click on the template name you want to use or right click on the template name and select Populate Order Form. For quick access, each order template is assigned a number automatically when it is created. This number is viewable in the order template manager to the left side of the template name. If you know the template number, you can quickly pull up the template by holding down the Ctrl Key and Shift Key and then typing the number associated with the template. The Ctrl/Shift shortcut code is also displayed with the templates at the bottom of the Order Form dropdown menu. To remove or rename a previously created template, open the Order Template Manager, and right click on the template that you would like to remove or rename. You will see a menu that allows you to select Populate Order Form, Rename Template or Remove Template. 24

26 The Market Book Another tool for entering orders is the MarketBook. If you signed up for real time quotes, the Depth of Market ladder displays a real time view of the bids and offers in products tradable through WebOE. It provides the fastest way to enter an order through the platform. The following functionality has been added to the new Market Book: Straight Option orders and Future Spread orders Working buys and working sells columns added Drag and drop CXL/RPL functionality added to working columns for total quantity Added multiple tabs User selectable right click order functions on bid/ask columns Cancel functionality on page bottom as seen or by right clicking on the Working Buys or Sells The available fields on the MarketBook screen are listed below. These fields allow you to select the product, as well as the quantity of orders placed through this screen. Account The account can be selected by: Clicking the drop down menu, and left-clicking on the account. Starting to type the account number, which will auto fill the account. Once the correct account is highlighted in the menu, click on the account number, or press the tab key. It can also be selected using the active account list, located on the toolbar. The account selected there will automatically be entered into the MarketBook when a new one is created. Quantity Enter the size of your orders in this text box. Left Click on the box and type the numerical amount. FutOpt Click the drop down menu, and left-click either Future or Option Symbol To select a product or symbol: Click the drop down menu, and left-click on the correct product in the list. 25
27 Begin typing the product symbol, name or description, which will autofill a selection to choose from. Once the correct symbol is highlighted in the menu, click on the product, or press the tab key. If you are not familiar with the correct symbol for a product, there is a symbol finder button (binoculars) which will allow you to select the correct symbol from a list. Month/Year The menu will show only the months available for the contract selected in the symbol field. To select a month/year, left click on the field and then left click on the month you re requesting. The screen updates automatically as soon as you ve populated the required fields or when you change existing symbol or month/year. There is also an AUTO CENTER check box on the bottom right side of the window which allows you to keep the price ladder centered on the last price. Since the Marketbook contains real-time data, the last price can quickly change, and when this check box is clicked it will keep this price in the center of the ladder pane. You can see the last Update time in the bottom center of the market book window. The Market Book can also be FLOATED and made independent of the WebOE homepage by clicking the Unlock into separate window icon in the upper right-hand corner of the grid. This option will allow for the market book to float or pop-out from the web browser and be moved freely between monitors. Please be aware the floating window will not be remembered in the layout after log-off. This setting will be available in a later release. Submitting an order from Market Book Placing an order using the market book can be done in a number of ways. To place a market order, fill out the account, symbol, month/year and quantity fields and click either the Buy MARKET BUTTON or the SELL MARKET button. Once you click either button, a SUBMIT CONFIRMATION window will pop up. This gives you an opportunity for reviewing the order before submission. Click the Submit Button to send the order into the Exchange or click Abort to cancel the transaction and close the order confirmation window. The order is not sent to the exchange unless the submit button is clicked. To place an order from the ladder, you can right click on either the Bid Qty or the Ask Qty for available orders that can be entered. Click on the type of order you d like to enter to bring up the SUBMIT CONFIRMATION window. This will give you an opportunity to review the order before submission. Click the Submit Button to send the order or click Abort to cancel the transaction and close the order confirmation window. The order is not sent to the exchange unless the submit button is clicked. 26


28 To place a limit order using Double Click Trading, you must first find the limit price on the price ladder. TO PLACE A BUY LIMIT ORDER, double click in the bid column on the row containing your requested limit price. To place a sell limit order, double click in the ask column on the row containing your requested limit price. You will receive a SUBMIT CONFIRMATION window. Click the Submit Button to send the order into the Exchange or click Abort to cancel the transaction and close the order confirmation window. The order is not sent to the exchange unless the submit button is clicked. The Chart Window One important tool for trader is charting software. The initial version of our new charting package will allow for futures, future spreads and option charts. Additional features will be added in the months to come. Charting through WebOE can be accessed in a number of different ways. In the toolbar, click on Tools and select New Chart Window. Using keyboard shortcut (Ctrl +Shift + C) Right clicking on an order in the order log, and then selecting Create New Chart. Right clicking on a quote in the quote grid and selecting New Chart from the drop down menu. 27


29 Click on the Sparkline located on the left hand side of the screen, then double clicking on the desired chart to open a new enlarged chart window. The Chart Window can also be FLOATED and made independent of the WebOE home page by clicking the Undock into separate window icon in the upper right-hand corner of the grid. This option will allow for the chart window to float or pop-out from the web browser and be moved freely between monitors. Please be aware the floating window will not be remembered in the layout after log-off. This setting will be available in a later release. Customizing Charts Once the chart window is opened, you will see various fields which allow you to customize the chart. To select your contract you can either use the symbol finder icon to search or manually add the contract. For Continuous charts, left click on the contract box, select % Continuous and click Load Chart. If you know the symbol or product description, you can quickly populate by first selecting future or option in the first drop down window. Then select your products by entering in the symbol or the contract description for a drop down menu of applicable products. The contract field will then allow you to select the month and year for the product. Then click Load Chart. If you wish to look up the symbol/product, use the Symbol Finder icon new window and will allow you to filter by either Market or Exchange. which will open a Once you have highlighted the contract, you can either double click or click select in the bottom right hand corner to load the chart. 28

30 Spread Charts To view a spread chart, first select the symbol. Then, in the Contract box you will either select the spread months from the drop down box or you can type in the contract month symbols with a hyphen in between. Option Charts You can access options charts the same way you would access futures charts. From the quotes board, right click on the options quote and select New Chart. Or from the Options Strike Matrix, locate the strike price, then right click on the Call or Put and select New Chart. Please note: Option spread charts are not available at this time. 29


31 Chart Settings To utilize the tools across the top of the chart, first hover over the icons to see the name of the tool. Click the icon for a menu of available features. Once the contract is selected, click the CHART PROPERTIES icon to customize. Here the chart type, style, and color can be adjusted along with price scales and time settings. 30

32 Chart Types The Chart Type can also be selected within the Chart Properties under Style as shown in the screenshot above. The following page shows the types of charts available. 31
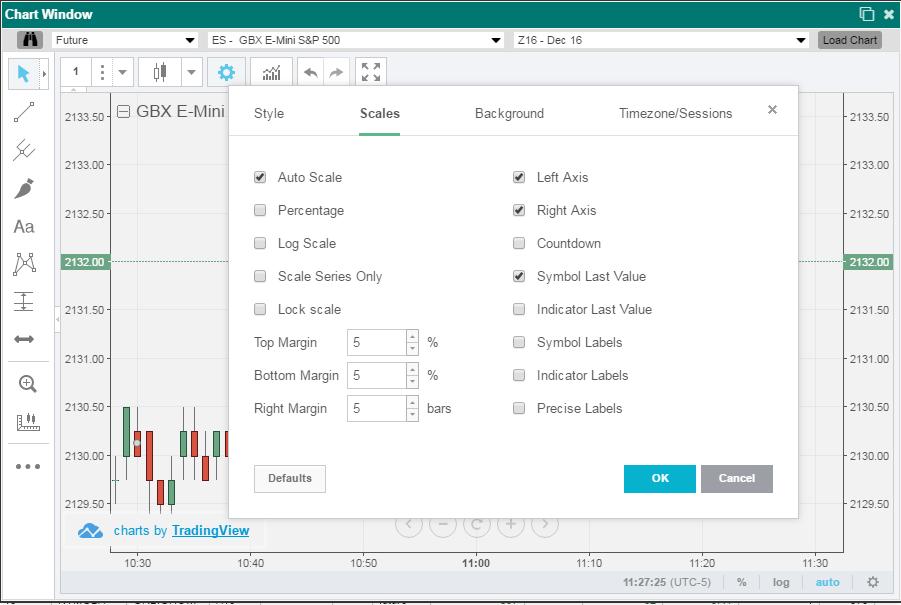
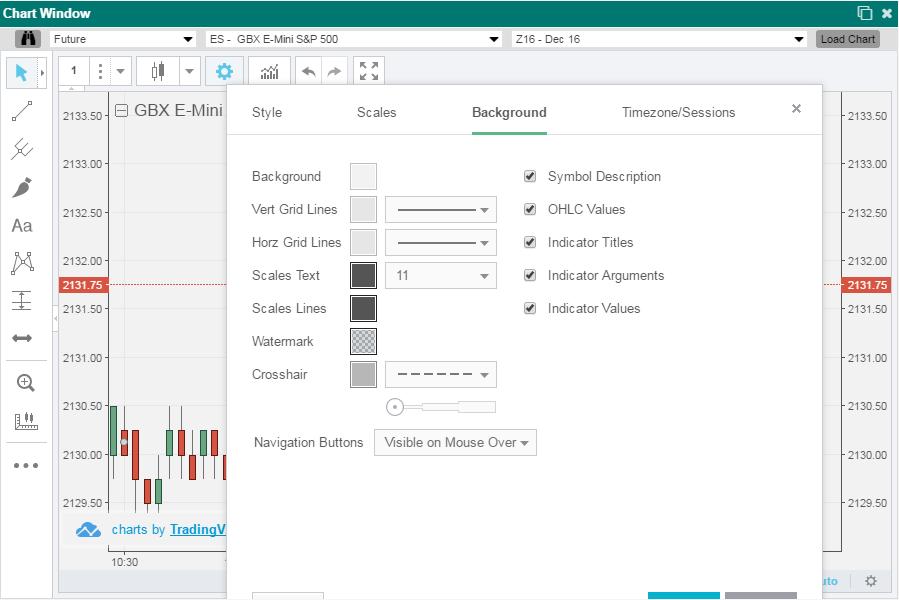
33 Scales Background 32


34 Time zone/sessions Chart Indicators Multiple Chart Indicators such as Bollinger Bands, Moving Average and RSI are available. Left click the chart icon to view the list of indicators. Left click the indicator you d like included on the chart. Once the indicator is selected, the variables can be adjusted. Below is a sample of some of the indicators available. The chart shown has Bollinger Bands included. 33

35 Drawing Tools Many drawing tools are available on the WebOE charts. These tools can be applied to the charts and used to analyze markets and spot potential opportunities. Below is a screen print of the drawing tools icons on the left side of the chart. The next page shows an index of the available drawing tools, as well as other icons included on the WebOE charts. Pointer Tools Select the type of pointer tool to use within the chart. Trend Lines Apply Trend Lines to point out different entry/exit points. Pitch Fork Technical analysis tool Drawing Tools Different shapes can be applied to charts to point out trends. Text - Add notes to charts Chart Patterns Use Patterns tool to discover developing market trends. Positions/Forecasting Used to forecast long/short positions Icons Add icons to charts Zoom Zoom in/out of charts. Measure Date/Price range Hidden Tools Lock, Hide or Remove Drawing Tools 34
36 Drawing Tools Index = Pointer Tools: Choose Cross, Dot, Arrow or Eraser = Types of Trend Lines: Choose between Trend Angle, Horizontal Line, Vertical, and many more = Types of Pitchforks: Schiff Pitchfork, Inside Pitchfork, Gann Box and more. = Drawing tool / Shapes: Brush, Rectangle, Ellipse and more = Text, notes and callouts = Price Patterns: XABCD, Cypher, ABCD & Triangle Patterns = Long/Short Positions, Forecast, Bars Pattern and Date/Price = Icons = Zoom In/Out of charts = Measure date/price range and market movement. = Hidden Tools keeps the chart in drawing mode, as well as locks/hides/removes drawing tools = Go Back/Forward = Full Screen = Chart Type 35 = Unlock/Float chart to other screens

37 Sparklines One of the default panes available on WebOE is the Hourly Sparklines pane. This contains a small, concise and quick chart view of market data. These Sparklines are directly correlated with the quotes you have on your Quote page. To Access the Sparklines, you can click the Sparklines button located on the tool bar. This will slide the sparklines pane out from the left hand side of the screen. To add a Sparkline to the Sparkline window, just add a quote to the current quote tab. This will cause the sparkline to appear whenever that tab is selected. 36

38 Settings From the Settings menu, you can configure various screens in the way that is most helpful to you. Select Language Allows users to change from default English language to Japanese, simplified Chinese, or Spanish/Latin American Order Form Settings Default Order Type allows you to set the default order type to Limit, Market, Stop or Stop Limit Default Duration allows you to set the default to Day or GTC Clear After Submission - allows user to choose the information displayed in the ticket after placing an order including closing or clearing the ticket, retaining order data, account, or office, and restoring active account or default order template. Include Account NLV & Margin E/D adds two fields to the bottom of the order ticket and displays the data for the active account Auto-Populate Last Price - The Price field is set to the last traded price for that contract Tab from Account Number to Buy/Sell field Not checked - tabs from account number to Fut/Opt field Checked - tabs from Account Number to Buy/Sell field Reverse Symbol and Month Year fields - Changes the layout of the fields on the order entry ticket to Buy/Sell, Quantity, MonthYear, Symbol (default is Symbol, then Month/Yr). Reverse Order Type and Price Fields - Changes the order of these two fields. Show Order Detail Panel - Extends the bottom of the order ticket to display all top day orders for the selected account. Right click menu gives the same options as on the All Top Day Orders tab. Open All Order Forms as External Windows - Opens order ticket as a separate window, allowing multiple tickets to be open at the same time. You will also be able to move them out of the WebOE screen. Enable Extended Order Entry Fields - Adds Giveup, DRT, FYI and OB fields to the bottom of the order ticket. These need to be permissioned by an RJO Admin. Enable Modal Order Forms Checking this box will display the order ticket in front with a grey background preventing you from interacting with the rest of the application until you enter an order or close the ticket. This only works if you do not have Open All Order Forms as External Windows checked. 37
39 Order Log Settings Show Quick Filter Panel - If checked, it shows the panel right above the order log, unchecked removes it Open Option Strike Matrix as an External Window Automatically opens the option strike matrix as a separate window, allowing multiple OSM windows to be open at the same time. You will also be able to move them out of the WebOE screen. Order Detail Settings Detail Order History This setting displays the ActivityCode with each event in the history of the order. Include Full Order Chain- This setting stacks all previous replaced orders for the original order of this thread into detail order history. Order Confirmation Settings Confirmation Window Simple Confirmation- uses the standard default confirmation window Ticket Confirmation- uses a ticket format confirmation window Notification settings Watch Activity - Check either All Orders or My Orders Only Visual Alerts - AUTOMATICALLY EXPAND NOTIFICATION PANEL opens the notification window in the upper right hand corner whenever an alert or announcement has been posted Audio Alerts Play Fill Alerts plays a specific sound file when an order is filled Play Notice Alerts- plays a specific sound file when an alert is posted Play Order Entry Alerts- plays a specific sound file when an order is entered Play Price Alarm Alerts Play Reject Alerts- plays a specific sound file when an order is rejected Play Review Alerts- plays a specific sound file when an order needs to be reviewed (brokers only) Play Disconnect Alerts plays a specific sound file when the platform disconnects from the server Application Alerts Preference to suppress logoff popup when closing WebOE or browser Bid/Ask Default This setting gives the option to make quote page defaults. If Buy on Bid, Sell at Ask is checked and you double click on a bid in the quote page, a ticket will pop up with a buy limit order with the bid price populated. If Buy on Ask, Sell at Bid is checked and you double click on a bid in the quote page, a ticket will pop up a sell limit order with the bid price populated 38

40 Marketbook Settings Default Quantity Type quantity or use up/down arrows for default quantity on market book orders Collapse Gaps Removes (hides) any price gaps in the ladder Auto Center When this check box is clicked it will keep this price in the center of the ladder pane. Layout QUOTEGRID ON TOP puts the quote grid on the top half of the screen QUOTEGRID ON BOTTOM- puts the quote grid on the bottom half of the screen Note: The quote page can be resized by dragging the line in the center between the order grid and quote page. Sparkline Options HIDE EMPTY SPARKLINES SHOW EMPTY SPARKLINES Set Timezone Allows the following time zone changes within the platform: Hong Kong London Chicago UTC New York Local 39
41 List of WebOE Keyboard Shortcuts Create a futures order form Create an option order form Create New Marketbook New Chart Window Symbol List Option Strike Matrix Statements and reports View Symbol Guide Toggle Sparklines Sidebar Open specific order template (Ctrl+Shift+F) (Ctrl+Shift+O) (Ctrl+Shift+M) (Ctrl+Shift+C) (Ctrl+Shift+L) (Ctrl+Shift+X) (Ctrl+Shift+R) (Ctrl+Shift+G) (Ctrl+Shift+S) (Ctrl+Shift+ 0 ) where 0 = template number 40


42 Delayed Market Data Indicators Delayed market data indicators in WebOE have been enhanced to be more visible to users. There are four places delayed market data may appear: the Quote Grid, the Order Form, the Market Book, and the Option Strike Matrix. An example of each is shown below. Contract appears italicized with (D) if market data in the Quote Grid is delayed Last Trade Time will be at least 10 minutes delayed for delayed market data Quote Type column can be selected by clicking on the column header dropdown and selecting Columns. R = Real-Time, D = Delayed Order Form Time appears bolded and in red with (D) if market data in the Order Form is delayed Time will be at least 10 minutes delayed for delayed market data 41

43 Market Book Time appears in red with (D) if market data in the Market Book is delayed Time will be at least 10 minutes delayed for delayed market data Market Book will only display best bid / best offer for delayed market data due to CME rules that depth is not available for consumers of delayed market data 42
RJO Armor Quick Start Guide. Armor Customer Role User Guide
 RJO Armor Quick Start Guide Armor Customer Role User Guide OCTOBER 2015 Contents I IIQ v1 vs. Armor... 2 II Armor Screen Details... 4 To View Account Balances and Positions:... 4 To Monitor Accounts Risk:...
What is DealBook WEB?
 What is DealBook WEB? DealBook WEB helps you trade quickly from anywhere you can connect to the Internet. A browser-based application, DealBook WEB provides a simple platform for beginning traders as well
SaxoTraderPRO Intro guide
 SaxoTraderPRO Intro guide Table of Content SETTING UP THE WORKSPACE... page 3 SAVING AND MANAGING WORKSPACES (latest edition).............. page 7 WATCHLIST MANAGEMENT... page 8 OPENING ONE OR MANY CHART
QST Mobile Application for Android
 QST Mobile Application for Android Welcome This guide will familiarize you with the application, a powerful trading tool developed for your Android. Table of Contents What is this application? Logging
SaxoTraderPRO Intro guide
 SaxoTraderPRO Intro guide Table of Content SETTING UP THE WORKSPACE... page 3 SAVING AND MANAGING WORKSPACES... page 7 WATCHLIST MANAGEMENT... page 8 OPENING ONE OR MANY CHART MODULES... page 10 TRADE
BTS Trading Station. Quick Reference Guide Cash Markets
 BTS Trading Station Quick Reference Guide Cash Markets Contents Quick Reference Guide 1.0 Getting Started 4 1.1 Application Layout 4 1.2 User Login and Password Management 4 1.3 Default Set Up 5 1.4 Virtual
Table of Contents 2 QST MOBILE APPLICATION FOR IPHONE
 Table of Contents What is this application? Logging in Login screen Login options Entering and viewing contracts Pages Contracts About Quote Detail page Contract Details Symbol Search Block Trades Charts
RHB Futures QST. - Desktop Application User Guideline
 RHB Futures QST - Desktop Application User Guideline RHB Futures QST Desktop Application Features : Multiple tabbed workspaces allow one or more internal frames. Frames can be pulled into external windows
Numbers Basics Website:
 Website: http://etc.usf.edu/te/ Numbers is Apple's new spreadsheet application. It is installed as part of the iwork suite, which also includes the word processing program Pages and the presentation program
Secure Guard Central Management System
 Speco Technologies, Inc. Secure Guard Central Management System Usage Information Contents 1 Overview... 7 2 Installation... 7 2.1 System Requirements... 7 2.2 System Installation... 7 2.3 Command Line
Contents 1. INTRODUCTION OVERVIEW GETTING STARTED... 7
 sin 2.9 Contents 1. INTRODUCTION...4 2. OVERVIEW...6 3. GETTING STARTED... 7 3.1 INSTALLING PROFIT... 8 3.2 LOGGING IN TO PROFIT... 9 3.3 FUNDING YOUR PROFIT ACCOUNT... 10 3.4 VIEWING THE PROFIT WORKSPACE
CME E-quotes Wireless Application for Android Welcome
 CME E-quotes Wireless Application for Android Welcome This guide will familiarize you with the application, a powerful trading tool developed for your Android. Table of Contents What is this application?
Electronic Sales Platform User s Manual
 Electronic Sales Platform User s Manual Version 1.1 2018 St. Petersburg 2 CONTENTS Preface... 3 1 Introduction... 4 1.1 Workstation Requirements and Settings... 4 1.2 Starting application... 5 2 Summary
The DTN Portal. Offer Management System with Hedging. User Manual
 The DTN Portal Offer Management System with Hedging User Manual The DTN Portal Today s Environment Makes it Difficult to Manage Offers Increased market volatility Frequent basis changes affecting cash
Akkadian Console 4.0
 Akkadian Console 4.0 User Guide Copyright and Trademarks: I. Copyright: This website and its content is copyright 2015 Akkadian Labs, LLC. All rights reserved. Except with the prior written permission
TECH REAL MT4 USER GUIDE
 TECH REAL MT4 USER GUIDE 1. MetaTrader 4 Interface 2 2. Trading Instrument 3-7 3. Trading Categories 8 4. Trading 9-16 5. Stop-loss Position 17-18 6. Chart 19 7. File 20 8. View 21-35 9. Insert 36 10.
ROX Quick Start Manual
 ROX Systems, Inc. One Liberty Plaza 52 nd Floor New York, NY 10006 www.roxsystems.com 1(646)-586-2100 help@roxsystems.com en Español: www.roxsystems.mx Last Revised: 11/16/2016 Contents Getting Started...
User s Guide. (Virtual Terminal Edition)
") User s Guide (Virtual Terminal Edition) Table of Contents Home Page... 4 Receivables Summary... 4 Past 30 Day Payment Summary... 4 Last 10 Customer Transactions... 4 View Payment Information... 4 Customers
User s Guide (Virtual Terminal Edition) Table of Contents Home Page... 4 Receivables Summary... 4 Past 30 Day Payment Summary... 4 Last 10 Customer Transactions... 4 View Payment Information... 4 Customers
USER MANNUAL. Version 1.9.6
 USER MANNUAL Version 1.9.6 Table of Contents 1. About this Document... 3 2. Manuscript Composition... 4 3. Getting Started... 4 3.1 BIPL Direct Login... 4 3.1.1 To log on to BIPL Direct... 5 3.1.2 Server
Guide to User Interface 4.3
 Datatel Colleague Guide to User Interface 4.3 Release 18 June 24, 2011 For corrections and clarifications to this manual, see AnswerNet page 1926.37. Guide to User Interface 4.3 All Rights Reserved The
PART 1 - GETTING STARTED LOGIN AND LOGOUT OF EFUTURES... 3
 Contents PART 1 - GETTING STARTED... 3 1.1 LOGIN AND LOGOUT OF EFUTURES... 3 PART 2 - MARKET... 6 2.1 UNDERLYER PRICE... 6 2.2 PRICE DEPTH... 8 2.3 MARKET STATUS... 9 2.4 CLOCK... 10 2.5 FX RATIO... 11
GraphWorX64 Productivity Tips
 Description: Overview of the most important productivity tools in GraphWorX64 General Requirement: Basic knowledge of GraphWorX64. Introduction GraphWorX64 has a very powerful development environment in
Keynote 08 Basics Website:
 Website: http://etc.usf.edu/te/ Keynote is Apple's presentation application. Keynote is installed as part of the iwork suite, which also includes the word processing program Pages and the spreadsheet program
MetaTrader 4 transaction procedure
 MetaTrader 4 transaction procedure 1. After downloading and installing, first set your software to English - there are Languages in the View item, you can select English; 2. The user who has obtained the
Tobacco Products Manufacturer s and Importer s Report
 Tobacco Products Manufacturer s and Importer s Report Logging Into EDS Log in with the user id and password provided through the EDS registration process and click on the Login button. If you have not
AutoCAD 2009 User InterfaceChapter1:
 AutoCAD 2009 User InterfaceChapter1: Chapter 1 The AutoCAD 2009 interface has been enhanced to make AutoCAD even easier to use, while making as much screen space available as possible. In this chapter,
Operation Manual for Real Time Quotes Service
 Operation Manual for Real Time Quotes Service www.eafutures.com.hk Enquiry and Account Opening Hotline: (852) 3608-8181 E-mail Enquiry: accounts@eafutures.com.hk Table of Contents 1. Introduction... 2
Getting Started with BarchartX
 Getting Started with BarchartX April 2007 Getting Started with BarchartX I ve signed up for BarchartX (or, signed up for a free trial). Now what? Within minutes, you will receive an email from Barchart
WELCOME TO OUR MARKETCONNECT WEBSITE
 WELCOME TO OUR MARKETCONNECT WEBSITE We recognize that easy, efficient, online access to investment accounts is a growing priority for our clients. We are continuously improving our online platform and
ACTIVE Net Insights user guide. (v5.4)
") ACTIVE Net Insights user guide (v5.4) Version Date 5.4 January 23, 2018 5.3 November 28, 2017 5.2 October 24, 2017 5.1 September 26, 2017 ACTIVE Network, LLC 2017 Active Network, LLC, and/or its affiliates
ACTIVE Net Insights user guide (v5.4) Version Date 5.4 January 23, 2018 5.3 November 28, 2017 5.2 October 24, 2017 5.1 September 26, 2017 ACTIVE Network, LLC 2017 Active Network, LLC, and/or its affiliates
Training Manual and Help File
 Training Manual and Help File 30.06.2011 Update Manage Grow Welcome to your new Juniper Website Management System with CMS Introduction The Juniper Website Management System with CMS (Website Content Management
Erlanger 2000 (E2K) Research and Analytics Platform Initial Installation and Quick Start User Guide
 Research and Analytics Platform Initial Installation and Quick Start User Guide") Erlanger 2000 (E2K) Research and Analytics Platform Initial Installation and Quick Start User Guide I. Installation Phil Erlanger Research Co., Inc. (PER) or Quantitative Partners, Inc. (QPI) will guide
Erlanger 2000 (E2K) Research and Analytics Platform Initial Installation and Quick Start User Guide I. Installation Phil Erlanger Research Co., Inc. (PER) or Quantitative Partners, Inc. (QPI) will guide
Excel 2007 New Features Table of Contents
 Table of Contents Excel 2007 New Interface... 1 Quick Access Toolbar... 1 Minimizing the Ribbon... 1 The Office Button... 2 Format as Table Filters and Sorting... 2 Table Tools... 4 Filtering Data... 4
esignal 11.4 March 2012
 esignal Release Notes Page 1 of 6 This new version of esignal introduces a host of new features and enhancements for active traders and investors. esignal 11.4 provides new alerts, toolbars, and so much
INTRODUCTION. InetSoft Mobile App
 INTRODUCTION InetSoft Mobile App Welcome to the InetSoft mobile app! The mobile app allows you to easily access your dashboards on your tablet or phone. This document explains how to configure and use
SOU Banner 9 Navigation Guide
 SOU Banner 9 Navigation Guide Draft 11.29.2018 Contents Introduction.... 2 Application Navigator.... 2 Basic Navigation.... 3 Page Header.... 4 Key Block... 4 Sections... 5 Bottom Section Navigation...
Excel 2013 Intermediate
 Excel 2013 Intermediate Quick Access Toolbar... 1 Customizing Excel... 2 Keyboard Shortcuts... 2 Navigating the Spreadsheet... 2 Status Bar... 3 Worksheets... 3 Group Column/Row Adjusments... 4 Hiding
ASTRA USER GUIDE. 1. Introducing Astra Schedule. 2. Understanding the Data in Astra Schedule. Notes:
 ASTRA USER GUIDE 1. Introducing Astra Schedule Astra Schedule is the application used by Academic Space Scheduling & Utilization to schedule rooms for classes and by academic colleges, schools, and departments
Maybank2u.com Online Stocks User Guide
 I INTRODUCTION...1 UNIVERSAL FEATURES...2 CALENDAR FEATURE...2 SEARCH FEATURE...2 RESET BUTTON...2 PRINT BUTTON...2 BACK BUTTON...2 EXIT BUTTON...2 HOME...3 LIVE QUOTES...5 SCREEN INTRODUCTION...5 SCREEN
Chart Pop-Up Menu. Show
 Chart Pop-Up Menu Right-click the mouse on a chart to view the chart Pop-Up menu. Many features and actions can be accessed from the pop-up menu. Many of the items on the pop-up menu are used to open panels
PM4 + Partners Knowledge Articles
 PM4 + Partners Knowledge Articles Customizing your PM4+ user experience r 1 November 30, 2108 PM4+ Partners Workspace - customize your experience Page 2 Contents Customizing Your Workspace... 1 Customizing
USER MANUAL. Contents. Advanced Reporting Tool PRO for vtiger
 USER MANUAL Advanced Reporting Tool PRO for vtiger Contents Contents... 1 ADVANCED REPORTING TOOL FEATURE OVERVIEW... 2 PRE-DEFINED REPORT LIST AND FOLDERS... 3 REPORT AND CHART SETTINGS OVERVIEW... 5
User Guide. Web Intelligence Rich Client. Business Objects 4.1
 User Guide Web Intelligence Rich Client Business Objects 4.1 2 P a g e Web Intelligence 4.1 User Guide Web Intelligence 4.1 User Guide Contents Getting Started in Web Intelligence 4.1... 5 Log into EDDIE...
Caterease User Training Guide
 Caterease User Training Guide Copyright: 2016 Table of Contents Unit 1: Introducing Event Manager 15 Entering General Event Information 17 Searching for Events 19 Using the Event Finder 20 Reviewing and
Using the Style Scope App
 Using the Style Scope App The following sections explain how to use dashboards on an Android device. 1 of 1269 Installing the Style Scope App To install the Style Scope app on your Android tablet, follow
2.1 Logging on to FieldManager Software
 2 Getting Started The main window displays all statewide contracts. Please note that you have access to ALL contracts and functionality is based on permission level. These contracts are imported into FieldManager
Office 365: . Accessing and Logging In. Mail
 Office 365: Email This class will introduce you to Office 365 and cover the email components found in Outlook on the Web. For more information about the Microsoft Outlook desktop client, register for a
Introduction... 2 Trading Profiles... 2 New 2 Strategies ) Order Strategies ) Strategy Builder ) Multiple Order Targets...
 Order Strategies ) Strategy Builder ) Multiple Order Targets...") Menu Items Introduction... 2 Trading... 2 Profiles... 2 New 2 Strategies... 4 1) Order Strategies... 4 3) Strategy Builder... 5 4) Multiple Order Targets... 5 Tools 6 1. Institutional Volume Filter...
Menu Items Introduction... 2 Trading... 2 Profiles... 2 New 2 Strategies... 4 1) Order Strategies... 4 3) Strategy Builder... 5 4) Multiple Order Targets... 5 Tools 6 1. Institutional Volume Filter...
SCC Banner 9 Admin Pages Navigation Guide
 SCC Banner 9 Admin Pages Navigation Guide 1 Contents Introduction.. 3 Using Banner 9..... 4 Application Navigator.. 5 Basic Navigation.. 7 Page Header. 7 Page Footer.. 8 Key Block 9 Sections.. 10 Bottom
Advisor Workstation Training Manual: Working in the Research Module
 Advisor Workstation Training Manual: Working in the Research Module Overview of the Research module - - - - - - - - - - - - - - - - 1 What you will learn in this section - - - - - - - - - - - - - - - -
Office of Instructional Technology
 Office of Instructional Technology Microsoft Excel 2016 Contact Information: 718-254-8565 ITEC@citytech.cuny.edu Contents Introduction to Excel 2016... 3 Opening Excel 2016... 3 Office 2016 Ribbon... 3
Style Report Enterprise Edition
 INTRODUCTION Style Report Enterprise Edition Welcome to Style Report Enterprise Edition! Style Report is a report design and interactive analysis package that allows you to explore, analyze, monitor, report,
User Manual. perfectionlearning.com/technical-support
 User Manual perfectionlearning.com/technical-support 1 User Manual Accessing Math X... 3 Login... 3 Forgotten Password... 3 Navigation Menu... 4 Logout... 4 Admin... 5 Creating Classes and Students...
My Sysco Reporting Job Aid for CMU Customers. My Sysco Reporting. For CMU Customers (Serviced by Program Sales)
") My Sysco Reporting For CMU Customers (Serviced by Program Sales) 1 Accessing My Sysco Reporting... 2 Logging In... 2 The Reporting Dashboard... 3 My Sysco Reporting Process... 6 Generating a Report...
My Sysco Reporting For CMU Customers (Serviced by Program Sales) 1 Accessing My Sysco Reporting... 2 Logging In... 2 The Reporting Dashboard... 3 My Sysco Reporting Process... 6 Generating a Report...
Preferences Table of Contents
 Preferences Table of Contents My Profile... 2 Quick Profile Maintenance... 2 My Names... 3 My Addresses... 3 My E-Mail Addresses... 4 Personal Photo and Logo Maintenance... 4 My Documents... 6 My Phone
Fixed Income Clearing Corporation REAL TIME TRADE MATCHING WEB FRONT END (RTTM WFE) SYSTEM FOR GSD USER GUIDE
 SYSTEM FOR GSD USER GUIDE") REAL TIME TRADE MATCHING WEB FRONT END (RTTM WFE) SYSTEM FOR GSD USER GUIDE Date: 12/31/2008 Version #: 3.0 Distribution: GSD Participants 1 RTTM WFE FOR GSD USER GUIDE (V3.0) Table of Contents 1. Introduction...
REAL TIME TRADE MATCHING WEB FRONT END (RTTM WFE) SYSTEM FOR GSD USER GUIDE Date: 12/31/2008 Version #: 3.0 Distribution: GSD Participants 1 RTTM WFE FOR GSD USER GUIDE (V3.0) Table of Contents 1. Introduction...
Fusion. CBR Fusion MLS Level 1 Core Functions. Class Handout
 Fusion 1 CBR Fusion MLS Level 1 Core Functions Class Handout GETTING STARTED IN FUSION Logging On and Off To log on to Fusion MLS: 1. Type your user name in the User ID box. 2. Type your password in the
emerge Help Document Table of Contents
 Table of Contents Logging Into emerge... 2 Navigation Bar... 3 Main Menu... 4 Creating a New Order... 6 Order Checklist... 6 Information... 7 Overview... 8 Geography... 9 List Select... 12 Demographics...
emerge Help Document Table of Contents
 Table of Contents Logging Into emerge... 2 Navigation Bar... 3 Main Menu... 4 My Account... 6 My Information... 6 Manage Lists... 7 Manage Seeds... 8 Search/Add Suppress... 9 Update My Suppress... 10 Creating
RITIS Training Module 4 Script
 RITIS Training Module 4 Script Welcome to the Regional Integrated Information System or RITIS Module 04 CBT. To begin, select the start button or press Shift+N on your keyboard. This training module will
FXCC MT4 Android Mobile User Guide
 FXCC MT4 Android Mobile User Guide 1. INSTALLATION OF THE APP The Android mobile application can be downloaded from the Google Play Store on your Android mobile device: Press the Install button to start
BE Share. Microsoft Office SharePoint Server 2010 Basic Training Guide
 BE Share Microsoft Office SharePoint Server 2010 Basic Training Guide Site Contributor Table of Contents Table of Contents Connecting From Home... 2 Introduction to BE Share Sites... 3 Navigating SharePoint
RONA e-billing User Guide
 RONA e-billing Contractor Self-Service Portal User Guide RONA e-billing User Guide 2015-03-10 Table of Contents Welcome to RONA e-billing What is RONA e-billing?... i RONA e-billing system requirements...
USER MANUAL. Contents. Analytic Reporting Tool Basic for SUITECRM
 USER MANUAL Analytic Reporting Tool Basic for SUITECRM Contents ANALYTIC REPORTING TOOL FEATURE OVERVIEW... 2 PRE-DEFINED REPORT LIST AND FOLDERS... 3 REPORT AND CHART SETTING OVERVIEW... 5 Print Report,
Copyright 2015 Integrated Environmental Solutions Limited. All rights reserved.
 Tabular Room Data User Guide IES Virtual Environment Copyright 2015 Integrated Environmental Solutions Limited. All rights reserved. No part of the manual is to be copied or reproduced in any form without
Login: Quick Guide for Qualtrics May 2018 Training:
 Qualtrics Basics Creating a New Qualtrics Account Note: Anyone with a Purdue career account can create a Qualtrics account. 1. In a Web browser, navigate to purdue.qualtrics.com. 2. Enter your Purdue Career
Out-of-State Tobacco Products Wholesale Dealer s Report
 Out-of-State Tobacco Products Wholesale Dealer s Report Logging Into EDS Log in with the user id and password provided through the EDS registration process and click on the Login button. If you have not
PART 7. Getting Started with Excel
 PART 7 Getting ed with Excel When you start the application, Excel displays a blank workbook. A workbook is a file in which you store your data, similar to a three-ring binder. Within a workbook are worksheets,
PlanWell Enterprise. User Manual
 PlanWell Enterprise User Manual 1 Table of Contents Finding PlanWell and Logging On... 4 Public Projects... 5 Guest Access... 5 Login to your Account... 6 Populating Shopping Cart... 6 Most Current Set...
CQG Integrated Client 7.5 New Features User s Guide. August 2007 version
 CQG Integrated Client 7.5 New Features User s Guide August 2007 version 2007-01 Copyright 2007 CQG Inc. All rights reserved. Table of Contents CQG Integrated Client 7.5...7 New Features... 7 New Enhancements...
Mastering the Environment WVU ecampus
 Mastering the Environment WVU ecampus Information Technology Services, West Virginia University Service Desk (304) 293-4444, ITShelp@mail.wvu.edu Mastering the Environment of WVU ecampus 1 Table of Contents
EXCEL + POWERPOINT. Analyzing, Visualizing, and Presenting Data-Rich Insights to Any Audience KNACK TRAINING
 EXCEL + POWERPOINT Analyzing, Visualizing, and Presenting Data-Rich Insights to Any Audience KNACK TRAINING KEYBOARD SHORTCUTS NAVIGATION & SELECTION SHORTCUTS 3 EDITING SHORTCUTS 3 SUMMARIES PIVOT TABLES
PlanWell 4.0 User Guide
 PlanWell 4.0 User Guide Contents Finding Planwell and Logging On 2 Planwell Access Portals 2 Document Selection 3 Build a Set 4 Most Current Set 4 Custom Packages 4 Issue Tree 5 Standard Order Process
User Guide. Product: GreenFolders. Version: 3.8
 User Guide Product: GreenFolders Version: 3.8 Release Date: October 2014 GreenFolders 3.8 User Guide Introduction Table of Contents 1 Introduction... 6 2 General Information... 7 2.1 Login Procedure...
CounselLink Reporting. Designer
 CounselLink Reporting Designer Contents Overview... 1 Introduction to the Document Editor... 2 Create a new document:... 2 Document Templates... 3 Datasets... 3 Document Structure... 3 Layout Area... 4
First 5 Things To Do. Administrator Tip. Keep Your Finger to the Pulse. Getting Started Guide
 Getting Started Guide Welcome to Analytics Booth, this document will help guide you through logging in and setting up common first-time tasks. Keep Your Finger to the Pulse Analytics Booth enables you
JSGCL TRADING TERMINAL. User Manual Getting Started
 JSGCL TRADING TERMINAL User Manual Getting Started Table of Contents 1 ABOUT THIS DOCUMENT... 5 1.1 Document Composition... 5 2 INTRODUCTION... 6 3 GETTING STARTED... 7 3.1 Login... 7 3.1.1 Login Window...
SharePoint: Fundamentals
 SharePoint: Fundamentals This class will introduce you to SharePoint and cover components available to end users in a typical SharePoint site. To access SharePoint, you will need to log into Office 365.
1. Understanding efinanceplus Basics
 1. Understanding efinanceplus Basics To understand the procedures described later in this guide, you will first need some background on the efinanceplus environment. Whether adding, searching for, viewing,
Table Basics. The structure of an table
 TABLE -FRAMESET Table Basics A table is a grid of rows and columns that intersect to form cells. Two different types of cells exist: Table cell that contains data, is created with the A cell that
MINI TERMINAL. Page 1 of 6
 v MINI TERMINAL 1. Placing trades using the Mini Terminal... 2 1.1 Placing buy/sell orders... 2 1.2 Placing pending orders... 2 1.2.1 Placing pending orders directly from the chart... 3 1.3 Order templates...
User Guide Ahmad Bilal [Type the company name] 1/1/2009
![User Guide Ahmad Bilal [Type the company name] 1/1/2009](/thumbs/92/109182878.jpg "User Guide Ahmad Bilal [Type the company name] 1/1/2009") User Guide Ahmad Bilal [Type the company name] 1/1/2009 Contents 1 LOGGING IN... 1 1.1 REMEMBER ME... 1 1.2 FORGOT PASSWORD... 2 2 HOME PAGE... 3 2.1 CABINETS... 4 2.2 SEARCH HISTORY... 5 2.2.1 Recent
User Guide Ahmad Bilal [Type the company name] 1/1/2009 Contents 1 LOGGING IN... 1 1.1 REMEMBER ME... 1 1.2 FORGOT PASSWORD... 2 2 HOME PAGE... 3 2.1 CABINETS... 4 2.2 SEARCH HISTORY... 5 2.2.1 Recent
BeetleEye Application User Documentation
 BeetleEye Application User Documentation BeetleEye User Documentation 1 Table of Contents Welcome to the BeetleEye Application... 6 Overview... 6 Navigation... 6 Access BeetleEye... 6 Update account information...
Log into your portal and then select the Banner 9 badge. Application Navigator: How to access Banner forms (now called pages.)
") Navigation Banner 9 Log into your portal and then select the Banner 9 badge. This will bring you to the Application Navigator. Application Navigator: How to access Banner forms (now called pages.) Menu
Navigation Banner 9 Log into your portal and then select the Banner 9 badge. This will bring you to the Application Navigator. Application Navigator: How to access Banner forms (now called pages.) Menu
Eastern Kentucky University. Banner 9 Navigation Guide
 Eastern Kentucky University Banner 9 Navigation Guide Stephanie King Systems Specialist Phone: (859)622-1079 Email: stephanie.king@eku.edu Page 1 Banner 9 landing page There are 9 areas of the landing
Asset and Work Order Maintenance Management Suite Training Manual for Technicians
 Asset and Work Order Maintenance Management Suite Training Manual for Technicians Welcome! Welcome to the erportal Asset and Work Order Maintenance Management Software Suite erportal is a powerful software
Chapter 2: Clients, charts of accounts, and bank accounts
 Chapter 2: Clients, charts of accounts, and bank accounts Most operations in BankLink Practice are client specific. These include all work on coding transactions, reporting, and maintaining chart of accounts
Quick Start Guide - Contents. Opening Word Locating Big Lottery Fund Templates The Word 2013 Screen... 3
 Quick Start Guide - Contents Opening Word... 1 Locating Big Lottery Fund Templates... 2 The Word 2013 Screen... 3 Things You Might Be Looking For... 4 What s New On The Ribbon... 5 The Quick Access Toolbar...
ELECTRONIC TRADING (ET) ET HTML5 Client Phase1 User Guide
 ET HTML5 Client Phase1 User Guide") ELECTRONIC TRADING (ET) Date of issue: 31 October 2016 Legal Information Thomson Reuters 2016. All Rights Reserved. Thomson Reuters, by publishing this document, does not guarantee that any information
ELECTRONIC TRADING (ET) Date of issue: 31 October 2016 Legal Information Thomson Reuters 2016. All Rights Reserved. Thomson Reuters, by publishing this document, does not guarantee that any information
CONTASign Pro User Manual
 CONTASign Pro User Manual CONTASign PRO MANUAL v3.5 rev01 Page 1 of 51 CONTA-CLIP Contents Page No. 1. Main Window Layout 4 - Window Layout Customisation 5 - Window Configuration 6 2. Start Menu & Quick
Introduction...2. Application Navigator...3
 Banner 9 Training Contents Introduction...2 Application Navigator...3 Basic Navigation...5 Page Header...5 Key Block...6 Sections...6 Bottom Section Navigation...7 Notification Center Messages...7 Data
Using SymPrint to Make Overlays, Templates & More...
 Welcome to SymPrint SymPrint is an easy-to-use tool for creating communication overlays, worksheets, classroom activities and more using a modern toolbar and common-sense interface modeled after the programs
User Manual. Administrator s guide for mass managing VirtueMart products. using. VM Mass Update 1.0
 User Manual Administrator s guide for mass managing VirtueMart products using VM Mass Update 1.0 The ultimate product management solution for VirtueMart! Contents Product Overview... 3 Feature List...
Coach s Office Playbook Tutorial Playbook i
 Playbook i The Playbook... 1 Overview... 1 Open the Playbook... 1 The Playbook Window... 2 Name the Chapter... 2 Insert the First Page... 3 Page Templates... 3 Define the Template Boxes... 4 Text on the
Teacher Connect Interface User Guide v
 Teacher Connect Interface User Guide v. 6.4.0 Copyright 2002-2019 eschooldata, LLC All rights reserved. TABLE OF CONTENTS Overview... 3 Accessing Teacher Connect... 3 Quick Access Icon...3 Course Number...3
MT4 ANDROID USER GUIDE
 MT4 ANDROID USER GUIDE HOW TO DOWNLOAD AND INSTALL From your Android device visit the Google Play store and search for the MetaTrader 4 application. To download the application, simply click the Install
Trading View Chart Setup
 Trading View Chart Setup Joining Trading View: 1. Click on this link or link in e-mail. 2. Click join for free. 3. Enter your e-mail, desired username, and password. Note Usernames and Passwords are case
UTRADE Stock Options User Guide
 UTRADE Stock Options User Guide Last Updated on June 2017 Contents 0. Installation & System Requirement 1. Login & Logout 2. Password Setting 3. Price Quote 4. Order Instructions 5. Order Enquiry 6. Account
Comcast Store Campaign Planning 2.0 Phase 1 & 2 - Quick Start Guide. Last Updated: 7/5/16
 Comcast Store Campaign Planning 2.0 Phase 1 & 2 - Quick Start Guide Last Updated: 7/5/16 TABLE OF CONTENTS OVERVIEW & ACCESS.3 GLOBAL GRIDS 4-5 BROWSE ALL PLANS 6 PLAN DETAILS VIEW.7 MASS EDIT 8 WORKFLOW
MEFFStation USER GUIDE
 MEFFStation USER GUIDE MEFF S/MART v9.86 15 July 2015 This manual is for version 9.86.12 of the MEFFStation Terminal. For subsequent versions of the terminal you should check with MEFF whether there is