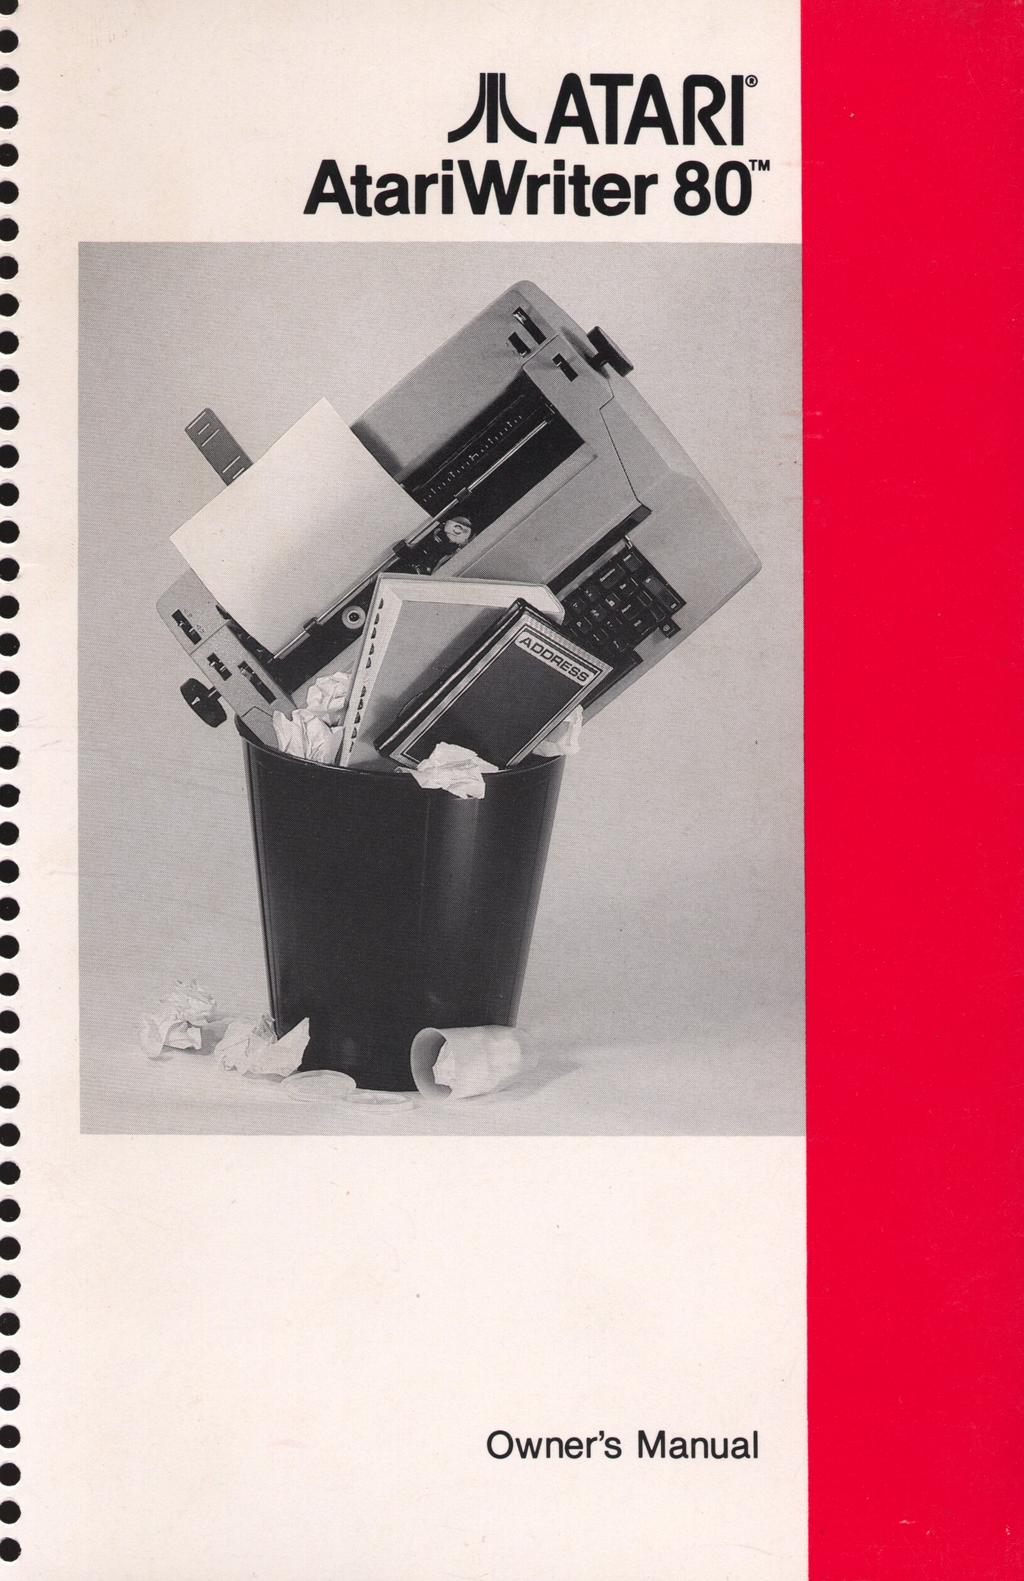
AtariWriter 80 was developed by Atari Corporation in conjunction with Micro Fantasy.
|
|
|
- Imogen Jefferson
- 6 years ago
- Views:
Transcription
1
2 AtariWriter 80 was developed by Atari Corporation in conjunction with Micro Fantasy. Atari Proofreader was developed by Atari Corporation in conjunction with R. Stanley Kistler. Atari, the Atari logo, AtariWriter 80, AtariWriter Ptus?', AtariWriter, Atari Proofreader?'. Atari Macro Assembler and Program-Text Editor, 800, 800XL, 1200XLTM, 65XE, 130XE, XE Game System, 810, 1050, 825, 1020, 1025, 1027, 1029, XEP80, XMM801, XF551, and XDM121 are trademarks or registered trademarks of Atari Corporation. Please Note: Every ellort has been made to ensure the accuracy of the product documentation in this manual. However, because Atari Corporation is constantly improving and updating its computer hardware and software, we are unable to guarantee the accuracy of printed material after the date of publication and disclaim liability for changes, errors, or omissions. Reproduction of this document or any portion of its contents is not allowed without the specific written consent of Atari Corporation. 1988, Atari Corporation Sunnyvale, CA All rights reserved.
3 AtariWriter 80 Owner's Manual
4 .-
5 TABLE OF CONTENTS INTRODUCTION 1 Overview of this Manual 1 CHAPTER 1: GETTING STARTED 5 Loading AtariWriter 80 5 The Main Menu 6 The Text Screen 8 Error Messages 9 Leaving the Program 9 CHAPTER 2: WRITING. EDITING. AND PRINTING 11 Keystroke Commands 11 [Returnl 11 Paragraphs 12 Upper- and Lowercase Characters 12 Creating a File 13 Editing a File 13 Cursor Movement 13 Deletion. 14 Replacement.. 15 Printing a File 15 Saving a File 17 With Two Disk Drives 18 Filenames 18 Sa ving Long Documents 19 Loading a File.20 Loading Long Documents 21 With Two Disk Drives 21 Indexing Files 21 Deleting a File. 22 Formatting Disks 22 Write-Protecting Disks 23 How Much Can You Write? 23
6 CHAPTER 3: ADVANCED EDITING 25 Operations on Blocks of Text. 25 Deleting Blocks of Text Deleting to the End of a File 26 Moving (Pasting) Blocks of Text.27 Duplicating (Pasting) Blocks of Text 27 Alphabetizing Lists 28 Counting The Number of Words 28 Search and Replace.28 Global Replace _.29 Notes on Search and Replace..._ 30 Advanced Disk Operations 30 Merging Files 30 Saving a Portion of a File XE Memory Banks _ 31 Programming Capability 32 Save ASCII 32 Compatibility with Other Word Processors 32 AtariWriter _ 33 Reading a Non Atari File 33 Creating a Non Atari File 33 CHAPTER 4: PRINT FORMATTING AND STYLING 35 Print Preview 35 The Global Format Screen. 37 Print Formatting Variations within a File.42 Bold Print. 43 Elongated Print.43 Underlining.44 Subscripts and Superscripts 45 International Characters..45 Blocking Text Right. 46 Centering Text. 46 Headers, Footers, and Page Numbering 46 Chaining Print Files.. 48 Page Eject 49 Tabs _
7 Section Headings Form Printing. Special Printer Controls Printer Control Codes Printing to Other Devices Custom Printer Driver Loading a Printer Driver Saving a Printer Driver Leaving the Printer Driver Editor CHAPTER 5: ATARI PROOFREADER 59 Loading Proofreader 59 The Proofreader Menu 60 How Proofreader Works 61 Highlighting Errors 62 Printing Errors 63 Correcting Errors 64 Proofreading Specific Passages 67 With Two Disk Drives. 67 Dictionary Search 67 Creating Personal Dictionary Files 69 Filing Personal Dictionaries 69 Creating and Saving a Personal Dictionary 70 Rules for Creating Word Lists 71 Proofreading with Personal Dictionary Files..72 CHAPTER 6: Atari Mail Merge 75 Loading Mail Merge The Mail Merge Menu 75 Creating a File Editing a File..78 Printing a File 79 Saving and Loading Files. 80 Updating Records 80 Appending Files. 81
8 ... Creating Your Own Record Format 82 Building a Subset...83 Database Merge Character 85 APPENDIX A: DOS ERROR MESSAGES.87 APPENDIX B: MAIL MERGE SORTING SEQUENCE.89 CUSTOMER SUPPORT 93 INDEX 95
9 INTRODUCTION Whether you are a student facing a term paper, a professional with frequent reports to write, or an aspiring novelist, AtariWriter 80 makes writing faster and easier. Gone are the days of tediously typing and retyping drafts. AtariWriter 80 lets you edit and reorganize your writing until it is just right. The program's built-in spelling-checker, Atari Proofreader, virtually eliminates misspellings and typos in your work. With AtariWriter 80's wealth of print formatting options, you can style your work just the way you like it. AtariWriter and AtariWriter Plus Users If you have worked with AtariWriter before, you will find AtariWriter 80 a similar, but far more powerful and versatile, program. If you have worked with AtariWriter Plus before, you will find that AtariWriter 80 has all the same features -- and it lets you display a full 80-column text screen (80 characters per line). Converting an AtariWriter or AtariWriter Plus file to an AtariWriter 80 file is as easy as loading the file (see Compatibility with Other Word Processors in Chapter 3). Important: There are two versions of AtariWriter 80. Both versions are on the AtariWriter 80 disk you received, one on each side. The side labeled "AtariWriter 80 Program Disk" contains the version for Atari 800, 800XL, 1200XL, XE Game System, and 65XE personal computers. The other side of the disk is labeled "AtariWriter 80 Program Disk 130XE Version." Use this side of the disk only if you have an Atari 130XE personal computer. OVERVIEW OF THIS MANUAL This manual guides you step-by-step through everything you need to know to use AtariWriter 80. The manual is arranged to meet your needs quickly and efficiently, whether you are a novice or a seasoned word-processor.
10 Here is a brief outline of the manual's contents: Chapter 1. Getting Started. shows you how to load AtariWriter 80 and explains the program's basic features. Chapter 2, Writing. Editing. and Printing, explains the basics of word processing with AtariWriter 80, then goes on to show you how to store and retrieve what you write. Chapter 3. Advanced Editing. shows you how to perform operations on whole blocks of text and how to search and replace with AtariWriter 80. The chapter also explains certain disk-related features of the program, how to write computer programs with AtariWriter 80, and also discusses the program's compatibility with other word processing or terminal programs. Chapter 4. Print Formatting and Styling. explains how to format your text file for printing. It discusses the Global Format screen and how to insert special print formatting commands in your file so you can uniquely format and style your written work. The chapter concludes with information about printing with AtariWriter 80, no matter what printer you use. Chapter 5. Atari Proofreader. explains how to use AtariWriter 80's built-in spelling checker, Atari Proofreader. Chapter 6. Atari Mail Merge. explains how to use AtariWriter 80's built-in data base program, Atari Mail Merge. Appendix A, DOS Error Messages. lists and explains those numbered DOS error messages that appear in AtariWriter 80, which are otherwise not self-explanatory. Appendix B, Mail Merge Sorting Sequence, is a convenient resource for determining the sorting sequence of the Mail Merge function. The last section, Customer Support. provides you with information about how to get your questions and comments about AtariWriter 80 answered, should they arise. 2
11 The Index at the back of this manual lists important terms and procedures to help you locate specific information. The manual also includes a Quick Reference card that lists all the AtariWriter 80 commands and what they do. Once you have worked with the program for awhile, this card may be all you need. 130XE Note: Throughout this manual, you will see paragraphs like this one that contain Information specific to the 130XE version of AtariWriter 80. Be sure to read these paragraphs carefully if you are using the 130XE version of the program They contain information not covered in, and sometimes contrary to, the main body of the manual. 3
12 ..
13 CHAPTER 1 GETTING STARTED If you have not already set up your Atari personal computer system, now is the time to do so. You will find complete setup instructions in the owner's manuals that came with your system. Important: To use the AtariWriter 80 program, your system should include the following equipment An Atari personal computer with a minimum of 48K of memory An Atari 810, 1050, or XF551 disk drive Acomposite video monitor (monochrome recommended) An Atari (or Atari-cornpatible) printer An XEP80 Interface Module LOADING ATARIWRITER 80 To load the AtariWriter 80 word processing program into your computer: 1. Remove any program cartridge from your computer With your computer off, switch on your monitor. Now switch on your disk drivers) and wait for the busy light to go out. Switch on the XEP80 Interface Module. 2. Insert the AtariWriter 80 program disk label side up into your disk drive (drive 1 if you have more than one drivel. Close the disk drive latch. Note: Make sure that the AtariWriter 80 disk is not write protected. 5
14 130XE Note: To load the 130XE version, insert your program disk with the 130XE version label side up. The 130XE version will not work with any other computer However, the non-130xe version will work with a 130XE, though it will not be able to access the 130XE's extra memory. 3. Now switch on your computer. The program takes about 30 seconds to load (a little longer if you are using the 130XE version) After the program has loaded, the AtariWriter 80 main menu appears THE MAIN MENU When the main menu is displayed, take a minute to look over the options available. Notice that the first character of each option is highlighted. You select a menu option by pressing the first character of its name on your computer keyboard Below, you will find short descriptions of the main menu options and where to look for further information ATtlIRIWRITER ea COPVRIGHT 1':J88 AlAR I CORP. (3 reate F i If",]ditFile (Jlndex Drive.1 OIndex Drive 2 JfrintFile :!jlobal For",at ai 1 Merge- 5ELECT ITEM ave Fi 1 eo File ::il ormat Disk. 6
15 Create File starts a new text file. (See Creating a File in Chapter 2.) Edit File allows you to revise a text file. (See Editing a File in Chapter 2). Verify Spelling loads Atari Proofreader. (See Loading Proofreader in Chapter 5.) Print File prints a text file. (See Printing a File in Chapter 2.) Global Format displays (and allows you to vary) the print formatting values. (See The Global Format Screen in Chapter 4). Mail Merge loads Mail Merge (See Loading Mail Merge in Chapter 6.) 1 Index Drive 1 lists the files on the disk in drive 1. (See Indexing Files in Chapter 2.) 2 Index Drive 2 lists the files on the disk in drive 2 Load File loads a file from a disk. (See Loading a File in Chapter 2.) Save File stores a file on a disk. (See Saving a File in Chapter 2.) Delete File erases a file stored on a disk. (See Deleting a File in Chapter 2.) Format Disk formats a disk. (See Formatting Disks in Chapter 2). Once you load AtariWriter 80. the program remains in memory until you switch your computer off. When you remove the AtariWriter 80 program disk from your drive, all main menu options remain available except Verify Spelling and Mail Merge, both of which require that you first insert the program disk in your drive 7
16 .- THE TEXT SCREEN Select Create File from the AtariWriter 80 main menu. Take a moment to become familiar with the text screen elements BVTE5 FREE INSERT HODE LOWERCASE Cursor is the blinking white box that marks your place on the screen: it is the point at which typed letters appear on the monitor. Message Window displays questions, prompts, error messages, and other information at the top of your screen. Tab Stops default settings are indicated by 16 arrows near the top of your screen. (See Tabs in Chapter 4.) Note: The word "default," as used throughout this manual, describes a mode, value, or feature of the program selected automatically by AtariWriter 80. To say that the Insert mode, for example, is the default edit mode, is to say that the program selects that mode when you first load AtariWriter 80 Default modes and values can be altered. Insert Mode is the default edit mode. (See Replacement in Chapter 2.) 8
17 Bytes Free indicates the amount of memory available, as expressed in bytes. (See How Much Can You Write? in Chapter 2.) Lowercase is the default text entry mode, which works like a typewriter. (See Upper- and Lowercase Characters in Chapter 2). Error Messages If AtariWriter 80 finds a mistake in one of your responses or commands, or if it detects a problem within your computer system, the program displays an error message in the message window. Most of these are self-explanatory. informing you in simple terms just what has gone wrong The other error messages you may encounter are numbered DOS error messages. For a complete list and explanation of those DOS error messages included in the program, see Appendix A. Whenever the program prompts you to perform some critical action, or when it detects that something has gone wrong, a beep sounds from your television or monitor's speaker. You can switch the beep off and on, except in the case of error messages, by pressing [Control] [B) when the main menu is displayed Leaving the Program You can return to the main menu at any time by pressing [Esc], located in the upper-left corner of your keyboard Pressing [Reset] resets the program Any text currently in your computer's memory will be retained. Important: No text is erased from memory unless you tell the program to erase it, or you switch the computer off Finally, that blank space below the cursor is there for you to write in. So turn the page and start writing I 9
18
19 CHAPTER 2 WRITING, EDITING, AND PRINTING Now it is time for you to write, edit, and print. Before beginning, however, you need to understand a few of the program's basic features. KEYSTROKE COMMANDS In order to get AtariWriter 80 to do anything, you must first tell it what you want it to do. To do so, type in the relevant command. Each keystroke command results in an action, or the promise of some action, by the program. When you enter one of these commands into a text file, the program displays a special character that stands in for the command requested. These characters will not print out when you print your written work. In this manual. boldface type enclosed by brackets ([ n represents keys on your keyboard. Throughout the manual you will find instructions such as "press [Return)" or "press [Esc]" These instructions ask you to press that key Several commands in AtariWriter 80 require keystroke combinations. For instance. the manual will instruct you to "press [Control] [P)" or "press [Select] [T]" To execute these keystroke combinations. hold down the first key while typing the second. [Return] With AtariWriter 80, you do not use [Return] on your computer keyboard the way you do on a conventional typewriter When you type in a word that overflows the right margin of your screen, the program automatically moves the word--to the beginning of the next screen line. This feature, called word wrap, is an invaluable advantage over a conventional typewriter 11
20 .. Use [Return] at the end of each paragraph or at the end of a line you want to stand alone (for example, a title or section heading). You should also use [Return] when you want to insert blank lines within your text (for instance, between a title and the main body of text). When you press [Return], AtariWriter 80 inserts a c symbol at that point and moves the cursor to the left margin of the next screen line. The c:::l symbol will not print out. Paragraphs To mark the beginning of a paragraph, press [Control] [P)' The program automatically instructs your printer to indent that line during printing. You do not have to separate paragraphs with a [Return). The program automatically spaces between paragraphs when printing, provided you marked your paragraphs with [Control] [P)' When you press [Control] [P]' the program inserts an inverse P symbol at that point The symbol will not print out. Upper- and Lowercase Characters The program's default text entry mode is LOWERCASE, as indicated in the message window. To enter a single uppercase character, hold down the [Shift] key while typing the character--just like on a conventional typewriter. If you want to type only uppercase letters, press [Caps] ([Shift] [Caps] if you have an Atari 800); the message window displays UPPERCASE. This is nearly equivalent to [Shift] [Lock] on a conventional typewriter, except that it works with alphabetic characters only. For all other "shift" characters, you still need to hold down [Shift] and type the character. Press [Caps] to return to Lowercase mode. With AtariWriter 80 you can also change letters that you have already entered from lower- to uppercase or vice versa. To do this, position the cursor on the letter you want to change and press [Control] [Caps). 12
21 CREATING A FILE Select Create File from the AtariWriter 80 main menu. Now type a few test paragraphs When you reach the bottom of the screen, keep typing--the program automatreally makes room for more text on the screen. Do not worry about typos; you will be able to fix them quickly when you edit with AtariWriter 80 When you are finished with your file, press [Return]. Important: A file must always end with a [Return]. EDITING A FILE Now that you have created your first AtariWriter 80 text file, you can go back and fix any typos you made. If you have already gone back to the main menu, select Edit File Otherwise, you can edit your file while in the Create File mode. You can also get to the text screen at any time by pressing [Break]. Cursor Movement In order to edit a file, you must be able to move from point to point within it. The following keystrokes allow you to move the cursor around and about a file. Press [Select] [T] to go to the top of your file; [Select] [B) moves you instantly to the bottom of the file. 130XE Note: Pressing [Select] [T] or [Select] [B) moves the cursor to the top or bottom, respectively, of the current memory bank (See the last two notes on the 130XE at the end of this chapter) Use [Control] [Down Arrow] or [Control] [Up Arrow] to scroll line by line through what you have typed [Control] [Right Arrow] and [Control] [Left Arrow] move the cursor to the right or to the left, respectively, on any given line 13
22 [Select] [Right Arrow] moves the cursor to the beginning of the next word on the right; [Select] [Left Arrow] moves the cursor to the beginning of the next word on the left. [Control] [A] moves the cursor to the beginning of the current line; [Control] [Z] moves the cursor to the end of the current line. [Tab] moves the cursor to the next tab stop. When you reach the last line of text on the current screen, keep moving the cursor down--the text will scroll up to show more of what you have written. You can also page through your text file, up or down, by pressing [Option] [Up Arrow] or [Option] [Down Arrow] When you reach the last line of your file, you can return to the top of the file using [Select] ltl or you may scroll back through the file using the cursor controls just described Deletion To correct a typo or replace a word or phrase, you must delete the misplaced or misspelled characters or words. To delete one character at a time, place the cursor over the character to be deleted. Press [Control] [Delete/Bk Sp] Continuing to press [Control] [Delete/Bk Sp] deletes characters repeatedly [Delete/Bk spl-when used alone--also deletes characters one at a time. Like the [Backspace] key on a typewriter, [Delete/Bk Sp] backspaces one character; but unlike a typewriter, it erases characters as it moves backward. 14
23 Use [Shift] [Delete/Bk Sp] to delete text from the position of the cursor to the end of the screen line If you decide not to delete, or delete a line by accident, press [Shift] [Insert] to restore the last line deleted. The program inserts the line at the current position of the cursor. Other keystroke commands allow you to delete whole blocks of text at once. (See Operations on Blocks of Text in Chapter 3.) Replacement AtariWriter 80's default edit mode is Insert mode, as displayed in the message window After deleting what you want, type in your correction or change. The program automatically makes room for as much new material as you want to add. To insert a whole new sentence, paragraph, or more, position the cursor where you want to add text and type in the new material. You can switch from Insert mode to Type-over mode by pressing [Control] [Insert] In Type-over mode, the program does not make room for new material. Instead, the old text is replaced by the new as you type it in PRINTING A FILE Now that you have typed and edited your test paragraphs, try printing them out. To do so 1 Make sure that your printer is online and switched on. Press [Esc] to return to the AtariWriter 80 main menu and select Print File 2 The program asks PRINT TO PRINTER, YIN? When you answer [Yl, it asks if you are using the XEP 80 printer port. Answer [V] or [N], then the Printer Selection menu appears 15
24 .. WHAT KIND OF PRINTER? A = ATARI 825 B = ATARI C = ATARI = ATARI E = ATARI 1-02') F = ATtliRI HI' G = ATARI HOM H = EPSQN FH-80 I = IDS MICROPRISM 480 J = JUKI K = OTHER 3. Enter the appropriate response, according to the printer model you have. (If you have a printer other than the models listed, type [K] and refer to Custom Printer Driver under Special Printer Controls in Chapter 4.) Important: Though your printer's name is not on the Printer Selection menu, it may nonetheless have been coded by the manufacturer to look or act like either a standard Atari printer or one of the other printers listed. In the case of Atari look-alikes. the Atari 825 (A) or Atari XMM801 (F) selections will most likely work fine. 4. Now the program asks PRINT WHOLE DOCUMENT, YIN? Type [Y). 5. Lastly, AtariWriter 80 prompts you to enter the number of copies you want to print. You can ask for up to 99 copies, but for now, type [1] and press [Return). Pressing [Return] alone also prints one copy. AtariWriter 80 takes it from there, first internally formatting and then printing your file. 16
25 You can also print selected pages from a file of several pages To do this, type [N] in response to PRINT WHOLE DOCUMENT, YIN? Then type in the starting and ending page numbers to be printed, pressing [Return] after each entry (Pressing [Return] for the ending page defaults to the last page of the file) To halt printing at any time, press [Break] You may have to experiment a bit, adjusting the paper in your printer before printing your files, to get the correct top margin on your printed pages The top margin of the file you have Just printed should be one inch. USing the program's Print Preview function, you can preview a file on screen much as it will appear when printed (See Print Preview in Chapter 4.) You can also print to devices other than your printer (See Printing to Other Devices in Chapter 4.) Finally, you are in no way bound by the program's default print formatting values You are free to vary the print formatting values AtariWriter 80 uses when it prints your file. (See The Global Format Screen in Chapter 4) SAVING A FILE The ability to save a text file means that you can store the file on disk for later reference, revision, or printing. 1. Remove the AtariWriter 80 program disk and insert a data disk formatted to DOS 20S or 2.5. If your disk is not formatted, you can have AtariWriter 80 format it for you (see Formatting Disks in this chapter). 2. Return to the AtariWriter 80 main menu and select Save File The program prompts you to enter the FILE TO SAVE Type D1: or D2: followed by a filename (see Filenames below) for your file. (If you save to drive 1, you may leave the D1: out) After entering the filename, press [Return] 17
26 If your file already has a filename associated with it (you have reloaded it for revision, for example), and you want to save the file under the same name, you can simply press [Return] to save the file--without typing in the filename. 3. Once the process is complete, the message SELECT ITEM appears. Whenever you save a file using a filename already on disk, the program asks REPLACE EXISTING FILE, YIN? When you type [YI. the program writes over the existing file and saves the new or revised file under that name. Important: Be certain that you want to replace the existing file on disk before you save the new file under the same name. If AtariWriter 80 finds that there is not enough room on disk to accommodate the file, the program saves as much of the file as will fit on the disk, then returns the message DISK FULL. (You will probably want to erase the partial save on disk.) Insert a new formatted disk with enough free sectors to accommodate the file With Two Disk Drives If you want to save a file to drive 2, you must type the number of the drive immediately after the 0 (for example, D2:MYFILE). If you do not specify a drive number, the program automatically saves to drive 1. AtariWriter 80 can only save to drives 1 and 2. Filenames Filenames may be up to eight characters in length, plus an optional period and an extension of up to three characters. For example, you might give your test paragraphs filenames such as "MYFILE" or "MYFILEOO 1" 18
27 Important: The letters A through Z and the numbers 0 through 9 are the only characters that can be used in AtariWriter 80 filenames If a number is the first character in a filename, you must use 0: or 02: or 01: before the filename It IS always a good idea to make a backup copy of your text files so you will have a duplicate in the event that something happens to your original disk. To copy an entire disk, or to copy a single file on disk, you must use DOS. See your DOS manual for complete instructions. If you want to lock an AtariWriter 80 file which you have saved to disk, you must also use DOS. Refer to your DOS manual. Saving Long Documents Anything that will exceed your computer's memory must be created and saved in segments, with each segment assigned a different filename. This is where filename extensions come in handy. You can relate the segments of a long piece by giving them each a common filename, but assigning each segment a different extension. As you save the segments of a long document named "REPORT," for example, you could name successive segments "REPORT 00 1," "REPORT 002," and so forth. Then you can print the segments of such a document in any order you wish. (See Chaining Print Files under Print Formatting Variations within a File in Chapter 4.) 130XE Note: The program will save all three banks of memory as one file. Unless your document is unusually long. you will not normally have to break a file into smaller ones Only if you fill all three banks with one document are you required to save the file and begin again with a clean slate (See the last two notes on the 130XE at the end of this chapter) 19
28 LOADING A FILE Using AtariWriter 80 to load a text file from your disk drive into your computer's memory is similar to saving a file, but you send the file in the opposite direction. Though you save text files to disk, they remain in memory until you erase them or you switch the computer off. If you want to load your test file from your drive as if you were beginning a work session, first return to the main menu and select Create File. The program asks if you want to ERASE FILE IN MEMORY, YIN? Type [Yl. The program erases the paragraphs from memory and presents you with a blank text screen. Here is the procedure for loading a file. Try it now with a test file. 1. Remove the AtariWriter 80 program disk and insert the data disk containing the file you want to load. 2. Select Load File from the AtariWriter 80 main menu. The program prompts you to enter the FILE TO LOAD. Type D1: or D2: followed by the filename for the file you want to load. (It you load from drive 1, you may leave the D1: out.) After entering the filename, press [Returnl 3. Once the process is complete, the message SELECT ITEM appears Select Edit File to view or edit the file. If there is already a file in memory and you select Load File, the program asks ERASE FILE IN MEMORY, YIN? When you type [Yl. the program prompts you to enter the FILE TO LOAD and erases the resident file from memory as it loads the new file. Important: Be certain to save the resident file before you load a new file into memory..- 20
29 With Two Disk Drives If you want to load a file from drive 2, you must type the number of the drive you want to load from after the D (D2:MYFILE, for example) If you do not enter a drive number, the program will load from drive 1. AtariWriter 80 can only load from drives 1 and 2. Loading Long Documents If a file overflows your computer's free memory when loading, the loading process is halted and the message o BYTES FREE appears in the message window. That part of the file successfully loaded remains in memory. 130XE Note: When loading a long document, the program automatically spills the file into the next memory bank evenly distributing the file between consecutive memory banks. (See the last two notes on the 130XE at the end of this chapter) INDEXING FILES AtariWriter 80 allows you to display on screen an index, or directory, of the files on a disk. To view a disk's index, insert the disk in your drive. Select either 1 Index Drive 1 or 2 Index Drive 2, depending on which drive you want to index. AtariWriter 80 displays a directory of every file on the disk, listed alphabetically. Also shown are the number of disk sectors occupied by each file, as well as the free sectors on the disk Any file you lock (using DOS) is noted with an asterisk (*) While viewing a file directory, AtariWriter 80 allows you to print out a copy of the directory Select Print Directory You may also select Delete File, Load File, or Save File while viewing the index Note: You cannot view the AtariWriter 80 program disk's index 21
30 DELETING A FILE To delete, or erase, a file on disk, follow much the same procedure as when you save or load a file to or from disk. Here is the procedure: 1. Remove the AtariWriter 80 program disk and insert the data disk containing the file you want to delete 2. Go to the AtariWriter 80 main menu and select Delete File. The program prompts you to enter the FILE TO DELETE. Type D1: or D2: followed by the filename for the file you want to delete. (If you delete from drive 1, you may leave the D 1: out) After entering the filename, press [Return). 3. As a safety precaution, the program displays DELETE FILE, YIN? Type [Yl to delete the file from disk ([N], or any other key, aborts the process) Once the file is erased, the message SELECT ITEM appears Now check the disk's index for the file you just deleted You will see that the filename no longer appears. Important: Be absolutely certain that you want to delete the designated file. There is no getting a file back once It has been erased from disk. FORMATTING DISKS In order to store your text files, disks must be formatted to Atari DOS 2.0S or 2.5, but you need not write DOS files on the disks. As a part of the program itself, AtariWriter 80 already contains DOS 2.5. While it is always a good idea to keep an extra formatted disk on hand, you can also have AtariWriter 80 format a disk during a work session. Here's the procedure 1. Insert the disk you want to format in your disk drive (drive 1 or 2 only) and select Format Disk from the main menu. 22
31 2. The program asks you to enter the FORMAT DRIVE #. Type in the drive number 3. As a safety precaution, the program asks ARE YOU SURE, YIN? Type [v] to format the disk ([N], or any other key, aborts the process) If you have an Atari 1050 or XF551 disk drive, the program formats disks in enhanced-density. If you have an Atari 810 disk drive, the program formats in single-density An 810 cannot read enhanced-density disks, but a 1050 or XF551 can read and write to disks formatted in single-density. Important: Be absolutely certain that the drive you use contains the disk you want to format. Formatting erases all files that may already be on the disk. Write-protecting Disks Write-protect tabs are included with every package of disks. To prevent the accidental erasure of your files on disk, attach a write-protect tab to disks that contain important files. Once a disk is write-protected, it cannot be reformatted, nor can you save to, or delete from, the disk. Your Atari Proofreader Dictionary disk is permanently write-protected. HOW MUCH CAN YOU WRITE? The amount of text you can enter into your computer before it becomes full depends on how much free memory remains, and this in turn depends on how much RAM (Random Access Memory) your computer is equipped with. While creating or editing a file, you can check the amount of memory available by noting the number of BYTES FREE displayed in the message window. As you type in text, this number decreases. 23
32 .- With an Atari 800, 800XL, 1200XL, XE Game System, or 65XE Computer, AtariWriter 80 provides about 11,000 bytes of memory for any given text file. 130XE Note: The 130XE version provides three memory banks. Each bank contains 15,872 bytes, for a total of over 47,600 bytes of available memory. One byte is roughly equivalent to one typed character. You can figure on about 1500 bytes for each standard doublespaced page. It is always a good idea to leave yourself some margin of free memory, in case you want to add to a file later on. If your computer's free memory becomes full, the message 0 BYTES FREE appears. When this happens, you must stop writing, save the file, and start a new file with which to continue your document. 130XE and Bank-Switching note: When the message o BYTES FREE appears, go to the next memory bank to continue your document. Press [Start] [B) to go to the next bank. If you fill all three banks, you must save the file and continue the document with a clean slate. (For more information on memory banks, see 130XE Memory Banks in Chapter 3.) 24
33 CHAPTER 3 ADVANCED EDITING To show you more of what you can do with AtariWriter 80, this chapter covers the program's advanced and powerful features that do not directly involve printing (those will be covered in Chapter 4) OPERATIONS ON BLOCKS OF TEXT You will inevitably be faced with whole passages of text that you want to delete, move, or duplicate. AtariWriter 80 allows you to perform these operations on blocks of text without having to erase or retype them letter by letter or line by line You can also alphabetize a list of words or count the number of words in a given text block or file Operations on blocks of text typically require that you mark the block you want to work with. How to define a text block and execute an operation on that block are explained below for each particular operation. Important: When marking the beginning and end of a text block, always be sure the cursor is positioned on top of the last character in the block you have marked off before you press the key that executes the command. 130XE Note: You cannot define text blocks across memory bank boundaries. Whenever you delete, move, or duplicate a text block, that text is stored in the program's failsafe buffer. The capacity of the failsafe buffer is the number of BYTES FREE, as displayed in the message window. If you try to define a block that is larger than available memory for the failsafe buffer, the message FAILSAFE BUFFER OVER- FLOWED is displayed and the program will not allow you to perform an operation on that block. 25
34 130XE Note: The capacity of the failsafe buffer is about 13K, approximately 13,000 bytes. The failsafe buffer is changed each time you delete, move, or duplicate a block of text. To erase the contents of the failsafe buffer, press [Start] [El This will free-up available memory (except on the 130XE version, which does not use editing space for the failsafe buffer) Deleting Blocks of Text To delete a block of text, position the cursor on top of the first character of the passage you want to delete and press [Option] [Bl The program displays the message BEGINNING MARKED. Next, move the cursor down to the end of the block you want to delete. Now press [Option] [Delete Bk/Spl As a safety precaution, you are asked, DELETE BLOCK YIN? When you type [Yl AtariWriter 80 deletes that block of text. If you change your mind about deleting a block of text, type [Nl Important: If you make a mistake and delete a text block you want to keep, you can recover the text from the failsafe buffer: Position the cursor at the point you want to restore the text and press [Option] lxl. Deleting to the End of a File To delete all text from the current position of the cursor to the end of the file, press [Select] [DeletelBk spl You are asked, DELETE TO END OF FILE, YIN? Type [V] to delete the material. Important: When you use [Select] [Delete Bk/Spl the deleted text is not stored in the failsafe buffer. Once you delete the text there is no recovering it. 130XE Note: [Select] [Delete Bk/Sp] deletes everything from the current cursor position to the end of the current memory bank only. 26
35 Moving (Pasting) Blocks of Text The procedure for moving a block of text is much like that for deleting a block of text. Press [Option] [8] at the beginning of what you want to move and [Option] [Delete 8k/Sp] at the end. Type [V] when asked, DELETE BLOCK, YIN? AtariWriter 80 now deletes the specified text block from its old place, but stores the block in the failsafe buffer. Next, place the cursor where you want to position the text and press [Option] [X] The program inserts it at that point and displays the message PASTING COMPLETE. 130XE Note: You can move a block of text from one memory bank to another After deleting the block, press [Start] [8] to go to the desired bank. Place the cursor where you want the block moved to, then press [Option] [X] Just remember that the failsafe buffer will only hold about 13K. If you try to define a block of more than 13K, the program returns the message BLOCK TOO LONG Duplicating (Pasting) Blocks of Text Duplicating a block of text is a little different from deleting or moving a block of text. Press [Option] [8] at the beginning of the block and [Option] [E] at the end. The program displays the message, BLOCK DEFINED. AtariWriter 80 puts a copy of the defined text in the failsafe buffer. Next, position the cursor where you want to insert the duplicate text and press [Option] [X] The program inserts the text and displays the message PASTING COMPLETE. 130XE Note: You can duplicate a block of text from one memory bank to another. After defining the block as shown above, press [Start] [8] to go to the desired bank. Position the cursor where you want the block duplicated, then press [Option] [X] 27
36 ..- Alphabetizing Lists To alphabetize a list of words or phrases, place a [Return] after each word or phrase to be alphabetized. Mark the beginning of the list with [Option] [B]. Move the cursor to the end of the list and press [Option] [A] to alphabetize the list. The cursor must be on a carriage return when you press [Option] [A]. The message ALPHABETIZING appears in the message window and disappears when the process is complete. This process takes time when alphabetizing long blocks, so be patient. Important: Strings of alphabetized characters cannot be more than 250 characters in length. Also, the program sequences numbers before it alphabetizes words. Counting the Number of Words To count the number of words in a file, press [Option] [W]. The number of words appears in the message window. The program defines a word as any string of characters separated from the next string with spaces. To count the number of words in only part of a file, mark the beginning of the block with [Option] [B]. Position the cursor at the end of the block and press [Option] [W]. SEARCH AND REPLACE AtariWriter 80 will search out and replace any string of characters up to 37 characters in length wherever it appears in a text file. To use the search-and-replace function, first position the cursor at the top of your text file, then press [Start] [S]. The program prompts you to enter the SEARCH STRING Type in the word or phrase and press [Return]. 28
37 Now press [Start] [R] At this point. AtariWriter 80 prompts you to enter the REPLACE STRING, which may be up to 37 characters in length Type in the word or phrase and press [Return] Next press [Select] [S] The cursor moves to the first occurrence of the string in your file and displays the message STRING FOUND. Finally, press [Select] [R] to replace the old string with the new one The program remembers your search-and-replace strings until you define new ones. There are two ways to search and replace on a case-bycase basis first, you can view, then replace, the old string with the new by pressing [Select] [S] and [Select] [R] as described above, or, you can simply press [Select] [R] to replace each occurrence, one at a time. Additionally, you can search for a string from any point in your file back through to the the top of the file by pressing [Select] [U] 130XE Note: To do a search-and-replace into the next memory bank, simply go to the next bank You do not have to redefine your original search-and-replace strings Global Replace You need not replace a string on a case-by-case basis only Once you have defined the search-and-replace strings, press [Option] [G] The program will search and replace globally--from the current position of the cursor to the end of your file When the process is complete, the program displays the message GLOBAL SEARCH/REPLACE COMPLETE. 29
38 130XE Note: A global replace operation will not continue across memory bank boundaries. To continue a global replace in the next bank, you must go to the next bank. You do not have to redefine the search-and-replace strings when you move to the next bank. Notes on Search-and-Replace The search-and-replace function is an extremely useful tool, but it must be used precisely. Look over the four uses of this function listed below: 1. When you enter a SEARCH STRING, you must type it exactly as it appears in the text file. When the string is a single short word, like "son," which might appear in your file as part of longer words, it is a good idea to type in blank spaces before and after it. If you do this, however, be sure to include the same blank spaces before and after your REPLACE STRING. 2. The program will search and replace control characters. 3. As in DOS, AtariWriter 80 allows you to use the question mark (?) as a stand-in, or wildcard, for any character, 4. You can also use the search-and-replace function as a search-and-delete tool. To do this, press [Return] when AtariWriter 80 asks for the REPLACE STRING ADVANCED DISK OPERATIONS Merging Files This feature allows you to merge a file you have previously saved with the file in memory. Keep in mind that you run the risk of overflowing your computer's free memory 30
39 To merge one file with another, first position the cursor where you want the merged file to appear. Now press [Option] [L). The program prompts you to enter the FILE TO MERGE. This prompt works just like Load File on the main menu--type in the filename and press [Returnl Important: If AtariWriter 80 finds that your computer's free memory has been used up in the process, the messages MEMORY FULL and 0 BYTES FREE appear in the message window At this point, merging is halted. Always be certain there is enough free memory to accommodate the file you wish to merge. 130XE Note: You cannot merge a file across memory bank boundaries. Whenever merging a file, make certain there is enough memory in the current bank to contain the file Saving a Portion of a File To save only a portion of the file you are working on, mark the beginning of the block with [Option] [B) Position the cursor at the end of the block and press [Option] [S] The program prompts you to enter the FILE TO SAVE. This prompt works just like the Save File option on the main menu--type in a filename and press [Return] 130XE MEMORY BANKS Here are some notes and reminders about the 130XE's three memory banks. 1. While writing or editing a file, press [Start] [B) to go to the next bank. 2. When returning to a bank, the cursor is positioned at the point at which you last exited the bank. 3. Free Memory Clean-Up Use [Option] [F) to evenly redistribute free memory The command takes all the text in all the banks and redistributes it equally among the three banks. 31
40 w- This command is especially useful if you have filled, say, bank 1 but would like more memory in bank 1 with which to add text. The cursor position may otherwise be lost during redistribution, so the clean-up should be done at the top of bank 1. PROGRAMMING CAPABILITY You can use AtariWriter 80 to write and edit computer programs, which gives you greater editing power than within a programming language. Writing a program is as easy as selecting Create File, then typing in your program. Save ASCII To save the program, go to the main menu and press [Control] [S). (You must have the main menu displayed.) This will save the file as ASCII characters only, omitting AtariWriter 80's global print formatting commands. Now load a programming language such as Atari BASIC or the Atari Macro Assembler and Program-Text Editor into your computer. Then ENTER rather than LOAD the program file from disk, and compile or run it as you wish. Particularly if you plan to edit or add to the file later on, LIST rather than SA VE it when you have finished compiling or running it. COMPATIBILITY WITH OTHER WORD PROCESSORS AtariWriter 80 can read any Atari DOS 2.0S or 25 file from disk. It is compatible with AtariWriter and AtariWriter Plus, as well as with non Atari programs that are compatible with DOS 2.0S or
41 AtariWriter You can load an AtariWriter or AtariWriter Plus file directly Into your computer using AtariWriter 80. All AtariWriter print formatting commands have been retained, so there is no need to delete a print formatting command within a file. However, you must delete the AtariWriter print formatting line at the top of the file. All of the global format commands are included within the Global Format screen (accessed from the main menu) in AtariWriter 80. Reading a Non Atari File You can load a file written using non Atari word processing programs (provided the file is compatibly formatted to Atari DOS 2.0S or 25), then edit, reformat, print, and save it using AtariWriter 80. Creating a Non Atari File To go from AtariWriter 80 to non Atari files (either word processing programs that read Atari DOS 2.0S or 2.5 files, or non Atari terminal programs), you must save your AtariWriter 80 file using the Save ASCII ([Control] [5)) command as described above This will save the file without including AtariWriter 80's global print formatting values. However, the Save ASCII command will not prevent any formatting commands entered within the file itself from being saved. (These formatting commands are most likely incompatible with, and possibly disruptive to, the non Atari word processor or terminal program) Delete these commands before using the Save ASCII command. 33
42
43 CHAPTER 4 PRINT FORMATTING AND STYLING AtariWriter 80 prints any given file according to a set of print formatting values. These are entered with the program's print formatting commands. The formatting commands allow you to print your written work in just about any shape you wish. Some of these commands, which are present on the Global Format screen, control the overall format of your text file. Others must be entered within your text file while you are writing or editing it, and are used to specify variations from the overall format. In the next several pages, you will find instructions for using all the program's formatting commands, along with some suggestions for using most of them in shaping up and styling your written work. PRINT PREVIEW As you experiment with various formatting commands, try printing several copies of a file, formatted in different ways, to see the results on paper. Use the Print Preview option at any time while writing or editing a document. This feature of the program allows you to examine a file on the screen much as it will appear on paper. Here is how to preview a file. With a file in memory, the text screen displayed, and the cursor at the top of the file, press [Option] [P] for Print Preview. You see the message NOW ON PAGE NUMBER 1. The upper-left corner of your first page, formatted as if printed, now appears on screen. Use the cursor movement controls to scroll down and to the right to view the rest of the page. 35
44 All four cursor controls ([Control] [Arrow Keys)) are valid in Print Preview. By default, they move the cursor nine spaces in the specified direction. Press [1] through [9] (while in Print Preview only) to change the number of spaces these controls move the cursor. In addition, Print Preview has a few special cursor controls that are valid only when previewing a file. They are: [Option] [Left Arrow] [Option] [Right Arrow] [Return] 28 spaces to the left 28 spaces to the right Left margin LINE: = 'J COLUMN =11 PRESS SPACE TO CONTINUE NOW ON PAGE NUMBER 1 For e x asep t e.. text that is e t onseree wi 11 be displayed with an extra character space between the characters and words. This is oe c aus e when printed., the elongated characters w.llbetwlceaswideasnormal. This 15 how It will look. During Print Preview, the line number and column number of the cursor, noted in the message window, show you where your cursor is on the formatted page To preview the next page of your file, press [Space Bar] to continue You can also preview selected pages of a file. While in the edit mode, position the cursor where you want to begin previewing As the program formats the document for previewing, the message NOW ON PAGE NUMBER--is displayed until the program reaches the point where you want to begin previewing then the specified formatted page comes up on your screen 36
Microsoft Office Word. Part1
 Microsoft Office 2010 - Word Part1 1 Table of Contents What is Microsoft Word?... 4 Creating a document... 5 Toolbar... 6 Typing in MS Word Text Area... 7 Cut, Copy and Paste Text... 9 Paste Preview...
Title bar: The top most bar in Word window that usually displays the document and software names.
 1 MICROSOFT WORD Table of Contents LINC ONE Hiding Standard toolbar, Formatting toolbar, and Status bar: To hide the Standard toolbar, click View Toolbars on the Menu bar. Check off Standard. To hide the
Open Book Format.docx. Headers and Footers. Microsoft Word Part 3 Office 2016
 Microsoft Word Part 3 Office 2016 Open Book Format.docx Headers and Footers If your document has a page number, you already have a header or footer (and can double click on it to open it). If you did not
Part 1 : Easy Working Writer for the IBM~PC &
 READ THIS MESSAGE! This program operates on three types of computers: IBM-PC and compatible computers, Apple II Series computers, and Commodore 64 computers. This manual contains documentation for all
What is a Word Processor?
 What is a Word Processor? Whether you're a student facing a term paper, a business professional with frequent reports to write, or an aspiring novelist, ST Writer can help you beat those deadlines -- with
Copyright 1984 VisiCorp All Rights Reserved. Printed in U.S.A.
 Copyright 1984 VisiCorp All Rights Reserved. Printed in U.S.A. Visi On Word Program Copyright 1984 VisiCorp All Rights Reserved. Epson MX-80 TM is a trademark of Epson America, Inc. Visi OnTM, Visi On
Contents. Launching Word
 Using Microsoft Office 2007 Introduction to Word Handout INFORMATION TECHNOLOGY SERVICES California State University, Los Angeles Version 1.0 Winter 2009 Contents Launching Word 2007... 3 Working with
Introduction to Microsoft Office 2016: Word
 Introduction to Microsoft Office 2016: Word Last Updated: September 2018 Cost: $2.00 Microsoft Word is a word processing software. You can use it to type letters, reports, and other documents. This class
Opening Microsoft Word. 1. Double click the Word 2016 icon on the desktop to launch word.
 Intro to Microsoft Word 2016 Class Description: This class will provide an introduction to the word processing program Microsoft Word 2016. Learn how to create a simple document, edit and format text,
Word for Research Writing I: Text and Structure
 Word for Research Writing I: Text and Structure Last updated: 10/2017 Shari Hill Sweet dteditor@nd.edu or 631-7545 1. The Graduate School Template...1 1.1 Document structure... 1 1.1.1 Beware of Section
Copyright 2004, Mighty Computer Services
 EZ-GRAPH DATABASE PROGRAM MANUAL Copyright 2004, Mighty Computer Services The Table of Contents is located at the end of this document. I. Purpose EZ-Graph Database makes it easy to draw and maintain basic
Microsoft Office 2003 Beginning Microsoft Word
 Microsoft Office 2003 Beginning Microsoft Word Objective 1: Become acquainted with the Microsoft Word environment. Toolbars Standard Toolbar Formatting Toolbar Toolbars provide easy access to commonly
WORD XP/2002 USER GUIDE. Task- Formatting a Document in Word 2002
 University of Arizona Information Commons Training Page 1 of 21 WORD XP/2002 USER GUIDE Task- Formatting a Document in Word 2002 OBJECTIVES: At the end of this course students will have a basic understanding
EVE WORKSHOP A practical introduction to the Extensible VAX Editor (2nd Edition)
") EVE WORKSHOP A practical introduction to the Extensible VAX Editor (2nd Edition) Adrian P Robson The University of Northumbria at Newcastle 26 March, 1994 c 1994, 2011 A. P. Robson Abstract A short workshop
EVE WORKSHOP A practical introduction to the Extensible VAX Editor (2nd Edition) Adrian P Robson The University of Northumbria at Newcastle 26 March, 1994 c 1994, 2011 A. P. Robson Abstract A short workshop
2 Frequently Asked... Questions. 4 How Do I... 1 Working within... Entries
 Contents I Table of Contents Part I Welcome 6 1 Welcome... 6 2 Frequently Asked... Questions 6 Part II Getting Started 6 1 Getting Started... 6 2... 7 Create a New Database... 7 Open an Existing... Database
Microsoft Word Important Notice
 Microsoft Word 2013 Important Notice All candidates who follow an ICDL/ECDL course must have an official ICDL/ECDL Registration Number (which is proof of your Profile Number with ICDL/ECDL and will track
PS TEXT EDIT and PS TEXT FORMAT User s Guide
 Information Management Technology Library PS TEXT EDIT and PS TEXT FORMAT User s Guide Part Number 058060 Tandem Computers Incorporated Document History Edition Part Number Product Version OS Version Date
Microsoft Word Introduction
 Academic Computing Services www.ku.edu/acs Abstract: This document introduces users to basic Microsoft Word 2000 tasks, such as creating a new document, formatting that document, using the toolbars, setting
Introduction to Microsoft Word 2010
 Introduction to Microsoft Word 2010 THE BASICS PAGE 02! What is Microsoft Word?! Opening Microsoft Word! The Title Bar! Page View and Zoom MENUS...PAGE 03! Quick Access Toolbar! The Ribbon! File Tab! Home
Intro to Microsoft Word
 Intro to Microsoft Word A word processor is a computer program used to create and print text documents that might otherwise be prepared on a typewriter. The key advantage of a word processor is its ability
Word - Basics. Course Description. Getting Started. Objectives. Editing a Document. Proofing a Document. Formatting Characters. Formatting Paragraphs
 Course Description Word - Basics Word is a powerful word processing software package that will increase the productivity of any individual or corporation. It is ranked as one of the best word processors.
Using nu/tpu on UNIX Last revised: 1/28/00
 Using nu/tpu on UNIX Last revised: 1/28/00 nu/tpu is a general-purpose text editor available on UNIX that simulates the TPU editor available on VMS operating systems. By default nu/tpu emulates the EDT
Word Processing. 3.1 Using the Application
 03 1371 ch03 3/17/04 8:09 AM Page 45 3............................................. Word Processing 3.1 Using the Application 3.1.1 First Steps With Word Processing 1. Which of the following will launch
Microsoft Word Part I Reference Manual
 Microsoft Word 2002 Part I Reference Manual Instructor: Angela Sanderson Computer Training Coordinator Updated by: Angela Sanderson January 11, 2003 Prepared by: Vi Johnson November 20, 2002 THE WORD SCREEN
University of Sunderland. Microsoft Word 2007
 Microsoft Word 2007 10/10/2008 Word 2007 Ribbons you first start some of the programs in 2007 Microsoft Office system, you may be surprised by what you see. The menus and toolbars in some programs have
Understanding PowerPoint s Text Capabilities
 Page 1 of 14 Chapter 3: Working with Text In this chapter z Understanding PowerPoint s Text Capabilities z Adding Text z Formatting Text z Using Bullets z Using Numbered Lists z Checking Spelling and Style
SKILL AREA 210: USE A WORD PROCESSING SOFTWARE. Lesson 1: Getting Familiar with Microsoft Word 2007 for Windows...5
 Contents Microsoft Word 2007...5 Lesson 1: Getting Familiar with Microsoft Word 2007 for Windows...5 The Microsoft Office Button...6 The Quick Access Toolbar...6 The Title Bar...6 The Ribbon...6 The Ruler...6
DOCUMENTATION CHANGE NOTICE
 DOCUMENTATION CHANGE NOTICE Product/Manual: WORDPERFECT 5.1 WORKBOOK Manual(s) Dated: 12/90, 6/91 and 8/91 Machines: IBM PC and Compatibles This file documents all change made to the documentation since
Microsoft Word 2007 Essential Skills
 The "Anatomy" of the Word Window The typical program window will look similar to that shown below. It is possible to customize your own display, but that is a topic for discussion later on. OFFICE BUTTON
The first time you open Word
 Microsoft Word 2010 The first time you open Word When you open Word, you see two things, or main parts: The ribbon, which sits above the document, and includes a set of buttons and commands that you use
Understanding Word Processing
 Understanding Word Processing 3.0 Introduction In this chapter you are going to learn how to create a simple memo or note or a complex and complicated multi column business document using word processing
Basic Microsoft Word
 (Demonstrated using Windows XP) An Introduction to Word Processing Adapted from Taskstream Word Tutorial (2005) < http://www.taskstream.com > Updated 4/05 by Dr. Bruce Ostertag What can Microsoft Word
MICROSOFT WORD 2010 BASICS
 MICROSOFT WORD 2010 BASICS Word 2010 is a word processing program that allows you to create various types of documents such as letters, papers, flyers, and faxes. The Ribbon contains all of the commands
The American University in Cairo. Academic Computing Services. Word prepared by. Soumaia Ahmed Al Ayyat
 The American University in Cairo Academic Computing Services Word 2000 prepared by Soumaia Ahmed Al Ayyat Spring 2001 Table of Contents: Opening the Word Program Creating, Opening, and Saving Documents
Office Wo Office W r o d r 2007 Revi i ng and R d Refifini ng a D Document
 Office Word 2007 Lab 2 Revising i and Refining i a Document In this lab, the student will learn more about editing documents They will learn to use many more of the formatting features included in Office
Microsoft Word Part 3 Office 2013
 Microsoft Word Part 3 Office 2013 Hyperlinks When a document is sent as an electronic copy, hyperlinks can be added to direct the reader to a web page. To add a hyperlink: Highlight the word, phrase, paragraph,
Introduction to Microsoft Word 2010
 1 Introduction to Microsoft Word 2010 Handout from Lodi Memorial Library (Developed by Barb Hauck Mah for ESL Tech Literacy Grant; Modified by Jennifer Cohen Feb. 2015) What is Microsoft Word? Microsoft
Introduction to MS Word XP 2002: An Overview
 Introduction to MS Word XP 2002: An Overview Sources Used: http://www.fgcu.edu/support/office2000/word/files.html Florida Gulf Coast University Technology Skills Orientation Word 2000 Tutorial The Computer
Word for Research Writing I: Text and Structure
 Word for Research Writing I: Text and Structure Last updated: 12/2017 Shari Hill Sweet dteditor@nd.edu or 631-7545 1. The Graduate School Template... 1 1.1 Document structure... 1 1.1.1 Beware of Section
MICROSOFT WORD. Table of Contents. What is MSWord? Features LINC TWO
 Table of Contents What is MSWord? MS Word is a word-processing program that allows users to create, edit, and enhance text in a variety of formats. Word is a powerful word-processor with sophisticated
Chapter 12 Creating Tables of Contents, Indexes and Bibliographies
 Writer Guide Chapter 12 Creating Tables of Contents, Indexes and Bibliographies OpenOffice.org Copyright This document is Copyright 2005 by its contributors as listed in the section titled Authors. You
Emacs Tutorial. Creating or Opening a File. Geog 405/605 Computer Programming for Environmental Research Fall 2018
 An Emacs tutorial generated by its authors is available online by typing control-h t from within an editing session. It is not good. This tutorial is written for an audience that is assumed to have used
4D Write. User Reference Mac OS and Windows Versions. 4D Write D SA/4D, Inc. All Rights reserved.
 4D Write User Reference Mac OS and Windows Versions 4D Write 1999-2002 4D SA/4D, Inc. All Rights reserved. 4D Write User Reference Version 6.8 for Mac OS and Windows Copyright 1999 2002 4D SA/4D, Inc.
E550W INTRODUCTION EDITING A LABEL LABEL PRINTING USING THE FILE MEMORY USING P-TOUCH SOFTWARE NETWORK RESETTING & MAINTENANCE TROUBLESHOOTING
 E0W In order to use your P-touch safely, read the included Quick Setup Guide first. Read this guide before you start using your P-touch. Keep this guide in a handy place for future reference. Please visit
Word 2000 MICROSOFT. Level Three Advanced. Version N1.2
 MICROSOFT Word 2000 Level Three Advanced Version N1.2 ICT Training First Floor Victoria House Queen Alexandra Hospital Cosham PO6 3LY Tel: 023 9228 6000 ext: 5867 Email: ICT.Training@porthosp.nhs.uk Website:
Using Microsoft Word. Getting Started With Word. Exercise 1 Starting the Program
 Using Microsoft Word Getting Started With Word Exercise 1 Starting the Program There are several ways to start a program in Microsoft Windows and they may include the following: Clicking an icon on the
Tips & Tricks for Microsoft Word
 T 330 / 1 Discover Useful Hidden Features to Speed-up Your Work in Word For what should be a straightforward wordprocessing program, Microsoft Word has a staggering number of features. Many of these you
Microsoft Office Word 2010
 Microsoft Office Word 2010 Content Microsoft Office... 0 A. Word Basics... 4 1.Getting Started with Word... 4 Introduction... 4 Getting to know Word 2010... 4 The Ribbon... 4 Backstage view... 7 The Quick
Word 2007/10/13 1 Introduction
 Objectives Word 2007/10/13 1 Introduction Understand the new Word 2007 Interface Navigate the Office button Learn about the Quick Access menu Navigate the Ribbon menu interface Understand the I-beam Learn
DATA WORD MANAGER WORD PROCESSING INSTRUCTION MANUAL MOULTON PARKWAY, SUITE B10. LAGUNA HILLS. CA 1714) CORPORATION
 CORPORATION") DATA CORPORATION WORD MANAGER WORD PROCESSING INSTRUCTION MANUAL 23011 MOULTON PARKWAY, SUITE B10. LAGUNA HILLS. CA 92653 1714)770-2366 WORD MANAGER WORD PROCESSING INSTRUCTION MANUAL WRITTEN BY PAT ADAMSON
DATA CORPORATION WORD MANAGER WORD PROCESSING INSTRUCTION MANUAL 23011 MOULTON PARKWAY, SUITE B10. LAGUNA HILLS. CA 92653 1714)770-2366 WORD MANAGER WORD PROCESSING INSTRUCTION MANUAL WRITTEN BY PAT ADAMSON
Word 97: Increasing Efficiency
 Windows 95 Word 97: Increasing Efficiency Increasing Your Efficiency Word for Windows has a number of features that can help you perform word processing tasks more quickly or to increase efficiency by
Easy Windows Working with Disks, Folders, - and Files
 Easy Windows 98-3 - Working with Disks, Folders, - and Files Page 1 of 11 Easy Windows 98-3 - Working with Disks, Folders, - and Files Task 1: Opening Folders Folders contain files, programs, or other
Indispensable tips for Word users
 Indispensable tips for Word users No matter how long you've been using Microsoft Word, you can always learn new techniques to help you work faster and smarter. Here are some of TechRepublic's favorite
WORD BASICS: MICROSOFT OFFICE 2010
 WORD BASICS: MICROSOFT OFFICE 2010 GETTING STARTED PAGE 02 Prerequisites What You Will Learn USING MICROSOFT WORD PAGE 03 Microsoft Word Components The Keyboard SIMPLE TASKS IN MICROSOFT WORD PAGE 08 Typing
Word Introduction SBCUSD IT Training Program. Word Introduction. Page Setup, Paragraph Attributes, Printing and More.
 SBCUSD IT Training Program Word Introduction Page Setup, Paragraph Attributes, Printing and More Revised 2/15/2018 SBCUSD IT Training Page 1 CONTENTS Cursor Movement... 4 Selecting Text... 5 Font/Typeset
Microsoft Word 2010 Basics
 1 Starting Word 2010 with XP Click the Start Button, All Programs, Microsoft Office, Microsoft Word 2010 Starting Word 2010 with 07 Click the Microsoft Office Button with the Windows flag logo Start Button,
MULTIMEDIA TRAINING KIT INTRODUCTION TO OPENOFFICE.ORG WRITER HANDOUT
 MULTIMEDIA TRAINING KIT INTRODUCTION TO OPENOFFICE.ORG WRITER HANDOUT Developed by: Anna Feldman for the Association for Progressive Communications (APC) MULTIMEDIA TRAINING KIT...1 INTRODUCTION TO OPENOFFICE.ORG
The Everex Scheduler TM Program
 ~~IVERE The Everex Scheduler TM Program OWNER'S MANUAL AND REFERENCE GUIDE (VERSION 2.0) EVER for EXcellence MAN-00039-20 The Everex Scheduler Program OWNER'S MANUAL AND REFERENCE GUIDE (VERSION 2.0) EVEREX
Word Processing. Delete text: Allows you to erase characters, words, lines, or pages as easily as you can cross them out on paper.
 Word Processing Practice Of all computer applications, word processing is the most common. To perform word processing, you need a computer, a special program called a word processor, and a printer. A word
MLP (Multi-Link Programming) SOFTWARE
 SOFTWARE") FOR REVISIONS 1.10 AND ABOVE Doc-6001005 Rev - 3380 USER'S GUIDE TO MLP (Multi-Link Programming) SOFTWARE CHATSWORTH, CALIFORNIA Multi-Link Programming software makes programming a chain of Sentex Infinity
FOR REVISIONS 1.10 AND ABOVE Doc-6001005 Rev - 3380 USER'S GUIDE TO MLP (Multi-Link Programming) SOFTWARE CHATSWORTH, CALIFORNIA Multi-Link Programming software makes programming a chain of Sentex Infinity
Word 2016 Advanced. North American Edition SAMPLE
 Word 2016 Advanced Word 2016 Advanced North American Edition WORD 2016 ADVANCED Page 2 2015 Cheltenham Group Pty. Ltd. All trademarks acknowledged. E&OE. No part of this document may be copied without
Introduction to Microsoft Office PowerPoint 2010
 Introduction to Microsoft Office PowerPoint 2010 TABLE OF CONTENTS Open PowerPoint 2010... 1 About the Editing Screen... 1 Create a Title Slide... 6 Save Your Presentation... 6 Create a New Slide... 7
Working with Tables in Word 2010
 Working with Tables in Word 2010 Table of Contents INSERT OR CREATE A TABLE... 2 USE TABLE TEMPLATES (QUICK TABLES)... 2 USE THE TABLE MENU... 2 USE THE INSERT TABLE COMMAND... 2 KNOW YOUR AUTOFIT OPTIONS...
PUREEDGE VIEWER User s Manual v6.5
 PUREEDGE VIEWER User s Manual v6.5 Revision 3, October 7, 2005. Copyright 2005 IBM Corporation. All rights reserved. U.S. Government Restricted Rights. The Product is provided with RESTRICTED RIGHTS. Use,
Modul ke: Aplikasi Komputer. Pengenalan Ms. Word. Fakultas FASILKOM. Program Studi Sistem Informasi
 Modul ke: 02 Devi Fakultas FASILKOM Aplikasi Komputer Pengenalan Ms. Word Fitrianah Program Studi Sistem Informasi Pendahuluan Microsoft Word is a word processing program used to create: Letters Memos
Unit Microsoft Word. Microsoft Word is the word processor included in Office. Word is one of the most popular word processors.
 Unit 4 1. Microsoft Word. Microsoft Word is the word processor included in Office. Word is one of the most popular word processors. Unformatted text documents have the extension TXT. Word documents have
W o r d M i c r o s o f t O f f i c e. T r a i n i n g O b j e c t i v e s. w w w. c l a y t o n c o u n t y g a. g o v
 Forest Park Branch Monday-Tuesday 9:00 a.m. 9:00 p.m. 4812 West St. Forest Park, GA 30297(770) 347-0160 Wednesday-Friday Saturday 9:00 a.m. 6:00 p.m. 9:00 a.m. 5:00 p.m. M i c r o s o f t O f f i c e Headquarters
Word 2010 Beginning. Technology Integration Center
 Word 2010 Beginning File Tab... 2 Quick Access Toolbar... 2 The Ribbon... 3 Help... 3 Opening a Document... 3 Documents from Older Versions... 4 Document Views... 4 Navigating the Document... 5 Moving
Figure 1: Patent Architect Toolbar
 TM Claims The Claims buttons are used to add or modify the claims of a patent application. To fully take advantage of Patent Architect's features, the claims should be written before any other section
Using Microsoft Word. Table of Contents
 Using Microsoft Word Table of Contents The Word Screen... 2 Document View Buttons... 2 Selecting Text... 3 Using the Arrow Keys... 3 Using the Mouse... 3 Line Spacing... 4 Paragraph Alignment... 4 Show/Hide
Writing Practice Tool Guide
 Writing Practice Tool Guide Virginia Standards of Learning Grades 5, 8, & End-of-Course (EOC) Writing February, 2013 Pearson 1 Revised February 14, 2013 Table of Contents OVERVIEW... 3 SYSTEM REQUIREMENTS
MICROSOFT WORD 2010 Quick Reference Guide
 MICROSOFT WORD 2010 Quick Reference Guide Word Processing What is Word Processing? How is Word 2010 different from previous versions? Using a computer program, such as Microsoft Word, to create and edit
Part II: Creating Visio Drawings
 128 Part II: Creating Visio Drawings Figure 5-3: Use any of five alignment styles where appropriate. Figure 5-4: Vertical alignment places your text at the top, bottom, or middle of a text block. You could
Parts of Computer hardware Software
 Parts of Computer Parts of Computer If you use a desktop computer, you might already know that there is not any single part called the "computer." A computer is really a system of many parts working together.
Beginning a presentation
 L E S S O N 2 Beginning a presentation Suggested teaching time 40-50 minutes Lesson objectives To learn how to create and edit title and bullet slides, you will: a b c d Select slide types by using the
Computer Nashua Public Library Introduction to Microsoft Word 2010
 Microsoft Word is a word processing program you can use to write letters, resumes, reports, and more. Anything you can create with a typewriter, you can create with Word. You can make your documents more
Corel Ventura 8 Introduction
 Corel Ventura 8 Introduction Training Manual A! ANZAI 1998 Anzai! Inc. Corel Ventura 8 Introduction Table of Contents Section 1, Introduction...1 What Is Corel Ventura?...2 Course Objectives...3 How to
User s guide to using the ForeTees TinyMCE online editor. Getting started with TinyMCE and basic things you need to know!
 User s guide to using the ForeTees TinyMCE online editor TinyMCE is a WYSIWYG (what you see is what you get) editor that allows users a familiar word-processing interface to use when editing the announcement
Microsoft Word 2010 Part 1: Introduction to Word
 CALIFORNIA STATE UNIVERSITY, LOS ANGELES INFORMATION TECHNOLOGY SERVICES Microsoft Word 2010 Part 1: Introduction to Word Summer 2011, Version 1.0 Table of Contents Introduction...3 Starting the Program...3
The major change in Word is the ribbon toolbar. The File menu has been replaced with a button.
 Word 2007 There are a lot of new changes to Office 2007. This handout will provide a few examples on how to do basic formatting. If at any point you get stuck, remember that Office has a feature that allows
Setup Contacts Add Compose Letter Compose Letter
 17 WORD-RITE Now that we have explored the Contacts and Campaigns sections of the program, it is time to work with WordRite, the integrated, full-function Rich Text word processor that is included with
Accessibility Aids in Microsoft Word 2010
 Accessibility Aids in Microsoft Word 2010 This document explains how to use many of Microsoft Word's accessibility features in order to improve productivity. It is assumed all users have a working knowledge
Lesson 2 Quick Tour and Features
 Lesson 2 Quick Tour and Features Objectives Students will format a document page. Students will use a spell-checker. Students will copy, cut, and paste text. Students will adjust paragraph indentations.
TLMC SHORT CLASS: THESIS FORMATTING
 Table of Contents Introduction... 2 Getting Help... 2 Tips... 2 Working with Styles... 3 Applying a Style... 3 Creating A New Style... 3 Setting Margins... 4 Adding Page Numbers... 5 Step 1: Using Sections
EXCEL BASICS: MICROSOFT OFFICE 2007
 EXCEL BASICS: MICROSOFT OFFICE 2007 GETTING STARTED PAGE 02 Prerequisites What You Will Learn USING MICROSOFT EXCEL PAGE 03 Opening Microsoft Excel Microsoft Excel Features Keyboard Review Pointer Shapes
In Depth: Writer. The word processor is arguably the most popular element within any office suite. That. Formatting Text CHAPTER 23
 CHAPTER 23 In Depth: Writer The word processor is arguably the most popular element within any office suite. That said, you ll be happy to know that OpenOffice.org s Writer component doesn t skimp on features.
Software Revision 1.13
 Software Revision 1.13 OVERVIEW...1 REAR PANEL CONNECTIONS...1 TOP PANEL...1 MENU AND SETUP FUNCTIONS...3 CHOOSE FIXTURES...3 PATCH FIXTURES...4 PATCH CONVENTIONAL DIMMERS...4 COPY FIXTURE...5 LOAD FIXTURE
Word 2016 Tips. Rylander Consulting
 Word 2016 Tips Rylander Consulting www.rylanderconsulting.com sandy@rylanderconsulting.com 425.445.0064 Word 2016 i Table of Contents Screen Display Tips... 1 Create a Shortcut to a Recently Opened Document
Microsoft Word Lecture 9. By lec. (Eng.) Hind Basil University of technology Department of Materials Engineering
 Hind Basil University of technology Department of Materials Engineering") Microsoft Word Lecture 9 By lec. (Eng.) Hind Basil University of technology Department of Materials Engineering Microsoft Word (often called Word) is graphical word processing program that users can type
Microsoft Word Lecture 9 By lec. (Eng.) Hind Basil University of technology Department of Materials Engineering Microsoft Word (often called Word) is graphical word processing program that users can type
FSEDIT Procedure Windows
 25 CHAPTER 4 FSEDIT Procedure Windows Overview 26 Viewing and Editing Observations 26 How the Control Level Affects Editing 27 Scrolling 28 Adding Observations 28 Entering and Editing Variable Values 28
You've never had it SO EASY.
 You've never had it SO EASY. A friendly Word from the people at Microsoft. If you've been cautious about buying a word processing program, more power to you. This is your reward. M icrosoft Word. Now you
formatted diskette write-protect notch track (one revolution) sector (section of track) timing hole read-write area
 sector (section of track) timing hole read-write area") 1 Introducing DOS 3 3 Gelling started with DOS 6 Looking at a file index 7 Help with DOS 8 Initializing a diskette 11 Duplicating a diskette 14 Naming and referring to files 17 To cartridge from DOS 18
1 Introducing DOS 3 3 Gelling started with DOS 6 Looking at a file index 7 Help with DOS 8 Initializing a diskette 11 Duplicating a diskette 14 Naming and referring to files 17 To cartridge from DOS 18
Item Number Change for Sage Accpac ERP
 SAGE ACCPAC Sage Accpac Options Item Number Change for Sage Accpac ERP User Guide 2008 Sage Software, Inc. All rights reserved. Sage Software, Sage Software logos, and all Sage Accpac product and service
Word Processing Basics Using Microsoft Word
 Word Processing Basics Using Microsoft Word lab 3 Objectives: Upon successful completion of Lab 3, you will be able to Use Word to create a simple word processing document Understand the concept of word
What is Word? How to Open Word. Intro to Word 2010 by Lodi Memorial Library Developed by Barb Hauck-Mah for ESL Literacy Grant
 Intro to Word 2010 by Lodi Memorial Library Developed by Barb Hauck-Mah for ESL Literacy Grant What is Word? Word is a computer software program that has many tools for typing and editing documents with
DRAFT. Table of Contents About this manual... ix About CuteSITE Builder... ix. Getting Started... 1
 DRAFT Table of Contents About this manual... ix About CuteSITE Builder... ix Getting Started... 1 Setting up... 1 System Requirements... 1 To install CuteSITE Builder... 1 To register CuteSITE Builder...
Microsoft Word: Steps To Success (The Bare Essentials)
") Microsoft Word: Steps To Success (The Bare Essentials) Workbook by Joyce Kirst 2005 Microsoft Word: Step to Success (The Bare Essentials) Page Contents 1 Starting Word 2 Save 3 Exit 5 Toolbars, Alignment,
Microsoft Word: Steps To Success (The Bare Essentials) Workbook by Joyce Kirst 2005 Microsoft Word: Step to Success (The Bare Essentials) Page Contents 1 Starting Word 2 Save 3 Exit 5 Toolbars, Alignment,
Introduction to Microsoft Word 2010
 Introduction to Microsoft Word 2010 Microsoft Word is a word processing program you can use to write letters, resumes, reports, and more. Anything you can create with a typewriter, you can create with
Windows XP. A Quick Tour of Windows XP Features
 Windows XP A Quick Tour of Windows XP Features Windows XP Windows XP is an operating system, which comes in several versions: Home, Media, Professional. The Windows XP computer uses a graphics-based operating
MS WORD. You can use it for writing letters, reports and so on.
 MS WORD MS WORD 2 You can use it for writing letters, reports and so on. Starting Word application 3 To start MS. Word do the following: 1. From the Start button on the taskbar, select All Programs. 2.