BR-Receipts User's Guide
|
|
|
- Holly Dawson
- 6 years ago
- Views:
Transcription
1 BR-Receipts User's Guide Version A USENG
2 Copyright 2016 Brother Industries, Ltd. All Rights Reserved. PDFlib (C) , PDFlib GmbH and Thomas Merz. JPEGlib (C) 1998 Independent JPEG Group. QuickBooks SDK The copyright and its proprietary rights reserved by Intuit Inc. Tiff G3 Lib License Copyright (c) Sam Leffler Copyright (c) Silicon Graphics, Inc. Permission to use, copy, modify, distribute, and sell this software and its documentation for any purpose is hereby granted without fee, provided that (i) the above copyright notices and this permission notice appear in all copies of the software and related documentation, and (ii) the names of Sam Leffler and Silicon Graphics may not be used in any advertising or publicity relating to the software without the specific, prior written permission of Sam Leffler and Silicon Graphics. THE SOFTWARE IS PROVIDED "AS-IS" AND WITHOUT WARRANTY OF ANY KIND, EXPRESS, IMPLIED OR OTHERWISE, INCLUDING WITHOUT LIMITATION, ANY WARRANTY OF MERCHANTABILITY OR FITNESS FOR A PARTICULAR PURPOSE. IN NO EVENT SHALL SAM LEFFLER OR SILICON GRAPHICS BE LIABLE FOR ANY SPECIAL, INCIDENTAL, INDIRECT OR CONSEQUENTIAL DAMAGES OF ANY KIND, OR ANY DAMAGES WHATSOEVER RESULTING FROM LOSS OF USE, DATA OR PROFITS, WHETHER OR NOT ADVISED OF THE POSSIBILITY OF DAMAGE, AND ON ANY THEORY OF LIABILITY, ARISING OUT OF OR IN CONNECTION WITH THE USE OR PERFORMANCE OF THIS SOFTWARE. Tesseract Copyright A. This product is created by NewSoft Technology Corporation. Copyright 2016, NewSoft Technology Corporation. All rights reserved. B. This product incorporates the tesseract-ocr engine, and includes portions of code which have been modified by NewSoft Technology Corporation subject to the terms of the Apache License version 2.0. Copyright [2016] [NewSoft Technology Corporation] Licensed under the Apache License, Version 2.0 (the "License"); you may not use this file except in compliance with the License. You may obtain a copy of the License at Unless required by applicable law or agreed to in writing, software distributed under the License is distributed on an "AS IS" BASIS, WITHOUT WARRANTIES OR CONDITIONS OF ANY KIND, either express or implied. See the License for the specific language governing permissions and limitations under the License. i
3 OpenCV Copyright OpenCV (Open Source Computer Vision) is a library of programming functions for real-time image processing. OpenCV is released under the liberal BSD license. Copyright (c) <2016>, <NewSoft Technology Corporation> All rights reserved. Redistribution and use in source and binary forms, with or without modification, are permitted provided that the following conditions are met: Redistributions of source code must retain the above copyright notice, this list of conditions and the following disclaimer. Redistributions in binary form must reproduce the above copyright notice, this list of conditions and the following disclaimer in the documentation and/or other materials provided with the distribution. THIS SOFTWARE IS PROVIDED BY THE COPYRIGHT HOLDERS AND CONTRIBUTORS "AS IS" AND ANY EXPRESS OR IMPLIED WARRANTIES, INCLUDING, BUT NOT LIMITED TO, THE IMPLIED WARRANTIES OF MERCHANTABILITY AND FITNESS FOR A PARTICULAR PURPOSE ARE DISCLAIMED. IN NO EVENT SHALL THE COPYRIGHT HOLDER OR CONTRIBUTORS BE LIABLE FOR ANY DIRECT, INDIRECT, INCIDENTAL, SPECIAL, EXEMPLARY, OR CONSEQUENTIAL DAMAGES (INCLUDING, BUT NOT LIMITED TO, PROCUREMENT OF SUBSTITUTE GOODS OR SERVICES; LOSS OF USE, DATA, OR PROFITS; OR BUSINESS INTERRUPTION) HOWEVER CAUSED AND ON ANY THEORY OF LIABILITY, WHETHER IN CONTRACT, STRICT LIABILITY, OR TORT (INCLUDING NEGLIGENCE OR OTHERWISE) ARISING IN ANY WAY OUT OF THE USE OF THIS SOFTWARE, EVEN IF ADVISED OF THE POSSIBILITY OF SUCH DAMAGE. Trademarks - IBM, PC, and VGA are registered trademarks of International Business Machines Corporation. - Windows 2000, Windows XP, Windows Vista, Windows 7, Windows Server 2003, Windows Server 2008 and Microsoft are registered trademarks of Microsoft Corporation. - PDFlib is a registered trademark of PDFlib GmbH. - All other trademarks are the properties of their respective owners. (C) NewSoft Technology Corporation. All rights reserved. SN: W-E ii
4 Table of Contents General Information 1 Features... 2 System Requirements... 2 Overview 3 Getting Started 7 Menu Bar... 7 Command Toolbar... 7 Folder View... 8 Status Bar...9 List View...10 Image View Edit View Working with BR-Receipts 12 Setting Up BR-Receipts Collecting Receipts Scanning Receipts Importing Receipts Creating Receipts Manually Using Receipt Templates Select Vendor New Template Manual Input Modify Template Delete Template Apply Another Template Field Categorizing Editing Receipts Searching for Receipts Creating Reports Menu Commands 26 File Menu Edit Menu View Menu Receipt Menu Help Menu Index 29 iii

5 1 General Information BR-Receipts processes receipts by reading the information from scanned images and categorizing it using field recognition. You can edit, view items and track expenses by building and maintaining a database of all the information. 1
6 Features Import receipts from files to build and maintain a database of all the information. Export receipt images or data to the cloud from BR-Receipts. Scan receipts to keep detailed records. Apply an existing template or create a new template to batch process receipts when importing or scanning. Read the information and categorize the data by field recognition. Create reports to view and track expenses. System Requirements Operating System Microsoft Windows XP, Windows Vista (32/64-bit), Windows 7 (32/64-bit), Windows 8 (32/64-bit), Windows 8.1 (32/64-bit), or Windows 10 (32/64-bit). The CPU and memory must meet the minimum requirements to run the operating system. For more information, visit the relevant Microsoft website. Computer Display CD-ROM Drive. SVGA (1024 x 768) or better. A minimum of 512 MB free hard disk space for installing the program. A USB port for scanner connection. Scanner Receipts A USB port for computer connection. Receipts must be in reasonably good condition to be readable by the scanner. 2
7 2 Overview The following descriptions and instructions will help you get started: 1. Create a Receipt Box Create a receipt box to build a database of your receipts. You can import, scan, manually create, and paste receipts into the receipt box. 2. Scan Put the receipt in the scanner and begin scanning. The scanning progress bar displays the scanning status. 3. Use a Template If your receipts have common information such as where they originated, how goods and services were paid for, and who is responsible for them, you can use a template for batch processing. For more information, see Using Receipt Templates. 4. Field Categorizing Use the field categorizing feature to sort receipt information using field recognition. Click in Image View, drag a rectangle to highlight a section of the receipt, right-click the selected receipt section and select the field type: Receipt Date, Amount, Sales Tax, Vendor, or Payment Type (or drag the selected section directly to the desired field) to activate field recognition. A dialog box will ask if you agree with the OCR results. Click OK to add the results to the desired field, or click Cancel to discard the results and try again. 5. Export To You can save specific receipts or all the receipts in a folder as a file in CSV, PDF, QIF, or the QuickBooks (IIF) format. Use the file format best suited to your needs. a. Click on the toolbar, or select Export to File from the File menu, to open the Export to File dialog box. b. Select All Receipts or Selected Receipts to control which receipts will be exported. c. Click Settings to set up the export style. The Export dialog box will display the file type (only applies to CSV format). Include a header line - Select Include a header line to have the field names exported. Header Language - Select the header language from the list. Encoding - Select a type from the list to specify a file encoding format. 3
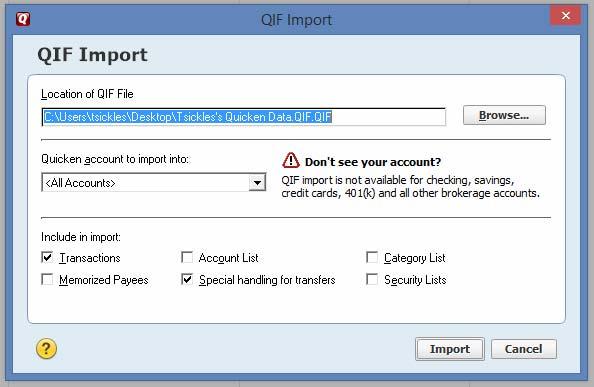
8 Delimited by - Under Delimited by, select Comma, Tab, or Space to choose the character that will separate fields in the exported file. Select with double quotes to have the information for each field enclosed in quotation marks. d. When you select export to QIF, a dialog box will open to let you manage Quicken Accounts first. You can import available Quicken accounts, or you can edit or delete accounts. When the Quicken accounts are ready, enter a file name and click Continue to finish. NOTE: In order to export to a QIF file, you must first create a QIF file using the Export to QIF setting in Quicken. e. When you select Export to QuickBooks, you must enter Debit Account and Credit Account details to continue. 6. Export to Cloud To export to cloud, do one of the following: Right-click a receipt box or folder and choose Export to Cloud from the context menu. Select a receipt box or folder and click on the toolbar. Choose Export to Cloud from the File menu to open the BOL log in dialog box. Enter an address and password to connect your Brother Online (BOL) account. appears, indicating that you can now send receipt images to the cloud from your local computer. You can click to monitor the uploading status. When you export successfully, will appear in the status bar. NOTE: If you select a receipt box to upload, all the folders in this receipt box will be uploaded. 7. Create Reports Reports let you see where receipts originated, how goods and services were paid for, and who is responsible for receipts. For more information, see Creating Reports. 8. Set up the Quicken Export File for BR-Receipts 4

9 NOTE: Quicken supports importing BR-Receipt data into a cash, business or investment based account. Before starting, open Quicken and specify the correct account and select File Export QIF file. Specify the location to export the file, select the Quicken Account and any other items to include in the export and press OK. 9. Export BR-Receipts into Quicken using the QIF format. a. Specify the QIF format by selecting File/Export to File. b. Select Manage Quicken Accounts and select the Import button. c. Select the file specified in QIF File to Export to and press OK d. Press the Continue button and name the export file to something different than what was used for the QIF File to Export and press save. e. Open Quicken and select File/File Import/QIF and select the file created you exported from BR-Receipts and the Quicken account to import into and any other items to import and press the import button. 5
10 6
, or Unverified.")

11 3 Getting Started From the BR-Receipts screen, you can view file folders, a list of all receipts, an image of the selected receipt, and the recognized data. You can control which receipts are displayed in the list by clicking the All drop-down list and selecting Recently Added (receipts updated in the last three days), or Unverified. Menu Bar The Menu bar provides the commands you use to perform program functions within BR-Receipts. For more information, see the Menu Commands section. Command Toolbar The Command toolbar displays the most commonly-used commands. Click an icon to execute the command. Scan Receipt: Scan receipts to the currently selected folder. NOTE: This feature only applies to folders. Import Receipt Images: Import receipts to the currently selected folder. 7
12 NOTE: This feature only applies to folders. Export to File: Export receipt images to file. Create Report: Create a data report for the selected receipts. Settings: Enter your BOL account information, user profile, defined field values and user interface language to personalize your program and provide easy access when you upload scanned receipt images. Export to Cloud: Enter an address and password to log in and select a receipt box or a folder, then send scanned receipt images to the cloud from your local computer. NOTE: If you select a receipt box to upload, all the folders in this receipt box will be uploaded. Link to Brother Online Receipts service: Click to open the BOL webpage and view the files you have uploaded, if the account information is not saved in the Settings, you will have to enter the account information first. Folder View Folder view includes a Folder section and a Search section. Click the Folder tab to view the Folder section, where you can create a receipt box, open a file, and create a new folder. Click the Search tab to view the Search section, where you can select a category and fill in the keyword, receipt date, amount, and vendor fields, and then click Start Search to find a specific receipt. Right-click the blank area to view these commands: New Receipt Box... Open Receipt Box... Create a receipt box. Open a receipt box that already exists. Right-click a receipt box to view these commands: New Folder Rename Box Create a folder. Change the name of the receipt box. NOTE: The receipt box name can be no more than 150 characters. Save As... Save the receipt box under another name. 8
13 Set Location Close Export to Cloud Choose a receipt box location from the menu. Close the receipt box and all the folders under it. Enter an address and password to log in, select a receipt box, and send the receipt image to the cloud from your local computer. Right-click a folder in the Folder section to view these folder commands: Scan Receipt... Import Receipt Images... Manually Create a New Receipt Paste Receipt Verify All Mark All as Unverified Rename Folder Scan receipts to the currently selected folder. Import receipts to the currently selected folder. Create a new receipt and save it as a record. Paste a copied receipt to a folder. Mark the folders as having been edited and approved. Mark the folders as not having been edited and approved. Change the name of a folder. NOTE: The folder name can be no more than 184 characters. Delete Folder Export to File Create Report Export to Cloud The folder and all of its contents will be erased from the database. Save specific receipts or all receipts in the folder as a file in CSV, PDF, QIF, or IIF format. Choose folders and generate reports. Enter an address and password to log in, select a receipt box, and send the receipt image to the cloud from your local computer. Status Bar The Status bar displays the current number of receipts, the unverified receipts and the processing status when you upload files to BOL. To view status when you upload receipt images or data to the cloud, click successfully, appears in the status bar.. When you export a file 9
14 List View The List View window displays information about the selected folder. It displays the receipt data in columns as three totals: Total Amount, Reimburse, and Sales Tax. Each receipt will be listed along with the data. To search for a receipt, type a keyword in the search bar, press the Enter key and the best-matched receipts will be listed. Click on a record to select it, or hold down the Shift key while clicking to choose multiple records. The first selected receipt will be displayed in the image view window. You can drag receipts to other folders. Right-click a receipt to see these commands: Cut (Ctrl+X) Copy (Ctrl+C) Paste (Ctrl+V) Delete Verify Mark as Unverified Copy and remove the selected receipt. Copy the selected receipt. Insert the contents of the clipboard. Delete the selected receipt. Mark the receipt as having been edited and approved. Mark the receipt as not having been edited and approved. Image View The Image View window displays the selected receipt. You can rotate the image before recognition, if needed. Use the following commands to refine your images and make the OCR process more accurate: Move: Click to move the image. Crop the image: Click, select a portion of the image, and when the pointer changes to a scissors icon, click it. The image will be cropped. Deskew image: Straighten an image that was skewed during scanning. Click and a blue line will appear on the image. Drag the line close to an edge that is supposed to be horizontal or vertical, and then drag either side of the blue line along the edge. When ready, release the mouse. Rotate image: Click to rotate an image clockwise 90 degrees. Recognize the field: Click and drag a rectangle to select an area, right-click the selected area to select the field type and perform OCR on the selection. Undo: Click to undo the last operation performed on an image file. Redo: Click to redo the last operation performed on an image file. Switch Image: Click to switch between the clean image and the original image. Zoom In or Zoom Out: Use the slider to change the magnification of the image. 10
15 Right-click on an empty area to view these commands: Zoom In Zoom Out Fit into Window Rotate image Increase magnification. Reduce magnification. Adjust the image width to match the current window. Rotate an image clockwise 90 degrees. Edit View To edit the receipt, do one of the following: Click Edit Items from the View menu. Double-click a receipt. Click in the bottom of the List View section. The Created Date and Modified Date cannot be edited. 11

16 4 Working with BR-Receipts BR- Receipts is designed to help you organize and track your expenses. Once you start scanning and saving your receipts, use these basic functions to keep your database current. Setting Up BR-Receipts Click on the toolbar or click the File menu and select Settings, and then enter your BOL account information, user profile and defined field values, and the user interface language to personalize your program. General: Type your address and password, select Save Password and then click OK to save the account information, providing easy access when you send receipt images to the cloud from your computer. In addition to uploading from your computer, you can add a proxy to upload your receipt images or data. Select Use a proxy server for this connection, and then type the proxy address, user name, password, and port to enable the proxy. Click Browse to specify a receipt box path. When you create a receipt box, the receipt box will be placed under the path specified in the Settings. When you open a receipt box, you can open the receipt box under the specified path, and the next time you start BR-Receipts, the default receipt box path will be the path specified. 12


17 User Profile: Type your user information to speed up future searches. User Defined Field: Select a receipt box and choose a type of field you want to update. The items under the selected type will be displayed as a list. Click Add to open a dialog box, type the item name, and click OK to add the item to the selected list. Click Edit to change an item name in the selected list. Click Delete to remove an item from the selected list. 13

18 You can add an item to a type list and define it as belonging to this type, then similar field content will be categorized to this type when encountered during field categorizing. For example, you can add Credit Card to the Display name of Payment Type list, so that when the keyword Credit Card is recognized during field categorizing, it will be placed under the Display name of Payment Type field. To import a CSV file that contains multiple items, click the File menu and select Import User Defined Field. Appearance: Select a user interface language and location for easier management. Select User Interface Language: Select a language for your program. Select Location: Select a location to set up the currency type and date format for your receipts. For example, if you select United States, the currency unit will be US Dollars $, and the date format will be mm/dd/yyyy. When you create a receipt box, the currency type and date format of the receipts in this box will be formatted based on the selected location. You can change the location by right-clicking the receipt box and choosing Set Location. Collecting Receipts Use your scanner to digitize receipts and store them in a database. Receipts can also be added from another database, or from image files. Scanning Receipts For the most powerful results when using BR-Receipts, it is important to configure your folders properly. 1. Click the File menu and select Scan Settings... 14
 to have scanning begin as soon as you click OK.")
19 2. Choose your preferred scanning style: Select Scan With TWAIN User Interface if you want to use the scanner's TWAIN interface for scanning. Select Quick Scan (the default setting) to have scanning begin as soon as you click OK. Quick Scan uses the settings defined in this screen, as follows: Resolution: 300 dpi (dots per inch) will have the best recognition performance in most cases. Image type: The default setting is Color. Set the Image type to Gray when scanning black and white receipts. Carrier Sheet Mode: Select Carrier Sheet Mode when scanning a receipt in a Carrier Sheet, Scan Size, Width, Height and Unit fields are unavailable when using a Carrier Sheet. 15


20 NOTE: When you select "Carrier Sheet Mode", the software automatically skips scanning the header of the carrier sheet. The width of the header depends on the scanner you are using. If you are scanning a long receipt, fold the receipt to fit to the carrier sheet with title and total amount items shown. Do not skew the paper when folding. NOTE: Carrier sheets may differ depending on your scanner model. 3. Click OK. Scan Size: The default setting is Auto Detect. Select User Defined from the drop-down list to customize the width, height, and unit. Orientation: The default setting is Auto Detect. Click Settings to select other options from the list. Enable Document Feeder: Select this check box if you want to use an automatic document feeder (ADF). To use this option, the selected scanner must have an ADF function. Receipt Position (ADF only): Select Left, Right, or Center from the drop-down list if you want BR-Receipts to tell you where you have placed the receipt in the scanner s document feeder. Brightness And Contrast: Drag the sliders to adjust the contrast and brightness of the scanned image. Threshold: When you select Black and White from the Image Type drop-down list, the threshold slider will appear. NOTE: The settings may differ depending on your scanner, and some features are only available for specific scanners. When you finish configuring your scan settings, you can start scanning receipts. 4. Put a receipt into your scanner. If you have several drivers available, click the File menu and select Select Scanner..., and then specify a driver for your scanner from the Select Scanner dialog box. 16

21 5. Click the File menu and select Scan Receipt... (or right-click a receipt box in the Folder View section and select Scan Receipt...). 6. The Choose template screen will open. Select a template or create a new template to batch-process your receipts. For more information, see Using Receipt Templates. 7. When the scanner finishes scanning the receipt, you can click in Image View and drag a rectangle to select an area, right-click the selected area and select the field type from Receipt Date, Amount, Sales Tax, Vendor and Payment Type, or drag the selected area directly to the desired field to recognize it. Importing Receipts You can import receipts saved as image files. 1. Click the File menu and select Import Receipt Images... (or right-click a folder in the Folder View section and select Import Receipt Images...). 2. In the dialog box, select one or more image files to import, choose the receipt language from the drop-down list and click Settings to open the Options dialog box to configure your receipts before importing. Auto Detect: Select to have BR-Receipts check to see how the receipt is positioned. Rotate left 90 degrees/rotate right 90 degrees: You may need to rotate the scanned receipt images before recognition. Rotate 180 degrees, or Do not rotate: If your receipts are displayed upside down, you can rotate them 180 degrees. If the images are correct, select Do not rotate. The three options above are in the Orientation drop-down list. 17
22 Automatically crop the receipts: Select to have BR-Receipts crop images automatically during importing. Display the last receipt imported or scanned: Select to display the last receipt imported or scanned. If this option is not selected, the most recently opened receipt will be displayed. Click OK to finish. 3. Click Open, the Choose template screen will open. Select a template or create a new template to batch-process your receipts. For more information, see Using Receipt Templates. 4. The image data will be added to the current receipt database. Creating Receipts Manually If your receipt is not in good condition or is unreadable by the scanner, you can manually add the receipt record to the database. 1. Click the Receipt menu and select Manually Create a New Receipt, (or right-click a receipt box and select Manually Create a New Receipt). A set of empty fields will open in Edit mode, allowing you to enter text. 2. In Edit view, you can select or type receipt information in each field to create or reconstruct the receipt. Using Receipt Templates If your receipts share common data such as where the receipts originated, how goods and services were paid for, and who is responsible for them, you can use a template for batch processing. A template consists of a top area (the top part of the receipt), and a bottom area (the lowest part of the receipt). When you scan or import receipts, a dialog box will open to ask if you want to apply an existing template, create a new template, or manually enter the receipt information. You can choose a different command for each receipt. Select Vendor Select a template from the vendor folder in the left pane. Select a template style and click OK to apply it to your receipt. 18
23 You can also move the orange rectangle or the color window separately to accurately match the correspond units. New Template Create templates to apply to your receipts. Create a different template for each vendor to help organize your receipts. 19


24 1. Click New template the receipt image will be displayed with a red bar. Click and drag the red bar to separate the top and bottom areas of the receipt. Drag to select an area of the receipt, right-click the selected area, and choose a field type from the pop-up menu to verify this area. 2. Set the expense data attributes this way. Drag a rectangle to select an area, right-click the area and choose a field type. Each data unit must be mapped to a separate field type. If you choose a data unit that is being used, the previous field type will be removed. Make sure your selections are accurate for the best OCR results. 3. When the field verification finished, name the template, add notes to the template, and then click OK to save it. 20

25 Manual Input Click Manually input later to ignore all the templates. You can manually type your receipt s field information in Edit view. Check Apply to all, and all the receipts will be imported or scanned without applying a template. Modify Template To edit the template applied to a receipt, select the receipt, click the Receipt menu, and then select Modify template. The Modify template screen appears with a template that has been assigned to the selected receipt. If you have verified an area of this receipt as a field, the field type in the menu list will be unavailable and cannot be applied to another data unit. 21


26 Delete Template To delete the template, click the Receipt menu and select Delete template. A dialog box will open. Click Delete to remove the template from your computer. 22
27 Apply Another Template To give your receipt another template, click the Receipt menu and select Apply another template. A dialog box will open. Field Categorizing Field categorizing lets you sort receipt information by field. Click in Image View, drag a rectangle to select an area, right-click the selected area and select the field type from Receipt Date, Amount, Sales Tax, Vendor, or Payment Type (or drag the selected area directly to the desired field) to recognize it. 23


28 A dialog box will ask if you agree with the OCR results, click OK to put the results into the desired field or click Cancel to discard it. When finished, the receipt and the data will be displayed and you can check and edit the data. This is called the verification process. You can mark a receipt as verified, or you can come back and verify it later when you have time. Editing Receipts In addition to verifying the receipts, you can also make changes and add comments or other information. Click the View menu and select Edit Items, (or double-click a receipt, or click in the bottom of the List View section). In Edit Items, if an item is purchased for others, you can select Reimbursable to record the charge that should be reimbursed to you. Searching for Receipts You can type keywords and specify a category, receipt date, amount, or vendor in the Search section to quickly find all receipts that match your query. The search results will be shown in List View and Image View. 24
.")
29 Creating Reports After all of your receipts are entered and edited in BR-Receipts, you can generate reports that will show the data in an organized way. Select options as described below, and then click Create Report. 1. Click the Receipt menu and select Create Report... (or click on the toolbar or right-click a folder and choose Create Report...). The Report Wizard appears. 2. Type a title for your report in the Title field. Select the Show Subheader check box to display a subheader. 3. The default Reporting Type is Expense. To change to a Spending Report, select Spending. In the Spending by drop-down list whatever is selected determines how receipt information is summarized. For example, if Payment Type is selected, the report information will be summarized by the payment type in the first field; if Vendor is selected, the report will be summarized by vendor names in the first field. 4. In the Formatting section: Select Include Cover Page if you want a cover page that includes receipt date, user profile and summary. Select Include Receipt if you want your report to display groups by spending type, with detailed information for each group. Select Include Image if you want the receipt images to be printed in the report. 5. When finished, click Continue. 25
30 5 Menu Commands File Menu New New Receipt Box New Folder Create a new receipt box whose properties you can determine yourself. Create an empty folder in the selected receipt box. Open...(Ctrl+O) Save As...(Ctrl+S) Close Scan Receipt... Scan Settings... Select Scanner... Import Receipt Images... Import User Defined Field... Export to File Export Receipt Image to File... Export to Cloud Settings... Exit Open a receipt box under a specified path. This receipt box path can be specified under the General tab in the Settings screen. Save the selected receipt box with a new name. Close the selected receipt box. Scan receipts to the currently selected folder. Configure the scan settings. Select a driver for your scanner, or a different scanner connected to your computer. Import receipts to the currently selected folder. Import a CSV file with customized items of different types in multiple fields. Save the receipts as a file in CSV, PDF, QIF, or IIF format, or export your data to a third party application. Export receipt images to file. The supported file formats are JPG, TIF, and BMP. Upload receipt images or data to cloud. Save available BOL accounts, specify the box path, enter user profile details, and define the field values for the receipts. Close BR-Receipts. 26
31 Edit Menu Cut (Ctrl+X) Copy (Ctrl+C) Paste (Ctrl+V) Cut the selected receipt. (You can choose more than one.) Copy the selected receipt. (You can choose more than one.) Insert any copied or cut information. Delete Receipt Folder Delete either a receipt or a folder. Select All (Ctrl+A) Unselect All Invert Selection Select all receipts in the current folder. Cancel all the selection in the current folder. Select the unchecked receipts in the current folder. View Menu Edit Items Zoom In Zoom Out Fit into Window Hide or display Edit View. Increase magnification. Reduce magnification. Adjust the image size to the current window. Rotate Image Sort By Rotate right 90 degrees Rotate left 90 degrees Verified Vendor Category Receipt Date Payment Type Sales Tax Amount Purpose Created Date Modified Date Reimburse Rotate the selected image clockwise 90 degrees. Rotate the selected image counterclockwise 90 degrees. Sort the receipts by the selected field. 27
32 Receipt Menu Manually Create a New Receipt Modify template Create a receipt in the current folder. Edit the template applied to this receipt. NOTE: An error message will appear if the receipt was not applied to any template, or if OCR is being performed on the receipt. Delete template Apply another template Create Report... Remove an existing template from the program. Choose another template to re-recognize your receipt. Make a report from the data on the selected receipts. Help Menu Using Help Link to Brother Website Check for Latest Version About BR-Receipts... Show the BR-Receipts Help documentation. Open the Brother webpage. Check for the latest version of BR-Receipts. Display information about BR-Receipts. 28
33 Index A Apply Another Template, 21 C Collecting Receipts, 12 Command Toolbar, 5 Creating Receipts Manually, 16 Creating Reports, 23 D Delete Template, 20 E Edit Menu, 25 Edit View, 9 Editing Receipts, 22 F Features, 2 Field Categorizing, 21 File Menu, 24 Folder View, 6 G General Information, 1 Getting Started, 5 H Help Menu, 26 I Image View, 8 Importing Receipts, 15 L List View, 8 M Manual Input, 19 Menu Bar, 5 Menu Commands, 24 Modify Template, 19 O Overview, 3 R Receipt Menu, 26 S Scanning Receipts, 12 Searching for Receipts, 22 Select Vendor, 16 Setting Up BR-Receipts, 10 Status Bar, 7 System Requirements, 2 U Using Receipt Templates, 16 V View Menu, 25 W Working with BR-Receipts, 10 29
Capture Perfect 3.0. Operation Guide ENGLISH
 Capture Perfect 3.0 Operation Guide ENGLISH Preface Thank you for purchasing a Canon Document Scanner. CapturePerfect 3.0 is an ISIS-compatible application program that enables the computer to acquire
PageScope Box Operator Ver. 3.2 User s Guide
 PageScope Box Operator Ver. 3.2 User s Guide Box Operator Contents 1 Introduction 1.1 System requirements...1-1 1.2 Restrictions...1-1 2 Installing Box Operator 2.1 Installation procedure...2-1 To install
T-Invoicer User Guide
 - 1 - T-Invoicer User Guide Introduction T-Invoicer is an entry level invoicing system designed for small & startup business's who need to invoice customers quickly & easily. T-Invoicer has all the basic
Operation Guide ENGLISH
 Operation Guide ENGLISH PUB. CE-IE-770 Preface Thank you for purchasing a Canon Document Scanner. CapturePerfect 3.0 is an ISIS-compatible application program that enables the computer to acquire images
Copyright PFU LIMITED
 -------------------------------------------------------- PaperStream Capture 1.0.12 README File -------------------------------------------------------- Copyright PFU LIMITED 2013-2015 This file contains
This file includes important notes on this product and also the additional information not included in the manuals.
 --- fi Series PaperStream IP driver 1.30 README file --- Copyright PFU LIMITED 2013-2015 This file includes important notes on this product and also the additional information not included in the manuals.
TWAIN driver User s Guide
 4037-9571-05 TWAIN driver User s Guide Contents 1 Introduction 1.1 System requirements...1-1 2 Installing the TWAIN Driver 2.1 Installation procedure...2-1 To install the software...2-1 2.2 Uninstalling...2-1
This file includes important notes on this product and also the additional information not included in the manuals.
 --- fi Series PaperStream IP driver 1.42 README file --- Copyright PFU LIMITED 2013-2016 This file includes important notes on this product and also the additional information not included in the manuals.
Fujitsu ScandAll PRO V2.1.5 README
 -------------------------------------------------------- Fujitsu ScandAll PRO V2.1.5 README -------------------------------------------------------- Copyright PFU Limited 2007-2017 This file contains information
Panaboard Overlayer User's Guide. Image Capture Software for Electronic Whiteboard (Panaboard)
") Panaboard Overlayer User's Guide Image Capture Software for Electronic Whiteboard (Panaboard) Contents Introduction... 3 Functional Overview... 3 Operation Flow... 3 Abbreviations... 4 Trademarks... 4
Panaboard Overlayer User's Guide Image Capture Software for Electronic Whiteboard (Panaboard) Contents Introduction... 3 Functional Overview... 3 Operation Flow... 3 Abbreviations... 4 Trademarks... 4
Copyright PFU LIMITED 2016
 -------------------------------------------------------- PaperStream Capture Lite 1.0.1 README File -------------------------------------------------------- Copyright PFU LIMITED 2016 This file contains
2010 by Microtek International, Inc. All rights reserved.
 2010 by Microtek International, Inc. All rights reserved. Microtek and DocWizard are trademarks of Microtek International, Inc. Windows is a registered trademark of Microsoft Corporation. All other products
MagicInfo Express Content Creator
 MagicInfo Express Content Creator MagicInfo Express Content Creator User Guide MagicInfo Express Content Creator is a program that allows you to conveniently create LFD content using a variety of templates.
User Manual. Date Aug 30, Enertrax DAS Download Client
 EnertraxDL - DAS Download Client User Manual Date Aug 30, 2004 Page 1 Copyright Information Copyright 2004, Obvius Holdings, LLC. All rights reserved. Redistribution and use in source and binary forms,
Copyright 2010 by Microtek International, Inc. Trademarks. Important. All rights reserved.
 Reference Manual Copyright 2010 by Microtek International, Inc. All rights reserved. Trademarks Microtek, the MII logo, MiPAX, MiDOCM and ScanWizard are trademarks or registered trademarks of Microtek
Use in High-Safety Applications
 ------ ScanSnap Organizer V5.6L20 README File ------ - Contents - 1. Cautions for using environment-dependent characters 2. Cautions Concerning Installation 3. Cautions Concerning the Operation 4. Connecting
JPdfBookmarks Manual. by Flaviano Petrocchi
 JPdfBookmarks Manual by Flaviano Petrocchi JPdfBookmarks Manual 1 Introduction 3 Installation and Uninstallation 4 Linux Instructions 4 Debian Instructions 6 Windows Instructions 6 Universal Archive Instructions
Bar Code Discovery. Administrator's Guide
 Bar Code Discovery Administrator's Guide November 2012 www.lexmark.com Contents 2 Contents Overview...3 Configuring the application...4 Configuring the application...4 Configuring Bar Code Discovery...4
HYDRODESKTOP VERSION 1.4 QUICK START GUIDE
 HYDRODESKTOP VERSION 1.4 QUICK START GUIDE A guide to using this free and open source application for discovering, accessing, and using hydrologic data February 8, 2012 by: Tim Whiteaker Center for Research
User Manual Version
 User Manual Version 8.14.0 This publication contains proprietary information of the Card Scanning Solution Company, provided for customer use only. No other use is authorized without the express written
HYDRODESKTOP VERSION 1.1 BETA QUICK START GUIDE
 HYDRODESKTOP VERSION 1.1 BETA QUICK START GUIDE A guide to help you get started using this free and open source desktop application for discovering, accessing, and using hydrologic data. September 15,
Fiery S450 65C-KM. Network Scanner
 Fiery S450 65C-KM Network Scanner Chapter 1: Introduction Chapter 2: Overview of the Scanning Features Chapter 3: Registration of the destination Chapter 4: Transmission to the registered destination Chapter
Operation Guide ENGLISH
 Operation Guide ENGLISH PUB. CE-IE-770-02 Preface Thank you for purchasing a Canon Document Scanner. CapturePerfect 3.1 is an ISIS-compatible application program that enables the computer to acquire images
User Guide 701P Wide Format Solution Wide Format Scan Service
 User Guide 701P44865 6204 Wide Format Solution Wide Format Scan Service Xerox Corporation Global Knowledge & Language Services 800 Phillips Road Bldg. 845-17S Webster, NY 14580 Copyright 2006 Xerox Corporation.
User guide. PRISMAdirect Order processing
 User guide PRISMAdirect Order processing Copyright 2016, Océ All rights reserved. No part of this work may be reproduced, copied, adapted, or transmitted in any form or by any means without written permission
W-E
 Signage Suite V2.20 User Guide 605220-02-01-W-E-051613-02 Trademarks Windows XP, Windows Vista, Windows 7, and Microsoft are registered trademarks of Microsoft Corporation. All other trademarks are the
Fiery PRO 80 /S450 65C-KM
 Fiery PRO 80 /S450 65C-KM Network Scanner/Web Connection Chapter 1: Introduction Chapter 2: Overview of the Scanning Features Chapter 3: Registration of the destination Chapter 4: Transmission to the registered
PTZ Control Center Operations Manual
 PTZ Control Center Operations Manual Introduction PTZ Control Center is an application software that runs on Windows. By running this software on a Windows PC, you can remotely operate the Panasonic cameras
Network Scanner Tool V3.3. User s Guide Version
 Network Scanner Tool V3.3 User s Guide Version 3.3.09 Copyright 2000-2012 by SHARP CORPORATION. All rights reserved. Reproduction, adaptation or translation without prior written permission is prohibited,
iwrite technical manual iwrite authors and contributors Revision: 0.00 (Draft/WIP)
") iwrite technical manual iwrite authors and contributors Revision: 0.00 (Draft/WIP) June 11, 2015 Chapter 1 Files This section describes the files iwrite utilizes. 1.1 report files An iwrite report consists
iwrite technical manual iwrite authors and contributors Revision: 0.00 (Draft/WIP) June 11, 2015 Chapter 1 Files This section describes the files iwrite utilizes. 1.1 report files An iwrite report consists
Watch 4 Size v1.0 User Guide By LeeLu Soft 2013
 Watch 4 Size v1.0 User Guide By LeeLu Soft 2013 Introduction Installation Start using W4S Selecting a folder to monitor Setting the threshold Setting actions Starting the monitor Live Log Using monitor
[The BSD License] Copyright (c) Jaroslaw Kowalski
![[The BSD License] Copyright (c) Jaroslaw Kowalski](/thumbs/72/66750557.jpg "[The BSD License] Copyright (c) Jaroslaw Kowalski") Software used by portions of this application require the following license statement: [The BSD License] Copyright (c) 2004-2011 Jaroslaw Kowalski jaak@jkowalski.net All rights reserved. Redistribution
Software used by portions of this application require the following license statement: [The BSD License] Copyright (c) 2004-2011 Jaroslaw Kowalski jaak@jkowalski.net All rights reserved. Redistribution
Use in High-Safety Applications
 ------ ScanSnap Organizer V5.5L31 README File ------ - Contents - 1. Cautions for using environment-dependent characters 2. Cautions Concerning Installation 3. Cautions Concerning the Operation 4. Connecting
KV-SS090. Operating Instructions. Instant Scanning Software. Model No.
 Operating Instructions Instant Scanning Software Model No. KV-SS090 Thank you for purchasing this Panasonic product. Please read this manual carefully before using this product and save this manual for
SmartScan. Barcode Translator for QuickBooks USER S MANUAL
 SmartScan Barcode Translator for QuickBooks USER S MANUAL Baus Systems 4727 44 th Ave. SW, Suite 202 Seattle, WA 98116 (206) 932-9986 Office (206) 923-0839 Fax E-mail: support@baus-systems.com 1 TABLE
Graphic Inspector 2 User Guide
 www.zevrix.com support@zevrix.com Graphic Inspector 2 User Guide Installation & System Requirements 2 Scanning Files and Folders 2 Checkup Presets 3 File Table and Info Panel 4 Export Data 5 Support 6
# Contents. # Use in High Safety Applications
 ================================================================================= ScanSnap Manager V5.5L10 Readme File PFU LIMITED =================================================================================
Presto! PageManager 8
 Presto! PageManager 8 User's Guide S/N: 207850-02-01-M-E-121908-05 Copyright 2009, NewSoft Technology Corp. All Rights Reserved. No portion of this document may be copied or reproduced in any manner without
Software User s Guide
 Software User s Guide For DCP users: This documentation is for both MFC and DCP models. Where it says MFC in this user s guide, please read MFC-xxxx as DCP-xxxx. Version 0 TWN-ENG Applicable models This
NETWORK PRINT MONITOR User Guide
 NETWORK PRINT MONITOR User Guide Legal Notes Unauthorized reproduction of all or part of this guide is prohibited. The information in this guide is subject to change for improvement without notice. We
PTZ Control Center Operations Manual
 PTZ Control Center Operations Manual Introduction PTZ Control Center is an application software that runs on Windows. By running this software on a Windows PC, you can remotely operate the Panasonic cameras
Open Source Used In Cisco Configuration Professional for Catalyst 1.0
 Open Source Used In Cisco Configuration Professional for Catalyst 1.0 Cisco Systems, Inc. www.cisco.com Cisco has more than 200 offices worldwide. Addresses, phone numbers, and fax numbers are listed on
Enterprise Payment Solutions. Scanner Installation April EPS Scanner Installation: Quick Start for Remote Deposit Complete TM
 Enterprise Payment Solutions Complete TM Portions of this software: Copyright 2004-2013 Apache Software Foundation Copyright 2005 Paul Querna Copyright 2008 Marc Gravell Copyright 2000-2007 Niels Provos
Software User's Guide
 Software User's Guide The contents of this guide and the specifications of this product are subject to change without notice. Brother reserves the right to make changes without notice in the specifications
Authorized Send User s Guide Version 3.5
 Canon Authorized Send User s Guide Version 3.5 08011-35-UD1-004 This page is intentionally left blank. 2 Authorized Send User s Guide Contents Preface...5 How to Use This Manual... 5 Symbols Used in This
Stellar WAB to PST Converter 1.0
 Stellar WAB to PST Converter 1.0 1 Overview Stellar WAB to PST Converter software converts Outlook Express Address Book, also known as Windows Address Book (WAB) files to Microsoft Outlook (PST) files.
Authorized Send User s Guide Version 4.0
 Canon Authorized Send User s Guide Version 4.0 08011-40-UD1-003 This page is intentionally left blank. 2 Authorized Send User s Guide Contents Preface...5 How to Use This Manual... 5 Symbols Used in This
Legal notices : Introduction Where we're coming from...13 Conventions in this book...13 Finding instructions for your role...
 A Guide to QPS 7.4 CONTENTS Contents Legal notices...7 1: Introduction...13 Where we're coming from...13 Conventions in this book...13 Finding instructions for your role...14 2: The QPS user interface...15
Trademark. Cadex C5100 BatteryStore User Guide
 Trademark C5100 BatteryStore is a trademark of Cadex Electronics Inc. All other trademarks or registered trademarks mentioned herein are the property of their respective owners. Copyright Notice Copyright
MFL QUICK START MANUAL
 MFL QUICK START MANUAL MFC 1780 If You Need to Call Customer Service Please complete the following information for future reference: Model: MFC1780 (Circle your model number) Serial Number:* Date of Purchase:
Open Source Used In TSP
 Open Source Used In TSP 3.5.11 Cisco Systems, Inc. www.cisco.com Cisco has more than 200 offices worldwide. Addresses, phone numbers, and fax numbers are listed on the Cisco website at www.cisco.com/go/offices.
Océ Engineering Exec. Advanced Import and Index
 Océ Engineering Exec Advanced Import and Index Océ-Technologies B.V. Copyright 2004, Océ-Technologies B.V. Venlo, The Netherlands All rights reserved. No part of this work may be reproduced, copied, adapted,
Migration Tool. Migration Tool (Beta) Technical Note
 Technical Note") Migration Tool (Beta) Technical Note VERSION: 6.0 UPDATED: MARCH 2016 Copyright Notices Copyright 2002-2016 KEMP Technologies, Inc.. All rights reserved.. KEMP Technologies and the KEMP Technologies logo
Migration Tool (Beta) Technical Note VERSION: 6.0 UPDATED: MARCH 2016 Copyright Notices Copyright 2002-2016 KEMP Technologies, Inc.. All rights reserved.. KEMP Technologies and the KEMP Technologies logo
Simba Cassandra ODBC Driver with SQL Connector
 Simba Cassandra ODBC Driver with SQL Connector Last Revised: March 26, 2013 Simba Technologies Inc. Copyright 2012-2013 Simba Technologies Inc. All Rights Reserved. Information in this document is subject
DataMaster for Windows
 DataMaster for Windows Version 3.0 April 2004 Mid America Computer Corp. 111 Admiral Drive Blair, NE 68008-0700 (402) 426-6222 Copyright 2003-2004 Mid America Computer Corp. All rights reserved. Table
ProgressBar Abstract
 Doc type here 1(21) ProgressBar Abstract The WireFlow progressbar module is an easy way to add progress bars to an application. It is easy to customize the look of the displayed progress window, since
Česky. Introduction... E-1 Minimum system requirements for PC... E-1 Using the AVerVision Application for PC.. E-3
 Table of Contents Introduction... E-1 Minimum system requirements for PC... E-1 Using the AVerVision Application for PC.. E-3 Video Screen... E-3 Control Panel... E-3 Document Camera Control Panel... E-4
Scan November 30, 2011
 Scan November 30, 2011 2170 Georgina Avenue Santa Monica, CA 90402 800-972-3027 www.rco.com Table of Contents 1 Introduction... 1 2 Document History... 2 3 Install and Uninstall... 3 4 Understanding the
NTLM NTLM. Feature Description
 Feature Description VERSION: 6.0 UPDATED: JULY 2016 Copyright Notices Copyright 2002-2016 KEMP Technologies, Inc.. All rights reserved.. KEMP Technologies and the KEMP Technologies logo are registered
ANZ TRANSACTIVE MOBILE for ipad
 ANZ TRANSACTIVE MOBILE for ipad CORPORATE CASH AND TRADE MANAGEMENT ON THE GO QUICK REFERENCE GUIDE April 2016 HOME SCREEN The home screen provides immediate visibility of your favourite accounts and transactions
PlanAhead Software Tutorial
 UG 677 (v 12.1.1) May 11, 2010 Xilinx is disclosing this Document and Intellectual Property (hereinafter the Design ) to you for use in thedevelopment of designs to operate on, or interface with Xilinx
Software User's Guide
 Software User's Guide The contents of this guide and the specifications of this product are subject to change without notice. Brother reserves the right to make changes without notice in the specifications
[ Getting Started with Analyzer, Interactive Reports, and Dashboards ] ]
![[ Getting Started with Analyzer, Interactive Reports, and Dashboards ] ]](/thumbs/88/117545107.jpg "[ Getting Started with Analyzer, Interactive Reports, and Dashboards ] ]") Version 5.3 [ Getting Started with Analyzer, Interactive Reports, and Dashboards ] ] https://help.pentaho.com/draft_content/version_5.3 1/30 Copyright Page This document supports Pentaho Business Analytics
Version 5.3 [ Getting Started with Analyzer, Interactive Reports, and Dashboards ] ] https://help.pentaho.com/draft_content/version_5.3 1/30 Copyright Page This document supports Pentaho Business Analytics
Interact QuickBooks Interface Module
 Instruction Manual Interact QuickBooks Interface Module 51196 2008 by Fairbanks Scales Revision 1.0 07/08 All rights reserved Amendment Record Interact QuickBooks Interface Module DOCUMENT 51196 Manufactured
SMARTCAPTURE USB 2.0 BASED, AUDIO VIDEO CAPTURE, H.264/AAC ENCODER. Manual v1.0
 SMARTCAPTURE USB 2.0 BASED, AUDIO VIDEO CAPTURE, H.264/AAC ENCODER Manual v1.0 Disclaimer FastVDO LLC 2008 All rights reserved Manual This document is provided AS IS. FastVDO LLC does not make warranty
Copyright Notice. Trademarks
 Copyright Notice All rights reserved. No part of this publication may be reproduced, stored in a retrieval system, or transmitted in any form or by any means, electronic, mechanical, photocopying, recording,
Bar Code Discovery. Administrator's Guide
 Bar Code Discovery Administrator's Guide September 2016 www.lexmark.com Contents 2 Contents Overview... 3 Optimizing bar code detection...4 Optimizing bar code detection...4 Configuring the application...5
Vizit Pro User Manual
 Vizit Pro User Manual 1 Table of Contents Vizit Pro User Manual... 1 Using Vizit Pro... 3 The Vizit Pro User Interface... 3 Toolbars... 4 File Tab Toolbar... 4 Edit Tab Toolbar... 5 Annotations Tab Toolbar...
PlanAhead Software Tutorial
 RTL Design and IP Generation with CORE Generator UG 675 (v 12.1) May 3, 2010 Xilinx is disclosing this Document and Intellectual Property (hereinafter the Design ) to you for use in the development of
User guide. PRISMAprepare VDP Editor VDP Editor
 User guide PRISMAprepare VDP Editor VDP Editor Copyright Copyright Copyright 2016 Océ. Illustrations and specifications do not necessarily apply to products and services offered in each local market. No
Authorized Send User s Guide for imagerunner Machines Version 4.1
 Canon Authorized Send User s Guide for imagerunner Machines Version 4.1 08011-41-UD1-003 This page is intentionally left blank. 2 Authorized Send User s Guide for imagerunner Machines Contents Preface...5
User Guide. Calibrated Software, Inc.
 User Guide Calibrated Software, Inc. Copyright 2008 Calibrated Software, Inc. All rights reserved. www.calibratedsoftware.com Your rights to the software are governed by the accompanying Software License
ATX Document Manager. User Guide
 ATX Document Manager User Guide ATX DOCUMENT MANAGER User Guide 2008 CCH Small Firm Services. All rights reserved. 6 Mathis Drive NW Rome, GA 30165 No part of this manuscript may be copied, photocopied,
XDCAM Browser. Installation Guide Before operating the unit, please read this manual thoroughly and retain it for future reference.
 4-261-700-16 (1) XDCAM Browser Installation Guide Before operating the unit, please read this manual thoroughly and retain it for future reference. 2010 Sony Corporation NOTICE TO USERS Documentation 2010,
IMAGE STUDIO LITE. Tutorial Guide Featuring Image Studio Analysis Software Version 3.1
 IMAGE STUDIO LITE Tutorial Guide Featuring Image Studio Analysis Software Version 3.1 Notice The information contained in this document is subject to change without notice. LI-COR MAKES NO WARRANTY OF
IRIScan Executive 2. Install the IRIScan. 2 - Quick Start Guide. For Win 2000 XP users. For Vista users
 IRIScan Executive 2 Install the IRIScan For Win 2000 XP users Log in as administrator. To install the IRIScan driver, insert the CD-ROM in your CD-ROM drive and click on Scanner when the splash screen
Trademark. Cadex C5100 BatteryStore v1.5 User Guide
 v1.5 Trademark C5100 BatteryStore is a trademark of Cadex Electronics Inc. All other trademarks or registered trademarks mentioned herein are the property of their respective owners. Copyright Notice Copyright
2.1. Project Information and Protection Global Settings Working with Tags... 15
 2.1. Project Information and Protection... 1 2.2. Global Settings... 3 2.2.1. Languages...4 2.2.2. Font Templates...5 2.2.3. Picture Database...6 2.2.4. Sound Database...10 2.2.5. Text Database...12 2.3.
FlukeView Forms. Documenting Software. Getting Started
 FlukeView Forms Documenting Software Getting Started PN 1574021 September 2000 2000 Fluke Corporation. All rights reserved. Printed in USA All product names are trademarks of their respective companies.
Intel Stress Bitstreams and Encoder (Intel SBE) 2017 AVS2 Release Notes (Version 2.3)
 2017 AVS2 Release Notes (Version 2.3)") Intel Stress Bitstreams and Encoder (Intel SBE) 2017 AVS2 Release Notes (Version 2.3) Overview Changes History Installation Package Contents Known Limitations Attributions Legal Information Overview The
Intel Stress Bitstreams and Encoder (Intel SBE) 2017 AVS2 Release Notes (Version 2.3) Overview Changes History Installation Package Contents Known Limitations Attributions Legal Information Overview The
14 July Ver CRView V3 User Guide. 1 P a g e
 Ver. 080707 CRView V3 User Guide 1 P a g e Contents Copyright notice... 3 Trademarks... 3 System requirements... 4 Required hardware... 4 Recommended hardware... 4 Installing CRView... 5 Installing from
Info Input Express Limited Edition
 Info Input Express Limited Edition User s Guide A-61891 Table of Contents Using Info Input Express to Create and Retrieve Documents... 7 Compatibility... 7 Contents of this Guide... 7 Terminology... 9
Excel 2010 Foundation. Excel 2010 Foundation SAMPLE
 Excel 2010 Foundation Excel 2010 Foundation Excel 2010 Foundation Page 2 2010 Cheltenham Courseware Pty. Ltd. All trademarks acknowledged. E&OE. No part of this document may be copied without written permission
Day : Date : Objects : Open MS Excel program. Subject : * Open Excel application. Select : start. Choose: programs. Choose : Microsoft Office
 1 2 Day : Date : Objects : Open MS Excel program. Subject : * Open Excel application. Select : start Choose: programs Choose : Microsoft Office Select: Excel * Close the Excel program Click on the Close
Aboriginal Information Systems. Per Capita Distribution TOBTAX. User Reference
 Aboriginal Information Systems Per Capita Distribution TOBTAX User Reference Custom Software. Network Services. E-Business. Complete I T Solutions. 2005 - Advanced DataSystems Ltd. Copyright Information
GrandReporter. User Guide
 GrandReporter User Guide Licensing and Copyright Agreement This software is Copyright 2009 TED and TRI-EDRE. Except as permitted under copyright law, no part of the program or this manual may be reproduced
VeriCard. Card Badging Module Software Guide
 VeriCard Card Badging Module Software Guide September 2005 Copyright and Version Number Information in this document, including URL and other Internet Web site references, is subject to change without
2016 July. Quick Start Manual V2.0 BadgeMaker Base V2.0.25
 2016 July Quick Start Manual V2.0 BadgeMaker Base V2.0.25 Create Dynamic Fields 22 Add a background 23 Add shapes 24 Add placeholder for passport photo and signature 24 Add barcode 25 Add Text 26 Add
SW MAPS TEMPLATE BUILDER. User s Manual
 SW MAPS TEMPLATE BUILDER User s Manual Copyright (c) 2017 SOFTWEL (P) Ltd All rights reserved. Redistribution and use in binary forms, without modification, are permitted provided that the following conditions
SPListX for SharePoint Installation Guide
 SPListX for SharePoint Installation Guide Product Description... 2 System Requirements and Recommendations... 3 Upgrade to the latest version of SPListX for SharePoint... 11 1 Product Description SPListX
Table of Contents. Page 2 of 72. High Impact 4.0 User Manual
 Table of Contents Introduction 5 Installing High Impact email 6 Installation Location 6 Select Mail Client 6 Create a ReadyShare Account 6 Create a Default Profile 6 Outlook Configuration Message 6 Complete
Operation Manual. version 1.0. SoftGenetics LLC
 Operation Manual version 1.0 SoftGenetics LLC 200 Innovation Blvd State College PA 16803 814-237-9340 www.softgenetics.com info@softgenetics.com tech_support@softgenetics.com copyright2007 Copyright, Licenses
Installing AudioLinux (Alternative way with GUI)
") Installing AudioLinux (Alternative way with GUI) By Maarten van Druten Version 1.0 6 September 2017 Disclaimer: THIS SOFTWARE INSTALLATION MANUAL IS PROVIDED ``AS IS'' AND ANY EXPRESSED OR IMPLIED WARRANTIES,
Installing AudioLinux (Alternative way with GUI) By Maarten van Druten Version 1.0 6 September 2017 Disclaimer: THIS SOFTWARE INSTALLATION MANUAL IS PROVIDED ``AS IS'' AND ANY EXPRESSED OR IMPLIED WARRANTIES,
Trimble. ecognition. Release Notes
 Trimble ecognition Release Notes Trimble Documentation: ecognition 8.9 Release Notes Imprint and Version Document Version 8.9 Copyright 2013 Trimble Germany GmbH. All rights reserved. This document may
User Guide. BlackBerry Docs To Go for Android. Version 1.3.0
 User Guide BlackBerry Docs To Go for Android Version 1.3.0 Published: 2017-09-13 SWD-20170925160536936 Contents Introduction... 5 What is the BlackBerry Docs To Go app?...5 Getting started with BlackBerry
USB Server User Manual
 1 Copyright Notice Copyright Incorporated 2009. All rights reserved. Disclaimer Incorporated shall not be liable for technical or editorial errors or omissions contained herein; nor for incidental or consequential
Excel Select a template category in the Office.com Templates section. 5. Click the Download button.
 Microsoft QUICK Excel 2010 Source Getting Started The Excel Window u v w z Creating a New Blank Workbook 2. Select New in the left pane. 3. Select the Blank workbook template in the Available Templates
Portico VT. Installation Guide FOR HEARTLAND MERCHANT USERS JULY 2015 V2.9
 Portico VT Installation Guide FOR HEARTLAND MERCHANT USERS JULY 2015 V2.9 Notice THE INFORMATION CONTAINED HEREIN IS PROVIDED TO RECIPIENT "AS IS" WITHOUT WARRANTY OF ANY KIND, EXPRESS OR IMPLIED, INCLUDING
Ecma International Policy on Submission, Inclusion and Licensing of Software
 Ecma International Policy on Submission, Inclusion and Licensing of Software Experimental TC39 Policy This Ecma International Policy on Submission, Inclusion and Licensing of Software ( Policy ) is being
Preface. Audience. Cisco IOS Software Documentation. Organization
 This preface describes the audience, organization, and conventions of this publication, and provides information on how to obtain related documentation. Cisco documentation and additional literature are