NovoSampler Pro Operator s Guide
|
|
|
- Norman Rice
- 6 years ago
- Views:
Transcription

1 NovoSampler Pro Operator s Guide
2
3 Table of Content Prologue 5 I. Revision History...5 II. Contact Information...5 III. Trademark...6 IV. Intended Use...6 V. Using this Guide...6 VI. Conventions...6 VII. Safety and Limitations...7 VIII. Technical Support Introduction Hardware Overview Installation Software Overview Software User Interface Menu Bar Cytometer Control Panel Experiment Manager Panel Plate Manager Panel Work List Statistical Tables Options Sample Acquisition Preparation Experiment Setup Instrument QC Test Prepare the ACEA NovoCyte QC Particles Run the QC Test Single Sample Acquisition Edit Work List Creating Compensation Control Samples Creating Experiment Samples Plate View Automatic Sample Acquisition Analysis of Data Shutdown Cleaning NovoSampler Pro Troubleshooting 47 Appendix 50 Appendix A Accessories and Consumables Appendix B Technical Specifications
4 4 Table of Content
5 Prologue Revision History Prologue I. Revision History Version Revision Date This NovoSampler Pro Operator s Guide and the corresponding intellectual property rights belong to ACEA Biosciences, Inc. This manual may not be reproduced, transmitted, transcribed, translated, or stored in a retrieval system in any form without the written consent of ACEA Biosciences, Inc. Information contained in this manual is subject to change without notification. While this manual has been carefully produced to ensure accuracy, ACEA Biosciences, Inc. assumes no responsibility for errors or omissions, or for any damages resulting from the use of this information. The NovoExpress Software provides users with the ability to control data collection and analysis on the NovoCyte Flow Cytometer and the NovoSampler Pro. The software contains features to control sample acquisition, data analysis, report generation, and quality control testing. The NovoExpress Software is the property of ACEA Biosciences, Inc. Purchase of the software grants the user a non-exclusive personal license. The NovoExpress Software cannot be copied or modified in any way without the written consent of ACEA Biosciences, Inc. II. Contact Information Manufacturer China Distributor International Distributors ACEA Biosciences, Inc Mesa Ridge Rd., Suite 100 San Diego, CA USA ACEA Bio (Hangzhou) Co., Ltd. Building 5, 2# Xiyuan Wu Rd. Xihu District Hangzhou, Zhejiang Province, P. R. China Please contact ACEA Biosciences, Inc., or visit for a complete list of international distributors 5
6 Prologue Trademark III. Trademark ACEA Biosciences, the ACEA logo, NovoCyte, NovoExpress, NovoSampler, Novo- Flow, NovoRinse, and NovoClean, are trademarks of ACEA Biosciences, Inc., in the United States and some other countries. All other company and product names might be trademarks of the respective companies with which they are associated. IV. Intended Use The ACEA NovoSampler Pro is an optional sample handling module to the ACEA Novo- Cyte system. The NovoSampler Pro is used with the NovoCyte Flow Cytometer to achieve automatic collection of sample in compatible sample plates or tubes. V. Using this Guide This manual describes the operation and maintenance of the ACEA NovoSampler Pro. The features of the NovoSampler Pro are controlled through the NovoExpress Software. The use of the software to control the NovoSampler Pro will be described in this guide. This manual contains the following chapters: Overview and Installation: Introduction to the NovoSampler Pro. Software Overview: Description of the NovoExpress software interface and functions related to the NovoSampler Pro. Sample Acquisition: Description of performing the instrument QC test, setting up work list, performing automatic sample acquisition, and analyzing data. Maintenance: Description of the maintenance on the NovoSampler Pro. Troubleshooting: Description of errors, possible causes, and solutions. The appendix lists the supplies and accessories of NovoSampler Pro. VI. Conventions Text and Keyboard Conventions The following conventions are used in this guide: Format Sequence of numbers Italic font, gold Description Sequences of numbers are used to describe the sequence of steps to be carried out. This font is used to refer to another section in the manual with additional information. 6
7 Prologue Safety and Limitations Format Italics Ctrl+X Description This font is used to describe an operation of the software using a button, icon, or function. Tips and additional information are also in this font. The arrow indicates selection steps. For example, click File Print, means to select the Print function from the File menu. When using a keyboard shortcut, + means to press the two keys simultaneously. For example, Ctrl+C means to hold down the Ctrl key (Control) and press the C key. Symbols The following table lists the symbols used in this guide: Symbol Meaning Description Biohazard Warning Shock Hazard This flag indicates that the operation may have potential for biological infection. Protective measures should be taken. This flag indicates improper or unsafe operation could result in material damage, data loss, mild or severe personal injury, or even death. This flag indicates that the operation has a risk of electric shock. Important Important information. Additional Information Provides additional information about the current topic or product. uuu Form Next to continue this form. The End of the Table This is the end of the table. VII. Safety and Limitations The NovoCyte System is intended for use by trained laboratory professionals. The NovoSampler Pro is designed with measures to protect the safety of the operator. However please use the instrument in strict accordance with the manual for operation, maintenance, and repair. Failure to follow instructions in the manual can result in failure or damage to the instrument s safety features. Electrical Safety To prevent electrical shock and instrument damage, follow the following electrical safety guidelines. Unless otherwise specified, always turn off the flow cytometer using the power switch and unplug the power cord before performing maintenance on the NovoSampler Pro. Use the proper power supply, and promptly replace any damaged electrical wires, plugs, or cables. 7
8 Prologue Technical Support If liquid enters inside the system or the system leaks, turn off the power immediately and contact the customer service department of ACEA Biosciences, Inc. Biosafety All biological samples and materials that come into contact with the instrument or components of the instrument can potentially transmit infectious diseases. To avoid exposure to biohazardous materials, follow the following biosafety guidelines. Take reasonable precautions in handling waste in accordance with the relevant local standards. Avoid having waste come into contact with the mouth or eyes. Do not directly touch the samples or waste. Wear appropriate protective equipment including gloves, clothing, and eyewear. Never pipette by mouth. If the sample accidentally comes in contact with skin, follow working standards and immediately consult a health professional. Users must wear gloves when handling samples as biohazardous material may come into contact with the outside of the sample tube. Users must wear gloves when handling the orbital shaker or rack as biohazardous material may remain on the surface. General Safety While the system is running, do not touch the sample injection probe. Do not put your fingers or hands near the opening of the housing of the sample injection probe. To prevent accidents and ensure high quality data, do not move the instrument after the installation of the NovoSampler Pro by an ACEA professional. If the instrument needs to be moved after the installation, please contact ACEA for re-installation. The instrument will be re-installed and verified for normal operation. The sample injection probe is a moving part and may cause injury. To prevent accidents, do not reach into the NovoSampler Pro while the instrument is running. When placing or removing samples, do not place your hand below the sample injection probe. The NovoSampler Pro contains moving parts which may cause injury. To prevent accidents, ensure that the cover to the NovoSampler Pro is closed during sample acquisition. The NovoSampler Pro contains a detector to sense if the lid is open to ensure the user s safety, but the user should confirm that the NovoSampler Pro has completely stopped running before opening the cover. VIII. Technical Support If there are operating or technical questions, please refer to the sections relating to the instrument operation in this guide. If a problem occurs, refer to the troubleshooting section in this guide for solutions. For additional technical support, please contact your local ACEA Biosciences representative or distributor. When contacting ACEA Biosciences, be sure to provide the following information: The product name, product model and serial number Usage history of the instrument 8 Instrument status information on the status bar from the NovoExpress software. If
9 Prologue Technical Support there is a warning or error message, please also provide that information. Experiment information conducted on the instrument, if not confidential. Details of recent instrument QC test. For support within the US, please call For support within China, please call For users in other countries or regions, contact your local ACEA Biosciences representatives or distributors, which may be found at When encountering an issue during operation of NovoCyte flow cytometer, NovoSampler or NovoSampler Pro instrument, it is highly recommended to submit a Technical Support Request by clicking Home Technical Support Request in the NovoExpress main window. The Technical Support Request Creation Wizard automatically collects NovoCyte configurations, NovoExpress system logs, current screenshot, current experiment file and other information that helps in the diagnosis and troubleshooting of NovoCyte instrument. User can also attach any other files using this function. Please refer to the NovoExpress Software Guide for detailed information on this function. 9


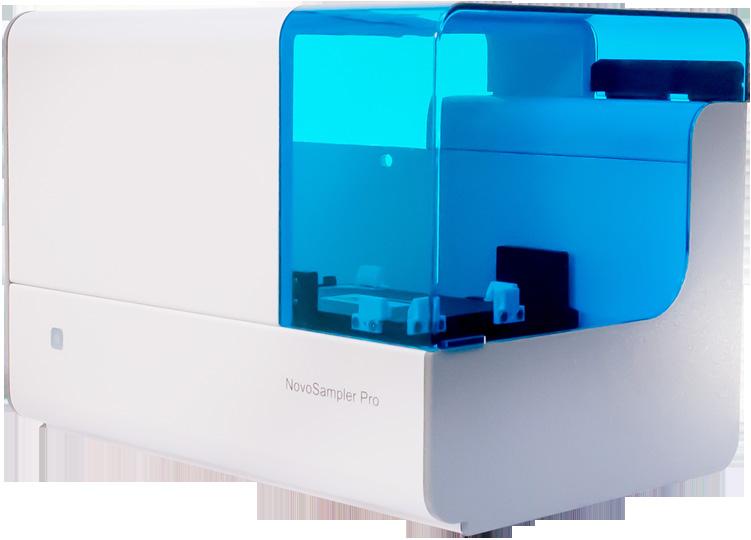
10 1 Introduction Hardware Overview 1. Introduction The ACEA NovoSampler Pro is an optional accessory to the ACEA NovoCyte system (Figure 1-1). The NovoSampler Pro is used with the NovoCyte Flow Cytometer to achieve automatic collection of sample in compatible sample plates or tubes. ACEA NovoSampler Pro uses an integrated orbital shaker to achieve efficient mixing of the sample in each well and achieve high uniformity across the entire multi-well plate for volumetric absolute counting. Figure 1-1 NovoCyte and NovoSampler Pro System Configuration This chapter will describe the hardware and installation of the NovoSampler Pro. 1.1 Hardware Overview The NovoSampler Pro has a built-in orbital shaker to hold the multi-well plate and mix the sample, a cover, and status indication LED, as shown in Figure 1-2. Figure 1-2 NovoSampler Pro The NovoSampler Pro contains moving parts which may cause injury. To prevent accidents, ensure that the cover to the NovoSampler Pro is closed during sample acquisition. The cover should only be opened when loading samples or when required for maintenance. If the cover is opened during sample acquisition, the NovoSampler Pro will stop running and an error message will appear on the NovoExpress Software. The orbital shaker in NovoSampler Pro is shown in Figure 1-3. The shaker is able to hold compatible multi-well plates and the ACEA 24 tube rack. 10

11 Introduction Hardware Overview 1 Figure1-3 Orbital Shaker in NovoSampler Pro Before loading multi-well plates and ACEA 24 tube rack, identify the correct orientation for loading into the orbital shaker. Make sure the sample plate is positioned properly on the orbital shaker and the clips hold the sample plate tightly. The sample plate should be inserted down to completely contact the surface of the orbital shaker without any tilting. Incorrect placement may cause misalignment between the sample wells and sample injection probe, resulting in damage to the sample injection probe or the orbital shaker. The inner surface of the NovoSamplear Pro may come in contact with residual biohazardous material. When working with NovoSampler Pro, use appropriate protective equipment, including gloves, clothing, and eyewear. ACEA 24 tube rack compatible with mm tubes is included with the ACEA NovoSampler Pro. Only ACEA 24 tube rack could be used with the NovoSampler Pro. Use the other type of tube rack may cause NovoSampler Pro malfunction and damage the instrument. The NovoSampler Pro status indication LED indicates the status of the NovoSampler Pro. The color of the status indication LED and the corresponding NovoSampler Pro status are listed in Table 1-1. LED Color Green Orange Status of the NovoSampler Pro Normal. NovoSampler Pro warning. Click the status bar in the NovoExpress Software to review the warning. Red NovoSampler Pro error. Click on the status bar in the NovoExpress Software to review the error. Table 1-1 The Status Indication LED Color and Corresponding NovoSampler Pro Status For additional information regarding warnings and errors, refer to Section 5 Troubleshooting in NovoCyte Flow Cytometer Operator s Guide. 11
12 1 Introduction Hardware Overview Compatibility The NovoSampler Pro is compatible with the following plates and tubes: mm tubes (with ACEA 24 tube rack) 96-well plates (V-bottom) 96-well plates (U-bottom) 96-well plates (flat-bottom) 48-well plates 24-well plates The minimum sample volume requirement for each plate and tube type is listed in Table 1-2. Sample Plate Type Minimum Sample Volume Dead Volume mm tube (with ACEA 24 tube rack) 90 µl < 50 µl 96-well plates (V-bottom) 90 µl < 50 µl 96-well plates (U-bottom) 90 µl < 50 µl 96-well plates (flat-bottom) 90 µl < 50 µl 48-well plates 210 µl < 170 µl 24-well plates 310 µl < 270 µl Table 1-2 The Minimum Sample Volume Requirement for Each Plate and Tube Type Throughput Table 1-3 summarizes the working conditions and the throughput for NovoSampler Pro. Working Condition Standard Mode High-Throughput Sample flow rate (µl / min) Sample volume (µl) Mix (cycles) 1 1 Rinse (cycles) well plate (min) < 75 < well plate (min) < 40 < well plate (min) < 20 < 12 Table 1-3 Throughput of NovoSampler Pro Sample Mixing The ACEA NovoSampler Pro has a mixing function to help keep the sample in suspension. This function achieves effective mixing with all compatible plates. Users can set the appropriate mixing conditions for their specific sample, as the tendency of sample to settle depends on the characteristics of the sample (sample density, liquid viscosity, etc.). 12

13 For setting the mixing conditions, see Section 3.2 Experiment Setup in this guid for more information. Carryover The ACEA NovoSampler Pro can automatically rinse the sample injection probe and fluidic tubing to reduce cross-contamination between samples. When this function is used, the NovoSampler has a carryover rate of less than 0.1%. Introduction Installation 1 For setting sampling conditions, see Section 3.2 Experiment Setup in this guid for more information. 1.2 Installation This section describes the process of installing the NovoSampler Pro. Before installing the NovoSampler Pro, NovoCyte instrument must be turned off. Before installing the NovoSampler Pro, the tube holder for manual sample acquisition must be removed. 1 To remove the tube holder, loosen the screws as shown in Figure 1-4 and take the tube holder off from NovoCyte. Figure 1-4 Remove the Tube Holder uuu 13


14 1 Introduction Installation 2 Position the NovoSampler Pro to NovoCyte instrument as shown in Figure 1-5. Align the left and back side of the sampler with the NovoCyte and gently push the sampler against the NovoCyte. Make sure the NovoSampler Pro is closely in contact with the NovoCyte. Make sure there is no gap between the NovoSampler Pro and NovoCyte on both left and back sides. Figure 1-5 Properly Positioning the NovoSampler Pro Ensure that the NovoSampler Pro is in close contact with NovoCyte Flow Cytometer on the left and back sides during installation is very important for the proper operation of the NovoSampler Pro. Failure to do so would cause calibration failure or the collision of the sample injection probe to the sample plate. 3 Open the cover, find two screw holes. Align the two holes of the NovoSampler Pro to the two holes on the Novocyte instrument (Figure 1-6). Tighten the screws (Figure 1-7) to install the NovoSampler Pro. Figure 1-6 Align the Two Holes of the NovoSampler Pro uuu 14


15 Introduction Installation 1 Figure 1-7 Tighten the Screws Use appropriate force (i.e., finger tight) when tightening the screws. Excessive force may result in damage. Ensure that the connections are tight and that the sampler is stable during sample acquisition. 4 Connect the cable between the NovoSampler Pro and the NovoCyte Flow Cytometer as shown in Figure 1-8. Figure 1-8 NovoSampler Pro and NovoCyte Flow Cytometer Cable Connection uuu 15

16 1 Introduction Installation 5 Power on the NovoCyte Flow Cytometer by pressing the power button on the instrument. Start the NovoExpress Software by double-clicking the icon from the workstation desktop. The software will display a dialog box requesting to calibrate the NovoSampler Pro, as shown in Figure 1-9. Click Calibrate to start the calibration of the NovoSampler Pro. Calibration can be postponed, but the software will not allow for samples to be collected until a calibration is performed successfully. To manually start the NovoSampler Pro calibration, click the Instrument NovoSampler Pro Calibrate on the NovoExpress software. Figure 1-9 Dialog Box to Indicate NovoSampler Pro Calibration For additional information on starting up the NovoCyte Flow Cytometer, refer to the Section 2.1 Instrument Start-up in NovoCyte Flow Cytometer Operator s Guide. Before calibrating the NovoSampler Pro remove any plates in the orbital shaker. Plates or other items in the orbital shaker may result in a collision and damage to the instrument. 16

17 Software Overview Software User Interface 2. Software Overview The NovoExpress Software controls the functions of NovoSampler Pro, including calibration, reset, sample mixing, and sample acquisition. The NovoExpress Software will automatically detect if the NovoSampler Pro is installed and connected to NovoCyte instrument Software User Interface The software interface when NovoSampler Pro is connected is shown in Figure 2-1. Compared to the software interface with NovoCyte alone, differences are observed in the Menu Bar, Cytometer Control panel, Experiment Manager panel, and Work List. The Plate Manager panel is only visible when NovoSampler Pro is installed. Figure 2-1 NovoExpress Software Interface with NovoSampler Pro Installed When analyzing NovoCyte data offline on a computer not connected to a NovoCyte Flow Cytometer, the NovoExpress software can be set to NovoSampler Pro not installed. To view the NovoSampler Pro related software interface and functions in the offline mode, open the instrument configuration window by clicking Instrument Instrument Configuration to change the setting (Figure 2-2). Check the NovoSampler installed checkbox, choose NovoSampler Pro in the prompted dialog box (Figure 2-3), and click OK. The software will prompt a dialog box, asking to restart software. After restarting, the Cytometer Control panel, the Experiment Manager panel and the Work List are all updated, and the Plate Manager panel will be visible. 17


18 Software Overview Menu Bar 2 Figure 2-2 The Instrument Configuration in NovoExpress Software Offline Mode Figure 2-3 Dialog Box to Choose NovoSampler Pro or NovoSampler in NovoExpress Software Offline Mode 2.2 Menu Bar In the Instrument tab, the functions of the NovoSampler Pro are available when the NovoSampler Pro is connected. These functions include Mix, Reset, Calibrate/Stop Calibration, Power Down/Power Up, and Manage Plate Types. The Menu Bar is shown in Figure 2-4. Figure 2-4 The Instrument Tab of Menu Bar Mix To use the Mix function, click the Mix button from Instrument NovoSampler Pro Mix. This function will immediately begin to mix the sample. The Mix button from the Cytometer Control panel has the same function. Reset To use the Reset function, click the Reset button from Instrument NovoSampler Pro Reset. The reset function will move the orbital shaker to the home position. This will allow a reset of the NovoSampler Pro in case of misalignment or error. 18

19 Software Overview Menu Bar Calibrate To use the Calibrate function, click the Calibrate button from Instrument NovoSampler Pro Calibrate. This function automatically aligns the NovoSampler Pro with the Novo- Cyte Flow Cytometer. Stop Calibration Once calibration is initiated, the Calibrate button in the Instrument NovoSampler Pro menu will automatically become Stop Calibration button. Click Stop Calibration will stop the NovoSampler Pro calibration. 2 Power Up When clicked (and the NovoSampler Pro is properly installed), the NovoCyte will power on and allow the operation of the NovoSampler Pro. After execution, the status indication LED on NovoSampler Pro will light up in green color. The NovoExpress will prompt a message to restart the software. After the software restart, a dialogue box requesting to calibrate the NovoSampler Pro will be shown. Click Calibrate to start the automatic NovoSampler Pro calibration procedure. The software features for control and use of the NovoSampler Pro will be available after restart of the NovoExpress software. This feature is only visible when logged into NovoExpress Software with the account with Power Down/Up NovoSampler privilege. Power Down When clicked (and the NovoSampler Pro is properly installed), the NovoCyte will power off the NovoSampler Pro. After execution, the status indication LED on NovoSampler Pro will be off. The NovoExpress will prompt a message to restart the software. After the software restart, only the NovoCyte stand-alone features will be available. This feature is only visible when logged into NovoExpress Software with the account with Power Down/Up NovoSampler privilege. NovoSampler Pro should only be uninstalled when powered off. Uninstalling the NovoSampler Pro when it is still powered up may cause damage of the NovoSamplerPro. Manage Plate Types User can add, remove, calibrate, and modify plate settings in the Manage Plate Types window. To use this function, click the Manage Plate Types button from Instrument NovoSampler Pro Manage Plate Types. The Manage Plate Types dialog is shown in Figure 2-5. Figure 2-5 The Manage Plate Types Dialog Box 19
20 Software Overview Menu Bar 2 A new plate type must be calibrated before it could be used on NovoSampler Pro. Once calibrated, the same type of plate can be used for an experiment without any calibration needed. Plate Type is defined by the format of the plate (24/48/96-well plate or 24 tube rack) and the geometry of the well. For example, two U-bottom 96-well plates are considered as different types if they have different height of the well. Specify the plate name to be calibrated in details to help easy recognition of different plate type, such as Nunc TM 96-Well Polypropylene Plates, Corning Carbo-BIND TM 96- well plates, etc. All the default plate types are listed in the left box in the Manage Plate Types window. NovoExpress software has six built-in plate types including 96-well plate (U-bottom), 96- well plate (flat bottom), 96-well plate (V-bottom), 24-well plate, 24 tube rack (ACEA 24 tube rack only) and 48-well plate. Name: The name of the selected plate type. Edit it to rename the customer plate other than the built-in plate types. The name of the built-in plate type cannot be changed. Plate Format: The plate format of the selected plate type. Supporting format includes 96-well plate, 48-well plate, 24-well plate, 24 tube rack. This property cannot be changed. Max Volume: Set the limit for the maximum sampling volume user can input in the Stop Condition of Cytometer Setting panel for an experiment. Max Volume can be set in a range between 10 µl to 5000 µl. Input an appropriate Max Volume to avoid running out of sample for a well during an experiment. SIP Movement Offset (+ Down, - Up): The sample injection probe height offset relative to the default height when aspirating the sample from each well or tube. Positive value means the height is decreased. Negative value means the height is increased. The SIP Movement Offset can be set in a range between -5 mm to 5 mm. Set SIP Movement Offset to be Positive can help to reduce the dead volume from each well. Be cautious to set the SIP Movement Offset. Incorrect setting would result in collision of SIP to the bottom of the well. During plate type calibration, NovoSampler Pro automatically calibrates the default SIP height. Normally, there is no need to adjust the SIP Movement Offset. Mix Speed: The mix speed of the orbital shaker. The Mix Speed for 96, 48 and 24-well plate can be set in a range between 0 rpm (no mixing) to 3000 rpm. The Mix Speed for 24 tube rack can be set in a range between 0 rpm (no mixing) to 1800 rpm. Mix Acceleration: The acceleration time for the orbital shaker to reach the specified Mix Speed. Mix Acceleration can be set from 0 second to 10 seconds. Mix Duration: The mixing time for the orbital shaker to mix the sample. Mix Duration can be set from 1 second to 120 seconds. Built-in: Checked if the selected plate is the built-in plate type. Built-in plate types cannot be renamed or deleted. The built-in information is read only. Calibrated: Indicate if the selected plate type is calibrated. Only calibrated plate type can be used in experiments. Reset to Default: Click this button to reset the Max Volume and SIP Movement Offset of the selected plate type to default. Only built-in plate types can be reset to default. 20

21 Software Overview Menu Bar The built-in plate type has been tested with biological samples, including human peripheral blood sample and cultured cell lines, to determine the default mixing settings. At the default mixing settings, the biological samples can be effectively mixed and uniformly suspended inside each well. The table below lists the default mixing settings and the maximum values allowed to be used for six built-in plate types. Determine the proper mixing speed and volume before running the experiment can help to avoid any potential spills during the experiment runing. 2 Default Value Max. Value Plate Type Mix Speed (rpm) Mix Duration (s) Acceleration (s) SIP Offset (mm) Max Volume (µl) 24 tube rack well plate (V-bottom) 96-well plate (U-bottom) 96-well plate (flat-bottom) Mix Duration (s) Acceleration (s) Mix Speed (rpm) well plate well plate Table 2-1 Default and Maximum Allowed Mixing Settings for the Built-in Plate Types of NovoSampler Pro Remove: Click this button to delete the selected plate type. Only non-built-in plate types can be removed. Add: Click this button to add a customer plate type. Input plate type name for new plate type in the prompted window. The Copy From function helps to quickly set up a customer plate type based on the format of an existing plate type. Choose a proper existing plate type from the Copy From drop-down list. The Plate Format, Max Volume, SIP Movement Offset, Mix Speed, Mix Acceleration and Mix Duration settings are copied from the Copy From plate type. Figure 2-6 The Add Plate Type Dialog Calibrate: Click this button to calibrate the selected plate type. Only calibrated plate type can be used in experiments. The Calibrated checkbox indicates if the selected plate type is already calibrated. Figure 2-7 shows the dialog box prompted when the Calibrate button is clicked. 21


22 Software Overview Cytometer Control Panel 2 Figure 2-7 Dialog Box Prompted when Clicking Calibrate Button Click OK after properly placing a plate of the selected plate type on the orbital shaker of the NovoSampler Pro. It will take several minutes to complete the plate type calibration process. If the plate is not placed properly, the calibration could fail and a dialog box shown in Figure 2-8 will be prompted. Reposition the plate properly and conduct the calibration again. Figure 2-8 Dialog Box Prompted when the Plate Type Calibration Fails Before loading multi-well plates and ACEA 24 tube rack, identify the correct orientation to position the plate or the tube rack onto the orbital shaker. Make sure the sample plate is positioned properly on the orbital shaker and the clips hold the sample plate tightly. The sample plate should be inserted down to completely contact the surface of the orbital shaker without any tilting. Incorrect placement may cause misalignment between the sample wells and sample injection probe, resulting in damage to the sample injection probe or the orbital shaker. Before calibrating the ACEA 24 tube rack, ensure a 12 X 75 mm tube is fully inserted in each position of the tube rack. Once plate type calibration is initiated, the Calibrate button in the Manage Plate Types window will automatically become Stop Calibration button. Click Stop Calibration will stop the plate type calibration. 2.3 Cytometer Control Panel Figure 2-9 shows the Cytometer Control panel when NovoSampler Pro is connected. The Active Sample Information area contains the sample name and the sample well ID. In the Experiment Control area, there are two options to start the sample acquisition, including Run Single Well and Run Plate. Click Run Single Well to run a single well in the plate. Click Run Plate to run multiple wells. 22


23 Software Overview Experiment Manager Panel 2 Figure 2-9 Cytometer Control Panel When Run Single Well is selected, the NovoSampler Pro does not perform the mixing function before sample acquisition. To mix the sample, click the Mix Sample button in the Cytometer Control panel. When Run Single Well is selected, NovoSampler Pro will automatically rinse the sample injection probe after sample acquisition. This SIP rinse function will minimize the carryover between samples. Before acquiring a sample, ensure the sample is the Active Sample and the Well ID is correct. In the Experiment Manager panel, double-click a sample node to set the sample to be the Active Sample. The active sample will be indicated by a red arrow on the left of the sample in the Experiment Manager panel. For additional information regarding the Run Single Well function, see Section 3.4 Single Sample Acquisition in this guide. For additional information regarding the Run Plate function, see Section 3.6 Automatic Sample Acquisition in this guide. NovoExpress can automatically shut down NovoCyte after plate run is completed. Check the Shut down NovoCyte after plate run checkbox in Cytometer Control panel to activate the automatically shut down function. When the plate run is completed, NovoExpress will prompt a 60 seconds count down dialog box to confirm whether or not to shut down the NovoCyte. The dialog box is shown in Figure If no action taken after 60 seconds, NovoExpress will shut down the NovoCyte automatically. Figure 2-10 Dialog Box to Confirm whether or not to Shut down the NovoCyte Automatic shutdown function is only effective for Run Plate. Run Single Well will not trigger the shut down process. 2.4 Experiment Manager Panel Figure 2-11 shows the Experiment Manager panel when the NovoSampler Pro is connected. The samples listed in the Experiment Manager panel include the Well ID and the sample name, separated by a colon. Click the sample node to select the sample, right-click and select Rename to rename the sample. When renaming the sample, both the Well ID and the sample name can be modified. Specimen is also associated with a Specimen ID. The Specimen ID is the number before the specimen name, separated by a colon. The Specimen ID is used to identify specimen and can be modified. For additional information regarding the Specimen ID, see Section 2.5 Plate Manager Panel in this guide. 23
24 Software Overview Plate Manager Panel 2 Figure 2-11 Experiment Manager Panel For additional information regarding the Experiment Manager panel, refer to the Section 6 Experiment Manager in NovoExpress Software Guide. 2.5 Plate Manager Panel The Plate Manager panel (Figure 2-12) will only be available when the NovoSampler Pro is installed or the NovoSampler installed checkbox is checked in the Instrument Configuration window in the NovoExpress software offline mode. This management tool provides users with an intuitive and convenient way to manage samples on a multi-well plate or on ACEA 24 tube rack. The Plate Manager also allows to set up the plate type, mixing and rinsing conditions. Figure 2-12 Plate Manager Panel 24
25 Software Overview Plate Manager Panel Table below provides details on all functions of the Plate Manager panel: Icon Description The Plate Manager panel displays an 8 x 12 grid indicating a 96-well plate map. In settings for a 24 tube-rack or a plate type other than a 96-well plate, invalid wells will be grayed out. In one plate, multiple samples can be set with the same Well ID. In the grid, one well will show one sample at one time. The currently visible sample in a well is defined as selected sample of a well. The state of each well can be: This icon indicates that this well is selected. Multiple wells can be selected at the same time. The number is the Specimen ID and indicates to which specimen the selected sample belongs to. An underlined number indicates that the selected sample has acquired data. The arrow in the upper right corner indicates that the well has multiple samples. Context menu of the well will list all samples. The italicized number indicates the acquisition sequence of the selected sample. A red background indicates the well contains the Active Sample. A green background indicates that the well contains sample in queue to be collected. / An alternating green and dark green background indicates that the well contains sample currently in acquisition. / An alternating green and red background indicates that the well contains sample currently in acquisition and also is the Active Sample. The following operations can be operated on the plate grid: Click: Click the header of a row or a column to select the entire row or column. Click the top left corner cell selects all wells in the plate. Right-click: Displays context menu. Double-click: Set selected sample to be the Active Sample. Drag: Drag to select multiple wells in a rectangular range. Ctrl + Click: Hold Ctrl to select multiple individual wells. Shift + Click: Hold Shift to select consecutive wells between two wells. Work List: View and edit Work List. 2 uuu 25
26 Software Overview Plate Manager Panel Icon Description 2 New Sample(s) on Selected Well(s): Creates new samples on the selected wells. The created samples will have the same template as the Active Sample with the same compensation matrix, report, data analysis, and Cytometer Setting. The samples will be created in the specimen with name specified in Specimen Name box. If specified specimen name is empty or does not exist, a new specimen will be created. The created sample name will use the name specified in the Sample Name box as a prefix. If the sample name box is empty, the default sample name prefix (sample 1, sample 2, ) will be used. Without Template: Creates new samples on the selected wells without template applied. The compensation matrix, report, and data analysis template will be empty. But the cytometer setting will be the same as the current cytometer setting in the Cytometer Setting panel. Delete Sample(s) on Selected Well(s): Deletes the selected samples from the selected wells. If one well has multiple samples defined, only the selected sample will be deleted. Copy Sample(s) on Selected Well(s): Copies templates of selected samples from the selected wells. If no sample has defined in the selected wells, this function is disabled. If part of selected wells has samples defined, only the wells which have sample defined will be copied. Paste Sample(s) on Selected Well(s): Pastes sample template or sample events to the selected wells according to copied content. If all the selected wells have samples defined, then it applies templates of the copied samples to the selected samples of selected wells one by one repeatedly. If all the selected wells have no samples defined, then it creates samples with the same templates as copied samples on the selected wells. The samples will be created in the specimen with the name specified in Specimen Name box. If part of the selected wells have samples defined and the rest part have no samples defined, or the selected samples of the selected wells are in different specimen, this tool will be disabled. If Copy Events is selected from context menu of a well, this tool will be available when only one well is selected and the selected sample of the selected well contains no events. uuu 26
27 Software Overview Plate Manager Panel Icon Description Duplicate Sample(s) on Selected Well(s): Creates new samples on empty wells, duplicating the template of the selected samples of the selected wells. If part of the selected wells have samples defined and the rest part have no samples defined, or the selected samples of the selected wells are in different specimen, this tool will be disabled. If the selected samples are all in the same specimen and all the samples of the specimen are selected (exclude the specimens that have only one sample), the created samples will be in a newly created specimen. 2 Samples Created Order: Selects whether to automatically proceed horizontally across the plate or vertically across the plate when creating new samples. Show Run Order: When selected, a blue outline shows on the icon. The sample acquisition sequence will be shown in the plate view. This area is designed to input plate information. The left drop-down box is the Plate ID. The Plate ID is a positive integer and can be modified by highlighting the area and entering a new number. The middle drop-down box is the Plate Type. The drop-down box lists all the available plate type defined in the Manage Plate Types window from the Instrument NovoSampler Pro menu. Pull down the list and select the corresponding plate type for the experiment. The right box is the Plate Name. Input plate name in this box to help identify the plate. The plate type cannot be modified once the sample acquisition has begun. This area is designed to input the specimen and sample information. The left drop-down box is the Specimen ID and Specimen Name, separated by a colon. The right box is the Sample Name. When creating new samples, the samples will be created in a specimen with specimen name specified in the Specimen Name box. If the Specimen Name box is empty or does not exist, a new specimen will be created. The default new specimen name is Specimen1, Specimen2, The default sample name is Sample1, Sample2, Mix: Sets the mixing conditions. Mix can be set for None (no mixing), 1 Cycle, 2 Cycles, 3 Cycles for every defined number of wells or every defined number of minutes. Rinse: Sets the rinse cycle to clean the sample injection probe. Rinse can be set for None (no rinse), 1 Cycle, 2 Cycles, 3 Cycles for every defined number of wells. There is always one rinse cycle at the end of each plate run even the Rinse setting is set to None. uuu 27

28 Software Overview Plate Manager Panel Icon Description 2 Mixing Parameters: Sets the mixing parameters for the orbital shaker. These default mixing parameters for each plate type are defined in the Manage Plate Type window from the Instrument NovoSampler Pro menu, and can be modified in this area for the current experiment. Speed: The mix speed of the orbital shaker. Acceleration: The acceleration time for the orbital shaker to reach the specified Mix Speed. Duration: The mixing time for the orbital shaker to mix the sample in one cycle. In addition to the Tools menu, the Plate Management panel also provides a rich set of context menu actions. Context menu when a single well is selected If the selected well has sample already defined, the right-click menu displays a list of the samples defined in the selected well and the software functions available to be used. This context menu is the same as the context menu by right-clicking a sample node in the Experiment Manager panel. From this context menu, you can quickly select the defined sample, open, close, delete, and create plots, copy and paste templates, delete events, rename the sample, import template or the data from a FCS file, or export as a template or the data in FCS and CSV formats. For additional information regarding these functions, refer to the Section Right-Click Menu in NovoExpress Software Guide. If the selected well has no sample defined, the right-click menu has two items available, New and Paste. New will create new sample without a template. Paste will create a new sample with the same template as the copied sample. Figure 2-13 Context Menu when a Single Well which has Sample Defined is Selected If the selected well has no sample defined, the right-click menu has two items available, New and Paste. New will create new sample without a template. Paste will create a new sample with the same template as the copied sample. 28
 tool in the toolbar. Delete: Same as the Delete Sample(s) on Selected Well(s) tool in the toolbar. Copy Template: Same as the Copy Sample(s) on Selected Well(s) tool in the toolbar.")

29 Software Overview Work List 2 Figure 2-14 Context Menu when a Single Well which has no Sample Defined is Selected Context menu when multiple wells are selected New: Same as the New Sample(s) on Selected Well(s) tool in the toolbar. Delete: Same as the Delete Sample(s) on Selected Well(s) tool in the toolbar. Copy Template: Same as the Copy Sample(s) on Selected Well(s) tool in the toolbar. Paste: Same as the Paste Sample(s) on Selected Well(s) tool in the toolbar. Paste Sample Names: Rename samples of the selected wells with the names copied from a spreadsheet program like Microsoft Excel, or create new samples with copied name on selected wells if there is no sample defined. If part of selected wells have samples defined and the rest part have no samples defined, this menu will be disabled. If you have an Excel spreadsheet defining the sample names in a plate format, use Paste Sample Names function from the right-click context menu to copy the sample name from the spreadsheet and quickly create new samples for a plate in NovoExpress Software. Duplicate: Same as the Duplicate Sample(s) on Selected Well(s) tool in the toolbar. Figure 2-15 Context Menu when Multiple Wells are Selected 2.6 Work List The Work List can be used to set up the sample for a plate. The Work List allows users to create new samples, import specimens or samples from a template, duplicate specimens or samples, and copy and paste sample information. To open the Work List window, click the Work List button from Home Experiment Work List, or alternatively, click the Work List icon, from Experiment Manager panel or Plate Manager panel. The Work List window is shown in Figure

30 Software Overview Work List 2 Figure 2-16 Work List Window Compared to the Work List in NovoExpress Software with no NovoSampler Pro installed, there are three additional icons shown on the menu bar. The created Work List with NovoSampler Pro installed will also include the Plate ID and Well ID columns. The other functions remain the same. Refer to the Section 4.2 Work List in NovoExpress Software Guide for the detailed information and functions to create a Work List. The table below describes the functions of the three additional icons. Icon Description Well ID Setting Direction When new samples are created in the Work List, the Well ID will be assigned sequentially. Use the Well ID Setting Direction button in the Work List window to set whether new samples are created in a row-by-row sequence or a columnby-column sequence for a plate. Automatic Setting Well ID When selected, a blue outline will show on the icon. When Well ID of a sample is modified manually, the NovoExpress Software will automatically assign new Well ID for blank samples below that sample in an order set in the Well ID Setting Direction based on the plate type information. uuu 30


31 Software Overview Statistical Tables Icon Description Plate View Click this icon opens the Plate View window. Plate View window is read only and is used to check the information of the blank samples on a plate view. The Plate drop-down menu lists the Plate ID for all the created plates. Select a Plate ID from the drop-down menu and view the sample information for this plate. Check the Show Specimen Name checkbox to enable the specimen name associated with each well to be shown. Check the Display sample has data checkbox to also show samples which have collected data. 2 Figure 2-17 Plate View Window The Plate ID and Well ID in the Work List can be modified to assign Plate ID and Well ID for the samples. When collecting repeats from a sample well is desired, multiple samples can be assigned to the same Well ID. 2.7 Statistical Tables The statistical tables provide a summary for multiple samples, gates, and parameters, enabling batch analysis and data comparison. For data generated using NovoSampler Pro, two additional columns Plate ID and Well ID are available. To show or hide Plate ID or Well ID column in statistical table, click the Show Columns button, and select or deselect the column from the drop-down menu. The drop-down menu is shown in Figure Figure 2-18 Drop-down Menu of the Show Columns Button For additional information regarding the Statistical Tables, refer to the Section 5.6 Statistical Tables in NovoExpress Software Guide. 31

32 Software Overview Options 2.8 Options 2 Additional settings for NovoSampler Pro operation can be set by clicking Settings Options Experiment from the menu. The window is shown in Figure Figure 2-19 Define Default Experiment Settings using Options Window The following settings are specific to the operation of the NovoSampler Pro: Always remind to check plate type for first run when using NovoSampler: With this setting checked, a window will be prompted to remind user to check if the correct plate type is selected before starting the experiment. It is highly recommended to enable this setting to remind user to check and make sure the correct plate type is selected for the experiment to avoid collision of the sample injection probe. 32
33 Sample Acquisition Preparation 3. Sample Acquisition This chapter describes the sample acquisition process using NovoSampler Pro, including the following sections: Preparation Experiment Setup Instrument QC Test Single Sample Acquisition Edit Work List Automatic Sample Acquisition Analysis of Data Shutdown 3 In this chapter, a 96-well plate will be used for sample acquisition. Firstly, a QC Test using NovoCyte QC Particles will be performed in well A1. The ACEA QuadriTest CD3 FITC/ CD8 PE/CD45 PerCP/CD4 APC Reagent (Cat # ) will be used to prepare a single sample of human peripheral blood in well A2. The sample will be used to determine the gate for the lymphocyte subpopulation. Well A3, A4, A5, and A6 are compensation beads labeled respectively with FITC, PE, PerCP, and APC conjugated antibodies for automatic fluorescence compensation using NovoExpress software and generating the compensation matrix. In well B1 to E12, 48 samples will be created and analyzed for 24 specimens with 2 samples in each specimen. For each specimen, one sample will be stained with ACEA QuadriTest CD3 FITC/CD8 PE/CD45 PerCP/CD4 APC Reagent (Cat # ) and the second sample will be stained with ACEA QuadriTest CD3 FITC/CD16+CD56 PE/CD45 PerCP/CD19 APC Reagent (Cat # ). 3.1 Preparation Before using the NovoSampler Pro for sample acquisition, please be familiar with the following operation and information: NovoCyte Flow Cytometer startup and shutdown procedures QC testing procedure NovoExpress Software s Cytometer Settings, Work List, and Experiment Manager panels NovoSampler Pro sample volume requirements For additional information regarding the operation of the NovoCyte Flow Cytometer, refer to the Section 2 Instrument Operation in NovoCyte Flow Cytometer Operator s Guide. For additional information regarding using the NovoExpress Software, refer to the NovoExpress Software Guide. Minimum Sample Volume Requirements for the NovoSampler Pro For samples in a mm tube, the minimum sample volume is 90 µl. For samples in a 96-well plate, the minimum sample volume in a well is 90 µl. 33
34 Sample Acquisition Experiment Setup For samples in a 48-well plate, the minimum sample volume in a well is 210 µl. For samples in a 24-well plate, the minimum sample volume in a well is 310 µl. The recommended sample concentration range is to cells/ml. 3 Confirm Sufficient Sheath Fluid Volume During sample acquisition, the NovoCyte Flow Cytometer consumes about 0.4 liters of sheath fluid per hour. A warning will appear if the sheath fluid in the sheath fluid container is less than 0.9 liters. To avoid the termination of the plate run due to the lack of sheath fluid or a full waste container, before starting an automatic sample acquisition with NovoSampler Pro, always make sure there is a sufficient volume of sheath fluid in the sheath fluid container and the waste container has enough capacity. 3.2 Experiment Setup Start the NovoCyte Flow Cytometer and NovoExpress Software according to the process described in the NovoCyte Flow Cytometer Operator s Guide. As the flow cytometer powers up, the NovoSampler Pro will also start and be ready to use. Before sample acquisition using the NovoSampler Pro, select the plate type from the Plate Manager panel (Figure 3-1). If the Plate Manager panel is not visible, check the box from View Show Plate Manager to open it. The plate type can then be selected from the Plate Type drop-down menu. In this example, the 96-well plate (U-bottom) is selected. For other compatible plate types, refer to Section 1.1 Hardware Overview in this guide. Figure 3-1 Plate Manager Panel Before starting sample acquisition, ensure that the correct plate type is selected. An incorrectly selected plate type may result in the collision of the sample injection probe with the plate and could cause damage to the instrument. 34
35 Sample Acquisition Instrument QC Test 3.3 Instrument QC Test Quality Control (QC) test is used to monitor the performance of NovoCyte Flow Cytometer. Use the NovoCyte QC Particles daily after startup to QC the NovoCyte instrument and make sure it functions properly Prepare the ACEA NovoCyte QC Particles To prepare the NovoCyte QC Particles for the QC test: 3 1 Label a mm tube for the QC test. Add 1 ml dilution buffer (0.8 ml PBS and 0.2 ml ACEA NovoRinse solution) into the tube. 2 Take one bottle of ACEA NovoCyte QC particles from storage. Invert the bottle a few times by hand to mix the particles thoroughly. 3 Add one drop of ACEA NovoCyte QC Particles (Generation 1, Cat. # ) or add two drops of ACEA NovoCyte QC Particles (Generation 2, Cat. # ) into the test tube. 4 Vortex the test tube to mix the QC particles thoroughly. 5 Transfer 150 µl of the QC particles sample from the test tube to the A1 well of a 96-well plate and run the QC Test immediately. If the prepared QC particle sample is not intended to be run immediately, store the sample in a 2-6 refrigerator away from light. The prepared QC particle sample should be used within four hours after preparation Run the QC Test To load the sample plate and run the QC test: 1 Open the cover of the NovoSampler Pro and place the sample plate on the orbital shaker. Make sure the plate is positioned with the correct orientation onto the orbital shaker with the clips of the orbital shaker holding the plate tightly. uuu 35

36 Sample Acquisition Single Sample Acquisition 2 In the NovoExpress Software, open the QC Test window by clicking Instrument Operation QC Test button. The QC Test window is shown in Figure Figure 3-2 QC Test Step 1 3 In the window, enter the name of the operator, select the QC Particles Lot ID, and select the Well ID of the QC Particles sample. In this example, the Well ID is A1. Click Next and follow the software prompt to run the QC test and view the test reports. For more information regarding the QC Test function, refer to the Section 2.3 Instrument Quality Control in NovoCyte Flow Cytometer Operator s Guide. 3.4 Single Sample Acquisition This section describes the collection of a single sample of human peripheral blood prepared using the ACEA QuadriTest CD3 FITC/CD8 PE/CD45 PerCP/CD4 APC Reagent. The sample will be used to set up the gate for the lymphocyte subpopulation. Based on this single sample, settings can be optimized for other human peripheral blood samples in the example described in this chapter, including setting up a proper acquisition threshold and determining the gates for the lymphocyte subpopulation. To begin the collection of the single sample in well A2, follow the procedure: 1 After the completion of the QC Test, the orbital shaker will return to the home position. After the orbital shaker moves to home position, open the NovoSampler Pro cover and remove the sample plate. 2 Add 150 µl of the sample of human peripheral blood stained with ACEA QuadriTest CD3 FITC/CD8 PE/CD45 PerCP/CD4 APC Reagent to well A2 of the sample plate. 3 Place the sample plate onto the orbital shaker of the NovoSampler Pro and close the cover. 4 In NovoExpress Software, create a new experiment file. Click the Next Sample button on the Cytometer Control panel to create a new sample (named A1: Sample1 by default) and specimen (named Specimen1 by default). Save the file to a specific folder on NovoCyte workstation by clicking File Save. uuu 36


37 Sample Acquisition Single Sample Acquisition 5 Setting conditions for sample acquisition is described in the Section 3 Running Samples in NovoCyte Flow Cytometer Operator s Guide. In this experiment, the parameters should be set to collect the Height parameter from FSC, SSC, BL1, BL2, BL4, and RL1. The aliases for BL1, BL2, BL4, and RL1 could be modified to CD3 FITC, CD8 PE, CD45 PerCP, and CD4 APC, respectively. Set the stop condition to 50 µl. Set the sample flow rate to Low. Set the threshold to collect samples with FSC-H greater than 100,000. The volume stop condition must be set when using NovoSampler Pro. 6 Change the sample information. Set the Well ID as A2 using one of the two following methods : Click Sample1 in the Experiment Manager panel to select the node (Figure 3-3). Right-click and select Rename. The Well ID can now be modified to A2. 3 Figure 3-3 Modify Well ID in the Experiment Manager Panel In the Active Sample Information window of the Cytometer Control panel (Figure 3-4), click the sample name and modify the Well ID to A2. Figure 3-4 Modify Well ID in the Cytometer Control Panel The well can be named from a range depending on the plate type selected from the Plate Manager panel. If a 96-well plate is selected, the wells can range from A1 to H12. If a 24-well plate or the 24-well tube rack is selected, the wells can range from A1 to D6. 7 In the Cytometer Control panel, click the Run Single Well button to start sample acquisition from well A2. 8 In the Workspace, create a density plot by clicking the Density Plot button from the toolbar. Change the x-axis parameter to CD45 PerCP-H and the y-axis parameter to SSC- H (Figure 3-5). Use the Zoom In tool, to display the appropriate coordinate range for the sample. Draw an Elliptical Gate to gate the lymphocyte population on the plot, and rename the gate as Lymphocyte. Figure 3-5 Create Density Plot and Draw Lymphocyte Gate 37

38 Sample Acquisition Edit Work List 3.5 Edit Work List In this section, the Work List will be used to create auto compensation samples and experiment samples Creating Compensation Control Samples To create the auto compensation samples, click Home Compensation Auto Compensation to open the New Auto Compensation window. In the window, select the four parameters used in the experiment, FITC (BL1), PE (BL2), PerCP (BL4), and APC (RL1). The software will then create four single-stained samples to be used to calculate fluorescence compensation, and the software will automatically assign the samples to wells A3 to A6. The four created samples will be added to the Compensation Specimen node in the Experiment Manager panel as shown in Figure 3-6. For detailed information about the auto compensation, refer to Section Automatic Fluorescence Compensation in NovoCyte Flow Cytometer Operator s Guide. Figure 3-6 Creating Compensation Control Samples Creating Experiment Samples New samples could be created through the Work List window or through the Plate Manager panel. Create experiment samples through the Work List window To open the Work List, click the Work List button from Home Experiment Work List. Alternatively, the Work List window can be opened by clicking the Work List button, from the Experiment Manager panel or Plate Manager panel. After opening the Work List window: 1 Set the Well ID Setting Direction to Horizontal, and enable Automatic Setting Well ID (a blue outline shows on the icon). uuu 38

39 Sample Acquisition Edit Work List 2 Right-click the header in the row for Specimen1 Sample1 and select Copy. Move the cursor to the last empty row below Specimen1 Sample 1, right-click the header and select Insert Copied Rows as Specimen. The software will create a new specimen, named Specimen2, and the specimen will contain a sample, named Sample1, which will contain the Lymphocyte gate from Specimen1 Sample1. 3 Double-click the Specimen Name cell of the Specimen2 Sample1 row to modify the specimen name. Rename the specimen as Name1. Double-click the Stop Condition cell and set the stop condition to 5,000 events in the Lymphocyte gate. 4 Click the header of the Name1 Sample1 row to select the entire row. From the toolbar of the Work List window, click the Duplicate as Sample button. A new sample will be created within the Name1 specimen and named Sample2. In the new sample Name1 Sample2, modify the alias under the BL2 and RL1 parameters. Rename the alias for BL2 as CD16 + CD56 PE and the alias for RL1 as CD19 APC. 3 5 Select both Name1 Sample1 and Name1 Sample2 rows. Click the Duplicate as Specimen button from the toolbar 23 times to create the remaining 23 specimens and 46 samples. Rename each specimen as Name2, Name3, etc. 6 In the Name1 Sample1 row, rename the Well ID to B1. The remaining sample wells will automatically update. The complete Work List is shown in Figure 3-7. Figure 3-7 Work List Window after Experiment Samples Created 7 Check the Work List to ensure the settings are correct, and click the Apply Modifications button from the toolbar to save the changes made to the Work List. You will see the new samples automatically showing up in the Experiment Manager panel (Figure 3-9). Create experiment samples from the Plate Manager panel 1 Open the Plate Manager panel by checking the View Show Plate Manager box if it is not visible. 2 Double click well A2 to set sample Specimen1 Sample1 as the Active Sample. Click well B1, input Name1 in the specimen name box, input Sample1 in the sample name box, and click the New Sample(s) on Selected Well(s) button in the Plate Manager panel toolbar to create a new sample with the same template as sample Specimen1 Sample1 in well B1. 3 In the Cytometer Setting panel, change the event number stop condition to 5000 events on gate Lymphocyte. uuu 39
 on Selected Well(s) button in the Plate Manager panel toolbar, rename the created sample as Sample2, modify alias of BL2 as CD16+56 PE and modify alias of RL1 as CD19")
40 Sample Acquisition Edit Work List 4 Set the Samples Created Order tool in the Plate Manager panel toolbar to Horizontal. 5 Click the Duplicate Sample(s) on Selected Well(s) button in the Plate Manager panel toolbar, rename the created sample as Sample2, modify alias of BL2 as CD16+56 PE and modify alias of RL1 as CD19 APC. 3 6 Select both well B1 and B2, click the Duplicate Sample(s) on Selected Well(s) button, in the Plate Manager panel toolbar 23 times to create the remaining 23 specimens and 46 samples. Sequentially rename each of the newly created specimens as Name2, Name3, etc. The created samples in the Plate Manager panel are shown in Figure Set the Mixing parameters as shown in Figure 3-8 as well. Figure 3-8 Plate Manager Panel after Experiment Samples Created The Experiment Manager panel will be updated with the newly created samples. The Experiment Manager panel is shown in Figure Figure 3-9 Experiment Manager Panel after Experiment Samples Created

41 Sample Acquisition Edit Work List In the Experiment Manager panel, a variety of templates can be used to easily perform fluorescence compensation and data analysis. Please refer to the Section 6 Experiment Manager in NovoExpress Software Guide. If the sample acquisition conditions are different between samples, the Work List allows to individual collection conditions to modify individual samples. For additional information regarding the Work List, refer to the Section 4.2 Work List in NovoExpress Software Guide Plate View 3 Plate view provides an intuitive view of the sample wells. To open the plate view, click the Plate View button from Home Experiment Plate View. In plate view, if the experiment contains multiple plates, the displayed plate can be switched using the drop-down menu. The plate view is shown in Figure Figure 3-10 Plate View Window If a stop condition has not been set for a sample, the sample well will not be set and the sample will not be displayed in the plate view. 41

42 Sample Acquisition Automatic Sample Acquisition 3.6 Automatic Sample Acquisition This section will describe the automatic sample acquisition procedure. 3 1 Remove the sample plate from the NovoSampler Pro, and load the plate according to the layout set for the experiment. In this experiment, the four single-stained samples for fluorescence compensation are in wells A3 to A6. The 48 samples from 24 different specimens are in wells B1 to E12. For each specimen, the first sample is stained with ACEA QuadriTest CD3 FITC/CD8 PE/CD45 PerCP/CD4 APC reagen and the second sample is stained with ACEA QuadriTest CD3 FITC/CD16+CD56 PE/CD45 PerCP/CD19 APC Reagent. After preparing the sample plate, load the plate onto the orbital shaker of the NovoSampler Pro and close the cover. 2 In the Cytometer Control panel, click the Run Plate button. The Select well(s) to run window will open as shown in Figure In the window, select the wells to be collected. Wells selected for collection will be displayed in blue, unselected wells will be displayed in white, and wells that are not available for collection will be displayed in gray. In this experiment, select all of the samples from A3 to E12. Click the Run button to begin sample acquisition. The selected samples will be collected in the order listed in the Work List. Figure 3-11 Window for Selecting Wells to Run Click the header row or header column to select all of the available wells in the row or column. Click the top-right corner cell of the grid, to select all available wells on the plate. 3 The automatic Sample acquisition workflow with NovoSampler Pro is shown in Figure The process will begin with mixing the sample. The orbital shaker with the sample plate will then move to align the sample injection probe with the first sample well and it will be followed by sample acquisition. After sample acquisition is completed, the instrument will rinse the sample injection probe. The NovoSampler Pro will then mix the sample, move the orbital shaker with the sample plate to align the sample injection probe with the next sample well, and begin the sample acquisition. The process will continue until all of the selected samples are acquired. The frequency of mixing and rinsing will depend on the settings in the Plate Manager panel, which is opened from View Show Plate Manager. uuu 42

43 Sample Acquisition Automatic Sample Acquisition 3 Figure 3-12 Work Flow of Automated Sample Acquisition Procedure with NovoSampler Pro 4 During automated sample acquisition, when starting acquiring a new sample, a window shown in Figure 3-13 will be prompted. In the prompted window, user can determine if the new sample will become the Active Sample. Active Sample is the sample shown in the Workspace for data analysis and indicated by a red arrow on the left of a sample in the Experiment Manager panel. Click Yes to make the sample to be acquired as the Active Sample so that you can observe the data for each new sample when it is acquired. Click No to keep the sample currently in analysis as the Active Sample so that you can continue working on the data analysis, in the meanwhile the rest of the samples are been acquired. If there is no user interference within 10 seconds after this window appears, NovoExpress Software will automatically make the new sample to be acquired as the Active Sample. Check the Do not show this again in current run checkbox and click Yes or No to make your selection as default for the rest of the plate run. Figure 3-13 Window for Options on Determining the Active Sample during a Plate Run To pause automated sample acquisition, click Pause button (Figure 3-14) in the Experiment Control panel. The Pause button then changes to a Resume button. The automated sample acquisition will be paused after current sample acquisition is completed. To stop current sample acquisition immediately, click Stop Single Well button in the Experiment Control panel. To resume automated sample acquisition, click Resume button. In this case, the Select well(s) to run window will not prompt. The software will automatically continue to run the rest wells in the experiment. To stop automated sample acquisition, click Stop button. 43

44 Sample Acquisition Analysis of Data 3 Figure 3-14 The Cytometer Control Panel after Automated Sample Acquisition Started 3.7 Analysis of Data After the sample is collected, data analysis can be performed with NovoExpress Software. NovoExpress software provides tools for batch data analysis of multiple samples generated with NovoSampler Pro, such as analysis template, batch report, Statistical Table, etc. The data analysis process is summarized in Figure Figure 3-15 Data Analysis Procedure The Well ID and Plate ID information is included in the exported FCS files. Third party software could read this information for data analysis after importing the FCS files. For additional information regarding data analysis, please refer to the NovoCyte Flow Cytometer Operator s Guide or the NovoExpress Software Guide. 44
45 Sample Acquisition Shutdown 3.8 Shutdown When all experiments are completed for the day, shut down the system using the following procedure: 1 Shut down the NovoCyte Flow Cytometer Press the power button on the NovoCyte Flow Cytometer, or click on the Shut Down button, in the Instrument tab of the NovoExpress Software. The light in the power button will start flashing, and the instrument will automatically start the shutdown cleaning process. After the shutdown cleaning process is completed, the instrument will be turned off automatically. The shutdown cleaning process will automatically clean the tubing inside the system without the need for user intervention. 3 Check the Shut down NovoCyte after plate run checkbox in Cytometer Control panel to automatically activate the shutdown function after all the defined samples have been acquired. Refer to Section 2.3 Cytometer Control Panel in this guide for more information. 2 Close NovoExpress software. 3 Shut down the NovoCyte workstation. Empty the waste container. For detailed information on emptying the waste container, please refer to the Section Empty Waste in NovoCyte Flow Cytometer Operator s Guide. 45
46 Cleaning NovoSampler Pro 4. Cleaning NovoSampler Pro The NovoSampler Pro frequently comes into contact with the experimental sample. To prevent corrosion of the instrument, periodically clean the outer and inner surfaces of the NovoSampler Pro. 4 Materials ACEA NovoRinse solution DI water Clean soft cloth Procedure 1 Turn off NovoCyte Flow Cytometer and unplug the power cable. To prevent possible injury and damage to the instrument, turn off the power of the NovoCyte Flow Cytometer and unplug the power cable before cleaning or moving the instrument. 2 Prepare a damp soft cloth with ACEA NovoRinse solution. Wipe the top surface of the orbital shaker and accessible outer and inner surfaces of the NovoSampler Pro. 3 Prepare a damp soft cloth with DI water. Wipe the surfaces again. 4 Wipe the surfaces one more time with a dry soft cloth. The NovoSampler Pro and NovoCyte instrument may come into contact with biohazardous material. During the cleaning procedure, use appropriate protective equipment, including gloves, clothing, and eyewear. Do not wipe the NovoSampler Pro using isopropyl alcohol or ethanol. 46
47 Troubleshooting 5. Troubleshooting This chapter will describe errors and possible solutions related to the NovoSampler Pro. For additional support, please contact your local ACEA technical support. For technical support contact information, refer to the Technical Support section in the Prologue of this guide. For errors related to NovoCyte Flow Cytometer, refer to the NovoCyte Flow Cytometer Operator s Guide. For errors related to the software, refer to the NovoExpress Software Guide. Table 5-1 provides guidance on troubleshooting the NovoSampler Pro. Table 5-2 lists the message IDs and the associated software prompted messages. Please contact ACEA Technical Support if issues are not resolved after performing the recommended solutions or if there are any issues which are not listed in these two tables. Investigate possible causes and perform the recommended solutions in the given order. 5 Observation Possible Causes Recommended Solutions Sample injection probe is not properly aligned with the wells or tubes Plate or tube rack is not loaded correctly. NovoSampler Pro is not calibrated. Load the plate or tube rack with the correct orientation. Make sure the plate or tube rack is seated onto the sample tray properly. Click Instrument NovoSampler Pro Calibrate in the NovoExpress Software to re-calibrate the NovoSampler Pro. Table 5-1 Troubleshooting Guide for NovoSampler Pro Message IDs Software Messages Possible Causes Recommended Solutions Dirty SIP or SIP wash apparatus Clean the SIP or SIP wash apparatus following the procedures described in Section 1.1 Preventative Maintenance in NovoCyte Maintenance Guide. 0x000F NovoSampler (Pro) communication is lost The cable between the NovoSampler Pro and NovoCyte Flow Cytometer is not securely connected Reconnect the cable between the NovoSampler Pro and NovoCyte Flow Cytometer. NovoSampler Pro is not communicating with NovoCyte Restart NovoCyte instrument. 0x0010 NovoSampler (Pro) has not been calibrated NovoSampler Pro is newly installed or reconnected. Follow the prompted instructions to calibrate the NovoSampler Pro. uuu 47
48 Troubleshooting Message IDs Software Messages Possible Causes Recommended Solutions 0x0011 NovoSampler (Pro) calibration is failed NovoSampler Pro is not installed properly Re-install and calibrate the NovoSampler Pro following the procedures described in Section 1.2 Installation in this guide. The NovoSampler Pro cover is opened during calibration. Close the NovoSampler Pro cover and redo the calibration. 5 0x0012 The movement of plate is out of range The movement of the orbital shaker is blocked. Check the path of the orbital shaker to make sure there are no objects blocking the movement. Clear the block if there is any. Click Instrument NovoSampler Pro Calibrate in NovoExpress Software to re-calibrate the NovoSampler Pro. NovoSampler Pro is not installed properly Re-install and calibrate the NovoSampler (Pro) following the procedures described in Section 1.2 Installation in NovoSampler Operator s Guide or NovoSampler Pro Operator s Guide. 0x0013 Cover of NovoSampler (Pro) is opened during moving plate The cover of NovoSampler Pro is opened during moving plate Close the NovoSampler Pro cover. NovoSampler Pro will automatically reset and be ready for operation. 0x0015 NovoSampler (Pro) firmware error NovoSampler Pro firmware is not working properly Re-install or upgrade the NovoSampler Pro firmware. 0x001E The SIP module needs to be upgraded to support NovoSampler Pro SIP module is not compatible with connected NovoSampler Pro Contact ACEA technical support for service. 0x0022 Resetting NovoSampler Pro to zero position failed NovoSampler Pro is not working properly. Click Reset. Restart the NovoSampler Pro. 0x0023 Resetting NovoSampler Pro to home position failed NovoSampler Pro is not working properly. Click Reset. Restart the NovoSampler Pro. 0x0105 Cover of NovoSampler (Pro) opened Cover of NovoSampler Pro is opened Close the cover. uuu 48
49 Troubleshooting Message IDs 0x0106 Software Messages Possible Causes Recommended Solutions NovoSampler(Pro) is disconnected when powered up The NovoSampler Pro is disconnected when powered up Table 5-2 NovoExpress Prompted Error Messages and Message IDs Shut down NovoCyte Flow Cytometer. Reconnect the cable of the NovoSampler Pro to Novo- Cyte flow cytometer. Turn on NovoCyte and follow the prompts to calibrate the NovoSampler Pro. 5 49
50 Accessories and Consumables Appendix A Accessories and Consumables To order spare parts and consumables for NovoSampler Pro: Within US, call or visit Within China, call or visit Users in other countries or regions, please contact your local ACEA Biosciences distributors. For a complete list of distributors, please visit (USA), com.cn (China). Name Product No. NovoSampler Pro NovoSampler Pro 24 Tube Rack NovoSampler Pro Connection Cable
51 Technical Specifications Appendix B Technical Specifications Physical parameters NovoSampler Pro Dimension (W D H) : in ( cm) NovoSampler Pro Weight: 19.8 lb (9 kg) NovoCyte Flow Cytometer with NovoSampler Pro installed: Work space requirements (W D H) : cm Operating temperature: 15 C ~ 32 C Operating Humidity: < 80% and non-condensing Power requirements: 100 ~ 220 VAC, 47 ~ 63 Hz, 20 W Sample Analysis Compatibility: Compatible with standard 96-well plates (flatbottom, U-bottom, V-bottom), standard 24-well, 48-well plates, and ACEA NovoSampler Pro 24 tube rack for mm tubes Carryover rate: less than 0.1% (with one rinse cycle per well) Mix mode: orbital shaker Rinse: automatically rinse the sample injection probe and fluidic tubing. Minimum sample volume: 90 µl for 96-well plates Dead volume: 50 µl for 96-well plates Workstation Operating System: Microsoft Windows Software: ACEA NovoExpress 51
52
53

54 Published by ACEA Biosciences, Inc Mesa Ridge Road Ste 100, San Diego, CA U.S.A. (866) ACEA Biosciences, Inc. All rights reserved. ID For Research Use Only. Not for use in diagnostic or therapeutic procedures.
NovoExpress Software Guide. Software Version 1.2.4
 NovoExpress Software Guide Software Version 1.2.4 Table of Content 1. Introduction 6 1.1 Revision History...6 1.2 About the NovoExpress Software...6 1.3 Conventions...6 2. Installation 8 2.1 Installation
Unscrew and remove the cap from the waste tank
 Stanford Cytoflex HTS User Guide 11232015 Starting up 1. Check the sheath fluid level every time you use the cytometer. This ensures that you do not run out of sheath fluid during an experiment. Replenish
BD CellQuest Pro Acquisition Tutorial
 BD CellQuest Pro Acquisition Tutorial Introduction This tutorial guides you through a CellQuest Pro Acquisition run like the one demonstrated in the CellQuest Pro Acquisition Movie on the BD FACStation
BD CellQuest Pro Software Acquisition Tutorial
 BD CellQuest Pro Software Acquisition Tutorial This tutorial guides you through a typical acquisition using BD CellQuest Pro software. If you are already familiar with previous versions of BD CellQuest
FACSLSRFortessa SORP QUICK REFERENCE GUIDE
 FACSLSRFortessa SORP QUICK REFERENCE GUIDE INSTRUMENT: 1. The computer is left on at all times. Note: If not Username: Administrator Password: BDIS 2. Unlock the screen with your PPMS account (UTSW username
Setup protocol for Firefly particles. On BD FACSCanto cytometers with single tube loader function
 Setup protocol for Firefly particles On BD FACSCanto cytometers with single tube loader function Version 1 Last Updated May 2016 Setup protocol for Firefly particles Contents Introduction Cytometer requirements
Gallios TM Quick Reference
 Gallios TM Quick Reference Purpose: The purpose of this Quick Reference is to provide a simple step by step outline of the information needed to perform various tasks on the system. We begin with basic
Setup protocol for Firefly particles. On BD LSR II and LSRFortessa cytometers with single tube loader function
 Setup protocol for Firefly particles On BD LSR II and LSRFortessa cytometers with single tube loader function Version 1 Last Updated May 2016 Setup protocol for Firefly particles Contents Introduction
Release Notes Life Technologies Attune NxT Software v2.3
 Release Notes Life Technologies Attune NxT Software v2.3 In the following pages you will find instructions describing: New software features Known software/system issues with troubleshooting guidance Software
A Bright Cytometer Easy to use
 BriCyte E6 Flow Cytometer A Bright Cytometer Easy to use BriCyte E6 Flow Cytometer Flow cytometer is an essential tool to analyze cells, so it s used for diagnosis as well as research in laboratories worldwide.
BD Multiwell AutoSampler Additional Features Tutorial
 BD Multiwell AutoSampler Additional Features Tutorial Introduction This tutorial provides step-by-step instructions on how to use the additional features available in BD Multiwell Plate Manager (MPM) software
Tutorial: FCAP Array Software with BD FACSArray Bioanalyzer
 Tutorial: FCAP Array Software with BD FACSArray Bioanalyzer After completing this tutorial you will be able to: Create an Experiment with the Experiment Wizard in FCAP Array software. Export the Experiment
TraceFinder Acquisition Quick Reference Guide
 TraceFinder Acquisition Quick Reference Guide This quick reference guide describes the Thermo TraceFinder acquisition tasks assigned to the Technician role. Contents Acquisition Mode Selecting a Batch
BD FACSMelody Cell Sorter Quick Reference Guide
 BD FACSMelody Cell Sorter Quick Reference Guide This guide contains instructions for using the BD FACSMelody cell sorter with BD FACSChorus software version. and later. Workflow Overview The following
Quick Start Guide: COLLECT
 Quick Start Guide: COLLECT Ready, Set, Run! The Collect tab is used to collect or import a sample, configure the run settings and set up plots and gates. Collect a Sample 1. Start the C6 Flow Cytometer,
Canto II Operation Protocol
 Canto II Operation Protocol Make sure the following actions have been taken before running your samples. Make sure the waste tank is empty and refilled with 500 ml clean (see page 15 for details) Make
LEGENDplex Data Analysis Software Version 8 User Guide
 LEGENDplex Data Analysis Software Version 8 User Guide Introduction Welcome to the user s guide for Version 8 of the LEGENDplex data analysis software for Windows based computers 1. This tutorial will
Science is hard. Flow cytometry should be easy.
 Science is hard. Flow cytometry should be easy. CFlow User Guide TABLE OF CONTENTS 1 INTRODUCTION TO CFLOW... 1 1.1 Installing CFlow... 1 1.2 Starting CFlow... 1 1.3 CFlow Workspace... 2 1.4 Opening a
Release Notes Life Technologies Attune NxT Software v2.2
 Release Notes Life Technologies Attune NxT Software v2.2 In the following pages you will find instructions describing: New software features Known software/system issues with troubleshooting guidance Software
FACSLyric TM General User instructions
 flowkon Flow Cytometry User Instructions at the University of Konstanz FACSLyric TM General User instructions In BD FACSuite software, you can measure and analyze samples using either assays or experiments.
UNC Flow Cytometry Core Facility LSR II Operation 2018
 Reference: Startup BD FACSDiva 6 Online Course BD Training & elearning 1. Check Sheath and Waste containers: Empty Waste container in the sink Add bleach to the black mark ( ~10% final concentration).
CELLQuest Acquisition Tutorial
 CELLQuest Acquisition Tutorial Introduction This tutorial guides you through a CELLQuest Acquisition run like the one demonstrated in the CELLQuest Acquisition Movie on the FACStation Overview CD-ROM.
Appendix 1: DataStudio with ScienceWorkshop Sensors Tech Tips
 Appendix 1: DataStudio with ScienceWorkshop Sensors Tech Tips Section 1: Starting an experiment 1.1 Opening a file 1. Open the File menu and select Open Activity. 2. In the Open dialog box, navigate to
FACCalibur Users Guide
 FACCalibur Users Guide FACSCalibur Start Up Procedure If the Instrument is OFF: 1. Check the sheath and waste tanks. Open the fluidics drawer (front of instrument) and check the levels of sheath fluid
Gallios Flow Cytometer
 Gallios Flow Cytometer For Research use only, not for use in diagnostic procedures. Quick Reference PN A75199AB.1 (May 2011) Beckman Coulter Inc. PN A75199AB.1 (May, 2011) 1 of 24 WARNINGS AND PRECAUTIONS
Preprocessing Methods for the Maxprep Liquid Handler Technical Manual
 Preprocessing Methods for the Maxprep Liquid Handler Technical Manual Instructions for use of AS9100, AS9101, AS9200 and AS9201 TM529 11/17 Table of Contents 1 Description...1 2...2 2.1. Maxprep Liquid
BD CellQuest Pro Analysis Tutorial
 BD CellQuest Pro Analysis Tutorial Introduction This tutorial guides you through a CellQuest Pro Analysis run like the one demonstrated in the CellQuest Pro Analysis Movie on the BD FACStation Software
minipcr Mobile App operation (Android devices) Appendix: maintenance and operating conditions
 Appendix: maintenance and operating conditions") minipcr TM Thermal Cycler User s Guide Contents I. Loading your samples II. Setting up your minipcr TM thermal cycler III. Creating, storing, and editing protocols IV. Running and monitoring protocols
minipcr TM Thermal Cycler User s Guide Contents I. Loading your samples II. Setting up your minipcr TM thermal cycler III. Creating, storing, and editing protocols IV. Running and monitoring protocols
Log into the computer using your CU Denver username and password. Log into the DIVA software using your CU and Username and the password flow
 Log into the computer using your CU Denver username and password Log into the DIVA software using your CU and Username and the password flow When DIVA opens, IF a CST Mismatch pop up box appears, then
Applied Biosystems Attune Cytometric Software version 1.2 Release Notes
 Applied Biosystems Attune Cytometric Software version 1.2 Release Notes Customer ( you ) must review these notes prior to installing or operating the Attune Cytometric Software version 1.2 ( Attune Software
Flow Cytometry & FACS Core Facility
 ZMBH - Zentrum für Molekulare Biologie der Universität Heidelberg Flow Cytometry & FACS Core Facility BD FACSCanto TM with HTS User's Guide For authorization to use the FACSCanto II cytometer, you first
USER GUIDE TO BECKMAN COULTER FC500
 USER GUIDE TO BECKMAN COULTER FC500 Create a New Protocol Purpose: This procedure describes how to define the parameters and create rough analysis plots for a new experimental set-up. Some protocol templates
STANDARD OPERATING PROCEDURE
 Document No: LAB/023/2 Page 1 of 7 Uncontrolled copy if not printed on yellow paper. Title: STANDARD OPERATING PROCEDURE Use of the Magtration System 8Lx Document No: LAB/023 Version No: 2 CopyNo/Holder:
Help us make this document better smarttech.com/docfeedback/ SMART Ink 3.1 USER S GUIDE FOR WINDOWS OPERATING SYSTEMS
 Help us make this document better smarttech.com/docfeedback/170830 SMART Ink 3.1 USER S GUIDE F WINDOWS OPERATING SYSTEMS Trademark notice SMART Ink, SMART Notebook, SMART Meeting Pro, Pen ID, smarttech,
FACSAria Fusion SORP QUICK REFERENCE GUIDE
 FACSAria Fusion SORP QUICK REFERENCE GUIDE INSTRUMENT: 1. The computer is left on at all times. Note: If not Username: Admin Password: BDIS 2. Ensure the flow cell access door is open. You will want to
TraceFinder Analysis Quick Reference Guide
 TraceFinder Analysis Quick Reference Guide This quick reference guide describes the Analysis mode tasks assigned to the Technician role in the Thermo TraceFinder 3.0 analytical software. For detailed descriptions
Customer ( you ) must review these notes prior to installing or operating the Attune NxT Software version ( Attune Software v1.1.0 ).
 must review these notes prior to installing or operating the Attune NxT Software version ( Attune Software v1.1.0 ).") Life Technologies Attune NxT Software version 1.1.0 Release Notes Customer ( you ) must review these notes prior to installing or operating the Attune NxT Software version 1.1.0 ( Attune Software v1.1.0
Life Technologies Attune NxT Software version 1.1.0 Release Notes Customer ( you ) must review these notes prior to installing or operating the Attune NxT Software version 1.1.0 ( Attune Software v1.1.0
Agilent 34826A BenchLink Data Logger for 34980A. Getting Started Guide. Agilent Technologies
 Agilent 34826A BenchLink Data Logger for 34980A Getting Started Guide Agilent Technologies Notices Agilent Technologies, Inc. 2006 No part of this manual may be reproduced in any form or by any means (including
CellaVision Proficiency Software
 CellaVision Proficiency USER S MANUAL 2.3 CellaVision Proficiency Preface CellaVision is a trademark of CellaVision AB. All other trademarks used in this document are property of their respective owners.
BD Accuri C6 with single tube loader protocol. For multiplex assays
 BD Accuri C6 with single tube loader protocol For multiplex assays BD Accuri C6 with single tube loader protocol This protocol contains instructions for setting up an Accuri C6 with Tube Loader. If you
ChromQuest 5.0 Quick Reference Guide
 ChromQuest 5.0 Quick Reference Guide This guide contains an overview of the ChromQuest chromatography data system, with topics organized by workflow. For more information, refer to the ChromQuest User
Data acquisition and analysis of MACSPlex Cytokine Kits using the MACSQuant Analyzer Express Modes in MACSQuantify Software version 2.
 Data acquisition and analysis of MACSPlex Cytokine Kits using the MACSQuant Analyzer Express Modes in MACSQuantify Software version 2.6 Contents 1. Description 1.1 Background information 1.2 Reagent and
ClonePix TM 2 QUICK SET-UP INTRUCTIONS MANUAL SOFTWARE RELEASE
 ClonePix TM 2 QUICK SET-UP INTRUCTIONS MANUAL SOFTWARE RELEASE 1.2.80.1071 07MAN1181.A1 Effective Date: 30-Jan-11 ECO #: 3093 Contents What are Quick Set-Up Instructions?... 3 Starting up ClonePix 2...
CyAn ADP Guide. Starting Up
 CyAn ADP Guide Starting Up 1. Check the sheath and waste fluids, if needed, fill and empty: 1. To fill the Sheath Tank: a. Unscrew the top of the tank labeled Sheath Tank, and set it on top of the tank.
USER GUIDE. UniFoilPrinter. for. User Guide for UniFoilPrinter
 1 USER GUIDE for UniFoilPrinter Version 2.9 March 2014 (UniFoilPrinter PC Tool version. 1.0.0.57, Firmware version 2.13, Hardware version 001) 2 TABLE OF CONTENTS 1 ABOUT THIS MANUAL... 6 2 ABOUT UNIFOILPRINTER...
Microsoft Access 5: Reports & Other Useful Functions
 Microsoft Access 5: Reports & Other Useful Functions You can print out simple records of your data by using the Office menu. However, if you want to create a customized report from one or more tables or
ClonePix TM FL Quick Set-Up Instructions
 ClonePix TM FL Quick Set-Up Instructions Software Release: 1.2.13.971 07MAN1055.A2 Effective Date: 01-Jun-10 QUICK INSTRUCTIONS > CONTENTS Contents What are Quick Set Up Instructions?...3 Starting up ClonePix
User Guide DYMO Label TM v.8
 User Guide DYMO Label TM v.8 Copyright Trademarks 2012-2015 Sanford, L.P. All rights reserved. Revised 9/6/2016. No part of this document or the software may be reproduced or transmitted in any form or
TraceFinder Analysis Quick Reference Guide
 TraceFinder Analysis Quick Reference Guide This quick reference guide describes the Analysis mode tasks assigned to the Technician role in Thermo TraceFinder analytical software. For detailed descriptions
1. Concepts and What s New Concepts What's New in E Getting Started Starting Electra Page Scale
 1 1. Concepts and What s New... 6 1.1 Concepts... 6 1.2 What's New in E6... 7 2. Getting Started... 8 2.1 Starting Electra... 8 2.2 Page Scale... 8 2.3 Page Measurement Units... 9 2.4 Stencils and Drawing
VWR Protocole Builder Software User manual Summary
 VWR Protocole Builder Software User manual Summary 1. Introduction... 2 1.1. What is VWR Protocole Builder Software?... 2 1.2. Passwords and User information... 2 1.3. Forgotten password... 2 2. Home screen...
Biomek Tutorial Guide. Beckman Part No AA April 1998
 Beckman Part No. 609912-AA April 1998 Biomek 2000 Tutorial Guide Beckman Instruments, Inc. 2500 N. Harbor Blvd., Fullerton, CA 92834-3100 Copyright 1998 Beckman Instruments, Inc. Printed in U.S.A. Copyright
Contents. Batch & Import Guide. Batch Overview 2. Import 157. Batch and Import: The Big Picture 2 Batch Configuration 11 Batch Entry 131
 Batch & Import Guide Last Updated: 08/10/2016 for ResearchPoint 4.91 Contents Batch Overview 2 Batch and Import: The Big Picture 2 Batch Configuration 11 Batch Entry 131 Import 157 Configure Import File
LSRFortessa Guide. Cell Evaluation and Therapy Core HO324
 LSRFortessa Guide Cell Evaluation and Therapy Core HO324 Before Use: Prime the instrument twice with no tube and arm to the side Ensure that sheath is full and waste is empty To Begin: Log into ilabs tracker
MultiMatePlus. User & Installation Guide. Version 1.3
 MultiMatePlus User & Installation Guide Version 1.3 July 2018 T O P T E C H S Y S T E M S MultiMatePlus User & Installation Guide Toptech Systems 1124 Florida Central Parkway Longwood, FL 32750 Phone 407.332.1774
BD FACS Loader Reference Manual
 BD FACS Loader Reference Manual bdbiosciences.com Part No. 643280 Rev. A November 2007 BD Biosciences San Jose, CA 95131-1807 USA Tel (877) 232-8995 Fax (800) 325-9637 facservice@bd.com Asia Pacific Tel
TopPoint User's Guide
 TopPoint User's Guide LT2152/ 2000 Gilson, Inc. All rights reserved August 2000 Table of Contents 1 Introduction 2 Operation 3 Troubleshooting Steps to Using TopPoint... 1-2 Accessing Online Help... 1-3...
BD FACSLink LIS Interface Solution User s Guide
 BD FACSLink LIS Interface Solution User s Guide bdbiosciences.com 23-14537-00 5/2013 Becton, Dickinson and Company BD Biosciences 2350 Qume Dr. San Jose, CA 95131 USA Tel 877.232.8995 Fax 408.954.2347
Software User's Guide
 Software User's Guide Brother QL-series The contents of this guide and the specifications of this product are subject to change without notice. Brother reserves the right to make changes without notice
To connect the AC adapter:
 Replacing the AC Adapter Replacing the AC Adapter 3 Plug the power cord into a wall outlet. The power indicator turns on. To connect the AC adapter: Connect the power cord to the AC adapter. Power indicator
Batch and Import Guide
 Batch and Import Guide 06/13/2017 Blackbaud Altru 4.96 Batch and Import US 2017 Blackbaud, Inc. This publication, or any part thereof, may not be reproduced or transmitted in any form or by any means,
Data acquisition and analysis of MACSPlex Exosome Kit using the MACSQuant Analyzer Express Mode in MACSQuantify Software version 2.
 Data acquisition and analysis of MACSPlex Exosome Kit using the MACSQuant Analyzer Express Mode in MACSQuantify Software version 2.8 Contents 1. Description 1.1 Background information 1.2 Reagent and instrument
Removal and Installation8
 8 Screw Types 8-4 Top Cover Assembly 8-5 Left Hand Cover 8-6 Right Hand Cover 8-10 Front Panel Assembly 8-14 Left Rear Cover 8-15 Right Rear Cover 8-16 Extension Cover (60" Model only) 8-17 Media Lever
TraceFinder Acquisition Quick Reference Guide
 TraceFinder Acquisition Quick Reference Guide This quick reference guide describes the Thermo TraceFinder acquisition tasks assigned to the role of Technician. Contents Acquisition Mode Selecting a Batch
Colony Counting User Manual A D I V I S I O N O F S Y N O P T I C S L T D
 ProtoCOL Colony Counting User Manual S Y N B I O S I S A D I V I S I O N O F S Y N O P T I C S L T D All possible care has been taken in the preparation of this publication, but Synoptics Limited accepts
GXLink MultiChannel Wave Inserter Model SP-631
 800173-0A Digital High Speed GXLink MultiChannel Wave Inserter Model SP-631 User Manual Copyright 2009 It is prohibited to copy, reproduce or distribute this information in whole or in part without the
FloMax Software for Cytometry. Operating Manual Instrument Control and Acquisition. FloMax Operating Manual Instrument Control and Acquisition
 FloMax Software for Cytometry Operating Manual Instrument Control and Acquisition 1 Contents Introduction to FloMax Software Acquisition and Instrument Control...3 Operating Basics - Preparing FloMax for
BD FACS Sample Prep Assistant III Instructions For Use
 BD FACS Sample Prep Assistant III Instructions For Use IVD For In Vitro Diagnostic Use bdbiosciences.com 23-13406-02 4/2016 Becton, Dickinson and Company BD Biosciences 2350 Qume Drive, San Jose, CA 95131
Leading LED Applications. XD6/XD10 User Manual
 Leading LED Applications XD6/XD10 User Manual Table of Contents 1. Product Introduction 2. Product Components 3. Product Installation 4. Product Wiring 5. Maintenance Safety information WARNING! Please
Use the AccuSEQ Software v2.0 Custom Experiment mode
 QUICK REFERENCE Use the AccuSEQ Software v2.0 Custom Experiment mode Publication Part Number 4425585 Revision Date 25 January 2013 (Rev. B) Custom Experiments Note: For safety and biohazard guidelines,
Microsoft Excel Level 1
 Microsoft Excel 2010 Level 1 Copyright 2010 KSU Department of Information Technology Services This document may be downloaded, printed, or copied for educational use without further permission of the Information
Chapter 4: Single Table Form Lab
 Chapter 4: Single Table Form Lab Learning Objectives This chapter provides practice with creating forms for individual tables in Access 2003. After this chapter, you should have acquired the knowledge
Section 1 Microsoft Excel Overview
 Course Topics: I. MS Excel Overview II. Review of Pasting and Editing Formulas III. Formatting Worksheets and Cells IV. Creating Templates V. Moving and Navigating Worksheets VI. Protecting Sheets VII.
TopPoint Administrator User's Guide
 TopPoint Administrator User's Guide LT2153/ 2000 Gilson, Inc. All rights reserved December 2000 Table of Contents 1 Introduction 2 Installation 3 Operation System Requirements... 1-2 Minimum... 1-2 Recommended...
Gateway Profile 4 service guide
 Gateway Profile 4 service guide Customizing Troubleshooting Contents Replacing Components in Your Gateway Profile 4.................. 1 About this guide.....................................................
Automated Plate Labeling
 Automated Plate Labeling Protocol Guide For Research Use Only. Not for use in diagnostic procedures. Original Instructions Notices Agilent Technologies, Inc. 2017 No part of this manual may be reproduced
User Manual Australia
 User Manual Australia April 2009 EAZ0057B06A Rev. A Trademarks Acknowledgements Snap-on, ShopStream Connect, ETHOS, MODIS, SOLUS, SOLUS PRO, and Vantage PRO are trademarks of Snap-on Incorporated. All
Creating Interactive PDF Forms
 Creating Interactive PDF Forms Using Adobe Acrobat X Pro for the Mac University Information Technology Services Training, Outreach, Learning Technologies and Video Production Copyright 2012 KSU Department
DYMO ID User Guide BC
 DYMO ID User Guide BC Copyright 2015 Sanford, L.P. All rights reserved. Revised: 4/28/2015 No part of this document or the software may be reproduced or transmitted in any form or by any means or translated
BD FACSDiva Software Quick Reference Guide for BD FACSCanto Systems with Loader Option
 BD FACSDiva Software Quick Reference Guide for BD FACSCanto Systems with Loader Option This guide contains instructions for using BD FACSDiva software version 6 with BD FACSCanto and BD FACSCanto II systems
Coach s Office Playbook Tutorial Playbook i
 Playbook i The Playbook... 1 Overview... 1 Open the Playbook... 1 The Playbook Window... 2 Name the Chapter... 2 Insert the First Page... 3 Page Templates... 3 Define the Template Boxes... 4 Text on the
Excel Select a template category in the Office.com Templates section. 5. Click the Download button.
 Microsoft QUICK Excel 2010 Source Getting Started The Excel Window u v w z Creating a New Blank Workbook 2. Select New in the left pane. 3. Select the Blank workbook template in the Available Templates
MagicInfo VideoWall Author
 MagicInfo VideoWall Author MagicInfo VideoWall Author User Guide MagicInfo VideoWall Author is a program designed to construct a VideoWall layout and create VideoWall content by adding various elements
LightOne Pro. Catalog No. LI Instructions Manual. Appendix. Tips for Advanced Users. Useful Links
 Appendix Tips for Advanced Users Generating Templates: Lighting-up Groups of Wells Simultaneously 1. Go to www.embitec.com 2. DownloadsgInstructionsgLightOne Pro: Generating Templates LightOne Pro Catalog
BD Lyoplate Human Screen Analysis Instructions For analysis using FCS Express or FlowJo and heatmap representation in Excel 2007
 BD Biosciences Technical Resources Page 1 For use with the BD Lyoplate Human Cell Surface Marker Screening Panel (Cat. No. 560747). Please check that your catalog numbers for the FCS Express Excel templates
Startup Guide C01
 Startup Guide 4012988-00 C01 Startup Guide English Where to Find Information........................ 2 Safety Instructions.............................. 4 Important Safety Instructions...........................
TABLE OF CONTENTS INTRODUCTION...1 DEVICE SETUP...4 SUPPORT RESOURCES...9
 TABLE OF CONTENTS INTRODUCTION...1 1.1 Minimum System Requirements 1.2 Package Contents 1.3 About This Manual 1.4 Rear View 1.4.1 Rear Features 1.5 Usage Notes DEVICE SETUP...4 2.1 Quick Start 2.2 Assembly
Version 1.1 March 2017
 Version 1.1 March 2017 QuantiFERON -TB Gold Plus Analysis Software (v2.71) Instructional Guide For installation, setup, and use of the QuantiFERON-TB Gold Plus Analysis Software 10595642 QIAGEN, 19300
Cedex Analyzer Operator s Manual
 Cedex Analyzer Operator s Manual Software Version 2.3.2 June 2016 For use in quality control/manufacturing processes only. Cedex Analyzer Addendum 3 to Operator s Guide, Version 3.0 Software Version 2.3.2
Mercury Elite Pro mini ASSEMBLY MANUAL & USER GUIDE
 Mercury Elite Pro mini ASSEMBLY MANUAL & USER GUIDE TABLE OF CONTENTS 1. INTRODUCTION... 1 1.1 MINIMUM SYSTEM REQUIREMENTS 1.1.1 Mac Requirements 1.1.2 PC Requirements 1.2 PACKAGE CONTENTS 1.3 ABOUT THIS
Software User's Guide
 Software User's Guide The contents of this guide and the specifications of this product are subject to change without notice. Brother reserves the right to make changes without notice in the specifications
Getting Started. Custom Reports Software
 Getting Started Custom Reports Software Custom Reports software Custom reporting The Custom Reports software lets you transfer quantitative results from Data Analysis into the Custom Reports spreadsheet
P3e REPORT WRITER CREATING A BLANK REPORT
 P3e REPORT WRITER CREATING A BLANK REPORT 1. On the Reports window, select a report, then click Copy. 2. Click Paste. 3. Click Modify. 4. Click the New Report icon. The report will look like the following
ImageNow eforms. Getting Started Guide. ImageNow Version: 6.7. x
 ImageNow eforms Getting Started Guide ImageNow Version: 6.7. x Written by: Product Documentation, R&D Date: September 2016 2014 Perceptive Software. All rights reserved CaptureNow, ImageNow, Interact,
Layout and display. STILOG IST, all rights reserved
 2 Table of Contents I. Main Window... 1 1. DEFINITION... 1 2. LIST OF WINDOW ELEMENTS... 1 Quick Access Bar... 1 Menu Bar... 1 Windows... 2 Status bar... 2 Pop-up menu... 4 II. Menu Bar... 5 1. DEFINITION...
SymBiot I Sample Workstation
 SymBiot I Sample Workstation Getting Started Guide DRAFT August 28, 2001 8:42 pm Symbfmgs.fm5 Copyright 1997, 2001, Applied Biosystems. All rights reserved. For Research Use Only. Not for use in diagnostic
Preface 1. Main Management System 2. Contact Information 3 SIPLUS CMS. SIPLUS CMS4000 X-Tools - User Manual Main Management System.
 4000 X-Tools - User Manual - 03 - Main Management System Preface 1 Main Management System 2 Contact Information 3 4000 X-Tools User Manual - 03 - Main Management System Release 2011-09 Release 2011-09
Before you can use the machine, you must set up the hardware. Please read this Quick Setup Guide for the correct setup procedure.
 FAX-2480C Quick Setup Guide Before you can use the machine, you must set up the hardware. Please read this Quick Setup Guide for the correct setup procedure. Setting Up the Machine Setup is Complete! Keep
Setup Guide. Confirming the Installation Space. Installation space (W x D x H) 70.5 x 66.3 x 61.5 inches (1790 x 1684 x 1560 mm) 23.
 70.5 x 66.3 x 61.5 inches (1790 x 1684 x 1560 mm) 23.") Introductory Information Setup Guide ENGLISH Read this manual before attempting to operate the printer. Keep this manual in a handy location for future reference. Caution Instructions in this Setup Guide
Introductory Information Setup Guide ENGLISH Read this manual before attempting to operate the printer. Keep this manual in a handy location for future reference. Caution Instructions in this Setup Guide
EASY-nLC Virtual Instrument for Xcalibur 2.1.x Quick Reference Guide
 EASY-nLC Virtual Instrument for Xcalibur 2.1.x Quick Reference Guide This guide describes how to install, configure, and use the Thermo EASY-nLC Virtual Instrument (VI) software with the Thermo Xcalibur