ESCHERLIKE developed by Géraud Bousquet. User s manual C03-04 STROKE WIDTH C03-05 TRANSPARENCY C04-01 SAVE YOUR WORK C04-02 OPEN A FILE
|
|
|
- Vivien Melanie Hoover
- 5 years ago
- Views:
Transcription
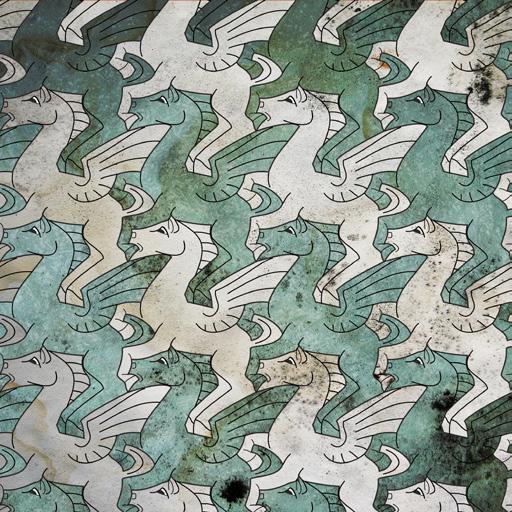
1 Summary ESCHERLIKE developed by Géraud Bousquet User s manual EscherLike is a software program that makes it easy to draw all the regular tilings of the plane. There are 93 different tilings (and 17 variations) so you can work with 110 tilings. You can draw your own tilings «à la Escher» way or create your own seamless patterns for textile, laser cutting machine, wood cutting machines... Once you have drawn your tiling, it can be exported in vector format (. SVG usable with Illustrator, Inkscape, GIMP, Firefox and Safari) or bitmap (. TIFF usable with all image editing software as Photoshop, GIMP, CorelPaintShopPro). The drawing can be exported in whole or in part (seamless pattern). Escherlike is available for Mac, Windows and Linux platforms and can be downloaded at the following address Chap 01 THE BASICS C01-01 THE INTERFACE C01-02 SELECTING A TILING C03-04 STROKE WIDTH C03-05 TRANSPARENCY C01-03 SELECTING A CURVE Chap 04 SAVE, OPEN AND EXPORT C01-04 ADDING A POINT TO A CURVE C01-05 REMOVING A POINT ON A CURVE C01-06 ADDING SEVERAL POINTS C01-07 MOVING A POINT C01-08 MODIFYING THE TANGENTS C01-09 CHANGING A POINT Chap 02 WORKING METHOD C02-01 TOOLS C02-02 WORKING ON A TILE C02-03 DIFFERENT DISPLAYS C04-01 SAVE YOUR WORK C04-02 OPEN A FILE C04-03 EXPORT TO VECTOR FORMAT C04-04 EXPORT TO BITMAP FORMAT Chap 05 DEFORMATIONS OF THE TILE C05-01 EXPANSION/CONTRACTION C05-02 SHEAR C05-03 ROTATION C05-04 AXIAL SYMMETRY Chap 03 TILING COLORS Chap 06 ADDING GRAPHIC ELEMENTS C03-01 DRAWING SPACE COLOR C03-02 FILL COLOR C03-03 STROKE COLOR C06-01 ADDING AN ARROW C06-02 ADDING A CIRCLE C06-03 ADDING A STRAIGHT LINE SEGMENT User s manual - EscherLike p 1
2 C06-04 ADDING A SPECIAL SQUARE C06-05 ADDING A WHOLE PATTERN C06-06 ADDING ANY SHAPE C06-07 MODIFICATION OF GRAPHIC ELEMENTS C06-08 LIBRARY OF GRAPHIC ELEMENTS Chap 07 TRACING A PICTURE C07-01 IMPORTING A PICTURE C07-02 POSITIONING THE TILE C07-03 ADJUSTING THE CURVES C07-04 SELECTING COLORS Chap 08 ESCHERLIKE AND OTHER APPLICATIONS C08-01 ESCHERLIKE & SEAMLESSMAKER C08-02 ESCHERLIKE & GIMP C08-03 ESCHERLIKE & INKSCAPE C08-04 ESCHERLIKE & ILLUSTRATOR C08-05 ESCHERLIKE & PHOTOSHOP User s manual - EscherLike p 2

 Area 3 Tools to import and manipulate an image on which you can draw.")
3 Chap 01 THE BASICS C01-01 THE INTERFACE 1 l Click on the icon Escherlike application to launch the application. The interface consists of five parts: 1 l Click on the select curve tool. 2 l Click on a green line to select it. When it is selected it becomes red or yellow. For tiling without spaces the yellow curves should not be changed. The yellow curves can be changed to create spaces that show the background colour Area 1 The drawing space: this is where you create and modify the tiling using Bezier curves. Area 2 The toolbar (adding points, moving points, choice of colors...) Area 3 Tools to import and manipulate an image on which you can draw. Area 4 Tools for manipulating the tile (rotation, expansion, shear, axial symmetry). Area 5 Tools to add editable graphic elements on the tile. Before selecting the curve is green. 2 l Escherlike is available in French, English or Spanish via the menu EscherLike > Preferences. C01-02 SELECTING A TILING 1 l Click on the four colors button to open the tilings window. 2 l Click on one of the 17 tabs representing the 17 plane symmetry group (cm, cmm, p1...). 3 l Select a tile from among the 110 available. After selecting the curve turns red (or yellow) C01-04 ADDING A POINT TO A CURVE 1 l Select the curve on which you want to add a point. 2 l Click on the add point button 3 l Adjust, with up/down arrows next to the add point button, the number of points to 1 4 l Click on the selected curve (red or yellow) to add an anchor point where you clicked. Three options are available : l click : the anchor point will have parallel tangents l alt+click : the anchor point will have independant tangents (they can do any angle between them) l cmd+click : the anchor point will not have a tangent at all (usefull to make straight line segments) 4 l Click the button in the lower right to confirm your choice. C01-03 SELECTING A CURVE User s manual - EscherLike p 3
 C01-07 MOVING A POINT click = parallel tangents 1 l Select the curve on which the point is.")

.")

4 l alt+click : the anchor point will have independant tangents (they can do any angle between them) l cmd+click : the anchor point will not have a tangent at all (usefull to make straight line segments) C01-07 MOVING A POINT click = parallel tangents 1 l Select the curve on which the point is. 2 l Click on the tool modify point / tangent 3 l Click on one anchor point of the selected curve without releasing the mouse button and move the point. alt+click = independant tangents moving an anchor point. C01-08 MODIFYING THE TANGENTS cmd+click = no tangent C01-05 REMOVE A POINT ON A CURVE 1 l Select the curve on which you want to remove a point. 2 l Click on the remove point button. 3 l Click on the point to remove (on a anchor point and not a control point) 1 l Select the curve on which the point is. 2 l Click on the tool modify point / tangent 3 l Click on one anchor point of the selected curve (the tangents, if the point has tangents, must appear). 4 l Click on one of the two extremities of tangents (control points - blue points) of the selected point without releasing the mouse button and move the control point. C01-06 ADDING SEVERAL POINTS 1 l Select the curve on which you want to add a point. 2 l Click on the add point button. 3 l Adjust, with up/down arrows next to the add point button, the desired number of points (here 5). 4 l Click on the selected curve (red or yellow) to add the anchor points. The added points are inserted between the two closest points and are regularly spaced. modification of the tangents. C01-09 CHANGING A POINT 1 l Select the curve on which the point is situated. 2 l Click on one of the following tools 3 l Click on an anchor point of the selected curve to change it. If you choose, you have to click and drag the mouse without releasing the button to make the tangents appear). Adding five anchor points regularly spaced. The three options are still available : l click : the anchor point will have parallel tangents an anchor point without tangents becomes an anchor point with parallel tangents of the same length. an anchor point with tangents becomes an anchor point without tangents an anchor point with parallel tangents becomes an anchor point with independant tangents an anchor point with parallel tangents of the same length becomes an anchor point with parallel tangents of different User s manual - EscherLike p 4


5 lengths. Chap 02 WORKING METHOD C02_01 TOOLS 1 l The toolbox will appear on the drawing space by clicking on the word Tools or by this menu item : Display > Tools ToolBox to work quickly. C02-02 WORKING ON A TILE 4 l After adding anchor and control points the curves can de modified. 1 l Choose a tiling (C01-02) for example p1 /IH41. 5 l Click on the button to show several tiles. 2 l Click on the button of the toolbox to show only one tile. 6 l Modify the number of tiles by using the up/down arrows near the Tilings checkbox. The button of the toolbox has the same effect as the checkbox 1 tile on the bottom left of the window. 7 l Modify the fill colors and the stroke colors (see C03) 3 l Click on the button to enlarge the tile User s manual - EscherLike p 5


6 C02-03 DIFFERENTS DISPLAYS 1 l When the tilings checkbox is checked, the default display show several full tiles. Before the modification of the canvas color. 2 l When the Tilings and 1 tiling checkboxes are selected, the display shows only 1 full tile. After the modification of the canvas color. C03-02 FILL COLORS 3 l When the Tilings checkbox is unchecked, the display shows only 1 empty tile. 1 l Click on the colored rectangle to choose the basic fill color. 2 l Adjust the increments for the hue, the saturation and the value with the up/down arrows. This is a more flowing drawing mode. 3 l Modify manually the automatically calculated fill colors by clicking on the different colored rectangles. Each rectangle corresponds to one different tile. Chap 03 COLORS OF TILING C03-01 DRAWING SPACE COLOR 1 l The drawing space color can be modified by clicking on the coloured square on the right of the text Canvas. User s manual - EscherLike p 6
 go to the menu item File> Save The corresponding shortcut is cmd+s C04-02 OPEN A FILE 1 l To open a file created with EscherLike (extension.")


7 Chap 04 SAVE, OPEN AND EXPORT C04-01 SAVE YOUR WORK 1 l To save a file created with EscherLike (extension.el ) go to the menu item File> Save The corresponding shortcut is cmd+s C04-02 OPEN A FILE 1 l To open a file created with EscherLike (extension.el ) go to the menu item File> Open The corresponding shortcut is cmd+o. C03-03 STROKE COLORS 1 l Click on the colored rectangle to choose the basic stroke color. C04-03 EXPORT TO VECTOR FORMAT 2 l Modify manually the automatically calculated fill colors by clicking on the different colored rectangles. Each rectangle corresponds to one different tile. It is recommanded to keep all these colors identical. C03-04 STROKE WIDTH file in EscherLike 1 l To export a full drawing created with EscherLike to the vector format.svg, go to the menu item : File > Export > SVG When the exported file is open with GIMP, Inkscape or Illustrator, all the visible tiles in EscherLike will be visible. 1 l Choose the stroke width (in points) with the drop down menu. You can hide the outlines by unchecking the checkbox Outline. C03-05 TRANSPARENCIES 1 l Adjust the backgrounds transparencies with the up/down arrows to the right of the button. 2 l Adjust the outlines transparencies with the up/down arrows to the right of the button. File > Export > SVG and opening with GIMP 2 l To export a single tile as.svg, go to the menu item : Pattern > Export single tile as SVG When the exported file is open with GIMP, Inkscape or Illustrator, only one tile will be visible. User s manual - EscherLike p 7


8 height by clicking on the up/down arrows near the buttons et. Pattern> Export a single tile as SVG and opening with GIMP 3 l To export a seamless pattern to the vector format.svg, go to the menu item : Pattern > Export seamless pattern as SVG When the exported file is open with GIMP, Inkscape or Illustrator, a seamless picture is created and can be used as a pattern. Horizontal expansion/contraction of the tile. C05-02 SHEAR Pattern > Export as a seamless pattern SVG and opening with GIMP C04-04 EXPORT TO BITMAP FORMAT 1 l To export the seamless pattern to TIFF bitmap format, go to the menu item : Pattern > Preview 2 l Choose the width of the pattern in pixels 1 l The tile can be deformed by shear vertically and horizontally by clicking on the up/down arrows near the buttons et. It is not recommended to use the shear and axial symmetry if you want to export a seamless pattern. In this case it is recommanded to export the whole drawing. Vertical shear of the tile. Pattern > Preview > Export seamless pattern as TIFF and opening with GIMP 3 l Click on the button TIFF Chap 05 DEFORMATIONS OF THE TILE C05-01 EXPANSION/CONTRACTION 1 l The tile can be expanded or contracted in width and / or User s manual - EscherLike p 8


9 C06-03 ADDING A STRAIGHT LINE SEGMENT 1 l To add a straight line segment, click on the button. This shape can be modified. C06-04 ADDING A SPECIAL SQUARE 1 l To add a special square, click on the button. C05-03 ROTATION 1 l The tile can be rotated 1, 30, 45 or 90 by clicking respectively on the up/down arrows near the buttons,... C05-04 AXIAL SYMMETRY 1 l You can apply an horizontal and/or vertical axial symmetry to the tile by clicking on the buttons et. Chap 06 ADDING GRAPHIC ELEMENTS You have two layers in EscherLike : - one layer with the curves of the tile - one layer with all the curves of the graphic elements To make the manipulation of the curves easier you can t work on the two layers at the same time. To choose the layer you want to work on, click on the button on the toolbox window. When the padlock is unlocked you work on the tile and when the padlock is locked, you work on the graphic elements. When you add a graphic element, you automatically switch to the graphic elements mode, so don t forget to click on the padlock to go back on the tile. Special square window 2 l Play with the different sliders to create polygons, flowers... This shape can be modified. C06-05 ADDING A WHOLE PATTERN 1 l To add a whole pattern,click on the button (use in preference with tilings with no internal symmetry, eg p1, p2, p3, p4, p6, pg, some pgg... ) C06-06 ADDING ANY SHAPE 1 l Click on the pen tool to create a new shape, then click on the canvas to create the first point of the new shape. 2 l Click on the canvas to add new points. 3 l Click on the first point to close the shape. 4 l Use the toolbox tools to modify the points of the shape. The padlock is unlocked : you are working on the curves of the tile. The padlock is locked : you are working on the curves of the graphic elements C06-01 ADDING AN ARROW 1 l It is possible to add any vector shape to the drawing. Some simple shapes are available by default; they can be added and modified. I am working to add more in the near future. To add an arrow you have to click on the button ; pedagogically, this is very useful to understand how the tile is moved to fill the plan. C06-07 MODIFICATION OF GRAPHIC ELEMENTS 1 l Select the graphic element with the selection tool. 2 l Click on the colored square on the bottom of the window to change the stroke color. 3 l Go to the drop down menu to choose the stroke width. C06-02 ADDING A CIRCLE 1 l To add a circle, click on the button. This shape can be modified. 4 l Click on the up/down arrows to modify the stroke opacity. If you click directly on the button, the opacity changes User s manual - EscherLike p 9


10 from 0% to 100 %, or from 100% to 0%. 5 l Click on the other colored square on the bottom of the window to change the fill color. C06-08 LIBRARY OF GRAPHIC ELEMENTS 1 l To open the libray of graphic elements, go to the menu item : Display > Library 6 l Click on the up/down arrows to modify the fill opacity. 7 l Fill the grey and white fields (here with 10 et 20) and then click on the blue icon to create a dotted line. The grey field represent the lenght of the visible segment and the white one the lenght of the invisible segment. 8 l To expand or contract a graphic element, click on the button then click on one of the red handles of the frame and then drag the handle without releasing the mouse button. 9 l To apply an axial symmetry to a graphic element, click on the button then click on one of the red handles of the frame. 10 l To rotate a graphic element, click on the button then click on one of the red corner of the frame and then drag the handle without releasing the mouse button. Library of graphic elements 2 l Display a graphic element by clicking in the hierarchical list 3 l Add the choosen graphic element by clicking on the plus button on the bottom right. 4 l To add a graphic element to the library, select it on the canvas and go to the menu item : File > Add to loibrary (cmd+e) 5 l You can create complex graphic elements by grouping several elements : - click on one graphic element to select it - click on another graphic element by keeping pressed the shift key - group the elements Edit > Group (cmd+g) The graphic elements can be ungrouped if necessary : Edit > Ungroup (shift+cmd+g) 6 l You can change the order of the objects by clicking on the graphic element and by using the following commands : Edit > Bring to front (shift+cmd+ ) ) Edit > Bring forward (shift+cmd+ + ) Edit > Send backward (shift+cmd+ - ) Edit > Send to back (shift+cmd+ ( ) Chap 07 TRACING A PICTURE 11 l To apply a horizontal shear to a graphic element, click on the button then click on the upper right red corner of the frame and then drag the handle without releasing the mouse button. C07-01 IMPORT A PICTURE 1 l To import a picture, go to the menu item : File > Import > Picture The picture is drawn in the background. User s manual - EscherLike p 10

. Adjustment of the first curve.")
11 2 l Adjust the size of the picture with the up/down arrows under the button which is at the right of the window. 3 l Adjust the vertical position of the picture with the up/down arrows under the button. 4 l Adjust the horizontal position of the picture with the up/ down arrows under the button. C07-03 AJDUST THE CURVES 1 l Add the necessary number of points ( )to each curve so that the curves follow the image curves. It s easier to work with points which have independant tangents (alt+clic : the new points will have independant tangents). Adjustment of the first curve. C07-02 POSITIONING THE TILE 1 l The most difficult thing is to identify the kind of tiling and to position the tile. Here the tiling is p1 because there are only translations to fill the plan with tiles (no rotation nor axial symmetry). Select the tiling IH 41 which is the p1 type (click on the button, then on the tab p1, then on the picture IH 41) 2 l Uncheck the checkbox Tilings to work on the tile while seeing the image below. With the checkbox Tilings checked. 3 l Adjust the size ( ) and the position ( ) of the tile in order to superimpose it to the image tile (not so easy, but a great satisfaction when you get it! ). Adjustment of the second curve. With the checkbox Tilings checked. User s manual - EscherLike p 11


12 C07-04 SELECTING COLORS 1 l Add graphic elements (lines...) and modify the colors. Filter conformal map + filter texture in SeamlessMaker Modification of colors. C08-02 ESCHERLIKE & GIMP 1 l In EscherLike, export the drawing as SVG. File > Export > SVG 2 l Launch GIMP and open the SVG file. GIMP open the following dialog box : Variants with graphic elements. Chap 08 ESCHERLIKE AND OTHER APPLICATIONS C08-01 ESCHERLIKE & SEAMLESSMAKER 1 l Export the drawing to format.tif (see C04-05 ). 2 l Open the TIFF file with SeamlessMaker. The pattern is seamless, so you can apply several transformations as the conformal map : Dialog box when a SVG file is open with GIMP 3 l Fill the field for the width in pixels (or height) and click on the OK button. Filter conformal map + filter texture in SeamlessMaker Creation of a bitmap file from a SVG file with GIMP. 4 l To use the picture as a pattern, copy it and paste as a new pattern. To select all, go to the menu item : Select > All (cmd+a) 5 l Copy the selection : Edit > Copy (cmd+c) 6 l Paste the pattern : Edit > Paste as > New pattern... 7 l Create a new document File > New... 8 l Select the paint bucket tool, check the radio button Pattern User s manual - EscherLike p 12


.")


13 fill in the section Fill type, choose the pattern and click on the canvas to fill it with your seamless pattern. SVG file open in Inkscape. Fill the canvas with your seamless pattern in GIMP 9 l It is possible to fill each color with a different texture in order to have a realistic rendering (cf vidéo). Adding paper texture to the vector drawing in Inkscape. Original colors. Modification of colors C08-04 ESCHERLIKE & ILLUSTRATOR Replacing colors by textures in GIMP. 1 l In EscherLike, export the seamless pattern to SVG. Pattern > Export to SVG or Pattern>Preview>Export to SVG C08-03 ESCHERLIKE & INKSCAPE 1 l In EscherLike, export the drawing assvg : File > Export > SVG 2 l Launch Inkscape and open the file SVG. File > Open 3 l You can individually manipulate the tiles in order to change the fill color, the stroke color... You can also apply vector filters. Filters >... Export pattern to vector format SVG. User s manual - EscherLike p 13


 are grouped in a single layer in order to facilitate handling.")
. 5 l Save the drawing to.ai in order to open it with Adobe Photoshop.")


 the colors with the eyedropper tool and the paint bucket")
14 2 l Launch Adobe illustrator and open the SVG file. File > Open Check SVG in the dialog box of Adobe Illustrator. Opening of the TIFF file created by EscherLike in Photoshop. SVG File created by EscherLike open in Adobe Illustrator. 3 l All the copies of a same graphic element (line...) are grouped in a single layer in order to facilitate handling. 4 l Use the tools of Illustrator to modify the drawing (apply a charcoal effect to the outlines...). 5 l Save the drawing to.ai in order to open it with Adobe Photoshop. Modifications of colors. C08-05 ESCHERLIKE & PHOTOSHOP 1 l In EscherLike, export the seamless pattern to TIFF. Pattern> Export to TIFF ou Pattern>Preview>Export to TIFF Filling a new document with the seamless pattern created by EscherLike. Export to TIFF. 2 l Launch Adobe Photoshop and open the TIFF file. File > Open 3 l Modify (if you want) the colors with the eyedropper tool and the paint bucket tool. 4 l Save the drawing as a seamless pattern : Edit > Define pattern 5 l Create a new document. 6 l Fill the empty layer of the new document with your pattern by using the paint bucket tool : Edit > Fill choose pattern and click 7 l You can apply textures (cf vidéo). 8 l You can also open the.ai file created by Illustrator. Applying textures in Adobe Photoshop. User s manual - EscherLike p 14


15 Applying textures in Adobe Photoshop. User s manual - EscherLike p 15
INKSCAPE BASICS. 125 S. Prospect Avenue, Elmhurst, IL (630) elmhurstpubliclibrary.org. Create, Make, and Build
 elmhurstpubliclibrary.org. Create, Make, and Build") INKSCAPE BASICS Inkscape is a free, open-source vector graphics editor. It can be used to create or edit vector graphics like illustrations, diagrams, line arts, charts, logos and more. Inkscape uses Scalable
INKSCAPE BASICS Inkscape is a free, open-source vector graphics editor. It can be used to create or edit vector graphics like illustrations, diagrams, line arts, charts, logos and more. Inkscape uses Scalable
ILLUSTRATOR TUTORIAL-1 workshop handout
 Why is Illustrator a powerful tool? ILLUSTRATOR TUTORIAL-1 workshop handout Computer graphics fall into two main categories, bitmap graphics and vector graphics. Adobe Illustrator is a vector based software
Pen Tool, Fill Layers, Color Range, Levels Adjustments, Magic Wand tool, and shadowing techniques
 Creating a superhero using the pen tool Topics covered: Pen Tool, Fill Layers, Color Range, Levels Adjustments, Magic Wand tool, and shadowing techniques Getting Started 1. Reset your work environment
Adobe Illustrator. Always NAME your project file. It should be specific to you and the project you are working on.
 Adobe Illustrator This packet will serve as a basic introduction to Adobe Illustrator and some of the tools it has to offer. It is recommended that anyone looking to become more familiar with the program
How to...create a Video VBOX Gauge in Inkscape. So you want to create your own gauge? How about a transparent background for those text elements?
 BASIC GAUGE CREATION The Video VBox setup software is capable of using many different image formats for gauge backgrounds, static images, or logos, including Bitmaps, JPEGs, or PNG s. When the software
Paint/Draw Tools. Foreground color. Free-form select. Select. Eraser/Color Eraser. Fill Color. Color Picker. Magnify. Pencil. Brush.
 Paint/Draw Tools There are two types of draw programs. Bitmap (Paint) Uses pixels mapped to a grid More suitable for photo-realistic images Not easily scalable loses sharpness if resized File sizes are
Adobe Photoshop Sh S.K. Sublania and Sh. Naresh Chand
 Adobe Photoshop Sh S.K. Sublania and Sh. Naresh Chand Photoshop is the software for image processing. With this you can manipulate your pictures, either scanned or otherwise inserted to a great extant.
INKSCAPE INTRODUCTION COMPONENTS OF INKSCAPE MENU BAR
 INKSCAPE Prepared by K. Srujana INTRODUCTION Inkscape began in 2003 as a code fork of the Sodipodia project. Sodipodi, developed since 1999, was itself based on Rsph Levien's Gill (Gnome Illustration Application).
Adobe Animate Basics
 Adobe Animate Basics What is Adobe Animate? Adobe Animate, formerly known as Adobe Flash, is a multimedia authoring and computer animation program. Animate can be used to design vector graphics and animation,
Ai Adobe. Illustrator. Creative Cloud Beginner
 Ai Adobe Illustrator Creative Cloud Beginner Vector and pixel images There are two kinds of images: vector and pixel based images. A vector is a drawn line that can be filled with a color, pattern or gradient.
How to draw and create shapes
 Adobe Flash Professional Guide How to draw and create shapes You can add artwork to your Adobe Flash Professional documents in two ways: You can import images or draw original artwork in Flash by using
Adobe Illustrator CS Design Professional GETTING STARTED WITH ILLUSTRATOR
 Adobe Illustrator CS Design Professional GETTING STARTED WITH ILLUSTRATOR Chapter Lessons Create a new document Explore the Illustrator window Create basic shapes Apply fill and stroke colors to objects
Quick Guide for Photoshop CC Basics April 2016 Training:
 Photoshop CC Basics Creating a New File 1. Click File > New 2. Keep Default Photoshop Size selected in the Preset drop-down list. 3. Click OK. Showing Rulers 1. On the Menu bar, click View. 2. Click Rulers.
Paint Tutorial (Project #14a)
") Paint Tutorial (Project #14a) In order to learn all there is to know about this drawing program, go through the Microsoft Tutorial (below). (Do not save this to your folder.) Practice using the different
Paint Tutorial (Project #14a) In order to learn all there is to know about this drawing program, go through the Microsoft Tutorial (below). (Do not save this to your folder.) Practice using the different
In this exercise you will be creating the graphics for the index page of a Website for children about reptiles.
 LESSON 2: CREATING AND MANIPULATING IMAGES OBJECTIVES By the end of this lesson, you will be able to: create and import graphics use the text tool attach text to a path create shapes create curved and
Education and Training CUFMEM14A. Exercise 2. Create, Manipulate and Incorporate 2D Graphics
 Education and Training CUFMEM14A Exercise 2 Create, Manipulate and Incorporate 2D Graphics Menu Exercise 2 Exercise 2a: Scarecrow Exercise - Painting and Drawing Tools... 3 Exercise 2b: Scarecrow Exercise
Creating Digital Illustrations for Your Research Workshop III Basic Illustration Demo
 Creating Digital Illustrations for Your Research Workshop III Basic Illustration Demo Final Figure Size exclusion chromatography (SEC) is used primarily for the analysis of large molecules such as proteins
Adobe After Effects Tutorial
 Adobe After Effects Tutorial GETTING STARTED Adobe After Effects CC is a video effects software that can be used to create animated graphics and video special effects. Whether you plan to green screen
Adobe Flash CS4 Part 1: Introduction to Flash
 CALIFORNIA STATE UNIVERSITY, LOS ANGELES INFORMATION TECHNOLOGY SERVICES Adobe Flash CS4 Part 1: Introduction to Flash Fall 2010, Version 1.0 Table of Contents Introduction...3 Downloading the Data Files...3
Kidspiration 3 Basics Website:
 Website: http://etc.usf.edu/te/ Kidspiration is the visual learning tool for K-5 learners from the makers of Inspiration. With Kidspiration, students can build graphic organizers such as webs, concept
Photoshop Introduction to The Shape Tool nigelbuckner This handout is an introduction to get you started using the Shape tool.
 Photoshop Introduction to The Shape Tool nigelbuckner 2008 This handout is an introduction to get you started using the Shape tool. What is a shape in Photoshop? The Shape tool makes it possible to draw
Adobe InDesign CS6 Tutorial
 Adobe InDesign CS6 Tutorial Adobe InDesign CS6 is a page-layout software that takes print publishing and page design beyond current boundaries. InDesign is a desktop publishing program that incorporates
Adobe Illustrator CS5 Part 2: Vector Graphic Effects
 CALIFORNIA STATE UNIVERSITY, LOS ANGELES INFORMATION TECHNOLOGY SERVICES Adobe Illustrator CS5 Part 2: Vector Graphic Effects Summer 2011, Version 1.0 Table of Contents Introduction...2 Downloading the
Krita Vector Tools
 Krita 2.9 05 Vector Tools In this chapter we will look at each of the vector tools. Vector tools in Krita, at least for now, are complementary tools for digital painting. They can be useful to draw clean
Photoshop / Editing paths
 Photoshop / Editing paths Path segments, components, and points Select a path Adjust path segments Add or delete anchor points Convert between smooth points and corner points Adjust path components Path
GIMP WEB 2.0 ICONS. GIMP is all about IT (Images and Text) OPEN GIMP
 OPEN GIMP") GIMP WEB 2.0 ICONS WEB 2.0 ICONS: STICKY NOTE Web 2.0 Icons: Sticky Note GIMP is all about IT (Images and Text) OPEN GIMP Step 1: To begin a new GIMP project, from the Menu Bar, select File New. At the
GIMP WEB 2.0 ICONS WEB 2.0 ICONS: STICKY NOTE Web 2.0 Icons: Sticky Note GIMP is all about IT (Images and Text) OPEN GIMP Step 1: To begin a new GIMP project, from the Menu Bar, select File New. At the
Introduction To Inkscape Creating Custom Graphics For Websites, Displays & Lessons
 Introduction To Inkscape Creating Custom Graphics For Websites, Displays & Lessons The Inkscape Program Inkscape is a free, but very powerful vector graphics program. Available for all computer formats
A Study of Angles & Curves
 A Study of Angles & Curves Method 1: Cutting Quilt Shapes/Using the Shapes Tools Open BERNINA CutWork Software. Make sure that Create New is selected. Click Next. Place a dot in front of New Graphic. Select
Insight: Measurement Tool. User Guide
 OMERO Beta v2.2: Measurement Tool User Guide - 1 - October 2007 Insight: Measurement Tool User Guide Open Microscopy Environment: http://www.openmicroscopy.org OMERO Beta v2.2: Measurement Tool User Guide
CS Multimedia and Communications REMEMBER TO BRING YOUR MEMORY STICK TO EVERY LAB! Lab 02: Introduction to Photoshop Part 1
 CS 1033 Multimedia and Communications REMEMBER TO BRING YOUR MEMORY STICK TO EVERY LAB! Lab 02: Introduction to Photoshop Part 1 Upon completion of this lab, you should be able to: Open, create new, save
Lesson 1: Creating T- Spline Forms. In Samples section of your Data Panel, browse to: Fusion 101 Training > 03 Sculpt > 03_Sculpting_Introduction.
 3.1: Sculpting Sculpting in Fusion 360 allows for the intuitive freeform creation of organic solid bodies and surfaces by leveraging the T- Splines technology. In the Sculpt Workspace, you can rapidly
Fig. A. Fig. B. Fig. 1. Fig. 2. Fig. 3 Fig. 4
 Create A Spinning Logo Tutorial. Bob Taylor 2009 To do this you will need two programs from Xara: Xara Xtreme (or Xtreme Pro) and Xara 3D They are available from: http://www.xara.com. Xtreme is available
Adobe Illustrator CC 2018 Tutorial
 Adobe Illustrator CC 2018 Tutorial GETTING STARTED Adobe Illustrator CC is an illustration program that can be used for print, multimedia and online graphics. Whether you plan to design or illustrate multimedia
GIMP ANIMATION EFFECTS
 GIMP ANIMATION EFFECTS Animation: Text Word by Word ANIMATION: TEXT WORD BY WORD GIMP is all about IT (Images and Text) BACKGROUND IMAGE Before you begin the text animation, you will download a public
MULTIMEDIA WEB DESIGN
 CLASS :: 02 02.02 2018 4 Hours THE AGENDA HOMEWORK 1 REVIEW [ Upload to Comm Arts Server ] :: Completed Questionnaire :: Best Works [Saved to Server] GIF ANIMATION DEMO :: Best Practices for GIF Animations
User Manual Version 1.1 January 2015
 User Manual Version 1.1 January 2015 - 2 / 112 - V1.1 Variegator... 7 Variegator Features... 7 1. Variable elements... 7 2. Static elements... 7 3. Element Manipulation... 7 4. Document Formats... 7 5.
Part 1: Basics. Page Sorter:
 Part 1: Basics Page Sorter: The Page Sorter displays all the pages in an open file as thumbnails and automatically updates as you add content. The page sorter can do the following. Display Pages Create
Overview of Adobe Fireworks
 Adobe Fireworks Overview of Adobe Fireworks In this guide, you ll learn how to do the following: Work with the Adobe Fireworks workspace: tools, Document windows, menus, and panels. Customize the workspace.
Creative Sewing Machines Workbook based on BERNINA Embroidery Software V8
 V8 Lesson 49 Using an Object for a Carving Stamp Edited for V8.1 update. We will start by using Corel to find and save an image. On your desktop there should be 4 Corel icons. I have grouped mine together
SETTINGS AND WORKSPACE
 ADOBE ILLUSTRATOR Adobe Illustrator is a program used to create vector illustrations / graphics (.ai/.eps/.svg). These graphics will then be used for logos, banners, infographics, flyers... in print and
Welcome to Desktop Publishing with InDesign!
 Welcome to Desktop Publishing with InDesign! What We ll Cover Today What is InDesign? Preparing a print project Creating a new document InDesign interface Working with layers and links Formatting and managing
Adobe Premiere Pro CC 2015 Tutorial
 Adobe Premiere Pro CC 2015 Tutorial Film/Lit--Yee GETTING STARTED Adobe Premiere Pro CC is a video layout software that can be used to create videos as well as manipulate video and audio files. Whether
Animated Gif - Illustrator /Text and Shapes
 - Illustrator /Text and Shapes Use Adobe Illustrator to create an animated gif. Use a variety of shapes, outlined type, or live traced objects as your subjects. Apply all the skills that we have developed
Draw Guide. Chapter 4 Changing Object Attributes
 Draw Guide Chapter 4 Changing Object Attributes Copyright This document is Copyright 2005 2011 by its contributors as listed below. You may distribute it and/or modify it under the terms of either the
FactoryLink 7. Version 7.0. Client Builder Reference Manual
 FactoryLink 7 Version 7.0 Client Builder Reference Manual Copyright 2000 United States Data Corporation. All rights reserved. NOTICE: The information contained in this document (and other media provided
L E S S O N 2 Background
 Flight, Naperville Central High School, Naperville, Ill. No hard hat needed in the InDesign work area Once you learn the concepts of good page design, and you learn how to use InDesign, you are limited
IN DESIGN. A review of the overview
 IN DESIGN A review of the overview InDesign Review GETTING STARTED: Start by clicking the InDesign icon in your dock. Wait for InDesign to load. Click on Create New Document If resuming work, find your
creating files and saving for web
 creating files and saving for web the template files assume a default image size of 300 x 300 pixels images intended for the web should be produced in rgb mode name your images in a logical format, so
GIMP ANIMATION EFFECTS
 GIMP ANIMATION EFFECTS Animation: Image ANIMATION: IMAGE GIMP is all about IT (Images and Text) DOWNLOADING THE SUNFLOWER AND BUMBLE BEE IMAGES Both images will come from the Public Domain. To find the
When dragging out a marquee: Shift toggles the corner selection
 VECTORSCRIBE DYNAMIC CORNERS When dragging out a marquee: Esc cancels the marquee When dragging out a marquee: Shift toggles the corner selection When dragging out a marquee: Option+Alt adds corners to
ADOBE ILLUSTRATOR CS3
 ADOBE ILLUSTRATOR CS3 Chapter 2 Creating Text and Gradients Chapter 2 1 Creating type Create and Format Text Create text anywhere Select the Type Tool Click the artboard and start typing or click and drag
MS Publisher 2007: Graphics. Lesson Notes Author: Pamela Schmidt
 MS Publisher 2007: Graphics Lesson Notes Author: Pamela Schmidt Auto Shapes When a shape tool is selected, a precision pointer (cross hair) will appear when the mouse pointer is taken over the document.
Adobe illustrator Introduction
 Adobe illustrator Introduction This document was prepared by Luke Easterbrook 2013 1 Summary This document is an introduction to using adobe illustrator for scientific illustration. The document is a filleable
Unit 21 - Creating a Navigation Bar in Macromedia Fireworks
 Unit 21 - Creating a Navigation Bar in Macromedia Fireworks Items needed to complete the Navigation Bar: Unit 21 - House Style Unit 21 - Graphics Sketch Diagrams Document ------------------------------------------------------------------------------------------------
Using Flash Animation Basics
 Using Flash Contents Using Flash... 1 Animation Basics... 1 Exercise 1. Creating a Symbol... 2 Exercise 2. Working with Layers... 4 Exercise 3. Using the Timeline... 6 Exercise 4. Previewing an animation...
:: MULTIMEDIA TOOLS :: (2131) :: CLASS NOTES
 :: CLASS NOTES") CLASS :: 06 03.04 2016 3 Hours THE AGENDA LOGO CREATION [Adobe Illustrator] :: Text Tool [Creating Outlines] :: Type on Path :: Shapes and Pathfinder :: Pen Tool [DEMO] :: Trace a Simple Illustration/Image
CLASS :: 06 03.04 2016 3 Hours THE AGENDA LOGO CREATION [Adobe Illustrator] :: Text Tool [Creating Outlines] :: Type on Path :: Shapes and Pathfinder :: Pen Tool [DEMO] :: Trace a Simple Illustration/Image
Step 1: Create A New Photoshop Document
 Snowflakes Photo Border In this Photoshop tutorial, we ll learn how to create a simple snowflakes photo border, which can be a fun finishing touch for photos of family and friends during the holidays,
Xyron Wishblade Software Manual (Mac)
") Xyron Wishblade Software Manual (Mac) Provided By http://www.mybinding.com http://www.mybindingblog.com Xyron Wishblade Create & Cut Software Manual Section 1 Getting Started with Tool Bars 2 Standard
Xyron Wishblade Software Manual (Mac) Provided By http://www.mybinding.com http://www.mybindingblog.com Xyron Wishblade Create & Cut Software Manual Section 1 Getting Started with Tool Bars 2 Standard
Adding Objects Creating Shapes Adding. Text Printing and Exporting Getting Started Creating a. Creating Shapes Adding Text Printing and Exporting
 Getting Started Creating a Workspace Pages, Masters and Guides Adding Objects Creating Shapes Adding Text Printing and Exporting Getting Started Creating a Workspace Pages, Masters and Guides Adding Objects
Adobe InDesign CC 2017
 Adobe InDesign CC 2017 InDesign is used for print and layout design. It is one of the best programs to work with text and make publications, fliers, and printed designs. New Document Toolbar Exporting
Adobe InDesign CS6 Tutorial
 Adobe InDesign CS6 Tutorial Adobe InDesign CS6 is a page-layout software that takes print publishing and page design beyond current boundaries. InDesign is a desktop publishing program that incorporates
Keyboard Shortcuts. Command Windows Macintosh
 S00ILCS5.qxp 3/19/2010 1:11 AM Page 477 Keyboard Shortcuts k Adobe Illustrator CS5 If a command on a menu includes a keyboard reference, known as a keyboard shortcut, to the right of the command name,
GIMP TEXT EFFECTS. Text Effects: Outline Completed Project
 GIMP TEXT EFFECTS ADD AN OUTLINE TO TEXT Text Effects: Outline Completed Project GIMP is all about IT (Images and Text) OPEN GIMP Step 1: To begin a new GIMP project, from the Menu Bar, select File New.
USER S MANUAL Software Usage Agreement Registered Trademarks Notes on this Manual Disclaimer
 USER S MANUAL Software Usage Agreement Registered Trademarks Notes on this Manual Disclaimer 1 1.1 1.2 2 3 Introduction 2.1 2.2 Features System Requirements Installing Xyron Wishblade Software 3.1 3.2
-Remember to always hit Command + S every time you make a change to your project going forward.
 -Open Animate -Under Create New - Select ActionScript 3.0 -Choose Classic as the Design type located in the upper right corner -Animate workspace shows a toolbar, timeline, stage, and window tabs -From
Photoshop Basics A quick introduction to the basic tools in Photoshop
 Photoshop Basics A quick introduction to the basic tools in Photoshop Photoshop logo courtesy Adobe Systems Inc. By Dr. Anthony R. Curtis Mass Communication Department University of North Carolina at Pembroke
MET 107 Drawing Tool (Shapes) Notes Day 3
 Notes Day 3") MET 107 Drawing Tool (Shapes) Notes Day 3 Shapes: (Insert Tab Shapes) Example: Select on the rounded rectangle Then use the mouse to position the upper left corner and produce the size by dragging out
MET 107 Drawing Tool (Shapes) Notes Day 3 Shapes: (Insert Tab Shapes) Example: Select on the rounded rectangle Then use the mouse to position the upper left corner and produce the size by dragging out
Corel Draw 11. What is Vector Graphics?
 Corel Draw 11 Corel Draw is a vector based drawing that program that makes it easy to create professional artwork from logos to intricate technical illustrations. Corel Draw 11's enhanced text handling
03 Vector Graphics. Multimedia Systems. 2D and 3D Graphics, Transformations
 Multimedia Systems 03 Vector Graphics 2D and 3D Graphics, Transformations Imran Ihsan Assistant Professor, Department of Computer Science Air University, Islamabad, Pakistan www.imranihsan.com Lectures
HYPERSTUDIO TOOLS. THE GRAPHIC TOOL Use this tool to select graphics to edit. SPRAY PAINT CAN Scatter lots of tiny dots with this tool.
 THE BROWSE TOOL Us it to go through the stack and click on buttons THE BUTTON TOOL Use this tool to select buttons to edit.. RECTANGLE TOOL This tool lets you capture a rectangular area to copy, cut, move,
Recipes4Success. Draw and Animate a Rocket Ship. Frames 5 - Drawing Tools
 Recipes4Success You can use the drawing tools and path animation tools in Frames to create illustrated cartoons. In this Recipe, you will draw and animate a rocket ship. 2012. All Rights Reserved. This
Custom Shapes As Text Frames In Photoshop
 Custom Shapes As Text Frames In Photoshop I used a background for this activity. Save it and open in Photoshop: Select Photoshop's Custom Shape Tool from the Tools panel. In the custom shapes options panel
3D Modeler Creating Custom myhouse Symbols
 3D Modeler Creating Custom myhouse Symbols myhouse includes a large number of predrawn symbols. For most designs and floorplans, these should be sufficient. For plans that require that special table, bed,
Drawing shapes and lines
 Fine F Fi i Handmade H d d Ch Chocolates l Hours Mon Sat 10am 6pm In this demonstration of Adobe Illustrator CS6, you will be introduced to new and exciting application features, like gradients on a stroke
INTRODUCTION TO ADOBE ILLUSTRATOR
 INTRODUCTION TO ADOBE ILLUSTRATOR Instructor: Gillian Goerz Website: GillianG.com This powerful design tool effectively creates crisp graphics and illustrations for all medias, including print, web and
Inkscape Interface. commands panes snap. tool. menus. controls. controls. toolbox. canvas. page. palette
 Inkscape Interface menus box canvas page palette commands panes snap Toolbox Interface Inkscape Selectionmenus Edit Paths by Nodes box Rectangle Align and Distribute pane Fill and Stroke panecommands panes
Fixed Perimeter Rectangles Geometry Creating a Document
 Activity Overview: This activity provides the steps to create a TI-Nspire document that will be used to investigate side length and area in a rectangle with a fixed perimeter. An algebraic approach is
Designer Reference 1
 Designer Reference 1 Table of Contents USE OF THE DESIGNER...4 KEYBOARD SHORTCUTS...5 Shortcuts...5 Keyboard Hints...5 MENUS...7 File Menu...7 Edit Menu...8 Favorites Menu...9 Document Menu...10 Item Menu...12
OnPoint s Guide to MimioStudio 9
 1 OnPoint s Guide to MimioStudio 9 Getting started with MimioStudio 9 Mimio Studio 9 Notebook Overview.... 2 MimioStudio 9 Notebook...... 3 MimioStudio 9 ActivityWizard.. 4 MimioStudio 9 Tools Overview......
Draw Guide. Chapter 3 Working with Objects and Object Points
 Draw Guide Chapter 3 Working with Objects and Object Points Copyright This document is Copyright 2005 2011 by its contributors as listed below. You may distribute it and/or modify it under the terms of
SNOWFLAKES PHOTO BORDER - PHOTOSHOP CS6 / CC
 Photo Effects: Snowflakes Photo Border (Photoshop CS6 / CC) SNOWFLAKES PHOTO BORDER - PHOTOSHOP CS6 / CC In this Photoshop tutorial, we ll learn how to create a simple and fun snowflakes photo border,
Expression Design Lab Exercises
 Expression Design Lab Exercises Creating Images with Expression Design 2 Beaches Around the World (Part 1: Beaches Around the World Series) Information in this document, including URL and other Internet
QUICK LOGO D E S I G N E R. User Manual
 QUICK LOGO D E S I G N E R User Manual Table Of Contents 1. Quick Logo Designer Overview 2. Logo Creation Methods 2.1 Create from Templates 2.2 Create a New Logo from Scratch 5 5 3. Creating and Saving
Work with Shapes. Concepts CHAPTER. Concepts, page 3-1 Procedures, page 3-5
 3 CHAPTER Revised: November 15, 2011 Concepts, page 3-1, page 3-5 Concepts The Shapes Tool is Versatile, page 3-2 Guidelines for Shapes, page 3-2 Visual Density Transparent, Translucent, or Opaque?, page
Overview of Adobe Fireworks CS6
 Overview of Adobe Fireworks CS6 Lesson topics: Work with the Adobe Fireworks CS6 workspace: tools, Document windows, menus, and panels. Customize the workspace. Change the magnification of a document.
GIMP WEB 2.0 ICONS. Web 2.0 Icons: Circle Completed Project. Notice that the default new layer background fill is transparency. Click the Ok button.
 GIMP WEB 2.0 ICONS WEB 2.0 ICONS: CIRCLE ICON OPEN GIMP or Web 2.0 Icons: Circle Completed Project Step 1: To begin a new GIMP project, from the Menu Bar, select File New. At the Create a New Image dialog
CENTAUR S REAL-TIME GRAPHIC INTERFACE V4.0 OPERATOR S MANUAL
 CENTAUR S REAL-TIME GRAPHIC INTERFACE V4.0 OPERATOR S MANUAL TABLE OF CONTENTS Installation... 6 Introduction to Centaur s real-time Graphic Interface... 6 Computer Requirements... 7 Operating System
SketchUp. SketchUp. Google SketchUp. Using SketchUp. The Tool Set
 Google Google is a 3D Modelling program which specialises in making computer generated representations of real-world objects, especially architectural, mechanical and building components, such as windows,
This document should only be used with the Apple Macintosh version of Splosh.
 Splosh 1 Introduction Splosh is an easy to use art package that runs under both Microsoft Windows and the Macintosh Mac OS Classic or Mac OS X operating systems. It should however be noted that the Apple
Documentation Colibrico Design Studio
 1 / 39 Documentation Colibrico Design Studio Table of content About Colibrico Design Studio...3 System requirements...3 Supported languages...3 Installation...3 Trial version...4 License...4 Registration...4
Chapter 8 Getting Started with Draw:
 Getting Started Guide Chapter 8 Getting Started with Draw: OpenOffice.org s Vector Graphics Drawing Tool OpenOffice.org Copyright This document is Copyright 2005 by its contributors as listed in the section
The original image. Let s get started! The final result.
 Vertical Photo Panels Effect In this Photoshop tutorial, we ll learn how to create the illusion that a single photo is being displayed as a series of vertical panels. It may look complicated, but as we
4 TRANSFORMING OBJECTS
 4 TRANSFORMING OBJECTS Lesson overview In this lesson, you ll learn how to do the following: Add, edit, rename, and reorder artboards in an existing document. Navigate artboards. Select individual objects,
Adobe Illustrator CC Advanced
 Copy/Paste Objects 1. Select with Selection-Tool 1. Hold Alt-Key Drag with Selection-Tool while still holding the Alt-Key (Additionally holding Shift will move straight or in 45/90/180 Degrees) Align Objects
ORGANIZING YOUR ARTWORK WITH LAYERS
 9 ORGANIZING YOUR ARTWORK WITH LAYERS Lesson overview In this lesson, you ll learn how to do the following: Work with the Layers panel. Create, rearrange, and lock layers and sublayers. Move objects between
Publication-quality figures with Inkscape
 Publication-quality figures with Inkscape In Lab 3 we briefly learnt about the different formats available to save the plots we create in R and how to modify them in PowerPoint and Adobe Illustrator. Today
Creating T-Spline Forms
 1 / 28 Goals 1. Create a T-Spline Primitive Form 2. Create a T-Spline Revolve Form 3. Create a T-Spline Sweep Form 4. Create a T-Spline Loft Form 2 / 28 Instructions Step 1: Go to the Sculpt workspace
How to work. How to work
 How to work How to work To create a collage using AKVIS Chameleon do the following: 1. Open an image with the object that you want to use for creating a collage (Pic. 1). 2. Select an object that you want
StickFont Editor v1.01 User Manual. Copyright 2012 NCPlot Software LLC
 StickFont Editor v1.01 User Manual Copyright 2012 NCPlot Software LLC StickFont Editor Manual Table of Contents Welcome... 1 Registering StickFont Editor... 3 Getting Started... 5 Getting Started...
Captain America Shield
 Captain America Shield 1. Create a New Document and Set Up a Grid Hit Control-N to create a new document. Select Pixels from the Units drop-down menu, enter 600 in the width and height boxes then click