Captain America Shield
|
|
|
- Marilyn Thompson
- 6 years ago
- Views:
Transcription
1 Captain America Shield 1. Create a New Document and Set Up a Grid Hit Control-N to create a new document. Select Pixels from the Units drop-down menu, enter 600 in the width and height boxes then click on the Advanced button. Select RGB, Screen (72ppi) and make sure that the Align New Objects to Pixel Grid box is unchecked before you click OK. Enable the Grid (View > Show Grid) and the Snap to Grid (View > Snap to Grid). For starters you will need a grid every 5px, so simply go to Edit > Preferences > Guides > Grid, enter 5 in the Gridline every box and 1 in the Subdivisions box. You should also open the Info panel (Window > Info) for a live preview with the size and position of your shapes. Do not forget to set the unit of measurement to pixels from Edit > Preferences > Units > General. All these options will significantly increase your work speed.
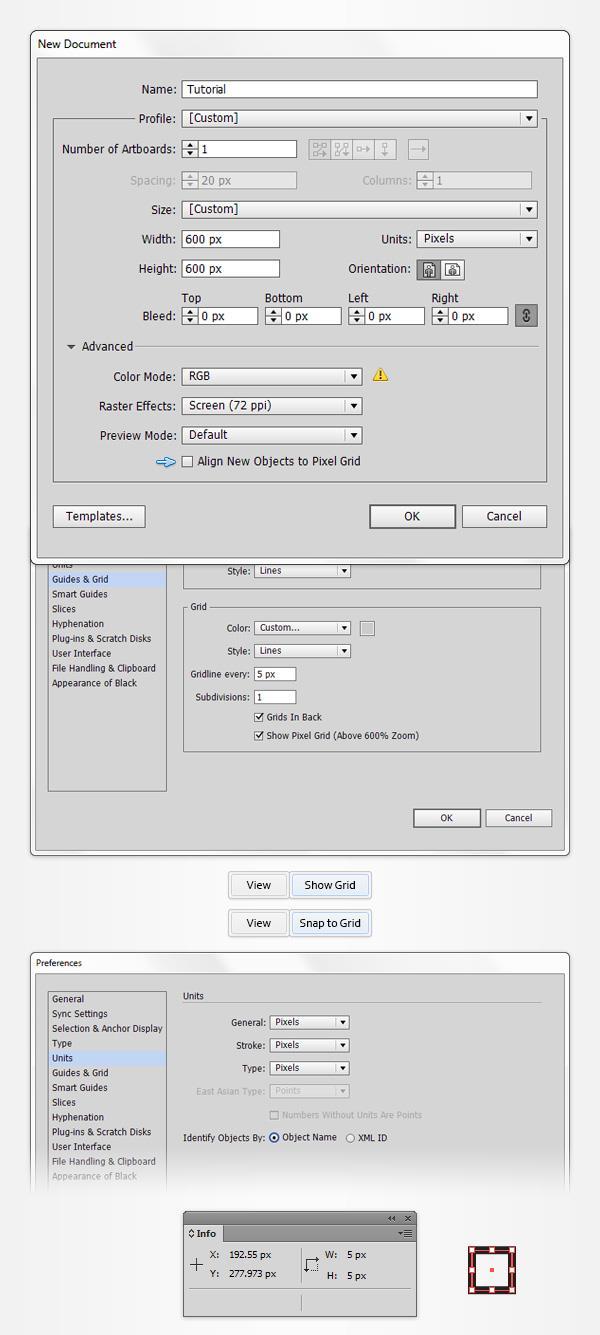
2
 and the Snap to Grid (View > Snap to Grid).")
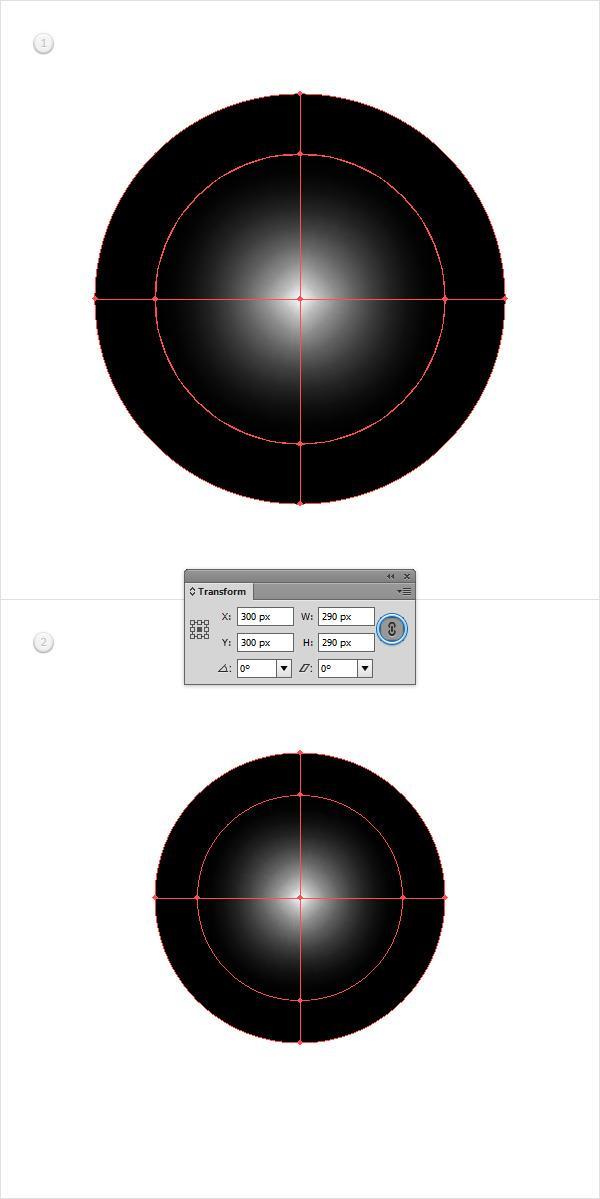
3 2. Create the Main Shapes Step 1 Pick the Ellipse Tool (L) and focus on your Toolbar. Remove the color from the stroke then select the fill and set its color at R=228 G=23 B=28. Move to your Artboard and simply create a 290px circle. Step 2 Disable the Grid (View > Hide Grid) and the Snap to Grid (View > Snap to Grid). In this step you need to center your red circle, so open the Align panel (Window > Align). Set the aligning to Artboard (open the fly out menu and go to Show Options if you can't see the Align To section as shown in the following image) then simply click the Horizontal Align Center and Vertical Align Center buttons. In the end things should look like in the following image.
 and go again to Object > Path > Offset Path. Enter a -25px Offset and click OK.")
4 Step 3 Make sure that your red circle is selected and go to Object > Path > Offset Path. Enter a -25px Offset and click OK. Select the resulting shape, replace the existing fill color with white (R=255 G=255 B=255) and go again to Object > Path > Offset Path. Enter a -25px Offset and click OK. Make sure that the resulting shape is selected, replace the existing fill color with R=228 G=23 B=28 and go one more time to Object > Path > Offset Path. Enter a -25px Offset and click OK. Select the newly created shape and replace the existing fill color with R=22 G=77 B=157.

5 Step 4 Go to Edit > Preferences > General and make sure that the Keyboard Increment is set at 1px. Select the largest, red circle and make two copies in front (Control-C > Control-F > Control-F). Select the top copy and move it 5px up using the up arrow button from your keyboard. Reselect both copies made in this step, open the Pathfinder panel (Window > Pathfinder) and click the Minus Front button. Make sure that the resulting shape stays selected and focus on the Appearance panel (Window > Appearance). Set the fill color at black (R=0 G=0 B=0) then simply click on the "Opacity" piece of text to open the Transparency fly-out panel. Focus on the Blending Mode drop-down menu and set it at Soft Light.

6 Step 5 Reselect the largest, red circle and make another two copies in front (Control-C > Control-F > Control-F). Select the top copy and move it 10px up using that same up arrow button from your keyboard. Reselect both copies made in this step and click the Minus Front button from the Pathfinder panel. Make sure that the resulting shape stays selected, focus on the Appearance panel and set the Blending Mode at Soft Light.
7 3. Create the Star Shape Step 1 Enable the Grid (View > Show Grid) and the Snap to Grid (View > Snap to Grid). Using the Rectangle Tool (M), create a 130 x 45px shape, set the fill color at white and place it as shown in the first image.
, select the remaining anchor point and simply drag it 65px to the right.")
8 Focus on the bottom side of this new rectangle, pick the Delete Anchor Point Tool (-) and simply click on the right anchor point to remove it. Keep focusing on the bottom side of your new shape, switch to the Direct Selection Tool (A), select the remaining anchor point and simply drag it 65px to the right. In the end things should look like in the second image. Step 2 Using the Rectangle Tool (M), create an 80 x 125px shape, set the fill color at white and place it as shown in the first image. Focus on the top side of this new rectangle, pick the Delete Anchor Point Tool (-) and simply remove the right anchor point. Keep focusing on the top side of your new, white shape and switch to the Direct Selection Tool (A). Select the remaining anchor point and simply drag it 40px to the right. Reselect the shape made in this step and go to Object > Path > Add Anchor Points. Make sure that the Direct Selection Tool (A) is still active, select the anchor point highlighted in the third image and simply drag it 30px up. In the end things should look like in the fourth image.


9 Step 3 Reselect the two, white shapes that make up your star and click the Unite button from the Pathfinder panel. Step 4 Make sure that your star shape stays selected, focus on the Appearance panel, select the existing stroke and set its color at black. Keep focusing on your new stroke and simply click on the "Stroke" piece of text to open the Stroke fly-out panel. Set the Weight at 2px and check the Align Stroke to Inside button. Make sure that your stroke is still selected, lower its Opacity to 3%, change the Blending Mode to Multiply and go to Effect > Path > Offset Path. Enter a -7px Ofset and click OK. Return to the Appearance panel, select the entire path (simply click on
, create a new 290px circle and center it using the Horizontal Align Center and Vertical Align Center buttons from the Align panel.")
10 the "Path" piece of text from the top of the Appearance panel) and go to Effect > Warp > Fisheye. Enter the properties shown in the following image and click OK. 4. Create a Radial Mesh Step 1 Using the Ellipse Tool (L), create a new 290px circle and center it using the Horizontal Align Center and Vertical Align Center buttons from the Align panel. Make sure that this new shape stays selected, open the Gradient panel (Window > Gradient) and simply click on the gradient thumbnail to add the default black to white linear gradient. Keep focusing on your Gradient panel, open the Type drop down menu and select Radial. In the end things should look like in the following image.
, select the newly created group, Ungroup it (Shift-Control-G) then hit Alt-Control-7 (or go to Object > Clipping Mask > Release) to release the existing")
11 Step 2 Make sure that the circle with the radial gradient is still selected and go to Object > Expand. Check the Gradient Mesh box then click OK. Focus on the Layers panel (Window > Layers), select the newly created group, Ungroup it (Shift-Control-G) then hit Alt-Control-7 (or go to Object > Clipping Mask > Release) to release the existing clipping mask. Return to the Layers panel and simply delete the top 290px circle (the former clipping path).

12 Step 3 Select your mesh and open the Transform panel (Window > Transform). Check the Constrain Width and Height Proportions button then simply enter 290 in the Width (or the Height) box.
13
 and add four, new mesh points as shown in the following image. Step 5 Pick the Direct Selection Tool (A) and focus on your mesh.")
14 Step 4 Disable the Grid (View > Hide Grid) and the Snap to Grid (View > Snap to Grid). Select your mesh, grab the Mesh Tool (U) and add four, new mesh points as shown in the following image. Step 5 Pick the Direct Selection Tool (A) and focus on your mesh. Select the mesh points one by one and replace the existing colors with the ones shown in the following image.
 and change the Blending Mode")
15 Step 6 Make sure that your mesh is still selected, focus on the Transparency panel (Window > Transparency) and change the Blending Mode to Multiply.

16 5. Add Subtle Shading and Texture Step 1 Using the Ellipse Tool (L), create a new 290px circle, set the fill color at black and center it using the Horizontal Align Center and Vertical Align Center buttons from the Align panel.

17 Step 2 Make sure that your black circle stays selected and focus on the Appearance panel. Select the existing fill, change the Blending Mode to Overlay and go to Effect > Path > Offset Path. Enter a -2px Offset, click OK and go to Effect > Artistic > Film Grain. Enter the properties shown in the following image, click OK and go to Effect > Blur > Radial Blur. Enter the attributes shown below and click OK.
18 Step 3 Reselect your front circle, focus on the Appearance panel and add a second fill using the Add New Fill button (pointed by the blue circle in the following image). Select this new fill, lower its Opacity to 70%, change the Blending Mode to Multiply and add the radial gradient shown in the following image. Keep in mind that the yellow numbers from the Gradient image stand for Opacity percentage while the white numbers stand for Location percentage. This simply means that you have to select each gradient slider, focus on the Opacity & Location boxes from the Gradient panel and enter the numbers pointed below.

19 Step 4 Reselect your front circle, focus on the Appearance panel and add a 1px, black stroke. Select this subtle stroke, align it to inside, lower the Opacity to 15% and change the Blending Mode to Overlay. Make sure that your front circle stays selected, keep focusing on the Appearance panel and add a second stroke using the Add New Stroke button (pointed by the blue circle in the following image). Select this new stroke, set the color at white and the Weight at 1px, align it to inside, change the Blending Mode to Soft Light and go to Effect > Path > Offset Path. Enter a -1px Offset and click OK.
, create a 130 x 60px shape, set the fill color at black and place it as shown in the first image.")
20 Step 5 Enable the Grid (View > Show Grid) and the Snap to Grid (View > Snap to Grid). Using the Ellipse Tool (L), create a 130 x 60px shape, set the fill color at black and place it as shown in the first image. Make sure that this new shape stays selected, lower its Opacity to 60%, change the Blending Mode to Multiply and go to Effect > Blur > Gaussian Blur. Enter a 20px Radius and click OK.

21 Step 6 Using the Ellipse Tool (L), create a 140 x 75px shape, set the fill color at white and place it as shown in the first image. Make sure that this new shape stays selected, lower its Opacity to 20%, change the Blending Mode to Color Dodge and go to Effect > Blur > Gaussian Blur. Enter a 15px Radius and click OK.

22 6. Add the Background and a Long Shadow Step 1 Using the Rectangle Tool (M), create a new 610px square, set the fill color at R=50 G=55 B=70 and center it using the Horizontal Align Center and Vertical Align Center buttons from the Align panel. Make sure that this new shape stays selected, focus on the Appearance panel and add a second fill using that same Add New Fill button. Select this new fill, set the color at black, lower its Opacity to 10%, change the Blending Mode to Multiply and go to Effect > Artistic > Film Grain. Enter the properties shown in the following image and click OK.
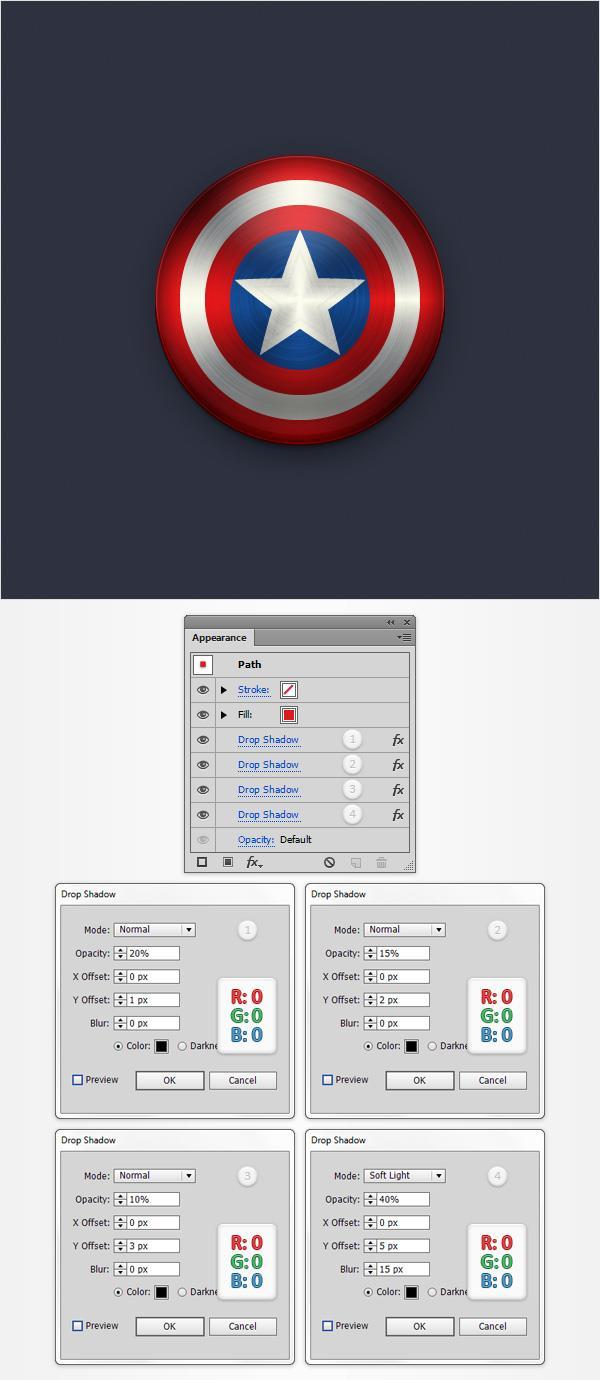
, click OK and go again to Effect > Stylize > Drop Shadow.")
23 Step 2 Reselect the largest, red circle and go to Effect > Stylize > Drop Shadow. Enter the properties shown in the top, left window (in the following image), click OK and go again to Effect > Stylize > Drop Shadow. Enter the properties shown in the top, right window, click OK and go once again to Effect > Stylize > Drop Shadow. Enter the properties shown in the bottom, left window, click OK and go one more time to Effect > Stylize > Drop Shadow. Enter the properties shown in the bottom, right window and click OK.
24
25 Step 3 Using the Rectangle Tool (M), create a 290 x 305px shape, set the fill color at black and place it as shown in the first image. Make sure that this new shape stays selected and focus on the Appearance panel. Lower its Opacity to 15%, change the Blending Mode to Soft Light and replace the flat color used for the fill with the linear gradient shown in the following image. Don't forget that the white zero from the Gradient image stands for Opacity percentage.

26 Congratulations! You're Done! Here is how it should look. I hope you've enjoyed this tutorial and can apply these techniques in your future projects.
27
Adobe Illustrator CS5 Part 2: Vector Graphic Effects
 CALIFORNIA STATE UNIVERSITY, LOS ANGELES INFORMATION TECHNOLOGY SERVICES Adobe Illustrator CS5 Part 2: Vector Graphic Effects Summer 2011, Version 1.0 Table of Contents Introduction...2 Downloading the
Create a Swirly Lollipop Using the Spiral Tool Philip Christie on Jun 13th 2012 with 12 Comments
 Advertise Here Create a Swirly Lollipop Using the Spiral Tool Philip Christie on Jun 13th 2012 with 12 Comments Tutorial Details Program: Adobe Illustrator CS5 Difficulty: Beginner Es timated Completion
Keyboard Shortcuts. Command Windows Macintosh
 S00ILCS5.qxp 3/19/2010 1:11 AM Page 477 Keyboard Shortcuts k Adobe Illustrator CS5 If a command on a menu includes a keyboard reference, known as a keyboard shortcut, to the right of the command name,
Note: Photoshop tutorial is spread over two pages. Click on 2 (top or bottom) to go to the second page.
 to go to the second page.") Introduction During the course of this Photoshop tutorial we're going through 9 major steps to create a glass ball. The main goal of this tutorial is that you get an idea how to approach this. It's not
Introduction During the course of this Photoshop tutorial we're going through 9 major steps to create a glass ball. The main goal of this tutorial is that you get an idea how to approach this. It's not
creating files and saving for web
 creating files and saving for web the template files assume a default image size of 300 x 300 pixels images intended for the web should be produced in rgb mode name your images in a logical format, so
Expression Design Lab Exercises
 Expression Design Lab Exercises Creating Images with Expression Design 2 Beaches Around the World (Part 1: Beaches Around the World Series) Information in this document, including URL and other Internet
Creating Digital Illustrations for Your Research Workshop III Basic Illustration Demo
 Creating Digital Illustrations for Your Research Workshop III Basic Illustration Demo Final Figure Size exclusion chromatography (SEC) is used primarily for the analysis of large molecules such as proteins
Actualtests.9A QA
 Actualtests.9A0-351.51.QA Number: 9A0-351 Passing Score: 800 Time Limit: 120 min File Version: 5.6 http://www.gratisexam.com/ 9A0-351 Adobe Illustrator CC Recertification Exam Marvelous planning guide
12 APPLYING EFFECTS. Lesson overview
 12 APPLYING EFFECTS Lesson overview In this lesson, you ll learn how to do the following: Use various effects like Pathfinder, Distort & Transform, Offset Path, and Drop Shadow effects. Use Warp effects
9 Using Appearance Attributes, Styles, and Effects
 9 Using Appearance Attributes, Styles, and Effects You can alter the look of an object without changing its structure using appearance attributes fills, strokes, effects, transparency, blending modes,
Exercise III: Creating a Logo with Illustrator CS6
 Exercise III: Creating a Logo with Illustrator CS6 Project 1: Creating Logos with the Shape Tools Now that we have some experience with Illustrator s tools, let s expand our goal to create a logo, web
Create a Cute Vector Penguin Character in Illustrator
 Create a Cute Vector Penguin Character in Illustrator Follow this step by step Adobe Illustrator tutorial to create a simple vector penguin character. We ll be using many of Illustrator s basic shapes
Drawing shapes and lines
 Fine F Fi i Handmade H d d Ch Chocolates l Hours Mon Sat 10am 6pm In this demonstration of Adobe Illustrator CS6, you will be introduced to new and exciting application features, like gradients on a stroke
Adobe Illustrator A Hot Air Balloon Sky Scene In this tutorial, we'll explain how to create a fun sky scene with hot air balloons.
 Adobe Illustrator A Hot Air Balloon Sky Scene In this tutorial, we'll explain how to create a fun sky scene with hot air balloons. We will take advantage of the Blend Tool and the Symbol Sprayer Tool and
12 APPLYING EFFECTS. Lesson overview
 12 APPLYING EFFECTS Lesson overview In this lesson, you ll learn how to do the following: Use various effects, such as Pathfinder, Scribble, and Drop Shadow. Use Warp effects to distort type. Create three-dimensional
Graffiti Wallpaper Photoshop Tutorial
 Graffiti Wallpaper Photoshop Tutorial Adapted from http://photoshoptutorials.ws/photoshop-tutorials/drawing/create-your-own-graffiti-wallpaper-inphotoshop.html Step 1 - Create a New Document Choose File
PanosFX VINYL RECORDS & DVDs User guide. VINYL RECORDS & DVDs. Photoshop actions. For Photoshop CC, CS6, CS5, CS4. User Guide
 VINYL RECORDS & DVDs Photoshop actions For Photoshop CC, CS6, CS5, CS4 User Guide Contents THE BASICS... 1 About the effects... 1 How the action set is organized... 1 THE CORE ACTIONS... 2 The minimum
View the final cute monster character
 Follow this step by step Illustrator tutorial to create a cute vector monster character. Weʼll create the character from basic shapes to give a cute and friendly appearance then weʼll bring the character
Advanced Special Effects
 Adobe Illustrator Advanced Special Effects AI exercise preview exercise overview The object is to create a poster with a unified color scheme by compositing artwork drawn in Illustrator with various effects
DESIGNING A WEBSITE LAYOUT IN PHOTOSHOP CS4. Step 1
 DESIGNING A WEBSITE LAYOUT IN PHOTOSHOP CS4 Step 1 We ll be using the 960s Grid System (download here) to keep everything aligned. Once you have it, open the included Photoshop document called: 960_grid_24_col.psd.
CHAPTER 7 Enrichment Activity
 Create an Illustration with Symbols The Symbols palette is a collection of images, like clip art. Choose Window>Symbols to view the Symbols pallet. When you open the palette, it looks like you have only
GIMP WEB 2.0 BADGES. GIMP is all about IT (Images and Text) OPEN GIMP
 OPEN GIMP") GIMP WEB 2.0 BADGES and Badges: Circle with Flap Completed Project WEB 2.0 BADGES: CIRCLE WITH FLAP GIMP is all about IT (Images and Text) OPEN GIMP Step 1: To begin a new GIMP project, from the Menu Bar,
GIMP WEB 2.0 BADGES and Badges: Circle with Flap Completed Project WEB 2.0 BADGES: CIRCLE WITH FLAP GIMP is all about IT (Images and Text) OPEN GIMP Step 1: To begin a new GIMP project, from the Menu Bar,
Create a Cool Vector Robot Character in Illustrator
 Create a Cool Vector Robot Character in Illustrator In this tutorial, we will use various tools and techniques to create a simple vector robot character and learn the basic of Adobe Illustrated. With this
Education and Training CUFMEM14A. Exercise 2. Create, Manipulate and Incorporate 2D Graphics
 Education and Training CUFMEM14A Exercise 2 Create, Manipulate and Incorporate 2D Graphics Menu Exercise 2 Exercise 2a: Scarecrow Exercise - Painting and Drawing Tools... 3 Exercise 2b: Scarecrow Exercise
Adobe Illustrator. Always NAME your project file. It should be specific to you and the project you are working on.
 Adobe Illustrator This packet will serve as a basic introduction to Adobe Illustrator and some of the tools it has to offer. It is recommended that anyone looking to become more familiar with the program
Illustrator Tutorial: How to create a stipple texture By Jason McConnell on Dec,
 Illustrator Tutorial: How to create a stipple texture By Jason McConnell on Dec, 19 2014 Have you ever wanted to add a stippled airbrush effect to your artwork in Illustrator? You might think you have
Creative Effects with Illustrator
 ADOBE ILLUSTRATOR PREVIEW Creative Effects with Illustrator AI OVERVIEW The object is to create a poster with a unified color scheme by compositing artwork drawn in Illustrator with various effects and
CREATING THE FUNKY BUSINESS CARD
 CREATING THE FUNKY BUSINESS CARD This is what the final product should look like. 1. Open Illustrator 2. Create a new document (file new) Name your document. Change the units to inches. Change the document
Creative Effects with Illustrator
 ADOBE ILLUSTRATOR Creative Effects with Illustrator PREVIEW OVERVIEW The object is to create a poster with a unified color scheme by compositing artwork drawn in Illustrator with various effects and photographs.
EDITING SHAPES. Lesson overview
 3 CREATING AND EDITING SHAPES Lesson overview In this lesson, you ll learn how to do the following: Create a document with multiple artboards. Use tools and commands to create basic shapes. Work with drawing
Adobe Illustrator CC Advanced
 Copy/Paste Objects 1. Select with Selection-Tool 1. Hold Alt-Key Drag with Selection-Tool while still holding the Alt-Key (Additionally holding Shift will move straight or in 45/90/180 Degrees) Align Objects
GIMP WEB 2.0 ICONS. GIMP is all about IT (Images and Text) OPEN GIMP
 OPEN GIMP") GIMP WEB 2.0 ICONS or WEB 2.0 ICONS: MEMO Web 2.0 Icons: Memo GIMP is all about IT (Images and Text) OPEN GIMP Step 1: To begin a new GIMP project, from the Menu Bar, select File New. At the Create a New
GIMP WEB 2.0 ICONS or WEB 2.0 ICONS: MEMO Web 2.0 Icons: Memo GIMP is all about IT (Images and Text) OPEN GIMP Step 1: To begin a new GIMP project, from the Menu Bar, select File New. At the Create a New
Adobe photoshop Using Masks for Illustration Effects
 Adobe photoshop Using Masks for Illustration Effects PS Preview Overview In this exercise you ll see a more illustrative use of Photoshop. You ll combine existing photos with digital art created from scratch
Using Masks for Illustration Effects
 These instructions were written for Photoshop CS4 but things should work the same or similarly in most recent versions Photoshop. 1. To download the files you ll use in this exercise please visit: http:///goodies.html
Do Now # 1 Label the Photoshop Interface.
 Class Warmup AVTECH Do Now # 1 Label the Photoshop Interface. The Menu Bar The Options Panel The Canvas The Navigator Panel The History Panel Button The Workspace Button The Tool Bar The Layers Panel The
SETTINGS AND WORKSPACE
 ADOBE ILLUSTRATOR Adobe Illustrator is a program used to create vector illustrations / graphics (.ai/.eps/.svg). These graphics will then be used for logos, banners, infographics, flyers... in print and
Pen Tool, Fill Layers, Color Range, Levels Adjustments, Magic Wand tool, and shadowing techniques
 Creating a superhero using the pen tool Topics covered: Pen Tool, Fill Layers, Color Range, Levels Adjustments, Magic Wand tool, and shadowing techniques Getting Started 1. Reset your work environment
Documentation Colibrico Design Studio
 1 / 39 Documentation Colibrico Design Studio Table of content About Colibrico Design Studio...3 System requirements...3 Supported languages...3 Installation...3 Trial version...4 License...4 Registration...4
ADOBE PHOTOSHOP Using Masks for Illustration Effects
 ADOBE PHOTOSHOP Using Masks for Illustration Effects PS PREVIEW OVERVIEW In this exercise, you ll see a more illustrative use of Photoshop. You ll combine existing photos with digital art created from
Adobe Illustrator CS Design Professional CREATING TEXT AND GRADIENTS
 Adobe Illustrator CS Design Professional CREATING TEXT AND GRADIENTS Chapter Lessons Create and format text Flow text into an object Position text on a path Create colors and gradients Apply colors and
Using Blending Modes for Simple Color Correction
 Using Blending Modes for Simple Color Correction In a previous lesson, you were introduced to blending modes using the Brush Tool. Blending modes are also a powerful feature of the Layers Panel and can
A QUICK TOUR OF ADOBE ILLUSTRATOR CC (2018 RELEASE)
") A QUICK TOUR OF ADOBE ILLUSTRATOR CC (2018 RELEASE) Lesson overview In this interactive demonstration of Adobe Illustrator CC (2018 release), you ll get an overview of the main features of the application.
A QUICK TOUR OF ADOBE ILLUSTRATOR CC (2018 RELEASE) Lesson overview In this interactive demonstration of Adobe Illustrator CC (2018 release), you ll get an overview of the main features of the application.
GIMP WEB 2.0 ICONS. GIMP is all about IT (Images and Text) OPEN GIMP
 OPEN GIMP") GIMP WEB 2.0 ICONS Web 2.0 Banners: Download E-Book WEB 2.0 ICONS: DOWNLOAD E-BOOK OPEN GIMP GIMP is all about IT (Images and Text) Step 1: To begin a new GIMP project, from the Menu Bar, select File New.
GIMP WEB 2.0 ICONS Web 2.0 Banners: Download E-Book WEB 2.0 ICONS: DOWNLOAD E-BOOK OPEN GIMP GIMP is all about IT (Images and Text) Step 1: To begin a new GIMP project, from the Menu Bar, select File New.
Learning to use the drawing tools
 Create a blank slide This module was developed for Office 2000 and 2001, but although there are cosmetic changes in the appearance of some of the tools, the basic functionality is the same in Powerpoint
Vectornator Pro. Manual Version 1.0.2, April 5th, A Linearity GmbH Production
 Vectornator Pro Manual Version 1.0.2, April 5th, 2018 A Linearity GmbH Production Vectornator Pro The best and most advanced vector graphic design software for ios A Linearity GmbH Production What you
Illustrator. Project Workbook
 Project Workbook 2 Contents Illustrator Illustrator Examples... 4 Pen Tool and Image Trace... 4 Illustrator Tour Project... 5 Type and Logos... 14 Designing with Symbols Project... 20 Illustrator Special
Basic Scene Composition
 Basic Scene Composition Welcome to the Basic Scene Composition tutorial. This tutorial was designed to teach you how to many of Illustrator key tools to create a sunset scene, this should give you good
GIMP WEB 2.0 ICONS. GIMP is all about IT (Images and Text) OPEN GIMP
 OPEN GIMP") GIMP WEB 2.0 ICONS WEB 2.0 ICONS: STICKY NOTE Web 2.0 Icons: Sticky Note GIMP is all about IT (Images and Text) OPEN GIMP Step 1: To begin a new GIMP project, from the Menu Bar, select File New. At the
GIMP WEB 2.0 ICONS WEB 2.0 ICONS: STICKY NOTE Web 2.0 Icons: Sticky Note GIMP is all about IT (Images and Text) OPEN GIMP Step 1: To begin a new GIMP project, from the Menu Bar, select File New. At the
ADOBE ILLUSTRATOR CS3
 ADOBE ILLUSTRATOR CS3 Chapter 2 Creating Text and Gradients Chapter 2 1 Creating type Create and Format Text Create text anywhere Select the Type Tool Click the artboard and start typing or click and drag
MAKING A TRIPTYCH IN PHOTOSHOP CC
 MAKING A TRIPTYCH IN PHOTOSHOP CC Open Photoshop CC and create a New Document Remember, the images shown here are 'screen grabs from my computer. I am using Photoshop CC. Therefore your screen may look
Unit 21 - Creating a Navigation Bar in Macromedia Fireworks
 Unit 21 - Creating a Navigation Bar in Macromedia Fireworks Items needed to complete the Navigation Bar: Unit 21 - House Style Unit 21 - Graphics Sketch Diagrams Document ------------------------------------------------------------------------------------------------
Designer Reference 1
 Designer Reference 1 Table of Contents USE OF THE DESIGNER...4 KEYBOARD SHORTCUTS...5 Shortcuts...5 Keyboard Hints...5 MENUS...7 File Menu...7 Edit Menu...8 Favorites Menu...9 Document Menu...10 Item Menu...12
Adobe Illustrator CC 2018 Tutorial
 Adobe Illustrator CC 2018 Tutorial GETTING STARTED Adobe Illustrator CC is an illustration program that can be used for print, multimedia and online graphics. Whether you plan to design or illustrate multimedia
THE CREATIVE SWEETS. Welcome to PHOTOSHOPTOPOLIS. Criag Naylor Instructor cnaylor
 Welcome to PHOTOSHOPTOPOLIS :) Criag Naylor Instructor cnaylor 2@me.com THE CREATIVE SWEETS Session 1 - Photoshop Appetizers This session is designed to basically wet your appetite. Here you will learn
INTRODUCTION TO ADOBE ILLUSTRATOR
 INTRODUCTION TO ADOBE ILLUSTRATOR Instructor: Gillian Goerz Website: GillianG.com This powerful design tool effectively creates crisp graphics and illustrations for all medias, including print, web and
Adobe Illustrator CS Design Professional GETTING STARTED WITH ILLUSTRATOR
 Adobe Illustrator CS Design Professional GETTING STARTED WITH ILLUSTRATOR Chapter Lessons Create a new document Explore the Illustrator window Create basic shapes Apply fill and stroke colors to objects
GIMP WEB 2.0 ICONS. Web 2.0 Icons: Circle Completed Project. Notice that the default new layer background fill is transparency. Click the Ok button.
 GIMP WEB 2.0 ICONS WEB 2.0 ICONS: CIRCLE ICON OPEN GIMP or Web 2.0 Icons: Circle Completed Project Step 1: To begin a new GIMP project, from the Menu Bar, select File New. At the Create a New Image dialog
Inkscape tutorial: Donate button
 Inkscape tutorial: Donate button By: Very Simple Designs (BDT466) Web Site: http://verysimpledesigns.com/vectors/inkscape-tutorial-donate-button.html This Inkscape beginner tutorial teaches the viewer
L E S S O N 2 Background
 Flight, Naperville Central High School, Naperville, Ill. No hard hat needed in the InDesign work area Once you learn the concepts of good page design, and you learn how to use InDesign, you are limited
ILLUSTRATOR TUTORIAL-1 workshop handout
 Why is Illustrator a powerful tool? ILLUSTRATOR TUTORIAL-1 workshop handout Computer graphics fall into two main categories, bitmap graphics and vector graphics. Adobe Illustrator is a vector based software
Cell Phone. Adobe Illustrator Lesson 16 Working with Gradients Transparency Menu 1. START>PROGRAMS>ADOBE ILLUSTRATOR CS3
 L e s s o n 1 6, P a g e 1 Adobe Illustrator Lesson 16 Working with Gradients Transparency Menu Cell Phone 1. START>PROGRAMS>ADOBE ILLUSTRATOR CS3 2. File>New and use these settings. Be sure to change
Illustrator syllabus and overview
 Illustrator syllabus and overview Adobe Illustrator CS6 is a sophisticated vector drawing tools. You can create distinctive designs with precise shape-building tools, fluid and painterly brushes, and advanced
Step 1: Create A New Photoshop Document
 Snowflakes Photo Border In this Photoshop tutorial, we ll learn how to create a simple snowflakes photo border, which can be a fun finishing touch for photos of family and friends during the holidays,
Adobe Photoshop Sh S.K. Sublania and Sh. Naresh Chand
 Adobe Photoshop Sh S.K. Sublania and Sh. Naresh Chand Photoshop is the software for image processing. With this you can manipulate your pictures, either scanned or otherwise inserted to a great extant.
When dragging out a marquee: Shift toggles the corner selection
 VECTORSCRIBE DYNAMIC CORNERS When dragging out a marquee: Esc cancels the marquee When dragging out a marquee: Shift toggles the corner selection When dragging out a marquee: Option+Alt adds corners to
Tower Drawing. Learning how to combine shapes and lines
 Tower Drawing Learning how to combine shapes and lines 1) Go to Layout > Page Background. In the Options menu choose Solid and Ghost Green for a background color. This changes your workspace background
Warping & Blending AP
 Warping & Blending AP Operation about AP This AP provides three major functions including Warp, Edge Blending and Black Level. If the AP is already installed, please remove previous version before installing
Description: Learn how to create a beautiful pumpkin using Bitmaps for Textures and the Gradient Fill Editor to colour the shapes.
 Title: PUMPKIN Software: Serif DrawPlus X8 Author: Teejay Joyce Website: Tutorials by Teejay Skill Level: Intermediate Supplies: None Description: Learn how to create a beautiful pumpkin using Bitmaps
ITP 101 Project 2 - Photoshop
 ITP 101 Project 2 - Photoshop Project Objectives Learn how to use an image editing application to create digital images. We will use Adobe Photoshop for this project. Project Details To continue the development
User Manual Version 1.1 January 2015
 User Manual Version 1.1 January 2015 - 2 / 112 - V1.1 Variegator... 7 Variegator Features... 7 1. Variable elements... 7 2. Static elements... 7 3. Element Manipulation... 7 4. Document Formats... 7 5.
A Step-by-step guide to creating a Professional PowerPoint Presentation
 Quick introduction to Microsoft PowerPoint A Step-by-step guide to creating a Professional PowerPoint Presentation Created by Cruse Control creative services Tel +44 (0) 1923 842 295 training@crusecontrol.com
Ombre Banner. Step One: Prepare the Workspace. Step Two: Create a Rectangle. digitalscrapper.com /blog/ombre-banner/ Ombre Banner by Jenifer Juris
 Ombre Banner digitalscrapper.com /blog/ombre-banner/ Ombre Banner by Jenifer Juris One of the fashion and design trends that has become very popular is ombre, or the change of a darker color to a lighter
Shape and Line Tools. tip: Some drawing techniques are so much easier if you use a pressuresensitive
 4Drawing with Shape and Line Tools Illustrator provides tools for easily creating lines and shapes. Drawing with shapes (rectangles, ellipses, stars, etc.) can be a surprisingly creative and satisfying
Shape Cluster Photo Written by Steve Patterson
 Shape Cluster Photo Written by Steve Patterson Before After Step 1: Create A New Document Let's begin by creating a new Photoshop document. Go up to the File menu in the Menu Bar along the top of the screen
CREATING A BUTTON IN PHOTOSHOP
 CREATING A BUTTON IN PHOTOSHOP Step 1: Create the Photoshop Document Our button will be exactly 170px wide and 50px tall, but we ll make a bigger canvas (600x600px) so that we have some breathing room
Illustrator 1 Object Creation and Modification Tools
 Illustrator 1 Object Creation and Modification Tools Pen Tool Creates a precision shape using points and curve handles. Shape Tools Creates geometric solids. Selection Tool Selects objects and groups.
Course Prerequisite: CE 1403 or 1404 Adobe Creative Suite, or equivalent experience.
 Syllabus: Adobe Illustrator Continuing Education-SPRING 12 CE*2407 Adobe Illustrator 10 Mondays, 7:00 10:00 pm, Jan 23 April 2 Sarah Gager Lochrie, sarah@sarahgager.com Course Description Turn out professional-looking
Working With Images: Intermediate Photoshop
 Working With Images: Intermediate Photoshop Viewing Information in the Layers Palette 1. Choose File > Open and open the Start.psd file in the Lesson01 folder located in the PS_Workshop folder on the desktop.
Tip: Shift/Control/Alt- will reset entire Photoshop program in case someone has changed settings.
 Adobe Photoshop CS2 Class 1 Tip: Shift/Control/Alt- will reset entire Photoshop program in case someone has changed settings. Create New File: 1. Click on File/New 2. Choose setting below Resolution: Higher
Work with Shapes. Concepts CHAPTER. Concepts, page 3-1 Procedures, page 3-5
 3 CHAPTER Revised: November 15, 2011 Concepts, page 3-1, page 3-5 Concepts The Shapes Tool is Versatile, page 3-2 Guidelines for Shapes, page 3-2 Visual Density Transparent, Translucent, or Opaque?, page
Chapter 1. Getting to Know Illustrator
 Chapter 1 Getting to Know Illustrator Exploring the Illustrator Workspace The arrangement of windows and panels that you see on your monitor is called the workspace. The Illustrator workspace features
Lesson 6 Adding Graphics
 Lesson 6 Adding Graphics Inserting Graphics Images Graphics files (pictures, drawings, and other images) can be inserted into documents, or into frames within documents. They can either be embedded or
SNOWFLAKES PHOTO BORDER - PHOTOSHOP CS6 / CC
 Photo Effects: Snowflakes Photo Border (Photoshop CS6 / CC) SNOWFLAKES PHOTO BORDER - PHOTOSHOP CS6 / CC In this Photoshop tutorial, we ll learn how to create a simple and fun snowflakes photo border,
tool brush pen rectangle tool J Direct Selection Shift + E Shift+K Group Selection H Magic Wand Z Lasso X Pen Shift+W D Add Anchor Point Shift+R
 delete lasso blend free transform rotate text magic wand mesh eye drop reflect pen tab direct selection gradient scale hand column graph live paint bucket ellipse enter caps lock return zoom scissors selection
This project covers the following design concepts:
 Design Project 4 This project covers the following design concepts: DRAWING TOOLS SNAP TO GRID SETTING CONSTRAINTS CUT PATH TOOL CENTERLINE TEXT COPY & PASTE CONFORMING VECTOR CREATING A CLOSED REGION
Big City Lights- Using Photoshop 7.0
 Big City Lights- Using Photoshop 7.0 This Tutorial makes use of Defining Patterns and Layer Effects in order to create a word in lights. It is based on: Big City Lights by Scott Kelby and Felix Nelson,
Working with Vectors in Photoshop
 A Quick Guide This Guide contains: Introduction Quick Guide to the Pen Tool Quick Guide to the Selection Tools Combining Shapes Create Crisp Vector shapes Making a Path from a Selection Cos Vectors are
NAME: PD DATE / / 2. The Name of this Tool is: A: The Text Tool B: The Type on a Path Tool C: The Selection Tool D: The Gradient Mesh Tool
 NAME: PD DATE / / GD I END OF COURSE / YEAR REVIEW ILLUSTRATOR TOOLS & FUNCTIONS 1: The Name of this Tool is: A: The Group Selection Tool B: The Add Anchor Point Tool C: The Selection Tool D: The Gradient
CS Multimedia and Communications REMEMBER TO BRING YOUR MEMORY STICK TO EVERY LAB! Lab 02: Introduction to Photoshop Part 1
 CS 1033 Multimedia and Communications REMEMBER TO BRING YOUR MEMORY STICK TO EVERY LAB! Lab 02: Introduction to Photoshop Part 1 Upon completion of this lab, you should be able to: Open, create new, save
ANIMATION FOR EDUCATORS. Professional Development Salary Point Class Presented by Jonathan Mazur, NBCT
 ANIMATION FOR EDUCATORS Professional Development Salary Point Class Presented by Jonathan Mazur, NBCT jonathan.mazur@lausd.net PLANNING YOUR ANIMATION PROJECT Identifying Learning Goals Defining Assessment
Xyron Wishblade Software Manual (PC)
") Xyron Wishblade Software Manual (PC) Provided By http://www.mybinding.com http://www.mybindingblog.com Xyron Wishblade Create & Cut Software Manual Section 1 Getting Started with Tool Bars 2 Standard Tool
Xyron Wishblade Software Manual (PC) Provided By http://www.mybinding.com http://www.mybindingblog.com Xyron Wishblade Create & Cut Software Manual Section 1 Getting Started with Tool Bars 2 Standard Tool
Layer Styles. Learning Objectives. Introduction
 5 Text, Shapes, and Layer Styles Learning Objectives After completing this chapter, you will be able to: Explain the differences between vector and bitmap graphics. Enter and edit text using the type tools.
Fig. A. Fig. B. Fig. 1. Fig. 2. Fig. 3 Fig. 4
 Create A Spinning Logo Tutorial. Bob Taylor 2009 To do this you will need two programs from Xara: Xara Xtreme (or Xtreme Pro) and Xara 3D They are available from: http://www.xara.com. Xtreme is available
Managing Objects 6. Introduction. In This Chapter CHAPTER
 Managing Objects 6 CHPTER Introduction Every object has properties every caption, every graphic, every highlight box. This chapter focuses on the properties that are common to most object types, whether
14. Using Illustrator CC with Other Adobe Applications
 14. Using Illustrator CC with Other Adobe Applications Lesson overview In this lesson, you ll learn how to do the following: Place linked and embedded graphics in an Illustrator file. Place multiple images
Add Photo Mounts To A Photo With Photoshop Part 1
 Add Photo Mounts To A Photo With Photoshop Part 1 Written by Steve Patterson. In this Photoshop Effects tutorial, we ll learn how to create and add simplephoto mounts to an image, a nice finishing touch
Quick Guide for Photoshop CC Basics April 2016 Training:
 Photoshop CC Basics Creating a New File 1. Click File > New 2. Keep Default Photoshop Size selected in the Preset drop-down list. 3. Click OK. Showing Rulers 1. On the Menu bar, click View. 2. Click Rulers.
Creating a 3D bottle with a label in Adobe Illustrator CS6.
 Creating a 3D bottle with a label in Adobe Illustrator CS6. Step 1 Click on File and then New to begin a new document. Step 2 Set up the width and height of the new document so that there is enough room
Intersecting Frame (Photoshop)
") Intersecting Frame (Photoshop) Tip of the Week by Jen White on October 4, 2011 Sometimes you feel like a nut. Sometimes you don t. I ve got that little Almond Joy jingle stuck in my head! It was driving
Intersecting Frame (Photoshop) Tip of the Week by Jen White on October 4, 2011 Sometimes you feel like a nut. Sometimes you don t. I ve got that little Almond Joy jingle stuck in my head! It was driving
ADOBE ILLUSTRATOR CS3. Chapter 4 Transforming and Distorting Objects
 ADOBE ILLUSTRATOR CS3 Chapter 4 Transforming and Distorting Objects Transform objects Defining the Transform Tools Transformation occurs when an object s size, shape, or position is changed on artboard