PIPE INSPECTION CAMERA SYSTEM
|
|
|
- Pauline Golden
- 6 years ago
- Views:
Transcription

1 PIPE INSPECTION CAMERA SYSTEM Read these instructions completely before operating this system. Please charge the battery first before use. MANUAL
... 12 3.1 INSERTING SD CARD... 12 3.2 AV1&AV2 SWITCH...12 3.3 RECORDING VIDEO... 12 3.4 RECORDING PHOTO.")

2 Catalog CATALOG...2 WARNING... 4 SAFETY AND NOTICE PARTS LIST ACCESSORIES CONTROL BOX QUICK START GUIDE CHARGING THE BATTERY STARTING UP CHECKING WATERPROOF RING & ASSEMBLING SKID RECORDING AND MENU(CONTROL BOX-1) INSERTING SD CARD AV1&AV2 SWITCH RECORDING VIDEO RECORDING PHOTO PLAYBACK VIDEO PLAYBACK PHOTO RECORDING AND MENU(CONTROL BOX-2) INSERTING SD CARD AV1&AV2 SWITCH RECORDING VIDEO RECORDING PHOTO PLAYBACK VIDEO PLAYBACK PHOTO MENU RECORDER SETTING SYSTEM SETTING DELETE FILES
3 5 KEYBOARD(OPTIONAL) TROUBLESHOOTING GUIDE
4 Warning Warning To Avoid electrical shock put the item indoor when Charging Warning Use Input 110~240V AC Output DC 12.6V, 1000mA Charger ONLY. Charge the battery first before use! Warning Item contains battery, dispose according local legal requirements properly Read this manual carefully before operating this system Avoid using the device in extreme humidity or temperatures as this may cause damage to the device Do not drop or press on the system as this may cause damage to the device The warranty becomes void if any physical damage is present or if the system is disassembled by the user Do not disconnect the SD card while recording or playing as this may damage the system and/or the SD card Remember to always back up the data on your SD card Safety and Notice For your safety 1. Do not attempt to insert, use, or charge a battery not designed for this inspection system. 2. Use the power supply only on even surfaces, without any cover. Open air and circulation around the product must be available. The maximum ambient temperature is 50 ºC. 3. Risk of explosion may occur if an incorrect battery type is inserted or used. Dispose of used batteries according to their instructions. 4. Keep the inspection system and its accessories out of the reach of babies, toddlers, and children. In particular, small parts such as memory cards and battery could be easily dismantled and swallowed. 5. Use only the original accessories to avoid possible risks to health and property, and thus meet all related legal regulations. 6. When using the LED lights, do not use to close to human or animal eyes (particularly for babies, toddlers, and children) to avoid injury. 4
5 7. In very rare occasions, Li-ion Batteries such as the one provided with this inspection system could explode if a conductive material such as jewelry, keys or beaded chains touch exposed terminals. The material may complete an electrical circuit and become quite hot. Exercise care in handling any batteries, particularly when placing it inside your pocket, purse, or other container with metal objects. In such an event, this could result in property damage, injury or burns. Do not dispose of batteries in fire as they may explode. Warranty 1. Warranty is void if damage or system failure occurred due to outside factors such as collision, fire, flood, dirt, sewage, earthquake, and other force majeure events as well as incorrect usage of electricity or use of non-original accessories. 2. It is the sole responsibility of the user if problems (such as data loss and system failure) occurred due to non-factory installed software, parts, and/or non-original accessories. Taking care of your inspection system 1. Always keep the inspection system in the pouch provided or other suitable cases for increased protection against splashes, dust, and collision. 2. The only way of replacing the battery and the memory card is to open the Battery / Memory cover. Use care when opening this cover to avoid damage the inspection system. 3. Dispose of unwanted batteries and inspection systems as permitted by the laws in your country. 4. Water may cause a fire or electric shock. Therefore, store your battery in a dry place. 5. If your control component becomes wet, wipe it with a dry cloth as soon as possible. 6. Do not drop, knock, or shake the inspection system. Inappropriate behavior when using the camera system may damage the internal electronic circuit board or deform the lens shape. 7. Do not use harsh chemicals, cleaning solvents, or strong detergents to clean the inspection system. 8. To avoid unclear images, be sure to clean the inspection system lens before taking pictures or recording videos. Use a lens brush or soft cloth to clean the lens. 9. To avoid the loss of video and photos on the memory card, you should make a backup copy to a computer or optical disc as soon as possible. Memory cards should not be considered as a long term storage device. 10. Before initial use of a memory card, it is recommended to use the inspection system to format the card first. 11. Remember to slide the write-protect tab (if available) to the unlock position. Otherwise, all data (if any) on the memory card is protected and the card cannot be edited or formatted. Operating environment 1. The camera system operating temperature is between -10ºC ~ 50ºC (14ºF ~ 122ºF). It is normal for the operating time to be shortened when the temperature is low. 2. The capacity of your inspection system battery will reduce each time it is charged/emptied. 3. Storage at too high or low temperatures will also result in a gradual capacity loss. As a result, the operating time of your inspection system may be considerably reduced. 4. It is normal for the camera system to become warm during operation, because the inspection system casing can conduct heat. 5


 Picture snap and movie record Movie format:avi AV1 and")
 Fiberglass diameter: ø5mm Fiberglass")
6 1 Parts list 1.1 Accessories Item Image Description Camera size: ø23x140mm Sensor size:1/4 inch View angle:105 Camera Head & Skids Camera work current:100ma; Camera power supply:dc 12V Camera light:12pcs white LEDS Leds adjustable Total Pixels: PAL:720X576;NTSC:720X480 Camera glass material:sapphire glass Camera shell material:aluminum alloy Waterproof:IP68 Camera color:black and silver S23-40 size: ø40mm Material: PC Control Box Cable Wheel DVR power supply:12v DVR work current:200ma Storage medium:sd card(max 32G) Digital clock and digital calendar Battery level indicator function DVR Total Pixels:720X576 (D1) Picture snap and movie record Movie format:avi AV1 and AV2 manually USB keyboard interface Support USB storage Cable size: ø320x105(h) mm Wire material:fiberglass rod Fiberglass length:20m(max 50m) Fiberglass diameter: ø5mm Fiberglass color:yellow red black blue CHARGER Input:AC V~50/60Hz Output:DC 12.6V/1000MA DC plug diameter:2.1mm 6


7 MONITOR Keyboard Microphone LI-ION BATTERY Cable connection CASE Monitor size:7inch TFT color monitor Monitor Total Pixels:800x480 Monitor power supply:dc 12V Osd language: English Battery level display Up,down,left,right adjustable 16:9&4:3 model Sunshade include Keyboard size:220x118x18mm Language: English Keyboard interface: USB Import Text edit line: PAL 27 letter 14 line NTSC 27 letter 12 line Max edit page:4pages Frequency respose:20-20khz Sensitivity:-47DB±2DB Output impedance: 2.2KΩ Line Length:1m battery(18650) 12.6V 2200MAH li-ion Total Power:7W Charge time:3hours Protective voltage:8.1v Work time: 240minutes Size:Φ5*1500mm GX16-4 and GX16-6 Elbow air head Size: L480XW415XH200mm Material: fire board+aluminum alloy Empty case weight:3.4kg Carton Size: 490*210*465mm Carton material:a=a paper 7

8 1.2 Control Box 8
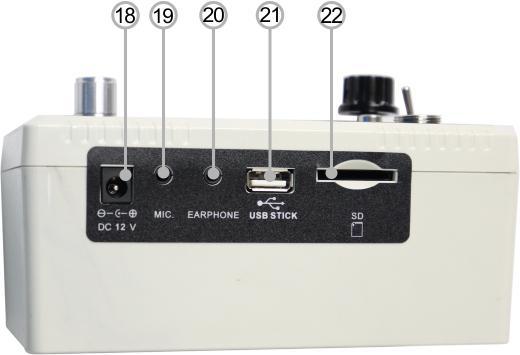
9 1 AV1/AV2 switch 12 Menu left 2 Camera signal cable connector 13 Reset 3 Video output 14 Menu back 4 Recorded directory 15 Metric/Imperial 5 Record/stop recording 16 Menu 6 Menu up/usb switch 17 Power control 7 Menu OK/pause/snap 18 Charge jack 8 Menu right 19 Microphone jack 9 Menu down 20 Earphone jack 10 USB keyboard 21 USB stick jack 11 LED brightness adjuster 22 SD card slot Operation order: Press to switch on USB STICK, shows up. Press again to switch off USB STICK, disappears. Attention: Turn off the unit before pull out the USB STICK. Do not use the USB STICK and SD card at the same time. 9


10 2 Quick Start Guide 2.1 Charging the Battery 1. Connect the charger to the socket, the indicator of charger will turn into green. 2. Connect the plug to the jack of control box. 3. Turn the switch knob to CHARGE position. 4. The indicator of charger will turn into red. When the Li-ion battery is full of power, the indicator of charger will turn into green. 2.2 Starting up 1. Open the suitcase and spread the sunshade 2. Connect the camera to the cable wheel 3. Connect one end to the control box 4. Connect the other end of connection wire to the cable wheel 5 Turn the switch knob to ON/BATT position 6. Switch to AV1 10


11 2.3 Checking waterproof ring & Assembling SKID Check waterproof rubber ring on the bottom of camera head mm SKID and 23mm camera head 1. Set the SKID in the camera head 2. Fasten the SKID with a screwdriver by tightening its screws. 3. The SKID assemble completed 11
12 3 Recording and Menu(Control Box-1) 3.1 Inserting SD Card 3.2 AV1&AV2 Switch Press the AV1/AV2 key on screen to switch the AV1 and AV2 mode. In AV1 mode, can both take picture and record video, in AV2 mode, can only monitor. 3.3 Recording video 1&2.Press the REC button to start record video 3. Press the REC button again to finish the recording 12


13 3.4 Recording photo 1. Press MENU, choose Recording Mode, enter Work Mode, select Photo, then press REC back to the homepage 2. Press the REC button to snap picture 3.5 Playback Video 1&2. Press the PLAYBACK button 3. Press the OK button to enter the Video Files 13

14 4. Select the file you need 5. The monitor plays the video 6. Press the OK button to pause the video 3.6 Playback Photo Follow the same steps that the Playback Video has mentioned. 14


15 4 Recording and Menu(Control Box-2) 4.1 Inserting SD Card 4.2 AV1&AV2 Switch Press the AV1/AV2 key on screen to switch the AV1 and AV2 mode. In AV1 mode, can both take picture and record video, in AV2 mode, can only monitor. 4.3 Recording video 1&2.Press the REC button to start record video 3. Press the REC button again to finish the recording 15

16 4.4 Recording photo 1. Press the REC button to snap picture 4.5 Playback Video 1&2. Press the PLAYBACK button 3. Press the OK button to enter the Video Files 16

17 4. Select the file you need 5. The monitor plays the video 6. Press the OK button to pause the video 4.6 Playback Photo Follow the same steps that the Playback Video has mentioned. 17
18 18


19 4.7 Menu Press menu key enter into main menu. Recorder Setting System Setting Event Playback 4.8 Recorder Setting 19
20 Work Mode Video: Record videos Photo: Snapshot photos Audio: Record audio Motion Detection Off: Stop the motion detection On: Start the motion detection Sensitivity High: Highest sensitivity Medium: Standard sensitivity Low: Lowest sensitivity Resolution 720X X X480 Video Quality High: High resolution Medium: Standard resolution Low: Low resolution Time Stamp Off: Time stamp will not be showed on the screen On: Time stamp will be shown on the screen Video Time Length of the video recording 5 minutes 10 minutes 15 minutes 30 minutes 60 minutes FPS Set 15 FPS: 15 frames per second 30 FPS: 30 frames per second Audio record volume Work with audio record mode 10 level can be adjusted Overwrite Off: The recording will be stop when the disk full On: The recording will overwrite old video files when the disk full 20

 4.")
21 4.9 System Setting Language Select the operating language Date Time Set the date and time, press OK to confirm Video Output Choose whether PAL or NTSC to suit your monitor and TV Video Output Format No: The system will not format the SD card Yes: The system will format the SD card.(caution: PLS backup the data of the SD card before operating) Firmware Update No: The system will not update the firmware Yes: The system will update the firmware Memory info All: The SD full capacity Free: The SD free capacity Default Setup No: Leaves set up as it is Yes: Factory resets the system Version Booc: (soft version) 4.10 Delete Files Please make sure the files you really want to delete, the files won t be found after deleting. Press Playback key to find the files Press menu to choose the file you want to delete, one and all. Press OK to delete it 21

22 5 Keyboard(optional) The font and text size are fixed and cannot be changed. The basic operation of the text overlay unit is straight forward. A flashing underscore cursor indicates the current screen position. This cursor can be moved the screen by the keyboard cursor keys. The cursor will wrap around the screen left and right, top and bottom. If no key is pressed then the cursor will disappear after approximately ten seconds. The video text overlay unit uses the standard US keyboard mapping. Standard US keyboard mapping used by the video text overlay unit. By default all US units are supplied with this. The alphanumeric characters in the QWERTY section of the keyboard and the keys of the numeric keypad can be typed directly to the screen as would normally be expected. Each alphabetic character key is normally lowercase. Uppercase characters can be typed by holding down the shift key or pressing the CAPS LOCK key. The keyboard s LED indicators will be lit by the unit. To exit CAPS LOCK mode press the key again. To remove a character from the screen use the backspace key and delete key. This will replace the character immediately to the left of the current cursor position with a blank space and move the cursor to that position. The Delete key has no function. The Home and End keys move the cursor position to the left and right of the current line on the screen. The Return key moves the cursor to the beginning of the next line. The video text overlay unit operates in two modes. In the first mode the text is overlaid over the video input signal. When the video signal is removed the unit automatically switches to generating its own internal dark grey background video signal and will switch back to the external video when this is reconnected. In the second mode the unit generates its own video signal internally, but ignores the external video signal. All keyboard commands operate in the same way in both modes. To switch between modes use the F3 key as shown in the command table below. Each page can have this mode set independently. Esc F1 F2 F3 Clear the cursor current settings back to the first line and the first position the cursor from any page back to the first line and the first position Select text over internal video Select text over external video signal 22
23 F4 F5 F6 F7 F8 F9 Shift display up Shift display down Shift display left Shift display right Reset display X-Y position (defaults) Clear the screen The video text overlay unit divides its display between four on screen pages. Text written to each of these pages will be stored in the unit s non-volatile memory until overwritten. These is no default on screen indication of which page is currently selected. To move between the screen pages use the page up and page down keys or Page up moves toward page1. Page down moves toward page 4.To clear the screen page of text press F9. 23
24 6 Troubleshooting Guide Common Faults & Repair If the system fails, please refer to the troubleshooting guide. Video without sound Didn t connect microphone or there are faults in microphone Didn t connect earphone or there are faults in earphone Control box DVR abnormal Unable to input letter Too quick to restart control box There are faults in Control box USB plug There are faults in keyboard There are faults in control box PCB Able to input, but no image 1.5M connect wire disconnects There are faults in camera installation or Camera damage When press F2, the image has already switch to no-image type mode, press F3 return to type mode Control box PCB board abnormal Time display error Control Box DVR board abnormal AV1 no image, AV2 display normally Control Box DVR abnormal AV1 no image, AV2 no image If 1.5m connect wire connect between cable wheel and control box Does camera head screw tightly The aviation jack of control box that connected to monitor looses There are faults in monitor There are faults in control box DVR Battery is unable to be charged Charger didn t insert correctly or there are faults in AC plug Please don t use non-original charger There are faults in charger Li-ion battery damage The power of battery run out quickly Use the full power battery The capability of battery is low SD card can t work Didn t insert SD card correctly The write protection switch of SD card is open SD card is full, please replace SD card or transfer the files to free the space DVR SD card slot damage 24
25 Turn on but no power Battery disconnects Fuse didn t install or Fuse broke down There are faults in control box DVR Display normally, Camera LED can t light Camera didn t install correctly There are faults in camera head There are faults in cable wheel There are faults in Control box PCB board Monitor can t display Didn t turn on monitor Monitor disconnects There are faults in monitor There are faults in control box 25
PIPE INSPECTION CAMERA SYSTEM
 PIPE INSPECTION CAMERA SYSTEM Read these instructions completely before operating this system. Please charge the battery first before use. MANUAL Catalog CATALOG...2 WARNING... 3 SAFETY AND NOTICE... 3
PIPE INSPECTION CAMERA SYSTEM AX-B2120CW/AX- B2120RD/AX-2120ST/AX-B2135CW/AX-B2135ST
 PIPE INSPECTION CAMERA SYSTEM AX-B2120CW/AX- B2120RD/AX-2120ST/AX-B2135CW/AX-B2135ST 1. Warning Read these instructions completely before operating this system. Please charge the battery first before use.
PIPE & WALL INSPECTION SYSTEMS ASSEMBLY AND OPERATING INSTRUCTION
 PIPE & WALL INSPECTION SYSTEMS ASSEMBLY AND OPERATING INSTRUCTION ---------------------------------------------------------------------------------------------------------- Read these instructions completely
Wireless Inspection Camera with recording LCD monitor. Product code: SRCAMV6 CAMERA NUMBER:
 User Manual Super Cam V6 SRCAMV6 Wireless Inspection Camera with recording LCD monitor. Product code: SRCAMV6 CAMERA NUMBER: Please read this user manual carefully before using this product. CONTENTS Welcome...
BORESCOPE INSTRUCTIONS INSPECTION CAMERA RANGE RBS100 RBS200 RBS300. Retain these instructions for future reference
 BORESCOPE INSPECTION CAMERA RANGE RBS100 RBS200 RBS300 INSTRUCTIONS Retain these instructions for future reference www.ringautomotive.co.uk 1 Instructions for Ring Automotive Borescope Inspection Camera
D11VR. USER MANUAL DVR Camera
 D11VR USER MANUAL DVR Camera WHAT S INCLUDED D11VR WINDSHIELD BRACKET DC POWER CORD USB CABLE OWNER S MANUAL Welcome Thank you for choosing a Whistler product. We are dedicated to providing products that
I. PRODUCT DESCRIPTION
 EP662 CAR DASH CAM INSTRUCTION MANUAL PLEASE READ THE MANUAL BEFORE YOUR FIRST USE. KEEP THIS MANUAL SAFE FOR FUTURE REFERENCE! GERMAN IS THE MENU LANGUAGE BY DEFAULT. TO FACILITATE THE SETTING FUNCTIONS,
YHC-308 & YHC-618 YHC-309M & YHC-619M
 YHC-308 & YHC-618 YHC-309M & YHC-619M YHC-308 Mini Digital Video Recorder and YHC- 618 Mini Button Camera YHC-309M Mini Digital Video Recorder and YHC-619M Motion Activation Camera Operating Instructions
Mini Audio/Video Recorder (SDV-03) User Manual
 User Manual") Mini Audio/Video Recorder (SDV-03) User Manual 1 CONTENTS 1. GENERAL INFORMATION.3 2. IMPORTANT SAFETY INSTRUCTION.4 3. OPERATING DVR BASIC OPERATION.5 SETUP......10 4. SPECIFICATION.17 5. LIST OF ACCESSORIES..18
Mini Audio/Video Recorder (SDV-03) User Manual 1 CONTENTS 1. GENERAL INFORMATION.3 2. IMPORTANT SAFETY INSTRUCTION.4 3. OPERATING DVR BASIC OPERATION.5 SETUP......10 4. SPECIFICATION.17 5. LIST OF ACCESSORIES..18
Car DVR User Manual. 1, Key features. Preface. Notes
 Car DVR User Manual Preface Thank you for purchasing this DVR, this device has a unique ultra-portable design; it can be used in various fields, to bring you convenient, safe, colorful daily life. Please
Super Cam V8 SRCAMV8
 User Manual Super Cam V8 SRCAMV8 Pipeline & drain inspection systems with DVR feature. Product code: SRCAM-V8 Please read this user manual carefully before using this product. Specifications Item Description
IN-CAR HD Digital Video Recorder
 IN-CAR HD Digital Video Recorder USER MANUAL KPT-200 In order to ensure better use of each function of your Kapture In-Car HD DVR, it is recommended that you read these product instructions carefully before
99 Washington Street Melrose, MA Phone Toll Free Visit us at
 99 Washington Street Melrose, MA 02176 Phone 781-665-1400 Toll Free 1-800-517-8431 Visit us at www.testequipmentdepot.com Table of Contents 1. General Safety Requirements... 1 2. Safety Terms and Symbols...
User Manual Video Borescope Model
 User Manual Video Borescope Model 20250-27 THE STANDARD IN PRECISION MEASUREMENT Introduction The Digi-Sense Video Borescope (Model 20250-27) is ideal for the inspection of ductwork, wiring locations,
CONTENTS I Getting to know your camera..1 II Software & Download 15 III Maintenance. 23 IV Specification and system requirement...
 CONTENTS I Getting to know your camera..1 1. Configuration & installation...1 2. Monitor screen display...2 3. Preparation before capture..2 4. Shooting 3 5. Video& Audio recording. 7 6. Audio input /output..8
Wireless Digital Video Doorbell
 Wireless Digital Video Doorbell User s Manual Door Camera Indoor Handset Remark Please follow the user manual for correct installation and testing, if there is any doubt, please call our tech-supporting
Model BS-150. Instruction Manual. Video Inspection Camera. reedinstruments. www. com
 Model BS-150 Video Inspection Camera Instruction Manual reedinstruments com Table of Contents Safety... 2 Features... 3 Specifications...3-4 Instrument Description... 5 Operating Instructions...6-8 Safety
1, Key features. Preface. Notes
 Car DVR User Manual Preface Thank you for purchasing this DVR, this device has a unique ultra-portable design; it can be used in various fields, to bring you convenient, safe, colorful daily life. Please
INSPECTION TOOL. Inspection Video Camera with Color LCD Monitor. EU Environmental Protection. Model: 8802LE,8803LE. Model: 8802LE,8803LE
 INSPECTION TOOL Inspection Video Camera with Color LCD Monitor Model: 8802LE,8803LE EU Environmental Protection Waste electrical products should not be disposed of with household waste. Please recycle
FengMi Wemax One Laser Projection TV
 FengMi Wemax One Laser Projection TV User`s Manual About electrical ground Transportation Use this device only with a compulsory grounding condition. It is recommended that you use the original packaging
Axiomet AXB Safety instructions
 Axiomet AXB350 1. Safety instructions Failure to follow the instructions listed below may result in electric shock or personal injury. Please read this manual carefully and thoroughly before using this
Handheld Video Magnifier
 Zoomax TM Snow Handheld Video Magnifier V1.1 1 Contents Description...3 Accessories...3 Compositions:...4 Operation...5 Battery installation...5 Charging the battery...6 Install short strap...6 Operation
Operation Manual Defender Car vision 5018FullHD Car DVR
 Operation Manual Defender Car vision 5018FullHD Car DVR 1 Thank you for buying Defender Car Vision 5018FullHD car DVR. Before using the device, read attentively this manual and keep it for the whole period
SLIMLINE DASH CAM Audio & Video Recorder
 SLIMLINE DASH CAM Audio & Video Recorder 1 EK142CAM INSTRUCTION MANUAL PLEASE READ ALL INSTRUCTIONS CAREFULLY AND RETAIN FOR FUTURE USE Getting Started Remove the Car Digital Video Recorder from the box.
Nature Cam TX-09. User Manual Declaration of Conformity internet link:: (in bottom bar Konformitätserkärung ) Features
 Features") Nature Cam TX-09 User Manual Declaration of Conformity internet link:: www.technaxx.de/ (in bottom bar Konformitätserkärung ) Features Security camera for indoor and outdoor use Ideal for viewing wild
Nature Cam TX-09 User Manual Declaration of Conformity internet link:: www.technaxx.de/ (in bottom bar Konformitätserkärung ) Features Security camera for indoor and outdoor use Ideal for viewing wild
SmartView Versa+ User Manual. Table of contents
 Table of contents Overview... 1 What s in the box?... 2 Getting to know your SmartView Versa+.. 3 Getting started... 5 Inserting the battery... 5 Charging the battery... 6 Install SD card... 7 Install
INSPECTION TOOL. Wireless Inspection Camera with Recordable Monitor. EU Environmental Protection. Model: 8802AL, 8803AL. Model: 8802AL, 8803AL
 TM TM INSPECTION TOOL Wireless Inspection Camera with Recordable Monitor Model: 8802AL, 8803AL EU Environmental Protection Waste electrical products should not be disposed of with household waste. Please
Instruction Manual BOOM BARREL MINI MODEL: S29
 MODEL: S29 BOOM BARREL MINI Instruction Manual Due to ongoing product improvements, specifications and accessories may change without notice. Actual product may differ slightly to that depicted. WARNING
DVR101 HD DASH CAM & 12MP CAMERA
 DVR101 HD DASH CAM & 12MP CAMERA GENERAL - Display: 3 HD LCD - Chipset: Novatek 96223 - Image Sensor: SC1143, 1.0M CMOS - Outputs: USB - PC Interface: USB - Power Supply: 12/24V Cig. Lead Charger - Input
f200 English User Manual Contents
 f200 English User Manual Contents About this Guide...3 FCC Statement...3 WEEE Notice...3 CE Regulatory Notice...4 Notes on Installation...4 Caution...4 1 Introduction...5 1.1 Features...5 1.2 Package Contents...5
Model BS-150. Instruction Manual. Video Inspection Camera. reedinstruments www.
 Model BS-150 Video Inspection Camera Instruction Manual reedinstruments www com Table of Contents Safety... 2 Features... 3 Specifications...3-4 Instrument Description... 5 Operating Instructions...6-8
DR-115 Portable DVR System
 DR-115 Portable DVR System User Manual The DR-115 is a compact high definition DVR system and is part of our RecordCam series of Mobile DVR systems. It is designed to be mounted to the windshield of the
Front view ENGLISH. Speaker. Infrared receiver (for optional remote control) Microphone. Power. Recording light. Lens HDMI Out. USB/AV Out.
 Microphone. Power. Recording light. Lens HDMI Out. USB/AV Out.") Front view ENGLISH Speaker Microphone Infrared receiver (for optional remote control) Power Recording light Lens HDMI Out USB/AV Out 5V DC-in www.kodak.com/go/zx1support 1 ENGLISH Back view LCD Record/OK
Front view ENGLISH Speaker Microphone Infrared receiver (for optional remote control) Power Recording light Lens HDMI Out USB/AV Out 5V DC-in www.kodak.com/go/zx1support 1 ENGLISH Back view LCD Record/OK
MODEL NO: T36 USER MANUAL
 CAR CAMCORDER MODEL NO: T36 USER MANUAL - Please ensure that you read the complete user manual carefully before using any part of the product. - Keep this copy safe for future reference in case of operational
Table of Contents. Chapter 1. Safety Precautions Notice Chapter 2. Components and accessories Chapter 3. Camera components...
 P. 770.270.1394 F. 770.270.2389 865 Marathon Parkway Lawrenceville GA 30046 P. 770.270.1394 F. 770.270.2389 865 Marathon Parkway Lawrenceville GA 30046 Table of Contents Chapter 1. Safety Precautions Notice...
MDVR-14 SOLID STATE MINI DVR User Guide
 MDVR-14 SOLID STATE MINI DVR User Guide 1 Contents 1. SAFETY PRECAUTIONS...3 2. FEATURES...4 3. PACKING LIST...4 4. MDVR DESCRIPTION... 5 5. BASIC CONFIGURATION...7 6. DISPLAY...8 7. OPERATION...9 8. MAIN
PIPE & WALL INSPECTION SYSTEMS WITH DVR FEATURE
 PIPE & WALL INSPECTION SYSTEMS WITH DVR FEATURE MODEL NO.: SWJ-3188D ASSEMBLY AND OPERATING INSTRUCTION -------------------------------------------------------------------------- Read these instructions
Vividia HM-250 HDMI/LCD/USB/TV Portable. Digital Measurement Microscope
 Vividia HM-250 HDMI/LCD/USB/TV Portable Digital Measurement Microscope Table of Contents 1. Precaution. 3 2. Preparation..5 Package Contents.. 6 Part Names & Functions..6 3. Specifications.... 7 4. Use
Welcome 1. Precaution
 0 Table of Contents 1. Precautions. 2 2. Preparation.. 2 Standard Accessories.. 5 Parts Names.. 6 Charging the Battery Pack..... 7 3. Recording Mode 9 Loading SD card 9 Connect External Camera.. 9 Powering
iq DIGITAL PICTURE FRAME iq Digital Picture Frame DPF701SB USER GUIDE
 iq Digital Picture Frame DPF701SB USER GUIDE 1 Table of Contents Important Safety Precautions... 3 Cleaning the LCD Screen... 3 Cleaning the Digital Picture Frame... 3 Introduction... 4 What s in the Box...
User manual. kitvision.co.uk. JB / Made in China. Kitvision Christchurch, Dorset. BH23 4FL. Li-ion
 User manual kitvision.co.uk A c t i o n C a m e r a Li-ion Do not dispose of Lithium-ion batteries with general waste. Please return it to battery recycling collection point. JB. 3287 / Made in China.
Always there to help you
 Always there to help you Register your product and get support at www.philips.com/welcome Question? Contact Philips CVR700 User manual 1 使用手冊 29 用户手册 15 Contents 1 Important 2 Safety 2 Notice 2 English
NE400 - LED MOTION LIGHT WITH VIDEO CAMERA
 USER MANUAL NE400 - LED MOTION LIGHT WITH VIDEO CAMERA Table of contents 1. Contents of package 2. NightWatcher NE400 Motion Light with Video Camera 3. Assembly 4. Installation 5. Programming your NightWatcher
VBRON TM Safety Security Fleet Management
 TM HD 2015. JULY V1.0 Safety Precautions Please Take and review some testing videos initially to make sure the images were recorded correctly. Please note that manufacturer, its subsidiaries and affiliates,
PA Series. Available in 6.0MP and 8.0MP
 Camera Quick Install Guide PA Series Available in 6.0MP and 8.0MP Thank you for purchasing a PA Series CCTV Surveillance Camera. This Quick Install Guide covers basic setup, installation and use of your
PMI Borescope Lizard 100 Series User Guide
 PMI Borescope Lizard 100 Series User Guide Thank you very much for purchasing Lizard 100 borescope. Be sure to read this Instruction manual before using, for operating it safely and correctly. Please keep
SeaViewer Cameras, Inc. DVR-SD. SD Digital Video Recorder. User s Manual
 SeaViewer Cameras, Inc. DVR-SD SD Digital Video Recorder User s Manual Please read this User s Manual carefully to ensure that you can use the device correctly and safely. The contents of this manual are
Thank you for your purchase USER MANUAL
 Thank you for your purchase USER MANUAL MANUAL ICONS Warning: situations involving injury risk of the user or other persons. Attention: situations, when damage of device or other equipment may be caused.
User's Guide. Video Borescope. Models BR200 and BR250
 User's Guide Video Borescope Models BR200 and BR250 Introduction Congratulations on your purchase of this Extech BR200 (17mm camera head) or BR250 (9mm camera head) Video Borescope. This instrument was
Mirror the world's first high-definition high-definition home security camera clock F8 HD video mirror clock F8 operating instructions
 www.1001espions.com 1 Mirror the world's first high-definition high-definition home security camera clock F8 HD video mirror clock F8 operating instructions First, Thank you for choose our products! Before
CONTENT COMPONENTS OF PROJECTOR... 2 SPECIFICATION... 3 INSTRUCTION MANUAL... 3 CHARGING THE PROJECTOR... 3 SET UP... 4
 MP50M User Manual CONTENT COMPONENTS OF PROJECTOR... 2 SPECIFICATION... 3 INSTRUCTION MANUAL... 3 CHARGING THE PROJECTOR... 3 SET UP... 4 POWERING UP AND VIEWING MEDIA... 4 ADJUSTING VOLUME... 5 ADJUSTING
User Guide. Video Borescope. Models BR200 and BR250
 User Guide Video Borescope Models BR200 and BR250 Introduction Congratulations on your purchase of this Extech BR200 (17mm camera head) or BR250 (9mm camera head) Video Borescope. This instrument was designed
Aspera R7. User Manual
 1 Aspera R7 User Manual Contents Safety Information... 3 Appearance and Key Function... 5 Introduction... 6 Call Functions... 7 Notifications Bar... 8 Contacts... 9 Messaging... 9 Bluetooth and Wi-Fi...
Split Type Mini Full HD DVR with 2.5"LCD
 Split Type Mini Full HD DVR with 2.5"LCD (the camera will be different if you choose a non-pinhole HD camera) Table of Contents Getting Started Identifying the parts of the recorder 1 Identifying the
DV 5470 User Manual Package Contents:
 DV 5470 User Manual Package Contents: Manual Camera Pouch Installation CD Earbuds AV Cable CONTENTS 1. NOTICE...2 2. SETUP...3 2.1 BATTERY INSTALLATION...3 2.2 MEMORY CARD...4 2.3 CONFIGURATION & INSTALLATION...4
Operation Manual. Table of Contents. Contents P1 Hardware Orientation P2. Setting Record Modes P4 Basic Operation P4~P11
 Operation Manual Table of Contents Contents P1 Hardware Orientation P2 Main Unit P2 Remote Control P3 Accessories P3 Setting Record Modes P4 Basic Operation P4~P11 How to turn on / off the DVR P4~P6 How
Innovative K5 Palm Size LED Projector.
 Innovative K5 Palm Size LED Projector www.innovative.com.sg 1 CONTENT COMPONENTS OF PROJECTOR... 2 SPECIFICATIONS... 3 CHARGING THE PROJECTOR... 3 SET UP... 4 POWERING UP AND VIEWING MEDIA... 4 ADJUSTING
HD Video Recorder Manual
 HD Video Recorder Manual (Ball-point pen Type) Remark: This picture only for reference 1. Structure Remark: This picture only for reference 1: operation button 2: camera 3: MIC 4: reset button 5: status
Do not open the cover! may cause electrical shock! Touch DC Convert parts
 Caution: This product is controlled microprocessor. Improper use may cause the machine stop operating. Please stop and restart themachine. If battery is not fully charged, this may cause serious system
Stonex Europe S.R.L. S3 Series Quick Start
 S3 Series Quick Start 1 S3 Series Quick Start 1. Appearance Antenna Earpiece External antenna connector Back strap screws Speaker Camera Lanyard tether point Touch panel Other function keys Power Microphone
THE 3G UMTS CAMERA MAGGIS AUTOMATIC VIDEOCALL ON ALARM TRIGGER INSTRUCTIONS FOR USE
 THE 3G UMTS CAMERA MAGGIS AUTOMATIC VIDEOCALL ON ALARM TRIGGER INSTRUCTIONS FOR USE 1 2 Index Introduction 4 Preliminary settings 6 Turning on the device 6 Inserting the USIM card 7 Installation 8 Suggestions
Available in 2.0MP, 4.0MP and 8.0MP variants
 Camera Quick Install Guide FBMINIIR Series Available in 2.0MP, 4.0MP and 8.0MP variants Thank you for purchasing a FBMINIIR Series CCTV Surveillance Camera. This Quick Install Guide covers basic setup,
<User Manual> PM-150
 PM-150 ENGLISH TABLE OF CONTENTS: PREFACE ------------------------------------------------------------ 1 DISCLAIMER ------------------------------------------------------- 1 PRECAUTIONS -----------------------------------------------------
X-Beam Waterproof Action Camera Light USER GUIDE
 X-Beam Waterproof Action Camera Light USER GUIDE EN Join the social movement and follow us on #ChallengeYourself Share your footage with us on our social media Need help? www.kaiserbaas.com/support To
CLIP ON MIRROR MONITOR
 USER MANUAL NCP-MIRDVRHD2 CLIP ON MIRROR MONITOR WITH BUILT-IN DASH CAM DVR & REAR CAMERA Caution...4 Battery warning...4 Notes on Installation...4 1 Introduction...5 1.1 Features...5 1.2 Package Contents...5
H D D A S H C A M E R A
 H D D A S H C A M E R A User Manual All trademarks are acknowledged as the property of their respective owners. Unless otherwise stated their use does not imply that the trademark owner is affiliated with
10.1 HD Memory View Instruction Manual
 10.1 HD Memory View Instruction Manual Cautions Precautions and maintenance For indoor use only To avoid risk of fire or electric shock, do not expose the unit to moisture or condensation. To avoid overheating,
Hidden Video Recording System Manual
 Hidden Video Recording System Manual Patent No. M356942 P/N: F40072B00 Thank you for purchasing our Hidden Video Recorder System. Please read this manual before installation. For customer support, please
User Guide. HAWKEYE CLASSIC VIDEO BORESCOPES (Non-Articulating) Hawkeye Classic Video Borescope. Hawkeye Classic Video Borescope - Set Up
 Hawkeye Classic Video Borescope. Hawkeye Classic Video Borescope - Set Up") User Guide Hawkeye Classic Video Borescope HAWKEYE CLASSIC VIDEO BORESCOPES (Non-Articulating) Table of Contents Set Up... Page 2 Operation.. Page 4 Troubleshooting Page 12 Specifications. Page 13 Hawkeye
User Guide Hawkeye Classic Video Borescope HAWKEYE CLASSIC VIDEO BORESCOPES (Non-Articulating) Table of Contents Set Up... Page 2 Operation.. Page 4 Troubleshooting Page 12 Specifications. Page 13 Hawkeye
Thanks for choosing 70mai dash cam. Product overview. Power key
 Thanks for choosing 70mai dash cam Equipped with a camera chip and image sensor which allows to record high-quality videos, 70mai dash cam becomes a perfect travel companion. Read this manual carefully
CONTENTS CHAPTER I: BEFORE USE I. BEFORE USE
 I. BEFORE USE Foreword 1. Features 2. Accessories 3. Product Safety Information 4. Illustrations and Functions II. FAST OPERATION 1. Startup 2. Shutdown 3. Lock 4. Reset 5. Pause 6. Music File Select 7.
UNIDEN AUTOMOTIVE VIDEO RECORDER CAM 500
 UNIDEN AUTOMOTIVE VIDEO RECORDER CAM 500 IMPORTANT SAFETY INSTRUCTIONS This product is not waterproof. Do not expose it to rain or moisture. This product is intended for use in a motor vehicle. Don t install
Operation Manual Defender Car Vision 2020 HD Car DVR
 Operation Manual Defender Car Vision 2020 HD Car DVR 1 Thank you for buying Defender Car Vision 2020 HD car DVR. Before using the device read carefully this manual. mini-usb connector HDMI connector Function
Thanks for you purchasing of this product. Please kindly read this user manual and keep it carefully for reference.
 CONTENTS Thanks for you purchasing of this product. Please kindly read this user manual and keep it carefully for reference. 01Read This First...01 Product Information...01 Standard Package Contents...02
Digital Night Vision Device Digital+ Series NV-440D3/NV-650D3/NV-760D3
 Digital Night Vision Device Digital+ Series NV-440D3/NV-650D3/NV-760D3 Instruction Manual Digital Night Vision Device Digital Series NV-440D3 / NV-650D3 / NV-760D3 Before using the device for the first
Table of Contents 1 Features and Specifications Functions Technical Specifications Appearance and Accessories
 Table of Contents 1 Features and Specifications... 2 1.1 Functions... 2 1.2 Technical Specifications... 3 2 Appearance and Accessories... 4 2.1 Appearance... 4 2.2 Accessories... 6 3 Preparations before
Do not attempt to service the unit yourself. Seek assistance from a qualified professional.
 USER S MANUAL experience originality * Swerve Bluetooth NFC speaker INTRODUCTION User's Manual Congratulations on your purchase of the new ifidelity Swerve NFC Bluetooth speaker! Please read and follow
Interactive WhiteBoard [ Conducting presentations become easier than ever ]
![Interactive WhiteBoard [ Conducting presentations become easier than ever ]](/thumbs/93/111733482.jpg "Interactive WhiteBoard [ Conducting presentations become easier than ever ]") Interactive WhiteBoard [ Conducting presentations become easier than ever ] EN Overview Introduction Interactive White Board is very easy to use. If you know how to use a computer, then you will know how
Interactive WhiteBoard [ Conducting presentations become easier than ever ] EN Overview Introduction Interactive White Board is very easy to use. If you know how to use a computer, then you will know how
Table of contents. Safety recommendations...3. Warning Notice..4
 Table of contents Safety recommendations...3 Warning Notice..4 1. Description...5 2. Preparation for use... 6 3. Menu set up...7 4. Digital Zoom......8 5. LED Adjustment......9 6. Mirror / Reflecting Object
MOBILE SAFETY DVR1543K. CLIP ON REARVIEW MIRROR KIT with 4.3-INCH LCD MONITOR FRONT & REAR CAR CAMCORDER with DUAL MOUNTING REVERSING CAMERA
 MOBILE SAFETY DVR1543K REARVIEW MIRROR CAR DRIVING RECORDER KIT CLIP ON REARVIEW MIRROR KIT with 4.3-INCH LCD MONITOR FRONT & REAR CAR CAMCORDER with DUAL MOUNTING REVERSING CAMERA 3.0 MEGA PIXEL CAMERA
PLDANDHR1056KT. Android Touchscreen Tablet Entertainment Display Bundle
 PLDANDHR1056KT Android Touchscreen Tablet Entertainment Display Bundle Dual Vehicle Headrest Mount Multimedia Systems with Bluetooth, Wi-Fi & App Download (10.5 -inch) FRONT PANEL MULTIMEDIA PLAYER 1.
Multi-functional Portable HD LCD Monitor. User Manual
 Multi-functional Portable HD LCD Monitor User Manual Product description: Multi-functional portable HD LCD monitor is a new multi-function products, adopted advanced integrated circuits, high-quality new
Tablet PA752C. User Manual
 Tablet PA752C User Manual User Manual Notice Before operating the device, please read the safety precautions and user s guide carefully to ensure safe and proper usage. The descriptions in this user s
High Definition VideoScope
 User Manual High Definition VideoScope Model HDV600 Additional User Manual Translations available at www.extech.com Introduction Congratulations on your purchase of this Extech HDV600 series Video Borescope.
INSTRUCTION MANUAL Kingfisher Micro DVR w/ Button Cam SB-MSDVR660
 INSTRUCTION MANUAL Kingfisher Micro DVR w/ Button Cam SB-MSDVR660 Revised: March 15, 2013 Thank you for purchasing from SafetyBasement.com! We appreciate your business. We made this simple manual to help
User's Manual. Car DVR Prestigio Roadrunner 520 with display
 (044)361-05-06 (067)469-02-12 (099)048-99-03 (093)672-77-76 ICQ:495-089-192 ICQ:613-211-859 User's Manual Car DVR Roadrunner 520 with display In the online store you also can buy car DVR Roadrunner 520.
Video Borescope Inspection Camera
 Owner's Manual Video Borescope Inspection Camera Model 82027 CAUTION: Read, understand and follow Safety Rules and Operating Instructions in this manual before using this product. Safety Operation Maintenance
FULL HD Vehicle Video Recorder User Manual
 FULL HD Vehicle Video Recorder 2013 JUL V1.1 Safety Precautions Please Take and review some testing videos initially to make sure the images were recorded correctly. Please note that manufacturer, its
T10 Photo Frame Camera-Black User Manual
 T10 Photo Frame Camera-Black User Manual Model No.: T10 Table of Contents Part 1 Before First Use...1-2 Part 2 Quick Guide...3 Part 3 Detailed User Manual... 4-20 Part 3 Detailed User Manual Safety Precautions...4
Tablet PC User Manual
 Tablet PC User Manual Please read all instructions carefully before use to get the most out of your Time2Touch Tablet PC. The design and features are subject to change without notice. Contents Important
Table of Contents. 3.1 Front/Rear Panel and User Interface Front Panel Rear Panel User Interface...
 General Warranty OWON warrants that the product will be free from defects in materials and workmanship for a period of 2 years (1 year for accessories) from the date of purchase of the product by the original
7 Digital Photo Frame
 7 Digital Photo Frame Instruction manual L7DPF17 12 month manufacturer's warranty -------------------------------------------------------------------------- --------------------------------------------------------------------------
Safety Information. Introduction. 1.1 Precaution before using the tester. 1.2 Precautions when using the tester
 CCTV-Test info CCTV-Test allthings.com.au Safety Information 1.1 Precaution before using the tester A. Make sure to read the user s manual before using the product. B. Make sure to check the input and
CCTV Tester. User s Manual
 CCTV Tester User s Manual Table of Contents CCTV Tester User s Manual 1, Safety Information... 2 1.1 Precaution before using the tester... 2 1.2 Precautions when using the tester... 2 1.3 Precautions for
Embedded Computer. User Manual
 Embedded Computer User Manual Safety defended: Properly maintain your system to guarantee its service life and reduce the damage risk. It should avoid the humidity and extreme temperature when using. Avoid
User manual RIDER F120 FHD
 User manual RIDER F120 FHD www.iget.eu SUPPORT: http://www.iget.eu/helpdesk Dear Users: Thank you for buying this high-resolution car DVR. This product is characterized by advanced technology, unique appearance,
Contents. Important Safety Notice. Your dash cam Introduction What's in the box
 Contents Important Safety Notice Your dash cam Introduction What's in the box Get started Install the dash cam Insert Micro SD card Turn on the dash cam Mode switch Video recording Video settings 6 6 Photo
AVerMedia. AverDiGi EH5116 PRO. Quick Installation Guide
 AVerMedia AverDiGi EH5116 PRO Quick Installation Guide i SPECIFICATIONS ARE SUBJECT TO CHANGE WITHOUT PRIOR NOTICE THE INFORMATION CONTAINED HEREIN IS TO BE CONSIDERED FOR REFERENCE ONLY WARNING TO REDUCE
Available in 2.0MP, 4.0MP, 6.0MP and 8.0MP, with 2.8mm and 3.6mm lenses.
 Camera Quick Install Guide VDMINIIRCB Series Available in 2.0MP, 4.0MP, 6.0MP and 8.0MP, with 2.8mm and 3.6mm lenses. Thank you for purchasing a VDMINIIRCB Series CCTV Surveillance Camera. This Quick Install
RF-Link 2.4GHz Digital Wireless Color Security/Baby Monitor. Model: ABM-4161 User's Manual
 RF-Link 2.4GHz Digital Wireless Color Security/Baby Monitor Model: ABM-4161 User's Manual 1 Package Content Camera x 1 Monitor x 1 Power Adapters x 2 Battery for Monitor ( 3.7V 1000mAH Li-ion ) x 1 User's