Installation and Setup of IBM Lotus Sametime From Zero to Hero The Next Generation
|
|
|
- Charlotte King
- 5 years ago
- Views:
Transcription

1 Installation and Setup of IBM Lotus Sametime From Zero to Hero The Next Generation Frank Altenburg Senior Field Support Engineer
2 Agenda Components of IBM Lotus Sametime Requirements for a IBM Lotus Sametime Deployment Architecture of a IBM Lotus Sametime pilot deployment The 21 steps to a IBM Lotus Sametime pilot deployment 2
3 The IBM Lotus Sametime Components we will cover Sametime System Console Sametime Community Server Sametime Proxy Server Sametime Meeting Server Sametime Media Manager Sametime Connect Client 3


4 IBM Lotus Sametime System Level Architecture Sametime Clients HTTP HTTP VP SIP, RTP SIP, RTP Meeting Server VP Community Server VP Advanced Server VP Media Manager Unified Telephony VP VP SIP SIP, TCSPI Partner A/V Bridges Sametime Proxy Sametime Gateway HTTP Logical servers shown may be combined physically depending on user workload Enterprise Phone System Embedded Applications, including Web Client, Portal, and Mobile SIP, XMPP External IM Communities
5 IBM Lotus Sametime System Console Manage prerequisites. Centralize configuration. Setup & testing of things like LDAP centralized in a single location, instead of various wizards in different installers Facilitate deployment planning. Mechanism to plan the Sametime server deployment Installation of server nodes is simpler, as the shared configuration already exists. Server installers are headless, and need no input from user Single point of action for administrative tasks Example: Policies are managed from a single place for all components Sametime System Console Sametime Presence/IM Sametime Classic Meetings LDAP Sametime New Meetings Sametime Media Server Sametime Proxy Sametime Gateway WebSphere No install/reinstall of IBM DB2 (for example) for each separate offering Domino System console manages all needed info for prerequisite components DB2
6 Agenda Components of IBM Lotus Sametime Requirements for a IBM Lotus Sametime Deployment Architecture of a IBM Lotus Sametime pilot deployment The 21 steps to a IBM Lotus Sametime pilot deployment 6
7 IBM Lotus Sametime 8.5 Prerequisites IBM Lotus Sametime System Console Server requires IBM Lotus Sametime Sametime Community Server requires IBM WebSphere Application Server x (provided automatically via Install) IBM Lotus Sametime Community Server (Version >= 7.5.1) IBM Lotus Sametime Meeting Server requires IBM Lotus Domino 8.0.x or 8.5 or (32 Bit Version only) LDAP directory server IBM Lotus Sametime Proxy Server requires IBM WebSphere Application Server x (provided automatically via Install) IBM DB2 9.5 FP1 (provided automatically via Install) LDAP directory server (Supported IBM Lotus Domino Directory LDAP, Microsoft Active Directory, IBM Tivoli Directory Server, SunOne iplanet, Novell edirectory ) IBM WebSphere Application Server x (provided automatically via Install) IBM DB2 9.5 FP1 (provided automatically via Install) LDAP directory server IBM Lotus Sametime Media Manager requires IBM WebSphere Application Server x (provided automatically via Install) IBM Lotus Sametime Community Server LDAP directory server
8 IBM Lotus Sametime Prerequisites, continued Compared with the first version of this document installing Sametime 8.5, we have now changed the recommendation for a pilot deployment. The reason for the change is a increased experience and many successful installations using this method in the last 6 month. Servers required (for a this pilot deployment) 1 server for the IBM DB2 Server, IBM Lotus Sametime System Console, IBM Lotus Sametime Meeting Server 1 server for Sametime Community Server 1 Server for Sametime Proxy Server and Sametime Media Manager Various client endpoints
9 IBM Lotus Sametime 8.5 Prerequisites, continued Software requirements Client Windows XP (SP2), Vista and Windows 7 32 and 64 bit (Sametime Connect or Notes upgrade) Server Windows Server 2003/ and 64 bit (Do not use the R2 Version) Linux (RHEL, SLES) - 32 and 64 bit AIX 5.3/6.1 i5/os 5.4, 6.1 Solaris 10 ESX 4.0 is now supported Browsers Microsoft Internet Explorer 6.x, 7.x, 8.0 (Windows) Firefox 2.x and 3.0.x (Windows, Mac, Linux) Safari 3.2 and 4.0.x (Mac) Other Domino 8.0 /8.5/8.5.1 for Community Server / 'Classic' meetings Websphere Application Server 7 for new servers and gateway (included) DB2 9.5 for new servers and gateway (included)
10 Other requirements: Make sure that all servers you want to use can be resolved in DNS. If DNS is not available then list all full qualified server names and IP addresses from all servers in the hosts File and publish this file to all servers. The machine hosting the Media Server does not work with a DNS Alias. You must configure the full qualified host name (including domain part) and use this for the installation. If you use Windows 2008 as Operating System, then you need to start all installations and configurations in Administrative mode. You need a LDAP Server hosting your user base. This can be a Domino LDAP or Microsoft Active Directory or any other supported V3 LDAP.
11 Required files for a deployment on Windows: For a Windows installation you need to download these files from Passport Advantage: CZLF6ML.zip CZIH7ML.zip CZIG0ML.zip CZIG9ML.zip CZIG3ML.zip CZIH5ML.zip DB2 9.5 FP1 Limited Use for Sametime Sametime System Console Sametime Community Server Standard Sametime Proxy Server Sametime Meeting Server Sametime Media Manager CZII3ML.zip Sametime Connect Client Standard Create a directory, for example C:\Install, on the servers where you want to install. Then unpack the downloaded files into this directory. Just unpack the files required for your deployment architecture on the particular server.
12 Agenda Components of IBM Lotus Sametime Requirements for a IBM Lotus Sametime Deployment Architecture of a IBM Lotus Sametime pilot deployment The 21 steps to a IBM Lotus Sametime pilot deployment 12
13 Different ways to a pilot deployment The Install Guide ( recommended small pilot deployment ) describes to distribute the Domino and non Domino based services on different servers. You can also install all components on separate servers. This is more for production environments or bigger pilots. You can use any mix between these two previous methods. In this example we will install on 3 servers: Server1: DB2 Server, Sametime System Console, Sametime Meeting Server Server2: Sametime Community Server Server3: Sametime Proxy Server, Sametime Media Manager An existing LDAP Server (we use AD in this example) Our reason for this scenario: No need for special IP configuration Works well with 32Bit OS using up to 4GB RAM Easiest and fastest way to have all components up and running with the smallest number of required boxes This script works well for all ways. 13


14 IBM Lotus Sametime 8.5 our deployment Active Directory LDAP ldap.renovations.com DB2 9.5 Server Sametime System Console Sametime Media Manager Sametime Community Server chat.renovations.com Sametime Proxy Server Sametime Meeting Server proxy.renovations.com meeting.renovations.com
15 Hardware required for this Pilot Example Deployment 1 server for the IBM DB2 Server, IBM Lotus Sametime System Console, IBM Lotus Sametime Meeting Server Dual CPU, 4GB RAM or more, 50GB disk space or more 1 server for Sametime Community Server Single CPU, 2GB RAM or more, 10GB disk space or more 1 Server for Sametime Proxy Server and Sametime Media Manager Dual CPU, 4GB RAM or more, 20GB disk space or more Various client endpoints With this pilot you can host up to 800 concurrent Meeting Participants concurrent Sametime Clients 300 concurrent Media Streams 5000 concurrent Proxy web client users
16 Agenda Components of IBM Lotus Sametime Requirements for a IBM Lotus Sametime Deployment Architecture of a IBM Lotus Sametime pilot deployment The 21 steps to a IBM Lotus Sametime pilot deployment 16
17 The 21 steps to deploy a complete Sametime environment 1.Set up or use an existing LDAP server 2.Install the IBM DB2 Server 3.Create the IBM Lotus Sametime System Console database 4.Install the IBM Lotus Sametime System Console 5.Log in to the IBM Lotus Sametime System Console 6.Configure the LDAP server connection Prerequisite 7.Run the guided activity to configure the IBM Lotus Sametime Community Server installation 8.Install the IBM Lotus Sametime Community Server
18 The 21 steps to implement a complete Sametime 8.5 environment (continued) 9. Enable trust between the IBM Lotus Sametime Community Server and the IBM Lotus Sametime Proxy Server 10.Run the guided activity to configure the IBM Lotus Sametime Proxy Server installation 11.Install the IBM Lotus Sametime Proxy Server 12.Create the IBM Lotus Sametime Meeting Server database 13.Configure the DB2 Meeting server database connection Prerequisite 14.Run the guided activity to configure the IBM Lotus Sametime Meeting Server installation 15.Install the IBM Lotus Sametime Meeting Server
19 The 21 steps to implement a complete Sametime 8.5 environment (continued) 16.Enable trust between the IBM Lotus Sametime Community Server and the IBM Lotus Sametime Media Manager 17.Run the guided activity to prepare the IBM Lotus Sametime Media Manager installation 18.Install the IBM Lotus Sametime Media Manager 19.Install a IBM Lotus Sametime Connect client 20.Configure the Meeting Plug-In on the IBM Lotus Sametime Connect client 21.Configure the Sametime Meeting Room in the IBM Lotus Sametime Connect Client Meeting Plug-In to use Audio and Video
20 STEP ONE: Setup an LDAP Server Summary This step installs or identifies the LDAP server containing the User directory you want to use for your Sametime implementation.
21 The LDAP Server In most environments a LDAP server is already present. If you use Domino it is simple to just enable LDAP on one of the Domino Directory Servers. If you use an existing LDAP Server other then Domino, it is important to use a V3 compliant LDAP. Make sure you have all relevant data from the LDAP system. (use ldapsearch, Apache LDAP studio or another LDAP browser to get the relevant LDAP information - an LDIF extract of a user and a group) A security related recommendation is to have a Bind DN. This means a user record in the LDAP that can be used for authenticated access to the data in the LDAP server. We use the LDAP Bind user in this example. The LDAP connection can be configured with SSL encryption. Make sure that your have access to the required certificate.

22 In this example we use an existing Microsoft Active Directory 2003 server. If you plan to use other LDAP servers then step 6 can be different, dependent on the used LDAP directory. See the Sametime InfoCenter for more details.

23 An example for the LDAPSEARCH command to an Active Directory and the results:
24 STEP TWO: Install the IBM DB2 Server Summary This step installs the IBM DB2 9.5 Server. We like to use a CMD command line window to enter some of the commands and start the installers. For that we have created a short cut in our fast start section. You can use the Windows Explorer as well to navigate to the destination directory and double click the installation file (lanuchpad.exe) The two steps to create a DB2 database need the database name as a command line parameter. We would recommend using a CMD command line window to enter this commands.

25 Enter the command cd \Install\SametimeDB2 and press the Enter key. Enter the command Launchpad and press the Enter key.
26 Just click the Install IBM DB2 link.
27 And again click the Install IBM DB2 link.
28 The Installation Manager is starting up
29 Click the Next button to continue.

30 Accept the terms in the license agreement and click the Next button to continue
31 Remove Program Files\ and click the Next button to continue Using the Windows standard path can cause problems during installation and deployment. Reason is the blank character in some directory names like in Program Files. Blanks and special characters are not supported for the installation of WebSphere Application Server and the Sametime components! Also long path names should be avoided as there are usually limitations of 80 characters for the WebSphere profiles path.
32 Click the Install button to install the Installation Manager.

33 The installation Manager is now installing
34 Click the Restart Installation Manager button to continue.
35 Installation Manager is re-launching. Now click the Install icon to continue.
36 Select DB2 Version and click the Next button to continue.

37 Accept the terms in the license agreement and click the Next button to continue.
38 Remove Program Files\ and click the Next button to continue. Using the Windows standard path can cause problems during installation and deployment. Reason is the blank character in some directory names like in Program Files. Blanks and special characters are not supported for the installation of WebSphere Application Server and the Sametime components! Also long path names should be avoided as there are usually limitations of 80 characters for the WebSphere profiles path.

39 Again remove Program Files\ and click the Next button to continue.
40 Click the Next button to continue.
41 Enter the DB2 Administrator Username (we use the default db2admin ) and enter the DB2 Administrator Password twice. Then click the Next button to continue If you use Windows 2008, be sure to enter a password that meets the password policy. The DB2 Admin User password should not be longer then 8 characters. Change the local security policy to allow passwords with 8 characters length. This db2admin user will be created as a local user or as a Active Directory User. This can not be done if the user already exists. Same with the 2 groups that the DB2 Installer adds.
42 Click the Install button to install the DB2 Server
43 The Installation Manager installs the IBM DB2 Server now. This step takes approximately 10 to 15 minutes.
44 Important to know Your DB2 Database Server is a sensitive component in your Sametime Environment. It stores all the predefined configuration data and holds the information how to communicate with your servers for administration and maintenance. We highly recommend to make regularly a backup of your DB2 database using a DB2 aware backup software, or export data and backup the exported data. It is possible to implement your DB2 Server for high availability and load balancing using DB2 methods. For more information check into the DB2 InfoCenter, or download and read the RedBook High Availability and Disaster Recovery Options for DB2 on Linux, UNIX, and Windows
45 When the installation has finished successfully, click the Finish button and then close the Installation Manager and the Launchpad.
46 STEP THREE: Create a DB2 Database for the Sametime System Console Summary This step creates the Sametime System Console Database on the DB2 Server. If you want to use a dedicated DB2 server or if you already have a DB2 9.5 Server environment available, you can find the Database creation scripts in the DB2 installation package or in the particular installer directory of the Sametime System Console and the Sametime Meeting Server. Use the existing CMD command line or open a new one.
47 Enter the command cd c:\install\sametimedb2.
48 Enter the command createscdb.bat STSC. The name of the database should not be the name of the Sametime System Console Server. If your SSC is named stsc.renovations.com then you can not name the database STSC. Then you need to use another name for example STSCDB. In this example we use meeting.renovations.com. So we dont have any issue with the Database Name STSC.

49 The DB2 database is now created and confgured. Be sure that you see The SQL command completed successfully. response after every command. If you don't see this responses or get an error message, be sure that your DB2 server is up and running (listening on Port or ) and you are authenticated with the correct user and password.
50 STEP FOUR: Install the IBM Lotus Sametime System Console Server Summary This step installs the Sametime System Console Server.

51 Navigate to the C:\Install\SametimeSystemConsole directory and enter the command Launchpad

52 The Sametime Launchpad opens. Click the Install IBM Lotus Sametime System Console link on the left side.
53 Now click the link Launch IBM Lotus Sametime System Console Installation
54 The Installation Manager is now loading.

55 Click the Install icon to start the installation.
56 Select IBM Sametime System Console server and Version Then click the Next button to continue.

57 Accept the terms in the license agreement and click the Next button to continue.
58 Enter the correct path (remove Program Files\ and click the Next button to continue. The Package group is the installation destination for the IBM Lotus WebSphere base files. The first installation requires the creation of a new package group. If you install more WebSphere based applications on the same hardware (like the Sametime Proxy Server and the Sametime Meeting Server) they can use the existing package group. Then you cannot change the installation path.
59 Click the Next button to continue.

60 In this screen you define the WebSphere Application Server administrative user. You need to authenticate with this user to access the Sametime System Console. It is important that this user does not exist in your LDAP. In this example we use the standard wasadmin. Enter the password twice and click the Next button to continue.

61 Enter the host name of your DB2 server and the DB2 Administrator password. In this example we have installed the DB2 server on the meeting.renovations.com server. Then click the Validate button to continue.
62 If the DB2 connection was successful, then you should see that the text in the button has changed to Validated. Now click the Next button to continue.
63 Click the Install button to install the Sametime System Console Server.
64 The Installation Manager now installs the Sametime System Console. This step can take approximately 30 to 45 Minutes.
65 Important to know... If you plan to use the IBM Lotus Sametime System Console, you should install this part first. But it is possible to add an already installed Sametime Server to the System Console for managing and administration. This can be done with every new Sametime component. By the way, if you lose your already installed System Console server, you can revert it back by installing a new one and add the already installed Sametime components to it using post install registration utilities. (Can be found in <product install root>/console directory) Be sure to make a backup of all related data and files (DB2 and WebSphere) because it is much faster to restore a backup if a failure occurs. You will see that it is worth to learn about the Sametime System Console and use it very soon!
66 The Sametime System Console server has installed successfully. Click the Finish button and close the Installation Manager and the Launchpad.
67 STEP FIVE: Log in to the IBM Lotus Sametime System Console Server Summary Start your preferred Browser, enter the System Console URL and log in. In this example we use the Internet Explorer.

68 Enter the URL The WebSphere Application Server Administrative interface ( the Integrated Solutions Console ISC) is always secured by SSL. Therefore you will be redirected to HTTPS and the port 8701 automatically. You are prompted to accept the default certificate. For different browsers the procedure to accept this IBM signed certificate is different. You can use the direct URL:

69 The IBM signed certificate is not trusted by the browser. Click the Yes button to accept the certificate. (this dialog is different using other browsers)

70 Enter the WebSphere Application Server Administrative User name and its password. We use wasadmin. Then click the Log in button to continue.

71 You have now reached the IBM Lotus Sametime System Console. Next step is to configure the LDAP connectivity.

72 STEP SIX: Configure the Connect to LDAP Server Prerequisite. Summary In this step you configure the LDAP connectivity in the Sametime System Console. This is used for the Sametime Community Server installation as well as in the Sametime Meeting Server and Media Manager installation. You can change this LDAP connectivity later. But this will not apply to any Deployment Plan or to any already installed server. Any changes needs to be done in the servers configuration directly. (Community, Meeting, Media) This is only for the first installation of the servers before creating the Deployment Plan. Click the Sametime System Console link.

73 Now click the Sametime Prerequisites link. Next click the Connect to LDAP Servers link.

74 On any Sametime System Console Screen you can find additional information on the middle part of the page. There are Links to the official Sametime InfoCenter for the particular step you want to do next.

75 To connect to an LDAP server click the Add button to continue.
76 Configure the LDAP connectivity information on this screen. - The Deployment Name can be anything describing this LDAP connection. - The Host name should be the Full Qualified Host name. The Port depends on the LDAP. - An MS AD LDAP Server normally uses the Port Other LDAP Systems use the Port Do not use the secure connection unless you have imported the certificate from the LDAP server. - The Bind Distinguished Name should be the full qualified Distinguished Name (DN) of the Bind user. - Be sure to enable the checkbox Is used by the System Console. This is required that you can assign users and groups to policies later on. Click the Next button to continue.
77 The system now connects to the LDAP server, authenticates and requests the LDAP parameters. It detects the possible Base DN's and the Directory type. Select the right Base DN on this screen. Check the Configure advanced LDAP settings checkbox to see more LDAP parameters. Click the Next button to continue.
78 If you use Domino LDAP then this step is a little different. Note: A dropdown list typically displays from which you select a base DN that is detected by the guided activity; however, the list does not display when Domino LDAP is being used. Additionally, Domino LDAP is the only LDAP that uses a blank base DN, while WebSphere requires a base DN for federating repositories. Since WebSphere does not let you federate an LDAP directory with an empty base DN, it sets the base DN to C=US. The LDAP repositories are listed by base DN after they are federated. Failure to specify a base distinguished name will prevent authenticated users from creating and attending meetings on the Lotus Sametime Meeting Server.
79 Important to know: Because WebSphere requires a Base DN, your Sametime Community Server will be configured with a Base DN as well. This is done in the Directory Assistance (DA.NSF) and the LDAP Document in the STCONFIG.NSF database. In some situations (specially if you have multiple directories with different Organizations in your LDAP) it is required to empty this BaseDN field in the DA.NSF and STCONFIG.NSF databases. Specially the BaseDN for Groups has to be removed. I assume you have not created your groups with a /renovations at the end. This is the marker for the O=renovations Base DN. And only then the groups can be found. So remove the Base DN in the Domino based Sametime Community Server is useful in most cases. But for the WebSphere Servers connecting to the Domino LDAP (Sametime System Console, Sametime Meeting Server and Sametime Media Manager) you need to do additional configuration steps if you have multiple directories in your Domino LDAP server. For example if the users in the first directory are registered with the certifier O=renovations and in the second directory with the certifier O=IBM, then you need to add a federated repository in the Integrated Solutions Console, configure the O=IBM setting in both fields and select the same LDAP server repository.
80 Click the Next button to continue. The Home Sametime Server field has to be filled only if you have a Sametime Community Cluster or more then one Sametime Community Server in your community.
81 Click the Next button to continue.
82 Click the Finish button to save the settings and configure the LDAP connection in the Symetime System Console Server.

83 The LDAP connection is now successfully created and the Sametime System Console server configured. This is a mayor security configuration change that requires a WebSphere server restart.

84 To restart the server it is easiest to create 2 batch files for stopping and starting all services. But first logout of the system console and close the browser. Just click the Logout Link.


85 To create the batch files just right click on the Desktop and select New and then Text Document. Then name it stop servers.bat and confirm with the Yes button. Now edit the batch file by right clicking the icon and select the Edit entry.


86 Enter this series of commands into the file. Then save and close it. Now create a second text file, name it start servers.bat and fill it with this series of commands. Then save and close it.
 and the password. Then click the OK button. Don't wait too long otherwise the server will not stop. This window appears 3 times.")
87 Now double click the stop servers.bat icon. A Command Line Box appears showing some messages. And a authentication window appears. Enter the WebSphere username (in this example we use wasadmin ) and the password. Then click the OK button. Don't wait too long otherwise the server will not stop. This window appears 3 times. Stopping all servers takes approximately 2 minutes. When all servers are stopped then restart all servers by clicking the start servers.bat icon. Starting all servers takes approximately 3 minutes.


88 To prevent these authentication pop-up windows when stopping the servers, you can navigate to the properties directory of the profiles and configure the WAS Admin username and password. and
89 Edit the file soap.client.props in both directories and add your WebSphere Administrative username and password. There is a way do encrypt this password later. Contact the InfoCenter for more information how to do this.
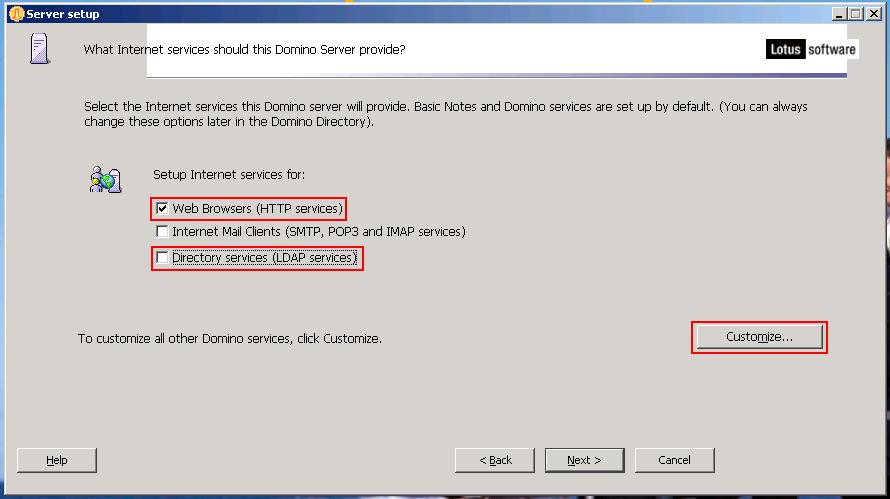
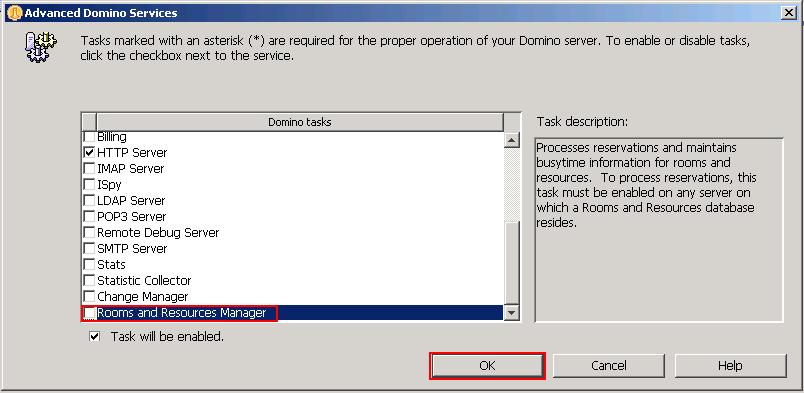
90 STEP SEVEN: Run the Guided Activity to configure the IBM Lotus Sametime Community Server installation Summary This guided activity takes you through the steps of creating a deployment plan, which collects information that pre-populates installation screens. We suppose you have your own Lotus Domino Server on that you want to install your Sametime Community Server. It is recommended to not implement this server in your existing Lotus Domino domain. Using a separate Domino Domain gives you independency. You can easily configure your server with LDAP authentication and you are version free. Do not install unwanted installation options like DOLS, DECS, RNRMGR or LDAP. But it is important to enable the HTTP task for the next installation step. In this example we have installed a Domino Server with FP3 level.

91 Some slides with my best practices installing a Domino Server hosting a Sametime Community Server.

92

93
94 Important to know: Configure your Domino Server hosting the Sametime Community Server in a separate Domain. Do not implement this server in your existing Mail Domain. You are version independent and can use another domino version then in your Mail Domain You are independent in the Directory Design and can use a standard design or a newer design Your Domino Directory is empty it does not contain any users. Makes it easier to implement LDAP Add all your collaboration servers (Sametime and/or QuickR) into this Domain You can use an existing certifier from your production mail domain to register the server ID. Then you don't need cross certification, can access the server from your Admin Client and Notes Client SSO to Sametime works without any additional configuration You can copy an existing SSO LtpaToken Document from your Production Domain to your Collaboration Domain. Add the Sametime Server(s) first and then copy the document.
95

96
97
98
.")
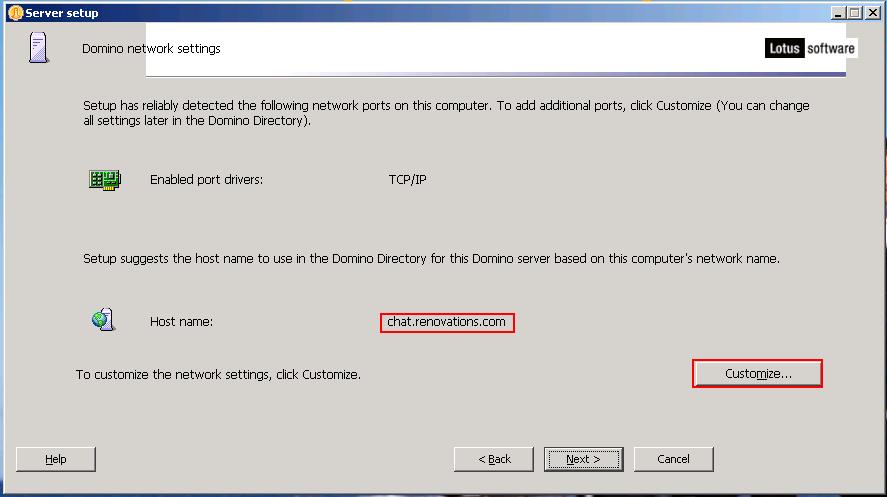
99 Be sure that the full qualified host name is listed in both fields (see below). If not, just edit the field.

100 Be sure that your Domino Server is up and running and the HTTP Task is started.

101 Start your Browser now and connect to the Sametime System Console and login as described in Step 5. Now click on Sametime System Console and then Guided Activities.

102 Click the Install Sametime Community Server link.

103 Confirm that Create a New Deployment Plan is checked and click the Next button.

104 Enter a name for your Community Server Deployment Plan. In this example we just name it Chat Server. Then click the Next button to continue.

105 We want to install the Product Version Leave it as it is and just click the Next button.
106 Enter the Host name of your running Domino Server. The port should only be changed if your Domino HTTP task listens on another port. Enter the Domino Administrators User ID and the password. In this example we use Domino Admin. Click the Next button to continue.
107 On Windows it is standard to use the local Sametime Server for Slide Conversion. But it is possible that you have a stand alone Slide Conversion server running. Then you can fill this settings. In this example we just click the Next button to continue.
108 Select the LDAP you want to use for the Sametime Community Server. In this example we use the Renovations AD LDAP. (it is the only one we have). Then click the Next button to continue.

109 HTTP Tunneling is required if your Sametime Clients need to connect to your Sametime Server through a Web Proxy or Reverse Proxy Server. But then performance can be slower. Only enable HTTP tunneling when urgently required. Then click the Next button to continue.
110 Confirm all settings and then click the Finish button.

111 You have now successfully created a deployment plan for your Sametime Community Server. The next step is to install the Sametime Community Server.

112 STEP EIGHT: Install the IBM Lotus Sametime Community Server Summary In this step you install the IBM Lotus Sametime Community Server using the Sametime System Console. Before you can start the installation you need to quit the Lotus Domino Server first. Enter the quit command in the Lotus Domino Console and wait until the console disappears.
113 When the Domino Console has disappeared you can open a new CMD line window and navigate to the installation directory. In this example we use: cd C:\Install\SametimeStandardServer\Server. Then enter the command to start the installer setupwin32.exe


114 The Lotus Install Shield Wizard is starting up. Confirm the English language or select your preferred language for the installer. Then click the OK button.

115 Click the Next button to continue.

116 Accept the terms in the license agreement anc click the Next button.

117 We want to install the Sametime Community Server using the predefined Deployment Plan in the Sametime System Console. To go this way just accept the default Yes answer and click the Next button.
 Port 9080 would be in use for unencrypted communication. The WebSphere Administrative User and password is required.")
118 Enter the Host name of the Sametime System Console. In this example we use meeting.renovations.com because we have installed the SSC on this host. The default port for communication is 9443 (using SSL encryption) Port 9080 would be in use for unencrypted communication. The WebSphere Administrative User and password is required. We use our standard user name wasadmin. The last field is the local host name where you want to install your Sametime Community Server. By default it just displays the host name. Add the domain to get the full qualified hostname in the field. We use chat.renovations.com. Then click the Next button.

119 Select the Deployment plan that you have created for your Community Server. We use the Chat Server plan. Then click the Next button.

120 Crosscheck that all settings are correct. Then click the Install button.

121 The Install Shield Wizzard is now installing the Lotus Sametime Community Server on top of your existing Domino Server installation using the predefined Settings from the Deployment Plan in the Sametime System Console. This step takes approximately 2 3 Minutes.
122 Important to know: The Sametime Community Server Deployment Plan Guided Activity checks the existence of the Domino Administrator user ID and that this user can authenticate with its HTTP password. Therefore it is required to install the Domino Server before the Sametime Community Server Deployment Plan is created. Later it is possible to change this credentials if the Domino Administrator user changes. This can be done in the Sametime System Console.
123 Important to know: The Sametime Community Server reads the policy configuration from the Sametime System Console during startup and then every hour. (This can be configured) The first startup of the Sametime Community Servers requires the SSC to get the Policy configuration. Then it caches this data in the local policies.user.xml file. This can be found in the Domino program directory. This means the Sametime Community Server can start and run even if the SSC is not available.

124 When the installation was successfully click the Finish button.
125 Now you can start the Lotus Sametime Server by double click the Domino Server icon on the desktop. If you have configured to start the Domino Server as a service you can start the Service as well or restart the OS. Then the service should start up automatically.


126 Confirm that all Sametime related Services (HTTP JVM and Sametime Services) start up correctly. A full start of a Sametime Server with all tasks can take up to 5 Minutes. You can check the Task Manager and there the Processes view to check that all 41 Tasks starting with the letters ST... are started.
127 STEP NINE: Enable Trust between the Sametime Community Server, the Sametime Proxy Server and the Sametime Media Manager. Summary In this step you configure the Sametime Community Server to trust the Sametime proxy Server and the Sametime Media Manager. The Sametime Proxy Server and Media Manager need to connect to the Sametime Community Server on the Virtual Places (VP) Server Port 1516 to the Sametime Community Server. Normally a Sametime Community Server only allows this connection if the connecting server is known (another Sametime Server in the same Community) or is trusted in the Trusted IP's field in the configuration database. Other Servers you need to trust can be Blackberry Servers, the Sametime Gateway, Sametime Advanced Server, SUT Server, WebSphere Proxy Server or other servers who want to connect using the VP Server protocoll.

128 Open the Sametime System Console, Log in and navigate to the Sametime Community Server by clicking on Sametime System Console then Sametime Servers and then Sametime Community Servers.

129 Click the link to your Community Server. We click on Chat Server because this is our name for the Community Server Deployment Plan. The Edit link allows you to change the authentication credentials to the Sametime Community Server (Domino Administrator Username, Password and Port)
130 The Sametime Community Server configuration screen appears. Go to the bottom of the screen to find the Trusted Servers Setting.


131 Enter the IP address of the Server you want to allow connecting to the Sametime Community Server. In this example we use the IP Because we want to install the proxy Server and the Sametime Media Manager on the same box, sharing the same IP address, we need to enter only one IP here. Now click the OK button to save the changes to the Community Server configuration.
132 The Sametime Community Server requires a Server restart for most of the configuration changes. Now restart the Sametime Community Server by entering the command restart server in the Domino Console window. Never use this command in a production Sametime server because it can happen that not all Sametime tasks are stopped before the domino server restarts. This can cause massive problems for starting the Sametime Services. It takes up to 5 Minutes until the Sametime Community Server is completely restarted and all 41 Sametime tasks are again active.

133 STEP Ten: Run the guided activity to configure the IBM Lotus Sametime Proxy Server deployment plan Summary Use the Lotus Sametime System Console to prepare to install a Lotus Sametime Proxy Server by pre-populating values required for installation. In the Sametime System Console click on Sametime System Console, then on Sametime Guided Activities and then click Install Sametime Proxy Server.

134 Confirm that Create a New Deployment Plan is checked and click the Next button.
135 Enter a name for your Proxy Server Deployment Plan. In this example we just name it Proxy Server. Then click the Next button to continue.
136 We want to install the actual version just click the Next button to continue.

137 Select the Community Server you want your Proxy Server to connect to. You need to connect only to one Community Server. The Proxy Server gets information about other Servers in the community and connects to this servers automatic. (Don't forget to enable trust on the other servers as well) In this example we just select the Chat Server. Then click Next to continue.
138 The default setting is Cell Profile that we use this example. If you plan to implement the Sametime Proxy Server in a clustered environment, then select Network Deployment and one of the components. Note that it is not possible to implement a Cell Profile and a Network Deployment on the same box. Click Next to continue.

139 Enter the full qualified host name of your proxy server. In this example we use proxy.renovations.com. Enter a WebSphere administrative user name and its password twice. We just use the standard wasadmin name. Click the Next button to continue.
140 Control your settings and if all is correct click the Finish button to save the new deployment plan.
141 STEP ELEVEN: Install the IBM Lotus Sametime Proxy Server using the predefined Deployment Plan Summary This step installs the Sametime Proxy Server using the pre-defined Deployment plan in the Sametime System Console.
142 Navigate to the Installation Directory and start the launchpad installer. We use a Windows CMD command window and enter the commands: cd \Install\SametimeProxyServer and just launchpad
143 The Sametime Proxy Launchpad Installer is loading. Click the link Install IBM Lotus Sametime Proxy Server
144 Now click the link Launch IBM Lotus Sametime proxy Server Installation

145 The IBM Installation Manager is loading.
146 Click Next to continue.

147 Accept the terms in the license agreement and click the Next button.
148 Remove the Program Files\ part in the path and click the Next button.
149 Click the Install button to start the Install Manager installation.

150 The Installation Manager is now installing. This process takes approximately 20 seconds.
151 When the Installation Manager has been installed successfully, click the Restart Installation Manager button.
152 To Install the Sametime Proxy Server click the Install icon.
153 Check the IBM Sametime Proxy server and Version entries. They are unchecked by default. Then click the Next button.

154 Accept the terms in the license agreement and click the Next button.
155 Remove again the Program Files\ part in the path and click the Next button.
156 Once more remove the Program Files\ part in the path and click the Next button.
157 We want to use the predefined Deployment Plan from the Sametime System console. Just click the Next button to continue.
158 Enter the Sametime System Console Server information and credentials to authenticate. In our example we use meeting.renovations.com as SSC Server name and wasadmin as the WebSphere Administrative User name. The last field is the host name where we want to install the Sametime Proxy Server. Here we use proxy.renovations.com. Then click the Validate button to check the connection to the System Console Server.
159 The connection to the Sametime System Console was successful when the button text Validate changes to Validated. Click the Next button to continue.
160 Select your Sametime Proxy Server Deployment plan that you have created in the previous step. We use our Proxy Server. Then click the Next button to continue.
161 Control your settings again and then click the Next button to continue.

162 Start the installation by clicking the Install button.
163 The Sametime Proxy Server is now installing. This step takes approximately 30 to 45 minutes if installing as first WebSphere instance on a Server. If you install the proxy Server as second Sametime Component on top of another Sametime Server (SSC or Media Manager) it takes only 10 to 15 minutes because the WebSphere binaries are already installed.
164 Important to know: The Sametime Proxy Server: does not need a Database does not need a LDAP connection is just a Web Interface for browser access to the Sametime Community Services Web based Sametime Connect Client supplies the new Web API for Web based application integration can be implemented with or without the SSC can be connected to existing older Sametime Servers can be connected to a community cluster You can have one or more Proxies in your organization You can implement one or more Proxies and cluster them using the WebSphere Cluster Method (Network Deployment) individual Proxies with a Load Balancer or RRDNS in front of them By default the Sametime Proxy Server installs to use Port 9080 and 9443 (SSL). If you want to use Port 80 and 443 you need to enter the Sametime Proxy ISC on Port 8600 and change the port settings in the Application Server. Do this change when the installation has finished successfully.
165 When the Sametime Proxy Server has installed successfully just click the Finish button and exit the Installation Manager and Launchpad. To configure your Start and Stop batches proceed the same way as on Page 85 and following (end of step 6) when the installation has finished successfully.

166 To test your Sametime Proxy Server installation and the connection to your Sametime Community Server, open a Browser window and navigate to the URL: You should see this page: Now click the Launch Sametime button.


167 Enter the user name and password of any user in the directory and click the Log In button. You are authenticated to the Sametime Community Server and see your (new) buddy list.
168 STEP TWELVE: Create the IBM Lotus Sametime Meeting Server database Summary In this step you create the second DB2 Database that is required for the Sametime Meeting Server.
169 In a CMD command line window navigate to the Sametime Meeting Server installation directory. We use the cd \Install\SametimeMeetingServer command. Then enter the command to create the Meeting Database. We use the Database name STMS and enter the command: createmeetingdb.bat STMS The name of the database should not be the name of the Sametime Meeting Server. If your Meeting Server is named stms.renovations.com then you can not name the database STMS. Then you need to use another name for example STMSDB. In this example we use meeting.renovations.com. So we dont have any issue with the Database Name STMS.

170 The Database creation takes approximately 2 3 minutes. You should confirm that the database is created and configured successfully. Check that you find the message The SQL command completed successfully after every command.
171 STEP THIRTEEN: Configure the Connect to DB2 Database for the Sametime Meeting Server Database Summary In this step you configure the connection to the Sametime Meeting Server Database on your DB2 Server.

172 In your Sametime System Console click on Sametime System Console then Sametime Prerequisites and then Connect to DB2 Database.

173 Click the Add button.
174 Fill the form with your DB2 Servers host name, the name of the Database you created in the previous step and the DB2 Administrator credentials. In this example we use meeting.renovations.com for the DB2 Server host name, STMS for the Database Name and db2admin for the DB2 administrative user name. In some installations the access port can be or different. Then click the Finish button to save your settings.

175 You have now created successfully your DB2 Database connection for the Sametime Meeting Server database. The next step is to create a deployment plan for your Sametime Meeting Server.
176 STEP FOURTEEN: Run the guided activity to configure the IBM Lotus Sametime Meeting Server deployment plan Summary This step is to preconfigure the settings for the Sametime Meeting Server installation.

177 In your Sametime System Console click on Sametime System Console then Sametime Guided Activities and then on Install Sametime Meeting Server.

178 Use the first entry Create a New Deployment Plan and click the Next button.
179 Enter a name for your Meeting Server Deployment Plan. In this example we use Meeting Server. Then click the Next button to continue.
180 We want to install the product version Click the Next button to continue.
181 Leave the default Cell Profile checked and click the Next button to continue.
182 Enter the full qualified host name of your Sametime Meeting Server. In this example we use meeting.renovations.com. Enter a WebSphere administrative user name and its password twice. We just use the standard wasadmin name. Click the Next button to continue.


183 Select your Sametime Meeting Server Database connection and click the Next button. Select your LDAP connection and click the Next button.
184 Check your settings and then click the Finish button to save the new Deployment Plan.

185 You have now successfully created a Deployment Plan for the Sametime Meeting Server installation. The next step is to install the Sametime Meeting Server.
186 STEP FIVTEEN: Install the IBM Lotus Sametime Meeting Server Summary In this step you install the Sametime Meeting Server using the preconfigured settings in the deployment plan on the Sametime System Console.
187 In a CMD command line window navigate to the Sametime Meeting Server install directory. We do this with the command: cd \Install\SametimeMeetingServer. Then start the Launchpad installer with the command launchpad.
188 Click the Install IBM Lotus Sametime Meeting Server link.
189 Click the Launch IBM Lotus Sametime Meeting Server Installation link.
190 The Installation Manager is starting loading.
191 Just click the Install icon to start the Sametime Meeting Server installation.
192 Check the IBM Sametime Meetings server and Version entries. They are unchecked by default. Then click the Next button.

193 Accept the terms in the license agreement and click the Next button.
194 Because we have already installed a WebSphere based Sametime Server on this box, (The Sametime System Console) we can reuse the installed binaries. The installer detects this and checks the Use the existing package group. And therefore the path is greyed and can not be changed. Click the Next button to continue.
195 We want to use the predefined Deployment Plan from the Sametime System Console. Click the Next button to continue.

196 Enter the Sametime System Console Server information and credentials to authenticate. In our example we use meeting.renovations.com as SSC Server name and wasadmin as the WebSphere Administrative User name. The last field is the host name where we want to install the Sametime Meeting Server. Here we use meeting.renovations.com. Then click the Validate button to check the connection to the System Console Server.
197 The connection to the Sametime System Console was successful when the button text Validate changes to Validated. Click the Next button to continue.
198 Select your Sametime Meeting Server Deployment plan that you have created in the previous step. We use our Meeting Server. Then click the Next button to continue.
199 Control the settings you received from the System Console. Then click the Next button.
200 To start the installation click the Install button.
201 The Sametime Meeting Server is now installing. This takes approximately 30 to 45 minutes. But because we already have the binaries installed and reuse this data, the installation is much shorter. It then takes only 15 to 20 minutes.
202 Important to know: To configure LiveName integration in the Browser Meeting interface, SSO between the Community Server and the Meeting Server is required. The LTPA Token has to be exported from the Meeting Server and imported in the community server. Live Name Integration works over the REST API in the Proxy Server. You can find the required steps in the Sametime InfoCenter. Configure this setting when the Meeting Server, the Community Server and the Proxy Server have been installed successfully. No Connectivity is required between the Meeting Server and the Media Manager. Audio and Video is possible only with the Sametime Connect Client Version 8.5 or newer. (Stand alone or Notes embedded client). This client first connects to the Community Server. From there it receives the connectivity information to other servers. Then it connects to the Media Manager with SIP protocol.
203 Important to know (cont) The Meeting Server can be clustered using the WebSphere Network Deployment. This can be configured and deployed with the Sametime System Console. The new Sametime Meeting Server consists of two components. - the Meeting Server - the Meeting HTTP Proxy Clustering means that a meeting room is running only on one server at a time. The Meeting Proxy servers have the information on witch Meeting Server instance the Meeting Room is running and forward incoming requests to the right server. Meeting data are stored only in the database. In case of a fail over the Meeting Room will be started on another Meeting Server in the cluster immediately. For external access a separate Sametime Meeting Server in your DMZ is recommended for better security.
204 Lotus Sametime Meetings Cluster Deployment Lotus Sametime Servers Cluster Lotus Sametime Lotus Notes or Web clients Meetings 1 WebSphere Application Server Proxy Meetings 2 Proxy server provides caching and helps application server scale; routes HTTP traffic to correct node Individual meetings exist on a single cluster member Clustered servers use the web services to support high availability and failover


205 Lotus Sametime External Meetings Deployment Internal participants Lotus Sametime Lotus Notes Clients Lotus Sametime Servers Presence & Instant Msg Lotus Sametime Web Clients Meetings 1 Lotus Sametime Lotus Notes Clients External participants Meetings 2 Lotus Sametime Web Clients
206 You have now successfully installed the Sametime Meeting Server. Click the Finish button and exit the Installation Manager and Launchpad. To configure your Start and Stop batches proceed the same way as on Page 85 and following (end of step 6) when the installation has finished successfully.
207 You can test the Meeting Server Browser access simple by opening a Browser window and enter the URL: You will be automatic redirected to the /stmeetings page. You should see this page:

208 To authenticate to the Sametime Meeting Server use one of the Log In links (3 possible locations for this link.
 and click the Log In")
209 Enter a User name and password (who is in the LDAP directory) and click the Log In button.

210 You are now logged in and can create a new meeting room using the New Meeting Room link.

211 Just enter a name for your Meeting Room. Then click the Save button.

212 Your new Meeting Room has been created successfully.
213 STEP SIXTEEN: Enable Trust between the IBM Lotus Sametime Community Server and the IBM Lotus Sametime Media Manager Summary In this step you configure the Sametime Community Server to allow the Sametime Media Manager to connect on port 1516 with the VP protocoll. Because we have the Sametime Proxy Server and the Sametime Media Manager running on the same box, they share the same IP address. We already have configured this trust for the Sametime Proxy Server. There is no need to configure this step in this example. If you want to deploy your Sametime Media Manager on another box, then you need to configure this Trust. See step Nine and follow the instructions there.
214 STEP SEVENTEEN: Run the Guided Activity to configure the IBM Lotus Sametime Media Manager Deployment plan Summary In this step you prepare the installation of the Sametime Media Manager.

215 In your Sametime System Console click on Sametime System Console then Sametime Guided Activities and then Install Sametime Media Manager

216 We want to Create a New Deployment Plan for the Sametime Media Manager. Click the Next button to continue.
217 Enter a name for your Media Manager Deployment. In this example we use Media Manager. Then click the Next button to continue.

218 We want to install the product version Click the Next button to continue.
219 We want to install all Media Manager components in this server. It is possible to split the components to separate machines for clustering. If you plan to cluster later you should use separat boxes for each of the 3 components. We accept the default setting Install All Components. Click the Next button to continue.
220 When installing all components in one box then only the Cell Profile is possible. Don't change the default setting and click the Next button to continue.

221 Enter the full qualified host name of your Sametime Media Manager Server. In this example we use proxy.renovations.com. Enter a WebSphere administrative user name and its password twice. We just use the standard wasadmin name. Click the Next button to continue.
222 Select the Community Server to which the Media Manager should connect to. In our example we use the Chat Server. Then click the Next button to continue.
223 Control that all settings are correct. Then click the Finish button to save the Deployment Plan.

224 You have now successfully created the Sametime Media Manager Deployment Plan. The next step is to install the Sametime media Manager.
225 STEP EIGHTEEN: Install the IBM Lotus Sametime Media Manager Summary In this step you install the Sametime Media Manager.
226 In a CMD command line window we navigate to the installation directory of the Sametime media Manager. In our example we use the command: cd \Install\SametimeMediaManagement. Then we start the installation with the Launchpad installer by entering the launchpad command.
227 The Sametime Launchpad Installer is starting up. Click the Install IBM Lotus Sametime Media Manager link to continue.
228 Click the Launch IBM Lotus Sametime media Manager Installation link.
229 The Installation Manager is starting up.

230 To install the Sametime Media Manager click the Install icon.

231 Check the IBM Sametime Media server and Version entries. They are unchecked by default. Then click the Next button.

232 Accept the terms in the license agreement and click the Next button to continue.
233 We use the existing package group. Click the Next button to continue.

234 We want to use the predefined deployment plan in the Sametime System Console for this installation. Click the Next button to continue.
235 Enter the Sametime System Console Server information and credentials to authenticate. In our example we use meeting.renovations.com as SSC Server name and wasadmin as the WebSphere Administrative User name. The last field is the host name where we want to install the Sametime Media Manager. Here we use proxy.renovations.com. Then click the Validate button to check the connection to the System Console Server.
236 The installer checks the connectivity to the Sametime System Console. When this was successful the text in the button changes from Validate to Validated. Click the Next button to continue.

237 Select your Media Manager Deployment plan. We use the Media Manager plan. Then click the Next button to continue.
238 Control your installation data that where read from the Deployment plan on the Sametime System Console. Then click the Next button to continue.
239 To start the installation click the Install button.
240 The Installation Manager now installs the Media Manager. This installation will take approximately 30 to 45 minutes. But because we are installing on a machine where the WebSphere binaries are already installed (with the Sametime proxy Server), this step will be skipped and it takes only 10 to 15 minutes.
241 Important to know: The Media Manager uses new Audio and Video codecs (H.264/MPEG4). The Media Manager uses SIP for VoIP connectivity (Sametime Connect Client or Notes Embedded Sametime Client). The Media Manager can be connected to existing Audio and Video conference systems and provides the interoperability of Sametime Clients and other A/V endpoints. The Media Manager is not exactly a PBX. It is just a server with its own connectivity and TCSPI SDK to connect to other systems. This has nothing to do with Sametime Unified Telephony.
242 Important to know: The Media Manager can be clustered for better scalability if required. The components of a Media Manager can be split and implemented on different machines for scalability. In the actual release only the SIP Proxy Registrar and the Conference Manager can be clustered. The Packet switcher can not be clustered. This is the cause for the need to have several boxes to cluster the Media Manager server. Sametime Media Manager has been extended for encrypted Media traffic transfer (TLS) and more participants in a single conference. This version of the Media Manager still does not support NAT traversal. If you want to communicate by Audio/Video over the Internet use VPN.
243 You have now successfully installed the Sametime Media Manager Server. Click the Finish button then close the Installation Manager and the Launchpad installer. To configure your Start and Stop batches proceed the same way as on Page 85 and following (end of step 6) when the installation has finished successfully.
244 STEP NINETEEN: Install the IBM Lotus Sametime Connect Client Summary In this step you install the Sametime Connect Client Standard.

245 Navigate to the installation directory. We use a CMD command line window and enter the command: cd \Install\SametimeStandardClient\sametimecilent.standalone\Windows. Then start the installer by entering sametime-connect.exe.

246 We want the installation files to be stored in a temporary directory. So we use the default setting. Then click the Next button.

247 The installation files are now extracted.

248 Select your preferred language for the installation and click the OK button.

249 The Lotus Sametime Connect Install Shield Wizard has started. Click the Next button to continue.

250 Accept the terms in the license agreement and click the Next button to continue.

251 My recommendation again is to remove the Program Files\ part of the path and then click the Next button to continue.
252 Check the settings and click the Install button to start the installation.

253 The Install Shield Wizard now installs the Sametime Connect Client. This process takes approximately 3 to 5 minutes.
254 Important to know: The new Sametime Connect Client can be installed as a stand alone version or as Embedded Version in an existing Notes or newer client. This works with all language versions of the Notes Client. The new Meeting Plug-In is automatically installed with this client. The SUT Client is installed with the new Sametime Connect Client installer. The Sametime Connect Client is available for Windows, Linux and MAC platforms.

255 You have now successfully installed the Sametime Connect Client. Leave the check box to Launch the Client checked and click the Finish button to start the configuration.
256 The Lotus Sametime Connect Client is now starting up.

257 Fill the configuration form with your Sametime Community Server host name and User credentials in the LDAP directory. In this example we use chat.renovations.com for the host name and Sam Curman as user. If you prefer to have the password saved and log in automatically, then check the 2 check boxes. Then click the Log In button.

258 After some seconds the question for saving chat transcripts will pop up. To make it easy just click the No button. This can be configured later.

259 You have now successfully installed the Sametime Connect Client Version The next step is to configure the Sametime Meetings Plugin
260 STEP TWENTY: Configure the IBM Lotus Sametime Client Meetings Plugin Summary In this step you configure your Sametime Meetings Plugin to connect to your Meeting Server.

261 In your Sametime Connect Client click on File and then in the menu on Preferences.

262 In the Preferences menu click on Sametime Meeting Rooms and then on Meeting Room Servers.

263 To add a new Sametime Meeting Room Server just click the Button Add Meeting Room Server....

264 In the Identity section you can configure the Community Server settings from where the authentication information is coming from. We use our chat.renovations.com server. In the Connection settings section we enter the Sametime Meeting Server host name. We use meeting.renovations.com. Then click the OK button to save the changes.

265 You will now find an entry for your new meeting server. Click the Apply button to save the changes to your preferences. Then click the OK button to close the preferences screen.

266 Open the Sametime Meetings Plugin. We now see a meeting room that was created before (in the Web Meeting Interface).

267 To access the Meeting Room Sams Room just click the Enter Room link.

268 You are now accessing the Sametime Meeting Room Sams Room with the Sametime Connect Client User interface.
269 STEP TWENTYONE: Configure the Meeting Room to use Audio and Video Summary In this step you configure your Sametime Meeting Room to use Audio and Video features over the Media Manager Server.

270 In your Sametime Connect Client, in the Sametime Meetings Plugin click the More Actions link in one of the meeting rooms.

271 Click the Edit... button to change the Meeting Room settings.


272 In the Edit Meeting Room Settings page in the Audio Conferences section click the button near Unspecified. There you should find an entry Sametime Audio/Video Conferencing. Select this option, enable Video and click the OK button.

273 Now enter the Meeting Room again by clicking the Enter Room link.

274 You can now see Telephone symbol in the Conferencing section at the top left corner. If you click the Telephone icon you can join the call with your computer for Audio and Video.
Show 201 Installation and Setup of IBM Lotus Sametime From Zero to Hero The Next Generation
 Show 201 Installation and Setup of IBM Lotus Sametime 8.5.1 From Zero to Hero The Next Generation Frank Altenburg SME for Sametime IBM Volker Juergensen Senior IT Specialist IBM 2011 IBM Corporation Agenda
Installation and Setup of IBM Sametime From Zero to Hero Part 2 Edge Components
 IBM Collaboration Solutions Installation and Setup of IBM Sametime 8.5.2 From Zero to Hero Part 2 Edge Components Frank Altenburg SME for Sametime IBM Collaboration Solutions mailto:frank.altenburg@de.ibm.com
Get Started Installing IBM Lotus Sametime You Too Can Be a WAS Admin! OR 140 Slides In 60 Minutes
 Get Started Installing IBM Lotus Sametime 8.5.1 You Too Can Be a WAS Admin! OR 140 Slides In 60 Minutes Gabriella Davis Technical Director The Turtle Partnership About Me Gabriella Davis The Turtle Partnership
VMware Identity Manager Connector Installation and Configuration (Legacy Mode)
") VMware Identity Manager Connector Installation and Configuration (Legacy Mode) VMware Identity Manager This document supports the version of each product listed and supports all subsequent versions until
VMware Identity Manager Connector Installation and Configuration (Legacy Mode) VMware Identity Manager This document supports the version of each product listed and supports all subsequent versions until
VMware Identity Manager Cloud Deployment. DEC 2017 VMware AirWatch 9.2 VMware Identity Manager
 VMware Identity Manager Cloud Deployment DEC 2017 VMware AirWatch 9.2 VMware Identity Manager You can find the most up-to-date technical documentation on the VMware website at: https://docs.vmware.com/
Open Mic Webcast. Jumpstarting Audio- Video Deployments Tony Payne March 9, 2016
 Open Mic Webcast Jumpstarting Audio- Video Deployments Tony Payne March 9, 2016 Agenda The Challenges of Audio and Video Architecture Bill of Materials Component Descriptions Deployment Sample Deployment
Implementing Single-Sign-On(SSO) for APM UI
 for APM UI") Implementing Single-Sign-On(SSO) for APM UI 1.Introduction...2 2.Overview of SSO with LTPA...3 3.Installing and configuring TDS...5 3.1.Installing TDS 6.3...5 3.2.Changing the administrator password (Optional)...7
Implementing Single-Sign-On(SSO) for APM UI 1.Introduction...2 2.Overview of SSO with LTPA...3 3.Installing and configuring TDS...5 3.1.Installing TDS 6.3...5 3.2.Changing the administrator password (Optional)...7
VMware Identity Manager Cloud Deployment. Modified on 01 OCT 2017 VMware Identity Manager
 VMware Identity Manager Cloud Deployment Modified on 01 OCT 2017 VMware Identity Manager You can find the most up-to-date technical documentation on the VMware Web site at: https://docs.vmware.com/ The
Deployment Scenario: WebSphere Portal Mashup integration and page builder
 Deployment Scenario: WebSphere Portal 6.1.5 Mashup integration and page builder Deployment Scenario: WebSphere Portal 6.1.5 Mashup integration and page builder...1 Abstract...2 Portal Mashup integration
Deploying VMware Identity Manager in the DMZ. JULY 2018 VMware Identity Manager 3.2
 Deploying VMware Identity Manager in the DMZ JULY 2018 VMware Identity Manager 3.2 You can find the most up-to-date technical documentation on the VMware website at: https://docs.vmware.com/ If you have
Deploying VMware Identity Manager in the DMZ. SEPT 2018 VMware Identity Manager 3.3
 Deploying VMware Identity Manager in the DMZ SEPT 2018 VMware Identity Manager 3.3 You can find the most up-to-date technical documentation on the VMware website at: https://docs.vmware.com/ If you have
Ensuring a smooth upgrade to Sametime and IFR 1
 Ensuring a smooth upgrade to Sametime 8.5.2 and 8.5.2 IFR 1 Tony Payne, Sametime L3 February 29,2012 2011 IBM Corporation Agenda Plan Prepare Execute Troubleshoot Validate Known Fixes 2011 IBM Corporation
Installing and Configuring VMware Identity Manager Connector (Windows) OCT 2018 VMware Identity Manager VMware Identity Manager 3.
 OCT 2018 VMware Identity Manager VMware Identity Manager 3.") Installing and Configuring VMware Identity Manager Connector 2018.8.1.0 (Windows) OCT 2018 VMware Identity Manager VMware Identity Manager 3.3 You can find the most up-to-date technical documentation on
Installing and Configuring VMware Identity Manager Connector 2018.8.1.0 (Windows) OCT 2018 VMware Identity Manager VMware Identity Manager 3.3 You can find the most up-to-date technical documentation on
Tips for Using the Integrated Solution Console (ISC) and Sametime System Console (SSC) with IBM Sametime
 and Sametime System Console (SSC) with IBM Sametime") Tips for Using the Integrated Solution Console (ISC) and Sametime System Console (SSC) with IBM Sametime October 28, 2015 Miguel Macias, Sandy Lee, Casey Toole IBM Corporation 2015 1 Agenda Integrated
Tips for Using the Integrated Solution Console (ISC) and Sametime System Console (SSC) with IBM Sametime October 28, 2015 Miguel Macias, Sandy Lee, Casey Toole IBM Corporation 2015 1 Agenda Integrated
docalpha Installation Guide
 ARTSYL DOCALPHA INSTALLATION GUIDE 1. docalpha Architecture Overview... 2 1.1. docalpha Server Components... 4 1.2. docalpha Production Environment Stations Overview... 4 1.3. docalpha Setup & Administration
NBC-IG Installation Guide. Version 7.2
 Installation Guide Version 7.2 2017 Nuance Business Connect 7.2 Installation Guide Document Revision History Revision Date August 8, 2017 Revision List Updated supported SQL Server versions June 14, 2017
Table of Contents HOL-1757-MBL-6
 Table of Contents Lab Overview - - VMware AirWatch: Technology Partner Integration... 2 Lab Guidance... 3 Module 1 - F5 Integration with AirWatch (30 min)... 8 Getting Started... 9 F5 BigIP Configuration...
Version Installation Guide. 1 Bocada Installation Guide
 Version 19.4 Installation Guide 1 Bocada Installation Guide Copyright 2019 Bocada LLC. All Rights Reserved. Bocada and BackupReport are registered trademarks of Bocada LLC. Vision, Prism, vpconnect, and
CLI users are not listed on the Cisco Prime Collaboration User Management page.
 Cisco Prime Collaboration supports creation of user roles. A user can be assigned the Super Administrator role. A Super Administrator can perform tasks that both system administrator and network administrator
WA1561 WebSphere Application Server v6.1 Administration. Classroom Setup Guide. Web Age Solutions Inc. Copyright Web Age Solutions Inc.
 WA1561 WebSphere Application Server v6.1 Administration Classroom Setup Guide Web Age Solutions Inc. 1 Table of Contents Classroom Requirements...3 Part 1 - Minimum Hardware Requirements...3 Part 2 - Minimum
WA1561 WebSphere Application Server v6.1 Administration. Classroom Setup Guide. Web Age Solutions Inc. Copyright Web Age Solutions Inc.
 WA1561 WebSphere Application Server v6.1 Administration Classroom Setup Guide Web Age Solutions Inc. Copyright Web Age Solutions Inc. 1 Table of Contents Classroom Requirements...3 Part 1 - Minimum Hardware
CLI users are not listed on the Cisco Prime Collaboration User Management page.
 Cisco Prime Collaboration supports creation of user roles. A user can be assigned the Super Administrator role. A Super Administrator can perform tasks that both system administrator and network administrator
BlackBerry Enterprise Server for Microsoft Office 365. Version: 1.0. Administration Guide
 BlackBerry Enterprise Server for Microsoft Office 365 Version: 1.0 Administration Guide Published: 2013-01-29 SWD-20130131125552322 Contents 1 Related resources... 18 2 About BlackBerry Enterprise Server
Setup domino admin client by providing username server name and then providing the id file.
 Main focus of this document is on the lotus domino 8 server with lotus sametime 8. Note: do not configure Web SSO, Ltpatoken, directory assistance and ldap configuration because they will be configured
Lotus Connections 2.5 Install
 Copyright IBM Corporation All rights reserved Lotus Connections 2.5 Install Contact you local IBM Representative for more information IBM Corporation Page 1 of 108 The architecture used in this guide is
Setting Up the Server
 Managing Licenses, page 1 Cross-launch from Prime Collaboration Provisioning, page 5 Integrating Prime Collaboration Servers, page 6 Single Sign-On for Prime Collaboration, page 7 Changing the SSL Port,
IBM Exam A Administering IBM Lotus Sametime 8.5 Version: 6.0 [ Total Questions: 130 ]
![IBM Exam A Administering IBM Lotus Sametime 8.5 Version: 6.0 [ Total Questions: 130 ]](/thumbs/91/107367219.jpg "IBM Exam A Administering IBM Lotus Sametime 8.5 Version: 6.0 [ Total Questions: 130 ]") s@lm@n IBM Exam A2040-988 Administering IBM Lotus Sametime 8.5 Version: 6.0 [ Total Questions: 130 ] IBM A2040-988 : Practice Test Question No : 1 - (Topic 0) You are planning to upgrade your Sametime
s@lm@n IBM Exam A2040-988 Administering IBM Lotus Sametime 8.5 Version: 6.0 [ Total Questions: 130 ] IBM A2040-988 : Practice Test Question No : 1 - (Topic 0) You are planning to upgrade your Sametime
WA1804 WebSphere Enterprise Service Bus v6.2 Administration. Classroom Setup Guide. Web Age Solutions Inc. Copyright Web Age Solutions Inc.
 WA1804 WebSphere Enterprise Service Bus v6.2 Administration Classroom Setup Guide Web Age Solutions Inc. 1 Table of Contents Part 1 - Minimum Hardware Requirements...3 Part 2 - Minimum Software Requirements...4
VMware Enterprise Systems Connector Installation and Configuration. JULY 2018 VMware Identity Manager 3.2 VMware Identity Manager VMware AirWatch 9.
 VMware Enterprise Systems Connector Installation and Configuration JULY 2018 VMware Identity Manager 3.2 VMware Identity Manager VMware AirWatch 9.3 You can find the most up-to-date technical documentation
System Administration
 Most of SocialMiner system administration is performed using the panel. This section describes the parts of the panel as well as other administrative procedures including backup and restore, managing certificates,
IBM Single Sign On for Bluemix Version December Identity Bridge Configuration topics
 IBM Single Sign On for Bluemix Version 2.0 28 December 2014 Identity Bridge Configuration topics IBM Single Sign On for Bluemix Version 2.0 28 December 2014 Identity Bridge Configuration topics ii IBM
SAML-Based SSO Configuration
 Prerequisites, page 1 SAML SSO Configuration Task Flow, page 5 Reconfigure OpenAM SSO to SAML SSO Following an Upgrade, page 9 SAML SSO Deployment Interactions and Restrictions, page 9 Prerequisites NTP
software Lotus LearningSpace - Virtual Classroom V1.1 Installation Guide
 software Lotus LearningSpace - Virtual Classroom V1.1 Installation Guide COPYRIGHT Disclaimer THIS DOCUMENTATION IS PROVIDED FOR REFERENCE PURPOSES ONLY. WHILE EFFORTS WERE MADE TO VERIFY THE COMPLETENESS
WA1976 WebSphere Application Server 7.0 Administration Fundamentals. Classroom Setup Guide. Web Age Solutions Inc.
 WA1976 WebSphere Application Server 7.0 Administration Fundamentals Classroom Setup Guide Web Age Solutions Inc. Copyright Web Age Solutions Inc. 1 01/28/09 Table of Contents Classroom Requirements...3
Attention: LifeSize Gatekeeper and LifeSize Multipoint Extension do not support virtual machines or 64-bit Windows based servers.
 Release Notes LifeSize Multipoint Extension Release: v7.0.1 Attention: LifeSize Gatekeeper and LifeSize Multipoint Extension do not support virtual machines or 64-bit Windows based servers. Contents Product
BlackBerry Enterprise Server for IBM Lotus Domino Version: 5.0. Administration Guide
 BlackBerry Enterprise Server for IBM Lotus Domino Version: 5.0 Administration Guide SWDT487521-636611-0528041049-001 Contents 1 Overview: BlackBerry Enterprise Server... 21 Getting started in your BlackBerry
Table of Contents. VMware AirWatch: Technology Partner Integration
 Table of Contents Lab Overview - HOL-1857-08-UEM - Workspace ONE UEM - Technology Partner Integration... 2 Lab Guidance... 3 Module 1 - F5 Integration with Workspace ONE UEM (30 min)... 9 Introduction...
IBM InfoSphere Information Server Single Sign-On (SSO) by using SAML 2.0 and Tivoli Federated Identity Manager (TFIM)
 by using SAML 2.0 and Tivoli Federated Identity Manager (TFIM)") IBM InfoSphere Information Server IBM InfoSphere Information Server Single Sign-On (SSO) by using SAML 2.0 and Tivoli Federated Identity Manager (TFIM) Installation and Configuration Guide Copyright International
IBM InfoSphere Information Server IBM InfoSphere Information Server Single Sign-On (SSO) by using SAML 2.0 and Tivoli Federated Identity Manager (TFIM) Installation and Configuration Guide Copyright International
Lotus Sametime. Installation Guide. Version 7.0 G
 Lotus Sametime Version 7.0 Installation Guide G210-2078-00 Note: Before using this information and the product it supports, read the information in "Notices" on page 35. First Edition (August, 2005) This
Extended Search Administration
 IBM Lotus Extended Search Extended Search Administration Version 4 Release 0.1 SC27-1404-02 IBM Lotus Extended Search Extended Search Administration Version 4 Release 0.1 SC27-1404-02 Note! Before using
NetExtender for SSL-VPN
 NetExtender for SSL-VPN Document Scope This document describes how to plan, design, implement, and manage the NetExtender feature in a SonicWALL SSL-VPN Environment. This document contains the following
WA2031 WebSphere Application Server 8.0 Administration on Windows. Classroom Setup Guide. Web Age Solutions Inc.
 WA2031 WebSphere Application Server 8.0 Administration on Windows Classroom Setup Guide Web Age Solutions Inc. 1 Table of Contents Part 1 - Minimum Hardware Requirements...3 Part 2 - Minimum Software Requirements...3
Acronis and Acronis Secure Zone are registered trademarks of Acronis International GmbH.
 1 Copyright Acronis International GmbH, 2002-2015 Copyright Statement Copyright Acronis International GmbH, 2002-2015. All rights reserved. Acronis and Acronis Secure Zone are registered trademarks of
VMware AirWatch Cloud Connector Guide ACC Installation and Integration
 VMware AirWatch Cloud Connector Guide ACC Installation and Integration Workspace ONE UEM v1810 Have documentation feedback? Submit a Documentation Feedback support ticket using the Support Wizard on support.air-watch.com.
Installing or Upgrading ANM Virtual Appliance
 CHAPTER 2 This chapter describes how to deploy Cisco ANM Virtual Appliance 4.3 (new installation) and how to upgrade from ANM software version 4.1 or 4.2 to software version 4.3. This chapter includes
Installing and Configuring vcloud Connector
 Installing and Configuring vcloud Connector vcloud Connector 2.6.0 This document supports the version of each product listed and supports all subsequent versions until the document is replaced by a new
SuperLumin Nemesis. Getting Started Guide. February 2011
 SuperLumin Nemesis Getting Started Guide February 2011 SuperLumin Nemesis Legal Notices Information contained in this document is believed to be accurate and reliable. However, SuperLumin assumes no responsibility
IBM Lotus Sametime Media Manager Cluster Deployment Walk-through Part VI- Bandwidth Manager IBM Corporation
 IBM Lotus Sametime 8.5.2 Media Manager Cluster Deployment Walk-through Part VI- Bandwidth Manager Prerequisites for this part of the walk-through We've completed parts I, II, II, IV, and V Lotus Domino
VMware Enterprise Systems Connector Installation and Configuration
 VMware Enterprise Systems Connector Installation and Configuration Modified APR 2018 VMware Identity Manager 3.1 VMware Identity Manager VMware AirWatch 9.2 You can find the most up-to-date technical documentation
IBM Sametime Administration WebSphere Demystified
 IBM Sametime Administration WebSphere Demystified Frank Altenburg, SME for IBM Sametime, IBM Germany Volker Juergensen, Senior IT Specialist, IBM Germany 2012 IBM Corporation Agenda Introduction Experience
SafeConsole On-Prem Install Guide
 SafeConsole On-Prem Install Guide This guide applies to SafeConsole 5.0.5 Introduction This guide describes how to install a new SafeConsole server on Windows using the SafeConsole installer. As an option,
Open Mic Webcast. Troubleshooting Sametime Policies
 Open Mic Webcast Troubleshooting Sametime Policies Date: March 30, 2016 Speaker: Sandy Lee Panelist: Casey Toole, Jennifer Isola-Mayes and Nancy Pittman Troubleshooting Sametime Policies 2 Agenda What
VMware Workspace ONE UEM VMware AirWatch Cloud Connector
 VMware AirWatch Cloud Connector VMware Workspace ONE UEM 1811 You can find the most up-to-date technical documentation on the VMware website at: https://docs.vmware.com/ If you have comments about this
Install and upgrade Qlik Sense. Qlik Sense 3.0 Copyright QlikTech International AB. All rights reserved.
 Install and upgrade Qlik Sense Qlik Sense 3.0 Copyright 1993-2016 QlikTech International AB. All rights reserved. Copyright 1993-2016 QlikTech International AB. All rights reserved. Qlik, QlikTech, Qlik
Unified CCX Administration Web Interface
 The Unified CCX provides a multimedia (voice, data, and web) IP-enabled customer-care application environment, using VoIP technology that allows your Cisco Unified Communications network to share resources
WA1327 WebSphere Application Server v6 Administration. Classroom Setup Guide. Web Age Solutions Inc. Copyright Web Age Solutions Inc.
 WA1327 WebSphere Application Server v6 Administration Classroom Setup Guide Web Age Solutions Inc. 1 Table of Contents Classroom Requirements...3 Part 1 - Minimum Hardware Requirements...3 Part 2 - Minimum
SafeConsole On-Prem Install Guide. version DataLocker Inc. July, SafeConsole. Reference for SafeConsole OnPrem
 version 5.2.2 DataLocker Inc. July, 2017 SafeConsole Reference for SafeConsole OnPrem 1 Contents Introduction................................................ 2 How do the devices become managed by SafeConsole?....................
Plug-in 3457 User Guide
 NN43060-100 Document status: Standard Document issue: 01.02 Document date: 23 November 2009 Product release: 1.1 Job function: Product Fundamentals Type: User Guide Language type: English. All Rights Reserved.
Deployment and User Guide Installing and Configuring WhatsUp Gold Failover Manager
 Deployment and User Guide Installing and Configuring WhatsUp Gold Failover Manager This guide provides information about installing and configuring WhatsUp Gold Failover Manager. Contents CHAPTER 1 Using
Integration Configuration
 Integration Configuration Configure LDAP with the Configuration Tool, page 1 Configure Voicemail Settings with the Configuration Tool, page 5 Configure Phone Control and Presence with the Configuration
Oracle Fusion Middleware
 Oracle Fusion Middleware Quick Installation Guide for Oracle Identity Management 11g Release 1 (11.1.1) E10033-01 May 2009 This guide is designed to help you quickly install the most common Oracle Identity
Cisco TelePresence Conductor with Cisco Unified Communications Manager
 Cisco TelePresence Conductor with Cisco Unified Communications Manager Deployment Guide TelePresence Conductor XC4.0 Unified CM 10.5(2) January 2016 Contents Introduction 6 About this document 6 Related
Migrating vrealize Automation 6.2 to 7.2
 Migrating vrealize Automation 6.2 to 7.2 vrealize Automation 7.2 This document supports the version of each product listed and supports all subsequent versions until the document is replaced by a new edition.
IBM Lotus Quickr STEW Technical Overview
 Lotus Worldwide Technical Sales IBM Lotus Quickr STEW Technical Overview 2007 IBM Corporation Agenda Section 1 Installing Quickr Services for Lotus Domino Configuring Quickr Services for Lotus Domino Section
VMware View Upgrade Guide
 View 4.0 View Manager 4.0 View Composer 2.0 This document supports the version of each product listed and supports all subsequent versions until the document is replaced by a new edition. To check for
Install and upgrade Qlik Sense. Qlik Sense 3.2 Copyright QlikTech International AB. All rights reserved.
 Install and upgrade Qlik Sense Qlik Sense 3.2 Copyright 1993-2017 QlikTech International AB. All rights reserved. Copyright 1993-2017 QlikTech International AB. All rights reserved. Qlik, QlikTech, Qlik
Getting Started with ESXi Embedded
 ESXi 4.0 Embedded vcenter Server 4.0 This document supports the version of each product listed and supports all subsequent versions until the document is replaced by a new edition. To check for more recent
Laserfiche Rio 10.3: Deployment Guide. White Paper
 Laserfiche Rio 10.3: Deployment Guide White Paper January 2018 Table of Contents How Laserfiche Licensing Works... 4 Types of Licenses... 4 Named User Licenses... 4 WebLink Public Portal Licenses... 6
IBM Sametime Web Client & Meeting Server - An Introduction to new features in version 9.0.1
 IBM Sametime Web Client & Meeting Server - An Introduction to new features in version 9.0.1 Open Mic Date: 13-10-2016 IBM Collaboration Solutions Open Mic Team Jayesh Parmar - IBM ICS Support engineer
VMware Enterprise Systems Connector Installation and Configuration. Modified 29 SEP 2017 VMware AirWatch VMware Identity Manager 2.9.
 VMware Enterprise Systems Connector Installation and Configuration Modified 29 SEP 2017 VMware AirWatch 9.1.1 VMware Identity Manager 2.9.1 You can find the most up-to-date technical documentation on the
Covene Cohesion Server Installation Guide A Modular Platform for Pexip Infinity Management October 25, 2016 Version 3.3 Revision 1.
 Covene Cohesion Server Installation Guide A Modular Platform for Pexip Infinity Management October 25, 2016 Version 3.3 Revision 1.0 Table of Contents 1. Overview... 3 2. Upgrading an Existing Installation...
Novell Access Manager
 Quick Start AUTHORIZED DOCUMENTATION Novell Access Manager 3.1 SP2 June 11, 2010 www.novell.com Novell Access Manager 3.1 SP2 Quick Start Legal Notices Novell, Inc., makes no representations or warranties
Pre-Installation Checklist v5.0
 Pre-Installation Checklist v5.0 November 2010 Table of Contents Introduction 3 Network infrastructure 4 ShareScan Manager PC 5 Devices 7 ecopy Connectors 8 Network Communication 13 Document Management
Note: Before using this information and the product it supports, read the information in "Notices" on page 39.
 Note: Before using this information and the product it supports, read the information in "Notices" on page 39. First Edition (July, 2006) This edition applies to IBM Lotus Sametime 7.5, (product number
Creating and Managing a Content Server Cluster
 CHAPTER 10 This chapter describes the main features, system requirements, setup, and management of a Cisco TelePresence Content Server (TCS) cluster. To a user, a Content Server Cluster behaves exactly
Installation Guide for Pulse on Windows Server 2012
 USER GUIDE MADCAP PULSE 4 Installation Guide for Pulse on Windows Server 2012 Copyright 2018 MadCap Software. All rights reserved. Information in this document is subject to change without notice. The
Apptix Online Backup by Mozy User Guide
 Apptix Online Backup by Mozy User Guide 1.10.1.2 Contents Chapter 1: Overview...5 Chapter 2: Installing Apptix Online Backup by Mozy...7 Downloading the Apptix Online Backup by Mozy Client...7 Installing
SafeConsole On-Prem Install Guide
 version 5.4 DataLocker Inc. December, 2018 Reference for SafeConsole OnPrem 1 Contents Introduction................................................ 3 How do the devices become managed by SafeConsole?....................
IBM SECURITY PRIVILEGED IDENTITY MANAGER
 IBM SECURITY PRIVILEGED IDENTITY MANAGER Integration with IBM Security Access Manager (ISAM) for One-time Password (OTP) Configuration Cookbook Version 2.0 Contents 1. Introduction 5 2. Requirements for
Installing and Configuring VMware Identity Manager. Modified on 14 DEC 2017 VMware Identity Manager 2.9.1
 Installing and Configuring VMware Identity Manager Modified on 14 DEC 2017 VMware Identity Manager 2.9.1 You can find the most up-to-date technical documentation on the VMware website at: https://docs.vmware.com/
Cisco Unified Serviceability
 Cisco Unified Serviceability Introduction, page 1 Installation, page 5 Introduction This document uses the following abbreviations to identify administration differences for these Cisco products: Unified
Installation on Windows Server 2008
 USER GUIDE MADCAP PULSE 4 Installation on Windows Server 2008 Copyright 2018 MadCap Software. All rights reserved. Information in this document is subject to change without notice. The software described
Integrate Microsoft Office Communicator and Microsoft Lync Clients for Cisco UC
 Integrate Microsoft Office Communicator and Microsoft Lync Clients for Cisco UC Overview, page 1 Limitations and considerations, page 2 Cisco UC Integration for Microsoft Office Communicator client design
Installing and Configuring VMware Identity Manager for Linux. Modified MAY 2018 VMware Identity Manager 3.2
 Installing and Configuring VMware Identity Manager for Linux Modified MAY 2018 VMware Identity Manager 3.2 You can find the most up-to-date technical documentation on the VMware website at: https://docs.vmware.com/
Getting Started with VMware View View 3.1
 Technical Note Getting Started with VMware View View 3.1 This guide provides an overview of how to install View Manager components and provision virtual desktops. Additional View Manager documentation
Oracle Enterprise Manager. 1 Before You Install. System Monitoring Plug-in for Oracle Unified Directory User's Guide Release 1.0
 Oracle Enterprise Manager System Monitoring Plug-in for Oracle Unified Directory User's Guide Release 1.0 E24476-01 October 2011 The System Monitoring Plug-In for Oracle Unified Directory extends Oracle
Cisco TelePresence Conductor with Unified CM
 Cisco TelePresence Conductor with Unified CM Deployment Guide TelePresence Conductor XC3.0 Unified CM 10.x Revised February 2015 Contents Introduction 5 About this document 5 Related documentation 5 About
Print Audit 6. Print Audit 6 Documentation Apr :07. Version: Date:
 Print Audit 6 Version: Date: 37 21-Apr-2015 23:07 Table of Contents Browse Documents:..................................................... 3 Database Documentation.................................................
Deltek Time & Expense with Employee Self Service Version New Installation for Microsoft SQL Sever
 Deltek Time & Expense with Employee Self Service Version 9.0.1 New Installation for Microsoft SQL Sever July 31, 2013 While Deltek has attempted to verify that the information in this document is accurate
Configuring the SMA 500v Virtual Appliance
 Using the SMA 500v Virtual Appliance Configuring the SMA 500v Virtual Appliance Registering Your Appliance Using the 30-day Trial Version Upgrading Your Appliance Configuring the SMA 500v Virtual Appliance
Installing and Configuring VMware Identity Manager. DEC 2017 VMware AirWatch 9.2 VMware Identity Manager 3.1
 Installing and Configuring VMware Identity Manager DEC 2017 VMware AirWatch 9.2 VMware Identity Manager 3.1 You can find the most up-to-date technical documentation on the VMware website at: https://docs.vmware.com/
CYAN SECURE WEB Installing on Windows
 CYAN SECURE WEB September 2009 Applies to: 1.7 and above Table of Contents 1 Introduction... 2 2 Preparation... 2 3 Network Integration... 3 3.1 Out-of-line Deployment... 3 3.2 DMZ Deployment... 3 4 Proxy
Policy Manager for IBM WebSphere DataPower 7.2: Configuration Guide
 Policy Manager for IBM WebSphere DataPower 7.2: Configuration Guide Policy Manager for IBM WebSphere DataPower Configuration Guide SOAPMDP_Config_7.2.0 Copyright Copyright 2015 SOA Software, Inc. All rights
Integration Configuration
 Configure LDAP with the Configuration Tool, page 1 Configure Voicemail Settings with the Configuration Tool, page 4 Configure Phone Control and Presence with the Configuration Tool, page 5 Credential Synchronization,
Lotusphere IBM Collaboration Solutions Development Lab
 Lotusphere 2012 IBM Collaboration Solutions Development Lab Lab#4 IBM Sametime Unified Telephony Lite telephony integration and integrated telephony presence with PBX 1 Introduction: IBM Sametime Unified
Introducing Lotus Domino 8, Designer 8 and Composite Applications
 Introducing Lotus Domino 8, Designer 8 and Composite Applications IBM Lotus collaboration product strategy Rich client W indows/office Browser eforms Portal RSS/Atom Mobile Interaction and client services
Automation Anywhere Enterprise 10 LTS
 Automation Anywhere Enterprise 10 LTS Document Version: 1.3 Installation Guide Date of Publication: 15 th November, 2016 Update(s) to this document edition: Table of Contents 1. Client Prerequisites Processor
SAML-Based SSO Configuration
 Prerequisites, page 1 SAML SSO Configuration Workflow, page 5 Reconfigure OpenAM SSO to SAML SSO After an Upgrade, page 9 Prerequisites NTP Setup In SAML SSO, Network Time Protocol (NTP) enables clock
Migrating from Citrix XenApp (IMA / FMA) to Parallels Remote Application Server
 to Parallels Remote Application Server") Parallels Remote Application Server Migrating from Citrix XenApp (IMA / FMA) to Parallels Remote Application Server Contents 1. Introduction a. Why Should You Migrate from Citrix to Parallels RAS b. Overview
Parallels Remote Application Server Migrating from Citrix XenApp (IMA / FMA) to Parallels Remote Application Server Contents 1. Introduction a. Why Should You Migrate from Citrix to Parallels RAS b. Overview
BusinessObjects Enterprise XI
 Overview Contents This document contains information on LDAP authentication and how to configure with this type of authentication. INTRODUCTION... 2 What Is LDAP?...2 LDAP platforms supported by...3 LDAP