Cascade V8.4 Website Content Management for the Site Manager UMSL
|
|
|
- Horace McCoy
- 6 years ago
- Views:
Transcription
1 Cascade V8.4 Website Content Management for the Site Manager UMSL
2 Contents Purpose & How to Use This Guide... 5 Getting Started and Logging In... 5 Login... 5 Dashboard... 5 Notifications... 5 Setting Preferences for Default Site & Unpublish on Move/Delete... 6 Find a Site... 7 Site Structure: Assets, Folders, Pages, and Files... 7 Assets... 7 Folders... 8 Pages... 9 Site Layout Creating and Editing Content Edit a Page Adding a New Page Create and Name the Page and Set Menu Options Page Name Placement Folder Display Name Title Include in Left Navigation Display Left Navigation Adding Page Metadata Building Page Content Title and Image Headers Building Page Body Content Content with 1 Column Content with 2 Columns Content with 3 Columns Accordion Image Gallery Slideshow Tabs Right Content Area
3 Right Side Content/Related Links Right Side Content/Related Callout Full Width Content Save, Preview, and Submit Adding an External Link Adding or Changing a Related Links List Block Add a Related Links List Block Change a Related Links List Block Adding Links in the Content Body: Internal vs. External Images Content Details Responsive Images ensure that images are sized according to the screen size it s being viewed on. 33 Styles view how to insert special styles such as buttons, header text, font colors, alerts and more Tables our table guide will show you how to build stylized tables that are responsive to screen size. 33 Publishing Your Content Publish all folder contents or just a single file Publish Selected Files Publish Your Entire Site Publish to WebDev (test server) Using Anchors Create the Anchor Link to the Anchor Editing the Footer and Tracking Visits to Your Site Importing Files Adding a File to Cascade Import a file with the Add Content link Import a file while editing a page Replace/Update an Existing file Renaming a File Creating a New Folder Creating References Unpublish and Delete Files Unpublish a file Delete a file or folder Restoring Previous Version of Page
4 Reordering Left Hand Navigation Reorder Sub (folder) navigation Coping Images from the Image Library Restore deleted files View Draft Versions
 by Hannon Hill. The CMS application provides a tool for creating, editing, and publishing Web pages.")
5 Purpose & How to Use This Guide The purpose of this guide is to acquaint you with the features of Cascade Server (Cascade). It is designed to be read chronologically and then used for reference. Getting Started and Logging In Cascade is a content management system (CMS) by Hannon Hill. The CMS application provides a tool for creating, editing, and publishing Web pages. The content of your website is on the Cascade server. As a site manager, you are responsible for maintaining and publishing your site content. Login Cascade is a web-based application that you access through a browser (such as Firefox or Chrome). 1. Open your browser and type in the address area. 2. Login to Cascade using your username (SSO ID) and password. Your username must be entered in all lowercase. If you are accessing Cascade from a computer that is not on UMSL s network (such as at home), then you must access through a VPN connection. You can get instructions for downloading VPN software from the Technology Support website. Dashboard When you login you will see the dashboard. From the dashboard you can manage and create your content. It includes movable widgets which you can arrange to customize your usage experience. Widgets give you easy access to information and functions such as: My Sites Your recently visited Cascade sites are displayed here. Notifications You can view notifications about pages you have published and/or unpublished. The notification includes the detail about the publishing function and indicates if any errors occurred during publishing. You will only see messages for files published with your own login id. My Content View and select recently edited and draft version of your files. Link Checker Summary of the link checker report. Stale Content List of assets that have not been recently modified. Dashboard options across the top of the screen 5

6 Setting Preferences for Default Site & Unpublish on Move/Delete You should choose to have content automatically unpublished (removed from live website) whenever you move or delete pages. You can also set a default site to make it the top link in your My Sites list and any new dashboard widget will be configured to display data from that site. 1. Click on your icon link at the top-right of the screen and select Settings. 2. Be sure the box for the Un-publish on Move/Delete is checked. 3. Also, uncheck the box for Appearance of Assets Link. 4. Click in the Default Site box to choose a site that you want your widgets to use. Then click Submit. 6

7 Find a Site At the top of the Cascade screen you will see the site-chooser drop-down box. Click in the site chooser box to view a list of sites you have access to. Select the site of your choice or you can also select a recently visited site from My Sites on the Dashboard. Site Structure: Assets, Folders, Pages, and Files Assets An asset is anything you can create, edit and manage in Cascade. Asset is a term referring to a file, folder, block, or page in Cascade. You may work with the following assets in Cascade: 1. Page indicates an html page. 2. File created by an external program and imported for use in Cascade, may be a jpeg image, PDF file, or any other static content. 3. Block - a "pluggable piece of content that can be easily substituted, into the right-hand related links area, the image rotation block, or the right callout area. 7
8 4. External Link - a symbolic link to a specific URL that links to a web page outside of your Cascade site. Used in the Related Links box, or the left-hand menu. 5. Folder - a container that holds other assets. All of the assets within a folder should be related to each other. For example, an image folder should only contain image files. Folders are used to create sub-navigation for your site or as containers for non-page assets (images, etc.). 6. Reference - a special asset that is used to get a link to a page that is not in a related folder to show up on the left hand navigation. The asset tree (file directory) displays a hierarchical view of the folders and files that make up your site s content. All of the files in your site are located on the Cascade server. Folders Folders help keep your site organized by grouping similar items together. The top level folder is labeled with the site name and contains the site s content. The _internal, and files folders are typical folders on every site. A folder s name becomes part of the URL when published. NOTE: do not delete or alter the _internal folder. You may add/edit files within the files folder, but do not delete or modify the folder structure. When a folder has a file in it named index, then the folder s Display Name displays in the web page s left-hand navigation menu. Clicking on the arrow to the right of the folder name will reveal its contents in the asset tree and in the main view area. In the example below, clicking on the files folder and then on the arrow for the images folder displays the contents of the images folder in the main view area. You can switch from viewing 8

9 files in either List or Thumbnail view. If there are images in the folder, the Thumbnail view will show thumbnails of the images. Pages Your site will have a homepage off of the root folder with a page name of index. A standard template is applied to each page which sets the page layout. You can add/change content on the page and control the display of the left hand navigation and the right-hand sidebar. Homepage for your site Most of the html pages on your site should be contained in folders. If the folder contains an index page then the folder s Display name shows in the top menu level, allows the folder to be displayed in the left navigation and any additional html pages in the folder can be included in a secondary menu level. 9


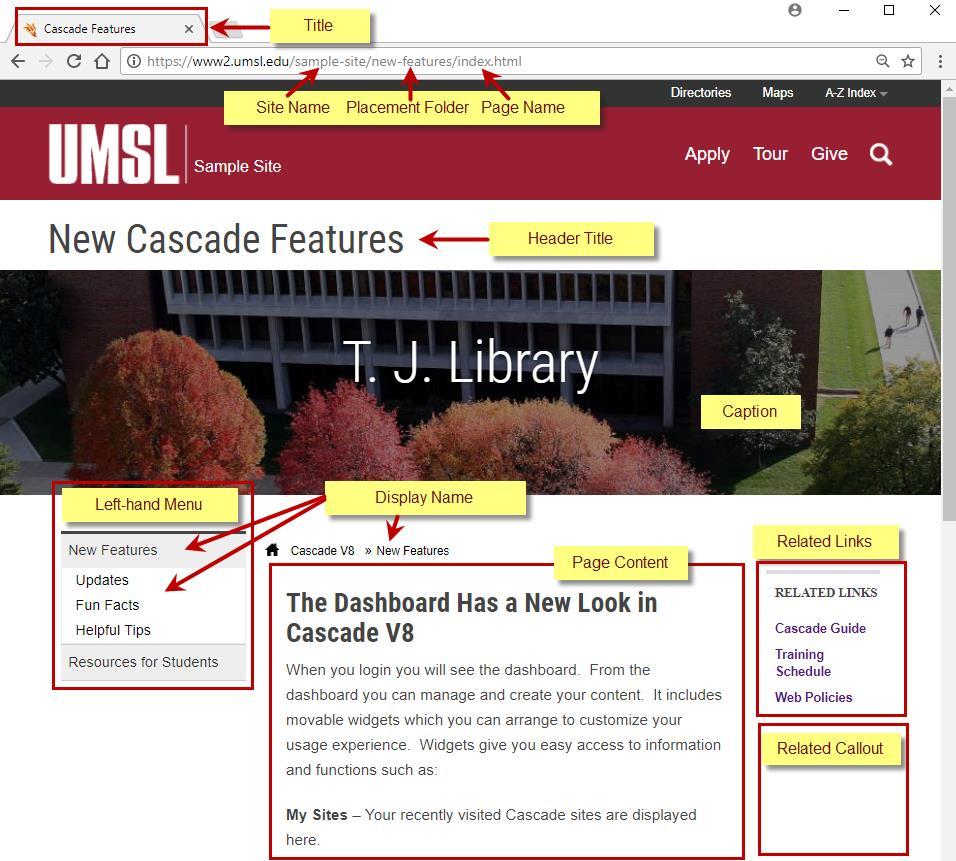
10 Site Layout In Cascade, you use a template to build your html pages. The examples below show where the Page Name, Title, Display Name, Title Header, and Caption template fields appear on the formatted page. Page Name in Cascade V8 is the same as System Name in the old version. Page Name becomes part of the URL. Page Name should not contain blank spaces, underscores, or other special characters (~ $ < > # % { } [ ] \ & +,. / : ; ) Title displays as a tab label of a browser AND is what Google Search will display as the name of the page in search results AND is on the site content map. Display Name appears as the Left Navigation text and Breadcrumb. 10


11 Title Header is displayed as the page header. It can be turned on or off. Caption text displays over a header image when an Image Header is included and caption selected. 11
12 12


13 Creating and Editing Content Edit a Page To edit content for an existing page, navigate to that page, select it and the click the Edit option at the top of the screen. Or right-click on the page name and select Edit from the drop-down box. Adding a New Page When you want to add a new page, use the Add Content link and select Unit Pages > New Page. The template provides content areas that you can choose from to customize the layout of your content. Each section of the template is explained below. A red star to the right of the name indicates it s a required field. Create and Name the Page and Set Menu Options 1. Determine which folder the new page will go in, and then click on the arrow to the right of the folder to select it. The left-hand navigation menu is based on folder structure. 2. Click Add Content > Unit Pages > New Page 3. Name your page and choose where to store it in your file directory: 13


![Page Name becomes part of the URL. Page Name should not contain blank spaces, underscores, or other special characters (~ $ < > # % { } [ ] \ & +,. / : ; +?](/docs-images/73/68814410/images/14-2.jpg "@ ) Display Name appears in the breadcrumbs, left-hand navigation menu and in the Related Links area if used there.")
14 Page Name This becomes the page name that appears in the URL. Page Name should be all lowercase without spaces. To separate words use a hyphen instead of an underscore character. If this is the first page in a new folder, you need to name it index in order for the folder s Display name to appear in the left-hand navigation of your page. Placement Folder the location in your Cascade file directory for the new page. Page Name in Cascade V8 is the same as System Name in the old version. Page Name becomes part of the URL. Page Name should not contain blank spaces, underscores, or other special characters (~ $ < > # % { } [ ] \ & +,. / : ; ) Display Name appears in the breadcrumbs, left-hand navigation menu and in the Related Links area if used there. Title displays on page tab of the browser and is used by search engines. Include in Left Navigation Allows you to choose whether the page should be included in the left navigation menu. 14


15 Display Left Navigation Controls whether or not the left navigation menu appears on the page. Title Display Name Adding Page Metadata When building a page, be sure to add metadata by clicking the Metadata tab. This information supports search engine results as well as social media posts. Summary - The synopsis of the asset. Teaser - A short enticing phrase about the asset. Keywords - Words or phrases about the asset. Description - The description of the asset. Author - The organization responsible for the asset. Building Page Content Title and Image Headers Title Header - A Title Header appears in large text across the top of your page, above the left menu and above the Image Header if one appears on the page. 15


16 Select Yes for Include Title Header and the Title Header field will appear for you to enter title text. Image Header - An Image Header spans the width of your page. The image width should be 1236px and height 382px. Select Yes to Include an Image Header. You can choose to display a caption over the image by selecting Image with Caption. Click in the Image box to select an image. See section on adding files for instructions on how to import an image to your site. Type Caption text if appropriate. 16


17 Building Page Body Content Select the layout of the page s content area. See examples of each layout type below. Content with 1 Column For Content with 1, 2 or 3 Columns use the WYSIWYG content area to type and build your content. 17


18 Content with 2 Columns Content with 3 Columns Accordion Accordion sections display a header. When you click the header, the related content displays below the header. This is a helpful way to display multiple topics of content on one page without showing all the content at once. 18


19 Give your Accordion section a Header then add the content for the section in the Content area. = Add Accordion section = Remove Accordion section = Reorder sections 19


20 Image Gallery Image Gallery arranges images in a two-column layout, with optional captions. UMSL Cascade Full Size Image displays when you click on the thumbnail image. Thumbnail Image appears on the page as in the example above. Caption Text appears under the thumbnail image and is optional. = Add Image = Remove Image = Reorder Images Slideshow Example when using the Related Links/Right Callout area (far right side of page). Slide headline and descriptive text display under the slide. 20
.")

21 Example when not using the Related Links/Right Callout area (for right side of page). Slide headline and descriptive text display to the right of the slide until the screen is sized smaller, then they display under the slide. 21

22 Headline displays in larger bolded text. Descriptive Text gives a little more detail and displays under the Headline. Banner Image indicates the file with your slide image. Link Types Choose Internal Link, and then click in the Internal Link box and select a page on your site OR, choose External Link and then click in the External Link box that appears to choose an External Link that you previously setup. Link Text is the text that will appear on top of the button that when clicked takes you to the internal or external link you selected. = Add Slide = Remove Slide = Reorder Slides 22


23 Tabs Tabs are an optional way to display multiple topics of content on one page, with each topic listed under a separate tab. 23

24 Name the Tab with a Header then in the Content area add the content that will appear when that tab is selected. = Add Tab = Remove Tab = Reorder Tabs Right Content Area This content displays on the right-hand side of your page if you select Yes for the Display Right Callout/Related Links Navigation option in the Right Content Area section of the template. Right Side Content/Related Links A Related Links list needs to first be built as a block file. Then you refer to the block file in this section of the template. The block file can be used on multiple pages by just selecting the file for your Related Links on each page you want the content to appear. See instructions for creating an External Link and for creating a Related Links List block 24


25 Select Yes to Display Right Callout/Related Links. In the Related Links section, click in the Link List box, select your related links block file, and then click Choose. External links in your related links block file will display in a Related Links box on the far right-hand side of your page. Right Side Content/Related Callout The Callout content displays on the far right side of the page, under the Related Links lists. If no Related Links list is being displayed, then the Callout content appears at the top of the area. 25


26 Enter text for a Callout Heading. This is optional, even if you are entering Callout content. Enter content for the Right Callout area. The width of the image in the Right Callout area should not be wider than 175px. Example below shows Related Links and Callout areas on published page. 26


27 Full Width Content Content entered in this section will display at the bottom of the page, below all other content, and will use 100% of the page width. Select Yes to Add 100% Width Content. Enter your content. Example below shows Related Links and Callout areas on published page. Full Width Content extends the width of the page and starts displaying below all other content, including the Right Content Area. 27


28 Save, Preview, and Submit To save your page, click the Save & Preview button. Your page will be displayed in a preview and saved as a draft. You must click the Submit button to save your new page to the site s file directory, or to replace an existing file with the changes you ve made. The file s Page Name is displayed in the directory. When you Save your page, it is saved as a draft as indicated in the image below. You must click Submit. 28


29 You can submit your page without first previewing it by clicking the Advance Submit button (three vertical dots) and selecting Submit. If you are ready to publish your changes, see the section on Publishing. Adding an External Link An External Link points to a webpage that does not reside on your Cascade site. Adding an external link to Cascade allows you to use the link in the Related Links list block or in the left-hand menu. 1. In the file directory, click on the files folder, then click on the arrow to the right of the externallinks folder. 2. Select Add Content > Default > External Link. 3. Complete the following: a. Link Name The name you give your link is what will appear on the webpage. b. Placement Folder This is the folder where the external link will be stored. If you plan to use the link in a Related Links list, then best practice is to store the file in the files/external-links folder. If you want the link as a left menu option, then choose the folder under which you want this link to be a second level menu option, or choose the root/site folder if you want this link to be a first level menu option. c. Link - Enter the full URL of the external webpage. You can copy/paste the URL from a website. d. Metadata Set leave this set to default. e. Click the Save & Preview button. f. Click the Submit button. 29
30 Adding or Changing a Related Links List Block If you want to use a Related Links list on a page or pages of your site, then you need to create a block file and point to the file in the Right Side Content > Related Links section on the page(s). A Related Links Block can contain html pages (Related Page) and External Links (Related External Link). Your site may already have a related links list block file. Related Pages will display first in the Related Links box, followed by Related External Links. Add a Related Links List Block: 1. Select Add Content > Blocks > Related Links List. 2. On the block template page enter a XHTML/Data Definition Block Name. The default name is untitled-related-links-list. Change the word untitled to a relevant name (for example admissions-related-links-list ). This is the file name. 3. If the Placement Folder is not files/blocks, then click in the Placement Folder box and select the files/blocks folder and click Choose. 4. In the Related Links section: a. If you want to include an html page that is on your site, then under Related Page click in the Choose Page box, select your page and click Choose. b. If you want to add an external link for a page that is not on your site, then under Related External Link, click in the Choose Link box, select your external link and click Choose. Note: If the related external link has not yet been created in Cascade, then see the Adding an External Link section. 5. Click the Advanced Submit button (three vertical dots at top right) and click Submit. 30
")
31 Page on your site = Add Page or Link = Remove Page or Link = Reorder Pages or Links External link file (to point to content that is not on your site) 31
32 Change a Related Links List Block 1. Navigate to the block file you want to change. It should be in the files/blocks folder. 2. Select the block file. 3. Click Edit. 4. See steps 4 and 5 under Add a Related Links List Block. 5. Click the Advanced Submit button (three vertical dots at top right) and click Submit. 6. Publish the page(s) that use this block file. Adding Links in the Content Body: Internal vs. External There are two types of links, internal and external. Internal links are links to pages or files within your Cascade site. External links are to pages outside of your site. To add or edit a link in a content area: 1. Highlight the text you want to make a link, and then click on the insert/edit link tool. a. Select Internal if you are pointing to a page or file within your folders (your site). i. Click in the Link box. ii. A chooser window will open. Select a file using the Recent, Browse, or Upload links and then click Choose. Use the Upload link when the file you want to use is on your computer and not yet part of your site directory. Then click Choose. In the Target box, select New window if you want this page to open in a new browser window. b. Select External if the link is not directly to a file on your site. i. A Link box appears. Type (or copy/paste) the full URL for the external link (e.g Click Ok. Images You can add an image to the Content or Right Callout area. The width of the image in the Right Callout area cannot be wider than 175px. To insert an image: 1. Place your cursor where you want to insert the image. 2. Click on the Insert/edit image tool. a. Select Internal if the image is located in a folder on your site. 1. Click in the Image box. 2. A chooser window will open. Select a file using the Recent, Browse, or Upload links and then click Choose. Use the Upload link when the image file you want to use is on your computer and not yet part of your site directory. Then click Choose. 3. Check the Decorative box if the image is for decorative purposes only and an image description is not needed. 4. Enter an Image description if you did not check the Decorative box. This is the text that is used by screen reader software. The text is usually a short description of the image. b. Select External to point to an image outside of your site. 1. In the Image box, enter (or copy/paste) the URL for the image. 2. Check the Decorative box if the image is for decorative purposes only and an image description is not needed. 32

33 3. Click OK. 3. Enter an Image description if you did not check the Decorative box. This is the text that is used by screen reader software. The text is usually a short description of the image. Content Details The following topics are covered in the online CMS Style Guide at Responsive Images ensure that images are sized according to the screen size it s being viewed on. Styles view how to insert special styles such as buttons, header text, font colors, alerts and more. Tables our table guide will show you how to build stylized tables that are responsive to screen size. Publishing Your Content The process of publishing your page/file is what puts that content on the web server. Anytime you make a change to a page or file you need to publish it to the web server so that your additions/changes can be viewed on your live webpage. You can publish individual pages, folders, or your entire site. Publish all folder contents or just a single file Select the folder or file you want to publish and click the icon at the top of the page, or right click on the file or folder and select Publish from the pop-up menu. Click Submit. Publish Selected Files If you select a folder then you can choose what you want to publish by checking the boxes next to the appropriate folders and/or files, then click the icon. Click Submit. 33
 in order to see the changes after you publish.")
34 Publish Your Entire Site If you add, move, or delete a first level left-hand navigation option, or update the page footer block, then you must publish your entire site before the change will appear on the live website. Select the site name at the top of the file directory, then click Be sure to refresh your live browser page (Ctrl + R) in order to see the changes after you publish. Publish to WebDev (test server) If you do not want to publish content to the live web server, but you want to see what the content would look like when it is published then you can choose to publish only to the test server named webdev. The URL for your webdev site is typically the same as your live site, but with ~webdev preceding your site name. For example: Live site= Webdev site= 1. Select the page or folder that you want to publish (or select the site name to publish your entire site). 2. Click. 3. Uncheck the box for the live Destination. 4. Click Submit. 34
35 Using Anchors By including an anchor tag within a page, you can place links on your page which, when clicked, allow the reader to jump to another location on the page. Create the Anchor 1. Place the cursor in front of the text where you want to create an anchor. 2. Select the anchor icon in the content editing tool area. 3. Name your anchor. Name must not contain spaces. Link to the Anchor 1. Highlight the text you wish to link to your anchor. 2. Select the insert/edit link icon in the text editor. 3. In the Anchor field, type in the name of the anchor you wish to link to. (See example below) 4. Click OK. 35
36 Anchor example. Editing the Footer and Tracking Visits to Your Site You can edit the address and contact phone number information in the page footer. The footer is a block file which appears on all of your html pages, so changing the footer block file and then publishing your entire site will update the footer for all of your pages. The footer file name is site-nav and is located in the root level of your site s file directory. DO NOT MOVE OR DELETE THIS FILE. This footer file is also where you can copy a Google Analytics Tracking ID. Adding Google Analytics to your site will allow you to keep track of how many people are visiting your site, get information on which pages are most popular and see where users are clicking. Please refer to this separate documentation for information on using Google Analytics on your site. 1. Select the footer file, site-nav located at the root level of your file tree. 36

37 2. Click the Edit tab and update the address and phone number information as appropriate.. 3. Click Save & Preview, then Submit. 4. Publish your entire site to update the footer on all pages of the live site. 37
38 Importing Files Best practice is to store all non-html files under the files folder. For example, PDF files should be stored in the files/pdf folder, and image files (JPG, PNG and GIF) in the files/images folder. Adding a File to Cascade Images and PDF documents are common examples of files you may use in your site. You can upload a file with the Add Content option, or when you are selecting a file in the appropriate section of the template. Both options are shown below. Import a file with the Add Content link 1. Select Add Content > Default > File. 2. Drag/Drop a file in the box or click in the box to browse for a file. NOTE: for images, size your images to the appropriate height and width before uploading them to the CMS and ensure that the file size is small a large file size will slow how fast the page loads for users and use additional data for mobile users. 3. File Name When you select or drop your file the System Name will be filled in with the file name. If necessary, change the system name to a URL friendly name. For example, remove all spaces and capital letters from the name. To separate words use a hyphen instead of an underscore character. Be sure to include the file extension with the name, otherwise you will not be able to view the file in your site. 4. Placement Folder - This indicates the folder where your file will be stored. If the location is not correct, click the folder icon to select the correct folder. Best practice is to place it in the files folder. 5. Click the Advanced Submit button (three vertical dots at top right) and click Submit. Import a file while editing a page 1. When you are editing a page and select to insert an image or an internal link, click in the box to choose a file, then select the Upload link. 2. Drag/Drop a file in the box or click in the box to browse for a file on your computer. 3. File Name When you select or drop your file the System Name will be filled in with the file name. If necessary, change the system name to a URL friendly name. For example, remove all spaces and capital letters from the name. To separate words use a hyphen instead of an underscore character. Be sure to include the file extension with the name, otherwise you will not be able to view the file in your site. 4. Placement Folder - This indicates the folder where your file will be stored. If the location is not correct, select the correct folder. Best practice is to place it in the files folder. You can search for a location in the box next to the current selection drop-down box. 5. Click Choose. 6. Click OK. 38

39 Replace/Update an Existing file If you need to replace an existing file with a new version of that file, follow the instructions below. If you need to delete a file, see the instructions for Unpublish and Delete Files. If you need to rename a file, see the instructions for Renaming a File. 1. Select the file that you want to replace and then click Edit. 2. Drag/Drop a file in the box or click in the box to browse for a file on your computer. Since you are replacing an existing file, the file name in Cascade will remain the same, regardless of what the file name is of the file you are importing. 3. Click the Advanced Submit button (three vertical dots at top right) and click Submit. 4. Publish the file. When you publish the new version of the file, any of your html pages that have a link to this file will automatically load the new file. You do not need to re-publish the html pages. You may need to clear your browser s cache to clear old history in order to see the new version of the file. Renaming a File If you want to rename a file, be sure to unpublish it first, or to select unpublish as part of the rename process. 1. In the file tree, highlight the file you want to rename. 2. Right-click on the file and select Rename. 3. BE SURE THE BOX IS CHECKED FOR Unpublish Content so that the current file name will be unpublished (removed) from the server. 4. In the New Page Name box, make the correction to the file name. Page Name should be all lowercase with no spaces. Use a hyphen to separate words. 5. Click Rename. 39

40 Creating a New Folder If you are adding new content to your site that does not relate to existing content, then you want to create a new folder to keep all the like content together. If you want to create a new first level left menu option, the folder s Display Name will be what appears in the left menu. In order for the folder s Display Name to appear in the left menu, you must have an html page named index in the folder. The Folder Name becomes part of the URL name. Follow the steps below to create a new folder. 1. Select Add Content > Unit Pages > Unit Folder. 2. Folder Name - Type a name for the folder. The Folder Name becomes part of the URL. The name should be in all lowercase with no spaces in the name. To separate words in the name, use a hyphen (-) and not an underscore. 3. Placement Folder This is the location in Cascade (your file tree) where the folder will be located. To change the folder location, click in the Placement Folder box and select a new location. 4. Title The Title is what Google Search will display as the name of the page in search results and is on the site content map. 5. Display Name - This is the name that will appear in left-hand navigation menu (if you add a file named index to this folder), and in the breadcrumbs. 6. Click Submit. Depending on your settings (see page 6) the appearance of the asset links will show either the asset s Title or Folder Name. 40
41 Creating References Using a Reference gives you a way to get a link for a page, which is not in the folder, to show up on the left hand navigation under this folder title. In the example below, the page helpful-tips is in the student-resources folder. To have a link to the helpful-tips page show as a sub-navigation option under New Features on the left-hand menu, a reference to the helpful-tips page was created in the new-features folder. The icon indicates a reference. To create a reference: Right-click on the page you want to create a Reference for. In this, example it is student-resources/helpful-tips. Select Reference from the pop-up menu. Enter a Reference Name, or just let it default to the original name. This is the name that will appear in the file tree. Placement Folder is the location where the reference will be located. Click in the Placement Folder box and select the appropriate folder location. Then click Choose. Click Submit. Publish the folder you placed the reference in by selecting the folder, then clicking the Publish option and then clicking Submit. 41

42 Unpublish and Delete Files Unpublishing a page will remove it from the live website. You should unpublish a page before you delete the page, or when you rename a page. If you do not unpublish the asset first, the page will still be live even if the file itself was deleted. There may also be occasions when you want to unpublish a page from the website, but still keep it in Cascade so that you can have it for reference in the future. Unpublish a file 1. Select the page or folder that you want to unpublish. 2. Right-click on the folder or file and select unpublish from the drop-down menu. 3. In the Unpublish page box click Submit. Delete a file or folder Deleting a file removes it from the Cascade server. You must first unpublish the file (or select to unpublish the file as part of the delete function) in order to remove the file from the web server and your live website. 1. Select the file or folder that you want to delete. 2. Right-click on the file or folder and select Delete from the drop-down menu. 3. BE SURE THE UNPUBLISH CONTENT box is checked. 4. Click Delete. Restoring Previous Version of Page Each time you submit a page that you are editing, a version of that page is saved. You can restore a previous version of a page (up to 19 previous versions are saved). 1. Select the page in the file directory for which you want to restore a previous version. 2. Right-click on the page and select Versions from the drop-down menu. 3. You can view the page to verify it is the version you want to restore. Select the version you think you want to restore by clicking on the file name in that line. 4. You will be viewing that version of the page. To restore this version or to select to view additional versions, click More (at top right) and select the appropriate action. 42

43 Reordering Left Hand Navigation You can change the order in which your left-hand menu options appear on your website. To reorder the main level left-hand navigation: 1. Select the Site Folder at the top of the file directory. You will see your folders and files listed in the main view area. 2. Sort by Order number by clicking the column name Order. Some folders, such as the _internal, and files folders do not display in the left navigation, so their position numbers are not relevant to the ordering. The item with lowest relevant number appears highest in the menu choices. 3. Drag a folder to place it in a higher or lower menu spot. 4. Publish. You must publish your entire site if you modify the left menu s navigation order. 43


44 Reorder Sub (folder) navigation 1. Click on the arrow to the right of the folder name. You will see the folder s content listed in the main view area. 2. Sort by Order number by clicking the column name Order. The item with lowest relevant number appears highest in the menu choices. 3. Drag a file to place it in a higher or lower menu spot. 4. Publish. You must publish your entire folder if you modify the page order. Coping Images from the Image Library The Image Library contains pictures you can use for an Image Header. It is a site that is available to you in the site-chooser drop-down box. 1. At the top left of the Cascade window you will see the site-chooser drop-down box. Click in the site chooser box and select the Image Library site. The steps below explain how to copy files from the Image Library to your site. a. Select the full-width folder in the Image Library. To preview the images, switch to Thumbnail view. 44


45 b. Select images: In Thumbnail view, click on an image to select it. You can select multiple images. In List view, select images by putting a checkmark in the box to the left of the image name. c. Click on the Copy icon. d. In the Choose a destination folder window, select the images folder on YOUR site. 45


46 e. Click Copy. f. Verify that the images will be copied to the correct site/folder. Then click Confirm Copy. Restore deleted files Deleted files are stored in the Trash for 30 days. The Trash can be accessed from your site and the link is located above your file directory. You can restore a file to your site while it is still in the trash. 1. Click on Trash. 2. Place a check mark next to the file(s) you want to restore. 3. Click the restore icon to restore the file(s). The files will be restored to the folder specified in the Original Location column. View Draft Versions When you edit a file, Cascade creates a draft version. When you Save & View the file, you are looking at the draft version. If you have previously submitted the file, then you will have two versions, the current version and a draft. When you submit the draft, it will overwrite the current version. 46

47 From the My Content area of the Dashboard, you can see all the files for which you have a draft version. 47
GENERAL TEMPLATE AREAS
 1 GENERAL TEMPLATE AREAS SIU Headers SIU Headers are created and edited through the main administration of the CMS. Users do not have access edit SIU headers. Logo and Identifier Logo or the College Identifier
NORTH CAROLINA A&T STATE UNIVERSITY CMS USER GUIDE. A Manual for the Cascade Server Content Management System (CMS)
") NORTH CAROLINA A&T STATE UNIVERSITY CMS USER GUIDE A Manual for the Cascade Server Content Management System (CMS) Table of Contents Chapter 1 - Getting Started... 3 Overview... 3 What is a Content Management
NORTH CAROLINA A&T STATE UNIVERSITY CMS USER GUIDE A Manual for the Cascade Server Content Management System (CMS) Table of Contents Chapter 1 - Getting Started... 3 Overview... 3 What is a Content Management
UW WEB CONTENT MANAGEMENT SYSTEM (CASCADE SERVER)
") UW WEB CONTENT MANAGEMENT SYSTEM (CASCADE SERVER) LEVEL 1 (INTRODUCTION) Information Technology Updated February 2018 Presented By: UW Institutional Marketing and IT Client Support Services University
UW WEB CONTENT MANAGEMENT SYSTEM (CASCADE SERVER) LEVEL 1 (INTRODUCTION) Information Technology Updated February 2018 Presented By: UW Institutional Marketing and IT Client Support Services University
WEBSITE USER GUIDE V.4
 WEBSITE USER GUIDE V.4 SEC. 01 SEC. 02 SEC. 03 SEC. 04 SEC. 05 SEC. 06 CASCADE INTERFACE OVERVIEW LOGIN PAGE USER DASHBOARD SITE DIRECTORY EDITING PAGES PAGE EDITOR OVERVIEW STANDARD ROW COMPONENTS EDITING
User s Manual. Beacon Technologies, Inc. 164-B Thatcher Rd. Greensboro, NC beacontechnologies.com
 Beacon Technologies, Inc. 164-B Thatcher Rd. Greensboro, NC 27409 User s Manual beacontechnologies.com Grossmont-Cuyamaca Community College District Version 1.4 January 26, 2015 Table of Contents 1. THE
CMS USER GUIDE A MANUAL FOR CASCADE SERVER CONTENT MANAGEMENT SYSTEM (CMS)
") CMS USER GUIDE A MANUAL FOR CASCADE SERVER CONTENT MANAGEMENT SYSTEM (CMS) CMS USER GUIDE A MANUAL FOR CASCADE SERVER CONTENT MANAGEMENT SYSTEM (CMS) BRANDEIS UNIVERSITY LOGIN webedit.brandeis.edu LIVE
CMS USER GUIDE A MANUAL FOR CASCADE SERVER CONTENT MANAGEMENT SYSTEM (CMS) CMS USER GUIDE A MANUAL FOR CASCADE SERVER CONTENT MANAGEMENT SYSTEM (CMS) BRANDEIS UNIVERSITY LOGIN webedit.brandeis.edu LIVE
NETZONE CMS User Guide Copyright Tomahawk
 NETZONE CMS User Guide Copyright 2015. Tomahawk 1 Phone: + 64 9 522 2333 Email: getintouch@tomahawk.co.nz Tomahawk 2015 www.tomahawk.co.nz 2 NETZONE CMS USER GUIDE WHAT YOU LL FIND INSIDE LOGGING IN 4
Introduction to Cascade Server (web content management system) Logging in to Cascade Server Remember me Messages Dashboard Home
 Logging in to Cascade Server Remember me Messages Dashboard Home") Introduction to Cascade Server (web content management system) Last Updated on Jul 14th, 2010 The College of Charleston's web site is being produced using a Content Management System (CMS) called Cascade
Introduction to Cascade Server (web content management system) Last Updated on Jul 14th, 2010 The College of Charleston's web site is being produced using a Content Management System (CMS) called Cascade
End User Guide Faculty Folders
 End User Guide Faculty Folders Hannon Hill Corporation for California State Polytechnic University, Pomona Hannon Hill Corporation 3423 Piedmont Road, Suite 520 Atlanta, GA 30305 www.hannonhill.com 678.904.6900
Site Owners: Cascade Basics. May 2017
 Site Owners: Cascade Basics May 2017 Page 2 Logging In & Your Site Logging In Open a browser and enter the following URL (or click this link): http://mordac.itcs.northwestern.edu/ OR http://www.northwestern.edu/cms/
SCHULICH MEDICINE & DENTISTRY Cascade Content Management System - February, 2018
 SCHULICH MEDICINE & DENTISTRY Cascade Content Management System - February, 2018 Cascade Web Editor Guide Schulich School of Medicine & Dentistry Helpdesk: t. 519.661.2111 x81377; helpdesk@schulich.uwo.ca
How to Edit Your Website
 How to Edit Your Website A guide to using your Content Management System Overview 2 Accessing the CMS 2 Choosing Your Language 2 Resetting Your Password 3 Sites 4 Favorites 4 Pages 5 Creating Pages 5 Managing
Administrative Training Mura CMS Version 5.6
 Administrative Training Mura CMS Version 5.6 Published: March 9, 2012 Table of Contents Mura CMS Overview! 6 Dashboard!... 6 Site Manager!... 6 Drafts!... 6 Components!... 6 Categories!... 6 Content Collections:
Creating a Website with Wordpress
 Creating a Website with Wordpress Wordpress Fundamentals Version 1.6 Fayette County Public Schools June 28, 2013 Sow-Foong Hedman Technology Web Team Contents What is Wordpress?... 4 Overview... 4 Key
How To Guide. Hannon Hill Corporation for Rowan University
 How To Guide Hannon Hill Corporation for Rowan University Hannon Hill Corporation 3423 Piedmont Road, Suite 520 Atlanta, GA 30305 www.hannonhill.com 678.904.6900 info@hannonhill.com Rowan University: How
How to Edit Your Website
 How to Edit Your Website A guide to using your Content Management System Overview 2 Accessing the CMS 2 Choosing Your Language 2 Resetting Your Password 3 Sites 4 Favorites 4 Pages 5 Creating Pages 5 Managing
Websites. Version 1.7
 Websites Version 1.7 Last edited 15 Contents MyNetball Information...3 Websites...4 Web packages...4 Setting up the layout...5 Uploading files and images...6 Using Dropbox to Increase your Website Data...7
In the fourth unit you will learn how to upload and add images and PDF files.
 Introduction Here at SUNY New Paltz, we use the Terminal Four (T4) web content management system (CMS). This puts the power of editing content on our college s webpage in the hands of our authorized users.
Vetstreet Web Builder Editor Tool User Guide v2.1. Web Builder. User Guide v2.1
 Web Builder User Guide v2.1 Contact your Account Manager at (888) 799-8387 or email support@vetstreet.com with questions. Page 1 Index... 1 The Editor Tool... 7 Forgot Your Username or Password?... 7 How
OU Campus Beginner s Guide
 OU Campus Beginner s Guide for web publishers at Augusta University Table of Contents Terminology... 1 Homepage, Index Page & Landing Page Website Binary Files Logging In... 2 Failed Logins & User Lockouts
General Training Curriculum
 General Training Curriculum Table of Contents 1.0 Getting Started 1.1 What is MODX? 1.2 Browser Support 1.3 How Do I Log In? 2.0 MODX Dashboard 2.1 What is a Dashboard? 2.2 Global Top Menu Bar 2.2.0 MODX
Login: https://authoring.ipfw.edu/c. Quick Guide for dotcms & Accessibility April 2016 Training:
 dotcms & Accessibility Note: The recommended browser for dotcms is Mozilla Firefox. at 0). d. Show on Menu Check the box if the folder should be shown on the menu. Logging In 1. Open Mozilla Firefox and
Creating an Image Gallery Asset in OU Campus 4/23/15
 Creating an Image Gallery Asset in OU Campus 4/23/15 IMPORTANT: To create a new image gallery, you must first crop all of your images to the same dimensions and save them to a folder on your computer.
Beginner Workshop Activity Guide 2012 User Conference
 Beginner Workshop Activity Guide 2012 User Conference TUESDAY, MARCH 6 2:00PM 5:00 PM Beginner Training Workshop Attendees will learn the end user functions of OU Campus TM. They will learn how to log
SCHULICH MEDICINE & DENTISTRY Website Updates August 30, Administrative Web Editor Guide v6
 SCHULICH MEDICINE & DENTISTRY Website Updates August 30, 2012 Administrative Web Editor Guide v6 Table of Contents Chapter 1 Web Anatomy... 1 1.1 What You Need To Know First... 1 1.2 Anatomy of a Home
Lava New Media s CMS. Documentation Page 1
 Lava New Media s CMS Documentation 5.12.2010 Page 1 Table of Contents Logging On to the Content Management System 3 Introduction to the CMS 3 What is the page tree? 4 Editing Web Pages 5 How to use the
College of Arts & Sciences
 College of Arts & Sciences RedDot CMS Guide for Site Editors This guide is designed to show you how to work with the RedDot Content Management System (CMS) at Georgia State University. Particularly, it
LEVEL 1 Site Administrator Grants permissions and manages access, manages main homepage.
 USING JOOMLA LEVEL 2 (TRAINING) OVERVIEW This document is designed to provide guidance and training for incorporating your department s content into to the Joomla Content Management System (CMS). Each
Dreamweaver CS 5.5. University Information Technology Services. Training, Outreach, Learning Technologies, and Video Production
 Dreamweaver CS 5.5 Creating Web Pages with a Template University Information Technology Services Training, Outreach, Learning Technologies, and Video Production Copyright 2012 KSU Department of Information
OUCampus v10. Basic Access and Editing Instructions
 OUCampus v10 Basic Access and Editing Instructions February 2017 Contents Logging on to OU Campus... 1 Check In/Check Out Concept... 1 Editing a Page... 2 Uploading Files... 3 Adding Links... 4 Editing/Removing
What is OU Campus? Log into OU Campus
 OU Campus v10 Content Providers User Guide This document is designed to provide (level 5) Content Providers with basic information needed to do most tasks. Those needing additional information are encouraged
EDITING CONTENT LOGGING IN. https://bond.edu.au/user. Login via CAS login. Navigate to your page, and click on New Draft at the bottom of the page
 EDITING CONTENT LOGGING IN https://bond.edu.au/user Login via CAS login Navigate to your page, and click on New Draft at the bottom of the page FINDING CONTENT Click on Content in the admin menu to view
Cascade User Guide. Introduction. Key System Features. User Interface
 Cascade User Guide Introduction Key System Features User Interface Menus and Moving Through the System Files and Pages Working with Existing Pages File Action Menu Version Control Deleting files Restoring
Information Technology Services
 Information Technology Services Quick Start Guide for Cascade Server Quick Start Guide Sections: Logging into Cascade Server... 3 Dashboard... 4 Main Navigation... 4 Search Field... 4 Left hand Navigation/Asset
Editor Guide. There are three ways to create, edit and delete an article within SOCS. They are Central Services, SOCS Wiki s and Easy Edit.
 Editor Guide There are three ways to create, edit and delete an article within SOCS. They are Central Services, SOCS Wiki s and Easy Edit. Central Services Select Editor from left-hand side navigation
Logging Into Your Site
 This training document is meant as a step-by-step guide to creating and delivering a UW-Madison site in the current UW-Madison theme. In this training class, you will learn how to log in to access your
eportfolio GENERAL USER
 eportfolio GENERAL USER Startup Guide [2016-17] Table of Contents Page 2: Introduction Logging in to your Digication account Page 3: Page 4: Steps to create an eportfolio from course template Steps to
WORDPRESS USER GUIDE HWDSB Websites
 WORDPRESS USER GUIDE HWDSB Websites Table of Contents Forward - About Wordpress... 3 1. Getting Started... 5 1.1) Log into your account... 5 1.2) About the Dashboard... 6 1.3) Internal vs. External Views...
e-portfolios Benefits of an e-portfolio Showcase your best works Progress assessment Job search; present to employers Share with family and friends
 1 e-portfolios Digication training objective The objective is to learn the tools and features of Digication and gain the essential skills to use Digication to develop an electronic portfolio. What you
EPiServer Content Editor s Guide
 EPiServer Content Editor s Guide Contents Getting Started with EPiServer... 19 Logging In... 19 Navigating from the Global Menu... 19 Generic Functions, Toolbar and Panes... 20 Generic Functions... 20
Classroom Blogging. Training wiki:
 Classroom Blogging Training wiki: http://technologyintegrationshthornt.pbworks.com/create-a-blog 1. Create a Google Account Navigate to http://www.google.com and sign up for a Google account. o Use your
Managing Your Website with Convert Community. My MU Health and My MU Health Nursing
 Managing Your Website with Convert Community My MU Health and My MU Health Nursing Managing Your Website with Convert Community LOGGING IN... 4 LOG IN TO CONVERT COMMUNITY... 4 LOG OFF CORRECTLY... 4 GETTING
OU Campus Training. Part 1
 OU Campus Training Part 1 OU Campus Training Before you Start Website Access forms are available from the Add-Ons Dropdown (page 3) or on the Web Support Website (www.unco.edu/web-support/resources/ou-campus/forms)
OU Campus VERSION 10
 OU Campus VERSION 10 End User Manual Last Update: 8/15/2017 Contact Tish Sailer with comments or questions regarding this Manual. Contents INTRODUCTION...3 HELP DOCUMENTS AND SUPPORT... 3 ACCESSING PAGES
School Website WordPress User Guide
 School Website WordPress User Guide version 3.3 Olathe Public Schools USD # 233 2012 Table of Contents Introduction 0 Log into WordPress... 1 Dashboard View... 1 Dashboard Menu Bar.. 2 Pages. 4 New Page
Introduction. The topics included in this guide are:
 Introduction Caorda Content is a powerful content management tool that allows you to update your web site through a standard Internet web browser. The purpose of this guide is to introduce you to Caorda
WordPress Manual For Massachusetts Academy of Math and Science
 WordPress Manual For Massachusetts Academy of Math and Science September 19, 2017 Table of Contents Who should use this manual... 4 Signing into WordPress... 4 The WordPress Dashboard and Left-Hand Navigation
page 1 OU Campus User Guide
 page 1 OU Campus User Guide Logging Into OU Campus page page 2 1. Navigate to a page on your site that you wish to edit. 2. Scroll down to the footer and click the symbol. 3. Enter your OU Campus username
Adobe Dreamweaver CS5/6: Learning the Tools
 Adobe Dreamweaver CS5/6: Learning the Tools Dreamweaver is an HTML (Hypertext Markup Language) editor, authoring tool, and Web site management tool. Dreamweaver is a WYSIWYG (what you see is what you get)
Web Pro Manager: General User Guide
 Web Pro Manager: General User Guide Version 1.14 (7/2013) Web Pro Manager is an open-source website management platform that is easy to use, intuitive, and highly customizable. Web Pro Manager can be used
BHM Website Teacher User Guide
 BHM Website Teacher User Guide How to Login 1. Go to HUhttp://bhmschools.org/userUH 2. Enter your username and password and click Log in How to Change Your Password 1. Go to My Account in your Nav bar
HOW TO USE THE CONTENT MANAGEMENT SYSTEM (CMS) TABLE OF CONTENTS
 TABLE OF CONTENTS") HOW TO USE THE CONTENT MANAGEMENT SYSTEM (CMS) TABLE OF CONTENTS GETTING STARTED (LOGIN) 2 SITE MAP (ORGANIZE WEBPAGES) 2 CREATE NEW PAGE 3 REMOVE PAGE 6 SORT PAGES IN CHANNEL 7 MOVE PAGE 8 PAGE PROPERTIES
HOW TO USE THE CONTENT MANAGEMENT SYSTEM (CMS) TABLE OF CONTENTS GETTING STARTED (LOGIN) 2 SITE MAP (ORGANIZE WEBPAGES) 2 CREATE NEW PAGE 3 REMOVE PAGE 6 SORT PAGES IN CHANNEL 7 MOVE PAGE 8 PAGE PROPERTIES
Monarch Services Website Quick Guide
 January 2016 Monarch Services Website Quick Guide www.monarchscc.org Credentials Wordpress Login URL: http://www.monarchscc.org/wp-login Login name :Nancya Password: wcs9na! Hosting Login at dreamhost.com
EKTRON 101: THE BASICS
 EKTRON 101: THE BASICS Table of Contents INTRODUCTION... 2 TERMINOLOGY... 2 WHY DO SOME PAGES LOOK DIFFERENT THAN OTHERS?... 5 LOGGING IN... 8 Choosing an edit mode... 10 Edit in context mode (easy editing)...
File Cabinet Manager
 Tool Box File Cabinet Manager Java File Cabinet Manager Password Protection Website Statistics Image Tool Image Tool - Resize Image Tool - Crop Image Tool - Transparent Form Processor Manager Form Processor
CreateASite Beginner s Guide
 Contents Getting Started... 3 Access the CreateASite Control Panel... 3 Select a Category/Subcategory... 4 Select a Template... 6 Change the Site Template... 10 Change Colours... 12 Change Fonts... 13
Percussion Documentation Table of Contents
 Percussion Documentation Table of Contents Intro to the Percussion Interface... 2 Logging In to Percussion... 2 The Dashboard... 2 Managing Dashboard Gadgets... 3 The Menu... 4 The Finder... 4 Editor view...
eportfolios First, request for an account through
 1 eportfolios Digication Training Objective The objective is to learn the tools and features of Digication and gain the essential skills to use Digication to develop an electronic portfolio. What you can
Introduction to Adobe CQ5
 UNDP Country Office User Guide Part I Introduction to Adobe CQ5 How to use Adobe CQ5 to build websites UNDP OC Web Team v1.1 1. How to log in to CQ5 1 Contents 1. How to log in to CQ5... 2 2. CMS terminology...
OU Campus Training. Part 2
 OU Campus Training Part 2 Login to OU Campus To get started you need to login to OU Campus. While work on your website just use the page last updated date located in the footer: This will take you to the
CMS Training. Web Address for Training Common Tasks in the CMS Guide
 CMS Training Web Address for Training http://mirror.frostburg.edu/training Common Tasks in the CMS Guide 1 Getting Help Quick Test Script Documentation that takes you quickly through a set of common tasks.
Pages are static content, generally linked in your navigation. They are used for things like your about page and contact page.
 North Star Marketing Client : The Guthrie Group Deliverable : Website Training +++ LOGGING IN AND OUT +++++++++ 1. Go to http://tgg.northstarmarketing.com/wp admin/. This is the address for the staging
Index. alt, 38, 57 class, 86, 88, 101, 107 href, 24, 51, 57 id, 86 88, 98 overview, 37. src, 37, 57. backend, WordPress, 146, 148
 Index Numbers & Symbols (angle brackets), in HTML, 47 : (colon), in CSS, 96 {} (curly brackets), in CSS, 75, 96. (dot), in CSS, 89, 102 # (hash mark), in CSS, 87 88, 99 % (percent) font size, in CSS,
Display Screen User Guide. Last Updated: October 28, 2016
 Display Screen User Guide Last Updated: October 28, 2016 Table of Contents Before you Begin... 2 Create content in Microsoft PowerPoint... 2 Convert your content in Microsoft PowerPoint to images... 3
End-User Reference Guide Troy University OU Campus Version 10
 End-User Reference Guide Troy University OU Campus Version 10 omniupdate.com Table of Contents Table of Contents... 2 Introduction... 3 Logging In... 4 Navigating in OU Campus... 6 Dashboard... 6 Content...
Installation and Activation of Foody pro theme
 Installation and Activation of Foody pro theme Installation 1. Install Word Press from http://codex.wordpress.org/installing_wordpress. 2. Upload via Word press Admin: - Go to your WordPress admin panel,
Logging in to the management system.
 Welcome to your new site! The Wordpress publishing platform is a robust tool that helps you publish your content to the web without getting too involved with the code. This guide is designed to help you
Learn how to login to Sitefinity and what possible errors you can get if you do not have proper permissions.
 USER GUIDE This guide is intended for users of all levels of expertise. The guide describes in detail Sitefinity user interface - from logging to completing a project. Use it to learn how to create pages
FileNET Guide for AHC PageMasters
 ACADEMIC HEALTH CENTER 2 PageMasters have the permissions necessary to perform the following tasks with Site Tools: Application Requirements...3 Access FileNET...3 Login to FileNET...3 Navigate the Site...3
Wordpress Training Manual
 The Dashboard... 2 If this is your first time logging in:... 2 How do I change my password or email address?... 3 Search Engine Optimization (SEO)... 4 SEO for Pages... 4 SEO for Images... 5 Managing Pages...
End-User Reference Guide El Camino College Compton Center
 End-User Reference Guide El Camino College Compton Center OU Campus Version 10 OmniUpdate, Inc. 1320 Flynn Road, Suite 100 Camarillo, CA 93012 OmniUpdate, Inc. 1320 Flynn Road, Suite 100 Camarillo, CA
WordPress Manual First Year Experience
 WordPress Manual First Year Experience May 18, 2015 Table of Contents Who should use this manual... 3 Signing into WordPress... 3 The WordPress Dashboard and Left-Hand Navigation Menu... 4 The Home Page
Drupal 7 Template. Page 1 of 27. Site Title. Navigation Tabs. Homepage Slide. Social Media. News article. Events. Links. Contact Information
 Site Title Navigation Tabs Homepage Slide News article Social Media Events Contact Information Links Page 1 of 27 Table of Contents USER ACCOUNT... 3 Edit Profile... 3 CONTENT... 5 ADD CONTENT... 5 BASIC
Portwalk Place WORDPRESS MANUAL O ROURKE HOSPITALITY MARKETING OROURKEHOSPITALITY.COM
 Portwalk Place WORDPRESS MANUAL TABLE OF CONTENTS Login... 3 Editing Existing Pages... 4 Adding New Pages... 7 Editing/Adding Text... 9 Creating a Link... 10 Linking to a PDF... 11 Making a Link a Button...
Somerville College WordPress user manual. 7th October 2015
 Somerville College WordPress user manual 7th October 05 0 INDEX YOUR SITE IMAGES FORMS THE MENU 4 4 5 0 YOUR SITE The Content Management System The Somerville website has been built using the WordPress
Do It Yourself Website Editing Training Guide
 Do It Yourself Website Editing Training Guide Version 3.0 Copyright 2000-2011 Sesame Communications. All Rights Reserved. Table of Contents DIY Overview 3 What pages are editable using the DIY Editing
New Website User Manual
 New Website User Manual General Notes 3 How To Login To Your Website And Access Admin Dashboard 4 Adding / Editing Sliders 5 Home Slider 5 School Slider (Same steps for ALL school pages) - Add a Slide
CMS Shado 9. Quick Start Guide
 CMS Shado 9 Quick Start Guide 1 Logging In 3 Shado Central Interface 4 Sections, Pages and Containers 7 Sections 7 Pages 7 Containers 7 The Site Tree 8 Edit Content on a Page 9 Editing Container Content
ALES Wordpress Editor documentation ALES Research websites
 ALES Wordpress Editor documentation ALES Research websites Contents Login... 2 Website Dashboard... 3 Editing menu order or structure... 4 Add a new page... 6 Move a page... 6 Select a page to edit...
Content User Guide. Pennsylvania Interactive. October 10, Training website -
 Content User Guide Pennsylvania Interactive October 10, 2014 Training website - http://www.training.pa.egov.com Table of Contents 1 INTRODUCTION... 6 1.1 Microsoft Office SharePoint Server... 6 2 ACCESS
OU Campus. Reference Guide
 OU Campus Reference Guide Table of Contents End-User Introduction...4 What is a CMS?...4 How it Works...4 New Philosophy...4 Highlights of the New TU Website...4 OU Campus Support...5 OTS WebDev...5 OTS
Centricity 2.0 Section Editor Help Card
 Centricity 2.0 Section Editor Help Card Accessing Section Workspace In order to edit your section, you must first be assigned Section Editor privileges. This is done by the Director of your Site, Subsite,
ScholarBlogs Basics (WordPress)
") Emory Center for Digital Scholarship Library and Information Technology Services ScholarBlogs Basics (WordPress) Table of Contents (click on the headings below to go directly to the section) Use of ScholarBlogs
Emory Center for Digital Scholarship Library and Information Technology Services ScholarBlogs Basics (WordPress) Table of Contents (click on the headings below to go directly to the section) Use of ScholarBlogs
Creating Teacher Webpages on the New APS WordPress Site
 Creating Teacher Webpages on the New APS WordPress Site TABLE OF CONTENTS INTRODUCTION 3 THE EDITING DASHBOARD 4 CREATING A NEW PAGE 5 EDITING YOUR PAGE 6 1. Page Title 7 2. Toolbar/ toolbar icons 7 3.
WCMS Designing Content
 WCMS Designing Content WCMS Redesign Series: Part II FINAL California State University, Bakersfield Last modified 7/15/2014 Page 2 REVISION CONTROL Document Title: Author: File Reference: CT055 WCMS -
Ektron Advanced. Learning Objectives. Getting Started
 Ektron Advanced 1 Learning Objectives This workshop introduces you beyond the basics of Ektron, the USF web content management system that is being used to modify department web pages. This workshop focuses
OU EDUCATE TRAINING MANUAL
 OU EDUCATE TRAINING MANUAL OmniUpdate Web Content Management System El Camino College Staff Development 310-660-3868 Course Topics: Section 1: OU Educate Overview and Login Section 2: The OmniUpdate Interface
OU Campus VERSION 10
 OU Campus VERSION 10 End User Manual Last Update: 9/8/2015 Contact Tish Sailer with comments or questions regarding this Manual. Contents INTRODUCTION...3 HELP DOCUMENTS AND SUPPORT... 3 ACCESSING PAGES
Joomla! 2.5.x Training Manual
 Joomla! 2.5.x Training Manual 1 Joomla is an online content management system that keeps track of all content on your website including text, images, links, and documents. This manual includes several
Center for Academic Excellence engaging faculty inspiring learning. WordPress Quick-Reference Manual
 Center for Academic Excellence engaging faculty inspiring learning WordPress Quick-Reference Manual Contents Signing up for a WordPress account... 2 Adding a new blog... 2 Changing the theme of your blog...
WORDPRESS TRAINING MANUAL LAST UPDATED ON FEBRUARY 26TH, 2016
 WORDPRESS TRAINING MANUAL LAST UPDATED ON FEBRUARY 26TH, 2016 LOG INTO WORDPRESS Visit the Login page http://intermountaineyecare.net/wp-admin/ Enter your Username and Password NOTE: Additional usernames
CLASS 6: March 5, 2014 MULTIMEDIA TOOLS: DGIM 601-W01 (127469)
") CLASS 6: March 5, 2014 MULTIMEDIA TOOLS: DGIM 601-W01 (127469) AGENDA: Homework Review: Website Logo (Save As: YourInitials_logo.psd ) Photoshop Lesson 6: Start Midterm Set-Up OBJECTIVE: Set-Up Photoshop
CLASS 6: March 5, 2014 MULTIMEDIA TOOLS: DGIM 601-W01 (127469) AGENDA: Homework Review: Website Logo (Save As: YourInitials_logo.psd ) Photoshop Lesson 6: Start Midterm Set-Up OBJECTIVE: Set-Up Photoshop
FirmSite Control. Tutorial
 FirmSite Control Tutorial 1 Last Updated June 26, 2007 by Melinda France Contents A. Logging on to the Administrative Control Center... 3 Using the Editor Overview:... 3 Inserting an Image... 7 Inserting
C1 CMS User Guide Orckestra, Europe Nygårdsvej 16 DK-2100 Copenhagen Phone
 2017-02-13 Orckestra, Europe Nygårdsvej 16 DK-2100 Copenhagen Phone +45 3915 7600 www.orckestra.com Content 1 INTRODUCTION... 4 1.1 Page-based systems versus item-based systems 4 1.2 Browser support 5
Roxen Content Provider
 Roxen Content Provider Generation 3 Templates Purpose This workbook is designed to provide a training and reference tool for placing University of Alaska information on the World Wide Web (WWW) using the
How to set up a local root folder and site structure
 Activity 2.1 guide How to set up a local root folder and site structure The first thing to do when creating a new website with Adobe Dreamweaver CS3 is to define a site and identify a root folder where
Web Publishing Basics II
 Web Publishing Basics II Jeff Pankin Information Services and Technology Table of Contents Course Objectives... 2 Create a Site Definition... 3 The Dreamweaver CS4 Interface... 4 Panels are groups of icons
2016 TRTA Content Managers Resource Guide How to update and edit your local unit website. Roy Varney, TRTA Multimedia Specialist
 2016 TRTA Content Managers Resource Guide How to update and edit your local unit website. Roy Varney, TRTA Multimedia Specialist Table of Contents Introduction... 1 Basic information... 1 - How to log
How to Access Your Website in WCMS
 1 Table of Contents 1. Accessing your website in WCMS 2. Creating a new page in WCMS 3. Editing a page in WCMS 4. Insert an image 5. Optional Elements a. Featured Image b. Custom Index Block c. Top Right
TYPO3 Editing Guide Contents
 TYPO3 Editing Guide Contents Introduction... 2 Logging in... 2 Selecting your Workspace for editing... 2 Working with Content Elements... 3 Working in the Editing Window... 4 Pasting content from MS Word