ONEWeb: The Definitive Guide. A Comprehensive Look at the ONEWeb Content Editor
|
|
|
- Coleen McGee
- 5 years ago
- Views:
Transcription

1 ONEWeb: The Definitive Guide A Comprehensive Look at the ONEWeb Content Editor Last revised November 18, 2014
2 Contents Getting Started with ONEWeb...4 Clearing Your Browsing Data and History...4 Windows Users...4 OS X Users...5 ONEWeb Page Structure...6 Masters and Regions...6 Content Page Master...7 Landing Page Master...8 News Master*...9 Wide Content Page Master Home Page Master* Logging in to ONEWeb Creating a New ONEWeb Page Editing Page Settings Working with Content Blocks Alpha-sorted Directory Byline* Carousel Data Table Emergency Home Page Content* Everyday Home Page* Featured Media Full Page Table Navigation News Listing People List Section with Definition List Section with List Section with Pull Media Section with Pull Quote Section with Text Spiffs Address Spiff
3 Calendar Spiff Clinical Appointments Spiff Contact Spiff List Spiff Media Spiff MyChart Spiff News Spiff Text Spiff Thumbnail Spiff Using the Link Chooser Using the Media Chooser Images Documents Upload a new file Audio/Video Page Versioning Page Approval and Publishing Process Step One: Internal Departmental Review Step Two: Share Your Page with the Office of Communications Option One: Manually Release for Review Option Two: Automatic Release for Review Step Three: Feedback or Approval Notification from the Office of Communications Web Content Reminders from the Office of Communications When creating or editing a page Media Content Accuracy Responsibility My Console
4 Getting Started with ONEWeb The ONEWeb content editor features an intuitive interface, which allows you to quickly add and update content and media as you manage your BCM website. All content and media are added and updated within content blocks, and these content blocks are designed specifically with the viewer in mind and will help you to divide content and media into easily scannable chunks. To begin making updates to your website using the ONEWeb content editor, please install the free Google Chrome web browser at or the free Mozilla Firefox web browser at Clearing Your Browsing Data and History If you are ever experiencing problems using the ONEWeb content editor, it is recommended that you first clear your browsing data and history and attempt to perform the operation again before reporting an issue. In addition, as new features are made available within ONEWeb, you should also clear your browsing data to ensure you are able to take advantage of the latest features and functions. Follow the steps below to clear your Chrome browsing data. 1. Click the Chrome menu in the upper, right corner of the browser toolbar. 2. Select Tools. 3. Select Clear browsing data. 4. In the dialog that appears, select all the checkboxes. 5. Use the menu at the top to select the amount of data that you want to delete. Select the beginning of time to delete everything. 6. Click Clear browsing data. You can also bookmark these steps for future reference: To clear your Firefox browser history, take the following steps. Windows Users 1. Select the Firefox menu (the orange button in the top left corner of your browser window). 2. Select History. 3. Select Clear Recent History 4. In the Clear Recent History window, select the Time range to clear. Select Everything if you want to completely expunge your history. 5. Click the arrow next to Details, and check all available boxes. 6. Click the Clear Now button. 4
5 You can also bookmark these steps for future reference: US/kb/remove-recent-browsing-search-and-download-history#w_how-do-i-clear-myhistory. OS X Users 1. Click the History menu. 2. Select Clear Recent History 3. In the Clear Recent History window, select the Time range to clear. Select Everything if you want to completely expunge your history. 4. Click the arrow next to Details, and check all available boxes. 5. Click the Clear Now button. You can also bookmark these steps for future reference: US/kb/remove-recent-browsing-search-and-download-history#w_how-do-i-clear-myhistory. 5
 within that theme 3. Content regions on the page, determined by the master 4. Content blocks compatible with each content region A page using the ONEWeb theme and Landing Page master.")
6 ONEWeb Page Structure Masters and Regions In the ONEWeb content management system, every web page has the following characteristics: 1. Specific visual theme (the look and feel of the page) 2. Master (layout) within that theme 3. Content regions on the page, determined by the master 4. Content blocks compatible with each content region A page using the ONEWeb theme and Landing Page master. Currently, only one theme (ONEWeb) is available. The following masters are compatible with this theme. 6
7 Content Page Master The Content Page master is the most commonly used master throughout the website, comprising nearly all pages that are not home pages or landing pages. Regions Noted below each region are the content blocks compatible with that region. 1: Navigation 2: Content 3: Origami (sidebar) Navigation menu Section with text Section with pull media Section with list Section with pull quote Section with definition list Carousel Alpha-sorted directory News listing Featured media People List Text Spiff List Spiff MyChart Spiff Address Spiff Clinical Appointments Spiff Contact Spiff Media Spiff Thumbnail Spiff News Spiff Calendar Spiff 7
 4: Spiff region Navigation menu Image carousel Text Spiff, List Spiff, MyChart Spiff, Address Spiff, Clinical Appointments Spiff, Contact Spiff, Media")
8 Landing Page Master Regions Noted below each region are the content blocks compatible with that region. 1: Navigation 2: Content 3: Origami (sidebar) 4: Spiff region Navigation menu Image carousel Text Spiff, List Spiff, MyChart Spiff, Address Spiff, Clinical Appointments Spiff, Contact Spiff, Media Spiff, Thumbnail Spiff, News Spiff, Calendar Spiff Text Spiff, List Spiff, MyChart Spiff, Address Spiff, Clinical Appointments Spiff, Contact Spiff, Media Spiff Thumbnail Spiff, News Spiff Calendar Spiff 8
 Navigation menu Section with text Section with pull media Section with list Section with pull quote Section with definition list Carousel Alpha-sorted")
9 News Master* *This master is currently reserved for use by the Office of Communications. Regions Noted below each region are the content blocks compatible with that region. 1: Navigation 2: Content 3: Origami (sidebar) Navigation menu Section with text Section with pull media Section with list Section with pull quote Section with definition list Carousel Alpha-sorted directory Byline People List Text Spiff List Spiff MyChart Spiff Address Spiff Clinical Appointments Spiff Contact Spiff Media Spiff Thumbnail Spiff News Spiff Calendar Spiff 9

10 Wide Content Page Master Regions Noted below each region are the content blocks compatible with that region. 1: Navigation 2: Content Navigation menu Alpha-sorted directory Full Page Table 10

11 Home Page Master* *This master is reserved for use by the Office of Communications. Regions Noted below each region are the content blocks compatible with that region. 1: Content Everyday home page Emergency home page content 11


12 Logging in to ONEWeb 1. Navigate to 2. Click the Log In link, located in the upper, right corner of the page. 3. Enter your BCM address and Password in the corresponding fields, and click Submit. 4. Browse to the desired page you wish to edit or create a new child page beneath. 12
13 Creating a New ONEWeb Page A website is really just a collection of pages, where some are children or siblings to other pages. A tree diagram, like a family tree, best illustrates how these pages connect to one another, where the BCM home page is alone at the top, and all other pages are children to it, and so on. Just like in a real family tree, you can t have children without parents higher up in the tree. So to have a Medical School page, you have to have a Schools parent. That Schools page has to have an Education parent, and that Education parent has to have a parent as well, which is the BCM home page. It is important to note that, to create a new ONEWeb page, you must first navigate to the desired parent page. 1. Navigate to the desired parent page under which you would like to create a new ONEWeb page. 2. From the parent page, click the Add new page button from the Editor toolbar. 13

14 3. Within the Add a new page window, complete the following fields. Title The title displays within the browser tab and breadcrumb. Name The page name displays at the end of the URL. It must contain only lowercase letters, numbers, or a hyphen. Include hyphens between words to ensure human-readable URLs. Description The description should be a descriptive sentence which summarizes what the page is about. The description will display for viewers on a search engine result page. Page parent The current page parent displays by default. Verify the parent is correct. The page parent can be changed here, if desired. Redirect target* If the viewer should be redirected to another ONEWeb page when visiting the current page, a redirect page can be selected. Tags** Press the down arrow key or start typing to select the desired tags. It is important to enter general tags and specific tags for search purposes. If the tag you enter does not appear in blue below the tags field, it will not be applied. Show in navigation Signifies that this page s title, as you entered in the Title field, will appear in the parent page s blue bar navigation menu. This box is checked by default, and should only be unchecked if you explicitly want to create a page that isn t meant to show in its parent page s blue bar navigation menu. * NOTE: Please contact the Office of Communications (pa-webteam@bcm.edu) before using. 14
 with any tags you need added to ONEWeb. 4. Within the Choose a Master section, select: Content Page if you are creating a standard page.")
15 ** NOTE: Though over 4,000 tags are preloaded in the system, and matches will appear as you type, if you wish to add a tag that isn t found, please contact the Office of Communications (pa-webteam@bcm.edu) with any tags you need added to ONEWeb. 4. Within the Choose a Master section, select: Content Page if you are creating a standard page. Landing Page if you are creating a landing, or entry, page. Directory if you wish to create a page that will only include an alpha-sorted directory listing. 5. Currently, there are no other visual themes to select from. Within the Choose a Theme section, the OneWeb theme is selected by default. 6. After completing the above fields, click ok. Your new page displays. 15

16 Editing Page Settings If you need to edit a page s properties, such as a page s title, description, or name, you can click the Edit page settings button from the Editor toolbar. Within the Page Settings screen, you can edit the page Title, Description, Tags, Name, and Page parent. In addition, the following features are available within the Page Settings screen: Duplicate this page if you would like to create a page very similar in nature to the current page, click the Duplicate this page button. You will be prompted to enter a Name, Title, and designate a New Parent page for the new page. After clicking ok, a duplicate page will be created and will include the same page master and content blocks as the original page. Show in navigation checkbox this option is selected by default. When selected, the text entered in the Title field displays in the blue bar navigation on the parent page. When deselected, the text entered in the Title field is hidden from the blue bar navigation on the parent page. Use as section title checkbox this option is deselected by default. When selected, the text entered in the Title field displays above the blue bar navigation on the current page and all child pages created beneath the current page. When deselected, the page title will be inherited from the Title field of the parent page created above the current page. 16
17 Page Settings Screen: 17
 icon. 2.")

18 Working with Content Blocks 1. Within the page on which you wish to add content, hover the cursor over the desired region and click the Edit (purple pencil) icon. 2. To add a content block to the Canvas, drag and drop the desired content block from the Block Palette to the desired location within the Canvas. Content blocks can be clicked and dragged up and down to be reordered within the Canvas. When a content block is dragged to the Canvas, it will open for editing. Doubleclick on an existing content block to edit it. To delete a content block, click click delete.. Then, 18

19 19
20 Alpha-sorted Directory Compatible masters: Content Page, Directory, News The Alpha-sorted Directory content type lets you display a list of links sorted in alphabetical and/or numerical order, providing visitors the ability to quickly scan and locate desired content. You can insert a heading and explanatory paragraph, followed by a list of linked items that are automatically alphabetically and/or numerically sorted. When displayed on a page, a selector appears at the top of the directory and displays the first letter (or number) of all of the items represented within the list. The linked list items are grouped alphabetically (or numerically), and corresponding headings (A-Z and 0-9) are automatically generated. Each letter that displays within the selector is automatically linked to the corresponding section heading. Add a Heading and Description for the List 1. Within the content block edit window, enter the desired heading in the Heading field. Note that the Heading field is required. 2. Enter a descriptive paragraph about the directory items in the Description field. Add and Link List Items 3. Within the List Items section, enter a list item within the Add field and click the Insert Link button. 20


21 4. The Link Chooser displays. Select the desired page from the page tree, enter the desired external URL or select the desired document, and click ok. 5. Click the Add to List button. 6. Repeat steps 3 5 as many times as needed to add each item to the list. Locate a List Item 7. Enter part of the item name within the Find list item field. As you type, the list is automatically filtered based on the text you enter. 21


22 Edit a List Item 8. Click the Edit button to the right of the item. 9. Within the Edit area, update the item name and/or select a new link target. Then, click the Update link button. Delete a List Item 10. Within the Edit area, click the click the Delete button to the right of the corresponding item. Then, click. 22
23 11. After adding all desired list items, click ok. 12. To view the Alpha-sorted Directory on the page, click done to return to Page View. Byline* Compatible masters: News The Byline content type lets you enter authorship and contact information for a news writer. When a new page is created and the News master is selected, the Byline content type is automatically included at the top of the canvas. *Note that the Byline content type is currently for use exclusively by the Office of Communications for the creation of corporate news pages. The creation and display of department/section/center news is forthcoming. 1. Enter the desired author s name in the Author field. 2. Enter the date the article was published in the Date Published field using the date selector. 3. Enter the author s address in the field. 4. Enter the author s phone number in the Phone field. 5. Enter a desired location in the Location field. 23


24 6. Click ok. 7. To view the Byline on the page, click done to return to Page View. Carousel Compatible masters: Landing Page, Content Page Minimum image size: 1200 x 520 pixels Carousel on Landing Page 24


25 Carousel on Content Page The Carousel content type displays one to four large images spanning the width of the page, which automatically cycle every few seconds, or can be cycled through by clicking left and right arrows on either end of the carousel. 1. Within the content block edit window, enter the desired heading in the Heading field. Note that the Heading field is required. 2. Enter the desired text in the Content field. 3. Click to select an image. Note that selecting media is required. 25

26 4. The Media Chooser > Image Chooser displays. Locate and select the desired image. Click. Note that if the desired image thumbnail has a crop symbol over it, you may select the image, and then you must click the button. You can then use the Cropper tool to reposition the image as desired. 5. To make the text within the Content field an active hyperlink, click the Link Chooser button, located directly below the Content field. 6. The Link Chooser displays. Select the desired page from the page tree and click ok. 7. Once a Carousel element is edited, a blank Carousel element displays. Repeat steps 1 6 as needed within the next Carousel element in order to add an additional Carousel item to the page. 8. After adding all desired Carousel elements, click ok. 9. To view the Carousel elements on the page, click done to return to Page View. 26
. Columns and rows can be dragged and reordered, and columns can be resized.")
27 Data Table Compatible masters: Content Page The Data Table content type lets you arrange relevant data in rows and columns, ranging from a minimum size of 2 x 2 (two columns by two rows) to a maximum size of 8 x 50 (eight columns by fifty rows). Columns and rows can be dragged and reordered, and columns can be resized. All data entered is automatically centered within each cell, and the table is automatically resized to span the width of the content region. NOTE: The Full-Page Table content type, on page 32, allows for a maximum of 12 columns. The Data Table content type is designed to be used in conjunction with a content type that includes a heading, such as Section with Text or Section with List. Please keep in mind the following requirements as you create a table: The Caption field is required. The text entered in the Caption field serves as the table title. Your table must be formatted in such a way that it has at least a header column or a header row. While you can include both a header column and a header row, only one of these is required. Create Your Table 1. Within the content block edit window, enter the desired table title in the Caption field. Note that the Caption field is required. 27


28 2. Enter the desired data in each cell. At minimum, a 2 x 2 table will be displayed. Note that when you click in a cell, a toolbar displays, allowing you to format text and add/remove links. Perform Table Operations Click the dropdown arrow next to a column label to display available column operations. Click the dropdown arrow next to a row label to display available row operations. 28


.")
29 Note that the header option is only available when clicking the dropdown arrow for Column A and Row 1. Reorder Columns and Rows You can reorder columns and rows by clicking and dragging a column or row label to its desired location. In the examples below, column B is dragged to the right of column C (left), and row 4 is dragged above row 3 (right). Resize Columns You can resize columns by clicking and dragging the dividing line between column headers. 29


30 Emergency Home Page Content* Compatible masters: Home Page *The Emergency Home Page content type prominently displays a banner with headline and text over the normal content of the BCM home page and is reserved SOLELY for use by the Office of Communications. 1. Ensure that the Emergency Home Page Content type displays above the Everyday Home Page content type within the Canvas. 2. Within the content block edit window, enter the desired text in the Heading field. 3. Enter the desired text in the Content field. 30

31 4. Click ok. 5. To view the Emergency Home Page content type on the page, click done to return to Page View. Everyday Home Page* Compatible masters: Home Page *The Everyday Home Page content type displays the contents of the BCM home page and is reserved SOLELY for use by the Office of Communications. Featured Media Compatible masters: Content Page Minimum image size: 970 x 444 pixels The Featured Media content type displays a single, large media object that spans the width of the region, along with a short caption beneath the object. The media object is intended to be the featured focus of the page. 1. Within the Add Media section of the content block edit window, click the Media Chooser button to select the desired media. 2. The Media Chooser displays. Within the Media Chooser, select the desired media type from the left menu. Then, locate and select the desired media. If you select an image that is larger than the defined parameters, use the Cropper tool to crop the image. Note that if you would like to upload new media or embed video or audio, select the Upload new menu item. 31

32 3. Within the Add/Edit Caption section, enter a brief caption to describe the selected media. 4. After entering the desired content, click ok. 5. To view the Featured Media content block on the page, click done to return to Page View. Full Page Table Compatible masters: Wide Content Page The Full Page Table content type allows you to enter tabular data onto a ONEWeb page, just as the Data Table content type does, with some important exceptions: The Full Page Table is only available as a choice when selecting the Wide Content Page master. 32
33 The Full Page Table allows for 12 columns, four more than the Data Table content type. (The same 50-row maximum applies to both content types.) NOTE: Because the Full Page Table behaves like the Data Table content type, please refer to the Data Table content type s usage instructions on page 27. Navigation Compatible masters: Landing, News, Directory, Content Page, Home page The Navigation content type lets you edit the navigation region on a desired page by rearranging automatically-generated navigation items or creating custom navigation. Note that the most common use of this content type will be to rearrange automaticallygenerated navigation items. If you would like to create custom navigation on a page, please first contact the Office of Communications. Editing Automatically-Generated Navigation 1. After selecting the Navigation region on the desired page (within the Canvas view), double-click on the Navigation content block. 2. Within the Auto-generated tab, click anywhere within the desired Navigation element and drag the element up or down to the desired location. 3. Click ok. 4. To view the Navigation elements on the page, click done to return to Page View. Creating Custom Navigation 1. Within the content block edit window, select the Custom tab. 2. Within the Navigation element field, enter the desired text, which will display as a navigation item on the page. 3. Click the Add Link button. The Link Chooser displays. Select the desired page from the page tree, enter the desired external URL, or select the desired document, and click ok. Note that each Navigation element must be linked to a page, external URL, or document. 33

34 4. Repeat steps 2 3 as needed in order to create each custom Navigation element. Rearrange a Custom Navigation Element Click anywhere within the desired element and drag the element up or down to the desired location. Edit a Custom Navigation Element Click within the desired element s text field. Edit the text as necessary. To change/update the link, click the Edit Link button to access the Link Chooser and select a new link. Delete a Custom Navigation Element Within the desired Navigation element, click the Delete button. Then, click. 5. After adding/editing all desired Navigation elements, click ok. 6. To view the custom Navigation elements on the page, click done to return to Page View. 34

35 News Listing Compatible masters: Content Page The News Listing content type displays a paginated list of linked headlines for existing BCM news stories where each headline, when clicked, takes the visitor to the page displaying the complete news story. 1. Within the content block edit window, enter the desired heading in the Heading field. Within the Filters section, use any of the following fields and drop down menus to narrow the news listing to meet specified criteria: 35

36 2. Enter any relevant tags as desired in the Has Tags field. Available tags correspond to the tag categories at 3. Select an author from the Written By drop down menu. 4. Within the Date Range section, use the calendar selector buttons to set a desired date range in the From and To fields. 5. Select the desired display order from the Order By drop down menu. 6. Select the desired amount of links to display per page from the Links per Page drop down menu. 7. Select the maximum number of news links to display in total from the Max Number of News Links drop down menu. 8. After applying all of the desired filters to the news listing, click ok. 9. To view the News Listing content block on the page, click done to return to Page View. 36

37 People List Compatible masters: Content Page, News The People List content type lets you insert a heading, followed by a brief description and a list of up to 20 BCM faculty, staff, and/or students, containing information they approve for display from their Signature profiles. 1. Within the content block edit window, select the appropriate Heading level from the dropdown menu. If this is the first content block that will display on the page, the Page title option should be selected. 2. Enter the desired heading for the content block in the Heading field. 3. Enter a descriptive paragraph that describes the list of people within the Description field. Note that you can copy content from a document or web page and paste the content in the Description field. 37


38 4. Within the People section, click the button. 5. The People Chooser displays. Search for a person by name, department, position, or facility by selecting the desired tab on the left. Then, enter part of the person s first or last name. Click the Search button. 6. A list of people meeting the search criteria displays. Click on the desired person you wish to add to the list. The person s name is added to the My list section on the right side of the screen. 38
 you wish to move up or down in the list. 9.")
39 7. Repeat steps 5-6 as many times as needed in order to search for and select all of the people you wish to include in your list, up to a maximum of 20 people. If you need to list more than 20 people, consider breaking your list up into categories. 8. To reorder items in your list, simply drag the person(s) you wish to move up or down in the list. 9. To delete a person from the list, click the located in the upper, right corner of the corresponding box containing the person s name/information. Then, click the button to confirm deletion. 10. Once you have created your list, click ok. 11. From the Profile Type dropdown menu, select whether the list is a staff/faculty list or a doctor list. 12. To save your list, click ok. 13. To view the People List on the page, click done to return to Page View. NOTE: Though you have added people to the People List, their information (photos, biographical and contact information) will not display on the published web page until those people (or their delegates) log into Signature and explicitly approve the display of their information on your page. 39

40 Section with Definition List Compatible masters: Content Page, News Minimum image size: 110 x 110 pixels The Section with Definition List content type lets you insert a heading, followed by a brief description and a list of terms and corresponding definitions. A thumbnail image may also be included with each term/definition pair, and each pair may be linked to a page, URL or document. 1. Within the content block edit window, select the appropriate Heading level from the dropdown menu. If this is the first content block that will display on the page, the Page title option should be selected. 2. Enter the desired heading for the content block in the Heading field. 3. Enter a descriptive paragraph that describes the list of terms and definitions within the Description field. Note that you can copy content from a document or web page and paste the content in the Description field. 40

41 4. Within the Definition List element block, enter a desired term within the Term field. 5. Enter the desired text in the corresponding Definition field. Link a Term/Definition to a ONEWeb Page, External URL or Document Click the Insert Link button. The Link Chooser displays. Select the desired page from the page tree, enter the desired external URL, or select the desired document, and click ok. Insert a Thumbnail Image Click the Media Chooser button. The Media Chooser displays. Within the Media Chooser, select the desired media. If you select an image that is larger than the defined parameters, use the Cropper tool to crop the image. Note that if you would like to upload new media, select the Upload new menu item. 41

42 6. Once a Definition List element is edited, a blank Definition List element displays. Repeat steps 4 5, along with the optional steps for adding a corresponding link or thumbnail image, as needed within the next Definition List element. Continue adding term/definition pairs as needed. Rearrange a Definition List Item Click anywhere within the desired Definition List element and drag the element up or down to the desired location. Delete a Definition List Item Within the desired Definition List element, click the click the Delete button in the upper, right corner. Then, click. 7. After adding all desired Definition List elements, click ok. 8. To view the Definition List elements on the page, click done to return to Page View. 42
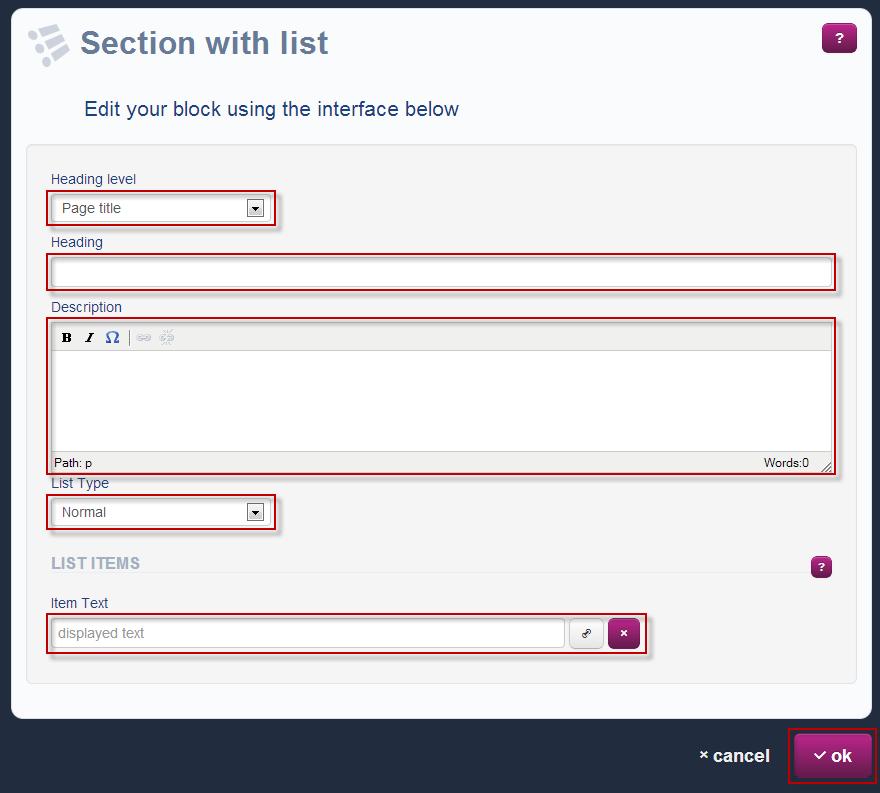
43 Section with List Compatible masters: Content Page The Section with List content type lets you insert a heading, followed by a descriptive paragraph and a bulleted or numbered list. 1. Within the content block edit window, select the appropriate Heading level from the dropdown menu. If this is the first content block that will display on the page, the Page title option should be selected. 2. Enter the desired heading for the content block in the Heading field. 3. Enter a descriptive paragraph that describes the list within the Description field. Note that you can copy content from a document or web page and paste the content in the Description field. 4. From the List Type dropdown menu, select Normal to create a bulleted list, or select Numbered to create a numbered list. 5. Within the Item Text field, enter the desired text, which will be formatted into a list item. To make the text a hyperlink, click the Insert Link item, click the Delete them as desired. 6. When you are finished adding content, click ok. button. To delete the list button. Note that you can drag and drop list items to reorder 43
44 44
, or embedded video/audio. 1.")
45 Section with Pull Media Compatible masters: Content Page Minimum image size: 320 x 240 pixels The Section with Pull Media content type allows you to insert a heading, followed by one or more paragraphs of text. The text flows to the left of a right-aligned image, linked document (represented by a large icon with metadata), or embedded video/audio. 1. Within the content block edit window, select the appropriate Heading level from the dropdown menu. If this is the first content block that will display on the page, the Page title option should be selected. 2. Enter the desired heading for the content block in the Heading field. 3. Enter the desired content for the content block in the Content field. Note that you can copy content from a document or web page and paste the content in the Content field. 45
 5.")
46 4. Within the Add Media section, click the Media Selection button. (See Using the Media Chooser section below.) 5. To save and close the Section with Pull Media content block, click ok. 46
. The paragraph(s) of text flow to the left of the pull quote, which is displayed in a larger, stylized font. 1.")
47 Section with Pull Quote Compatible masters: Content Page The Section with Pull Quote content type allows you insert a heading, one or more paragraphs of text, and a short selected quotation pulled from that text (known as a pull quote). The paragraph(s) of text flow to the left of the pull quote, which is displayed in a larger, stylized font. 1. Within the content block edit window, select the appropriate Heading level from the dropdown menu. If this is the first content block that will display on the page, the Page title option should be selected. 2. Enter the desired heading for the content block in the Heading field. 3. Enter the desired content for the content block in the Content field. Note that you can copy content from a document or web page and paste the content in the Content field. 4. Select and copy the desired text from the Content field, and paste it in the Quoted text field. 5. When you are finished adding content, click ok. 47

48 48

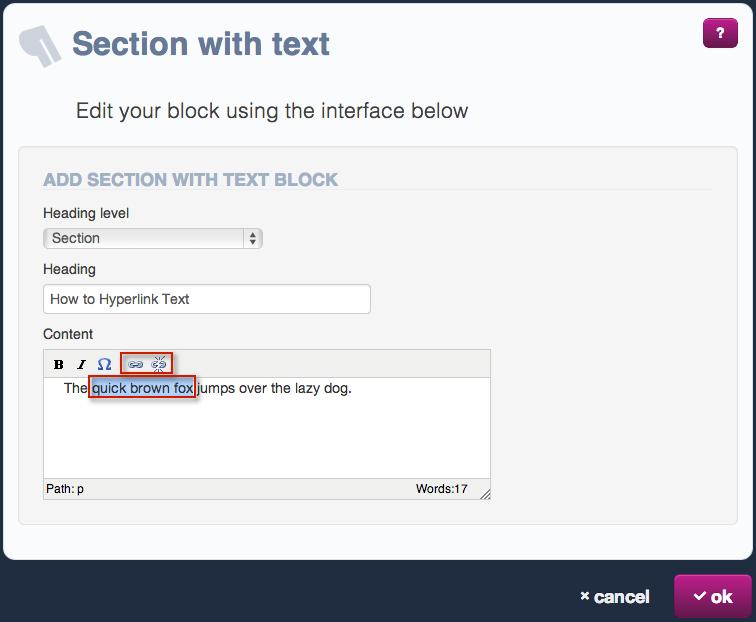
49 Section with Text Compatible masters: Content Page The Section with Text content type allows you to insert a heading, followed by one or more paragraphs of text. 1. Within the content block edit window, select the appropriate Heading level from the dropdown menu. If this is the first content block that will display on the page, the Page title option should be selected. 2. Enter the desired heading for the content block in the Heading field. 3. Enter the desired content for the content block in the Content field. Note that you can copy content from a document or web page and paste the content in the Content field. 4. When you are finished adding content, click ok. 49

50 Hyperlinking Text To hyperlink text, click and drag your cursor to highlight the text you wish to hyperlink. The link controls will now be available. Once you click the Insert Link button, use the Link Chooser (see page 64) to select the link destination. 50
51 51
52 Spiffs Special interest features, or Spiffs, are dimensionally small areas of content on a web page meant to give a visitor quick reference information, or to link them to more information elsewhere. Spiffs generally live on the boundaries of the main content area of a page. Address Spiff Compatible masters: Landing Page, News, Content Page The Address Spiff allows for the display of a physical address, providing a heading and up to five lines of text, in addition to city, state and zip code information. 1. Within the Address Heading section of the content block edit window, enter the desired heading in the Heading field. Note that the Heading field is required. 2. Within the Address section, enter the desired address information in the available fields. Note that the Address Line 1 field is required, in addition to the City and Zip fields. If a state abbreviation is not entered, TX will be automatically populated. 3. After entering the desired content, click ok. 52


53 4. To view the Address Spiff on the page, click done to return to Page View. Calendar Spiff Compatible masters: Landing Page, News, Content Page The Calendar Spiff displays up to three events from a selected Active Data calendar. Each event, when clicked, takes the user to that event s details page on the BCM Active Data calendar website. 1. Select the desired Active Data calendar from the Choose a Calendar drop down menu. 2. Within the Date Range section, use the calendar selector buttons to set a desired date range in the Start date and End date fields. 53

54 3. Select the desired number of events to display on the page from the Number of events shown drop down menu. 4. After making the desired selections, click ok. 5. To view the Calendar Spiff on the page, click done to return to Page View. 54

55 Clinical Appointments Spiff Compatible masters: Landing Page, News, Content Page The Clinical Appointments Spiff allows for the display of a clinic s primary contact information, along with up to two additional phone labels, numbers and hours. 1. Within the Clinical Appointments section of the content block edit window, enter the desired heading in the Heading field. 2. Enter the desired content in the Phone label field. 3. Enter the desired information in the Phone number field. 4. Enter the desired information in the Phone hours field. 5. Within the Additional section(s), enter any additional clinical contact information in the Phone label, Phone number and Phone hours fields as desired. 55

56 6. After entering the desired information, click ok. 7. To view the Clinical Appointments Spiff on the page, click done to return to Page View. 56


57 Contact Spiff Compatible masters: Landing Page, News, Content Page The Contact Spiff allows for the display of non-clinical contact information, including a contact heading and up to four addresses and/or phone numbers. 1. Within the Contact Heading section of the content block edit window, enter the desired heading in the Heading field. Note that the Heading field is required. 2. Within the or Phone section, enter the desired information within the Contact Label and corresponding Phone or field(s). Note that the first Contact Label and corresponding Phone or fields are required. 3. After entering the desired information, click ok. 4. To view the Contact Spiff on the page, click done to return to Page View. 57

58 List Spiff Compatible masters: Landing Page, News, Content Page The List Spiff displays a heading with up to three short list items below it. Each list item can be linked to a desired page. The heading cannot be linked. 1. Within the content block edit window, enter the desired heading in the Heading field. Note that the Heading field is required. 2. From the List Type dropdown menu, select Numbered to create a numbered list. (If the default Normal list type is selected, the list will be non-bulleted and non-numeric.) 3. Within the List Items section, enter the desired text in the first field. To make the text a hyperlink, click the button. The Link Chooser displays. Select the desired page from the page tree and click ok. 4. Once text is entered within a list item field, a blank list item field displays. Repeat step 3 in order to add an additional list item to the page. Note that up to three list items can be displayed within the List Spiff. To remove or edit the hyperlink associated with a list item, click in the desired list item field and select the or option as desired. 58

59 To delete a list item, click the Delete Then, click. button to the right of the corresponding item. 5. After entering the desired content, click ok. 6. To view the List Spiff on the page, click done to return to Page View. Media Spiff Compatible masters: Landing Page, News, Content Page Minimum image size: 320 x 240 pixels The Media Spiff allows for the display of a media object, along with a heading and a small amount of text, which can be linked to a desired page or URL. 1. Within the Media section of the content block edit window, click the Media Chooser button to the right of the Media File field to select the desired media. 59
60 2. The Media Chooser displays. Within the Media Chooser, select the desired media type from the left menu. Then, locate and select the desired media. If you select an image that is larger than the defined parameters, use the Cropper tool to crop the image. Note that if you would like to upload new media or embed video or audio, select the Upload new menu item. 3. Within the Spiff Heading and Text section, enter the desired heading in the Heading field. 4. Enter the desired content in the Text field. 5. To make the heading and text an active hyperlink, click the Link Chooser button within the Link section. 60

61 6. The Link Chooser displays. Select the desired page from the page tree and click ok. 7. After entering the desired information, click ok. 8. To view the Media Spiff on the page, click done to return to Page View. MyChart Spiff Compatible masters: Landing Page, News, Content Page The MyChart Spiff displays a BCM MyChart logo button, which links to the BCM MyChart patient portal. After dragging the MyChart Spiff from the Block Palette to the Canvas, click ok. The BCM MyChart logo button displays on the page. Note that there are no configuration options for this content block. 61

 in the From and To fields. 5.")
62 News Spiff Compatible masters: Landing Page, News, Content Page The News Spiff displays a single headline for a corporate BCM news story that, when clicked, takes the visitor to the page displaying the complete news story. 2. Enter any relevant tags as desired in the Has Tags field. Available tags correspond to the tag categories at 3. Select an author from the Written By drop down menu. 4. Within the Date Range section, use the calendar selector buttons to set a desired date range (or type the desired dates) in the From and To fields. 5. After entering the desired information, click ok. 62

63 6. To view the News Spiff on the page, click done to return to Page View. Text Spiff Compatible masters: Landing Page, News, Content Page The Text Spiff displays a heading with a small amount of text below it. The heading and text can be linked to a desired page. If a link target is selected, both the heading and text are linked to the desired location. 1. Within the content block edit window, enter the desired heading in the Heading field. Note that the Heading field is required. 2. Enter the desired text in the Content field. 3. To make the text within the Heading and Content fields an active hyperlink, click the button. The Link Chooser displays. Select the desired page from the page tree and click ok. 63

64 4. After entering the desired content, click ok. 5. To view the Text Spiff on the page, click done to return to Page View. Thumbnail Spiff Compatible masters: Landing Page, News, Content Page Minimum image size: 93 x 77 pixels The Thumbnail Spiff allows for the display a small image, known as a thumbnail, with a heading above it and descriptive text to the right. 1. Within the Thumbnail section of the content block edit window, click the Media Chooser button to select the desired media. 2. The Media Chooser displays. Within the Media Chooser, select the desired media type from the left menu. Then, locate and select the desired media. If you select an image that is larger than the defined parameters, use the Cropper tool to crop the image. Note that if you would like to upload new media, select the Upload new menu item. 3. Within the Spiff Heading and Text section, enter the desired heading in the Heading field. Note that the Heading field is required. 64

65 4. Enter the desired content in the Text field. Note that the Text field is required. 5. Click the Link Chooser button within the Link section. Note that a target ONEWeb page or URL must be selected. 6. The Link Chooser displays. Select the desired page from the page tree and click ok. 7. After entering the desired information, click ok. 8. To view the Thumbnail Spiff on the page, click done to return to Page View. 65


66 Using the Link Chooser When clicking on the Insert Link button, either within a content area or within a list item, the Link Chooser displays. Within the Link Chooser, hyperlinks to ONEWeb pages, external URLs, and uploaded documents can be created. 1. When the Link Chooser displays, the Page option is selected by default. To link to a ONEWeb page, navigate to the desired page through the page tree. Select the desired page and click ok. 2. To link to an external URL or an address, select the URL option, located in the farleft column of the Link Chooser. Type or paste a complete URL or address in the available field. Click ok. Note that some examples of acceptable URL types include and www. When entering an address, no mailto: or other text prepending the address is necessary. 3. To link to an uploaded document, select the Document option, located in the far-left column of the Link Chooser. Select the desired document and click ok. In addition to 66

67 searching for a document by clicking the Prev and Next buttons, a document can also be located by entering a tag in the Tag or Category field and clicking the Filter button to narrow the selection. Using the Media Chooser When clicking the Media Selection button, the Media Chooser displays. Within the Media Chooser, images, documents, and audio/video can be selected, and new media can be uploaded. Images When the Media Chooser displays, the Image Chooser is selected by default. Select the desired image. In addition to searching for an image by clicking the Prev and Next buttons, an image can also be located by entering a tag in the Tag field and clicking the Filter button to narrow the selection. To edit the image caption or change the image size, select the edit media button and make the desired changes. Click ok. Then, click Use this image. If the image you wish to use has a crop symbol over it, proceed to Using the Cropper below. Using the Cropper The Cropper tool becomes available when you need to insert an image too large for your intended content block. You will know that an image is too large if the crop symbol appears over the image's thumbnail in the Media Chooser. The Cropper will not only help you resize your photo to the correct dimensions, but will ensure the image properly fills your content block without being stretched, distorted, blurry, or pixelated. Documents To select documents, as well as audio/video, select the desired option, located in the far-left column of the Media Chooser. Locate the desired file and click ok. 67

68 Upload a new file 1. To upload a new file, click the Upload new option, located in the far-left column of the Media Chooser. 2. Within the Upload tab of the Add New Media area, drag and drop the desired file, or click within the Add New Media area to browse for and select the desired file. After the file is uploaded, select the corresponding media option located in the far-left column of the Media Chooser to navigate to and select the uploaded file. 68
69 Audio/Video BCM has official YouTube, Vimeo, and SoundCloud channels, and any video or audio files intended for the BCM website must first be uploaded to these channels. Using the BigFile service at send any video or audio files to Once your media is approved and added to the official BCM YouTube/Vimeo/SoundCloud channel, the Office of Communications will send you a URL to embed using the instructions below. YouTube, Vimeo, and SoundCloud media can be embedded within a content area. To embed media: 1. Open any media content block (listed at right). 2. Click the purple folder icon to access the Media Chooser. 3. Click the Upload new option, located in the far-left column of the Media Chooser. 4. Click the Embed tab in the resulting Add New Media screen. 5. Paste the video or audio URL in the Embed New Video or Audio field and click embed. A thumbnail of the video will display. 6. Edit the Title, Description, and Credit fields as desired and click ok. The AV Chooser displays. 7. Click Use this AV. Media Content Blocks Content Region Section with Pull Media Carousel Featured Media Section with Definition List Origami Region Thumbnail Spiff Media Spiff 69

70 Page Versioning Any time you create or edit a page, a new version is created. All versions are saved in ONEWeb. Keep in mind the following points regarding page versioning: When you create a page, you create an initial version of it. Any time you edit a page, you create another version of it. When you change a page s master, a new version is created. When you edit a page s other properties, such as page name, a new version is NOT created. All previous versions are retained in the system. A page s previous versions can be viewed by clicking the versions button on the Editor toolbar. From the versions screen, a previous version can be viewed by selecting the View hyperlink to the right of the corresponding version. It is also possible to revert to a previous version of the page by clicking the Revert hyperlink. The reverted page must be submitted to the Office of Communications using the Share with reviewers button in order for this page to become the approved, live version. 70

71 Page Approval and Publishing Process There are three steps to the page approval and publishing process: 1. Review your finished edits within your department. 2. Share your page with the Office of Communications, who will ultimately approve your page for publication. 3. If the page is not published, you must publish the approved page to make it visible to the public (or approved groups, if the site is meant for a limited audience). Step One: Internal Departmental Review Once you are done editing your page, you can copy and paste the URL of your page into an for anyone in your department to internally review. NOTE: Anyone who will review your unapproved work in ONEWeb will need to have the appropriate ONEWeb permissions to view your pages, and be logged into ONEWeb. Please send an to the Office of Communications at pa-webteam@bcm.edu, notifying them of the names of any internal reviewers who need to view your pages before they are approved. The Office of Communications will then add these reviewers to the appropriate group so they can view your unapproved pages. Step Two: Share Your Page with the Office of Communications To submit a page for review, you must first navigate to the desired page. You can either explicitly choose when changes to your page are submitted to the Office of Communications, or have your edits automatically submitted at regular intervals on your behalf. Option One: Manually Release for Review By manually releasing pages to the Office of Communications for review, you control when your updates and changes are submitted, but this also means that you must remember to do so. When you are ready for the Office of Communications to review and approve your page, click the Share with reviewers button from the Editor toolbar. 71

72 Option Two: Automatic Release for Review Using the automatic release feature, you can simply make changes to your page, and not have to remember to manually submit changes to the Office of Communications. To use the automatic release feature, click the Edit page settings button from the Editor toolbar. The Page Settings screen displays, and you can choose a time interval in which changes to this page are automatically submitted to the Office of Communications. By default, the time interval is set to never. Step Three: Feedback or Approval Notification from the Office of Communications The Office of Communications will receive notification of your request, and they will either: Send feedback with any recommended changes, or Approve the page In either case, you will receive an notification containing a link to your page. If you receive an notification with feedback, you will need to make the recommended changes, then click the Share with reviewers button again. If you receive an notification that your page is approved, and the page is not published, proceed to Step Three: Publish Your Page below. If your page is already published, the approved version becomes the version seen online by the public (or approved groups, if your site is restricted to a limited audience), and you do not need to do anything else. NOTE: Your notification will tell you whether the page is published, and you can also check for yourself in the upper right corner of the Page Settings screen (see screenshot below). 72

73 Step Three: Publish Your Page To publish your approved page, click the Publish button in the upper right corner of the Page Settings screen. If your page is already published, you do not need to do anything else. 73
74 Web Content Reminders from the Office of Communications When creating or editing a page Initial capitalize headings and titles, with the exception of articles, prepositions, and conjunctions Hyphenate page names (which become URLs) for human readability Check with the OoC first before creating redirects Check with the OoC first before modifying navigation menus Media Let the OoC know if you need tags not in ONEWeb Use the BigFile service at to send video or audio files you wish to appear on official Baylor video and audio channels Content Accuracy Responsibility Prior to submitting content for posting, and again when reviewing the site before go live, it is the web maintainer s responsibility to review content with department, center or program leadership to ensure all content accurately reflects the College s practices and policies. Web maintainers are expected to review for accuracy all content they have posted on at least once per academic year. 74

, page title, URL, modified date/time, as well as the options to view all page")
75 My Console Within the ONEWeb content editor, the My Console feature provides an at-a-glance view of the web pages you have access to and your site permissions. To access My Console, you must first be logged in to ONEWeb. Next, click on the Hello, Your Name hyperlink in the upper right corner of the page. Then, select My Console. Recent changes displays a listing of changes you have made to pages, including the page title, modified date/time, a brief description of the modification, along with the option to view the page. My content displays a listing of pages you have access to edit, including each page s status (published/not published), page title, URL, modified date/time, as well as the options to view all page versions or delete a page. My groups displays a listing of ONEWeb groups to which you belong. These groups determine a user s specific page permissions. 75
Logging Into Your Site
 This training document is meant as a step-by-step guide to creating and delivering a UW-Madison site in the current UW-Madison theme. In this training class, you will learn how to log in to access your
Web Site Documentation Eugene School District 4J
 Eugene School District 4J Using this Documentation Revision 1.3 1. Instruction step-by-step. The left column contains the simple how-to steps. Over here on the right is the color commentary offered to
ASTRA USER GUIDE. 1. Introducing Astra Schedule. 2. Understanding the Data in Astra Schedule. Notes:
 ASTRA USER GUIDE 1. Introducing Astra Schedule Astra Schedule is the application used by Academic Space Scheduling & Utilization to schedule rooms for classes and by academic colleges, schools, and departments
How to Edit Your Website
 How to Edit Your Website A guide to using your Content Management System Overview 2 Accessing the CMS 2 Choosing Your Language 2 Resetting Your Password 3 Sites 4 Favorites 4 Pages 5 Creating Pages 5 Managing
Drupal User Guide for Authors
 0 Drupal User Guide for Authors SSU WEB CONTENT EDITING Information Technology Services SALEM STATE UNIVERSITY ITS-TRAINING@SALEMSTATE.EDU Author User Guide DRAFT version 2 Author User Guide DRAFT version
Digication eportfolio Student s Guide (Last update: 8/2017)
") Digication eportfolio Student s Guide (Last update: 8/2017) 2 Table of Contents Introduction... 1 Creating Your eportfolio... 3 Editing Your eportfolio... 4 Area 1: Top Menu Bar... 6 Area 2: The Main Tabs...
Digication eportfolio Student s Guide (Last update: 8/2017) 2 Table of Contents Introduction... 1 Creating Your eportfolio... 3 Editing Your eportfolio... 4 Area 1: Top Menu Bar... 6 Area 2: The Main Tabs...
Vetstreet Web Builder Editor Tool User Guide v2.1. Web Builder. User Guide v2.1
 Web Builder User Guide v2.1 Contact your Account Manager at (888) 799-8387 or email support@vetstreet.com with questions. Page 1 Index... 1 The Editor Tool... 7 Forgot Your Username or Password?... 7 How
Administrative Training Mura CMS Version 5.6
 Administrative Training Mura CMS Version 5.6 Published: March 9, 2012 Table of Contents Mura CMS Overview! 6 Dashboard!... 6 Site Manager!... 6 Drafts!... 6 Components!... 6 Categories!... 6 Content Collections:
EKTRON 101: THE BASICS
 EKTRON 101: THE BASICS Table of Contents INTRODUCTION... 2 TERMINOLOGY... 2 WHY DO SOME PAGES LOOK DIFFERENT THAN OTHERS?... 5 LOGGING IN... 8 Choosing an edit mode... 10 Edit in context mode (easy editing)...
Roxen Content Provider
 Roxen Content Provider Generation 3 Templates Purpose This workbook is designed to provide a training and reference tool for placing University of Alaska information on the World Wide Web (WWW) using the
Basic CMS User Guide
 "We create exceptional business solutions for cash-pay healthcare professionals that enable them to realize their full potential." Basic CMS User Guide Version 1.2 3/28/2012 1 Table of Contents Table of
WEBSITE USER GUIDE V.4
 WEBSITE USER GUIDE V.4 SEC. 01 SEC. 02 SEC. 03 SEC. 04 SEC. 05 SEC. 06 CASCADE INTERFACE OVERVIEW LOGIN PAGE USER DASHBOARD SITE DIRECTORY EDITING PAGES PAGE EDITOR OVERVIEW STANDARD ROW COMPONENTS EDITING
How to Edit Your Website
 How to Edit Your Website A guide to using your Content Management System Overview 2 Accessing the CMS 2 Choosing Your Language 2 Resetting Your Password 3 Sites 4 Favorites 4 Pages 5 Creating Pages 5 Managing
Swiiit User Guide 03/09/2015
 Swiiit User Guide 03/09/2015 Contents Getting Started... 4 Overview of Main Tools... 5 Webpages... 6 Main pages (Sections)... 6 Rearrange Sections... 6 Subpages... 7 Change the Title of a Webpage... 8
UTAS CMS. Easy Edit Suite Workshop V3 UNIVERSITY OF TASMANIA. Web Services Service Delivery & Support
 Web Services Service Delivery & Support UNIVERSITY OF TASMANIA UTAS CMS Easy Edit Suite Workshop V3 Web Service, Service Delivery & Support UWCMS Easy Edit Suite Workshop: v3 Contents What is Easy Edit
SoftChalk 10. Level 1. University Information Technology Services. Learning Technologies, Training, Audiovisual, and Outreach
 SoftChalk 10 Level 1 University Information Technology Services Learning Technologies, Training, Audiovisual, and Outreach Copyright 2018 KSU Division of University Information Technology Services This
NORTH CAROLINA A&T STATE UNIVERSITY CMS USER GUIDE. A Manual for the Cascade Server Content Management System (CMS)
") NORTH CAROLINA A&T STATE UNIVERSITY CMS USER GUIDE A Manual for the Cascade Server Content Management System (CMS) Table of Contents Chapter 1 - Getting Started... 3 Overview... 3 What is a Content Management
NORTH CAROLINA A&T STATE UNIVERSITY CMS USER GUIDE A Manual for the Cascade Server Content Management System (CMS) Table of Contents Chapter 1 - Getting Started... 3 Overview... 3 What is a Content Management
Swiiit User Guide 09/11/2016
 Swiiit User Guide 09/11/2016 Contents Getting Started... 4 Overview of Main Tools... 5 Webpages... 6 Main pages (Sections)... 6 Rearrange Sections... 6 Subpages... 7 Change the Title of a Webpage... 8
SharePoint User Manual
 SharePoint User Manual Developed By The CCAP SharePoint Team Revision: 10/2009 TABLE OF CONTENTS SECTION 1... 5 ABOUT SHAREPOINT... 5 1. WHAT IS MICROSOFT OFFICE SHAREPOINT SERVER (MOSS OR SHAREPOINT)?...
Folios & Web Pages. 71 WEST 23RD STREET, NEW YORK, NY T e
 Folios & Web Pages 71 WEST 23RD STREET, NEW YORK, NY 10010 T 1.800.311.5656 e help@taskstream.com Table of Contents About the Folios & Web Pages Tool... 1 Create a New Folio or Web Page... 3 Manage Existing
Website Creating Content
 CREATING WEBSITE CONTENT As an administrator, you will need to know how to create content pages within your website. This document will help you learn how to: Create Custom Pages Edit Content Areas Creating
2016 TRTA Content Managers Resource Guide How to update and edit your local unit website. Roy Varney, TRTA Multimedia Specialist
 2016 TRTA Content Managers Resource Guide How to update and edit your local unit website. Roy Varney, TRTA Multimedia Specialist Table of Contents Introduction... 1 Basic information... 1 - How to log
End-User Reference Guide Troy University OU Campus Version 10
 End-User Reference Guide Troy University OU Campus Version 10 omniupdate.com Table of Contents Table of Contents... 2 Introduction... 3 Logging In... 4 Navigating in OU Campus... 6 Dashboard... 6 Content...
What is OU Campus? Log into OU Campus
 OU Campus v10 Content Providers User Guide This document is designed to provide (level 5) Content Providers with basic information needed to do most tasks. Those needing additional information are encouraged
Drupal Basics. for COS and CLASS site maintainers
 Drupal Basics for COS and CLASS site maintainers Introduction This guide is meant as a starting point for site maintainers in the UNT College of Science and College of Liberal Arts and Social Sciences
General Training Curriculum
 General Training Curriculum Table of Contents 1.0 Getting Started 1.1 What is MODX? 1.2 Browser Support 1.3 How Do I Log In? 2.0 MODX Dashboard 2.1 What is a Dashboard? 2.2 Global Top Menu Bar 2.2.0 MODX
Web Manager 2.0 User s Manual Table of Contents
 Web Manager 2.0 User s Manual Table of Contents Table of Contents... 1 Web Manager 2.0 Introduction... 2 Rights and Permissions... 2 User Access Levels... 2 Normal Access... 2 Publisher Access... 2 WM2
There are four (4) skills every Drupal editor needs to master:
 skills every Drupal editor needs to master:") There are four (4) skills every Drupal editor needs to master: 1. Create a New Page / Edit an existing page. This entails adding text and formatting the content properly. 2. Adding an image to a page.
There are four (4) skills every Drupal editor needs to master: 1. Create a New Page / Edit an existing page. This entails adding text and formatting the content properly. 2. Adding an image to a page.
Lucid CMS User Guide
 "We create exceptional business solutions for cash-pay healthcare professionals that enable them to realize their full potential." Lucid CMS User Guide Version 1.2 3/13/2012 1 Table of Contents Table of
Somerville College WordPress user manual. 7th October 2015
 Somerville College WordPress user manual 7th October 05 0 INDEX YOUR SITE IMAGES FORMS THE MENU 4 4 5 0 YOUR SITE The Content Management System The Somerville website has been built using the WordPress
Linn-Mar Staff Web Page Setup
 Linn-Mar Staff Web Page Setup Log In To set up your staff/teacher site, browse to sites.linnmar.juiceboxint.com/jb-login and log in with your network username. NOTE: Once the sites are launched, you ll
WordPress Manual For Massachusetts Academy of Math and Science
 WordPress Manual For Massachusetts Academy of Math and Science September 19, 2017 Table of Contents Who should use this manual... 4 Signing into WordPress... 4 The WordPress Dashboard and Left-Hand Navigation
PBwiki Basics Website:
 Website: http://etc.usf.edu/te/ A wiki is a website that allows visitors to edit or add their own content to the pages on the site. The word wiki is Hawaiian for fast and this refers to how easy it is
Classroom Blogging. Training wiki:
 Classroom Blogging Training wiki: http://technologyintegrationshthornt.pbworks.com/create-a-blog 1. Create a Google Account Navigate to http://www.google.com and sign up for a Google account. o Use your
FirmSite Control. Tutorial
 FirmSite Control Tutorial 1 Last Updated June 26, 2007 by Melinda France Contents A. Logging on to the Administrative Control Center... 3 Using the Editor Overview:... 3 Inserting an Image... 7 Inserting
Website Management with the CMS
 Website Management with the CMS In Class Step-by-Step Guidebook Updated 12/22/2010 Quick Reference Links CMS Login http://staging.montgomerycollege.edu/cmslogin.aspx Sample Department Site URLs (staging
While editing a page, a menu bar will appear at the top with the following options:
 Page Editor ===> Page Editor How Can I Use the Page Editor? The Page Editor will be your primary way of editing your website. Page Editor Basics While editing a page, you will see that hovering your mouse
TEACHER PAGES USER MANUAL CHAPTER 6 SHARPSCHOOL. For more information, please visit: Chapter 6 Teacher Pages
 SHARPSCHOOL USER MANUAL CHAPTER 6 TEACHER PAGES For more information, please visit: www.customernet.sharpschool.com 0 TABLE OF CONTENTS 1. 2. 3. 4. 5. 6. 7. 8. 9. 10. 11. INTRODUCTION... 1 I. TEACHER PAGE
Percussion Documentation Table of Contents
 Percussion Documentation Table of Contents Intro to the Percussion Interface... 2 Logging In to Percussion... 2 The Dashboard... 2 Managing Dashboard Gadgets... 3 The Menu... 4 The Finder... 4 Editor view...
Cascade User Guide. Introduction. Key System Features. User Interface
 Cascade User Guide Introduction Key System Features User Interface Menus and Moving Through the System Files and Pages Working with Existing Pages File Action Menu Version Control Deleting files Restoring
Sitefinity Manual. Webmasters. University of Vermont College of Medicine. Medical Communications
 Sitefinity Manual Webmasters University of Vermont College of Medicine Medical Communications Table of Contents Basics... 2 Navigating to the Website... 3 Actions.. 4 Titles & Properties. 5 Creating a
Learn how to login to Sitefinity and what possible errors you can get if you do not have proper permissions.
 USER GUIDE This guide is intended for users of all levels of expertise. The guide describes in detail Sitefinity user interface - from logging to completing a project. Use it to learn how to create pages
WPM for Departments Using WPM to Edit Your Department s Website
 Overview Web Profile Manager allows Ithaca College community members to easily edit department sites. All of the specialty language and code has been omitted to provide a consistent format and to make
RRJ.ca Uploading content and managing the site
 RRJ.ca Uploading content and managing the site Logging In: To log in, go to: http://rrj.ca/wp admin You will need to use your FCAD login credentials. The first time you log in a WordPress user account
Today s workshop introduces CommonSpot, ECU s Web Content Management System, through hands-on training.
 Belinda Perkinson ITCS Training and Communication perkinsons@ecu.edu Introduction Today s workshop introduces CommonSpot, ECU s Web Content Management System, through hands-on training. 1. Introduction
page 1 OU Campus User Guide
 page 1 OU Campus User Guide Logging Into OU Campus page page 2 1. Navigate to a page on your site that you wish to edit. 2. Scroll down to the footer and click the symbol. 3. Enter your OU Campus username
BCI.com Sitecore Publishing Guide. November 2017
 BCI.com Sitecore Publishing Guide November 2017 Table of contents 3 Introduction 63 Search 4 Sitecore terms 66 Change your personal settings 5 Publishing basics 5 Log in to Sitecore Editing 69 BCI.com
Transitioning Teacher Websites
 Transitioning Teacher Websites Google sites is an online web building tool that can be accessed and updated from anywhere there is an internet connection. Here is a brief video introduction of Google sites.
FrontPage 2000 Tutorial -- Advanced
 FrontPage 2000 Tutorial -- Advanced Shared Borders Shared Borders are parts of the web page that share content with the other pages in the web. They are located at the top, bottom, left side, or right
Wordpress Training Manual
 The Dashboard... 2 If this is your first time logging in:... 2 How do I change my password or email address?... 3 Search Engine Optimization (SEO)... 4 SEO for Pages... 4 SEO for Images... 5 Managing Pages...
Contact at Once Widget..5. Contact Us Widget...5 Contact Info Widget. 6 Dealership Contacts Widget. 6
 Table of Contents Flexible Design Overview. 3 Selecting the Flex Design. 3 Widget Overview. 4 Configuring Widgets..5 Contact at Once Widget..5 Contact Us Widget...5 Contact Info Widget. 6 Dealership Contacts
Using New Google Sites
 Using New Google Sites With the New Google Sites, building websites is easy. Just drag content where you need it. Create a onestop destination for all important information, including videos, images, calendars,
Microsite Overview. The Basics: How to build and manage your ISA Section microsite
 Microsite Overview The Basics: How to build and manage your ISA Section microsite We are excited to work with you to build your microsites within the all-new www.isa.org. The website has state-of-the-art
Dreamweaver CS 5.5. University Information Technology Services. Training, Outreach, Learning Technologies, and Video Production
 Dreamweaver CS 5.5 Creating Web Pages with a Template University Information Technology Services Training, Outreach, Learning Technologies, and Video Production Copyright 2012 KSU Department of Information
New Website User Manual
 New Website User Manual General Notes 3 How To Login To Your Website And Access Admin Dashboard 4 Adding / Editing Sliders 5 Home Slider 5 School Slider (Same steps for ALL school pages) - Add a Slide
to Quick Start Guide Last modified December 18, 2015
 to Quick Start Guide Last modified December 18, 2015 Table of Contents What is Signature?... 3 Accessing Signature... 5 Browser Requirements... 5 Logging into Signature for the First Time... 5 Logging
Web Content Management
 Web Content Management With Drupal School Website User Guide Version 1.1 1 Table of Contents Overview 3 Getting Started 4 Writing for the Web 5 Introducing: Your New Website 7 Logging in 7 The Landing
Adding Text and Images. IMCOM Enterprise Web CMS Tutorial 1 Version 2
 Adding Text and Images IMCOM Enterprise Web CMS Tutorial 1 Version 2 Contents and general instructions PAGE: 3. First steps: Open a page and a block to edit 4. Edit text / The menu bar 5. Link to sites,
ScholarBlogs Basics (WordPress)
") Emory Center for Digital Scholarship Library and Information Technology Services ScholarBlogs Basics (WordPress) Table of Contents (click on the headings below to go directly to the section) Use of ScholarBlogs
Emory Center for Digital Scholarship Library and Information Technology Services ScholarBlogs Basics (WordPress) Table of Contents (click on the headings below to go directly to the section) Use of ScholarBlogs
NiCHE Website Posting Guidelines & Best Practices (updated 22 December, 2013)
") NiCHE Website Posting Guidelines & Best Practices (updated 22 December, 2013) Getting oriented Registering for an account The WordPress Dashboard Editing your profile What to do if you ve lost your password
NiCHE Website Posting Guidelines & Best Practices (updated 22 December, 2013) Getting oriented Registering for an account The WordPress Dashboard Editing your profile What to do if you ve lost your password
TYPO3 Editing Guide Contents
 TYPO3 Editing Guide Contents Introduction... 2 Logging in... 2 Selecting your Workspace for editing... 2 Working with Content Elements... 3 Working in the Editing Window... 4 Pasting content from MS Word
User s Manual. Beacon Technologies, Inc. 164-B Thatcher Rd. Greensboro, NC beacontechnologies.com
 Beacon Technologies, Inc. 164-B Thatcher Rd. Greensboro, NC 27409 User s Manual beacontechnologies.com Grossmont-Cuyamaca Community College District Version 1.4 January 26, 2015 Table of Contents 1. THE
New website Training:
 New website Training: Table of Contents 1. Logging in and out of the new site. 2. Edit Content a. How to edit content b. Paragraph types c. Adding links d. Adding an image e. Adding a document f. Saving
eportfolio GENERAL USER
 eportfolio GENERAL USER Startup Guide [2016-17] Table of Contents Page 2: Introduction Logging in to your Digication account Page 3: Page 4: Steps to create an eportfolio from course template Steps to
How To Guide. Hannon Hill Corporation for Rowan University
 How To Guide Hannon Hill Corporation for Rowan University Hannon Hill Corporation 3423 Piedmont Road, Suite 520 Atlanta, GA 30305 www.hannonhill.com 678.904.6900 info@hannonhill.com Rowan University: How
SCHULICH MEDICINE & DENTISTRY Website Updates August 30, Administrative Web Editor Guide v6
 SCHULICH MEDICINE & DENTISTRY Website Updates August 30, 2012 Administrative Web Editor Guide v6 Table of Contents Chapter 1 Web Anatomy... 1 1.1 What You Need To Know First... 1 1.2 Anatomy of a Home
"We create exceptional business solutions for cash-pay healthcare professionals that enable them to realize their full potential.
 "We create exceptional business solutions for cash-pay healthcare professionals that enable them to realize their full potential." Blog User Guide Version 2.2 3/8/2012 1 Table of Contents Table of Contents...
Getting Started with Penn State WikiSpaces
 Getting Started with Penn State WikiSpaces About Penn State WikiSpaces Penn State WikiSpaces is a platform intended to support Penn State-associated collaboration. Wikis are websites that allow for the
Sacred Heart Nativity
 August 2016 Sacred Heart Nativity http://www.shnativity.org Credentials Wordpress Admin Login URL: http://www.shnativity.org/wp-login.php login = sarriola@shnativity.org pw = sent via system email Login
GENERAL TEMPLATE AREAS
 1 GENERAL TEMPLATE AREAS SIU Headers SIU Headers are created and edited through the main administration of the CMS. Users do not have access edit SIU headers. Logo and Identifier Logo or the College Identifier
Create a new form. To create a form from a new or existing spreadsheet: 1. Click the Tools drop down menu and select Create a form.
 Create a new form You can choose Google Forms when creating a new doc from Google Drive. You can also create a new form from a Google Sheet or from a template. To create a form within Google Drive: Click
Mediasation Content Management System 4.0 Users Guide & Training Manual
 Mediasation Content Management System 4.0 Users Guide & Training Manual 2008 Mediasation Web Solutions, Inc. All rights reserved. Mediasation, Inc. CMS 4.0 Users Guide Version: October 2008 Editor: Jaimee
How to lay out a web page with CSS
 Activity 2.6 guide How to lay out a web page with CSS You can use table design features in Adobe Dreamweaver CS4 to create a simple page layout. However, a more powerful technique is to use Cascading Style
Moodle The Basics of Editing a Content Management Course
 Logging In Moodle The Basics of Editing a Content Management Course 1. Using Firefox or Internet Explorer, navigate to: http://learn.district196.org 2. Click on the Login link in the upper right corner
The Distributor s Content Management Guide for subzero-wolf.com
 The Distributor s Content Management Guide for subzero-wolf.com Dear Distributor Partner Portal users, Please use this guide help you find your way around and assist you in editing Showroom detail page
The Etomite Manual for website editors.
 The Etomite Manual for website editors. (Version: 1.1) Etomite is a web tool that allows your website to be user-editable. This means that you can add, edit, and delete pages and whole website sections
Yearbook Edition Software
 Yearbook Edition Software End User Guide Pixami, Inc. www.pixami.com Table of Contents 1 Introduction... 4 1.1 Configuration and Preparation... 4 1.2 Software System Requirements... 4 1.3 The Basic Steps...
Beginning Web Administrator Training
 Welcome Beginning Web Administrator Training for School Site and District Staff Welcome Please log on to your computer workstation using your SCUSD login and password Guests use our training login Username:
gaalliance.org and bap.gaalliance.org Users Guide
 IDENTITY PRINT PUBLISHING WEB Visible Logic, Inc. 142 High Street Suite 615 Portland, ME 04101 207.761.4230 visiblelogic.com gaalliance.org and bap.gaalliance.org Users Guide CONTENTS Introduction 2 Site
How to use WordPress to create a website STEP-BY-STEP INSTRUCTIONS
 How to use WordPress to create a website STEP-BY-STEP INSTRUCTIONS STEP 1:Preparing your WordPress site Go to the Dashboard for your new site Select Appearance > Themes. Make sure you have Activated the
Pages are static content, generally linked in your navigation. They are used for things like your about page and contact page.
 North Star Marketing Client : The Guthrie Group Deliverable : Website Training +++ LOGGING IN AND OUT +++++++++ 1. Go to http://tgg.northstarmarketing.com/wp admin/. This is the address for the staging
OU EDUCATE TRAINING MANUAL
 OU EDUCATE TRAINING MANUAL OmniUpdate Web Content Management System El Camino College Staff Development 310-660-3868 Course Topics: Section 1: OU Educate Overview and Login Section 2: The OmniUpdate Interface
Google Sites 101. Mrs. Wilson
 Google Sites 101 Mrs. Wilson Google Sites 101 Create a site 1. Go to http://sites.google.com/ 2. Login with your Google Account [or Google Apps account] email address and password You can create a Google
Web Content Management
 Web Content Management With Drupal Department User Guide Version 1.1 1 Table of Contents Overview 3 Getting Started 3 Writing for the Web 4 Speak to Your Audience 4 Keep it Professional 4 Introducing:
Astra Scheduling Grids
 Astra Scheduling Grids To access the grids, click on the Scheduling Grids option from the Calendars tab. A default grid will be displayed as defined by the calendar permission within your role. Choosing
mygateway Portal Training for Staff
 mygateway Portal Training for Staff Index What Is A Portal?... 4 Portal Terms... 4 Signing In To Mygateway... 5 Terms in Use... 6 Channels... 7 Remove / Add a Channel... 7 Content Layout... 8 Order of
Editor Guide. There are three ways to create, edit and delete an article within SOCS. They are Central Services, SOCS Wiki s and Easy Edit.
 Editor Guide There are three ways to create, edit and delete an article within SOCS. They are Central Services, SOCS Wiki s and Easy Edit. Central Services Select Editor from left-hand side navigation
WORDPRESS USER GUIDE HWDSB Websites
 WORDPRESS USER GUIDE HWDSB Websites Table of Contents Forward - About Wordpress... 3 1. Getting Started... 5 1.1) Log into your account... 5 1.2) About the Dashboard... 6 1.3) Internal vs. External Views...
UW WEB CONTENT MANAGEMENT SYSTEM (CASCADE SERVER)
") UW WEB CONTENT MANAGEMENT SYSTEM (CASCADE SERVER) LEVEL 1 (INTRODUCTION) Information Technology Updated February 2018 Presented By: UW Institutional Marketing and IT Client Support Services University
UW WEB CONTENT MANAGEMENT SYSTEM (CASCADE SERVER) LEVEL 1 (INTRODUCTION) Information Technology Updated February 2018 Presented By: UW Institutional Marketing and IT Client Support Services University
Kinetika. Help Guide
 Kinetika Help Guide 1 Hope you enjoy Kinetika theme! 3 Table of Contents Important Links 6 Theme Options - Setting Up Logo 26 Cover Photos 44 Applying Revolution Slider Slides 71 Important Notes 7 Logo
This Tutorial is for Word 2007 but 2003 instructions are included in [brackets] after of each step.
![This Tutorial is for Word 2007 but 2003 instructions are included in [brackets] after of each step.](/thumbs/72/67280806.jpg "This Tutorial is for Word 2007 but 2003 instructions are included in [brackets] after of each step.") This Tutorial is for Word 2007 but 2003 instructions are included in [brackets] after of each step. Table of Contents Just so you know: Things You Can t Do with Word... 1 Get Organized... 1 Create the
This Tutorial is for Word 2007 but 2003 instructions are included in [brackets] after of each step. Table of Contents Just so you know: Things You Can t Do with Word... 1 Get Organized... 1 Create the
A Quick Introduction to the Genesis Framework for WordPress. How to Install the Genesis Framework (and a Child Theme)
") Table of Contents A Quick Introduction to the Genesis Framework for WordPress Introduction to the Genesis Framework... 5 1.1 What's a Framework?... 5 1.2 What's a Child Theme?... 5 1.3 Theme Files... 5
Table of Contents A Quick Introduction to the Genesis Framework for WordPress Introduction to the Genesis Framework... 5 1.1 What's a Framework?... 5 1.2 What's a Child Theme?... 5 1.3 Theme Files... 5
e-portfolios Benefits of an e-portfolio Showcase your best works Progress assessment Job search; present to employers Share with family and friends
 1 e-portfolios Digication training objective The objective is to learn the tools and features of Digication and gain the essential skills to use Digication to develop an electronic portfolio. What you
BHM Website Teacher User Guide
 BHM Website Teacher User Guide How to Login 1. Go to HUhttp://bhmschools.org/userUH 2. Enter your username and password and click Log in How to Change Your Password 1. Go to My Account in your Nav bar
Creating Teacher Webpages on the New APS WordPress Site
 Creating Teacher Webpages on the New APS WordPress Site TABLE OF CONTENTS INTRODUCTION 3 THE EDITING DASHBOARD 4 CREATING A NEW PAGE 5 EDITING YOUR PAGE 6 1. Page Title 7 2. Toolbar/ toolbar icons 7 3.
Compliance Document Manager User Guide
 Compliance Document Manager User Guide Contents OVERVIEW... 3 SYSTEM REQUIREMENTS... 3 VENDORMATE PASSWORD REQUIREMENTS... 3 LOGIN... 4 THE HOME SCREEN... 5 BA Screening... 5 BA Oversight... 5 My Screening
How to Create a Google Sites Website
 How to Create a Google Sites Website * Google Sites must be built and maintained in either Google Chrome or Firefox. Google Sites is not supported by Internet Explorer. Let s get started! Go to google.com
Keynote 08 Basics Website:
 Website: http://etc.usf.edu/te/ Keynote is Apple's presentation application. Keynote is installed as part of the iwork suite, which also includes the word processing program Pages and the spreadsheet program
Worldnow Producer. Stories
 Worldnow Producer Stories Table of Contents Overview... 4 Getting Started... 4 Adding Stories... 5 Story Sections... 5 Toolbar... 5 Copy Live URL... 6 Headline... 6 Abridged Title... 6 Abridged Clickable
Cascade V8.4 Website Content Management for the Site Manager UMSL
 Cascade V8.4 Website Content Management for the Site Manager UMSL Contents Purpose & How to Use This Guide... 5 Getting Started and Logging In... 5 Login... 5 Dashboard... 5 Notifications... 5 Setting