Office of Space Management J STREE. Arboretum. Lot A. Lot B. Sacramento. Sacramento. Hall. Hall. Hall Annex. Lassen. Hall. Hall. Solano. Kadema.
|
|
|
- Britton Jennings
- 5 years ago
- Views:
Transcription
 RNET SSING RED OAK WAY Office of Space Management Astra Schedule Department Scheduler User Guide 50 m Sierra Sutter Commons Hall Hall N")


1 s, 57th Street and Downtown ehouses ceiving COLLEGE TOWN DRIVE n/ le ss el t., ail n, er de s) RNET SSING RED OAK WAY Office of Space Management Astra Schedule Department Scheduler User Guide 50 m Sierra Sutter Commons Hall Hall N o r t h E n d Intramural Fields Soccer Field Softball Field 5th Floor Baseball Field Football Practice Field Challenge Center (Peak Adventures) SINCLAIR RD. Parking Structure I Facilities Services Reprographics and Mailroom Handball Courts Tennis Courts Arboretum ARBORETUM WAY Student Lot 1 Athletic Center Yosemite Hall Amador Hall Solano Hall Central Plant MORAGA WAY J STREE Lot B Eureka Hall Lot A Student Lot 1 STATE UNIVERSITY DRIVE Sacramento Hall Lassen Hall Kadema Hall Mariposa Hall Capistrano Studio Hall Theatre Outpost Outdoor Theatre Library Quad Tahoe Hall Sacramento Hall Annex Library Academic Information Resource Center Lot 5 Transit Center Round House Douglass Hall Calaveras Hall Alpine Hall Brighton Hall Santa Clara Hall Union American River Courtyard STATE UNIVERSITY DR. Main Quad Placer Hall Humboldt Hall Serna Plaza Residence Hall Lot 2 River Front Center Lot 4 Lot 3 Del Norte Hall Mendocino Hall Riverside Hall Shasta Hall Sequoia Hall Hornet Bookstore STATE UNIVERSITY DR. Student Lot 2 Desmond Hall Residence Hall Lot 2 Faculty/ Lot 2 Greenhouses Environmental Health & Safety Non- Destructive Lab Draper Hall Jenkins Hall AMERICAN RIVER BIK A m e r i c a n R i Guy West Footbridge v e r AMERICAN RIVER BIKE TRAIL AMERICAN RIVER BIKE TRAIL Benicia Hall 3rd Floor Parking Structure II
2 Astra Schedule Department Scheduler User Guide November 2016 Office of Space Management csus.edu/aba/space (916)
3 PREFACE The is specifically designed to introduce Department Schedulers to the look and feel of Astra Schedule. It covers common Astra Schedule features, basic user navigation and procedures to maintain facility assignments for the Class Schedule. This user guide is not intended to be a comprehensive reference manual. A legend of icons used throughout the guide is listed below. Screenshots included in this user guide were developed using the native version of Astra Schedule; the actual software may vary slightly in appearance due to University branding. Legend Tab Hint about how to use Astra Schedule Alerts you to important information Information about how data is used or interpreted Astra Schedule Tab or Link List Icon Facility Detail Icon Excel Icon Table Icon Button Astra Schedule Screen Button <, > Timeline Scroll Keys Field Astra Schedule Input Field Captions Title of Page or Area Edit Icon Captions Instructions Delete Icon Date Filter Icon Captions General information Quick Step Guide or Example* Refresh Icon *At the top of most Quick Steps and Examples, the path used to navigate to the point where the steps begin is indicated. i
4 CONTENTS 1 WHAT IS ASTRA SCHEDULE? ASTRA SCHEDULE AND CMS SA INTERFACE TIMELINES FOR REAL TIME AND BATCH UPDATES USAGE REQUIREMENTS ACCESS ASTRA SCHEDULE NAVIGATE ASTRA SCHEDULE HOME TAB GENERAL NAVIGATION, DISPLAYING, PRINTING, EXPORTING LIST PAGE DISPLAY DISPLAY OPTIONS SEARCH FILTERS SET DATE FILTER PAGINATION CONTROLS PRINT DATA EXPORT DATA VIEW SCHEDULING GRIDS SELECT CALENDAR SELECT CALENDAR FORMAT AND SETTINGS VIEW ACTIVITY INFORMATION ADD ACTIVITY TO YOUR PERSONAL CALENDAR E MAIL AN ACTIVITY FIND AVAILABLE FACILITIES ADD MEETING TIMES AND DATES SET AVAILABLE ROOMS SEARCH FILTERS VIEW AND PRINT SEARCH RESULTS VIEW FACILITY INFORMATION SELECT ROOMS OPTION SET FACILITY FILTERS VIEW ROOM LIST VIEW AND SCHEDULE FACILITIES FOR CLASS SECTIONS SELECT SECTIONS OPTION SET CLASS SECTION FILTERS VIEW SECTION LIST VIEW CLASS SECTION INFORMATION VIEW CLASS SECTION MEETING INFORMATION SET EDIT MODE ON CLASS SECTION INFORMATION PAGE USE THE AD HOC SCHEDULER ASSIGN A FACILITY TO A CLASS SECTION DROP THE FACILITY FROM A CLASS SECTION APPENDIX A ASTRA SCHEDULE EXAMPLES A.1 DISPLAY OPTION EXAMPLES ii
5 A.2 SEARCH FILTER OPTIONS EXAMPLE A.3 EXPORT EXAMPLES A.4 EXAMPLE SEARCH FOR SCHEDULED ACTIVITIES BY BUILDING ON A SPECIFIC DATE A.5 EXAMPLE SEARCH FOR SCHEDULED ACTIVITIES BY BUILDING FOR A SPECIFIC WEEK A.6 EXAMPLE SEARCH FOR AVAILABLE FACILITIES FOR A SINGLE MEETING A.7 EXAMPLE SEARCH FOR AVAILABLE FACILITIES FOR A RECURRING MEETING A.8 EXAMPLE FIND ALL CLASSES FOR A SPECIFIC TERM, SUBJECT, AND MEETING PATTERN A.9 EXAMPLE SAVE SECTION LIST FILTER FOR A SPECIFIC TERM AND VIEW APPENDIX B ASTRA SCHEDULE BUILDING CODES AND DESCRIPTIONS APPENDIX C ASTRA SCHEDULE ROOM TYPE CODES AND DESCRIPTIONS APPENDIX D ASTRA SCHEDULE ROOM FEATURES AND CATEGORIES APPENDIX E ASTRA SCHEDULE EVENT TYPES AND DESCRIPTIONS APPENDIX F ASTRA SCHEDULE REGIONS AND DESCRIPTIONS APPENDIX G SPECIAL SCHEDULING CONSIDERATIONS iii
6 1 WHAT IS ASTRA SCHEDULE? Astra Schedule is a comprehensive facility scheduling suite of software tools used by Sacramento State to locate and schedule facilities for classes, final exams, and events. The Office of Space Management is responsible for administering Astra Schedule. Depending on access, campus users may view classes and events scheduled in Astra Schedule as well as assign facilities for classes using Astra Schedule. Astra Schedule is a Web based application available at astra.csus.edu. When Astra Schedule loads, Guest User access is automatically granted. As a Department Scheduler, log in with your SacLink username and password. Astra Schedule is available 24/7 on campus or off campus with a VPN connection. Astra Schedule has an interface with the Common Management Systems Student Administration system (referred to as CMS SA in this Guide) that synchronizes facility assignments for classes between the two systems. Event information is maintained in Astra Schedule only; it is not maintained in CMS SA. 1.1 Astra Schedule and CMS SA Interface The Astra Schedule and CMS SA interface is designed to facilitate the coordination of data between the two systems. Building, Room Astra CMS SA Schedule Active and Tentative Class Section Information Data that moves from Astra Schedule to CMS SA includes: Basic facility scheduling information: Building, Room Data that moves from CMS SA to Astra Schedule includes: Basic class section information: Unique Section Meeting ID (concatenated), Title, Subject, Class Section, Instructor, Maximum Enrollment, Actual Enrollment, Start and End Times, Start and End Dates, Days, Building/Room (pre assigned), and combined class section information (referred to as cross listed in Astra Schedule). Courses and class sections are only created in CMS SA. Astra Schedule imports class section information. Facilities are assigned to class sections as required using the Astra Schedule toolset and then exported back to CMS SA. Additionally, as class section details and facility assignments change, updates are sent in both directions to keep the respective information synchronized. Events are created and maintained only in Astra Schedule and are not exported to CMS SA. 1 What is Astra Schedule? 1
7 1.2 Timelines for Real Time and Batch Updates The Astra Schedule and CMS SA interface has three update modes and runs them concurrently: (Astra to CMS SA) A real time export runs whenever a facility assignment has been made or a facility is removed from a class section in Astra Schedule. The facility assignment or removal is sent to CMS SA within 30 seconds after the change is saved. (CMS SA to Astra) A batch import runs every weekday morning before 7:00AM to re import active and tentative semester class section data from CMS SA to Astra Schedule. This import allows academic department schedulers to work in Astra Schedule with the most current CMS SA data at the start of each work day. (CMS SA to Astra) A transactional import is scheduled to run every few minutes to capture changes made in CMS SA during that timeframe. 1.3 Usage Requirements Astra Schedule is a Web based application. The following is required to access Astra Schedule: On Campus connection or VPN connection if off campus Internet browser Ensure pop up windows are not blocked by your browser. It is recommended to maximize your browser window so displayed information is not truncated. Astra Schedule features can display slightly differently than depicted in this Guide depending on the browser you use. Examples shown in this user guide were developed using Mozilla Firefox. 2 ACCESS ASTRA SCHEDULE Web access is required to access Astra Schedule. Access Astra Schedule Navigation: Your Browser 1. Enter astra.csus.edu into the address bar of your Web browser. 2. The Astra Schedule Home Page loads with Guest User access by default. 3. Enter your SacLink username and password to gain Department Scheduler access. If you plan on using Astra Schedule frequently, it is recommended you create a bookmark or shortcut to easily access the home page. 2 2 Access Astra Schedule
8 3 NAVIGATE ASTRA SCHEDULE Astra Schedule organizes the application by tabs. The major features available are shown below. Across the top of the page are the login and password fields. As a Department Scheduler, you must log in with your SacLink username and password in order to view class section information and assign facilities. You do not need to log into Astra Schedule to view calendar information. Astra Schedule automatically logs you in as a Guest User. If your session is idle for more than 30 minutes, Astra Schedule logs you out. You will be prompted to log in again. Tabs and links are provided for easy navigation to other areas of the application. Click a tab to reveal additional options and features appropriate to the area selected. As a Department Scheduler, the following tabs are available: ASTRA HOME View Astra Schedule home page (see 3.1 Home Tab). CALENDARS View classes and events scheduled facilities (see 4 View Scheduling Grids) and search for available facilities (see 5 Find Available Facilities). ACADEMICS View Class Section Information And Assign Facilities To Class Sections (See 7 View And Schedule Facilities For Class Sections). RESOURCES View facility information (see 6 View Facility Information). 3 Navigate Astra Schedule 3
 as described and depicted in the screenshot below: A. Space Management Helpful Links B.")
9 3.1 Home Tab If you endeavor to access a page or perform an action for which you are not authorized, you will receive an Access Denied message. Click your browser s back arrow to return to Astra Schedule. The ASTRA HOME tab is divided into five areas (A E) as described and depicted in the screenshot below: A. Space Management Helpful Links B. Space Request Forms and Procedures C. Astra Schedule Resources D. Sacramento State Holidays & Announcements E. Sacramento State Helpful Links 3.2 General Navigation, Displaying, Printing, Exporting Several techniques and features are common to many screens in Astra Schedule. These include displaying and filtering information, page control, printing, and exporting data. These are described in the following sections and detailed examples may be found in Appendix A Astra Schedule Examples. 3.3 List Page Display In many screens of Astra Schedule, lists of items are presented in a data grid on the right with search and filter options in a panel on the left. Use the search and filter options to narrow the list results or to find a specific record. To view more information about a specific item on the list, click directly on the item name link. In many cases you can hover over an activity or icon to see a summary description. Examples include activities on the calendar, references to facilities, and anywhere a hover icon is displayed next to the name of an item or activity. 4 3 Navigate Astra Schedule
10 3.4 Display Options You may collapse the filter panel on a list page to make more room for the list results or task. Simply click on the panel arrow icon in the upper right corner of a panel to hide it. Click again to show the panel. Astra Schedule offers several ways to display the information on a page. Customizing a List page makes it easier to view key information. Customization options include which columns are displayed and in what order. See A.1 Display Option Examples for detailed examples of selecting the various display options. Often you can click on the column labels on the list page to change the way the list is sorted. Click again to reverse the sort order. Another method is to click on the down arrow next to the column heading and select Sort Ascending or Sort Descending. Columns in a list page may be rearranged as preferred. To move a column, click and drag the column header to a new position. When the arrows appear between other columns in the correct position, release the mouse button to drop the column into its new position. The columns that are displayed on a given list page may be changed as well. To customize the display, click on the right arrow on any column in the list and choose the Columns option. All of the available column options for the record type being viewed are displayed. Place or remove a check mark to add or remove columns from the list page. You may also choose to display the data in groups. 3 Navigate Astra Schedule 5
11 To resize a column, hover your cursor over the line to the right of the column you wish to resize and then click and drag right or left. 3.5 Search Filters Search filters are available on various screens including filter panels, and designated search filter areas. The filters vary depending on the type of information being displayed. In general: Many filters allow for multiple choices to be selected. To add a filter, click the + button to display the possible choices. To set a filter, enter a value or select from the list. You can select one or more items from a list. Check the box next to each item you would like to include in your filter. Notice that the items are added automatically to the filter list. Click the Search button to update the list page. You can temporarily unset the filter item by removing the check mark, or delete the filter by clicking the delete button X next to the filter. On a list page, you can collapse the Filter panel to make more room for the list results. Click the panel arrow in the upper right corner of the Filter panel to hide it. Click it again to display the panel. For filters with many values, use the pagination controls at the bottom of the Add Filter pop up window to view all available values. 6 3 Navigate Astra Schedule


12 After adding a filter, click anywhere outside of the Add Filter pop up window to close the Add Filter pop up window. Filter criteria are combined as you enter more options. Filter criteria are retained for each List Page and will continue to be displayed if you leave the List Page and return within the same browser session. When you start a new browser session, the default search filter is in effect for that List Page. See A.2 Search Filter Options Example for an example of the filters available on a filters panel. 3.6 Set Date Filter A date filter tool is provided to select the day, week, month or year to display on a calendar or to use when searching for an available facility. Click the date filter icon to display the date filter tool as a pop up window. You can use the arrow buttons on either side of the month and year displayed to move to the previous or next month. Click directly on the month and year heading to quickly select a different month and year. Click the day in the month displayed to set the date. Alternatively, you can edit the date displayed in mm/dd/yyyy format to the left of the date filter icon. To close the date filter pop up window, select a day or click Today. Depending on the screen, you must click the refresh icon or OK to begin the search. Depicted in the screenshot below are the navigation features of the date filter. 3.7 Pagination Controls Depending on the data and your filter settings, several lists contain more information than can be displayed in the current window and it is presented in pages within the window. Pagination controls may appear on several types of windows including, but not limited to list pages, filter panels, drop down 3 Navigate Astra Schedule 7
13 menus, and pop up windows. Use the pagination controls at the bottom of a window to configure the number of items displayed per page and to navigate the various pages. You can move to the next page, last page, previous page, or first page by using the arrow buttons provided. You can also type in a specific page number or use the slider to move through the pages. Not all controls may be present. 3.8 Print Data Click the Print icon or button to print the information on the page. The information is displayed in a printable format in a new window. Use your browser to print the information and close the print window to return to Astra Schedule. Before printing a calendar grid, you may want to minimize the Rooms Panel. 3.9 Export Data After printing, close print window to return to Scheduling Grids page. Astra Schedule allows some screen data to be exported to Microsoft Excel or to a table. Screens that allow their data to be exported have the export icons displayed at the bottom of the screen. Once the page reflects the data you wish to export (see 3.4 Display Options and 3.5 Search Filters), click the Excel icon at the bottom of the page to open or save the data in Excel format or click the table icon at the bottom of the page to display the data in table format within your browser. Files are saved according to the settings of your browser. The Export option gives you a choice of including all pages in the report, or just the displayed page. See A.3 Export Examples for detailed examples of exporting screen data. 8 3 Navigate Astra Schedule


14 4 VIEW SCHEDULING GRIDS The Astra Schedule scheduling grids provide multiple ways to view information about scheduled activities in facilities across campus quickly and easily. Select Scheduling Grids on the CALENDARS tab to view scheduled activities and dates and times facilities may be available for scheduling. For examples, see Appendix A sections A.4 Example Search for Scheduled Activities by Building on a Specific Date and A.5 Example Search for Scheduled Activities by Building for a Specific Week. Key areas on the Calendar Grid page are shown below for your reference in this section. Depicted in the screenshot below are: User input areas (filters, searches, calendars, formats, configuration, and printing) Display areas: A. Rooms Panel B. Calendar C. Holidays and Announcements area on Day calendar format The Scheduling Grids present a list of rooms on the left, and activities using the applicable facility appear as shaded cells in the grid to the right. The Rooms panel displays a list of the facilities according to the filters you select. You can navigate this list, using the scroll bar to the right of the calendar, to find detailed information for each individual facility on the list. The information displayed as well as the format in which it is displayed can be customized. The date can be changed by using the arrow buttons to the left and right of the displayed date or date range to navigate backward or forward in time or click the calendar date filter icon to go to a particular date (see 3.6 Set Date Filter). In the Scheduling Grids, activities are displayed in colored boxes as follows: 4 View Scheduling Grids 9
15 Classes and Final Exams are displayed in a blue box. Cross Listed Classes are displayed in an orange box. Events are displayed in a green box. Blocked facilities are displayed in a salmon colored box. Blocked group (partitioned) facilities are displayed in a gray box. Announcements are displayed on weekly calendar in a yellow box. Holidays are displayed on weekly calendar in an orchid box. An activity labeled Partition indicates the facility is part of a partitioned space and cannot be scheduled because one or all of the facilities in that same partitioned space have an activity scheduled during the noted time. Only facilities included by your filter settings are displayed in the Rooms panel. The Scheduling Grids are designed to be view only. Astra Schedule allows you the option to print or export some information. You may prefer to use your browser or other means to capture, save, or print the information displayed. When changing the calendar content or format, a progress bar appears in the middle of the screen indicating it is searching for activities to display: 4.1 Select Calendar The Scheduling Grids feature allows you to choose the type of calendar to display such as: Building Activity Calendar to view classes and events by Building. By default, all Buildings are displayed. You may select from a drop down menu of buildings. Events Calendar to view events by their Event Type. By default, all events are displayed. You may select from a drop down menu of event types. Lecture Activity Calendar to view classes and events scheduled in lecture facilities. Instructional Computer Lab Calendar to view classes and events scheduled in select instructional computer labs View Scheduling Grids


16 To begin, select the type of calendar you want to view as described and depicted in the screenshot below: Select Calendar Navigation: Calendars > Scheduling Grids 1. Click Choose Calendar to choose a Calendar. 2. Click the Calendar to select it and refresh the display. For Building Facility and Event Calendars, you may view all buildings and events, respectively, or choose a pre defined filter Select Pre Defined Calendar Filter The Building Activity and Events calendars include pre defined calendar filters for each building and event type, respectively. You can choose between these calendar filters using the calendar Filter dropdown menu. Upon selecting a calendar filter, the contents of the calendar being viewed updates accordingly. Limiting your search to a particular building or event type reduces the search time. The Buildings maintained in Astra Schedule may be found in Appendix A Astra Schedule Building Codes and Descriptions and Event Types in Appendix D Astra Schedule Event Types and Descriptions. Described and depicted in the screenshot below are the steps to follow to view activities scheduled in a particular building. Similar steps would be followed for the Events Calendar. Select Building Filter Navigation: Calendars > Scheduling Grids > Building Activity Calendar 1. Click the calendar Filter to choose a Building. 2. Use scroll bar on right side of pull down window to view more Buildings. 3. Click the Building to select it. 4 View Scheduling Grids 11

17 4.2 Select Calendar Format and Settings The calendar grids can be displayed in day or week format. The Settings feature allows you to select the beginning and ending times displayed on the calendar as well as highlighting certain activities such as those with an actual enrollment higher than the maximum enrollment. When switching between day and week formats verify the appropriate date is displayed as the last date selected for a given format is used Select Calendar Day Format The Day format of the calendar displays each facility s schedule on a single row. This view provides immediate feedback on availability and usage for a single day, across a page full of facilities at a time. It has the following features: The rows in the calendar align with each facility in the Rooms Panel. Click the date filter icon or an arrow above the calendar grid to change dates. Click Choose Calendar to change the calendar. Click the calendar Filter to change building or event type. Depicted in the screenshot below are: Navigation features (scroll bars, hovers) User input areas (viewing options), configuring, printing You may need to adjust the browser window to reveal the scroll bar along the bottom edge of the calendar in order to view all of the times. In Day format, to make the Rooms Panel narrower, eliminate columns displayed and/or drag the columns to make them narrower View Scheduling Grids
 at once.")
18 4.2.2 Select Calendar Week Format The Week format of the calendar requires that you select the facility you would like to view from the list on the left. This view provides immediate feedback on availability and usage for a full week (or date range) at once. The Week format, depicted below, has the following features: The activities displayed in the calendar are for only the selected facility. To select a facility, click a facility in the Rooms panel on the left. The selected facility is highlighted in pale orange. By default, the first facility is selected. Click the timeline scroll key (< or >) to move the calendar 1 week. The first day of the displayed week is always the Sunday on or before the current or selected date. The activity hover window includes options to add the activity to your calendar or to it. Depicted in the screenshot below are: Navigation features (scroll bars, date selectors) User input areas (viewing options), configuring, printing In Week format, when viewing a date range instead of a single week, all activities that occur during the entire range are shown together. This feature is useful when searching for an available time slot for a recurring activity as it shows not only the rooms and times that are available but also what s scheduled during the selected period. For example, when the range is set to a full term, this feature will show which rooms are available for the entire semester. To specify a date range while in Week format, click End Date to the right of the date selector to open a calendar window (see 3.6 Set Date Filter Set Date Filter). Navigate to the preferred end date and click on the day. The grid refreshes and the selected date is displayed to indicate you are viewing a date range. Click the X to remove the end date and return to standard week behavior. 4 View Scheduling Grids 13
 to set the start date of range. 3. Click End Date to set the end date of range.")

19 Described and depicted in the screenshot below are the steps to follow to display a range of dates in week format. 1. Select Week format. Display Date Range in Week Format Navigation: Calendars > Scheduling Grids 2. Click the date filter icon (see 3.6 Set Date Filter) to set the start date of range. 3. Click End Date to set the end date of range. 4. Click X to remove the date range. When using the date range feature of the weekly grid, the dates shown in the header reflect only the first week in your range, however, the data displayed is for the entire range. In a date range view, a recurring activity appears only once. Different activities scheduled in the same room at a given time are stacked over the time slot Configure Calendar Settings Astra Schedule allows you to configure the calendar by clicking the Settings Icon to the right of the Calendar Filter. The Calendar Configuration window is displayed. You may: Select the start and end times displayed on the day format calendar Easily identify over enrolled courses or events by assigning them a special color See Select Calendar Week Format for an example of how over enrolled courses are displayed View Scheduling Grids

.")
20 4.3 View Activity Information Depicted in the screenshots below is the information displayed when hovering over a class section or event on a Scheduling Grid. This may include Meeting Type, Enrollment, Capacity (referred to as Max Enrollment in CMS SA), Days Met, Start and End Date, Start and End Time, and Room (Facility). The Activity Details hover window is where you can e mail the activity information or add it to your personal calendar. Final exams are denoted by a Meeting Type of EXM when viewing the Class Section Details hover window. 4 View Scheduling Grids 15

21 4.4 Add Activity to Your Personal Calendar Activities on the Astra Schedule calendar can be added to your personal calendar. While hovering over the calendar entry for an activity to view details, click the Add to Calendar icon next to the activity you wish to add to your personal calendar, as shown in 4.3 View Activity Information. You can save the activity to your calendar of choice or to a file for later import to a calendar. 4.5 E Mail an Activity Details about activities on the Astra Schedule calendar can be ed to anyone you choose. While hovering over the calendar entry for an activity to view details, click the icon next to the activity you wish to , as shown in 4.3 View Activity Information. You can edit the message prior to sending. 5 FIND AVAILABLE FACILITIES The Available Rooms calendar tool provides a quick way to search for all available facilities. Select Available Rooms on the CALENDARS tab when you want to search for facilities to schedule for classes or events and to search for available times to view facilities or perform facility maintenance Find Available Facilities
22 The Available Rooms tool allows you to enter time and date information and filters to limit your search. A list of resulting available facilities can be printed for short term reference. To perform a search, you will create one or more time/date entries, enter filter criteria, and search for availability. This process may be repeated as desired to refine results or perform additional searches. Class and event scheduling is dynamic and facility availability data is current only for the day and time it is generated. Requests to reserve or hold facilities for activities, routine maintenance, or renovation must be submitted to the Office of Space Management. For examples, see Appendix A sections A.6 Example Search for Available Facilities for a Single Meeting and A.7 Example Search for Available Facilities for a Recurring Meeting. Depicted in the screenshot below are key areas as well as the steps to follow to define the meeting time and location to search for available facilities. Navigation features (scroll bars, print results) User input areas (add meeting date/time, filters, purpose of search) Key areas (A G) A. Add New Meeting area: Enter and view requested meeting time(s) here. B. Location Search Filters: Enter preferred location, Room Type, Feature, or Capacity here. C. Equipment/Services Filters: Not used D. Search Results: Facilities meeting your criteria are displayed here. E. Purpose of Search: Select Event or Section. F. Search: Click to begin search. G. Print: Click to print search results. Perform Facility Availability Search Navigation: Calendars > Available Rooms 1. In the Add New Meeting area, click Add New and fill in the time(s) and date(s) as described in section 5.1 Add Meeting Times and Dates. 2. Add additional search filters as described in section 5.2 Set Available Rooms Search Filters. 3. Click Purpose of Search drop down menu to specify Event or Section for conflict checking. 4. When all the search criteria have been entered, click Search in the lower middle of the page to generate a list of available facilities based on the meetings and filters provided. You can change search criteria and re search as needed. The Search Results area displays a list of facilities that are available for all times and dates in your search and that meet all the filter criteria. The Building/room, Capacity, and Room Type are displayed in the Search Results area. To view more information about a particular facility, hover over the facility details icon next to the room name. 5. A printer friendly view of the search results, including the meeting and filter information may be generated by clicking Print. 5 Find Available Facilities 17
. A search can be for a single or a recurring meeting.")
 and date(s) to search for available facilities.")

23 Confirm Purpose of Search is set appropriately as facilities may be blocked for class section or event usage. 5.1 Add Meeting Times and Dates To search for available facilities, the time and date information must first be entered for the meeting(s). A search can be for a single or a recurring meeting. This flexibility allows for searches to be performed on behalf of an event or class, or simply to research open facilities for informational purposes. Described and depicted in the screenshot below are the steps to follow to define the meeting time(s) and date(s) to search for available facilities. Enter Time and Date Information for a Search Navigation: Calendars > Available Rooms > Add New 1. Select the frequency option for Single Meeting or Recurring Meeting. 2. If Single Meeting is selected, enter Start Time, End Time, Start Date, and End Date of the meeting. 3. (A C) If Recurring Meeting is selected, enter Start Time, End Time, the Day Pattern, and the date range of the meetings. 4. Click OK to add your meeting to the search page. 5. Repeat as needed to build a list of meetings (i.e., to search for facilities that are available across multiple times and days). Click the delete icon to remove a meeting Find Available Facilities

24 You can enter the date and time directly, tabbing between hour, minute, and AM/PM or use the Date Selector and Time Scroll buttons to set the values. If the search is for a facility to accommodate a weekly multi day event, a recurring meeting can be created to represent its meeting pattern. Choose weekly as the day pattern, select the days met, and then provide the event start and end dates as the date range. The recurring meeting option is used for meetings with a regular meeting pattern. If meeting dates/times are irregular (e.g., different times each week, or not meeting every day/week/month/year) then multiple single meetings must be added. If, for example, five separate meetings are entered, only facilities that are available all five times are displayed. 5.2 Set Available Rooms Search Filters The Available Rooms search filters are used to narrow searches for available facilities. By default, all filter options are set to Any, meaning that all facilities are searched, and any available facility is returned in the list. However, complex filtering is also supported, allowing multiple filter options to be set to restrict the list as needed. These settings can be edited repeatedly to reduce and refine the list of results returned. 5 Find Available Facilities 19

25 Described and depicted in the screenshot below are the steps to follow to define filters to apply when searching for available facilities. You may need to adjust your window size to see the scroll bars. Set Search Filter Criteria Navigation: Calendars > Available Rooms 1. Scroll down to the Search Filters area and ensure the Search For: drop down menu indicates Locations. The Equipment/Services filters are not used. 2. Click the edit icon for the field on which you would like to filter the search. See filter descriptions below. 3. Use the scroll bar to view available values for the filter and click the box to select the value. Multiple values can be selected for a given filter. You can search on room Capacity by entering a range for the number of occupants. 4. Select the item(s) on the list you would like to include in the search and click OK. 5. Repeat with other fields as needed. The Available Rooms search filters tool supports the following filters: Campus Identifies campus. Always set to MAIN. Building May represent a physical building, outdoor space, or virtual space. Building Code and Room Number make up the CMS SA Facility ID. A list of building abbreviations can be found in Appendix A Astra Schedule Building Codes and Descriptions. Region Regions are groupings of facilities used primarily by the Office of Space Management to create and maintain scheduling security and priority and to develop internal reports. Regions listed are applicable to fall and spring semesters only. A list of Regions can be found in Appendix E Astra Schedule Regions and Descriptions Find Available Facilities

26 Room Lists all rooms (facilities) that can be scheduled in Astra Schedule. Room Type Used to categorize facilities. For example, you may want to only search lecture facilities or conference rooms for available space. A list of Room Types can be found in Appendix B Astra Schedule Room Types and Descriptions. Feature Facility features are permanent attributes of a facility that are significant for scheduling and reporting purposes and are assigned by the Office of Space Management. For example, some facilities may have tiered seating or tables/chairs. For convenience, media Level features are prefixed with * so they sort to the top. Features prefixed with zsm Use are for the Office of Space Management s use only. A list of features maintained in Astra Schedule can be found in Appendix C Astra Schedule Room Features and Categories. Capacity Designates maximum seating capacity for the facility. Can specify a range or a single value. For example, to view all facilities that can seat 100 or more people, enter 100 in the lower range box (left) and leave the upper range box (right) blank. Search and filter criteria are combined as you enter more options. To reduce search time, it is recommended you enter a Capacity value greater than 1 in order to distinguish from special facilities that have an assigned Capacity of 1 (e.g., Rest Rooms). To remove a filter, click the delete icon for the appropriate field as shown below for Room Type. 5.3 View and Print Search Results The Available Rooms calendar tool displays all facilities that meet the requested search criteria for all the designated date(s) and time(s). Depicted in the screenshot below are: Navigation Features (scroll bar, hovers) User input areas (Activity Type, printing) 5 Find Available Facilities 21


27 Depicted in the screenshot below is the information displayed when hovering over a room in the Search Results area of the Available Rooms calendar. This includes Room Type, Capacity, Layout, Description, and Features. The print option displays the search criteria as well as the results in a separate window for printing as depicted in the screenshot below. Use your web browser to print the report. Some browsers may need to be set to allow pop up windows Find Available Facilities


28 6 VIEW FACILITY INFORMATION Facility information is viewed by accessing the RESOURCES tab that provides a list of State owned facilities on campus maintained in Astra Schedule for scheduling class sections and events. Department and Faculty offices are not currently managed in Astra Schedule. Select the RESOURCES tab to display the following options: Rooms to select and view information about facilities maintained in Astra Schedule. Notifications is not used. 6.1 Select Rooms Option Select the Rooms option of the RESOURCES tab to view facility information. Depicted in the screenshot below are features and key areas within the Room List including: Display information (hover for facility details) Navigation options (Room List scroll bar) 6 View Facility Information 23


29 Key areas (A B) A. Filter Panel Includes several filters that can be used when searching for facilities. B. Room List Displays facilities that meet your search criteria. The list can be several pages long, depending on the filter settings. 6.2 Set Facility Filters Astra Schedule allows you to set filters in the Rooms option of the RESOURCES tab to only list facilities that match your search criteria. Results from a search are displayed in the Room List. See 3.4 Display Options. Astra Schedule offers several ways to display the information on a page. Customizing a List page makes it easier to view key information. Customization options include which columns are displayed and in what order. See A.1 Display Option Examples for detailed examples of selecting the various display options. Often you can click on the column labels on the list page to change the way the list is sorted. Click again to reverse the sort order. Another method is to click on the down arrow next to the column heading and select Sort Ascending or Sort Descending. Columns in a list page may be rearranged as preferred. To move a column, click and drag the column header to a new position. When the arrows appear between other columns in the correct position, release the mouse button to drop the column into its new position View Facility Information

30 The columns that are displayed on a given list page may be changed as well. To customize the display, click on the right arrow on any column in the list and choose the Columns option. All of the available column options for the record type being viewed are displayed. Place or remove a check mark to add or remove columns from the list page. You may also choose to display the data in groups. To resize a column, hover your cursor over the line to the right of the column you wish to resize and then click and drag right or left. See 3.5 Search Filters for detailed information about setting filters. The Rooms option supports the following filters: Room Number The Room Number of any facility. Campus Identifies campus. Keep as All. Building May represent a physical building, outdoor space, or virtual space. Building Code and Room Number make up the CMS SA Facility ID. A list of building abbreviations can be found in Appendix A Building Codes and Descriptions. Region Groupings of facilities. See Appendix F Astra Schedule Regions and Descriptions for more information and a list of regions. 6 View Facility Information 25
.")
31 Room Type Used to categorize facilities according to their use. See Appendix C Astra Schedule Room Type Codes and Descriptions. 6.3 View Room List Results from a search are displayed in the Room List. You can change the information in the Room List and how it is displayed (see 3.4 Display Options). By hovering over the facility details icon, you can view the details for a particular facility including Room Type, Capacity, Layout, and Features. If you click the Facility (Room) link, it opens a page that is used by the Office of Space Management to maintain facilities. 7 VIEW AND SCHEDULE FACILITIES FOR CLASS SECTIONS The ACADEMICS tab provides access to class section information for viewing and facility scheduling. The class section information is imported from CMS SA. When the initial schedule building period in CMS SA is over, class section facility assignments shall be made in Astra Schedule. All other class section information must be edited in CMS SA and cannot be changed in Astra Schedule. Select the ACADEMICS tab to display the following options: Sections to view class section information and assign facilities to class sections you have been authorized to schedule. Notifications is not used View and Schedule Facilities for Class Sections
 Navigation options (Section List scroll bar) Key")

32 7.1 Select Sections Option Select the Sections option of the ACADEMICS tab to view class section information or assign a facility to a class section. Depicted in the screenshot below are features and key areas within the Section List including: Display information (hover for class section details) Navigation options (Section List scroll bar) Key areas (A B) A. Filter Panel: Includes several filters that can be used when searching for class sections. B. Section List: Displays class sections that meet your search criteria and you have been authorized to view. The list can be several pages long, depending on the filter settings. From this list you can access the Class Section Information page where you can make or change a facility assignment. 7.2 Set Class Section Filters Astra Schedule allows you to set filters in the Sections option of the ACADEMICS tab to list only class sections that match your search criteria. Results from a search are displayed in the Section List. See 3.5 Search Filters for more information about setting filters. 7 View and Schedule Facilities for Class Sections 27
33 The Class Sections option supports the following filters: Keyword text string appearing in Subject, Course Number, Subject/Course Number combination, Building, Room, Building/Room combination, Instructor, and Meeting Type. Combination values must be separated by % (e.g., accy%1 ). Class sections containing the keyword in any of these fields are selected. Start Date Earliest start date of class section meeting. End Date Latest end date of class section meeting. Days Met Class section meetings scheduled on these days. Invalid Meeting Pattern Keep as All unless searching for incomplete class section meeting information. Arranged Not Used; keep as All. Is Exam Not Used; keep as All. View Sections/View Meetings Indicates how Class sections and Meetings are displayed in the Section List. See Select Section List View Option below. Term Designates the term to which the class section applies. Term is of the format: 2yyn where yy is the two digit year and n is the term number (1=Winter, 3=Spring, 5=Summer, and 8=Fall). For example, 2143 designates the spring 2014 term. Subject Lists only the subjects you are authorized to view. Course Lists only the courses within the selected Subject you are authorized to view. Instructor Lists only instructors assigned to Subjects you are authorized to view. Campus Identifies campus. Keep as All. Building May represent a physical building, outdoor space, or virtual space. Building Code and Room Number make up the CMS SA Facility ID. A list of building abbreviations can be found in Appendix A Building Codes and Descriptions. Room Lists only rooms you are authorized to assign in Astra Schedule. Department Not Used. Meeting Status Not Used. Meetings with Not Used. For an example of setting filters, see A.8 Example Find All Classes for a Specific Term, Subject, and Meeting Pattern View and Schedule Facilities for Class Sections

34 7.2.1 Select Section List View Option The Section List can be viewed as a list of sections or as a list of meetings. The Sections view groups multiple meetings of the same section into one row, whereas the Meetings view shows each meeting in a separate row. It is recommend you set your default view to Meetings as it allows sorting on class section meeting related information (see Select Section List Report Options). Select the radio button toggle in the Filter panel to choose the preferred list view and click Search at the bottom of the Filter panel to update the Section List. In the Sections View, class sections with more than one meeting type or pattern are displayed on one row. To display the individual meetings that comprise it, click the expand button. Click the collapse button to hide the meetings. To display the expand and collapse buttons in Sections View, you must set the Subject filter to the subject(s) to view before beginning the search. Described and depicted in the screenshots below are examples of the View Sections option for ACCY 1 Section 02 with two meeting types: a discussion section and an online section. 7 View and Schedule Facilities for Class Sections 29


35 In the Meetings View, the same example of ACCY 1 Section 02 with two meeting types: a discussion section and an online section would be displayed with one meeting per row and no main class section record as depicted in the screenshot below Save Class Section Filter Astra Schedule allows you to save filter settings for future use. Frequently used searches can quickly be recalled by using saved filters. See A.9 Example Save Section List Filter for a Specific Term and View. Described and depicted in the screenshot below are the steps to follow to save a Class Section filter. Save Class Section Filter Navigation: Academics > Sections 1. Set filters for the appropriate fields and values (see 7.2 Set Class Section Filters). 2. Click Search to confirm results are as expected. Refine filter settings until satisfactory. 3. Click the save filter icon at bottom of Filter panel to display the Save Filter window. 4. Enter a meaningful Filter Name. 5. If you want this filter to be used each login, click Set as Default Filter. 6. Click OK to save filter View and Schedule Facilities for Class Sections
, meeting")

36 It is recommended you set and save frequently used search filters. 7.3 View Section List Results from the search are displayed in the Section List. By hovering over the class section details icon, you can view the details for a particular class section including Meeting Type, Enrollment, Capacity (Maximum Enrollment in CMS SA), meeting days and times, Room (Facility), and Instructor. If you click the class section link in the Class/Section column or the View Class Section Details link in the hover window of a class section, it opens the Class Section Information page for viewing (see 7.4 View Class Section Information). All screenshots in this section are displayed in Meetings View unless otherwise noted. 7 View and Schedule Facilities for Class Sections 31
37 The current sort order is indicated by a pale blue column header with a small arrow to indicate ascending or descending sort order. Astra Schedule provides countless ways for you to view information and there are many ways to attain the same information. For example, to view all section meetings for a given instructor, you could set the Instructor filter on the Filter panel, or on the Section List you could sort on the Instructor column or select Group By This Field on the Instructor column menu. The chart below lists several common queries and a suggested way to display it. The M/S column indicates if you need to be in Meetings View (M) or Sections View (S) of the Section List or either (MS). See 7.2 Set Class Section Filters and Select Section List Report Options for more detailed information. M/S Section Meetings That Action MS Are in a specific term Set Term filter. MS Are in a specific subject Set Subject filter. M Have a specific Meeting Type Select report options to include Meeting Type column and group by that column. M Have a specific Meeting Type (quick ID) Set Keyword to specific Meeting Type (e.g. DIS). M Have a specific Room Type (quick ID) Set Keyword to specific Room Type (e.g. LEC). M Go beyond end of term Set End Date filter = <end of term date>, then click the not equal to icon. M Start before beginning of term Set Start Date filter = <beginning term date>, then click the not equal to icon. M Have incomplete meeting information Set Invalid Meeting Pattern filter to Yes. MS Are not assigned to a facility Click the Rooms column header to sort in ascending order. Unassigned meetings are displayed at the top with a blank Room value. M Meet on Saturday Set Days Met to S. M Meet on Sunday Set Days Met to U. M Are cross listed Include Cross List column in Section List. Click the Cross List column header to sort in ascending order. Cross Listed class sections are displayed at the top with a non blank value. All class sections associated with a term are displayed even if they begin before, or end after official term dates. Keyword searches may not be as precise as searching on a particular field since the keyword may be found in more than one field. In Meetings View: If Start Time = 12am and End Time=12am, the time is likely not set in the CMS SA class section. If no meetings are displayed in the hover window it is likely an incomplete class section from CMS SA View and Schedule Facilities for Class Sections


38 7.3.1 Select Section List Report Options Astra Schedule allows you to change how and what information is displayed in the Section List. Customizing the Section List makes it easier to view key information. Customization options include which columns are displayed and in what order. You can also group the data according to a particular column. See 3.4 Display Options for more information. Astra Schedule allows you to filter some columns directly. These are: Course/Section and Section Title. To filter the data in a column, click the down arrow next to the column and enter a search string. Columns relating to class section meetings are not sortable in Sections View. You must be in Meetings view to sort on meeting related columns (e.g., Days Met, Start Date, and Room). 7.4 View Class Section Information On the Section List, when you click a class section link, the Class Section Information page is displayed. Depicted in the screenshot below are features and key areas within the Class Section Information page including: User input areas (edit button, hide/expand buttons) Navigation options (return to prior page) Key areas (A D): A. Class Section Information B. Section Notes Not used C. Same Time Info Not used D. Meeting Information 7 View and Schedule Facilities for Class Sections 33
. Information displayed in the Class Section Info area is maintained in CMS SA.")
39 The Section Information area (A) contains general information about the class section record indicated at the top of the page. This includes data that defines the class section, but is separate from the individual meeting(s). Information displayed in the Class Section Info area is maintained in CMS SA. Do not make any changes on this page (including Term) as the changes will not be exported to CMS SA and may create reporting and facility synchronization issues. Do not select any of the Sandbox options; for Space Management use only. At the bottom of the page is a tabbed interface displaying the section meeting(s). The Meetings tab is a summary list that includes any meetings for the class section. The Meeting Type, Start and End Times, Days, Start and End Dates, Instructor, and Room (Facility) are all included here at a glance. More detailed meeting information is available by viewing the Class Section Meeting Information page (see next section). 7.5 View Class Section Meeting Information To view class section meeting details such as individual meetings, multiple Instructors, and cross listed class sections, you must be on the Class Section Information page (see previous section). On the Class Section Information page, scroll down to the Meeting Information area, click the view icon to the left of the Meeting Type column (if you are in edit mode, click the edit icon ). A new tab is created for each meeting opened. Also, when the detail for an individual meeting is displayed, the Class Section Information area is automatically collapsed to provide as much display space as possible. It is re expanded when you click the main Meetings tab. Depicted in the screenshot below are: Displayed information (Instructors, Meeting Patterns, cross listed class sections, and a breakdown of the individual meeting dates) Navigation Options (expand and collapse buttons) 34 7 View and Schedule Facilities for Class Sections

40 No information shall be updated in the Meeting Info area except for the Room (Facility). Do not make any other changes on this page as the changes will not be exported to CMS SA and may create reporting issues. The Resources, Preferences, Meeting Dates, and Meeting Notes areas are not used and therefore not addressed in this User Guide View Cross Listed Class Sections Combined section information for class sections is maintained in and imported from CMS SA. Astra Schedule refers to these sections as cross listed. Combined sections include all class sections meeting together in the same facility: cross listed courses from different subject areas, different sections of the same course meeting together in the same facility, or any other combination of class sections that meet together in the same facility. Cross Listed class sections require a facility with a Facility Capacity that can accommodate the sum total of the maximum enrollments of all the cross listed class sections. You may not be authorized to view the detail of the cross listed class section. Expanding the Cross List Information area on the individual meeting tab of the Class Section Meeting Information page, the cross listed meetings are displayed along with their combined enrollment information as depicted in the screenshot below. 7 View and Schedule Facilities for Class Sections 35

.")
41 Cross listed class sections can be identified on the Section List by including the Cross List column and sorting it in ascending order. Cross listed class sections will sort to the top of the display. 7.6 Set Edit Mode on Class Section Information Page To assign or drop the facility assignment for a class section, you must be in edit mode on the Class Section Information Page (see 7.4 View Class Section Information). This may be done by clicking the Edit button at the top of the Class Section Information page. Alternatively, you may open the Class Section Information page in edit mode by clicking the edit Icon section to be updated (see 7.3 View Section List). in the Section List row of the class It is recommended you work in view mode until you are ready to assign or drop the facility assignment. The only class section information that shall be changed in Astra Schedule is the facility assignment (Building and Room Number). All other class section information must be maintained in CMS SA View and Schedule Facilities for Class Sections

42 In order to assign a facility to a class section in Astra Schedule, the class section must have Date, Days Met, Start Time and End Time set. This information must be entered into CMS SA. In some, but not all cases, Astra Schedule prompts you to confirm your changes before saving them. Described and depicted in the screenshot below are the additional features available to you on the Class Section Meeting information page when in edit mode. Navigational features (return to previous page, begin Ad Hoc Scheduler) Input Areas (save or cancel changes, drop the facility) The assign resources feature is not used Be careful where you click on the page or you may accidentally drop the facility assignment. When you click the assign facility icon, it begins the Ad Hoc Scheduler and displays the message Loading while it is searching for facilities for the selected class section. 7.7 Use the Ad Hoc Scheduler Astra Schedule s Ad Hoc Scheduler assigns a facility to a class section very simply and efficiently. It helps you find the most appropriate room and best seat fill. For optimum facility optimization, click the assign facility icon for a class section meeting in the Meetings area of the Class Section Information page to display the Ad Hoc Scheduler. You must be in edit mode for the assign facility icon to be displayed (see 7.6 Set Edit Mode on Class Section Information Page). Depicted in the screenshot below are: User input areas (Set, manage, and apply filters, OK/Cancel buttons) Navigation options (Facility and filter scrolls) 7 View and Schedule Facilities for Class Sections 37

43 Key areas (A B): A. Ad Hoc Scheduler Filter panel B. Availability List Within the Availability List, Astra Schedule provides many features including: Display information (hover for facility details, pages in display, number of meetings in Selected facility) Display options of expandable column information (Room information (B1), Score information (B2), and Facility Status (B3)) Navigation options (facility scroll bar, page navigation buttons) User Input areas (Facility Status, OK/Cancel buttons, refresh button) Only facilities you are authorized to schedule are displayed by the Ad Hoc Scheduler. Facilities shall only be scheduled if displayed as Available for the entire term. If you are changing a facility assignment, simply assign a new facility; Astra Schedule automatically drops the current room and assigns the new room. Assigning a facility to a cross listed class section automatically assigns it to the associated cross listed class section as well View and Schedule Facilities for Class Sections
44 You can sort on the Room and Score columns in the Availability List area by clicking on the column heading. If you are away from your screen for a few minutes, click the refresh button to ensure the most current facility availability information is reflected in the Availability List. The Availability list may include a number of pages. Use the pagination controls at the bottom of the list to page through the results, configure the number of facilities displayed per page, and jump to a specific page Set Ad Hoc Scheduler Filters When the Ad Hoc Scheduler opens, the Filter panel is populated with the class section s Maximum Capacity and other preference information based upon the Subject and preferences set for the class section being scheduled. You may set additional filters including Capacity, Room Type, Feature, Building, Room, and Facility Layout. For your convenience, the Ad Hoc Scheduler allows you to save frequently used filters, similar to the Section List filters (see Save Class Section Filter). The Show Additional Meeting Patterns, Show Shared Rooms and Show Alt Room Configs options are not used. To reduce search time, ensure sure they are not checked. Astra Schedule allows you to search for and assign a facility with a Capacity smaller than the Max Enrollment for the class section. Use this feature carefully; this shall only be done when needed and Maximum Enrollment must be adjusted in CMS SA to ensure it does not exceed facility capacity. It is the College and Department s responsibility to ensure that actual attendance does not exceed the facility s capacity. After setting any additional filter preferences, click Search to apply your filter(s) and display the resulting facilities and their status in the Availability List View Availability List The Ad Hoc Scheduler displays the facilities you are authorized to schedule and the availability of each. It calculates which rooms are acceptable for the meeting being scheduled and determines best fit. When determining acceptable rooms, the Ad Hoc Scheduler takes into consideration any requirements set in the Filter panel. By default, the Ad Hoc Scheduler displays 3 columns: Room, Score, and Facility Status. The Score of a facility is comprised of 1) how closely the facility matches your selected filters and more importantly, 2) how well your class section will fit the available seats within the facility. A Score of 100 is the best score. Clicking the expand button at the top of a column expands the column for more information. Expand the Room column for additional information on the rooms available. Expand the Score column to reveal the Preference and Seat Fill scores. The total score is an average of these two values. Expand the Facility Status column to display all meeting dates for the class section you are scheduling. 7 View and Schedule Facilities for Class Sections 39


45 The following screenshot depicts the column detail on the Ad Hoc Scheduler: In the Facility Status column, Astra Schedule color codes the facilities by status as described and depicted in the screenshot below. Selected Available Conflicts Currently assigned facility, or newly selected facility. Facility available to assign to currently selected class section for entire term. Cannot be selected. Facility available only part of term. Unavailable Cannot be selected. Facility not available during selected dates and times View and Schedule Facilities for Class Sections
46 Only choose a facility that is available for the entire term (displayed in white). The Astra Schedule and CMS SA Interface only supports one scheduled facility per class section. If you are changing a facility assignment, the currently assigned facility is displayed in the Availability List as Selected. When the new facility is selected, it is displayed as Selected and the previous facility is displayed as Available. It is recommended you select the room with the highest score for optimal facility utilization. 7.8 Assign a Facility to a Class Section This section describes, in a straightforward manner, the complete process involved to assign a facility to or change a currently assigned facility for a class section in Astra Schedule. Some steps may require more consideration to complete than is practical to include in this example. For those steps, more information and detailed instructions can be found in the referenced section. Described and depicted in the screenshots below are the steps to follow to assign a facility to a class section. The screenshots for the steps described below span several pages and detailed information is provided for each. Assign a Facility to a Class Section Navigation: Academics > Sections 1. (A B) In the Filter panel, set and apply filter options until the class section you want to update is displayed. See 7.2 Set Class Section Filters for detailed instructions. 2. In the Section List, click the edit icon for the class section to which you want to assign a facility. The Class Section Information page is displayed in edit mode. See 7.4 View Class Section Information. 3. Click the assign facility icon in the Meetings area at the bottom of the page to begin the Ad Hoc Scheduler. A progress wheel displays while Astra Schedule searches for available facilities. 4. (A B) Use the Ad Hoc Scheduler Filter to narrow down the facility list, if preferred. See 7.7 Use the Ad Hoc Scheduler. 5. Click an available facility (displayed in white) to select it for assignment to the class section. The color changes to green, indicating it is now the selected facility. 6. Click OK at the bottom of the page to confirm selection and return to the Class Section Information page. 7. Click Save to assign the selected facility to the class section displayed and end edit mode. 8. Click the back arrow on top right of screen to return to the Section List. In order to assign a facility to a class section in Astra Schedule, the class section must have Date, Days Met, Start Time and End Time set. This information must be entered into CMS SA. 7 View and Schedule Facilities for Class Sections 41


47 To change a facility assignment, follow the same steps used to assign a facility. Simply select the new assignment and Astra Schedule automatically drops the current room and assigns the new room. At any point prior to saving the facility assignment (step 7 above), you can abandon your changes by clicking Cancel until you return to the Class Section Information page. You will be asked to confirm your decision. You may want to sort the Room column in ascending order so unassigned class sections sort to the top of Section List. It is recommended you choose the available room with the highest score whenever possible for optimal facility utilization View and Schedule Facilities for Class Sections


48 Your room assignment is not complete until you click Save. 7.9 Drop the Facility from a Class Section To drop the facility from a class section follow the steps in this section. If you want to change a currently assigned facility, dropping the facility first is not necessary, simply follow the steps in 7.8 Assign a Facility to a Class Section. 7 View and Schedule Facilities for Class Sections 43
 you want to update are displayed in the Section List. See 7.2 Set Class Section Filters for detailed instructions. 2.")
49 Described and depicted in the screenshot below are the steps to follow to drop the facility from a class section. Drop the Facility from a Class Section Navigation: Academics > Sections 1. In the Filter panel, set filter options until the class section(s) you want to update are displayed in the Section List. See 7.2 Set Class Section Filters for detailed instructions. 2. In the Section List, click the edit icon for the class section from which you want to drop the facility. The Class Section Information page is displayed in edit mode. See 7.4 View Class Section Information for detailed instructions. 3. In the Meetings area at the bottom of the page, locate the class section you want to update. Click the Drop Facility icon for that class section. 4. Click Save to drop the selected facility from the class section displayed and end edit mode. 5. Click the back arrow on top left of screen to return to the Section List. You may want to set the Subject and Course Number of the class section being updated the in the Section List Filter to minimize the class sections displayed in the Section List View and Schedule Facilities for Class Sections


50 APPENDIX A ASTRA SCHEDULE EXAMPLES This appendix contains specific detailed examples of several features of Astra Schedule. A.1 Display Option Examples The steps to follow to change the data displayed in the Room List of the RESOURCES tab are described and depicted in the screenshot below. Similar options are available on other screens. See 3.4 Display Options for more information. The screenshots for the steps described below span several pages. Select Room List Display Options Navigation: Resources > Rooms 1. Hover over a column header and click the down arrow to the right of the header to reveal the Display Options menu. 2. Click Columns to view the list of available columns. 3. Click the check box next to a column to include or exclude it from the Room List. 4. Click a column heading name to sort the display on that column. 5. Click a column header and drag it to the preferred location. 6. Hover over the column header you wish to group by and click the down arrow to reveal the Display Options menu. 7. Click Group By This Field to group the display according to the column heading selected and set Show in Groups field. 8. Clear Show in Groups field to ungroup. Resorting may be necessary. Click the column heading name to sort the Room List in ascending order by that column. Click again to sort in descending order. Alternatively, set the sort order on the Display Options menu of the preferred column. An arrow is displayed on the column header to indicate the sort direction. Appendix A Astra Schedule Examples 45


51 You may customize the order of the columns displayed on the page by clicking and dragging a column to the preferred position. Arrows appear to indicate your position. For example, to move Description to after Building Code, click the Description column header and drag it until the blue arrows appear after Building Code, and drop it. You may choose to display the data in groups. Hover over the column header you want to group by and click the down arrow to reveal the Display Options menu. Choose the Group By This Field option. The data will be grouped by the selected field (column). Each group may be expanded or collapsed as needed. To no longer show the display in groups, clear the Show in Groups field in the column header menu of any column. It may be necessary to reset your sort order. 46 Appendix A Astra Schedule Examples

52 A.2 Search Filter Options Example The filters available on the Rooms option of the RESOURCES tab are described and depicted in the screenshot below. Other filter panels work in a similar manner. See 3.5 Search Filters for more information. A.3 Export Examples Described and depicted in the screenshot below are the steps to follow to export facility data to Excel from the Room List on the RESOURCES tab. See 3.9 Export Data for more information. Export Facility Information to Excel Navigation: Resources > Rooms 1. Set preferred filter criteria (see 3.5 Search Filters). 2. Click Search to display all activities meeting search criteria. 3. Select preferred display format (see 3.4 Display Options). 4. Click the Excel icon to bring up the Export to Excel window. You are given a choice of exporting the current page only or all pages of data. 5. Depending on your browser settings, the data will be saved to your downloads folder or you may be prompted to open or save the data in Excel format. Click your browser s back arrow to return to the Room List page of Astra Schedule. Appendix A Astra Schedule Examples 47

. 4. Click the table icon to display data as a table in your browser.")
53 Astra Schedule also allows the data to be exported to a table. For example, the Room List. Described and depicted in the screenshot below are the steps to follow to export facility data to a table from the Room List of the RESOURCES tab. Export Facility Information to a Table Navigation: Resources > Rooms 1. Set preferred filter criteria (see 3.5 Search Filters). 2. Click Search to display all facilities meeting search criteria 3. Select preferred display format (see 3.4 Display Options). 4. Click the table icon to display data as a table in your browser. Click your browser s back arrow to return to the Room List page of Astra Schedule. The export to table option displays the table in a separate window as depicted in the screenshot below. 48 Appendix A Astra Schedule Examples

54 A.4 Example Search for Scheduled Activities by Building on a Specific Date Described and depicted in the screenshot below are the steps to follow to find all activities scheduled in a particular facility on a specific date. See 4 View Scheduling Grids for more information. EXAMPLE Steps to find all activities scheduled in Brighton Hall lecture room 208 on 4/12/2016 Navigation: Calendars > Scheduling Grids > Building Activity Calendar 1. Select Building Activity Calendar on the Calendar drop down menu. 2. Select BRH (Brighton Hall) on the calendar Filter. 3. Ensure Day format is selected. 4. Click the date filter icon (see 3.6 Set Date Filter). Navigate to 4/12/2016 and click the refresh icon to begin the search. 5. Using the scroll bar to the right of the calendar, find BRH 208 in the room list on the left. Reading across the page, you can view all activities scheduled in that room on the selected day. 6. The scroll bar at the bottom of the calendar can be used to view other times of day. Appendix A Astra Schedule Examples 49

55 A.5 Example Search for Scheduled Activities by Building for a Specific Week Described and depicted in the screenshot below are the steps to follow to find all activities scheduled in a particular facility during a specific week. See 4 View Scheduling Grids for more information. EXAMPLE Steps to find all activities scheduled in Brighton Hall lab 205 for the week of 4/10/2016 Navigation: Calendars > Scheduling Grids > Building Activity Calendar 1. Select Building Activity Calendar on the Calendar drop down menu. 2. Select BRH (Brighton Hall) on the calendar Filter. 3. Click the Week tab to display activities for the week beginning 4/10/ Click the date filter icon (see 3.6 Set Date Filter). Navigate to 4/10/2016 and click the refresh icon to begin the search. 5. Click the BRH 205 LAB link in the Rooms panel to update the page to reflect only activities for that room. Use scroll bar to right of calendar to view more times of day. A.6 Example Search for Available Facilities for a Single Meeting Described and depicted in the screenshots below are the steps to follow to find all available facilities for an event with a single meeting. See 5 Find Available Facilities for more information. The screenshots for the steps described below span several pages. 50 Appendix A Astra Schedule Examples
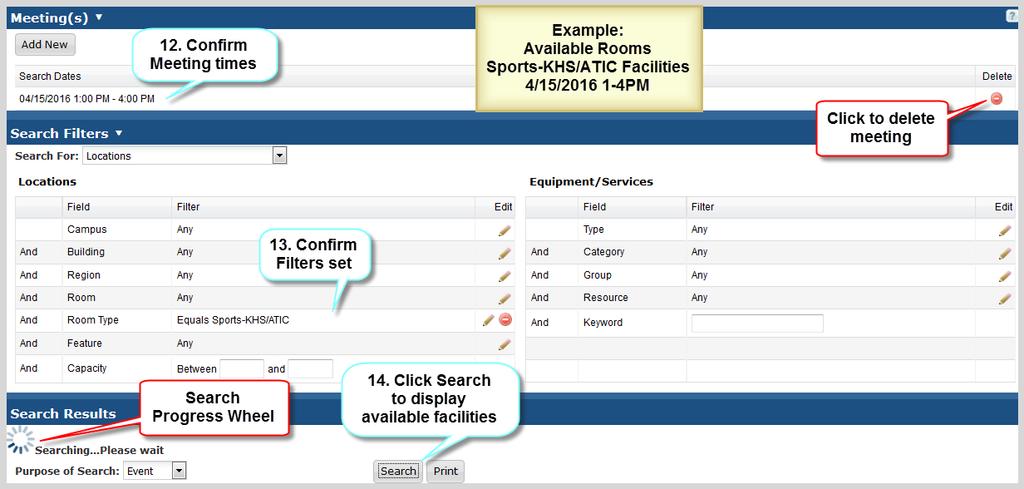
56 EXAMPLE Steps to find all available Sports KHS/ATIC facilities from 1 4PM on 2/5/16 (single meeting) Navigation: Calendars > Available Rooms 1. In the Add New Meeting area, click Add New to set meeting date and time. 2. In the pop up window, select the option for Single Meeting. 3. Set the start time for the meeting to 1:00PM. 4. Set the end time for the meeting to 4:00PM. 5. Set the start date for the meeting to 02/05/ Set the end date for the meeting to 02/05/ Click OK to create meeting request and close pop up window. 8. Click the edit icon for Room Type. 9. Scroll down the Room Type pop up window and select Sports KHS/ATIC. 10. Click OK to create the filter. 11. Select Event for Purpose of Search. 12. Confirm meeting times are correct. Click delete icon and re add if incorrect. 13. Confirm filter criteria is correct. 14. Click Search to display available facilities. 15. Use scroll bar on right to view results. 16. Hover over the facility details icon to view facility details. To change meeting information (e.g., Start Date or frequency), delete meeting and re add with new information. Click the Available Rooms tab to quickly clear all meetings and filters on the Available Rooms page. Appendix A Astra Schedule Examples 51


57 52 Appendix A Astra Schedule Examples

58 Astra Schedule displays a progress wheel above the Purpose of Search field while it is searching for available facilities. If the progress wheel does not appear, or your search is taking a significant amount of time, refresh your browser as your session could have timed out. A.7 Example Search for Available Facilities for a Recurring Meeting Described and depicted in the screenshots below are the steps to follow to find all available facilities for a class section with a recurring meeting. See 5 Find Available Facilities for more information. The screenshots for the steps described below span several pages. EXAMPLE Steps to find all lecture rooms available from 3 5PM on four (4) consecutive Thursdays beginning 4/18/2016 (recurring meeting) Navigation: Calendars > Available Rooms 1. In the Add New Meeting area, click Add New to set meeting date and time. 2. In the pop up window, select the option for Recurring Meeting. 3. Set the start time for the meeting to 3:00PM. 4. Set the end time for the meeting to 5:00PM. 5. In the Day Pattern area, set the meeting frequency to Weekly. 6. Set Days Met to R for Thursday. 7. Click the date filter icon and set the start date for the first meeting to 4/18/ Click the End After radio button to set number of meetings. 9. Click the up arrow and set the number of End After occurrences to Click OK to create the meeting request and close pop up window. 11. Click the edit icon for Room Type. 12. Scroll down and select Lecture for Room Type. 13. Click OK to create the filter. 14. Confirm meeting times are correct. Click delete icon and re add if incorrect. 15. Confirm filter criteria is correct. Appendix A Astra Schedule Examples 53


, delete meeting and re add with new information.")
59 16. Select Section for Purpose of Search. 17. Click Search to display available lecture rooms. 18. Use scroll bar on right to view Search Results area. 19. Use scroll bar in the middle of the page to view more results. 20. Hover over the facility details icon to view facility details. To change meeting information (e.g., Start Date or frequency), delete meeting and re add with new information. Click the Available Rooms tab to quickly clear all meetings and filters on the Available Rooms page. 54 Appendix A Astra Schedule Examples


60 Astra Schedule displays a progress wheel above the Purpose of Search field while it is searching for available facilities. If the progress wheel does not appear, or your search is taking a significant amount of time, refresh your browser as your session could have timed out. Appendix A Astra Schedule Examples 55

61 A.8 Example Find All Classes for a Specific Term, Subject, and Meeting Pattern Described and depicted in the screenshot below are the steps to follow to find all classes in a particular Term with a specific Subject and Meeting Pattern. See 7.2 Set Class Section Filters for more information. EXAMPLE Steps to find all English Classes in Spring 2014 Semester meeting MWF. Navigation: Academics > Sections 1. In the Class Section Filter panel, set Days Met to M, W, F by clicking the days to highlight. 2. In Term filter, click add filter button and click box next to 2163 for Spring In Subject filter, click add filter button, scroll down, and click box next to ENGL for English. 4. Click Search to apply filters and begin the search. 5. View results in Section List. 56 Appendix A Astra Schedule Examples


62 A.9 Example Save Section List Filter for a Specific Term and View Described and depicted in the screenshots below are the steps to follow to create a filter to display class sections for a specific term in the Section List in Meetings view and save it as your default search filter. See Save Class Section Filter for more information. Example: Steps to create a search filter to display class sections for a specific term In Meetings view and save it as your default search filter. 1. Click View Meetings to set Meetings view. 2. Click the add filter icon to add Term filter. Navigation: Academics > Sections 3. Click box next to '2163' to set Spring 2016 Term. 4. Click anywhere on Section page to close pop up filter window. 5. Scroll down to ensure no other filters are set. 6. Click the save filter icon at bottom of Filter panel to display save filter window. 7. Enter a meaningful Filter Name. 8. If you want this filter to come up upon login, click Set as Default Filter. 9. Click OK to save filters. Appendix A Astra Schedule Examples 57


63 APPENDIX B ASTRA SCHEDULE BUILDING CODES AND DESCRIPTIONS Building codes are used to identify physical buildings and other facilities on campus. Building Code and Room Number make up the CMS SA Facility ID. For a complete list of buildings and building codes, visit the campus interactive map at csus.edu/campusmap/. BUILDING CODE AF ALP AMD ARC ASL BNC BRH CLV CPS DESCRIPTION Broad Athletic Facility Alpine Hall Amador Hall Academic Info Resource Center Art Sculpture Lab Benicia Hall Brighton Hall Calaveras Hall Capistrano Hall BUILDING CODE DH DLN EUR FLS HMB KDM LIB LSN MND DESCRIPTION Douglass Hall Del Norte Hall Eureka Hall Folsom Hall Humboldt Hall Kadema Hall Library Lassen Hall Mendocino Hall 58 Appendix B Astra Schedule Building Codes and Descriptions
Astra Schedule Guest User Guide
 s, 57th Street and Downtown ehouses ceiving COLLEGE TOWN DRIVE n/ le ss el t., ail n, er de s) RNET SSING RED OAK WAY Office of Space Management Astra Schedule Guest User Guide 50 m Sutter Hall N o r t
Astra Scheduling Grids
 Astra Scheduling Grids To access the grids, click on the Scheduling Grids option from the Calendars tab. A default grid will be displayed as defined by the calendar permission within your role. Choosing
ASTRA USER GUIDE. 1. Introducing Astra Schedule. 2. Understanding the Data in Astra Schedule. Notes:
 ASTRA USER GUIDE 1. Introducing Astra Schedule Astra Schedule is the application used by Academic Space Scheduling & Utilization to schedule rooms for classes and by academic colleges, schools, and departments
Astra Schedule User Guide Scheduler
 Astra Schedule User Guide 7.5.12 Scheduler 1 P a g e ASTRA SCHEDULE USER GUIDE 7.5.12... 1 LOGGING INTO ASTRA SCHEDULE... 3 LOGIN CREDENTIALS... 3 WORKING WITH CALENDARS... 4 CHOOSING A CALENDAR AND FILTER...
Astra Scheduling Grids
 Astra Scheduling Grids To access the grids, click on the Scheduling Grids option from the Calendars tab. A default grid will be displayed as defined by the calendar permission within your role. Choosing
McGovern Medical School Internal User Guide
 McGovern Medical School Internal User Guide Welcome to McGovern Medical School s Internal User Guide for the Ad Astra Event Scheduling application! The MMS Internal User Guide has been created to introduce
UTHealth Medical School Internal User Guide
 UTHealth Medical School Internal User Guide Welcome to UTHealth Medical School Internal User Guide for the Ad Astra Event Scheduling application! The MS Internal User Guide has been created to introduce
ASTRA 7.5 Quick Reference Guide
 ASTRA 7.5 Quick Reference Guide Definitions Portal Pages: Astra Home Page, whether for a guest or a user. Guests can access Astra by going to astra.utah.edu. From here guests will be able to view calendars,
EMS MASTER CALENDAR User Guide
 EMS MASTER CALENDAR User Guide V44.1 Last Updated: May 2018 EMS Software emssoftware.com/help 800.440.3994 2018 EMS Software, LLC. All Rights Reserved. Table of Contents CHAPTER 1: Introduction to the
SIS Modernization Faculty (Instructor) Portal Training Guide
 Portal Training Guide") Faculty (Instructor) Portal Training Guide Created on August 2017 Table of Contents Introduction to the New Faculty Portal... 1 Logging into the Faculty Portal... 1 Navigating the Faculty Portal... 5 Using
Faculty (Instructor) Portal Training Guide Created on August 2017 Table of Contents Introduction to the New Faculty Portal... 1 Logging into the Faculty Portal... 1 Navigating the Faculty Portal... 5 Using
Astra Schedule User Guide - Reports
 California State University Long Beach Astra Schedule User Guide - Reports Run reports, see room usage, and room information Revised 11/04/2016 Contents Astra Schedule User Guide - Reports... 1 Overview...
Campus Solutions Self Service: Faculty Quick Reference Guide
 Campus Solutions Self Service: Faculty Table of Contents Introduction to Step Sheets... 1 The Faculty Center... 2 View Teaching Schedule... 3 Enter My Textbooks... 9 View Textbook Summary... 19 View Exam
Academic Scheduling Manual
 Academic Scheduling Manual Revised: November 1, 2018 Table of Contents Academic Sections Overview 3 Viewing and editing sections 4 Finding an available room 6 Section Meetings 8 Introduction to Academic
SCC Banner 9 Admin Pages Navigation Guide
 SCC Banner 9 Admin Pages Navigation Guide 1 Contents Introduction.. 3 Using Banner 9..... 4 Application Navigator.. 5 Basic Navigation.. 7 Page Header. 7 Page Footer.. 8 Key Block 9 Sections.. 10 Bottom
My Sysco Reporting Job Aid for CMU Customers. My Sysco Reporting. For CMU Customers (Serviced by Program Sales)
") My Sysco Reporting For CMU Customers (Serviced by Program Sales) 1 Accessing My Sysco Reporting... 2 Logging In... 2 The Reporting Dashboard... 3 My Sysco Reporting Process... 6 Generating a Report...
My Sysco Reporting For CMU Customers (Serviced by Program Sales) 1 Accessing My Sysco Reporting... 2 Logging In... 2 The Reporting Dashboard... 3 My Sysco Reporting Process... 6 Generating a Report...
Admissions & Intro to Report Editing Participants Guide
 IBM Cognos Analytics Admissions & Intro to Report Editing Participants Guide Welcome to Cognos - Admissions and Introduction to Report Editing! Today s objectives include: Gain a Basic Understanding of
Viewing and Filtering the Calendar Scheduling Grid in Astra
 Viewing and Filtering the Calendar Scheduling Grid in Astra Astra Home screen. Astra will default to Guest access which can view all general use lecture and conference rooms. Click on the Calendar tab.
Module SECTION SCHEDULING. Astra Schedule Training Guide
 Module 2 SECTION SCHEDULING Astra Schedule Training Guide Table of Contents Introduction... 3 Lesson Audience... 3 Lesson Objectives... 3 Configuration Requirements... 3 Common Practices... 3 Best Practices...
PowerSchool Student and Parent Portal User Guide. https://powerschool.gpcsd.ca/public
 PowerSchool Student and Parent Portal User Guide https://powerschool.gpcsd.ca/public Released June 2017 Document Owner: Documentation Services This edition applies to Release 11.x of the PowerSchool software
User Manual. perfectionlearning.com/technical-support
 User Manual perfectionlearning.com/technical-support 1 User Manual Accessing Math X... 3 Login... 3 Forgotten Password... 3 Navigation Menu... 4 Logout... 4 Admin... 5 Creating Classes and Students...
Parent Student Portal User Guide. Version 3.1,
 Parent Student Portal User Guide Version 3.1, 3.21.14 Version 3.1, 3.21.14 Table of Contents 4 The Login Page Students Authorized Users Password Reset 5 The PSP Display Icons Header Side Navigation Panel
Records and Enrollment Participants Guide
 IBM Cognos Analytics Welcome to Cognos Records and Enrollment Training! Today s objectives include: Gain a Basic Understanding of Cognos Understand University policies on data security including FERPA
SOU Banner 9 Navigation Guide
 SOU Banner 9 Navigation Guide Draft 11.29.2018 Contents Introduction.... 2 Application Navigator.... 2 Basic Navigation.... 3 Page Header.... 4 Key Block... 4 Sections... 5 Bottom Section Navigation...
Table of Contents ADMIN PAGES QUICK REFERENCE GUIDE
 Admin Pages brings an all new look and feel to Banner. It delivers a fresh user experience, all new tools, and significantly improved capabilities. Admin Pages replaces underlying Banner 8 INB technology
The Fleet page provides you with the tools needed to display, find, and manage your equipment. The page views and elements include:
 Using the Fleet Page The Fleet page provides you with the tools needed to display, find, and manage your equipment. The page views and elements include: Assets tab Components tab Asset Details view Add/Modify
CHRIS Introduction Guide
 1 Introduction... 3 1.1 The Login screen... 3 1.2 The itrent Home page... 5 1.2.1 Out of Office... 8 1.2.2 Default User Preferences... 9 1.2.3 Bookmarks... 10 1.3 The itrent Screen... 11 The Control Bar...
User Guide for TASKE Contact Web Interface
 User Guide for TASKE Contact Web Interface For Avaya Communication Manager with Application Enablement Services Version: 8.9 Date: 2011-06 This document is provided to you for informational purposes only.
PeopleSoft Departmental Student Records Training. Bloomsburg University
 PeopleSoft Departmental Student Records Training Bloomsburg University 1 Table of Contents Bloomsburg University Training Notes... 3 Terminology Crosswalk... 3 Term Code Logic... 3 Viewing a Student s
Getting Started in CAMS Enterprise
 CAMS Enterprise Getting Started in CAMS Enterprise Unit4 Education Solutions, Inc. Published: 18 May 2016 Abstract This document is designed with the new user in mind. It details basic features and functions
SIS Modernization Faculty Portal Training Guide
 SIS Modernization Faculty Portal Training Guide Created May 2017 Table of Contents Introduction to the New Faculty Portal... 1 Logging into the Faculty Portal... 1 Navigating the Faculty Portal... 6 Using
User Guide. Web Intelligence Rich Client. Business Objects 4.1
 User Guide Web Intelligence Rich Client Business Objects 4.1 2 P a g e Web Intelligence 4.1 User Guide Web Intelligence 4.1 User Guide Contents Getting Started in Web Intelligence 4.1... 5 Log into EDDIE...
Records and Enrollment Participants Guide
 IBM Cognos Analytics Welcome to Cognos Records and Enrollment Training! Today s objectives include: Understand University policies on data security including FERPA Understand which package/report to use
BANNER 9 QUICK NAVIGATION GUIDE
 Application Navigator Application Navigator provides a single interface to navigate the Banner 9 JAVA pages. It is a tool that allows you to go back and forth between the current Banner forms and the new
INSTRUCTOR SELF SERVICE USER GUIDE
 INSTRUCTOR SELF SERVICE USER GUIDE Page 1 of 38 Instructor Self Service Table of Contents Introduction... 3 Overview... 3 Access... 3 Sign in to Bear Tracks... 4 General Navigation... 6 Menu Navigation...
Table of Contents. Copyright JAVS
 1 Table of Contents Introduction to...4 Getting Started...5 Login...5 Interface at a glance...5 Creating a new session...10 New Session Window...10 Parties and Exhibits...12 Entering Exhibits...12 Entering
RONA e-billing User Guide
 RONA e-billing Contractor Self-Service Portal User Guide RONA e-billing User Guide 2015-03-10 Table of Contents Welcome to RONA e-billing What is RONA e-billing?... i RONA e-billing system requirements...
Astra Schedule User Guide Resources
 California State University Long Beach Astra Schedule User Guide Resources View and manage your room resources. Revised 10/22/2015 Contents Astra Schedule User Guide... 1 Resources... 1 Viewing Room Information...
Introduction to Cognos Participants Guide. Table of Contents: Guided Instruction Overview of Welcome Screen 2
 IBM Cognos Analytics Welcome to Introduction to Cognos! Today s objectives include: Gain a Basic Understanding of Cognos View a Report Modify a Report View a Dashboard Request Access to Cognos Table of
Working with Actions Stratum.Viewer 6
 Working with Actions Stratum.Viewer 6 Getting Started Access to Actions Accessing Actions Functionality Introduction to Actions Quick Start Set up an Action Tasks Add an Email Action Add a File Share Action
User Manual: Instructor
 Learning Management System ( LMS ) User Manual: Instructor V NLFIG-03102017-1 Disclaimer and Warranty Information Limits of Liability / Disclaimer of Warranty The information contained within this manual
Virtual EMS ~ User Guide
 Virtual EMS ~ User Guide You may use Internet Explorer, Mozilla Firefox, Safari and other internet browsers to work with this system. To locate Virtual EMS, go to the Conference Services web page. It can
BLACKBOARD: Course Management
 BLACKBOARD: Course Management LOGGING IN Note: you will use your Babson username and password to access Blackboard. TO LOGIN TO BLACKBOARD: 1. Open a web browser and type http://blackboard.babson.edu.
Blackboard 5 Level One Student Manual
 Blackboard 5 Level One Student Manual Blackboard, Inc. 1899 L Street NW 5 th Floor Washington DC 20036 Copyright 2000 by Blackboard Inc. All rights reserved. No part of the contents of this manual may
Introduction...2. Application Navigator...3
 Banner 9 Training Contents Introduction...2 Application Navigator...3 Basic Navigation...5 Page Header...5 Key Block...6 Sections...6 Bottom Section Navigation...7 Notification Center Messages...7 Data
Wholesale Lockbox User Guide
 Wholesale Lockbox User Guide August 2017 Copyright 2017 City National Bank City National Bank Member FDIC For Client Use Only Table of Contents Introduction... 3 Getting Started... 4 System Requirements...
PowerSchool Student and Parent Portal User Guide. PowerSchool Student Information System
 PowerSchool Student and Parent Portal User Guide PowerSchool Student Information System Released December 2016 Document Owner: Documentation Services This edition applies to Release 10.1 of the PowerSchool
Guide to User Interface 4.3
 Datatel Colleague Guide to User Interface 4.3 Release 18 June 24, 2011 For corrections and clarifications to this manual, see AnswerNet page 1926.37. Guide to User Interface 4.3 All Rights Reserved The
INSERVICE. Version 5.5. InService Easily schedule and monitor attendance for your training programs, even at remote locations.
 INSERVICE Version 5.5 InService Easily schedule and monitor attendance for your training programs, even at remote locations. 5/15/2014 Page 0 of 11 Table of Contents 1.1 Logging In... 2 1.2 Navigation...
SharePoint List Booster Features
 SharePoint List Booster Features Contents Overview... 5 Supported Environment... 5 User Interface... 5 Disabling List Booster, Hiding List Booster Menu and Disabling Cross Page Queries for specific List
The PeopleSoft Financials System
 The PeopleSoft Financials System 2 Introduction...................... 14 Signing In and Out.................... 14 Signing In to the System.............. 14 Signing Out................... 17 Navigation
User Guide. General Navigation
 User Guide General Navigation Table of Contents INTRODUCTION 2 TECHNICAL REQUIREMENTS 3 Screen Display for Laptop 3 Screen Display for Desktop PC 3 NAVIGATION 4 Contact Us 4 Log Out 4 Menu > Sub Menu Display
Tutorial: Input Grades in Blackboard
 Tutorial: Input Grades in Blackboard Get into the Grade Center The following steps will lead you to the Full Grade Center page (❶ - ❽). ❶ Enter the URL: blackboard.indstate.edu ❷ Enter username and password
Banner 9. Navigation Guide Revised for Ithaca College Fall The URL for Banner 9 is
 Banner 9 Navigation Guide Revised for Ithaca College Fall 2018 The URL for Banner 9 is http://banner.ithaca.edu/ Login with Netpass Credentials Recommended Browsers Firefox Safari Edge Chrome (no Java
ecampus 9.2 Faculty Homepage
 1 I. ecampus Features In ecampus 9.2, the ecampus Faculty Homepage features three (3) tiles. The tiles have all the functionalities found on the previous ecampus Faculty Homepage. ecampus 9.2 Faculty Homepage
Tyler SIS Student 360 Parent Portal
 To begin using the Parent Portal, follow these steps: 1.) Your password will be emailed to the address KSD has on record for you. 2.) Go to the Tyler SIS Student 360 web page https://sis.kunaschools.org/idkn360
University of Minnesota Room Scheduling Guidelines for Academic Rooms
 University of Minnesota Room Scheduling Guidelines for Academic Rooms Astra Schedule is the UMN enterprise software for scheduling classes and events in academic rooms. Any user may view the calendar of
Astra Schedule is our facility management system
 Astra Schedule Astra Schedule is our facility management system Permissions in Astra are based on Region (Security) Regions are groupings of rooms used by a College or Area Check availability of most campus
Log into your portal and then select the Banner 9 badge. Application Navigator: How to access Banner forms (now called pages.)
") Navigation Banner 9 Log into your portal and then select the Banner 9 badge. This will bring you to the Application Navigator. Application Navigator: How to access Banner forms (now called pages.) Menu
Navigation Banner 9 Log into your portal and then select the Banner 9 badge. This will bring you to the Application Navigator. Application Navigator: How to access Banner forms (now called pages.) Menu
ACTIVE Net Insights user guide. (v5.4)
") ACTIVE Net Insights user guide (v5.4) Version Date 5.4 January 23, 2018 5.3 November 28, 2017 5.2 October 24, 2017 5.1 September 26, 2017 ACTIVE Network, LLC 2017 Active Network, LLC, and/or its affiliates
ACTIVE Net Insights user guide (v5.4) Version Date 5.4 January 23, 2018 5.3 November 28, 2017 5.2 October 24, 2017 5.1 September 26, 2017 ACTIVE Network, LLC 2017 Active Network, LLC, and/or its affiliates
EMS Walk. Browse Events: Events in University Housing Space
 EMS Walk This guide explains the various components of University Housing s Event Management System (EMS) and provides step-by-step instructions for new users. EMS Web App Home Page (formerly Virtual EMS)
Faculty Access for the Web 7 - New Features and Enhancements
 Faculty Access for the Web 7 - New Features and Enhancements New Design...................................................................... 2 Alerts............................................................................
Rooms Management Manual
 Fidelio Suite 7 Rooms Management Manual Front Office Version 7.13 Creation Date: March 2002 Delphi is a trademark of Borland. MSDOS, Windows 95, Windows-NT and Microsoft Word are trademarks of Microsoft
USER GUIDE. Document ID: D. Abbott Point of Care Inc. Abbott Park, IL 60064
 USER GUIDE Document ID: 732029-00D Abbott Point of Care Inc. Abbott Park, IL 60064 This page intentionally left blank. Table of Contents Preface 1 1 - Getting started 1-1 1.1 Point-of-Care testing (POCT)
CareDx Customer Web Portal User Guide Version 3.6.3
 CareDx Customer Web Portal User Guide Version 3.6.3 Copyright Notice CareDx, Inc, 3260 Bayshore Blvd, Brisbane, CA 94005 Copyright 2015 CareDx All rights reserved. This document is protected by the copyright
Campus Solutions Faculty Guide Section 2 - Faculty Center
 Financial Management Human Resources Campus Solutions Campus Solutions Faculty Guide Section 2 - Faculty Center Updates Date Action Page(s) 04/13/12 Created 05/14/12 Entire document updated. all 05/15/12
SCP-Embraer Train the Trainer. General Skills
 SCP-Embraer Train the Trainer General Skills Page Set-Up A. Header: includes your user name and role, log-out function, and Help feature B. Navigation Tree: used to navigate around the various workflows
WEST TEXAS A&M UNIVERSITY
 WEST TEXAS A&M UNIVERSITY Instructional Technology Services WTClass Training Manual Grade Center July 2014 WTClass Blackboard 9.1 For technical support call (806) 651-4357 Support website: http://angel.wtamu.edu/online
Getting Started with EMS Desktop Client
 Getting Started with EMS Desktop Client Getting Started with EMS Desktop Client What is the EMS Desktop Client? Reservations and Bookings What is an Everyday User Reservation? Starting EMS Managing Database
Query Studio Training Guide Cognos 8 February 2010 DRAFT. Arkansas Public School Computer Network 101 East Capitol, Suite 101 Little Rock, AR 72201
 Query Studio Training Guide Cognos 8 February 2010 DRAFT Arkansas Public School Computer Network 101 East Capitol, Suite 101 Little Rock, AR 72201 2 Table of Contents Accessing Cognos Query Studio... 5
PEOPLESOFT TIPS. TABLE OF CONTENTS Overview... 3 Navigate PeopleSoft... 3
 PEOPLESOFT TIPS TABLE OF CONTENTS Overview... 3 Navigate PeopleSoft... 3 Main Menu in PeopleSoft... 3 Sort the Main Menu... 3 Cascading Menu... 5 Breadcrumb Trail Menu... 6 Search... 7 Searches: Maximum
BANNER 9 ADMIN GENERAL NAVIGATION USER'S GUIDE
 BANNER 9 ADMIN GENERAL NAVIGATION USER'S GUIDE Computing and Telecommunications Services Banner 9 Admin General Navigation - User's Guide 0 WRIGHT STATE UNIVERSITY Contents Banner 9 Admin General Modules...
Supplier SAP SNC User Guide
 Supplier SAP SNC User Guide Version 1.0 July 29, 2014 AGCO Corporation Page 1 1 Introduction AGCO has chosen SAP Supplier Network Collaboration (SNC) to improve visibility and capability in North America
PEOPLESOFT TIPS. TABLE OF CONTENTS Background... Error! Bookmark not defined. Navigate PeopleSoft... 3
 PEOPLESOFT TIPS TABLE OF CONTENTS Background... Error! Bookmark not defined. Navigate PeopleSoft... 3 Main Menu in PeopleSoft... 3 Sort the Main Menu... 3 Change the Default Sort Order... 5 Cascading Menu...
Blackboard for Faculty: Grade Center (631) In this document:
 In this document:") 1 Blackboard for Faculty: Grade Center (631) 632-2777 Teaching, Learning + Technology Stony Brook University In this document: blackboard@stonybrook.edu http://it.stonybrook.edu 1. What is the Grade Center?..
1 Blackboard for Faculty: Grade Center (631) 632-2777 Teaching, Learning + Technology Stony Brook University In this document: blackboard@stonybrook.edu http://it.stonybrook.edu 1. What is the Grade Center?..
WINGS Faculty Center Guide 12/01/09
 WINGS Faculty Center Guide 12/01/09 Table of Contents Faculty Center... 3 My Schedule... 3 Viewing Exam Schedule... 3 Changing Terms... 4 Displaying Classes... 5 Viewing Weekly Teaching Schedule... 6 Viewing
PowerTeacher Portal User Guide. PowerSchool 7.x Student Information System
 PowerSchool 7.x Student Information System Released March 2013 Document Owner: Documentation Services This edition applies to Release 7.7 of the PowerSchool software and to all subsequent releases and
New Finance Officer & Staff Training
 New Finance Officer & Staff Training Overview MUNIS includes many programs and tools to allow for the management of the District financials. As newer finance officers and staff, you are charged with understanding,
BE Share. Microsoft Office SharePoint Server 2010 Basic Training Guide
 BE Share Microsoft Office SharePoint Server 2010 Basic Training Guide Site Contributor Table of Contents Table of Contents Connecting From Home... 2 Introduction to BE Share Sites... 3 Navigating SharePoint
User s Guide for SMFA Opportunity Seekers
 User s Guide for SMFA Opportunity Seekers https://www.myinterfase.com/artsource/student NEW STUDENT ACCOUNTS: > Enter standardized username and password to login: USERNAME: PASSWORD: your SMFA email address
THE LOGIN PAGE... 3 THE HOME PAGE... 4 REPORTS... 15
 CheckTrack Web Reporting User guide 1 Contents THE LOGIN PAGE... 3 THE HOME PAGE... 4 REPORTS... 5 REPORT SCREEN FUNCTIONALITY... 5 CHECK DETAILS & CHECK IMAGE... 8 NEW CHECKS... 10 ALL ACTIVE CHECKS...
Class Scheduling- Basics
 Class Scheduling- Basics Oct 2006 Rev 2 Maintain Schedule of Classes Class Scheduling - Basics Class Scheduling- Basics This course explains how to maintain a schedule of classes in PeopleSoft 8.9 Student
Figure 1.1 GENESIS Log In Page
 TEACHERVUE User Guide Chapter One OVERVIEW OF THE TEACHERVUE SOFTWARE The TEACHERVUE software, frequently abbreviated TXP and also known as Teacher Experience, provides districts with an easy method to
version 7.6 user manual
 version 7.6 user manual 2 Copyright JAVS 1981-2014 Table of Contents Introduction... 4 Getting Started... 5 Login... 5 JAVS Publisher 7 Overview... 6 Search Tool Overview... 7 Search Tool-Detailed Operation...
Marquette University Time and Attendance
 2016 Marquette University Time and Attendance TM01 Student Employee Time and Attendance This guide helps you learn the most commonly used student employee functions in EmpCenter Time and Attendance. The
MAUI Final Exam Assignment Needs Submission Instructions for Academic Department Administrators
 MAUI Final Exam Assignment Needs Submission Instructions for Academic Department Administrators 1.) Go to MAUI (Made At the University of Iowa student information system) at http://www.maui.uiowa.edu 2.)
PowerSchool Parent Portal User Guide. PowerSchool 7.x Student Information System
 PowerSchool 7.x Student Information System Released December 2012 Document Owner: Documentation Services This edition applies to Release 7.6 of the PowerSchool software and to all subsequent releases and
BANNER 9 QUICK NAVIGATION GUIDE
 MARCH 2017 Application Navigator Application Navigator provides a single interface to seamlessly navigate between Banner 9 JAVA pages and Banner 8 Oracle forms. It is a tool that allows you to go back
Telax Administrator Portal
 Telax Administrator Portal Table of Contents A. Getting Started... 2 B. Home... 2 C. Executive Dashboard... 3 E. Configuration... 5 1. General Page... 5 2. Working Hours... 5 3. Contact List:... 6 4. Queues:...
Palisades School District PowerSchool Parent Portal Guide
 Palisades School District PowerSchool Parent Portal Guide Get Started To get started, you must create a parent account in the PowerSchool Parent Portal. Create a Parent Account Use this procedure to create
25Live Room Scheduler Reference Guide ICIT Technology Training and Advancement
 25Live Room Scheduler Reference Guide ICIT Technology Training and Advancement Updated on 11/18/2015 Table of Contents Log In... 3 25Live Interface... 3 Page Tabs... 3 Page Views... 4 Customize the Home
Power School Parent Portal User Guide
 Power School Parent Portal User Guide Preface Use this guide to assist you while navigating the PowerSchool Parent Portal. This guide is based on the PowerSchool Parent Portal online help, which you can
PowerSchool 7.x Student Information System
 PowerSchool 7.x Student Information System Released May 2012 Document Owner: Documentation Services This edition applies to Release 7.2 of the PowerSchool software and to all subsequent releases and modifications
Veco User Guides. Grids, Views, and Grid Reports
 Veco User Guides Grids, Views, and Grid Reports Introduction A Grid is defined as being a list of data records presented to the user. A grid is shown generally when an option is selected from the Tree
Campus Solutions Self Service: Student Quick Reference Guide
 Campus Solutions Self Service: Student Table of Contents Introduction to Step Sheets... 4 Getting Started in CUNYfirst... 5 Managing Mozilla Firefox Pop Up Blockers for CUNYfirst... 6 Managing Microsoft
PowerTeacher Substitute Portal User Guide. PowerSchool Student Information System
 PowerTeacher Substitute Portal User Guide PowerSchool Student Information System Released June 2016 Document Owner: Documentation Services This edition applies to Release 10 of the PowerSchool software
View Payments. User Guide. Online Merchant Services
 View Payments User Guide Online Merchant Services Copyright Statement Copyright 2010-2011 by American Express Company. All rights reserved. No part of this document may be reproduced in any form or by
CCRS Quick Start Guide for Program Administrators. September Bank Handlowy w Warszawie S.A.
 CCRS Quick Start Guide for Program Administrators September 2017 www.citihandlowy.pl Bank Handlowy w Warszawie S.A. CitiManager Quick Start Guide for Program Administrators Table of Contents Table of Contents
Marquette University Time and Attendance
 2016 Marquette University Time and Attendance TM02 Manager/Timekeeper Functions This guide helps you learn the most commonly used manager/timekeeper functions in EmpCenter Time and Attendance. The intended
Welcome to Selector2GO Help
 Welcome to Selector2GO Help World Headquarters 445 Hamilton Avenue, 7th floor, White Plains, New York 10601 United States of America Support: +1 914 259 4900 support@rcsworks.com 2004-2018. All Rights
User Guide. Version
 User Guide Version 0.19 2-11-2008 StormPro Max User Guide Page 1 of 69 5/10/2008 Table of Contents 1. Overview... 4 1.1 Definition of StormPro Max Terms... 4 2. Accessing StormPro Max... 5 3. Navigating