Getting Started Guide. Version 4.4
|
|
|
- Alisha Lynch
- 5 years ago
- Views:
Transcription

1 C i s co EnergyWise Management Getting Started Guide Version 4.4
2 Contents Introduction to Cisco EnergyWise Management...4 Setup & Installation...5 System Requirements (Single Server Installation)...5 Installation...6 Download...6 License Agreement...9 Installation Method Finish Installation Install Cisco EnergyWise Management - Complete Installation Administrator Account for Management Console Internal Ports EnergyWise Message Queue Installation Directory Install Cisco EnergyWise Management - Controller Internal Ports Installation Directory Starting the Management Console Welcome Page Cisco EnergyWise Management Setup Wizard Your Company Activate Your License Import Devices Configuration Completed Working with Devices Working with Devices Importing Devices into Cisco EnergyWise Management Adding the First Device Supported Power States and Descriptions: A note about Windows devices Integration with Active Directory Cisco EnergyWise Support Customizing Cisco EnergyWise Management Protect your most important devices Page 2
3 Adjust Energy Utility Rates and Currency Managing Locations Automated Software Updates Single-Server Deployment Upgrading Multi-Server Deployment Multi-Server Installation Appendix Frequently Asked Questions Online Help Resources Integrated Online Help Documentation External Knowledge Base Contacting Cisco General Inquires Technical Support Page 3
4 Introduction to Cisco EnergyWise Management Cisco EnergyWise Management helps optimize and reduce energy consumption across the enterprise. Whether you want to improve energy efficiency in the data center, manage energy usage across facilities and distributed office environments, or automate corporate sustainability reporting, Cisco EnergyWise Management can help. The product suite reduces energy costs by monitoring, analyzing, and controlling energy usage for all of your network-connected devices and systems no client-side agents or hardware meters required. Unlike other technologies, Cisco EnergyWise Management is a single solution that provides a global view of energy consumption for devices such as: PCs, Macs, and thin clients Physical and Virtual Servers VoIP phones Printers and copiers Network switches and routers Power-over-Ethernet switches Heating, ventilating and air conditioning and lighting systems Storage devices And much more The Cisco EnergyWise Management is a network-based software solution that enables a complete lifecycle of enterprise energy management. First, Cisco EnergyWise Management leverages a unique method to automatically discover and remotely measure all devices and systems on the corporate network. After discovery, Cisco EnergyWise Management continually measures, tracks and reports energy usage, enabling you to baseline, monitor and analyze energy consumption across the enterprise. Based on the energy consumption metrics collected, you can also use Cisco EnergyWise Management to develop policies and rules designed to optimize energy usage and reduce costs on a massive scale. Page 4

5 Setup & Installation Cisco EnergyWise Management can be installed on any physical or virtual machine running within your network that meets the minimum System Requirements. Because Cisco EnergyWise Management provides remote monitoring and control capabilities to your network connected devices, specific access credentials will be required, based on the type of devices being managed. Cisco EnergyWise Management 4.4 allows you to choose from two different deployment structures; single or multiple server deployments. For multi-server deployments, each server has its own management and monitoring consoles but are all joined to a central reporting server. System Requirements (Single Server Installation) A Windows system (at least XP SP3, but also other Windows platforms are supported, as Windows 7) with a minimum of a 2 GHz Dual Core, 2 GB of RAM and 40 GB of hard drive space. This system can be virtualized within a VMware or Hyper-V Server. Cisco EnergyWise Management comes with a built-in database to collect energy information about all of your devices. The database can become quite large even for medium size installations and we recommend installing Cisco EnergyWise Management on a dedicated machine with 4 GB to 8 GB RAM and 250 GB high performance hard disk. 1) Recommended configuration for more than devices: 12 Cores, 24GB RAM 2) Hard disk performance plays a critical role in a Cisco EnergyWise Management deployment. Cisco EnergyWise Management comes with its own database to store device data, power measurements and other data at a high rate. A local physical storage or high-performance SAN is recommended, especially when deploying on a VM. Cisco EnergyWise Management has a browser-based management console for configuration, operation, and reporting. For the best user experience, it is recommended that you use an up-to-date browser, such as the latest version of Google Chrome (preferred), Mozilla Firefox or Internet Explorer 8 or better. Older browsers, especially IE 6 are not fully supported. Regardless of which browser is used, JavaScript will need to be enabled. EnergyWise Controller uses Microsoft.NET 4.0 framework. If this framework is not present on the server prior to installation, it will be automatically downloaded and installed as part of the EnergyWise Controller installation. If the internet connection on the installation server is slow or unavailable, we recommend that you manually download and install the Microsoft.NET 4.0 framework prior to Page 5
6 beginning the EnergyWise Controller installation (Download here: Note: Multiple.NET versions can be installed concurrently (e.g..net 4). Since EnergyWise Controller depends on the.net 3.5 framework,.net 3.5 will still be required. Some Microsoft operating systems already include the.net 3.5 framework. On Windows Server 2008 R2 the.net framework is activated as a server feature via the Server Manager. If you have manually defined Port 80 as HTTP Port you are will not be able to activate IIS. Installation Cisco EnergyWise Management can be installed on a physical or virtual machine running inside your network. Because Cisco EnergyWise Management monitors and controls your devices remotely, it requires certain access credentials, depending on the devices to be controlled. This section will guide you through the installation and software activation process of the Cisco EnergyWise Management. Download First, you will need to download the latest Cisco EnergyWise Management 4.4 Build from Cisco.com. Open your download folder. And double click CiscoEnergyWiseManagement_4.4_*.exe to start the installation wizard. Page 6


7 Depending on your user configuration, Windows may request permission to make changes to the system. If necessary enter your credentials and Click Yes. Page 7

8 Click Next. Page 8

9 License Agreement You will need to review the License Agreement and accept the terms to move forward with the installation. Click Next. Page 9

10 Installation Method In this section you will choose the type of installation that is appropriate for your network size and configuration. Choose Installation Method. Cisco EnergyWise Management Complete Installation Both the EnergyWise Controller and the EnergyWise Server will be installed on the same server EnergyWise Server Choose this option if you plan to install the EnergyWise Server and the EnergyWise Controller on different servers. EnergyWise Controller Choose this option when installing additional EnergyWise Controllers or when you plan to install the EnergyWise Server and the EnergyWise Controllers on different servers. Page 10
11 Finish Installation Click Finish. Page 11
12 Install Cisco EnergyWise Management - Complete Installation For complete installation on one server, choose the Cisco EnergyWise Management Complete Installation (Controller and Server) option. Click Next. Administrator Account for Management Console At this point in the installation, you will need to create a user account to access the browser based Management Console. Choose a Username and a secure Password and Re-enter the password to confirm. The Web-Port specifies through which port the management console can be accessed. If port 443 is already in use, choose any other unused port (this will not change the SSL securitization). In the event that you need to deactivate SSL, this will need to be done manually. If you choose a different port, remember to make note of the port used. You will need this information again when you access the Management Console. Page 12

13 By default, the Cisco EnergyWise Management installer will configure the Windows Firewall settings to open the required ports for the web interface to be accessed from outside the server. Note: If you do not use the Windows Firewall, Cisco EnergyWise Management will not be able to open these ports automatically. In this case, you will need to configure them manually. Page 13
. You can also configure non-secured standard port (5673).")
14 Internal Ports For communication between the EnergyWise Controller and the EnergyWise Server, Cisco EnergyWise Management installs an EnergyWise Message Queue Server. The default port is SSL secured port (5672). You can also configure non-secured standard port (5673). The EnergyWise Message Queue server has a separate management console which requires an additional port (55672). For internal communication, Cisco EnergyWise Management requires access to port 8000 and port 9090 on the installation machine. Port 8000 is fixed and not able be changed by the user. A local EnergyWise database service will be installed along with other components. The default port is It is recommended that you install Cisco EnergyWise Management using the default settings. These default port settings are used throughout this documentation. All ports can be modified manually during the installation procedure. Detailed instructions for modifying these ports after installation is complete can be found in our Ports section. If you wish to customize the ports, edit them and click Next. Note: If you do not use the Windows Firewall, Cisco EnergyWise Management will not be able to open these ports automatically. In this case, you will need to configure them manually. Page 14

15 EnergyWise Message Queue Server During installation you will be able to customize the credentials for the EnergyWise Message Queue server. Enter username and password in the EnergyWise Message Queue Configuration screen and click Next to continue. Page 15
16 Installation Directory In this step, choose the installation directory. Make sure you have enough hard disk space, as the EnergyWise Server and other features require a large amount of disk space over time. Click Install. Page 16
17 Install Cisco EnergyWise Management - EnergyWise Controller This option is generally used when installing additional EnergyWise Controllers or when an EnergyWise Controller should not be installed on the same server as the EnergyWise Server. For EnergyWise Controller installation, please choose EnergyWise Controller. Click Next. Page 17

18 Internal Ports To ensure proper communication between the EnergyWise Controller and Central Management Server, Cisco EnergyWise Management also includes a Message Queuing Protocol. The default for this protocol is SSL secured port You may instead opt for non-secured port For management of the queuing protocol, port will also need to be available. A local EnergyWise database service will be installed along with other components. The default port is 5432 and, while modifiable, should only be changed if this port is already in use. All ports can be modified manually during the installation procedure. Detailed instructions for modifying these ports after installation is complete can be found in our Ports section. If you wish to customize the ports, edit them and click Next. Page 18
19 Installation Directory In this step, choose the target installation directory. Make sure you have ample hard disk space, as the EnergyWise Controller and other features require a large amount of disk space over time. Click Install. Page 19

20 Starting the Management Console Cisco EnergyWise Management user utilizes a browser-based management console for configuration, operation, and reporting. The management console can be accessed using a standard modern web browser and opens automatically once the installation has finished. To access the management console manually, enter the default address in the address bar of your browser. The default address is: or You will have specified the port of the management console during installation. The default setting is HTTPS SSL secured port 443 (non-secured port 8080 is also available). If you chose an alternate port for the management console, make sure you enter the correct port. When entering the address manually, append the address as seen below. In this example, the default non-secure HTTP port is used. or To access Cisco EnergyWise Management from a remote location, enter the IP address or hostname of the remote machine on which you have installed Cisco EnergyWise Management into your address bar. See example below: or During the installation process, you will choose a username and password for the Cisco EnergyWise Management platform. You will need this username and a password to access the management console. Page 20

21 Welcome Page Once you have successfully logged into the management console, you'll see the Welcome page. From here, follow the on screen instructions for activation of Cisco EnergyWise Management. Activation of Cisco EnergyWise Management will be required upon first login. Once the License Activation has been completed, you will see the Initial Setup Wizard, which will help you to begin maximizing the capabilities of the Cisco EnergyWise Management platform. Page 21
22 Cisco EnergyWise Management Setup Wizard The Cisco EnergyWise Management Setup Wizard will guide you through the first steps with your Cisco EnergyWise Management, and will assist in optimizing your initial configuration and customization. Your Company Enter your company's name here. This name will be used later for naming the root folder in your folder structure within the Cisco EnergyWise Management environment. Click Next. Page 22

23 Activate Your License Enter the license key and activate Cisco EnergyWise Management. Click Next. Once the license is activated, the corresponding license details will be displayed and the yellow warning message will disappear. Cisco EnergyWise Management will attempt to verify the license key once daily. If the license key is not able to be verified for 7 days consecutive days, Cisco EnergyWise Management will be disabled automatically. If you have internet connectivity problems, you will be redirected to the internet settings page. Note: For licensing, your Cisco EnergyWise Management needs to be connected to the internet. If activation does not work, please check your Internet Connectivity/Proxy of the respective Controller in Settings and activate Cisco EnergyWise Management manually with the help of Software License in the Settings menu. If you don't have internet connectivity from your Cisco EnergyWise Management installation machine, please contact our technical support regarding a Cisco EnergyWise Management Offline License. Page 23
 server and automatically imports Windows devices.")
24 Import Devices Cisco EnergyWise Management has the potential to automatically import your existing devices. Active Directory Integration The Cisco EnergyWise Management connects to your Active Directory (AD) server and automatically imports Windows devices. If you want to import any devices, enter the configuration credentials of your AD server. Click Next. Otherwise click Skip this step and continue with the regular setup. Page 24

25 Cisco EnergyWise Setup The Cisco EnergyWise Management connects to your Cisco EnergyWise domain imports all connected devices. If you want to import any devices, enter the configuration credentials of your Cisco EnergyWise domain. Click Next. Otherwise click Skip this step and continue with the regular setup. You finished the basic settings now. Select Windows Access Method. Configuration Completed Page 25

26 If you wish to define the user and role settings, continue with the next wizard Create Users & Roles, otherwise click Next and close this wizard. You can edit role based access settings at any time from the User Management section. Page 26
27 Working with Devices Now that the Cisco EnergyWise Management is installed, you can start working with devices. Cisco EnergyWise Management is able to monitor, measure, and control a large variety of different device types in your network. This includes Windows, Linux or Mac based desktops and servers, Voice-over-IP (VoIP) phones, printers, switches, virtual machines, PDUs and many more. Cisco EnergyWise Management has an agentless architecture which requires no additional software to be installed on the controlled devices. Instead, Cisco EnergyWise Management uses already existing network and system management protocols to monitor, measure, or control the power state of devices in your network. In many cases, the appropriate protocols are already in place and can be used out of the box, whereas in other cases you might need to adjust a few settings to make it work. This section will just explain the basic steps on how to integrate devices to be used with Cisco EnergyWise Management. You will find detailed information about device integration in the Help Documentation. Working with Devices Once the Cisco EnergyWise Management is installed, you can begin working with Devices. Cisco EnergyWise Management is able to monitor, measure, and control a wide variety of different Device Types on your network. This includes Windows, Linux, or Mac based desktop computers and servers, Voice-over-IP (VoIP) phones, printers, switches, virtual machines, PDUs, and many more. Cisco EnergyWise Management is an "agentless" architecture which requires no additional software to be installed on the controlled devices. Instead, Cisco EnergyWise Management uses the existing network and system management protocols to monitor, measure, or control the power state of devices in your network. In most cases, the appropriate system management protocols are already in place and can be used without customization whereas, in other cases, it may be necessary to adjust a few settings to achieve full functionality. This section will explain the basic steps of device integration for Cisco EnergyWise Management. You will be able to find detailed information about device integration in the online help system. Importing Devices into Cisco EnergyWise Management This tutorial will explain how to integrate single devices manually, using the Management Console. Manual integration, however, is not the recommended approach when planning to integrate a large number of devices. You can import devices from existing system management tools and directory services, like Microsoft Active Directory, Cisco Works, Cisco CallManager, OpenScape DLS, etc., instead of manual integration. Cisco EnergyWise Management also supports mass import of devices via database connectors and CSV (Comma Separated Values) file import. The imported devices are periodically synchronized with your system management tools to ensure all device data is up-to-date, and new devices will be imported automatically into Cisco EnergyWise Management. Page 27

28 Adding the First Device This example describes the steps on how to manually add a Windows device to Cisco EnergyWise Management. To get started, you will need the following information for the Windows machine available: Hostname or IP address Username and password for a local-admin account To get started, open the Devices Page and click. Then enter basic information about the device in the Device tab. To identify the device, enter either the hostname of the device in the Hostname field or the IP address in the URI field. Usually, providing hostnames is sufficient as Cisco EnergyWise Management automatically resolves hostnames. You will then choose the device type from the Device Type Selector. For this example, that is pc.windows (Windows). The Device Information Field Folder name is populated automatically, based on the folder you are currently operating in. In our example, it is the root folder named Demo, which we created during the initial Setup Wizard. Finally, enter the Username and Password to access the Windows machine. To do this, select the Credentials tab in the dialog and enter username and password into the respective fields. When finished, click Save Changes & Close. Page 28

29 After you have integrated the device into Cisco EnergyWise Management, it should be visible in the device table. If you don't see the device, refresh the device table by clicking the Search button. Cisco EnergyWise Management displays different status levels for a device, depending on its current power state. Page 29

30 Supported Power States and Descriptions: Device Status Description UNKNOWN The device status is currently unknown. This usually happens when a device was imported via an asset connector and not accessible in the network thereafter. OFF The device is currently turned off. STANDBY The device is currently in standby mode. HIBERNATE The device is currently in hibernate mode. ON The device is currently turned on. If the Device Status is UNKNOWN, you can initiate a manual device status check using Cisco EnergyWise Management. To check the current device status, select the device in the device table then click Execute. Select the Check Status action from the available actions list and click on the Execute button on the right. If the device status is still UNKNOWN after the status check, verify your device settings. An Unknown Status can also be caused by incorrect user credentials, access rights, or WMI configuration. If the device is joined to an Active Directory domain, verify that the provided user account has administrator rights over the device by being a member of the local admin group or domain admin group. Another common error is the configuration of the WMI protocol settings on the Windows device. Page 30
 to monitor, measure, and control Windows based devices.")
31 A note about Windows devices As mentioned earlier, Cisco EnergyWise Management uses existing software protocols to access remote devices. For Windows devices, Cisco EnergyWise Management uses a software protocol called WMI (Windows Management Instrumentation) to monitor, measure, and control Windows based devices. For security reasons, Windows requires a user account to be in the local admin group to use the WMI protocol remotely. In some cases, additional configuration steps might be required to enable full support for WMI on the remote machine. Integration with Active Directory A common designated use of Cisco EnergyWise Management is to monitor, measure, and powermanage Windows computers in the network. Cisco EnergyWise Management integrates into Windows Active Directory server to import and synchronize devices automatically. To enable Active Directory integration, go to the Devices tab and choose Import from the list. Then click on Add Asset Connector and choose Directory > Active Directory from the menu. This will open a dialog box for the asset connector setup. From here, enter the requested information for the Active Directory Integration, like Domain, Username, Password, and the address of the Active Directory Server (Host) then click OK and Save your Changes. Page 31
 that it finds.")

32 Cisco EnergyWise Management will automatically connect to the Active Directory server and import all devices (Windows machines, printers, etc.) that it finds. Depending on the number of devices, this process might take a while to complete but generally finishes within an hour. During the import process, Cisco EnergyWise Management will automatically try to retrieve location data from Active Directory and populate the location field for each device. Page 32


33 Cisco EnergyWise Support Cisco EnergyWise Management provides full monitoring, analysis, and control of Cisco EnergyWise enabled devices with specific EnergyWise reporting, to optimize energy consumption and reduce energy costs. Here are some Cisco EnergyWise Management features shown for EnergyWise Devices: EnergyWise Integration EnergyWise Monitoring and Controlling Page 33
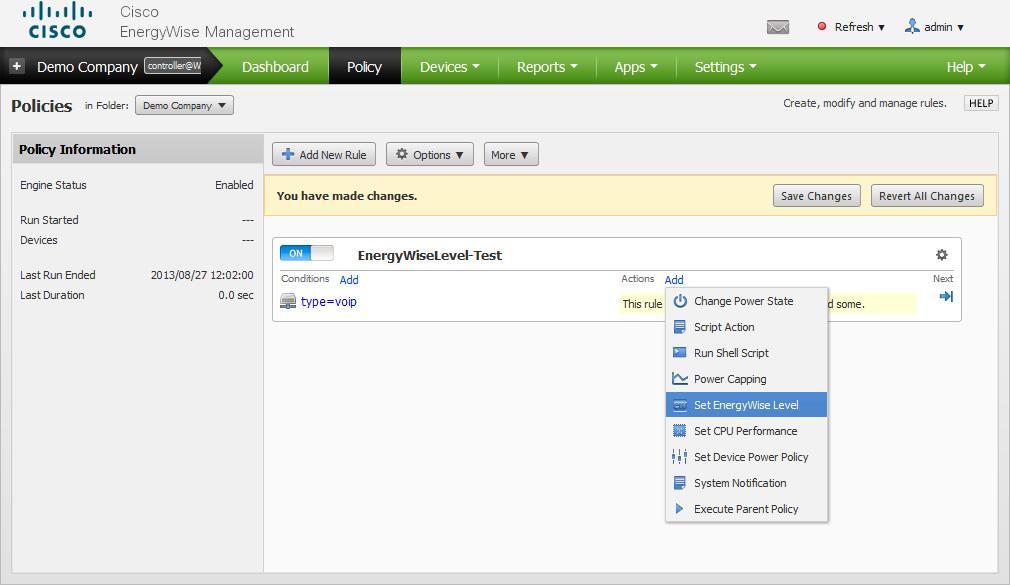
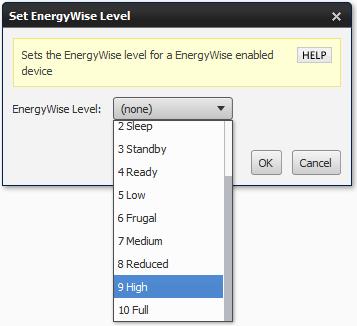
34 EnergyWise Policies Page 34

35 EnergyWise Reports Page 35

36 Customizing Cisco EnergyWise Management Now that early steps with Cisco EnergyWise Management have been completed, configuration of some additional Settings, which will become important once Cisco EnergyWise Management is expanded to support more devices, is recommended. Protect your most important devices Cisco EnergyWise Management is a powerful software platform, capable of managing and controlling the energy usage across the entire network. In order to prevent important devices from being mistakenly powered down or put into hibernate status, the Protected Devices settings are important. Protected Devices, allows you to specify which devices should never be powered down, hibernated, or put in standby mode by policy rules or by manual actions. To add a Protected Device, go to the Devices Tab and click Protected Devices then enter IP addresses, locations, device types or other filtering criteria to describe the device that should be protected. As in the example below, you will enter "deny *" to project all devices from status changes by Cisco EnergyWise Management. deny * Take a look at the examples below for other options. Don't forget to click on Save Changes to apply the protected devices settings. Page 36

37 Adjust Energy Utility Rates and Currency For correct reporting of energy costs, energy savings, and carbon emissions, it is recommended that actual energy prices and carbon information be entered into Cisco EnergyWise Management. To do this, first go to the Central Settings page and choose the Currency Settings. Enter the appropriate currency symbol into the Currency field. This currency will be used across all Cisco EnergyWise Management reporting, cost and savings calculation, and simulation. Therefore, all monetary values entered should be consistently in one given currency. Cisco EnergyWise Management supports energy pricing and carbon accounting for multiple Locations. This is important for multiple locations with different energy prices and carbon emissions. To get started, first enter a meaningful value for the Default Energy Rate. To do this, go to Settings > Controller Management and click on Edit Settings of the respective Controller. Next, click on Energy Prices on the right, select the corresponding row in the energy prices table and click Edit. To enter specific energy prices and carbon emissions, you will need to provide the following data: Price per kwh This is the price you pay for one kwh (kilowatt hour). Example: 0.10 CO2 Emission kg/kwh This value represents the equivalent carbon emissions in kg for each kwh consumed. Example: 0.6 These values can be obtained from your utility company or facilities department. The energy price information is imperative for correct energy cost and savings reporting, and the carbon emissions can be considered a Green metric to be used for sustainability reporting. Page 37

38 If no location-based energy pricing is entered into Cisco EnergyWise Management, the Default Energy Rate will be used. Managing Locations Locations play an important role in Cisco EnergyWise Management. For instance, you can assign energy utility prices to individual locations, create different power management rules on a per-location basis, or create location-based reports. If you're using Active Directory, locations are imported automatically for all devices in AD. The location for a device can be manually set through the Device Viewer Dialog on the Devices page. Page 38

39 Automated Software Updates Cisco EnergyWise Management supports automated Software Updates. By default, automated software updates are disabled. However, we recommend enabling this feature in order to always have the most current version of Cisco EnergyWise Management. To enable this feature, go to the Settings page, click the Edit button of the respective Controller and select Software Updates. To generally enable software updates, check the Enable automatic updates box. If you only want the smaller releases and important hotfix updates should be automated, check Hotfixes only box. Page 39
 are installed on a single Windows machine (physical server or virtual machine). This is recommended for smaller installations, pilots and trials to get familiar with Cisco EnergyWise Management.")
40 Single-Server Deployment This is the simplest form of deploying Cisco EnergyWise Management. All components (Server, Controller, EnergyWise Message Queue, Database, Web Server, etc.) are installed on a single Windows machine (physical server or virtual machine). This is recommended for smaller installations, pilots and trials to get familiar with Cisco EnergyWise Management. For deployment, use the standard installer (See Installation) to install and configure all components. Upgrading As mentioned before, this deployment works well up to devices or endpoints, depending on the hardware configuration of the server. For scaling and distributed deployment, it is possible to add additional Controllers to this deployment which are connected to the existing central server. It is also possible to disable the Controller which was installed for the single-server deployment entirely and only use external controllers. Each controller requires access to the EnergyWise Message Queue server for communication with the central server. This can be configured during the installation or afterwards. Page 40

41 Multi-Server Deployment Deploying Cisco EnergyWise Management across multiple servers is recommended when more than devices or endpoints should be managed. This requires one instance of the Central Server and one or more Controller instances. Each Controller can handle up to devices or endpoints on a selected, high-performance hardware server. A separate EnergyWise Server can scale up to devices on a selected, high-performance hardware server. For larger installations, please contact Cisco support. Multi-Server deployment also enables implementation of Cisco EnergyWise Management for geographically distributed sites or isolated networks. Individual EnergyWise Controllers can be deployed across your organization, preferably close to the endpoints in the network, so that network traffic, latency and scanning times are optimized. EnergyWise Controllers can also be deployed in isolated networks and only require a single connection with the central server via the message queue. Page 41
42 1) 2) Multi-Server Installation Install EnergyWise Server on a high-performance hardware server. See Installation for details and only install the EnergyWise Server Take note of port settings for the EnergyWise Message Queue server. Install EnergyWise Controller on a separate server. Follow the instructions in EnergyWise Controller Installation and use the EnergyWise Message Queue settings from step 1) to configure the communication between the EnergyWise Controller and the central server. Also make sure firewall and network settings are correct. New EnergyWise Controllers will automatically appear in the Management Console under Settings > Controller Management and need to be assigned to a folder. 3) Repeat step 2) for multiple EnergyWise Controllers Page 42
43 Appendix Frequently Asked Questions What is WMI? Cisco EnergyWise Management uses the Microsoft WMI protocol for remote management of Windows devices. Starting from Windows XP, WMI is a central component of all Windows operating systems which provides a secure way to interact with Windows machines to retrieve device information (hardware configuration, CPU utilization, etc.) as well as to remotely control the power state. For more information on how to enable WMI, please see the Help Documentation. What is WoL (Wake-on-LAN)? Wake-On-LAN is a widely adopted technology which allows computer systems (Windows, Linux and Mac) to be powered on (waked up) remotely via (wired) network. In some case, WoL is disabled through factory default settings and must be enabled manually in the BIOS settings of the device. Some device types (Mac OS X) also support Wake-On-WLAN. Please refer to the individual system documentation on how to enable WoL features. Online Help Resources Integrated Online Help Documentation Cisco EnergyWise Management has a built-in context sensitive online help. Click on HELP or the question mark in widgets, windows, views and dialog boxes. External Knowledge Base You can also find additional information on special topics, FAQ and technical articles in the Cisco knowledge base under: Page 43
44 Contacting Cisco For product information, sales information or technical support* please use the following contact information: General Inquires For general information about our products and service, please contact us via at: Technical Support You can reach our technical support teams at standard business hours at the following address: *) Availability of technical support levels and priorities depend on your service agreement with Cisco or one of its partners. Page 44
This guide details the deployment and initial configuration necessary to maximize the value of JetAdvantage Insights.
 HP JetAdvantage Insights Deployment Guide This guide details the deployment and initial configuration necessary to maximize the value of JetAdvantage Insights. 1. Overview HP JetAdvantage Insights provides
Install and upgrade Qlik Sense. Qlik Sense 3.0 Copyright QlikTech International AB. All rights reserved.
 Install and upgrade Qlik Sense Qlik Sense 3.0 Copyright 1993-2016 QlikTech International AB. All rights reserved. Copyright 1993-2016 QlikTech International AB. All rights reserved. Qlik, QlikTech, Qlik
Quick Start Guide. Get started in 5 minutes! This document will give a brief introduction about the product and its installation procedure.
 Quick Start Guide Get started in 5 minutes! This document will give a brief introduction about the product and its installation procedure. INTRODUCTION The role of a Network Administrator is to manage
Install and upgrade Qlik Sense. Qlik Sense 3.2 Copyright QlikTech International AB. All rights reserved.
 Install and upgrade Qlik Sense Qlik Sense 3.2 Copyright 1993-2017 QlikTech International AB. All rights reserved. Copyright 1993-2017 QlikTech International AB. All rights reserved. Qlik, QlikTech, Qlik
VMware vcloud Air User's Guide
 vcloud Air This document supports the version of each product listed and supports all subsequent versions until the document is replaced by a new edition. To check for more recent editions of this document,
CaliberRDM. Installation Guide
 CaliberRDM Installation Guide Borland Software Corporation 4 Hutton Centre Dr., Suite 900 Santa Ana, CA 92707 Copyright 2010 Micro Focus (IP) Limited. All Rights Reserved. CaliberRDM contains derivative
VMware Identity Manager Cloud Deployment. DEC 2017 VMware AirWatch 9.2 VMware Identity Manager
 VMware Identity Manager Cloud Deployment DEC 2017 VMware AirWatch 9.2 VMware Identity Manager You can find the most up-to-date technical documentation on the VMware website at: https://docs.vmware.com/
VMware Identity Manager Cloud Deployment. Modified on 01 OCT 2017 VMware Identity Manager
 VMware Identity Manager Cloud Deployment Modified on 01 OCT 2017 VMware Identity Manager You can find the most up-to-date technical documentation on the VMware Web site at: https://docs.vmware.com/ The
Installation on Windows Server 2008
 USER GUIDE MADCAP PULSE 4 Installation on Windows Server 2008 Copyright 2018 MadCap Software. All rights reserved. Information in this document is subject to change without notice. The software described
ForeScout Extended Module for Tenable Vulnerability Management
 ForeScout Extended Module for Tenable Vulnerability Management Version 2.7.1 Table of Contents About Tenable Vulnerability Management Module... 4 Compatible Tenable Vulnerability Products... 4 About Support
Getting Started Guide. This document provides step-by-step instructions for installing Max Secure Anti-Virus and its prerequisite software.
 Getting Started Guide This document provides step-by-step instructions for installing Max Secure Anti-Virus and its prerequisite software. Contents 2 Contents Introduction... 3 System Requirements... 4
Freshservice Discovery Probe User Guide
 Freshservice Discovery Probe User Guide 1. What is Freshservice Discovery Probe? 1.1 What details does Probe fetch? 1.2 How does Probe fetch the information? 2. What are the minimum system requirements
Installing and Configuring VMware Identity Manager Connector (Windows) OCT 2018 VMware Identity Manager VMware Identity Manager 3.
 OCT 2018 VMware Identity Manager VMware Identity Manager 3.") Installing and Configuring VMware Identity Manager Connector 2018.8.1.0 (Windows) OCT 2018 VMware Identity Manager VMware Identity Manager 3.3 You can find the most up-to-date technical documentation on
Installing and Configuring VMware Identity Manager Connector 2018.8.1.0 (Windows) OCT 2018 VMware Identity Manager VMware Identity Manager 3.3 You can find the most up-to-date technical documentation on
Comodo Network Center Software Version 1.1
 Comodo Network Center Software Version 1.1 User Guide Guide Version 2.3.112311 Comodo Security Solutions 1255 Broad Street STE 100 Clifton, NJ 07013 Table of Contents Comodo Network Center - Introduction...
XIA Configuration Server
 XIA Configuration Server XIA Configuration Server v6 Cloud Services Quick Start Guide Tuesday, 20 May 2014 1 P a g e X I A C o n f i g u r a t i o n C l o u d S e r v i c e s Contents Overview... 3 Creating
Getting started with System Center Essentials 2007
 At a glance: Installing and upgrading Configuring Essentials 2007 Troubleshooting steps Getting started with System Center Essentials 2007 David Mills System Center Essentials 2007 is a new IT management
Storage Manager 2018 R1. Installation Guide
 Storage Manager 2018 R1 Installation Guide Notes, Cautions, and Warnings NOTE: A NOTE indicates important information that helps you make better use of your product. CAUTION: A CAUTION indicates either
MYOB Advanced Business
 MYOB Advanced Business On-Premise Installation Last Updated: 24 November 2014 Contents Introduction 1 Pre-Requisites 1 Web Browsers... 1 Server Hardware and Software... 1 Database Hardware and Software...
 Trend Micro Incorporated reserves the right to make changes to this document and to the products described herein without notice. Before installing and using the product, please review the readme files,
 Trend Micro Incorporated reserves the right to make changes to this document and to the products described herein without notice. Before installing and using the product, please review the readme files,
NiceLabel 2017 Installation Guide
 NiceLabel 2017 Installation Guide Rev-1702 NiceLabel 2017. www.nicelabel.com 1 Contents 1 Contents 2 2 System Requirements 4 2.1 NiceLabel 2017 4 2.2 Additional Requirements for NiceLabel Control Center
Patch Manager INSTALLATION GUIDE. Version Last Updated: September 25, 2017
 INSTALLATION GUIDE Patch Manager Version 2.1.5 Last Updated: September 25, 2017 Retrieve the latest version from: https://support.solarwinds.com/success_center/patch_manager/patch_manager_documentation
INSTALLATION AND SET UP GUIDE
 INSTALLATION AND SET UP GUIDE This guide will help IT administrators to install and set up NVivo Server. It provides step by step instructions for installing the software, configuring user permissions
Easy Setup Guide. Cisco FindIT Network Probe. You can easily set up your FindIT Network Probe in this step-by-step guide.
 Cisco FindIT Network Probe Easy Setup Guide You can easily set up your FindIT Network Probe in this step-by-step guide. 1 5 System Requirements Installing Probe Configuring Probe Using Probe Connecting
 Trend Micro Incorporated reserves the right to make changes to this document and to the products described herein without notice. Before installing and using the product, please review the readme files,
Installing and Configuring hopto Work. System Requirements Be sure you have these system requirements to install and use hopto Work.
 Installing and Configuring hopto Work To configure and install hopto Work on your Microsoft Windows server, you ll need to have Administrator status. Note: The recommended setup is that Active Directory
Welcome to PDQ Inventory
 Getting Started Contents Welcome to PDQ Inventory........ 1 Licensing.................... 2 PDQ Inventory Licensing Mode Comparison.................. 2 PDQ Inventory Product Feature Comparison..................
Sophos Enterprise Console
 advanced startup guide Product Version: 5.5 Contents About this guide... 1 Planning installation... 2 Planning the installation of Enterprise Console... 2 Planning database security... 4 Planning the computer
VDI-in-a-Box 5.1.x :27:51 UTC Citrix Systems, Inc. All rights reserved. Terms of Use Trademarks Privacy Statement
 VDI-in-a-Box 5.1.x 2015-03-16 16:27:51 UTC 2015 Citrix Systems, Inc. All rights reserved. Terms of Use Trademarks Privacy Statement Contents VDI-in-a-Box 5.1.x... 6 VDI-in-a-Box 5.1.x... 7 About Citrix
Sophos Enterprise Console advanced startup guide
 Sophos Enterprise Console advanced startup guide For distributed installations Product version: 5.3 Document date: April 2015 Contents 1 About this guide...4 2 Planning installation...5 2.1 Planning the
Deployment and User Guide Installing and Configuring WhatsUp Gold Failover Manager
 Deployment and User Guide Installing and Configuring WhatsUp Gold Failover Manager This guide provides information about installing and configuring WhatsUp Gold Failover Manager. Contents CHAPTER 1 Using
Comodo One Software Version 3.26
 rat Comodo One Software Version 3.26 Network Assessment Tool Administrator Guide Guide Version 1.3.113018 Comodo Security Solutions 1255 Broad Street Clifton, NJ 07013 Table of Contents 1 Introduction
Getting Started Guide. Installation and Setup Instructions. For version Copyright 2009 Code 42 Software, Inc. All rights reserved
 Installation and Setup Instructions For version 06.11.2009 Copyright 2009 Code 42 Software, Inc. All rights reserved About This Guide This guide shows you how to install, activate and back up with CrashPlan
Quick Start Guide ViPR Controller & ViPR SolutionPack
 ViPR Quick Start Guide Quick Start Guide ViPR Controller & ViPR SolutionPack Abstract This is a Quick Start Guide containing the main installation steps for the ViPR Controller and ViPR SolutionPack. For
SafeConsole On-Prem Install Guide
 version 5.4 DataLocker Inc. December, 2018 Reference for SafeConsole OnPrem 1 Contents Introduction................................................ 3 How do the devices become managed by SafeConsole?....................
Forescout. Configuration Guide. Version 2.4
 Forescout Version 2.4 Contact Information Forescout Technologies, Inc. 190 West Tasman Drive San Jose, CA 95134 USA https://www.forescout.com/support/ Toll-Free (US): 1.866.377.8771 Tel (Intl): 1.408.213.3191
Cisco Unified Serviceability
 Cisco Unified Serviceability Introduction, page 1 Installation, page 5 Introduction This document uses the following abbreviations to identify administration differences for these Cisco products: Unified
Aspera Connect Windows XP, 2003, Vista, 2008, 7. Document Version: 1
 Aspera Connect 2.6.3 Windows XP, 2003, Vista, 2008, 7 Document Version: 1 2 Contents Contents Introduction... 3 Setting Up... 4 Upgrading from a Previous Version...4 Installation... 4 Set Up Network Environment...
Synchronizer Quick Installation Guide
 Synchronizer Quick Installation Guide Version 5.7 September 2015 1 Synchronizer Installation This document provides simplified instructions for installing Synchronizer. Synchronizer performs all the administrative
Novell ZENworks Asset Management 7
 Novell ZENworks Asset Management 7 w w w. n o v e l l. c o m July 2006 INSTALLATION GUIDE Table Of Contents 1. Installation Overview... 1 Upgrade/Update Matrix...1 Installation Choices...2 ZENworks Asset
Kaseya 2. Installation guide. Version R8. English
 Kaseya 2 Kaseya Server Setup Installation guide Version R8 English October 24, 2014 Agreement The purchase and use of all Software and Services is subject to the Agreement as defined in Kaseya s Click-Accept
VMware Horizon FLEX Client User Guide
 Horizon FLEX 1.10 This document supports the version of each product listed and supports all subsequent versions until the document is replaced by a new edition. To check for more recent editions of this
IMC VAN Fabric Manager v7.0 (E0201) Copyright (c) Hewlett-Packard Development Company, L.P. and its licensors.
 Copyright (c) Hewlett-Packard Development Company, L.P. and its licensors.") IMC VAN Fabric Manager v7.0 (E0201) Copyright (c) 2013-2014 Hewlett-Packard Development Company, L.P. and its licensors. Table of Contents 1. What's New in this Release 2. Problems Fixed in this Release
IMC VAN Fabric Manager v7.0 (E0201) Copyright (c) 2013-2014 Hewlett-Packard Development Company, L.P. and its licensors. Table of Contents 1. What's New in this Release 2. Problems Fixed in this Release
VMware Identity Manager Connector Installation and Configuration (Legacy Mode)
") VMware Identity Manager Connector Installation and Configuration (Legacy Mode) VMware Identity Manager This document supports the version of each product listed and supports all subsequent versions until
VMware Identity Manager Connector Installation and Configuration (Legacy Mode) VMware Identity Manager This document supports the version of each product listed and supports all subsequent versions until
Deployment Guide. 3.1 For Windows For Linux Docker image Windows Installation Installation...
 TABLE OF CONTENTS 1 About Guide...1 2 System Requirements...2 3 Package...3 3.1 For Windows... 3 3.2 For Linux... 3 3.3 Docker image... 4 4 Windows Installation...5 4.1 Installation... 5 4.1.1 Install
Installation Guide for Pulse on Windows Server 2012
 USER GUIDE MADCAP PULSE 4 Installation Guide for Pulse on Windows Server 2012 Copyright 2018 MadCap Software. All rights reserved. Information in this document is subject to change without notice. The
Deployment Guide Installing WhatsUp Gold Distributed Edition to Central and Remote Sites
 Deployment Guide Installing WhatsUp Gold Distributed Edition to Central and Remote Sites This guide provides information about installing and configuring WhatsUp Gold Central and Remote Sites. Contents
Transport Gateway Installation / Registration / Configuration
 CHAPTER 4 Transport Gateway Installation / Registration / Configuration This chapter covers the following areas: Transport Gateway requirements. Security Considerations When Using a Transport Gateway.
WhatsConnected v3.5 User Guide
 WhatsConnected v3.5 User Guide Contents Table of Contents Welcome to WhatsConnected Finding more information and updates... 5 Installing and Configuring WhatsConnected System requirements... 6 Installation
Quick Start Guide for Vmware. Version 2.5 Vmware vsphere Instance
 Quick Start Guide for Vmware Version 2.5 Vmware vsphere Instance CONTENTS 1. Introduction 1.1 Running Gemini appliance on Vmware vsphere 1.1.1 Supported Versions 1.1.2 System Requirement 1.1.3 Note on
Installation and Deployment Guide for HEAT Service Management
 Installation and Deployment Guide for HEAT Service Management Supported Deployment Configurations The section briefly describes the deployment configurations that are supported by the HEAT Service Management
Sophos Enterprise Console
 secure network quick startup guide Product Version: 5.5 Contents About this guide... 1 Limitations on the secure network...2 What do I install?...3 What are the key steps?... 4 Download the installers...5
Device Manager. Managing Devices CHAPTER
 2 CHAPTER This chapter describes how to perform routine device management tasks using the Administrator Console. It provides information on managing the devices within your Cisco VXC Manager environment.
LiveNX 7.4 QUICK START GUIDE (QSG) LiveAction, Inc WEST BAYSHORE ROAD PALO ALTO, CA LIVEACTION, INC.
 LiveAction, Inc WEST BAYSHORE ROAD PALO ALTO, CA LIVEACTION, INC.") LIVEACTION, INC. LiveNX 7.4 QUICK START GUIDE (QSG) LiveAction, Inc. 3500 WEST BAYSHORE ROAD PALO ALTO, CA 94303 1-1 LiveNX 7.4 Quick Start Guide (QSG) Introduction This LiveNX 7.4 Quick Start Guide will
LIVEACTION, INC. LiveNX 7.4 QUICK START GUIDE (QSG) LiveAction, Inc. 3500 WEST BAYSHORE ROAD PALO ALTO, CA 94303 1-1 LiveNX 7.4 Quick Start Guide (QSG) Introduction This LiveNX 7.4 Quick Start Guide will
Free Download: Quick Start Guide
 Free Download: Quick Start Guide ViPR Controller & ViPR Controller Reporting Abstract This Quick Start Guide provides the main installation steps for the Free Download version of ViPR Controller and ViPR
McAfee epo Deep Command
 Quick Start Guide McAfee epo Deep Command version 2.4.1 This Quick Start Guide provides high level instructions for setting up McAfee epo Deep Command 2.4.1. For detailed instructions, refer to the McAfee
Sophos Anti-Virus for VMware vshield: On-Premise Edition startup guide. Product version: 2.1
 Sophos Anti-Virus for VMware vshield: On-Premise Edition startup guide Product version: 2.1 Document date: August 2016 Contents 1 About this guide...4 2 About Sophos Anti-Virus...5 3 Key steps in installation...7
Enterprise Vault.cloud CloudLink Google Account Synchronization Guide. CloudLink to 4.0.3
 Enterprise Vault.cloud CloudLink Google Account Synchronization Guide CloudLink 4.0.1 to 4.0.3 Enterprise Vault.cloud: CloudLink Google Account Synchronization Guide Last updated: 2018-06-08. Legal Notice
NMS300 Network Management System Application
 NMS300 Network Management System Application Quick Start Guide October 2013 202-11288-02 350 East Plumeria Drive San Jose, CA 95134 USA Support Thank you for purchasing this NETGEAR product. After installing
Install QlikView Expressor Standard and Enterprise Editions
 Install QlikView Expressor Standard and Enterprise Editions The QlikView Expressor Full Installer installs both the Standard and Enterprise Editions. These two Editions consist of multiple components and
Bomgar Vault Server Installation Guide
 Bomgar Vault 17.2.1 Server Installation Guide 2017 Bomgar Corporation. All rights reserved worldwide. BOMGAR and the BOMGAR logo are trademarks of Bomgar Corporation; other trademarks shown are the property
Version 2.3 User Guide
 V Mware vcloud Usage Meter Version 2.3 User Guide 2012 VMware, Inc. All rights reserved. This product is protected by U.S. and international copyright and intellectual property laws. This product is covered
Sage 200c Professional. System Requirements and Prerequisites
 Sage 200c Professional System Requirements and Prerequisites Copyright statement Sage (UK) Limited, 2017. All rights reserved. If this documentation includes advice or information relating to any matter
Sage 200c Professional. System Requirements and Prerequisites
 Sage 200c Professional System Requirements and Prerequisites Copyright statement Sage (UK) Limited, 2017. All rights reserved. If this documentation includes advice or information relating to any matter
Data Access Studio Install/Upgrade Guide for JDE EnterpriseOne
 Data Access Studio Install/Upgrade Guide for JDE EnterpriseOne 5299 DTC Blvd Greenwood Village, CO 80111, USA www.reportsnow.com Contents Supported Versions... 2 System Requirements... 3 Downloading and
Installing the Cisco Virtual Network Management Center
 CHAPTER 4 Installing the Cisco Virtual Network Management Center This chapter provides procedures for installing the Cisco Virtual Network Management Center (VNMC). This chapter includes the following
Installing Cisco APIC-EM on a Virtual Machine
 About the Virtual Machine Installation, page 1 System Requirements Virtual Machine, page 2 Pre-Install Checklists, page 4 Cisco APIC-EM Ports Reference, page 7 Verifying the Cisco ISO Image, page 8 Installing
Installation Guide. EventTracker Enterprise. Install Guide Centre Park Drive Publication Date: Aug 03, U.S. Toll Free:
 EventTracker Enterprise Install Guide 8815 Centre Park Drive Publication Date: Aug 03, 2010 Columbia MD 21045 U.S. Toll Free: 877.333.1433 Abstract The purpose of this document is to help users install
User Guide. Version R9. English
 Discovery User Guide Version R9 English March 5, 2015 Agreement The purchase and use of all Software and Services is subject to the Agreement as defined in Kaseya s Click-Accept EULATOS as updated from
A D S S G o > S i g n D e s k t o p. I n s t a l l a t i o n G u i d e. D o c u m e n t V e r s i o n
 A D S S G o > S i g n D e s k t o p I n s t a l l a t i o n G u i d e A S C E R T I A LTD A p r i l 2 0 1 8 D o c u m e n t V e r s i o n - 5.7. 0. 1 Ascertia Limited. All rights reserved. This document
Welcome to the. SACRRA Data Master Application. Administration Guide
 Welcome to the SACRRA Data Master Application Administration Guide SACRRA DMA Help Guide v1.0 Copyright 2015 - All Rights Reserved - South African Credit & Risk Reporting Association SACRRA Contents COPYRIGHT...
VI-CENTER EXTENDED ENTERPRISE EDITION GETTING STARTED GUIDE. Version: 4.5
 VI-CENTER EXTENDED ENTERPRISE EDITION GETTING STARTED GUIDE This manual provides a quick introduction to Virtual Iron software, and explains how to use Virtual Iron VI-Center to configure and manage virtual
VMware vfabric Data Director Installation Guide
 VMware vfabric Data Director Installation Guide vfabric Data Director 2.5 This document supports the version of each product listed and supports all subsequent versions until the document is replaced by
IMC Network Traffic Analyzer 7.1 (E0301P04) Copyright (c) 2015 Hewlett-Packard Development Company, L.P. All Rights Reserved.
 Copyright (c) 2015 Hewlett-Packard Development Company, L.P. All Rights Reserved.") Network Traffic Analyzer 7.1 (E0301P04) Copyright (c) 2015 Hewlett-Packard Development Company, L.P. All Rights Reserved. Table of Contents 1. What's New in this Release 2. Problems Fixed in this Release
Network Traffic Analyzer 7.1 (E0301P04) Copyright (c) 2015 Hewlett-Packard Development Company, L.P. All Rights Reserved. Table of Contents 1. What's New in this Release 2. Problems Fixed in this Release
InventoryControl Quick Start Guide
 InventoryControl Quick Start Guide Copyright 2013 Wasp Barcode Technologies 1400 10 th St. Plano, TX 75074 All Rights Reserved STATEMENTS IN THIS DOCUMENT REGARDING THIRD PARTY PRODUCTS OR SERVICES ARE
CounterACT VMware vsphere Plugin
 Configuration Guide Version 2.0.1 Table of Contents About VMware vsphere Integration... 4 Use Cases... 4 Additional VMware Documentation... 4 About this Plugin... 5 What to Do... 5 Requirements... 5 CounterACT
Deploying VMware Identity Manager in the DMZ. JULY 2018 VMware Identity Manager 3.2
 Deploying VMware Identity Manager in the DMZ JULY 2018 VMware Identity Manager 3.2 You can find the most up-to-date technical documentation on the VMware website at: https://docs.vmware.com/ If you have
USER GUIDE. CTERA Agent for Windows. June 2016 Version 5.5
 USER GUIDE CTERA Agent for Windows June 2016 Version 5.5 Copyright 2009-2016 CTERA Networks Ltd. All rights reserved. No part of this document may be reproduced in any form or by any means without written
Version 4.1 June Xerox Device Agent (XDA) Lite User Guide
 Lite User Guide") Version 4.1 June 2013 Xerox Device Agent (XDA) Lite User Guide 2008-2013 Xerox Corporation. All rights reserved. Xerox and Xerox and Design are trademarks of Xerox Corporation in the US and/or other countries.
Version 4.1 June 2013 Xerox Device Agent (XDA) Lite User Guide 2008-2013 Xerox Corporation. All rights reserved. Xerox and Xerox and Design are trademarks of Xerox Corporation in the US and/or other countries.
CounterACT VMware vsphere Plugin
 CounterACT VMware vsphere Plugin Configuration Guide Version 2.0.0 Table of Contents About VMware vsphere Integration... 4 Use Cases... 4 Additional VMware Documentation... 4 About this Plugin... 5 What
Edge Device Manager Quick Start Guide. Version R15
 Edge Device Manager Quick Start Guide Version R15 Notes, cautions, and warnings NOTE: A NOTE indicates important information that helps you make better use of your product. CAUTION: A CAUTION indicates
VMware Identity Manager Administration
 VMware Identity Manager Administration VMware Identity Manager 2.4 This document supports the version of each product listed and supports all subsequent versions until the document is replaced by a new
271 Waverley Oaks Rd. Telephone: Suite 206 Waltham, MA USA
 Contacting Leostream Leostream Corporation http://www.leostream.com 271 Waverley Oaks Rd. Telephone: +1 781 890 2019 Suite 206 Waltham, MA 02452 USA To submit an enhancement request, email features@leostream.com.
NBC-IG Installation Guide. Version 7.2
 Installation Guide Version 7.2 2017 Nuance Business Connect 7.2 Installation Guide Document Revision History Revision Date August 8, 2017 Revision List Updated supported SQL Server versions June 14, 2017
Cherwell Service Management
 Version 9.1.0 April 2017 Legal Notices Cherwell Software, LLC 2017 All Rights Reserved. Cherwell and the Cherwell logo are trademarks owned by Cherwell Software, LLC and are registered and/or used in the
NetBrain OE System Quick Start Guide
 NetBrain Technologies Inc. NetBrain OE System Quick Start Guide For Operator Edition Administrators Table of Contents 1. Install NetBrain OE System... 3 1.1 Install Gateway Server... 4 1.2 Install Network
SC-T35/SC-T45/SC-T46/SC-T47 ViewSonic Device Manager User Guide
 SC-T35/SC-T45/SC-T46/SC-T47 ViewSonic Device Manager User Guide Copyright and Trademark Statements 2014 ViewSonic Computer Corp. All rights reserved. This document contains proprietary information that
User Manual. Virtual and Hardware Appliance User Manual - Version
 User Manual Virtual and Hardware Appliance User Manual - Version 4.5.0.2 I Endpoint Protector Virtual Appliance User Manual Table of Contents 1. Endpoint Protector Virtual Appliance formats1 1.1. Virtualization
KYOCERA Net Admin Installation Guide
 KYOCERA Net Admin Guide Legal Notes Unauthorized reproduction of all or part of this guide is prohibited. The information in this guide is subject to change without notice. We cannot be held liable for
Dell Wyse Management Suite. Version 1.0 Quick Start Guide
 Dell Wyse Management Suite Version 1.0 Quick Start Guide Notes, cautions, and warnings NOTE: A NOTE indicates important information that helps you make better use of your product. CAUTION: A CAUTION indicates
Installing Authoring Manager
 Installing Authoring Manager Installing Authoring Manager v5.2 (PC only) System Requirements: Before you install Authoring Manager, you should ensure that your system meets the minimum software and hardware
Citrix Connector Citrix Systems, Inc. All rights reserved. p.1. About this release. System requirements. Technical overview.
 Citrix Connector 3.1 May 02, 2016 About this release System requirements Technical overview Plan Install Citrix Connector Upgrade Create applications Deploy applications to machine catalogs Publish applications
dctrack Quick Setup Guide (Recommended) Obtain a dctrack Support Website Username and Password
 Obtain a dctrack Support Website Username and Password") dctrack 5.0.0 Quick Setup Guide This guide walks you through installing dctrack for the first time. In other words, this is a clean install - it is not an integration of dctrack and Power IQ, and it is
dctrack 5.0.0 Quick Setup Guide This guide walks you through installing dctrack for the first time. In other words, this is a clean install - it is not an integration of dctrack and Power IQ, and it is
This section of the release notes is reserved for notable changes and new features since the prior version.
 Release Notes Browsium Proton 4.1 Product Version: 4.1.0 Release Notes Updated: 15 October 2016 About this Release This document lists new features and known issues as of the release date. If you discover
Release Notes for the Cisco EnergyWise Orchestrator, EnergyWise Phase 2
 Release Notes for the Cisco EnergyWise Orchestrator, EnergyWise Phase 2 Revised November 22, 2010 Unless otherwise noted, the term network device refers to Cisco switches, routers, access points and other
Microsoft Exchange Proxy Settings Outlook 2010 Gpo
 Microsoft Exchange Proxy Settings Outlook 2010 Gpo Cloud App Encryption supports Microsoft Outlook 2010 and 2013 for Windows. accounts for each user in Microsoft Office 365 and the Outlook proxy settings
IBM BigFix Version 9.5. WebUI Administrators Guide IBM
 IBM BigFix Version 9.5 WebUI Administrators Guide IBM IBM BigFix Version 9.5 WebUI Administrators Guide IBM Note Before using this information and the product it supports, read the information in Notices
Core Component Installation
 Core Components Installation Approach, page 1 Golden Template Requirements, page 2 Common s for Golden Templates, page 14 Core Components Installation Approach You can use golden templates to clone and
Dell EMC Ready Architectures for VDI
 Dell EMC Ready Architectures for VDI Designs for VMware Horizon 7 on Dell EMC XC Family September 2018 H17387 Deployment Guide Abstract This deployment guide provides instructions for deploying VMware
Dell Lifecycle Controller Integration Version 1.1 for Microsoft System Center 2012 Virtual Machine Manager Installation Guide
 Dell Lifecycle Controller Integration Version 1.1 for Microsoft System Center 2012 Virtual Machine Manager Installation Guide Notes, cautions, and warnings NOTE: A NOTE indicates important information