Filing Forms Electronically COGCC Denver, CO
|
|
|
- Dorothy Skinner
- 5 years ago
- Views:
Transcription

1 Filing Forms Electronically COGCC Denver, CO
2 First Time Users: Set-up and Create Users
3 First-time users will need to install Silverlight. Go to the site will automatically run a check of the users system to see if the proper add-on is installed within their browser. The application can run on any browser: including; Internet Explorer, Firefox, Safari and Chrome. If the add-on has not been installed within the browser, the following window will display.


4 Click on the Install Microsoft Silverlight box to begin the install process and the following dialogue box will appear. Click the Run button and another dialogue box will appear and you will need to click that Run button also.


5 The Microsoft Silverlight Install window will appear. Click on the Install Now Button. The Enable Microsoft Update window appears. Click the Next button.
6 The Installation Successful window will appear when the installation is complete. Click the Close button and move onto the next step.


7 Re-enter the web-site address for efrom - Enter the Login Name, Password and Operator ID# and click the Login button. The system will verify the user associated with that operator number and bring up the default dashboard page.
8 There are two different dashboard views for operators. One view is for the Colorado Operator User Administrator (COUA). This individual is responsible for setting up users for that operator. The other is the dashboard that the users will see. The difference is in the number of menu options. The COUA has the additional Operator Administrator option which is used to setup users.
9 Using the Operator Administration option, the COUA will create and maintain users for the Operator. Click on the option for Operator Administrator Click on Create Login. Type in the new users USER NAME, a PASSWORD (letters, numbers and at least 1 special character, for a total of at least 6 characters is required), and their address. The same information will be entered a second time and it must match the initial entries. Once the is entered and the COUA exits the field the user has been created. The COUA can continue entering additional new users or can exit to get back to the dashboard as needed. When you want to leave the page and save all of the data click on the Update and Exit button. This will return you to the dashboard. The Cancel button will cause all of the entered data to be deleted See the following slide for the snapshot view of the screen display and example for setting up new users.

10 Each user requires an individual username and password to access the system. Each user will have the ability to create a template with their identifying information. The COUA clicks the Create Login to create new users. Continue to click until all new users are added, then click the Save button to exit. COUA= Colorado Operator User Administrator Every user needs to be an established Designated Agent (Form 1A).

11 Maintaining current addresses is imperative since the address within the users account is the default for communication related to the eform processing. To delete users: From the Edit Users for Current Operator display of user names, click on the delete box for that individual user. Click on the Update and Exit button when ready to save and exit. Use the Designated Agent Form 1A to delete individuals no longer working with the operator.
12 Creating and Locating Electronic Forms: The Basics of eform Screens, Messages and Navigation

13 Go to the eform website address to log in and get to the dashboard: Login Detail eform Announcements


14 Two or three options to choose from depending on role. Locating a Document: There are several ways to locate an existing document: Doc ID, Form #, Date Range and Form Status.
15 Click on the New Form link. The Create Form drop down list will appear. Select the Form number from the list and click on the Go button. eform will start loading the form template into the data entry screen and, depending on the type of form selected, you may get a secondary window to enter additional data. This secondary window is used to gather information from the database to populate certain data fields on the form.

16 Creating a New Form Drop down the list of forms and click the Go button The following slides are basic information for using eform applications. For specific Form 2 instructions scroll to slides For Form 2A scroll to slides For Form 5 instructions scroll to slides For Form 5A scroll to slides

17 Assignment of Doc Numbers Document ID# is assigned by the system. After you have selected the New Form/New Application function, chose a form from the drop down list and click on the GO button. The system will assign a DOC ID to each new form created. The DOC ID is the number that will be used to track the form as it moves through the COGCC process from the initial entry by the operator to approval by the COGCC. If the user decides to save the form without completing it in this session, they will be able to return to the document and the data will have been saved. Users can return to the document using the DOC ID number.

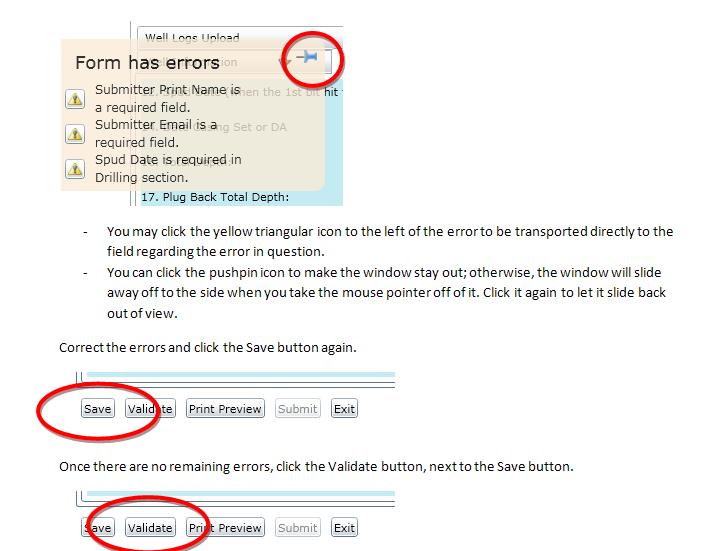
18 Each section is set up in tabs. The tabs are arranged so a user can select any tab in any order. Warning Message Error Message Panel Save, Validate, Print Preview, Submit and Exit Buttons
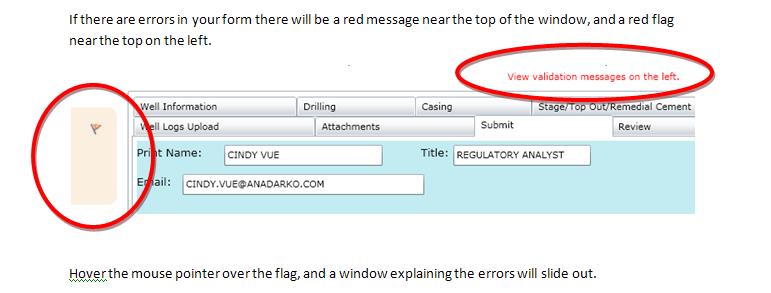
19
20 Save: The data will be validated against the Rules Engine and will be saved to the database Validate: The data will be validated and errors will be listed but no data will be written to the database. Print Preview: A PDF report of the data entered and saved to the database will be created. Submit: This button will only be available when the data entered has been saved to the database and there are no errors when validation has been run. Exit: Selecting this option will close the form and return the user to the dashboard.
21 There are a number of different parameters that can be used to locate documents already in eform. If a user enters a Doc #, all other parameters are ignored. Otherwise the system will use the information that is entered. The date range is always used along with status and Form No. Currently the date range is tied to the date the form was created or first started. The wider the date range, the longer it will take to return the result set. Status refers to the current status of the form. Click on the FIND button. See the following slide for additional information.

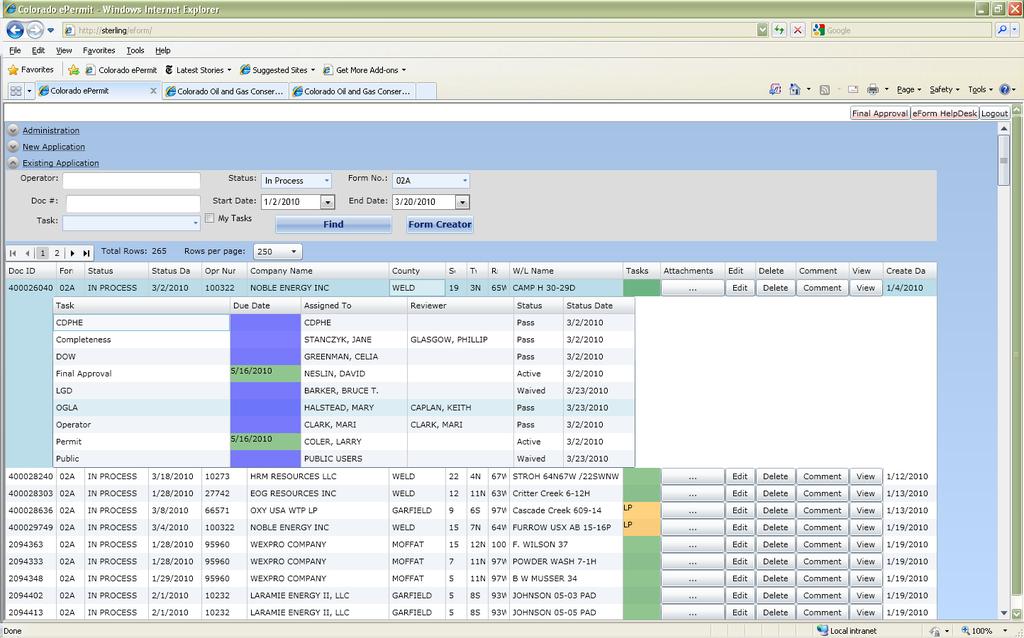
22 Enter search criteria and click on Find to receive results such as this example. Columns Buttons Result set from a search for draft 2A from 3/15/2010 to 3/19/2010 The result set from a search can be re-sorted by clicking on the name of the column. Once the page has re-sorted, there will be an arrow pointing either up or down representing ascending or descending order. The only column that cannot be used for sorting is the Tasks column.
23 Doc ID: The system generated Document number This is how the COGCC tracks the document through the review process. Numbers greater than represent forms submitted by operators using eform. Form Num: The COGCC Form Number, i.e. Form 2 is an APD. Status: The current status of the form. Status Date: Date the last time the status of the form changed. Example: If a Form 2 status is In Process, then the Status Date listed would be the date the APD passed the Completeness check and the status changed to In Process. This would be when the COGCC staff began their review of the document. Oper Num: The Operator Number the form is associated to. Company Name: The name of the Operator associated to the Operator Number. County, Sec, Twp, Rng: The location information from the form, if available. W/L Name: The Well or Location Name from the data entered on the form, if available. Tasks: The column displays a count of the assigned tasks that are coming due or are overdue.
24 Attachments: Used to display a screen where operators can add attachments to documents that are required for processing the form or to see a list of documents that were submitted with the form. Edit: Opens up the data entry screen where the operator enters the data. Button is only visible for a form in Draft status. Delete: Allows an operator to delete a form they started but have not yet submitted. Comment: Used to review Public Comments that have been made on any Form 2 or Form 2A. The Public is allowed to make comments on these forms for the first 20 days that the form is in process. View: Creates a PDF report of the current data for the form. Every time any data on the form is changed and saved, the PDF report created by this button will reflect the changes.
25 Click on the Attachments button to open the Attachments screen. NOTE: Attachments must be in PDF format.

26 Press New Attachment to browse operator system or network to upload attachment. Note: Must be in PDF format. Press Save Updates to save the attachments after adding all of the documents, then press the Close button. The following slide provides instructions for viewing a complete list of attachment names for each form type.

27 Click on Help to get to this screen. Click here for list of attachment documents drop down descriptions.


28 Tabs for pages Data Entry Fields The EDIT button takes the user back into a form and allows changes to the data entry screens of existing documents. Button is only visible for a form in Draft status. No changes can be made to forms once submitted.

29 Click OK or Cancel to verify action. Click on Delete button for any draft document you would like to remove.

30 Click on New Comment to enter any additional comments or to enter the first comment. Existing Comments

31 Submitted comments will be reviewed by a staff member for acceptable language. Once reviewed, the comments will then become viewable to everyone who has access to that form.
32 According to Rule 305 c., the Public can make comments on any Form 2A or associated Form 2 for the first twenty days the form is In Process at the COGCC. Through eform, the public has the ability to make those comments and any comments that are made are viewable to the public. All comments are reviewed by staff at the COGCC for acceptable language before the comment is published to the Web site.

33 The VIEW button creates a PDF document. This can be saved for your records. This feature is often used to view the document and proof read it prior to the final submission stage.

34 Once a form is submitted to the COGCC and the review process begins, a number of Tasks will be assigned. These tasks represent the different groups within the agency that have a responsibility to review the information provided on the form and any attachments related to the form. The operator and anyone else who is interested can track the progress of the form as it is being reviewed in the COGCC business process. The tracking is done on the dashboard of eform. Clicking on any part of the row listing the form will display the detailed list of the tasks assigned to that form.
35 Tasks
36 Creating Forms 2 and 2A
37 The Permit To Drill Form tabs: Sections I, II, III, IV and V, Object Formation, Casing, BMP, Related Forms, Attachments, Review, and General Comments/COA. The user can move through each tab completing the data entry as applicable to that tab. User can click on the SAVE button at the bottom of each page to ensure the data is saved prior to moving on to the next tab, or the user may choose to wait to click the SAVE button until all of the tabs have been completed. Any errors detected by the system will display on the error panel described in the Tutorial 2. Examples of each tab follow.

38 Section I Basic Information Tab Click on each drop down box to make selections for these fields. Either the mouse or the arrow keys can be used to make your selection. Click on the TAB key to accept and move to next field. Each user can create a template so the operator information will automatically populate from the individual template.

39 Section II Well Location Information Tab Enter Longitude as a negative.

40 Section III Lease, Spacing and Pooling Information Tab
41 Section IV Drilling Plans and Procedures Tab

42 Section V Informational Tab

43 Click the Add button to create Formation entry rows as needed. Click on Add to continue to enter new formation data lines. Object Formation Tab
44 Casing Tab Click on the Add button to create Casing entry rows as needed. Click on Add to continue to enter new data. Casing tab allows rows to be added, as many as needed.

45 Related Forms Tab If the Form 2 is RELATED to a Form 2A - Click on the Add button to create a related form entry row. Enter the DOC ID from that related form and choose the form type from the drop down list.

46 Click on the New Attachments button and follow the instructions from the Creating and Locating Documents Tutorial. Attachments Tab
47 The form is in draft status until it is submitted to the system. The five function keys at the bottom of each page will complete the following tasks. Save: The data will be validated against the Rules Engine and will be saved to the database Validate: The data will be validated and errors will be listed but no data will be written to the database. Print Preview: A PDF report of the data entered and saved to the database will be created. Submit: This button will only be available when the data entered has been saved to the database and there are no errors when validation has been run. Exit: Selecting this option will close the form and return the user to the dashboard. Save, Validate, Print Preview, Submit and Exit Buttons Once you have saved and/or validated your form the Submit button will no longer be grayed out. Click on the submit button and the form will upload to the database. You should receive a successfully submitted message unless there is a problem that needs to be addressed.
48 The Oil and Gas Location Assessment is comprised of the following tabs: Sections I, II, III, IV-1, IV-2, Section V, Section VI, Section VII, and Section VIII. BMP Forms Related Attachments Examples of each tab follows.

49 Section I Basic Information Tab Radio Buttons you may have to click on these buttons twice to activate the check mark function.

50 Section II Location Identification Tab Drop Down Fields Make your selections and then tab to the next field to accept the selection.

51 Section III Facilities and Construction Information Tab
52 Click the Add button to create Surface Owner rows as needed. Use the Add button to continue to enter new data entry lines as needed. Section IV-1 Surface Owner Information Tab
53 Section IV-2 Surface Owner Information Tab (2) Radio Buttons click ALL that apply, click buttons twice to activate the check mark function.
54 Section V Current and Future Land Use Tab Radio Buttons click ALL that apply, click buttons twice to activate the check mark function.

55 Section VI Cultural and Soil Information Tab
56 Section VII Plant Community Information Tab Radio Buttons click ALL that apply, click buttons twice to activate the check mark function. Radio Buttons This is what the radio button will look like if only clicked one time.
57 Section VIII Water Resources and Operator Comments Tab

58 Select a BMP Type from the dropdown list and provide details in the BMP Comment box. Use the Add button to create as many lines as need for the different BMP Types that need to be addressed. BMP Tab Best Management Practices Details.
59 Related Forms Tab When the Form 2A is RELATED to one or more Form 2, click on the Add button to create a related form entry row. Enter the DOC ID from that related form and choose the form type from the drop down list. You can add as many entry lines as needed. Click on the View tab to see the created related form from this screen.
60 Click on the New Attachments button and follow the instructions from the Creating and Locating Documents Tutorial. Attachments Tab
61 The form is in draft status until it is submitted to the system. The five function keys at the bottom of each page will complete the following tasks. Save: The data will be validated against the Rules Engine and will be saved to the database Validate: The data will be validated and errors will be listed but no data will be written to the database. Print Preview: A PDF report of the data entered and saved to the database will be created. Submit: This button will only be available when the data entered has been saved to the database and there are no errors when validation has been run. Exit: Selecting this option will close the form and return the user to the dashboard. Save, Validate, Print Preview, Submit and Exit Buttons Once you have saved and/or validated your form the Submit button will no longer be grayed out. Click on the submit button and the form will upload to the database. You should receive a successfully submitted message.unless there is a problem that needs to be addressed.
62 Creating Forms 5 and 5A
63 The Drilling Completion Report tabs: Well Information, Drilling, Casing, Cement, Formation Information, Related Forms, Well Logs Upload, Attachments, Submit, Review, General Comments/COA. When starting a new form, a smaller window will open to enter the API number. This will direct eform to query the database to obtain information to populate a select set of fields on the eform data entry pages. The operator will then be able to update some of these fields and enter data for the rest of the form. Examples of each tab follows.

64 Each user can create a template so the operator information will automatically populate from the individual template. Well Information Tab Fill in the API number and the well information from the database will auto populate many of the fields. Enter Longitude as a negative.
65 Drilling Information

66 You will click the Add button to create Casing entry rows as needed. Click on Add to continue to enter new data. Casing tab allows rows to be added, as many as needed. Similar to the casing tab in the Form 2.

67 Click the Add button to create entry rows as needed. Cement Information
 Each row has a comment box associated to that formation for information about log intervals and the test zones. The comment box is only open if you are viewing that particular formation entry.")
68 The Formation name is chosen from a drop down list and can be added as many times as needed. (You can not enter two of any of the same formation in the same Form 5.) Each row has a comment box associated to that formation for information about log intervals and the test zones. The comment box is only open if you are viewing that particular formation entry. Use the drop down arrows to open the formation entry lines that you have added.
69 The Submit tab contains the signature data for the agent submitting the form. Included is a comment box for the operator to add any general comments.
70 The form is in draft status until it is submitted to the system. The five function keys at the bottom of each page will complete the following tasks. Save: The data will be validated against the Rules Engine and will be saved to the database Validate: The data will be validated and errors will be listed but no data will be written to the database. Print Preview: A PDF report of the data entered and saved to the database will be created. Submit: This button will only be available when the data entered has been saved to the database and there are no errors when validation has been run. Exit: Selecting this option will close the form and return the user to the dashboard. Save, Validate, Print Preview, Submit and Exit Buttons Once you have saved and/or validated your form the Submit button will no longer be grayed out. Click on the submit button and the form will upload to the database. You should receive a successfully submitted message unless there is a problem that needs to be addressed.
71 The Completed Interval Report tabs: Well Information, Formation Information, Submit, Related Forms, Attachments, Review and General Comments. When starting a new form, a smaller window will to enter the API number. This will direct eform to query the database to obtain information to populate a select set of fields on the eform data entry pages. The operator will then be able to update some of these fields and enter data for the rest of the form. Examples of each tab follows.

72 Well Information Tab Fill in the API number and the well information from the database will auto populate many of the fields.

73 The Formation name is chosen from a drop down list after you have clicked the Add button, then select the status from the drop down list. Clicking on the drop down arrow opens the detail for the interval test for that formation. Under the detail is the Add and Remove buttons to either add or remove additional formations that had interval tests. As many as needed can be added to this form. (You can not enter two of any of the same formation in the same Form 5.) Only the active formation, designated by the arrow you have chosen will show the details.
74 This tab contains the signature data for the agent submitting the form. Included is a comment box for the operator to add any other related comments.

75 The form is in draft status until it is submitted to the system. The five function keys at the bottom of each page will complete the following tasks. Save: The data will be validated against the Rules Engine and will be saved to the database Validate: The data will be validated and errors will be listed but no data will be written to the database. Print Preview: A PDF report of the data entered and saved to the database will be created. Submit: This button will only be available when the data entered has been saved to the database and there are no errors when validation has been run. Exit: Selecting this option will close the form and return the user to the dashboard. Save, Validate, Print Preview, Submit and Exit Buttons Once you have saved and/or validated your form the Submit button will no longer be grayed out. Click on the submit button and the form will upload to the database. You should receive a successfully submitted message unless there is a problem that needs to be addressed.

76 Each user can create a Template that will retain their individual data No hyphens or letters are allowed in Bond numbers All distances are to be entered in feet or miles when applicable. All Form 5s associated to a Form 5A need to be listed on the Related Forms tab Reset value by entering a -1


77
78 Form 17 is also available as an online eform document. Please let us know if a tutorial is needed. Watch the COGCC webpage for announcements on new electronic forms developments! Feel free to contact our office at if you have any questions or need assistance with the eform applications.
Creating and Locating Electronic Forms The Basics Training Part 2 of 5 COGCC Denver, CO
 Creating and Locating Electronic Forms The Basics Training Part 2 of 5 COGCC Denver, CO 303-894-2100 Creating and Locating Electronic Forms: The Basics of eform Screens, Messages and Navigation Go to the
eform Training Manual Filing Forms Electronically 7/10/2009 version 1.4 Department of Natural Resources Colorado Oil and Gas Conservation Commission
 eform Training Manual Filing Forms Electronically 7/10/2009 version 1.4 Department of Natural Resources Colorado Oil and Gas Conservation Commission First Time Install of Silverlight The first time a user
User Guide. Version
 User Guide Version 0.19 2-11-2008 StormPro Max User Guide Page 1 of 69 5/10/2008 Table of Contents 1. Overview... 4 1.1 Definition of StormPro Max Terms... 4 2. Accessing StormPro Max... 5 3. Navigating
CO Environmental Web Application Users Help. March 2012 Updated June 2012 Updated March 2014
 CO Environmental Web Application Users Help March 2012 Updated June 2012 Updated March 2014 Contents Welcome to CO Environmental... 1 About CO Env... 2 Logging in to the CO Env Web... 3 Changing Your Password...
Secure Transfer Site (STS) User Manual
 User Manual") Secure Transfer Site (STS) User Manual (Revised 3/1/12) Table of Contents Basic System Display Information... 3 Command Buttons with Text... 3 Data Entry Boxes Required / Enabled... 3 Connecting to the
Secure Transfer Site (STS) User Manual (Revised 3/1/12) Table of Contents Basic System Display Information... 3 Command Buttons with Text... 3 Data Entry Boxes Required / Enabled... 3 Connecting to the
Leon County Permits Online (Citizens Access - ACA)
") Leon County Permits Online (Citizens Access - ACA) Accela Citizens Access - Public User Guide L e o n C o u n t y B o a r d o f C o u n t y C o m m i s s i o n e r s Instructions for using Leon Counties
Leon County Permits Online (Citizens Access - ACA) Accela Citizens Access - Public User Guide L e o n C o u n t y B o a r d o f C o u n t y C o m m i s s i o n e r s Instructions for using Leon Counties
Printable Help. The complete text of the MLS Online Help
 Printable Help The complete text of the MLS Online Help Updated June 12, 2017 Table of Contents Table of Contents 2 Accessing the MLS 11 Access Edge MLS from a Mobile Device 11 Log On or Off the MLS 11
Supplier Portal (External) JIRA User Guide. July 2016
 JIRA User Guide. July 2016") Supplier Portal (External) JIRA User Guide July 2016 External JIRA Tool Allows users outside of Honeywell (i.e. suppliers and customers) to interact with AeroJIRA projects Can be used by external users
Supplier Portal (External) JIRA User Guide July 2016 External JIRA Tool Allows users outside of Honeywell (i.e. suppliers and customers) to interact with AeroJIRA projects Can be used by external users
SONIA GUIDELINE
 Starting Sonia To access Sonia, you will need a web (internet) browser (e.g., Chrome, Firefox, Internet Explorer) and internet access. Signing In & Setting Your Password Navigate to the Sonia Online homepage
e-submission System User Manual Publication Related Matters
 e-submission System User Manual For Publication Related Matters March 2018 Version 2.2 Table of Contents 1.5 SUBMISSION MANAGEMENT... 19 1.5.1 Edit Saved Submission For Publication... 19 1.5.2 Approve
OAR (Online Assigned Risk) User Documentation Page 1
 User Documentation Page 1") OAR (Online Assigned Risk) User Documentation Page 1 TABLE OF CONTENTS Overview...2 OAR Menu Bar...2 Home page... 2 How do I register as a new OAR user?...2 How do I log in to OAR?...2 Registration page...
OAR (Online Assigned Risk) User Documentation Page 1 TABLE OF CONTENTS Overview...2 OAR Menu Bar...2 Home page... 2 How do I register as a new OAR user?...2 How do I log in to OAR?...2 Registration page...
SLG for School Site Administrators. Applicable to Onwards
 SLG for School Site Administrators Applicable to 7.136 Onwards Revision History Version Change Description Date 7.136-1.0 Initial Release 22/10/10 7.136 1.1 Cosmetic Changes made to Deleting Online Reports.
OAR (Online Assigned Risk) User Documentation Page 1
 User Documentation Page 1") OAR (Online Assigned Risk) User Documentation Page 1 TABLE OF CONTENTS Overview... 2 OAR Menu Bar... 2 Home page... 2 How do I register as a new OAR user?... 3 How do I log in to OAR?... 3 Registration
OAR (Online Assigned Risk) User Documentation Page 1 TABLE OF CONTENTS Overview... 2 OAR Menu Bar... 2 Home page... 2 How do I register as a new OAR user?... 3 How do I log in to OAR?... 3 Registration
My Publications Quick Start Guide
 IHS > Decision Support Tool My Publications Quick Start Guide January 28, 2011 Version 2.0 2011 IHS, All Rights Reserved. All trademarks belong to IHS or its affiliated and subsidiary companies, all rights
Grant Lifecycle Manager Learning Lab Applicant Tutorial
 VIDEO 1: Site Access & Account Creation You will access the system via the log on page. The Foundation may have provided you with a link to this page, or it may be hyperlinked on their Foundation website.
Tenant Coordination Website User Guide For Mall Management
 Tenant Coordination Website User Guide For Mall Management Website s Testing address: http://www.ninthdegree.com/westfield/ Contents View Specific Deal 1 Upload the Complete Design Criteria Package 5 View
PolicyTech. University of Memphis Policy Review Board User Guide for Management of System-wide Policies and Procedures. PolicyTech User Guide
 PolicyTech University of Memphis Policy Review Board User Guide for Management of System-wide Policies and Procedures Page 1 of 18 Table of Contents Getting Started... 3 How to Access PolicyTech... 3 PolicyTech
Licensure and Certification Tracking System (LACTS) User Manual. July 2013
 User Manual. July 2013") Licensure and Certification Tracking System (LACTS) User Manual July 2013 Contents Overview... 2 Who this document is for?... 2 Supported Browsers... 2 Internet Explorer 9 Settings... 2 Search Facility
Licensure and Certification Tracking System (LACTS) User Manual July 2013 Contents Overview... 2 Who this document is for?... 2 Supported Browsers... 2 Internet Explorer 9 Settings... 2 Search Facility
TABLE OF CONTENTS CHAPTER 1. PROTOCOL APPLICATION PROCESS OVERVIEW
 IBC Creating Protocol Applications TABLE OF CONTENTS CHAPTER 1. PROTOCOL APPLICATION PROCESS OVERVIEW... 1.1 CHAPTER 2. GENERAL INFORMATION... 2.1 2.1. STARTING AND LOGGING IN... 2.1 2.2. USING NAVIGATION
From the COGCC website click on Dashboard, then scroll down to, Click HERE to access the Daily Activity Dashboard. This link will the load the DAD.
 DAILY ACTIVITY DASHBOARD HOW TO ACCESS AND USE The Daily Activity Dashboard (DAD) is an interactive visualization of the data obtained by the Colorado Oil and Gas Conservation Commission from Operators
How to Login Transaction Management
 How to Login Transaction Management 1. 2. 1. Open a web browser and go to https://www.bvonesource.com/wps/portal 2. Input User ID and Password, then press Login. In case forget your password, please press
Company. Business Online Banking Admin - Company. Company - Profile. Company - BAI Settings
 Company The Company page displays information specific to your Business. Additional function tabs or sub-menus are available to view information and settings specific to the company. From here you can
I. Overview... 2 A. Users and User Roles... 2 B. System Information... 2 C. Help Menu... 3 D. Changing Your Password... 3 E. Logging In... 3 F.
 I. Overview... 2 A. Users and User Roles... 2 B. System Information... 2 C. Help Menu... 3 D. Changing Your Password... 3 E. Logging In... 3 F. Logging Off... 4 G. Navigation Bar... 4 II. Search Menu...
Arkansas Prescription Drug Monitoring Program. User Support Manual
 Arkansas Prescription Drug Monitoring Program User Support Manual 1 Contents 1 What Is a Requestor?... 4 2 Registration... 4 2.1 Registration Process... 5 2.2 Registering as a Delegate... 9 2.3 Email Verification...
IRA Basic Running Financial Reports
 IRA Basic Running Financial Reports Updated 6-7-2013 1 Training Index Part I Introduction to the IRA Reporting Tool IRA Resources (3) Logging onto the system (4) Navigating the Dashboard (5-9) Running
My Sysco Reporting Job Aid for CMU Customers. My Sysco Reporting. For CMU Customers (Serviced by Program Sales)
") My Sysco Reporting For CMU Customers (Serviced by Program Sales) 1 Accessing My Sysco Reporting... 2 Logging In... 2 The Reporting Dashboard... 3 My Sysco Reporting Process... 6 Generating a Report...
My Sysco Reporting For CMU Customers (Serviced by Program Sales) 1 Accessing My Sysco Reporting... 2 Logging In... 2 The Reporting Dashboard... 3 My Sysco Reporting Process... 6 Generating a Report...
Updating Your Local Program Webpage
 I. Go to www.soor.org Updating Your Local Program Webpage II. III. IV. On the top right hand side of the home page of www.soor.org click on LPC LOGIN. Type in your Username and Password, then click the
Frequently Asked Questions (FAQ):
:") Frequently Asked Questions (FAQ): For Customers: Q1. What is EPM? The Electronic Plan Management (EPM) System is a web-based work flow tool that allows architects, engineers, and designers the ability
Frequently Asked Questions (FAQ): For Customers: Q1. What is EPM? The Electronic Plan Management (EPM) System is a web-based work flow tool that allows architects, engineers, and designers the ability
Overview & General Navigation
 User Guide Contents Overview & General Navigation... 3 Application Terminology... 3 Groups... 3 Text Formatting Menu Bar... 3 Logging into the Application... 3 Dashboard... 4 My Profile... 5 Administrator
Instructional Technology & Technology Enhancement Centers -itec Grade Center Tutorial for Faculty
 Instructional Technology & Technology Enhancement Centers -itec Grade Center Tutorial for Faculty Creating a Test From Course Tools, click Tests, Surveys, and Pools. Click Tests. Click Build Test. Give
Calendar & Buttons Dashboard Menu Features My Profile My Favorites Watch List Adding a New Request...
 remitview User Guide 1 TABLE OF CONTENTS INTRODUCTION... 3 Calendar & Buttons... 3 GETTING STARTED.... 5 Dashboard.... 7 Menu Features... 8 PROFILE.... 10 My Profile... 10 My Favorites... 12 Watch List...
Banner 9. Navigation Guide Revised for Ithaca College Fall The URL for Banner 9 is
 Banner 9 Navigation Guide Revised for Ithaca College Fall 2018 The URL for Banner 9 is http://banner.ithaca.edu/ Login with Netpass Credentials Recommended Browsers Firefox Safari Edge Chrome (no Java
NEASC ACCREDITATION PORTAL Quick Reference for Schools. accportal.org/cpss
 NEASC ACCREDITATION PORTAL Quick Reference for Schools accportal.org/cpss April 2017 1 Portal Website: www.accportal.org/cpss The portal works best using the Chrome or Firefox browsers. Log In You should
Ministry of Education
 Ministry of Education EFIS 2.0 - User Version 2.0 June 2015 Table of Contents 1 Document History... 4 2 Logon to EFIS 2.0... 5 2.1 Logon through Go Secure... 5 2.2 Bookmarking the Link... 6 3 Planning
UACareers User Guide August 2015
 UACareers User Guide August 2015 v. 4.0 Contents Introduction...1 Web Browser Compatibility...1 Privacy of Applicant Data...1 Logging In...2 Adding Postings...3 Entering Posting Information...4 Adding
Residential Builder User Manual for the New Home Buyer Protection System v2.0
 Residential Builder User Manual for the New Home Buyer Protection System v2.0 Prepared by New Home Buyer Protection Office Alberta Municipal Affairs Contents 1 Introduction... 4 2 Using the Residential
EFIS User Guide Family Support Programs User
 Ministry of Education EFIS 2.0 - User Guide Family Support Programs User Version 2.0 June 2015 Table of Contents 1 Document History... 1 2 Logon to EFIS 2.0... 2 2.1 Logon through Go Secure... 2 2.2 Bookmarking
MyCSF User Guide. Prepared By: HITRUST Frisco Square Blvd. Suite 327. Frisco, Texas P: (469) F: (469)
 F: (469)") MyCSF User Guide Prepared By: HITRUST 6136 Frisco Square Blvd. Suite 327 Frisco, Texas 75034 P: (469)269-1110 F: (469)269-1101 www.hitrustalliance.net 1 P a g e Table of Contents MyCSF User Guide Browser
MyCSF User Guide Prepared By: HITRUST 6136 Frisco Square Blvd. Suite 327 Frisco, Texas 75034 P: (469)269-1110 F: (469)269-1101 www.hitrustalliance.net 1 P a g e Table of Contents MyCSF User Guide Browser
Bell County. E-Discovery Portal. Training Guide. 1/8/2014 Version 1.0
 Bell County E-Discovery Portal Training Guide 1/8/2014 Version 1.0 The E-Discovery portal has been developed to provide the District Attorney s Office with the ability to electronically upload discoverable
Processing Submittals via Prolog Converge
 Processing Submittals via Prolog Converge Submittal Review Procedure Receiving Notification An automatic notification will be sent to your email when the team creates a new Submittal Package and assigns
Building Standards Department Markham eplan Applicant Handbook For Building Permits, Sign Permits and Zoning Preliminary Review
 Markham eplan Applicant Handbook For Building Permits, Sign Permits and Zoning Preliminary Review In addition to this user manual, please refer to the instructions provided in the electronic forms (eforms)
Paragon Essentials: Getting Started with Paragon 4 This manual sets the foundation for all future work in Paragon 4. It covers the basic activities
 Paragon Essentials: Getting Started with Paragon 4 This manual sets the foundation for all future work in Paragon 4. It covers the basic activities necessary to navigate the MLS. Table of Contents 1. Accessing
Entering a Child in ChildWare 2.0
 1 Entering a Child in ChildWare 2.0 Welcome to ChildWare 2.0! Our newest upgrade of ChildWare has made it very easy to take a child from the Application process to the enrollment process seamlessly. How
User Guide. Avery Dennison Web Ordering Solution for Steinmart
 User Guide Avery Dennison Web Ordering Solution for Steinmart March 2012 Copyright 2012 A very Dennison The information in this document is subject to change without notice and should not be construed
emerge Help Document Table of Contents
 Table of Contents Logging Into emerge... 2 Navigation Bar... 3 Main Menu... 4 Creating a New Order... 6 Order Checklist... 6 Information... 7 Overview... 8 Geography... 9 List Select... 12 Demographics...
emerge Help Document Table of Contents
 Table of Contents Logging Into emerge... 2 Navigation Bar... 3 Main Menu... 4 My Account... 6 My Information... 6 Manage Lists... 7 Manage Seeds... 8 Search/Add Suppress... 9 Update My Suppress... 10 Creating
Tenant Coordination Website User Guide For Tenant Coordinators
 Tenant Coordination Website User Guide For Tenant Coordinators Website s Testing address: http://www.ninthdegree.com/westfield/ Contents View Specific Deal 1 Download Documents 4 Upload Documents 7 Post
BC Spatial Member Map Viewer. Version 2.0. User Guide. May 2015
 BC Spatial Member Map Viewer Version 2.0 User Guide May 2015 1 P a g e Revised: 16 June 2015 Contents Contents... 2 Introduction... 4 System Requirements... 5 BC Spatial Map Viewer... 6 I. Navigation Tools...
ipcr Web Training Manual
 ipcr Web Training Manual Technical support: (800) 464-1740 Technical support email address: support@ipcrems.com [1] Table of Contents Accessing ipcr Web... 4 ipcr Web Sign In... 5 Persistent ipcr Web Features...
October 2015 Allstate (A553)
") October 2015 Allstate (A553) October 23, 2015 First Advantage 2013 FADV.com Emails sent to Candidate Username (Log in ID) & Password Once an User name is created, the Candidate will be sent two emails
October 2015 Allstate (A553) October 23, 2015 First Advantage 2013 FADV.com Emails sent to Candidate Username (Log in ID) & Password Once an User name is created, the Candidate will be sent two emails
Legal Kiosk TM v3.0. Internal User Guide
 Legal Kiosk TM v3.0 Internal User Guide Table of Contents Overview... 2 Legal Kiosk Admin Management... 3 User Access Section... 3 Adding A New User... 3 Adding a New Contact... 6 Granting Access to Files
SOU Banner 9 Navigation Guide
 SOU Banner 9 Navigation Guide Draft 11.29.2018 Contents Introduction.... 2 Application Navigator.... 2 Basic Navigation.... 3 Page Header.... 4 Key Block... 4 Sections... 5 Bottom Section Navigation...
Faculty Guide to Grade Center in Blackboard 9.1
 Faculty Guide to Grade Center in Blackboard 9.1 Grade Center, formally known as Gradebook, is a central repository for assessment data, student information, and instructor notes. Although it includes items
Kitsap County Online Permit Center How to Log In and Apply for a Right-of-Way Permit
 Kitsap County Online Permit Center How to Log In and Apply for a Right-of-Way Permit Step 1: Go to https://co-kitsap-wa.smartgovcommunity.com/applicationpublic/applicationhome For new users select Sign
Campus Solutions Self Service: Faculty Quick Reference Guide
 Campus Solutions Self Service: Faculty Table of Contents Introduction to Step Sheets... 1 The Faculty Center... 2 View Teaching Schedule... 3 Enter My Textbooks... 9 View Textbook Summary... 19 View Exam
IDRP Portal User Guide for Providers and Plans
 IDRP Portal User Guide for Providers and Plans Version 1.0, September 2017 Controlled electronic version prevails over printed copy of this document. Provided by MAXIMUS Federal Services, Folsom, CA. Work
MY MEDIASITE. https://mediasite.ecu.edu/ms/mymediasite
 MY MEDIASITE https://mediasite.ecu.edu/ms/mymediasite My Mediasite provides tools for managing your recordings. All faculty have access to My Mediasite and the ability to download the Desktop Recorder.
2012 Learning Guide Employee. StaffReady.
 2012 Learning Guide Employee StaffReady http://www.staffready.com Table of Contents 1 MODULE ONE (1): INTRODUCTION, LOGIN, AND WELCOME TAB... 3 1.1 SCHEDULEREADY OVERVIEW... 3 1.2 TECHNOLOGY UPGRADES...
SharePoint User Manual
 SharePoint User Manual Developed By The CCAP SharePoint Team Revision: 10/2009 TABLE OF CONTENTS SECTION 1... 5 ABOUT SHAREPOINT... 5 1. WHAT IS MICROSOFT OFFICE SHAREPOINT SERVER (MOSS OR SHAREPOINT)?...
User s Guide. Biomedical Research Alliance of New York
 Using IRBManager to Maintain Your BRANY Studies User s Guide Biomedical Research Alliance of New York Institutional Review Board 1981 Marcus Avenue, Suite 210 Lake Success, NY 11042 P: (516) 470-6900 F:
Kaltura Video Package for Moodle 2.x Quick Start Guide. Version: 3.1 for Moodle
 Kaltura Video Package for Moodle 2.x Quick Start Guide Version: 3.1 for Moodle 2.0-2.4 Kaltura Business Headquarters 5 Union Square West, Suite 602, New York, NY, 10003, USA Tel.: +1 800 871 5224 Copyright
Talent Connect User Guide
 Talent Connect User Guide Table of Contents Register As A New User Search For Jobs/Save Jobs Basic Search Advanced Search Save Search Queries Job Cart Apply For A Job Resume Upload Candidate Personal Info
Division of Alcoholic Beverages and Tobacco. Liquor Distiller s and Rectifier s Monthly Report
 Division of Alcoholic Beverages and Tobacco Liquor Distiller s and Rectifier s Monthly Report Logging Into EDS Log in with the user id and password provided through the EDS registration process and click
Processing RFIs Using Prolog Converge
 Processing RFIs Using Prolog Converge Receiving Notification An automatic notification will be sent to your email when the team creates a new RFI and assigns you as having action required Clicking on
Outlook Web Access Exchange Server
 Outlook Web Access Exchange Server Version 2.0 Information Technology Services 2008 Table of Contents I. INTRODUCTION... 1 II. GETTING STARTED... 1 A. Logging In and Existing Outlook Web Access... 1 B.
Center for Medicare Management (CM) Clinical Lab Fee Schedule (CLFS) CLFS User Manual
 Clinical Lab Fee Schedule (CLFS) CLFS User Manual") Centers for Medicare & Medicaid Services Center for Medicare Management (CM) 7500 Security Blvd Baltimore, MD 21244-1850 Center for Medicare Management (CM) Clinical Lab Fee Schedule (CLFS) Version: 3.0
Centers for Medicare & Medicaid Services Center for Medicare Management (CM) 7500 Security Blvd Baltimore, MD 21244-1850 Center for Medicare Management (CM) Clinical Lab Fee Schedule (CLFS) Version: 3.0
Tenant Coordination Website User Guide For Tenants
 Tenant Coordination Website User Guide For Tenants Contents Log In 1 Download Documents 3 Upload Documents 6 Progress Bar 16 View Criteria Manuals 17 Help 19 FAQ 20 Log Out 21 Log in You have been given
CAREERTECH INFORMATION MANAGEMENT SYSTEM (CTIMS) TECHNOLOGY CENTER BUSINESS MASTER GUIDEBOOK. Information Management Division
 TECHNOLOGY CENTER BUSINESS MASTER GUIDEBOOK. Information Management Division") CAREERTECH INFORMATION MANAGEMENT SYSTEM (CTIMS) TECHNOLOGY CENTER BUSINESS MASTER GUIDEBOOK Information Management Division March 26, 2018 Table of Contents Logging in to CTIMS... 1 Help and Troubleshooting...
CAREERTECH INFORMATION MANAGEMENT SYSTEM (CTIMS) TECHNOLOGY CENTER BUSINESS MASTER GUIDEBOOK Information Management Division March 26, 2018 Table of Contents Logging in to CTIMS... 1 Help and Troubleshooting...
CERTIFIED HIRING MANAGER USER GUIDE
 CERTIFIED HIRING MANAGER USER GUIDE University of California Santa Cruz Recruitment Management System 12/21/12 TABLE OF CONTENTS INTRODUCTION... 3 BEFORE YOU GET STARTED... 4 Your Web Browser... 4 Web
CAHIIM HELP for Program Users
 CAHIIM HELP for Program Users 2018 CAHIIM Table of Contents GETTING STARTED... 1 Performing Basic Functions... 1 Logging In... 1 Logging Out... 1 Resetting Password... 1 Viewing or Changing User Information...
E: W: avinet.com.au. Air Maestro Training Guide Document Library Module Page 1
 E: help@avinet.com.au W: avinet.com.au Air Maestro Training Guide Document Library Module Page 1 Contents Assigning Access Levels... 3 Document Library Overview... 4 Sort Documents... 4 Find Documents...
Importing from Blackboard Learn Grade Center Data to Banner 9 User Learning Scenarios
 Importing from Blackboard Learn Grade Center Data to Banner 9 User Learning Scenarios Step 1: Make sure Final Grade Column Displays Letter Grade Ensure your final grade column in Grade Center has letter
Applying for EMSWCD Small Project and Community Events (SPACE) Grants
 Grants") ZOOMGRANTS TUTORIAL Applying for EMSWCD Small Project and Community Events (SPACE) Grants Instructions for ZoomGrants ZoomGrants is an online tool that helps facilitate grant applications, committee review,
ZOOMGRANTS TUTORIAL Applying for EMSWCD Small Project and Community Events (SPACE) Grants Instructions for ZoomGrants ZoomGrants is an online tool that helps facilitate grant applications, committee review,
FormsNet3 sm Recipient Module Training Guide
 FormsNet3 sm Recipient Module Training Guide FormsNet3 sm More than 95% of data collected by the CIBMTR is submitted electronically via FormsNet3 sm, a comprehensive electronic data submission system containing
CJA evoucher. Attorney User Manual Release 5.2 October 2018
 CJA evoucher Attorney User Manual Release 5. October 08 CJA evoucher for Attorneys i Contents Nota Bene: Edit before using!... Introduction... Panel Management... Voucher & Authorization Request Submission...
Printable Documentation
 Printable Documentation The complete text of the Online Help Updated April 10, 2007 Table Of Contents Administrative... 1 Add a picture to your Agent Profile... 1 Add a bio to your agent profile... 1 Add
Instructional Technology & Technology Enhancement Center -itec Grade Center Tutorial for Faculty
 Instructional Technology & Technology Enhancement Center -itec Grade Center Tutorial for Faculty Grade Center: Several changes have been made in new Grade Center including new icons. Note that grade center
Chapter 1 : Getting Started with Integrity... Chapter 2 : Interface Layout... Chapter 3 : Navigation... Chapter 4 : Printing...
 .0 User s Manual Table of Contents Chapter : Getting Started with Integrity... Chapter : Interface Layout... Chapter : Navigation... Chapter : Printing... Chapter : Quick Search and Results Pane... Results
IACUC PROTOCOL REVIEW
 IACUC PROTOCOL REVIEW Last Updated: 1/28/2016 Contents Accessing a Protocol for Review... 2 1) Log In To Topaz Elements... 2 2) Open Protocol... 3 Reviewing and Commenting... 6 1) Review Each Section Of
Tobacco Products Manufacturer s and Importer s Report
 Tobacco Products Manufacturer s and Importer s Report Logging Into EDS Log in with the user id and password provided through the EDS registration process and click on the Login button. If you have not
SALTO E&T website User manual
 SALTO E&T website User manual salto-et.net Second edition Last updated (01/02/2019) 1 / 34 Table of contents 1. Aims and objectives of the TCA Resource Centre... 4 2. Before use... 5 3. Structure of SALTO
Expedient User Manual Getting Started
 Volume 1 Expedient User Manual Getting Started Gavin Millman & Associates Pty Ltd 281 Buckley Street Essendon VIC 3040 Phone 03 9331 3944 Web www.expedientsoftware.com.au Table of Contents Logging In...
Welcome to the new Nebraska Transit Invoice System!
 Welcome to the new Nebraska Transit Invoice System! Welcome to the new Nebraska Transit Invoice System! These stepby-step instructions will show you how to set up a User Account and begin using the new
User Manual for Request for Proposal PMKVY
 User Manual for Request for Proposal PMKVY (Pradhan Mantri Kaushal Vikas Yojana) Powered by Hard Shell Technologies (P) Ltd. 1 Table of Contents 1. Home Page... 3 1.1. Dashboard... 3 2. Training Partner
Production Assistance for Cellular Therapies (PACT) PACT Application System User s Guide
 PACT Application System User s Guide") Production Assistance for Cellular Therapies (PACT) PACT Application System User s Guide Version 1.0 February 9, 2017 Version 1.0 TABLE OF CONTENTS 1.0 Getting Started... 1 1.1 Access to the Internet...
Production Assistance for Cellular Therapies (PACT) PACT Application System User s Guide Version 1.0 February 9, 2017 Version 1.0 TABLE OF CONTENTS 1.0 Getting Started... 1 1.1 Access to the Internet...
SUMMER CAMP. Provider Manual
 SUMMER CAMP Provider Manual Prepared By: Palm Beach County Information System Services December 2017 Provider Process Contents Provider Login... 2 Summer Camp Application... 5 Home Tab... 5 Checklist Tab...
Océ Engineering Exec. Advanced Import and Index
 Océ Engineering Exec Advanced Import and Index Océ-Technologies B.V. Copyright 2004, Océ-Technologies B.V. Venlo, The Netherlands All rights reserved. No part of this work may be reproduced, copied, adapted,
Applying for Funding in Fluxx. Quick Start Instructions
 Applying for Funding in Fluxx Quick Start Instructions GETTING STARTED The Hogg Foundation Fluxx Grant Portal is optimized for use with Chrome or Safari browsers and using another browser may cause technical
MITI- Ministry of International Trade and Industry MITI AP (Trader User Module)
") MITI- Ministry of International Trade and Industry MITI AP (Trader User Module) epermit MITI AP Vehicle User Guide for Trader User Module Prepared by Dagang Net Technologies Version 1.0 Updated: December
MITI- Ministry of International Trade and Industry MITI AP (Trader User Module) epermit MITI AP Vehicle User Guide for Trader User Module Prepared by Dagang Net Technologies Version 1.0 Updated: December
BeetleEye Application User Documentation
 BeetleEye Application User Documentation BeetleEye User Documentation 1 Table of Contents Welcome to the BeetleEye Application... 6 Overview... 6 Navigation... 6 Access BeetleEye... 6 Update account information...
Managing Applicants in PeopleSoft. Reference Guide
 Contents Introduction... 3 Navigating Manage Applicants in PeopleSoft... 3 Topic 1: Access Manage Applicants Menus... 3 Topic 2: Browse Job Openings... 4 Topic 3. Using Job Opening Categories (Optional)...
Local Authority User Guide. Back-Office System. Software for Data Analysis Limited Version: 1-1a/
 Online Free School Meals Back-Office System Software for Data Analysis Limited Version: 1-1a/2012-08-01 Contents Introduction 3 1. Signing into the OFSM Back-Office System 4 2. LA Menu Bar 4 3. Schools
Basic Navigation for Partners
 Food for Peace Management Information System Users Guide Basic Navigation for Partners Date: 09/18/2017 This publication was produced for review by the United States Agency for International Development.
UNIT ASSESSMENT SYSTEM DOCUMENTATION FACULTY
 UNIT ASSESSMENT SYSTEM DOCUMENTATION FACULTY November 2013 The purpose of UAS is to collect and measure assessment data for select courses. 1 Accessing the Unit Assessment System Application 2 Browser
Register. JAMWARE TV-Team Manager s instructions. STEP 1: Navigate to
 Register. STEP 1: Navigate to www.jamware.tv Please note: You must use the in page navigation controls. Using the browser back and forward controls will drop you out of the session. The first time you
Routing a BennyBuy Access Form Using DocuSign
 Routing a BennyBuy Access Form Using DocuSign Become a DocuSign sender If you have not already done so, review the overview, signing and sending videos on the Resources/Senders page of the OSU DocuSign
era(infoed) Electronic Submission Instructions and Tips: Initial Application
 Electronic Submission Instructions and Tips: Initial Application") era(infoed) Electronic Submission Instructions and Tips: Initial Application This instructional document introduces users to submitting NEW research protocols electronically through the era(infoed) system.
era(infoed) Electronic Submission Instructions and Tips: Initial Application This instructional document introduces users to submitting NEW research protocols electronically through the era(infoed) system.
Luxor CRM 2.0. Getting Started Guide
 Luxor CRM 2.0 Getting Started Guide This Guide is Copyright 2009 Luxor Corporation. All Rights Reserved. Luxor CRM 2.0 is a registered trademark of the Luxor Corporation. Microsoft Outlook and Microsoft
Hanger Shopping Site Users Guide
 Hanger Shopping Site Users Guide Hanger Shopping Site Users Guide...3 Home Page Tab...3 Announcements...3 Field Materials...3 Help...3 Ordering...5 Phase I: Shopping...6 Phase II: Checking Out...8 Shipping
INSIGHT SITE ADMINISTRATOR MANUAL
 INSIGHT SITE ADMINISTRATOR MANUAL Jeff Martin-Moreno MCLENNAN COMMUNITY COLLEGE Updated 11/11/2015 Creating a New Care Area Managing Users in a Care Area Editing or Deleting a Care Area Exporting Activity