Workspace. User Guide (Administrators) Issue 19 Date HUAWEI TECHNOLOGIES CO., LTD.
|
|
|
- Gervase Price
- 5 years ago
- Views:
Transcription

1 Issue 19 Date HUAWEI TECHNOLOGIES CO., LTD.
2 Copyright Huawei Technologies Co., Ltd All rights reserved. No part of this document may be reproduced or transmitted in any form or by any means without prior written consent of Huawei Technologies Co., Ltd. Trademarks and Permissions and other Huawei trademarks are trademarks of Huawei Technologies Co., Ltd. All other trademarks and trade names mentioned in this document are the property of their respective holders. Notice The purchased products, services and features are stipulated by the contract made between Huawei and the customer. All or part of the products, services and features described in this document may not be within the purchase scope or the usage scope. Unless otherwise specified in the contract, all statements, information, and recommendations in this document are provided "AS IS" without warranties, guarantees or representations of any kind, either express or implied. The information in this document is subject to change without notice. Every effort has been made in the preparation of this document to ensure accuracy of the contents, but all statements, information, and recommendations in this document do not constitute a warranty of any kind, express or implied. Huawei Technologies Co., Ltd. Address: Website: Huawei Industrial Base Bantian, Longgang Shenzhen People's Republic of China Issue 19 ( ) Copyright Huawei Technologies Co., Ltd. i
3 Contents Contents 1 Introduction Concepts Software Client Thin Client Mobile Terminal Infrastructure Server AD Management Server Desktop Regions and AZs Project Application Scenarios Service Process and Function Overview Accessing and Using How to Access Related Services User Permissions Getting Started Logging In to the Management Console Applying for the Service Purchasing Desktops Logging In to a Desktop Using an SC Logging In to a Desktop Using an SC (Using a Proxy for Internet Access) Logging In to a Desktop Using a Browser Logging In to a Desktop Using a TC Logging In to a Desktop Using a Mobile Terminal (Android) Logging In to a Desktop Using a Mobile Terminal (ios) Operation Guide (Administrators) Overview Managing Desktops Managing Desktop Pools Managing Users...33 Issue 19 ( ) Copyright Huawei Technologies Co., Ltd. ii
4 Contents 3.5 Managing User Group Viewing User Login Records Managing Policies Managing Policy Group Restoring Infrastructure Server Data Changing the Service Subnet Changing the Internet Access Port Configuring Two-Factor Authentication Changing the Password of a Domain Administrator Monitoring Monitoring Metrics Setting Alarm Rules Viewing Monitoring Metrics Recording Operations Key Operations Recorded by CTS CTS Traces Canceling Managing Private Images Creating Private Images Introduction Solution Overview Procedure Creating Private Images Creating ECSs Configuring ECS OSs Creating Private Images Updating Private Images Image Update Overview Image Update Solution Image Update Process Updating Private Images Creating Desktops Using Private Images Introduction Creating Desktops Operation Guide (End Users) Introduction to Introduction to Terminals Risky Operations Failure When Connecting to Desktops Dual-Screen Display Configuration HDPDeviceHelper Peripheral Assistant FAQs (Administrators) Issue 19 ( ) Copyright Huawei Technologies Co., Ltd. iii
5 Contents 5.1 What Is? What Are the Features and Advantages of? What Is the Process of Using? What Are Packages? How Is Charged? Do I Need to Purchase TCs? How Do End Users Access the Internet? How Do I Install Applications on the Desktop? What Resources Do I Need to Prepare Before Applying for? What Should I Do If I Fail to Apply for? How Is Connected to Enterprise Intranets? How Do I Interconnect with Microsoft AD? What Should I Do If I Fail to Apply for by Interconnecting with Microsoft AD? How Do I Check the Network Status of Desktops? What Are the Network Requirements for Accessing the Desktop? FAQs (End Users) What Devices Can Be Used to Log In to? What Are the Precautions for Using? What OSs Can Run on? Can I Upgrade OSs by Myself? How Do I Install Applications on the Desktop? What Software Is Compatible with? How Does Manage Peripherals? Does Support Personalized Settings? Can Data in Be Saved for a Long Time? How Do I Use a Local Printer for Printing? How Do I Use a Network Printer for Printing? What Should I Do If I Cannot Connect to the Desktop? How Do I Log In to the Desktop for Maintenance Using VNC? What Should I Do If the Desktop Freezes When Using? How Do I Check the Network Status of Desktops? How Do I Change the Login Password? How Do I Change the Login Password (Mobile Client)? What Should I Do If I Forget the Password? What Should I Do If the Account Is Locked? Does Support Dual-Screen Display? What Should I Do If I Fail to Log In to the GPU Desktop Using an SC? How Do I Partition a Hard Disk Larger than 2 TB? A Change History Issue 19 ( ) Copyright Huawei Technologies Co., Ltd. iv
6 1 Introduction 1 Introduction 1.1 Concepts Concept is a cloud computing-based desktop service that outperforms personal computers (PCs) and the conventional Virtual Desktop Infrastructure (VDI) solution. provides the same configurations (including vcpus, GPUs, memory, and disks) as those of PCs and Windows OSs. Its familiarity ensures that you can use like using your own PCs. Different from the conventional local VDI solution, does not require high investment or a long deployment period. can automatically handle heavy deployment tasks and provide hosting services. supports access from multiple devices, including computers running Windows and Mac OSs, as well as ipads, iphones, and Android smart devices (For details, see Software Client, Thin Client, and Mobile Terminal). With, you can save and obtain files, and use applications anytime and anywhere, implementing mobile office. Procedure After you apply for, a secure and exclusive infrastructure server (For details, see AD Management Server) will be deployed and a dedicated elastic IP address used for accessing will be allocated to you. You can create an active directory (AD) domain (For details, see Infrastructure Server) on the cloud or use your local Microsoft AD domain when you apply for the service. With, you can effortlessly create and configure desktops (For details, see Desktop). provides packages of multiple types so that you can create desktops based on your requirements. After you apply for the service and desktops are successfully created, the system will notify the end users by . Principle Figure 1-1 illustrates basic principles of. Issue 19 ( ) Copyright Huawei Technologies Co., Ltd. 1
 is a PC-standard-compliant computer that uses an embedded processor and small-sized flash memory and runs a simplified OS. It is used to access.")
7 1 Introduction Figure 1-1 Basic principles of Software Client Thin Client Mobile Terminal A software client (SC) runs on local PCs running Windows or Mac OSs and is used for logging in to and using. A thin client (TC) is a PC-standard-compliant computer that uses an embedded processor and small-sized flash memory and runs a simplified OS. It is used to access. The TC sends whatever entered by the mouse and keyboard to the backend server for processing and then the backend server returns the processing result to the display connecting to the TC. TCs of various models provide different performance, peripheral ports, and operation portals. The variety of TCs meets the requirements of different scenarios, such as common office, high security, and high-performance graphics design. A mobile terminal is a mobile device used for logging in to and using, including ipads, iphones, and Android smart devices Infrastructure Server An infrastructure server is automatically created when you apply for and runs components such as desktop management. Two infrastructure servers occupy two quotas, including two instances, eight cores, and 32 GB memory AD Management Server The active directory (AD) management server, an infrastructure component where the AD service is deployed, provides directory service functions for centralized organization management and network resource access. You can create an AD domain on the cloud or use your local Microsoft AD domain when you apply for the service. Issue 19 ( ) Copyright Huawei Technologies Co., Ltd. 2
8 1 Introduction Desktop Regions and AZs Project A desktop is a virtual computer system where desktop agent software is installed and that can interact with desktop management components. deposits all desktops in the data center for unified management. End users can access the desktop by using SCs, browsers, TCs, or mobile terminals to obtain complete PClike user experience. A region is a geographic area where is located. services in the same region can communicate with each other over an intranet, but those in different regions cannot. HUAWEI CLOUD data centers are deployed worldwide in places such as North America, Europe, and Asia. is therefore available in different regions. For example, applications can be designed to meet user requirements in specific regions or comply with local laws or regulations. Each region contains many availability zones (AZs) where power and networks are physically isolated. AZs in the same region can communicate with each other over an intranet. Each AZ provides cost-effective and low-latency network connections that are unaffected by faults that may occur in other AZs. Using deployed in an independent AZ protects your applications against failures in a single place. Projects are used to group and isolate OpenStack resources (computing resources, storage resources, and network resources). A project can be a department or a project team. Multiple projects can be created for one account. 1.2 Application Scenarios Use of conventional PC desktops or the local VDI solution requires high investment and features difficult and complicated deployment and management. For, neither early investment nor continuous infrastructure management is required. You can apply for a complete set of cloud desktop computing services, such as computation and persistent storage, with certain fees, providing secure desktop experience with various access options for your users in simple and cost-effective ways. can be applied to mainstream industries including government and public utilities, telecommunications, energy, finance, transportation, medical care, education, broadcasting, media, and manufacturing. It is applicable to diversified scenarios, such as common office, security office, branch office, and public terminal (call center, business hall, and training classroom). Mobile office scenario Users can log in remotely to anytime and anywhere. is applicable for employees who are on business trips frequently and need to work in many locations. Short-term use scenario Issue 19 ( ) Copyright Huawei Technologies Co., Ltd. 3
9 1 Introduction and necessary application system services can be configured for short-term employees of enterprises. After the short-term employees leave, their services can be stopped. Security office automation (OA) scenario can provide enterprises with office solutions that comply with the enterprises' security standards. Permission to access physical devices can be controlled and data is not locally stored, thereby improving the security of enterprise data. Branch office scenario is applicable for employees who work in branches and external employees. They can log in to to access applications on the headquarters network. Data is not locally stored. High-definition (HD) graphics processing scenario provides 2D and 3D graphics processing capabilities for end users and supports multiple high-performance graphics software such as Computer Aided Design (CAD) and Geographic Information System (GIS), 3D game software, and omnimedia video editing software. can meet the high-performance graphics processing requirements of customers from multiple industries (including engineering, manufacturing, oil, automobile, medical care, game, and media). 1.3 Service Process and Function Overview provides two different operation pages for administrators and end users respectively. Administrators apply for the service, purchase desktops, manage desktops and users on the management console. End users log in to and use desktops on the web page. Figure 1-2 shows the processes for applying and purchasing a desktop. Figure 1-2 Operation process for administrators Figure 1-3 shows the process for logging in to and using a desktop. Issue 19 ( ) Copyright Huawei Technologies Co., Ltd. 4

10 1 Introduction Figure 1-3 Operation process for end users Table 1-1 describes the functions provided by. Table 1-1 Function list Role Function Description Administrator End user Self-service service application Self-service desktop creation User login record query LiteAD authentication Customer AD diversification Policy management End user notification Windows 7 desktop experience Windows 10 desktop experience The administrator can apply for the service online in self-service mode. The administrator can create desktops online in self-service mode. User login information can be recorded, including login time and device types. The Linux-based AD can be used to implement username and password authentication. Existing Microsoft ADs of enterprises can be interconnected. The administrator can configure policies to manage devices such as printers and USB devices. The administrator can send notification s to new users who obtain desktops. The Windows 7 desktop experience based on the Windows Server 2008 R2 64-bit OS is provided. The Windows 10 desktop experience based on the Windows Server 2016 OS is provided. Issue 19 ( ) Copyright Huawei Technologies Co., Ltd. 5

11 1 Introduction Role Function Description Multi-device access End users can access desktops by using PCs running Windows or Mac OSs and Android or ios mobile phones or tablets. 1.4 Accessing and Using How to Access HUAWEI CLOUD provides a web-based service management platform. Users can access by using a management console. For details about how to log in to the management console, see Logging In to the Management Console. You need to enable ports listed in Table 1-2 on the enterprise firewall so that end users can log in to the desktops properly. Table 1-2 Internet access ports Port Protocol Description 443 TCP Used by the end user to access the web login page TCP Used by the end user to access the desktop. NOTE By default, port 443 and port 8443 are used. If you want to change the ports, see Changing the Internet Access Port. Figure 1-4 shows how an end user accesses through a specified port. Figure 1-4 Accessing Related Services ECS Elastic Cloud Server (ECS) is a computing server that consists of CPUs, memory, images, and Elastic Volume Service (EVS) disks, and supports on-demand allocation and elastic scaling. The service invokes ECS interfaces to create desktops. Issue 19 ( ) Copyright Huawei Technologies Co., Ltd. 6
12 1 Introduction IMS Image Management Service (IMS) provides a simple and convenient self-service management function. In, desktops are created based on IMS. ELB Elastic Load Balance (ELB) is a service that automatically distributes access traffic to multiple ECSs to balance their service loads. It enables you to achieve greater levels of fault tolerance in your applications and expand application service capabilities. ELB is the access entry of from the Internet. VPC Virtual Private Cloud (VPC) provides virtual networks similar to conventional networks and advanced network services, such as elastic IP addresses, security groups, and virtual private networks (VPNs). The VPC service implements network isolation in logical mode and provides secure and isolated network environments for. DirectConnect Direct Connect (DirectConnect) is a service that allows you to establish a dedicated network connection from your data center to the cloud platform. With DirectConnect, potential network delays when is used are reduced, which provides a highperformance system to satisfy user experience. IAM Identity and Access Management (IAM) is a Web service. The administrator can apply this service to manage users and user rights. Only after an account is created through IAM can the administrator use related resources of. NAT gateway The NAT gateway provides the Network Address Translation (NAT) service for desktops in a VPC so that multiple desktops can share an EIP to access the Internet. Tag Management Service (TMS) Tag Management Service (TMS) is a visualized service for fast, unified tag management that enables you to control your resource permissions and billing across regions and services. Tags identify desktops so that the desktops can be categorized easily and searched quickly. CTS Cloud Trace Service (CTS) generates traces to enable you to get a history of operations performed on cloud service resources. The content of a trace includes operation requests sent using the management console or open APIs as well as the operation results. You can view all generated traces to query, audit, and backtrack performed operations. Cloud Eye User Permissions Cloud Eye is an open monitoring platform that helps you monitor the statuses of infrastructure servers in real time. Cloud Eye supports multiple alarm modes to ensure timely pre-warning and normal service running. HUAWEI CLOUD provides two types of user permissions by default: user management and resource management. User management refers to the management of users, user groups, and user group rights. Issue 19 ( ) Copyright Huawei Technologies Co., Ltd. 7
13 1 Introduction Resource management refers to the control operations that can be performed by users on cloud service resources. For further details, see Permission Description. Issue 19 ( ) Copyright Huawei Technologies Co., Ltd. 8
14 2 Getting Started 2 Getting Started 2.1 Logging In to the Management Console Scenario Procedure Log in to the management console. Step 1 Use the administrator account to log in to HUAWEI CLOUD. Step 2 Click in the upper-left corner of the management console and select Region and Project. Step 3 On the console home, locate Enterprise Application and select. The management console is displayed. ----End 2.2 Applying for the Service Scenario Prerequisites Apply for the service. After you apply for, a secure and exclusive infrastructure will be deployed and a dedicated elastic IP address used for accessing will be allocated to you. The AD is a necessary component used for managing users and desktops. You can create an AD on the cloud or use an existing AD. After you apply for the service, you can purchase desktops. When applying for, if the existing enterprise AD domain is used, refer to How Do I Interconnect with Microsoft AD? to enable related ports on the AD server and prepare the following data: Issue 19 ( ) Copyright Huawei Technologies Co., Ltd. 9
15 2 Getting Started Domain name Domain administrator's account and password Active domain controller IP address (Optional) Standby domain controller IP address Active DNS server IP address (Optional) Standby DNS server IP address Procedure Step 1 Step 2 Step 3 Log in to the management console. On the Dashboard page, click Click here to complete real-name authentication and complete real-name authentication as prompted. On the Dashboard page, click Apply for. The Apply for page is displayed. Step 4 Select an AZ based on actual conditions. NOTE An AZ is a physical region where resources use independent power supplies and networks. AZs are physically isolated but interconnected through an internal network, improving HA of applications. Step 5 Click View VPC to create a VPC and a subnet. For details about how to create a VPC, see the Virtual Private Cloud User Guide. NOTE You are advised to use 16-bit subnet gateways during VPC creation. After you apply for the service, do not modify the VPC configuration. Step 6 Click to refresh the drop-down list. Step 7 Configure the VPC. Select the VPC and Service Subnet created in Step 5 and enter Management Subnet. NOTE You can select multiple subnets to support more desktops. Use the subnet that is created in Step 5 and dedicated to. Do not use the subnet dedicated to other services. The service subnet is used by desktops to access applications and resources on ECSs or enterprises internets. The management subnet is used for internal communication among desktops. Step 8 Configure the AD domain. Check whether your enterprise has an AD domain. If yes, go to Step 10. If no, go to Step 9. Step 9 Create an AD domain. Issue 19 ( ) Copyright Huawei Technologies Co., Ltd. 10
16 2 Getting Started Set the Domain Name, Domain Administrator Account, Domain Administrator Password, and Confirm Password parameters of the new AD domain. After an AD domain is created, go to Step 11. NOTE To ensure system security, you need to change the password periodically. You are advised to change the password every three months. Step 10 Connect to the existing domain. Set the Domain, Domain Administrator Account, Domain Administrator Password, Primary domain controller IP address, Backup domain controller IP address (optional), Active DNS IP address, and Standby DNS IP address (optional) parameters of the existing domain. NOTE When you use an existing AD domain, ensure that the related ports of the firewall are enabled. For details, see How Do I Interconnect with Microsoft AD?. Step 11 Specify the network access mode. By default, Internet access is selected. You can select multiple options. If the network quality does not meet requirements, you can select DirectConnect access. For details about the network quality requirements, see What Are the Network Requirements for Accessing the Desktop?. If GPU desktops are required, you must select DirectConnect access. NOTE The DirectConnect access mode provides the load balancing capability. Therefore, enterprises do not need to deploy third-party load balancers before access addresses. Step 12 Step 13 Step 14 Read the Huawei Service Agreement. Select I have read and agree to the Huawei Service Agreement. Click Apply Now. The service application is complete. NOTE ----End The application process takes about 40 minutes. The system creates ManagerSecurityGroup and UserSecurityGroup security groups in the VPC during the application. ManagerSecurityGroup is used for management components, and UserSecurityGroup is used for user desktops. By default, only virtual desktops in the UserSecurityGroup security group can access each other. If you want to access a virtual desktop in the security group from an external desktop, choose VPC > Security Groups to modify the configurations. 2.3 Purchasing Desktops Scenario Select and purchase related packages and assign desktops to end users after applying for the service. After the administrator creates desktops, end users will be informed by that desktops are provisioned. Issue 19 ( ) Copyright Huawei Technologies Co., Ltd. 11
17 2 Getting Started Procedure Yearly/Monthly Step 1 Step 2 Log in to the management console. On the Overview or Desktop page, click Create Desktop. The Create Desktop page is displayed. Step 3 Step 4 Select Charging Mode to Yearly/Monthly. Select an AZ based on actual conditions. An availability zone (AZ) is a physical region where resources use independent power supplies and networks. AZs are physically isolated but interconnected through an internal network. If you create a desktop for the first time, you are advised to use the default value, that is, the optimal AZ recommended by the system. If you do not create a desktop for the first time, you are advised to create desktops in different AZs to improve application availability. Step 5 Step 6 Select the proper Specifications based on site requirements. Select the proper Image Type and OS based on site requirements. NOTE For details about the creation and maintenance of private images, see the Managing Private Images. The current version supports only private images with a 80 GB system disk. If the private images of the GPU type are required, select the GPU desktop package in Step 5. Step 7 Step 8 Check whether the user's existing AD domain is used in. If yes, go to Step 8. If no, go to Step 9. Set the OUs. Enter a maximum of 5 levels and separate levels from each other using a slash (/). Only letters, digits, spaces (not before or after a slash), and special characters including are allowed, for example, ab/cd/ef. Step 9 Step 10 Select a Service Subnet based on actual conditions. Add a tag based on actual conditions. For more information about tags, see the Tag Management Service User Guide. NOTE You can add a maximum of 10 tags to a desktop. Issue 19 ( ) Copyright Huawei Technologies Co., Ltd. 12
18 2 Getting Started Table 2-1 Tag key and value requirements Parameter Key Value Requirement Cannot be left blank. Can contain a maximum of 36 characters. Can contain only the following character types: Uppercase letters Lowercase letters Numerals Special characters: hyphens (-) and underscores (_) Unicode characters The keys of a desktop must be different. Cannot be left blank. Can contain a maximum of 43 characters. Can contain only the following character types: Uppercase letters Lowercase letters Numerals Special characters: periods (.), hyphens (-), and underscores (_) Unicode characters Step 11 Assign desktops. You can manually add or batch import users. In a scenario where the existing AD domain is used, you need to create users on the AD server before assigning desktops. Manual input Set Username used for logging in to and used for receiving the notification . Select a user group from the drop-down list of User Group. You can grant different levels of access permission to users based on site requirements. The following describes the user group permission: Administrators: Administrator group. Administrators have complete access to the desktop and can make any desired changes except for forbidden operations. Users: Standard user group. Users in this group can use most software and change system settings that do not affect other users. NOTE You can click Add Desktop to add other desktops as required. A maximum of 10 desktops can be added each time. Each desktop belongs to one user only. Batch import. A maximum of 50 desktops can be added each time. Click Download Template. In the Excel template, enter values for columns A (Username), B ( ), and C (User Group) respectively. Save the settings and close the Excel template. Issue 19 ( ) Copyright Huawei Technologies Co., Ltd. 13
19 2 Getting Started Upload the file. Step 12 Send notification s. By default, the system automatically sends notification s to users after desktops are subscribed. In a scenario where the existing AD domain is used, you can select or deselect Send Notification based on site requirements. Step 13 Step 14 Drag the slider to set Validity Period. Click Buy Now. The Confirm Order page is displayed. Step 15 Step 16 Step 17 Step 18 Check whether the values of Order Details and Price are correct. Read the Huawei Service Agreement. Select I have read and agree to the Huawei Service Agreement. Click Submit. The Pay page is displayed. Step 19 Step 20 You can pay for your order by using the following methods: Account balance payment Platform payment Online bank payment Transfer and remittance payment After you select a payment method and pay for your order, the service is purchased successfully. ----End Metered Step 1 Step 2 Log in to the management console. On the Overview or Desktop page, click Create Desktop. The Create Desktop page is displayed. Step 3 Step 4 Select Charging Mode to Metered. Select an AZ based on actual conditions. An availability zone (AZ) is a physical region where resources use independent power supplies and networks. AZs are physically isolated but interconnected through an internal network. If you create a desktop for the first time, you are advised to use the default value, that is, the optimal AZ recommended by the system. If you do not create a desktop for the first time, you are advised to create desktops in different AZs to improve application availability. Step 5 Step 6 Select the proper Specifications based on site requirements. Select the proper Image Type and OS based on site requirements. Issue 19 ( ) Copyright Huawei Technologies Co., Ltd. 14
20 2 Getting Started NOTE For details about the creation and maintenance of private images, see the Managing Private Images. If the private images of the GPU type are required, select the GPU desktop package in Step 5. Step 7 Configure disks based on the actual requirements. Table 2-2 provides disk configuration details. Table 2-2 Disk configuration Category Description Disk Type Configuration Range (GB) System Disk Mandatory. Only one system disk can be configured based on the actual requirements. Common I/O: type of disks that use SATA storage. Ultra-high I/O: type of disks that use SSD storage. 80 to 32,768 Data Disk Optional. A maximum of 10 data disks can be configured based on the actual requirements. Common I/O: type of disks that use SATA storage. Ultra-high I/O: type of disks that use SSD storage. 100 to 32,768 Step 8 Step 9 Check whether the user's existing AD domain is used in. If yes, go to Step 9. If no, go to Step 10. Set the OUs. Enter a maximum of 5 levels and separate levels from each other using a slash (/). Only letters, digits, spaces (not before or after a slash), and special characters including are allowed, for example, ab/cd/ef. Step 10 Step 11 Select a Service Subnet based on actual conditions. Add a tag based on actual conditions. For more information about tags, see the Tag Management Service User Guide. NOTE You can add a maximum of 10 tags to a desktop. Issue 19 ( ) Copyright Huawei Technologies Co., Ltd. 15
21 2 Getting Started Table 2-3 Tag key and value requirements Parameter Key Value Requirement Cannot be left blank. Can contain a maximum of 36 characters. Can contain only the following character types: Uppercase letters Lowercase letters Numerals Special characters: hyphens (-) and underscores (_) Unicode characters The keys of a desktop must be different. Cannot be left blank. Can contain a maximum of 43 characters. Can contain only the following character types: Uppercase letters Lowercase letters Numerals Special characters: periods (.), hyphens (-), and underscores (_) Unicode characters Step 12 Assign desktops. You can manually add or batch import users. In a scenario where the existing AD domain is used, you need to create users on the AD server before assigning desktops. Manual input Set Username used for logging in to and used for receiving the notification . Select a user group from the drop-down list of User Group. You can grant different levels of access permission to users based on site requirements. The following describes the user group permission: Administrators: Administrator group. Administrators have complete access to the desktop and can make any desired changes except for forbidden operations. Users: Standard user group. Users in this group can use most software and change system settings that do not affect other users. NOTE You can click Add Desktop to add other desktops as required. A maximum of 10 desktops can be added each time. Each desktop belongs to one user only. Batch import. A maximum of 50 desktops can be added each time. Click Download Template. In the Excel template, enter values for columns A (Username), B ( ), and C (User Group) respectively. Save the settings and close the Excel template. Issue 19 ( ) Copyright Huawei Technologies Co., Ltd. 16
22 2 Getting Started Upload the file. Step 13 Send notification s. By default, the system automatically sends notification s to users after desktops are created. In a scenario where the existing AD domain is used, you can select or deselect Send Notification based on site requirements. Step 14 Click Create Desktop. The Confirm Specifications page is displayed. Step 15 Step 16 Check whether the value of Resource Details is correct. Click Submit. Desktops are created successfully. ----End 2.4 Logging In to a Desktop Using an SC Scenario Download, install, and configure an SC, and then log in to from the login address in the notification using the SC. Prerequisites NOTE When you access the Internet using a proxy, log in to your desktop by following the instructions in Logging In to a Desktop Using an SC (Using a Proxy for Internet Access). The procedure for logging into desktops in this section takes the Windows PC as an example. Operations for logging in to the SC on PCs running other operating systems are slightly different. Required software has been downloaded and installed. For details, see Table 2-4. Table 2-4 Software packages Software Package AccessClient.msi Description Applies to Windows PC How to Obtain AccessClient.msi Issue 19 ( ) Copyright Huawei Technologies Co., Ltd. 17
23 2 Getting Started Software Package AccessClient_x8 6lnx.run AccessClient_x6 4lnx.run Client_for_mac_ v1.6.xxxxx.dmg Description Applies to Linux PCs running the following operating systems: Red Hat bit Ubuntu bit Applies to Linux PCs running the following operating systems: Red Hat bit Ubuntu bit Applies to Mac PC How to Obtain AccessClient_x86lnx.run AccessClient_x64lnx.run Client_for_mac_v1.6.xxxxx.dmg Procedure Step 1 Step 2 After the cloud client software is installed, double-click the CloudClient icon on the desktop to start the SC. In the Address Manager window, click Add. In the Edit Server Info window that is displayed, set Server Name to a customized name and set Server Address to the address obtained from the notification . NOTE The Edit Server Info window is displayed automatically upon your first login to the desktop. Step 3 Click Ok to save the configuration information, as shown in Figure 2-1. Issue 19 ( ) Copyright Huawei Technologies Co., Ltd. 18
24 2 Getting Started Figure 2-1 Edit server info Step 4 Step 5 Click Launch to go to the desktop login page. On the desktop login page, enter your domain account and password, and click Login to go to the desktop list page. Step 6 On the desktop list page, click to log in to the desktop, as shown in Figure 2-2. Figure 2-2 Desktop list ----End 2.5 Logging In to a Desktop Using an SC (Using a Proxy for Internet Access) Scenario Log in to a desktop using an SC when a proxy is used for Internet access. NOTE The procedure for logging into desktops in this section takes the Windows PC as an example. Operations for logging in to the SC on PCs running other operating systems are slightly different. Issue 19 ( ) Copyright Huawei Technologies Co., Ltd. 19
25 2 Getting Started Prerequisites Required software has been downloaded and installed. For details, see Table 2-5. Table 2-5 Software packages Software Package AccessClient.msi AccessClient_x86 lnx.run AccessClient_x64 lnx.run Client_for_mac_v 1.6.xxxxx.dmg Description Applies to Windows PC Applies to Linux PCs running the following operating systems: Red Hat bit Ubuntu bit Applies to Linux PCs running the following operating systems: Red Hat bit Ubuntu bit Applies to Mac PC How to Obtain AccessClient.msi AccessClient_x86lnx.run AccessClient_x64lnx.run Client_for_mac_v1.6.xxxxx.dmg Procedure Step 1 Step 2 After the cloud client software is installed, double-click the CloudClient icon on the desktop to start the SC. In the Address Manager window, click Add. The Edit Server Info window is displayed. Issue 19 ( ) Copyright Huawei Technologies Co., Ltd. 20


26 2 Getting Started Figure 2-3 Editing server information Step 3 Step 4 Step 5 Set Server Name to a customized name and set Server Address to the address obtained from the notification . Click Ok. On the Address Manager page, select the newly added server address and click Launch. The window for logging in to the desktop is displayed. Step 6 Tap in the upper-right corner. The Settings dialog box is displayed. Step 7 On the Network tab page, select Enable HTTP Proxy. Figure 2-4 Enabling HTTP proxy Issue 19 ( ) Copyright Huawei Technologies Co., Ltd. 21

27 2 Getting Started Step 8 Step 9 Step 10 Step 11 Click Yes. Enter the value for Host, Port, User Name, and Password of the proxy server obtained from the administrator. Click Ok. On the desktop login page, enter your domain account and password, and click Login to go to the desktop list page. Step 12 On the desktop list page, click to log in to the desktop, as shown in Figure 2-5. Figure 2-5 Desktop list ----End 2.6 Logging In to a Desktop Using a Browser Scenario Log in to a desktop using a browser. Use Internet Explorer 8, Internet Explorer 9, Internet Explorer 10, Internet Explorer 11, and Mozilla Firefox 14 or later to log in to desktops. NOTE When you use a proxy for Internet access, you cannot log in to your desktop using a browser. Instead, you can log in to your desktop following the instructions in Logging In to a Desktop Using an SC (Using a Proxy for Internet Access). Procedure NOTE A Windows PC is used as an example in the following steps. The specific operation steps may be different on different OSs. Step 1 Open the browser, enter the desktop login address obtained from the notification in the address box, and press Enter. The window for logging in to the desktop is displayed. Issue 19 ( ) Copyright Huawei Technologies Co., Ltd. 22


28 2 Getting Started If a dialog box indicating a plug-in running request is displayed in the browser, enable the plug-in to avoid any effect on proper login and use. Step 2 Enter your domain account and password, and click Login, as shown in the following figure. Step 3 Download the client plug-in upon the first login, as shown in the following figure. Step 4 On the desktop list page, click to log in to the desktop, as shown in the following figure. Issue 19 ( ) Copyright Huawei Technologies Co., Ltd. 23
29 2 Getting Started ----End 2.7 Logging In to a Desktop Using a TC Scenario Procedure Log in to a desktop using a TC. Step 1 Step 2 Step 3 Step 4 Connect all cables and power on the TC. Click Start, and choose Control Center. In Control Center, select Cloud Client. Click Add. In the Edit Server Info window that is displayed, set Server Name to a customized name and set Server Address to the address obtained from the notification . Step 5 Step 6 Step 7 Click Ok to save the configuration information. Click Launch to go to the desktop login page. On the desktop login page, enter your domain account and password, and click Login to go to the desktop list page. Issue 19 ( ) Copyright Huawei Technologies Co., Ltd. 24
 Scenario Procedure FusionAccess is an application installed on a mobile terminal and used for accessing and using desktops.")
30 2 Getting Started Step 8 On the desktop list page, click to log in to the desktop. ----End 2.8 Logging In to a Desktop Using a Mobile Terminal (Android) Scenario Procedure FusionAccess is an application installed on a mobile terminal and used for accessing and using desktops. If you need to use desktops to work at home or during your trips, you can download FusionAccess to your Android device and use it to access and use desktops. Step 1 Step 2 Step 3 Step 4 Step 5 Step 6 Step 7 Open the application store on your Android mobile terminal. Search for FusionAccess. Download and install the FusionAccess desktop client software. After the FusionAccess software is installed, open the software on your Android mobile terminal. Tap Add Account. On the Add page that is displayed, set Label to customized description, set Address and User Name to the address and username obtained from the notification , and set Password to the new password. Tap save in the upper-right corner to save the configuration. Issue 19 ( ) Copyright Huawei Technologies Co., Ltd. 25

31 2 Getting Started Step 8 On the home page of the FusionAccess software, tap the Label you set to log in to the desktop. The following figure shows the functions of the shortcut menus on the desktop. Issue 19 ( ) Copyright Huawei Technologies Co., Ltd. 26
32 2 Getting Started ----End 2.9 Logging In to a Desktop Using a Mobile Terminal (ios) Scenario Procedure FusionAccess is an application installed on a mobile terminal and used for accessing and using desktops. If you need to use desktops to work at home or during your trips, you can download FusionAccess to your ios devices and use it to access and use desktops. Step 1 Step 2 Step 3 Step 4 Step 5 Open App Store on your ios mobile terminal. Search for FusionAccess. Download and install the FusionAccess desktop client software. After the FusionAccess software is installed, open the software on your ios mobile terminal. Tap New Account. Step 6 Tap in the upper-right corner. Issue 19 ( ) Copyright Huawei Technologies Co., Ltd. 27

33 2 Getting Started The New Account page is displayed. Step 7 Step 8 Set Description to customized description, set Address and User Name to the address and username obtained from the notification , and set Password to the new password. Tap Save in the upper-right corner to save the configuration. Step 9 On the home page of the FusionAccess software, tap the desktop description you set to log in to the desktop. The following figure shows the functions of the shortcut menus on the desktop. Issue 19 ( ) Copyright Huawei Technologies Co., Ltd. 28
34 2 Getting Started ----End Issue 19 ( ) Copyright Huawei Technologies Co., Ltd. 29
35 3 Operation Guide (Administrators) 3 Operation Guide (Administrators) 3.1 Overview Configuration Information After applying for the service, view statistics information about, including the configuration information, desktop status, and number of online users on the Dashboard page. Step 1 Step 2 Log in to the management console. Click Dashboard. The Dashboard page is displayed. Step 3 In the Configuration Information area, view network configurations and AD domain configurations. Desktop Status ----End Step 1 Step 2 Log in to the management console. Click Dashboard. The Dashboard page is displayed. Step 3 In the Status area, displays the Login Status and Running Status of the desktop in pie charts. Table 3-1 describes the meaning of each status. Table 3-1 Desktop status Category Status Description Login Status In use Indicates that a user has successfully logged in to the desktop and is using the desktop. Issue 19 ( ) Copyright Huawei Technologies Co., Ltd. 30
36 3 Operation Guide (Administrators) Category Status Description Running Status Unregistered Ready Disconnected Running Stopped Faulty Indicates that the desktop is stopped or faulty. A desktop automatically registers with the infrastructure server after being started up. Indicates that the desktop has been registered with and connected to the infrastructure server and is waiting for the user to log in. Indicates that the desktop is disconnected from the terminal because the user closes the window of the terminal or the network connection between the terminal and the desktop is interrupted. Indicates that the desktop runs properly. Indicates that the desktop is stopped. Indicates that the desktop is faulty. You can restart the desktop or contact technical support engineers to rectify the fault. ----End Number of Online Users Step 1 Step 2 Step 3 Log in to the management console. Click Dashboard. The Dashboard page is displayed. In the Online Users area, view the number of online users by day, week, or month. ----End 3.2 Managing Desktops Scenario Procedure Start, stop, restart, or delete a desktop, add disks to a desktop, manage tags, or change desktop specifications. You can search for and view a desktop based on the tag added during desktop creation. Step 1 Step 2 Step 3 Log in to the management console. Click Desktop. The Desktop page is displayed. In the upper-right corner of the desktop list, select Assigned user, enter a keyword, and click. Issue 19 ( ) Copyright Huawei Technologies Co., Ltd. 31
37 3 Operation Guide (Administrators) Step 4 Select a desktop, and click Start/Stop/Restart/Delete/Add Disk/Modify Specifications in the upper-left corner of the desktop list or in the Operation column. NOTE When performing the Stop Desktop operation, determine whether to select Forcibly stop based on site requirements. When performing the Restart Desktop operation, determine whether to select Forcibly restart based on site requirements. When performing the Delete Desktop operation, determine whether to select Delete the user based on site requirements. You can add disks (data disks) to the desktop whose status is Running and user group is Administrators only. Each desktop can have a maximum of 10 data disks. You can change specifications for desktops whose status is Stopped only and can only make them more advanced. Step 5 Click in the row that contains the desktop, click the Tag tab, and add tags to, delete tags from, or edit or view the tags of the desktop. NOTE You can add tags to, delete tags from, or edit the tags of the desktops whose Running Status is Running, Stopped, or Creating. View tags. You can view details of desktop tags, including the number of tags and the key and value of each tag. Add a tag. Click Add in the upper left corner. In the displayed dialog box, enter the key and value of the tag to be added, and click OK. Edit a tag. Locate the row containing the tag to be edited and click Edit in the Operation column. In the Edit Tag dialog box, change the value of the tag and click OK. Delete a tag. Locate the row containing the tag to be deleted and click Delete in the Operation column. In the Delete Tag dialog box, click OK. Step 6 Confirm the displayed information. ----End 3.3 Managing Desktop Pools Scenario Procedure Create, edit, or delete a desktop pool, or view the number of desktops in a created desktop pool. Creating a desktop pool Step 1 Log in to the management console. Issue 19 ( ) Copyright Huawei Technologies Co., Ltd. 32
38 3 Operation Guide (Administrators) Step 2 Click Desktop Pool Management. The Desktop Pool Management page is displayed. Step 3 Click Create Desktop Pool. The Create Desktop Pool dialog box is displayed. Step 4 Step 5 Step 6 Input Desktop Pool Name. Click Display Advanced Options, and set Peak time (weekdays), Peak time (hours), Prestarted in peak time, Prestarted in off-peak time, or Automatic restoration after shutdown as required. Click OK. ----End Editing a desktop group Step 1 Step 2 Log in to the management console. Click Desktop Pool Management. The Desktop Pool Management page is displayed. Step 3 Locate the row that contains the desktop pool you want to edit and click Edit. The Modify Desktop Pool dialog box is displayed. Step 4 Step 5 Click Display Advanced Options, and modify Desktop Pool Name, Peak time (weekdays), or Peak time (hours) as required. Click OK. ----End Deleting a desktop group Step 1 Step 2 Log in to the management console. Click Desktop Pool Management. The Desktop Pool Management page is displayed. Step 3 Locate the row that contains the desktop pool you want to delete and click Delete. The Delete dialog box is displayed. Step 4 Click OK. ----End 3.4 Managing Users Scenario View the number of desktops owned by a user, change the address, export data, reset the password, unlock the account, send the notification or delete the account for a created user. Issue 19 ( ) Copyright Huawei Technologies Co., Ltd. 33
39 3 Operation Guide (Administrators) NOTE If the enterprise uses an existing AD domain, the password reset and account unlocking functions are not supported. Procedure Changing an address You can change an address if the address provided by a user is incorrect or cannot receive s. Step 1 Step 2 Log in to the management console. Click User. The User Management page is displayed. Step 3 In the row that contains the user whose address you want to change and click Modify. The Modify User Information dialog box is displayed. Step 4 Step 5 In the Address text box, enter the new address. Click OK. The user receives an address change notification. ----End Exporting data You can batch export user data, including the username, address, and the number of desktops. Step 1 Step 2 Log in to the management console. Click User. The User Management page is displayed. Step 3 Click Export Account. The system exports user information to a local computer. ----End Resetting a password You can reset the password of a user when the user loses or forgets the login password. Password resetting is risky. After being reset, the original password cannot be used. Confirm that the operation is necessary. Step 1 Step 2 Log in to the management console. Click User. The User Management page is displayed. Issue 19 ( ) Copyright Huawei Technologies Co., Ltd. 34
40 3 Operation Guide (Administrators) Step 3 In the row that contains the user whose password needs to be reset, click More > Reset Password. The dialog box for password resetting is displayed. Step 4 Click OK. The password resetting link will be sent to the user's address automatically by the system. The validity period of the password resetting link in the is 24 hours. Reset the password in a timely manner. ----End Unlocking an account You can unlock the account for a user when the user's account is locked because the user enters an incorrect password consecutively. Step 1 Step 2 Log in to the management console. Click User. The User Management page is displayed. Step 3 In the row that contains the user whose account needs to be unlocked, click More > Unlock. The dialog box for account unlocking is displayed. Step 4 Click OK. ----End Sending a notification You can send a notification when the user already has a desktop and the for notifying the user of the desktop creation needs to be sent again. Step 1 Step 2 Log in to the management console. Click User. The User Management page is displayed. Step 3 In the row that contains the user to whom the notification needs to be sent, click More > Resend Notification . The dialog box for sending the is displayed. Step 4 Click OK. ----End Deleting an account You can delete a specific account as required. You cannot delete a user if the user has desktops. Issue 19 ( ) Copyright Huawei Technologies Co., Ltd. 35
41 3 Operation Guide (Administrators) Step 1 Step 2 Log in to the management console. Click User. The User page is displayed. Step 3 In the row that contains the user whose account needs to be deleted, click More > Delete (If the enterprise uses an existing AD domain, click Delete). The dialog box for user information deletion is displayed. Step 4 Click OK. ----End 3.5 Managing User Group Scenario Procedure Create, modify, or delete a user group, or add users to or delete users from each group. Creating a user group Step 1 Step 2 Log in to the management console. Click User and Group Management > Group. The Group Management page is displayed. Step 3 Click Create Group. The Create Group dialog box is displayed. Step 4 Step 5 Set parameters on the page, for example, Group Name. Click OK. Modifying a user group Group Name cannot be modified. Only Address and Description can be modified. Step 6 Step 7 Log in to the management console. Click User and Group Management > Group. The Group Management page is displayed. Step 8 Locate the row that contains the user group whose settings you want to modify and click Modify. The Modify Group dialog box is displayed. Step 9 Step 10 Modify the settings of Address or Description as required. Click OK. Deleting a user group Issue 19 ( ) Copyright Huawei Technologies Co., Ltd. 36
42 3 Operation Guide (Administrators) Step 11 Step 12 Log in to the management console. Click User and Group Management > Group. The Group Management page is displayed. Step 13 Locate the row that contains the user group you want to delete and click Delete. The Warning dialog box is displayed. Step 14 Click OK. Managing users Step 15 Step 16 Log in to the management console. Click User and Group Management > Group. The Group Management page is displayed. Step 17 Locate the row that contains the user group in which the users you want to manage and click Manage User. The Manage User dialog box is displayed. Step 18 Step 19 Select Available Users and click to add the user to the user group. Select Selected Users and click to remove the user from the user group. Click OK. ----End 3.6 Viewing User Login Records Scenario Procedure View user login records to obtain the desktop running status and user login status. This helps troubleshooting and system maintenance. Step 1 Step 2 Step 3 Log in to the management console. Click User Login Record. The User Login Record page is displayed. View user login records, including Desktop Name, Login User, Terminal IP Address, Terminal System Type, Connection Start Time, Connection End Time, and Failure Cause. ----End Issue 19 ( ) Copyright Huawei Technologies Co., Ltd. 37
43 3 Operation Guide (Administrators) 3.7 Managing Policies Scenario Procedure Configure policies such as USB Port Redirection, Printer Redirection, File Redirection, and Clipboard Redirection to control the permission on data transmission and peripheral access between user terminals and. Step 1 Step 2 Log in to the management console. Click Policy. The Policy page is displayed. Step 3 On the Policy page, click the following button to enable or disable a policy. Table 3-2 describes the policies. indicates that the policy is enabled. indicates that the policy is disabled. Table 3-2 Policy management Policy Type Policy Parameter Policy Description USB port redirection Printer redirection Graphics devices (such as scanners) Video devices (such as cameras) Print devices (such as printers) Storage devices (such as USB flash drives) Smartcard devices (such as Ukeys) Sync Client Default Printer Users can use USB graphics devices by using USB port redirection on desktops. Users can use USB video devices by using USB port redirection on desktops. Users can use USB print devices by using USB port redirection on desktops. Users can use USB storage devices by using USB port redirection on desktops. Users can use smartcard devices by using USB port redirection on desktops. Users can use printers by using printer redirection (a policy of device redirection) on desktops. Issue 19 ( ) Copyright Huawei Technologies Co., Ltd. 38
44 3 Operation Guide (Administrators) Policy Type Policy Parameter Policy Description Universal printer driver File redirection Clipboard redirection HDP Plus Display level Default HDP XPSDrv Driver Universal Printing PCL 5 Universal Printing PCL 6 Universal Printing PS Fixed Drive (such as local disks) Removable drive (such as USB flash drives) CD/DVD-ROM drives Network Drive Server to client Client to server Enable Bidirection Disable Enable Disable (default) Smoothness first (default) When Default is selected, Universal Printing PS will be loaded if printer redirection is enabled on Linux clients, and HDP XPSDrv Driver will be loaded if printer redirection is enabled on Windows clients. NOTICE To use the printer service, you need to ensure that all end users use SCs running the same OS to log in to. Redirects client fixed drives. Redirects client removable drives, such as USB flash drives and removable hard disks. Redirects client CD-ROM drives. Redirects client network drives. After the redirection is enabled, end users can copy data on desktops and paste the data on clients. However, data copied on clients cannot be pasted on desktops. That is, the one-way clipboard function from the server to the client is supported. After the redirection is enabled, end users can copy data on clients and paste the data on desktops. However, data copied on desktops cannot be pasted on clients. That is, the one-way clipboard function from the client to the server is supported. After the redirection is enabled, end users can copy data on clients and paste the data on desktops, and data copied on desktops can also be pasted on clients. That is, the two-way clipboard function between the client and the server is supported. Disables the clipboard redirection. This option only applies to video editing scenarios. Balances display quality and bandwidth requirement. The recommended bandwidth is 20,000 kbit/s. Issue 19 ( ) Copyright Huawei Technologies Co., Ltd. 39
45 3 Operation Guide (Administrators) Policy Type Policy Parameter Policy Description Advanced policies Image quality first Bandwidth Frame Rate Video Frame Rate Smoothing Factor Lossy Compression Quality Provides best display quality but requires highest bandwidth. The recommended bandwidth is 25,000 kbit/s. For details about how to set video image quality and smoothness, see Table 3-3. Table 3-3 Advanced policies Policy Name Default Value Range Description Bandwidth (kbit/s) This policy is available only when the HDP Plus policy is disabled. Smoothness first: 20,000 Quality first: 25, to 25,000 Specifies the data code stream limit. Increasing this value improves user experience but consumes more bandwidth resources. For this reason, if the network bandwidth is insufficient, increasing this value compromises the smoothness. The default value is recommended. Frame Rate (fps) This policy is available only when the HDP Plus policy is disabled. Smoothness first: 25 Quality first: to 30 Specifies the frame rate in non-video scenarios. Increasing this value improves image smoothness but consumes more bandwidth resources. For this reason, if the network bandwidth is insufficient, increasing this value compromises the smoothness. The default value is recommended. Issue 19 ( ) Copyright Huawei Technologies Co., Ltd. 40
46 3 Operation Guide (Administrators) Policy Name Default Value Range Description Video Frame Rate (fps) This policy is available only when the HDP Plus policy is disabled. Smoothing Factor This policy is available only when the HDP Plus policy is disabled. Lossy Compression Quality Smoothness first: 30 Quality first: 50 Smoothness first: 60 Quality first: 60 Smoothness first: 85 Quality first: to 50 Specifies the video frame rate. Increasing this value improves image smoothness but consumes more bandwidth resources. For this reason, if the network bandwidth is insufficient, increasing this value compromises the smoothness. The default value is recommended. 0 to 60 Specifies the static image quality. Decreasing this value improves image quality but consumes more bandwidth resources, and compromises the smoothness. 70 to 90 Specifies the static natural image quality. Increasing this value improves image quality but consumes more bandwidth resources, and compromises the smoothness. Step 4 Click Save to save the configured policy information. An end user must relog in to the desktop for the new policy to take effect. ----End 3.8 Managing Policy Group Scenario Create policy groups to customize and plan a group of policies from the following perspectives: Peripherals Audio Client Display Issue 19 ( ) Copyright Huawei Technologies Co., Ltd. 41
47 3 Operation Guide (Administrators) Files&Clipboard Session Bandwidth Watermark Keyboard&Mouse Audio and Video Bypass Personalized Data Mgmt Procedure Creating Managing Policy Group Step 1 Step 2 Log in to the management console. Click Policy. The Policy page is displayed. Step 3 Step 4 Click Advanced View. Click Create. The Create Policy Group page is displayed. Step 5 Step 6 Step 7 Set Policy Group Name. Click Next. Set the peripherals policies. Table 3-4 shows the peripherals policies. indicates that the policy is enabled. indicates that the policy is disabled. Table 3-4 Peripherals policies Policy Type Policy Parameter Policy Description Recommended Value USB Port Redirection USB Port Redirection Users can use USB devices by setting the USB port redirection mode on desktops. Disabled Graphics Devices (such as scanners) Users can use USB graphics devices by setting the USB port redirection mode on desktops. Enabled Video Devices (such as cameras) Users can use USB video devices by setting the USB port redirection mode on desktops. Disabled Issue 19 ( ) Copyright Huawei Technologies Co., Ltd. 42
48 3 Operation Guide (Administrators) Policy Type Policy Parameter Policy Description Recommended Value Print Devices (such as printers) Storage Devices (such as USB flash drives) Wireless Devices (such as bluetooth) Network Devices (such as wireless NIC) Smart Card (such as Ukey) Remove Smart Card To Disconnect Session Other USB Devices Users can use USB print devices by setting the USB port redirection mode on desktops. Users can use USB storage devices by setting the USB port redirection mode on desktops. Users can use wireless devices by setting the USB port redirection mode on desktops. Users can use network devices by setting the USB port redirection mode on desktops. Users can use smart cards by setting the USB port redirection mode on desktops. Users can remove smart cards to disconnect user sessions. Users can use other USB devices (excluding graphics devices, video devices, printers, storage devices, and smart cards) connected to TCs by using USB port redirection. Enabled Enabled Disabled Disabled Enabled Disabled Enabled Issue 19 ( ) Copyright Huawei Technologies Co., Ltd. 43
49 3 Operation Guide (Administrators) Policy Type Policy Parameter Policy Description Recommended Value USB Port Redirection Customization Policy Users can customize USB policies using the ID or CLASS customization policy. Use vertical bars ( ) to separate multiple policies and store them in a configuration file as complete strings. The string can contain a maximum of 1024 character, excluding invalid characters, such as "!@#$%^&*()>? and spaces. Format example: Customized ID policy format: ID:VID:PID:isShare: iscompress NOTE PID fuzzy match format(for peripherals with the same VID): ID:VID:FFFF:isShare: iscompress Customized class policy format: CLASS:DeviceClass: DeviceSubClass:Devi ceprotocol:interface Class:InterfaceSubCl ass:interfaceprotocol : isshare:iscompress USBKEY policy format: USBKEY:VID:PID ADV policy format: ADV:VID:PID:isSele ctconfig:isresetinter face:isselectinterface :isrevert ID:147E:2016:1:0 CLASS: 08:06:50:08:06:50:1 :0 USBKEY:147E: 2016 ADV:78e:79f: 1:1:1:1 Issue 19 ( ) Copyright Huawei Technologies Co., Ltd. 44
50 3 Operation Guide (Administrators) Policy Type Policy Parameter Policy Description Recommended Value USB Redirection Mode This policy sets the USB redirection mode only for Linux TC. Common mode: The client USB driver is implemented based on the user mode driver. Classical mode: The client USB driver is implemented based on a kernel mode driver. Classical mode Device Redirection Printer Redirection Users can use printers connected to TCs by setting printer redirection (a policy of device redirection). Disabled Print Data Compression Mode Enabled: Print Data Compression Mode is enabled. Disabled: Print Data Compression Mode is disabled. Disabled Synchronize Client Default Printer Enabled: Synchronize Client Default Printer is enabled. Disabled: Synchronize Client Default Printer is disabled. Enabled Issue 19 ( ) Copyright Huawei Technologies Co., Ltd. 45
51 3 Operation Guide (Administrators) Policy Type Policy Parameter Policy Description Recommended Value Universal Printer Driver Session Printer Default HDP XPSDrv Driver Universal Printing PCL 5 Universal Printing PCL 6 Universal Printing PS When Default is selected, Universal Printing PS will be loaded if printer redirection is enabled on Linux clients, and HDP XPSDrv Driver will be loaded if printer redirection is enabled on Windows clients. NOTICE To use the printer service, you need to ensure that all end users use SCs running the same OS to log in to. Enabled: After the session printer is enabled and customized policy is configured, a network sharing printer is automatically created in the session. Disabled: The session printer is disabled. Default Disabled Issue 19 ( ) Copyright Huawei Technologies Co., Ltd. 46
52 3 Operation Guide (Administrators) Policy Type Policy Parameter Policy Description Recommended Value Session Printer Customization Policy Users can customize session printer policies by configuring the IP address, printer name, printer model, default printer, settings, and location. Configuration items are separated by semicolons (;), and multiple policies are separated by vertical bars ( ) and form a character string to save to the configuration file. The string can contain a maximum of 1024 characters, excluding illegal characters, such as "!@#$%^&*()>?. IP address: Printer server IP address, for example, This parameter is mandatory. Printer name: Printer name, for example, EPSON TM-T88IV Receipt. This parameter is mandatory. Printer model: Printer driver model, for example, EPSON TM- T88IV ReceiptSC4. This parameter is mandatory. Default printer: If the value is 0, the printer is not a default printer; if the value is 1, the printer is used as a default printer. This parameter is mandatory. Settings: If the value is 0, the printer is not a network shared printer; ;EPSO N TM-T88IV Receipt;EPSON TM-T88IV ReceiptSC4;1;0;IP: Issue 19 ( ) Copyright Huawei Technologies Co., Ltd. 47
53 3 Operation Guide (Administrators) Policy Type Policy Parameter Policy Description Recommended Value if the value is 1, the printer is used as a network port printer. This parameter is mandatory. Location: Printer location matching. Partial matching and full matching of client IP addresses, MAC addresses, and TC host names are supported at present, for example, full matching of IP: and partial matching of IP: , partial matching of MAC:00- ac, and full matching of HOSTNAME:huaweivdesktop. If location matching is not required, set the parameter to 0. Camera Redirection Users can use cameras connected to TCs by setting camera redirection (a policy of device redirection). Disabled Camera Frame Rate(fps) Camera Maximum Width(pixel) Camera Maximum Height(pixel) Camera Data Compression Mode Value range: 1 to Value range: 1 to Value range: 1 to H.264 H.264 Issue 19 ( ) Copyright Huawei Technologies Co., Ltd. 48
54 3 Operation Guide (Administrators) Policy Type Policy Parameter Policy Description Recommended Value TWAIN Redirection Image Compression Level PC/SC Smart Card Redirection Remove Smart Card To Disconnect Session HID(Human Interface Device) Redirection HID Redirection Customization Policy Users can use TWAIN devices connected to TCs by setting TWAIN device redirection (a policy of device redirection) on desktops. NOTE The TWAIN device driver must be installed on TCs. This policy is used to define the compression level for TWAIN device redirection. none low (highest speed) medium (medium speed) lossless(lossless compression) low-loss(low-loss compression) mediumloss(medium-loss compression) high-loss(high-loss compression) Users can use smart cards connected to TCs by setting PC/SC smart card redirection (a policy of device redirection) on desktops. Users can remove smart cards to disconnect user sessions. Users can use human interface device redirection on desktops. Users can use human interface devices (HIDs) by customizing HID redirection. Disabled medium (medium speed) Disabled Disabled Disabled - Issue 19 ( ) Copyright Huawei Technologies Co., Ltd. 49
55 3 Operation Guide (Administrators) Policy Type Policy Parameter Policy Description Recommended Value Serial Port Redirection Serial Port Redirection Users can use serial port devices connected to TCs by setting serial port redirection on desktops. Disabled Auto Connect Client Serial Ports When users log in to desktops, serial ports on TCs are automatically enable to prevent the serial ports from being used by other local programs. Disabled LPT Redirection LPT Redirection When users log in to desktops, serial ports on TCs cannot be automatically enabled to prevent the serial ports from being used by other local programs. Disabled Step 8 Set the audio policies. Table 3-5 shows the audio policies. Table 3-5 Audio policies Policy Type Policy Parameter Policy Description Recommended Value Audio Redirection Audio Redirection The applications on desktops can use audio devices on terminals to record and play audios. Enabled Play Volume The policy is used to set the audio broadcasting volume. Do Not Set Volume Play Volume Ratio The policy is used to set the audio broadcasting volume by ratio. It is a volume optimization policy. Do Not Set Volume Ratio Record Volume The policy is used to set the audio recording volume. The audio recording volume is set to 100 by default, indicating the original sound volume value (optimal in voice call scenarios). 100 Issue 19 ( ) Copyright Huawei Technologies Co., Ltd. 50
56 3 Operation Guide (Administrators) Policy Type Policy Parameter Policy Description Recommended Value Record Volume Ratio The policy is used to set the audio recording volume by ratio. It is a volume optimization policy. Do Not Set Volume Ratio Audio Transmission Mode Reliable Transmission: Audio data is transmitted through the Transmission Control Protocol (TCP). This mode is recommended for local area networks (LANs) especially. Real Time Transmission: Audio data is transmitted through the Real-Time Transport Protocol (RTP). This mode is not recommended. Reliable Transmission Play Redirection Play Redirection This option takes effect after the audio redirection is enabled. It controls the broadcasting switch separately. Enabled: End users can play broadcasting normally after the broadcasting redirection is enabled. Disabled: After the broadcasting redirection is disabled, the system has no sound when end users play broadcasting. Enabled Issue 19 ( ) Copyright Huawei Technologies Co., Ltd. 51
57 3 Operation Guide (Administrators) Policy Type Policy Parameter Policy Description Recommended Value Play Classification LossLess: The audio quality is the best, but the bandwidth occupation is the highest. This scenario is recommended when the network bandwidth is sufficient and the network is stable and reliable. In generally, this scenario is not recommended. Speech Call: The best voice call processing capability can be provided and the bandwidth occupation is the lowest, but the music processing capability is common. Customers who focus on voice calls can select this scenario. Music Play: The best music processing capability can be provided and the bandwidth occupation is medium, but the voice call processing capability is common. Customers who focus on music or entertainment can select this scenario. Automatic Identification: It can detect users' behaviors (voice call or music playing). The accuracy rate exceeds 90%. The system will switch to the best algorithm based on users' behaviors. Music Play Play Quality The broadcasting quality is used together with the broadcasting scenario. In the same broadcasting scenario, the broadcasting quality can be adjusted and has three levels: high, medium, and low. Middle Issue 19 ( ) Copyright Huawei Technologies Co., Ltd. 52
58 3 Operation Guide (Administrators) Policy Type Policy Parameter Policy Description Recommended Value Play Denoising This function is used in special broadcasting environments. Before using the function, you need to perform verification tests. This function is not recommended for nonprofessional audio personnel. Disabled Denoising Play AGC This function is used in special broadcasting environments. Before using the function, you need to perform verification tests. This function is not recommended for nonprofessional audio personnel. Disabled AGC Play CRC This is a retained item. This function can be used when real-time transmission is selected. Disabled CRC Play Device Mode Play Device In Shared Mode: In this mode, audio devices have strong compatibility and support multiple instances. Play Device In Exclusive Mode: The audio device only uses the Huawei Desktop Protocol (HDP) protocol as the audio protocol. Play Device In Shared Mode Play Delay Threshold When the specific volume of audio data exists in the broadcasting buffer, mute detection is started to control the latency threshold. This policy is the latency optimization policy. When the policy is modified, related tests need to be performed. 240 Issue 19 ( ) Copyright Huawei Technologies Co., Ltd. 53
59 3 Operation Guide (Administrators) Policy Type Policy Parameter Policy Description Recommended Value Play Amplitude Threshold This is a retained item. When the audio waveform amplitude is lower than the preset threshold, the audio is mute. This item is a policy item mapped with the broadcasting latency threshold function Play Prefill Data Before music is played, a small amount of data is prefilled to improve interruptions caused by network jitter. Do Not Prefill Data Record Redirection Record Redirection This option takes effect after the audio redirection is enabled. Independent control recording switch. Enabled: End users can make recording normally after the recording redirection is enabled. Disabled: After the recording redirection is disabled, the system has no sound when end users make recording. Enabled Issue 19 ( ) Copyright Huawei Technologies Co., Ltd. 54
60 3 Operation Guide (Administrators) Policy Type Policy Parameter Policy Description Recommended Value Record Classification LossLess: The audio quality is the best, but the bandwidth occupation is the highest. This scenario is recommended when the network bandwidth is sufficient and the network is stable and reliable. Speech Call: The best voice call processing capability can be provided and the bandwidth occupation is the lowest, but the music processing capability is common. Recording is generally voice recording. Music Record: This is a retained item. Music playing is rare in this recording scenario. Automatic Identification: This is a retained item. This scenario is the same as the voice call scenario currently. Speech Call Record Quality The recording quality is used together with the recording scenario. In the same recording scenario, the recording quality can be adjusted and has three levels: high, medium, and low. Middle Record Denoising You can enable this function as required because high-level noise reduction will have negative impacts. In the voice call scenario, the background noise can be reduced. The larger the negative number is, the higher the noise reduction level is. -25 Issue 19 ( ) Copyright Huawei Technologies Co., Ltd. 55
61 3 Operation Guide (Administrators) Policy Type Policy Parameter Policy Description Recommended Value Record AGC This function is used in special recording environments. Before using the function, you need to perform verification tests. This function is not recommended for nonprofessional audio personnel. Disabled AGC Record CRC This is a retained item. This function can be used when real-time transmission is selected. Disabled CRC Record Device Mode Record Device In Shared Mode: In this mode, audio devices have strong compatibility and support multiple instances. Record Device In Exclusive Mode: The audio device only uses the HDP protocol as the audio protocol. This mode is not recommended generally. Record Device In Shared Mode Record Delay Threshold When the specific volume of audio data exists in the recording buffer, mute detection is started to control the latency threshold. This policy is the latency optimization policy. When the policy is modified, related tests need to be performed. 200 Record Amplitude Threshold This is a retained item. When the audio waveform amplitude is lower than the preset threshold, the audio is mute. This item is a policy item mapped with the recording latency threshold function Step 9 Set the client policies. Table 3-6 shows the display policies. Issue 19 ( ) Copyright Huawei Technologies Co., Ltd. 56
62 3 Operation Guide (Administrators) Table 3-6 Client policies Policy Parameter Policy Description Recommended Value Automatic Reconnection Interval (Unit: s) Session Persistence Time (Unit: s) Shut down the local monitor automatically after the screen is locked Wait time of automatic monitor shutdown (Unit: s) Period before the next connection attempt after the client is disconnected. The value is an integer ranging from 1 to 50. Maximum automatic reconnection attempts after the client is disconnected. The value is an integer ranging from 0 to 180. Enabled: If this function is enabled, the monitor is automatically shut down when the wait time of automatic monitor shutdown is due after the screen is locked and no keyboard or mouse operation is performed. NOTE It doesn't work with nested login. Disabled: The function is disabled. Waiting time before automatic screen shutdown after the desktop screen is locked. The value ranges from 10 to Disabled 300 Step 10 Set the display policies. Table 3-7 shows the display policies. Issue 19 ( ) Copyright Huawei Technologies Co., Ltd. 57
63 3 Operation Guide (Administrators) Table 3-7 Display policies Policy Type Policy Parameter Policy Description Recommended Value Display Display Policy Grade LEVEL1: applies to network bandwidth lower than 512 Kbit/s. It can be used only for light-load office scenarios, such as browsing text documents. The display quality of this grade is low. LEVEL2: applies to network bandwidth lower than 1 Mbit/s. It can be used only for light-load office scenarios, such as browsing text documents and static images. The display quality of this grade is better than that of Grade 1. LEVEL3: applies to network bandwidth lower than 4 Mbit/s. It can be used for medium-load office scenarios, such as browsing documents, images, and dynamic web pages. LEVEL4: applies to network bandwidth lower than 20 Mbit/s. It can be used to play standard definition (SD) and high definition (HD) videos. This grade balances the display quality and bandwidth requirement. LEVEL5: applies to network bandwidth higher than 20 Mbit/s. This grade delivers the optimal video playback effect. LEVEL4 Issue 19 ( ) Copyright Huawei Technologies Co., Ltd. 58
64 3 Operation Guide (Administrators) Policy Type Policy Parameter Policy Description Recommended Value Display Frame Rate(fps) Frame rate in non-video scenarios. Increasing this value improves image and operation smoothness but consumes more network bandwidth and CPU resources. The value ranges from 1 to Video Frame Rate(fps) Frame rate in video scenarios. Increasing this value improves video playback smoothness but consumes more network bandwidth and CPU resources. For GPU desktops, increasing this value increases the GPU workload during video playback. The value ranges from 1 to 60. NOTE This parameter is unavailable after the HDP Plus or Rendering Acceleration parameter is enabled. 30 Bandwidth Maximum bandwidth for a single user during peak hours. The value ranges from 256 to NOTE This parameter is unavailable after the HDP Plus or Rendering Acceleration parameter is enabled Image Compression Parameters Min. Capacity for Image Cache (MB) Minimum capacity for image cache, expressed in MB. Increasing this value reduces required bandwidth but consumes more client memory resources. If the parameter is set to a value smaller than 50, the cache function is disabled. The value ranges from 0 to Issue 19 ( ) Copyright Huawei Technologies Co., Ltd. 59
65 3 Operation Guide (Administrators) Policy Type Policy Parameter Policy Description Recommended Value Lossy Compression Recognition Threshold Threshold for recognizing image complexity. Decreasing this value increases image quality but consumes more network bandwidth resources. The value ranges from 0 to 255. NOTE This parameter can be used to adjust the quality of static images only. 60 Lossless Compression Mode Lossless image compression algorithm. You can select Basic Compression or Deep Compression. When you compress the same picture, basic compression features a low compression ratio and CPU usage. NOTE This parameter is unavailable after the HDP Plus or Rendering Acceleration parameter is enabled. Basic Compression Deep Compression Level Image compression algorithm. This parameter is available after deep compression is used. A higher compression level means a higher compression ratio and CPU usage but lower bandwidth usage. Grade 0 indicates a copy operation and no compression is involved. This level consumes the least CPU resources but the most bandwidth resources. NOTE This parameter is unavailable after the HDP Plus or Rendering Acceleration parameter is enabled. Compression grade 0 Lossy Compression Quality Image quality after lossy compression. Increasing this value improves image quality. 85 Color Enhancement for Office Work The color enhancement for office work. Disabled Issue 19 ( ) Copyright Huawei Technologies Co., Ltd. 60
66 3 Operation Guide (Administrators) Policy Type Policy Parameter Policy Description Recommended Value Video Compression Parameters Quality/Bandwidth First Video compression mode. 0 indicates quality first, and 1 indicates bandwidth first. Quality First: preferentially compresses videos with fixed quality. If you select Quality First, the values of parameters Average Video Quality, Lowest Video Quality, Highest Video Quality, and Peak Video Bit Rate take effect. Bandwidth First: preferentially compresses videos at a constant bit rate. If you select Bandwidth First, the values of parameters Average Video Bit Rate and Peak Video Bit Rate take effect. Quality First Average Video Bit Rate (Kbps) The video compression algorithm parameter, expressed in Kbps. Increasing this value in Bandwidth First mode improves display quality. The value ranges from 256 to NOTE After HDP Plus is enabled for GPU desktops, the Average Video Bit Rate and Peak Video Bit Rate cannot be lower than Otherwise, the bit rate limit becomes invalid Peak Video Bit Rate (Kbps) Video compression algorithm parameter, expressed in Kbps. Increasing this value improves display quality. The value ranges from 256 to NOTE After HDP Plus is enabled for GPU desktops, the Average Video Bit Rate and Peak Video Bit Rate cannot be lower than Otherwise, the bit rate limit becomes invalid Issue 19 ( ) Copyright Huawei Technologies Co., Ltd. 61
67 3 Operation Guide (Administrators) Policy Type Policy Parameter Policy Description Recommended Value Average Video Quality Average quality coefficient of videos. In Quality First mode, increasing this value decreases display quality. The value ranges from 5 to Lowest Video Quality Lower limit of video quality. In Quality First mode, increasing this value decreases display quality. The value ranges from 5 to Highest Video Quality Upper limit of video quality. In Quality First mode, increasing this value decreases display quality. The value ranges from 1 to GOP Size Video compression algorithm parameter. Decreasing this value improves video quality but consumes more bandwidth resources. It is recommended that this value be 1 to 2 times the video frame rate. The value ranges from 0 to Encoding Preset Video compression algorithm parameter. A smaller value means a faster encoding speed and better smoothness but poorer image quality and higher bandwidth usage. Preset 1 HDP Plus Enable: enables HDP Plus GPU acceleration. Disable: disables HDP Plus GPU acceleration. Disabled Rendering Acceleration Video Optimization Enable: enables rendering acceleration to improve smoothness. Disable: disables rendering acceleration. Enable: enables video optimization to improve smoothness. Disable: disables video optimization. Disabled Disabled Issue 19 ( ) Copyright Huawei Technologies Co., Ltd. 62
68 3 Operation Guide (Administrators) Policy Type Policy Parameter Policy Description Recommended Value GPU Color Optimization Video Recognition Threshold Frame Rate Statistical Length Image Quality Threshold Refresh Frequency Threshold Threshold of Exiting Video Area Min. Video Width Min. Video Length Threshold of the Single-Frame Natural Image Block Percentage Number of Cyclical Natural Images Enable: enables GPU color optimization to increase color reproduction in video/ office hybrid scenarios. Disable: disables GPU color optimization. Number of frames required when you enter or switch a video. It is easier to enter or exit a video as the value increases. The value ranges from 0 to 500. Number of statistical frames during the video detection phase. It is easier to enter a video as the value decreases. The value ranges from 2 to 100. It is easier to enter a video as the value decreases. The value ranges from 0 to 100. It is easier to enter a video as the value decreases. The value ranges from 1 to 100. It is easier to exit a video as the value decreases. The value ranges from 0 to 100. It is easier to enter a video as the value decreases. The value ranges from 0 to It is easier to enter a video as the value decreases. The value ranges from 0 to It is easier to enter a video as the value decreases. The value ranges from to 1. It is easier to enter a video as the value decreases. The value ranges from 0 to 100. Disabled Issue 19 ( ) Copyright Huawei Technologies Co., Ltd. 63
69 3 Operation Guide (Administrators) Policy Type Policy Parameter Policy Description Recommended Value Threshold of the Non-Natural Image Area Percentage Number of Non-Natural Images It is more difficult to exit a video as the value increases. The value ranges from to 1. It is more difficult to exit a video as the value increases. The value ranges from 0 to Adaptive Bitrate Control Adaptive Bitrate Control Enable: enables adaptive bitrate control. Disable: disables adaptive bitrate control. Disabled Expected Average Network Latency (ms) The adaptive bitrate control latency threshold. If the latency exceeds the threshold, display quality decreases. If the latency is lower than the threshold, display quality increases. The value ranges from 1 to Network Latency Threshold 1 (ms) Adaptive bitrate control threshold 1. The value ranges from 1 to Network Latency Threshold 2 (ms) Adaptive bitrate control threshold 2. The value ranges from 1 to Min. Dynamic Frame Rate (fps) Sefault minimum dynamic frame rate. The value ranges from 1 to Min. Dynamic Frame Rate Lv1 (fps) Minimum dynamic frame rate level 1. The value ranges from 1 to Min. Dynamic Frame Rate Lv2 (fps) Minimum dynamic frame rate level 2. The value ranges from 1 to Adaptive Bandwidth Lower Limit (Kbps) Lower bandwidth limit of adaptive bitrate control. If the value decreases, the minimum bandwidth allowed by adaptive bitrate control decreases accordingly. The value ranges from 100 to Issue 19 ( ) Copyright Huawei Technologies Co., Ltd. 64
70 3 Operation Guide (Administrators) Policy Type Policy Parameter Policy Description Recommended Value Adaptive Lossy Compression Quality Lower Limit Lower limit of JPEG compression QoS, namely, the poorest JPEG quality allowed by adaptive bitrate control. The quality deteriorates as the value decreases. The value ranges from 1 to Adaptive Lossy Compression Quality Upper Limit Upper limit of JPEG compression QoS, namely, the best JPEG quality allowed by adaptive bitrate control. The quality deteriorates as the value decreases. The value ranges from 1 to Adaptive Lossy Compression Quality Increase Limit Increase limit of JPEG compression QoS, namely, the maximum JPEG quality increase allowed by adaptive bitrate control each time. JPEG quality improves faster as the value increases. The value ranges from 1 to Adaptive Lossy Compression Quality Decrease Limit Decrease limit of JPEG compression QoS, namely, the maximum JPEG quality decrease allowed by adaptive bitrate control each time. JPEG quality deteriorates faster as the value increases. The value ranges from 1 to Adaptive Video Average Quality Lower Limit Lower limit of the average video compression quality, namely, the best average video quality allowed by adaptive bitrate control. Video quality improves as the value decreases. The value ranges from 5 to Issue 19 ( ) Copyright Huawei Technologies Co., Ltd. 65
71 3 Operation Guide (Administrators) Policy Type Policy Parameter Policy Description Recommended Value Adaptive Video Average Quality Upper Limit Upper limit of the average video compression quality, namely, the poorest average video quality allowed by adaptive bitrate control. Video quality improves as the value decreases. The value ranges from 5 to Adaptive Video Average Quality Increase Limit Increase limit of average video compression quality, namely, the maximum video quality increase allowed by adaptive bitrate control each time. Video quality deteriorates faster as the value increases. The value ranges from 1 to Adaptive Video Average Quality Decrease Limit Decrease limit of average video compression quality, namely, the maximum video quality decrease allowed by adaptive bitrate control each time. Video quality improves faster as the value increases. The value ranges from 1 to Adaptive Video Min. Quality Lower Limit Lower limit of the poorest video compression quality. This parameter pairs with Adaptive Video Average Quality Lower Limit. Video quality improves as the value decreases. The value ranges from 5 to Adaptive Video Min. Quality Upper Limit Upper limit of the poorest video compression quality. This parameter pairs with Adaptive Video Average Quality Upper Limit. Video quality improves as the value decreases. The value ranges from 5 to Issue 19 ( ) Copyright Huawei Technologies Co., Ltd. 66
72 3 Operation Guide (Administrators) Policy Type Policy Parameter Policy Description Recommended Value Adaptive Video Min. Quality Increase Limit Increase limit of the poorest video compression quality, namely, the maximum video quality increase allowed by adaptive bitrate control each time. Video quality deteriorates faster as the value increases. The value ranges from 1 to Adaptive Video Min. Quality Decrease Limit Decrease limit of the poorest video compression quality, namely, the maximum video quality decrease allowed by adaptive bitrate control each time. Video quality improves faster as the value increases. The value ranges from 1 to Duplicate Display Duplicate Display Enable: After duplicate display is enabled, you can use duplicate display application tray or invoke duplicate display interface to initiate duplicate display on the desktop. Disable: After duplicate display is disabled, you cannot initiate duplicate display on the desktop. Disabled Default Mapping Order After duplicate display is enabled, a screen is displayed on the terminal according to the mapping priority. 1,2,3,4 Duplicate Display Mode One-to-One: initiates the duplicate display request to one terminal. One-to-Many: initiates the duplicate display request to multiple terminals. One-to-One Step 11 Set the file and Clipboard policies. Table 3-8 shows the file and Clipboard policies. Issue 19 ( ) Copyright Huawei Technologies Co., Ltd. 67
73 3 Operation Guide (Administrators) Table 3-8 File and Clipboard policies Policy Type Policy Parameter Policy Description Recommended Value File Redirection File Redirection READ ONLY: Only reads the redirected client files. READ AND WRITE: Reads and writes the redirected client files. Disable: Redirecting client files is disabled. Disabled Fluid Control Switch Enabled: Fluid control switch is enabled. Disabled: Fluid control switch is disabled. Disabled Good Network Latency(ms) Threshold of Good network latency. Value range: 1 to Normal Network Latency(ms) Threshold of Normal network latency. Value range: 1 to Poor Network Latency(ms) Threshold of Poor network latency. Value range: 1 to Reducing Step(KB) Step of reducing the transmission speed. Value range: 1 to Slow Increasing Step(KB) Slow step of increasing the transmission speed. Value range: 1 to Quick Increasing Step(KB) Quick step of increasing the transmission speed. Value range: 1 to Start Speed(KB/s) Initial transmission speed. Value range: 1 to Test Block Size(KB) Block size of speed testing. Value range: 64 to Test Time Gap(ms) Gap of testing. Value range: 1000 to Issue 19 ( ) Copyright Huawei Technologies Co., Ltd. 68
74 3 Operation Guide (Administrators) Policy Type Policy Parameter Policy Description Recommended Value Compression Switch Enabled: Compression switch is enabled. Disabled: Compression switch is disabled. Disabled Compression Threshold(Byte) Minimum Compression Rate Value range: 0 to Value range: 0 to File Size Supported by Linux Enabled: File size supported by Linux is enabled. Disabled: File size supported by Linux is disabled. Disabled File Size Threshold Supported by Linux(MB) Value range: 0 to Linux Root Directory Mount Switch Linux File System Mount Path Linux Fixed Drive File System Format Linux Removable Drive File System Format Linux CD-ROM Drive File System Format Linux Network Drive File System Format Enabled: Linux root directory is mounted. Disabled: Linux root directory is not mounted. The maximum length is 256 characters, expressed in UTF-8 string format. The maximum length is 256 characters, expressed in UTF-8 string format. The maximum length is 256 characters, expressed in UTF-8 string format. The maximum length is 256 characters, expressed in UTF-8 string format. The maximum length is 256 characters, expressed in UTF-8 string format. Disabled \media \Volumes \swdb\mnt \home - vfat ntfs msdos fuseblk cd9660 iso9660 udf smbfs afpfs cifs Path Separator Single ASCII character. Issue 19 ( ) Copyright Huawei Technologies Co., Ltd. 69
75 3 Operation Guide (Administrators) Policy Type Policy Parameter Policy Description Recommended Value Client Fixed Driver (such as local disk) Enabled: Redirect client local partitions. Disabled: Redirect client local partitions. NOTE When File Redirection is disabled, this function is disabled. Disabled Client Removable Driver (such as USB flash drives) Enabled: Redirect client removable drivers, such as USB and removable hard disks. Disabled: Redirect client removable drivers, such as USB and removable hard disks. NOTE When File Redirection is disabled, this function is disabled. Disabled Client Disc Driver Enabled: Redirect client disc drivers. Disabled: Redirect client disc drivers. NOTE When File Redirection is disabled, this function is disabled. Disabled Client Network Driver Enabled: Redirect client network drivers. Disabled: Redirect client network drivers. NOTE When File Redirection is disabled, this function is disabled. Disabled Send File In Virtual Machine to Client Enabled: Allow Sending File In Virtual Machine to Client. Disabled: No Sending File In Virtual Machine to Client. Disabled Issue 19 ( ) Copyright Huawei Technologies Co., Ltd. 70
76 3 Operation Guide (Administrators) Policy Type Policy Parameter Policy Description Recommended Value Read Write Speed(Kbps) When the File Redirection and Send File In Virtual Machine to Client are disabled, this function is disabled. 0 means no speed limit, the other is to set the read and write speed. The default minimum speed is 32Kbps. When the speed is less than 32Kbps, use the default minimum value. 0 Issue 19 ( ) Copyright Huawei Technologies Co., Ltd. 71
77 3 Operation Guide (Administrators) Policy Type Policy Parameter Policy Description Recommended Value Clipboard Redirection Clipboard Redirection Server to client: Enable the clipboard function from servers to clients: After this function is enabled, end users can copy data on desktops and paste the data on clients, but cannot copy data from clients to desktops. This function is the unidirectional clipboard function from servers to the clients. Client to server: Enable the clipboard function from clients to servers: After this function is enabled, end users can copy data on clients and paste the data on desktops, but cannot copy data from desktops to clients. This function is the unidirectional clipboard function from clients to the servers. Enable bidirection: Enable the bidirectional clipboard function: After this function is enabled, end users can copy data on clients and paste the data on desktops, or copy data from desktops to clients. This function is the directional clipboard function between clients and servers. Disabled: Redirect clipboard is disabled. Disabled Clipboard Rich Text Redirection Enabled: The function of clipboard rich text redirection is enabled. Disabled: The function of clipboard rich text redirection is disabled. Enabled Issue 19 ( ) Copyright Huawei Technologies Co., Ltd. 72
78 3 Operation Guide (Administrators) Policy Type Policy Parameter Policy Description Recommended Value Clipboard File Redirection Enabled: The function of clipboard file redirection is enabled. Disabled: The function of clipboard file redirection is disabled. Enabled Step 12 Set the session policies. Table 3-9 shows the session policies. Table 3-9 Session policies Policy Parameter Policy Description Recommended Value Automatic screen lock Screen lock waiting time (minute) Enabled: After the automatic screen lock function is enabled, a desktop will automatically lock the screen if no keyboard and mouse operation is performed when the screen lock waiting time is due. Disabled: The automatic screen lock function is disabled. Wait time for screen automatic lock. The value ranges from 3 to minutes. The default value is 10 minutes. Disabled 10 Issue 19 ( ) Copyright Huawei Technologies Co., Ltd. 73
79 3 Operation Guide (Administrators) Policy Parameter Policy Description Recommended Value Automatic disconnection or logout Disconnection or logout waiting time (minute) Automatic logout after disconnection Waiting time for automatic logout after disconnection (minute) Automatic disconnection: After the automatic screen lock function is enabled and the automatic disconnection is enabled as well, a desktop will automatically disconnect if no keyboard and mouse operation is performed when the disconnection or logout waiting time is due. Automatic logout: After the automatic screen lock function is enabled and the automatic logout is enabled as well, a desktop will automatically log out if no keyboard and mouse operation is performed when the disconnection or logout waiting time is due. Disabled: The automatic disconnection and logout function is disabled. Wait time for desktop automatic disconnection or logout. The value ranges from 1 to minutes. Enable: Automatic logout after disconnection function is enabled. When the waiting time is due, a disconnected desktop will automatically log out. Disable: Automatic logout after disconnection function is disabled. Waiting time for automatic logout after a desktop is disconnected. The value ranges from 3 to 1440 minutes. Disabled 1440 Disabled 10 Step 13 Set the bandwidth policies. Table 3-10 shows the bandwidth policies. Issue 19 ( ) Copyright Huawei Technologies Co., Ltd. 74
80 3 Operation Guide (Administrators) Table 3-10 Bandwidth policies Policy Type Policy Parameter Policy Description Recommended Value Total Bandwidth Control Total Bandwidth Control Enabled: The total bandwidth control function is enabled. Disabled: The total bandwidth control function is disabled. Disabled Total Bandwidth Control Value(Kbps) The value ranges from to Display Bandwidth Control Display Bandwidth Control Enabled: The bandwidth control function is enabled. Disabled: The bandwidth control function is disabled. Disabled Display Bandwidth Control Value(Kbps) The value ranges from 500 to Display Bandwidth Percentage Control Enabled: The bandwidth percentage control function is enabled. Disabled: The bandwidth percentage control function is disabled. Disabled Display Bandwidth Percentage Control Value(%) The value ranges from 0 to MultiMedia Bandwidth Control MultiMedia Bandwidth Control Enabled: The bandwidth control function is enabled. Disabled: The bandwidth control function is disabled. Disabled MultiMedia Bandwidth Control Value(Kbps) The value ranges from 5000 to Issue 19 ( ) Copyright Huawei Technologies Co., Ltd. 75
81 3 Operation Guide (Administrators) Policy Type Policy Parameter Policy Description Recommended Value MultiMedia Bandwidth Percentage Control Enabled: The bandwidth percentage control function is enabled. Disabled: The bandwidth percentage control function is disabled. Disabled MultiMedia Bandwidth Percentage Control Value(%) The value ranges from 0 to USB Bandwidth Control USB Bandwidth Control Enabled: The bandwidth control function is enabled. Disabled: The bandwidth control function is disabled. Disabled USB Bandwidth Control Value(Kbps) The value ranges from 1000 to USB Bandwidth Percentage Control Enabled: The bandwidth percentage control function is enabled. Disabled: The bandwidth percentage control function is disabled. Disabled USB Bandwidth Percentage Control Value(%) The value ranges from 0 to PCSC Bandwidth Control PCSC Bandwidth Control Enabled: The bandwidth control function is enabled. Disabled: The bandwidth control function is disabled. Disabled PCSC Bandwidth Control Value(Kbps) The value ranges from 1000 to Issue 19 ( ) Copyright Huawei Technologies Co., Ltd. 76
82 3 Operation Guide (Administrators) Policy Type Policy Parameter Policy Description Recommended Value PCSC Bandwidth Percentage Control Enabled: The bandwidth percentage control function is enabled. Disabled: The bandwidth percentage control function is disabled. Disabled PCSC Bandwidth Percentage Control Value(%) The value ranges from 0 to TWAIN Bandwidth Control TWAIN Bandwidth Control Enabled: The bandwidth control function is enabled. Disabled: The bandwidth control function is disabled. Disabled TWAIN Bandwidth Control Value(Kbps) The value ranges from 2000 to TWAIN Bandwidth Percentage Control Enabled: The bandwidth percentage control function is enabled. Disabled: The bandwidth percentage control function is disabled. Disabled TWAIN Bandwidth Percentage Control Value(%) The value ranges from 0 to Printer Bandwidth Control Printer Bandwidth Control Enabled: The bandwidth control function is enabled. Disabled: The bandwidth control function is disabled. Disabled Printer Bandwidth Control Value(Kbps) The value ranges from 1000 to Printer Bandwidth Percentage Control Enabled: The bandwidth percentage control function is enabled. Disabled: The bandwidth percentage control function is disabled. Disabled Issue 19 ( ) Copyright Huawei Technologies Co., Ltd. 77
83 3 Operation Guide (Administrators) Policy Type Policy Parameter Policy Description Recommended Value Printer Bandwidth Percentage Control Value(%) The value ranges from 0 to COM Bandwidth Control COM Bandwidth Control Enabled: The bandwidth control function is enabled. Disabled: The bandwidth control function is disabled. Disabled COM Bandwidth Control Value(Kbps) The value ranges from 500 to COM Bandwidth Percentage Control Enabled: The bandwidth percentage control function is enabled. Disabled: The bandwidth percentage control function is disabled. Disabled COM Bandwidth Percentage Control Value(%) The value ranges from 0 to File Redirection Bandwidth Control File Redirection Bandwidth Control Enabled: The bandwidth control function is enabled. Disabled: The bandwidth control function is disabled. Disabled File Redirection Bandwidth Control Value(Kbps) The value ranges from 500 to File Redirection Bandwidth Percentage Control Enabled: The bandwidth percentage control function is enabled. Disabled: The bandwidth percentage control function is disabled. Disabled File Redirection Bandwidth Percentage Control Value(%) The value ranges from 0 to Issue 19 ( ) Copyright Huawei Technologies Co., Ltd. 78
84 3 Operation Guide (Administrators) Policy Type Policy Parameter Policy Description Recommended Value Clipboard Bandwidth Control Clipboard Bandwidth Control Enabled: The bandwidth control function is enabled. Disabled: The bandwidth control function is disabled. Disabled Clipboard Bandwidth Control Value(Kbps) The value ranges from 100 to Clipboard Bandwidth Percentage Control Enabled: The bandwidth percentage control function is enabled. Disabled: The bandwidth percentage control function is disabled. Disabled Clipboard Bandwidth Percentage Control Value(%) The value ranges from 0 to Secure Channel Bandwidth Control Secure Channel Bandwidth Control Enabled: The bandwidth control function is enabled. Disabled: The bandwidth control function is disabled. Disabled Secure Channel Bandwidth Control Value(Kbps) The value ranges from 500 to Secure Channel Bandwidth Percentage Control Enabled: The bandwidth percentage control function is enabled. Disabled: The bandwidth percentage control function is disabled. Disabled Secure Channel Bandwidth Percentage Control Value(%) The value ranges from 0 to Issue 19 ( ) Copyright Huawei Technologies Co., Ltd. 79
85 3 Operation Guide (Administrators) Policy Type Policy Parameter Policy Description Recommended Value Flash Bandwidth Control Flash Bandwidth Control Enabled: The bandwidth control function is enabled. Disabled: The bandwidth control function is disabled. Disabled Flash Bandwidth Control Value(Kbps) The value ranges from 1000 to Flash Bandwidth Percentage Control Enabled: The bandwidth percentage control function is enabled. Disabled: The bandwidth percentage control function is disabled. Disabled Flash Bandwidth Percentage Control Value(%) The value ranges from 0 to Camera Bandwidth Control Camera Bandwidth Control Enabled: The bandwidth control function is enabled. Disabled: The bandwidth control function is disabled. Disabled Camera Bandwidth Control Value(Kbps) The value ranges from 0 to Camera Bandwidth Percentage Control Enabled: The bandwidth percentage control function is enabled. Disabled: The bandwidth percentage control function is disabled. Disabled Camera Bandwidth Percentage Control Value(%) The value ranges from 0 to Virtual Channel Bandwidth Control Virtual Channel Bandwidth Control Enabled: The bandwidth control function is enabled. Disabled: The bandwidth control function is disabled. Disabled Issue 19 ( ) Copyright Huawei Technologies Co., Ltd. 80
86 3 Operation Guide (Administrators) Policy Type Policy Parameter Policy Description Recommended Value Virtual Channel Bandwidth Control Value(Kbps) Virtual Channel Bandwidth Percentage Control Virtual Channel Bandwidth Percentage Control Value(%) The value ranges from 500 to Enabled: The bandwidth percentage control function is enabled. Disabled: The bandwidth percentage control function is disabled. The value ranges from 0 to Disabled 65 Step 14 Set the watermark policies. Table 3-11 shows the watermark policies. indicates that the policy is enabled. indicates that the policy is disabled. Table 3-11 Watermark policies Policy Parameter Policy Description Recommended Value Watermark Show Style Color Opacity(%) Number Enable: If the function is enabled, the watermark will be displayed on the screen after a user accesses a desktop. Disable: The function is disabled. Fixed position: The watermark is displayed in a fixed position on the screen. Random motion: The watermark moves randomly on the screen every 2 seconds. When the main switch is enabled, you can edit the color. The value ranges from 0 to means completely transparent and 100 means completely opaque. The number of watermarks. When the Display Mode is set to Fixed position, you can configure this item. The value ranges from 1 to 7. Disabled Random motion #2a2a2a - - Issue 19 ( ) Copyright Huawei Technologies Co., Ltd. 81
87 3 Operation Guide (Administrators) Policy Parameter Policy Description Recommended Value Custom The content can contain only digits, uppercase letters, lowercase letters, Chinese character, and some special characters, and cannot exceed 45 characters. After you customize the content, the desktop screen displays the watermark "Customized content Login username desktop time." For example, if the customized content is set to CopyRight, the watermark is CopyRight administrator Wed Jan 06 01:01: Step 15 Set the keyboard and mouse policies. Table 3-12 shows the keyboard and mouse policies. Table 3-12 Keyboard and mouse policies Policy Parameter Policy Description Recommended Value VM Mouse Feedback VM Mouse Simulation Mode VM External Cursor Feedback Windows Client Keyboard Mode Windows Client Mouse Mode Special Keyboard Adapt Mouse Feedback Force Mouse Feedback Disable Mouse Feedback Absolute Position Simulate Relative Position Simulate Enable: The function of desktop external cursor feedback is enabled. Disable: The function of desktop external cursor feedback is disabled. Windows Client Keyboard Global Mode Windows Client Keyboard Window Mode Windows Client Mouse Global Mode Windows Client Mouse Window Mode Enable: The function of special keyboard is enabled. Disable: The function of special keyboard is disabled. Adapt Mouse Feedback Absolute Position Simulate Disabled Windows Client Keyboard Global Mode Windows Client Mouse Window Mode Disabled Issue 19 ( ) Copyright Huawei Technologies Co., Ltd. 82
88 3 Operation Guide (Administrators) Step 16 Set the audio and video bypass policies. Table 3-13 shows the audio and video bypass policies. indicates that the policy is enabled. indicates that the policy is disabled. Table 3-13 Audio and video bypass policies Policy Parameter Policy Description Recommended Value Audio and Video Bypass Software Path Enable: The function of common audio and video policy is enabled. Disable: The function of common audio and video policy is disabled. This policy is used to configure the path and start parameters for software that uses common audio and video policies. Use semicolons (;) to separate multiple software paths. If a path includes spaces, use double quotation marks ("") to quote the path. Disabled C:\Windows \System32\notepad.exe hello.txt;"c:\program Files (x86)\notepad++.exe" hello.txt; Step 17 Set the personalized data management policies. Table 3-14 shows the personalized data management policies. indicates that the policy is enabled. indicates that the policy is disabled. Issue 19 ( ) Copyright Huawei Technologies Co., Ltd. 83
89 3 Operation Guide (Administrators) Table 3-14 Personalized data management policies Policy Type Policy Parameter Policy Description Recommended Value Path for Managing Personalized Data Path for Managing Personalized Data Path for storing the roamed files. If User Data Roaming Switch or User Folder Redirection Switch is enabled, this value cannot be empty. NOTE The shared directory must be Everyone permission. \ \ \Roami ng User Data Roaming User Data Roaming Switch Enable: roams the user's personalized data and configured files (folders) to the configured network location. The network location for storing the roamed files is required for enabling this function. Disable: The function of user data roaming policy is disabled. Disabled Local Path of Roamed Files (Folders) The path of the files or folders to be roamed in the user configuration files. Only the files and folders under the AppData directory are supported. Wildcard characters are supported. If you want to add multiple paths, separate them from each other using semicolons (;). AppData \Local;AppData \LocalLow Issue 19 ( ) Copyright Huawei Technologies Co., Ltd. 84
90 3 Operation Guide (Administrators) Policy Type Policy Parameter Policy Description Recommended Value User Folder Redirection User Folder Redirection Switch Enable: enables this function stores user data to a directory on the network instead of a local host. A separate directory needs to be configured for redirection. Disable: The function of user folder redirection policy is disabled. NOTE If roaming and redirection are configured for the same directory, user folder redirection is implemented preferentially. Disabled Configuration File Processing Delete User Configuration File upon Session Logoff Enable: The locally stored user configuration file is automatically deleted upon user logout. Disable: The locally stored user configuration file is not deleted upon user logout. Disabled Network Drive Mapping Network Drive Mapping Switch Enable: The function of network drive mapping is enabled. Disable: The function of network drive mapping is disabled. Disabled Issue 19 ( ) Copyright Huawei Technologies Co., Ltd. 85
91 3 Operation Guide (Administrators) Policy Type Policy Parameter Policy Description Recommended Value Network Drive Mapping Path Drive Letter This policy configures a valid network drive path, which is used to automatically mount to the user's desktop. Both public and private network drives can be mapped. If a private network drive is mapped, a user's directory is generated in the shared path and the user is granted the exclusive rights of the directory. For example: Public Network Drive:\ \ \Na sdisk Private Network Drive\:\ \ \Na sdisk\%username %. NOTE The shared directory must be Everyone permission. The default is empty. The available drive letter is automatically selected when the default value of drive letter is empty. - - Step 18 Step 19 Step 20 Click Next. Set Object type as required, and select objects. Click Finish. The policy group is created. Managing Policy Group Issue 19 ( ) Copyright Huawei Technologies Co., Ltd. 86
92 3 Operation Guide (Administrators) Step 21 In the policy group list, adjust the priority of policy groups, or edit or delete policy groups. NOTE Click in the Priority column to set the priority of policy groups. Click Edit in the Operation column to edit a policy group. Click Delete in the Operation column to delete a manually created policy group. The Default policy group cannot be deleted. Synchronizing Policies to the HDC Step 22 Click Publish all policies to HDC in the upper-right corner of the Advanced View page. If Synchronize policy to HDC successfully. is displayed, the operation is successful. ----End 3.9 Restoring Infrastructure Server Data Scenario If a system fault occurs, use data that is automatically backed up to restore the infrastructure servers. After you restore the data of infrastructure servers: The desktop data and user data generated after the backup point in time are not stored. If the desktop data or user data is incorrect, follow the instructions or contact technical support engineers to rectify the fault. Enabled or disabled policies may be restored to the state before the backup point in time. If this happens, configure the policies again. For details, see Managing Policies. An end user cannot use the password set after the backup point in time to log in to the desktop. Inform the end user to use the password set before the backup point in time to log in to the desktop or reset the password. Procedure Step 1 Step 2 Log in to the management console. Click Infrastructure. The Infrastructure page is displayed. Step 3 Click Restore. The Restore page is displayed. Step 4 Step 5 Choose the time point when you want to restore the data of infrastructure servers from the Backup Time Point drop-down list. Select I understand the impact and want to continue and click OK. Issue 19 ( ) Copyright Huawei Technologies Co., Ltd. 87
93 3 Operation Guide (Administrators) Disk data is restored to the last backup point in time. ----End 3.10 Changing the Service Subnet Scenario On the management console, change the service subnet based on the plan. Procedure Step 1 Step 2 Log in to the management console. Click Dashboard. The Dashboard page is displayed. Step 3 Step 4 Step 5 In the Network area, click Modify next to Service Subnet. Select a desired service subnet based on your planned subnet information. Click OK. ----End 3.11 Changing the Internet Access Port Scenario On the management console, change the Internet access port based on the plan. Procedure Step 1 Step 2 Log in to the management console. Click Dashboard. The Dashboard page is displayed. Step 3 In the Network area, click Modify next to Internet Access Port. The Internet access port changing dialog box is displayed. Step 4 Step 5 Change the HTTPS access port or Access Gateway (AG) port based on the plan. The port ID can be 80 or 443, or ranges from 1024 to 65,535. Click OK. ----End Issue 19 ( ) Copyright Huawei Technologies Co., Ltd. 88
94 3 Operation Guide (Administrators) 3.12 Configuring Two-Factor Authentication Scenario Two-factor authentication indicates the Domain account + Dynamic password authentication. In the scenario where is connected to an existing AD server, you can enable twofactor authentication as required to enhance system security. NOTE Two-factor authentication only applies to the scenario where dynamic password authentication using the customer's Radius authentication server based on the standard Radius protocol is required. Procedure Enabling dual-factor authentication Step 1 Step 2 Log in to the management console. Click Dashboard. The Dashboard page is displayed. Step 3 Click Modify next to Two-factor authentication. The Two-factor authentication dialog box is displayed. Step 4 Click to enable two-factor authentication and set the following parameters. Table 3-15 Parameters to be configured Parameter Description Example Value Radius server address Port Shared secret code Confirm shared secret code The Radius server is a twofactor authentication server used for dynamic password authentication based on the Radius protocol. Indicates the IP address of the Radius server. Indicates the port used for communication between the Radius server and the Web login page of end users. Indicates the password used for authentication between the Radius server and client. Enter the shared password again Default: Issue 19 ( ) Copyright Huawei Technologies Co., Ltd. 89
95 3 Operation Guide (Administrators) Parameter Description Example Value Authentication type Indicates the password authentication protocol. Only PAP is supported. Server timeout(in seconds) 1 to 999. Max retries 1 to 999. Configure it based on latencies of the Web login page of end users and Radius server. Indicates the maximum number of retries upon connection failure between the Web login page of end users and Radius server. Recommended value: 10 Recommended value: 2 Step 5 Click OK. Two-factor authentication is enabled. ----End Disabling dual-factor authentication Step 1 Step 2 Log in to the management console. Click Dashboard. The Dashboard page is displayed. Step 3 Click Modify next to Two-factor authentication. The Two-factor authentication dialog box is displayed. Step 4 Click to disable two-factor authentication. Step 5 Click OK. Two-factor authentication is disabled. ----End 3.13 Changing the Password of a Domain Administrator Scenario The password of a domain administrator needs to be changed periodically to ensure system security. You are advised to change the password every three months. Change the password of a domain administrator on the management console. Issue 19 ( ) Copyright Huawei Technologies Co., Ltd. 90
96 3 Operation Guide (Administrators) NOTE If the enterprise uses an existing AD domain, the period for changing the password of the domain administrator depends on the preset password policy. Change the domain administrator password on the AD server first, and then perform the following operations. Procedure Step 1 Step 2 Log in to the management console. Click Dashboard. The Dashboard page is displayed. Step 3 Click Modify in the lower right corner of AD Domain. The Modify Password dialog box is displayed. Step 4 Set Old Password, New Password, and Confirm New Password, and click OK. ----End 3.14 Monitoring Monitoring Metrics Table 3-16 describes monitoring metrics. Table 3-16 monitoring metrics Metric Description Value Range Monitored Object CPU usage Measures the CPU usage of a monitored object (unit: %). 0% to 100% Infrastructure server Memory usage Measures the memory usage of a monitored object (unit: %). 0% to 100% Infrastructure server Disk usage Measures the disk usage of a monitored object (unit: %). 0% to 100% Infrastructure server IOPS Measures the number of I/O operations per second on a monitored object. 0 counts Infrastructure server Network input throughput Measures incoming network traffic of a monitored object per second (unit: bytes/s). 0 bytes/s Infrastructure server Network output throughput Measures outgoing network traffic of a monitored object per second (unit: bytes/s). 0 bytes/s Infrastructure server Issue 19 ( ) Copyright Huawei Technologies Co., Ltd. 91
97 3 Operation Guide (Administrators) Setting Alarm Rules Scenarios Procedure Setting alarm rules for infrastructure servers allows you to customize the monitored objects and notification policies and determine the running status of your infrastructure server at any time. An infrastructure server alarm rule includes the alarm rule name, monitored object, metric, threshold, monitoring interval, and whether to send a notification. This section describes how to set alarm rules for infrastructure servers. Step 1 Step 2 Step 3 Step 4 Log in to the management console. Choose Management & Deployment > Cloud Eye. In the navigation pane on the left, choose Alarm Management > Alarm Rules. On the displayed Alarm Rules page, click Create Alarm Rule. For details about how to configure alarm parameters, see the Cloud Eye User Guide. ----End Viewing Monitoring Metrics Scenarios Prerequisites Procedure Cloud Eye provided by the public cloud monitors the running statuses of infrastructure servers. You can obtain the monitoring metrics of each infrastructure server on the management console. Monitored data requires a period of time for transmission and display. The status of an infrastructure server displayed on the Cloud Eye page is the status obtained 5 10 minutes before. If your service has just been enabled, that is, your infrastructure server has just been created, wait for 5-10 minutes and check the monitoring data. The infrastructure server is running properly for about 10 minutes. Step 1 Step 2 Step 3 Step 4 Step 5 Log in to the management console. Choose Management & Deployment > Cloud Eye. In the navigation pane on the left, choose Cloud Service Monitoring >. Click View Graph in the Operation column of the infrastructure server whose monitoring details you want to view. In the monitoring area, you can select a duration to view the monitoring data. Issue 19 ( ) Copyright Huawei Technologies Co., Ltd. 92
98 3 Operation Guide (Administrators) You can view the monitoring data of an infrastructure server in the recent 1 hour, 3 hours, or 12 hours. To view the monitoring curve of a longer time range, click to enlarge the graph. ----End 3.15 Recording Operations Key Operations Recorded by CTS CTS records operations related to for further query, audit, and backtrack operations. Table 3-17 operations that can be recorded by CTS Operation Resource Type Trace Name Start a desktop. workspace startdesktop Shut down a desktop. workspace shutdowndesktop Restart a desktop. workspace rebootdesktop Purchase a desktop. workspace ordervm Subscribe to the service. workspace openservice Update a desktop. workspace updatedesktopstatus Modify the user information. workspace modifyuserinfo Delete a user. workspace deleteuser Unlock a user. workspace unlockuser Reset a password. workspace resetuserpassword Export the user information. Download a user template. workspace workspace exportuserinfo downloadusermould Update a policy. workspace updatepolicy Modify the domain controller information. workspace updateadpwd Deregister a tenant. workspace tenantclose Delete a desktop. workspace deletedesktop Update the desktop metadata information. workspace updatedesktopmetadata Issue 19 ( ) Copyright Huawei Technologies Co., Ltd. 93
99 3 Operation Guide (Administrators) Operation Resource Type Trace Name Delete a task. workspace deletejob Synchronize IAM resource tenants. Change the password of a domain user. Tenants retry tasks about the service. Restore an infrastructure VM. Modify desktop properties. Modify the Internet access address. workspace workspace workspace workspace workspace workspace syniamresourcetenant updatedomainuserpassword tenantretryservicetask restoremanagervmbackup modifydesktopattributes modifyinternetaddress Update the access mode. workspace updateaccessway Update a port. workspace changeinternetaccessport Clear a tenant's resources. Add data disks to a desktop. workspace workspace cleanuptenantresources addvolumes Send s to a user. workspace send Modify the bandwidth. workspace modifybandwidth Enable Internet access. workspace adjustaccessmode Change desktop specifications. Modify the Radius server information. workspace workspace resizedesktop modifyradius Modify a subnet. workspace updatesubnets Create a tag. workspace createtag Delete a tag. workspace deletetag Update a tag. workspace updatetag Perform operations on tags in batches. workspace operationtagbatch Implement an order. workspace orderimplementation Issue 19 ( ) Copyright Huawei Technologies Co., Ltd. 94
100 3 Operation Guide (Administrators) CTS Traces Scenarios Procedure After CTS is enabled, CTS starts recording operations on cloud resources. The CTS management console stores the last seven days of operation records. This section describes how to query the last seven days of operation records on the CTS console. Step 1 Log in to the management console. Step 2 In the upper left corner of the page, click and select the desired region and project. Step 3 Step 4 Step 5 Click Service List. Under Management & Deployment, choose Cloud Trace Service. Choose Trace List in the navigation pane on the left. Specify the filters used for querying traces. The following four filters are available: Trace Source, Resource Type, Search By, and Operator Select the filter from the drop-down list. When you select Trace name for Search By, you also need to select a specific trace name. When you select Resource ID for Search By, you also need to select or enter a specific resource ID. When you select Resource name for Search By, you also need to select or enter a specific resource name. Operator: Select a specific operator (a user rather than tenant). Trace Status: Available options include all trace status, normal, warning, and incident. You can only select one of them. Start time and end time: You can specify the time period for query traces. Step 6 Click on the left of the record to be queried to extend its details. Step 7 Locate a trace and click View Trace in the Operation column. ----End 3.16 Canceling Scenario Procedure If is no longer needed, delete the user desktops and perform the following steps to cancel. Step 1 Log in to the management console. Issue 19 ( ) Copyright Huawei Technologies Co., Ltd. 95
101 3 Operation Guide (Administrators) Step 2 Click Dashboard. The Dashboard page is displayed. Step 3 In the Configuration Information area, click Cancel. The Cancel dialog box is displayed. Step 4 Click OK. ----End 3.17 Managing Private Images Creating Private Images Introduction Solution Overview Procedure Users can pair desired application software with a Windows ECS instance, convert the instance into a private image, and create a desktop using the private image. allows users to create and update private images based on Windows Server 2008 R2. Figure 3-1 shows the process for creating a private image. Figure 3-1 Process for creating a private image Issue 19 ( ) Copyright Huawei Technologies Co., Ltd. 96
102 3 Operation Guide (Administrators) Creating Private Images Creating ECSs Scenario Prerequisites Procedure This section describes how to create ECSs to prepare for subsequent ECS configuration and image creation. You have obtained the username and password for logging in to Console Home. Step 1 Step 2 Step 3 Step 4 Step 5 In the browser address box, type the IP address of Console Home and press Enter. Enter the username and password and click Log In. Select Elastic Cloud Server. On the Cloud Server Console page, click Create ECS. Set the following parameters, and click Create Now: Table 3-18 Parameter settings Tab Parameter Configuration Description Basic information Type Image Disk ECS Name Common desktop: General-purpose GPU desktop: GPU-optimized Select an image based on the selected ECS Type: Common desktop: Select the Windows Server 2008 R2 Standard image or Windows Server 2016 Standard image. GPU desktop: Select the Windows Server 2008 R2 Standard image that contains the GPU driver. Common desktop: System disk 80 GB GPU desktop: System disk 80 GB Enter the name based on site requirements. Network NIC Retain the default settings. NOTE If there are no available NICs, choose Basic Information > AZ to select another AZ. Enable port 3389 for the security group. EIP Select Automatically Assign. Issue 19 ( ) Copyright Huawei Technologies Co., Ltd. 97
103 3 Operation Guide (Administrators) Tab Parameter Configuration Description Login and File Injection Select the certificate based on site requirements. (The following uses selecting the Key pair as an example.) Select the certificate based on site requirements: Key pair If this is your first login, create a key pair. NOTE Upon your first login, create a certificate as follows: 1. Choose Cloud Server Console > Key Pair, and click Create SSH Key Pair on the right. 2. In the Information dialog box that is displayed, click OK. Password Set the initial password of Administrator. NOTE Retain the default values for other parameters involved in the page. The values of vcpu and Memory are not related to the flavor of desktops. Step 6 Step 7 On the Resource Details page, confirm the specifications of the selected ECS. Click Submit. After the application is complete, choose Cloud Server Console > Elastic Cloud Server. The created ECS is displayed. Take note of the ECS' Elastic IP Address (EIP). Step 8 Step 9 Step 10 Choose More > Get Password. In the window that is displayed, click Select File, and select the created SSH Key. Click Get Password to obtain the password and keep it secure. ----End Configuring ECS OSs Scenario This section describes how to install application software, configure patch updates, and install system patches in ECSs based on site requirements. Prerequisites Preparing data You have obtained the EIP of the ECS. You have obtained the username and password for logging in to the ECS. Preparing files Table 3-19 lists the files to be prepared. Issue 19 ( ) Copyright Huawei Technologies Co., Ltd. 98
104 3 Operation Guide (Administrators) Table 3-19 Preparing files File Name Description How to Obtain FusionAccess_Windows _Installer_V100R006C2 0.iso Image creation tool for Windows Click here System patches OS patches Prepared by the user Applications Peripheral drivers Software (office and real-time communication software) is prepared by users based on personal requirements. Peripheral drivers are prepared by users based on personal requirements. Prepared by the user Prepared by the user Procedure NOTE The following uses Windows Server 2008 R2 as an example. The procedure varies with the OSs. Copying files Step 1 Step 2 Step 3 Step 4 Run mstsc. Enter the ECS EIP and click Connect. Enter the username and password for logging in to the ECS and click OK. Copy non-iso files, such as tools, OS patches, peripheral drivers, and application installation programs to the C:\ directory on the desktop. NOTE ----End By default, the ECS cannot decompress ISO files. Therefore, copy the decompressed ISO files to the ECS. Installing OS patches Step 1 Install patches for OSs based on site requirements. ----End Installing application software Step 1 Install application software based on site requirements. Issue 19 ( ) Copyright Huawei Technologies Co., Ltd. 99
105 3 Operation Guide (Administrators) Some security software (such as the antivirus software, safeguard, and firewall) may conflict with the Microsoft encapsulation tool, causing blue screen of death (BSOD) or blank screen errors on created desktops or resulting in a desktop creation failure. Therefore, install security software only after the desktops are provisioned successfully. ----End (Optional) Installing peripheral drivers Step 1 Install peripheral drivers based on site requirements. ----End Disabling DNS registration on the NIC Step 1 Choose Start > Run. The Run dialog box is displayed. Step 2 In Open, type ncpa.cpl and press Enter. The Network Connections window is displayed. Step 3 Step 4 Step 5 Right-click the NIC and choose Properties. In the Local Area Connection Properties window that is displayed, double-click Internet Protocol Version 4 and choose Advanced. In the Advanced TCP/IP Settings dialog box that is displayed, click DNS. Step 6 Deselect Register this connection's addresses in DNS, as shown in Figure 3-2. Issue 19 ( ) Copyright Huawei Technologies Co., Ltd. 100

106 3 Operation Guide (Administrators) Figure 3-2 Advanced TCP/IP settings Step 7 Click OK. Step 1 Step End Enabling "Do not display Manage Your Server page at logon" Choose Start > Run. The Run dialog box is displayed. In Open, type gpedit.msc and press Enter. The Local Group Policy Editor window is displayed. Step 3 In the navigation tree, choose Computer Configuration > Administrative Templates > System, as shown in Figure 3-3. Issue 19 ( ) Copyright Huawei Technologies Co., Ltd. 101

107 3 Operation Guide (Administrators) Figure 3-3 Do not display Manage Your Server page at logon Step 4 In the right pane, double-click Do not display Manage Your Server page at logon. The Do not display Manage Your Server page at logon dialog box is displayed. Step 5 Step 6 Select Enabled. Click OK. Close the Do not display Manage Your Server page at logon dialog box. Step 7 Close the Local Group Policy Editor window. ----End Enabling the group policy that allows standard user groups to shut down the Windows system Step 1 Choose Start > Run. The Run dialog box is displayed. Step 2 In Open, type gpedit.msc and press Enter. The Local Group Policy Editor window is displayed. Step 3 In the navigation tree, choose Computer Configuration > Windows Settings > Security Settings > Local Policies > User Rights Assignment, as shown in Figure 3-4. Issue 19 ( ) Copyright Huawei Technologies Co., Ltd. 102
108 3 Operation Guide (Administrators) Figure 3-4 User Rights Assignment Step 4 In the right pane, double-click Shut down the system. The Shut down the system Properties dialog box is displayed. Step 5 Step 6 Step 7 Step 8 Click Add User or Group. The Select Users or Groups dialog box is displayed. Click Object Types, select Groups, and click OK. In the Enter the object names to select area, enter Users to query and add the Users group to the policy. Click OK. ----End Enabling the "Allow log on locally" group policy that allows standard user groups to locally log in to the Windows system Step 1 In the right pane of the Local Group Policy Editor window, double-click Allow log on locally. The Allow log on locally Properties dialog box is displayed. Step 2 Click Add User or Group. The Select Users or Groups dialog box is displayed. Issue 19 ( ) Copyright Huawei Technologies Co., Ltd. 103
109 3 Operation Guide (Administrators) Step 3 Step 4 Step 5 Step 6 Click Object Types, select Groups, and click OK. In the Enter the object names to select area, enter Users to query and add the Users group to the policy. Click OK. Close the Local Group Policy Editor window. ----End Encapsulating an image Step 1 Step 2 Step 3 Step 4 Set automatic login to Windows using the Administrator account. For details about how to set automatic login, see How to turn on automatic logon in Windows. In the C:\ directory of the ECS, locate FusionAccess_Windows_Installer_XXX, the decompressed template tool folder. In the blank area of the opened window, hold down Shift, right-click, and select Open command windows here. In Command Prompt, run the following command to encapsulate the image: Common desktops: run_silent.bat --passive GPU desktops: run_silent.bat --passive --hda_type 2 Step 5 After image encapsulation is complete, the ECS is automatically shut down. ----End Creating Private Images Scenario This section describes how to create private images. Prerequisites You have obtained the username and password for logging in to Console Home. You have obtained the password of Administrator. Procedure Step 1 Step 2 Step 3 Log in to Cloud Server Console. In the list on the left, click Elastic Cloud Server. On the row that contains the ECS to be converted to an image, choose More > Make Image from the drop-down list. The Create Private Image page is displayed. Step 4 Enter the planned image name, for example, _Image_01 and click Create Now. Image creation takes about 10 to 15 minutes. Choose Cloud Server Console > Image Mgmt Service > Private Image. You can view the created images in the list. ----End Issue 19 ( ) Copyright Huawei Technologies Co., Ltd. 104
110 3 Operation Guide (Administrators) Updating Private Images Image Update Overview Image Update Solution If you want to install new application software, drivers, and system patches, update private images Image Update Process Figure 3-5 shows the process for updating a private image. Figure 3-5 Process for updating a private image Updating Private Images Scenario If you want to install new application software, drivers, and system patches, update private images. Issue 19 ( ) Copyright Huawei Technologies Co., Ltd. 105
111 3 Operation Guide (Administrators) Prerequisites You have obtained the username and password for logging in to Console Home. You have obtained Windows image tool FusionAccess_Windows_Installer_V100R006C20.iso. Procedure Creating an ECS Step 1 Step 2 Step 3 Use a user account to log in to Console Home. In Image Mgmt Service, click Private Image and find the private image used by the current service version, for example, _Image_01. In Operation, click Create ECS and configure required parameters. For details, see Table Table 3-20 Parameter settings Tab Parameter Configuration Description Basic information ECS Name ECS Type vcpu Memory Image Type Image Disk Enter the name based on site requirements. Common desktop: General-purpose GPU desktop: GPU-optimized 4 vcpus 8 GB. Memory varies with ECS types. Therefore, select your desired memory based on site requirements. Private image Private image, for example, _Image_01. Common desktop: System disk 80 GB GPU desktop: System disk 80 GB Network NIC Retain the default settings. NOTE If there are no available NICs, choose Basic Information > AZ to select another AZ. Enable port 3389 for the security group. EIP Select Automatically Assign. Issue 19 ( ) Copyright Huawei Technologies Co., Ltd. 106
112 3 Operation Guide (Administrators) Tab Parameter Configuration Description Login and File Injection Select the certificate based on site requirements. (The following uses selecting the Key pair as an example.) Select the certificate based on site requirements: Key pair If this is your first login, create a key pair. NOTE Upon your first login, create a certificate as follows: 1. Choose Cloud Server Console > Key Pair, and click Create SSH Key Pair on the right. 2. In the Information dialog box that is displayed, click OK. Password Set the initial password of Administrator. NOTE Retain the default values for other parameters involved in the page. The values of vcpu and Memory are not related to the flavor of desktops. Step 4 Step 5 Step 6 Click Create Now. On the Resource Details page, confirm the specifications of the ECS to be created. Click Submit. After the application is complete, choose Cloud Server Console > Elastic Cloud Server. The created ECS is displayed. Take note of the ECS' Elastic IP Address (EIP). Step 7 Step 8 Step 9 Choose More > Get Password. In the window that is displayed, click Select File, and select the created SSH Key. Click Get Password to obtain the password and keep it secure. ----End Copying files Step 1 Step 2 Step 3 Step 4 Run mstsc. Enter the EIP and click Connect. Enter the username and password for logging in to the ECS and click OK. Copy non-iso files to be updated, such as OS patches, peripheral drivers, and application installation programs to the C:\ directory of the ECS. NOTE ----End If decompression software is not installed on the ECS, decompress ISO files and copy the files to the ECS. Installing OS patches Issue 19 ( ) Copyright Huawei Technologies Co., Ltd. 107
113 3 Operation Guide (Administrators) Step 1 Install OS patches based on site requirements. ----End Installing application software Step 1 Install application software based on site requirements. Some security software (such as the antivirus software, safeguard, and firewall) may conflict with the Microsoft encapsulation tool, causing BSOD or blank screen errors on created desktops or resulting in a desktop creation failure. Therefore, install security software only after the desktops are provisioned successfully. If the antivirus software contains firewalls, disable the firewalls or enable the ports required by HDP in the firewalls before you install the application software. Otherwise, ECS connections will be affected. For details about the ports required by HDP, see the Communication Matrix. ----End (Optional) Installing peripheral drivers Step 1 Install peripheral drivers based on site requirements. ----End Encapsulating an image Step 1 Step 2 Step 3 In the C:\ directory of the ECS, locate FusionAccess_Windows_Installer_XXX, the decompressed template tool folder. In the blank area of the opened window, hold down Shift, right-click, and select Open command windows here. In Command Prompt, run the following command to encapsulate the image: run_silent.bat --passive Step 4 After image encapsulation is complete, the ECS is automatically shut down. ----End Converting the ECS into an image Step 1 Step 2 Step 3 Log in to Cloud Server Console. In the list on the left, click Elastic Cloud Server. On the row that contains the ECS to be converted to an image, choose More > Make Image from the drop-down list. The Create Private Image page is displayed. Step 4 Step 5 Set Source to ECS. Select the ECS. Issue 19 ( ) Copyright Huawei Technologies Co., Ltd. 108
114 3 Operation Guide (Administrators) Step 6 Step 7 Enter the image name, for example, _Image_01_New. Click Create Now to create the image. ----End Updating the image Step 1 Step 2 Step 3 Step 4 Step 5 Step 6 Log in to Cloud Server Console. In the list on the left, click Image > Private Image. Find the old private image, for example, _Image_01 and click Modify. In the dialog box that is displayed, change the name of the old image, for example, _Image_01_Old. Find the new private image and click Modify. In the dialog box that is displayed, change the name of the new image to the old image name, for example, _Image_ End Creating Desktops Using Private Images Introduction Creating Desktops Procedure enables you to use private images to create desktops on the management console. Yearly/Monthly Step 1 Step 2 Log in to the management console. On the Overview or Desktop page, click Create Desktop. The Create Desktop page is displayed. Step 3 Step 4 Select Charging Mode to Yearly/Monthly. Select an AZ based on actual conditions. An availability zone (AZ) is a physical region where resources use independent power supplies and networks. AZs are physically isolated but interconnected through an internal network. If you create a desktop for the first time, you are advised to use the default value, that is, the optimal AZ recommended by the system. If you do not create a desktop for the first time, you are advised to create desktops in different AZs to improve application availability. Step 5 Select the proper Specifications based on site requirements. Issue 19 ( ) Copyright Huawei Technologies Co., Ltd. 109
115 3 Operation Guide (Administrators) Step 6 Select the proper Image Type and OS based on site requirements. NOTE The current version supports only private images with a 80 GB system disk. If the private images of the GPU type are required, select the GPU desktop package in Step 5. Step 7 Step 8 Check whether the user's existing AD domain is used in. If yes, go to Step 8. If no, go to Step 9. Set the OUs. Enter a maximum of 5 levels and separate levels from each other using a slash (/). Only letters, digits, spaces (not before or after a slash), and special characters including are allowed, for example, ab/cd/ef. Step 9 Step 10 Select a Service Subnet based on actual conditions. Add a tag based on actual conditions. For more information about tags, see the Tag Management Service User Guide. NOTE You can add a maximum of 10 tags to a desktop. Table 3-21 Tag key and value requirements Parameter Key Value Requirement Cannot be left blank. Can contain a maximum of 36 characters. Can contain only the following character types: Uppercase letters Lowercase letters Numerals Special characters: hyphens (-) and underscores (_) Unicode characters The keys of a desktop must be different. Cannot be left blank. Can contain a maximum of 43 characters. Can contain only the following character types: Uppercase letters Lowercase letters Numerals Special characters: periods (.), hyphens (-), and underscores (_) Unicode characters Issue 19 ( ) Copyright Huawei Technologies Co., Ltd. 110
116 3 Operation Guide (Administrators) Step 11 Assign desktops. You can manually add or batch import users. In a scenario where the existing AD domain is used, you need to create users on the AD server before assigning desktops. Manual input Set Username used for logging in to and used for receiving the notification . Select a user group from the drop-down list of User Group. You can grant different levels of access permission to users based on site requirements. The following describes the user group permission: Administrators: Administrator group. Administrators have complete access to the desktop and can make any desired changes except for forbidden operations. Users: Standard user group. Users in this group can use most software and change system settings that do not affect other users. NOTE You can click Add Desktop to add other desktops as required. A maximum of 10 desktops can be added each time. Each desktop belongs to one user only. Batch import. A maximum of 50 desktops can be added each time. Click Download Template. In the Excel template, enter values for columns A (Username), B ( ), and C (User Group) respectively. Save the settings and close the Excel template. Upload the file. Step 12 Send notification s. By default, the system automatically sends notification s to users after desktops are subscribed. In a scenario where the existing AD domain is used, you can select or deselect Send Notification based on site requirements. Step 13 Step 14 Drag the slider to set Validity Period. Click Buy Now. The Confirm Order page is displayed. Step 15 Step 16 Step 17 Step 18 Check whether the values of Order Details and Price are correct. Read the Huawei Service Agreement. Select I have read and agree to the Huawei Service Agreement. Click Submit. The Pay page is displayed. Step 19 You can pay for your order by using the following methods: Account balance payment Platform payment Online bank payment Transfer and remittance payment Issue 19 ( ) Copyright Huawei Technologies Co., Ltd. 111
117 3 Operation Guide (Administrators) Step 20 After you select a payment method and pay for your order, the service is purchased successfully. ----End Metered Step 1 Step 2 Log in to the management console. On the Overview or Desktop page, click Create Desktop. The Create Desktop page is displayed. Step 3 Step 4 Select Charging Mode to Metered. Select an AZ based on actual conditions. An availability zone (AZ) is a physical region where resources use independent power supplies and networks. AZs are physically isolated but interconnected through an internal network. If you create a desktop for the first time, you are advised to use the default value, that is, the optimal AZ recommended by the system. If you do not create a desktop for the first time, you are advised to create desktops in different AZs to improve application availability. Step 5 Step 6 Select the proper Specifications based on site requirements. Select the proper Image Type and OS based on site requirements. NOTE If the private images of the GPU type are required, select the GPU desktop package in Step 5. Step 7 Configure disks based on the actual requirements. Table 3-22 provides disk configuration details. Table 3-22 Disk configuration Category Description Disk Type Configuration Range (GB) System Disk Mandatory. Only one system disk can be configured based on the actual requirements. Common I/O: type of disks that use SATA storage. Ultra-high I/O: type of disks that use SSD storage. 80 to 32,768 Data Disk Optional. A maximum of 10 data disks can be configured based on the actual requirements. Common I/O: type of disks that use SATA storage. Ultra-high I/O: type of disks that use SSD storage. 100 to 32,768 Step 8 Check whether the user's existing AD domain is used in. Issue 19 ( ) Copyright Huawei Technologies Co., Ltd. 112
118 3 Operation Guide (Administrators) If yes, go to Step 9. If no, go to Step 10. Step 9 Set the OUs. Enter a maximum of 5 levels and separate levels from each other using a slash (/). Only letters, digits, spaces (not before or after a slash), and special characters including are allowed, for example, ab/cd/ef. Step 10 Step 11 Select a Service Subnet based on actual conditions. Add a tag based on actual conditions. For more information about tags, see the Tag Management Service User Guide. NOTE You can add a maximum of 10 tags to a desktop. Table 3-23 Tag key and value requirements Parameter Key Value Requirement Cannot be left blank. Can contain a maximum of 36 characters. Can contain only the following character types: Uppercase letters Lowercase letters Numerals Special characters: hyphens (-) and underscores (_) Unicode characters The keys of a desktop must be different. Cannot be left blank. Can contain a maximum of 43 characters. Can contain only the following character types: Uppercase letters Lowercase letters Numerals Special characters: periods (.), hyphens (-), and underscores (_) Unicode characters Step 12 Assign desktops. You can manually add or batch import users. In a scenario where the existing AD domain is used, you need to create users on the AD server before assigning desktops. Manual input Set Username used for logging in to and used for receiving the notification . Select a user group from the drop-down list of User Group. Issue 19 ( ) Copyright Huawei Technologies Co., Ltd. 113
119 3 Operation Guide (Administrators) You can grant different levels of access permission to users based on site requirements. The following describes the user group permission: Administrators: Administrator group. Administrators have complete access to the desktop and can make any desired changes except for forbidden operations. Users: Standard user group. Users in this group can use most software and change system settings that do not affect other users. NOTE You can click Add Desktop to add other desktops as required. A maximum of 10 desktops can be added each time. Each desktop belongs to one user only. Batch import. A maximum of 50 desktops can be added each time. Click Download Template. In the Excel template, enter values for columns A (Username), B ( ), and C (User Group) respectively. Save the settings and close the Excel template. Upload the file. Step 13 Send notification s. By default, the system automatically sends notification s to users after desktops are created. In a scenario where the existing AD domain is used, you can select or deselect Send Notification based on site requirements. Step 14 Click Create Desktop. The Confirm Specifications page is displayed. Step 15 Step 16 Check whether the value of Resource Details is correct. Click Submit. Desktops are created successfully. ----End Issue 19 ( ) Copyright Huawei Technologies Co., Ltd. 114
120 4 Operation Guide (End Users) 4 Operation Guide (End Users) Issue 19 ( ) Copyright Huawei Technologies Co., Ltd. 115
 Copyright Huawei")
121 4 Operation Guide (End Users) 4.1 Introduction to Issue 19 ( ) Copyright Huawei Technologies Co., Ltd. 116
 Copyright Huawei Technologies Co.")
122 4 Operation Guide (End Users) Issue 19 ( ) Copyright Huawei Technologies Co., Ltd. 117
 Copyright Huawei Technologies Co.")
123 4 Operation Guide (End Users) Issue 19 ( ) Copyright Huawei Technologies Co., Ltd. 118


124 4 Operation Guide (End Users) 4.2 Introduction to Terminals Issue 19 ( ) Copyright Huawei Technologies Co., Ltd. 119


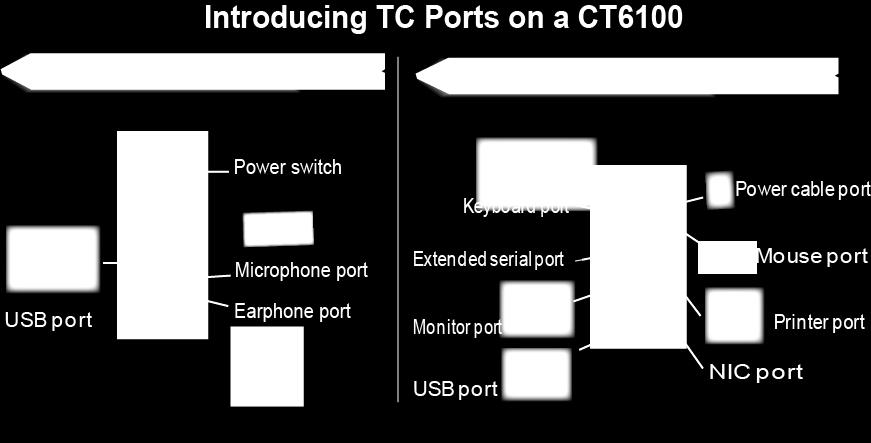
125 4 Operation Guide (End Users) Issue 19 ( ) Copyright Huawei Technologies Co., Ltd. 120
126 4 Operation Guide (End Users) 4.3 Risky Operations desktops provide on-demand services based on network resources and work depending on OSs and network configurations in desktops. This section describes some risky operations on desktops. Risky Operations (Processes and Services) 1. Change the default service and startup options in the system configuration. Figure 4-1 shows the Services and Startup options. Figure 4-1 Services and startup 2. Disable HDP services shown in Figure 4-2. Issue 19 ( ) Copyright Huawei Technologies Co., Ltd. 121
127 4 Operation Guide (End Users) Figure 4-2 HDP services 3. Uninstall programs shown in Figure 4-3. Figure 4-3 Programs 4. End the LOCAL SERVICE, NETWORK SERVICE, or SYSTEM processes in Task Manager. Figure 4-4 shows the processes that cannot be ended. Issue 19 ( ) Copyright Huawei Technologies Co., Ltd. 122
128 4 Operation Guide (End Users) Figure 4-4 Task Manager Risky Operations (Network) 1. Disable NICs, and disable or modify network configurations, as shown in Figure 4-5. Figure 4-5 Local connection Risky Operations (Others) 2. Run the script or command for modifying a route, such as route DELETE *. 3. Delete ports 28511, 28512, 28521, and from Windows firewall exception options. 4. Enable software or tools, such as the IPsec, that can restrict network traffic. 1. Delete files or folders in C:\Program Files\Huawei listed in Figure 4-6. Issue 19 ( ) Copyright Huawei Technologies Co., Ltd. 123
129 4 Operation Guide (End Users) Figure 4-6 Folders 2. Enable the sleep function on desktops. The sleep function is disabled for desktops by default, as shown in Figure 4-7. Figure 4-7 Sleep function 3. Modify the configuration file of the HDP client (AccessAgent). 4. Run Rabbit Magic or Wopti Utilities to clean or optimize the registry. 5. Install a customized screensaver with complex transformation functions, which consumes system resources and causes a delay in desktop access. 4.4 Failure When Connecting to Desktops During the use of desktops, desktops may fail to be connected due to misoperations. If this happens, you can click problem. to restart the desktops to resolve the NOTE If desktops cannot be restarted or you cannot log in to the desktops after they are restarted, click to forcibly restart the desktops. Data that is not saved may be lost after the desktops are forcibly restarted. Therefore, exercise caution when forcibly restarting desktops. 4.5 Dual-Screen Display Configuration When accessing desktops using TCs, perform the following operations to configure dual-screen display. Issue 19 ( ) Copyright Huawei Technologies Co., Ltd. 124
130 4 Operation Guide (End Users) Prerequisites Table 4-1 lists the materials required for configuring dual-screen display. Table 4-1 Materials required for configuring dual-screen display Item Quantit y Image (Example) Description TC 1 - Monitor/Converter 2 Typically, a monitor provides a DVI-D port and a VGA port. If two monitors have only VGA ports in some special cases, a DVI-D-to- VGA converter is required. DVI-I one-to-two cable 1 Converts DVI-I signals to DVI-D and VGA signals. DVI-D-to-DVI-D cable 1 - VGA-to-VGA cable 1 - Procedure Dual-Screen Connection Step 1 Connect a TC to monitors based on the monitor type. If the monitors provide DVI and VGA ports, go to Step 2. If the monitors provide VGA ports only, go to Step 3. Issue 19 ( ) Copyright Huawei Technologies Co., Ltd. 125
131 4 Operation Guide (End Users) Step 2 Connect the TC to the monitors, as shown in Figure 4-8. Figure 4-8 Dual-screen connection Step 3 Connect the TC to the monitors, as shown in Figure 4-9. Figure 4-9 Dual-screen connection ----End TC Setting Step 1 Step 2 Step 3 Step 4 Step 5 Power on the TC. Perform the following operation based on the TC type. Linux TC: Perform Step 3 to Step 7. Windows TC: Perform Step 8to Step 10 Click Start, and choose Control Center. Double-click Display. Select Optimum settings. Issue 19 ( ) Copyright Huawei Technologies Co., Ltd. 126
132 4 Operation Guide (End Users) Step 6 Step 7 Step 8 Step 9 Select the display mode based on site requirements. Duplicate Extend Select the main monitor based on site requirements. DVI VGA The task is completed. Right-click on the desktop and choose Screen Resolution. Set Multiple displays based on site requirements. Duplicate these displays Extend these displays NOTE Only Extend these displays can be selected when two desktops and dual-screen display are used. Step 10 Click OK. ----End Client Setting Step 1 Step 2 Step 3 Step 4 Step 5 Perform the following operation based on the dual-screen display scenario. If a desktop and two screens are used, go to Step 2. If two desktops and two screens are used, go to Step 6. Log in to the desktop using the client. Click Settings. Select Open Multiple Monitor (The configuration will take effect after reconnect). Click Close. The task is completed. Step 6 Step 7 Step 8 Step 9 Log in to a desktop using the client. Click Settings. Deselect Open Multiple Monitor (The configuration will take effect after reconnect). Click Close. Step 10 Log in to the other desktop and repeat Step 6 to Step 9. Step 11 Drag the two desktops to different screens to achieve dual-screen display. ----End Issue 19 ( ) Copyright Huawei Technologies Co., Ltd. 127
133 4 Operation Guide (End Users) Others 4.6 HDPDeviceHelper Peripheral Assistant If you encounter peripheral configuration problems when using, you can use HDPDeviceHelper. Choose Start > Huawei vdesk. Start HDPDeviceHelper and configure peripherals following the instructions. Figure 4-10 vdesk Issue 19 ( ) Copyright Huawei Technologies Co., Ltd. 128
134 5 FAQs (Administrators) 5 FAQs (Administrators) 5.1 What Is? is a cloud computing-based desktop service that outperforms personal computers (PCs) and the conventional VDI solution. provides the same configurations (including vcpus, GPUs, memory, and disks) as those of PCs and Windows OSs. Its familiarity ensures that you can use like using your own PCs. Different from the conventional local VDI solution, does not require high investment or a long deployment period. can automatically handle heavy deployment tasks and provide hosting services. supports access from multiple devices, including computers running Windows and Mac OSs, as well as ipads, iphones, and Android smart devices. With, you can save and obtain files, and use applications anytime and anywhere, implementing mobile office. 5.2 What Are the Features and Advantages of? A web-based management console is provided for you to flexibly enable and disable that works out of the box. provides the following features and advantages: can be provisioned and deployed quickly whereas deploying conventional private desktop clouds takes several days. Administrators can manage hundreds of desktops at the same time using the web page. Multiple desktop package specifications are available for you to choose the most appropriate one (vcpus, GPUs, memory, system disks, and data disks). The password can be reset if a user forgets it. Encrypted remote access, isolated user resources, and network and peripheral security control are used to ensure high security of data access. Issue 19 ( ) Copyright Huawei Technologies Co., Ltd. 129
135 5 FAQs (Administrators) 5.3 What Is the Process of Using? Administrators only need to apply for and purchase desktops before using desktops, as shown in Figure 5-1. End users can use desktops after completing basic configurations on clients, as shown in Figure 5-2. Figure 5-1 use process on servers Figure 5-2 use process on clients 5.4 What Are Packages? Packages packages are resources that are packaged for leasing. Packages shown in Table 5-1 are for reference only. The actual package prevails. Issue 19 ( ) Copyright Huawei Technologies Co., Ltd. 130
136 5 FAQs (Administrators) Table 5-1 packages Package Type vcpu Memor y GPU System Disk Data Disk OS Economical 2 2 GB - 60 GB 100 GB Windows Standard 2 4 GB - 60 GB 100 GB Windows Advanced 4 8 GB - 60 GB 150 GB Windows Luxury 8 16 GB - 60 GB 200 GB Windows GPU A desktop GPU B desktop 4 8 GB M60-1Q (1 GB) 8 16 GB M60-2Q (2 GB) 80 GB 200 GB Windows 80 GB 200 GB Windows When an order expires, a 7-day grace period is provided. Services in the grace period are still available. After the grace period elapses, a 15-day reservation period is provided. Resources in the reservation period are unavailable but retained. The resources are automatically deleted after the reservation period elapses and the order is not renewed. Charging Mode of AD Management Virtual Desktops For a normal order, AD management virtual desktops are not charged. If the administrator applies for the service but does not purchase desktops in more than 15 days, the AD management desktops will be reclaimed. The administrator must apply for again for subsequent use. 5.5 How Is Charged? supports the pay-per-use and monthly/yearly charging modes. is charged based on the usage of the following resources: vcpu, memory, and GPU System disk and data disk 5.6 Do I Need to Purchase TCs? You are advised to log in to the desktop using an SC or purchase a TC for login. You can use Huawei FusionCloud Compatibility Check Assistant > FusionAccess > Compatible Terminal List to query TC models that are compatible with. You can contact the local TC vendor or agent to purchase the TC. Issue 19 ( ) Copyright Huawei Technologies Co., Ltd. 131
137 5 FAQs (Administrators) 5.7 How Do End Users Access the Internet? The administrator can enable user desktops to access the Internet as follows: using NAT gateway using a proxy server Method 1: using NAT gateway The NAT gateway provides the Network Address Translation (NAT) service for desktops in a VPC so that multiple desktops can share an EIP to access the Internet. For detailed operations, see the NAT Gateway User Guide. After configuring the NAT gateway, you need to set the number of interface metrics on the user desktop. 1. Log in to the desktop. 2. Go to Network and Sharing Center. 3. In the View your active networks area, click Local Area Connection 2 or Ethernet 2. The Local Area Connection 2 Status dialog box or the Ethernet 2 Status dialog box is displayed. 4. Click Properties. The Local Area Connection 2 Properties dialog box or the Ethernet 2 Properties dialog box is displayed. 5. Click Advanced. The Advanced TCP/IP Settings dialog box is displayed. 6. Deselect Automatic metric, and set Interface metric to Click OK in sequence to save the settings and close the dialog boxes. 8. Click Close to close the Local Area Connection 2 Status dialog box or the Ethernet 2 Status dialog box. Method 2: using a proxy server Creating a proxy server 1. Ceate a proxy server that runs, for example, CentOS. The proxy server must reside on a subnet different from the one where resides in the same VPC. NOTE For details about how to configure the ECS, see the Elastic Cloud Server User Guide. 2. Configure an elastic IP address for the proxy server to access the Internet. Installing squid NOTE The following operations use Cent OS 6.6 as an example. 1. Log in to the proxy server as user root. Issue 19 ( ) Copyright Huawei Technologies Co., Ltd. 132
138 5 FAQs (Administrators) 2. Run the following command to check whether squid is installed: rpm -qa grep squid If it is installed, go to 4. If it is not installed, go to Run the following command to install squid: yum -y install squid 4. Run the following command to edit the squid.conf configuration file: vi /etc/squid/squid.conf 5. Check whether SSH is used for connection. If SSH is used, go to 6. If SSH is not used, go to Press I to enter the edit mode and add the following content in a blank row. aclsafe_ports port Use # to comment out http_access deny CONNECT!SSL_ports. 8. Press Esc to exit the edit mode. Type :wq and press Enter. Save configurations and exit the vi editor. 9. Run the following command to restart the squid service. service squid restart Configuring security group rules 1. Configure security group rules to ensure that the extranet cannot access any port of the proxy server and the user desktop can access only the proxy port of the proxy server. NOTE For details about how to configure security group policies, see the Virtual Private Cloud User Guide. Configuring the user's browser 1. Open the proxy server setting page of the browser. 2. Set the IP address and the port of the proxy server to the IP address and the monitoring port configured in 1, respectively. 5.8 How Do I Install Applications on the Desktop? If an end user needs to install applications on the desktop, the administrator can use the following methods to assist the end user in the installation: Method 1: using file redirection 1. Choose File redirection > Fixed Drive (such as local disks) to enable the policy. For details, see Managing Policies. 2. The end user downloads required applications to the local PC. 3. The end user copies the applications from the local PC to the desktop and installs them. Method 2: using USB redirection 1. Choose USB port redirection > Storage devices (such as USB flash drives) to enable the policy. For details, see Managing Policies. Issue 19 ( ) Copyright Huawei Technologies Co., Ltd. 133
139 5 FAQs (Administrators) 2. The end user copies the applications from the USB flash drive to the desktop and installs them. Method 3: using the Internet 1. Enable the Internet access permission for the end user. For details, see How Do End Users Access the Internet?. 2. The end user downloads the applications from the Internet to the desktop and installs them. Method 4: using private images Create the desktop where the required applications are installed for the end user. For details, see Purchasing Desktops. Method 5: using Microsoft AD pushing Use Microsoft AD to push the applications to the desktop of the end user. For details, see How to use Group Policy to remotely install software in Windows Server What Resources Do I Need to Prepare Before Applying for? You need to enable ports listed in Table 5-2 on the enterprise firewall so that end users can log in to the desktops properly. Table 5-2 Internet access ports Port Protocol Description 443 TCP Used by the end user to access the web login page TCP Used by the end user to access the desktop. NOTE By default, port 443 and port 8443 are used. If you want to change the ports, see Changing the Internet Access Port. In GPU desktop scenarios, prepare DirectConnect resources What Should I Do If I Fail to Apply for? Scenario Procedure If you are unable to access after the initial application is complete, retry the application, or cancel and reapply again. Step 1 Log in to the management console. Issue 19 ( ) Copyright Huawei Technologies Co., Ltd. 134

140 5 FAQs (Administrators) Step 2 Step 3 Step 4 Click Dashboard. The Dashboard page is displayed. In the Configuration Information area, click Retry. The Retry Apply for dialog box is displayed. Click OK. NOTE ----End You can click Cancel in the Configuration Information area to cancel and apply for again How Is Connected to Enterprise Intranets? desktops can communicate with PCs in the enterprise intranet using the VPN or DirectConnect method. VPN: Figure 5-3 shows how to use VPN to connect desktops to PCs in the enterprise intranet. Figure 5-3 Connecting to an enterprise intranet using a VPN DirectConnect: To connect to an enterprise intranet using DirectConnect, see Direct Connect User Guide. NOTE reserves the /16 network segment for the NIC on the management plane. Do not use this network segment on the enterprise intranet in case the route conflict occurs How Do I Interconnect with Microsoft AD? You can deploy Microsoft AD in the intranet of the enterprise DC or in the VPC where resides. The following describes how to interconnect with Microsoft Issue 19 ( ) Copyright Huawei Technologies Co., Ltd. 135
141 5 FAQs (Administrators) AD in two deployment scenarios. After interconnecting with Microsoft AD, configure DNS forwarding on the DNS to allow to access the Internet. NOTE Ensure that the network where resides is communicating correctly with that where Microsoft AD resides. Procedure Scenario 1: Microsoft AD is deployed in the intranet of the customer's DC. Figure 5-4 Microsoft AD deployed in the intranet of the customer's DC Step 1 Step 2 Use DirectConnect or IPsec VPN to connect the customer's DC to the VPC. For details about the configuration, see the Direct Connect User Guide or VPN User Guide. If a firewall is deployed between Microsoft AD and, enable the following ports on the firewall for to connect to Microsoft AD, as shown in Table 5-3: Table 5-3 Port list Role Port Protocol Description AD 135 TCP Remote Procedure Call (RPC) protocol This port is used by the Lightweight Directory Access Protocol (LDAP), Distributed File System (DFS), and Distributed File System Replication (DFSR). 137 UDP NetBIOS name resolution This port is used by the network login service. 138 UDP NetBIOS data gram service 139 TCP NetBIOS-SSN service This port is used by services, such as the DFS and network login service. This port is used for network basic input and output. Issue 19 ( ) Copyright Huawei Technologies Co., Ltd. 136
142 5 FAQs (Administrators) Role Port Protocol Description 445 TCP NetBIOS-SSN service 49,152-65,535 TCP RPC dynamic port 49,152-65,535 UDP RPC dynamic port This port is used for network basic input and output. 88 TCP Kerberos key distribution center service 88 UDP Kerberos key distribution center service 123 UDP Port used by the NTP service 389 UDP LDAP server 389 TCP LDAP server 464 TCP Kerberos authentication protocol 464 UDP Kerberos authentication protocol 500 UDP isakmp 593 TCP RPC over HTTP 636 TCP LDAP SSL 3268 TCP LDAP global catalog server 3269 TCP LDAP global catalog server 4500 UDP IPsec NAT-T 5355 UDP llmnr 9389 TCP Active Directory Web service DNS 53 TCP DNS server 53 UDP DNS server Step 3 Step 4 After the configuration, verify the interconnection and ensure that the networks and ports are working correctly. For details, see Verification. Log in to your DNS server, configure the DNS reverse lookup function in the DNS Manager, and add the first subnet segment that is selected in the subnet list during application to the IP address segment for reverse lookup. ----End Scenario 2: Microsoft AD is deployed in a subnet and the VPC where resides is deployed in another subnet. Issue 19 ( ) Copyright Huawei Technologies Co., Ltd. 137
143 5 FAQs (Administrators) Figure 5-5 Microsoft AD deployed in a subnet and the VPC where resides deployed in another subnet In this scenario, you must add security group rules for Microsoft AD to enable some ports of Microsoft AD for so that can connect to Microsoft AD. Step 1 Step 2 Create a security group, add an inbound rule, and configure the parameters as follows: Protocol: ANY Source IP Address: IP Address IP Address: Enter the subnet where resides. Apply the security group to AD server instances so that can communicate correctly with Microsoft AD. NOTE If you want to minimize the number of enabled ports and protocols, you can add multiple inbound rules to the security group. For details about the ports that need to be enabled, see Table 5-3. Step 3 Step 4 After the configuration, verify the interconnection and ensure that the networks and ports are working correctly. For details, see Verification. Log in to your DNS server, configure the DNS reverse lookup function in the DNS Manager, and add the first subnet segment that is selected in the subnet list during application to the IP address segment for reverse lookup. ----End Verification Step 1 Check the firewall or security group settings of the AD server and ensure that ports 49,152 to 65,535 have been enabled. NOTE For details about the requirements on AD server ports, see Active Directory and Active Directory Domain Services Port Requirements. Step 2 Create a Windows OS instance in the VPC where the user desktop resides using the ECS service and add the instance to the existing domain. Issue 19 ( ) Copyright Huawei Technologies Co., Ltd. 138
144 5 FAQs (Administrators) NOTE For details about how to configure and operate ECS, see the Elastic Cloud Server User Guide. Step 3 Log in to the Windows instance using the RDP client tool (such as mstsc) or VNC. The remaining steps are performed on this Windows instance. Step 4 Step 5 Step 6 Download ADTest.zip and unzip the test application. In the blank area of the directory where ADTest.exe resides, hold down Shift, right-click, and choose Open command windows here. In Command Prompt, enter the following command to check the AD server connectivity: ADTest.exe -file ADTest.cfg -ip AD IP address -domain AD domain name -user domain administrator account Command example: ADTest.exe -file ADTest.cfg -ip domain abc.com -user vdsadmin Step 7 Check whether SUCCEED is displayed in all test results. If FAILED is displayed, check the AD server configuration or firewall ports following the instructions. ----End Configure DNS forwarding. NOTE The following uses Windows Server 2012 as an example. Step 1 Log in to the DNS server as the administrator. Step 2 On the task bar, click. The Server Manager window is displayed. Step 3 Step 4 In the navigation pane on the left, click DNS. In the SERVER area, right-click server name and choose DNS Manager. The DNS Manager window is displayed. Step 5 Step 6 Step 7 Unfold DNS, right-click computer name, and choose Properties from the shortcut menu. On the Advanced tab page, deselect Disable recursion (also disable forwarders), and click Apply. On the Forwarders tab page, click Edit, enter the IP address of the default DNS server of HUAWEI CLOUD, and click OK. NOTE ----End You can view the IP address of the default DNS server of HUAWEI CLOUD on the page for creating the VPC. Issue 19 ( ) Copyright Huawei Technologies Co., Ltd. 139
145 5 FAQs (Administrators) 5.13 What Should I Do If I Fail to Apply for by Interconnecting with Microsoft AD? Scenario Procedure If you fail to apply for by interconnecting with Microsoft AD and a message is displayed stating "Failed to configure an infrastructure component(85%)", you can rectify the fault as follows: Step 1 Step 2 Step 3 Step 4 Step 5 Step 6 In the AD Domain area of the Dashboard page, check whether the domain information is correct. Click Modify to modify incorrect domain configurations. Click Retry to reapply for the service. If you use Scenario 1: Microsoft AD is deployed in the intranet of the customer's DC in section How Do I Interconnect with Microsoft AD? and use DirectConnect for connections, log in to the AD server and ping the IP address of DirectConnect. If the ping fails, check whether the network where the AD server resides as well as the VPC network and subnet ports used for applying for are normal. Check the AD server connectivity. For details, see the Verification area in section How Do I Interconnect with Microsoft AD?. Click Retry to reapply for the service. If the fault persists, contact technical support engineers. ----End 5.14 How Do I Check the Network Status of Desktops? Procedure Perform the following operations to check the network status of desktops and determine the network segment where the fault occurs. Step 1 Step 2 Log in to the desktop. Move the cursor to the upper area of the desktop. The floating window is displayed, as shown in Figure 5-6. Figure 5-6 Floating window Step 3 Click Network. The Connection Status dialog box is displayed. Issue 19 ( ) Copyright Huawei Technologies Co., Ltd. 140
146 5 FAQs (Administrators) NOTE When the network connection is good, the network indicator is steady green. When the network connection is poor, the network indicator is steady yellow. When the network connection is bad, the network indicator is steady red. Step 4 On the Connection Status page, check Round-Trip Time. Figure 5-7 shows the network connection status. Figure 5-7 Network connection status Step 5 Step 6 Click Start. In the Search programs and files text box, type cmd, and press Enter. In the command-line interface, run the following command to check the network connectivity between the desktop and the terminal: ping Internet access address of the desktop NOTE The Internet access address of the desktop can be found in the desktop provisioning notification . Information similar to the following is displayed: Step 7 Determine the network segment where the fault occurs based on the results in Step 4 and Step 6. If the network latency in Step 4 and Step 6 is large, the public network is faulty. Issue 19 ( ) Copyright Huawei Technologies Co., Ltd. 141
147 5 FAQs (Administrators) If the network latency in Step 4 is large but that in Step 6 is small, the internal network of is faulty. ----End 5.15 What Are the Network Requirements for Accessing the Desktop? Table 5-4 lists the network requirements for accessing the desktop. If the network requirements cannot be met, you are advised to use DirectConnect access. Table 5-4 Network requirements Desktop Type Common desktop GPU desktop Network Requirement Average bandwidth: 300 kbps/ instance; Peak 5 Mbps/ instance. Packet loss rate 0.01% Round -trip delay 30 ms Jitter 10 ms Average bandwidth: 20 Mbps/ instance. Packet loss rate 0.01% Round -trip delay 30 ms Jitter 10 ms These values are for reference only and may be more stringent depending on the application scenario. Must be used in conjunction with the Direct Connect service. Issue 19 ( ) Copyright Huawei Technologies Co., Ltd. 142
148 6 FAQs (End Users) 6 FAQs (End Users) 6.1 What Devices Can Be Used to Log In to? You can log in to using TCs, SCs, browsers, Android terminals, and ios terminals. 6.2 What Are the Precautions for Using? desktops provide on-demand services based on network resources and work depending on OSs and network configurations in desktops. This section describes some risky operations on desktops. These operations do not need to be adjusted. If special modification is required, contact the administrator for confirmation. Risky Operations (Processes and Services) 1. Change the default service and startup options in the system configuration. Figure 6-1 shows the Services and Startup options. Issue 19 ( ) Copyright Huawei Technologies Co., Ltd. 143


149 6 FAQs (End Users) Figure 6-1 Services and startup 2. Disable HDP services shown in Figure 6-2. Figure 6-2 HDP services 3. Uninstall programs shown in Figure 6-3. Issue 19 ( ) Copyright Huawei Technologies Co., Ltd. 144

 1.")
150 6 FAQs (End Users) Figure 6-3 Programs 4. End the LOCAL SERVICE, NETWORK SERVICE, or SYSTEM processes in Task Manager. Figure 6-4 shows the processes that cannot be ended. Figure 6-4 Task Manager Risky Operations (Network) 1. Disable NICs, and disable or modify network configurations, as shown in Figure 6-5. Issue 19 ( ) Copyright Huawei Technologies Co., Ltd. 145


151 6 FAQs (End Users) Figure 6-5 Local connection Risky Operations (Others) 2. Run the script or command for modifying a route, such as route DELETE *. 3. Delete ports 28511, 28512, 28521, and from Windows firewall exception options. 4. Enable software or tools, such as the IPsec, that can restrict network traffic. 1. Delete files or folders in C:\Program Files\Huawei listed in Figure 6-6. Figure 6-6 Folders 2. Enable the sleep function on desktops. The sleep function is disabled for desktops by default, as shown in Figure 6-7. Figure 6-7 Sleep function 3. Modify the configuration file of the HDP client (AccessAgent). 4. Run Rabbit Magic or Wopti Utilities to clean or optimize the registry. Issue 19 ( ) Copyright Huawei Technologies Co., Ltd. 146
152 6 FAQs (End Users) 5. Install a customized screensaver with complex transformation functions, which consumes system resources and causes a delay in desktop access. 6.3 What OSs Can Run on? runs Windows Server 2008 R2 or Windows Server 2016 and delivers the Windows 7 or Windows 10 desktop environment. 6.4 Can I Upgrade OSs by Myself? must use OSs provided by HUAWEI CLOUD or OSs made based on the OSs provided by HUAWEI CLOUD. You are not allowed to upgrade an OS but can install OS patches. 6.5 How Do I Install Applications on the Desktop? By default, end users are configured as local administrators and can install applications. Administrators can modify the settings to prevent end users from installing applications. An end user can install applications on the desktop using the following methods: NOTE The administrator must enable necessary policies and perform required configurations before the following methods are used. Method 1: using file copy 1. Download required applications to the local PC. 2. Copy the applications from the local PC to the desktop and install them. Method 2: using USB flash drive copy Copy the applications from the USB flash drive to the desktop and install them. Method 3: using the Internet Download the applications from the Internet to the desktop and install them. Method 4: using private images Contact the administrator to create the required desktop. Method 5: using application pushing Contact the administrator to push the required applications to your desktop and install them. 6.6 What Software Is Compatible with? Software that works with must be compatible with Windows Server 2008 R2 or Windows Server Issue 19 ( ) Copyright Huawei Technologies Co., Ltd. 147

153 6 FAQs (End Users) 6.7 How Does Manage Peripherals? If you encounter peripheral configuration problems when using, you can use HDPDeviceHelper. Choose Start > Huawei vdesk. Start HDPDeviceHelper and configure peripherals following the instructions. Figure 6-8 vdesk 6.8 Does Support Personalized Settings? By default, after logging in to, end users can personalize items, such as wallpapers, icons, and shortcuts for OSs. The settings will be retained until the next modification. Administrators can use policies, such as USB Redirection, Printer Redirection, File Redirection, and Clipboard Redirection to control data transmission and peripheral access permission between end users and. Installing a customized screensaver with complex transformation functions consumes system resources and causes a delay in desktop access. Issue 19 ( ) Copyright Huawei Technologies Co., Ltd. 148
154 6 FAQs (End Users) 6.9 Can Data in Be Saved for a Long Time? Yes. End users use desktops separated from other end users. Applications, documents, settings, and other data can be saved for a long time How Do I Use a Local Printer for Printing? If you have configured a local printer, the printer will be selected by default. If no printer is configured, you need to configure one. Then select the local printer from the printing menu and click Print How Do I Use a Network Printer for Printing? Any printer that resides in the same network as and is supported by Windows can be added as a network printer. After a network printer is added, you can select the printer in applications for printing What Should I Do If I Cannot Connect to the Desktop? During the use of desktops, connections to desktops may fail due to misoperations. If this happens, click to restart the desktops to resolve the problem. NOTE If desktops cannot be restarted or you cannot log in to the desktops after they are restarted, click to forcibly restart the desktops. Doing this may cause unsaved data to be lost. Therefore, exercise caution when forcibly restarting desktops How Do I Log In to the Desktop for Maintenance Using VNC? If you cannot log in to your desktop normally, you can log in to the desktop for maintenance using VNC. NOTE This function does not apply to scenarios where DirectConnect is used to access desktops. The procedure is as follows: 1. Log in to the desktop and enter the desktop list page. 2. Click, as shown in Figure 6-9. The VNC self-help console is displayed. NOTE If a black screen occurs, click Send CtrlAltDel in the upper-right corner of the window. Issue 19 ( ) Copyright Huawei Technologies Co., Ltd. 149

155 6 FAQs (End Users) Figure 6-9 Self-help console 6.14 What Should I Do If the Desktop Freezes When Using? If a fault such as desktop freezing or slow response occurs when you use a desktop, rectify the fault by performing operations provided in this section. Issue 19 ( ) Copyright Huawei Technologies Co., Ltd. 150
156 6 FAQs (End Users) Figure 6-10 Fault locating Method 1: Stopping Unnecessary Processes 1. On the desktop, open Task Manager. The following figure shows the Task Manager window. Issue 19 ( ) Copyright Huawei Technologies Co., Ltd. 151

157 6 FAQs (End Users) Figure 6-11 Windows Task Manager 2. View the processes that consume massive CPU and memory resources. 3. Save user documents. 4. Stop the processes that consume massive CPU and memory resources. Do not stop the processes mandatory for desktop operating. For details, see What Are the Precautions for Using?. Method 2: Restarting the Desktop 1. Save user documents. 2. Choose Start > Restart or click to restart the desktop, as shown in the following figure. NOTE If desktops cannot be restarted or you cannot log in to the desktops after they are restarted, click to forcibly restart the desktops. Data that is not saved may be lost after the desktops are forcibly restarted. Therefore, exercise caution when forcibly restarting desktops. Issue 19 ( ) Copyright Huawei Technologies Co., Ltd. 152
158 6 FAQs (End Users) Figure 6-12 Self-help console 3. On the login page that is displayed, enter the user domain account and password. 4. In the desktop list, click to go to the desktop How Do I Check the Network Status of Desktops? Perform the following operations to check the network status of desktops and determine the network segment where the fault occurs. Procedure Step 1 Step 2 Log in to the desktop. Move the cursor to the upper area of the desktop. The floating window is displayed, as shown in Figure Figure 6-13 Floating window Step 3 Click Network. The Connection Status dialog box is displayed. NOTE When the network connection is good, the network indicator is steady green. When the network connection is poor, the network indicator is steady yellow. When the network connection is bad, the network indicator is steady red. Step 4 On the Connection Status page, check Round-Trip Time. Figure 6-14 shows the network connection status. Issue 19 ( ) Copyright Huawei Technologies Co., Ltd. 153


159 6 FAQs (End Users) Figure 6-14 Network connection status Step 5 Step 6 Click Start. In the Search programs and files text box, type cmd, and press Enter. In the command-line interface, run the following command to check the network connectivity between the desktop and the terminal: ping Internet access address of the desktop NOTE The Internet access address of the desktop can be found in the desktop provisioning notification . Information similar to the following is displayed: Step 7 Determine the network segment where the fault occurs based on the results in Step 4 and Step 6. If the network latency in Step 4 and Step 6 is large, the public network is faulty. If the network latency in Step 4 is large but that in Step 6 is small, the internal network of is faulty. ----End 6.16 How Do I Change the Login Password? The passwords of accounts in the system must be changed periodically. The recommended interval is three months. The minimum validity period of a password is two days. Issue 19 ( ) Copyright Huawei Technologies Co., Ltd. 154
160 6 FAQs (End Users) You can perform the following steps to change the login password on the WI (desktop login page). Step 1 Use the original domain account and password to log in. The desktop list page is displayed. Step 2 On the desktop list page, click. Then click. Step 3 Step 4 Enter Old Password, New Password, and Confirm Password. Click OK. ----End 6.17 How Do I Change the Login Password (Mobile Client)? The passwords of accounts in the system must be changed periodically. The recommended interval is three months. The minimum validity period of a password is two days. You can perform the following steps to change the login password on the WI (desktop login page) through the FusionAccess client on a mobile terminal. Step 1 Open the FusionAccess client on the mobile terminal to go to the desktop login page. NOTE You must configure the desktop login address upon your initial login. Step 2 Step 3 Enter the username and password, and click Login. The VM list is displayed. Step 4 Click in the upper right corner and click Change Password. Step 5 The Change Password page is displayed. Step 6 Enter Old Password, New Password, and Confirm Password, as shown in Figure Issue 19 ( ) Copyright Huawei Technologies Co., Ltd. 155

161 6 FAQs (End Users) Figure 6-15 Change Password Step 7 Step 8 Choose Modify Password. The password is changed successfully. ----End 6.18 What Should I Do If I Forget the Password? If you lose or forget the login password, contact the administrator. After the administrator processing, the password resetting link will be sent to your address by the system. You can click the link to reset the password. The validity period of the password resetting link in the is 24 hours. Reset the password in a timely manner What Should I Do If the Account Is Locked? Your account will be locked if you enter an incorrect password consecutively. If this happens, contact the administrator to unlock the account. Issue 19 ( ) Copyright Huawei Technologies Co., Ltd. 156


 Description TC 1 -")


162 6 FAQs (End Users) 6.20 Does Support Dual-Screen Display? Prerequisites When accessing desktops using TCs, perform the following operations to configure dual-screen display. Table 6-1 lists the materials required for configuring dual-screen display. Table 6-1 Materials required for configuring dual-screen display Item Quantity Image (Example) Description TC 1 - Monitor/Converter 2 Typically, a monitor provides a DVI-D port and a VGA port. If two monitors have only VGA ports in some special cases, a DVI-D-to-VGA converter is required. DVI-I one-to-two cable 1 Converts DVI-I signals to DVI-D and VGA signals. DVI-D-to-DVI-D cable 1 - VGA-to-VGA cable 1 - Issue 19 ( ) Copyright Huawei Technologies Co., Ltd. 157
163 6 FAQs (End Users) Procedure Dual-Screen Connection Step 1 Connect a TC to monitors based on the monitor type. If the monitors provide DVI and VGA ports, go to Step 2. If the monitors provide VGA ports only, go to Step 3. Step 2 Connect the TC to the monitors, as shown in Figure Figure 6-16 Dual-screen connection Step 3 Connect the TC to the monitors, as shown in Figure Figure 6-17 Dual-screen connection ----End TC Setting Step 1 Power on the TC. Issue 19 ( ) Copyright Huawei Technologies Co., Ltd. 158
164 6 FAQs (End Users) Step 2 Step 3 Step 4 Step 5 Step 6 Step 7 Step 8 Step 9 Perform the following operation based on the TC type. Linux TC: Perform Step 3 to Step 7. Windows TC: Perform Step 8 to Step 10 Click Start, and choose Control Center. Double-click Display. Select Optimum settings. Select the display mode based on site requirements. Duplicate Extend Select the main monitor based on site requirements. DVI VGA The task is completed. Right-click on the desktop and choose Screen Resolution. Set Multiple displays based on site requirements. Duplicate these displays Extend these displays NOTE Only Extend these displays can be selected when two desktops and dual-screen display are used. Step 10 Click OK. ----End Client Setting Step 1 Step 2 Step 3 Step 4 Step 5 Perform the following operation based on the dual-screen display scenario. If a desktop and two screens are used, go to Step 2. If two desktops and two screens are used, go to Step 6. Log in to the desktop using the client. Click Settings. Select Open Multiple Monitor (The configuration will take effect after reconnect). Click Close. The task is completed. Step 6 Step 7 Step 8 Step 9 Log in to a desktop using the client. Click Settings. Deselect Open Multiple Monitor (The configuration will take effect after reconnect). Click Close. Step 10 Log in to the other desktop and repeat Step 6 to Step 9. Issue 19 ( ) Copyright Huawei Technologies Co., Ltd. 159

165 6 FAQs (End Users) Step 11 Drag the two desktops to different screens to achieve dual-screen display. ----End Others 6.21 What Should I Do If I Fail to Log In to the GPU Desktop Using an SC? If your PC desktop is configured with a non-standard screen resolution, login to the GPU desktop using an SC may fail. You can perform the following steps to solve the problem. Procedure NOTE Examples of standard screen resolutions: 1920 x 1080 and 1680 x 1050 Step 1 Step 2 Step 3 Set a standard screen resolution, such as 1920 x 1080 or 1680 x 1050, for your PC desktop. Delete the SetCLientToTop.txt file in C:\PermanenceDataPath. Log in to the GPU desktop again using an SC. ----End 6.22 How Do I Partition a Hard Disk Larger than 2 TB? Symptom Solution The default maximum storage space of the Windows data disk is 2 TB. If the purchased space is greater than 2 TB, the remaining space cannot be formatted. That is, the disk whose partition size is greater than 2 TB cannot be used. NOTE Before performing the following operations, ensure that the disk data to be formatted is cleared. Issue 19 ( ) Copyright Huawei Technologies Co., Ltd. 160

166 6 FAQs (End Users) Step 1 Right-click Computer on the desktop and choose Manage from the shortcut menu. The Server Manage window is displayed. Click Disk Management on the left. The disk management page is displayed, as shown in the following figure. Step 2 Step 3 If the disk to be formatted is DataDisk(D:), right-click DataDisk(D:) and choose Delete volume from the shortcut menu. After deleting the volume, right-click the block to which Disk 1 belongs and choose Convertto GPT Disk from the shortcut menu. The following figure shows the converted table: Step 4 Right-click Unallocated and choose New Simple volume from the shortcut menu. Format the disk as prompted. After the disk is formatted, you can use the disk. ----End Issue 19 ( ) Copyright Huawei Technologies Co., Ltd. 161
Workspace. User Guide (Administrators) Issue 18 Date HUAWEI TECHNOLOGIES CO., LTD.
 Issue 18 Date HUAWEI TECHNOLOGIES CO., LTD.") Issue 18 Date 2018-08-17 HUAWEI TECHNOLOGIES CO., LTD. Copyright Huawei Technologies Co., Ltd. 2018. All rights reserved. No part of this document may be reproduced or transmitted in any form or by any
Issue 18 Date 2018-08-17 HUAWEI TECHNOLOGIES CO., LTD. Copyright Huawei Technologies Co., Ltd. 2018. All rights reserved. No part of this document may be reproduced or transmitted in any form or by any
Workspace. User Guide (Administrators) Issue 04 Date HUAWEI TECHNOLOGIES CO., LTD.
 Issue 04 Date HUAWEI TECHNOLOGIES CO., LTD.") Issue 04 Date 2018-10-12 HUAWEI TECHNOLOGIES CO., LTD. Copyright Huawei Technologies Co., Ltd. 2018. All rights reserved. No part of this document may be reproduced or transmitted in any form or by any
Issue 04 Date 2018-10-12 HUAWEI TECHNOLOGIES CO., LTD. Copyright Huawei Technologies Co., Ltd. 2018. All rights reserved. No part of this document may be reproduced or transmitted in any form or by any
Workspace. User Guide (Administrators) Date
 Date") Date 2018-11-12 Contents Contents 1 Introduction... 1 1.1 Concepts... 1 1.1.1...1 1.1.2 Software Client... 2 1.1.3 Mobile Terminal... 2 1.1.4 Infrastructure Server... 2 1.1.5 AD Management Server... 2
Date 2018-11-12 Contents Contents 1 Introduction... 1 1.1 Concepts... 1 1.1.1...1 1.1.2 Software Client... 2 1.1.3 Mobile Terminal... 2 1.1.4 Infrastructure Server... 2 1.1.5 AD Management Server... 2
Workspace. User Guide (End Users) Date
 Date") Date 2018-11-16 Contents Contents 1 Basic Concepts...1 1.1 Getting to Know...1 1.2 Software Client... 1 1.3 Mobile Terminal... 1 1.4 Desktop...1 2 Common Operation...3 2.1 Logging In to a Desktop Using
Date 2018-11-16 Contents Contents 1 Basic Concepts...1 1.1 Getting to Know...1 1.2 Software Client... 1 1.3 Mobile Terminal... 1 1.4 Desktop...1 2 Common Operation...3 2.1 Logging In to a Desktop Using
Virtual Private Cloud. User Guide. Issue 21 Date HUAWEI TECHNOLOGIES CO., LTD.
 Issue 21 Date 2018-09-30 HUAWEI TECHNOLOGIES CO., LTD. Copyright Huawei Technologies Co., Ltd. 2018. All rights reserved. No part of this document may be reproduced or transmitted in any form or by any
Vulnerability Scan Service. User Guide. Issue 20 Date HUAWEI TECHNOLOGIES CO., LTD.
 Issue 20 Date 2018-08-30 HUAWEI TECHNOLOGIES CO., LTD. Copyright Huawei Technologies Co., Ltd. 2018. All rights reserved. No part of this document may be reproduced or transmitted in any form or by any
Elastic Load Balance. User Guide. Issue 01 Date HUAWEI TECHNOLOGIES CO., LTD.
 Issue 01 Date 2018-04-30 HUAWEI TECHNOLOGIES CO., LTD. 2018. All rights reserved. No part of this document may be reproduced or transmitted in any form or by any means without prior written consent of
Anti-DDoS. User Guide (Paris) Issue 01 Date HUAWEI TECHNOLOGIES CO., LTD.
 Issue 01 Date HUAWEI TECHNOLOGIES CO., LTD.") Issue 01 Date 2018-08-15 HUAWEI TECHNOLOGIES CO., LTD. Copyright Huawei Technologies Co., Ltd. 2018. All rights reserved. No part of this document may be reproduced or transmitted in any form or by any
Issue 01 Date 2018-08-15 HUAWEI TECHNOLOGIES CO., LTD. Copyright Huawei Technologies Co., Ltd. 2018. All rights reserved. No part of this document may be reproduced or transmitted in any form or by any
Web Cloud Solution. User Guide. Issue 01. Date
 Issue 01 Date 2017-05-30 Contents Contents 1 Overview... 3 1.1 What Is Web (CCE+RDS)?... 3 1.2 Why You Should Choose Web (CCE+RDS)... 3 1.3 Concept and Principle... 4... 5 2.1 Required Services... 5 2.2
Advanced Anti-DDoS. User Guide. Issue 17 Date HUAWEI TECHNOLOGIES CO., LTD.
 Issue 17 Date 2018-08-13 HUAWEI TECHNOLOGIES CO., LTD. Copyright Huawei Technologies Co., Ltd. 2019. All rights reserved. No part of this document may be reproduced or transmitted in any form or by any
Elastic Load Balance. User Guide. Issue 14 Date
 Issue 14 Date 2018-02-28 Contents Contents 1 Overview... 1 1.1 Basic Concepts... 1 1.1.1 Elastic Load Balance... 1 1.1.2 Public Network Load Balancer...1 1.1.3 Private Network Load Balancer... 2 1.1.4
Relational Database Service. User Guide. Issue 05 Date
 Issue 05 Date 2017-02-08 Contents Contents 1 Introduction... 1 1.1 Concepts... 2 1.1.1 RDS... 2 1.1.2 DB Cluster... 2 1.1.3 DB Instance... 2 1.1.4 DB Backup... 3 1.1.5 DB Snapshot... 3 1.2 RDS DB Instances...
Elastic Load Balancing. User Guide. Date
 Date 2018-07-20 Contents Contents 1 Product Description... 4 1.1 What Is Elastic Load Balancing (ELB)?... 4 1.2 Load Balancer Type... 4 1.3 Basic Architecture... 5 1.3.1 Classic Load Balancer... 5 1.3.2
Unified Load Balance. User Guide. Issue 04 Date
 Issue 04 Date 2017-09-06 Contents Contents 1 Overview... 1 1.1 Basic Concepts... 1 1.1.1 Unified Load Balance...1 1.1.2 Listener... 1 1.1.3 Health Check... 2 1.1.4 Region...2 1.1.5 Project...2 1.2 Functions...
Database Security Service. FAQs. Issue 19 Date HUAWEI TECHNOLOGIES CO., LTD.
 Issue 19 Date 2019-04-08 HUAWEI TECHNOLOGIES CO., LTD. Copyright Huawei Technologies Co., Ltd. 2019. All rights reserved. No part of this document may be reproduced or transmitted in any form or by any
Huawei FusionCloud Desktop Solution 5.3. Branch Technical White Paper. Issue 01. Date HUAWEI TECHNOLOGIES CO., LTD.
 Issue 01 Date 2015-06-30 HUAWEI TECHNOLOGIES CO., LTD. 2015. All rights reserved. No part of this document may be reproduced or transmitted in any form or by any means without prior written consent of
Object Storage Service. Client Guide (OBS Browser) Issue 10 Date HUAWEI TECHNOLOGIES CO., LTD.
 Issue 10 Date HUAWEI TECHNOLOGIES CO., LTD.") Issue 10 Date 2018-07-15 HUAWEI TECHNOLOGIES CO., LTD. 2018. All rights reserved. No part of this document may be reproduced or transmitted in any form or by any means without prior written consent of
Issue 10 Date 2018-07-15 HUAWEI TECHNOLOGIES CO., LTD. 2018. All rights reserved. No part of this document may be reproduced or transmitted in any form or by any means without prior written consent of
Object Storage Service. Product Introduction. Issue 04 Date HUAWEI TECHNOLOGIES CO., LTD.
 Issue 04 Date 2017-12-20 HUAWEI TECHNOLOGIES CO., LTD. 2017. All rights reserved. No part of this document may be reproduced or transmitted in any form or by any means without prior written consent of
271 Waverley Oaks Rd. Telephone: Suite 206 Waltham, MA USA
 Contacting Leostream Leostream Corporation http://www.leostream.com 271 Waverley Oaks Rd. Telephone: +1 781 890 2019 Suite 206 Waltham, MA 02452 USA To submit an enhancement request, email features@leostream.com.
Anti-DDoS. User Guide. Issue 05 Date
 Issue 05 Date 2017-02-08 Contents Contents 1 Introduction... 1 1.1 Functions... 1 1.2 Application Scenarios...1 1.3 Accessing and Using Anti-DDoS... 2 1.3.1 How to Access Anti-DDoS...2 1.3.2 How to Use
CDN. Product Description. Issue 03 Date HUAWEI TECHNOLOGIES CO., LTD.
 Issue 03 Date 2018-08-30 HUAWEI TECHNOLOGIES CO., LTD. Copyright Huawei Technologies Co., Ltd. 2018. All rights reserved. No part of this document may be reproduced or transmitted in any form or by any
SAP HANA. HA and DR Guide. Issue 03 Date HUAWEI TECHNOLOGIES CO., LTD.
 Issue 03 Date 2018-05-23 HUAWEI TECHNOLOGIES CO., LTD. Copyright Huawei Technologies Co., Ltd. 2019. All rights reserved. No part of this document may be reproduced or transmitted in any form or by any
Huawei FusionCloud Desktop Solution 5.1 Resource Reuse Technical White Paper HUAWEI TECHNOLOGIES CO., LTD. Issue 01.
 Huawei FusionCloud Desktop Solution 5.1 Resource Reuse Technical White Paper Issue 01 Date 2014-03-26 HUAWEI TECHNOLOGIES CO., LTD. 2014. All rights reserved. No part of this document may be reproduced
Object Storage Service. Client Guide (OBS Browser) Issue 02 Date HUAWEI TECHNOLOGIES CO., LTD.
 Issue 02 Date HUAWEI TECHNOLOGIES CO., LTD.") Issue 02 Date 2018-01-17 HUAWEI TECHNOLOGIES CO., LTD. 2018. All rights reserved. No part of this document may be reproduced or transmitted in any form or by any means without prior written consent of
Issue 02 Date 2018-01-17 HUAWEI TECHNOLOGIES CO., LTD. 2018. All rights reserved. No part of this document may be reproduced or transmitted in any form or by any means without prior written consent of
Elastic Compute Service. Quick Start for Windows
 Overview Purpose of this document This document describes how to quickly create an instance running Windows, connect to an instance remotely, and deploy the environment. It is designed to walk you through
Virtual Private Cloud. User Guide. Issue 03 Date
 Issue 03 Date 2016-10-19 Change History Change History Release Date What's New 2016-10-19 This issue is the third official release. Modified the following content: Help Center URL 2016-07-15 This issue
SAP Business One. User Guide. Issue 04 Date HUAWEI TECHNOLOGIES CO., LTD.
 Issue 04 Date 2018-12-31 HUAWEI TECHNOLOGIES CO., LTD. Copyright Huawei Technologies Co., Ltd. 2019. All rights reserved. No part of this document may be reproduced or transmitted in any form or by any
Getting Started with Amazon Web Services
 Getting Started with Amazon Web Services Version 3.3 September 24, 2013 Contacting Leostream Leostream Corporation 411 Waverley Oaks Rd. Suite 316 Waltham, MA 02452 USA http://www.leostream.com Telephone:
Mediant Cloud Edition (CE)
") Installation Manual AudioCodes Mediant Family of Session Border Controllers (SBC) Mediant Cloud Edition (CE) Session Border Controller Version 7.2 Installation Manual Contents Table of Contents 1 Introduction...
Installation Manual AudioCodes Mediant Family of Session Border Controllers (SBC) Mediant Cloud Edition (CE) Session Border Controller Version 7.2 Installation Manual Contents Table of Contents 1 Introduction...
Domain Name Service. FAQs. Issue 07 Date HUAWEI TECHNOLOGIES CO., LTD.
 Issue 07 Date 2019-03-05 HUAWEI TECHNOLOGIES CO., LTD. Copyright Huawei Technologies Co., Ltd. 2019. All rights reserved. No part of this document may be reproduced or transmitted in any form or by any
Amazon AppStream 2.0: SOLIDWORKS Deployment Guide
 2018 Amazon AppStream 2.0: SOLIDWORKS Deployment Guide Build an Amazon AppStream 2.0 environment to stream SOLIDWORKS to your users June 2018 https://aws.amazon.com/appstream2/ 1 Welcome This guide describes
ElasterStack 3.2 User Administration Guide - Advanced Zone
 ElasterStack 3.2 User Administration Guide - Advanced Zone With Advance Zone Configuration TCloud Computing Inc. 6/22/2012 Copyright 2012 by TCloud Computing, Inc. All rights reserved. This document is
My Account. User Guide. Issue 01 Date HUAWEI TECHNOLOGIES CO., LTD.
 Issue 01 Date 2018-09-28 HUAWEI TECHNOLOGIES CO., LTD. Copyright Huawei Technologies Co., Ltd. 2018. All rights reserved. No part of this document may be reproduced or transmitted in any form or by any
AD SSO Technical White Paper
 Issue V1.0 Date 2017-02-28 Huawei Technologies Co., Ltd. 2017. All rights reserved. No part of this document may be reproduced or transmitted in any form or by any means without prior written consent of
Third-Party Client (s3fs) User Guide
 User Guide") Issue 02 Date 2017-09-28 HUAWEI TECHNOLOGIES CO., LTD. 2018. All rights reserved. No part of this document may be reproduced or transmitted in any form or by any means without prior written consent of
Issue 02 Date 2017-09-28 HUAWEI TECHNOLOGIES CO., LTD. 2018. All rights reserved. No part of this document may be reproduced or transmitted in any form or by any means without prior written consent of
How to set up a Virtual Private Cloud (VPC)
") Date published: 15.06.2018 Estimated reading time: 20 minutes Authors: Editorial Team The bookmarks and navigation in this tutorial are optimized for Adobe Reader. How to set up a Virtual Private Cloud
Date published: 15.06.2018 Estimated reading time: 20 minutes Authors: Editorial Team The bookmarks and navigation in this tutorial are optimized for Adobe Reader. How to set up a Virtual Private Cloud
VMware vcloud Air User's Guide
 vcloud Air This document supports the version of each product listed and supports all subsequent versions until the document is replaced by a new edition. To check for more recent editions of this document,
Service Portal User Guide
 FUJITSU Cloud Service K5 IaaS Service Portal User Guide Version 1.4 FUJITSU LIMITED All Rights Reserved, Copyright FUJITSU LIMITED 2015-2016 K5IA-DC-M-005-001E Preface Purpose of This Manual This manual
Direct Connect. User Guide. Issue 4 Date
 Issue 4 Date 2017-10-30 Contents Contents 1 Change History... 1 2 Overview... 6 2.1 What Is Direct Connect?...6 2.2 Direct Connect Application Scenarios... 6 2.3 Charging Standards...7 3 Getting Started...
Third-Party Client (s3fs) User Guide
 User Guide") Issue 02 Date 2017-09-28 HUAWEI TECHNOLOGIES CO., LTD. 2017. All rights reserved. No part of this document may be reproduced or transmitted in any form or by any means without prior written consent of
Issue 02 Date 2017-09-28 HUAWEI TECHNOLOGIES CO., LTD. 2017. All rights reserved. No part of this document may be reproduced or transmitted in any form or by any means without prior written consent of
Anti-DDoS. FAQs. Issue 11 Date HUAWEI TECHNOLOGIES CO., LTD.
 Issue 11 Date 2018-05-28 HUAWEI TECHNOLOGIES CO., LTD. Copyright Huawei Technologies Co., Ltd. 2019. All rights reserved. No part of this document may be reproduced or transmitted in any form or by any
Cloudera s Enterprise Data Hub on the Amazon Web Services Cloud: Quick Start Reference Deployment October 2014
 Cloudera s Enterprise Data Hub on the Amazon Web Services Cloud: Quick Start Reference Deployment October 2014 Karthik Krishnan Page 1 of 20 Table of Contents Table of Contents... 2 Abstract... 3 What
NetApp Cloud Volumes Service for AWS
 NetApp Cloud Volumes Service for AWS AWS Account Setup Cloud Volumes Team, NetApp, Inc. March 29, 2019 Abstract This document provides instructions to set up the initial AWS environment for using the NetApp
unisys Unisys Stealth(cloud) for Amazon Web Services Deployment Guide Release 2.0 May
 for Amazon Web Services Deployment Guide Release 2.0 May") unisys Unisys Stealth(cloud) for Amazon Web Services Deployment Guide Release 2.0 May 2016 8205 5658-002 NO WARRANTIES OF ANY NATURE ARE EXTENDED BY THIS DOCUMENT. Any product or related information described
unisys Unisys Stealth(cloud) for Amazon Web Services Deployment Guide Release 2.0 May 2016 8205 5658-002 NO WARRANTIES OF ANY NATURE ARE EXTENDED BY THIS DOCUMENT. Any product or related information described
Virtual Private Network. Network User Guide. Issue 05 Date
 Issue 05 Date 2018-03-30 Contents Contents 1 Overview... 1 1.1 Concepts... 1 1.1.1 VPN... 1 1.1.2 IPsec VPN...1 1.2 Application Scenarios...2 1.3 Billing Standards... 3 1.4 VPN Reference Standards and
ForeScout CounterACT. (AWS) Plugin. Configuration Guide. Version 1.3
 Plugin. Configuration Guide. Version 1.3") ForeScout CounterACT Hybrid Cloud Module: Amazon Web Services (AWS) Plugin Version 1.3 Table of Contents Amazon Web Services Plugin Overview... 4 Use Cases... 5 Providing Consolidated Visibility... 5 Dynamic
ForeScout CounterACT Hybrid Cloud Module: Amazon Web Services (AWS) Plugin Version 1.3 Table of Contents Amazon Web Services Plugin Overview... 4 Use Cases... 5 Providing Consolidated Visibility... 5 Dynamic
HySecure Quick Start Guide. HySecure 5.0
 HySecure Quick Start Guide HySecure 5.0 Last Updated: 25 May 2017 2012-2017 Propalms Technologies Private Limited. All rights reserved. The information contained in this document represents the current
Domain Name Service. Product Description. Issue 03 Date HUAWEI TECHNOLOGIES CO., LTD.
 Issue 03 Date 2018-08-15 HUAWEI TECHNOLOGIES CO., LTD. Copyright Huawei Technologies Co., Ltd. 2018. All rights reserved. No part of this document may be reproduced or transmitted in any form or by any
ForeScout Extended Module for MobileIron
 Version 1.8 Table of Contents About MobileIron Integration... 4 Additional MobileIron Documentation... 4 About this Module... 4 How it Works... 5 Continuous Query Refresh... 5 Offsite Device Management...
SAS Visual Analytics 7.3 for SAS Cloud: Onboarding Guide
 SAS Visual Analytics 7.3 for SAS Cloud: Onboarding Guide Introduction This onboarding guide covers tasks that account administrators need to perform to set up SAS Visual Statistics and SAS Visual Analytics
DSS User Guide. End User Guide. - i -
 DSS User Guide End User Guide - i - DSS User Guide Table of Contents End User Guide... 1 Table of Contents... 2 Part 1: Getting Started... 1 How to Log in to the Web Portal... 1 How to Manage Account Settings...
FUJITSU Cloud Service S5. Introduction Guide. Ver. 1.3 FUJITSU AMERICA, INC.
 FUJITSU Cloud Service S5 Introduction Guide Ver. 1.3 FUJITSU AMERICA, INC. 1 FUJITSU Cloud Service S5 Introduction Guide Ver. 1.3 Date of publish: September, 2011 All Rights Reserved, Copyright FUJITSU
End User Manual. December 2014 V1.0
 End User Manual December 2014 V1.0 Contents Getting Started... 4 How to Log into the Web Portal... 5 How to Manage Account Settings... 6 The Web Portal... 8 How to Upload Files in the Web Portal... 9 How
Comodo IT and Security Manager Software Version 6.9
 Comodo IT and Security Manager Software Version 6.9 End User Guide Guide Version 6.9.072817 Comodo Security Solutions 1255 Broad Street Clifton, NJ 07013 Table of Contents 1. Introduction to Comodo IT
Comodo IT and Security Manager Software Version 6.4
 Comodo IT and Security Manager Software Version 6.4 End User Guide Guide Version 6.4.040417 Comodo Security Solutions 1255 Broad Street Clifton, NJ 07013 Table of Contents 1. Introduction to Comodo IT
Cloud Stream Service. User Guide. Issue 18 Date HUAWEI TECHNOLOGIES CO., LTD.
 Issue 18 Date 2018-11-30 HUAWEI TECHNOLOGIES CO., LTD. Copyright Huawei Technologies Co., Ltd. 2018. All rights reserved. No part of this document may be reproduced or transmitted in any form or by any
Web Portal User Guide Leap GIO Public. Leap GIO Public. New Generation - Web Portal User Guide. Copyright 2017 by Leap Solutions Asia Co., Ltd.
 New Generation - Web Portal User Guide 1 Page Contents 1 General... 3 1.1 Overview... 3 1.2 Definition... 3 1.3 Access the Web Portal... 3 2 Sign-Up... 4 2.1 Personal Account... 4 2.2 Corporate Account...
ForeScout Amazon Web Services (AWS) Plugin
 Plugin") ForeScout Amazon Web Services (AWS) Plugin Version 1.1.1 and above Table of Contents Amazon Web Services Plugin Overview... 4 Use Cases... 5 Providing Consolidated Visibility... 5 Dynamic Segmentation
ForeScout Amazon Web Services (AWS) Plugin Version 1.1.1 and above Table of Contents Amazon Web Services Plugin Overview... 4 Use Cases... 5 Providing Consolidated Visibility... 5 Dynamic Segmentation
HUAWEI Secospace USG Series User Management and Control White Paper
 Doc. code HUAWEI Secospace USG Series User Management and Control White Paper Issue 1.0 Date 2014-03-27 HUAWEI TECHNOLOGIES CO., LTD. Copyright Huawei Technologies Co., Ltd. 2012. All rights reserved.
Virtual Private Cloud. User Guide
 Alibaba Cloud provides a default VPC and VSwitch for you in the situation that you do not have any existing VPC and VSwitch to use when creating a cloud product instance. A default VPC and VSwitch will
Live Streaming Accelerator. Quick Start. Issue 03 Date HUAWEI TECHNOLOGIES CO., LTD.
 Issue 03 Date 2018-08-30 HUAWEI TECHNOLOGIES CO., LTD. Copyright Huawei Technologies Co., Ltd. 2018. All rights reserved. No part of this document may be reproduced or transmitted in any form or by any
 Trend Micro Incorporated reserves the right to make changes to this document and to the product described herein without notice. Before installing and using the product, please review the readme files,
PrinterOn Embedded Agent for Samsung Printers and MFPs. Setup Guide for PrinterOn Hosted
 PrinterOn Embedded Agent for Samsung Printers and MFPs Setup Guide for PrinterOn Hosted Contents Chapter 1: Introduction... 3 Overview: Setting up the PrinterOn Embedded Agent... 4 PrinterOn service prerequisites...
Comodo IT and Security Manager Software Version 6.6
 Comodo IT and Security Manager Software Version 6.6 End User Guide Guide Version 6.6.053117 Comodo Security Solutions 1255 Broad Street Clifton, NJ 07013 Table of Contents 1. Introduction to Comodo IT
Splashtop Enterprise for IoT Devices - Quick Start Guide v1.0
 Introduction For information about different deployment choices, please see chapter 3 of the full Splashtop Center Administrator s Guide. Splashtop Enterprise for IoT Devices is comprised of three components:
Contents Using the Primavera Cloud Service Administrator's Guide... 9 Web Browser Setup Tasks... 10
 Cloud Service Administrator's Guide 15 R2 March 2016 Contents Using the Primavera Cloud Service Administrator's Guide... 9 Web Browser Setup Tasks... 10 Configuring Settings for Microsoft Internet Explorer...
Getting Started with Soonr
 WWW.SOONR.COM Getting Started with Soonr A Quick Start Guide for New Users Soonr Inc. 12/19/2012 Revision 1.1 Copyright 2012, Soonr Inc., all rights reserved. Table of Contents 1 How Soonr Workplace Works...
VMware Identity Manager Connector Installation and Configuration (Legacy Mode)
") VMware Identity Manager Connector Installation and Configuration (Legacy Mode) VMware Identity Manager This document supports the version of each product listed and supports all subsequent versions until
VMware Identity Manager Connector Installation and Configuration (Legacy Mode) VMware Identity Manager This document supports the version of each product listed and supports all subsequent versions until
Ansible Tower Quick Setup Guide
 Ansible Tower Quick Setup Guide Release Ansible Tower 2.4.5 Red Hat, Inc. Jun 06, 2017 CONTENTS 1 Quick Start 2 2 Login as a Superuser 3 3 Import a License 4 4 Examine the Tower Dashboard 6 5 The Setup
ArcGIS 10.3 Server on Amazon Web Services
 ArcGIS 10.3 Server on Amazon Web Services Copyright 1995-2016 Esri. All rights reserved. Table of Contents Introduction What is ArcGIS Server on Amazon Web Services?............................... 5 Quick
CA Agile Central Administrator Guide. CA Agile Central On-Premises
 CA Agile Central Administrator Guide CA Agile Central On-Premises 2018.1 Table of Contents Overview... 3 Server Requirements...3 Browser Requirements...3 Access Help and WSAPI...4 Time Zone...5 Architectural
ForeScout Extended Module for MaaS360
 Version 1.8 Table of Contents About MaaS360 Integration... 4 Additional ForeScout MDM Documentation... 4 About this Module... 4 How it Works... 5 Continuous Query Refresh... 5 Offsite Device Management...
Avalanche Remote Control User Guide. Version 4.1
 Avalanche Remote Control User Guide Version 4.1 ii Copyright 2012 by Wavelink Corporation. All rights reserved. Wavelink Corporation 10808 South River Front Parkway, Suite 200 South Jordan, Utah 84095
DESS. User Guide. Issue 06 Date HUAWEI TECHNOLOGIES CO., LTD.
 Issue 06 Date 2018-12-20 HUAWEI TECHNOLOGIES CO., LTD. Copyright Huawei Technologies Co., Ltd. 2018. All rights reserved. No part of this document may be reproduced or transmitted in any form or by any
OnCommand Cloud Manager 3.2 Deploying and Managing ONTAP Cloud Systems
 OnCommand Cloud Manager 3.2 Deploying and Managing ONTAP Cloud Systems April 2017 215-12035_C0 doccomments@netapp.com Table of Contents 3 Contents Before you create ONTAP Cloud systems... 5 Logging in
Setting Up Resources in VMware Identity Manager (On Premises) Modified on 30 AUG 2017 VMware AirWatch 9.1.1
 Modified on 30 AUG 2017 VMware AirWatch 9.1.1") Setting Up Resources in VMware Identity Manager (On Premises) Modified on 30 AUG 2017 VMware AirWatch 9.1.1 Setting Up Resources in VMware Identity Manager (On Premises) You can find the most up-to-date
Setting Up Resources in VMware Identity Manager (On Premises) Modified on 30 AUG 2017 VMware AirWatch 9.1.1 Setting Up Resources in VMware Identity Manager (On Premises) You can find the most up-to-date
Huawei Agile Controller. Agile Controller 1
 Huawei Agile Controller Agile Controller 1 Agile Controller 1 Product Overview Agile Controller is the latest user- and application-based network resource auto control system offered by Huawei. Following
Open Telekom Cloud Tutorial: Getting Started. Date published: Estimated reading time: 20 minutes Authors: Editorial Team
 Date published: 03.08.2018 Estimated reading time: 20 minutes Authors: Editorial Team The bookmarks and navigation in this tutorial are optimized for Adobe Reader. Getting Started 1. Introduction 2. Prerequisites
Confluence Data Center on the AWS Cloud
 Confluence Data Center on the AWS Cloud Quick Start Reference Deployment March 2017 Atlassian AWS Quick Start Reference Team Contents Overview... 2 Costs and Licenses... 2 Architecture... 3 Prerequisites...
CITRIX 1Y0-200 EXAM QUESTIONS & ANSWERS
 CITRIX 1Y0-200 EXAM QUESTIONS & ANSWERS Number: 1Y0-200 Passing Score: 800 Time Limit: 120 min File Version: 38.7 http://www.gratisexam.com/ CITRIX 1Y0-200 EXAM QUESTIONS & ANSWERS Exam Name: Managing
CPM. Quick Start Guide V2.4.0
 CPM Quick Start Guide V2.4.0 1 Content 1 Introduction... 3 Launching the instance... 3 CloudFormation... 3 CPM Server Instance Connectivity... 3 2 CPM Server Instance Configuration... 4 CPM Server Configuration...
StarWind Virtual SAN AWS EC2 Deployment Guide
 One Stop Virtualization Shop StarWind Virtual SAN AUGUST 2018 TECHNICAL PAPER Trademarks StarWind, StarWind Software and the StarWind and the StarWind Software logos are registered trademarks of StarWind
271 Waverley Oaks Rd. Telephone: Suite 206 Waltham, MA USA
 f Contacting Leostream Leostream Corporation http://www.leostream.com 271 Waverley Oaks Rd. Telephone: +1 781 890 2019 Suite 206 Waltham, MA 02452 USA To submit an enhancement request, email features@leostream.com.
vcloud Director User's Guide
 vcloud Director 8.0 This document supports the version of each product listed and supports all subsequent versions until the document is replaced by a new edition. To check for more recent editions of
ServiceStage. User Guide. Issue 01 Date
 Issue 01 Date 2018-06-26 Contents Contents 1 Environment Preparation...1 2 Console... 3 3 Resource Preparation... 5 3.1 Creating a Cluster... 5 3.2 Creating a Namespace... 11 3.3 Adding a Node...12 3.4
OBS. Management Console Operation Guide. Issue 02 Date HUAWEI TECHNOLOGIES CO., LTD.
 Management Console Operation Guide Issue 02 Date 2015-10-30 HUAWEI TECHNOLOGIES CO., LTD. 2015. All rights reserved. No part of this document may be reproduced or transmitted in any form or by any means
NGF0502 AWS Student Slides
 NextGen Firewall AWS Use Cases Barracuda NextGen Firewall F Implementation Guide Architectures and Deployments Based on four use cases Edge Firewall Secure Remote Access Office to Cloud / Hybrid Cloud
imanager NetEco 1000S V001R002C70 User Manual Date HUAWEI TECHNOLOGIES CO., LTD.
 V001R002C70 Issue Draft C Date 2017-12-14 HUAWEI TECHNOLOGIES CO., LTD. 2017. All rights reserved. No part of this document may be reproduced or transmitted in any form or by any means without prior written
Blazer Express FAQ. Blazer Express V1.4 Frequently Asked Questions (FAQ)
") Blazer Express V1.4 Frequently Asked s (FAQ) Frequently Asked s COPYRIGHT 2017 Hangzhou Hikvision Digital Technology Co., Ltd. ALL RIGHTS RESERVED. Any and all information, including, among others, wordings,
Blazer Express V1.4 Frequently Asked s (FAQ) Frequently Asked s COPYRIGHT 2017 Hangzhou Hikvision Digital Technology Co., Ltd. ALL RIGHTS RESERVED. Any and all information, including, among others, wordings,
HikCentral Web Client User Manual
 HikCentral Web Client User Manual Table of Content Disclaimer... 1 Overview... 2 About This Document... 2 Introduction to HikCentral... 3 Administrator Rights... 4 Getting Started... 5 Installation and
Online Help StruxureWare Data Center Expert
 Online Help StruxureWare Data Center Expert Version 7.2.7 What's New in StruxureWare Data Center Expert 7.2.x Learn more about the new features available in the StruxureWare Data Center Expert 7.2.x release.
Amazon AppStream 2.0: Getting Started Guide
 2018 Amazon AppStream 2.0: Getting Started Guide Build an Amazon AppStream 2.0 environment to stream desktop applications to your users April 2018 https://aws.amazon.com/appstream2/ 1 Welcome This guide
USER GUIDE. CTERA Agent for Windows. June 2016 Version 5.5
 USER GUIDE CTERA Agent for Windows June 2016 Version 5.5 Copyright 2009-2016 CTERA Networks Ltd. All rights reserved. No part of this document may be reproduced in any form or by any means without written
Service Activation of AT&T NetBond
 Service Activation of AT&T NetBond For SunGard Availability Services TM (AS) and AT&T Enterprise Recovery Services (ERS) Publication Date: 11/16/2015 Revision: 1.0 Legal Disclaimer Copyright AT&T Intellectual
Installing and Configuring vcloud Connector
 Installing and Configuring vcloud Connector vcloud Connector 2.6.0 This document supports the version of each product listed and supports all subsequent versions until the document is replaced by a new
The following device commands are used most frequently: Lock/Unlock device O - O O. Reset screen password O - O - Factory reset + Initialize SD Card
 10 Device management Administrators can install apps on an activated device using device commands and check the profiles settings. Moreover, they can update, delete, or re-install apps installed on users'
22 August 2018 NETOP REMOTE CONTROL PORTAL USER S GUIDE
 22 August 2018 NETOP REMOTE CONTROL PORTAL USER S GUIDE CONTENTS 1 Overview... 3 1.1 Netop Remote Control Portal... 3 1.2 Technical Requirements... 3 2 General... 4 2.1 Authentication... 4 2.1.1 Forgot
GRS Enterprise Synchronization Tool
 GRS Enterprise Synchronization Tool Last Revised: Thursday, April 05, 2018 Page i TABLE OF CONTENTS Anchor End User Guide... Error! Bookmark not defined. Last Revised: Monday, March 12, 2018... 1 Table
DiskPulse DISK CHANGE MONITOR
 DiskPulse DISK CHANGE MONITOR User Manual Version 10.5 Feb 2018 www.diskpulse.com info@flexense.com 1 1 DiskPulse Overview...3 2 DiskPulse Product Versions...5 3 Using Desktop Product Version...6 3.1 Product
Viz Licensing Administrator Guide. Product Version 1.0 November 27, 2017
 Viz Licensing Administrator Guide Product Version 1.0 November 27, 2017 Copyright 2017 Vizrt. All rights reserved. No part of this software, documentation or publication may be reproduced, transcribed,