PEAP under Cisco Unified Wireless Networks with ACS 4.0 and Windows 2003
|
|
|
- Harry Kelley
- 6 years ago
- Views:
Transcription
1 PEAP under Cisco Unified Wireless Networks with ACS 4.0 and Windows 2003 Document ID: Contents Introduction Prerequisites Requirements Components Used Network Diagram Conventions Windows Enterprise 2003 Setup with IIS, Certificate Authority, DNS, DHCP (DC_CA) DC_CA (wirelessdemoca) Windows Standard 2003 Setup with Cisco Secure ACS 4.0 Basic Installation and Configuration Cisco Secure ACS 4.0 Installation Cisco LWAPP Controller Configuration Create the Necessary Configuration for WPAv2/WPA PEAP Authentication Install the Certificate Templates Snap in Create the Certificate Template for the ACS Web Server Enable the New ACS Web Server Certificate Template ACS 4.0 Certificate Setup Configure Exportable Certificate for ACS Install the Certificate in ACS 4.0 Software CLIENT Configuration for PEAP using Windows Zero Touch Perform a Basic Installation and Configuraiton Install the Wireless Network Adapter Configure the Wireless Network Connection Problem: Odyssey Client Prompts Three Times for Token Authentication Platform PEAP Authentication Fails with ACS Server Related Information Introduction This document describes how to configure secure wireless access using Wireless LAN controllers, Microsoft Windows 2003 software and Cisco Secure Access Control Server (ACS) 4.0 via Protected Extensible Authentication Protocol (PEAP) with Microsoft Challenge Handshake Authentication Protocol (MS CHAP) version 2. Note: For information about the deployment of secure wireless, refer to the Microsoft Wi Fi web site Cisco SAFE Wireless Blueprint. and Prerequisites
2 Requirements There is an assumption that the installer has knowledge of basic Windows 2003 installation and Cisco controller installation as this document only covers the specific configurations to facilitate the tests. For initial installation and configuration information for the Cisco 4400 Series Controllers, refer to the Quick Start Guide: Cisco 4400 Series Wireless LAN Controllers. For initial installation and configuration information for the Cisco 2000 Series Controllers, refer to the Quick Start Guide: Cisco 2000 Series Wireless LAN Controllers. Microsoft Windows 2003 installation and configuration guides can be found at Installing Windows Server 2003 R2. Before you begin, install the Microsoft Windows Server 2003 with SP1 operating system on each of the servers in the test lab and update all Service Packs. Install the controllers and lightweight access points (LAPs) and ensure that the latest software updates are configured. Important: At the time of this writing, SP1 is the latest Microsoft Windows Server 2003 update, and SP2 with update patches is the latest software for Microsoft Windows XP Professional. Windows Server 2003 with SP1, Enterprise Edition, is used so that autoenrollment of user and workstation certificates for PEAP authentication can be configured. Certificate autoenrollment and autorenewal make it easier to deploy certificates and improve security by automatically expiring and renewing certificates. Components Used The information in this document is based on these software and hardware versions: Cisco 2006 or 4400 Series Controller that runs Cisco 1131 Lightweight Access Point Protocol (LWAPP) AP Windows 2003 Enterprise with Internet Information Server (IIS), Certificate Authority (CA), DHCP, and Domain Name System (DNS) installed Windows 2003 Standard with Access Control Server (ACS) 4.0 Windows XP Professional with SP (and updated Service Packs) and wireless network interface card (NIC) (with CCX v3 support) or third party supplicant. Cisco 3560 Switch Network Diagram This document uses this network setup: Cisco Secure Wireless Lab Topology
3 The primary purpose of this document is to provide you the step by step procedure to implement the PEAP under Unified Wireless Networks with ACS 4.0 and the Windows 2003 Enterprise server. The main emphasis is on auto enrollment of the client so that the client auto enrolls and takes the certificate from the server. Note: In order to add Wi Fi Protected Access (WPA)/WPA2 with Temporal Key Integrity Protocol (TKIP)/Advanced Encryption Standard (AES) to Windows XP Professional with SP, refer to WPA2/Wireless Provisioning Services Information Element (WPS IE) update for Windows XP with Service Pack 2. The information in this document was created from the devices in a specific lab environment. All of the devices used in this document started with a cleared (default) configuration. If your network is live, make sure that you understand the potential impact of any command. Conventions Refer to the Cisco Technical Tips Conventions for more information on document conventions. Windows Enterprise 2003 Setup with IIS, Certificate Authority, DNS, DHCP (DC_CA) DC_CA (wirelessdemoca) DC_CA is a computer that runs Windows Server 2003 with SP1, Enterprise Edition, and performs these roles: A domain controller for the wirelessdemo.local domain that runs IIS A DNS server for the wirelessdemo.local DNS domain A DHCP server Enterprise root CA for the wirelessdemo.local domain Complete these steps in order to configure DC_CA for these services: 1. Perform a basic installation and configuration. 2. Configure the computer as a domain controller.
4 3. Raise the domain functional level. 4. Install and configure DHCP. 5. Install certificate services. 6. Verify Administrator permissions for certificates. 7. Add computers to the domain. 8. Allow wireless access to computers. 9. Add users to the domain. 10. Allow wireless access to users. 11. Add groups to the domain. 12. Add users to the WirelessUsers group. 13. Add client computers to the WirelessUsers group. Step 1: Perform Basic Installation and Configuration Complete these steps: 1. Install Windows Server 2003 with SP1, Enterprise Edition, as a stand alone server. 2. Configure the TCP/IP protocol with the IP address of and the subnet mask of Step 2: Configure the Computer as a Domain Controller Complete these steps: 1. In order to start the Active Directory Installation wizard, choose Start > Run, type dcpromo.exe, and click OK. 2. On the Welcome to the Active Directory Installation Wizard page, click Next. 3. On the Operating System Compatibility page, click Next. 4. On the Domain Controller Type page, select Domain Controller for a new Domain and click Next. 5. On the Create New Domain page, select Domain in a new forest and click Next. 6. On the Install or Configure DNS page, select No, just install and configure DNS on this computer and click Next. 7. On the New Domain Name page, type wirelessdemo.local and click Next. 8. On the NetBIOS Domain Name page, enter the Domain NetBIOS name as wirelessdemo and click Next. 9. In the Database and Log Folders Locations page, accept the default Database and Log Folders directories and click Next.


5 10. In the Shared System Volume page, verify that the default folder location is correct and click Next. 11. On the Permissions page, verify that Permissions compatible only with Windows 2000 or Windows Server 2003 operating systems is selected and click Next.


6 12. On the Directory Services Restore Mode Administration Password page, leave the password boxes blank and click Next. 13. Review the information on the Summary page and click Next. 14. When you are done with the Active Directory installation, click Finish.
, and then right click the")
7 15. When prompted to restart the computer, click Restart Now. Step 3: Raise the Domain Functional Level Complete these steps: 1. Open the Active Directory Domains and Trusts snap in from the Administrative Tools folder (Start > Programs > Administrative Tools > Active Directory Domains and Trusts), and then right click the domain computer DC_CA.wirelessdemo.local. 2. Click Raise Domain Functional Level, and then select Windows Server 2003 on the Raise Domain Functional Level page. 3. Click Raise, click OK, and then click OK again. Step 4: Install and Configure DHCP Complete these steps: 1. Install Dynamic Host Configuration Protocol (DHCP) as a Networking Service component by using Add or Remove Programs in the Control Panel. 2. Open the DHCP snap in from the Administrative Tools folder (Start > Programs > Administrative Tools > DHCP), and then highlight the DHCP server, DC_CA.wirelessdemo.local. 3. Click Action, and then click Authorize in order to authorize the DHCP service. 4. In the console tree, right click DC_CA.wirelessdemo.local, and then click New Scope. 5. On the Welcome page of the New Scope wizard, click Next. 6. On the Scope Name page, type CorpNet in the Name field.

8 7. Click Next and fill in these parameters: Start IP address End IP address Length24 Subnet mask


9 8. Click Next and enter for the Start IP address and for the End IP address to be excluded. Then click Next. This reserves the IP addresses in the range from to These reserve IP addresses are not allotted by the DHCP server. 9. On the Lease Duration page, click Next.


10 10. On the Configure DHCP Options page, choose Yes, I want to configure these options now and click Next. 11. On the Router (Default Gateway) page add the default router address of and click Next.

11 12. On the Domain Name and DNS Servers page, type wirelessdemo.local in the Parent domain field, type in the IP address field, and then click Add and click Next. 13. On the WINS Servers page, click Next. 14. On the Activate Scope page, choose Yes, I want to activate this scope now and click Next.

12 15. When you finish with the New Scope Wizard page, click Finish. Step 5: Install Certificate Services Complete these steps: Note: IIS must be installed before you install Certificate Services and the user should be part of the Enterprise Admin OU. 1. In Control Panel, open Add or Remove Programs, and then click Add/Remove Windows Components. 2. In the Windows Components Wizard page, choose Certificate Services, and then click Next.


13 3. On the CA Type page, choose Enterprise root CA and click Next.

14 4. In the CA Identifying Information page, type wirelessdemoca in the Common name for this CA box. You can also enter the other optional details. Then click Next and accept the defaults on the Certificate Database Settings page. 5. Click Next. Upon completion of the installation, click Finish. 6. Click OK after you read the warning message about installing IIS. Step 6: Verify Administrator Permissions for Certificates Complete these steps: 1. Choose Start > Administrative Tools > Certification Authority. 2. Right click wirelessdemoca CA and then click Properties. 3. On the Security tab, click Administrators in the Group or User names list. 4. In the Permissions or Administrators list, verify that these options are set to Allow: Issue and Manage Certificates Manage CA Request Certificates If any of these are set to Deny or are not selected, set the permission to Allow.

15 5. Click OK to close the wirelessdemoca CA Properties dialog box, and then close Certification Authority. Step 7: Add Computers to the Domain Complete these steps: Note: If the computer is already added to the domain, proceed to Add Users to the Domain. 1. Open the Active Directory Users and Computers snap in. 2. In the console tree, expand wirelessdemo.local. 3. Right click Users, click New, and then click Computer. 4. In the New Object Computer dialog box, type the name of the computer in the Computer name field and click Next. This example uses the computer name Client.

16 5. In the Managed dialog box, click Next. 6. In the New Object Computer dialog box, click Finish. 7. Repeat steps 3 through 6 in order to create additional computer accounts. Step 8: Allow Wireless Access to Computers Complete these steps: 1. In the Active Directory Users and Computers console tree, click the Computers folder and right click on the computer for which you want to assign wireless access. This example shows the procedure with computer Client which you added in Step 7. Click Properties, and then go to the Dial in tab. 2. Choose Allow access and click OK. Step 9: Add Users to the Domain Complete these steps: 1. In the Active Directory Users and Computers console tree, right click Users, click New, and then click User. 2. In the New Object User dialog box, type the name of the Wireless user. This example uses the name WirelessUser in the First name field, and WirelessUser in the User logon name field. Click Next.


17 3. In the New Object User dialog box, type a password of your choice in the Password and Confirm password fields. Clear the User must change password at next logon check box, and click Next. 4. In the New Object User dialog box, click Finish. 5. Repeat steps 2 through 4 in order to create additional user accounts.

18 Step 10: Allow Wireless Access to Users Complete these steps: 1. In the Active Directory Users and Computers console tree, click the Users folder, right click WirelessUser, click Properties, and then go to the Dial in tab. 2. Choose Allow access and click OK. Step 11: Add Groups to the Domain Complete these steps: 1. In the Active Directory Users and Computers console tree, right click Users, click New, and then click Group. 2. In the New Object Group dialog box, type the name of the group in the Group name field and click OK. This document uses the group name WirelessUsers. Step 12: Add Users to the WirelessUsers Group Complete these steps: 1. In the details pane of Active Directory Users and Computers, double click on the group WirelessUsers. 2. Go to the Members tab and click Add. 3. In the Select Users, Contacts, Computers, or Groups dialog box, type the name of the users that you want to add to the group. This example shows how to add the user wirelessuser to the group. Click OK.


19 4. In the Multiple Names Found dialog box, click OK. The WirelessUser user account is added to the WirelessUsers group. 5. Click OK in order to save changes to the WirelessUsers group. 6. Repeat this procedure to add more users to the group. Step 13: Add Client Computers to the WirelessUsers Group Complete these steps:

20 1. Repeat steps 1 and 2 in the Add Users to the WirelessUsers Group section of this document 2. In the Select Users, Contacts, or Computers dialog box, type the name of the computer that you want to add to the group. This example shows how to add the computer named Client to the group. 3. Click Object Types, clear the Users check box, and then check Computers. 4. Click OK twice. The CLIENT computer account is added to the WirelessUsers group. 5. Repeat the procedure to add more computers to the group. Windows Standard 2003 Setup with Cisco Secure ACS 4.0 Cisco Secure ACS is a computer that runs Windows Server 2003 with SP1, Standard Edition, that provides RADIUS authentication and authorization for the controller. Complete the procedures in this section in order to configure ACS as a RADIUS server: Basic Installation and Configuration Complete these steps:
21 1. Install Windows Server 2003 with SP1, Standard Edition, as a member server named ACS in the wirelessdemo.local domain. Note: The ACS server name appears as cisco_w2003 in the remaining configurations. Substitute ACS or cisco_w2003 on the remaining lab setup. 2. For the local area connection, configure the TCP/IP protocol with the IP address of , the subnet mask of , and the DNS server IP address of Cisco Secure ACS 4.0 Installation Note: Refer to the Installation Guide for Cisco Secure ACS 4.0 for Windows for more information on how to configure Cisco Secure ACS 4.0 for Windows. Complete these steps: 1. Use a Domain Administrator account in order to login to the computer named ACS to install Cisco Secure ACS. Note: Only installations performed at the computer where you install Cisco Secure ACS are supported. Remote installations performed using Windows Terminal Services or products such as Virtual Network Computing (VNC) are not tested, and are not supported. 2. Insert the Cisco Secure ACS CD into a CD ROM drive on the computer. 3. If the CD ROM drive supports the Windows autorun feature, the Cisco Secure ACS for Windows Server dialog box appears. Note: If the computer does not have a required service pack installed, a dialog box appears. Windows service packs can be applied either before or after you install Cisco Secure ACS. You can continue with the installation, but the required service pack must be applied after the installation is complete. Otherwise, Cisco Secure ACS might not function reliably. 4. Perform one of these tasks: If the Cisco Secure ACS for Windows Server dialog box appears, click Install. If the Cisco Secure ACS for Windows Server dialog box does not appear, run setup.exe, located in the root directory of the Cisco Secure ACS CD. 5. The Cisco Secure ACS Setup dialog box displays the software license agreement. 6. Read the software license agreement. If you accept the software license agreement, click Accept. The Welcome dialog box displays basic information about the setup program. 7. After you have read the information in the Welcome dialog box, click Next. 8. The Before You Begin dialog box lists items that you must complete before you continue with the installation. If you have completed all items listed in the Before You Begin dialog box, check the corresponding box for each item and click Next. Note: If you have not completed all items listed in the Before You Begin dialog box, click Cancel and then click Exit Setup. After you complete all items listed in the Before You Begin dialog box, restart the installation. 9. The Choose Destination Location dialog box appears. Under Destination Folder, the installation location appears. This is the drive and path where the setup program installs Cisco Secure ACS. 10. If you want to change the installation location, complete these steps: a. Click Browse. The Choose Folder dialog box appears. The Path box contains the installation location. b. Change the installation location. You can either type the new location in the Path box or use the Drives and Directories lists to select a new drive and directory. The installation location
22 c. must be on a drive local to the computer. Note: Do not specify a path that contains a percent character, "%". If you do so, the installation might appear to continue properly but fails before it completes. Click OK. Note: If you specified a folder that does not exist, the setup program displays a dialog box to confirm the creation of the folder. In order to continue, click Yes. 11. In the Choose Destination Location dialog box, the new installation location appears under Destination Folder. 12. Click Next. 13. The Authentication Database Configuration dialog box lists options for authenticating users. You can authenticate with the Cisco Secure user database only, or also with a Windows user database. Note: After you install Cisco Secure ACS, you can configure authentication support for all external user database types in addition to Windows user databases. 14. If you want to authenticate users with the Cisco Secure user database only, choose the Check the Cisco Secure ACS database only option. 15. If you want to authenticate users with a Windows Security Access Manager (SAM) user database or Active Directory user database in addition to the Cisco Secure user database, complete these steps: a. Choose the Also check the Windows User Database option. b. The Yes, refer to "Grant dialin permission to user" setting check box becomes available. Note: The Yes, refer to "Grant dialin permission to user" setting check box applies to all forms of access controlled by Cisco Secure ACS, not just dial in access. For example, a user who accesses the network through a VPN tunnel does not dial into a network access server. However, if the Yes, refer to "Grant dialin permission to user" setting box is checked, Cisco Secure ACS applies the Windows user dial in permissions in order to determine whether to grant the user access to the network. c. If you want to allow access to users who are authenticated by a Windows domain user database only when they have dial in permission in their Windows account, check the Yes, refer to "Grant dialin permission to user" setting box. 16. Click Next. 17. The setup program installs Cisco Secure ACS and updates the Windows registry. 18. The Advance Options dialog box lists several features of Cisco Secure ACS that are not enabled by default. For more information about these features, refer to the User Guide for Cisco Secure ACS for Windows Server, version 4.0. Note: The listed features appear in the Cisco Secure ACS HTML interface only if you enable them. After installation, you can enable or disable them on the Advanced Options page in the Interface Configuration section. 19. For each feature you want to enable, check the corresponding box. 20. Click Next. 21. The Active Service Monitoring dialog box appears. Note: After installation, you can configure active service monitoring features on the Active Service Management page in the System Configuration section. 22. If you want Cisco Secure ACS to monitor user authentication services, check the Enable Login Monitoring box. From the Script to Execute list, choose the option you want applied in the event of authentication service failure: No Remedial ActionCisco Secure ACS does not run a script.
23 Note: This option is useful if you enable event mail notifications. RebootCisco Secure ACS runs a script that reboots the computer that runs Cisco Secure ACS. Restart AllCisco Secure ACS restarts all Cisco Secure ACS services. Restart RADIUS/TACACS+Cisco Secure ACS restarts only the RADIUS and TACACS+ services. 23. If you want Cisco Secure ACS to send an e mail message when service monitoring detects an event, check the Mail Notification box. 24. Click Next. 25. The Database Encryption Password dialog box appears. Note: The Database Encryption Password is encrypted and stored in the ACS registry. You might need to reuse this password when critical problems arise and the database needs to be accessed manually. Keep this password at hand so that Technical Support can gain access to the database. The password can be changed each expiration period. 26. Enter a password for database encryption. The password needs to be at least eight characters long and needs to contain both characters and digits. There are no invalid characters. 27. Click Next. 28. The setup program finishes and the Cisco Secure ACS Service Initiation dialog box appears. 29. For each Cisco Secure ACS Services Initiation option you want, check the corresponding box. The actions associated with the options occur after the setup program finishes. Yes, I want to start the Cisco Secure ACS Service nowstarts the Windows services that compose Cisco Secure ACS. If you do not select this option, the Cisco Secure ACS HTML interface is not available unless you reboot the computer or start the CSAdmin service. Yes, I want Setup to launch the Cisco Secure ACS Administrator from my browser following installationopens the Cisco Secure ACS HTML interface in the default web browser for the current Windows user account. Yes, I want to view the Readme FileOpens the README.TXT file in Windows Notepad. 30. Click Next. 31. If you selected an option, the Cisco Secure ACS services start. The Setup Complete dialog box displays information about the Cisco Secure ACS HTML interface. 32. Click Finish. Note: The rest of the configuration is documented under the section for the EAP type that is configured. Cisco LWAPP Controller Configuration Create the Necessary Configuration for WPAv2/WPA Complete these steps: Note: The assumption is that the controller has basic connectivity to the network and IP reachability to the management interface is successful. 1. Browse to in order to login to the controller.
 8. In the VLAN ID field type 20. (This field can be any VLAN that is carried in the network.) 9. Click Apply. 10.")
24 2. Click Login 3. Login with the default user admin and default password admin. 4. Create a new Interface for VLAN mapping under Controller menu. 5. Click Interfaces. 6. Click New. 7. In the Interface name field type Employee. (This field can be any value you like.) 8. In the VLAN ID field type 20. (This field can be any VLAN that is carried in the network.) 9. Click Apply. 10. Configure the information as this Interfaces > Edit window shows.


25 11. Click Apply. 12. Click the WLANs tab. 13. Choose Create New and click Go. 14. Enter a Profile Name and in thewlan SSID field type Employee. 15. Choose an ID for the WLAN and click Apply. 16. Configure the information for this WLAN when the WLANs > Edit window shows. Note: WPAv2 is the chosen Layer 2 encryption method for this lab. In order to allow WPA with TKIP MIC clients to associate to this SSID, you can also check the WPA compatibility mode and Allow WPA2 TKIP Clients boxes or those clients that do not support the i AES encryption method.

26 17. On the WLANs > Edit screen, click the General tab. 18. Ensure that the Status box is checked for Enabled and the appropriate Interface (employee) is chosen. Also, make sure to check the Enabled check box for Broadcast SSID. 19. Click the Security tab. 20. Under the Layer 2 sub menu check WPA + WPA2 for Layer 2 Security. For WPA2 encryption check AES + TKIP in order to allow TKIP clients. 21. Choose 802.1x as the authentication method. 22. Skip the Layer 3 sub menu as it is not required. Once the RADIUS server is configured the appropriate server can be chosen from the Authentication menu. 23. The QoS and Advanced tabs can be left at default unless any special confiugrations are required. 24. Click the Security menu to add the RADIUS Server. 25. Under the RADIUS sub menu click Authentication. Then, click New. 26. Add the RADIUS server IP address ( ) which is the ACS server configured earlier. 27. Ensure that the shared key matches the AAA client configured in the ACS server. Ensure that the Network User box is checked and click Apply. 28. The basic configuration is now complete and you can begin to test PEAP. PEAP Authentication PEAP with MS CHAP version 2 requires certificates on the ACS servers but not on the wireless clients. Auto enrollment of computer certificates for the ACS servers can be used to simplify a deployment. In order to configure DC_CA to provide autoenrollment for computer and user certificates, complete the procedures in this section. Note: Microsoft has changed the Web Server template with the release of the Windows 2003 Enterprise CA so that keys are no longer exportable and the option is greyed out. There are no other certificate templates supplied with certificate services that are for server authentication and give the ability to mark keys as exportable that are available in the drop down so you have to create a new template that does so. Note: Windows 2000 allows for exportable keys and these procedures do not need to be followed if you use Windows 2000.

27 Install the Certificate Templates Snap in Complete these steps: 1. Choose Start > Run, type mmc, and click OK. 2. On the File menu, click Add/Remove Snap in and then click Add. 3. Under Snap in, double click Certificate Templates, click Close, and then click OK. 4. In the console tree, click Certificate Templates. All of the certificate templates appear in the Details pane. 5. In order to bypass steps 2 through 4, type certtmpl.msc which opens the Certificate Templates snap in. Create the Certificate Template for the ACS Web Server Complete these steps: 1. In the Details pane of the Certificate Templates snap in, click the Web Server template. 2. On the Action menu, click Duplicate Template.

28 3. In the Template display name field, type ACS.

29 4. Go to the Request Handling tab and check Allow private key to be exported. Also ensure that Signature and Encryption is selected from the Purpose drop down menu.

30 5. Choose Requests must use one of the following CSPs and check Microsoft Base Cryptographic Provider v1.0. Uncheck any other CSPs that are checked and then click OK.

31 6. Go to the Subject Name tab, choose Supply in the request and click OK.
 and uncheck the Include email name in subject name and E mail name because an e mail")
32 7. Go to the Security tab, highlight the Domain Admins Group and ensure that the Enroll option is checked under Allowed. Important: If you choose to build from this Active Directory information only check the User principal name (UPN) and uncheck the Include name in subject name and E mail name because an e mail name was not entered for the Wireless User account in the Active Directory Users and Computers snap in. If you do not disable these two options, autoenrollment attempts to use e mail, which results in an autoenrollment error.

33 8. There are additional security measures if needed to prevent certificates from being automatically pushed out. These can be found under the Issuance Requirements tab. This is not discussed further in this document.

34 9. Click OK to save the template and move onto issuing this template from the Certificate Authority snap in. Enable the New ACS Web Server Certificate Template Complete these steps: 1. Open the Certification Authority snap in. Follow steps 1 3 in the Create the Certificate Template for the ACS Web Server section, choose the Certificate Authority option, choose Local Computer and click Finish.


35 2. In the console tree, expand wirelessdemoca, and then right click Certificate Templates. 3. Choose New > Certificate Template to Issue. 4. Click the ACS Certificate Template.


36 5. Click OK and open the Active Directory Users and Computers snap in. 6. In the console tree, double click Active Directory Users and Computers, right click wirelessdemo.local, and then click Properties. 7. On the Group Policy tab, click Default Domain Policy, and then click Edit. This opens the Group Policy Object Editor snap in.

37 8. In the console tree, expand Computer Configuration > Windows Settings > Security Settings > Public Key Policies, and then select Automatic Certificate Request Settings.

38 9. Right click Automatic Certificate Request Settings and choose New > Automatic Certificate Request. 10. On the Welcome to the Automatic Certificate Request Setup Wizard page, click Next. 11. On the Certificate Template page, click Computer and click Next.


39 12. When you complete the Automatic Certificate Request Setup Wizard page, click Finish. The Computer certificate type now appears in the details pane of the Group Policy Object Editor snap in. 13. In the console tree, expand User Configuration > Windows Settings > Security Settings > Public Key Policies.


40 14. In the details pane, double click Autoenrollment Settings. 15. Choose Enroll certificates automatically and check Renew expired certificates, update pending certificates and remove revoked certificates and Update certificates that use certificate templates. 16. Click OK. ACS 4.0 Certificate Setup Configure Exportable Certificate for ACS Important: The ACS server must obtain a server certificate from the enterprise root CA server in order to authenticate a WLAN PEAP client. Important: Ensure that the IIS Manager is not open during the certificate setup process as causes problems with cached information.


41 1. Log into the ACS server with an account that has Enterprise Admin rights. 2. On the local ACS machine, point the browser at the Microsoft certification authority server at address of Root CA/certsrv. In this case, the IP address is Log in as the Administrator. 4. Choose Request a Certificate and click Next. 5. Choose Advanced Request and click Next. 6. Choose Create and submit a request to this CA and click Next. Important: The reason for this step is due to the fact that Windows 2003 does not allow for exportable keys and you need to generate a certificate request based on the ACS Certificate that you created earlier that does.
42 7. From the Certificate Templates select the certificate template created earlier named ACS. The options change after you select the template. 8. Configure the Name to be the fully qualified domain name of the ACS server. In this case the ACS server name is cisco_w2003.wirelessdemo.local. Ensure that Store certificate in the local computer certificate store is checked and click Submit.
43 9. A pop up window appears warning about a potential scripting violation. Choose Yes. 10. Click Install this certificate.


44 11. A pop up window appears again and warns about a potential scripting violation. Choose Yes. 12. After you click Yes, the certificate is installed. 13. At this point, the certificate is installed in the Certificates MMC under Personal > Certificates.
, point the browser at the Microsoft Certification Authority server to http://172.16.100.")
, point the browser at the Microsoft CA server to http://172.16.100.26 /certsrv. 2.")
45 14. Now that the certificate is installed to the local computer (ACS or cisco_w2003 in this example), you need to generate a certificate file (.cer) for the ACS 4.0 certificate file configuration. 15. On the ACS server (cisco_w2003 in this example), point the browser at the Microsoft Certification Authority server to /certsrv. Install the Certificate in ACS 4.0 Software Complete these steps: 1. On the ACS server (cisco_w2003 in this example), point the browser at the Microsoft CA server to /certsrv. 2. From the Select a Task option choose Download a CA certificate, certificate chain or CRL. 3. Choose the Base 64 radio encoding method and click Download CA Certificate.


46 4. A File Download Security Warning window appears. Click Save. 5. Save the file with a name such as ACS.cer or any name that you wish. Remember this name since you use it during the ACS Certificate Authority setup in ACS Open ACS Admin from the desktop shortcut created during the installation. 7. Click System Configuration.


47 8. Click ACS Certificate Setup. 9. Click Install ACS Certificate.

.")
48 10. Choose Use certificate from storage and type in the fully qualified domain name of cisco_w2003.wirelessdemo.local (or ACS.wirelessdemo.local if you used ACS as the name). 11. Click Submit.

49 12. Click System Configuration. 13. Click Service Control and then click Restart.
50 14. Click System Configuration. 15. Click Global Authentication Setup. 16. Check Allow EAP MSCHAPV2 and Allow EAP GTC.
51 17. Click Submit + Restart. 18. Click System Configuration. 19. Click ACS Certification Authority Setup. 20. Under the ACS Certification Authority Setup window, type the name and location of the *.cer file created earlier. In this example, the *.cer file created is ACS.cer in the root directory c:\. 21. Type c:\acs.cer in the CA certificate file field and click Submit.
52 22. Restart the ACS service. CLIENT Configuration for PEAP using Windows Zero Touch In our example, CLIENT is a computer that runs Windows XP Professional with SP that acts as a wireless client and obtains access to Intranet resources through the wireless AP. Complete the procedures in this section in order to configure CLIENT as a wireless client. Perform a Basic Installation and Configuraiton Complete these steps: 1. Connect CLIENT to the Intranet network segment using an Ethernet cable connected to the hub. 2. On CLIENT, install Windows XP Professional with SP2 as a member computer named CLIENT of the wirelessdemo.local domain. 3. Install Windows XP Professional with SP2. This must be installed in order to have PEAP support. Note: Windows Firewall is automatically turned on in Windows XP Professional with SP2. Do not turn the firewall off. Install the Wireless Network Adapter Complete these steps: 1. Shut down the CLIENT computer. 2. Disconnect the CLIENT computer from the Intranet network segment. 3. Restart the CLIENT computer, and then log on using the local administrator account. 4. Install the wireless network adapter.

53 Important: Do not install the manufacturer's configuration software for the wireless adapter. Install the wireless network adapter drivers using the Add Hardware Wizard. Also, when prompted, provide the CD provided by the manufacturer or a disk with updated drivers for use with Windows XP Professional with SP2. Configure the Wireless Network Connection Complete these steps: 1. Log off and then log on by using the WirelessUser account in the wirelessdemo.local domain. 2. Choose Start > Control Panel, double click Network Connections, and then right click Wireless Network Connection. 3. Click Properties, go to the Wireless Networks tab, and ensure that the Use Windows to configure my wireless network settings is checked. 4. Click Add. 5. Under the Association tab, type Employee in the Network name (SSID) field. 6. Select WPA for the Network Authentication and ensure that Data Encryption is set to TKIP.
 check Authenticate as computer when computer")
54 7. Go to the Authentication tab. 8. Validate that EAP type is configured to use Protected EAP (PEAP). If it is not, select it from the drop down menu. 9. If you want the machine to be authenticated prior to login (which allows login scripts or group policy pushes to be applied) check Authenticate as computer when computer information is available.


55 10. Click Properties. 11. As PEAP involves authentication of Server by the client ensure that Validate server certificate is checked. Also, make sure the CA that issued the ACS certificate is checked under the Trusted Root Certification Authorities menu. 12. Choose Secured password (EAP MSCHAP v2) under Authentication Method as it is used for inner authentication. 13. Make sure the Enable Fast Reconnect check box is checked. Then, click OK three times.

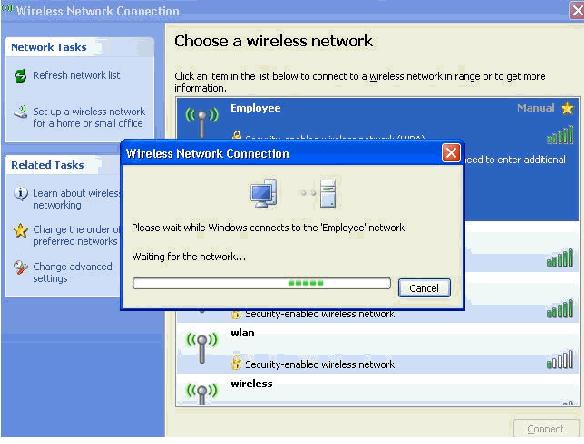
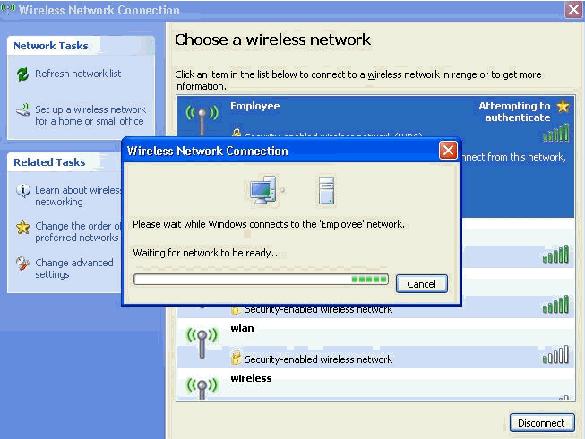
56 14. Right click the wireless network connection icon in systray and then click View Available Wireless Networks. 15. Click the Employee wireless network and click Connect. These screen shots indicate if the connection completes successfully.
57


58 16. After authentication is successful, check the TCP/IP configuration for the wireless adapter by using Network Connections. It should have an address range of from the DHCP scope or the scope created for the wireless clients. 17. In order to test functionality, open up a browser and browse to (or the IP address of the Enterprise CA server).

59 Problem: Odyssey Client Prompts Three Times for Token Authentication Platform This issue occurs in all Windows versions and 2.x Solution. Typically, a wireless services setting in XP causes this to happen. Complete these steps in order to correct this issue: 1. Choose Start > Settings > Control Panel > Administrative Tools > Services. 2. Go to the bottom of the list and look for Wireless Zero Configuration. 3. Double click this setting. 4. Select the option to stop this service. 5. Under the setting for startup type select disable. Note: If all you do is stop the service, it starts again on reboot, so you must disable it in order for this issue to not occur again. 6. Save the settings and close. PEAP Authentication Fails with ACS Server When your client fails PEAP authentication with an ACS server, check if you find the "NAS duplicated authentication attempt" error message in the Failed attempts option under the Report and Activity menu of the ACS. You might receive this error message when Microsoft Windows XP SP2 is installed on the client machine and Windows XP SP2 authenticates against a third party server other than a Microsoft IAS server. In particular, Cisco RADIUS server (ACS) uses a different method to calculate the Extensible Authentication Protocol Type:Length:Value format (EAP TLV) ID than the method Windows XP uses. Microsoft has identified this as a defect in the XP SP2 supplicant. For a Hotfix, contact Microsoft and refer to article KB The underlying issue is that on the client side, with windows utility, the Fast Reconnect option is disabled for PEAP by default. However, this option is enabled by default on the server side (ACS). In order to resolve this issue, uncheck the Fast Reconnect option on the ACS server and press submit+restart. Alternatively, you can enable the Fast Reconnect option on the client side to resolve the issue.

60 Complete these steps in order to enable Fast Reconnect on the client that runs Windows XP using Windows Utility: 1. Click Start > Settings > Control Panel. 2. Double click the Network Connections icon. 3. Right click the Wireless Network Connection icon and click Properties. 4. Click the Wireless Networks tab. 5. Check the Use Windows to configure my wireless network settings option to enable windows to configure the client adapter. 6. If you have already configured an SSID, choose the SSID and click Properties. If not, click New to add a new WLAN. 7. Enter the SSID under the Association tab. Make sure that Network Authentication is Open and Data Encryption is set to WEP. 8. Click Authentication. 9. Check the Enable IEEE 802.1x authentication for this network option. 10. Choose the EAP Type as PEAP and click Properties. 11. Check the Enable Fast Reconnect option at the bottom of the page. Related Information EAP Authentication with WLAN Controllers (WLC) Configuration Example Wireless LAN Controller Configuration Guide Wireless LAN Controller and Lightweight Access Point Basic Configuration Example VLANs on Wireless LAN Controllers Configuration Example AP Group VLANs with wireless LAN Controllers Configuration Example Technical Support & Documentation Cisco Systems Contacts & Feedback Help Site Map Cisco Systems, Inc. All rights reserved. Terms & Conditions Privacy Statement Cookie Policy Trademarks of Cisco Systems, Inc.
61 Updated: Nov 18, 2009 Document ID: 72013
PEAP under Unified Wireless Networks with ACS 5.1 and Windows 2003 Server
 PEAP under Unified Wireless Networks with ACS 5.1 and Windows 2003 Server Document ID: 112175 Contents Introduction Prerequisites Requirements Components Used Conventions Configure Network Diagram Windows
Install Certificate on the Cisco Secure ACS Appliance for PEAP Clients
 Install Certificate on the Cisco Secure ACS Appliance for PEAP Clients Document ID: 64067 Contents Introduction Prerequisites Requirements Components Used Conventions Microsoft Certificate Service Installation
Cisco Secure ACS for Windows v3.2 With PEAP MS CHAPv2 Machine Authentication
 Cisco Secure ACS for Windows v3.2 With PEAP MS CHAPv2 Machine Authentication Document ID: 43486 Contents Introduction Prerequisites Requirements Components Used Background Theory Conventions Network Diagram
Cisco 4400 Series Wireless LAN Controllers PEAP Under Unified Wireless Networks with Microsoft Internet Authentication Service (IAS)
") Cisco 4400 Series Wireless LAN Controllers PEAP Under Unified Wireless Networks with Microsoft Internet Authentication Service (IAS) HOME SUPPORT PRODUCT SUPPORT WIRELESS CISCO 4400 SERIES WIRELESS LAN
Cisco 4400 Series Wireless LAN Controllers PEAP Under Unified Wireless Networks with Microsoft Internet Authentication Service (IAS) HOME SUPPORT PRODUCT SUPPORT WIRELESS CISCO 4400 SERIES WIRELESS LAN
Wired Dot1x Version 1.05 Configuration Guide
 Wired Dot1x Version 1.05 Configuration Guide Document ID: 64068 Introduction Prerequisites Requirements Components Used Conventions Microsoft Certificate Services Installation Install the Microsoft Certificate
Secure ACS for Windows v3.2 With EAP TLS Machine Authentication
 Secure ACS for Windows v3.2 With EAP TLS Machine Authentication Document ID: 43722 Contents Introduction Prerequisites Requirements Components Used Background Theory Conventions Network Diagram Configuring
802.1x Radius Setup Guide Working AirLive AP with Win X Radius Server
 OvisLink 8000VPN VPN Guide 802.1x Radius Setup Guide Working AirLive AP with Win2003 802.1X Radius Server Table of Content Secured Enterprise Wireless Environment Configuration Guide... 3 WHAT IS THIS
Figure 5-25: Setup Wizard s Safe Surfing Screen
 4. After the settings have been saved, the Safe Surfing screen will appear. Click the Norton Internet Security Suite button to install the special edition of Norton Internet Security on your computer,
Protected EAP (PEAP) Application Note
 Application Note") to users of Microsoft Windows 7: Cisco plug-in software modules such as EAP-FAST and PEAP are compatible with Windows 7. You do not need to upgrade these modules when you upgrade to Windows 7. This document
to users of Microsoft Windows 7: Cisco plug-in software modules such as EAP-FAST and PEAP are compatible with Windows 7. You do not need to upgrade these modules when you upgrade to Windows 7. This document
A Division of Cisco Systems, Inc. GHz g. Wireless-G. USB Network Adapter. User Guide WIRELESS WUSB54G. Model No.
 A Division of Cisco Systems, Inc. GHz 2.4 802.11g WIRELESS Wireless-G USB Network Adapter User Guide Model No. WUSB54G Copyright and Trademarks Specifications are subject to change without notice. Linksys
Step-by-step installation guide for monitoring untrusted servers using Operations Manager
 Step-by-step installation guide for monitoring untrusted servers using Operations Manager Most of the time through Operations Manager, you may require to monitor servers and clients that are located outside
GHz g. Wireless A+G. User Guide. Notebook Adapter. Dual-Band. Dual-Band WPC55AG a. A Division of Cisco Systems, Inc.
 A Division of Cisco Systems, Inc. Dual-Band 5 GHz 802.11a + GHz 2.4 802.11g WIRELESS Dual-Band Wireless A+G Notebook Adapter User Guide Model No. WPC55AG Copyright and Trademarks Specifications are subject
A Division of Cisco Systems, Inc. GHz g. Wireless-G. PCI Adapter with SRX 400. User Guide WIRELESS WMP54GX4. Model No.
 A Division of Cisco Systems, Inc. GHz 2.4 802.11g WIRELESS Wireless-G PCI Adapter with SRX 400 User Guide Model No. WMP54GX4 Copyright and Trademarks Specifications are subject to change without notice.
Configuring EAP for Wireless Network Connectivity By Victor Zapata
 Configuring EAP for Wireless Network Connectivity By Victor Zapata Requirements: 1. Windows 2000 Domain Controller Service Pack 2 with hotfixes Q306260 and Q304347 OR Service Pack 3 2. Enterprise Certificate
20411D D Enayat Meer
 Lab A Module 8: Implementing Direct Access by Using the Getting Started Wizard Scenario: Recommended lab time is 240 Minutes {a complete class session is dedicated for this lab} Many users at A. Datum
Wireless-N. User Guide. USB Network Adapter WUSB300N WIRELESS. Model No.
 2.4 GHz WIRELESS Wireless-N USB Network Adapter User Guide Model No. WUSB300N Copyright and Trademarks Specifications are subject to change without notice. Linksys is a registered trademark or trademark
Using the Cisco Unified Wireless IP Phone 7921G Web Pages
 CHAPTER 4 Using the Cisco Unified Wireless IP Phone 7921G Web Pages You can use the Cisco Unified Wireless IP Phone 7921G web pages to set up and configure settings for the phone. This chapter describes
RSA SecurID Ready with Wireless LAN Controllers and Cisco Secure ACS Configuration Example
 RSA SecurID Ready with Wireless LAN Controllers and Cisco Secure ACS Configuration Example Document ID: 100162 Contents Introduction Prerequisites Requirements Components Used Conventions Background Information
PMS 138 C Moto Black spine width spine width 100% 100%
 Series MOTOROLA and the Stylized M Logo are registered in the US Patent & Trademark Office. All other product or service names are the property of their respective owners. 2009 Motorola, Inc. Table of
Configuring the Client Adapter through the Windows XP Operating System
 APPENDIX E Configuring the Client Adapter through the Windows XP Operating System This appendix explains how to configure and use the client adapter with Windows XP. The following topics are covered in
Setting Up Cisco SSC. Introduction CHAPTER
 CHAPTER 2 This chapter provides an overview of the Cisco Secure Services Client and provides instructions for adding, configuring, and testing the user profiles. This chapter contains these sections: Introduction,
MSC-5100 Promotional Bundle Quickstart
 MSC-5100 Promotional Bundle Quickstart This Quickstart shows you how to install, configure, and use the MSC-5100 Promotional Bundle. For detailed configuration and operating information on the MSC-5100
Installation Guide. EventTracker Enterprise. Install Guide Centre Park Drive Publication Date: Aug 03, U.S. Toll Free:
 EventTracker Enterprise Install Guide 8815 Centre Park Drive Publication Date: Aug 03, 2010 Columbia MD 21045 U.S. Toll Free: 877.333.1433 Abstract The purpose of this document is to help users install
Configure the IM and Presence Service to Integrate with the Microsoft Exchange Server
 Configure the IM and Presence Service to Integrate with the Microsoft Exchange Server Configure a Presence Gateway for Microsoft Exchange Integration, page 1 SAN and Wildcard Certificate Support, page
LAB: Configuring LEAP. Learning Objectives
 LAB: Configuring LEAP Learning Objectives Configure Cisco ACS Radius server Configure a WLAN to use the 802.1X security protocol and LEAP Authenticate with an access point using 802.1X security and LEAP
Windows Server 2003 { Domain Controller Installation and Configuration}
 Windows Server 2003 { Domain Controller Installation and } Benedikt Riedel MCSE + Messaging www.go-unified.com www.siemens.com/open Benedikt.riedel@siemens.com Start up the prepared Windows Server 2003
Network User s Guide
 Network User s Guide Multi-Protocol On-board Ethernet Print Server and Wireless Print Server This Network User's Guide provides useful information on wired and wireless network settings and security settings
A Division of Cisco Systems, Inc. GHz 2, g. Wireless-G. User Guide. PCI Adapter WIRELESS. with SpeedBooster WMP54GS (EU/UK/LA) Model No.
 Model No.") A Division of Cisco Systems, Inc. GHz 2,4 802.11g WIRELESS Wireless-G PCI Adapter with SpeedBooster User Guide Model No. WMP54GS (EU/UK/LA) Copyright and Trademarks Specifications are subject to change
A Division of Cisco Systems, Inc. GHz 2,4 802.11g WIRELESS Wireless-G PCI Adapter with SpeedBooster User Guide Model No. WMP54GS (EU/UK/LA) Copyright and Trademarks Specifications are subject to change
Click on Close button to close Network Connection Details. You are back to the Local Area Connection Status window.
 How to configure EW-7228APn/EW-7416APn as a Repeater to extend wireless range This article can apply on EW-7228APn and EW-7416APn. We used screen shots of EW-7416APn in this instruction. We recommend you
Secure Access Configuration Guide For Wireless Clients
 ProCurve Networking Secure Access Configuration Guide For Wireless Clients Secure Access Configuration Guide For Wireless Clients Introduction... 2 Configuration Scenarios... 2 Required Network Services...
Notebook Adapter. Quick Installation Guide WPC300N (EU/LA) Package Contents
 Package Contents") Package Contents Wireless-N Notebook Adapter Setup Wizard CD-ROM User Guide (English only) on CD-ROM Quick Installation 24, GHz Wireless-N Notebook Adapter Wireless Model No. WPC300N (EU/LA) Quick Installation
Package Contents Wireless-N Notebook Adapter Setup Wizard CD-ROM User Guide (English only) on CD-ROM Quick Installation 24, GHz Wireless-N Notebook Adapter Wireless Model No. WPC300N (EU/LA) Quick Installation
User Databases. ACS Internal Database CHAPTER
 CHAPTER 12 The Cisco Secure Access Control Server Release 4.2, hereafter referred to as ACS, authenticates users against one of several possible databases, including its internal database. You can configure
TCP/IP CONFIGURATION 3-6
 TCP/IP CONFIGURATION 3. Type IPCONFIG /RENEW and press the Enter key. Verify that your IP Address is now 192.168.2.xxx, your Subnet Mask is 255.255.255.0 and your Default Gateway is 192.168.2.1. These
AmbiCom WL11-SD Wireless LAN SD Card. User Manual
 AmbiCom WL11-SD Wireless LAN SD Card User Manual Version 3.0 October 15, 2004 Table of Contents 1 WL11-SD features...3 2 Package Contents & System Requirements...3 2.1 Package Contents... 3 2.2 System
For my installation, I created a VMware virtual machine with 128 MB of ram and a.1 GB hard drive (102 MB).
.") HOWTO: ZeroShell WPA Enterprise by Paul Taylor ZeroShell can be obtained from: http://www.zeroshell.net/eng/ For my installation, I created a VMware virtual machine with 128 MB of ram and a.1 GB hard drive
HOWTO: ZeroShell WPA Enterprise by Paul Taylor ZeroShell can be obtained from: http://www.zeroshell.net/eng/ For my installation, I created a VMware virtual machine with 128 MB of ram and a.1 GB hard drive
ms-help://ms.technet.2004apr.1033/ad/tnoffline/prodtechnol/ad/windows2000/howto/mapcerts.htm
 Page 1 of 8 Active Directory Step-by-Step Guide to Mapping Certificates to User Accounts Introduction The Windows 2000 operating system provides a rich administrative model for managing user accounts.
NCR. Wi-Fi Setup Assistant. User guide
 NCR Wi-Fi Setup Assistant User guide 15 Contents 1 Getting started... 3 1.1 Features... 3 1.2 System Requirements... 3 1.3 Installing Wi-Fi Setup Assistant... 4 2 Configuring a Wi-Fi Printer... 6 2.1 Setup
Wireless LAN Controller Web Authentication Configuration Example
 Wireless LAN Controller Web Authentication Configuration Example Document ID: 69340 Contents Introduction Prerequisites Requirements Components Used Conventions Web Authentication Web Authentication Process
HPE IMC BYOD WLAN 802.1X Authentication and Security Check Using inode Configuration Examples
 HPE IMC BYOD WLAN 802.1X Authentication and Security Check Using inode Configuration Examples Part Number: 5200-1385 Software version: IMC UAM 7.2 (E0403) Document version: 2 The information in this document
A Division of Cisco Systems, Inc. GHz 2, g. Wireless-G. User Guide. Access Point WIRELESS WAP54G (EU/LA/UK) Model No.
 Model No.") A Division of Cisco Systems, Inc. GHz 2,4 802.11g WIRELESS Wireless-G Access Point User Guide Model No. WAP54G (EU/LA/UK) Copyright and Trademarks Specifications are subject to change without notice. Linksys
A Division of Cisco Systems, Inc. GHz 2,4 802.11g WIRELESS Wireless-G Access Point User Guide Model No. WAP54G (EU/LA/UK) Copyright and Trademarks Specifications are subject to change without notice. Linksys
Deploying Windows Server 2003 Internet Authentication Service (IAS) with Virtual Local Area Networks (VLANs)
 with Virtual Local Area Networks (VLANs)") Deploying Windows Server 2003 Internet Authentication Service (IAS) with Virtual Local Area Networks (VLANs) Microsoft Corporation Published: June 2004 Abstract This white paper describes how to configure
Deploying Windows Server 2003 Internet Authentication Service (IAS) with Virtual Local Area Networks (VLANs) Microsoft Corporation Published: June 2004 Abstract This white paper describes how to configure
A Division of Cisco Systems, Inc. GHz g. Wireless-G. Access Point. User Guide WIRELESS. WAP54G ver Model No.
 A Division of Cisco Systems, Inc. GHz 2.4 802.11g WIRELESS Wireless-G Access Point User Guide Model No. WAP54G ver. 3.1 Copyright and Trademarks Specifications are subject to change without notice. Linksys
STEP TWO: Configure your network settings (Windows XP and 2000 users start here, Windows 98se / Me start on page 3.)
") Hood College Dorm Network Setup Instructions These instructions assume you already have a working computer with a properly installed network interface card (NIC, Ethernet). These instructions are written
Hood College Dorm Network Setup Instructions These instructions assume you already have a working computer with a properly installed network interface card (NIC, Ethernet). These instructions are written
Network. NEC Portable Projector NP905/NP901W WPA Setting Guide. Security WPA. Supported Authentication Method WPA-PSK WPA-EAP WPA2-PSK WPA2-EAP
 USB(LAN) WIRELESS WIRELESS USB LAN L/MONO R L/MONO R SELECT 3D REFORM AUTO ADJUST SOURCE AUDIO IN MONITOR OUT AUDIO OUT COMPUTER / COMPONENT 2 IN PC CONTROL HDMI IN AUDIO IN AC IN USB LAMP STATUS NEC Portable
Implementing Messaging Security for Exchange Server Clients
 Implementing Messaging Security for Exchange Server Clients Objectives Scenario At the end of this lab, you will be able to: Protect e-mail messages using S/MIME signing and encryption Manage e-mail attachment
A Division of Cisco Systems, Inc. GHz g. Wireless-G. User Guide. Access Point WIRELESS. WAP54G v2. Model No.
 A Division of Cisco Systems, Inc. GHz 2.4 802.11g WIRELESS Wireless-G Access Point User Guide Model No. WAP54G v2 Copyright and Trademarks Specifications are subject to change without notice. Linksys is
Using the Cisco Unified Wireless IP Phone 7921G Web Pages
 4 CHAPTER Using the Cisco Unified Wireless IP Phone 7921G Web Pages This chapter describes how to set up your PC to configure a Cisco Unified Wireless IP Phone 7921G by using a USB connector and how to
Wireless-N Business Notebook Adapter
 Wireless-N Business Notebook Adapter USER GUIDE BUSINESS SERIES Model No. WPC4400N Model Model No. No. Copyright and Trademarks Specifications are subject to change without notice. Linksys is a registered
DCP585CW Windows Network Connection Repair Instructions
 Difficulty printing from your PC can occur for various reasons. The most common reason a networked Brother machine may stop printing, is because the connection between the computer and the Brother machine
The information in this document is based on these software and hardware versions:
 Contents Introduction Prerequisites Requirements Components Used Configure Generate Certificate Signed Request Sign the Certificate on the Certificate Authority Install the Certificate Copy the certificate
Configuring the Client Adapter through Windows CE.NET
 APPENDIX E Configuring the Client Adapter through Windows CE.NET This appendix explains how to configure and use the client adapter with Windows CE.NET. The following topics are covered in this appendix:
Dell Flexible Computing Solutions: Deploying On-Demand Desktop Streaming
 Dell Flexible Computing Solutions: Deploying On-Demand Desktop Streaming Product Group November 2007 Dell White Paper November 2007 Contents Introduction... 3 Overview... 4 Planning the Deployment... 5
Configuring Funk Odyssey Software, Avaya AP-3 Access Point, and Avaya
 Configuring Funk Odyssey Software, Avaya AP-3 Access Point, and Avaya 802.11a/b Wireless Client for User Authentication (802.1x) and Data Encryption - Issue 1.0 Abstract These Application Notes describe
Wireless N USB Adapter. User Guide
 Wireless N USB Adapter User Guide Part#: PL-18N Model: Hermes V. 0613 Contents Chapter 1 Getting Start...3 Chapter 2 Installation Guide...5 Installing the Drivers for Mac OS X...10 Uninstall the Drivers
Managing NCS User Accounts
 7 CHAPTER The Administration enables you to schedule tasks, administer accounts, and configure local and external authentication and authorization. Also, set logging options, configure mail servers, and
Managing External Identity Sources
 CHAPTER 5 The Cisco Identity Services Engine (Cisco ISE) integrates with external identity sources to validate credentials in user authentication functions, and to retrieve group information and other
Integrated Information Technology Services (IITS)
") Integrated Information Technology Services (IITS) User Guide for Laptops with Windows 7 Network Configuration & Software Installation Version 1.4 Updated as at 15-Aug-11 Table of Contents How to verify
Integrated Information Technology Services (IITS) User Guide for Laptops with Windows 7 Network Configuration & Software Installation Version 1.4 Updated as at 15-Aug-11 Table of Contents How to verify
HPE IMC UAM BYOD Quick Deployment on Mobile Device Configuration Examples
 HPE IMC UAM BYOD Quick Deployment on Mobile Device Configuration Examples Part Number: 5200-1387 Software version: IMC UAM 7.2 (E0403) Document version: 2 The information in this document is subject to
Wireless Network Video Recorder
 LD2R/LD2R500 Wireless Network Video Recorder User Guide Version 1.0 PREFACE Thank you for purchasing the Wireless Network Video Recorder, an IP based device that installed on your network, which can be
10ZiG Technology. Thin Desktop Quick Start Guide
 10ZiG Technology Thin Desktop Quick Start Guide 2010 05 20 Introduction This document is intended as a quick start guide for installing Thin Desktop. After reading this document, you will know how to:
Troubleshooting Web Authentication on a Wireless LAN Controller (WLC)
") Troubleshooting Web Authentication on a Wireless LAN Controller (WLC) Document ID: 108501 Contents Introduction Prerequisites Requirements Components Used Related Products Conventions Web Authentication
Troubleshooting Web Authentication on a Wireless LAN Controller (WLC) Document ID: 108501 Contents Introduction Prerequisites Requirements Components Used Related Products Conventions Web Authentication
Manually Configuring Windows 8 for Wireless PittNet
 Technology Help Desk 412 624-HELP [4357] http://technology.pitt.edu Manually Configuring Windows 8 for Wireless PittNet If you are not able to connect to Wireless PittNet using our automated wizard, you
Windows 7 Configuration for ORU Wireless Networks
 Page 1 of 13 Windows 7 Configuration for ORU Wireless Networks Show hidden icons Wireless Signal Strength Indicator Figure 1 Windows 7 Documentation for the ORU- Employee wireless network Clicking the
Supporting Networked Computers
 CHAPTER 7 Supporting Networked Computers After completing this chapter, you will be able to: Define the main concepts of networking, including the roles of TCP/IP, IP addresses, and subnet masks. Set up
Configuring the Cisco VPN 3000 Concentrator with MS RADIUS
 Configuring the Cisco VPN 3000 Concentrator with MS RADIUS Document ID: 20585 Contents Introduction Prerequisites Requirements Components Used Conventions Install and Configure the RADIUS Server on Windows
S/MIME on Good for Enterprise MS Online Certificate Status Protocol. Installation and Configuration Notes. Updated: November 10, 2011
 S/MIME on Good for Enterprise MS Online Certificate Status Protocol Installation and Configuration Notes Updated: November 10, 2011 Installing the Online Responder service... 1 Preparing the environment...
Instructions for connecting to winthropsecure
 Instructions for connecting to winthropsecure Windows 7/8 Quick Connect Windows 7/8 Manual Wireless Set Up Windows 10 Quick Connect Windows 10 Wireless Set Up Apple Quick Connect Apple Settings Check Windows
VMware AirWatch: Directory and Certificate Authority
 Table of Contents Lab Overview - HOL-1857-06-UEM - VMware AirWatch: Directory and Certificate Authority Integration... 2 Lab Guidance... 3 Module 1 - Advanced AirWatch Configuration, AD Integration/Certificates
Implementing Security in Windows 2003 Network (70-299)
") Implementing Security in Windows 2003 Network (70-299) Level 1 Authorization & Authentication 2h 20m 20s 1.1 Group Strategy 1.2 Group Scopes 1.3 Built-in Groups 1.4 System or Special Groups 1.5 Administrating
Implementing Security in Windows 2003 Network (70-299) Level 1 Authorization & Authentication 2h 20m 20s 1.1 Group Strategy 1.2 Group Scopes 1.3 Built-in Groups 1.4 System or Special Groups 1.5 Administrating
VMware AirWatch Integration with RSA PKI Guide
 VMware AirWatch Integration with RSA PKI Guide For VMware AirWatch Have documentation feedback? Submit a Documentation Feedback support ticket using the Support Wizard on support.air-watch.com. This product
IT Quick Reference Guides Connecting to SU-Secure using Windows 8
 IT Quick Reference Guides Connecting to SU-Secure using Windows 8 Windows Guides CONNECTING TO SU-SECURE WI-FI This document will give you instructions on how to connect your Windows 8 Computer to our
NBC-IG Installation Guide. Version 7.2
 Installation Guide Version 7.2 2017 Nuance Business Connect 7.2 Installation Guide Document Revision History Revision Date August 8, 2017 Revision List Updated supported SQL Server versions June 14, 2017
This primer covers the following major topics: 1. Getting Familiar with ACS. 2. ACS Databases and Additional Server Interaction
 CACS Primer Introduction Overview This document, ACS 4.0 Primer, has been designed and created for use by customers as well as network engineers. It is designed to provide a primer to the Cisco Secure
Installing driver over the network
 Installing driver over the network Command- line Definition Description Command- line Definition Description /a or /A /n or /N /nd or /ND Specifies
54Mbps Pocket Wireless Access Point (WL-330g)
") 54Mbps Pocket Wireless Access Point (WL-330g) Copyright 2004 ASUSTeK COMPUTER INC. All Rights Reserved. Contents Conventions... 2 Welcome!... 3 Package contents... 3 System requirements... 3 Device installation...
54Mbps Pocket Wireless Access Point (WL-330g) Copyright 2004 ASUSTeK COMPUTER INC. All Rights Reserved. Contents Conventions... 2 Welcome!... 3 Package contents... 3 System requirements... 3 Device installation...
Deploying HP SIM 6.x on MSCS clusters on Windows 2008 with SQL Server 2008 SP1 White Paper
 Deploying HP SIM 6.x on MSCS clusters on Windows 2008 with SQL Server 2008 SP1 White Paper Table of Contents Abstract... 2 Introduction... 2 System infrastructure... 3 Storage configuration... 3 IP addresses...
Configuring the Client Adapter through the Windows XP Operating System
 APPENDIX E through the Windows XP Operating System This appendix explains how to configure and use the client adapter with Windows XP. The following topics are covered in this appendix: Overview, page
NETWORK USER S GUIDE. Multi-Protocol On-board Ethernet Multi-function Print Server and Wireless Ethernet Multi-function Print Server
 Multi-Protocol On-board Ethernet Multi-function Print Server and Wireless Ethernet Multi-function Print Server NETWORK USER S GUIDE This Network User's Guide provides useful information of wired and wireless
Solution Integration Guide for Multimedia Communication Server 5100/WLAN/Blackberry Enterprise Server
 Solution Integration Guide for Multimedia Communication Server 5100/WLAN/Blackberry Enterprise Server NN49000-302 Document status: Standard Document version: 0101 Document date: 24 May 2007 All Rights
NetExtender for SSL-VPN
 NetExtender for SSL-VPN Document Scope This document describes how to plan, design, implement, and manage the NetExtender feature in a SonicWALL SSL-VPN Environment. This document contains the following
5 Press or to choose Infrastructure, then press OK.
 Before you begin you must know your wireless network settings. Write down the wireless network settings of your access point or wireless router. SSID (Service Set ID or Network name) WEP Key (if needed)
VIEW Certified Configuration Guide. Cisco
 VIEW Certified Configuration Guide Cisco 4400 Series Wireless LAN Controller (WLC), Wireless Services Module (WiSM), and 3750G Integrated Wireless LAN Controller with 1100, 1200, 1300 Series APs January
Wireless-N USB Adapter User s Manual
 Wireless-N USB Adapter User s Manual Copyright 2007 EUSSO Technologies, Inc. All rights reserved. Table of Contents PREFACE... 3 WIRELESS LAN BASICS... 3 Warning... 3 INSTALLATION OVERVIEW... 4 INTRODUCTION...
VMware AirWatch Certificate Authentication for EAS with NDES-MSCEP
 VMware AirWatch Certificate Authentication for EAS with NDES-MSCEP For VMware AirWatch Have documentation feedback? Submit a Documentation Feedback support ticket using the Support Wizard on support.air-watch.com.
Configuring the WT-4 for ftp (Ad-hoc Mode)
") En Configuring the WT-4 for ftp (Ad-hoc Mode) Windows XP Introduction This document provides basic instructions on configuring the WT-4 wireless transmitter and a Windows XP Professional SP2 ftp server
En Configuring the WT-4 for ftp (Ad-hoc Mode) Windows XP Introduction This document provides basic instructions on configuring the WT-4 wireless transmitter and a Windows XP Professional SP2 ftp server
Configuring the WT-4 for ftp (Infrastructure Mode)
") Configuring the WT-4 for ftp (Infrastructure Mode) Configuring the WT-4 for ftp (Infrastructure Mode) Windows 7 This document provides basic instructions on configuring the WT-4 wireless transmitter and
Configuring the WT-4 for ftp (Infrastructure Mode) Configuring the WT-4 for ftp (Infrastructure Mode) Windows 7 This document provides basic instructions on configuring the WT-4 wireless transmitter and
Upgrading the Cisco ONS CL to Release 7.0
 This document explains how to upgrade Cisco ONS 15310-CL Cisco Transport Controller (CTC) software from Release 5.x or Release 6.x to Release 7.0.x, or from Release 7.0.x to a later maintenance release
Wireless USB Port Multi-Functional Printer Server. Model # AMPS240W. User s Manual. Ver. 1A
 Wireless USB 2.0 1-Port Multi-Functional Printer Server Model # AMPS240W User s Manual Ver. 1A Table of Contents 1 Introduction...3 1.1 Package Contents... 3 1.2 System Requirements... 3 2 Multi-Functional
Workspace ONE UEM Certificate Authority Integration with Microsoft ADCS Using DCOM. VMware Workspace ONE UEM 1811
 Workspace ONE UEM Certificate Authority Integration with Microsoft ADCS Using DCOM VMware Workspace ONE UEM 1811 You can find the most up-to-date technical documentation on the VMware website at: https://docs.vmware.com/
AirCruiser G Wireless Router GN-BR01G
 AirCruiser G Wireless Router GN-BR01G User s Guide i Contents Chapter 1 Introduction... 1 Overview...1 Features...1 Package Contents...2 AirCruiser G Wireless Router Rear Panel...2 AirCruiser G Wireless
Wireless-G Router User s Guide
 Wireless-G Router User s Guide 1 Table of Contents Chapter 1: Introduction Installing Your Router System Requirements Installation Instructions Chapter 2: Preparing Your Network Preparing Your Network
Cisco Exam Questions and Answers (PDF) Cisco Exam Questions BrainDumps
 Cisco Exam Questions BrainDumps") Cisco 300-375 Dumps with Valid 300-375 Exam Questions PDF [2018] The Cisco 300-375 Securing Cisco Wireless Enterprise Networks (WISECURE) exam is an ultimate source for professionals to retain their credentials
Cisco 300-375 Dumps with Valid 300-375 Exam Questions PDF [2018] The Cisco 300-375 Securing Cisco Wireless Enterprise Networks (WISECURE) exam is an ultimate source for professionals to retain their credentials
Configuring 802.1X Authentication Client for Windows 8
 Configuring 802.1X Authentication Client for Windows 8 1. At the Metro Screen, press the windows key on your keyboard together with the alphabets x to go to the Control Panel. Page 1 1.1 In the Control
IMC inode Intelligent Client v7.0 (E0106) Copyright (c) Hewlett-Packard Development Company, L.P. and its licensors.
 Copyright (c) Hewlett-Packard Development Company, L.P. and its licensors.") IMC inode Intelligent Client v7.0 (E0106) Copyright (c) 2011-2014 Hewlett-Packard Development Company, L.P. and its licensors. Table of Contents 1. What's New in this Release 2. Problems Fixed in this
IMC inode Intelligent Client v7.0 (E0106) Copyright (c) 2011-2014 Hewlett-Packard Development Company, L.P. and its licensors. Table of Contents 1. What's New in this Release 2. Problems Fixed in this
SETTING UP NETWORKING FOR LOOKOUT 4.0
 NOTE TO USER SETTING UP NETWORKING FOR LOOKOUT 4.0 Contents Testing TCP/IP Capability The purpose of this document is to help you with basic configuration of your computers in order to run Lookout 4. This
Cisco CTL Client setup
 Cisco CTL Client setup This chapter provides information about Cisco CTL client setup. About Cisco CTL Client setup, page 2 Remove etoken Run Time Environment 3.00 for CTL Client 5.0 plug-in, page 2 Cisco
Intel Unite. Enterprise Test Environment Setup Guide
 Intel Unite Enterprise Test Environment Setup Guide Intel Unite Enterprise Test Environment Setup Guide Page 1 of 49 October 2015 Legal Disclaimers & Copyrights All information provided here is subject
Integrating AirWatch and VMware Identity Manager
 Integrating AirWatch and VMware Identity Manager VMware AirWatch 9.1.1 This document supports the version of each product listed and supports all subsequent versions until the document is replaced by a
Cisco Secure Desktop (CSD) on IOS Configuration Example using SDM
 on IOS Configuration Example using SDM") Cisco Secure Desktop (CSD) on IOS Configuration Example using SDM Document ID: 70791 Contents Introduction Prerequisites Requirements Components Used Network Diagram Related Products Conventions Configure
Cisco Secure Desktop (CSD) on IOS Configuration Example using SDM Document ID: 70791 Contents Introduction Prerequisites Requirements Components Used Network Diagram Related Products Conventions Configure
Guide to Deploying VMware Workspace ONE. VMware Identity Manager VMware AirWatch 9.1
 Guide to Deploying VMware Workspace ONE VMware Identity Manager 2.9.1 VMware AirWatch 9.1 Guide to Deploying VMware Workspace ONE You can find the most up-to-date technical documentation on the VMware