Skills Funding Agency
|
|
|
- Domenic Daniel
- 6 years ago
- Views:
Transcription
 v17 User")
1 Provider Data Self-Assessment Toolkit (PDSAT) v17 User Guide
2 Contents Introduction... 2 Compatibility and prerequisites Installing PDSAT Opening PDSAT Opening Screen Updates Disclaimer PDSAT Overview Sidebar Top Bar Returns a Loading returns - ILR b Loading returns FIS Changing returns Deleting returns Reports Report Definition Selecting Reports Running Reports Viewing Reports in Excel Reports Viewer Applying Filters Sorting Columns Adding Annotations Favourites Creating Favourites Editing Favourites Deleting Favourites Annotations Importing Annotations from Excel Deleting Annotations Settings FIS Settings PDSAT Support
3 Introduction Provider DSAT (PDSAT) is a tool for further education and training providers (colleges, training providers and employers) to output a series of reports to test the integrity of their Individualised Learner Record (ILR) data. This will assist providers in carrying out their routine data cleansing and submitting accurate ILR data returns to the funding agencies. PDSAT version 17 has been developed as a standalone application this year which no longer requires Microsoft Access to be installed on a users machine. This has allowed for PDSAT to become a more efficient application in some of the following ways: Process speed for loading returns has increased Downloads of new versions of PDSAT will occur automatically No need to close Excel whilst running reports Compatibility and prerequisites PDSAT has been designed to run on the Windows operating system, and is compatible with the following operating systems: Windows Vista Windows 7 Windows 8 Windows 10 Note we do not support installation of PDSAT on a server or similar client. In addition, you will need the following prerequisites in order for PDSAT to run: An internet connection, in order to download and update PDSAT Microsoft.NET framework 4.5 (It is likely that.net Framework 4.5 is already installed on most Windows machines) Microsoft SQL Server 2012 Express LocalDB If your machine does not have these prerequisites, they will automatically download when you install PDSAT. However, download of the prerequisites will require administrator rights. 2


4 1. Installing PDSAT To download PDSAT, select the link under PDSAT version 17, on the SFA website. This will begin the download process and a message box will ask whether you wish to run or save. Select Run to begin the download. The following box will appear. If you are required to download any of the prerequisites detailed in Compatibility and Prerequisites, and do not have administrator rights, you will need some with administrator rights to allow the install to take place. Usually this will be someone in your IT department. Once administrator rights have been granted, select Install to continue. 3


5 If you are required to download any of the prerequisites, the following box will appear. This example shows that Microsoft SQL Server 2012 Express LocalDB is not currently installed. Select Accept, and the prerequisite will begin its download and a progress bar show. An administrator may again be required to allow the download to continue. After the prerequisite(s) are downloaded, you will be returned to the initial install screen. Select Install to start the main download of PDSAT. This will usually take in the region of thirty seconds to two minutes, with the progress being tracked by the green bar. 4

6 As soon as the install is complete, PDSAT will automatically begin to open. In addition, a PDSAT icon will appear on your desktop, as well as appearing in your program listings. You can select either of these to open PDSAT in the future. 5

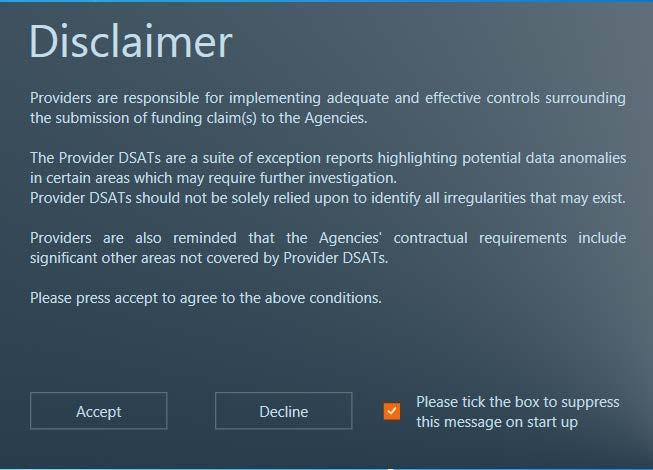
7 2. Opening PDSAT 2.1 Opening Screen When you open PDSAT, the following opening screen will be seen. This opening screen details the following information: Application name: PDSAT 17 The current version you have downloaded, i.e. Version: 17.X.X.X A message indicating the progress of the set up When PDSAT is installing for the first time, it will perform its initial setup, which will take a few minutes. The various steps of this initial setup will be detailed as messages on this opening screen. 2.2 Updates If there is an update available, such as an update to the LARS database, the update will automatically download, providing there is an internet connection. The opening screen will show that an update is taking place and will detail the version that is being downloaded. In addition, the progress of the download will be shown on this screen. Once the update has completed, PDSAT will automatically restart and the version number will have changed to the latest version number. This indicates that the update has successfully taken place and PDSAT will then continue to open. 2.3 Disclaimer As soon as PDSAT is set up, the disclaimer will appear. In order to continue, read the disclaimer and if you agree, select Accept. Selecting Decline will close PDSAT. If you do not want the disclaimer to appear when you open PDSAT in the future, select the tick box as shown below. This will suppress the disclaimer message on future sessions. Please note, whenever an update is downloaded, the disclaimer will appear on start-up and you will need to select the tick box again to suppress the disclaimer for future sessions. 6
8 7


9 3. PDSAT Overview Once you have accepted the disclaimer, PDSAT will open to the following screen. Version 17 has quite a different look compared to previous versions of PDSAT, however the core functionality and layout remains much the same. 3.1 Sidebar In order to navigate throughout PDSAT, there is a sidebar on the far left, containing a series of buttons. The sidebar indicates the currently selected page by highlighting the currently selected button in light blue. To move to a different tab, hover over the button for the page you wish to go to and left click to select. When you hover over a page name, the button goes to a dark blue. The button at the bottom of the sidebar allows you to contact the PDSAT helpdesk with issues relating to PDSAT. This will be explained further in the PDSAT support section. 8
10 3.2 Top Bar The grey top bar allows you to move the PDSAT window around. Click within the grey portion of the top bar and drag to move PDSAT where you want on your screen. There is a minimise button, symbolised by the -, to collapse the window out of sight. To restore PDSAT into view, click on the PDSAT icon in your Windows taskbar. Finally there is an exit button, symbolised by the X. Pressing this will close PDSAT. 9

11 4. Returns The returns tab is the first page you will see of the main PDSAT application and is split into two main parts: Instructions The instructions section provides a brief summary of how to use each of the tabs in PDSAT. Returns This section gives you the ability to import ILR XML files and import from FIS into PDSAT. It contains four buttons: Import ILR Import FIS Delete Return(s) Delete All While there are no returns loaded, the Delete Return(s) and Delete All buttons are disabled. The section also contains a selection box with the heading All loaded returns, where any loaded returns will be displayed. In addition, the currently selected return will be displayed to the right of the heading, Currently selected return. 4.1a Loading returns - ILR Version 17 is only able to load 2016/17 ILR XML files. In order to load an ILR XML file, follow these steps: Select the Import ILR button under the Returns heading. This will open a window which will allow you to navigate to the directory where your ILR XML files are stored. Only ILR XML files will be able to be selected. Once you have selected the file, the import process will begin and a loading screen will appear. The loading screen will display information messages about the import process. If the file you have selected is already loaded into PDSAT, the following message will display: Once the file has imported into PDSAT, you will be notified with a success message. The loaded return will appear in the All loaded returns box at the bottom of the page as well as besides the heading, Currently selected return. The provider name will also appear in the top right hand corner. 10


12 4.1b Loading returns FIS Version 17 now allows you to import from the Funding Information System (FIS) directly, without the need to export an MS Access file from the FIS. In order to import from FIS, follow this steps: Load the ILR you wish to run the PDSAT reports on into FIS and run the funding calculations, picking the following two options: Note, that in order for PDSAT to run the exception reports for a FIS return, the funding calculations need to have been run. If you have not run the funding calculations, the following message will show. Select the Import FIS button. This will allow PDSAT to connect to the FIS database and will extract the data from the last ILR you loaded into the FIS. Note, only the last ILR that was loaded into FIS will be imported into PDSAT. This is because the FIS database only stores data from one ILR at a time. 11
13 If the FIS return is already loaded into PDSAT, a message will display that indicates the return is already loaded similar to that of an ILR already existing in PDSAT. A success message will indicate that the FIS data has been successfully imported. PDSAT will create a FIS return with a name that corresponds to the ILR you loaded into the FIS. For example, for the ILR, ILR , the corresponding FIS return will show as FIS The return will appear in the All loaded returns box at the bottom of the page as well as besides the heading, Currently selected return. The provider name will also appear in the top right hand corner. The connection to the FIS from PDSAT can be specified using the FIS Settings in the settings tab. Information on how to use these settings is detailed in the section 9.1 FIS Settings, in this user guide. 4.2 Changing returns Every loaded return will appear in the All loaded returns selection box which is adjacent to the delete buttons this is shown below. The currently selected return is highlighted within this box, as well as being displayed adjacent to the heading Currently selected return. In order to change the currently selected return, select the desired return in the selection box. You will see that the return name next to Currently selected return will change to the one you have just selected. If the return is for a different provider, the provider name will also change. 12

14 4.3 Deleting returns Once a return is loaded, the delete buttons become enabled. One or many returns can be deleted at a time. This can be done by the following: Deleting all returns Select the Delete All button to clear all returns currently loaded into PDSAT. Deleting a single return Select a single return in the selection box and press the button Delete Return(s). Deleting a selection of returns Hold the shift key and select the returns in the selection box that you wish to delete. Once you have made your selection, press the Delete Return(s) button. When you press either the Delete All or Delete Return(s) button, a message box will appear which will ask you whether you are sure you want to delete the returns. If you have pressed the delete button by mistake, select No, and you will be returned to the Returns tab. If you wish to continue with the deletion, select Yes. 13

15 5. Reports To navigate to the reports tab, select the button titled Reports in the side bar. The page you will see will look like this. You can see the page has four main components: Current Return dropdown menu A drop down menu which shows you all the returns you have currently loaded. The return that is shown when the menu is closed, is the one that is currently selected. (By default, this is the last return you loaded into PDSAT on the returns page). Favourites Group dropdown menu A drop down menu which shows you your current favourite groups. Favourites will be further explained in the Favourites section. Run Reports button Selecting this button will run your reports selection out to either the PDSAT reports viewer or an Excel workbook, depending on your current settings. If there are no returns loaded or reports selected, this button will be disabled, as you cannot run reports without a loaded return. Reports grid 14

16 This is the main reports grid which shows all reports. In previous years, reports have been split into separate tabs for SFA, EFA and Both reports. In version 17, all reports for SFA, EFA and Both are displayed in the grid. The grid displays the following: A check box, allowing you to select the report to be run. Report ID, a unique short hand code for each report. Report Name, a short description of what the report does. Record Count, provides a count of the number of records that report will give. This record count will filter depending on whether any partner UKPRNs have been selected in the Settings tab. 5.1 Report Definition In order to gain further information about a report before actually running it, select the Report ID of any of the reports to display a reports definition window. An example can be seen below. The report definition window gives more detailed information about the report. In addition to the Report ID, Report Name and Record Count from the reports grid, it provides the following information: Old Report ID - giving the report ID from version 16 of PDSAT. If the report is new for version 17 of PDSAT, NEW will be displayed. Scheduled to Run this will show true if you have ticked the check box to run the report, else false will be shown. Purpose gives detail as to what the report will show. Logic provides detail to the logic behind the report. Implication what the results of this report will mean for you. The reports window can be moved like the main PDSAT window, by selecting the top bar and dragging. Furthermore, it can be minimised and closed by using the - and X buttons respectively. 15
17 5.2 Selecting Reports To create your selection of reports to run, you can do any of the following. Select individual reports Skills Funding Agency Scroll through the reports grid and select any of the reports you wish to run by ticking the check box associated to that report. The check box next to the selected report will turn orange with a white tick. In addition, the checkbox in the header of the grid will go orange, but will not show a white tick. This shows that some, but not all, of the reports have been selected. Select all reports To select all reports in the reports grid, select the checkbox in the header of the reports grid. This will turn this checkbox, and all checkboxes below, orange with a white tick. This shows that all reports are now selected to run. Favourite Groups If you do not want to see all SFA, EFA and Both reports, you can use the Favourites Group dropdown menu to filter you selection. The favourite group menu will provide the following defaults: None No reports are selected to be run. SFA Filters and selects only SFA reports, as well as the three Both reports. EFA Filters and selects only EFA reports, as well as the three Both reports. All Selects all reports, SFA, EFA and Both. Your favourite group Any favourite groups you have created in the favourites tab will show in the dropdown menu. The reports will filter and select the reports you have added to your favourite group. 5.3 Running Reports Exporting to the reports viewer Once you have made your selection of reports, select the Run Reports button. By default, this will run your reports selection to a reports viewer, providing a fast means of viewing the reports and for quickly adding annotations. Details of how to use the reports viewer are in section 6 Reports Viewer, of this user guide. To run the report selection directly out to Excel, you must change the report export setting in the Settings tab. This is detailed in section 9 Settings, of this user guide. Exporting to Excel If you have the export settings set to exporting to Excel, when you select the Run Reports button, a window will open where a default name for your report will be displayed. You can use this name for your report or you can type a name of your own choice for your report. In addition, you can select the directory for where the report will be saved. Please note, you can set the report directory in the settings tab this will be explained in the section 9 Settings. To continue, select OK, and the export to Excel will begin. A loading screen will appear, detailing which report is currently being exported. 16


18 Please note, if you have any very large record counts for a report i.e. around 10,000 records, you may experience performance issues whilst exporting to Excel. Other instances of Excel Please note that in version 17 of PDSAT, you no longer need to close all instances of Excel whilst running your reports. PDSAT is able to export reports to Excel with multiple other instances of Excel still open. Note, as per standard Excel functionality if a cell is being edited in another open instance of Excel, the reports will not run. 5.4 Viewing Reports in Excel Once all the reports have been exported, you will see the following message box: If you wish to view your reports now, select Yes. If you select No, you can view your reports any time by opening the Excel workbook, which has saved in the directory that you specified. If you selected yes, the Excel workbook will automatically open up. The first page you will see will be a contents page, similar to below. 17
19 Contents Page The contents page will display the following: Return name the name of the return of which you have run reports for. Provider name provider name for the corresponding return. Report ID the unique shorthand identifier for the report. Report Name the name for the report, also a hyperlink to the corresponding report. Record Count the number of rows the report has taken. You can navigate to any report in Excel workbook by selecting a report name in the contents page. Alternatively, you can select the report you wish to see by selecting the corresponding tab in Excel. Once you have navigated to the report, you can return to the contents page by selecting the PDSAT icon in the top left hand corner of the report. Reports Page To view the report information, select the plus symbol adjacent to row 14. This will open out the group and display the report information. The information detailed will be the same as would be shown in the report definition window for that report. There is the addition of a User Notes section, where users can add notes relating to that report, which will be saved when the Excel workbook is saved. In addition to the report information, there is the following detail: Record Count Learner Count the count of distinct learners for that report. Report run date the date that report was run. The main data for the report is laid in the same way as previous versions of PDSAT. The headers will always remain at the top of the screen whilst you scroll down to view the rest of the data. To save any changes you have made to the report, use the normal Excel functionality of save and the report will be saved. 18

20 6. Reports Viewer The reports viewer allows for a rapid means of viewing the reports and adding annotations. When you select Run Reports and the export settings are set to Viewer selected, the following viewer will be shown. The reports viewer is a separate window to PDSAT and is made up of the following components: Main Window The reports viewer has a similar top bar to that of other windows within PDSAT. The window has the same drag ability as the main PDSAT window. The window name is displayed in the top left hand corner. In addition to the minimise and close buttons in the top right hand corner, there is a full screen button, shown as two overlapping rectangles. This allows you to maximise the reports viewer to full screen. In order to resize the window, go to the bottom right hand corner and a diagonal white double headed arrow will appear. Left click and drag the window to the size you wish. There is a main title in the top left, which provides both the report ID and the report name. Below this is the record count for the report. This will change if you filter your selection and will indicate how many records remain after a filter is applied. Data Grid The data grid displays the report data in a similar manner to that of Excel. Headers are displayed at the top and are separated from the main data by a thicker grey line. You can scroll through the data both horizontally and vertically, using the corresponding scroll bars. 19
21 Filter buttons Adjacent to each header there is a filter button: When unchecked, the filter button is dark blue. When highlighted, the filter button goes grey. When checked, the filter button goes orange. Selecting a filter will filter your data selection based on a value that you type in, further details are provided below. Clear All Filters button Selecting this button will clear any filters that have been applied to that report. View Report Details This will open up a window that is identical to that of the reports definition viewer, providing additional information about the report such as logic, implication, etc. Previous Report button Allows you to move to the previous report in your selection. This button will be disabled if there are no previous reports. Next Report button Allows you to move to the next report in your selection. This button will be disabled if there are no subsequent reports. Reports list drop down A drop down list of all the reports you have run out to the viewer. You can use this drop down menu to display the report of your choice without having to traverse forwards and backwards using the Next Report and Previous Report buttons. Export to Excel button This button is displayed as the green icon for Excel. When highlighted, it will go to a lighter green. If you select this button it will allow you to export the report you are current displaying. It works in the same way as if you selected the Run Reports button in the Reports tab and the export settings are set to Excel selected. A window will appear with a suggested name for your file and you can then save the report to Excel. If you wish to run your entire reports selection to Excel, please set the export setting in the Settings tab to Excel selected and follow the guidance in section 5.3 Running Reports, in this user guide. Future updates to PDSAT will expand this functionality. 20

.")
22 6.1 Applying Filters To apply a filter, check the filter button adjacent to the field you wish to filter. A text box will appear below the heading name. Type into the text box the value which you wish to filter by. This can be a part search, for example if you wanted to return all Funding lines which contain Apprenticeship, type apprenticeship into the textbox and hit the enter/return key. All records that have a funding line that contain apprenticeship will be returned (Figure A). If you want to do a more specific search, for example looking for only 24+ Apprenticeship, add 24+ to the start of the search to get only those records (Figure B). You can apply multiple filters by selecting the filter button of another column. For example, we could search for all 24+ apprenticeship Funding lines AND where Prior attainment is 99 (Figure C). Figure A Figure B Figure C To remove a filter, select the filter button of the filter which you wish to remove and the data grid will refresh accordingly to show records that apply to the resulting filter selection. If there are no filters showing in the end, then the data grid will show the original report data. All filters can be removed by selecting the Clear All Filters Button. 6.2 Sorting Columns In order to sort a column, select the centre of the header name and the column will sort into ascending order. If you wish to re-order a column to descending order, select the column heading name again. 6.3 Adding Annotations The majority of reports will have a column on the far right of the report named User annotations. This column allows you to add your own comments next to any of the records in your report. In the reports viewer, once you have typed in an annotation it will automatically be stored. All annotations will 21
23 automatically be saved into PDSAT when you close the reports viewer and will appear in your report whenever you view the report again, either in the reports viewer or in Excel. 22

24 7. Favourites Skills Funding Agency To navigate to the favourites tab, select the button titled Favourites in the side bar. The page you will see will look like this: You can see the page is made up of the following components: Favourites Group dropdown menu This dropdown menu shows you all the favourite groups that currently exist, and will include any new groups that you have created. There are four default favourite groups: SFA EFA None All You are unable to edit or delete any of the default favourite groups. Save button Saves any changes you have made to a favourite group that you have previously made. If one of your own favourites isn t selected, this button will be disabled you cannot edit a default group. Save As New button Allows you to save a new favourite. Delete Group button Allows you to delete a group that you have made. If one of your own favourites isn t selected, this button will be disabled you cannot delete a default group. 23

25 Refresh Group button If you have made a change to a favourite group, but have not saved the favourite yet, you can refresh the favourite group to your original selection. Favourite s grid A grid very similar to that of the reports grid. The ticked checkboxes represent those that are selected for a favourite group. The grid displays the following: Checkbox Report ID Report Name 7.1 Creating Favourites To create a favourite group, follow these steps: Use the checkboxes to select the reports that you want to add to your favourite group. Select the Save As New button to save your selection of reports as a favourite. A message box will appear asking you to give a name to your favourite group. An example is seen below. Type a name for your favourite group in the input box. Once you select Save, a success message will appear, indicating the favourite has been successfully saved. You will now be able to see the name of your favourite group in your Favourite Group dropdown menu. 7.2 Editing Favourites In order to edit a favourite group you have created, follow these steps: Select your favourite group in the Favourite Group dropdown menu. The reports in your favourite selection will be indicated in the favourite grid by the ticked checkboxes. To add more reports to the group, tick the corresponding check box for the report you wish to add. If you want to remove reports, un-tick the checkbox of a selected report. If you want to return your favourite group to how it originally was, select the Refresh Group button. Any checkboxes you have since un-ticked will become ticked and any checkboxes you have ticked will become un-ticked. To retain the changes you have made, press the Save button. A success message will appear to indicate the change has been made 24
26 7.3 Deleting Favourites To delete a non-default favourite group, select the group you wish to delete in the Favourite Group dropdown menu. Select the Delete Group button and the group will be removed from the list. 25

27 8. Annotations Skills Funding Agency To navigate to the annotations tab, select the button titled Annotations in the side bar. The page you will see will look like this: The annotations tab is divided into two sections: Import annotations and Delete annotations. 8.1 Importing Annotations from Excel This section provides some brief instructions on how to import your annotations from an Excel report you have added annotations to, annotations enter on the PDSAT Reports Viewer are automatically saved. The detailed steps are below: Add your annotations to the reports you wish in the User annotations column only, else they will not be recorded. The import process is not affected by the change of colour or font of the cells within the worksheet, however altering the main header section of the report will impact the import process and should therefore be avoided. Ensure that you have saved and completely closed the report you are going to import. Select the Import Annotations button and this will open a window which allows you to select the file you wish to import annotations from. You will only be allowed to select an.xlsb file to import. The import process will take place and you will be notified that the annotations have been imported via a success message. The annotations will be retained within PDSAT. Whenever you run a report for which you have imported annotations, these will be displayed in the User annotations column of your report. If you make changes to your annotations for a report and re-import that report, these will overwrite the annotations you previously had stored. 8.2 Deleting Annotations By selecting the Delete Annotations button, you will clear all annotations you have added to PDSAT, for all your returns. 26

28 9. Settings Skills Funding Agency To navigate to the settings tab, select the button titled Settings in the side bar. The page you will see will look like this: The settings page is made up of the following components: Exclude reports with zero records toggle switch In order to run a series of reports without including reports with zero records, you can turn this switch on. When the switch is off, the colour of the switch is grey and the bold text next to the switch states Included. This indicates that when you export a report, reports with zero records will be included. If you press the switch, it will turn orange and the bold text will read Excluded. When you run a series of reports now, any reports with zero records will be excluded from the report. Export reports with Reduced Fields toggle switch In order to run a series of reports with a reduced list of fields, you can turn on this switch. When the switch is off, the colour of the switch is grey and the bold text next to the switch states Full fields. This indicates that when you export a report, the full fields list will be exported. If you press the switch, it will turn orange and the bold text will read Reduced Fields. When you run a series of reports now, they will be run out with a reduced fields list. Export reports to Reports Viewer toggle switch In order to run a series of reports out to the reports viewer, you can turn on this switch. This switch is selected on by default. 27
29 When the switch is off, the colour of the switch is grey and the bold text next to the switch states Excel selected. This indicates that when you export a report selection, they will be exported to Excel. If you press the switch, it will turn orange and the bold text will read Viewer Selected. When you run a series of reports now, they will be run out to the Reports Viewer. Set Report Folder button By selecting this button, you are able to set which folder you want any reports that you export to be saved. When you select the Run Reports button in the Reports tab, the folder you have set as your report folder will open up as the default area to save your reports. Open Report Folder button The Open Report Folder button will open up the folder that you have set as the destination for your reports. This allows you to easily find your reports. If you have not set a folder, your desktop will open as default. Open Log Folder button This button will open the folder where your log file resides. The log file details all the major steps of code that PDSAT has taken and will tell the PDSAT team where any issues have occurred within PDSAT. If you select PDSAT helpdesk and Microsoft Outlook is your default provider, the log file will automatically attach to your . However, if this is not the case, you can attach the log file from this location directly to your . FIS Settings button This button opens up a window that allows you to set a series of options which allow you customise your connection to the FIS database. It follows a similar lay out to the settings panel in FIS which can be found under: Tools -> Storage Settings. Further details of this process are covered below in section 9.1. Partner UKPRNs Filter grid The Partner UKPRN grid allows you to select individual Partner UKPRNs to filter your reports by. Use the checkbox adjacent to the Partner UKPRN you want to filter by, or select the checkbox in the heading to select all. There are also some brief instructions on the settings page that give an overview as to how to use this feature. Please note, you must have at least one partner UKPRN selected in the list else you will not be able to run reports. You will get the following warning message if no partner UKPRNs are selected: 28


30 Funding Period drop down This drop down allows you to select the funding period for which you wish your FIS reports to show the funding for. The funding period selected will give the funding in the report cumulatively up to and including that funding period. For example, if period 03 is selected, all funding from periods 01, 02 and 03 will be shown in the report. By default, when you load in a FIS return, the funding period will change to that of the return period for the ILR. Current Version The current version details which iteration of PDSAT you are currently using. It is a point of reference for you to keep track of whether you are up to date with the latest PDSAT or not. 9.1 FIS Settings The FIS Settings window looks like this (Figure A). This layout is similar to that of the storage settings panel in the FIS program which can be found in FIS menu bar under: Tools -> Storage Settings (Figure B). Figure A Figure B Any changes you make to the FIS settings in PDSAT will automatically save when you close the settings window. Database Machine Name This setting refers to your machine name that is hosting the database. It is set by default to (local) as is in settings page in the FIS - and should in almost all instances be kept as this. If you specify the wrong Database Machine Name you will be notified with a message like this when you try and import FIS. 29

31 Database Instance This refers to the database instance that FIS is stored in. By default, this is set to SQLEXPRESS as is in the settings in FIS. If you have a named instance in your storage settings in FIS, select the switch to select named instance. This will allow you to type in the named instance that you will use. An incorrect named instance will show the following message. If the named instance does not work, try the default instance. Connection Type This option is set by default to Trusted Connection, which specifies that a trusted connection should be used to connect to the database. If you have a specific connection you use to connect to the FIS database, please use your user name and password, and these will allow the specific connection to occur. An incorrect named user name and password will show the following message. If the named connection does not work, try the default connection type. 30

32 10. PDSAT Support Skills Funding Agency PDSAT provides a link in the bottom left hand corner which is titled PDSAT helpdesk. Please us whenever you experience any error messages. You will often be prompted to contact the PDSAT helpdesk in the error message. An example error message may be: To contact the PDSAT helpdesk, click on this link and an Outlook message will automatically pop up enabling you to note your enquiry. In addition, if Microsoft Outlook is your default provider, the log file will automatically attach to the . If a log file is not attached please manually attach the file via the Open Log File button on the Settings page. Alternatively please DSATHelpDesk@kpmg.co.uk for all PDSAT enquiries. Include the following information: Your organisation name Your name Your address Your contact telephone number Your operating system detail e.g. Windows 7 Your MS Office version e.g. Microsoft Office 2010 The version of PDSAT you are using A description of your problem Your log file The PDSAT Helpdesk will aim to respond to your query within 2 working days. 31
IP4 - Running reports
 To assist with tracking and monitoring HRIS recruitment and personnel, reports can be run from Discoverer Plus. This guide covers the following process steps: Logging in... 2 What s changed? Changed reference
Nintex Reporting 2008 Help
 Nintex Reporting 2008 Help Last updated: Thursday, 24 December 2009 1 Using Nintex Reporting 2008 1.1 Chart Viewer Web Part 1.2 Importing and Exporting Reports 1.3 Import Nintex report page 1.4 Item Level
Introduction to Personal Computers Using Windows 10 and Microsoft Office 2016
 Watsonia Publishing 47 Greenaway Street Bulleen VIC 3105 Australia www.watsoniapublishing.com info@watsoniapublishing.com Introduction to Personal Computers Using Windows 10 and Microsoft Office 2016 Quick
Copyright 2015 Integrated Environmental Solutions Limited. All rights reserved.
 Tabular Room Data User Guide IES Virtual Environment Copyright 2015 Integrated Environmental Solutions Limited. All rights reserved. No part of the manual is to be copied or reproduced in any form without
User Guide. Web Intelligence Rich Client. Business Objects 4.1
 User Guide Web Intelligence Rich Client Business Objects 4.1 2 P a g e Web Intelligence 4.1 User Guide Web Intelligence 4.1 User Guide Contents Getting Started in Web Intelligence 4.1... 5 Log into EDDIE...
Tabular Building Template Manager (BTM)
") Tabular Building Template Manager (BTM) User Guide IES Vi rtual Environment Copyright 2015 Integrated Environmental Solutions Limited. All rights reserved. No part of the manual is to be copied or reproduced
Tabular Building Template Manager (BTM) User Guide IES Vi rtual Environment Copyright 2015 Integrated Environmental Solutions Limited. All rights reserved. No part of the manual is to be copied or reproduced
CHRIS Introduction Guide
 1 Introduction... 3 1.1 The Login screen... 3 1.2 The itrent Home page... 5 1.2.1 Out of Office... 8 1.2.2 Default User Preferences... 9 1.2.3 Bookmarks... 10 1.3 The itrent Screen... 11 The Control Bar...
2013 edition (version 1.1)
") 2013 edition (version 1.1) Contents 1 Introduction... 3 2 Signing in to your Office 365 account... 3 2.1 Acceptable Use Policy and Terms of Use... 4 3 Setting your profile and options... 4 3.1 Settings:
2013 edition (version 1.1) Contents 1 Introduction... 3 2 Signing in to your Office 365 account... 3 2.1 Acceptable Use Policy and Terms of Use... 4 3 Setting your profile and options... 4 3.1 Settings:
Appraisal Module. 1. Introduction 1.01 Changes in this Version. 2. Start Page 2.1 Survey details.
 Appraisal Module 1. Introduction 1.01 Changes in this Version 2. Start Page 2.1 Survey details. 3. Manage Appraisal Users 3.1 Initial setup 3.2 New User 3.3 Setting Appraisal Permissions 4. User Preferences
VIMED JWEB Manual. Victorian Stroke Telemedicine. Version: 1.0. Created by: Grant Stephens. Page 1 of 17
 VIMED JWEB Manual Victorian Stroke Telemedicine Version: 1.0 Created by: Grant Stephens Page 1 of 17 1 Table of Contents 1 Table of Contents... 2 2 What is JWEB?... 4 3 Accessing JWEB... 4 3.1 For Mac
IntraMaps End User Manual
 IntraMaps End User Manual For IntraMaps Version 8 Date: 6 th July 2014 Contents Introduction... 4 What is IntraMaps?... 4 Application... 5 Main Toolbar... 6 View... 7 Original View:... 7 Pan:... 7 Zoom
Tutorial for Horde . Contents
 Tutorial for Horde email Contents Basics 1. Starting Horde 2. Reading emails 3. Replying / Forwarding 4. New email 5. Attachments 6. Save as Draft 7. Address books Adding contact details and accessing
Adobe Acrobat DC Forms
 Adobe Acrobat DC Forms Course objectives: Create interactive forms Manage form fields and properties Use forms in Adobe Reader Use PDF Actions Digital Signatures This course does not cover LiveCycle. Staff
JITs Portal. User Manual
 JITs Portal User Manual November 2017 JITs Portal 1 Table of Contents Chapter 1 Introduction... 2 1.1 What is the JITs Portal?...3 1.2 User Guide structure...4 Chapter 2 Working with the JITs Portal...
4) Study the section of a worksheet in the image below. What is the cell address of the cell containing the word "Qtr3"?
 Study the section of a worksheet in the image below. What is the cell address of the cell containing the word Qtr3?") Choose The Correct Answer: 1) Study the highlighted cells in the image below and identify which of the following represents the correct cell address for these cells: a) The cell reference for the selected
Choose The Correct Answer: 1) Study the highlighted cells in the image below and identify which of the following represents the correct cell address for these cells: a) The cell reference for the selected
Section 2 Getting Started
 Section 2 Getting Started ECDL Section 2 Getting Started By the end of this section you should be able to: Start, restart and close down a device Log on and log off Windows Recognise and use the Desktop
Expedient User Manual Getting Started
 Volume 1 Expedient User Manual Getting Started Gavin Millman & Associates Pty Ltd 281 Buckley Street Essendon VIC 3040 Phone 03 9331 3944 Web www.expedientsoftware.com.au Table of Contents Logging In...
Discoverer Viewer. User Manual. for SDS
 Discoverer Viewer User Manual for SDS saskatchewan.ca 2017 Table of Contents Introduction... 3 How to Get Started... 3 Logging In... 3 First Time Logging In Preferences Changes... 4 Worksheet List... 5
Tasks. User Guide 4.12
 Tasks User Guide 4.12 ABOUT NORTHWOODS CONSULTING PARTNERS Northwoods Consulting Partners, Inc., founded in 1999, is a privately-held software development and services company headquartered in Dublin,
Secure Transfer Site (STS) User Manual
 User Manual") Secure Transfer Site (STS) User Manual (Revised 3/1/12) Table of Contents Basic System Display Information... 3 Command Buttons with Text... 3 Data Entry Boxes Required / Enabled... 3 Connecting to the
Secure Transfer Site (STS) User Manual (Revised 3/1/12) Table of Contents Basic System Display Information... 3 Command Buttons with Text... 3 Data Entry Boxes Required / Enabled... 3 Connecting to the
Microsoft Excel 2010 Basic
 Microsoft Excel 2010 Basic Introduction to MS Excel 2010 Microsoft Excel 2010 is a spreadsheet software in the new Microsoft 2010 Office Suite. Excel allows you to store, manipulate and analyze data in
User Guide. Rev Dot Origin Ltd.
 User Guide Introduction to the EasyTac File Explorer...1 Using EasyTac to read drivers' cards with a card reader...2 Using EasyTac to read VU files from a download device...3 Using EasyTac to download
SAP Business Client Quick Start Guide
 SAP Business Client Quick Start Guide This guide introduces the SAP Business Client, how to navigate and use basic features. SAP Business Client 6.5 integrates SAP 7.50 GUI. It s now possible to use both
Login: Quick Guide for Qualtrics May 2018 Training:
 Qualtrics Basics Creating a New Qualtrics Account Note: Anyone with a Purdue career account can create a Qualtrics account. 1. In a Web browser, navigate to purdue.qualtrics.com. 2. Enter your Purdue Career
Sostenuto 4.1 title page. System Management User s Guide
 Sostenuto 4.1 title page System Management User s Guide Date: November 2013 All rights reserved. No part of this document may be reproduced or transmitted in any form or by any means, or stored in any
How to Create Custom Name Badge Inserts with a Mail Merge in Microsoft Word 2007
 Many people know that you can use the Mail Merge feature in Microsoft Word 2007 to easily create mailing labels, but did you know you can use it to quickly create custom name badge inserts? Here, you will
Identifying Updated Metadata and Images from a Content Provider
 University of Iowa Libraries Staff Publications 4-8-2010 Identifying Updated Metadata and Images from a Content Provider Wendy Robertson University of Iowa 2010 Wendy C Robertson Comments Includes presenter's
New Finance Officer & Staff Training
 New Finance Officer & Staff Training Overview MUNIS includes many programs and tools to allow for the management of the District financials. As newer finance officers and staff, you are charged with understanding,
Quick Start Guide - Contents. Opening Word Locating Big Lottery Fund Templates The Word 2013 Screen... 3
 Quick Start Guide - Contents Opening Word... 1 Locating Big Lottery Fund Templates... 2 The Word 2013 Screen... 3 Things You Might Be Looking For... 4 What s New On The Ribbon... 5 The Quick Access Toolbar...
MultiSite Suite: Accounts Payable
 MultiSite Suite: Accounts Payable User s Manual version 6 Copyright & Trademarks Copyright Notice and Trademarks 2010 MultiSite Systems, All rights reserved. Microsoft, Windows, Excel, and Outlook are
The following instructions cover how to edit an existing report in IBM Cognos Analytics.
 IBM Cognos Analytics Edit a Report The following instructions cover how to edit an existing report in IBM Cognos Analytics. Navigate to Cognos Cognos Analytics supports all browsers with the exception
HealthStream Connect Administrator User Guide
 HealthStream Connect Administrator User Guide ii Contents About HealthStream Connect... 1 Administrator Overview of HealthStream Connect... 2 Administrator Access and Privileges... 2 Navigating HealthStream
EXCEL Using Excel for Data Query & Management. Information Technology. MS Office Excel 2007 Users Guide. IT Training & Development
 Information Technology MS Office Excel 2007 Users Guide EXCEL 2007 Using Excel for Data Query & Management IT Training & Development (818) 677-1700 Training@csun.edu TABLE OF CONTENTS Introduction... 1
R EIN V E N TIN G B U S I N E S S I L E M A. MARK5 Basic guide. - All rights reserved
 R EIN V E N TIN G B U S I N E S S I L E M A MARK5 Basic guide 0.0 Welcome In this brief guide we will cover the basics of MARK5 such as starting up, understanding the MARK5 interface basics and sending
Excel4apps Reports Wand User Guide (SAP) 2013 Excel4apps
 2013 Excel4apps") Excel4apps Reports Wand User Guide (SAP) 2013 Excel4apps Table of Contents 1 QuickStart Guide... 4 2 System Requirements... 5 3 Authorizations... 5 4 Logging On... 5 5 The Reports Wand Toolbar A Brief
Excel4apps Reports Wand User Guide (SAP) 2013 Excel4apps Table of Contents 1 QuickStart Guide... 4 2 System Requirements... 5 3 Authorizations... 5 4 Logging On... 5 5 The Reports Wand Toolbar A Brief
Excel Tables & PivotTables
 Excel Tables & PivotTables A PivotTable is a tool that is used to summarize and reorganize data from an Excel spreadsheet. PivotTables are very useful where there is a lot of data that to analyze. PivotTables
Quick Start Guide to Dynamic Templates
 Quick Start Guide to Dynamic Templates CS Version 2.7.7 (EMIS) Getting Started CHECKLIST: You must be logged into your Clinical System (EMIS) with a patient selected to access Clinical Support (CS) o Double
Gradebook Entering, Sorting, and Filtering Student Scores March 10, 2017
 Gradebook Entering, Sorting, and Filtering Student Scores March 10, 2017 1. Entering Student Scores 2. Exclude Student from Assignment 3. Missing Assignments 4. Scores by Class 5. Sorting 6. Show Filters
Monash University Policy Management. User Guide
 Monash University Policy Management User Guide 1 Table of Contents 1. GENERAL NAVIGATION... 4 1.1. Logging In to Compliance 360 - Single Sign On... 4 1.2. Help... 4 1.2.1. The University Policy Bank...
Wholesale Lockbox User Guide
 Wholesale Lockbox User Guide August 2017 Copyright 2017 City National Bank City National Bank Member FDIC For Client Use Only Table of Contents Introduction... 3 Getting Started... 4 System Requirements...
Introduction to SAP. Navigation Module
 Introduction to SAP Navigation Module October 2009 Contents 1 Introduction to SAP... 3 1.1 Log On... 3 1.2 Navigation Through SAP... 5 1.3 The Menu Bar... 5 1.4 The Short Cut Toolbar... 6 1.5 Display Technical
IT Training Services. SharePoint 2013 Getting Started. Version: 2015/2016 V1
 IT Training Services SharePoint 2013 Getting Started Version: 2015/2016 V1 Table of Contents ACCESSING SHAREPOINT SITE 1 IT Intranet SharePoint Site... 1 Create a SubSite... 1 DOCUMENT LIBRARIES 2 Create
UTAS CMS. Easy Edit Suite Workshop V3 UNIVERSITY OF TASMANIA. Web Services Service Delivery & Support
 Web Services Service Delivery & Support UNIVERSITY OF TASMANIA UTAS CMS Easy Edit Suite Workshop V3 Web Service, Service Delivery & Support UWCMS Easy Edit Suite Workshop: v3 Contents What is Easy Edit
Release Notes for Cost of the Diet Version
 Release Notes for Cost of the Diet Version 2.2.84 Contents 1. Installing the Cost of the Diet Software and Starting the Application 1.1. Downloading the Installer executable and running it 1.2. Starting
Mihaylo College Website Content Editing Guide
 Mihaylo College Website Content Editing Guide The following guide will take you through the steps necessary to update website content for https://business.fullerton.edu through the OmniUpdate (OUCampus)
AudaIntel User Guide Version 2
 AudaIntel User Guide Version 2 Audatex (UK) Limited The Forum Station Road Theale Reading RG7 4RA Tel: +44 (0)118 932 3535 AudaIntel User Guide 2011 Copyright Audatex. Strictly Audatex. Confidential. All
Seko Global Logistics
 Seko Global Logistics Dock Processing Utility Installation and Usage 1. Introduction... 2 1.1 Objective... 2 1.2 Document Information... 2 1.3 Revision History... 2 2. Plug-In Installation Instructions...
Microsoft Word 2010 Introduction to Mail Merge
 Microsoft Word 2010 Introduction to Mail Merge Elizabeth Wells February 2012 Copyright 2012 ElizabethWells All rights reserved. Except as permitted under current legislation, no part of this work may be
Frequently Asked Questions: SmartForms and Reader DC
 Frequently Asked Questions: SmartForms and Reader DC Initial Check Browsers - Google Chrome - Other browsers Form functions - List of additional buttons and their function Field functions - Choosing a
Prepared By: Graeme Hilson. U3A Nunawading
 0 Prepared By: Graeme Hilson U3A Nunawading - 2015 1 CONTENTS This Course Page 3 Reference Material Page 3 Introduction page 3 Microsoft Excel Page 3 What is a Spreadsheet Page 4 Excel Screen Page 4 Using
Introduction to 9.0. Introduction to 9.0. Getting Started Guide. Powering collaborative online communities.
 Introduction to 9.0 Introduction to 9.0 Getting Started Guide Powering collaborative online communities. TABLE OF CONTENTS About FirstClass...3 Connecting to your FirstClass server...3 FirstClass window
Exercise 1: Introduction to MapInfo
 Geog 578 Exercise 1: Introduction to MapInfo Page: 1/22 Geog 578: GIS Applications Exercise 1: Introduction to MapInfo Assigned on January 25 th, 2006 Due on February 1 st, 2006 Total Points: 10 0. Convention
Excel. Database functions
 Excel Database functions Objectives Week 3 By the end of this session you will be able to :- Move around a worksheet Recognise cell references Sort data alphabetically Insert rows and columns Delete rows
BusinessObjects Frequently Asked Questions
 BusinessObjects Frequently Asked Questions Contents Is there a quick way of printing together several reports from the same document?... 2 Is there a way of controlling the text wrap of a cell?... 2 How
INTRODUCTION TO THE MATLAB APPLICATION DESIGNER EXERCISES
 INTRODUCTION TO THE MATLAB APPLICATION DESIGNER EXERCISES Eric Peasley, Department of Engineering Science, University of Oxford version 4.6, 2018 MATLAB Application Exercises In these exercises you will
Skills Exam Objective Objective Number
 Overview 1 LESSON SKILL MATRIX Skills Exam Objective Objective Number Starting Excel Create a workbook. 1.1.1 Working in the Excel Window Customize the Quick Access Toolbar. 1.4.3 Changing Workbook and
Calendar & Buttons Dashboard Menu Features My Profile My Favorites Watch List Adding a New Request...
 remitview User Guide 1 TABLE OF CONTENTS INTRODUCTION... 3 Calendar & Buttons... 3 GETTING STARTED.... 5 Dashboard.... 7 Menu Features... 8 PROFILE.... 10 My Profile... 10 My Favorites... 12 Watch List...
Barchard Introduction to SPSS Marks
 Barchard Introduction to SPSS 22.0 3 Marks Purpose The purpose of this assignment is to introduce you to SPSS, the most commonly used statistical package in the social sciences. You will create a new data
Contents Introduction... 4 Features new to CyDesk Web... 4 Call History: - Show All or Filter by Category... 4 Call History: - View the Call History
 Contents Introduction... 4 Features new to CyDesk Web... 4 Call History: - Show All or Filter by Category... 4 Call History: - View the Call History of other Agents... 4 Busy Agents: - Hover to View who
Intro to Excel. To start a new workbook, click on the Blank workbook icon in the middle of the screen.
 Excel is a spreadsheet application that allows for the storing, organizing and manipulation of data that is entered into it. Excel has variety of built in tools that allow users to perform both simple
OpenForms360 Validation User Guide Notable Solutions Inc.
 OpenForms360 Validation User Guide 2011 Notable Solutions Inc. 1 T A B L E O F C O N T EN T S Introduction...5 What is OpenForms360 Validation?... 5 Using OpenForms360 Validation... 5 Features at a glance...
LEGISLATIVE BUDGET BOARD STAFF. Finalizing Budget Structures and Defining Measures in ABEST
 LEGISLATIVE BUDGET BOARD Finalizing Budget Structures and Defining Measures in ABEST Instructions for State Agencies, Institutions of Higher Education, and Appellate Courts for the Eighty-fifth Legislature,
EQuIS Data Processor (EDP) User Manual
 User Manual") EQuIS Data Processor (EDP) User Manual Introduction EQuIS Data Processor (EDP) Introduction The EQuIS Data Processor, or EDP, is today s answer to the many data quality issues that plague data managers.
EQuIS Data Processor (EDP) User Manual Introduction EQuIS Data Processor (EDP) Introduction The EQuIS Data Processor, or EDP, is today s answer to the many data quality issues that plague data managers.
Introductory Exercises in Microsoft Access XP
 INFORMATION SYSTEMS SERVICES Introductory Exercises in Microsoft Access XP This document contains a series of exercises which give an introduction to the Access relational database program. AUTHOR: Information
Forms. Section 3: Deleting a Category
 9. If a category was NOT previously published, Authors may modify it by following the same procedures as an Administrator or Publisher. When the category is ready for publishing an Author must Save and
This guide provides information to help you learn about navigating your way through the itrent Human Resources Management and Payroll system.
 1 Introduction The software system that holds and maintains employment and payroll information for staff at the University of Cambridge is called itrent. The project to bring about changes regarding access
WAITOMO DISTRICT COUNCIL ONLINE MAPS. Updated June This document contains an overview of Waitomo District Council Online Maps
 WAITOMO DISTRICT COUNCIL ONLINE MAPS V8 Updated June2017 - This document contains an overview of Waitomo District Council Online Maps Table of Contents Starting Online Maps... 3 Main Screen... 4 Menu Bar...
Excel 2016 Basics for Mac
 Excel 2016 Basics for Mac Excel 2016 Basics for Mac Training Objective To learn the tools and features to get started using Excel 2016 more efficiently and effectively. What you can expect to learn from
Help Contents. Custom Query Builder Functionality Synopsis
 Help Contents Custom Query Builder Functionality Synopsis... Section : General Custom Query Builder Functions... Section : Query Tool Main Menu Functions... Section : Query Tool Choose Datasource Functions...
VERSION ASSET TRACKING SYSTEM USER MANUAL STARTER EDITION
 VERSION 4.20.3 ASSET TRACKING SYSTEM USER MANUAL STARTER EDITION ATS USER MANUAL- STARTER EDITION TABLE OF CONTENTS ATS User Manual- Starter Edition... 2 Table of Contents... 2 Quick Start Overview...
Desktop Charge Capture
 Version 4.2 Quick Start Guide for Healthcare Providers Desktop Charge Capture Physician Information System Contents Logging Into Desktop Charge Capture... 1 Introduction to Desktop Charge Capture... 3
Retain Wallchart Manual
 M Retain Wallchart Manual www.retaininternational.com Contents Table of Contents 1 Introduction 1.1 1.2 1.3 Introduction About Retain Scope of this userguide... 7... 8... 8 How to use this guide... 9 1.4
Australia Online Forms for Research Software User Manual
 Australia Online Forms for Research Software User Manual Version 1.3 Released 21 August 2010 2 P a g e A u s t r a l i a O n l i n e F o r m s f o r R e s e a r c h Contents 1. Introduction 5 2. Getting
How to use: TMA Live
 How to use: TMA Live Page 1 of 17 Contents Welcome to TMA Live... 3 Getting to TMA Live... 3 From Your Desktop PC... 3 From Your Mobile Device... 3 Logging in to TMA Live... 4 TMA Live Home Screen... 5
Excel 2016 Basics for Windows
 Excel 2016 Basics for Windows Excel 2016 Basics for Windows Training Objective To learn the tools and features to get started using Excel 2016 more efficiently and effectively. What you can expect to learn
WPS Workbench. user guide. "To help guide you through using the WPS user interface (Workbench) to create, edit and run programs"
 to create, edit and run programs") WPS Workbench user guide "To help guide you through using the WPS user interface (Workbench) to create, edit and run programs" Version: 3.1.7 Copyright 2002-2018 World Programming Limited www.worldprogramming.com
WPS Workbench user guide "To help guide you through using the WPS user interface (Workbench) to create, edit and run programs" Version: 3.1.7 Copyright 2002-2018 World Programming Limited www.worldprogramming.com
CCH Audit Automation SQL Release Notes
 CCH Audit Automation SQL 2017.3 Release Notes Disclaimer CCH Software has made every effort to ensure the accuracy and completeness of these release notes. However, CCH Software, its staff and agents will
Module 4 : Spreadsheets
 Module 4 : Spreadsheets What is a spreadsheet program? A spreadsheet program allows you to store, organise and analyse information. Applications of spreadsheets focus on generating numeric information
E-Report. User Manual
 E-Report User Manual 2011 All rights reserved. No parts of this work may be reproduced in any form or by any means graphic, electronic, or mechanical, including photocopying, recording, taping, or information
Section 2 Customisation and Printing
 Level 6 Spreadsheet 6N4089 Section 2 Customisation and Printing Contents 1. Customise Toolbars and Create Custom Menus... 2 Recognise the Features Available on Toolbars... 2 Display or Hide the Ribbon...
Layout and display. STILOG IST, all rights reserved
 2 Table of Contents I. Main Window... 1 1. DEFINITION... 1 2. LIST OF WINDOW ELEMENTS... 1 Quick Access Bar... 1 Menu Bar... 1 Windows... 2 Status bar... 2 Pop-up menu... 4 II. Menu Bar... 5 1. DEFINITION...
Records Explorer MANUAL
 Records Explorer MANUAL August 2015 ARCHIVES & RECORDS MANAGEMENT SERVICES Rm 134, Below Lobby M, Main Quadrangle A14 The University of Sydney NSW 2006 Australia HELPDESK: p +61 2 9036 9537 f +61 2 9351
SharePoint List Booster Features
 SharePoint List Booster Features Contents Overview... 5 Supported Environment... 5 User Interface... 5 Disabling List Booster, Hiding List Booster Menu and Disabling Cross Page Queries for specific List
Administration. Training Guide. Infinite Visions Enterprise Edition phone toll free fax
 Administration Training Guide Infinite Visions Enterprise Edition 406.252.4357 phone 1.800.247.1161 toll free 406.252.7705 fax www.csavisions.com Copyright 2005 2011 Windsor Management Group, LLC Revised:
Data. Selecting Data. Sorting Data
 1 of 1 Data Selecting Data To select a large range of cells: Click on the first cell in the area you want to select Scroll down to the last cell and hold down the Shift key while you click on it. This
Navigate to Cognos Cognos Analytics supports all browsers with the exception of Microsoft Edge.
 IBM Cognos Analytics Create a List The following instructions cover how to create a list report in IBM Cognos Analytics. A list is a report type in Cognos that displays a series of data columns listing
HBS Training - IT Solutions. PlanWeb. Introduction
 HBS Training - IT Solutions PlanWeb Introduction CONTENTS Logging on to the system...3 The PlanWeb Window...5 The Tool Bar...6 The Status Bar...6 The Map Window...6 The Information Window...7 Changing
An Introduction to Oracle Business Intelligence
 Table of Contents Introduction... 2 What is OBI...2 What is a Dashboard?...2 Accessing OBI... 3 Viewing Data via Dashboards... 4 Using Favorites... 5 Filtering Data... 6 Changing the way data is displayed...
Working with Actions Stratum.Viewer 6
 Working with Actions Stratum.Viewer 6 Getting Started Access to Actions Accessing Actions Functionality Introduction to Actions Quick Start Set up an Action Tasks Add an Email Action Add a File Share Action
Pulse LMS: User Management Guide Version: 1.86
 Pulse LMS: User Management Guide Version: 1.86 This Guide focuses on the tools that support User Managers. Please consult our separate guides for processes for end users, learning management and administration
Farm Modernisation Programme Tranche 3
 Farm Modernisation Programme Tranche 3 A step by step guide to the completion of an online application for funding under Tranche 3 of the Farm Modernisation Programme. 1 TABLE OF CONTENTS Introduction...
CONTASign Pro User Manual
 CONTASign Pro User Manual CONTASign PRO MANUAL v3.5 rev01 Page 1 of 51 CONTA-CLIP Contents Page No. 1. Main Window Layout 4 - Window Layout Customisation 5 - Window Configuration 6 2. Start Menu & Quick
Records Explorer MANUAL
 Records Explorer MANUAL April 2010 ARCHIVES & RECORDS MANAGEMENT SERVICES Rm 134, Below Lobby M, Main Quadrangle A14 The University of Sydney NSW 2006 Australia HELPDESK: p +61 2 9036 9537 f +61 2 9351
Web Page Basics. FRSD Elementary Technology Workshop. February Presented by Lisa Stewart, Tammy Gianvito, and Diane Kaufmann
 Web Page Basics FRSD Elementary Technology Workshop February 2014 Presented by Lisa Stewart, Tammy Gianvito, and Diane Kaufmann Please save this booklet for future reference. 2 P a g e Notes and Questions
EFIS 2.0 Training Materials Child Care User
 EFIS 2.0 Training Materials Child Care User Contents Module 1 Basic Planning... 3 Module 2 Basic Planning Through Smart View... 17 Module 3 Advanced Smart View... 29 Module 4 Data Entry Validation... 40
OUTLOOK 2007 BASICS. In this session you will: FOCUS
 In OUTLOOK 2007 BASICS FOCUS WPL_O70 Outlook 2007 is a time and information management program that helps you to manage your day-to-day tasks and information quickly and effectively. This chapter covers
THE EXCEL ENVIRONMENT... 1 EDITING...
 Excel Essentials TABLE OF CONTENTS THE EXCEL ENVIRONMENT... 1 EDITING... 1 INSERTING A COLUMN... 1 DELETING A COLUMN... 1 INSERTING A ROW... DELETING A ROW... MOUSE POINTER SHAPES... USING AUTO-FILL...
Query Studio Training Guide Cognos 8 February 2010 DRAFT. Arkansas Public School Computer Network 101 East Capitol, Suite 101 Little Rock, AR 72201
 Query Studio Training Guide Cognos 8 February 2010 DRAFT Arkansas Public School Computer Network 101 East Capitol, Suite 101 Little Rock, AR 72201 2 Table of Contents Accessing Cognos Query Studio... 5
Dreamweaver MX Overview. Maintaining a Web Site
 Dreamweaver MX Overview Maintaining a Web Site... 1 The Process... 1 Filenames... 1 Starting Dreamweaver... 2 Uploading and Downloading Files... 6 Check In and Check Out Files... 6 Editing Pages in Dreamweaver...
Candy is Dandy Project (Project #12)
") Candy is Dandy Project (Project #12) You have been hired to conduct some market research about M&M's. First, you had your team purchase 4 large bags and the results are given for the contents of those
Candy is Dandy Project (Project #12) You have been hired to conduct some market research about M&M's. First, you had your team purchase 4 large bags and the results are given for the contents of those