User Manual SW-11Z-I1-V1.0-E DVR. This document contains preliminary information and subject to change without notice.
|
|
|
- Stewart Black
- 5 years ago
- Views:
Transcription
1 SW-11Z-I1-V1.0-E l User Manual DVR This document contains preliminary information and subject to change without notice. 1


2 WARNING TO REDUCE THE RISK OF FIRE OR ELECTRIC SHOCK, DO NOT EXPOSE THIS APPLIANCE TO RAIN OR MOISTURE. This symbol is intended to alert the user to the presence of unprotected Dangerous voltage" within the product's enclosure that may be strong enough to cause a risk of electric shock. This symbol is intended to alert the user to the presence of important operating and maintenance (servicing) instructions in the literature accompanying the appliance. NOTE: This equipment has been tested and found to comply with the limits for a class digital device, pursuant to part 15 of the FCC Rules. These limits are designed to provide reasonable protection against harmful interference when the equipment is operated in a commercial environment. This equipment generates, uses, and can radiate radio frequency energy and, if not installed and used in accordance with the instruction manual, may cause harmful interference to radio communications. Operation of this equipment in a residential area is likely to cause harmful interference in which case the user will be required to correct the interference at his own expense. Disposal of Old Electrical & Electronic Equipment (Applicable in the European Union and other European countries with separate collection systems) This symbol on the product or on its packaging indicates that this product shall not be treated as household waste. Instead it shall be handed over to the applicable collection point for the recycling of electrical and electronic equipment. By ensuring this product is disposed of correctly, you will help prevent potential negative consequences for the environment and human health, which could otherwise be caused by inappropriate waste handling of this product. The recycling of materials will help to conserve natural resources. For more detailed information about recycling of this product, please contact your local city office, your household waste disposal service or the shop where you purchased the product. Notice: Ghosting or fractured images may occur on the screen when there is a suddenly surge or lightning stroke which cause damage on IC in the DVRs. 2
3 Table of Contents CHAPTER 1 MAIN MENU SETUP RECORD SETUP Quality & Frame Rate Setup EVENT SETUP MOTION SETUP MOTION AREA SETUP SENSOR SETUP SCHEDULE SETUP Schedule Record Setup Holiday Setup CAMERA SETUP ACCOUNT SETUP Permission Setup User Picture Setup NETWORKING SETUP NETWORKING SETUP DHCP LAN ADSL G HTTP Setup DDNS Setup Mail Setup PTZ & RS485 SETUP SYSTEM SETUP DISPLAY SETUP DATE/TIME SETUP CHANGE DATE & TIME TIME ZONE AND DAYLIGHT SAVING TIME SETUP INTERNET TIME SETUP BUZZER & RELAY SETUP SPOT SETUP UTILITY SETUP DIAGNOSTIC 25 CHAPTER 2 BACKUP & SEARCH BACKUP SETUP SEARCH SETUP EVENT SEARCH CRITERIA SETUP FOR EVENT SEARCH TIME SEARCH 31 CHAPTER 3 Remote Software Installation and Setup AP Software Installation and instruction How to do remote monitoring through IE How to do remote monitoring through JPEG VIEWER(Only Monitor Function) AP Software Operation 37 CHAPTER 4 Specification 38 3


4 CHAPTER 1 MAIN MENU SETUP To enter the main menu and set up DVR, log-in account and user password are required. The default password of the administrator is Please check the Account Setup for related setup of other log-in users. Table Some definition of virtual keyboard. Switch between capital and small letters. / Switch between numbers and letters. Press to cancel the setup, and re-choose the login account. Delete the last character. Enter to identify the password. It will enter the set up menu, If the password is verified. Space key 4

5 Table The operation of remote control under the setting menu MENU ESC ENTER Switch to different options under one item Switch to different items Save setup and back to LIVE mode Back to Upper level of menu without saving Enter the menu, or display virtual keyboard PS. The initialization of new-installed HD is required before recording, please refer to UTILITY SETUP for detail. 1-1 RECORD SETUP HDD FULL OSD position X OSD position Y OSD position setup Video Preservation Quality & Frame Rate Setup Select STOP to stop recording or OVERWRITE to reuse the HDD when HDD is full Stop : Stop Recording Overwrite : Start to overwrite that begin from the oldest data Setup OSD X axis Set up OSD y axis Set up OSD axis of HDD, and continue to record. Setup the video preservation period. Recorded video will be deleted automatically after expiry of preservation period. Setup the quality and frame rate for each channel under normal recording and event recording type. Note:4CH DVR will display 4 channels and 8CH DVR will display 8 channels. 5

 Assign each channel with its maximum accessible fps Note:4CH DVR will display 4 channels and 8CH DVR will display 8")
6 1-1.1 Quality & Frame Rate Setup Normal setup/ event setup Resolution Record Type No. Select recording mode Select recording resolution: NTSC:352x240, 704x240, 704x480 PAL:352X288,704X288,704X576 You can setup quality and FPS separately for record type. Check/uncheck the box enable/disable selected channel recording Quality FPS Auto Select quality: Below Basic/ Basic/ Normal/ High/ Highest Select recording frame rate. (The number of sheets in accordance with the actual models) Assign each channel with its maximum accessible fps Note:4CH DVR will display 4 channels and 8CH DVR will display 8 channels. 1-2 EVENT SETUP Motion Setup Sensor Setup Enter to set up motion detection Enter to set up sensor detection 6


7 1-2.1 MOTION SETUP Alarm Duration(Seconds) When motion detect,the number of seconds continuous alarm 1~16 You can setup independently for each channel. Enable Sensitivity Motion Area Setup Check the box to Enable/Disable motion detection for each channel. Drag the white bar or press to set up Sensitivity from value 0 to 10 for each channel. The higher value you set the higher sensitivity it will be. Enter to setup motion detection area Note:4CH DVR will display 4 channels and 8CH DVR will display 8 channels MOTION AREA SETUP The motion detection has been divided into 22x18 grids. The default detection area is full screen as it marked in transparent for local DVR and purple for remote access. Areas deselected for motion detection are marked in red for both local and remote site. 7

8 Mask Mouse Selection All Area Detection Mask All Area Continue Exit & Save Exit & Discard Switch between select and deselect for cursor-dragging function Select entire screen as detection area. Deselect entire detection area. Continue setup Save setup and leave Cancel setup and leave SENSOR SETUP Sensor Popup All Off All Low All High Sensor Polarity Check the box to Enable/Disable popup screen function for all channels. When Sensor is detected in LIVE mode, the detected channel image will pop up in full screen display. Set all sensor off Set all sensor polarity low Set all sensor polarity high Click or press to select between HIGH, LOW voltage for triggering sensor detection or OFF to turn off polarity for each channel Low Polarity:Sensor has not been triggered. When connected, sensor will be turned on.. High Polarity:Sensor has been triggered. When connected, sensor Off status will be turned off.. :Sensor is deactivated, and will not be turned on/off. Note:4CH DVR will display 4 channels and 8CH DVR will display 8 channels. 8


9 1-3 SCHEDULE SETUP Except from starting recording manually, you can also setup the recording time by weeks and schedule including normal, motion detect, and recording type. Page Holiday Setup View Event/ Motion/ Sensor Setup Each page provides 10 schedules for setup. 5 pages in total. Enter to setup holiday, up to 50 days, other than weekends,. View Normal/ Motion/Sensor Note:4CH DVR will display 4 channels and 8CH DVR will display 8 channels Schedule Record Setup Click on the time on the left side. The setup menu will be displayed. You can have detail setup by dates, Time and event. 9


10 1-3.2 Holiday Setup Since holidays are different by different country and region, you can setup the holiday of your location accordingly. 1-4 CAMERA SETUP 1~16 You can setup independently for each channel. Mask Check the box to Enable/Disable mask function for LIVE mode Sharpness Drag the bar or press to adjust Sharpness of your camera from value 0 to 15. Brightness Drag the bar or press to adjust Brightness of your camera from value 1 to 255. Contrast Drag the bar or press to adjust Contrast of your camera from value 1 to 255. Saturation Drag the bar or press to adjust Saturation of your camera from value 1 to 255. Name Set up name of each channel Volume Audio volume under LIVE mode and recording mode can be adjusted. Note:4CH DVR will display 4 channels and 8CH DVR will display 8 channels. 10
 No.")

11 1-5 ACCOUNT SETUP The Account Setup menu is used to provide role-based permission independently setting for each user (maximum of 4 users) to access DVR over network. The default admin account and password is admin and (The default password remains the same after firmware upgrade) No. Username Password Permissions Change Admin Password Picture Check to activate the user s account. Set up username Set up password for each user. Password is 8-digits required and can be mixed by letters and numbers with case-sensitive. Letters can be mixed with capitals or lowercases. Set up Permissions for each user Change administrator s password Change user s picture Permission Setup The Account Setup is set to provide individual user (maximum of 4 users) role-based permissions, including access to Setup menu, Network operation, PTZ function, Playback, Utility, Backup, Password expiry date and Mask on specific channels while playing back. 11

.")
12 1-5.2 User Picture Setup User can select picture wished to be changed to from hard drive. 1-6 NETWORKING SETUP Connect type HTTP Setup DDNS Setup Mail Setup 3G Setup Setup mode for network connection: (ADSL DHCP LAN 3G). Enter to set up HTTP Enter to set up DDNS Enter to set up mail Enter to set up 3G network 12

13 1-6.1 NETWORKING SETUP There are three ways to connect to the network as followed DHCP When DHCP is selected, IP address will be assigned by DHCP server automatically LAN Select LAN for network connection, the following information is required. IP Address Subnet Mask Gateway DNS Enter IP address provided by ISP Enter IP address of Subnet Mask provided by ISP Enter IP address of Gate way provided by ISP Enter DNS address provided by ISP. (Note: The correct DNS address must be entered for DDNS function). 13
14 ADSL Select ADSL for network connection, the following information is required. User Name Password Enter user name provided by ISP Enter password provided by ISP G Select 3G for network connection, the following information is required. Dial-up Number PIN APN Advance Setting Dial-up Number,Determined as the ISP Enter SIM card password Enter internet The advanced settings (Taiwan ISP outside) 14
 PS:This feature currently only supports the Huawei 3G card Enable HTTP Server Check to")

15 Enable User Name Password Enable advance setting Enter ISP username Enter ISP password IP Address Enter the ISP provides a fixed IP address HTTP Setup (if the client uses the Internet only need to enter a fixed IP) PS:This feature currently only supports the Huawei 3G card Enable HTTP Server Check to enable HTTP server. Users can remotely access into the DVR over the network if the HTTP function is activated. Port Enter a valid port value from 1 up to The default value is 80. Auto No. Quality FPS Assign each channel with its maxima accessible fps Chanel number Set up record quality. There are below basic, basic, normal, high, highest Set up record FPS 15
 If the user name is h.264 and you choose i-dvr as your server, you should enter: h.264.i-dvr.net Enter user name.")
16 1-6.3 DDNS Setup Enable DDNS DDNS Server Host Name User Name Enable/disable DDNS function. Enter the registered SMTP Server: ez-dns* I-DVR.NET* DYNDNS.ORG NO-IP.ORG 3322.ORG Enter the completed registered SMTP Server. (Including username + Server) If the user name is h.264 and you choose i-dvr as your server, you should enter: h.264.i-dvr.net Enter user name. Password Enter password. *For more detailed I-DVR.NET,ez-dns operation instruction,please refer to appendix 16


17 1-6.4 Mail Setup When event occurs (VLOSS, MOTION), will be sent to the receiver account automatically. Enable Notification SMTP Server User Name Password Sender Trigger Event Receiver Check the box to enable/disable E-mal Notification function. Enter to set up SMTP Server name. (Varies according to the user) Enter to set up User Name. Enter to set up Password. Enter to set up address of receivers. Enter to select events to send out notifications when below circumstances happen: Motion, Sensor and Vloss (Video Loss). Enter to set up addresses for up to 10 receivers individually. 17
18 1-7 PTZ & RS485 SETUP The DVR allows users to control PTZ functions of your camera. To enable PTZ function, the 485 cable should be connected to the RS-485 port of DVR. Enable PTZ Protocol Click the box to Enable/Disable PTZ function for each channel. Set up the protocol of PTZ cam. The supported protocol are PELCO-P, PELCO-D, KND, LI-LIN, SAMSUNG, LG, AVTECH. PTZ ID Click or press to set up PTZ ID. The valid ID value is from 1 to 64. Baud Rate Select Baud Rate for PTZ from 2400, 4800, 9600,19200 RS-485 ID Select RS-485 ID from 1 to 64 RS-485 Baud Rate Select RS-485 Baud Rate from , 9600,19200 Keyboard Select Keyboard. Note:4CH DVR will display 4 channels. 8CH DVR will display 8 channels. 18

19 1-8 SYSTEM SETUP DVR Name DVR Location Language Remote ID Display Setup Date/Time Setup Device Setup Spot Setup The name of DVR will be shown when users login from remote access. The location of DVR will be shown when users login from remote access Click or press to select OSD language. Default ID is 0. DVR is controlled by standard remote control, Enter to set up Display Enter to set up Date/Time Enter to set up Buzzer & Relay Enter to set up Spot DISPLAY SETUP 19

20 Auto-Seq Interval Show OSD Show DVR Status Show Date/Time Show Channel Name Border Color Set up duration time in seconds for the interval between channels under Auto-Seq mode. Turn On / Off OSD display Turn On / Off DVR illustration and record status display Turn On / Off date and time display Turn On / Off channel name display Set up the color of border in LIVE, PLAYBACK mode.(red, Green, Blue) DATE/TIME SETUP Hour Format Date Format Date/Time Position Change Date & Time Time Zone Setup Internet Time Setup 12HOURS/ 24HOURS MM-DD-YY/DD-MM-YY/YY-MM-DD Choose the position of Time and Date display Setup time and date of DVR Set up GMT and Daylight Saving Time. Setup automatic synchronization with internet server 20

21 CHANGE DATE & TIME Setup date and time of DVR manually according to user s local time TIME ZONE AND DAYLIGHT SAVING TIME SETUP Set up time zone and activate Daylight Saving Time function according to user s DVR location. Select Time Zone Enter to modify GMT from GMT- 13 to GMT+ 13 Daylight Saving Time Turn on/ off Daylight Saving Time 21
22 INTERNET TIME SETUP Synchronize your DVR time with internet time server. Automatic Synchronization Update Now Check to enable DVR automatic synchronization function. Effective by this option selected, DVR will automatically synchronize the time upon rebooting or by every 24 hours after booting. Effectively, Date and Time show on DVR will immediately correspond with those in internet server BUZZER & RELAY SETUP Mouse Speed Buzzer & Relay Setup Move the mouse cursor speed, the more the faster to the right. (Only Local machine) Into the buzzer & relay setup. 22


23 Key Tone Buzzer Relay Enable/Disable keystrokes. Enable/Disable buzzer operation when the alarm is triggered for sensor, motion and vloss (Video Loss). Enable/Disable the signal to be sent to the RELAY OUT blocks when the alarm is triggered for sensor, motion and vloss SPOT SETUP DVR's Main Monitor output signal, do the main screen output or switch SPOT mode output SPOT MODE Interval (Seconds) Skip Video Loss Channel Channels display in spot for two different modes: Disable:The screen is same the main screen with VGA output, Enable: Spot Mode The duration time in seconds for the interval between channels under SPOT mode. Whether to skip channels without video signal. 23
 of HDD that installed in DVR. Check the HDD you d like to initialize then press Start.")
24 1-9 UTILITY SETUP HDD Initialization USB Initialization System Recovery Reset System Events Copy Setup to USB Select to enter hard disk initialization menu. Please stop recording before entering this menu. Enter the menu, system will show all the data (model,volume ) of HDD that installed in DVR. Check the HDD you d like to initialize then press Start. HDD initialization is successful when the status shows Succeed Clean up all data on USB. Enter USB initialization and press YES to clean up all data on your USB. The initialization is done when it s showed Succeed. Restore system default values Reset all the recording events in DVR. Copy configuration to a USB device. There will be a file named sdvr_conf.dat on your USB. Download Setup from USB Upgrade Download configuration from a USB device into DVR. Upgrade DVR through USB. Please stop recording and backup setup configuration before upgrading. System will reboot automatically when the upgrade is completed. Notice! DO NOT TURN OFF POWER OR UNPLUG USB DEVICE DURING THE UPGRADE as it may cause incomplete firmware upgrade and damage to the DVR. 24

25 1-10 DIAGNOSTIC Version IP MAC The current firmware version of DVR The connected IP address of DVR. If disconnected from network, the screen will display NETWORK DISCONNECT. MAC Address of DVR HDD Status No. HDD number Volume Used Rate HDD Capacity Percentage of space used on HDD. Shows HDD status. Status Format Time USING: means the HDD is being used for recording now GOOD/BAD: means the HDD has a known/unknown format for the DVR. (Note: Please initialize your newly-installed HDD before using it.) The latest format time of HDD 25

26 CHAPTER 2 BACKUP & SEARCH 2-1 BACKUP SETUP User can backup any segment of recorded data in a specified time frame. To do so, either a CD R/W or storage device, like USB, must be connected to the DVR. The format of backup file is IRF file that can be played by both Ifileplay and CMS *:Use the USB flash backup, the system will automatically copy "Ifileplay" to the USB From To Device Free Space Refresh Required Space Calculate The start time of backup file The end time of backup file Select USB or PC as the backup device The available space in your backup device. (not available for PC backup) Recalculate the available space of backup device. (not available for PC backup) Show the size of the backup file Calculate the size of backup file Start Start backup operation. Be sure to calculate the size of backup file BEFORE operating backup. Note! Do not unplug the USB device or turn off the DVR during the backup process to avoid unrecoverable error. 26


27 ifileplay Use Method Step 1: install ifileplay software to your PC. You can get ifileplay file from the CD with DVR Packing. PS: When you using USB to backup file, ifileplay.exe will copy to USB with the backup file automatically. Step 2:Setup ifileplaypack.exe Step 3:Click open,choose and star a DVR backup file 27

28 Step 4:Ifileplay software will play the backup file automatically. Step 5:If there is no display on the screen, The backup file is not our DVR recording format. Please check it. 28

29 2-2 SEARCH SETUP Event Search Time Search Event search menu Enter time search menu EVENT SEARCH The DVR automatically records events with type, time and channel information included. If there is recording data for an event, a yellow signal will be shown on the left side of time information. Rest your cursor under the line and press enter, or left click your mouse to playback the recording data. P.S. Event Records will still be generated even when hard disk is not installed or the record function is not activated. However, the record can t be viewed after selecting it. 29

30 Criteria Page Date/Time Event Type Info Setup conditions of event search Switch between pages of events Date/time when event occurred. Event type, defined as following MOTION Motion Detected Video Loss Remote Login Remote Logout Power On HDD Full HDD Error Reboot Video Loss user log-in over the network user log-out over the network DVR Power on HDD Space FULL Detect HDD error DVR Reboot The channel where event occurs or login user CRITERIA SETUP FOR EVENT SEARCH The amount of events can be numerous. Therefore, you can facilitate event sorting by setting up criteria. Setup start time and end time for event search, then the search result will be limited to this specific period of time. Only checked events and channels will be sorted in event search. 30


31 2-2.2 TIME SEARCH TIME SEARCH can search for the specific time of recording data to playback. Press Enter or left click on the desired date to playback. Note that dates with recording data are marked with a red square System will start playing back according to the date you selected. Calendar will be shown by using mouse to click on year and month. Click date to display recording time of that specific date with time bar. You can change time (hour/minute/second) or click on a specific time of time bar by mouse then press ok. DVR will playback the selected recording data. 31
32 CHAPTER 3 Remote Software Installation and Setup 3-1 AP Software Installation and instruction AP software: DVR Remote Desktop can allow you to remotely access and control the DVR from PC. p.s. Operation system currently supports Windows XP SP2(above) and Windows Vista, Windows 7 Step One:Enter the IP address of DVR in IE browser Step Two: Windows as below will show up. Please enter the user name and password. Default user name and password is admin/ Other related setup about user account and password, please check 4-5 Account Setup. Step Three: Click on the link to start downloading the AP software. 32


33 Step Four: Run or Save our AP software. Step Five: If you choose to run the software, Start window will be shown up. Please enter information of login DVR: IP, Port, Username and Password, or choose Play Recorded File to open backup files in your PC. Step Six: You ve logged into the DVR 33
34 3-2 How to do remote monitoring through IE Step One:Enter the IP address of DVR in IE browser. The address appeared in this image is only for demonstration. Actual address is depending on the setup of on-site DVR. Step Two: Windows as below will show up. Please enter the user name and password. Default user name and password is admin/ Other related setup about user account and password, please check 4-5 Account Setup. The user name and password appeared in this image is only for demonstration. Actual user name and password depend on the setup of on-site DVR. Step Three: Click on Internet Explorer 6, 7, and 8 to start downloading the AP software. ( The first option is for IE view, please refer to next chapter for more information) p.s. There will be IE connection security issue when clicking this link for the first time. Please refer to index II for Remote Monitoring IE ActiveX Control Installation Instruction. 34

35 Step Four: DVR images appear. 3-3 How to do remote monitoring through JPEG VIEWER(Only Monitor Fun ction) Step One:Enter the IP address of DVR in IE browser. The address appeared in this image is only for demonstration. Actual address is depending on the setup of on-site DVR. Step Two: Windows as below will show up. Please enter the user name and password. Default user name and password is admin/ Other related setup about user account and password, please check 4-5 Account Setup. The user name and password appeared in this image is only for demonstration. Actual user name and password depend on the setup of on-site DVR. 35


36 Step Three: Click on Jpeg Viewer Step Four: DVR images appear. PS : Only for viewer, without any operation function. 36
37 3-4 AP Software Operation Open the file DVRemoteDesktop.exe ; enter the information of DVR IP address, Port Username and Password and click OK. You should be able to login DVR successfully and start to use the software. The default username and password is admin/ DVRemoteDesktop.exe AP software provides some extra functions for remote users. Please check Table for minimum system requirements for DVRemoteDesktop.exe operation. Table System Requirements for AP software CPU OS RAM Intel Pentium 4 above Microsoft Windows 7 Windows Vista Windows XP SP2 above 512M above VGA Card Needed to support DirectX9.0 (Above) Note 1 Others DirectX 9.0 above Note 1: Known VGA card that support DirectX9.0 currently: NVIDIA: Geforce FXseries, Geforce 6series, Geforce 7series, Geforce 8series, Geforce 9series, Geforce 200series, etc. Or visit: ATI: Radeon R300series, Radeon R400series, Radeon R500series, Radeon R600series, Radeon R700series, Radeon HD 3xxx IGPseries, Mobility Radeonseries (9500 above), Mobility Radeon Xseries, Mobility Radeon HDseries, or FireGL Vseries etc. SiS: Or visit: SiS 67Xseries, or SiS 77Xseries etc. Or visit: Intel: 91Xseries, 94Xseries, 96Xseries, G3Xseries, or G4Xseries, etc. Or visit: 37
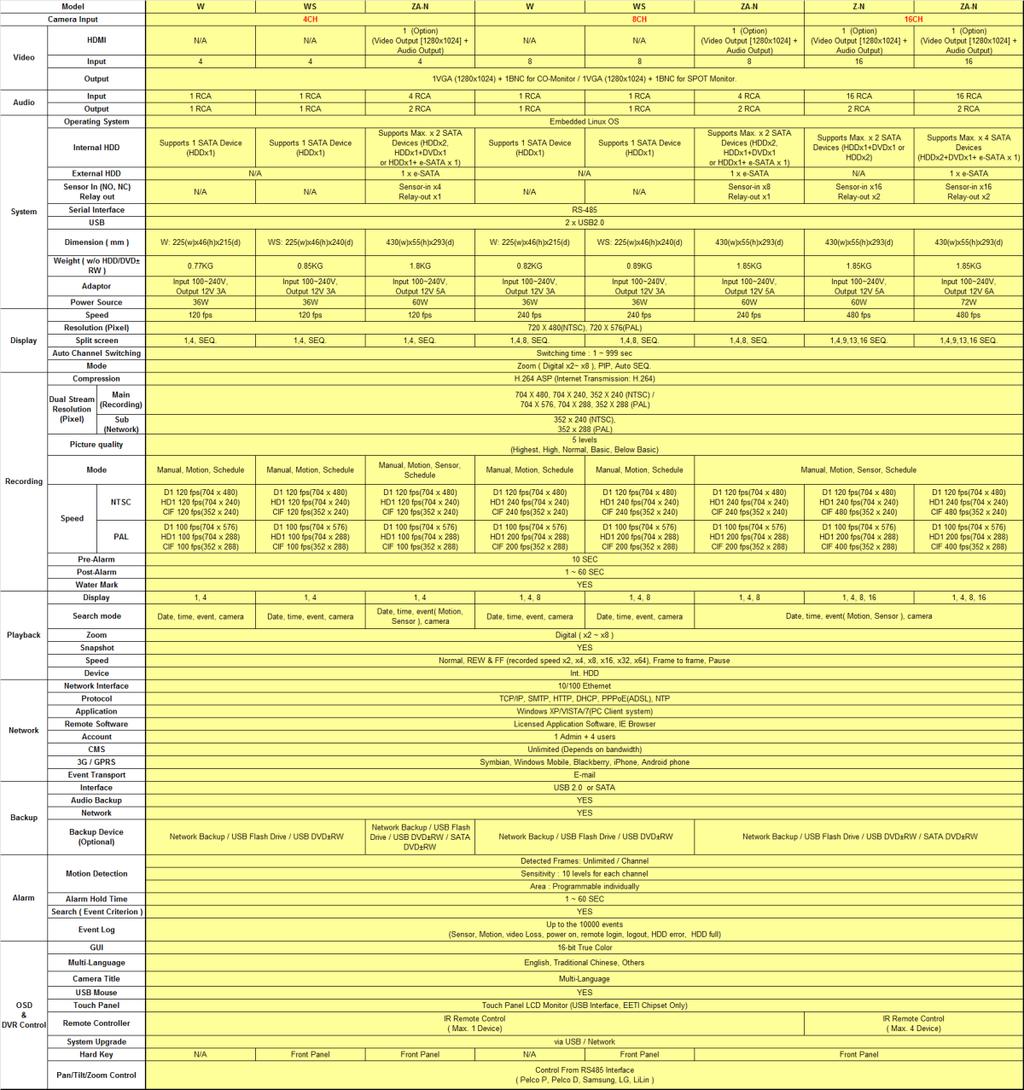
38 CHAPTER 4 Specifications 38


39 APPENDIXⅠ I-DVR.NET REGISTRATION DDNS Registration on I-DVR.NET In the package of each DVR, you will find a sticker shows account information including username and password that allows users to login I-DVR.NET for registration. To register DDNS on I-DVR.NET, please follow the steps as shown. Step 1. Please open IE browser and then enter in IE browser bar. Next, Control Panel Logo dialog will appear. Enter the username and password provided by the sticker and then press, Logon. Step 2. After login successfully, enter name at host in Add New Record dialog. For example, hostname is the host name, and then the address will be hostname.i-dvr.net. Select Standard type and enter an IP address of the DVR. Input known IP address if any, or press the Add New button if none. Please enter any name by your choice at Column, host.domain For example, hostname Therefore, IE address will be hostname.i-dvr.net System will automatically show the current computer IP. If the DVR IP is known, you can type it in the column. If not, you can press insert button. Step 3. The Host Manager dialog will show insert succeed when user setup successfully. The host.domain column will show up the setup just entered. Next, enter the DVR the same time setting the DDNS client machine information If DDNS set up at DVR side successfully, the website will update the IP information in one minute. The IP column will be renewed to the corresponding IP address by pressing F5: refresh button. host.domain is named by your choice. hostname.i-dvr.net is what the main server generates If DVR IP has any changes, there are updates Here at the same time. Press, F5: Refresh And then IP column will update automatically to it s real IP Address.

40 Step 4. Enter DVR Main Menu Network Setup DDNS. Activate DDNS functions and input related information. DDNS work properly when this option selected. This part of the information required and the same within the i-dvr.net Step 5.Back to the i-dvr.net, on this page by pressing "F5: Refresh", IP will be automatically updated into the DVR of the real IP location.

 Step 2.")
41 APPENDIXⅡ ez-dns REGISTRATION DDNS Registration on ez-dns.com In addition to I-DVR.NET the Company, the other has a ez-dns.com server may be used.. To register DDNS on ez-dns.com, please follow the steps as shown. Step 1. Please open IE browser and then enter in IE browser bar. First time, please click on the top of the screen of "Sing up" (red box ) Step 2. To input a user name and password, after clicking singup. Later, log in to use ez-dns.com that this group account password

42 Step 3. The host.domain column will show up the setup just entered. Next, enter the DVR the same time setting the DDNS client machine information If DDNS set up at DVR side successfully, the website will update the IP information in 10 minute. The IP column will be renewed to the corresponding IP address by pressing F5: refresh button. host.domain is named by your choice. demodvr.ez-dns.com is what the main server generates The system will automatically display the current user's computer IP, If the DVR's IP location is known can be input field and click update, If DVR IP has any changes, there are updates Here at the same time. Press, F5: Refresh And then IP column will update automatically to it s real IP Address. Step 4. Enter DVR Main Menu Network Setup DDNS. Activate DDNS functions and input related information.

43 DDNS work properly when this option selected. This part of the information required and the same within the ez-dns.com Step 5.Back to the ez-dns.com, on this page by pressing "F5: Refresh", IP will be automatically updated into the DVR of the real IP location.


44 APPENDIXⅢ Remote Monitoring IE ActiveX Control Installation Instruction When using IE for remote monitoring for the first time, IE ActiveX Control is needed to be downloaded. 1. When remote monitoring on IE for the first time, an alert message occurs Install ActiveX control on the tool bar. 2. Click at this alert message and select Install ActiveX Control 3. Do you want to install this software alert pops up. Select Install


45 4. After installation, IE remote monitoring image appears. 5. If message, Your security Settings do not allow web sites to use ActiveX controls installed on your computer. pops on when logging in, please follow the next instruction. 6. First select Tools on the tool bar and then select Internet Options


46 7. Select Security Trusted Sites Sites 8. Enter DVR address (This address is only for demonstration. Please use the address depends on the setup of on-site DVR.) into the blanks shown in picture, and then press add.

47 9. Newly added website will appear at the trusted web sites list. Press close. 10. Go back to IE window, press refresh button or F5.
User Manual SW-11ZS-I2-V1.0-E DVR. This document contains preliminary information and subject to change without notice.
 SW-11ZS-I2-V1.0-E l User Manual DVR This document contains preliminary information and subject to change without notice. 1 WARNING TO REDUCE THE RISK OF FIRE OR ELECTRIC SHOCK, DO NOT EXPOSE THIS APPLIANCE
User Manual. v1.0 DVR. This document contains preliminary information and subject to change without notice User Manual v1.
 v1.0 l User Manual DVR This document contains preliminary information and subject to change without notice. 2010.12.29 User Manual v1.0 1 WARNING TO REDUCE THE RISK OF FIRE OR ELECTRIC SHOCK, DO NOT EXPOSE
User Manual. 410M v0.6 4CH DVR. This document contains preliminary information and subject to change without notice.
 410M v0.6 User Manual 4CH DVR This document contains preliminary information and subject to change without notice. 1 Caution RISK OF ELECTRIC SHOCK DO NOT OPEN CAUTION: TO REDUCE THE RISK OF ELECTRIC SHOCK,
DESCRIPTION Enter user name provided by ISP Enter password provided by ISP
 User name Password ICON Enter user name provided by ISP Enter password provided by ISP 4-5-2. HTTP 4-5-3. DDNS ICON Startup HTTP Check to enable HTTP server. Users can remotely access into the DVR over
4CH H.264 Multiplex DVR
 4CH H.264 Multiplex DVR User Manual VER.:1.0, P/N: R040199A This symbol is intended to alert the user to the presence of unprotected Dangerous voltage" within the product's enclosure that may be strong
User Manual. Date: 12/11/06. confi DVR. Notice: This content is subject to be changed without notice. User Manual v1.2
 User Manual Date: 12/11/06 confi DVR Notice: This content is subject to be changed without notice. 1 WARNING TO REDUCE THE RISK OF FIRE OR ELECTRIC SHOCK, DO NOT EXPOSE THIS APPLIANCE TO RAIN OR MOISTURE.
User Manual. 411ZA/811ZA/611ZA v1.1(n03) 4/8/16CH DVR. This document contains preliminary information and subject to change without notice.
 4/8/16CH DVR. This document contains preliminary information and subject to change without notice.") 411ZA/811ZA/611ZA v1.1(n03) l User Manual 4/8/16CH DVR This document contains preliminary information and subject to change without notice. 1 WARNING TO REDUCE THE RISK OF FIRE OR ELECTRIC SHOCK, DO NOT
411ZA/811ZA/611ZA v1.1(n03) l User Manual 4/8/16CH DVR This document contains preliminary information and subject to change without notice. 1 WARNING TO REDUCE THE RISK OF FIRE OR ELECTRIC SHOCK, DO NOT
HD-8/8X 8CH HD1 H.264 DVR. REAL TIME RECORDING HD1 30 FPS PER CHANNEL MAXIMUM RECORDING RESOLUTION D1 15 FPS PER CHANNEL
 HD-8X / HD-8 8CH HD1 H264 DVR User Manual HD-8/8X 8CH HD1 H.264 DVR REAL TIME RECORDING HD1 (720x240) @ 30 FPS PER CHANNEL MAXIMUM RECORDING RESOLUTION D1 (720x480) @ 15 FPS PER CHANNEL HD-8X: NAVIGATION
User Manual. 411 v0.4(s05) 4CH DVR. This document contains preliminary information and subject to change without notice.
 4CH DVR. This document contains preliminary information and subject to change without notice.") 411 v0.4(s05) User Manual 4CH DVR This document contains preliminary information and subject to change without notice. 1 WARNING TO REDUCE THE RISK OF FIRE OR ELECTRIC SHOCK, DO NOT EXPOSE THIS APPLIANCE
411 v0.4(s05) User Manual 4CH DVR This document contains preliminary information and subject to change without notice. 1 WARNING TO REDUCE THE RISK OF FIRE OR ELECTRIC SHOCK, DO NOT EXPOSE THIS APPLIANCE
User Manual. 411/811/611 v0.6(n02) 4/8/16CH DVR. This document contains preliminary information and subject to change without notice.
 4/8/16CH DVR. This document contains preliminary information and subject to change without notice.") 411/811/611 v0.6(n02) User Manual 4/8/16CH DVR This document contains preliminary information and subject to change without notice. 1 WARNING TO REDUCE THE RISK OF FIRE OR ELECTRIC SHOCK, DO NOT EXPOSE
411/811/611 v0.6(n02) User Manual 4/8/16CH DVR This document contains preliminary information and subject to change without notice. 1 WARNING TO REDUCE THE RISK OF FIRE OR ELECTRIC SHOCK, DO NOT EXPOSE
User Manual 4/8/16CH DVR
 User Manual 4/8/16CH DVR This document contains preliminary information and subject to change without notice. 1 WARNING TO REDUCE THE RISK OF FIRE OR ELECTRIC SHOCK, DO NOT EXPOSE THIS APPLIANCE TO RAIN
Chapter 1 Features FEATURES
 Chapter 1 Features Operation Playback, recording and network transmission simultaneously Real time full screen or quad screen display 2X digital zoom and Picture-in-picture display Easy operations by shuttle
4CH H.264 HD-SDI DVR. User Manual VER.:1.0, P/N: R040205A
 4CH H.264 HD-SDI DVR User Manual VER.:1.0, P/N: R040205A This symbol is intended to alert the user to the presence of unprotected Dangerous voltage" within the product's enclosure that may be strong enough
User Manual. v0.5 4CH DVR. This document contains preliminary information and subject to change without notice.
 v0.5 User Manual 4CH DVR This document contains preliminary information and subject to change without notice. 1 Caution RISK OF ELECTRIC SHOCK DO NOT OPEN CAUTION: TO REDUCE THE RISK OF ELECTRIC SHOCK,
BRASH IMPORTS 4/8/16CH DVR
 \ BRASH IMPORTS 4/8/16CH DVR User Manual This document contains preliminary information and subject to change without notice. 1 WARNING TO REDUCE THE RISK OF FIRE OR ELECTRIC SHOCK, DO NOT EXPOSE THIS
Quick Start Guide 4/8-CH DVR
 Quick Start Guide 4/8-CH DVR 1 1. Install Hard Drive &DVD Writer 1.1 Install Hard Drive Notice: 1. this series support one SATA hard drives. Please use the hard drive the manufacturers recommend specially
User Manual. 410 / 810 / 610 v1.3 4/8/16CH DVR. This document contains preliminary information and subject to change without notice.
 \ 410 / 810 / 610 v1.3 User Manual 4/8/16CH DVR This document contains preliminary information and subject to change without notice. 1 WARNING TO REDUCE THE RISK OF FIRE OR ELECTRIC SHOCK, DO NOT EXPOSE
4-Ch H.264 Digital Video Recorder
 4-Ch H.264 Digital Video Recorder DVR-462 User s Manual Version 1.0 Copyright Copyright (C) 2010 PLANET Technology Corp. All rights reserved. The products and programs described in this User s Manual are
Quick Start Guide 4/8/16-Ch DVR
 Quick Start Guide 4/8/16-Ch DVR 1 1. Install Hard Drive &DVD Writer 1.1Install Hard Drive Notice: 1.This series support one SATA hard drive. Please use the hard drive the manufacturers recommend specially
Quick Start Guide 4/8/16-Ch DVR
 Quick Start Guide 4/8/16-Ch DVR 1 1. Install Hard Drive &DVD Writer 1.1Install Hard Drive Notice: 1. Support two SATA hard drives. Please use the hard drive the manufacturers recommend specially for security
Quick Start Guide 4/8/16/24-Ch DVR
 Quick Start Guide 4/8/16/24-Ch DVR 1.1 Install Hard Drive 4/8/16/24-CH DVR Quick Start Guide Notice: 1.4/3/16-ch DVR supports one SATA hard drive. 24-ch DVR supports three SATA hard drives. Please use
USER GUIDE STAND-ALONE. 4 channel MPEG-4 Triplex DVR V Stand-Alone DVR User Guide
 USER GUIDE STAND-ALONE 4 channel MPEG-4 Triplex DVR V. 1.4 This document contains preliminary information and subject to change without notice. SAFETY PRECAUTIONS EXPLANATION OF SYMBOLS This symbol is
CCTV42 System2 DVR Quick Start Guide 4/8/16-Ch DVR
 CCTV42 System2 DVR Quick Start Guide 4/8/16-Ch DVR If you have purchased a DVR / Hard drive package from us then we will have already installed the hard drive(s) and configured the basic settings on your
Quick Start Guide 4/8/16-CH DVR.
 Quick Start Guide 4/8/16-CH DVR 1. Install Hard Drive &DVD Writer 1.1 Install Hard Drive Notice: 1. Support two SATA hard drives. Please use the hard drive the manufacturers recommend specially for security
4CH/ 8CH/ 16CH Digital Video Recorder
 4CH/ 8CH/ 16CH Digital Video Recorder DVR204B/ 208B/ 216B INSTRUCTION MANUAL DIRECTORY CHAPTER 1 Hard Disk Installing (Standard shipping products include neither HDD or R/W)...2 CHAPTER 2 Panel Appearance...4
Video Management Software
 Video Management Software User Manual Web: europesecurity.eu Mail: info@europesecurity.eu Tel.: 0541 352 952 User s Manual 2 Contents CHAPTER : XMS CENTRAL USER MANUAL 1 PC REQUIREMENT 3 2 INSTALL 3 3
BlackHawk for MAC Software User Guide
 BlackHawk for MAC Software User Guide Products: BLK-DH2 Series and BLK-HD Series DVRs Please read this manual before using your software, and always follow the instructions for safety and proper use. Save
NVR&IPCAM USER MANUAL V1.0 (USER MANUAL) V1.0. Thanks for choosing our products, please read this manual carefully before use!
 V1.0. Thanks for choosing our products, please read this manual carefully before use!") NVR&IPCAM (USER MANUAL) V1.0 Thanks for choosing our products, please read this manual carefully before use! NOTICE Installation condition 1) In order to ensure your rights, please read this manual carefully
NVR&IPCAM (USER MANUAL) V1.0 Thanks for choosing our products, please read this manual carefully before use! NOTICE Installation condition 1) In order to ensure your rights, please read this manual carefully
USER MANUAL. 4 Channels Dual Bay Style Enclosure Based Power Over Ethernet Network Video Recorder
 USER MANUAL 4 Channels Dual Bay Style Enclosure Based Power Over Ethernet Network Video Recorder INSTRUCTION MANUAL To obtain the best performance and ensure device function correctly, please read this
User s Guide. Combo DVR. Thank you for purchasing our product. Please read this User s Manual before using the product. Change without Notice
 Thank you for purchasing our product. Please read this User s Manual before using the product. Change without Notice Combo DVR User s Guide User please operate according to the DVR model that you purchased
H.264 DVR User Manual 4/8/16CH DVR
 H.264 DVR User Manual 4/8/16CH DVR This document contains preliminary information and subject to change without notice. 1 WARNING TO REDUCE THE RISK OF FIRE OR ELECTRIC SHOCK, DO NOT EXPOSE THIS APPLIANCE
USER S MANUAL GV-DVR1042. Real Time DVR System. Stand Alone 4 Channel.
 USER S MANUAL GV-DVR1042 Stand Alone 4 Channel Real Time DVR System www.gviss.com 1 B E F O R E I N S T A L L A T I O N - - - - - - - - - - - - - - - - - - - - - - - - - - - - - - - - - - - - - - - - -
Analog High Definition DVR. Stand alone digital video recorder. User Manual H.264 AHD DVR
 Analog High Definition DVR Stand alone digital video recorder User Manual H.264 AHD DVR WARNING To reduce the risk of fire or electric shock, do not expose this appliance to rain or moisture. All the safety
RemoteManager Software
 RMS RemoteManager Software User Manual Contents of this user manual are protected under copyrights and computer program laws. Functions or configurations are subject to be changed or modified without prior
Before Setting. GMS is an integrated security management system that provides a useful solution for central monitoring station operation.
 GMS MANUAL Before Setting What What is is GMS? GMS? GMS is an integrated security management system that provides a useful solution for central monitoring station operation. Minimum Minimum System System
LOREX CLIENT Remote Agent Software
 LOREX CLIENT Remote Agent Software Instruction Manual English Version 1.0 MODEL: L500 Series www.lorexcctv.com Copyright 2006 LOREX Technology Inc. Table of Contents Table of Contents About the Lorex Client...
Lorex Client 7.0 & Lorex Message Master
 Lorex Client 7.0 & Lorex Message Master Software Manual English Version 1.0 MODELS: L19WD Series www.lorexcctv.com Includes L19WD800 & L19WD1600 Copyright 2008 Lorex Technology Inc. Table of Contents Table
HLong Asia Industrial
 SDI DVR Stand alone digital video recorder HLong Asia Industrial Thank you for using the company's products! This manual describes only the host functions basic operation. Product design and specification
ALL-IN-ONE SECURITY SYSTEM
 DO NOT OPEN CAUTION : TO REDUCE THE RISK OF ELECTRICAL SHOCK DO NOT OPEN COVERS. NO USER SERVICEABLE PARTS INSIDE. REFER SERVICING TO QUALIFIED SERVICE PERSONNEL. WARNING : TO PREVENT FIRE OR SHOCK HAZARD.
User Manual. Central Monitoring Software for TER-series recorders. CenPro
 EN User Manual Central Monitoring Software for TER-series recorders CenPro Contents CENPRO USER MANUAL 1 PC REQUIREMENT 3 2 INSTALL 3 3 UNINSTALL 5 4 BASIC OPERATION 7 4.1 Log In 7 4.2 Screen Layout 8
errors, or places that do not match the product. If you have any unsolved please contact our technical support department.
 - 0 - Statement: This manual may contain several technical inaccuracies or typographical errors, or places that do not match the product. If you have any unsolved problems in the process of using product
VIDEO WEB SERVER. User s Manual. Please read instructions thoroughly before operation and retain it for future reference. PATENT 732 V1.
 VIDEO WEB SERVER PATENT User s Manual Please read instructions thoroughly before operation and retain it for future reference. 732 V1.0 WARNING The apparatus shall not be exposed to dripping or splashing
RemoteManager USER S MANUAL
 Remote Monitoring Software RemoteManager USER S MANUAL Thank you for purchasing our products. Before operating the system, please read this User s Manual thoroughly and retain it for future reference.
Stand Alone Type. Digital Video Recorder USER S MANUAL. XRS 1000 Series. This manual is written based on 1016
 Stand Alone Type Digital Video Recorder USER S MANUAL XRS 1000 Series This manual is written based on 1016 Index CHAPTER 1 Specification & System organization 1. Product Contents List --------------------------------------------------------
truvision DVR 31 Quick Start Guide
 truvision DVR 31 Quick Start Guide Content Contact information 1 Package contents 1 Installation environment 1 Setting up the DVR 31 1 Connecting the devices 2 Turning on the DVR 31 2 Operating the DVR
LOREX CLIENT 3.0 SOFTWARE MANUAL IRMS Integrated Remote Management Software
 LOREX CLIENT 3.0 SOFTWARE MANUAL IRMS Integrated Remote Management Software Instruction Manual English Version 2.0 Copyright 2007 Lorex Technology Inc. www.lorexcctv.com Table of Contents Overview... -
4Ch Real time / Triplex / Mux Stand Alone DVR
 4Ch Real time / Triplex / Mux Stand Alone DVR User s Manual VER 1.2 VSD-31 4 Channel Stand Alone DVR USB Backup available The most stable and reliable real stand alone Digital Video Multiplex Recorder
SAMSUNG ALL-IN-ONE SECURITY SYSTEM
 Quick Start Guide KIT MODEL SDH-B74041/SDH-B74081 DVR MODEL SDR-B74301 SAMSUNG ALL-IN-ONE SECURITY SYSTEM Thank you for purchasing the Samsung DVR Security System. Follow the simple steps in this guide
User s Manual November 2004 V 1.1
 User s Manual Please read instructions thoroughly before operation and retain it for future reference. November 2004 V 1.1 WS2 WARNING The apparatus shall not be exposed to dripping or splashing and that
H.264 Network DVR. Quick Start
 H.264 Network DVR Quick Start GUI Display with USB Mouse Control Please read instructions thoroughly before operation and retain it for future reference. For the actual display & operation, please refer
1 SYMPHONY USERS GUIDE
 1 SYMPHONY USERS GUIDE 2 Control Panel Control Panel Details Camera Select buttons Status indicators MENU: access the Login Screen. Navigation buttons: move around the menu screens, control PTZ cameras
TruVision DVR 30 Quick Start Guide
 TruVision DVR 30 Quick Start Guide Content Contact information 1 Package contents 1 Installation environment 1 Setting up the TVR 30 1 Connecting the devices 2 Turning on the TVR 30 2 Operating the TVR
H.264 Network DVR. Quick Start. GUI Display with USB Mouse Control 336Z
 336Z H.264 Network DVR Quick Start GUI Display with USB Mouse Control Please read instructions thoroughly before operation and retain it for future reference. For the actual display & operation, please
DSC-N114_Network_Video_Recorder
 DSC-N114_Network_Video_Recorder Quick Start Guide 8200-1116-05 Regulatory information FCC information FCC compliance: This equipment has been tested and found to comply with the limits for a digital device,
MPEG4 4 Channel Digital Recording System VXM4-4. User Manual
 MPEG4 4 Channel Digital Recording System VXM4-4 User Manual CONTENTS Before installing 1 Key features 2 Front panel description 3 Rear panel description 4 Getting started 5 Connect and switch on 5 Configuring
VMS-A1 Client Software. User Manual
 VMS-A1 Client Software User Manual Contents Contents... 2 Chapter1. Overview... 4 1.1 Description... 4 1.2 Features & Functions... 4 Chapter2. Update Info... 6 Chapter3. Starting VMS-A1... 7 3.1 Installing
PCMS User Manual. User Manual PCMS. A-Series DVR (Cloud)
") PCMS User Manual A-Series DVR (Cloud) User Manual PCMS User Manual PCMS A-Series DVR (Cloud) 1 PCMS User Manual A-Series DVR (Cloud) Contents 1. Brief Introduction... 3 2. Application... 3 3. OS Compatibility...
PCMS User Manual A-Series DVR (Cloud) User Manual PCMS User Manual PCMS A-Series DVR (Cloud) 1 PCMS User Manual A-Series DVR (Cloud) Contents 1. Brief Introduction... 3 2. Application... 3 3. OS Compatibility...
H.264 Network DVR. Quick Start
 341Z H.264 Network DVR Quick Start GUI Display with USB Mouse Control Please read instructions thoroughly before operation and retain it for future reference. For the actual display & operation, please
7 LCD H.264 DVR COMBO
 7AV06-4L User Manual 7 LCD H.264 DVR COMBO 1 WARNING TO REDUCE THE RISK OF FIRE OR ELECTRIC SHOCK, DO NOT EXPOSE THIS APPLIANCE TO RAIN OR MOISTURE. This symbol is intended to alert the user to the presence
User s Manual. Combo DVR. Thank you for purchasing our product. Please read this User s Manual before using the product. Change without Notice
 Thank you for purchasing our product. Please read this User s Manual before using the product. Change without Notice Combo DVR User s Manual User please operate according to the DVR model that you purchased
NetClient software user manual
 NetClient software user manual 1-1. General information Net Client is an application which provides users not only viewing and controling remote DVRs, but also receiving realtime event data or alarm signals
DVR User Manual. For H channel digital video recorder All rights reserved
 DVR User Manual For H.264 16-channel digital video recorder All rights reserved CAUTION Please read this user manual carefully to ensure that you can use the device correctly and safely We do not warrant
Digital Video Recorder User Manual. DVR User Manual. For H channe/ 8-channel/16-channel Digital Video Recorder All rights reserved
 DVR User Manual For H.264-4-channe/ 8-channel/16-channel Digital Video Recorder All rights reserved i CAUTION Please read this user manual carefully to ensure that you can use the device correctly and
DVR RANGE ENGINEER MANUAL
 INSPIRE DVR RANGE ENGINEER MANUAL Contents Hardware Inspire DVR range Connections Connecting a mouse Connecting keyboard Connecting PTZ cameras Connecting Keyboard/PTZ Alarm connections Using front panel
PIVOT CMS CLIENT SOFTWARE USER MANUAL
 PIVOT CMS CLIENT SOFTWARE USER MANUAL 1 CMS USER GUIDE 1.1 PC REQUIREMENT Recommended PC Requirement OS CPU VGA RAM HDD Graphics Card OS CPU VGA RAM HDD Windows Vista, 7 or higher Intel Core2Quad Q9400
QSD2308L/QSD2316L DVR User s Manual
 QSD2308L/QSD2316L DVR User s Manual NOTE: We use two different front panel designs on these models. They have the same function buttons but they are arranged differently. Please match the front panel on
Pro7400H1 Hybrid DVR User Manual
 Pro7400H1 Hybrid DVR User Manual User Information Admin User Name: Admin Password: IP Address: System Name: Table Of Contents 1. Menu Operation... 4 1.1 Main Menu... 4 2. Start Up/Shutdown System... 5
Video Web Server. User s s Manual MPEG-4 VIDEO WEB SERVER. Please read instructions thoroughly before operation and retain it for future reference.
 13 Video Web Server MPEG-4 VIDEO WEB SERVER User s s Manual Please read instructions thoroughly before operation and retain it for future reference. 733_V0.95 Thank-You Note Before You Get Start First
SmartWatch Eco/Eco Compact
 SmartWatch Eco/Eco Compact Digital Video Recorders SmartWatch Eco SmartWatch Eco Compact Quick User Guide Index Box Contents...3 Front Panel Controls...4-5 SmartWatch Eco Compact...4 SmartWatch Eco...5
DVR User Manual. For H.264 4/8-channel digital video recorder All rights reserved
 DVR User Manual For H.264 4/8-channel digital video recorder All rights reserved CAUTION Please read this user manual carefully to ensure that you can use the device correctly and safely We do not warrant
Pro71600N3 NVR User Manual
 Pro71600N3 NVR User Manual User Information Admin User Name: Admin Password: IP Address: System Name: Table Of Contents 1. Menu Operation...4 1.1 Main Menu...4 2. Start & Shutdown System...5 2.1 Start
NVMS1000. User Manual
 NVMS1000 User Manual Contents 1 Software Introduction... 1 1.1 Summary... 1 1.2 Operation Environment... 1 1.3 Install and Uninstall... 2 1.3.1 Install the Software... 2 1.3.2 Uninstall the Software...
HD NVR User Manual. High-Definition Network Video Recorder. Model : HD NVR 1 st Edition : 13 Nov nd Edition : 28 Dec Thank You!
 High-Definition Network Video Recorder HD NVR User Manual The picture & functions & supplied items might differ according to the specification and model. Contents of this user manual are protected under
NVR-0316 User s Manual 1 NVR User s Manual. Version 1.0.0
 NVR-0316 User s Manual 1 NVR-0316 User s Manual Version 1.0.0 2 NVR-0316 User s Manual Table of Contents Hardware... 4 Overview... 4 LED & Buttons Definitions... 4 Connect to the NVR... 5 Use NVR Search
Control Device
 1 Import Safety Notification ----------------------------------------------------- 5 Before Installation ---------------------------------------------------------- 6 Main Features -------------------------------------------------------------
H Channel Digital Recording System. User Manual
 H.264 4 Channel Digital Recording System V X H 2 6 4-4 User Manual CONTENTS Before installing 1 Key features 2 Front panel description 3 Rear panel description 4 Getting started 5 Connect and switch on
Please read instructions thoroughly before operation and retain it for future reference.
 DIGITAL VIDEO RECORDER USER MANUAL Please read instructions thoroughly before operation and retain it for future reference. KD673_672_671_670_AC791_790_CD540_MR673_manual_V1.1 IMPORTANT SAFEGUARD CAUTION
DHE-04 DHE-08 DHE H H.264 DVR 4 / 8 / 16 CH. Quick Setup Guide PACKAGE CONTENTS A. B. C. D. E. F. G. H. Inside the DVR I.
 960H H.264 DVR 4 / 8 / 16 CH. Quick Setup Guide DHE-04 DHE-08 DHE-16 PACKAGE CONTENTS A. One (1) DHE-04 / DHE-08 / DHE-16 DVR B. One (1) Remote Controller C. Two (2) AAA Battery for Remote Controller D.
TruVision IP Cam Open-Standards Quick Start Guide
 TruVision IP Cam Open-Standards Quick Start Guide P/N 1076514A-EN REV 1.0 ISS 07OCT11 Copyright 2011 UTC Fire & Security. All rights reserved. Trademarks and patents Interlogix, TruVision brand and logo
7) Do not block any of the ventilation openings. Install in accordance with the manufacturer's instructions.
 Do not block any of the ventilation openings. Install in accordance with the manufacturer's instructions.") 1 IMPORTANT SAFETY INSTRUCTIONS 1) Read these instructions. 2) Keep these instructions. 3) Heed all warnings. 4) Follow all instructions. 5) Do not use this apparatus near water. 6) Clean only with a dry
1 IMPORTANT SAFETY INSTRUCTIONS 1) Read these instructions. 2) Keep these instructions. 3) Heed all warnings. 4) Follow all instructions. 5) Do not use this apparatus near water. 6) Clean only with a dry
NVMS User Manual
 NVMS-1000 User Manual Contents 1 Software Introduction...1 1.1 Summary... 1 1.2 Operation Environment... 1 1.3 Install and Uninstall... 2 1.3.1 Install the Software... 2 1.3.2 Uninstall the Software...
Quick User Guide to Linux DVR (V2.0)
") Quick User Guide to Linux DVR (V2.0) 1 Contents Main GUI Setup GUI Preview PTZ Control Manual Recording Schedule Recording Continuous Recording Schedule Recording Motion Detection Recording Playback File-list
Quick User Guide to Linux DVR (V2.0) 1 Contents Main GUI Setup GUI Preview PTZ Control Manual Recording Schedule Recording Continuous Recording Schedule Recording Motion Detection Recording Playback File-list
Pro7804N1 NVR User Manual
 Pro7804N1 NVR User Manual Pro7804N1 User Manual BW R6.indd 1 User Information Admin User Name: Admin Password: IP Address: System Name: Table Of Contents 1. Menu Operation...4 1.1 Main Menu...4 2. Start
DVR SYSTEM User s Manual
 DVR SYSTEM User s Manual Manual Revision : Version 5.3 above Release Date : July 1. 2004 INDEX Chapter. Main Screen -1. Explanation of Main Screen A ~ N Functions per button -2. Pan/Tilt Control O Pan/Tilt
Digital Video Recorder User Manual. DVR User Manual. For H channel/ 8-channel/16-channel Digital Video Recorder All rights reserved
 DVR User Manual For H.264-4-channel/ 8-channel/16-channel Digital Video Recorder All rights reserved i CAUTION ii Please read this user manual carefully to ensure that you can use the device correctly
DVR User Manual. For H.264 4/8/16-channel digital video recorder All rights reserved
 DVR User Manual For H.264 4/8/16-channel digital video recorder All rights reserved CAUTION Please read this user manual carefully to ensure that you can use the device correctly and safely We do not warrant
VIP Kit 16 channel software manual. Set up and user manual for Vista s VIP Kit software IP CCTV system
 VIP Kit 16 channel software manual Set up and user manual for Vista s VIP Kit software IP CCTV system Table of Contents 1. Introduction of Program... 1 2. Preparations before operating... 1 2.1 Minimum
DVR User s Manual. For H FPS /8-channel digital video recorder All rights reserved. Rev
 QSDT8DP DVR User s Manual For H.264-240 FPS /8-channel digital video recorder All rights reserved Rev 120209 i QSDT8DP User s Manual CAUTION Please read this user manual carefully to ensure that you can
NVR Equipment WEB Operation Guide ISSUE V1.1 DATE
 NVR Equipment WEB Operation Guide ISSUE V1.1 DATE 2018-05-15 About This Document About This Document Purpose This document describes how to use the web management system for NVR and the cameras managed
USER GUIDE VCT-STDDVR9-1 = /16 channel MPEG-4 Triplex DVR V. 1.0
 USER GUIDE VCT-STDDVR9-1 = 16-1 9/16 channel MPEG-4 Triplex DVR V. 1.0 This document contains preliminary information and subject to change without notice. 2 SAFETY PRECAUTIONS EXPLANATION OF SYMBOLS This
TruVision DVR 10 Quick Start Guide
 GE Security TruVision DVR 10 Quick Start Guide Content Contact information 1 Package contents 1 Installation environment 1 Setting up the TVR 10 1 Connecting the devices 1 Turning on the TVR 10 2 Operating
Universal User s manual for Videosec digital video recorders
 Universal User s manual for Videosec digital video recorders 1 Prologue Thank you for choosing our product. This manual is universal, it values for every Videosec recorder. Please read it carefully, every
User Manual VXM4-8. MPEG4 8 Channel Digital Recording System HOLD DISPLAY SEQ PANIC RW. ZOOM OUT FF. ZOOM IN ZOOM LOCK ARCHIVE PTZ SETUP SEARCH
 DISPLAY SEQ PANIC ZOOM LOCK ARCHIVE PTZ SETUP SEARCH RETURN ENTER PWR REC NET RW. ZOOM OUT HOLD FOCUS IRIS NEAR FAR CLOSE OPEN FF. ZOOM IN MPEG4 8 Channel Digital Recording System VXM4-8! ± + 1 2 3 4 5
JVS-D7216 Standalone DVR User Manual
 Menu JVS-D7216 Standalone DVR User Manual JVS-D7216 Standalone DVR Instructions 1. Introduction..4 1.1 Product Description...4 1.2 Features..4 1.3 Specifications...4 2. Product Features....6 2.1 Panel
DVR User Manual. For H.264-4/8/16-channel digital video recorder All rights reserved
 DVR User Manual For H.264-4/8/16-channel digital video recorder All rights reserved CAUTION Please read this user manual carefully to ensure that you can use the device correctly and safely We do not warrant
ROHS AND WEEE COMPLIANCE
 210Z ROHS AND WEEE COMPLIANCE All lead-free products offered by the company comply with the requirements of the European law on the Restriction of Hazardous Substances (RoHS) directive, which means our
SPECIFICATIONS ARE SUBJECT TO CHANGE WITHOUT PRIOR NOTICE. THE INFORMATION CONTAINED HEREIN IS TO BE CONSIDERED FOR REFERENCE ONLY.
 COPYRIGHT 2010 by AVerMedia Information, Inc. All right reserved. Reproduction without permission is prohibited. No part of this document may be reproduced or transmitted in any form, or by any means without
GRAND IP VIDEO SERVER PRO. User s Manual INDEX
 INDEX GRAND IP VIDEO SERVER PRO Video & Audio Transmission/ iphone Web Browser Support User s Manual ISSUE:Mar 16, 2010 1. Package Contents.... 1 2. Introduction.... 1 3. System Requirements...... 1 4.
Regulatory information FCC information. EU Conformity Statement. FCC conditions
 The information in this quick guide is subject to change without notice. SmartWatch assumes no responsibility for any errors or omissions in this quick guide. Regulatory information FCC information FCC
QSTD2404/QSTD2408/QSTD2416 Digital Video Recorders User s Manual
 QSTD2400 Series DVR User s Manual QSTD2404/QSTD2408/QSTD2416 Digital Video Recorders User s Manual For H.264-4-channel/ 8-channel/16-channel Digital Video Recorders All rights reserved Rev 091708 i QSTD2400