Installation manual for 26HFL5008D/10 32HFL5008D/10 40HFL5008D/10 46HFL5008D/10 55HFL5008D/10
|
|
|
- Irene Walsh
- 5 years ago
- Views:
Transcription

1 Philips Hospitality TV Installation manual for 26HFL5008D/10 32HFL5008D/10 40HFL5008D/10 46HFL5008D/10 55HFL5008D/10 Status: Approved Version 1.0 Date: June 2013 Author: Marian Pufulete
2 Contents 1. Requirements before starting the installation Find out the state of the TV Re-install TV Installation wizard Channel options a. Reordering channels b. Rename channels c. Hide channels Professional Setup Welcome Logo Clone /Upgrade Feature settings CSM (Consumer Setup menu)

. For cloning settings from one TV to another TV, you will need to have a USB stick.")

3 1. Requirements before starting the installation Before starting the installation, make sure that you have everything you need at hand. Master remote control 22AV8573 or Guest remote control 22AV1109A And USB stick You will need the master remote control or the guest remote control to access the menus. To access the setup menu press the RC5 SETUP key, and then press the Home/Menu button. For the guest remote control, press the following keys sequential: 3, 1, 9, 7, 5, 3, MUTE. Note: The sequence: 3,1,9,7,5,3, MUTE will not show the Setup Menu if High Security Menu is enabled. (See. Page 19). For cloning settings from one TV to another TV, you will need to have a USB stick. This stick needs to be formatted as FAT32 and should be empty. For the best guest experience check if the software version on the TV is the latest one. This can be done using the Master Remote control by pressing Recall Button and checking on page Current Main Software. This also can be done with the Guest Remote by pressing 1,2,3,6,5,4. Go to: Enter the model number and check to confirm you have the latest version available. Confirm the software version present on TV is identical with the one from website. If not please download the latest version from website, unzip and save on to a USB key The USB key must be format FAT32 and preferably empty to avoid and accidental upload of wrong setting and software. Follow the instruction how to upgrade the software. If the software version from your TV is identical with the one available on website it is not necessary to upgrade. If an upgrade is necessary you can upgrade and clone files at the same time automatically. (Upgrade -> Reboot -> Clone) --- See Instant Initial Cloning (page 32) Initial instant cloning option can only be used if you reinstall TV or TV is out the box. 2


4 2. Find out the state of the TV It is important to know if a TV is in virgin mode (out of the box) or installed before. If you can see this screen below, you know that the TV is in virgin mode and you can install the set. See chapter 4 of this manual. If you power on the set and then press the Home button on the guest remote, you will see this screen appear, if the TV already has been installed or if the wizard was already skipped. Professional Settings mode on Professional Settings mode off You can start the installation wizard again by reinstalling the TV as explained in chapter 3 of this manual. Disable the Professional Settings Mode Access the setup menu by pressing the RC5 SETUP key, and then press the Home/Menu button. (For the guest remote control, press the following keys in sequence: 3,1,9,7,5,3, MUTE ). Go to Professional Settings Professional Mode and select the OFF option and confirm with OK. Go back with the arrow keys and select Store settings. Confirm with OK. After restart the TV will have the Professional Settings mode set to OFF. 3


5 3. Re-install TV If you want to start an installation from scratch you can always re-install the TV. This can be done by using the option: Re-install TV set. If Professional Settings are active you can access the setup menu press the RC5 SETUP key, and then press the Home/Menu button (For the guest remote control, press the following keys in sequence: 3,1,9,7,5,3, MUTE ), then go to TV Setup, confirm with OK. This menu will appear: If the Professional Settings Menu is disabled, you can access the Setup menu with the guest remote control. Select Setup and press OK. Select the option TV settings for this menu: 4


6 Press OK to access the sub-menu, navigate to Reinstall TV. Press OK to reinstall the TV set. If all is correct select YES and press OK. After this operation the TV will power off and on and display the installation wizard. Note: All settings are at default values and no channel plan is available. After reinstalling, the PROFESSIONAL SETTINGS menu will keep the PROFESSIONAL SETTINGS Mode and Room ID, all other parameters will be reseted to default values. 5


7 4. Installation wizard When you turn on the TV for the first time, or you have reinstalled the TV, you should see the following screen. Here you will need to select your preferred language. After this, you will need to select the country. Depending on the country selection, some pre-defined settings will be activated, because of local broadcast requirements. Example: digital/analog channels could be disabled; reordering and deleting channels can in some cases not be possible. Note: If you are experiencing some issues after selecting your country, please select Others in the menu. 6


8 The next step is to select Wall mounted or On a TV stand. This option changes some settings for the audio and image of the TV. Now you can select the visual and hearing impaired options. If you select On, your TV will automatically turn on settings to help visual and hearing impaired people. THE MOST COMMON OPTION IS TO TURN THIS FUNCTION OFF. On the following page we can start the channel installation wizard. You can also press Back to correct any previous setting. We recommend you only select your preferred options as this will result in longer installation times. 7


9 For the channel installations, select Install TV channels and press OK Then you can select Continue and press OK again. Here you can select the type of channels you would like to install and what preference you will use. It is advisable to check the settings before starting the search. 8


10 Note: If all options are disabled you have to go down to the Digital channels option and set the digital channels to ON. Installation medium: Allows you to define what type of channels will be installed. Depending on country settings some channel types might be disabled. A screen is displayed to make changes to set the channel list/map configuration: [Symbol rate mode]: Automatic TV will use the preset Symbol rate (6.900/6.875) Manual Option to set Symbol rate 1 and Symbol rate 2 [Symbol rate 1]: (to set) [Symbol rate 2]: (to set) 9


 will not be found.")
11 The Frequency scan contains two options: - Quick : this is a fast method to search channels but it might skip some channels (depending on the network). - Full : the scan will search on all frequencies and will store all channels available. This is the safe method if you don t know the network parameters, but it takes more time. Frequency step size has two options: 1. 1 MHz With Full scan, the step size to search for channels is 1 MHz The scan will take more time but will find also channels broadcasted not according to the channel grid MHz (default) With Full scan, the step size to search for channels is 8 MHz. The scan will be shorter in time but some channels which are not in the expected channel grid (local head-end) will not be found. When details of the local network are known they can be filled out in this menu. If the details are not known leave everything as the default values. LCN sorting: With the LCN function (Logical Channel Number), the channel list is ordered automatically. This function can be disabled and the TV will not change channel order according to the LCN table. Note: Only applicable if this is supported on the local network. 10


12 The Reset option will reset the search settings to default. After you have checked or changed settings, you can select Done and select Start to start the channel search. During the channel search you can see the progress bar and how many channels are found at that time. When the search is done, you should see Channel search complete and a summary of the channels found. In this case: Digital channels found: 53 Analogue channels found: 0 Press the OK button on the remote control to finish the search. If you would like to change the picture and sound settings, you can go to Optimize TV picture and sound and press the OK button on the remote control. A wizard will start to guide you through the process of setting the sound and picture on the TV set. 11


13 Select Continue to start the wizard and press OK on the remote control. The wizard will ask you some questions about which image you prefer, select the option you desire and press OK on the remote control. Once this wizard is done, you will return to the installation menu again. The network wizard will guide you through network setup. This wizard will popup: Please select Next and press OK to continue 12


14 The connection will be made to a wireless network or via a wired network, depending on preferences. The TV will automatically acquire an IP address if this is available via DHCP. After the connection is made, the result is shown on the TV. The last option in this menu is Add your devices. This can be done if you would like to add a DVD player or STB. 13

15 When you are done with this, select Done and press OK on the remote control. After pressing Done you have completed the installation of the TV and you should see this screen. Press OK on the remote control to exit this wizard. Note: This wizard will not be available anymore when you start the TV the next time. The only way to re-use this wizard is to reinstall the TV set. 14


16 5. Channel options a. Reordering channels For reordering TV channels, the channel plan from the Professional Settings menu must be used. In the consumer menu you cannot rearrange channels. The Channel Setup can be accessed by using the Yellow remote (RC 22AV8573 Master Remote control) and pressing the MENU Button or with the TV remote press 3,1,9,7,5,3, MUTE). The Professional Settings menu will appear like in picture. Go to the option Channel setup and press OK to access the submenu. The channel grid will contain all installed channels. With the channel grid displayed, press the OPTION button on the remote control to display settings for channels. Select Reorder and Press the OK button on the remote control to reorder channels. 15
17 16


18 Navigate to the channel that you want to move and press OK on the remote control to select that channel. The arrows around the channel indicate that the channel is selected and can be moved. Use the arrow keys to move the channel to the new position. When you reached the new position press OK on the remote control to confirm the new position of the channels. Once you are finished with the reordering, press Options on the remote control again. 17

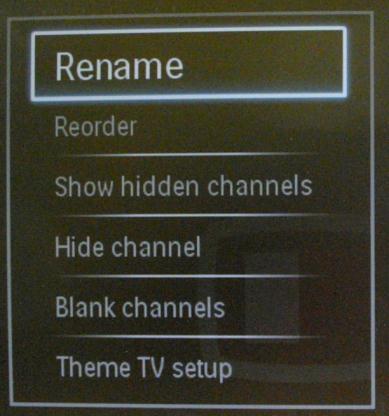
19 Press OK on the remote control to confirm that you are done with the re-ordering. b. Rename channels Select the channel, press the Options button on the remote control and select Rename to change the name of a channel. If you then press the OK button a virtual QWERTY keyboard will pop up. c. Hide channels Important: You cannot delete channels from the channel grid, but you can use the option to hide the channels. Select the Channel, press the Options button and select Hide channels. You will see an H in the channel square. Note: Select Show hidden channels if you want to see all channels, hidden or not hidden. Using this option will not remove the hidden attribute. 18
![6. Professional Setup [Professional Settings] Select the Setup menu language to be in English,](/docs-images/82/86647108/images/20-0.jpg "French, German or Italian. [Professional Mode] [Off]: The TV operates as a basic (consumer) TV.")
![[On]: All settings in the Professional Settings mode Setup menu are active.](/docs-images/82/86647108/images/20-1.jpg "Only by switching on this mode the TV will act as a Hospitality TV.")
![[Native UI Source] Change the source of the user interface to browser or native (HTML or](/docs-images/82/86647108/images/20-3.jpg "Flash).")
![[SmartTV Settings] [NetTV] [Configure Net TV] allows you to disable/enable the Net TV portal](/docs-images/82/86647108/images/20-4.jpg "provided by the Philips Net TV server.")
20 6. Professional Setup [Professional Settings] Select the Setup menu language to be in English, French, German or Italian. [Professional Mode] [Off]: The TV operates as a basic (consumer) TV. [On]: All settings in the Professional Settings mode Setup menu are active. Only by switching on this mode the TV will act as a Hospitality TV. [Native UI Source] Change the source of the user interface to browser or native (HTML or Flash). [SmartTV Settings] [NetTV] [Configure Net TV] allows you to disable/enable the Net TV portal provided by the Philips Net TV server. If you select [Configuration], [Hotelier] and [Profile], options become visible -- [Hotelier] and [Profile] are text entry fields that allow you to configure the Net TV portal for the hotel. 19
![[Smart UI] Smart UI allows hotels to display an HTML portal when users select [Browse Portal] from](/docs-images/82/86647108/images/21-0.jpg "the Home menu. Select [Off] to disable this feature and hide [Browse Portal] from the Home menu.")
![Selecting [Server] links to a URL and [Local] displays locally-stored HTML pages.](/docs-images/82/86647108/images/21-1.jpg "The HTML files and supporting content stored in the TV should not exceed a total of 4MB.")
![[Smart UI Backup] If [SmartUI] is on, enabling the backup automatically launches locally-stored HTML](/docs-images/82/86647108/images/21-2.jpg "content if the link to an external server or URL does not work.")
![[Icon Label] Change the label of the [Browse Portal] icon.](/docs-images/82/86647108/images/21-3.jpg "[Portal URL] Enter the URL to access from [Browse Portal].")
21 [Smart UI] Smart UI allows hotels to display an HTML portal when users select [Browse Portal] from the Home menu. Select [Off] to disable this feature and hide [Browse Portal] from the Home menu. Selecting [Server] links to a URL and [Local] displays locally-stored HTML pages. The HTML files and supporting content stored in the TV should not exceed a total of 4MB. [Smart UI Backup] If [SmartUI] is on, enabling the backup automatically launches locally-stored HTML content if the link to an external server or URL does not work. [Icon Label] Change the label of the [Browse Portal] icon. [Portal URL] Enter the URL to access from [Browse Portal]. The address is for the SmartUI external server. [Web Services] [AutoDiscovery] Enable auto discovery by selecting [On]. Disable it by selecting [Off]. 20
![[TV Registration]: This service is used to provide some basic information about the TV to a server side application.](/docs-images/82/86647108/images/22-0.jpg "Disable TV registration by selecting [Off] [SI Services]: If SI Services is enabled by selecting [On], users view the server defined in [Smart TV Settings] when")
![they select [Browse Portal] in the home menu.](/docs-images/82/86647108/images/22-2.jpg "If SI Services is disabled, the locally-stored HTML files (defined in [Smart TV Settings]) will launch when [Browse Portal] is selected.")
![[Raw WebIXP] It is possible to send and receive strings between the client application and the server side code by making use of the RawWIXP feature.](/docs-images/82/86647108/images/22-3.jpg "Enable:ON/OFF IP Adress Port: [Room ID] Entry field to store 4 digits to set the Room Identifier.")
22 [TV Registration]: This service is used to provide some basic information about the TV to a server side application. Disable TV registration by selecting [Off] [SI Services]: If SI Services is enabled by selecting [On], users view the server defined in [Smart TV Settings] when they select [Browse Portal] in the home menu. If SI Services is disabled, the locally-stored HTML files (defined in [Smart TV Settings]) will launch when [Browse Portal] is selected. [Raw WebIXP] It is possible to send and receive strings between the client application and the server side code by making use of the RawWIXP feature. Enable:ON/OFF IP Adress Port: [Room ID] Entry field to store 4 digits to set the Room Identifier. Room ID can be used to distinguish between different floors/rooms/setups when using SmartInstall. [Switch on settings] [Switch on volume] When the guest switches the TV on, it will play at the specified volume level. Selectable value from 00 until
![[Maximum volume] This option specifies the maximum allowable](/docs-images/82/86647108/images/23-1.jpg "volume level of the TV. Selectable value from 00 until 60.")
![[Switch on channel] When the TV is switched on, it will start up](/docs-images/82/86647108/images/23-2.jpg "on the specified source/channel.")

![[Switch on feature] Starts up in Theme TV, Smart UI or Net TV](/docs-images/82/86647108/images/23-4.jpg "modes.")
![[Blank Until Feature] The TV will remain black until the Feature](/docs-images/82/86647108/images/23-5.jpg "is fully loaded.")
23 [Maximum volume] This option specifies the maximum allowable volume level of the TV. Selectable value from 00 until 60. [Switch on channel] When the TV is switched on, it will start up on the specified source/channel. Available EXT1, EXT2, VGA, HDMI, HDMI side, AV side or one of the installed TV channels. [Switch on feature] Starts up in Theme TV, Smart UI or Net TV modes. [Blank Until Feature] The TV will remain black until the Feature is fully loaded. Note: Enabling this option will increase the startup time. [Switch on Picture Format] Switches to a pre-defined picture format. [Display message] [On] To enable the welcome message. [Off] No welcome message 22
![[Welcome message line 1 &2] Line 1: First line of the welcome message. Line 2: Second line of the welcome message. Clear: Will delete the message entered on the welcome message.](/docs-images/82/86647108/images/24-0.jpg "A virtual keyboard will pop up when pressing the OK button on the remote control while editing line 1 or 2, Maximum 20 characters per line.")
![[Message timeout] Sets the period of time to display the welcome message on the screen when TV is turned on from standby. Note: Selectable values: 20, 25, 30 seconds.](/docs-images/82/86647108/images/24-1.jpg "[Local keyboard lock] [Off]: The local keyboard (control buttons on TV) buttons are enabled. [On]: The local keyboard (control buttons on TV) buttons are disabled, power button still enabled.")
![[All]: All local keyboard (control buttons on TV) buttons are disabled. [Remote control lock] [OFF]: All buttons on the guest remote control will function normally.](/docs-images/82/86647108/images/24-2.jpg "[On]: All buttons on the guest remote control are disabled. Master remote control 22AV8573 (yellow) or RC2573 (green) commands are not affected by this setting.")
24 [Welcome message line 1 &2] Line 1: First line of the welcome message. Line 2: Second line of the welcome message. Clear: Will delete the message entered on the welcome message. A virtual keyboard will pop up when pressing the OK button on the remote control while editing line 1 or 2, Maximum 20 characters per line. [Message timeout] Sets the period of time to display the welcome message on the screen when TV is turned on from standby. Note: Selectable values: 20, 25, 30 seconds. [Local keyboard lock] [Off]: The local keyboard (control buttons on TV) buttons are enabled. [On]: The local keyboard (control buttons on TV) buttons are disabled, power button still enabled. [All]: All local keyboard (control buttons on TV) buttons are disabled. [Remote control lock] [OFF]: All buttons on the guest remote control will function normally. [On]: All buttons on the guest remote control are disabled. Master remote control 22AV8573 (yellow) or RC2573 (green) commands are not affected by this setting. [OSD Display] Set this function to show or hide on screen information. [Off]: On screen information is suppressed. [On]: Normal onscreen information is displayed. [Off]: Professional Settings menu can be accessed by both Guest remote control and Master remote control 22AV8573 (yellow) or RC2573 (green). Guest remote control access to the set up menu only possible with code 3,1,9,7,5,3, mute. [On]: Professional Settings menu can only be accessed by the Master remote control 22AV8573 (yellow) or RC2573 (green). 23
![[Welcome logo] Enables / disables the showing of the stored welcome Logo at startup when the TV starts up in Green Mode (see Power Settings): [Off]: When set to Off, the TV will hide the Welcome Logo](/docs-images/82/86647108/images/25-0.jpg "at startup. [On]: When set to On, the TV will show the Welcome Logo at startup. Note: If no welcome logo is loaded the feature is greyed out.")
![[Display information] [On]: Enables hotel information to be available in guest menu. [Off]: Disables hotel information to be available in guest menu. Check upload hotel info.](/docs-images/82/86647108/images/25-1.jpg "(on page 31) [Browse USB] Enables / disables the USB Browse icon to be presented in the Guest Menu. [Off]: When set to Off, the TV will hide the USB icon in the Home menu.")
25 [Welcome logo] Enables / disables the showing of the stored welcome Logo at startup when the TV starts up in Green Mode (see Power Settings): [Off]: When set to Off, the TV will hide the Welcome Logo at startup. [On]: When set to On, the TV will show the Welcome Logo at startup. Note: If no welcome logo is loaded the feature is greyed out. [Display information] [On]: Enables hotel information to be available in guest menu. [Off]: Disables hotel information to be available in guest menu. Check upload hotel info. (on page 31) [Browse USB] Enables / disables the USB Browse icon to be presented in the Guest Menu. [Off]: When set to Off, the TV will hide the USB icon in the Home menu. [On]: When set to On, the TV will show the USB icon in the Home menu. [Auto scart] Enables auto scart switching (or break-in) in Professional mode. [AV]: Enables auto scart switching or break-in. [Power On Scart]: Enables auto TV start On/Off when detecting scart break-in. (never use this feature without a connected STB) [Off]: Disables auto scart switching or break-in. [Easylink Break-in] Enables or disables the HDMI-CEC standby feature in Professional mode: [Off]: Not able to switch on the TV by external HDMI-CEC devices. [On]: Able to switch on the TV by external HDMI-CEC devices [Easylink control] Enables or disables the HDMI-CEC one touch play Professional mode: feature in [Off]: Disables TV functionality to control external HDMI-CEC devices. [On]: Enables TV functionality to control external HDMI-CEC devices. 24
26 [Easylink Application menu] Allows the menu to control external HDMI-CEC. [Off]: Disables TV functionality to control external HDMI-CEC devices. [On]: Enables TV functionality to control external HDMI-CEC devices. [Auto USB] Enables or disables USB break-in feature in Professional mode: [Off]: When a USB device is plugged in, the [Multimedia] menu will not appear automatically, but users can access the [Multimedia] menu from the Guest menu. [On]: When a USB device is plugged in, the [Multimedia] menu appears automatically. [SXP Baudrate] Sets the Baud rate for the Serial Express communication channel to be or Baud (bits per second). [Enable CI-slot] Enables or disables the use of the integrated CI/CI+ slot: [Off]: No pass through of the TV input signal via the CI-Slot Card is possible; the use of CI Card slot is not possible. [On]: Pass through of the TV input signal via the CI-Slot Card is possible; the use of CI-Card slot is possible.!! Check with your local operator if your CI-Card is compatible with this TV. [Enable teletext] Enables or disables the use of Teletext by pressing the Teletext button: [Off]: Disables Teletext. [On]: Enables Teletext. [Enable MHEG] Enables or disables the use of MHEG by pressing the MHEG button: [Off]: Disables MHEG. [On]: Enables MHEG. 25
![[Enable EPG] Enables or disables the use of the EPG by pressing the EPG button: [Off]: No EPG services available [Now & Next]: EPG (Now/Next) services available [8 Day EPG]: EPG (8 Day) services](/docs-images/82/86647108/images/27-1.jpg "available Note: EPG availability depends on local conditions.")
![[Subtitle On StartUp] Enables or disables the use of subtitles at start-up: [Off]: No subtitles services available [On]: Subtitles services available [On during mute]: Subtitles services when TV](/docs-images/82/86647108/images/27-2.jpg "audio is muted [Enable subtitle] Enables or disables the use of subtitles in a DVB broadcast channel: [Off]: No subtitles services available [On]: Subtitles services available [Enable Channel Map]")
27 [Enable EPG] Enables or disables the use of the EPG by pressing the EPG button: [Off]: No EPG services available [Now & Next]: EPG (Now/Next) services available [8 Day EPG]: EPG (8 Day) services available Note: EPG availability depends on local conditions. [Subtitle On StartUp] Enables or disables the use of subtitles at start-up: [Off]: No subtitles services available [On]: Subtitles services available [On during mute]: Subtitles services when TV audio is muted [Enable subtitle] Enables or disables the use of subtitles in a DVB broadcast channel: [Off]: No subtitles services available [On]: Subtitles services available [Enable Channel Map] Select Channel Map to be viewed: [Native]: Show standard default channel map [BDS]: To be used only if a system is connected [Source setup] Lists all supported connectors on the TV. A disabled connector will not be visible from the Source menu. [Jointspace] This feature is not supported for hotel mode. Always set it to off. 26
![[Freeze on no signal] When this feature is enabled, the TV will display the last received frame in case of signal loss on DVB](/docs-images/82/86647108/images/28-1.jpg "signals. [Simply Share] Enable or disable the Simply Share feature. [Scrambled Program OSD] Show OSD on scrambled TV channel.")
![[Wifi Lost OSD] Enable or disabled the message when the wireless network is not available.](/docs-images/82/86647108/images/28-2.jpg "[Smart UI Info Key] Enables or disables the access on SmartInfo using the Info button on the remote control.")
28 [Freeze on no signal] When this feature is enabled, the TV will display the last received frame in case of signal loss on DVB signals. [Simply Share] Enable or disable the Simply Share feature. [Scrambled Program OSD] Show OSD on scrambled TV channel. [Wifi Lost OSD] Enable or disabled the message when the wireless network is not available. [Smart UI Info Key] Enables or disables the access on SmartInfo using the Info button on the remote control. [Power settings] The possible power settings are explained below. 27
![The power on function allows the TV to enter a specific mode ([On], [Standby], or [Last status]) of operation when the mains power is activated (cold start): [On]: The TV will always turn on (show](/docs-images/82/86647108/images/29-0.jpg "startup channel) after the mains power is connected. [Standby]: When set, the TV will always turn to standby (status as defined in Low power standby option) after the mains power is connected.")
29 The power on function allows the TV to enter a specific mode ([On], [Standby], or [Last status]) of operation when the mains power is activated (cold start): [On]: The TV will always turn on (show startup channel) after the mains power is connected. [Standby]: When set, the TV will always turn to standby (status as defined in Low power standby option) after the mains power is connected. [Low power standby] The Low power standby option defines the TV to enter a specific standby mode after pressing the On/Off button on the remote control. [Fast]: The TV will quickly turn on (This mode will consume more power in stand-by compared to Green mode). [Green]: The TV will turn on less fast. (This mode will consume less power in stand-by compared to Fast mode). [Smart power] The power consumption for the Smart power mode is defined by the Smart Picture setting in the TV Setup part. [Off]: The TV will start with the Standard Smart Picture setting, but the setting can be changed in the guest setup mode. [On]: The TV will start with the default Smart Picture setting and Smart Picture setup and is not selectable in the guest setup. [Auto Powerdown] Enables or disables the use of the automatic switch off functionality. The TV will switch off if no RC action is noticed after 240 minutes: [Off]: The TV will not switch off after 240 minutes [On]: The TV will switch of after 240 minutes [Delayed reboot] Enables or disables the use of delayed standby: [On]: TV is able to switch on immediately after switching to standby. [Off]: Switch ON time of the TV will be longer after switching to stand-by. [Standby Delay Timeout] This option will set the amount of time for Delayed reboot. 5 mts TV will power down complete after 5 minutes. 10 mts - TV will power down complete after 10 minutes. 28
![[Clock settings] All the clock settings are explained below.](/docs-images/82/86647108/images/30-0.jpg "[Display Standby] Defines the brightness level for the Clock")
![LCD backlight if the TV is in Standby mode: [Set]: Off, 1, 2,](/docs-images/82/86647108/images/30-1.jpg "3, 4, 5 [Display ON] Defines the brightness level for the")
![Clock LCD backlight if the TV is in On mode: [Set]: Off, 1,](/docs-images/82/86647108/images/30-2.jpg "2, 3, 4, 5 [Time Setting] Manually set the Time.")
![[Time Download] Select the source for the clock time:](/docs-images/82/86647108/images/30-3.jpg "[Automatic-RF]: Clock time is retrieved from the Download")

![[Manual]: The clock time is set using the Time Setting option.](/docs-images/82/86647108/images/30-5.jpg "Note: If the power is disconnected the TV will lose the time")
30 [Clock settings] All the clock settings are explained below. [Display Standby] Defines the brightness level for the Clock LCD backlight if the TV is in Standby mode: [Set]: Off, 1, 2, 3, 4, 5 [Display ON] Defines the brightness level for the Clock LCD backlight if the TV is in On mode: [Set]: Off, 1, 2, 3, 4, 5 [Time Setting] Manually set the Time. [Time Download] Select the source for the clock time: [Automatic-RF]: Clock time is retrieved from the Download Program channel. [Automatic-IP]: Function available only for IP channels [Manual]: The clock time is set using the Time Setting option. Note: If the power is disconnected the TV will lose the time set. [Download Country] Set the selected country as the source for clock time. 29
![[Download Program] Set selected Download Program as the source for the clock time.](/docs-images/82/86647108/images/31-0.jpg "Note: Correct clock information is needed to provide correct EPG data and to have MyChoice working.")
![[Time Offset] In case the clock download information is not correct for your region you can set an](/docs-images/82/86647108/images/31-1.jpg "offset here to correct this. Selectable value between -12 and +12.")
![[Buzzer Volume] Alarm (buzzer): [Set]: Off, On [Daylight saving] Set the Daylight saving options:](/docs-images/82/86647108/images/31-2.jpg "[Set]: Off, On [Reference Time and Date] Define whether the time and date are referenced from the TV.")
31 [Download Program] Set selected Download Program as the source for the clock time. Note: Correct clock information is needed to provide correct EPG data and to have MyChoice working. [Time Offset] In case the clock download information is not correct for your region you can set an offset here to correct this. Selectable value between -12 and +12. [Buzzer Volume] Alarm (buzzer): [Set]: Off, On [Daylight saving] Set the Daylight saving options: [Set]: Off, On [Reference Time and Date] Define whether the time and date are referenced from the TV. [Feature settings] Check Feature settings (page 34) 30
![[Speaker settings] [TV Speaker Enable] [Off]: The main speakers are muted.](/docs-images/82/86647108/images/32-0.jpg "The RC can control the volume and mute the headphone/bathroom speaker [On]: The main speakers are active and the behavior")

![[Independent Main Speakers] [Off]: The volume +/- on the Guest remote control will affect both the TV Main speaker and the](/docs-images/82/86647108/images/32-2.jpg "headphone volume.")
![[On]: The volume +/- on the Guest remote control will affect both the TV Main speaker and the After pressing MUTE, the](/docs-images/82/86647108/images/32-3.jpg "volume +/- on the Guest remote control will not reactivate the TV Main speaker volume, but will only control the [Default")
![Main Speakers Volume] This option defines the volume level that will be set to the main speakers when the TV is unmuted](/docs-images/82/86647108/images/32-4.jpg "and the Independent Main Speaker Mute is set to On. [Headphone] The default volume for headphones can be set.")
32 [Speaker settings] [TV Speaker Enable] [Off]: The main speakers are muted. The RC can control the volume and mute the headphone/bathroom speaker [On]: The main speakers are active and the behavior of the headphone/bathroom speaker is defined by the Independent Main Speaker Mute. [EasyLink & EasyLink autostart]: only to be used when external audio amplifier supporting HDMI-CEC is connected. [Independent Main Speakers] [Off]: The volume +/- on the Guest remote control will affect both the TV Main speaker and the headphone volume. [On]: The volume +/- on the Guest remote control will affect both the TV Main speaker and the headphone volume. After pressing MUTE, the volume +/- on the Guest remote control will not reactivate the TV Main speaker volume, but will only control the headphone volume. [Default Main Speakers Volume] This option defines the volume level that will be set to the main speakers when the TV is unmuted and the Independent Main Speaker Mute is set to On. [Headphone] The default volume for headphones can be set. The value define will be applied when the headphones are connected. [Factory default] Restore the factory default of the Professional Settings Menu. Channel installation is not affected. 31
![[TV Setup] A shortcut to enter the consumer installation menu. Consumer installation menu should be accessed to change](/docs-images/82/86647108/images/33-0.jpg "e.g. picture and sound settings and update channels.")

![[Channel setup] A shortcut to enter the channel grid.](/docs-images/82/86647108/images/33-2.jpg "Info: check Channel Options In this grid you can reorder, rename and hide channels.")

![[Store settings] To save the changes in the Professional Settings menu Menu, the changes must be stored. 1.](/docs-images/82/86647108/images/33-4.jpg "Select [Store settings] and press OK to store. Note: TV will automatically reboot to apply changes. 2.")
33 [TV Setup] A shortcut to enter the consumer installation menu. Consumer installation menu should be accessed to change e.g. picture and sound settings and update channels. Using this shortcut will trigger a popup screen which warns losing settings in the Professional Settings menu if you continue. Select discard if you want to stay in the Professional Settings menu or continue. [Channel setup] A shortcut to enter the channel grid. Info: check Channel Options In this grid you can reorder, rename and hide channels. Using this shortcut will trigger a popup screen which warns about losing settings in the Professional Settings menu if you continue. Select discard if you want to stay in the Professional Settings menu. [Store settings] To save the changes in the Professional Settings menu Menu, the changes must be stored. 1. Select [Store settings] and press OK to store. Note: TV will automatically reboot to apply changes. 2. Select [Cancel] to discard any changes [Clone/Upgrade] Check Clone/Upgrade section (page 32) [Express Box] Only applicable for system connected installation. After storing Professional Settings, the TV will restart to apply the new parameters. Now you can clone all settings to other TV sets by using the option TV to USB and USB to TV. Check how to clone settings (On page 32). 32

34 7. Welcome Logo There are 2 Philips logos displayed at startup. The second logo can be replaced by a picture uploaded via USB. File format: 1280 x 720.jpg file. The Welcome Logo is displayed only when Standby mode is set to Green. Note: below timing values are approximate indications and can differ from the real situation! Welcome Logo 1. Create graphics file: 1280 x 720 jpg file with the logo. 2. File name: WelcomeLogo.jpg (File name is case-sensitive) 3. Install TV channels and access the Professional Settings menu a. Go to Professional Settings -> Professional Mode -> Set to ON b. Go to Professional Settings ->Power settings ->Low power standby -> Set to Green. c. Go Store settings (Back in the root of Professional settings) -> Press OK and confirm that you want to store the settings. 4. Power on the TV, insert a USB key in the side USB port (USB key must be formatted FAT32). 5. Enter the Professional Settings menu a. Go to Smart Clone -> TV to USB -> Press OK to copy settings to USB key. After the Done message pops up remove the USB key. 6. Insert the USB key on your computer. Save the WelcomeLogo.jpg into the TV cloning data folder (Q554B\WelcomeLogo) 7. Insert a USB key in the side USB port and enter the Professional Settings menu 8. Go to: Smart Clone -> USB to TV -> Press OK to copy settings from USB to TV. 9. The TV will load all settings and reboot to activate the new settings. After rebooting the TV please enter the Professional menu and Go to Professional Settings -> Control Settings -> Welcome Logo -> Set to ON. (The option should be active and you can select the OFF or ON). 10. Store all settings and check if the welcome logo is properly displayed. After this you can clone the settings from TV to USB for future use in other TV sets. Hotel Information Any JPEG can be used for the Hotel information and triggered from consumer menu screen. How to upload single page Hotel Info 1. Create a JPEG graphics file with maximum resolution 1920 x File name: HotelInfo.jpeg (File name is case-sensitive). 3. Copy the file to the folder Wallpaper inside the TV cloning data folder (Q554B/Wallpaper/) 4. Insert the USB device into the TV 5. Enter the Professional menu 6. Go to Smart Clone 7. Select USB -> TV 8. The TV will load all settings and reboot to activate the new settings. 33
35 8. Clone /Upgrade Clone/Upgrade The cloning option is used to copy data from/to a TV by a USB stick. It contains all configuration and channel list data, Place a USB Memory stick in the USB side connector of the TV. *The USB device should be formatted as FAT or FAT32. [Clone to TV] 1. Select [Clone/Upgrade] and press OK. 2. Select [Clone to TV] and press OK. 3. The clone data will be loaded from the USB device into the TV. To activate the loaded settings, wait until the OSD message is displayed to remove the power cord. 4. Remove and re-insert the power cord. [Clone to USB] 1. Select [Clone/Upgrade] and press OK. 2. Select [Clone to USB] and press OK. 3. Clone data will be loaded from the TV into the USB device. 4. Wait until the OSD message returns to its earlier state before removing the USB device. [RF Upgrade] Instead of using a USB memory device to do cloning and firmware update, this upgrading is also possible using the RF infrastructure. This is supported by SmartInstall (Philips Hospitality RF Download mechanism) and allows a simultaneous upgrade of all installed televisions. [Start Download]: To manually start a RF download action: 1. Select [RF Download] and press OK. 2. Select [Start Download] and press OK. The download action will start and search if valid content is found on the RF network. [IP Upgrade] Instant initial clone: A TV out of the box will trigger the software upgrade and instant initial cloning. Before connecting the power cord and power on the TV, insert the USB key with latest software version and cloning data. After power on, the TV will search on the USB key for software and cloning files. When the software upgrade is complete, the TV will reboot and start the instant initial cloning. After power down you can remove the USB key and power on the TV to check the result of the cloning and also check the correct functionality of the TV (e.g: Welcome message, welcome logo, starting channel, startup volume). 34
36 9. Feature settings [Multi RC] This function allows that up to four televisions can be installed in a room whereas every TV will listen to its own RC. Once the TV is set, also every RC can be set to remember its connected TV: [Off] Multi RC is turned off; all TVs will listen to a blue RC. The TV will listen to a blue RC. Press and hold both the menu and blue button on the RC for about five seconds to change the color of the remote. [Green] The TV will listen to a green RC. Press and hold both the menu and green button on the RC for about five seconds to change the color of the remote. [Yellow] The TV will listen to a yellow RC. Press and hold both the menu and yellow button on the RC for about five seconds to change the color of the remote. [Red] The TV will listen to a red RC. Press and hold both the menu and red button on the RC for about five seconds to change the color of the remote. [Digit 0] The TV will listen to a 0 RC. Press and hold both the menu and digit 0 button on the RC for about five seconds to assign the remote to the number. [Digit 1] The TV will listen to a 0 RC. Press and hold both the menu and digit 1 button on the RC for about five seconds to assign the remote to the number. [Digit 2] The TV will listen to a 0 RC. Press and hold both the menu and digit 2 button on the RC for about five seconds to assign the remote to the number. The same process can be applied for all 10 digits on the remote control. Press and hold the OK button for about five seconds to check on the current color of the Multi Remote setting for the TV and the user remote. [MyChoice] In this manual we will cover only the configuration of MyChoice on TV, all details about the account and credit are covered in a different manual. Please contact your TP Vision country sales manager to setup an account and buy the credits. During the installation of the TV sets please collect the following information: Room number TV model Serial number HFL5008D/10 FZ1A Room number, TV model and serial number are required on the MyChoice website when the rooms are configured. Make sure that all values are correct because the MyChoice website is generating pin codes based on this information. You can gather all these details during the installation and afterwards enter them in the administration part of the MyChoice website. How to configure the MyChoice is described below: 1. The most important step for MyChoice is the clock. If the clock is not defined or TV doesn t have the correct time, MyChoice will display the following message: MyChoice is not available, please contact the reception. 35


![installation. [On]: MyChoice channel packages will be available with the help of scratch card.](/docs-images/82/86647108/images/37-3.jpg "[On (credit)]: My Choice channel packages will be available with a pin code generated by MyChoice website or with the help of scratch")
37 Enter in the Professional menu go to: Clock settings and configure the following: Time Download: Automatic-RF is the default option for DVB-C/DVB-T channels. Download Country: Define the country in which the TV is installed. Download Program: Define the TV channel from which the TV set will download the correct date and time. Make sure that clock is available for that TV channel. After making the correct settings in the clock settings, go back and access the menu Feature settings. Inside you will find the MyChoice sub menu with few extra categories: [Enable]: [Off]: Single channel map as configured during channel installation. [On]: MyChoice channel packages will be available with the help of scratch card. [On (credit)]: My Choice channel packages will be available with a pin code generated by MyChoice website or with the help of scratch card. If you are using the pin codes generated by the website this is the correct option to be used. [Ask for PIN Code]: [Once]: The pin code is required one time. [Every time on switch ON]: The code is required every time. 36
![[Channel setup]: MyChoice channel setup. Before entering the MyChoice Channel setup please confirm that you want to discard the unsaved changes.](/docs-images/82/86647108/images/38-0.jpg "The MyChoice setup will look like in the picture from below. From the channel list you can assign the channels to different locked packages.")

38 [Channel setup]: MyChoice channel setup. Before entering the MyChoice Channel setup please confirm that you want to discard the unsaved changes. The MyChoice setup will look like in the picture from below. From the channel list you can assign the channels to different locked packages. In this case the channel 26 Arte HD is assigned to locked package 1 which means that the channel will be visible only after a MyChoice pin code for package 1 was entered. To add a channel to a locked package just select the box from the right side of the channel and press OK, the box will become ticked and that channel will be assigned to that locked package. You also can put the same channel in different locked packages like channel 42 BBC1 CI in this example. You can configure any number of locked packages between one and five, every package will have a different pin code for access. Be aware that you cannot have a TV channel in Free Package and also in one of the Locked packages. 37
39 [ThemeTV] With ThemeTV it is possible to activate a customizable user interface to select up to 15 different themes that contains Channel references. ThemeTV can be presented on the display by means of pressing the ThemeTV button on the RC, or automatically after starting up the TV: [On]: Show ThemeTV on the display after pressing the ThemeTV button on the RC. [Off]: ThemeTV disabled. [Startup]: Show ThemeTV on startup and able to show the ThemeTV by pressing the ThemeTV button on the RC. [VSecure] VSecure is the hospitality content scrambling method used by the Philips Hospitality TVs. If you are interested to use it please contact the local Philips Hospitality TV sales representative. 38

 menu on the screen. How to save the CSM content on USB stick: 1. Insert the USB stick 2. Enter the CSM 3.")
40 10. CSM (Consumer Setup menu) The CSM contains data about the TV software, serial number and other details. The menu can be accessed using a standard remote control or using the master remote control. 1. Using the standard remote control: press the following key sequence 1,2,3,6,5,4 2. Using master remote control (22AV8753D): Press the RECALL button, available only if Professional Settings mode is ON. Notes: Activation of the CSM is only possible if there is no (user) menu on the screen. How to save the CSM content on USB stick: 1. Insert the USB stick 2. Enter the CSM 3. The CSM content will be saved on USB stick as a text file 4. File name example: CSM_32HFL5008D10_FZ1A txt a. Where 32HFL5008D10 is the TV model number b. Where FZ1A is the TV serial number 39
Installation manual for 42HFL5007D/10 47HFL5007D/10
 Philips Hospitality TV Installation manual for 42HFL5007D/10 47HFL5007D/10 Version 1.1 Contents 1. Requirements before starting the installation... 2 2. Find out the state of the TV... 3 3. Re-install
Installation Manual for 22HFL4373D/10 26HFL4373D/10 32HFL4373D/10 42HFL4373D/10
 Philips Hospitality TV Installation Manual for 22HFL4373D/10 26HFL4373D/10 32HFL4373D/10 42HFL4373D/10 Version 1.0 Contents 1. Requirements before starting the installation... 2 2. Find out the state of
Installation Manual for. 22HFL30x7x/10. 26HFL30x7x/10. 32HFL30x7x/10. 42HFL30x7x/10
 Philips Hospitality TV Installation Manual for 22HFL30x7x/10 26HFL30x7x/10 32HFL30x7x/10 42HFL30x7x/10 Version 1.1 Contents 1. Requirements before starting the installation... 2 2. Find out the state of
Installation Manual for 22HFL3233D/10 26HFL3233D/10 32HFL3233D/10 42HFL3233D/10
 Philips Hospitality TV Installation Manual for 22HFL3233D/10 26HFL3233D/10 32HFL3233D/10 42HFL3233D/10 Version 1.0 Contents 1. Requirements before starting the installation... 2 2. Find out the state of
Installation Manual for EasySuite range. xxhfl3xx9d. xxhfl3xx9w
 Register your product and get support at www.philips.com/welcome Installation Manual for EasySuite range xxhfl3xx9d xxhfl3xx9w Status: Release Version 1.2 Date: September 2014 Author: Marian Pufulete Contents
Installation Manual for 19HFL2807D/10 24HFL2808D/10 32HFL2808D/10 39HFL2808D/10
 Philips Hospitality TV Installation Manual for 19HFL2807D/10 24HFL2808D/10 32HFL2808D/10 39HFL2808D/10 Status: Approved Version 1.0 Date: June 2013 Author: Marian Pufulete Contents 1. Requirements before
Installation Manual for. xxhfl2819d/10
 Register your product and get support at www.philips.com/welcome Installation Manual for xxhfl2819d/10 Status: Release Version 1.3 Date: October 2014 Author: Marian Pufulete Contents 1. Requirements before
Installation Manual for xxhfl2829
 Installation Manual for xxhfl2829 Contents 1. Requirements before starting the installation... 2 2. Find out the state of the TV... 3 3. Re-install TV... 5 4. Installation wizard... 7 5. Picture... 11
Installation Manual for StudioLine xxhfl2869t. xxhfl2879t
 Get support at http://www.philips.com/support/ http://philipshtv.supportsystem.com/ Installation Manual for StudioLine xxhfl2869t xxhfl2879t (update of StudioLine Installation Manual for xxhfl2839/2849/2859)
Software upgrade procedure for
 Software upgrade procedure for XxHFL4010x/12 HeartLine 2k15 range XxHFL5009x/12 Mediasuite 2k14 range XxHFL5010x/12 Mediasuite 2k15 range XxHFL7009x/12 Signature 2k14-5 range 1 GENERAL INFORMATION The
DENVER DTB-136H H.265 DVB-T2 RECEIVER
 DENVER DTB-136H H.265 DVB-T2 RECEIVER USER MANUAL Table of Contents Safety Information... 1 Package Contents... 1 System Connection... 2 Remote Control... 3 First Time Installation... 4 Basic Operation...
Table of Contents. Introduction 2 1. Intelligent Remote Control 2 2. Charging the Remote Control 3
 Table of Contents Introduction 2 1. Intelligent Remote Control 2 2. Charging the Remote Control 3 Getting Started 6 1. Activating the Remote Control 6 2. Selecting a Device 7 3. Operating a Device 8 4.
Point of View SmartTV-500 Center - Android 4.2. General notices for use...2 Disclaimer...2 Box Contents...2
 Point of View SmartTV-500 Center - Android 4.2 English Table of Contents General notices for use...2 Disclaimer...2 Box Contents...2 1.0 Product basics...3 1.1 Buttons and connections... 3 1.2 Connecting
Chapter 1: Introduction
 Chapter 1: Introduction Introduction: TVGo A11 turns your PC into a TV set. No need to buy an additional TV in your home as this will save both space and electric consumption. It lets you watch TV or listen
Dobrodošli! Samsung Hotel-TV 2010
 Dobrodošli! Samsung Hotel-TV 2010 What s New 2010? LED Technology for Hotels Ultra-Slim Design (29,9mm depth) Mixed ATV & DTV Channel List USB device for guests (JPEG, MP3s, Movies) Internet@TV access
Samsung Hospitality Display with Manageability - HE590
 Samsung HE590 Series Hospitality Displays Samsung Hospitality Display with Manageability - HE590 Deliver Premium Interactive Guest Services through Hospitality Displays Stylish design that includes a swivel
High Definition LCD Digital Signage Display
 High Definition LCD Digital Signage Display User Manual Applicable Models L/PFxxH7(Android Version) MxxSA Cautions 1. Do Not install and use the unit in moisture, high temperature, outdoor and closed environment.
Harmony Touch User Guide
 Harmony Touch User Guide Version 5 (2013-11-14) Harmony Touch User Guide Table of Contents About this Manual... 6 Terms used in this manual... 6 At a Glance... 6 Features... 6 Know your Harmony Touch...
Samsung SMART Hospitality Display
 Samsung SMART Hospitality Display Samsung HE89U Series Hospitality Displays Samsung Hospitality Display with Manageability - HE89U Basic Feature Hospitality Solution Convenience Feature Security Content
USER GUIDE. K-Router Plus Online User Guide. Version P/N: Rev 1
 KRAMER ELECTRONICS LTD. USER GUIDE K-Router Plus Online User Guide Version 2.0.28 P/N: 2900-300247 Rev 1 Contents 1 Introduction 1 2 Downloading and Installing K-Router Plus 2 3 Defining K-Router Plus
Unpacking... 3 Getting Started... 3 Tour of the Remote... 4 Hard keys...4 Interactive LCD screen...5
 UNO Owners Manual Contents Unpacking... 3 Getting Started... 3 Tour of the Remote... 4 Hard keys...4 Interactive LCD screen...5 Home Screen... 6 Devices... 6 What is Quick Power?...6 Activities... 7 Setting
USER MANUAL
 USER MANUAL R emote C ontrol F unc tions Most of your television s functions are available via the menus that appear on the screen. The remote control supplied with your set can be used to navigate
FOR FURTHER ASSISTANCE, PLEASE CALL:
 USER MANUAL Welcome Thank you for choosing TeeVee. To set up your TeeVee box and enjoy all of the features available with your device, please review the user manual. Follow all steps before using this
Wireless Presentation System
 Wireless Presentation System WGA-310 User s Manual (Model Name: WPS-Interactive) Transmissor WPS AVLIFE (SBWPS2) Versão 2015.04 Version: 2.0 Date: Jan. 15, 2013 Table of Contents Table of Contents 1. Overview...
Lorex Client 7.0 & Lorex Message Master
 Lorex Client 7.0 & Lorex Message Master Software Manual English Version 1.0 MODELS: L19WD Series www.lorexcctv.com Includes L19WD800 & L19WD1600 Copyright 2008 Lorex Technology Inc. Table of Contents Table
Firmware User Manual. Firmware version v1.0. Suitable for Product Series: Touch Panel PC Panel PC Box PC. QD-FW_Manual_v1.0
 1 Firmware User Manual Firmware version v1.0 Suitable for Product Series: Touch Panel PC Panel PC Box PC 2 Contents Features 3 System setup 3 System start up 3 System Settings 4 System Information 9 System
LYNK SINC Server. User Guide. Hotel Smart TV Solution
 Hotel Smart TV Solution LYNK SINC Server User Guide LYNK SINC Server is a web-based solution designed to construct widgets installed on TVs in hotel rooms. LYNK SINC Server allows you to manage TVs conveniently.
Hospitality TV. The right message. at the right time
 Hospitality TV 2015 The right message at the right time Welcome to Philips Hospitality TV 2 Delight your guests with pure taste Just as you care about your guests in every detail, we care about your Philips
Samsung Hospitality Display with Manageability - HE690
 Samsung HE690 Series Hospitality Displays Samsung Hospitality Display with Manageability - HE690 Deliver Premium Interactive Guest Services through Samsung HE690 Hospitality Displays Slim, stylish design
1. Introduction P Package Contents 1.
 1 Contents 1. Introduction ------------------------------------------------------------------------------- P. 3-5 1.1 Package Contents 1.2 Tablet Overview 2. Using the Tablet for the first time ---------------------------------------------------
AM-101 AM-101AirMedia Presentation Gateway. Supplemental Guide Crestron Electronics, Inc.
 AM-101 AM-101AirMedia Presentation Gateway Supplemental Guide Crestron Electronics, Inc. Crestron software, including without limitation, product development software and product operating system software
2015/09/24. M-Touch
 M-Touch 2.00.12 VERSION HISTORY (> 1.00) Graphics Maps: by means of Graphic Maps it s possible to display the alarm zones simply by tapping icons on the map shown on keypad screen. It s very simple to
Samsung SMART Hospitality Display Specification Book HE460 HE470 HE590 HE670 HE690 HE694 HE890U HE890W EU/ CIS
 Samsung SMART Hospitality Display Specification Book HE460 HE470 HE590 HE670 HE690 HE694 HE890U HE890W EU/ CIS Samsung HE690 Series Hospitality Displays Samsung Hospitality Display with Manageability -
22 Bathroom Mirror TV Product Code: WP-A2208 Instructions Manual
 22 Bathroom Mirror TV Product Code: WP-A2208 Instructions Manual Table of Contents Safety Guidelines Safety Guidelines 3 Package Contents 4 Television Dimensions 5 Ports and Connectors 6 Technical Specifications
Offer every guest an. upgraded experience. NE477 Series Hospitality TVs. Meet guests TV expectations with the LED industy leader.
 NE Series Hospitality TVs " 0" " HGNEFFXZA HG0NESFXZA HGNESFXZA 9" " HG9NEHFXZA HGNEBFXZA Offer every guest an upgraded experience. NE Series Hospitality TVs Meet guests TV expectations with the LED industy
Wireless Presentation Adaptor User s Manual
 Wireless Presentation Adaptor User s Manual (Model Name: WPS-Speedy) Version: 1.5 Date: Sep. 24, 2010 1 Table of Contents 1. Overview... 4 2. Quick Start... 6 3. Windows Client Utility... 10 3.1 Starting
Samsung Hospitality Displays
 Samsung Hospitality Displays HJ0 Series (EU_CIS) Highlights Customizable content and home menu creation to suit guests needs Streamline operations through coaxial infrastructure compatibility Gauge and
PORTABLE VIDEO RECORDER AND CASSETTE CONVERTER. Item No User Guide
 PORTABLE VIDEO RECORDER AND CASSETTE CONVERTER Item No. 206557 User Guide Thank you for choosing the Sharper Image Portable Video Recorder and Cassette Converter. Please take a moment to read this guide
Breeze III FB201N User Manual
 Breeze III FB201N User Manual Table of Contents Getting Started... 3 Insert the SIM Card and Battery... 3 Insert the Media Card... 4 Keys and Parts... 5 Basics... 6 Display Indicators... 6 Home Screen...
Meet and exceed every guest s expectations.
 NJ477 Series Hospitality TVs 32" 40" HG32NJ477NFXZA HG40NJ477MFXZA 43" 49" HG43NJ477MFXZA HG49NJ477MFXZA Meet and exceed every guest s expectations. NJ477 Series Hospitality TVs Meet guests TV expectations
MANUAL PELITT MINI 1
 MANUAL PELITT MINI 1 TABLE OF CONTENTS 1. Warnings 3 2. Getting Started 3 3. Your Phone 4 4. File Manager 4 5. Phone book 4 6. Fun&Games 4 7. Call center 4 8. Messaging 4 9. Multimedia 5 10. Organizer
TSS-7/TSS-10 7" and 10.1" Room Scheduling Touch Screens
 TSS-7/TSS-10 7" and 10.1" Room Scheduling Touch Screens Supplemental Guide Crestron Electronics, Inc. Crestron product development software is licensed to Crestron dealers and Crestron Service Providers
1. Introduction P Package Contents 1.
 1 Contents 1. Introduction ------------------------------------------------------------------------------- P. 3-5 1.1 Package Contents 1.2 Tablet Overview 2. Using the Tablet for the first time ---------------------------------------------------
IMPORTANT NOTE for. Choose the zip file v and unzip it in USB. Do not rename the UPG folder. Follow
 IMPORTANT NOTE for (HTB3280G/12 HTB3520/40/55/94/98 HTB3520G/12/51 HTB3550/40/98 HTB3550G/12 HTB3580/40/79/98 HTB3580G/12/51 HTB4520G/51 HTB4580G/51 HTB5260G/12 HTB5520/55/94/98 HTB5520G/12 HTB5550/98
FDS3NAV2. For Ford Vehicles Equipped With SYNC3. Installation Instructions. Calibration and Setup Guide. Page 1 of 14
 FDS3NAV2 For Ford Vehicles Equipped With SYNC3 Installation Instructions Calibration and Setup Guide Page 1 of 14 Please read this manual thoroughly before installation. This manual illustrates a typical
Operation Guide. for the MultiPresenter Stick. DS1-MP10RX series. (Compatible with Ver. 1.01)
") Operation Guide for the MultiPresenter Stick DS1-MP10RX series (Compatible with Ver. 1.01) To ensure safe use of the MultiPresenter Stick, be sure to read the included Important Information before using
Operation Guide for the MultiPresenter Stick DS1-MP10RX series (Compatible with Ver. 1.01) To ensure safe use of the MultiPresenter Stick, be sure to read the included Important Information before using
49BDL5055P/11 V User Manual (English)
") /11 V1.10 www.philips.com/welcome User Manual (English) Safety Instructions Safety precautions and maintenance shock, electrical hazards and/or mechanical hazards. Read and follow these instructions when
/11 V1.10 www.philips.com/welcome User Manual (English) Safety Instructions Safety precautions and maintenance shock, electrical hazards and/or mechanical hazards. Read and follow these instructions when
CAUTION. 1 Important safety information.
 CAUTION TO PREVENT FIRE OR SHOCK HAZARD, DO NOT USE THIS PLUG WITH AN EXTENSION CORD, RECEPTACLE OR OTHER OUTLET UNLESS THE BLADES CAN BE FULLY INSERTED TO PREVENT BLADE EXPOSURE. TO PREVENT FIRE OR SHOCK
Contents. Introduction. Getting Started. Navigating your Device. Customizing the Panels. Pure Android Audio. E-Books
 Contents Introduction Getting Started Your Device at a Glance Charging Assembling the Power Adapter Turning On/Off, Unlocking Setting to Sleep and Waking Up Inserting and Removing a microsd Card Connecting
RC-SV Configuration Guide Revision 3
 Kramer Electronics, Ltd. RC-SV Configuration Guide Revision 3 Software Version 2.1.2.32 Intended for Kramer Technical Personnel or external System Integrators. To check that you have the latest version,
A premium experience for every guest.
 NE Series Hospitality TVs " 0" HGNEFFXZA HG0NESFXZA HGNESFXZA 9" " HG9NEHFXZA HGNEBFXZA A premium experience for every guest. NE Series Hospitality TVs Meet expectations with affordable direct-lit LED
RC-SV Configuration Guide (Rev 4)
") Kramer Electronics, Ltd. RC-SV Configuration Guide (Rev 4) Software Version 2.1.2.69 Intended for Kramer Technical Personnel or external System Integrators. To check that you have the latest version, go
Kramer Electronics, Ltd. RC-SV Configuration Guide (Rev 4) Software Version 2.1.2.69 Intended for Kramer Technical Personnel or external System Integrators. To check that you have the latest version, go
IMPORTANT SAFETY INSTRUCTIONS. When using this electronic device, basic precautions should always be taken, including the following:
 IMPORTANT SAFETY INSTRUCTIONS When using this electronic device, basic precautions should always be taken, including the following: 1. Read all instructions before using the product. 2. Do not use this
Contents. Introduction
 Page 1 of 15 Contents Introduction Getting Started Your Device at a Glance Charging Assembling the Power Adapter Turning On/Off, Unlocking Setting to Sleep and Waking Up Inserting and Removing a microsd
A premium LED experience from the LED industry leader
 70 Series Hospitality TVs " Class LED HGNE70AF " Class LED HGNE70SF 8" Class LED HG8NE70AF 0" Class LED HG0NE70SF " Class LED HGNE70SF " Class LED HGNE70BF 0" Class LED HG0NE70SF 0" Class LED HG0NE70EF
Sharp Aquos LC50LE651K 50 LED Screen
 Sharp Aquos LC50LE651K 50 LED Screen Display Visible diagonal screen size cm / inch 127 / 50 Panel resolution 1920 x 1080 Panel techlogy RGBY / RGB Panel sub pixels 8 Mega / 6 Mega Panel techlogy 3D /
SAFETY INFORMATION...3
 Contents SAFETY INFORMATION...3 Headphone Warning...4 Where to install...4 LED Screen...4 Unit and Accessories...5 Unit and Started...5 Front view...5 Remote Control...6 Remote control instructions...6
Table of Contents. Manual Overview
 Table of Contents Manual Overview D-Link reserves the right to revise this publication and to make changes in the content hereof without obligation to notify any person or organization of such revisions
LocationFree Base Station LocationFree Player for PC
 2-681-469-11(1) LocationFree Base Station LocationFree Player for PC Operating Instructions LF-PK1 LF-B1 LFA-PC2 2006 Sony Corporation Contents What is the LocationFree Base Station?... 4 Identifying Parts
Revox Joy S232 App Operating Instructions D 1.0 2
 Operating Instructions Revox Joy App S232 1 Revox Joy S232 App Operating Instructions D 1.0 2 Operating Instructions Revox Joy App S232 Welcome...2 Installation... 2 Requirements... 2 Number of clients...
IAdea Player Firmware User Manual
 IAdea Player Firmware User Manual Firmware version 4.6 Media players : XMP-2200 XMP-2300 XMP-2400 Signboards : XDS-1060 XDS-1062 XDS-1068 Contents IAdea Player Firmware User Manual 0 1. Introduction 1
ATV520 User Manual V1.1
 ATV520 User Manual V1.1 ATV520 Enjoy TV Box User Manual V1.0 Introduction The ATV520, also called Dual core Android TV box, is a box connected to your TV HDMI input that turn your TV to a multifunction
TV Box User Manual V1.4
 TV Box User Manual V1.4 1. Introduction TV box is a box where is connected to your TV HDMI input that turn your TV to a multifunction smart TV, a media player, an internet browser with big view, a photo
Table of Contents. Taking a First Look 2 Intelligent Remote Control 2 Before You Start 4
 Table of Contents Taking a First Look 2 Intelligent Remote Control 2 Before You Start 4 Getting Started 6 Activating the Remote Control 6 Defining the Brands of Your Devices 7 Working with the Home Panel
Lionstracs Groove X-R
 Lionstracs Groove X-R Groove OS version 5.3 Installation & Upgrade Guide 31 October 2011 English Language documentation prepared by Corcyra Global in consultation with Lionstracs Table of Contents Warning
A Standard Smart Hotel TV with Pro:Centric Smart
 A Standard Smart Hotel TV with Pro:Centric Smart Enhance guests in-room experience and hotel brand image with the interactive smart solution, Pro:CentricSMART. The series offers Ultra HD Display, Customizable
Samsung SMART Hospitality Display Specification Book HD460 ARGENTINA
 Samsung SMART Hospitality Display Specification Book HD460 ARGENTINA Samsung HE460 Series Hospitality Displays Samsung Hospitality Display with Manageability - HD460 Expand In-Room Content Delivery Possibilities
Instruction Manual. Wi-Fi Full HD 1080p IP Concealed Junction Box Hidden Camera. V 1.3
 Instruction Manual Wi-Fi Full HD 1080p IP Concealed Junction Box Hidden Camera After Sales Support techsupport@123anfang.com www.yooseecamera.com V 1.3 Hardware Installation 1. Connect the power supply
WINCE 6.0 Car Navigation Box CS9320 User Manual
 WINCE 6.0 Car Navigation Box CS9320 User Manual CS9320 is Wonde Proud's new era for GPS+GLONASS dual mode navigation. Following past model's stability and universal compatibility, we developed CS9320 as
Firmware User Manual
 Firmware User Manual Contents Firmware User Manual 1 1. Introduction 1 1.1. Features 1 2. Configuring the Player 1 2.1. System connections 1 2.2. Basic settings 2 2.3. Connect the player to your network
& Technical Specifications
 User Manual & Technical Specifications User manual Contents Pidion BM-170 Technical specifications... 2 Micro Rolltalk basic package... 3 Micro Rolltalk functions and buttons... 3 Preparing Micro Rolltalk...
Contents. Introduction. Getting Started. Navigating your Device. Customizing the Panels. Pure Android Audio. E-Books. Browsing the Internet
 Contents Introduction Getting Started Your Device at a Glance Charging Assembling the Power Adapter Turning On/Off, Unlocking Setting to Sleep and Waking Up Connecting to a Computer Navigating your Device
GV-IP Decoder Box Plus User s Manual
 GV-IP Decoder Box Plus User s Manual Before attempting to connect or operate this product, please read these instructions carefully and save this manual for future use. DBPV10-UM-A 2015 GeoVision, Inc.
TL240C/TL321C Transparent Display User Manual
 TL240C/TL321C Transparent Display User Manual Disclaimer BenQ Corporation makes no representations or warranties, either expressed or implied, with respect to the contents of this document. BenQ Corporation
50 LED TV C50238T2-LED
 50 LED TV C50238T2-LED Contents Unpacking the TV / Accessory s Installing / Removing the Base Stand Front / Right Side View and Controls Rear View and Sockets 1 2 3 4 Remote Control 5-6 Installing Batteries
Elite 600S M254. MAG User Guide. 2 Connecting the receiver 3 Wi-Fi Setup 4 Using the system 5 Catch-Up 6 The remote control 7 Troubleshooting
 Elite 600S M254 MAG User Guide 2 Connecting the receiver 3 Wi-Fi Setup 4 Using the system 5 Catch-Up 6 The remote control 7 Troubleshooting 2 Connecting the receiver - MAG CONNECTING THE RECEIVER Place
DIGITAL TV RECEIVER TV STAR T910 USB PVR ENGLISH
 DIGITAL TV RECEIVER TV STAR T910 USB PVR ENGLISH CONTENIDO 1.SAFETY INFORMATION... 1 2.INTRODUCTION... 2-4 3.SYSTEM CONNECTION... 5 BASIC OPERATIONS 4.WELCOME PAGE... 6 5.EDIT CHANNEL... 6-9 6.INSTALLATION...
ProntoPro Intelligent Remote Control. User Guide
 ProntoPro Intelligent Remote Control User Guide Table of Content Taking a First Look... 3 Intelligent Remote Control... 3 Before You Start... 5 Getting Started... 7 Activating the Remote Control... 7 Defining
960P and 1080P HD Video Security DVR System User Manual
 960P and 1080P HD Video Security DVR System User Manual www.tigersecu.com Copyright 2017 TIGERSECU, Inc Contents Contents... 1 Important Information...3 Installation Guide....4 Chapter 1. Start-up Wizard...6
Chapter 3. Using the System CHANGING CHANNELS USING THE MENUS OPENING THE MENUS CLOSING THE MENUS MENU OPTIONS
 CHANGING CHANNELS There are three basic ways to change channels while watching a program: Press the remote control UP or DOWN ARROW button to get to the desired channel. Use the remote control number pad
User Manual PDUTracker
 User Manual PDUTracker Management Software for PDU Table of Contents 1. Overview... 1 1.1. Introduction... 1 1.2. Features... 1 2. Install and Uninstall... 1 2.1. System Requirement... 1 2.2. Software
SAMSUNG HOSPTALITY DISPLAYS
 SAMSUNG HOSPTALITY DISPLAYS HF0 SERIES (EU_CIS) HIGHLIGHTS Build and launch compatible web applications within powerful Tizen OS Maintain impactful, secure content performance via the integrated H.Browser
HooToo IP Camera User Manual(part two)
") HooToo Inc. HooToo IP Camera User Manual(part two) For Model: HT-IP210P Published by SunvalleyTek Group 2014/9/14 Content 1. IPCamClient (windows software)...3 Set up...3 CAM... 13 Local Setting... 13
HooToo Inc. HooToo IP Camera User Manual(part two) For Model: HT-IP210P Published by SunvalleyTek Group 2014/9/14 Content 1. IPCamClient (windows software)...3 Set up...3 CAM... 13 Local Setting... 13
TS-1542/TS-1542-C 15.6 in. HD Touch Screens
 TS-1542/TS-1542-C 15.6 in. HD Touch Screens Supplemental Guide Crestron Electronics, Inc. Original Instructions The U.S. English version of this document is the original instructions. All other languages
Instructions for SimplicityTouch ST-700 Gen 3 TECHNICAL TRAINING GUIDE
 Page 1 Instructions for SimplicityTouch ST-700 Gen 3 TECHNICAL TRAINING GUIDE Manuals included in guide: 1. Update panel firmware and reinstall applications. page 2 2. Update router firmware page 10 3.
Using GIGABYTE Notebook for the First Time
 Congratulations on your purchase of the GIGABYTE Notebook. This manual will help you to get started with setting up your notebook. The final product configuration depends on the model at the point of your
Contents Unpacking the TV / Accessory s Installing / Removing the Base Stand. Front / Right Side View and Controls Rear View and Sockets
 40 LED TV Contents Unpacking the TV / Accessory s Installing / Removing the Base Stand Front / Right Side View and Controls Rear View and Sockets 1 2 3 4 Remote Control 5-6 Installing Batteries in the
Welcome Operation Installation... 3 Scope of function... 3 Pre-requirements... 3 Number of clients... 4 Version number...
 Contents Revox Joy S232 App 1 4 network receiver Contents Welcome... 3 Installation... 3 Scope of function... 3 Pre-requirements... 3 Number of clients... 4 Version number... 4 Operation... 5 Switching
AX1824S Series 2 / AX1832S 12/24V LED DVD/SMART TV
 AX1824S Series 2 / AX1832S 12/24V LED DVD/SMART TV PANEL - Display Size: 60cm (23.6 ) - AX1824S 81cm (32 ) - AX1832S - Full High Definition LED TV - AX1824S - High Definition LED TV - AX1832S - Aspect
IdeaTab A1000L-F. User Guide V1.0. Please read the Important safety and handling information in the supplied manuals before use.
 IdeaTab A1000L - UserGuide IdeaTab A1000L-F User Guide V1.0 Please read the Important safety and handling information in the supplied manuals before use. file:///c /Users/xieqy1/Desktop/EN UG/index.html[2013/8/14
The leg stand is located at the back of the product, on the top right. This adjustable-length leg stand will allow your ARCHOS to stand by itself on a
 About ARCHOS 9 PCtablet How do I activate the webcam? General It is activated by default and it automatically turns on when using an application that uses the webcam such as Skype. How can I install my
Studio 5.5. User Manual
 Studio 5.5 User Manual 1 Table of Contents Safety Information... 3 Appearance and Key Function... 4 Introduction... 5 Call Functions... 6 Contacts... 7 Messaging... 8 Internet Browser... 9 Bluetooth...
Overview 1. Foreword 2. Warnings
 Overview 1. Foreword Thank you for choosing our product. Please read this manual carefully before using the product. Specifications and software updates may be subject to change without notice. Some pictures
Using GIGABYTE Notebook for the First Time
 V. 0 Congratulations on your purchase of the GIGABYTE Notebook. This manual will help you to get started with setting up your notebook. The final product configuration depends on the model at the point
700TSU INSTALLATION MANUAL
 M 700TSU INSTALLATION MANUAL 2 Table of Contents Features...03 Specifications...04 Quick-Start...05 Remote Control...07 Hardware Installation...10 Software Installation...14 Touch Screen Driver Installation
NDS3524 DVB-T SD&HD Encoder & Modulator with USB. --- Home Use. User Manual
 NDS3524 DVB-T SD&HD Encoder & Modulator with USB --- Home Use User Manual Thank you for buying this encoder modulator. Please read this manual carefully to install, use and maintain the encoder modulator
BEP 600-ACSM AC SYSTEMS MONITOR. Installation and Operating Instructions. Page 1
 BEP 600-ACSM AC SYSTEMS MONITOR Installation and Operating Instructions Page 1 This page has been deliberately left blank Page 2 Table of Contents 1. BASICS 4 WARNING AND CAUTION 4 WARNING 4 CAUTION 4
Give every guest an upgrade.
 NJ470 Series Hospitality TVs 32" 40" HG32NJ470NFXZA HG40NJ470MFXZA 43" 49" HG43NJ470MFXZA HG49NJ470MFXZA Give every guest an upgrade. NJ470 Series Hospitality TVs Meet guests TV expectations with the LED
9.GAME HOTKEY
 USER MANUAL XC4921 Please Note: This device is factory preset to Auto standby mode which will automatically be switched off after 3 hours. To turn the auto standby mode off, please use the following instructions:
Quick Start Guide 4/8/16-CH DVR.
 Quick Start Guide 4/8/16-CH DVR 1. Install Hard Drive &DVD Writer 1.1 Install Hard Drive Notice: 1. Support two SATA hard drives. Please use the hard drive the manufacturers recommend specially for security