COREN. User Manual.
|
|
|
- Marjorie Palmer
- 5 years ago
- Views:
Transcription

1 COREN User Manual Rev. A 10/2015
2 Page 2 of 40 v IU_Coren_00_eng
3 Table of contents 1 - COREN overview Software installation First launch of Coren Software layout Main menu bar Logout: Change Password Events log Settings Options Monitor Appearance Branches window Operations menu bar Lock Status Operate Change code Start time delay Stop counting Time delay override Block from remote Immediate timelock Open extension Special functions Audit Lock users Update Install Enable Disable Remove View Configuration Time & Date Timelock Time delay Software Operators Branches Add Areas Add Branches Add Safes Add Locks IU_Coren_00_eng v Page 3 of 40
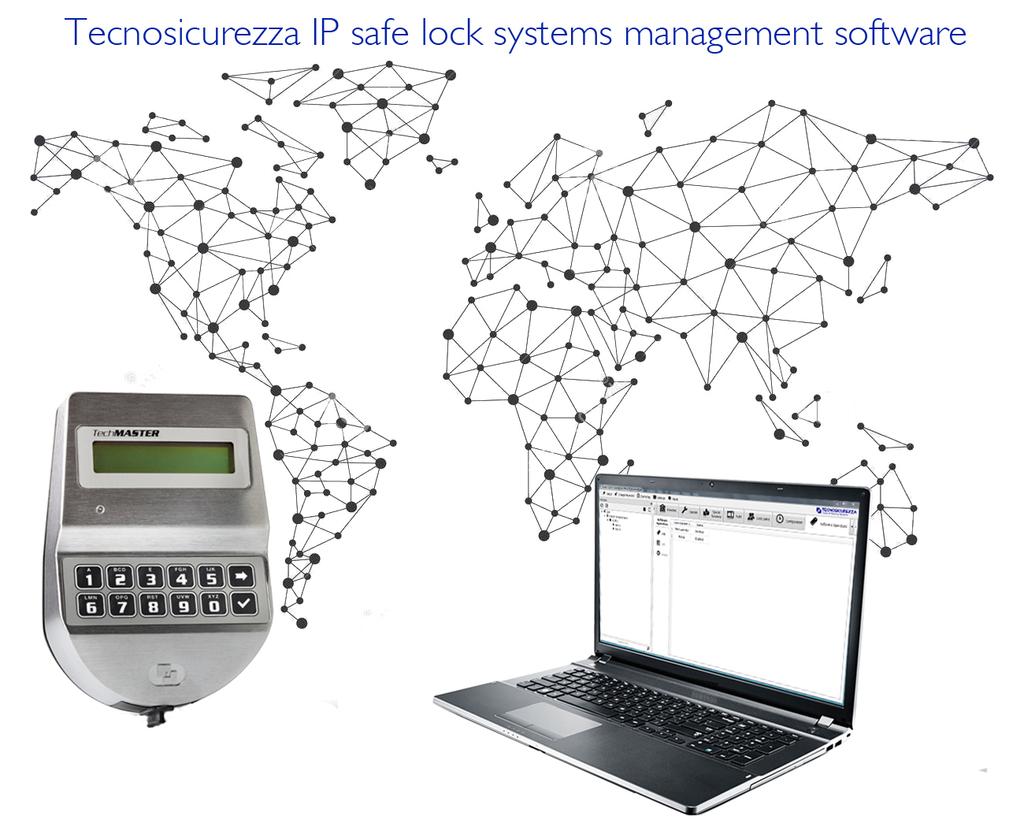
4 1 - COREN overview Coren is a management software designed to allow a centralized control over your entire network of safes, vaults, strong room doors equipped with the Tecnosicurezza Techmaster safe- lock system. Coren, developed entirely by the R&D department of Tecnosicurezza, has a user- friendly interface, and finds its ideal application in organizations with large branch networks, such as banks, post office, retail and restaurant chains. Concluded the first configuration and specified the characteristics of the network such as IP addresses, communication ports and/or DHCP management, you can proceed immediately with the use of software, by identifying an operator and the password to access the system. Each operator can be fully configured, so that it may or may not manage certain features/options of the locks and systems. The twofold objective behind the software is to allow a complete real- time remote monitoring of all systems, without any limitation to their number or the number of safes belonging to them, and give the possibility to remotely change the configuration of users, Time Lock, Time Delay, etc., individually or on groups of locks. Coren thus eliminates the need to travel to the plants, with a consequent reduction of costs of maintenance. In Coren you can enable or disable the display of specific alarms, allowing also to modify the graphical visualization of the events. This allows you to highlight the more important information, ensuring an easy and immediate real- time monitoring of the systems. Coren can also be used by cashiers, as you can create one or more operators,"cashier", which have the only possibility to change their own code and start the time delay directly from their PC on the locks to which they have access. Then the SW Coren will inform the operator when the lock is in Open window, preventing the cashier to move in continuation to the safe/safes, thereby increasing his productivity. Last but not least, Coren can be customized. Operational needs vary from company to company, which is why Tecnosicurezza believes it is the technology that has to adapt to customer needs and not the other way around. Page 4 of 40 v IU_Coren_00_eng
 Launch the product installer by double- clicking the.exe file and then click Next.")
 During the installation, it will be created the software operator IT, who has database management and system setup")
5 2 - Software installation Complete the following steps to install the Coren software. a) Launch the product installer by double- clicking the.exe file and then click Next. b) Enter your name and organization and then click Next. c) During the installation, it will be created the software operator IT, who has database management and system setup functions. You will be asked to choose a password for this operator. Once you have entered the password click Next. IU_Coren_00_eng v Page 5 of 40

 Choose if you want Coren to be used")

6 d) After reading the License Agreement, select I accept the agreement and click Next. e) Select the destination location and click Next. f) Choose if you want Coren to be used for all Windows users or only by you and click Next. Page 6 of 40 v IU_Coren_00_eng

7 IU_Coren_00_eng v Page 7 of 40


8 g) Select where you want the program s shortcuts and click Next. h) Choose if you want to create a desktop icon and click Next. i) Click Next to begin the installation. Page 8 of 40 v IU_Coren_00_eng

9 j) The installation is completed. IU_Coren_00_eng v Page 9 of 40


10 3 - First launch of Coren After installation, at the first launch Coren will display this message: This message is displayed because Coren requires a database to run and the database has to be created. In order to create the database, it is necessary to log in with the IT operator. Click OK and log in with the IT operator using the password chosen during the installation. Click the button Settings to open the Settings window and then select the tab Database. Coren will suggest a database path. If you want to select a different path, click the button Select database path and choose the folder when you want to create the database. It is recommended to place the database in a folder backed up daily. Page 10 of 40 v IU_Coren_00_eng


11 Click Create database to display the create database screen. If you want to create an encrypted database, select the appropriate option and type- in a password for the database. Click the button Create. The database is created. It will also be created a new user for access to the software with the following credentials (which can be modified later. See chapter 4.3.7): Software operator: main Password: corenpass IU_Coren_00_eng v Page 11 of 40
.")

12 4 Software layout The layout of Coren is clean and intuitive. Commands and information are grouped into 3 main blocks. On the top, there is the main menu bar. Below the main menu bar, on the left side are displayed the locks of the system, shown in a tree view (Areas, Branches, Safes, Locks). Whereas, on the right side there is the operations menu bar, divided into 8 tabs. 4.1 Main menu bar The Coren main menu bar consists of 5 commands: Logout: Click Logout to log- out the current operator Change Password Click Change Password to change the password of the current operator. It is required to type- in the old password, the new password and then to type- in the new password a second time as confirmation. Page 12 of 40 v IU_Coren_00_eng

13 Events log Click Events log to view the log of events. The Events header contains the following information about the events: Date: The date and time when the event occurred. Software operator name: The user name of the user that was logged- in when the event occurred. Event: The description of the event. The default view of events log is to list all its entries. If you want to find a specific event, you can search for a specific word and/or filter for a date range. Furthermore, it is possible to print or save in PDF format the list of events Settings Click Settings to open the settings windows. In this window, there are 3 different screens that can be viewed by clicking on the relevant tab.. IU_Coren_00_eng v Page 13 of 40


14 Options Language Click on the drop- down list to select the language for the software. Once the language is selected, click Apply and then OK to close the Settings window. The language change will be fully active after you restart Coren. General settings Select the check- box if you want to sort the lock tree by name. When this option is deselected, locks will be shown in the order they were added. Lock name Select the check- box of the lines you want to see in the lock name header in the Locks Status main window You can drag the lines to re- order them to your preference. Page 14 of 40 v IU_Coren_00_eng

15 Monitor The Monitor screen is divided into the following 3 screens that can be viewed by clicking on the relevant subtabs: Triggers Select the check- box of the events for which you want to trigger an action. In the bottom part of the window, there are 2 options related to the triggers. In Second between monitor queries you can select the polling interval, that is the frequency with which the system checks its I/O. In Minutes before door open alarm you can select the time (in minutes) in which the door should remain open before the open door alarm is activated. If you select the value 0, the alarm is disabled. Actions In the Actions screen, you can select the actions you want to trigger when a trigger you selected in the Triggers subtab occurs. Select the check- box of the actions you want to trigger. In addition to the actions listed, you can send s. See the s screen to set this action. IU_Coren_00_eng v Page 15 of 40

16 Page 16 of 40 v IU_Coren_00_eng

17 s In order to send an when a trigger occurs you need to select the related checkbox and specify the SMTP parameters for the connection to the server. Server: enter the path to the server. Port: enter the SMTP port number. SSL: Select this checkbox if the server requires the SSL protocol in the authentication process. Username: Enter the username of the account to be used by Coren to send notification s. Password: Enter the password of the account to be used by Coren to send notification s. Repeat a same only after (0 to disable): Enter the minimum time between the sending of the same recipients: enter the address of the recipients (one per line). Subject: Enter the subject of the notification . You can use the tags %N for the lock name, %S for the lock status and %D for the date. Content: Enter the content of the notification . You can use the tags %N for the lock name, %S for the lock status and %D for the date. Click Apply to save the changes and leave the Settings window open. Click OK to save the changes and close the Settings window Appearance In this tab you can set some graphic options so that you can display data in the clearest way for you. The first two options are for the font. Size: Enter the desired size for the font. Family: Click on the drop- down list to select the font for the text used in Coren. The other options are for the colours of the events and information displayed. It is possible to change the colour of the text (foreground) and the colour of the background of the text. IU_Coren_00_eng v Page 17 of 40

18 Click the type of event/information for which you would like to change the colour and then click the rectangle at the right side of Foreground to select the colour of the text or click the rectangle at the right side of Background to select the background colour of the text. You will make the colour selection in the Select color window that will open after you click the rectangles. Click Apply to save the changes and leave the Settings window open. Click OK to save the changes and close the Settings window. 4.2 Branches window In this window you can view all the parts of the systems managed by Coren. The Lock systems are defined by 4 levels. The first level is Area. In each Area you can add Branches (second level). For each Branch you can add Safes (third level). For each Safe you can add up to 5 locks. In practice with the term safe we mean the keypad that manages the locks. You can have an unlimited number of Areas, Branches and Safes. You can add Areas, Branches, Safes and Locks in the Branches tab of the Operations menu bar. Click the down arrow icon Click the right arrow icon Click the filled square icon to expand all lines. to collapse all lines. to select all lines. Click the blank square icon to deselect the selected lines. Click the right arrow at the side of each line to expand it of one level. Page 18 of 40 v IU_Coren_00_eng

19 4.3 Operations menu bar The Operations menu bar is divided in 8 tabs. You can change the order of these tabs by dragging them while holding down the left button of the mouse Lock Status In the Lock Status screen you can view the status of the locks managed by Coren. Select the check- box Monitor if you want Coren to monitor the lock status automatically. If the Monitor check- box is deselected, you have to manually refresh the status of the lock by clicking the button Refresh. Below the Monitor check- box, there are further 4 check- boxes. With these check- boxes you can select which locks to show. Select the check- box All if you want to see the status of all locks (whether they are online or offline). Select the check- box Selected if you want to see only the status of the locks selected in the Branches window (see chapter 4.2). Select the check- box Operating if you want to see the status only of the locks that are operating. Select the check- box Opened if you want to see the status only of the opened locks. The options Operating and Opened will show also the locks that are Offline Operate IU_Coren_00_eng v Page 19 of 40
 will be all active if you select a lock in the Branches window")


20 In the Operate screen, there are 7 commands. The first 3 commands (Change code, Start time delay, Stop counting) will be all active if you select a lock in the Branches window (see chapter 4.2). The remainder commands will be active only If you select a safe in the Branches window (see chapter 4.2). Clicking the command will open the relevant window Change code With this command you can change the users PIN code. Select for which type of user you want to change the PIN code (Administrator, Manager, Master, Lock user) and enter the old PIN code. After you enter the old PIN code, a new window will open. In this window you have to enter the new PIN code and confirm it. A message will confirm if the operation is completed successfully. Page 20 of 40 v IU_Coren_00_eng
 with whom you want to execute the command and enter its PIN code. A message will confirm if the operation is completed successfully. 4.3.2.")
21 Start time delay With this command you can start the time delay for the lock/locks you selected in the in the Branches window (see chapter 4.2). Select the type of user (Manager or Lock user) with whom you want to execute the command and enter its PIN code. A message will confirm if the operation is completed successfully Stop counting With this command you can stop the counting of the time delay. Click the Stop counting button to stop the time delay counting. A message will confirm if the operation is completed successfully Time delay override This command is active only if you select a safe in the Branches window (see chapter 4.2). With this command you can activate the Time delay override function that allows to all users to override the time delay. Click the Time delay override button to open a drop- down list. Click Check to check if the Time delay override function is activated or not. Click Activate and enter the administrator code when requested, in order to activate the Time delay override function. Click Deactivate and enter the administrator code when requested, in order to to deactivate the Time delay override function. A message will confirm if the operations are completed successfully. IU_Coren_00_eng v Page 21 of 40
.")

.")
22 Block from remote This command is active only if you select a safe in the Branches window (see chapter 4.2). With this command you can activate the Block from remote function, that blocks all the locks connected to safe/safes selected in the Branches window (see chapter 4.2). Click the Block from remote button to open a drop- down list. Click Check to check if the Block from remote function is activated or not. Click Activate and enter the administrator code in the window that will open, in order to activate the Block from remote function. Click Deactivate and enter the administrator code when requested, in order to to deactivate the Block from remote function. A message will confirm if the operations are completed successfully Immediate timelock This command is active only if you select a safe in the Branches window (see chapter 4.2). With this command you can activate the Immediate timelock function, that keeps blocked all the locks connected to safe/safes selected in the Branches window (see chapter 4.2) from the moment the function is activated until it is reached a pre set time. Click the Immediate timelock button to open a drop- down list. Click Check to check if the Immediate timelock function is activated or not. Click Activate to open the Immediate timelock window and enter the time and date when you want the immediate timelock to end. Click OK and enter the administrator code when requested, in order to activate the Immediate timelock function. Click Deactivate and enter the administrator code when requested in order to to deactivate the Immediate timelock function. Page 22 of 40 v IU_Coren_00_eng

23 A message will confirm if the operations are completed successfully Open extension This command is active only if you select a safe in the Branches window (see chapter 4.2). With this command you can activate the Open extension function, that extends the opening period of the time lock until the time and date you enter. Open extension works only when a time lock is set. Click the Open extension button to open a drop- down list. Click Check to check if the Open extension function is activated or not. Click Activate to open the Open extension window and enter the time and date up to which extend the opening. The maximum limit of the opening extension is 4 hours. Click Deactivate and enter the administrator code when requested, in order to to deactivate the Open extension function. A message will confirm if the operations are completed successfully. IU_Coren_00_eng v Page 23 of 40
 and check the firmware version of the above parts.")
24 4.3.3 Special functions In the Special functions screen you can find the Tester function. Through the Tester function, you can check the operation of the system s components (keypad, locks, I/O interfaces, etc.) and check the firmware version of the above parts. Click the Tester button to open the Tester window. Select which components to check: All: Check all safes managed by Coren. Only selected: Check only the safes you selected in the in the Branches window (see chapter 4.2). Click the start button to to execute the test. Once the test is completed, you can export the results in a.csv file. Click Save to CSV to open a window where you can specify name and destination of the.csv file. Page 24 of 40 v IU_Coren_00_eng
25 IU_Coren_00_eng v Page 25 of 40
26 4.3.4 Audit In the Audit screen you can download the locks and/or keypads activity. Click the Download button to open a drop- down list. From the list you can select which audit trail to download: Select the checkbox Locks to download the audit trail of the locks, select the checkbox Keypads to download the audit trail of the Keypads, select both checkboxes to download the audit trail of the locks and keypads. After selecting which audit trail to download, you have to select the number of events you want to download: 20, 50, 100 or all events. Depending on the number of Locks and Keypads managed by Coren, the information will be displayed on several screens that can be called up by clicking on the relevant tab. The Audit header contains the following information about the event: Date: The date and time when the event occurred. Lock user: The lock user correlated to the event. It can be blank if the event is not correlated to any users. Event: The description of the event Click the button Clear to clear the Audit screen. You can print or save the audit trail Click the button Print preview to open a window showing the print preview of the audit trail shown in the Audit screen. Click the button Print to open the Print window. In the Print window you can select and set the preferences of the printer and execute the print. Click the button Save as PDF to open a window where you can specify name and destination of the.pdf file with the audit trail. Click the button Save as CSV to open a window where you can specify name and destination of the.csv file with the audit trail. Page 26 of 40 v IU_Coren_00_eng
27 IU_Coren_00_eng v Page 27 of 40
28 4.3.5 Lock users In the Lock users screen you can manage the users of the locks. In the left side of the screen you can find the buttons for the commands whereas in the right side, it is shown the information. To download the list of the lock users, select one or more locks in the Branches window (see chapter 4.2) and click the Update button. Users are divided in 3 groups (Users, Override users and Special users) and you can see the relevant group by clicking the specific tab. The Lock Users header contain the following information about users: ID: The identification number of the user. Name: The name of the user. By default the user name is Lock user + ID (e.g. for the user 2, the name is Lock user 2 ). You can change the user name in the Lock user status window. To open it, click the View button or double- click the user name (this last procedure is valid if you have selected one single lock in the Branches window). Status: The status of the user. There are 3 different status: Deleted: The user is deleted (not installed). Enabled: The user is enabled (active). Disabled: The user is disabled (not active). If you selected 2 or more locks in the Branches window (see chapter 4.2), when a user does not share the same status among the locks, it will be shown the message Different values in the Status column. In the left side of the lock users screen there are 6 commands. Click the user name to highlight the applicable commands for that user. It is possible to perform the same operation on multiple locks provided that they share the same status (it is not possible if in the Status column is indicated Different values ) Update Page 28 of 40 v IU_Coren_00_eng

29 With this command you download and update the list of the users who will be shown in the right side of the Lock users screen Install With this command you can install an user who is deleted. To install the user click the button Install and enter the administrator code when requested. A new window will open where you have to enter and confirm a PIN code for the user you are installing. A message will confirm if the operation is completed successfully Enable With this command you can enable an user who is disabled. Click the button Enable and enter the administrator code when requested. A message will confirm if the operation is completed successfully Disable With this command you can disable an user who is enabled. Click the button Disable and enter the administrator code when requested. A message will confirm if the operation is completed successfully Remove With this command you can remove (delete) an user who is installed (whether it is enabled or disabled). IU_Coren_00_eng v Page 29 of 40
 is selected one lock.")

30 Click the button Remove and enter the administrator code when requested. A message will confirm if the operation is completed successfully View With this command you can view the status and the configuration of the user you select. You can use this command only if in the Branches window (see chapter 4.2) is selected one lock. If you selected multiple locks, when you click the view button, an error message will inform you that you have to select only one lock to view the user configuration. Click the view button to open the window where you can view the lock status and configuration. In this window you can see the following information: Name: Here it is indicated the name of the user and you can change or add it. This is the only changeable field because the other information of this window is read only. Id: Here it is indicated the identification number of the user. Lock: Here it is indicated to which lock the user belongs. Configuration Type: Here it is indicated the type of user. Timelock: Here it is indicated if the user is subject to time lock and at which one (Time lock 1, Time lock 2, Time lock 3). Code: Here it is indicated if the user Dallas: Time Delay variable: Here it is indicated if the user is subject to the variable Time Delay. Dual mode: Here it is indicated if the user is subject to Dual mode. Current state Lock user status: Here it is indicated if the user is currently enabled or disabled. Timelock: Here it is indicated whether at present the user can open or not. Time Delay: Here it is indicated the Time Delay to which the user is currently subject. 0 minutes means no Time Delay. Page 30 of 40 v IU_Coren_00_eng

 in the Branches window (see chapter 4.2).")
31 4.3.6 Configuration In the Configuration screen you can change the settings of the Time & Date, Timelock and Time delay. These settings are located in 3 different screens that can be viewed by clicking on the relevant tab Time & Date In the Time & Date screen you can check and synchronize the time and date of the locks. In order to check and synchronize the time and date, first you have to select a safe (keypad) in the Branches window (see chapter 4.2). Click the Load button to check the time and date memorized in the keypad. To synchronize the time and date of the keypad with the one of the PC running Coren, click the Synchronize button and enter the administrator code when requested. A message will confirm if the operation is completed successfully Timelock In the Timelock screen you can program the Time lock function. In order to program the Time lock function, first you have to select in the Branches window (see chapter 4.2) the safe (keypad) or safes for which you want to set/modify the Time lock. The Timelock screen is divided in 5 subscreens that can be viewed by clicking on the relevant subtab. The Techmaster lock system can manage up to 3 independent Time Locks tables and you can program them selecting the relevant tab (Standard week 1, Standard week 2, Standard week 3). In the Standard week (1 or 2 or 3) subscreen, click the Load button to download and view the Time Lock table that is currently memorized in the keypad. From the drop- down list of the Load button you can also choose to download the 3 Time Lock tables (Standard week 1, Standard week 2, Standard week 3) all at once. To enter the opening and closing time, click on the relevant box and enter the time. You can enter the time directly using the keyboard of the computer where Coren is installed or you can use the up and down arrows that will appear once you click the box. You can configure up to 4 time periods per day. To save the values you entered, click the Save button and enter the administrator code when requested. IU_Coren_00_eng v Page 31 of 40

32 A message will confirm if the operation is completed successfully. In the Special events subscreen you can add up to 30 closing periods for a maximum of 10 days each. To enter the Special events, click on the relevant box and enter the time. You can enter the time directly using the keyboard of the computer where Coren is installed or you can use the up and down arrows that will appear once you click the box. To save the values you entered, click the Save button and enter the administrator code when requested. A message will confirm if the operation is completed successfully. In the Opening period subscreen you can add up to 30 opening periods for a maximum of 10 days each. Page 32 of 40 v IU_Coren_00_eng


33 To enter the Opening periods, click on the relevant box and enter the time. You can enter the time directly using the keyboard of the computer where Coren is installed or you can use the up and down arrows that will appear once you click the box. To save the values you entered, click the Save button and enter the administrator code when requested. A message will confirm if the operation is completed successfully Time delay In the Time delay screen you can program the Time delay function. In order to program the Time delay function, first you have to select in the Branches window (see chapter 4.2) the safe (keypad) or safes for which you want to set/modify the Time delay. The Time delay screen is divided in 2 subscreens, Time Delay & Open window and Variable time delay, that can be viewed by clicking on the relevant subtab. In the Time delay & Open window subscreen, click the Load button to download and view the Time delay and Open Window values currently memorized in the keypad. To enter the Time delay and Open Window, click on the relevant box and enter the values (expressed in minutes). You can enter the time directly using the keyboard of the computer where Coren is installed or you can use the up and down arrows that will appear once you click the box. Accepted values are: mins for Time Delay and mins for Open window To save the values you entered, click the Save button and enter the administrator code when requested. IU_Coren_00_eng v Page 33 of 40

34 A message will confirm if the operation is completed successfully. In the Variable time delay subscreen, click the Load button to download and view the Variable time delay values currently memorized in the keypad. To enter the Variable time delay values, click the relevant box and enter the values. You can enter the time directly using the keyboard of the computer where Coren is installed or you can use the up and down arrows that will appear once you click the box. In the Start and End boxes you have to enter the starting time and ending time in which the Variable time delay will be active. In the Delay box you have to enter the Variable time delay value (expressed in minutes). You can configure up to 4 periods. To save the values you entered, click the Save button and enter the administrator code when requested. A message will confirm if the operation is completed successfully. In the example below, we program the lock to allow an opening without Time delay (0 minutes) in the time band that runs from Monday to Friday, from 08:30 to 09:00. Outside this time band, the lock will return to open with the preset Time delay. Page 34 of 40 v IU_Coren_00_eng
.")
.")
35 4.3.7 Software Operators In the Software Operators screen you can add, edit and delete the software operators. By default, here you can find the user main, automatically created during the software installation (see chapter 3). To add a software operator click the Add button. To edit a software operator select the software operator name and click the Edit button (or double- click the software operator name). In both case, the Software Operator window will open. This window consists of 4 fields and an Options area with several check- boxes. The fields are: IU_Coren_00_eng v Page 35 of 40
. Competence: Enter the descriptive field where it can be specified the function of the operator (optional).")
36 Name: Enter the Name and surname of the software operator (compulsory field). Account: Enter the desired Login name (compulsory field). Password: Enter the password (minimum 6 characters. Compulsory field). Competence: Enter the descriptive field where it can be specified the function of the operator (optional). In the Options area you can define which operations are granted to the software operator you are creating. The options available are the following: Is enabled: If selected, the software operator is enabled. Change software operator password: If selected, the software operator can change its password (it has access to the Change Password button on the main menu bar). View lock status: If selected, the software operator can view the locks status (it has access to the Locks Status screen). Operate on the lock: If selected, the software operator can operate on the lock (it has access to the Operate screen). You can also grant single operations. Click the right arrow to expand the selection and select which operations are granted to the software operator. Lock users: If selected, the software operator can manage the lock users (it has access to the Lock users screen). You can also grant the management of a single group of users. Click the right arrow to expand the selection and select the group of users that can be managed. Select Lock users group 1 for Users and Override users. Select Lock users group 2 for Special Users. Download audit: If selected, the software operator can download the audit (it has access to the Audit screen). Special functions: If selected, the software operator can operate the special functions (it has access to the Special functions screen). Modify lock configuration: If selected, the software operator can modify the lock configuration (it has access to the Configuration screen). You can also select which configurations can be modified. Click the right arrow to expand the selection and select the configurations that can be modified. Manage lock database: If selected, the software operator can add/remove locks in the system (it has access to the Branches screen). Software operators: If selected, the software operator can manage the software operators (it has access to the Software Operators screen). View events log: If selected, the software operator can view the events log (it has access to the events log button in the main menu bar). Modify program settings: If selected, the software operator can modify the program settings (it has access to the Settings button in the main menu bar). To delete a software operator, select the software operator name and click the Delete button. A Confirm deletion window will open. Click the Yes button to confirm Branches In the Branches screen you can add and remove locks in the system. After the first installation, there are no locks in the system. Page 36 of 40 v IU_Coren_00_eng
. For each Safe you can add up to 5 Locks.")
 4.3.8.")

37 As explained in the chapter 4.2, the lock systems are defined by 4 levels. The first level is Area. In each Area you can add Branches (second level). For each Branch you can add Safes (third level). For each Safe you can add up to 5 Locks. In practice with the term safe we mean the keypad that manages the locks. In order to add Locks, first you have to add the other levels of the lock system (Areas, Branches, Safes) Add Areas Click the Add Area button to open the Add Area window where you have to enter the name of the Area. Click OK to add the Area Add Branches After adding an Area, you have to add a Branches in the area. Select the Area for which you want to add Branches and click the Add Branch button. The Add Branch window will open. Here you have to add the name of the Branch (compulsory) and other information (optional). IU_Coren_00_eng v Page 37 of 40


38 Click OK to add the Branch Add Safes After adding a Branch, you have to add Safes in the Branch. Select the Branch for which you want to add Safes and click the Add Safe button. The Add Safe window will open. Here you have to enter the following information: Name: Enter the name of the safe IP Address or Host Name: Enter the IP address or the Host Name of the IP box connected to the Techmaster keypad Tcp port: Enter the TCP port of the IP box connected to the Techmaster keypad RS485 Id: Enter the RS485 ID of the IP box connected to the Techmaster keypad. Each safe has to have a different RS485 ID. The RS485 ID can be set from the Techmaster keypad (in the CONFIGURATION menu select the CONFIGURE I/O INTERFACE option, click the button and enter the RS485 ID) Besides the previous listed compulsory fields, there are 2 optional descriptive fields (Competence and Description) where you can add information useful for the identification of the safe. Page 38 of 40 v IU_Coren_00_eng

. The Add Lock window will open.")

39 Click OK to add the Safe Add Locks After adding a Safe, you have to add Locks in the Safe. Select the Safe where you want to add locks and click the Add Lock button. You can add up to 5 locks for each Safe (keypad). The Add Lock window will open. Here you have to enter the name of the lock and the Id of the lock (from 1 to 5). Each lock must have a different Id. As optional, there is a descriptive field (Description), where you can add information useful for the identification of the lock. IU_Coren_00_eng v Page 39 of 40
40 TECNOSICUREZZA S.r.l. Via Cesare Battisti S. Giovanni Lupatoto Verona Italy Tel Fax info@tecnosicurezza.it Rev. A 10/2015
KYOCERA Net Admin User Guide
 KYOCERA Net Admin User Guide Legal Notes Unauthorized reproduction of all or part of this guide is prohibited. The information in this guide is subject to change without notice. We cannot be held liable
KYOCERA Net Viewer User Guide
 KYOCERA Net Viewer User Guide Legal Notes Unauthorized reproduction of all or part of this guide is prohibited. The information in this guide is subject to change without notice. We cannot be held liable
(B) Execute SMS TCP MODBUS Interface Application
 Execute SMS TCP MODBUS Interface Application") Security Management System software generates notifications which indicate the state of various health parameters eg disk failure, one or more cameras offline etc. These notifications can be exposed as
Security Management System software generates notifications which indicate the state of various health parameters eg disk failure, one or more cameras offline etc. These notifications can be exposed as
Configuring Personnel and Badges
 CHAPTER 10 This chapter describes how to create the personnel records and badges used to access doors in the Cisco Physical Access Control system. Note For instructions to synchronize Cisco PAM with personnel
CLIQ Web Manager. User Manual. The global leader in door opening solutions V 6.1
 CLIQ Web Manager User Manual V 6.1 The global leader in door opening solutions Program version: 6.1 Document number: ST-003478 Date published: 2016-03-31 Language: en-gb Table of contents 1 Overview...9
Managing WCS User Accounts
 CHAPTER 7 This chapter describes how to configure global e-mail parameters and manage WCS user accounts. It contains these sections: Adding WCS User Accounts, page 7-1 Viewing or Editing User Information,
Legal Notes. Regarding Trademarks KYOCERA MITA Corporation
 Legal Notes Unauthorized reproduction of all or part of this guide is prohibited. The information in this guide is subject to change without notice. We cannot be held liable for any problems arising from
Barracuda NextGen Report Creator
 The creates customized reports using statistics and logs collected on Barracuda NextGen F-Series Firewalls. Each report can be configured to use multiple appliances, custom or predefined report data templates,
User Guide. Web Intelligence Rich Client. Business Objects 4.1
 User Guide Web Intelligence Rich Client Business Objects 4.1 2 P a g e Web Intelligence 4.1 User Guide Web Intelligence 4.1 User Guide Contents Getting Started in Web Intelligence 4.1... 5 Log into EDDIE...
Getting Started With the Cisco PAM Desktop Software
 CHAPTER 3 Getting Started With the Cisco PAM Desktop Software This chapter describes how to install the Cisco PAM desktop client software, log on to Cisco PAM, and begin configuring access control features
SECTION 5 USING STUDENT
 SECTION 5 USING STUDENT EMAIL 5. USING STUDENT EMAIL On enrolling at the University all students automatically have an email account created. Account creation depends on a student successfully enrolling
Windows user guide for version 3.3
 1 Windows user guide for version 3.3 2 Contents 1. Installation...4 1.1. How to install BABEL on your Windows desktop...4 2. Getting started...5 2.1. First run...5 2.2. Password setup...5 2.3. Key import...5
nfax 5.0 OceanFax User s Guide
 nfax 5.0 OceanFax User s Guide 1 Table of Contents 1. FAXVIEW GUIDE... 1 1.1 FaxView Login and Exit... 1 1.1.1 FaxView Client Login... 1 1.1.2 WebFax Client... 2 1.1.3 FaxView Exit... 3 2.2 FaxView Over
Expedient User Manual Getting Started
 Volume 1 Expedient User Manual Getting Started Gavin Millman & Associates Pty Ltd 281 Buckley Street Essendon VIC 3040 Phone 03 9331 3944 Web www.expedientsoftware.com.au Table of Contents Logging In...
Managing WCS User Accounts
 7 CHAPTER This chapter describes how to configure global email parameters and manage WCS user accounts. It contains these sections: Adding WCS User Accounts, page 7-2 Viewing or Editing User Information,
Chapter 2: Clients, charts of accounts, and bank accounts
 Chapter 2: Clients, charts of accounts, and bank accounts Most operations in BankLink Practice are client specific. These include all work on coding transactions, reporting, and maintaining chart of accounts
Parallels Remote Application Server
 Parallels Remote Application Server Parallels Client for Mac User's Guide v16 Parallels International GmbH Vordergasse 59 8200 Schaffhausen Switzerland Tel: + 41 52 672 20 30 www.parallels.com Copyright
Argos Creating Labels with Word
 Argos Creating Labels with Word This document explains how create mailing labels using Argos. For information about Argos, refer to the document, Argos for Typical Users. There are two (2) basic steps
Pulse PRO. High security lock for safes USER INSTRUCTIONS
 Pulse PRO High security lock for safes USER INSTRUCTIONS Contents Information about Pulse PRO... 4 Before use... 8 Pre-setup mode... 8 How to select a configuration... 8 Open the lock with a standard
PROCESS AUTOMATION. MANUAL VisuNet Control Center Version 4.1
 PROCESS AUTOMATION MANUAL VisuNet Control Center Version 4.1 With regard to the supply of products, the current issue of the following document is applicable: The General Terms of Delivery for Products
Superview INSTRUCTIONS. Version 2.0x
 INSTRUCTIONS Version 2.0x INDEX INDEX... 1 INTRODUCTION... 2 INSTALLING SUPERVIEW... 3 SYSTEM REQUIREMENTS... 3 INSTALLATION PROCEDURES... 3 FIRST STEPS... 4 CREATING A SIMPLE APPLICATION... 4 Start...
Boomerang System Administrator Manual
 Boomerang System Administrator Manual SG001-0003-01-B2.doc Page 1 of 43 Table of Contents INTRODUCTION...4 BOOMERANG CLIENT...5 FILE...6 3.1. Logout...... 6 3.2. Exit... 6 VIEW...7 4.1. Sensors events
Adobe Document Cloud esign Services. for Salesforce Version 17 Installation and Customization Guide
 Adobe Document Cloud esign Services for Salesforce Version 17 Installation and Customization Guide 2015 Adobe Systems Incorporated. All rights reserved. Last Updated: August 28, 2015 Table of Contents
Managing NCS User Accounts
 7 CHAPTER The Administration enables you to schedule tasks, administer accounts, and configure local and external authentication and authorization. Also, set logging options, configure mail servers, and
User Guide. Product: GreenFolders. Version: 3.8
 User Guide Product: GreenFolders Version: 3.8 Release Date: October 2014 GreenFolders 3.8 User Guide Introduction Table of Contents 1 Introduction... 6 2 General Information... 7 2.1 Login Procedure...
User Guide Online Backup
 User Guide Online Backup Table of contents Table of contents... 1 Introduction... 2 Getting Started with the Online Backup Software... 2 Installing the Online Backup Software... 2 Configuring a Device...
GRS Enterprise Synchronization Tool
 GRS Enterprise Synchronization Tool Last Revised: Thursday, April 05, 2018 Page i TABLE OF CONTENTS Anchor End User Guide... Error! Bookmark not defined. Last Revised: Monday, March 12, 2018... 1 Table
Android User Guide. for version 5.3
 Android User Guide for version 5.3 Contents 1. Installation... 3 1.1. How to install Babelnet... 3 1.2. Enter Babelnet in the search field.... 3 1.3. Safety precautions when using Babelnet on your Android...
INSTRUCTIONS MANUAL V2.9x B
 www.superview.com.br INSTRUCTIONS MANUAL V2.9x B INDEX INDEX... 1 INTRODUCTION... 3 INSTALLATION... 4 SYSTEM REQUIREMENTS... 4 INSTALLATION PROCEDURES... 4 SOFTWARE LANGUAGE SELECTION... 4 FIRST STEPS...
Pepkor webcom Quick Reference Guide. Version Date: 2013/12 Version Number: 1.3
 Pepkor webcom Quick Reference Guide Version Date: 2013/12 Version Number: 1.3 Table of Contents 1 INTRODUCTION... 4 2 LOGGING IN... 4 3 NAVIGATE INSIDE WEBCOM... 5 3.1 MAIN SECTION 5 3.1.1 Home... 5 3.1.2
KRAMER ELECTRONICS LTD. USER GUIDE
 KRAMER ELECTRONICS LTD. USER GUIDE MODEL: Kramer Site-CTRL Room Controller Guide Software Version 2.0.0.x Intended for Kramer Technical Personnel or External System Integrators. To check that you have
AirStick S-ID User Guide
 AirStick S-ID User Guide User Manual Version 1.0 Contents 1. Definition... 4 2. Introduction... 5 Description... 5 Install S-ID... 5 Launch S-ID software... 6 Connect AirStick reader to S-ID... 7 PC and
User Guide. Version R92. English
 AuthAnvil User Guide Version R92 English October 9, 2015 Agreement The purchase and use of all Software and Services is subject to the Agreement as defined in Kaseya s Click-Accept EULATOS as updated from
Sync User Guide. Powered by Axient Anchor
 Sync Powered by Axient Anchor TABLE OF CONTENTS End... Error! Bookmark not defined. Last Revised: Wednesday, October 10, 2018... Error! Bookmark not defined. Table of Contents... 2 Getting Started... 7
OUTLOOK HOW DO I? 2013
 OUTLOOK HOW DO I? Click on a Link to take you to that Section OUTLOOK - GENERAL... 2 GENERAL How Do I Navigate the 2010 Outlook Screen?... 2 GENERAL: How Do I Change the Reading Pane View?... 7 GENERAL:
imageprograf Direct Print & Share Guide
 imageprograf Direct Print & Share Guide imageprograf Direct Print & Share Guide Ver. 2.1 Canon Inc. 1. Features of imageprograf Direct Print & Share The features of imageprograf Direct Print & Share are
Solution Composer. User's Guide
 Solution Composer User's Guide January 2014 www.lexmark.com Contents 2 Contents Overview...4 Understanding the basics...4 System recommendations...5 Building custom solutions...6 Getting started...6 Step
HarePoint HelpDesk for SharePoint. User Guide
 HarePoint HelpDesk for SharePoint For SharePoint Server 2016, SharePoint Server 2013, SharePoint Foundation 2013, SharePoint Server 2010, SharePoint Foundation 2010 User Guide Product version: 16.2.0.0
DSS User Guide. End User Guide. - i -
 DSS User Guide End User Guide - i - DSS User Guide Table of Contents End User Guide... 1 Table of Contents... 2 Part 1: Getting Started... 1 How to Log in to the Web Portal... 1 How to Manage Account Settings...
UNIVERSAL SOFTWARE. Universal Software. Data Sheet
 Universal Software Data Sheet System Requirements: The minimum requirements for using the Software are: 1). Windows XP/Vista/7 2). A minimum of 512 MB RAM 3). 1 GB of hard disk space 4). Microsoft Office
InTemp System User s Guide
 InTemp System User s Guide Onset Computer Corporation 470 MacArthur Blvd. Bourne, MA 02532 www.onsetcomp.com Mailing Address: P.O. Box 3450 Pocasset, MA 02559-3450 Phone: 1-800-LOGGERS (1-800-564-4377)
Password Memory 7 User s Guide
 C O D E : A E R O T E C H N O L O G I E S Password Memory 7 User s Guide 2007-2018 by code:aero technologies Phone: +1 (321) 285.7447 E-mail: info@codeaero.com Table of Contents How secure is Password
KYOCERA Net Device Manager User Guide
 KYOCERA Net Device Manager User Guide Legal Notes Unauthorized reproduction of all or part of this guide is prohibited. The information in this guide is subject to change without notice. We cannot be held
User Guide. Version R94. English
 AuthAnvil User Guide Version R94 English March 8, 2017 Copyright Agreement The purchase and use of all Software and Services is subject to the Agreement as defined in Kaseya s Click-Accept EULATOS as updated
Introduction to Cognos
 Introduction to Cognos User Handbook 7800 E Orchard Road, Suite 280 Greenwood Village, CO 80111 Table of Contents... 3 Logging In To the Portal... 3 Understanding IBM Cognos Connection... 4 The IBM Cognos
Layout. Usual menu tabs. Top toolbar. Right toolbar. Left toolbar. Work area
 Layout Top toolbar Usual menu tabs Left toolbar Right toolbar Work area Layout - left toolbar Contains tools like textbox, mediabox, line etc. Textbox tool Mediabox tool Layout - top toolbar Edit size,
KYOCERA Device Manager User Guide
 KYOCERA Device Manager User Guide Legal Notes Unauthorized reproduction of all or part of this guide is prohibited. The information in this guide is subject to change without notice. We cannot be held
INSTITUTE BUSINESS SYSTEMS IMSS COGNOS REPORT STUDIO GUIDE
 INSTITUTE BUSINESS SYSTEMS IMSS COGNOS REPORT STUDIO GUIDE Table of Contents Logging into Cognos... 3 Viewing Summary Information... 6 Running a Report... 6 Rerunning a Report... 9 Comparing Summary Information...
Pay. Quick Start Guide Debit Orders
 Pay Quick Start Guide Debit Orders 2017 Our easy to use guide will get you up and running in no time! Index Page: 3 Login 4 Working with groups A) Creating groups B) Managing clients in groups 5 Managing
R A D I O N I C S. READYKEY K6100 Readykey for Windows. User Guide. Logging In. Logging Out. If an ID device has been issued:
 R A D I O N I C S READYKEY K6100 Readykey for Windows User Guide Logging In If an ID device has been issued: 1. Use your ID device with the desktop administration or Central Network Controller (CNC) reader,
USER S MANUAL FOR UNDER VEHICLE INSPECTION SYSTEM PORTABLE AND IN GROUND UNITS
 USER S MANUAL FOR UNDER VEHICLE INSPECTION SYSTEM PORTABLE AND IN GROUND UNITS Revision Date Description Initials 0 2017 01 02 New template LR Index Chapter 1 INTRODUCTION... 3 Chapter 2 OPERATING INSTRUCTIONS...
TEAM5 Operation Manual
 Contents System Overview Version Feature Comparison Chart Install Recommendations User Edit Importing a User List Add a User Delete User(s) Edit Multiple Users ( Global Controls ) Sort / Filter User List
1 Log into DIGIOP Control
 DIGIOP Control Quick Start Guide DIGIOP Control enables centralized configuration of systems, devices, users, and permissions. It is a web-based administration portal that allows you to manage your video
NETWORK PRINT MONITOR User Guide
 NETWORK PRINT MONITOR User Guide Legal Notes Unauthorized reproduction of all or part of this guide is prohibited. The information in this guide is subject to change for improvement without notice. We
NotifySync 4.7. Notify Technology Corporation
 1 NotifySync 4.7 Notify Technology Corporation Device Requirements 2 BlackBerry OS 4.1 4.7 (5.0 coming soon) 4.5.0 and later Attachments can be downloaded and saved to the file system or SD Card. Any attachment
KYOCERA Net Viewer 5.3 User Guide
 KYOCERA Net Viewer. User Guide Legal Notes Unauthorized reproduction of all or part of this guide is prohibited. The information in this guide is subject to change without notice. We cannot be held liable
REPORTING Copyright Framework Private Equity Investment Data Management Ltd
 REPORTING Copyright Framework Private Equity Investment Data Management Ltd - 2016 Table of Contents Standard Reports... 3 Standard Report Pack... 4 General Data Protection and Framework... 7 Partner Bank
JITs Portal. User Manual
 JITs Portal User Manual November 2017 JITs Portal 1 Table of Contents Chapter 1 Introduction... 2 1.1 What is the JITs Portal?...3 1.2 User Guide structure...4 Chapter 2 Working with the JITs Portal...
Legal Notes. Regarding Trademarks KYOCERA MITA Corporation
 Legal Notes Unauthorized reproduction of all or part of this guide is prohibited. The information in this guide is subject to change without notice. We cannot be held liable for any problems arising from
PlantVisorPRO. Plant supervision. Quick guide. Integrated Control Solutions & Energy Savings
 PlantVisorPRO Plant supervision Quick guide Integrated Control Solutions & Energy Savings +040000081 ver. 2.0 14/09/2010 2 Contents 1. Introduction 5 Purpose of this guide... 5 Notes... 5 2. Key 6 3. Completing
Identity Finder: Managing Your Results
 Updated 1/30/2012 Identity Finder: Managing Your Results The most important part of running Identity Finder is determining the most effective and secure way of managing the search results. Be sure to carefully
Outlook 2010 One. Wednesday, August 7, 9-11 am. Agenda:
 Page 1 Outlook 2010 One Wednesday, August 7, 9-11 am Agenda: Outlook Search Options Working with Attachments Creating a Signature Marking a Message as Read Flag an item for Follow-Up Reply, Reply All &
Time Reorder Utility User Manual
 Time Reorder Utility User Manual Revisions...3 Introduction...4 Getting Started...5 Running Modes...7 Tray icon menu...7 Enter Password...8 Connections...8 Define Connections...8 Verify Connections...9
User Guide. Created: Tuesday, August 06, OCI ChequeWriter System
 User Guide Created: Tuesday, August 06, 2013 Copyright OC Innovations Pte Ltd. All rights reserved. http://www.ocisystem.com/ The information contained in this document is subject to change without notice.
SALTO GRAPHICAL MAPPING MANUAL. Version 1.0
 SALTO GRAPHICAL MAPPING MANUAL Version 1.0 Historic of changes Version Status Date Author Change description 1.0 Official 28/11/2012 Aitor Apalategi First version of the manual 2 INDEX 1. Introduction...
TREENO ELECTRONIC DOCUMENT MANAGEMENT
 TREENO ELECTRONIC DOCUMENT MANAGEMENT User Guide February 2012 Contents Introduction... 5 About This Guide... 5 About Treeno... 6 Navigating Treeno EDM... 7 Logging in to Treeno EDM... 7 Changing Your
RK-LINK TM Version 2.x Instructions
 Quick Start Steps Requirements - Windows 95 or Windows NT 4.0 or later, 16MB RAM, 20-30MB Hard Disk, 486 or better processor, Serial COM Port capable of 19.2K Baud. RKAT Module must be installed at the
Webmail 7.0 is an online client which runs in your web browser. Webmail 7.0 allows you to access your , contact list, and calendar from
 Webmail 7.0 is an online email client which runs in your web browser. Webmail 7.0 allows you to access your email, contact list, and calendar from any computer with an internet connection and a web browser.
Agent and Agent Browser. Updated Friday, January 26, Autotask Corporation
 Agent and Agent Browser Updated Friday, January 26, 2018 2018 Autotask Corporation Table of Contents Table of Contents 2 The AEM Agent and Agent Browser 3 AEM Agent 5 Privacy Mode 9 Agent Browser 11 Agent
USING ITEM SYNC FINESTRA POS
 USING ITEM SYNC FINESTRA POS POSitec is pleased to provide the Item Sync program to support the review and apply process for items presented based on your Pharmasave My Catalogue subscription. Item Sync
TeamViewer Manual Manager
 TeamViewer Manual Manager Rev 12/2014 TeamViewer GmbH Jahnstraße 30 D-73037 Göppingen teamviewer.com Overview Table of Contents 1 Overview... 4 1.1 About TeamViewer Manager... 4 1.2 About this manual...
Quick Reference Guide
 Quick Reference Guide Quick Reference Guide Online Courier: Direct Download Direct Download is a Java -based program that serves as a secure access channel through which information is exchanged between
USER MANUAL. Disclaimer
 USER MANUAL Disclaimer The instructions in this document have been carefully checked for accuracy and are presumed to be reliable. Smart I Electronics Systems Pvt. Ltd. and its writers assume no responsibility
Anchor User Guide. Presented by: Last Revised: August 07, 2017
 Anchor User Guide Presented by: Last Revised: August 07, 2017 TABLE OF CONTENTS GETTING STARTED... 1 How to Log In to the Web Portal... 1 How to Manage Account Settings... 2 How to Configure Two-Step Authentication...
User Guide. 3CX Enhanced Billing Codes. Version
 User Guide 3CX Enhanced Billing Codes Version 15.5.54 "Copyright VoIPTools, LLC 2011-2018" Information in this document is subject to change without notice. No part of this document may be reproduced or
BTS Trading Station. Quick Reference Guide Cash Markets
 BTS Trading Station Quick Reference Guide Cash Markets Contents Quick Reference Guide 1.0 Getting Started 4 1.1 Application Layout 4 1.2 User Login and Password Management 4 1.3 Default Set Up 5 1.4 Virtual
EMCO Ping Monitor Enterprise 6. Copyright EMCO. All rights reserved.
 Copyright 2001-2017 EMCO. All rights reserved. Company web site: emcosoftware.com Support e-mail: support@emcosoftware.com Table of Contents Chapter... 1: Introduction 4 Chapter... 2: Getting Started 6
Quick Start Guide. Microinvest Barcode Printer Pro
 Quick Start Guide Microinvest Barcode Printer Pro 2016 Microinvest Barcode Printer Pro provides barcode printing functionality specifically designed to account for new orders and existing entries in the
Configuring User Access for the Cisco PAM Desktop Client
 CHAPTER 4 Configuring User Access for the Cisco PAM Desktop Client This chapter describes how to configure operators for the Cisco PAM desktop client. Note Whenever you upgrade the server software, you
BBVA Compass Spend Net Payables
 User Guide BBVA Compass Spend Net Payables User Guide Vault Services Table of Contents Introduction 2 Technical Requirements 2 Getting started 3 Sign In 3 General Navigation 4 Upload/Create Payment 5
D-WEB. Administration Manual
 D-WEB Administration Manual Table of Contents User Management Accessing User Management... 1 Overview of the User Management Page... 1 Creating a New Group... 2 Changing Group Permissions... 2 Renaming
Total Connect 2.0 Online Help
 Security Events Users Locations Video Hints for use. After logging in hit F11 to toggle full screen mode. Hover over icons for tool tip help. Upon the initial login, control panel data should be imported
GROUPWISE INSTRUCTIONS
 Viewing the GroupWise Home Desktop From the Folder List on the left-hand side of the screen, [Click] on the yourname HOME FOLDER The Home view provides panels of shortcut views which can be customized.
PROXY Pro Web Console Operations v10.0. User Guide October 2017
 PROXY Pro Web Console Operations v10.0 User Guide October 2017 Table of contents 1. Intro and Overview...5 Web Console Landing Page...6 Definitions...7 Account Users...9 Common Header Fields...10 Menu
BioStar 2. Revision Notes KO BS2 V Version 2.7.1
 BioStar 2 Revision Notes Version 2.7.1 Version 2.7.1 (Build No. 2.7.1.13) Release: 2018-12-20 1. Important Bug Fix 1.1. Fixed a security vulnerability: Cross Site Scripting. 1.2. The row setting changes
Attix5 Pro Storage Platform Console
 Attix5 Pro Storage Platform Console V7.0.1 User Manual for Microsoft Windows Your guide to managing the Attix5 Pro backup environment using the Storage Platform Console. 0 Copyright notice and proprietary
Smart Access Control System Software User Manual (Client Version)
") Disclaimer Information in this document is subject to change without notice. Companies, names, and data used in examples herein are fictitious unless otherwise noted. No part of this document may be reproduced
Disclaimer Information in this document is subject to change without notice. Companies, names, and data used in examples herein are fictitious unless otherwise noted. No part of this document may be reproduced
ACTIVE Net Insights user guide. (v5.4)
") ACTIVE Net Insights user guide (v5.4) Version Date 5.4 January 23, 2018 5.3 November 28, 2017 5.2 October 24, 2017 5.1 September 26, 2017 ACTIVE Network, LLC 2017 Active Network, LLC, and/or its affiliates
ACTIVE Net Insights user guide (v5.4) Version Date 5.4 January 23, 2018 5.3 November 28, 2017 5.2 October 24, 2017 5.1 September 26, 2017 ACTIVE Network, LLC 2017 Active Network, LLC, and/or its affiliates
User Guide For Universal Devices Administrative Console (ISY)
") User Guide For Universal Devices Administrative Console (ISY) - 1 - Table of Contents 1. PURPOSE 6 2. THEORY OF OPERATION 6 3. INSTALLATION 7 4. CONFIGURATION 8 4.1 Prerequisites 8 4.1.1 Host Computer
User Guide For Universal Devices Administrative Console (ISY) - 1 - Table of Contents 1. PURPOSE 6 2. THEORY OF OPERATION 6 3. INSTALLATION 7 4. CONFIGURATION 8 4.1 Prerequisites 8 4.1.1 Host Computer
GFI EventsManager 8 ReportPack. Manual. By GFI Software Ltd.
 GFI EventsManager 8 ReportPack Manual By GFI Software Ltd. http://www.gfi.com E-Mail: info@gfi.com Information in this document is subject to change without notice. Companies, names, and data used in examples
Welcome to your Lacerte products! We appreciate your business.
 Welcome to your Lacerte products! We appreciate your business. Please follow steps 1 through 4 in this guide: Step 1: Install the Final 2014 Program Step 2: Install the 2015 Program Step 3: Transfer Your
SmartLock Surf OPERATOR GUIDE
 SmartLock Surf OPERATOR GUIDE May 2015 Table of Contents Introduction... 5 Server PC Requirements... 7 Client PC Requirements... 7 Step 1. Software Installation... 8 Step 2. Firewall... 8 Step 3. Port
801 Avenida Acaso, Camarillo, Ca (805) Fax: (805)
 Fax: (805)") 801 Avenida Acaso, Camarillo, Ca. 93012 (805) 494-0622 Fax: (805) 494-8861 www.sdcsecurity.com E-mail: service@sdcsecurity.com E70PS Series PC Managed Electronic Lockset E7 Software Installation & Operations
801 Avenida Acaso, Camarillo, Ca. 93012 (805) 494-0622 Fax: (805) 494-8861 www.sdcsecurity.com E-mail: service@sdcsecurity.com E70PS Series PC Managed Electronic Lockset E7 Software Installation & Operations
sohodox Quick Start Guide
 sohodox Quick Start Guide Starting Sohodox Click on Start > All Programs > Sohodox or double click Sohodox icon desktop to run Sohodox. Login as Superadmin. Username: superadmin Password: superadmin Sohodox
Login: Quick Guide for Qualtrics May 2018 Training:
 Qualtrics Basics Creating a New Qualtrics Account Note: Anyone with a Purdue career account can create a Qualtrics account. 1. In a Web browser, navigate to purdue.qualtrics.com. 2. Enter your Purdue Career
ClientNet Admin Guide. Boundary Defense for
 ClientNet Admin Guide Boundary Defense for Email DOCUMENT REVISION DATE: Feb 2012 ClientNet Admin Guide / Table of Contents Page 2 of 36 Table of Contents OVERVIEW... 3 1 INTRODUCTION... 3 1.1. AUDIENCE
Quick Guide FAST HR. For more resources, including a guide on FAST HR codes, visit # Instructions Screenshot
 Tips & tricks This quick guide describes basic navigation within the FAST HR reporting tool, including how to use filter options, format columns and export reports. For more resources, including a guide
End User Manual. December 2014 V1.0
 End User Manual December 2014 V1.0 Contents Getting Started... 4 How to Log into the Web Portal... 5 How to Manage Account Settings... 6 The Web Portal... 8 How to Upload Files in the Web Portal... 9 How
AccessMail Users Manual for NJMLS members Rev 6
 AccessMail User Manual - Page 1 AccessMail Users Manual for NJMLS members Rev 6 Users Guide AccessMail User Manual - Page 2 Table of Contents The Main Menu...4 Get Messages...5 New Message...9 Search...11
Wholesale Lockbox User Guide
 Wholesale Lockbox User Guide August 2017 Copyright 2017 City National Bank City National Bank Member FDIC For Client Use Only Table of Contents Introduction... 3 Getting Started... 4 System Requirements...