icatvision Quick Reference
|
|
|
- Felicity Skinner
- 6 years ago
- Views:
Transcription

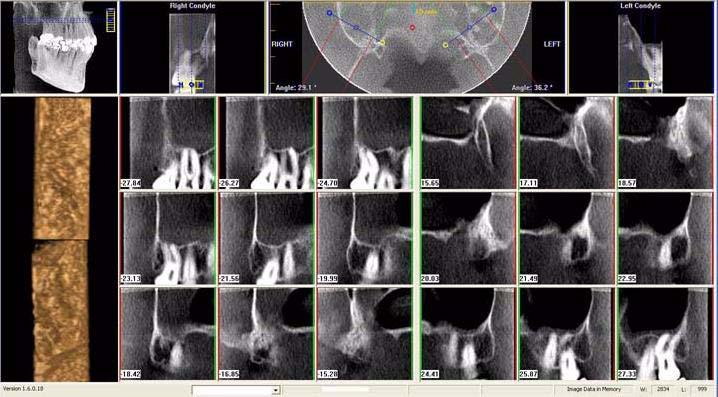
1 icatvision Quick Reference Navigating the i-cat Interface This guide shows how to: View reconstructed images Use main features and tools to optimize an image. REMINDER Images are displayed as if you are looking at the patient from the front NOTE: Images shown in this document were acquired on a 7-9 system. Images acquired on a GXCB-500 system may have a smaller field of view (examples are shown at the end of this document). Tools for Viewing this Image HIDING THE PATIENT LIST Patient List can be hidden by selecting Tools > Hide Patient List. To show, select Tools > Show Patient List. CURSOR TOOLS ROTATION TOOL - Hover cursor over the lower right corner of the desired view. Cursor changes to the rotation tool. BRIGHTNESS / CONTRAST TOOL - Drag cursor up, down, left, and right to adjust brightness and contrast. Use Reset Window/Level options on Pop Up menu to reset brightness and contrast settings. MIP/RADIOGRAPH - The system software enables displaying images as MIP or Radiograph. Move cursor to the top right of any image. The cursor becomes an M, toggle a selection. MAXILLA and MANDIBLE CONTOUR LINES - can be repositioned with a click and drag to the desired location. 4 TO DISPLAY PATIENT IMAGE. Click Patient Name. 2. Click Patient Scans DISPLAYED VIEWS 3. Patient Study Info 4. PANORAMIC View Opens to IMPLANT Screen 5. SAGITTAL View Opens to CEPH Screen 6. CORONAL View Opens to MPR Screen 7. AXIAL View Opens to TMJ Screen MEASUREMENTS HU Statistics (Bone Density) Right click a view and select HU Statistics. Drag and click to define an area. Statistics appear in upper right corner. A maximum of 4 HU stats can be taken at a time in a normal view and 2 in a cross section view. Distance (Linear Measurement) right click a view and select Distance. Point, click, drag, and release to draw a line. A measurement in mm appears in upper left corner. A maximum of 9 distance measurements can be taken at a time in a normal view and 4 in a cross section view. Right click and select HU Stats or Distance again to turn the tool off Right click the actual measurement statistic to remove, inactivate, or activate them. D-

2 Suggestions for Adjusting Panoramic Map Start adjusting the Panoramic map from the Preview Screen. It is recommended to center the anterior point at midline and then move the next two points up closer to the anterior point on each side. Place them a few teeth away from anterior center. Then move the next two points closer to the molars. Filtering Defaults There are already filters applied to all images. The filters are defaulted as seen below.. Preview Screen: Hardon Panoramic and Sharpen Mild for all others. 2. Implant Screen: Sharpen Mild on Axial Slice and Cross Sections - Hard on Panoramic Map. 3. TMJ Screen: Hard for top row images and Sharpen Mild for Condyle Ceph Images. 4. MPR Screen: Sharpen Mild all images. 5. Ceph Screen: Sharp for Upper Left Right Lateral and Hard for all others. These defaults can always be changed by clicking Tools > Filter Settings > Set Filters. They can also be changed on the fly by right clicking an individual image, selecting Filter Setting > Set Filter and clicking the desired option (Smooth, Normal, Hard, Sharp, Very Sharp). They can be changed back to the default by clicking Tools > Filter Settings > Reset to Default. Removing Circumference Artifact Circumference Artifact are seen visually in the Preview Screens as horizontal lines in the Coronal and Sagittal images and a white partial circle around the axial image. This can be removed from the dataset by right clicking the screen and selecting Remove Data Outside of Center Scanfield. The data re-calculates and the image is displayed without that artifact. Saving and Loading Workups Created plans can be saved for retrieval. When a plan is changed and an attempt to exit or switch patients is made, icatvision prompts to save the workup. To save the workup, click Yes. A window is displayed to Create New Workup. Click this button and enter a new title for the workup or choose an existing workup name (if one) from the list to overwrite. Once the workup is named, click OK to save. Or, before exiting or switching patients, from the Preview Screen, right click to access the pop up menu and select Save this Workup. Then proceed as instructed above. To load a workup, click a Patient Name, and Patient Image, and then a workup. To select another workup (if there are multiple workups), right click the screen to access the pop up menu and select Load Different Workup. Then select the workup from the list. Keyboard Shortcuts Alt + S - Opens Setup dialog Alt + F - Opens File menu Alt + T - Opens Tools menu Alt + R - Opens Screen menu Alt + F - Opens Help menu D-2

3 Implant Planning Screen REMINDER Implant Screen is acquired by double clicking Panoramic View from Preview window or selecting it from the Screen menu. DISPLAYED VIEWS. AXIAL SLICE POSITION 2. PANORAMIC MAP 3. 3D MODEL 4. CROSS SECTIONS 5. Center Slice is outlined in Blue. 6. Slice Location Number Slice Location numbers start at 0 for center of anatomy or midline. (The 0 slice is outlined in Red). All slices to the patient s right are negative # s. All slices to the patient s left are positive # s. Midline is determined by axial map. Double click an individual Cross Section to zoom in. Double click again to reduce to original size. LABELS: The following labels on the images help clarify the orientation of the anatomy: R: Right Side (Axial, Pan) P: Posterior (Axial) B: Buccal (Cross Sections) POP UP MENUS Right click views to display a Pop Up menu containing a subset of these options: HU Statistics Distance Display Formats: The default is 5 x 2. The other options are 7 x 3 and 3 x. Set Filters Save as JPEG Open Output Folder Estimate Nerve Canal CURSOR TOOLS All views, except the 3D Model, have Brightness/Contrast, Rotate, Drag, Zoom and Pan. 3D Model only has Rotate. The mouse scroll wheel is active on the Axial Slice Position, 3D Model and Cross Sections to scroll through slices. Back Tool: to exit out of a planning screen back to the Main Display, move cursor to the very top left corner of screen until X is displayed and click. Or click the Screen option on the Main Menu bar. D-3


4 PAN TOOLS. Horizontal Tool Bar Drag this center tool left to right to move the slice location of the Cross Sections. The center slice is outlined in Blue on the Cross Sections. Panoramic Map Drag the tool to the right to adjust the slice thickness of the Cross Sections. 2. Diagonal Tool Bar Drag this tool to adjust slice thickness of Panoramic View. Drag the center tool to adjust Pan Focal Trough. Click the bottom tool to change the Pan view from Radiographic to MIP. 3. Vertical Tool Bar Drag this center tool up or down to adjust height of anatomy viewed in the Cross Sections and Axial. AXIAL TOOLS. Drag blue dots to adjust Pan Map. 2. Orange hash marks are Slice Location Indicators. 3. Blue hash mark represents the centerline of the axial slices displayed on the Cross Section views. Axial Slice Position D-4

5 Ceph Screen. Right click blank screen and select Tag Airways. This generates a 3D view of the airways for the patient in the blank view. In addition, the tagged airway data is displayed in the view at the bottom center of the Ceph screen. MPR Screen 2. Drag center tools from any view to move slice location. The views are colored coded to correlate which view will adjust. 2. Drag tool to the right for horizontal and bottom for vertical bars to adjust slice thickness of the corresponding color coded view. 3. Right click any of the 3 views and select Irregular, Line, or Explore for additional cut planes to be displayed in the blank area. 3 REMINDER Ceph Screen is acquired by double clicking Sagittal View from Preview window or selecting it from the Screen menu. DISPLAYED VIEWS The Ceph Screen displays the Lateral Cephs in Radiographic and MIP mode as well as a Coronal View and a Mid Sagittal Slice (5mm thick). CURSOR TOOLS All views have Brightness/Contrast, Zoom and Pan. POP UP MENUS Right click to display the Pop Up menu to select: Set Filters Save as JPEG Open Output Folder REMINDER MPR Screen is acquired by double clicking Coronal View from Preview window or selecting it from the Screen menu. DISPLAYED VIEWS The MPR Screen allows scrolling through the Axial, Sagittal, and Coronal Slices. Mouse scroll wheel is active to scroll through slices. CURSOR TOOLS All views have Brightness/Contrast, Zoom and Pan. POP UP MENUS Right click to display the Pop Up menu to select: Irregular Line HU Statistics Distance Explore Explore Speed Set Filters Save as JPEG Open Output Folder Reset Volume Rotation D-5

 view until displayed is the P for pan tool to drag the image downward.")
6 REMINDER TMJ Planning Screen is acquired by double clicking Axial View from Preview window or selecting it from the Screen menu. DISPLAYED VIEWS TMJ Screen enables condyle mapping and creating corresponding coronal slice views. CURSOR TOOLS All views have Brightness/Contrast, Zoom and Pan. POP UP MENUS Right click to display the Pop Up menu to select: Set Filters Save as JPEG Open Output Folder TMJ Planning Screen 2 3 HINT It may be necessary to first drag the Axial (SMV) view down in the window to see the condyles. Move the cursor to the lower left of the SMV (axial) view until displayed is the P for pan tool to drag the image downward.. Drag center tool to scroll up and down Sagittal view to locate condyles in the Axial view to display condyles properly for mapping. 2. Create Lateral Slices: Drag center blue circles to move condyle map (do this for each condyle) Drag yellow and blue end circles to adjust the angle of each condylar map. Green markings indicate anterior to condyle. Red marking indicate posterior of condyle. Create Coronal Slices: Click red circle on either end map to create Coronal views. 3. Horizontal Tool Bar: Drag center tool left to right to move slice location of Cross Section views. Drag tool right to change slice thickness of Cross Section views NOTE: Make sure to Save Workups before attempting to burn to a CD, Install Case Studies from CDs The icatvision program will autorun when the CD is inserted into the computer drive. The User can choose to install icatvision and the case(s) Permanently or Temporarily. Once installed, the icatvision program opens and the new case is highlighted in the patient list and ready to be loaded. Just click the patient name. Create Export CDs. From the top Main menu, select Tools > Create Export CD. 2. If you have multiple CD drives, select the hardware from the drop down list. If using a CD-RW and need to erase data, choose Erase CD- RW. 3. Click the patient for burning to CD. If selecting multiple patients, hold down the CTRL key and click on additional patients. All highlighted patients are copied to the CD. 4. Click Create CD in CD burner window. A message is displayed when the burn is complete and the CD ejects. D-6


7 Getting the most from your i-cat Training Session We want you to get the most out of your i-cat training session. Please review this information prior to this session. If you have any questions or concerns, call the ISI training number at the bottom of this sheet. The i-cat Workflow at a Glance 2 3 Acquire Scan View Images and Prepare Reports Output in a Variety of Formats and Export to Third-Party Software Thinking in Three Dimensions The Coronal, Axial, and Sagittal Planes are color coded in the icatvision software interface as Red, Green, and Blue. AXIAL PLANE CORONAL PLANE SAGITTAL PLANE Click, Zoom, Burn: Are you ready? All trainees must be proficient with the basic tools and functions of the Windows Operating System before beginning i-cat training. If you are new to computers or if your skills are rusty, please contact your ISI trainer at the number below to arrange Windows training. ISI TRAINING HOTLINE: ext. 284 This graphic helps you to visualize the three planes as you manipulate images in icatvision software. GLOSSARY 3-D Rendering: A method of depicting the anatomy as a true 3-D object as would be seen in real life. Cone Beam Computed Tomography (CBCT): The latest technology that generates a three dimensional image of the skull while reducing radiation exposure substantially as compared to conventional CT scanners. DICOM: A standardized file format and communication protocol for transmission and archiving of medical images. Field of View (FOV): The diameter and height of patient anatomy seen in an i-cat scan. Gantry: The rotating mechanism on the i-cat that is composed of the x-ray source and the image receptor at either side of the patient. Hounsfield Unit (HU): A numerical value used in CT scan interpretation that characterizes the tissue density within the imaged anatomy. Maximum Intensity Projection (MIP): A computer visualization method for 3-D data that depicts only the voxels with the highest density. Reconstructed Data: The 3-D volume generated by software from the raw projections captured during the scan. Resolution: The ability to see fine details in an object. A higher resolution implies finer detail. Voxel: A voxel (a combination of the words volumetric and pixel) is a volume element which represents the density value of a point in 3-D space. This is analogous to a pixel, which represents 2-D image data. A smaller voxel size results in an image with finer detail. Window/Level: Analogous to Brightness/Contrast. D-7
8 QUIZ Just for fun, we ll start the training session with a quiz!. A smaller voxel size will result in: A: Less detail B: More detail C: No change in detail 2. The Axial Plane in icatvision software is color coded as: A: Red B: Blue C: Green 3. During Day of the training, the staff and doctors attending the training should plan to schedule: A: No patients B: 2 to 4 patients for scanning C: Their normal patient schedule 4. Before the training session, future users should be proficient in: A: Basic functions of Windows B: Basic use of a mouse C: Both of the above 5. Window/Level refers to: A: The tilt of the monitor B: The location of the image on the screen C: The brightness and contrast of the image 6. Images taken with the i-cat can be exported as: A: DICOM B: FOV C: MIP 7. Cone Beam Computed Tomography: A: Provides a 2-D image B: Provides a 3-D image C: Exposes the patient to more radiation than a conventional CT scanner Getting the most from your i-cat Training Session A Typical Onsite Training Schedule It is required for training participants to be present for the entire training without interruption. On the first day of training, schedule only 2 to 4 patients for scanning. The first patient should be no earlier than 0 am. DAY DAY 2 TIME ACTIVITY 8:30 am 8:45 am Introduction to the i-cat and CBCT Technology 8:45 am 9:5 am Physical Mechanisms and Safety Features 9:5 am 0:00 am i-cat software basics 0:00 am 0:45 am Positioning a patient and acquiring a scan 0:45 am :5 am Acquire second patient scan :5 am 2:5 pm Post-scan image processing 2:5 pm :00 pm Lunch :00 pm 3:00 pm Post-scan image processing, continued 3:00 pm 5:00 pm Output of reports and exporting studies 5:00 pm 5:30 pm 3DVR Software (3D Renderings) TIME 8:00 am 2:00 pm ACTIVITY Onsite Coaching: One Scan per Hour. Review as Needed. During Training, you will Learn to: Position the patient to acquire the best possible scan Navigate the icatvision Software Interface Quickly and Easily Visualize 3-D Anatomical Forms from 2-D Onscreen Images Map and Measure Anatomical Features Optimize Images for TMJ Treatment and Implant Planning Generate Panoramics and Cephalometrics Create, Modify, Print, and Save Reports Export in DICOM 3 Format for use in Third-party Software Save Studies to a Hard Drive or CD-ROM ISI TRAINING HOTLINE: ext. 284 D-8


9 GXCB-500 TM Image Examples Preview Screen Implant Planning Screen D-9


10 Ceph Screen MPR Screen TMJ Planning Screen D-0
icatvision Software Manual
 University of Minnesota School of Dentistry icatvision Software Manual April 19, 2013 Mansur Ahmad, BDS, PhD Associate Professor, University of Minnesota School of Dentistry Director, American Board of
Dolphin 3D Imaging 11.7 beta
 Dolphin 3D Imaging 11.7 beta The Dolphin 3D software module is a powerful tool that makes processing 3D data extremely simple, enabling dental specialists from a wide variety of disciplines to diagnose,
Shadow casting. What is the problem? Cone Beam Computed Tomography THE OBJECTIVES OF DIAGNOSTIC IMAGING IDEAL DIAGNOSTIC IMAGING STUDY LIMITATIONS
 Cone Beam Computed Tomography THE OBJECTIVES OF DIAGNOSTIC IMAGING Reveal pathology Reveal the anatomic truth Steven R. Singer, DDS srs2@columbia.edu IDEAL DIAGNOSTIC IMAGING STUDY Provides desired diagnostic
Visage 7 Clinical Training Basic Features
 Visage 7 Clinical Training Basic Features Contents Overview... 4 Usage... 4 Client Server Architecture... 5 Client Login... 6 Study Browser... 7 Query Section... 8 Study Labels... 10 Query Labeled Studies...
OnDemand3D Application
 OnDemand3D Application Operating Manual Build 1.0.9.2225 Version 1.0 Copyright 2012 Cybermed Inc. - 0 - Index Index - 1-1. Introduction - 5-1.1 Main Functions... - 5-2. Installation - 6-2.1 System Requirements...
ClinicalConnect TM eunity TM Training Guide
 ClinicalConnect TM eunity TM Training Guide October, 2013 Launch eunity TM from ClinicalConnect TM Search and select the patient whose record you wish to view. Navigate to the Radiology module in ClinicalConnect
1 Filter the search by entering search criteria; 2 Enter a range of dates in which to search. 3 You can filter the search by modality type.
 efilm / Managing Studies STUDY MANAGER How to use the study manager The Study Manager can search for four different types of exams: Local Exams: studies stored on your workstation s hard drive. Remote
3DMMVR REFERENCE MANUAL V 0.81
 3DMMVR REFERENCE MANUAL V 0.81 Page 1 of 30 Index: 1.0 System Requirements...5 1.1 System Processor...5 1.2 System RAM...5 1.3 Graphics Card...5 1.4 Operating System...5 2.0 Conventions...6 2.1 Typographic
IMPAX Volume Viewing 3D Visualization & Segmentation
 Getting started guide IMPAX Volume Viewing 3D Visualization & Segmentation This guide outlines the basic steps to perform and manipulate a 3D reconstruction of volumetric image data using IMPAX Volume
Sending image(s) to report Click Send Snapshot on any screen in Dolphin3D and choose the Send to Report option
 to report Click Send Snapshot on any screen in Dolphin3D and choose the Send to Report option") Dolphin 3D Reports Sending image(s) to report Click Send Snapshot on any screen in Dolphin3D and choose the Send to Report option Creating a report step by step 1. Generate the desired images in Dolphin3D
Dolphin 3D Reports Sending image(s) to report Click Send Snapshot on any screen in Dolphin3D and choose the Send to Report option Creating a report step by step 1. Generate the desired images in Dolphin3D
INTRODUCTION TO MEDICAL IMAGING- 3D LOCALIZATION LAB MANUAL 1. Modifications for P551 Fall 2013 Medical Physics Laboratory
 INTRODUCTION TO MEDICAL IMAGING- 3D LOCALIZATION LAB MANUAL 1 Modifications for P551 Fall 2013 Medical Physics Laboratory Introduction Following the introductory lab 0, this lab exercise the student through
Profound understanding of anatomy
 ENGLISH Profound understanding of anatomy The unique Planmeca ProMax 3D product family offers equipment for all maxillofacial imaging. All volume sizes from the smallest special cases to whole head images
Ossa 3D User Manual. ios App v1.0.0
 Ossa 3D User Manual ios App v1.0.0 CONTENTS Description 3 Getting Started User Interface 4 Control Gestures 4 View Modes 5 Save Project 5 Settings Menu In-App Purchases 5 Enable Passcode 5 Page Tools View
Voxar 3D ColonMetrix. Reference Guide
 Voxar 3D ColonMetrix Reference Guide The software described in this document is furnished under a license, and may be used or copied only according to the terms of such license. Toshiba means, Toshiba
Using TeraRecon intuition Viewer with STAT Quick Reference Guide
 Using TeraRecon intuition Viewer with STAT Quick Reference Guide 1. Launching intuition 2. 3D Assessment of Coronary Arteries for Stenosis 3. Time Volume Analysis (TVA) for Determination of Left Ventricular
PLANMECA PROMAX 3D MID CBCT UNIT
 1(5) PLANMECA PROMAX 3D MID CBCT UNIT Introduction The Planmeca ProMax 3D Mid X-ray unit uses cone beam computerized tomography (CBCT) to produce three-dimensional X-ray images. Panoramic and cephalometric
Display. Introduction page 67 2D Images page 68. All Orientations page 69 Single Image page 70 3D Images page 71
 Display Introduction page 67 2D Images page 68 All Orientations page 69 Single Image page 70 3D Images page 71 Intersecting Sections page 71 Cube Sections page 72 Render page 73 1. Tissue Maps page 77
Contents. Page 2 of 117
 Version 1.2.00 Contents 1. Introduction... 4 2. Product Installation... 5 2.1 PC System Specification... 5 2.2 DentiqGuide Installation... 5 2.3 Implant Library Installation... 6 3. Product Overview...
Learn Image Segmentation Basics with Hands-on Introduction to ITK-SNAP. RSNA 2016 Courses RCB22 and RCB54
 Learn Image Segmentation Basics with Hands-on Introduction to ITK-SNAP RSNA 2016 Courses RCB22 and RCB54 RCB22 Mon, Nov 28 10:30-12:00 PM, Room S401CD RCB54 Thu, Dec 1 2:30-4:30 PM, Room S401CD Presenters:
SIVIC GUI Overview. SIVIC GUI Layout Overview
 SIVIC GUI Overview SIVIC GUI Layout Overview At the top of the SIVIC GUI is a row of buttons called the Toolbar. It is a quick interface for loading datasets, controlling how the mouse manipulates the
Arbitrary cut planes Slab control with slab thickness Projection plane adjustment Box cropping Mandible detection MPR cross-section linked views
 Provides unparalleled quality and performance no need to sacrifice one for the other Enables high fidelity viewing with interactive deep supersampling Requires no GPUs or hardware accelerators a true,
Autodesk Fusion 360 Training: The Future of Making Things Attendee Guide
 Autodesk Fusion 360 Training: The Future of Making Things Attendee Guide Abstract After completing this workshop, you will have a basic understanding of editing 3D models using Autodesk Fusion 360 TM to
Gamepad Controls. Figure 1: A diagram of an Xbox controller. Figure 2: A screenshot of the BodyViz Controller Panel. BodyViz 3 User Manual 1
 BodyViz User Manual Gamepad Controls The first step in becoming an expert BodyViz user is to get acquainted with the Xbox gamepad, also known as a controller, and the BodyViz Controller Panel. These can
Medical Image Processing: Image Reconstruction and 3D Renderings
 Medical Image Processing: Image Reconstruction and 3D Renderings 김보형 서울대학교컴퓨터공학부 Computer Graphics and Image Processing Lab. 2011. 3. 23 1 Computer Graphics & Image Processing Computer Graphics : Create,
DDX-R Quick Start Guide
 DDX-R Quick Start Guide Imaging Support 1-855-726-9995 www.scilvet.com Contents USING DDX-R... 2 Opening a Patient File... 2 Opening a New Patient File... 3 Screen Layout... 3 ACQUIRING IMAGES ON A PATIENT...
Medical Image Viewer Guide
 Cloud Medical Image Management Medical Image Viewer Guide March 2016 Table of Contents Indications for Use 3 Browser Requirements 3 User Interface Overview 4-5 Study Page 6 Main Toolbar 7 Sub-Toolbars
One Machine... Mac OS Compatible! Multiple Modalities. ProMax 3D & 3D s
 One Machine... Multiple Modalities Mac OS Compatible! 3D Bitewing Panoramic Cephalometric Features Availability of multiple imaging modalities in one machine (3D, bitewing, panoramic, and cephalometric)
Opal RAD User Manual
 Opal RAD Mini Manual Table of Contents Basic Workflow of Opal RAD... 3 Introduction... 4 Logging On... 5 The Study List screen... 6 Searching and Sorting Your Studies... 7 Installing and Updating the Image
RSNA, /rg
 RSNA, 2015 10.1148/rg.2015140320 Appendix As noted in the main article, DICOM image files cannot be used directly for 3D printing; further steps are necessary to make them readable by 3D printers. The
Copyright 2017 Medical IP - Tutorial Medip v /2018, Revision
 Copyright 2017 Medical IP - Tutorial Medip v.1.0.0.9 01/2018, Revision 1.0.0.2 List of Contents 1. Introduction......................................................... 2 2. Overview..............................................................
ClinicalExpress Operator s Guide. version 6.1 for general radiography and mammography
 ClinicalExpress Operator s Guide version 6.1 for general radiography and mammography Copyright by VIDAR Systems Corporation. All rights reserved. No part of this publication may be reproduced, stored in
MedDream WEB DICOM Viewer User's Manual
 MedDream WEB DICOM Viewer User's Manual Version 4.01 2013, UAB Softneta, info@softneta.com Table of Contents Change log:...3 1. Logging on to MedDream...4 2. Search of studies...5 2.1 Opening multiple
Planmeca ProMax 3D Max CBCT unit
 D00107623 1(6) Planmeca ProMax 3D Max CBCT unit Introduction The Planmeca ProMax 3D Max X-ray unit uses cone beam computerized tomography (CBCT) to produce threedimensional X-ray images. Panoramic and
JAZZ HARMONY User Manual
 JAZZ HARMONY User Manual Copyright 2017 Imaging. All rights reserved. This manual and the software described herein are protected by copyright laws and international copyright treaties, as well as other
Simplant. CBCT to Simplant. - Export protocol for Newtom VGi 5G
 Simplant CBCT to Simplant - Export protocol for Newtom VGi 5G This protocol gives a detailed description of the steps to be followed for exporting your NewTom VGi/5G scan images, with NNT software V3.00
SolidWorks Intro Part 1b
 SolidWorks Intro Part 1b Dave Touretzky and Susan Finger 1. Create a new part We ll create a CAD model of the 2 ½ D key fob below to make on the laser cutter. Select File New Templates IPSpart If the SolidWorks
:Network enabled medical diagnosis and education in skeletal imaging using X-Rays
 Document title Project title Document Ref. : Suggestions for CollabDDS V1.1 Application :Network enabled medical diagnosis and education in skeletal imaging using X-Rays : CSIO/CI/NKN/2012-13/DOC/9 Computational
3Shape Dental System
 3Shape Dental System List The use of a mouse and keyboard for common functions in 3Shape Dental System is identical to the standard Windows applications. The list of specific shortcut keys available in
General. Move the mouse to pan the view. Move the mouse to rotate the model.
 3Shape Keyboard s The use of a mouse and keyboard for common functions in 3Shape Dental System is identical to the standard Windows applications. The list of specific shortcut keys used in 3Shape Dental
RadiAnt DICOM Viewer. User manual. Version July 1, Copyright Medixant. All rights reserved.
 RadiAnt DICOM Viewer User manual Version 1.8.6 July 1, 2013 http://www.radiantviewer.com Copyright 2009-2013 Medixant. All rights reserved. Table of contents 3 Table of contents 1 Welcome to RadiAnt DICOM
efilm Workstation Quick Reference
 efilm Workstation Quick Reference Toolbar Features Customizing the Toolbar Toolbar Properties NOTE: Some tools have function key shortcuts, which can be adjusted. You can alter the mouse button selection
Synapse Quick Guide PACS
 The FUJIFILM UK Limited Pension and Life Assurance Scheme provides a range of benefits that are competitive when compared with those of other UK companies. The benefits are designed to ensure that you
Understanding the Interface
 2. Understanding the Interface Adobe Photoshop CS2 for the Web H O T 2 Understanding the Interface The Welcome Screen Interface Overview Customizing Palette Locations Saving Custom Palette Locations Customizing
SeeSnake HQ User Guide
 SeeSnake HQ User Guide SeeSnake HQ Version 1.53.85.1426 23 May 2010 About SeeSnake HQ 3 Digital Technology 3 Installation and Updates 5 Windows XP 5 Windows Vista 5 Windows 7 5 The Home Window 6 Home Toolbar
imaging management aquarium What s New in Imaging 11.5 anywheredolphin
 imaging management aquarium What s New in Imaging 11.5 3d domo What s New in Dolphin Imaging 11.5 Welcome to Dolphin Imaging 11.5 Premium! This document provides an overview of many of the new features
Autodesk Inventor Design Exercise 2: F1 Team Challenge Car Developed by Tim Varner Synergis Technologies
 Autodesk Inventor Design Exercise 2: F1 Team Challenge Car Developed by Tim Varner Synergis Technologies Tim Varner - 2004 The Inventor User Interface Command Panel Lists the commands that are currently
DICOM VIEWER. Version 3.2. Software User Guide Revision 1.1. Copyright 2017, Brainlab AG Germany. All rights reserved.
 DICOM VIEWER Version 3.2 Software User Guide Revision 1.1 Copyright 2017, Brainlab AG Germany. All rights reserved. TABLE OF CONTENTS TABLE OF CONTENTS 1 GENERAL INFORMATION...5 1.1 Contact Data...5 1.2
Modifications for P551 Fall 2014
 LAB DEMONSTRATION COMPUTED TOMOGRAPHY USING DESKCAT 1 Modifications for P551 Fall 2014 Introduction This lab demonstration explores the physics and technology of Computed Tomography (CT) and guides the
AutoCAD 2009 User InterfaceChapter1:
 AutoCAD 2009 User InterfaceChapter1: Chapter 1 The AutoCAD 2009 interface has been enhanced to make AutoCAD even easier to use, while making as much screen space available as possible. In this chapter,
SolidWorks 2½D Parts
 SolidWorks 2½D Parts IDeATe Laser Micro Part 1b Dave Touretzky and Susan Finger 1. Create a new part In this lab, you ll create a CAD model of the 2 ½ D key fob below to make on the laser cutter. Select
The Fundamentals. Document Basics
 3 The Fundamentals Opening a Program... 3 Similarities in All Programs... 3 It's On Now What?...4 Making things easier to see.. 4 Adjusting Text Size.....4 My Computer. 4 Control Panel... 5 Accessibility
IMPAX Volume Viewing Configuration
 Getting started guide IMPAX Volume Viewing Configuration This guide describes the various configuration settings for IMPAX Volume Viewing. Some of these settings are only relevant if a license for one
Sante DICOM Editor 3D
 Sante DICOM Editor 3D Quick start guide Copyright 2017 Santesoft, all rights reserved Contents The user interface... 2 The modes of the Main Window (4)... 5 Customize the toolbars... 11 Open a file...
BrainMask. Quick Start
 BrainMask Quick Start Segmentation of the brain from three-dimensional MR images is a crucial preprocessing step in morphological and volumetric brain studies. BrainMask software implements a fully automatic
ezimagex2 User s Guide Version 1.0
 ezimagex2 User s Guide Version 1.0 Copyright and Trademark Information The products described in this document are copyrighted works of AVEN, Inc. 2015 AVEN, Inc. 4595 Platt Rd Ann Arbor, MI 48108 All
June 05, 2018, Version 3.0.6
 June 05, 2018, Version 3.0.6 VolViCon is an advanced application for reconstruction of computed tomography (CT), magnetic resonance (MR), ultrasound, and x-rays images. It gives features for exporting
Primal s 3D Real-time on Anatomy.tv
 USER GUIDE Primal s 3D Real-time on Anatomy.tv Welcome to our user guide to 3D Real-time on Anatomy.tv. Please read on, or select one of the links opposite to jump straight to a particular topic. Anatomy.tv
2 SELECTING AND ALIGNING
 2 SELECTING AND ALIGNING Lesson overview In this lesson, you ll learn how to do the following: Differentiate between the various selection tools and employ different selection techniques. Recognize Smart
Diffusion Mapping with FireVoxel Quick Start Guide
 Diffusion Mapping with FireVoxel Quick Start Guide Medical image analysis tool developed by Artem Mikheev and Henry Rusinek Radiology Department, NYU School of Medicine Original version prepared by Jinyu
LAB DEMONSTRATION COMPUTED TOMOGRAPHY USING DESKCAT Lab Manual: 0
 LAB DEMONSTRATION COMPUTED TOMOGRAPHY USING DESKCAT Lab Manual: 0 Introduction This lab demonstration explores the physics and technology of Computed Tomography (CT) and guides the student and instructor
VXvue User Manual (For Human Use)
") VXvue User Manual (For Human Use) Page 2 of 90 Revision History Version Date Description 1.0 2012-03-20 Initial Release Page 3 of 90 Contents Safety and Regulatory... 8 Safety Notice... 8 1. Introduction...
VXvue User Manual (For Human Use) Page 2 of 90 Revision History Version Date Description 1.0 2012-03-20 Initial Release Page 3 of 90 Contents Safety and Regulatory... 8 Safety Notice... 8 1. Introduction...
Copyright 2018 Medical IP - Tutorial Medip v x 06/2018, Revision
 Copyright 2018 Medical IP - Tutorial Medip v.1.2.0.x 06/2018, Revision 1.0.0.1 List of Contents 1. Introduction......................................................... 2 2. Overview..............................................................
SNOWFLAKES PHOTO BORDER - PHOTOSHOP CS6 / CC
 Photo Effects: Snowflakes Photo Border (Photoshop CS6 / CC) SNOWFLAKES PHOTO BORDER - PHOTOSHOP CS6 / CC In this Photoshop tutorial, we ll learn how to create a simple and fun snowflakes photo border,
Planmeca ProMax 3D s CBCT unit
 D0010759 1(5) Planmeca ProMax 3D s CBCT unit Introduction The Planmeca ProMax 3D s X-ray unit uses cone beam computerized tomography (CBCT) to produce threedimensional X-ray images. Panoramic and cephalometric
InSyTe FLECT/CT Application Note
 Summary This note is a quick guide for FLECT and CT image co-registration and fusion with VivoQuant (VQ3.0Patch1). Scope This application note is for users who process/analyze images acquired with InSyTe
14 July Ver CRView V3 User Guide. 1 P a g e
 Ver. 080707 CRView V3 User Guide 1 P a g e Contents Copyright notice... 3 Trademarks... 3 System requirements... 4 Required hardware... 4 Recommended hardware... 4 Installing CRView... 5 Installing from
Troubleshooting in Microsoft Excel 2002
 Page 1 of 8 Troubleshooting in Microsoft Excel 2002 Result: To understand how to work with the Excel software to enter data, navigate the page, and print materials. Tabs Look at the tabs at the bottom
CHAPTER 1: IMPORT. 5 CHAPTER 2: MIMI. 11 CHAPTER 3: SIMON. 25 CHAPTER 4: HIP. 39 CHAPTER 5: OBTURATOR. 47 CHAPTER 6: MANUAL IMPORT.
 Tutorials Table of Contents CHAPTER 1: IMPORT... 5 CHAPTER 2: MIMI... 11 CHAPTER 3: SIMON... 25 CHAPTER 4: HIP... 39 CHAPTER 5: OBTURATOR... 47 CHAPTER 6: MANUAL IMPORT... 59 CHAPTER 7: SIMULATION TUTORIAL...
OBJECT MANAGEMENT OBJECT MANIPULATION
 OBJECT MANAGEMENT OBJECT MANIPULATION Version 1.1 Software User Guide Revision 1.0 Copyright 2018, Brainlab AG Germany. All rights reserved. TABLE OF CONTENTS TABLE OF CONTENTS 1 GENERAL INFORMATION...5
Getting Started with ShowcaseChapter1:
 Chapter 1 Getting Started with ShowcaseChapter1: In this chapter, you learn the purpose of Autodesk Showcase, about its interface, and how to import geometry and adjust imported geometry. Objectives After
Photoshop Fundamentals
 Lesson 3 Photoshop Fundamentals Photoshop Fundamentals How to Navigate your Document Zooming in and out To zoom in and out on your Photoshop document, hold down the Command key (Ctrl on Win) and press
EPILOG PREOP. Viewer Interpretation Guideline
 EPILOG PREOP Viewer Interpretation Guideline Starting the viewer Launch the viewer for a patient by clicking this icon. A new browser tab or window will open. Data loading To ensure smooth switching between
Ch. 4 Physical Principles of CT
 Ch. 4 Physical Principles of CT CLRS 408: Intro to CT Department of Radiation Sciences Review: Why CT? Solution for radiography/tomography limitations Superimposition of structures Distinguishing between
VIEWER. Version 4.0. Software User Guide Revision 1.0. Copyright 2018, Brainlab AG Germany. All rights reserved.
 VIEWER Version 4.0 Software User Guide Revision 1.0 Copyright 2018, Brainlab AG Germany. All rights reserved. TABLE OF CONTENTS TABLE OF CONTENTS 1 GENERAL INFORMATION...5 1.1 Contact Data...5 1.2 Legal
Profile Modeler Profile Modeler ( A SuperControl Product )
") Profile Modeler ( A SuperControl Product ) - 1 - Index Overview... 3 Terminology... 3 Launching the Application... 4 File Menu... 4 Loading a File:... 4 To Load Multiple Files:... 4 Clearing Loaded Files:...
Profile Modeler ( A SuperControl Product ) - 1 - Index Overview... 3 Terminology... 3 Launching the Application... 4 File Menu... 4 Loading a File:... 4 To Load Multiple Files:... 4 Clearing Loaded Files:...
To access the images that accompany a Radiology result from Memorial Health System select the document in Chart Viewer and click on View.
 ImageLink To access the images that accompany a Radiology result from Memorial Health System select the document in Chart Viewer and click on View. On the upper right side of the Order Viewer select the
RadiAnt DICOM Viewer. User manual. Version /31/2018. Copyright Medixant. All rights reserved.
 RadiAnt DICOM Viewer User manual Version 4.6.9 10/31/2018 https://www.radiantviewer.com Copyright 2009-2018 Medixant. All rights reserved. Table of contents 3 Table of contents 1 Welcome to RadiAnt DICOM
This lesson introduces Blender, covering the tools and concepts necessary to set up a minimal scene in virtual 3D space.
 3D Modeling with Blender: 01. Blender Basics Overview This lesson introduces Blender, covering the tools and concepts necessary to set up a minimal scene in virtual 3D space. Concepts Covered Blender s
Carestream Vita user quick guide. Software version 3.2 From April 2012
 Carestream Vita user quick guide Software version 3.2 From April 2012 1 Carestream Vita user quick guide Software version 3.2 from April 2012 1. To switch your Vita on Press the power button on the PC
Table of Contents. Logos Imaging Application User s Manual Version Page 1
 Table of Contents About... 4 System Requirements... 5 Uninstall Previous Versions... 5 Install LIA 6.0... 6 Install the Device Drivers... 13 Register... 14 Getting Help... 14 Technical Support... 14 Workspace
AORTA CTA VPMC-12419
 AORTA CTA VPMC-12419 Workflow Overview: The Aorta can be post-processed in various ways. Auto Bone Removal and Vessel Pick provide a quick overview of the entire Aorta. Vessel Probe creates a centerline
Controlling the Drawing Display
 Controlling the Drawing Display In This Chapter 8 AutoCAD provides many ways to display views of your drawing. As you edit your drawing, you can control the drawing display and move quickly to different
SI-100 Digital Microscope. User Manual
 SI-100 Digital Microscope User Manual Read this manual before use Keep for future reference Content 1 Introduction... 3 1.1 About The SI-100... 3 1.2 Advantage of SI-100... 3 1.3 Product Specification...
ImplaStation. ProDigiDent. Instruction. 1. Hardware requirements. 2. Installation and update
 ProDigiDent ImplaStation Instruction ImplaStation is a medical software intended for the plan the placement of one or more implants build on an imported and aligned Computed Tomography or Cone Beam Computed
RT_Image v0.2β User s Guide
 RT_Image v0.2β User s Guide RT_Image is a three-dimensional image display and analysis suite developed in IDL (ITT, Boulder, CO). It offers a range of flexible tools for the visualization and quantitation
XnView Image Viewer. a ZOOMERS guide
 XnView Image Viewer a ZOOMERS guide Introduction...2 Browser Mode... 5 Image View Mode...14 Printing... 22 Image Editing...26 Configuration... 34 Note that this guide is for XnView version 1.8. The current
[PDR03] RECOMMENDED CT-SCAN PROTOCOLS
![[PDR03] RECOMMENDED CT-SCAN PROTOCOLS](/thumbs/72/66454100.jpg "[PDR03] RECOMMENDED CT-SCAN PROTOCOLS") SURGICAL & PROSTHETIC DESIGN [PDR03] RECOMMENDED CT-SCAN PROTOCOLS WORK-INSTRUCTIONS DOCUMENT (CUSTOMER) RECOMMENDED CT-SCAN PROTOCOLS [PDR03_V1]: LIVE 1 PRESCRIBING SURGEONS Patient-specific implants,
SURGICAL & PROSTHETIC DESIGN [PDR03] RECOMMENDED CT-SCAN PROTOCOLS WORK-INSTRUCTIONS DOCUMENT (CUSTOMER) RECOMMENDED CT-SCAN PROTOCOLS [PDR03_V1]: LIVE 1 PRESCRIBING SURGEONS Patient-specific implants,
Simplant. Simplant Editor 2.2. Instructions for Use
 Simplant Simplant Editor 2.2 Instructions for Use 0120 Contents Introduction 3 Product information 3 Caution 3 Indications for use 3 Contraindications 3 Warnings 4 Precautions 4 Adverse reactions 4 Step-by-Step
Virtual MODELA USER'S MANUAL
 Virtual MODELA USER'S MANUAL Virtual MODELA is a program that simulates the movement of the tool on the screen. Contents Contents Part 1 Introduction 1-1 System Requirements... 4 1-2 Overview of Virtual
Simplant. Simplant Editor 3.0. Instructions for Use
 Simplant Simplant Editor 3.0 Instructions for Use Table of Contents Introduction... 3 Product information... 3 Caution... 3 Indications for use... 3 Contraindications... 3 Warnings... 4 Precautions...
The principles of CCTV design in VideoCAD
 The principles of CCTV design in VideoCAD By Stanislav Utochkin, cctvcad.com CCTV focus readers have already had an opportunity to read about VideoCAD in the past issues. This is the only specialised program
Loupedeck. Capture One Beta User Guide.
 Loupedeck Capture One Beta User Guide What does Capture One Beta Integration actually mean? Currently Loupedeck+ works using keyboard shortcuts where all our other integrations work via the internal support
The Allen Human Brain Atlas offers three types of searches to allow a user to: (1) obtain gene expression data for specific genes (or probes) of
 obtain gene expression data for specific genes (or probes) of") Microarray Data MICROARRAY DATA Gene Search Boolean Syntax Differential Search Mouse Differential Search Search Results Gene Classification Correlative Search Download Search Results Data Visualization
Microarray Data MICROARRAY DATA Gene Search Boolean Syntax Differential Search Mouse Differential Search Search Results Gene Classification Correlative Search Download Search Results Data Visualization
Quick Guide Software Version 4.4
 Quick Guide Software Version 4.4 On-Call Clinical Consultants 1-888-FUJIMED We re here to assist you with questions about operating your equipment. Locating a Study in Worklist 1. Double-click the Synapse
On Call Imaging Specialists. We re here to assist you with questions about operating your equipment. Pocket Quick Guide. Software version 3.2.
 On Call Imaging Specialists 1800 060 209 We re here to assist you with questions about operating your equipment. Pocket Quick Guide Software version 3.2.1 Locating a Study in Worklist 1. Double Click the
Please Read This First
 Please Read This First Getting Started with CDR DICOM For complete details about your CDR DICOM software, please refer to the User Guide on the DVD or our website at www. schicktech.com Getting Started
Instructions for using Borg and Ide CONNECT. Referring Provider Portal. Version 3.5.
 Instructions for using Borg and Ide CONNECT Referring Provider Portal www.borgideconnect.com Version 3.5 Topic Table of Name Contents Description Getting Started...1 Home Page and Finding Patient Exams...2
XnView 1.9. a ZOOMERS guide. Introduction...2 Browser Mode... 5 Image View Mode...15 Printing Image Editing...28 Configuration...
 XnView 1.9 a ZOOMERS guide Introduction...2 Browser Mode... 5 Image View Mode...15 Printing... 22 Image Editing...28 Configuration... 36 Written by Chorlton Workshop for hsbp Introduction This is a guide
HOW TO SETUP AND RUN SHIVA...
 TABLE OF CONTENTS HOW TO SETUP AND RUN SHIVA... 1 REQUIREMENTS... 1 Java... 1 Architecture... 2 LAUNCHING SHIVA... 2 LOADING THE ATLAS... 2 USAGE INSTRUCTIONS... 2 FILES... 2 Image Volumes... 2 Label Indices...
fmri/dti analysis using Dynasuite
 fmri/dti analysis using Dynasuite Contents 1 Logging in 2 Finding patient session 3 Viewing and adjusting images 4 Checking brain segmentation 5 Checking image registration 6 Seeing fmri results 7 Saving