Hitachi Virtual Storage Platform
|
|
|
- Allison Johns
- 5 years ago
- Views:
Transcription

1 Hitachi Virtual Storage Platform Hitachi ShadowImage User Guide Document Organization Product Version Getting Help Contents MK-90RD
2 Hitachi, Ltd. All rights reserved. No part of this publication may be reproduced or transmitted in any form or by any means, electronic or mechanical, including photocopying and recording, or stored in a database or retrieval system for any purpose without the express written permission of Hitachi, Ltd. Hitachi, Ltd., reserves the right to make changes to this document at any time without notice and assumes no responsibility for its use. This document contains the most current information available at the time of publication. When new or revised information becomes available, this entire document will be updated and distributed to all registered users. Some of the features described in this document might not be currently available. Refer to the most recent product announcement for information about feature and product availability, or contact Hitachi Data Systems Corporation at Notice: Hitachi, Ltd., products and services can be ordered only under the terms and conditions of the applicable Hitachi Data Systems Corporation agreements. The use of Hitachi, Ltd., products is governed by the terms of your agreements with Hitachi Data Systems Corporation. Notice on Export Controls. The technical data and technology inherent in this Document may be subject to U.S. export control laws, including the U.S. Export Administration Act and its associated regulations, and may be subject to export or import regulations in other countries. Reader agrees to comply strictly with all such regulations and acknowledges that Reader has the responsibility to obtain licenses to export, re-export, or import the Document and any Compliant Products. Hitachi is a registered trademark of Hitachi, Ltd., in the United States and other countries. Hitachi Data Systems is a registered trademark and service mark of Hitachi, Ltd., in the United States and other countries. Archivas, Essential NAS Platform, HiCommand, Hi-Track, ShadowImage, Tagmaserve, Tagmasoft, Tagmasolve, Tagmastore, TrueCopy, Universal Star Network, and Universal Storage Platform are registered trademarks of Hitachi Data Systems Corporation. AIX, AS/400, DB2, Domino, DS6000, DS8000, Enterprise Storage Server, ESCON, FICON, FlashCopy, IBM, Lotus, MVS, OS/390, RS/6000, S/390, System z9, System z10, Tivoli, VM/ESA, z/os, z9, z10, zseries, z/vm, and z/vse are registered trademarks or trademarks of International Business Machines Corporation. All other trademarks, service marks, and company names in this document or website are properties of their respective owners. Microsoft product screen shots are reprinted with permission from Microsoft Corporation. ii
3 Contents Preface... ix Intended audience... x Product version...x Document revision level...x Changes in this revision... xi Referenced documents... xi Document organization...xi Document conventions...xii Convention for storage capacity values...xiii Accessing product documentation...xiv Getting help... xiv Comments... xiv 1 ShadowImage overview How ShadowImage works Hardware and software components Volume pairs (primary volumes and secondary volumes) Cascaded pairs Storage Navigator GUI Command Control Interface and consistency groups Initial and update copy operations Initial copy Update copy Requirements and planning System requirements License capacity requirements Planning pair volumes Planning number of pairs Calculating the number of differential tables and pair tables Calculating maximum number of pairs Organizing volumes into P-VOLs and S-VOLs Planning for performance Consistency group pair-split Consistency group pair-split for shared volumes iii
4 Requirements, restrictions, and recommendations for shared volumes Consistency group pair-split and supported pair statuses Sharing ShadowImage volumes Cache Residency Manager Thin Image and Copy-on-Write Snapshot Data Retention Utility Access attributes and ShadowImage operations ShadowImage pair statuses and access attribute settings Dynamic Provisioning and Dynamic Tiering High Availability Manager LUN Manager Open Volume Management Resource Partition Manager TrueCopy Universal Replicator Sharing volumes in 3-UR data center configurations Sharing volumes in a 3-UR DC multi-target configuration Sharing volumes in 3-UR DC delta resync (multi-target) configuration Sharing volumes in a 3-UR DC cascade configuration Sharing volumes in a 3-UR DC delta resync (cascade) configuration Sharing volumes in 3-UR/TC data center configurations Sharing volumes in 3-UR/TC DC multi-target and delta resync configurations Sharing volumes in a 3-TC/UR DC cascade configuration Universal Volume Manager Volume Migration Performing configuration operations Configuration workflow Setting up primary and secondary volumes Reserving secondary volumes System options that affect performance Setting performance options Performing pair operations Pair operations workflow Check pair status Pair creation Prerequisite information for creating pairs On creating L1 and L2 pairs with different topologies Creating pairs Suspending pair creation Pair split Types of split operations Prerequisite information for splitting pairs PSUS, performance, and SOM Splitting pairs Splitting pairs in a consistency group Pair resynchronization iv
5 Types of resync operations Prerequisite information for resynchronizing Resynchronizing pairs Pair deletion Prerequisite information for deleting pairs Deleting pairs Monitoring and maintaining the system Monitoring the system Monitoring pair activity, status Pair status definitions CCI pair status names Status, pair operations permitted Status for L1, L2 pairs and operations permitted Status of unaffected S-VOLs, operations permitted Monitoring pair, volume details Monitoring synchronous rates Monitoring consistency groups Monitoring reserve volumes Monitoring a pair s operation history Maintaining the system Removing reserve attribute from a volume Pair operations during system, device maintenance Troubleshooting ShadowImage Troubleshooting Operation and display troubleshooting Troubleshooting pinned tracks Troubleshooting extended copy times Troubleshooting with CCI Troubleshooting consistency group pair-split Calling the Hitachi Data Systems customer support A Interface support for SI operations and options...a-1 Operations supported by Storage Navigator, CCI...A-2 Consistency group operations supported by Storage Navigator, CCI... A-3 B ShadowImage GUI reference...b-1 Replications window... B-3 Local Replications window... B-4 View Pair Properties window...b-11 View Pair Synchronous Rate window... B-13 View Histories window...b-14 Consistency Group Properties window... B-16 Create Pairs wizard... B-18 Select Pair Configuration window... B-18 Select Primary Volumes window...b-20 Select Secondary Volumes window...b-22 Confirm window... B-27 Split Pairs wizard... B-28 v
6 Split Pairs window...b-28 Confirm window... B-31 Resync Pairs wizard... B-32 Resync Pairs window...b-32 Confirm window... B-35 Suspend Pairs window...b-36 Delete Pairs window...b-38 Edit Mirror Units dialog box...b-39 Change Options dialog box... B-39 Add Reserve Volumes Wizard...B-40 Add Reserve Volumes window... B-40 Confirm window... B-42 Remove Reserve Volumes window... B-42 Edit Local Replica Option wizard...b-43 Edit Local Replica Option window...b-43 Confirm window... B-45 C Configuration operations (secondary window)... C-1 Configuration workflow... C-2 Setting up primary and secondary volumes...c-2 Reserving S-VOLs... C-2 Reserving a consistency group...c-3 Setting performance options...c-4 D Pair operations (secondary window)...d-1 Pair operations workflow...d-2 Check pair status...d-2 Creating L1 and/or L2 pairs...d-2 Splitting pairs, creating and splitting pairs... D-5 Splitting pairs in a consistency group... D-8 Suspending pair creation...d-9 Resynchronizing pairs... D-10 Deleting pairs...d-13 E Monitoring and maintaining the system (secondary window)...e-1 Monitoring the system (secondary window)... E-2 Monitoring pair activity, status (secondary window)... E-2 Pair status definitions (secondary window)...e-2 Status, pair operations permitted (secondary window)... E-3 Reviewing pair, volume details...e-3 Reviewing S-VOL path information...e-5 Reviewing pair, license information...e-6 Reviewing a pair s operation history...e-8 Maintaining the system (secondary window)... E-10 Removing reserve attribute from a volume... E-10 F ShadowImage GUI reference (secondary window)... F-1 Pair Operation window... F-2 Main components... F-3 Volume list...f-4 vi
7 Preview list...f-5 Pair Operation command menu...f-6 Display Filter dialog box... F-6 History window...f-8 Option window... F-9 Glossary Index vii
8 viii
9 Preface This document provides information for setting up and operating Hitachi ShadowImage on the Hitachi Virtual Storage Platform (VSP) storage system. Please read this document carefully to understand how to use this product, and maintain a copy for reference purposes. This preface includes the following information: Intended audience Product version Document revision level Changes in this revision Referenced documents Document organization Document conventions Convention for storage capacity values Accessing product documentation Getting help Comments Preface ix
10 Intended audience This document is intended for system administrators, HDS representatives, and authorized service providers who are involved in installing, configuring, and operating the Hitachi Virtual Storage Platform storage system. This document assumes the following: The user has a background in data processing and understands RAID storage systems and their basic functions. The user is familiar with the Hitachi Virtual Storage Platform storage system and has read the Hitachi Virtual Storage Platform User and Reference Guide. The user is familiar with the Storage Navigator software for VSP and has read the Hitachi Storage Navigator User Guide. Product version This document revision applies to Hitachi Virtual Storage Platform microcode x or later. Document revision level Revision Date Description MK-90RD October 2010 Initial release MK-90RD December 2010 Supersedes and replaces MK-90RD MK-90RD January 2011 Supersedes and replaces MK-90RD MK-90RD April 2011 Supersedes and replaces MK-90RD MK-90RD August 2011 Supersedes and replaces MK-90RD MK-90RD November 2011 Supersedes and replaces MK-90RD MK-90RD March 2012 Supersedes and replaces MK-90RD MK-90RD June 2012 Supersedes and replaces MK-90RD MK-90RD November 2012 Supersedes and replaces MK-90RD MK-90RD January 2013 Supersedes and replaces MK-90RD MK-90RD July 2013 Supersedes and replaces MK-90RD MK-90RD April 2014 Supersedes and replaces MK-90RD MK-90RD September 2014 Supersedes and replaces MK-90RD MK-90RD March 2016 Supersedes and replaces MK-90RD x Preface
11 Changes in this revision Updated System requirements on page 2-2. Updated prerequisites in Pair creation on page 5-2. Referenced documents Hitachi Virtual Storage Platform documentation: Command Control Interface User and Reference Guide, MK-90RD7010 Hitachi Copy-on-Write Snapshot User Guide, MK-90RD7013 Hitachi Compatible FlashCopy V2 User Guide, MK-90RD7017 Hitachi Virtual Storage Platform Performance Guide, MK-90RD7020 Hitachi Virtual Storage Platform Provisioning Guide for Open Systems, MK-90RD7022 Hitachi TrueCopy User Guide, MK-90RD7029 Hitachi Universal Replicator User Guide, MK-90RD7032 Hitachi Thin Image User Guide, MK-90RD7179 Business Continuity Manager User Guide, MK-94RD247 Document organization The following table provides an overview of the contents and organization of this document. Click the chapter title in the left column to go to that chapter. The first page of each chapter provides links to the topics in that chapter. Chapter/Appendix Title Chapter 1, ShadowImage overview on page 1-1 Chapter 2, Requirements and planning on page 2-1 Description Provides an overview of Hitachi ShadowImage. Describes system requirements and recommendations for planning a ShadowImage system. Chapter 3, Sharing ShadowImage volumes on page 3-1 Discusses requirements, recommendations, and restrictions for using ShadowImage with other Hitachi software. Chapter 4, Performing configuration operations on page 4-1 Chapter 5, Performing pair operations on page 5-1 Provides information and instructions for configuring a ShadowImage system. Provides instructions for performing ShadowImage pair operations. Chapter 6, Monitoring and maintaining the system on page 6-1 Provides information and instructions for checking ShadowImage s operational status. Chapter 7, Troubleshooting on page 7-1 Provides information and instructions for troubleshooting ShadowImage. Preface xi
12 Chapter/Appendix Title Appendix A, Interface support for SI operations and options on page A-1 Appendix B, ShadowImage GUI reference on page B-1 Appendix C, Configuration operations (secondary window) on page C-1 Appendix D, Pair operations (secondary window) on page D-1 Appendix E, Monitoring and maintaining the system (secondary window) on page E-1 Appendix F, ShadowImage GUI reference (secondary window) on page F-1 Description Lists operations and the user interfaces that support them. Describes the ShadowImage windows and dialog boxes in Storage Navigator. Provides information and instructions for configuring a ShadowImage system using the previous Storage Navigator GUI, which is shown in a secondary window. Provides information and instructions for performing ShadowImage operations using the previous Storage Navigator GUI, which is shown in a secondary window. Provides information and instructions for checking ShadowImage s operational status using the previous Storage Navigator GUI, which is shown in a secondary window. Describes the ShadowImage windows and dialog boxes in Storage Navigator as seen in the previous Storage Navigator GUI, which is shown in a secondary window. Document conventions This document uses the following typographic conventions: Convention Description Bold Italic screen/code Indicates text on a window, other than the window title, including menus, menu options, buttons, fields, and labels. Example: Click OK. Indicates a variable, which is a placeholder for actual text provided by the user or system. Example: copy source-file target-file Note: Angled brackets (< >) are also used to indicate variables. Indicates text that is shown on screen or entered by the user. Example: # pairdisplay -g oradb < > angled brackets Indicates a variable, which is a placeholder for actual text provided by the user or system. Example: # pairdisplay -g <group> Note: Italic font is also used to indicate variables. [ ] square brackets Indicates optional values. Example: [ a b ] indicates that you can choose a, b, or nothing. { } braces Indicates required or expected values. Example: { a b } indicates that you must choose either a or b. vertical bar Indicates that you have a choice between two or more options or arguments. Examples: [ a b ] indicates that you can choose a, b, or nothing. xii Preface
13 Convention Description { a b } indicates that you must choose either a or b. Underline Indicates the default value. Example: [ a b ] This document uses the following icons to draw attention to information: Icon Meaning Description Tip Provides helpful information, guidelines, or suggestions for performing tasks more effectively. Note Calls attention to important and/or additional information. Caution Warns the user of adverse conditions and/or consequences, such as disruptive operations. WARNING Warns the user of severe conditions and/or consequences, such as destructive operations. Convention for storage capacity values Physical storage capacity values, such as disk drive capacity, are calculated based on the following values: Physical capacity unit Value 1 KB 1,000 bytes 1 MB 1,000 2 bytes 1 GB 1,000 3 bytes 1 TB 1,000 4 bytes 1 PB 1,000 5 bytes 1 EB 1,000 6 bytes Logical storage capacity values, such as logical device capacity, are calculated based on the following values: Logical capacity unit Value 1 KB 1,024 bytes 1 MB 1,024 KB or 1,024 2 bytes 1 GB 1,024 MB or 1,024 3 bytes 1 TB 1,024 GB or 1,024 4 bytes Preface xiii
14 Logical capacity unit Value 1 PB 1,024 TB or 1,024 5 bytes 1 EB 1,024 PB or 1,024 6 bytes 1 block 512 bytes Accessing product documentation The Hitachi Virtual Storage Platform user documentation is available on the HDS Support Portal: Please check this site for the most current documentation, including important updates that may have been made after the release of the product. Getting help The HDS customer support staff is available 24 hours a day, seven days a week. If you need technical support, log on to the HDS Support Portal for contact information: Comments Please send us your comments on this document: doc.comments@hds.com. Include the document title, number, and revision, and refer to specific sections and paragraphs whenever possible. All comments become the property of HDS. Thank you! xiv Preface
15 1 ShadowImage overview ShadowImage (SI) uses local mirroring technology to create and maintain a full copy of any volume in the storage system. With SI software you can create one or more copies of a data volume within the same storage system. You can use SI copies as backups, with secondary host applications, for data mining, for testing, and other uses while business operations continue without stopping host application I/O to the production volume. This guide provides instructions for planning, configuring, operating, maintaining, and troubleshooting an SI system. How ShadowImage works Hardware and software components Initial and update copy operations ShadowImage overview 1-1
16 How ShadowImage works A pair is created when you: Select a volume that you want to duplicate. This becomes the P-VOL volume (P-VOL). Identify another volume to contain the copy. This becomes the secondary volume (S-VOL). Associate the P-VOL and S-VOLs. Perform the initial copy. During the initial copy, the P-VOL remains available for read/write. After the copy is completed, subsequent write operations to the P-VOL are regularly duplicated to the S-VOL. The P-VOL and S-VOLs remain paired until they are split. The P-VOL for a split pair continues to be updated but data in the S-VOL remains as it was at the time of the split. The S-VOL contains a mirror image of the original volume at that point in time. S-VOL data is consistent and usable. It is available for read/write access by secondary host applications. Changes to the P-VOL and S-VOLs are managed by differential bitmaps. You can pair the volumes again by resynchronizing the update data from P-VOL-to-S-VOL, or from S-VOL-to-P-VOL, as circumstance dictates. Note: In Storage Navigator (SN), the source volume is called P-VOL and the destination volume is called S-VOL. Hardware and software components A typical configuration consists of a Hitachi Virtual Storage Platform storage system, a host connected to the storage system, SI software, a P-VOL, a S- VOL or volumes, and interface tools for operating SI. Interface tools include the SN graphical user interface (GUI) and Command Control Interface software (CCI). The following shows a typical configuration. 1-2 ShadowImage overview

17 Volume pairs (primary volumes and secondary volumes) Cascaded pairs A pair consists of the P-VOL and secondary data volume. Each P-VOL can be paired with up to three S-VOLs. Thus, you can create three pairs using one P- VOL. During most operations, the P-VOL remains available to the host for I/O operations. Updating the P-VOL regularly copies the new data, the differential data, to the S-VOL. Because S-VOLs are updated asynchronously, the P-VOL and S-VOLs may not be identical. S-VOLs become available for host access only after you split or delete the pair, and all updates to the S-VOL complete only when the pair is split. If the pair is deleted, pending updates to the S- VOL are not completed. You can pair each SI S-VOL with a second level S-VOL. You can pair a first level (L1) S-VOL with two second level (L2) S-VOLs. Thus, up to nine S-VOLs can be available for one P-VOL. L2 pairs are referred to as cascaded pairs. ShadowImage overview 1-3
18 The P-VOL of the L1 pair is the root volume. An S-VOL of the L1 pair is a node volume. A P-VOL of an L2 pair is an L1 S-VOL a node volume. An S-VOL of an L2 pair is a leaf volume. You can use SI cascaded pairs as TrueCopy (TC) pairs. A distinction is not made in TC between node and leaf volumes. Both are considered as S-VOLs. Storage Navigator GUI With the SN GUI, you: Enable the SI license key. Configure the storage system. Perform copy operations. Perform monitoring, maintenance, and troubleshooting. You perform SI operations using the new version of the SN GUI. You are also able to use the previous version, if you choose to do so. Procedures describing operations in the previous version are found in the appendixes. 1-4 ShadowImage overview
19 The SN GUI communicates with the storage system s service processor (SVP) over defined TCP/IP connections. SN is LAN-attached to the storage system. Command Control Interface and consistency groups With Command Control Interface (CCI) you use a command line interface for running most of the same operations as are performed with SN. Pair commands are issued directly from the host. Commands can also be automated using scripts. Using CCI, you can specify multiple pairs as a consistency group. With a consistency group, you perform tasks on multiple pairs at the same time. This also changes the pair status for all the pairs in a group. Initial and update copy operations Initial copy Creating a pair causes the storage system to create an initial copy. The storage system asynchronously copies updates received by the P-VOL to the S-VOL. Creating a pair causes the storage system to start the initial copy and copies all the data in the P-VOL to the S-VOL. Before the pair is created, the pair s status is SMPL. While the initial copy is in progress, the status is COPY(PD)/COPY. When the initial copy is complete, the volumes are paired ( PAIR status). ShadowImage overview 1-5
20 Update copy A P-VOL continues receiving updates from the host during the initial copy. When the initial copy is completed, update copy operations start. I/O sent to the P-VOL that is paired ( PAIR status) is marked as differential data and stored in bitmaps for transfer to the S-VOL. Update copy operations are performed periodically by the storage system. The timing of the update copy operation is based on the amount of differential data that accumulates and the elapsed time since the previous update. 1-6 ShadowImage overview
21 Though the volumes are paired ( PAIR status), data in the P-VOL and S- VOLs may not be the same because update copying occurs asynchronously, and therefore later data exists in the P-VOL. You can ensure that P-VOL and S-VOLs data are the same at a certain point in time, by splitting pair. Also, data in the P-VOL and the data in the S-VOL may not be the same if a copy operation is completed without host I/O. As mentioned above, the P- VOL and S-VOLs can be made the same by splitting the pair. ShadowImage overview 1-7
22 1-8 ShadowImage overview
23 2 Requirements and planning This chapter describes system requirements and recommendations for planning an SI system. System requirements License capacity requirements Planning pair volumes Planning for performance Consistency group pair-split Requirements and planning 2-1
24 System requirements The following table shows minimum requirements for SI. Item SI license capacity License key Requirement Based on purchased capacity. For more information, see License capacity requirements on page 2-3. Must be installed. For more information about installation, see the Hitachi Storage Navigator User Guide. RAID level RAID 1, RAID 5, RAID 6 SN CCI If you are using the previous version of SN, which is shown in a secondary window, you must be in Modify mode to perform pair operations. Requires a command device when used in In-Band mode, though not for Out-of-Band mode. For more information, see the Command Control Interface User and Reference Guide. Pair volumes Number of P-VOLs per S-VOL: one Number of S-VOLs per P-VOL: For L1 pairs, a maximum of three S-VOLs per P-VOL. For L2 pairs, a maximum of two S-VOLs per P-VOL. (For information on pair-layers, see Cascaded pairs on page 1-3). Volume capacity: The P-VOL and S-VOLs must be the same size in blocks. If the capacity is displayed in gigabytes, a small difference between P-VOL and S-VOL capacity might not be displayed. To view the capacity in blocks, click Options > Capacity Unit > block in the Logical Devices window, or for a secondary window, look at the Capacity (blocks) area of the Detail window. Supported emulation types: Supported emulation types are the same as the ones for SMPL. The emulation type of the P-VOL and S-VOLs must be the same. However, you can create a pair from an intermediate volume and a normal volume if the two volumes are of the same type (such as and A/3390-3B). Supported volume types: - Internal system volumes. - External volumes. Universal Volume Manager (UVM) license required. - Custom-sized volumes. VLL required. Pair volumes must have same capacity and emulation type. - LUSE volumes require LUSE license. SI S-VOLs must have the same size and structure as the P-VOL. For example, if the P-VOL is a LUSE volume in which volumes of 1 GB, 2 GB, and 3 GB are combined in this order, the S-VOL must also be a 2-2 Requirements and planning
25 Item Maximum number of pairs Requirement LUSE volume with volumes of 1 GB, 2 GB, and 3 GB combined in the same order. MU number (mirror unit number): - For an L1 pair, use 0, 1, or 2. - For an L2 pair, use 1 or 2. Sharing volumes with other software products is supported. See Chapter 3, Sharing ShadowImage volumes on page 3-1. The following cannot be used as pair volumes: - Universal Replicator (UR) journal volumes. - Virtual volumes (except Dynamic Provisioning volumes). - Pool volumes. Per storage system: 16,384 pairs (when one S-VOL per P-VOL). Actual number is based on amount of additional shared memory. See Planning number of pairs on page 2-4 for further information. Maximum number of pairs decreases if LUSE volumes are used. Consistency groups You can configure up to 256 consistency groups in a storage system, including SI, SIz, Thin Image (HTI), and Copy-on- Write Snapshot (SS) consistency groups. Note: SI, SIz, HTI, and SS pairs cannot co-exist in the same consistency group. You can define up to 8,192 SI pairs in a consistency group. Note: LUSE volumes that contain n LDEVs should be counted as n volumes. For more information, see the Provisioning Guide for Open Systems. A number (0 FF) is assigned to each consistency group. You specify a consistency group number when you create pairs. If you do not specify a number, the storage system automatically assigns it. - Consistency group numbers 00 to 7F (or 0 to 127) that you can use for SI, SIz, HTI, and SS. Consistency group numbers 80 to FF (or 128 to 255) are exclusively used for HTI and SS. License capacity requirements The total capacity of pair volumes must be less than the maximum volume capacity licensed to you. After operations begin, you should be aware of capacity requirements in order to keep volumes total size within purchased capacity. P-VOLs, S-VOLs, and volumes are reserved for use as S-VOLs must have licensed capacity. SS P-VOLs and pool volumes require the SI license capacity. Requirements and planning 2-3
26 If you are using a volume for multiple purposes, the capacity of the volume is counted only once. You do not need to multiply the capacity by the number of purposes for which it is used. If you are using a Dynamic Provisioning volume as an SI P-VOL or S-VOL (or as a reserved volume), the capacity of the Dynamic Provisioning pool allocated to the volume is added to the SI license capacity. The reason is because Dynamic Provisioning volumes are not updated in real time. As a result, some write requests may cause excess data, which is saved in the pool. When your SI volumes exceed license capacity, you are allowed to use the volumes for additional 30 days. After that, you cannot perform SI operations except to delete pairs. For more information, see the Hitachi Storage Navigator User Guide. Planning pair volumes You must create volumes for P-VOLs and S-VOLs prior to creating pairs. For more information about the system requirements for pair volumes, see System requirements on page 2-2. Also, you can use the following options: Before creating a pair, you can reserve a volume as an S-VOL. This ensures that an I/O does not occur in the reserved volume before creating the pair. You can only use reserved volumes as S-VOLs. If you use CCI, you can place a group of pairs in a consistency group. Using the consistency group, you can perform pair operations on all the pairs in the group at the same time, including consistency group pair-split operations. For more information about setting up consistency groups and performing pair operations, see the Command Control Interface User and Reference Guide. Planning number of pairs You can calculate the number of system resources required for an SI pair. With this information you can calculate the maximum number of pairs allowed on your system. Differential tables (tables managing differential bitmaps) and pair tables are required to create pairs. You must supply an adequate number of tables to handle all the pairs you plan to create. The number of differential and pair tables that are present in the system depends on additional shared memory that is installed. Therefore, you must ensure that you have sufficient additional shared memory to handle the number of pairs. 2-4 Requirements and planning
27 Number of differential tables, pair tables, and volumes per additional shared memory The following table shows the number of differential and pair tables and the number of volumes allowed per additional shared memory. The maximum number of pairs is half the number of volumes shown, when P-VOLs and S- VOLs are in a one-to-one relationship. For example, if additional shared memory is not installed, since the number of volumes is 16,384, then the number of pairs you can create is 8,192. This example assumes one S-VOL per P-VOL. If there are more S-VOLs than P- VOLs, then the number of allowed pairs decreases. However, for Extension 1 and Extension 2, the maximum number of pairs is 16,384, regardless of the total number of system volumes. Additional shared memory Number of diff. tables Number of pair tables Number of system volumes Base (No additional shared memory) 26,176 8,192 16,384 Extension 1 104,768 16,384 65,536 Extension 2 209,600 16,384 65,536 You can determine the maximum number of pairs that can be created on your system by calculating the number of differential and pair tables your system needs to create SI pairs. This number must be equal to or less than the difference of the total number of differential and pair tables in the storage system, minus the number of tables being used by the other products (for example, Hitachi Compatible FlashCopy ). The following software products also use differential tables: SIz Compatible FlashCopy Compatible FlashCopy SE Volume Migration SS The following software products also use pair tables: SIz Volume Migration (using migration plans) Note: You can use CCI s inqraid command to query the number of the differential tables required when you create SI pairs, though not for creating SIz pairs. For SI, you can also query the number of differential tables not used in the storage system with this command. For more information about the inqraid command, see the Command Control Interface User and Reference Guide. Requirements and planning 2-5
28 Calculating the number of differential tables and pair tables Calculations in the following sections assume that you are only using SI in the system. The emulation type of your volumes affects the number of differential and pair tables. To calculate the number of differential and pair tables for emulation types other than OPEN-V Total number of differential tables per pair = (volume capacity KB 48) + (number of the control cylinders* 15) (20,448**) * See the following table. ** Number of slots that can be managed by a differential table Round up the total number to the nearest whole number. For example, if the number of the cylinders of the divided volume is 2,403,360 KB, the calculation of the total number of the differential tables is as follows: (2,403, ) 20,448 = Rounding up to the nearest whole number changes it to 3. In this example, the total number of the differential tables for one pair is 3. Because one pair table is used for up to 36 differential tables, the total number of the pair tables for a pair in this example is 1. To calculate the number of differential and pair tables for OPEN-V Total number of the differential tables per pair = (volume capacity KB 256) 20,448* * Number of the slots that can be managed by a differential table Round up the total number to the nearest whole number. For example, if the number of the cylinders of the divided volume is 3,019,898,880 KB, the calculation of the total number of the differential tables is as follows. (3,019,898, ) 20,448 = Rounding up to the nearest whole number changes it to 577. In this example, the total number of the differential tables for one pair is 577. Because one pair table is used for up to 36 differential tables, the total number of the pair tables for a pair is 17. (Only OPEN-V can use more than one pair table per pair.) The following table shows control cylinders per emulation type. Emulation type Number of control cylinders OPEN-3 OPEN-8, OPEN-9 OPEN-E 8 (5,760KB) 27 (19,440KB) 19 (13,680KB) 2-6 Requirements and planning
29 Emulation type Number of control cylinders OPEN-K OPEN-L OPEN-V 9 (6,480KB) 7 (5,040KB) 0 (0KB) If the volume is divided by VLL, use the volume capacity after the division. Note: You cannot perform VLL operations on OPEN-L volumes. Having determined the number of differential and pair tables required per pair on your storage system, you can now calculate the maximum number of pairs. Calculating maximum number of pairs Finding the number of pairs that can be created on your system depends on whether you use LUSE volumes or not. Two calculations are provided below, one without LUSE, and one with LUSE. To calculate the maximum number of pairs allowed on your system without LUSE volumes Use the following formula: Σ {(α) x (the number of SI pairs)} (β) and Σ {(γ) x (the number of SI pairs)} (δ) where: (α): Required number of differential tables per pair (per previous calculation). (β): Number of differential tables available in the system (see Number of differential tables, pair tables, and volumes per additional shared memory on page 2-5). (γ): The required number of pair tables per pair (per previous calculation). (δ): The number of pair tables available in the system (see Number of differential tables, pair tables, and volumes per additional shared memory on page 2-5). For example, if you are to create 10 pairs of OPEN-3 volumes and 20 pairs of OPEN-V volumes in a storage system that has 26,176 differential tables, you can use the equation as follows: If the emulation type is OPEN-3 and the capacity of the volume is 2,403,360 kb, 3 differential tables and a pair table is required for a pair. If the emulation type is OPEN-V and the capacity of the volume is 3,019,898,880 kb, 577 differential tables and 17 pair tables are required for a pair. Requirements and planning 2-7
30 If you apply these numbers in equation: 3 x x 20 = 11,570 less-than-or-equal-to 26,167 and also 1 x x 20 = 350 less-than-or-equal-to 8,192 Thus, 10 pairs of OPEN-3 volumes and 20 pairs of OPEN V volumes can be created. To calculate the maximum number of pairs allowed on your system with LUSE volumes Σ[Σ {(α) x (the number of the volumes that forms LUSE volumes)} x (the number of SI pairs)] (β) and also Σ[Σ {(γ) x (the number of the volumes that forms LUSE volumes)} x (the number of SI pairs)] (δ) where: (α): Required number of differential tables that forms a LUSE volume. When you use LUSE volumes, each volume forming the LUSE volume uses the differential tables. For example, if you create an SI pair using LUSE volumes, which are created by combining two OPEN-V volumes, you need differential tables for two OPEN-V pairs. (β): Number of differential tables available in the system (see Number of differential tables, pair tables, and volumes per additional shared memory on page 2-5). (γ): The required number of pair tables for each volume that forms a LUSE volume. (δ): The number of pair tables available in the system (see Number of differential tables, pair tables, and volumes per additional shared memory on page 2-5). For example, if you are to create 10 pairs of LUSE volumes consisting respectively of three OPEN-3 volumes in a storage system that has 26,176 differential tables, you can use the equation condition as follows: When the emulation type is OPEN-3, and if the capacity of the volume is 2,403,360 kb, the number of differential tables required for a pair is 3, and the number of pair tables required for a pair will be 1. If you apply this number to the above-mentioned equation: (3 x 3) x 10 = 90 <= 26,176 and also (1 x 3) x 10 = 30 <= 8,192 Therefore, you can see that 10 SI pairs, which are formed by three OPEN-3, volumes can be created. 2-8 Requirements and planning
31 Organizing volumes into P-VOLs and S-VOLs Before creating pairs, you must prepare volumes for SI. The following table provides an example of volume information to prepare volumes. CU Port GID: LUN Pair Volume Type Associate d L1 S- VOLs Associate d L1 P- VOLs Associated L2 S-VOLs Associated L2 P-VOL 0 1A 0:00 L1 P-VOL 1B-0:00, 2A-0:00, 2B-0:00 0 1A 0:01 L1 P-VOL 1B-0:01, 2A-0:01, 2B-0:01 NA NA NA NA NA NA etc... NA NA NA NA NA NA NA 0 1B 0:00 L1 S-VOL L2 P-VOL 0 1B 0:01 L1 S-VOL L2 P-VOL NA 1A-0:00 3A-0:00, 3A-0:01 NA 1A-0:00 3B-0:00, 3B-0:01 NA NA etc... NA NA NA NA NA NA NA 0 2A 0:00 L1 S-VOL L2 P-VOL 0 2A 0:01 L1 S-VOL L2 P-VOL NA 1A-0:00 4A-0:00, 3B-0:01 NA 1A-0:00 4B-0:00, 3B-0:01 NA NA etc... NA NA NA NA NA NA NA 0 3A 0:00 L2 S-VOL NA NA NA 1B-0:00 0 3A 0:01 L2 S-VOL NA NA NA 1B-0:00 Planning for performance Pair operations affect I/O performance on the storage system. The following information is provided to help calibrate your system: Performance versus number of pairs. Compare the importance of performance with the number of pairs and copy pace (rate at which data is copied). Assigning multiple S-VOLs to a P-VOL uses more system resources and lowers performance. The slower the copy pace, the less impact on I/O performance; a fast pace has a greater impact on performance. (You assign copy pace while creating, splitting, and resynchronizing pairs.) Load sharing on parity groups. A parity group should contain an even distribution of P-VOLs and S- VOLs, rather than a concentration of one or the other. Requirements and planning 2-9
32 If you plan to perform multiple pair operations simultaneously, place the pairs in different parity groups. For copy pace, specify Slower when you create, split, or resynchronize. If you plan to perform a copy operation on multiple pairs on the same parity group, perform the operation on one pair at a time. If the system is overloaded, increase parity groups, cache, channel adapters (CHAs), and/or disk adapters (DKAs). Assign S-VOLs to newly installed parity groups. When using multiple software products simultaneously. If you are using more than one software product at the same time, ensure that your storage system is configured for optimal performance, such as sufficient cache. Contact the Hitachi Data Systems customer support. Concurrent use affects the performance and the operation of the other software products. When using AIX host servers. Best performance results when P-VOLs are located on one AIX host server and paired S-VOLs on another. The problem with using one AIX host server for both P-VOLs and S-VOLs is that during the paircreate or pairresync operation, the P-VOL and S-VOLs have the same PVID. If the host server reboots when this is the case, it can mis-identify the volumes and identify the S-VOL as the P-VOL after rebooting. Preparing for resynchronization by Quick Restore. During a quick restore operation, in which the contents of the P-VOL and S-VOLs are swapped, the RAID levels, HDD types, and Cache Residency Manager settings of the two volumes are also exchanged. To avoid performance impact, consider the following: Both pair volumes should have the same RAID level and HDD type before performing the quick restore operation. You can resume the original RAID levels after the quick restore by again splitting the pair and performing the quick restore. Set the same Cache Residency Manager settings (locations) for the P- VOL and S-VOLs before the quick restore operation. Alternatively, you can release Cache Residency Manager settings before the quick restore operation, then reset them when the operation is completed. For more information about settings, see the Hitachi Virtual Storage Platform Performance Guide. Caution: Do not perform the Quick Restore when the P-VOL and S-VOLs are in different CLPRs, otherwise the two volumes will be reversed when the operation completes. Consistency group pair-split With a consistency group, you perform tasks and change the pair status on a group of pairs. This allows you to copy data from the P-VOLs in the 2-10 Requirements and planning
33 consistency group to the S-VOLs simultaneously. The S-VOLs will contain the same data as the P-VOLs when the operation is performed. The following is a list of requirements and restrictions: CCI is required to run this and all operations on the pairs in the consistency group. If you have performed pair operations using the SN after creating pairs using CCI, you cannot use consistency group pairsplit. Pairs in the CCI copy group must be in an SI consistency group. You can use consistency group pair-split when SI P-VOLs are shared with UR or TC S-VOLs. For more information, see Consistency group pair-split for shared volumes on page Consistency group pair-split for shared volumes If you share SI P-VOLs in a storage system with TC or UR S-VOLs, you can use consistency group pair-split to keep the SI S-VOLs consistent. The following illustrations show consistency group pair-split with TC and with UR. Requirements and planning 2-11
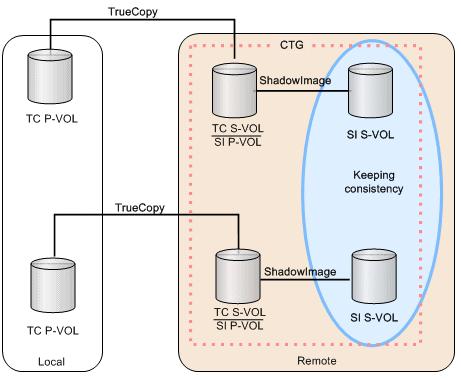
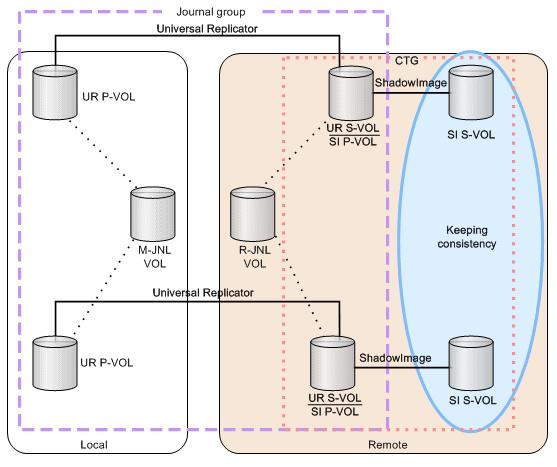
34 2-12 Requirements and planning
35 The following takes place when you use consistency group pair-split with shared UR volumes: 1. UR restore journal data created before the split time is restored to UR S- VOLs (SI P-VOLs). 2. Restore journal operations are suspended when UR detects restore journal data with a time stamp later than the split time. After the UR suspension, the SI split operations run. 3. When SI split operations are completed, UR resumes the suspended restore journal operations. Requirements, restrictions, and recommendations for shared volumes The following is a list of the requirements, restrictions, and recommendations for using consistency group pair-split with shared TC or UR volumes: CCI is required. You must share the SI P-VOLs with the UR or TC S-VOLs. The SI pairs must be registered in the same SI consistency group to ensure consistent backup operations. If you are sharing SI P-VOLs in a storage system with UR or TC S-VOLs, to prevent the consistency group pair-split from ending abnormally, ensure the status of all UR or TC pairs in the consistency group is the same, PAIR or PSUS. You can perform one split operation per SI consistency group. UR pairs must belong to the same journal group. If multiple journal groups are registered in one SI consistency group, consistent backup cannot be ensured on SI S-VOLs. With UR, three split operations can be performed per UR journal (equivalent to three SI consistency groups). Consistency group pair-split and supported pair statuses The pair status for all of the SI pairs in the consistency group determines if you can perform a consistency group pair-split. If all of the SI pairs in the consistency group are paired ( PAIR status), you can perform a consistency group pair-split. The following table shows when you can perform a consistency group pairsplit based on the SI pairs in the consistency group that are not paired (a status other than PAIR ), and the resulting pair status after you perform a consistency group pair-split. The status of the pairs in the consistency group that have a status other than PAIR Can you perform a consistency group pair-split? Status after you perform a consistency group pair-split COPY(PD)/COPY YES PSUS Requirements and planning 2-13
36 The status of the pairs in the consistency group that have a status other than PAIR Can you perform a consistency group pair-split? Status after you perform a consistency group pair-split COPY(SP)/COPY YES 2 PSUS PSUS(SP)/PSUS YES 2 PSUS PSUS YES 2 PSUS COPY(RS)/COPY COPY(RS-R)/RCPY PSUE NO The command ends abnormally and shows the following information: [EX_CMDRJE] An order to the control/command device was rejected 1 NO The command ends abnormally and shows the following information: [EX_CMDRJE] An order to the control/command device was rejected 1 NO The command ends abnormally and shows the following information: [EX_CMDRJE] An order to the control/command device was rejected The pair statuses remain the same. The pair statuses remain the same. The pair statuses remain the same. Notes: 1. If you share the UR S-VOL and the SI P-VOL, the command may end normally after you perform a consistency group pair-split. Ensure the status of the pairs within the consistency group have changed to PSUS (use the pairdisplay command). 2. Consistency is guaranteed only for SI pairs in PAIR or COPY(PD)/COPY status. The following are examples of when you can perform a consistency group pair-split based on status of the SI pairs in the consistency group: Example 1 The are six SI pairs in a consistency group. Two of the pairs are paired ( PAIR status), two are in COPY(PD)/COPY status, and two are in PSUS status. In this case, you can perform a consistency group pairsplit, and doing so changes the status of all of the pairs in the consistency group to PSUS. Example 2 There are two SI pairs in a consistency group and one is paired ( PAIR status) and the other is in the process of being resynchronized ( COPY(RS)/COPY status). In this case, you cannot perform a consistency group pair-split Requirements and planning
37 Example 3 The are six SI pairs in a consistency group. Two of the pairs are paired ( PAIR status), two are in the process of Quick Split ( PSUS(SP)/PSUS status), and two are in PSUE status. In this case, the consistency group pair-split ends abnormally and the status of all of the pairs in the consistency group remains the same. Requirements and planning 2-15
38 2-16 Requirements and planning
39 3 Sharing ShadowImage volumes You can share SI volumes with other Hitachi software product volumes. This topic discusses requirements, recommendations, and restrictions for sharing volumes. Cache Residency Manager Thin Image and Copy-on-Write Snapshot Data Retention Utility Dynamic Provisioning and Dynamic Tiering High Availability Manager LUN Manager Open Volume Management Resource Partition Manager TrueCopy Universal Replicator Universal Volume Manager Volume Migration Sharing ShadowImage volumes 3-1
40 Cache Residency Manager You can use volumes with Cache Residency Manager settings as SI P-VOLs and S-VOLs. Note: For important information about the operation and volumes with Cache Residency Manager settings, see the bullet on Quick Restore in Planning for performance on page 2-9. Thin Image and Copy-on-Write Snapshot You can share SI volumes with HTI and SS volumes. You can assign shared pairs to consistency groups, though not to the same consistency group. The following table shows how you can share volumes. HTI and SS volumes P-VOL (all statuses except RCPY) 1 SI volume P-VOL S-VOL Reserve volume YES YES 2 NO V-VOL NO NO NO Data pool NO NO NO 1. An HTI or SS P-VOL in RCPY status cannot be used by SI. For more information, see the following tables. 2. The SI pair must be created before the HTI or SS pair. SI pair operations that you can perform are limited according to the HTI or SS pair status. The following topics show the SI supported operations. Sharing HTI or SS primary volumes with SI primary volumes The following table shows the pair operations allowed when the P-VOL is shared with an HTI or SS P-VOL. HTI or SS pair status SI operation COPY 1 PAIR, PFUL PSUS, PFUS COPY 2 RCPY PSUE Create a pair (paircreate) YES YES YES YES NO YES Create and split a pair (paircreate - split) YES YES YES YES NO YES Split a pair (pairsplit) YES YES YES YES NO YES Resynchronize a pair (pairresync) YES YES YES YES NO YES Restore a pair (pairresync -restore) YES YES 3 YES YES NO YES Restore a pair 4 NO NO NO NO NO NO 3-2 Sharing ShadowImage volumes
41 HTI or SS pair status SI operation COPY 1 PAIR, PFUL PSUS, PFUS COPY 2 RCPY PSUE (pairresync -restore) Suspend a pair operation (pairsplit -E) Delete a pair (pairsplit -S) YES YES YES YES YES YES YES YES YES YES YES YES 1. COPY status during initial copy. 2. COPY status during resynchronization. 3. After executing the pairsplit command on the HTI or SS pair, you must confirm that all pairs in the HTI or SS consistency group are in PSUS status before performing the SI operation. This ensures that all snapshot data is consistent with P-VOL data, and therefore is ready to use in the SI operation. 4. When the host accesses the HTI or SS S-VOL, HTI or SS P-VOL data may be used. Therefore you cannot perform a Quick Restore to swap the SI P-VOL and S-VOLs. Sharing the HTI or SS primary volume with the SI secondary volume The following table shows the pair operations that are supported when the SI S-VOL is shared with an HTI or SS P-VOL. HTI or SS pair status SI operation COPY 1 PAIR, PFUL PSUS, PFUS COPY 2 RCPY PSUE Create a pair (paircreate) NO NO NO NO NO NO Create and split a pair (paircreate - split) NO NO NO NO NO NO Split a pair (pairsplit) YES YES 1 YES YES NO YES Resynchronize a pair (pairresync) YES YES 1 YES YES NO YES Restore a pair (pairresync -restore) YES YES 3 YES YES NO YES Quick Restore a pair 4 (pairresync -restore) Suspend a pair operation (pairsplit -E) Delete a pair (pairsplit -S) NO NO NO NO NO NO YES YES YES YES NO YES YES YES YES YES YES YES 1. COPY status during initial copy. 2. COPY status during resynchronization. 3. After running the pairsplit command on the HTI or SS pair, you must confirm that all pairs in the HTI or SS consistency group are in PSUS status before performing the SI operation. This ensures Sharing ShadowImage volumes 3-3
42 SI operation COPY 1 PAIR, PFUL HTI or SS pair status PSUS, PFUS COPY 2 RCPY PSUE that all snapshot data is consistent with P-VOL data, and therefore is ready to use in the SI operation. 4. When the host accesses the HTI or SS S-VOL, HTI or SS P-VOL data may be used. Therefore you cannot perform a Quick Restore to swap the SI P-VOL and S-VOLs. Data Retention Utility Access attributes and ShadowImage operations You can create SI pairs using volumes for which you set access attributes with Data Retention Utility. However, depending on the access attribute, SI pair operations and reserve attribute change operations cannot be performed. The following tables show whether SI pair operations and reserve attribute change operations can be performed for volumes for which access attributes are set with Data Retention Utility. You can also set access attributes for SI P-VOLs, S-VOLs, and reserve volumes. For SI pair operations and reserve attribute change operations after access attribute setting, see the following tables. Note: The Data Retention Utility access attributes of volumes do not change as a result of SI operations. Even though the Quick Restore operation reverses the P-VOL and S-VOL, the access attributes of the P-VOL and S-VOL are not reversed. The following table shows volume access attribute and SI pair operations. Volume access attributes specified for the SI pair SI operations P-VOL S-VOL Create, Split, Suspend, Resync (forward) Resync (reverse) Delete Read/Write Read/Write YES YES YES Read Only, Protect, S-VOL Disable Read/Write YES NO YES Read/Write, Read Only, Protect, S- VOL Disable Read Only, Protect, S-VOL Disable NO NO YES The following table shows access attributes and SI reserve attribute change operations. 3-4 Sharing ShadowImage volumes
43 Volume access attributes specified by SI SI reserve attribute change operation Setting reserve attribute Removing reserve attribute Read/Write YES YES Read Only, Protect, S-VOL Disable NO YES ShadowImage pair statuses and access attribute settings Depending on the SI pair status, you may not be able to set access attributes for SI P-VOL or SI S-VOL using Data Retention Utility. For SI reserve volumes, you can set all of the following Data Retention Utility access attributes: Read/Write Read Only Protect S-VOL Disable The following table shows whether access attributes can be set for SI pairs. Volume specified by SI Pair status Volume Read/Write Attribute setting Read Only, Protect, or S-VOL Disable COPY P-VOL YES YES S-VOL YES NO PAIR P-VOL YES YES S-VOL YES NO COPY(SP)/COPY P-VOL YES YES S-VOL YES NO PSUS(SP)/PSUS P-VOL or S-VOL YES YES PSUS P-VOL or S-VOL YES YES SMPL(PD) P-VOL or S-VOL YES YES COPY(RS)/COPY P-VOL YES YES S-VOL YES NO COPY(RS-R)/ RCPY P-VOL or S-VOL YES NO PSUE P-VOL or S-VOL YES YES Sharing ShadowImage volumes 3-5
44 Dynamic Provisioning and Dynamic Tiering You can share Hitachi Dynamic Provisioning (HDP) and Hitachi Dynamic Tiering software (HDT) volumes with SI P-VOLs and S-VOLs. You can also use HDP and HDT volumes with SI reserved volumes. The following restrictions apply: You should share HDP and HDT volumes with both the SI P-VOL and S- VOLs, rather than one or the other. If you share an HDP or HDT volume with only the P-VOL, or only the S- VOL, you cannot perform the Quick Restore operation. To perform the Quick Restore, both P-VOL and S-VOLs must be shared with HDP or HDT volumes. Also, sharing an HDP or HDT volume with only the S-VOL is not recommended for the Quick Restore because the S-VOL consumes the same amount of the pool capacity as the P-VOL. You cannot perform SI pair operations while doing the following: Increasing HDP volume capacity Initializing the HDP pool The maximum size of HDP or HDT volume that you can use as an SI P- VOL, S-VOL, and reserve volume is 4 TB ( bytes). Caution: You cannot use TB, GB, or MB specifications for SI volumes. If you want to create a 4 TB P-VOL, secondary, or reserve volume, do not use the terabyte specification; instead only use the block specification. The block-size equivalent to 4 TB is blocks. Peforming an SI paircreate or pairresync operation while zero pages are being reclaimed (including operations by Writesame, Unmap, and Rebalance) results in the zero-page reclamation being interrupted. SI pair creation might be rejected if the Unmap command operation is in progress with system option mode 905 ON. Wait a while and then retry the operation. If the operation still fails, set system option mode 905 to OFF and retry again. High Availability Manager You can share the SI P-VOL with the High Availability Manager (HAM) S-VOL. However, you cannot share other HAM volumes. You cannot share the HAM P-VOL with SI. You cannot share the HAM quorum disk with SI. SI pair operations are limited according to the HAM pair status. The following table shows the pair operations that are allowed. 3-6 Sharing ShadowImage volumes
45 SI operation HAM pair status COPY PAIR PSUE PSUS SSWS Create a pair (paircreate) YES YES YES YES YES Create and split a pair (paircreate -split) YES YES YES YES YES Split a pair (pairsplit) YES YES YES YES YES Resynchronize a pair (pairresync) Restore a pair (pairresync - restore) Quick Restore a pair (pairresync -restore) Interrupt a pair operation (pairsplit -E) Delete a pair (pairsplit -S) YES YES YES YES YES NO NO YES YES YES NO NO YES YES YES YES YES YES YES YES YES YES YES YES YES Note: Write processing to the HAM P-VOL requires more time generally, but especially when SI pair status is PSUS(SP), during which copy processing occurs. For more information on sharing HAM volumes with SI, see the Hitachi High Availability Manager User Guide. LUN Manager LUN Manager operations do not affect SI operations. You can assign volumes that are under secure ports and/or that are assigned to World Wide Name (WWN) groups and/or LUN groups to SI pairs. You can also use volumes that are assigned to SI pairs in LUN Manager operations, such as assignment to WWN groups, and/or LUN groups. A host cannot access SI S-VOLs except when the pair is split. Open Volume Management You can use both LUSE and Virtual LUN volumes as SI volumes. With LUSE volumes, the P-VOL and S-VOLs must have the same configuration (the same LU capacity and the same number of LUs). With Virtual LUN volumes, the P-VOL and S-VOLs must have the same capacity. Sharing ShadowImage volumes 3-7
46 Resource Partition Manager You can specify volumes in a Resource Partition Manager resource group as SI P-VOLs and S-VOLs. However, ensure the resource group is assigned to one of your user groups. The resource group must be assigned to a user group for which your user account has privileges. For more information about Resource Partition Manager, see the Provisioning Guide for Open Systems TrueCopy You can share TC volumes with SI volumes. You can share SI P-VOLs and S-VOLs with TC P-VOLs and S-VOLs. However, you cannot share an SI S-VOL with a TC S-VOL. When you share an SI P-VOL with a TC S-VOL, the write operation on the TC P-VOL takes more time. This is especially true when the SI pair is in the PSUS(SP) status because of the copying time needed for the SI pair. You can use both L1 and L2 pairs with TC volumes. Both node and leaf S- VOLs are considered S-VOLs by TC. You can perform the Quick Restore operation on an SI pair when the TC pair is suspended. The SI P-VOL can be shared with TC volumes in a 3 data center configuration. For more information, see Sharing volumes in a 3-TC/UR DC cascade configuration on page You can use the consistency group pair-split operation on SI pairs whose volumes are shared with TC S-VOLs. For more information, see Consistency group pair-split for shared volumes on page For more information about sharing SI and TC volumes, see the section on sharing volumes with SI in the Hitachi TrueCopy User Guide. Universal Replicator You can share UR volumes with SI volumes. You can share SI P-VOLs with UR P-VOLs and S-VOLs. You cannot share SI S-VOLs with UR S-VOLs. You cannot share SI pair volumes with UR journal volumes. You can use both L1 and L2 pairs with UR volumes. Both node and leaf S- VOLs are considered S-VOLs by UR. You cannot perform the Quick Restore operation on the SI pair when the UR pair is suspended. You can share SI volumes with UR volumes in a 3 UR data center configuration. For more information, see Sharing volumes in 3-UR data center configurations on page Sharing ShadowImage volumes

47 You can share the SI P-VOL with UR and TC volumes in a 3 UR/TC data center configuration. For more information, see Sharing volumes in a 3- TC/UR DC cascade configuration on page You can use the consistency group pair-split operation on SI pairs whose volumes are shared with UR S-VOLs. For more information, see Consistency group pair-split for shared volumes on page For more information about sharing SI and UR volumes, see the related appendix in the Hitachi Universal Replicator User Guide. Sharing volumes in 3-UR data center configurations You can share SI pair volumes with UR volumes in the following 3-UR data center (3DC) configurations: Multi-target Delta-resync Cascade These sections describe the configurations and supported SI operations. For more information about these configurations, see the Hitachi Universal Replicator User Guide. Sharing volumes in a 3-UR DC multi-target configuration You can share SI volumes with UR volumes in 3 DC multi-target configurations. You can share the SI P-VOL and S-VOLs with UR volumes, as shown in the following figure. Figure 3-1 SI volumes in a 3-UR DC multi-target configuration In these configurations, SI pair operations are dependent on the pair status of the UR local-intermediate pair and the local-remote pair. The following table shows the supported SI operations when the P-VOL is shared with UR P-VOL. Sharing ShadowImage volumes 3-9
48 UR localintermed. pair status UR intermed.- remote pair status SI operations Create, Split, Suspend, Delete, Resync--Normal Copy, Quick Resync Resync -- Reverse Copy, Resync -- Quick Restore PAIR, COPY(PD)/ COPY*, and PSUS/SSWS PAIR or COPY(PD)/COPY YES NO NO PAIR or COPY(PD)/ COPY PSUS/SSWS YES NO NO PSUS/SSWS PSUS/SSWS YES YES NO * You cannot perform SI operations if the status for both UR pairs is COPY. The following table shows the supported SI operations when the S-VOL is shared with UR P-VOL. UR localintermed. pair status UR intermed.- remote pair status Create Split SI operations Suspend, Delete Resync Normal Copy, Quick Resync, Reverse Copy Quick Restore PAIR, COPY(PD)/ COPY*, or PSUS/SSWS PAIR or COPY(PD)/ COPY* NO NO YES NO NO PAIR or COPY PSUS/SSWS NO NO YES NO NO PSUS/SSWS PSUS/SSWS NO YES YES YES NO * You cannot perform SI operations if the status for both UR pairs is COPY(PD)/COPY. The following table shows the supported SI operations when the P-VOL is shared with UR S-VOL (intermediate or remote site). SI operations UR* pair status Create, Split, Suspend, Delete, Resync--Normal Copy, Quick Resync Resync -- Reverse Copy, Quick Restore PAIR or COPY(PD)/COPY YES NO PSUS/SSWS YES YES * Note: If the SI P-VOL is shared with the intermediate site s UR S-VOL, then check UR status for the localintermediate pair Sharing ShadowImage volumes

49 UR* pair status SI operations Create, Split, Suspend, Delete, Resync--Normal Copy, Quick Resync Resync -- Reverse Copy, Quick Restore If the SI P-VOL is shared with the remote site s UR S-VOL, then check UR status for the local-remote pair. Sharing volumes in 3-UR DC delta resync (multi-target) configuration The following figure shows multi-target with delta resync configurations that include SI volumes. Figure 3-2 SI volumes in a delta resync (multi-target) configuration Supported operations for SI pairs on the local and remote sites (related to the non-delta resync UR pairs) are the same as those shown in the tables in Sharing volumes in a 3-UR DC multi-target configuration on page 3-9. Supported operations for SI pairs at the intermediate and remote sites (related to the delta resync pair), and UR status requirements, are shown in the following table. They are the same whether you perform the SI operation at the intermediate or remote site. SI operations UR A or B 1, pair status UR C 2 pair status Create, Split, Suspend, Delete, Resync--Normal Copy, Quick Resync Resync -- Reverse Copy, Quick Restore PAIR, COPY(PD)/ COPY, or PSUS/SSWS HOLD or HLDE YES NO 1. Local-intermediate pair, or local-remote pair 2. Delta resync pair Sharing ShadowImage volumes 3-11

50 Sharing volumes in a 3-UR DC cascade configuration You can share SI volumes with UR volumes in 3 DC cascade configurations. You can share SI P-VOL and S-VOLs with UR volumes, as shown in the following figure. Figure 3-3 SI volumes in a 3-UR DC cascade configuration When associated with these configurations, SI pair operations are dependent on the pair status of the UR local-intermediate pair and the local-remote pair. The following table shows the SI operations that you can perform when the P- VOL is shared with UR P-VOL at local site. UR localintermed. pair status SI operations Create, Split, Suspend, Delete, Resync--Normal Copy, Quick Resync Resync--Reverse Copy and Quick Restore PAIR or COPY(PD)/COPY YES NO PSUS/SSWS YES YES The following table shows the SI operations that you can perform when the S-VOL is shared with UR P-VOL at local site. SI operations UR local-intermed. pair status Pair create Pair split Suspend, Delete Resync - all types PAIR NO NO YES NO COPY(PD)/COPY NO NO YES NO PSUS/SSWS NO YES YES YES The following table shows the SI operations that you can perform when the P- VOL is shared with UR S-VOL/P-VOL at intermediate site Sharing ShadowImage volumes
51 UR localintermed. pair status UR intermed.- remote pair status SI operations Create, Split, Suspend, Delete, Resync--Normal Copy, Quick Resync Resync -- Reverse Copy, Resync -- Quick Restore PAIR, COPY(PD)/ COPY*, and PSUS/SSWS PAIR or COPY(PD)/COPY YES NO NO PAIR or COPY(PD)/ COPY PSUS/SSWS YES NO NO PSUS/SSWS PSUS/SSWS YES YES NO * You cannot perform SI operations if the status for both UR pairs is COPY(PD)/COPY. The following table shows the SI operations that you can perform when the P- VOL is shared with UR S-VOL at remote site. UR intermed.- remote pair status SI operations Create, Split, Suspend, Delete, Resync--Normal Copy, Quick Resync Resync -- Reverse Copy, Quick Restore PAIR or COPY(PD)/COPY YES NO PSUS/SSWS YES YES Sharing volumes in a 3-UR DC delta resync (cascade) configuration The cascade delta resync configuration with shared SI volumes is shown in the following figure. You can share SI P-VOLs with the delta resync P-VOL and the S-VOL. Sharing ShadowImage volumes 3-13

52 Figure 3-4 SI volumes in a delta resync (cascade) configuration When a delta resync pair is part of the 3 DC cascade configuration, supported operations for SI pairs are dependent on the UR pairs. The following table shows the SI operations that you can perform when the P- VOL is shared with the UR P-VOL/delta resync at the local site. UR localintermed. pair status UR delta resync pair status SI operations Create, Split, Suspend, Delete, Resync--Normal Copy, Quick Resync Resync -- Reverse Copy, Quick Restore PAIR, COPY, or PSUS/ SSWS HOLD or HLDE YES NO The following table shows the SI operations that you can perform when the S-VOL is shared with the UR P-VOL/delta resync P-VOL at the local site. UR localintermed. pair status UR delta resync pair status Pair create, Pair split SI operations Suspend, Delete Resync -- All types PAIR, COPY, or PSUS/SSWS HOLD or HLDE NO YES NO The following table shows the SI operations that you can perform when the P- VOL is shared with the UR S-VOL/P-VOL at the intermediate site Sharing ShadowImage volumes
53 UR localintermed. pair status UR intermed.- remote pair status SI operations Create, Split, Suspend, Delete, Resync--Normal Copy, Quick Resync Resync -- Reverse Copy, Resync -- Quick Restore PAIR, COPY*, and PSUS/ SSWS PAIR or COPY YES NO NO PAIR or COPY PSUS/SSWS YES NO NO PSUS/SSWS PSUS/SSWS YES YES NO * You cannot perform SI operations if the status for both UR pairs is COPY(PD)/COPY. The following table shows the SI operations that you can perform when the P- VOL is shared with the UR S-VOL/delta resync S-VOL at the remote site. UR intermed.- remote pair status UR delta resync pair status SI operations Create, Split, Suspend, Delete, Resync--Normal Copy, Quick Resync Resync -- Reverse Copy, Quick Restore PAIR, COPY, or PSUS/SSWS HOLD or HLDE YES NO Sharing volumes in 3-UR/TC data center configurations You can share SI pair volumes with UR and TC volumes in the following 3- UR/TC DC configurations: Multi-target Cascade Delta-resync These sections describe the configurations and supported SI operations. For more information about these configurations, see the Hitachi Universal Replicator User Guide. Sharing volumes in 3-UR/TC DC multi-target and delta resync configurations You can share SI P-VOL with TC and UR volumes at the intermediate and remote sites in 3DC multi-target and delta resync configurations, as shown in the following figure. Sharing ShadowImage volumes 3-15
/ COPY PAIR or")
54 The SI operations that you can perform depend on the pair status of the other pairs. The following table shows supported SI operations at the intermediate site. TC localintermed. pair status UR delta resync pair status SI operations Create, Split, Suspend, Delete, Resync--Normal Copy, Quick Resync Resync -- Reverse Copy, Resync -- Quick Restore PAIR or COPY(PD)/ COPY PAIR or COPY(PD)/ COPY PSUS/ SSWS PSUS/ SSWS HOLD YES NO NO HLDE YES NO NO HOLD YES YES NO HLDE YES YES NO The following table shows supported SI operations at the remote site. UR localremote pair status UR delta resync pair status SI operations Create, Split, Suspend, Delete, Resync--Normal Copy, Quick Resync Resync -- Reverse Copy, Resync -- Quick Restore PAIR or COPY(PD)/ COPY PSUS/ SSWS HOLD YES NO NO HOLD YES YES NO 3-16 Sharing ShadowImage volumes


55 Sharing volumes in a 3-TC/UR DC cascade configuration You can share SI P-VOL with TC and UR pairs at the intermediate site in 3DC cascade configurations, as shown in the following figure. Figure 3-5 UR, TC, and SI Shared Volume Configuration 1 Figure 3-6 UR, TC, and SI Shared Volume Configuration 2 You can perform all SI operations, with the following exceptions, in the intermediate site, irrespective of TC pair status. The UR delta resync pair s status must be HOLD or HLDE: You can perform Reverse Copy only when the TC and UR pair status is PSUS, PSUE, or SSWS. You cannot perform the Quick Restore. Universal Volume Manager If you use SI with UVM, you can create pairs to use the external volumes. Sharing ShadowImage volumes 3-17
56 For more information about the external volumes, see the Hitachi Universal Volume Manager User Guide. Volume Migration You can assign the following SI volumes to Volume Migration migration volumes: L1 P-VOL with up to two S-VOLs. L2 P-VOL with one S-VOL. Reserved volumes. To assign or reserve SI volumes to Volume Migration migration volumes, complete the following: 1. Delete the SI pairs. 2. Unreserve the reserved SI S-VOLs. 3. Assign the SI volumes to Volume Migration migration volumes. You cannot use SI volumes for destination volumes. You cannot use migration, destination, and reserved volumes of Volume Migration for SI pair operations. To perform SI operations, you must first release the Volume Migration volumes. You can assign SI volumes as Volume Migration volumes, with the following restrictions: If the SI S-VOL is paired with three T-VOLs, you must delete the pair before migrating the volumes with Volume Migration. If you want to assign SI volumes as destination volumes of a migration using Volume Migration, or reserve SI volumes for Volume Migration, you must delete the SI volumes or un-reserve them before using Volume Migration. If you assign a SI S-VOL that is paired with three T-VOLs as a migration volume, or assign SI volumes to volumes other than Volume Migration migration volumes, the command is rejected. If you split a SI pair in which the volumes are assigned as migration volumes, migration of those volumes is canceled Sharing ShadowImage volumes
57 4 Performing configuration operations This chapter provides instructions for configuring SI. Configuration workflow Setting up primary and secondary volumes Reserving secondary volumes System options that affect performance Performing configuration operations 4-1
58 Configuration workflow Setup for SI consists of the following operations. You must have Storage Administrator (Local Copy) role to perform SI operations. Setting up primary and secondary volumes on page 4-2. Reserving secondary volumes on page 4-2. (Optional.) System options that affect performance on page 4-3. (Optional.) Setting up primary and secondary volumes The P-VOL and S-VOLs must be set up prior to making copies. Ensure that the volumes you plan to use meet the requirements for pair volumes in Planning pair volumes on page 2-4. Reserving secondary volumes This is an optional feature that allows you to reserve SMPL volumes for use as S-VOLs. The storage system rejects write I/Os to reserved volumes (except in PSUS status). Prerequisite information Volumes must be: In SMPL status Unreserved and unpaired 1. In the tree, click Replications > Local Replications, then click the Reserve Volumes tab. 2. In the Reserve Volumes tab, click Add Reserve Volumes. 3. In the Add Reserve Volumes window/available LDEVs table, select the LDEV you want for a reserved volume and click Add. This action moves the LDEV to the Selected LDEVs table. 4-2 Performing configuration operations

59 4. Click Finish. 5. In the Confirm window, enter a Task Name then click Apply. Related information Removing reserve attribute from a volume on page 6-10 System options that affect performance You can enable and disable the following options that affect performance. (To go directly to the procedure, see Setting performance options on page 4-4). Swap&Freeze. Alters the behavior of the quick restore operation. With Swap&Freeze, update copy operations are suppressed when the quick restore is completed and the pair is in PAIR status. Differential data is not copied to the new S-VOL. Use the Swap&Freeze option when you want to keep S-VOLs unchanged after the quick restore operation. Host I/O Performance. Increases I/O performance while suppressing copy processing. However, be aware that enabling this option results in a longer copy time, slowing copy processing. Copy Threshold. Temporarily stops copy operations when the workload on the storage system is heavy. This is done to minimize degradation to host I/O performance during peak periods. The option performs only when workload is heavy; the Host I/O Performance option suppresses copy operations at all times regardless of workload level. When the Copy Threshold Option is enabled, it is effective for all of the following software: SI Performing configuration operations 4-3
60 SIz Compatible FlashCopy HTI SS Volume Migration Note: Your service representative must enable the Copy Threshold option. Copy Pace options. Reduce the effect on host server I/O performance by suppressing copy processing in PAIR status. The system uses this option when pairs are in PAIR status only. This option does not have an effect if the pair is in other statuses. You can choose from three levels of processing-suppression/performanceimprovement: Copy Pace Ext. None (usable since program version xx/ xx). This is the most effective option stops copy processing. Note: With this option, synchronization when a pair is split tends to be slower, which prolongs the time that the pair is in process of Quick Split ( PSUS(SP)/PSUS status) or in the process of Steady Split ( COPY(SP)/COPY status). If this poses a problem, complete one of the following: Minimize the time that the pair is in PAIR status so that synchronization at the pair split does not require so much time. Use one of the other Copy Pace options. Copy Pace Ext. Slower2 2nd most effective Copy Pace Ext. Slower1 3rd most effective Setting performance options 1. In the tree, click Replications > Local Replications. 2. In the Local Replications window, click Edit Local Replica Options. 3. In the Edit Local Replica Options window, for System Type, select Open. 4-4 Performing configuration operations
61 4. In the System Options list, select the option you want and click Enable. You may need to scroll down to the option you want. Copy Threshold must be enabled by your service representative. 5. Click Finish. 6. In the Confirm window, enter a Task Name then click Apply. Performing configuration operations 4-5
62 4-6 Performing configuration operations
63 5 Performing pair operations This chapter provides instructions for performing SI pair operations using SN. Also included is an operation for splitting pairs by consistency group, using CCI. Pair operations workflow Check pair status Pair creation Suspending pair creation Pair split Pair resynchronization Pair deletion Performing pair operations 5-1
64 Pair operations workflow A typical workflow for performing pair operations consists of the following. You must have Storage Administrator (Local Copy) role to perform SI operations. Check pair status on page 5-2. Each operation requires a pair to have a specific status. You also check pair status to ensure that an operation completed successfully. Pair creation on page 5-2, in which the S-VOL becomes a duplicate of the P-VOL. You can create a pair and immediately split it so that you can access the S-VOL. Suspending pair creation on page 5-9. Pair split on page 5-9, which separates the P-VOL and S-VOLs and allows use of S-VOL data by secondary applications. Splitting pairs in a consistency group on page 5-12, which allows you to split pairs in a consistency group at a specified time. Pair resynchronization on page 5-13, in which the S-VOL is again updated from the P-VOL. Pair deletion on page 5-16 in which the pair relationship between the pair volumes is ended, though the data remains. Check pair status Every pair operation requires the pair to have a specific status. When you want to perform a pair operation, check pair status to ensure that you can proceed successfully. For pair status definitions and instructions for finding pair status, see Monitoring the system on page 6-2. You should also check whether an operation is possible given the status of related L1 and L2 pairs. For information, see Status for L1, L2 pairs and operations permitted on page 6-5. Pair creation When you create the initial copy, data in the P-VOL is copied to the S-VOL. During the operation, the P-VOL can receive updates from the host. After the initial copy is completed, the updated data in the P-VOL differential data is copied to the S-VOL periodically (update copy). You can create the pair and immediately split it so that you can have instant access to the S-VOL. Instructions are included in the procedure. You can create cascaded pairs; instructions are included for L1 and L2 pairs. Related information Prerequisite information for creating pairs on page Performing pair operations
65 Creating pairs on page 5-5 Prerequisite information for creating pairs Make sure that your volumes are set up for pairing. For more information, see Planning pair volumes on page 2-4. Volumes should be in SMPL status. However, for L1 and L2 pairs, check the status. For more information on the L1 and L2 permitted statuses, see Status for L1, L2 pairs and operations permitted on page 6-5. When creating an L1 pair and an L2 pair at the same time, specify Non Split as the Split Type. Doing this prevents failure, since using another split type can result in the split operation for the L2 pair to begin before the pair status changes to PSUS. If the P-VOL is already paired with other S-VOLs, before creating the new pair, check the permitted status of existing S-VOLs. For more information, see Status of unaffected S-VOLs, operations permitted on page 6-7. Because pair creation affects performance on the host, observe the following: Create a pair when I/O load is light. Limit the number of pairs that you create simultaneously. When you create a pair, the S-VOL s LDEV is allocated to the same processor blade to which the P-VOL s LDEV is allocated. The paircreate operation overwrites all existing data on the S-VOL. The user is responsible for backing up data on the S-VOLs before creating pairs. If you use BEDs supporting encryption, you can create an SI pair by using an encrypted volume and a non-encrypted volume. For example, you can create the pair specifying an encrypted volume as the P-VOL and a nonencrypted volume as the S-VOL. In this case, data in the encrypted P-VOL becomes non-encrypted data in the S-VOL. In the Create Pairs wizard, specify pair configuration settings that require additional explanation. For more information on setting up pair configurations, see On creating L1 and L2 pairs with different topologies on page 5-4. If you are using one of its volumes as an HTI P-VOL, first create the SI pair. If an MU number is not available, complete the following: a. Delete the HTI pair that has an MU number between 0 and 2. b. Create the SI pair. c. Create the HTI pair. The P-VOL and S-VOLs must be the same size in blocks. If the capacity is displayed in gigabytes, a small difference between P-VOL and S-VOL capacity might not be displayed. Performing pair operations 5-3
66 To view the capacity in blocks, click Options > Capacity Unit > block in the Logical Devices window, or for a secondary window, look at the Capacity (blocks) area of the Detail window. On creating L1 and L2 pairs with different topologies You begin the Create Pairs wizard by specifying L1 and L2 pair topology in the Select Pair Configuration window. Though you may be performing the operation for more than one P-VOL, you specify pair topology only once, and this topology applies to all P-VOLs in the operation. However, you can change L1 and L2 pair configurations that do not match the specified configuration later in the Create Pairs wizard. This is also true when you create a new pair using an existing P-VOL with an existing configuration. To change L1 and L2 pair configuration, you begin by setting the topology for the pair with the largest topology. The following figure shows an example of the P-VOL with the largest topology, of all the pairs being created in an operation. To change a pair s L1 and L2 combination from the preceding topology to the one shown in the following figure, for example, you would continue through the Create Pairs wizard to the Select Secondary Volumes window. 5-4 Performing pair operations

67 In the Select Secondary Volumes window, after pairing S-VOLs with P- VOLs, in the Selected Pairs table you would select the line with the S-VOLs whose configuration you want to modify, and then click Edit MU Number. In the Edit MU Number dialog box, you would specify 0 for the L1, and 2 for the L2. This has the effect of moving the number-4 L2 S-VOL to be paired with the number-1 L1 volume (with MU#0), as intended. Creating pairs You can also refine a pair s topology by removing unwanted volumes. To do this, click Remove in the Select Secondary Volumes window. 1. In the tree, click Replications > Local Replications. 2. In the Pairs tab, click Create Pairs. 3. In the Select Pair Configuration window of the Create Pairs wizard, select the Copy Type, ShadowImage. Performing pair operations 5-5

68 4. Select the Emulation Type. 5. In Pair Topology Type, select the boxes that matches your configuration. For more information, see On creating L1 and L2 pairs with different topologies on page In Split Type, you have the option of splitting the pair once it is created. Select one of the following: Non Split: Does not split the new pair. Quick Split: The new pair is split prior to data copy so that the S-VOL is immediately available for read and write I/O. Any remaining differential data is copied to the S-VOL in the background. Steady Split: Splits the new pair after all differential data is copied to the S-VOL. 7. In Copy Pace, select the pace at which data is to be copied, Slower, Medium, or Faster. Processing speed and system performance are affected by the pace you select; you see slower speed and better performance with Slower, faster speed but more impact to performance with Faster. 8. Click Next. 9. In the Select Primary Volumes window, in the Available LDEVs table, select an LDEV to be a P-VOL, then click Add. The LDEV is moved to the Selected LDEVs table. You can make multiple selections. 5-6 Performing pair operations

69 10. Click Next. 11. In the Select Secondary Volumes window, assign LDEVs as S-VOL to the P-VOL LDEV (or LDEVs) selected in the Select Primary Volumes window. Complete the following: If you specified a P-VOL, select a secondary LDEV ID in the Available LDEVs table, and click Set. Repeat this step to assign additional S-VOLs. If you specified more than one P-VOL, select an LDEV ID in the Available LDEVs table, then select a P-VOL LDEV ID in the Selected Pairs table, and click Set. Repeat this step as many times as needed to make all your pairings. By not selecting a P-VOL in the Selected Pairs table, the S-VOL you select and set is assigned to P-VOLs in order from the first line of the table. Performing pair operations 5-7
70 To sort the Available LDEVs and Selected Pairs tables according to the capacity, click Capacity near the top of the window. The remaining number you have to select refers to the P-VOLs that do not have an assigned S-VOL, as seen in the Selected Pairs table. Sort in the middle-left allows you to sort the Selected Pairs table. Change Options in the middle-right allows you to change Split Type and Copy Pace (applies to all new pairs). To change MU numbers, complete the following: a. Select the desired primary/secondary line in the Selected Pairs table. b. Click Edit Mirror Unit near the bottom-right which results in a modified pair topology after specifying S-VOL. For more information on changing a pair s topology, see On creating L1 and L2 pairs with different topologies on page 5-4. To remove a line from the Selected Pairs table, select the line and click Remove. The pair topology changes. 12. Click Finish. 13. In the Confirm window, type a Task Name then click Apply. After creating the pair, if you do not see the number of pairs and other information you expect to see in the Summary tab of the Local 5-8 Performing pair operations
71 Replications window, the system is working and requires more time. Wait a little longer, then click File/Refresh. Suspending pair creation You can suspend a pair create operation (initial copy). When this is done, pair status changes to PSUE. The S-VOL continues accepting write I/O operations from the P-VOL and marks the entire P-VOL track as difference data. Resynchronizing a suspended pair change the pair status to COPY(RS)/ COPY and copies the entire P-VOL to the S-VOL. Resynchronizing a suspended pair takes the same time as the initial copy operation. The storage system automatically suspends a pair when it detects an error condition related to an update copy operation, or when it cannot keep the pair mirrored. 1. In the tree, click Replications > Local Replications. 2. In the Pairs tab, select the pair you want to suspend, and click More Actions > Suspend Pairs. 3. In the Suspend Pairs window, type a Task Name and click Apply. Pair split Host updates to the P-VOL and periodic copying to the S-VOL continue until the pair is split. After the pair is split, updates continue to the P-VOL but are not copied to the S-VOL; data in the S-VOL is ensured at the time of the split. Update data that accrues during the split is stored in differential bitmaps until it is copied to the S-VOL during resynchronization. Performing pair operations 5-9
72 The P-VOL and S-VOL are synchronized when the pair status changes from PSUS(SP)/PSUS or COPY(SP)/COPY to PSUS. Related information Types of split operations on page 5-10 Prerequisite information for splitting pairs on page 5-10 Splitting pairs on page 5-11 Splitting pairs in a consistency group on page 5-12 Types of split operations The following options are available when splitting a pair: Non split, which does not split the pair. Steady split, which copies all differential data to the S-VOL and then splits the pair. Quick split, in which the pair is immediately split, so that the S-VOL is immediately available for read and write I/O. Remaining differential data is copied to the S-VOL in the background. Consistency group pair-split, in which all pairs in a consistency group are split simultaneously. You can use this method with CCI. For split operations with CCI, both Quick Split and Steady Split are available. For more information, see Command Control Interface User and Reference Guide. Prerequisite information for splitting pairs Pair status must be one of the following: PAIR when splitting an existing pair. SMPL, when creating and immediately splitting an L1 pair. To split an L1 pair that has L2 pairs, check Status for L1, L2 pairs and operations permitted on page 6-5. PSUS for the L1 pair when splitting, or creating and immediately splitting, an L2 pair. The P-VOL and S-VOL are synchronized when pair status changes from COPY(SP)/COPY or PSUS(SP)/PSUS to PSUS. To ensure that the data in the P-VOL matches data in the S-VOL after the pair split, stop write operations from the host server to the P-VOL before running the operation. For a split operation to complete faster on an existing pair, stop host access to the P-VOL before starting the split. Related information PSUS, performance, and SOM 459 on page Performing pair operations
73 Status for L1, L2 pairs and operations permitted on page 6-5 PSUS, performance, and SOM 459 Performance can be affected for pairs that are in PSUS(SP)/PSUS or COPY(SP)/COPY status depending on the following: Whether system option mode 459 is enabled. Whether the S-VOL is an external or internal volume. Whether the S-VOL is a volume in a Hitachi Dynamic Provisioning pool. The following table shows the affects of these conditions. System option mode 459 S-VOL* PSUS(SP)/PSUS or COPY(SP)/COPY status OFF Internal volume Pair status changes to PSUS(SP)/PSUS External volume after differential data is copied to the cache in the storage system ON Internal volume External volume Pair status changes to PSUS after differential data is copied to the cache in the storage system and destage to the external storage system has completed. * If the S-VOL is a DP-VOL, this indicates whether the top pool volume allocated to the S-VOL is internal or external. Splitting pairs 1. In the tree, click Replications > Local Replications. 2. In the Pairs tab, select the pair you want to split, then click Split Pairs. 3. In the Split Pairs window, select a Split Type. Values: Quick Split or Steady Split For more information, see Types of split operations on page Performing pair operations 5-11

74 4. In Copy Pace, select the pace at which data is to be copied. Values: Slower, Medium, or Faster. Processing speed and system performance are affected by the pace you select; you see slower speed and better performance with Slower, faster speed but more impact to performance with Faster. 5. Click Finish. 6. In the Confirm window, type a Task Name then click Apply. Splitting pairs in a consistency group Use consistency group pair-split to simultaneously split all the pairs in a consistency group. Prerequisite information For requirements and restrictions, see Consistency group pair-split on page For more information about splitting pairs, see Splitting pairs in a consistency group on page D-8. For more information about troubleshooting consistency group pair-split and the consistency group pair-split option, see Troubleshooting consistency group pair-split on page Use the consistency group pair-split feature in CCI to define a consistency group for the SI pairs that you are splitting. 2. Specify the consistency group pair-split option, then create the pairs. 3. Ensure that all SI pairs in the consistency group are in PAIR or COPY(PD)/COPY status. 4. Split the pairs in the consistency group. The pairs are split simultaneously Performing pair operations
75 Note: You cannot maintain SI S-VOL consistency if you are sharing an SI P- VOL with UR S-VOLs and you have included SI pairs in a status other than PAIR or COPY(PD)/COPY in the consistency group. Pair resynchronization You resynchronize a pair that is split or suspended by the system. Resynchronizing updates the S-VOL so that it is again paired with the P-VOL. Caution: Resynchronizing the pair does not guarantee that P-VOL data is the same as S-VOL data. Data in the two volumes is the same only if the P-VOL is offline and the pair has been split ( PSUS status). Related information Types of resync operations on page 5-13 Prerequisite information for resynchronizing on page 5-14 Resynchronizing pairs on page 5-15 Types of resync operations You can resynchronize pairs from P-VOL to S-VOL and from S-VOL to P-VOL. The types of resync operation follow, with requirements and restrictions: Normal Copy. Forward full resync, from P-VOL to S-VOL. The P-VOL is accessible to hosts for both read and write operations. The S-VOL is inaccessible to hosts. After performing a Quick Split, wait 20 seconds before a Normal Copy resynchronization, otherwise the operation might end abnormally. Quick Resync. Forward resync from P-VOL to S-VOL but does not data copy. The status changes to PAIR but does not resynchronize the data to the S-VOL. Differential data is copied to the S-VOL during update copying. The P-VOL is accessible to hosts for read and write operations. Data in the P-VOL and S-VOL might not be the same after a Quick Resync even when there a host I/O is not present during the operation. Split the pair to ensure that data is the same. After performing a Quick Split, wait 20 seconds before a Quick Resync resynchronization, otherwise the operation might end abnormally. Reverse Copy. Reverse full resync from S-VOL to P-VOL. The P-VOL is inaccessible to hosts. All differential data is updated to the P-VOL. Pairs sharing the same P-VOL must be in PSUS or PSUE status. If the pair shares a volume with TC or UR, you must suspend the TC or UR pair to perform the Reverse Copy or Quick Restore operation. Performing pair operations 5-13
76 You cannot create a TC or UR pair with a volume shared by SI during the Reverse Copy or Quick Restore operation. When the Reverse Copy or Quick Restore is in progress, you cannot create, split, or resync any pair sharing the same P-VOL. However, the pairs can be deleted or suspended. Reverse Copy cannot be used for the following: - SI L2 pair - ShadowImage for Mainframe (SIz) pair when the P-VOL is shared with an FCv2/FCSE volume Quick Restore, P-VOL and S-VOL are swapped. NO data is copied, and the pair is placed in PAIR status. Differential data is copied to the S-VOL during update copy operations. Differential data is copied during update copying. The P-VOL and S-VOL are inaccessible during this operation. When the operation completes, the P-VOL is accessible. Pairs sharing the same P-VOL must be in PSUS or PSUE status. When there is a small amount of differential data between P-VOL and S-VOL, the Reverse Copy operation may complete faster than the Quick Restore operation. Performing LDEV maintenance during the Quick Restore process increases the time for the operation to complete. If the pair shares a volume with TC or UR, you must suspend the TC or UR pair to perform the Reverse Copy or Quick Restore operation. You cannot create a TC or UR pair with a volume shared by SI during the Reverse Copy or Quick Restore operation. When the Reverse Copy or Quick Restore operation is in progress, you cannot create, split, or resync any pair sharing the same P-VOL. However, the pairs can be deleted or suspended. Quick Restore cannot be used for the following: - An SI L2 pair - When a quick format is being performed on either pair volume - A pair in which one volume is a DP-VOL, though not both - When the SI S-VOL is shared with an HTI or SS volume Prerequisite information for resynchronizing For Normal Copy and Quick Resync, the S-VOL must be offline. For Reverse Copy and Quick Restore, the P-VOL must be offline. For Normal Copy or Quick Resync, the pair must be in PSUS, PSUE, or PSUS(SP)/PSUS status. For Reverse Copy or Quick Restore, the pair must be in PSUS status. The pairresync normally takes less time when the pair is in PSUS status than when it is in PSUE. This is because the amount of differential data accumulated for a split pair is usually much less than the total amount of 5-14 Performing pair operations
77 data in the P-VOL, which must be copied in full when the pair was suspended by the storage system. To keep the P-VOL and S-VOL unsynchronized when performing a Quick Restore, enable the Swap&Freeze option prior to performing the operation. Update copy operations are then suppressed when the Quick Restore is completed, and the pair is in PAIR status. If a pair consists of encrypted volumes and a non-encrypted volume, and the Quick Restore is run, the P-VOL and S-VOL encryption statuses are reversed. With a Quick Restore, SN can show outdated information. Click Refresh View to ensure the most up-to-date information. Resynchronizing pairs 1. In the tree, click Replications > Local Replications. 2. In the Pairs tab, select the pair you want to resynchronize, then click Resync Pairs. 3. In the Resync Pairs window, select a Resync Type. For more information, see Types of resync operations on page Performing pair operations 5-15
78 4. Select a Copy Pace, which is the rate that data is to be copied. Values: Slower, Medium, or Faster. Processing speed and system performance are affected by the pace you select; you see slower speed and better performance with Slower, faster speed but more impact to performance with Faster. 5. Click Finish. 6. In the Confirm window, type a Task Name and click Apply. Note: The following concerns possible post-resync conditions: Make sure that pair status changes to PAIR before attempting any other operation. If the reverse or quick restore operation ends abnormally, the pair status changes to PSUE. In this case, the P-VOL is read/write-enabled for all hosts, but the data is not guaranteed. The S-VOL remains write-disabled and data is not guaranteed. The status of other pairs sharing the same P- VOL does not change. Pair deletion You can delete a pair when you do not need it. When you delete a pair, the P- VOL and S-VOL return to their SMPL state, though their data remains intact. After deletion, both volumes are available for use in another pair. Note: If the pair status changes to SMPL, the status is not shown in SN. Related information Prerequisite information for deleting pairs on page 5-16 Deleting pairs on page 5-17 Prerequisite information for deleting pairs The P-VOL and S-VOL must be synchronized. Before deleting, wait until all write I/O operations to the P-VOL are completed, set the P-VOL offline, then split the pair. Pair deletion cannot be performed when the pair status is PSUS(SP)/ PSUS. When a pair is created, the processor blade allocated to the P-VOL's LDEV is also allocated to the S-VOL's LDEV. When a pair is deleted, the processor blade that was originally allocated to the S-VOL's LDEV is allocated to it again. If the original processor blade was removed, another processor blade is allocated. Deleting a pair first changes the status of the volumes to SMPL(PD) then to SMPL. SMPL status is not shown in SN Performing pair operations
79 Deleting pairs To distinguish between SMPL and SMPL(PD) volumes, run the CCI pairdisplay and Inqraid commands. The pairdisplay command shows status but cannot distinguish between SMPL and SMPL(PD) ; and the Inqraid shows whether a volume is being used by SI. If the result of the pairdisplay command is SMPL, and the result of the Inqraid command is the P-VOL or S-VOL, then SI is still using the pair and status is SMPL(PD). If the result of the pairdisplay command is SMPL, and the result of the Inqraid command is not the P-VOL or S-VOL, then SI is not using the volumes. Therefore, status is confirmed as SMPL. After deleting a pair, wait 10 seconds until volume status changes from SMPL(PD) to SMPL before performing tasks such as a pair operation or event waiting. If you do not wait 10 seconds, the operation might end abnormally. 1. In the tree, click Replications > Local Replications. 2. In the Pairs tab, select the pair you want to delete, and click More Actions > Delete Pairs. 3. In the Delete Pairs window, type a Task Name and click Apply. After performing the pairdelete operation, if you do not see the number of pairs and other information you expect to see in the Summary tab of the Local Replications window, the system is working and requires more time. Wait a little longer, then click File/Refresh. Performing pair operations 5-17
80 5-18 Performing pair operations
81 6 Monitoring and maintaining the system This chapter provides information and instructions for monitoring and maintaining the SI system. Monitoring the system Maintaining the system Monitoring and maintaining the system 6-1
82 Monitoring the system Monitoring helps you keep track of pairs and volumes and their current and past conditions. Monitoring should be an ongoing activity. This topic provides information for the following: Monitoring pair activity, status on page 6-2. Status definitions, permitted operations for each status, and permitted operations for L1 and L2 pairs are included. Monitoring pair, volume details on page 6-7. Monitoring synchronous rates on page 6-8. Monitoring consistency groups on page 6-8. Monitoring reserve volumes on page 6-8. Monitoring a pair s operation history on page 6-8. Monitoring pair activity, status Monitoring the SI system is necessary to maintain your pairs. Each operation requires a specific status or statuses. When you want to perform a pair command, first check the pair s status. Pair-status changes when an operation is performed. Check status to see that pairs are operating correctly and that status is changing to the appropriate state during and after the operation. Monitoring should be repeated frequently. notifications of problems in pair operations can be set up using SN. 1. In the tree, click Replications > Local Replications. 2. In the Pairs tab, locate the pair whose status you want to review. 3. Review pair status in the Status column. You can view license information in the Summary section. You can view more details for a selected pair by clicking More Actions > View Pair Properties. For more information about the fields, see Monitoring pair, volume details on page 6-7. Related information Pair status definitions on page 6-3 CCI pair status names on page 6-4 Status, pair operations permitted on page 6-4 Status for L1, L2 pairs and operations permitted on page 6-5 Status of unaffected S-VOLs, operations permitted on page Monitoring and maintaining the system
83 Pair status definitions Pair status descriptions are provided in the following table. Click Refresh View for the most current data. (For the CCI status names, see CCI pair status names on page 6-4. SN Status Description P-VOL access S-VOL access SMPL The volume is not assigned to a pair. The storage system accepts read/write for SMPL volumes that are not reserved. N/A N/A Note: If the volume is in SMPL status, the status is not shown in SN. SMPL(PD) The pair is being deleted. Pair operations are not allowed in this status. Upon deletion, the status changes to SMPL. Read/write disabled 1 Read/write disabled COPY(PD)/ COPY The paircreate initial copy is in progress. 2 The storage system accepts read/write to the P-VOL but stops write operations to the S-VOL. Read/write enabled Read only PAIR The initial copy operation is complete and the volumes are paired. The storage system performs update copy operations from P-VOL to S-VOL. The P-VOL and S-VOL in PAIR status may not be identical. Read/write enabled Read only COPY(SP)/ COPY The pair is in the process of Steady Split. Any remaining differential data is copied to the S-VOL. 2 When this is completed, the pair is split and the data in the S-VOL is identical to data in the P-VOL at the time of the split. Read/write enabled Read only PSUS(SP)/ PSUS The pair is in the process of Quick Split. P-VOL differential data is copied to the S-VOL in the background. 2 Pairs cannot be deleted. Read/write enabled Read/write enabled PSUS The pair is split. The storage system stops performing update copy operations. Write I/Os are accepted for S-VOL. The storage system keeps track of updates to split P-VOLs and S-VOL, so that the pair can be resynchronized quickly. Read/write enabled Read/write enabled COPY(RS)/ COPY The pairresync operation is in progress. The storage system does not accept write I/Os for S-VOL. 2 When a split pair is resynchronized, the storage system copies only P-VOL differential data to the S-VOL. When a suspended pair is resynchronized, the storage system copies the entire P-VOL to the S-VOL. Read/write enabled Read only COPY(RS-R)/ RCPY The reverse pairresync operation is in progress. The storage system copies only S-VOL differential data to the P-VOL. No update copy operations are performed during Reverse Copy or Quick Restore. 2 Write I/O operations to S-VOL are rejected. Read/write disabled Read only PSUE The pair is suspended by the storage system. The storage system continues accepting read and write I/Os to the P- VOL. Update copy operations are stopped to a S-VOL. The storage system marks the entire P-VOL as differential data, resulting in entire P-VOL being copied to the S-VOL when the pair is resynchronized. Read/write enabled Read only Monitoring and maintaining the system 6-3
84 SN Status Description P-VOL access S-VOL access 1. Read/write enabled if status before transition to SMPL(PD) is Read/write. 2. Starting time of the copy depends on the numbers of pairs and the storage system environment. CCI pair status names Some CCI pair status names are different than the SN status names. The following shows the corresponding names. SN pair status name CCI pair status name SMPL COPY(PD)/COPY PAIR COPY(SP)/COPY PSUS(SP)/PSUS PSUS COPY(RS)/COPY COPY(RS-R)/RCPY PSUE SMPL COPY PAIR COPY PSUS Primary volume: PSUS Secondary volume: SSUS COPY RCPY PSUE Status, pair operations permitted A pair s status shows whether a desired operation can be performed. Each operation requires a specific status, or is permitted for multiple possible statuses. Supported operations and statuses are shown in the following tables. Pair operation Pair Status Create pairs Split pairs Resync pairs (forward) Resync pairs (reverse) Suspend pairs Delete pairs SMPL(PD) NO NO NO NO NO N O COPY(PD)/ COPY YES YES NO NO YES YES PAIR YES YES NO NO YES YES COPY(SP)/ COPY PSUS(SP)/ PSUS YES NO NO NO YES YES YES NO YES NO YES NO 6-4 Monitoring and maintaining the system
85 Pair operation Pair Status Create pairs Split pairs Resync pairs (forward) Resync pairs (reverse) Suspend pairs Delete pairs PSUS YES NO YES YES YES YES COPY(RS)/ COPY COPY(RS-R)/ RCPY YES NO NO NO YES YES YES NO NO NO YES YES PSUE YES NO YES NO NO YES Related information Status for L1, L2 pairs and operations permitted on page 6-5 Status of unaffected S-VOLs, operations permitted on page 6-7 Status for L1, L2 pairs and operations permitted When you have cascaded pairs, the operations that you can perform depend on pair status for both layers. The ability to perform an operation depends on the following: To perform an L1 operations, the status of the L2 pair To perform an L2 operations, the status of the L1 pair Supported read/write on L1 and L2 S-VOLs Supported operations and statuses are shown in the following tables. L2 Pair Status Create pairs Split pairs L1 pair operation Resync pairs Suspend pairs Delete pairs COPY(PD)/ COPY YES YES YES YES YES PAIR YES YES YES YES YES COPY(SP)/ COPY PSUS(SP)/ PSUS NO NO NO YES YES NO NO NO YES YES PSUS YES YES YES YES YES COPY(RS)/ COPY COPY(RS-R)/ RCPY YES YES YES YES YES NO NO NO YES YES PSUE YES YES YES YES YES Monitoring and maintaining the system 6-5
86 L1 Pair Status Create pairs Split pairs L2 pair operation Resync pairs 1 Suspend pairs Delete pairs COPY(PD)/ COPY YES NO YES YES YES PAIR YES NO YES YES YES COPY(SP)/ COPY PSUS(SP)/ PSUS YES NO YES YES YES YES NO YES YES YES PSUS YES YES 2 YES YES YES COPY(RS)/ COPY COPY(RS-R)/ RCPY YES NO YES YES YES YES NO YES YES YES PSUE YES NO YES YES YES 1. L2 pairs can only be resynchronized in Normal Copy or Quick Resync mode. You cannot restore (Reverse Copy or Quick Restore) the pair. 2. To split L2 pairs, the L1 pair must be split ( PSUS status). The following table shows node volume read/write per L1 and L2 pair status. L1 Pair Status COPY(PD) /COPY PAIR COPY(SP) /COPY L2 pair status PSUS(SP) /PSUS PSUS COPY(RS) /COPY PSUE COPY(PD)/ COPY Read only Read only Read only Read only Read only Read only Read only PAIR COPY(SP)/ COPY PSUS(SP)/ PSUS Read/Write Read/ Write Read/Write Read/Write Read/ Write Read/Write Read/ Write PSUS COPY(RS)/ COPY Read only Read only Read only Read only Read only Read only Read only COPY(RS- R)/RCPY PSUE The following table shows leaf volume read/write per L2 pair status. 6-6 Monitoring and maintaining the system
87 L2 pair status COPY(PD) /COPY PAIR COPY(SP)/ COPY PSUS(SP)/ PSUS PSUS COPY(RS)/ COPY PSUE Read only Read only Read only Read/Write Read/ Write Read only Read only Status of unaffected S-VOLs, operations permitted The pair operations you can perform depend on the pair s status, but also on the status of unaffected S-VOLs. The following table shows which operations can be performed, given the status of S-VOLs related to the P-VOL in other pairs. Status of unaffected S-VOLs Create pairs Split pairs Pair operation Resync pairs (forward) Resync pairs (reverse) Suspend pairs Delete pairs SMPL(PD) NO NO NO NO NO NO COPY(PD)/ COPY YES YES YES NO YES YES PAIR YES YES YES NO YES YES COPY(SP)/ COPY PSUS(SP)/ PSUS YES YES YES NO YES YES YES YES YES NO YES YES PSUS YES YES YES YES YES YES COPY(RS)/ COPY COPY(RS-R)/ RCPY YES YES YES NO YES YES YES NO NO NO YES YES PSUE YES YES YES YES YES YES Monitoring pair, volume details You can review the data related to L1 and L2 pairs and their volumes. This includes volume capacity, pair status, P-VOL and S-VOL, identifiers, and several other details. 1. Select the pair in Local Replications then click More Actions > View Pair Properties Related information View Pair Properties window on page B-11 Monitoring and maintaining the system 6-7
88 Monitoring synchronous rates You can check on the percentage of synchronized data between the P-VOL and S-VOL. 1. Select the pair in Local Replications then click More Actions > View Pair Synchronous Rate. Clicking Refresh View shows the latest synchronous rate. If you close the window, information in the Local Replications window may not be the latest. Click Refresh View again. Related information View Pair Synchronous Rate window on page B-13 Monitoring consistency groups You can check the number of consistency groups and the details and individual properties for consistency groups. View the number of consistency groups in the Summary section of the Local Replications window. View a list of consistency groups with status and number of pairs on the Consistency Groups tab in the Local Replications window. View a consistency group s properties by clicking the CTG ID link on the Consistency Groups tab in the Local Replications window. Related information Local Replications window on page B-4 Monitoring reserve volumes You can see the number of reserve volumes and a list of the individual reserve volumes and their details. View the number of reserve volumes in the Summary section of the Local Replications window. View a list of reserve volumes and their details on the Reserve Volumes tab in the Local Replications window. Related information Local Replications window on page B-4 Monitoring a pair s operation history You can review the operations that have been performed on a pair using the View History window. Prerequisite information 6-8 Monitoring and maintaining the system
89 If you use 1,000 or more pairs concurrently, some operation history might not be recorded. 1. In the tree, click Replications > Local Replications. 2. Click View Histories. 3. In the View Histories window, select SI from the Copy Type list. 4. The Description column shows the operation that was run. The following table shows a list of the codes. Code Description Explanation 4710 PAIR START Initial copy began PAIR END Initial copy completed and pair status changed to SMPL PSUS START Pair split operation began PSUS END Pair split completed and pair status changed to PSUS COPY(SP)/COPY START COPY(RS-R)/RCPY START 4760 COPY(SP)/COPY END COPY(RS-R)/RCPY END Pair resync operation began. Pair resync operation completed and pair status changed to PAIR SMPL(PD) DELETE The pair was deleted and status changed to SMPL PSUE SUSPEND The pair was suspended and pair status has changed to PSUE. 47D0 COPY ABNORMAL END The copy has terminated abnormally for reasons other than above. 47E9 INITIALIZE START Initialization processing has begun. Monitoring and maintaining the system 6-9
90 Code Description Explanation 47EA INITIALIZE END Initialization processing has terminated normally. 47EB INITIALIZE ENDED ABNORMAL Initialization processing has terminated abnormally. Related information View Histories window on page B-14 Maintaining the system Some maintenance tasks are a response to behavior discovered during system monitoring. Other tasks are done to keep the system in tune with your changing requirements. Related information Removing reserve attribute from a volume on page 6-10 Pair operations during system, device maintenance on page 6-10e Removing reserve attribute from a volume You can remove the reserve attribute from a volume. Prerequisite information The volume is not assigned to a pair ( SMPL status). 1. In the tree, click Replications > Local Replications. 2. Click Reserve Volumes tab. 3. In the Remove Reserve Volumes window, select the volume and click Remove Reserve Volumes. 4. Enter a Task Name and click Apply. Pair operations during system, device maintenance The following recommendations are provided for performing pair operations when maintenance on VSP and related devices is underway. Review the following to check whether pairs and pair operations are affected when maintenance is performed on physical and logical devices. If VSP cache maintenance is performed during a period of high I/O usage, one or more pairs may suspend. Reduce the I/O load before performing cache maintenance. Physical devices that contain LDEVs used by SI can be maintained independently of pair operations and pair status. Maintenance does not affect SI Monitoring and maintaining the system
91 If a physical device failure occurs, pair status is not affected because of the RAID architecture. If a physical device failure requires the storage system to utilize dynamic sparing or automatic correction copy, pair status is not be affected. If an LDEV failure occurs, the storage system suspends the pair. Maintenance is restricted for LDEVs used by a pair. However, the format operation is allowed even when pair is suspended ( PSUE status). Maintenance is also restricted for LDEVs in which the Reserve attribute is set for a volume. To maintain these LDEVs, suspend or delete the pair, and/or remove the reserve attribute. Monitoring and maintaining the system 6-11
92 6-12 Monitoring and maintaining the system
93 7 Troubleshooting This topic provides SI troubleshooting information. ShadowImage Troubleshooting Troubleshooting with CCI Calling the Hitachi Data Systems customer support Troubleshooting 7-1
94 ShadowImage Troubleshooting This topic provides instructions for troubleshooting in SI. Operation and display troubleshooting The following table provides operation and display troubleshooting information for SI pairs. Error SN hangs, or SI operations do not function properly. The volume pairs are not showing correctly. An SI error message is displayed in SN during an operation. Pair status is incorrect (or unexpected). Corrective action Make sure all SI requirements and restrictions are met. Make sure the storage system is powered on and fully functional. Check all input values and parameters to make sure that you entered the correct information in the SI windows (such as P-VOL and S-VOL IDs). Make sure the correct volumes are selected. Click Tasks in the Storage Systems tree and select the failed task to check the message. If you are using the previous SN GUI, which is shown in a secondary window, complete the following: 1. Select the failed volume in the Preview list in the Pair Operation window. 2. Right-click to show the menu. 3. Click Error Detail. For the list of error codes and corrective actions, see Hitachi Storage Navigator Messages. The pair may have been suspended or deleted from the UNIX/PC server host using CCI. If not, VSP detected an error condition during SI operations. Check the SN error log. If necessary, call the Hitachi Data Systems customer support for assistance. Troubleshooting pinned tracks If a pinned track occurs on an SI P-VOL or S-VOL, the storage system suspends the pair. Contact your HDS representative for assistance in recovering pinned tracks. Troubleshooting extended copy times The following table describes the causes for bottlenecks that result in long copy time. 7-2 Troubleshooting
95 Cause A processor whose MP usage rate exceeds 80% exists within the processor blade to which the P-VOL and S-VOL are allocated. The Host I/O Performance option is enabled. The S-VOL s HDD or external storage performance is lower than the P-VOL s. The S-VOL s HDD or external storage has an error. The P-VOL s HDD or external storage has an error. Response Reexamine the configuration. For information about checking the MP usage rate, see the Hitachi Virtual Storage Platform Performance Guide. Disable the option. For more information about disabling, see System options that affect performance on page 4-3. Make sure the configuration of the S-VOL s HDD or external storage is the same as the P-VOL s. Check the error and make the necessary correction. Check the error and make the necessary correction. Troubleshooting with CCI This topic provides troubleshooting information for operations performed using CCI. The following describes CCI error codes and instructions for using them. Also, see Troubleshooting consistency group pair-split on page When using CCI, you can identify the cause of an error by referring to either of the following: The log displayed in the CCI window. The error code in the CCI operation log file. The default location for this file is: /HORCM/log*/curlog/horcmlog_HOST/horcm.log where * = instance number, and, HOST = host name 1. Do one of the following: If you are using the CCI-window log, locate the error code you are investigating. An example error code in the CCI-window log is: It was rejected due to SKEY=0x05, ASC=0x20,SSB=0xB9E1,0xB901 on Serial#(64015) If using the operation log file, locate the error code you are investigating. An example error code in the log file is: 11:06: SSB = 0xb9a0, Locate the SSB1 and SSB2 codes. In both examples above, these codes appear to the right of the equal symbol (=). The SSB1 code consists of the alpha-numeric characters which are the last four digits on the left of the comma (,). Examples: B9E1 in the CCI-window log b9a0 in the operation log file Troubleshooting 7-3
96 The SSB2 code consists of the alphanumeric characters which are last four digits on the right of the comma (,). Examples: 0xB901 in the CCI-window log 2089 in the operation log file 3. In the following table, locate the description of the SSB1/SSB2 error code combination. For errors not described in the table, call the Support Center. Note: (For SIz) Some related software names in the following table refer to the mainframe version. For example, it may be inferred that Universal Replicator or UR can be replaced with Universal Replicator for Mainframe or URz. The following table describes CCI error codes. SSB2 code Description - Error occurred in SI pair operation. 200D 201B The pair operation was rejected because the Dynamic Provisioning or Dynamic Tiering V-VOL you specified was not associated with a pool. The consistency group pair-split was rejected because the UR pair was not in PAIR status, split ( PSUS status), or suspended ( PSUE status). The UR S-VOL was the SI P-VOL included in the consistency group on which the consistency group pair-split was performed The quick restore operation was rejected because the cache mode of the P- VOL you specified was different from the cache mode of the external S-VOL The pair operation was rejected because the volume you specified as a P- VOL was a quorum disk The pair operation was rejected because the volume you specified as an S- VOL was a quorum disk The volume you specified as a P-VOL was a volume using two mirrors included in the 3-UR DC multi-target, cascade, or delta resync configuration. The operation was rejected because the volume was used in the delta resync pair or as an UR pair volume The volume you specified as an S-VOL was a volume using two mirrors included in the 3-UR DC multi-target, cascade, or delta resync configuration. The operation was rejected because the volume was used in the delta resync pair or as an UR pair volume The pair operation was rejected because the current microcode version does not support the P-VOL capacity you specified The pair operation was rejected because the current microcode version does not support the S-VOL capacity you specified. 205B The Paircreate operation was rejected because the MU number you specified was in use The volume you specified as a P-VOL was a volume of a UR pair. The pair operation was rejected because the status of the UR pair was invalid. 7-4 Troubleshooting
97 SSB2 code Description 2061 The volume you specified as an S-VOL was a volume of a UR pair. The pair operation was rejected because the status of the UR pair was invalid The volumes you specified for the pair were shared by TC and UR. The quick restore or reverse copy operation was rejected because the TC or UR pair was not split ( PSUS status) The pair operation was rejected because the P-VOL or S-VOL you specified was being shredded The pair operation was rejected for one of the following reasons: The P-VOL was also an HTI or SS pool volume. The P-VOL was also an HTI or SS secondary volume, or V-VOL. The P-VOL was also an HTI or SS P-VOL, and one of the following conditions was also true. - While the HTI or SS pair was restored, the create, split, or resync pair operation was performed on the SI pair. - The SI quick restore operation was performed. - A consistency group was defined for SI. - After the MU number used by an HTI or SS pair was specified, the create, split, or resync pair operation was performed on the SI pair The pair operation was rejected for one of the following reasons: The S-VOL was also an HTI or SS pool volume. The S-VOL was also an HTI or SS secondary volume, or V-VOL. The S-VOL was an HTI or SS S-VOL pair, and one of the following conditions was also true. - The HTI or SS pair was being restored. - The SI quick restore operation was performed. - A create pair operation was performed on the SI pair Because the P-VOL you specified was also a UR P-VOL for delta resync, one of the following errors occurred: The reverse copy operation was rejected because the UR pair was not split ( PSUS status). The quick restore operation was rejected The pair operation was rejected because the P-VOL you specified was also a UR P-VOL for delta resync The pair operation was rejected because the initialization process was being performed The quick restore operation was rejected because the volume you specified as a P-VOL was undergoing quick format 208A The quick restore operation was rejected because the volume you specified as an S-VOL was undergoing quick format The volume you specified as a P-VOL was a TC S-VOL. The split operation was rejected because the status of the TC pair was not Suspend. Troubleshooting 7-5
98 SSB2 code Description 2094 The volume you specified as a P-VOL was a TC S-VOL. The Split operation was rejected because the consistency time of the consistency group is not equal to the consistency time of the TC pair The quick restore operation was rejected because of one of the following: The P-VOL was also a Dynamic Provisioning V-VOL, but the S-VOL was a normal volume. The P-VOL was a normal volume, but the S-VOL also a Dynamic Provisioning V-VOL. 209B 209C The quick restore operation was rejected because the emulation type of only one of the volumes in the pair was OPEN-0V. The quick restore operation was rejected because the updated information about storage system configuration was being backed up. 209E The pair operation was rejected because the volume you specified as the P- VOL was a FICON Data Migration volume. 20A0 20A2 20A3 20A9 The pairs you specified contain the TC asynchronous volumes. The quick restore operation was rejected because the CLPRs of the P-VOL and S-VOL for the pair you specified were different. The create pair operation was rejected because the P-VOL was a Dynamic Provisioning or Dynamic Tiering V-VOL whose capacity was increasing. The create pair operation was rejected because the S-VOL was a Dynamic Provisioning or Dynamic Tiering V-VOL whose capacity was increasing. The pair operation was rejected because the consistency group number you specified was being used by HTI or SS. 20AA The pair operation was rejected because the volume you specified as the P- VOL was an HDP or HDT V-VOL and the Unmap command operation was in progress with system option mode 905 ON. 20AB The pair operation was rejected because the volume you specified as the S- VOL was an HDP or HDT V-VOL and the Unmap command operation was in progress with system option mode 905 ON. 20B0 The pair operation was rejected because the volume you specified as the P- VOL was a Dynamic Provisioning or Dynamic Tiering V-VOL and its capacity was increasing. 20B1 The pair operation was rejected because the volume you specified as the S- VOL was a Dynamic Provisioning or Dynamic Tiering V-VOL and its capacity was increasing. 20B4 The pair operation was rejected because the volume you specified as the P- VOL was a Dynamic Provisioning or Dynamic Tiering V-VOL, which was not associated with a pool. 20B5 The pair operation was rejected because the volume you specified as the S- VOL was a Dynamic Provisioning or Dynamic Tiering V-VOL, which was not associated with a pool. 20B7 The pair operation was rejected because you did not define an LU path to the volume you specified as the P-VOL. 7-6 Troubleshooting
99 SSB2 code 20B8 20D0 20D1 Description The pair operation was rejected because you did not define an LU path to the volume you specified as S-VOL. The P-VOL rejected the paircreate operation because the DP pool is initializing in the Dynamic Provisioning or Dynamic Tiering V-VOL. The S-VOL rejected the paircreate operation because the DP pool is initializing in the Dynamic Provisioning or Dynamic Tiering V-VOL. 20DE The pair operation was rejected because the volume you specified as the P- VOL is an external volume that is mapped for online data migration. 20E9 The pair operation was rejected because the volume you specified as the P- VOL was a S-VOL for an existing pair, and the volume you specified as the S-VOL was the P-VOL for another existing pair. 20DF The pair operation was rejected because the volume you specified as the S- VOL is an external volume that is mapped for online data migration. 22F6 The pair operation was rejected because the volume you specified as the P- VOL was a Compatible FlashCopy S-VOL. 22F7 The pair operation was rejected because the volume you specified as the S- VOL was a Compatible FlashCopy P-VOL or S-VOL. 22F9 The Quick Restore or the Reverse Copy operation was rejected because the volume you specified as the S-VOL was a Compatible FlashCopy P-VOL or S-VOL The pair operation was rejected because shared memory is not allocated or SI is not installed The pair operation was rejected because the volume you specified as the P- VOL or S-VOL was not the top volume of the LUSE volume The pair operation was rejected because the LBA size of the P-VOL you specified was not the same as the size of the S-VOL you specified The create pair operation was rejected because the number of pairs exceeded the maximum number of pairs. 230A 230B The create pair operation was rejected because the volume you specified as the S-VOL was the P-VOL of the SI pair whose MU number is 0. The pair operation was rejected because the pair was being suspended or deleted One of the following occurred: The create pair operation was rejected because the consistency group number you specified had already been used for L1 pair. The create pair operation was rejected because the consistency group number you specified had already been used for L2 pair. The create pair operation was rejected because the volume specified as the P-VOL was the S-VOL of the pair which was being Quick Split. The quick restore operation was rejected because the VLL setting of the P-VOL was different from that of the S-VOL. The pair operation was rejected because the P-VOL and S-VOLs you specified were a Compatible FlashCopy pair. Troubleshooting 7-7
100 SSB2 code Description The quick restore or reverse copy operation was rejected because the pair of the P-VOL and S-VOLs you specified are suspended ( PSUE status). The quick restore or reverse copy operation was rejected because the P-VOL and the S-VOL you specified was the L2 pair. The consistency group pair-split was rejected because some of the pairs in the consistency group were being resynchronized, split, or were already suspended. The pair operation was rejected because the pair status of the P-VOL, the S-VOL, or both showed that the pair could not receive the issued command The pair operation was rejected because the volume you specified as the S- VOL was online to the host The create pair operation was rejected because the volume you specified as the S-VOL was the S-VOL of another pair that was split ( PSUS status). 231F The quick restore or reverse copy operation was rejected because the P-VOL of the pair you specified was online to the host The pair operation was rejected because the necessary shared memory was not installed, or initialization was not completed The pair operation was rejected because the number of slots of the volume you specified as the P-VOL exceeded the upper limit The pair operation was rejected because the number of slots of the volume you specified as the S-VOL exceeded the upper limit The create pair operation was rejected because the volume you specified as the P-VOL had already had three S-VOLs The create pair operation was rejected because the node volume specified as the P-VOL had already had two S-VOLs The pair operation was rejected because the pair configuration exceeded the number of the layers of the cascade configuration The pair operation was rejected because the volume you specified as the S- VOL was the S-VOL of an existing pair. 232A The create pair operation was rejected because pairs that would exceed the license capacity were going to be created. 232F The pair operation was rejected because the volume you specified as the P- VOL was allocated as the destination of the Volume Migration The pair operation was rejected due to one of the following causes. The volume you specified as the P-VOL was a reserved volume. The volume you specified as the P-VOL was the volume for Volume Migration. The capacity of the P-VOL and the S-VOL you specified was not the same The create pair operation was rejected because the volume you specified as the P-VOL had already had three S-VOLs. 7-8 Troubleshooting
101 SSB2 code Description 2333 The pair operation was rejected because the volume you specified as the P- VOL was not the P-VOL of the existing pair One of the following occurred: The pair operation was rejected because the volume you specified as the P-VOL had an emulation type that could not be handled by CCI. The consistency group pair-split was rejected because the volume you specified as the P-VOL was an intermediate volume The pair operation was rejected because the volume you specified as the S- VOL had an emulation type that could not be handled by CCI The pair operation was rejected because the emulation type for the P-VOL you specified was different from the emulation type of the S-VOL The pair operation was rejected because of one of the following reasons: The volume you specified as the P-VOL is an intermediate volume. The number of volumes you specified for P-VOLs combined as a LUSE volume differs from that for S-VOLs. You specified only P-VOLs for the LUSE volume. You specified only S-VOLs for the LUSE volume. 233A The pairresync was rejected because the volume you specified as the P-VOL was not a SI P-VOL. 233B The pair operation was rejected because the volume you specified as the S- VOL was a root volume. 233C The pair operation was rejected because the volume you specified as the S- VOL was a node volume, and the volume you specified as the P-VOL was not the P-VOL for the S-VOL you specified. 233D The pairsplit was rejected because the P-VOL and S-VOLs you specified were a L2 pair, and the L1 pair was not split ( PSUS status). 233E The pair operation was rejected because the volume you specified as the P- VOL was used as a TC P-VOL. 233F The pair operation was rejected because the volume you specified as the S- VOL was the TC P-VOL, and the pair was not split ( PSUS status) or suspended ( PSUE status) The pair operation was rejected because the volume you specified as the S- VOL was the destination of the Volume Migration The create pair operation was rejected because the volume you specified as the S-VOL had already been an S-VOL The pair operation was rejected because the volume you specified as the S- VOL for SI pair operations was not an S-VOL The volume you specified as an S-VOL was a TC P-VOL. The pair operation was rejected because the status of the TC pair was invalid The volume you specified as an S-VOL was a TC S-VOL. The pair operation was rejected because the status of the TC pair was invalid. 234A The pair creation for the cascade configuration was rejected because the volume you specified as the S-VOL was an intermediate volume. Troubleshooting 7-9
102 SSB2 code Description 234B The pair operation was rejected because the volume you specified as the S- VOL was the volume of the Volume Migration The pair operation was rejected because the P-VOL and the S-VOL you specified for SI pair operations was not a pair The pair operation was rejected because the volume you specified as the P- VOL and the volume you specified as the S-VOL was the same one The Quick Restore operation or the Reverse Copy operation was rejected because the P-VOL and S-VOLs you specified was online to the host The deletion operation was rejected because the P-VOL and S-VOLs you specified was being Quick Split The pairresync operation was rejected because the P-VOL and S-VOLs was being split by using Steady Split The pair creation was rejected because the volume you specified as the S- VOL was the P-VOL of the splitting pair, or the P-VOL of the pair where the Reverse Copy operation or Quick Restore operation is being performed The pairresync operation was rejected because the volume you specified as the S-VOL was the P-VOL of the splitting pair. 235B 235C 235D 236C The volume you specified as a P-VOL was a TC P-VOL. The reverse copy or the quick restore operation was rejected because the TC pair was not suspended ( PSUE status) or split ( PSUS status). The volume you specified as a P-VOL was a TC S-VOL. Because the TC pair was not suspended ( PSUE status) or split ( PSUS status), the reverse copy or the Quick Restore operation was rejected. The volume you specified as an S-VOL was a TC P-VOL. The reverse copy or the quick restore operation was rejected because the TC pair was not suspended ( PSUE status) or split ( PSUS status). The reverse copy or the quick restore operation was rejected because the volume you specified as the P-VOL has the S-VOL Disable attribute assigned by the Data Retention Utility. 236D The pair operation was rejected because the volume you specified as the S- VOL has the S-VOL Disable attribute assigned by the Data Retention Utility, the pair operation was rejected The pair operation was rejected because the volume you specified as the P- VOL was not mounted, the pair operation was rejected The pair operation was rejected because the volume you specified as the P- VOL was blocked or a system disk The pair operation was rejected because the volume you specified as the P- VOL was being formatted The pair operation was rejected because the volume you specified as the P- VOL was a command device The pair operation was rejected for one of the following reasons: The volume you specified as the S-VOL was not mounted. The MU number was 3 or more Troubleshooting
103 SSB2 code Description 2381 The pair operation was rejected because the volume you specified as the S- VOL was blocked or a system disk The pair operation was rejected because the volume you specified as the S- VOL was being formatted The pair operation was rejected because the volume you specified as the S- VOL was a command device The pair operation was rejected because the volume you specified as the P- VOL was a reserved volume for Volume Migration The pair operation was rejected because the volume you specified as the S- VOL was a reserved volume for Volume Migration The create pair operation was rejected because the volume you specified as the P-VOL was the volume for Volume Migration The registering of the pair in the consistency group was rejected because the number of the pairs in a consistency group exceeded the definable maximum number of pairs The pair operation was rejected because the pair sharing the volume you specified as the P-VOL was undergoing the reverse copy operation or the Quick Restore operation The pair operation was rejected because the L1 pair sharing the P-VOL you specified as the root volume was undergoing the reverse copy operation or the Quick Restore operation The pair operation was rejected because the L2 pair sharing the P-VOL or S- VOL you specified as the node volume was undergoing the reverse copy operation or the Quick Restore operation The quick restore or reverse copy operation was rejected because the pair you specified was not suspended ( PSUE status) or split ( PSUS status) The quick restore or reverse copy operation was rejected because some of the pairs sharing the volume you specified as the P-VOL were not suspended ( PSUE status) or split ( PSUS status). 239E 23A8 23A9 The Paircreate operation was rejected because the Protect attribute was set for the volume you specified as the S-VOL. The quick restore or reverse copy operation was rejected because the volume you specified as the volume was specified as the P-VOL for XRC. The quick restore or reverse copy operation was rejected because the volume you specified as the volume was specified as the P-VOL for CC. 23AA The pair operation was rejected because the volume you specified as the S- VOL was specified as the P-VOL for XRC. 23AB The pair operation was rejected because the volume you specified as the S- VOL was specified as the P-VOL for CC. 23AF 23BB Registering the pair in the consistency group from CCI was rejected because the consistency group number you specified was reserved by PPRC/BCM. The create pair was rejected because the volume you specified as the S-VOL could not be used as the S-VOL because of Volume Security settings. Troubleshooting 7-11
104 SSB2 code 23EF 23F1 Description The pair deletion was rejected because the primary and secondary volumes were being Quick Split. The Paircreate operation was rejected because the CTGID you specified was not supported You cannot execute the command because the system could not authenticate the user. B911 B912 B913 The pair operation was rejected because the volume you specified did not exist. The pair operation was rejected because the S-VOL specified at the pair operation did not exist. The pair operation was rejected because the mirror ID was invalid. Troubleshooting consistency group pair-split If the consistency group pair-split fails, note the following: The pairs in the consistency group are suspended ( PSUE status). When the host server is down or has failed, you can define a consistency group that does not have SI pairs. Running the paircreate command with the consistency group split option under such a condition can cause the paircreate command to be rejected. In this case, complete the following: a. Locate a consistency group number that is not used by any pairs in the Pair Operation window by sorting the CTG column. b. Specify that consistency group number explicitly, and run the paircreate command with the consistency group split option using CCI on the host server. If you use an UR S-VOL as an SI P-VOL and you cannot change the status of some pairs included in the consistency group, some pairs remain unsplit in the consistency group after you run the pairsplit command in CCI. Consistency is not guaranteed. The following are possible reasons why the pair status cannot be changed: The UR pair belongs to a consistency group, and the P-VOL and S-VOL have the same contents. The journal volumes for this pair are full. The SI license is invalid. The SI pair volumes are blocked. The SI pair is in a status that does not allow the pairsplit operation. For more information, see Monitoring pair activity, status on page 6-2. The SI pair is a part of cascaded pairs. The other pairs in the cascaded pairs are in a status that does not allow the pairsplit operation Troubleshooting
105 For more information, see Status for L1, L2 pairs and operations permitted on page 6-5. An SI pair volume is also used in a TC (TC) or UR pair. The TC or UR pair is in a status that does not allow the pairsplit operation. After these factors are removed, perform the pairresync operation, and run the pairsplit command. Calling the Hitachi Data Systems customer support If you need to call the Hitachi Data Systems customer support, provide as much information about the problem as possible, including the following: The circumstances surrounding the error or failure. The content of any error message(s) displayed on the host system(s). The content of any error message(s) displayed on SN. The SN configuration information (use the FD Dump Tool). The service information messages (SIMs), including reference codes and severity levels, displayed by SN. The HDS customer support staff is available 24 hours a day, seven days a week. If you need technical support, log on to the HDS Support Portal for contact information: Troubleshooting 7-13
106 7-14 Troubleshooting
107 A Interface support for SI operations and options This appendix lists SI operations and options, and consistency group operations and options, and the interfaces that support them. Operations supported by Storage Navigator, CCI Consistency group operations supported by Storage Navigator, CCI Interface support for SI operations and options A-1
108 Operations supported by Storage Navigator, CCI The following table lists SI operations and options supported by SN and CCI. Operation Options SN Command CCI Option Reserve volume as S-VOL Remove reservation as S- VOL Change system options No options YES Not applicable Not applicable No options YES Not applicable Not applicable No options YES Not applicable Not applicable Create pairs No options YES paircreate Not applicable MU number YES* paircreate Uses MU# in HORCM.conf file Copy pace YES paircreate -c <size> Steady Split YES paircreate -split -fq normal Quick Split YES paircreate -split -fq quick MSGREQ NO NO NO ONLINSEC NO NO NO Split pairs No options YES pairsplit Not applicable Copy pace YES pairsplit -C <size> Steady Split YES pairsplit -fq normal Quick Split YES pairsplit -fq quick Prevent S-VOL read NO paircreate -m noread Resync pairs No options YES pairresync Not applicable Copy pace YES pairresync -c <size> Normal Copy YES pairresync -fq normal Quick Resync YES pairresync -fq quick Reverse Copy YES pairresync -fq normal -restore Quick Restore YES pairresync -fq quick -restore Suspend pairs No options YES pairsplit -E Delete pairs No options YES pairsplit -S * Not supported in the old SN GUI (which is shown in a secondary window). A-2 Interface support for SI operations and options
109 Consistency group operations supported by Storage Navigator, CCI The following table lists SI consistency group (CG) operations and options supported by SN and CCI. Operation Option SN Command CCI Option Reserve CG No options YES Not necessary Not necessary Remove CG reserve No options YES Not necessary Not necessary Add pairs to a CG No options NO paircreate -m grp [CTGID] MU number NO paircreate Uses MU# in HORCM.conf file Copy pace NO paircreate -m grp [CTGID] -c <size> User can specify CG number System allocates CG number NO paircreate -m grp xx (xx = CTGID) NO paircreate -m grp (CTGID is omitted) CG split (split time not specified) No options NO pairsplit Not applicable Copy pace NO pairsplit -C <size> Steady Split NO pairsplit -fq normal Quick Split NO pairsplit -fq quick UR-SI combination (Steady Split) UR-SI combination (Quick Split) NO pairsplit -fq normal NO pairsplit -fq quick Resync pairs No options NO pairresync* Not applicable Copy pace NO pairresync* -c <size> Normal Copy NO pairresync* -fq normal Quick Resync NO pairresync* -fq quick Reverse Copy NO pairresync* -fq normal -restore Quick Restore NO pairresync* -fq quick -restore ONLINSEC NO NO NO Delete pairs No options NO pairsplit* -S * You must use a CCI pair group to run the command for the consistency group. Interface support for SI operations and options A-3
110 A-4 Interface support for SI operations and options
111 B ShadowImage GUI reference This appendix describes SI windows and dialog boxes in SN. Replications window Local Replications window View Pair Properties window View Pair Synchronous Rate window View Histories window Consistency Group Properties window Create Pairs wizard Split Pairs wizard Resync Pairs wizard Suspend Pairs window Delete Pairs window Edit Mirror Units dialog box Change Options dialog box Add Reserve Volumes Wizard Remove Reserve Volumes window ShadowImage GUI reference B-1
112 Edit Local Replica Option wizard B-2 ShadowImage GUI reference

113 Replications window Use this window to view pair information for local replication. Summary tab Item Licensed Capacity Number of Replica LDEVs Number of FCv2/FCSE Relationships Description Used and licensed capacity of each product. Number of LDEVs used for all local replication pairs. Number of relationships that Compatible FlashCopy V2 and Compatible FlashCopy SE use. ShadowImage GUI reference B-3
114 Item Number of Differential Tables View Histories button Description (SI, SIz, and SS only.) Number of differential tables in use. Click to open the View History window. Replica LDEVs tab Item Description LDEV ID LDEV Name Emulation Type Capacity Copy Type Export button Selected LDEV s identifier Selected LDEV s name Selected LDEV s emulation type Selected LDEV s capacity Shows the following copy types: SI-L1: SI L1 P-VOL or S-VOL SI-L2: SI L2 P-VOL or S-VOL TI: HTI P-VOL or S-VOL SS: SS P-VOL or S-VOL SIMF: SIz P-VOL or S-VOL FCv2: Compatible FlashCopy V2 relationship FCSE: Compatible FlashCopy SE relationship Click to open the dialog box for downloading table information to a file. Local Replications window Use this window to view pair, reserve volume, and consistency group information for local replication. Use it also to perform the following operations: Creating pairs on page 5-5 Splitting pairs on page 5-11 Resynchronizing pairs on page 5-15 Deleting pairs on page 5-17 B-4 ShadowImage GUI reference

115 Summary tab Item Number of Pairs Number of Consistency Groups Number of Reserve Volumes Snapshot Estimated Manageable Capacity Description Number of pairs for each local replication software type Number of consistency groups whose status is other than Free Number of reserved volumes. Values: Open: Number of OPEN system reserved volumes Mainframe: Number of mainframe system reserved volumes Total: Total reserved volumes Total including S-VOLs: Includes number of reserve volumes and number of S-VOL for SI, SIz, HTI, and SS. Estimated HTI pair capacity. An icon is shown,, when the value is less than 128 TB. For more information, see the Hitachi Thin Image User Guide. ShadowImage GUI reference B-5
116 Item Number of Pair Tables Number of Differential Tables Edit Local Replica Options button Edit SCP Time button Description Number of pair tables in use for the following: SI/SIz/Volume Migration: SI, SIz, Volume Migration TI/SS: HTI and SS (SI, SIz, and SS only.) Number of differential tables in use. Click to open the Edit Local Replica Options window. Click to open the Edit SCP Time window. Pairs tab The Pairs tab shows only pairs to which you are allocated the P-VOL and/or S-VOL. Item Description Primary Volume LDEV ID: The P-VOL s LDEV identifier. Click to open the LDEV Properties window. LDEV Name: The P-VOL s LDEV name. Port ID: The port name of the P-VOL LDEV s LUN path. For SIz, a hyphen (-) is shown. Host Group Name: The host group name of the P-VOL LDEV s LUN path. For SIz, a hyphen (-) is shown. LUN ID: LUN identifier of the P-VOL LDEV's LUN path. For SIz, a hyphen (-) is shown. Capacity: The P-VOL s capacity. CLPR: The P-VOL s CLPR number. Copy Type Snapshot Group Status Shows the following types of pairs: SI-L1: SI L1 SI-L2: SI L2 TI: HTI SS: SS SIMF: SIz (HTI only.) The snapshot group name. If you have not set a snapshot group for HTI pairs, this item is blank. For SI, SIz, and SS, a hyphen (-) is shown. Shows the following icons and pair status names: ( SIMPLEX and SMPL are not statuses that are shown in SN.) B-6 ShadowImage GUI reference
117 Item Status, continued Description The pair is being deleted. Status names are: SI, HTI: SMPL(PD) SIz: Deleting/TRANS This icon is used for the following: The pair is being copied. Status names are: SI: COPY(PD)/COPY SIz: PENDING HTI, SS: COPY The pair is being resynchronized. Status names are: SI: COPY(RS)/COPY SIz: Resync/PENDING The pair is being resynchronized from secondary to primary volume. Status names are: SI: COPY(RS-R)/RCPY SIz: Resync-R/REVRSY HTI, SS: COPY(RS-R)/RCPY The pair is being split in normal mode. Status names are: SI: COPY(SP)/COPY SIz: SP-Pend/TRANS This icon is used for the following: The volumes are paired. Status names are: SI: PAIR SIz: DUPLEX The pool has exceeded the threshold. Status name is: HTI, SS: PFUL This icon is used for the following: The pair is split. Status names are: SI: PSUS SIz: Split/SUSPOP The pair is being split in Quick Split mode. Status names are: SI: PSUS(SP)PSUS SIz: V-Split/SUSPVS The pool is full. Status name is: HTI, SS: PFUS The pair is suspended. Status names are: SI: PSUE SIz: Suspend/SUSPER ShadowImage GUI reference B-7
118 Item Description For more information, see Pair status definitions on page 6-3. Secondary Volume LDEV ID: The S-VOL s LDEV identifier. LDEV Name: The S-VOL s LDEV name. Port ID: The port name of the P-VOL LDEV s LUN path. For SIz, a hyphen (-) is shown. Host Group Name: The host group name of the P-VOL LDEV s LUN path. For SIz, a hyphen (-) is shown. LUN ID: The LUN ID of the S-VOL LDEV's LUN path. For SIz, a hyphen (-) is shown. Emulation Type: The S-VOL s emulation type. Capacity: The S-VOL s capacity. CLPR: The S-VOL s CLPR number. Snapshot Date Pool Name (ID) Copy Pace CTG ID Mirror Unit Topology ID Create Pairs button Split Pairs button Resync Pairs button View Pair Synchronous Rate* View Pair Properties* Suspend Pairs* (HTI and SS only.) The date and time that a snapshot was acquired. If you have not set a snapshot date for HTI pairs, this item is blank. For SI and SIz, a hyphen (-) is shown. (HTI and SS only.) The pool name and identification number. If you have not set a pool name for HTI pairs, this item is blank. For SI and SIz, a hyphen (-) is shown. (SI and SIz only.) The speed at which the split operation is performed. Values: Faster, Medium, Slower If you have not set a copy pace for HTI pairs, this item is blank. For HTI and SS pairs, a hyphen (-) is shown. Consistency Group ID Mirror unit number LDEV s topology identifier Click to open the Create Pairs wizard. Click to open the Split Pairs window. Click to open the Resync Pairs window. Opens the View Pair Synchronous Rate window. Opens the View Pair Properties window. Opens the Suspend Pairs window. B-8 ShadowImage GUI reference

119 Delete Pairs* Export* Item Description Opens the Delete Pairs window. Opens the dialog box for downloading table information to a file. *An option you can choose from the More Actions menu. Reserve Volumes tab Use this tab on the Local Replications window to view reserved volume information for local replication, and to perform the following operations: Reserving secondary volumes on page 4-2 Removing reserve attribute from a volume on page 6-10 Item Description LDEV ID LDEV Name Capacity Number of Paths Add Reserve Volumes button Remove Reserve Volumes button Export button Reserved volume LDEV s identifier Reserved volume LDEV s name Reserved volume s capacity The number of paths to reserved volume. Click to open the Add Reserve Volumes window. Click to open the Remove Reserve Volumes window. Click to open the dialog box for downloading table information to a file. ShadowImage GUI reference B-9

120 Consistency Group tab Use this tab in the Local Replications window to view consistency group information for local replication Item Description CTG ID Status Number of Pairs Reserve Mainframe CTGs button Release Reserved Mainframe CTGs button Export button Consistency group identifier. Click to open the Consistency Group Properties window. Possible values include: SI Used: Consistency group used by SI. SIMF Used (RAID Manager): Consistency group used for SIz pairs and managed with CCI. SIMF Used (PPRC/BCM): Consistency group used for SIz pairs and managed using PPRC or BCM. TI Used: Consistency group used by HTI pairs. SS Used: Consistency group used for SS pairs. Mainframe Reserved: Consistency group reserved for PPRC or BCM. Free: Consistency group not being used and is not reserved. (Changing...): Status is in the process of changing. Number of pairs for the consistency group in use. Click to open the Reserved Mainframe CTGs window. Click to open the Release Reserved Mainframe CTGs window. Click to open the dialog box for downloading table information to a file. B-10 ShadowImage GUI reference
 Type of pair: ShadowImage ShadowImage for Mainframe Thin Image COW Copy-on-Write Snapshot (HTI and SS only.) The pool name and ID.")
121 View Pair Properties window Use this window to review pair and volume details for local replication. For detailed information, see Monitoring pair, volume details on page 6-7. Pair Properties tab Item Description Copy Type Pool Name (ID) Type of pair: ShadowImage ShadowImage for Mainframe Thin Image COW Copy-on-Write Snapshot (HTI and SS only.) The pool name and ID. If you have not set a pool name for HTI pairs, this item is blank. For SI and SIz, a hyphen (-) is shown. Most Recent Snapshot Date (HTI and SS only.) Date and time that the most recent snapshot was acquired. If you have not set a most recent snapshot date for HTI pairs, this item is blank. For SI and SIz, a hyphen (-) is shown. ShadowImage GUI reference B-11
122 Item Description LDEV ID LDEV Name Identifiers of P-VOL and S-VOL LDEVs Names of P-VOL and S-VOL LDEVs Pairs table Item Description Primary Volume LDEV ID: The P-VOL s LDEV identifier. LDEV Name: The P-VOL s LDEV name. Emulation Type: The P-VOL s emulation type. Capacity: The P-VOL s volume capacity. CLPR: The P-VOL s CLPR number. Snapshot Group Status (HTI only.) The snapshot group name. If you have not set a snapshot group for HTI pairs, this item is blank. For SI, SIz and SS, a hyphen (-) is shown. Pair status. For more information, see Pair status definitions on page 6-3. Secondary Volume LDEV ID: The S-VOL s LDEV identifier. LDEV name: The S-VOL s LDEV name. Emulation Type: The S-VOL s emulation type. Capacity: The S-VOL s volume capacity. CLPR: The S-VOL s CLPR number. Mode: Indicates whether the S-VOL has been written to. For SI, this item also indicates whether the S-VOL can be read. For SI: - W is shown if the S-VOL was written to and when the S-VOL was written to and cannot be read when its pair status is PSUS(SP)/PSUS or PSUS. - N is shown if the S-VOL cannot be read. You have specified -m noread using CCI. - A hyphen (-) indicates that the S-VOL has not been written to and it can be read. For HTI and SS: - W is shown if the S-VOL was written to when its pair status is PSUS(SP)/PSUS or PSUS. - A hyphen (-) indicates that the S-VOL has not been written to. For SIz: - W is shown if the S-VOL was written to when its pair status is V-Split/SUSPVS or Split/SUSPOP. B-12 ShadowImage GUI reference

123 Item Snapshot Date CTG ID COPY Pace Mirror Unit Description - Protect is shown if the S-VOL is write-protected. You specified the PROT MODE in BCM as PROTECT when the S-VOL s pair status was Split/SUSPOP, SP-Pend/TRANS, or V-Split/SUSPVS. - A hyphen (-) indicates that the S-VOL has not been written to and you made Protect settings. (HTI and SS only.) The date and time when a snapshot was acquired. For SI and SIz, a hyphen (-) is shown. Consistency group identifier (SI and SIz only.) The copy speed. For HTI and SS pairs, a hyphen (-) is shown. The mirror unit number. View Pair Synchronous Rate window Use this window to view the percentage of synchronized data between the P- VOL and S-VOL. For detailed information, see Monitoring synchronous rates on page 6-8. ShadowImage GUI reference B-13
124 Pairs table Item Description Primary Volume LDEV ID: The P-VOL s LDEV identifier. LDEV Name: The P-VOL s LDEV name. CLPR: The P-VOL s CLPR number. Copy Type Snapshot Group Status Synchronous Rate (%) Shows the following types of pairs: SI-L1: SI L1 SI-L2: SI L2 TI: HTI SS: SS SIMF: SIz (HTI only.) The snapshot group name. If you have not set a snapshot group for HTI pairs, this item is blank. For SI, SIz and SS pairs, a hyphen (-) is shown. Pair status. For more information, see Pair status definitions on page 6-3. Synchronous rate (%) between P-VOL and S-VOL. Secondary Volume LDEV ID: The S-VOL s LDEV identifier. LDEV Name: The S-VOL s LDEV name. CLPR: The -VOL s CLPR number. Copy Pace Mirror Unit Refresh (SI and SIz only.) The speed at which the split operation is performed. Values: Faster, Medium, or Slower For HTI and SS pairs, a hyphen (-) is shown. Mirror unit number When clicked, updates the information in the Pairs table. View Histories window Use this window to review the operations that have been performed on pairs. You can view a maximum of 16,384 operation histories. For full information, see Monitoring a pair s operation history on page 6-8. B-14 ShadowImage GUI reference
 Secondary Volume ( Target Volume for FCv2/FCSE) Operation date and time LDEV ID: The P-VOL/source volume s LDEV identifier Provisioning")
125 Setting fields Item Description Copy Type Shows the following types of pairs: SI: SI TI: HTI SS: SS SIMF: SIz FCv2/FCSE: Compatible FlashCopy V2 and Compatible FlashCopy SE Histories table Item Description Date Primary Volume ( Source Volume for FCv2/FCSE) Secondary Volume ( Target Volume for FCv2/FCSE) Operation date and time LDEV ID: The P-VOL/source volume s LDEV identifier Provisioning Type: The provisioning type. Values: - Basic: Internal volume - DP: DP-VOL - External: External volume - External MF: Migration volume LDEV ID: The secondary/target volume s LDEV identifier. Provisioning Type: The provisioning type. Values: - Basic: Internal volume ShadowImage GUI reference B-15

126 Item Mirror Unit Pool ID Relationship ID Description Code Description Export - DP: DP-VOL Description - External: External volume The mirror unit number. Shown only when TI or SS is the selected Copy Type. The pool identifier. Shown only when TI or SS is the selected Copy Type. The relationship identifier. Shown only when FCv2/FCSE is the selected Copy Type. The code for the type of operation performed. Description of the operation. Click to open the dialog box for downloading table information to a file. Consistency Group Properties window Use this window to view a list of consistency groups, with status and number of pair information; also use it to view a consistency group s properties. For full information, see Monitoring consistency groups on page 6-8. B-16 ShadowImage GUI reference
127 Consistency Group Properties table Item Description CTG ID Status Number of Pairs Consistency group identifier Consistency group status SI Used: The consistency group is in use by SI. SIMF Used (RAID Manager): The consistency group is used by SIz and managed with CCI. SIMF Used (PPRC/BCM): The consistency group is used by SIz and managed with PPRC/BCM. TI Used: The consistency group is used by HTI. SS Used: The consistency group is used by SS. Mainframe Reserved: Consistency group is reserved for use by PPRC and BCM. Free: The consistency group is not being used and is not reserved. (Changing...): Status is the process of changing. Number of pairs assigned to the consistency group Pairs table This table shows pairs for P-VOL and/or S-VOL to which you are allocated. Item Description Primary Volume LDEV ID: The P-VOL s LDEV identifier. LDEV Name: The P-VOL s LDEV name. Emulation Type: The P-VOL s emulation type. Capacity: The P-VOL s volume capacity. CLPR: The P-VOL s CLPR number. Copy Type Snapshot Group Status Shows the following types of pairs: SI-L1: SI L1 SI-L2: SI L2 TI: HTI SS: SS SIMF: SIz (HTI only.) The snapshot group name. If you have not set a snapshot group for HTI pairs, this item is blank. For SI, SIz and SS pairs, a hyphen (-) is shown. The pair status. For more information, see Pair status definitions on page 6-3. Secondary Volume LDEV ID: The S-VOL s LDEV identifier. ShadowImage GUI reference B-17
128 Item Snapshot Date Pool Name (ID) Copy Pace Mirror Unit Detail button Description LDEV Name: The S-VOL s LDEV name. Emulation Type: The S-VOL s emulation type. Capacity: The S-VOL s volume capacity. CLPR: The S-VOL s CLPR number. (HTI and SS only.) The date and time that a snapshot was acquired. For SI and SIz pairs, a hyphen (-) is shown. (HTI and SS only.) The pool name and identification number. For SI and SIz pairs, a hyphen (-) is shown. (SI and SIz only.) The speed at which the split operation is performed. Values: Faster, Medium, Slower For HTI and SS pairs, a hyphen (-) is shown. The mirror unit number. Click to open the Pair Properties window. Create Pairs wizard Use this wizard to create pairs, including specifying new pair details. This wizard includes the following windows: Select Pair Configuration window Select Primary Volumes window Select Secondary Volumes window Confirm window For full information, see Creating pairs on page 5-5. Select Pair Configuration window Use this window to configure the pairs you will create. B-18 ShadowImage GUI reference

129 Item Description Copy Type Emulation Type Pair Topology Type Number of Secondary Volumes Initial MU Number Split Type Copy Pace The copy type. Values: ShadowImage, ShadowImage for Mainframe, TI, or COW Snapshot The emulation type. For HTI or SS, you can only specify OPEN-V. (SI only.) Use the check boxes to select the pair configuration for the L1 and L2 pairs. (SIz, HTI and SS only.) The total number of S-VOL assigned to the P-VOL. Includes volumes for the pairs you are creating and volumes for existing pairs. (SIz and SS only.) The initial MU number. (SI and SIz only.) Non Split: Does not split the pair Quick Split: Splits the pair immediately Steady Split: After all differential data is copied, the pair is split. (SI and SIz only.) The speed at which the split operation is performed. Values: Faster, Medium, Slower For HTI and SS pairs, a hyphen (-) is shown. ShadowImage GUI reference B-19
 Description Indicates whether the P-VOLs are used. Yes: Only HTI and SS P-VOL LDEVs are shown in the Available LDEVs table. No: Only unpaired LDEVs are shown in the Available LDEVs table.")
130 Select Primary Volumes window Use this window to select LDEVs that are P-VOLs. Item Use Primary Volumes of Snapshot Pairs Port ID Host Group Name (HTI and SS only.) Description Indicates whether the P-VOLs are used. Yes: Only HTI and SS P-VOL LDEVs are shown in the Available LDEVs table. No: Only unpaired LDEVs are shown in the Available LDEVs table. (SI, HTI, SS only.) Filters LDEVs in the Available LDEVs table according to the port ID. (SI, HTI, SS only.) Filters LDEVs in the Available LDEVs table according to host group name. Any is the default. Available LDEVs table Item Description LDEV ID LDEV Name Port ID Host Group Name LUN ID The LDEV s identifier. The LDEV s name. (SI, HTI, SS only.) Port name of the LDEV s LUN path. (SI, HTI, SS only.) Host group name of the LDEV s LUN path. (SI, HTI, SS only.) B-20 ShadowImage GUI reference
131 Item Provisioning Type Emulation Type Capacity CLPR Number of Secondary Volumes Primary Volumes Mirror Unit Pool Name (ID) Select Pool button Description LUN ID of the LDEV's LUN path. The LDEV s provisioning type. Values: Basic: Internal volume HDP: HDP volume External: External volume The LDEV s emulation type. Capacity of the LDEV CLPR number of the LDEV The number of S-VOLs. (SI only) The number for an L1 pair does not include the number of L2 S-VOL. (HTI and SS only.) Information about the P-VOL when the LDEV is used as a S- VOL for an existing pair. Values: LDEV ID: The LDEV identifier. LDEV Name: The LDEV name. Port ID: The port name of the LDEV s LUN path. Host Group Name: The host group name of the LDEV s LUN path. LUN ID: The LUN ID of the LDEV's LUN path. Emulation Type: The volume s emulation type. Capacity: The volume s capacity. CLPR: The volume s CLPR number. (HTI and SS only.) The mirror unit number. (HTI and SS only.) The pool name and ID. For SI and SIz, this item is blank. (HTI and SS only.) Click to open the Select Pool window. Note: If you selected Yes for Use Primary Volumes of Snapshot Pairs, this button is not available. Selected LDEVs table Item Description LDEV ID LDEV Name The selected P-VOL s LDEV identifier. The selected P-VOL s LDEV name. ShadowImage GUI reference B-21
132 Item Description Port ID Host Group Name LUN ID Provisioning Type Emulation Type Capacity CLPR Number of Secondary Volumes Primary Volume Mirror Unit Pool Name (ID) (SI, HTI, and SS only.) The port name of the LDEV s LUN path. (SI, HTI, and SS only.) Host group name of the LDEV s LUN path. (SI, HTI, and SS only.) LUN ID of the LDEV's LUN path. The LDEV s provisioning type. Values: Basic: Internal volume HDP: HDP volume External: External volume Emulation type of LDEV Capacity of LDEV. CLPR number The number of S-VOL. (SI only) The number for an L1 pair does not include the number of L2 S-VOL. (HTI and SS only.) Information about the P-VOL. Values: LDEV ID: The P-VOL s LDEV identifier: LDEV Name: The P-VOL s LDEV name. Port ID: The port name of the P-VOL LDEV s LUN path. Host Group Name: The host group name of the P-VOL LDEV s LUN path. LUN ID: The LUN ID of the P-VOL LDEV's LUN path. Emulation Type: The P-VOL s emulation type. Capacity: The P-VOL s capacity. CLPR: The P-VOL s CLPR number. (HTI and SS only.) The mirror unit number. (HTI and SS only.) The pool name and identifier. Select Secondary Volumes window Use this window to select LDEVs that are the S-VOL. B-22 ShadowImage GUI reference
 Select to hide the volumes that are already in a pair from the list.")
133 Capacity list Item The remaining number you have to select Exclude Paired Volumes Port ID Host Group Name Detail button Set button Description Allows you to filter the available LDEVs according to the capacity you select. Refers to the selected P-VOLs in the Selected Pairs table that do not have an assigned S-VOL. (SI only.) Select to hide the volumes that are already in a pair from the list. Default: Selected (SI, HTI, and SS only.) Filters LDEVs in the Available LDEVs table according to the port ID. (SI, HTI, and SS only.) Filters LDEVs in the Available LDEVs table according to host group name. Any is the default. Click to open the LDEV Properties window, which contains additional information for the selected LDEV. Click to move the selected LDEV to the Selected Pairs table. ShadowImage GUI reference B-23
134 Item Clear button Sort Pairs button Edit Mirror Unit button Snapshot Group Change Options button Remove button Description Click to move the selected S-VOL from the Selected Pairs table to the Available LDEVs table. (SI only.) Click to sort the Select Pairs table according to the following: Arrange in Mirror Unit: Data is shown according to mirror units. Arrange in Topology: Data is shown according to L1 and L2 pairs. Click to open the Edit Mirror Units dialog box, from which you can change the mirror unit numbers, and thereby, pair topology. (SI only) For more information, see the step on pair typology type in Creating pairs on page 5-5.) (HTI only.) Choose to create a new snapshot group or use an existing snapshot group. Create new snapshot group: The new snapshot group name is entered. Use defined snapshot group: An existing snapshot group is selected. If you have not set a snapshot group for HTI pairs, this item is blank. (SI and SIz only.) Click to open the Change Options dialog box, from which you can change the Split Type and Copy Pace. Click to remove the pair from the table. (SI only) You cannot remove L1 pairs if they have an L2 pair. Available LDEVs table Item Description LDEV ID LDEV Name Port ID Host Group Name LUN ID Emulation Type The LDEV s identifier. The LDEV s name. (SI only.) The port name of the LDEV s LUN path. (SI only.) The host group name of the LDEV s LUN path. (SI only.) The LUN ID of the LDEV's LUN path. The LDEV s emulation type. B-24 ShadowImage GUI reference
135 Item Description Capacity Provisioning Type CLPR Number of Secondary Volumes Reserve Volume The LDEV s capacity. Provisioning type of the LDEV: Basic: Internal volume DP: DP-VOL External: External volume Snapshot: HTI or SS volume LDEV s CLPR number (SI only.) The number of S-VOL that the selected P-VOL has been assigned so far. This may include the number of S-VOL for an L2 pair that is already created. (SI and SIz only.) Indicates whether LDEV is reserved as an S-VOL. Values: Yes or No Selected Pairs table Item Primary Volume Snapshot Group New Snapshot Group Information about the P-VOL. Description LDEV ID: The P-VOL s LDEV identifier. LDEV Name: The P-VOL s LDEV name. Port ID: The port name of the P-VOL LDEV s LUN path. For SIz, this item is blank. Host Group Name: The host group name of the P-VOL LDEV s LUN path. For SIz, this item is blank. LUN ID: The LUN ID of the P-VOL LDEV's LUN path. For SIz, this item is blank. Emulation Type: The P-VOL s emulation type. Capacity: The P-VOL s volume capacity. (HTI only.) The snapshot group name. If you have not set a snapshot group for TI pairs, this item is blank. (HTI only.) Values: Yes: New snapshot group is used. No: Existing snapshot group is used. Secondary Volume LDEV ID: The S-VOL s LDEV identifier. LDEV Name: The S-VOL s LDEV name. Port ID: The port name of the S-VOL LDEV s LUN path. ShadowImage GUI reference B-25
136 Item Description For SIz, this item is blank. Host Group Name: The host group name of the S-VOL LDEV s LUN path. For SIz, this item is blank. LUN ID: The LUN ID of the S-VOL LDEV's LUN path. For SIz, this item is blank. Emulation Type: The S-VOL s emulation type. Capacity: The S-VOL s volume capacity. Copy Type Mirror Unit Split Type Copy Pace Pool Name (ID) The following types of pairs are shown: SI-L1: SI L1 SI-L2: SI L2 TI: HTI SS: SS SIMF: SIz The mirror unit number. For HTI and SS pairs, a hyphen (-) is shown. (SI and SIz only.) One of the following selected split types are shown: Non Split: Does not split the pair. Quick Split: Splits the pair immediately Steady Split: Splits the pair after all differential data is copied (SI and SIz only.) The speed at which the split operation is performed. Values: Faster, Medium, Slower For HTI and SS pairs, a hyphen (-) is shown. (HTI and SS only.) The pool name and ID number. For SI and SIz pairs, a hyphen (-) is shown. B-26 ShadowImage GUI reference

137 Confirm window Selected Pairs table Item Description Primary Volume LDEV ID: The P-VOL s LDEV identifier. LDEV Name: The P-VOL s LDEV name. Port ID: The port name of the P-VOL LDEV s LUN path. For SIz, this item is blank. Host Group Name: The host group name of the P-VOL LDEV s LUN path. For SIz, this item is blank. LUN ID: The LUN ID of the P-VOL LDEV's LUN path. For SIz, this item is blank. Emulation Type: The P-VOL s emulation type. Capacity: The P-VOL s volume capacity. CLPR: The P-VOL s CLPR number. Copy Type Snapshot Group New Snapshot Group Shows the following types of pairs: SI-L1: SI L1 SI-L2: SI L2 TI: TI SS: SS SIMF: SIz (HTI only.) The snapshot group name. If you have not set a snapshot group for TI pairs, this item is blank. (HTI only.) ShadowImage GUI reference B-27
138 Item Description Yes: New snapshot group is used. No: Existing snapshot group is used. Secondary Volume LDEV ID: The S-VOL s LDEV identifier. LDEV Name: The S-VOL s LDEV name. Port ID: (HTI and SI only.) The port name of the S- VOL LDEV s LUN path. Host Group Name: (HTI and SI only.) The Host group name of the S-VOL LDEV s LUN path. LUN ID: (HTI and SI only.) The LUN ID of the S-VOL LDEV's LUN path. Emulation Type: The S-VOL s emulation type. Capacity: The S-VOL s volume capacity. CLPR: The S-VOL s CLPR number. Split Type Copy Pace Pool Name (ID) Mirror Unit (SI and SIz only.) Non Split: Does not split the pair. Quick Split: Splits the pair immediately Steady Split: Splits the pair after all differential data is copied (SI and SIz only.) The speed at which the split operation is performed. Values: Faster, Medium, Slower (HTI and SS only.) The pool name and ID number. (SI and SIz only.) The mirror unit number. Split Pairs wizard Split Pairs window Use this wizard to split pairs. Use this window to split pairs. For full information, see Splitting pairs on page B-28 ShadowImage GUI reference

139 Selected Pairs table The same Selected Pairs table appears on the Confirm window and the Split Pairs window. Item Description Primary Volume LDEV ID: P-VOL s LDEV identifier LDEV Name: P-VOL s LDEV name Emulation Type: P-VOL s emulation type Capacity: P-VOL s volume capacity CLPR: P-VOL s CLPR number Copy Type Shows the following types of pairs: SI-L1: SI L1 SI-L2: SI L2 TI: HTI SS: SS SIMF: SIz ShadowImage GUI reference B-29
140 Item Snapshot Group Status (HTI only.) The snapshot group name. Description If you have not set a snapshot group for HTI pairs, this item is blank. For SI, SIz and SS pairs, a hyphen (-) is shown. Pair status. For more information, see Pair status definitions on page 6-3. Secondary Volume LDEV ID: S-VOL s LDEV identifier LDEV Name: S-VOL s LDEV name Emulation Type: S-VOL s emulation type Capacity: S-VOL s volume capacity CLPR: S-VOL s CLPR number Pool Name (ID) Mirror Unit Split Type list Copy Pace list (HTI and SS only.) The pool name and ID number. For SI and SIz pairs, hyphen (-) is shown. Mirror unit number The split type. Values: Quick Split: Splits the pair immediately Steady Split: After all differential data is copied, the pair is split. For HTI and SS, this is the only option you can select. Default: Quick Split (SI and SIz only.) The speed at which the split operation is performed. Values: Faster, Medium, Slower Default: Medium For HTI and SS pairs, a hyphen (-) is shown. B-30 ShadowImage GUI reference
141 Confirm window Selected Pairs table Item Description Primary Volume LDEV ID: The P-VOL s LDEV identifier LDEV Name: The P-VOL s LDEV name Emulation Type: The P-VOL s emulation type Capacity: The P-VOL s volume capacity CLPR: The P-VOL s CLPR number Copy Type Snapshot Group Status Shows the following types of pairs: SI-L1: SI L1 SI-L2: SI L2 TI: HTI SS: SS SIMF: SIz (HTI only.) The snapshot group name. If you have not set a snapshot group for HTI pairs, this item is blank. For SI, SIz and SS pairs, a hyphen (-) is shown. The pair status. For more information, see Pair status definitions on page 6-3. Split Type Quick Split: Splits the pair immediately ShadowImage GUI reference B-31
142 Item Description Steady Split: Splits the pair after all differential data is copied. Copy Pace (SI and SIz only.) The speed at which the split operation is performed. Values: Faster, Medium, Slower For HTI and SS pairs, a hyphen (-) is shown. Secondary Volume LDEV ID: The S-VOL s LDEV identifier LDEV Name: The S-VOL s LDEV name Emulation Type: The S-VOL s emulation type Capacity: The S-VOL s volume capacity CLPR: The S-VOL s CLPR number Pool Name (ID) Mirror Unit (HTI and SS only.) The pool name and identification number. For SI and SIz pairs, a hyphen (-) is shown. Mirror unit number Resync Pairs wizard Use this wizard to resynchronize pairs. This wizard includes the following windows: Resync Pairs window Confirm window Resync Pairs window Use this window to specify resync operation details. For full information, see Resynchronizing pairs on page B-32 ShadowImage GUI reference
143 Selected Pairs table Item Description Primary Volume LDEV ID: The P-VOL s LDEV identifier LDEV Name: The P-VOL s LDEV name Emulation Type: The P-VOL s emulation type Capacity: The P-VOL s volume capacity CLPR: The P-VOL s CLPR number Copy Type Snapshot Group Shows the following types of pairs: SI-L1: SI L1 SI-L2: SI L2 TI: HTI SS: SS SIMF: SIz (HTI only.) The snapshot group name. ShadowImage GUI reference B-33
144 Item Description If you have not set a snapshot group for HTI pairs, this item is blank. For SI, SIz and SS pairs, a hyphen (-) is shown. Status Pair status. For more information, see Pair status definitions on page 6-3. Secondary Volume LDEV ID: The S-VOL s LDEV identifier LDEV Name: The S-VOL s LDEV name Emulation Type: The S-VOL s emulation type Capacity: The S-VOL s volume capacity CLPR: The S-VOL s CLPR number Snapshot Date Pool Name (ID) Mirror Unit Resync Type Copy Pace list (HTI and SS only.) The date and time that a snapshot was acquired. For SI and SIz pairs, a hyphen (-) is shown. (HTI and SS only.) The pool name and identification number. For SI and SIz pairs, a hyphen (-) is shown. The mirror unit number. The type of resynchronization is specified: Normal Copy (Primary > Secondary) Reverse Copy (Secondary > Primary) Quick Resync (Primary > Secondary) Quick Restore (Secondary > Primary) For more information, see Types of resync operations on page (SI and SIz only.) The speed at which the split operation is performed. Values: Faster, Medium, Slower Default: Medium For HTI and SS pairs, a hyphen (-) is shown. B-34 ShadowImage GUI reference
145 Confirm window Selected Pairs table Item Description Primary Volume LDEV ID: The P-VOL s LDEV identifier LDEV Name: The P-VOL s LDEV name Emulation Type: The P-VOL s emulation type Capacity: The P-VOL s volume capacity CLPR: The P-VOL s CLPR number Copy Type Snapshot Group Status Resync Type Shows the following types of pairs: SI-L1: SI L1 SI-L2: SI L2 TI: HTI SS: SS SIMF: SIz (HTI only.) The snapshot group name. If you have not set a snapshot group for HTI pairs, this item is blank. For SI, SIz and SS pairs, a hyphen (-) is shown. The pair status. For more information, see Pair status definitions on page 6-3. The resync type. Values: ShadowImage GUI reference B-35
146 Item Description Normal Copy (Primary > Secondary) Reverse Copy (Secondary > Primary) Quick Resync (Primary > Secondary) Quick Restore (Secondary > Primary) For more information, see Types of resync operations on page Copy Pace Secondary Volume Snapshot Date Pool Name (ID) Mirror Unit (SI and SIz only.) The speed at which the split operation is performed. Values: Faster, Medium, Slower Default: Medium For HTI and SS pairs, a hyphen (-) is shown. The secondary information. Values: LDEV ID: The S-VOL s LDEV identifier LDEV Name: The S-VOL s LDEV name Emulation Type: The S-VOL s emulation type Capacity: The S-VOL s volume capacity CLPR: The S-VOL s CLPR number (HTI and SS only.) The date and time that a snapshot was acquired. For SI and SIz pairs, a hyphen (-) is shown. (HTI and SS only.) The pool name and identification number. For SI and SIz pairs, a hyphen (-) is shown. The mirror unit number. Suspend Pairs window Use this window to suspend pair creation. For full information, see Suspending pair creation on page 5-9. B-36 ShadowImage GUI reference
147 Selected Pairs table Item Description Primary Volume LDEV ID: The P-VOL s LDEV identifier. LDEV Name: The P-VOL s LDEV name. Emulation Type: The P-VOL s emulation type. Capacity: The P-VOL s volume capacity. CLPR: The P-VOL s CLPR number. Copy Type Status Shows the following types of pairs: SI-L1: SI L1 SI-L2: SI L2 TI: TI SS: SS SIMF: SIz Pair status. For more information, see Pair status definitions on page 6-3. Secondary Volume LDEV ID: The S-VOL s LDEV identifier. LDEV Name: The S-VOL s LDEV name. Emulation Type: The S-VOL s emulation type. Capacity: The S-VOL s volume capacity. CLPR: The S-VOL s CLPR number. Mirror Unit The mirror unit number. ShadowImage GUI reference B-37

148 Delete Pairs window Use this window to delete pairs. For full information, see Deleting pairs on page Selected Pairs table Item Description Primary Volume LDEV ID: The P-VOL s LDEV identifier. LDEV Name: The P-VOL s LDEV name. Emulation Type: The P-VOL s emulation type. Capacity: The P-VOL s volume capacity. CLPR: The P-VOL s CLPR number. Copy Type Snapshot Group Shows the following types of pairs: SI-L1: SI L1 SI-L2: SI L2 TI: HTI SS: SS SIMF: SIz (HTI only.) The snapshot group name. If you have not set a snapshot group for HTI pairs, this item is blank. For SI, SIz and SS pairs, a hyphen (-) is shown. B-38 ShadowImage GUI reference
 Mirror Unit (HTI and SS only.")
149 Item Description Status The pair status. For more information, see Pair status definitions on page 6-3. Secondary Volume LDEV ID: The S-VOL s LDEV identifier. LDEV Name: The S-VOL s LDEV name. Emulation Type: The S-VOL s emulation type. Capacity: The S-VOL s volume capacity. CLPR: The S-VOL s CLPR number. Snapshot Date Pool Name (ID) Mirror Unit (HTI and SS only.) The date and time that a snapshot was acquired. For SI and SIz, a hyphen (-) is shown. (HTI and SS only.) The pool name and identification number. For SI and SIz, a hyphen (-) is shown. The mirror unit number. Edit Mirror Units dialog box Use this dialog box to change mirror unit numbers. Item Description Mirror Unit Mirror unit number assigned to L1 and L2 volumes (SI only). For more information, see the step on MU number in Creating pairs on page 5-5. Change Options dialog box Use this dialog box to change the Split Type and Copy Pace. The changes you make in this dialog box applies to all new pairs you create. ShadowImage GUI reference B-39

150 Item Description Split Type Non Split: Does not split the pair Quick Split: Splits the pair immediately. Specify this if you want to have the S-VOL available for read and write I/O immediately after the pair split operation is issued. Any remaining differential data is copied to the S-VOL in the background. Steady Split: After all differential data is copied, the pair is split. Default: Non Split Copy Pace (SI and SIz only.) The speed at which the split operation is performed. Values: Faster, Medium, or Slower Default: Medium For HTI and SS pairs, a hyphen (-) is shown. Add Reserve Volumes Wizard Use this wizard to reserve a volume as a S-VOL. Add Reserve Volumes window Use this window to select LDEVs for use as reserved S-VOL. For full information, see Reserving secondary volumes on page 4-2. B-40 ShadowImage GUI reference

151 Available LDEVs table Item Description LDEV ID LDEV Name Emulation Type Capacity Number of Paths LDEV identification number. LDEV name Emulation Type of each LDEV Capacity of each LDEV Number of paths to each LDEV Selected LDEVs table Item Description LDEV ID LDEV Name Emulation Type Capacity Number of Paths Selected reserved volume s LDEV identifier. Selected reserved volume s LDEV name Selected reserved volume s emulation type Selected reserved volume s capacity Number of paths to each LDEV ShadowImage GUI reference B-41

152 Confirm window Selected LDEVs table Item Description LDEV ID LDEV Name Emulation Type Capacity Number of Paths Selected reserved volume s LDEV identifier. Selected reserved volume s name Selected reserved volume s emulation type Selected reserved volume s capacity Number of paths for each LDEV Remove Reserve Volumes window Use this window to remove the reserve attribute from a volume. For full information, see Removing reserve attribute from a volume on page B-42 ShadowImage GUI reference

153 Selected Reserve Volumes table Item Description LDEV ID LDEV Name Emulation Type Capacity Number of Paths Selected reserved volume s LDEV identifier Selected reserved volume s LDEV name Selected reserved volume s emulation type Selected reserved volume s capacity Number of paths to each LDEV Edit Local Replica Option wizard Use this wizard to enable and disable options that affect performance. Edit Local Replica Option window Use this window to specify options that affect performance. For full information, see System options that affect performance on page 4-3. ShadowImage GUI reference B-43

154 SI/TI/SS System Options table Item System Option Status Enable button Disable button Options that you can change. Values: Swap & Freeze Host I/O Performance Description Copy Pace Ext. Slower1 Copy Pace Ext. Slower2 Copy Pace Ext. None For more information, see Setting performance options on page 4-4. Shows whether the option is currently enabled or disabled. Click to enable the selected option. Click to disable the selected option. B-44 ShadowImage GUI reference

155 Confirm window SI/TI/SS System Options table Item System Option Status Options that can be changed. Description Shows whether the option is currently enabled or disabled. ShadowImage GUI reference B-45
156 B-46 ShadowImage GUI reference
157 C Configuration operations (secondary window) This appendix provides instructions for configuring SI using the previous SN GUI, which opens in a secondary window. Configuration workflow Setting up primary and secondary volumes Reserving S-VOLs Reserving a consistency group Setting performance options Configuration operations (secondary window) C-1
158 Configuration workflow Setup for SI consists of the following: 1. Ensuring that primary and secondary volumes are set up correctly. 2. (Optional) Reserving volumes for use as S-VOLs. 3. Setting the HOST I/O Performance option, which boosts I/O performance, though copy time slows as a result. (Optional.) Setting up primary and secondary volumes Set up the primary and secondary volumes before making copies. Ensure that the volumes you plan to use meet the requirements for pair volumes in Planning pair volumes on page 2-4. Reserving S-VOLs This is an optional feature you can use to reserve volumes that are not assigned to a pair ( SMPL status) for use as S-VOLs. The storage system rejects write I/Os to reserved volumes except those that are split ( PSUS status). Prerequisite information Volumes to be reserved must be: Not assigned to a pair ( SMPL status) Unreserved and unpaired 1. Select the volume or volumes that you want to reserve offline from the host. 2. In SN, click Actions > Local Replications > SI/SS > Pair Operation. 3. Change to Modify mode by clicking the icon. 4. In the tree in the Pair Operations window, select the appropriate port or host group CU image for the volumes you want to reserve. Related volumes are shown in the volume list. 5. To show unreserved volumes ( SMPL status), complete the following: a. Click Display Filter. b. Clear the Reserved and Pair check boxes. c. Select Non-Pair, and click OK. 6. In the Volume list, right-click the desired unreserved pair ( SMPL status), then click Change Reserve from the menu. C-2 Configuration operations (secondary window)

159 7. In the Set Reserve Attribute dialog box, confirm that the volumes you want to reserve are shown and selected, then click OK. The selected volumes are shown in the Preview list. 8. In the Pair Operations window, click Apply. Reserving a consistency group A consistency group number is required when assigning pairs to a consistency group. Once you have assigned pairs to a consistency group, you can perform pair operations on the pairs in the group, including consistency group pairsplit. 1. In SN, click Actions > Local Replications > SI/SS > CTG. Configuration operations (secondary window) C-3

160 2. Change to Modify mode by clicking the icon. 3. Select and right-click one or more CTGs with status Free, then click Add CT Group. 4. Click Apply. The status changes to Reserved. You can remove the reserve attribute by selecting the Reserved group or groups, right-clicking, and selecting Delete CT Group. Setting performance options You can enable and disable the following options that affect performance. For descriptions of these options, see System options that affect performance on page 4-3. If you have both SIz and SI pairs, Hitachi recommends that you enable this option on both; otherwise host I/O response may not improve. 1. In SN, click Actions > Local Replications > SI/SS > Option. 2. Change to Modify mode by clicking the icon. 3. In the ShadowImage Option window, select the option you want and click Apply. C-4 Configuration operations (secondary window)
161 Configuration operations (secondary window) C-5
162 C-6 Configuration operations (secondary window)
163 D Pair operations (secondary window) This appendix provides instructions for performing pair operations using the previous SN GUI, which opens in a secondary window. Pair operations workflow Check pair status Creating L1 and/or L2 pairs Splitting pairs, creating and splitting pairs Suspending pair creation Resynchronizing pairs Deleting pairs Pair operations (secondary window) D-1
164 Pair operations workflow A typical pair-operations workflow follows: Check pair status. Each operation requires a pair to have a specific status. You also check pair status to ensure that an operation completed successfully. Create the pair, in which the S-VOL becomes a duplicate of the P-VOL. You can create the pair and immediately split it so that you can have instant access to the S-VOL. Split the pair, which separates the primary and secondary volumes and allows use of S-VOL data by secondary applications. Resynchronize the pair, in which the S-VOL is again updated from the P- VOL. Delete the pair, in which the pair relationship between the pair volumes is ended, though the data remains. Check pair status Every pair operation requires the pair to have a specific status. When you want to perform a pair operation, check pair status to ensure that you can proceed successfully. For pair status definitions and instructions for finding pair status, see Monitoring the system on page 6-2. For the operations allowed for specific pair statuses, see Status, pair operations permitted on page 6-4. When you have L2 pairs, besides checking pair status, you will also check whether an operation is possible given the status of related L1 and L2 pairs. For information, see Status for L1, L2 pairs and operations permitted on page 6-5. Creating L1 and/or L2 pairs When you create the initial copy, data in the P-VOL is copied to the S-VOL. During the operation, the P-VOL can receive updates from the host. When the initial copy is completed, the updated data in the P-VOL differential data is copied to the S-VOL periodically (update copy). You can create the pair and immediately split it so that you can have instant access to the S-VOL. For more information about creating and splitting pairs, see Splitting pairs, creating and splitting pairs on page D-5. You can create pairs for L1 or L2. Instructions for both procedures are included in this topic. Prerequisite information Make sure that your volumes are set up for pairing. For more information, see Planning pair volumes on page 2-4. D-2 Pair operations (secondary window)
165 If the P-VOL is used with another pair, the pair status of the existing pairs must be PAIR. If the P-VOL is not used with another pair, the P-VOL and S-VOL must not be assigned to a pair ( SMPL status). Because pair creation affects performance on the host, observe the following: Create a pair when I/O load is light. Limit the number of pairs that you create simultaneously. When a pair is created, the S-VOL s LDEV is allocated to the same processor blade to which the P-VOL s LDEV is allocated. You must first create the SI pair if you are using one of its volumes as a TI P-VOL. If an MU number is not available, complete the following: a. Delete a TI pair whose MU number is 0-to-2. b. Create an SI pair. c. Create the TI pair. WARNING: The SI paircreate operation overwrites all existing data on the S- VOL. The user is responsible for backing up data on the S-VOLs before creating SI pairs. 1. In SN, click Actions > Local Replications > SI/SS > Pair Operation. 2. Change to Modify mode by clicking the icon. 3. In the tree, in the Pair Operations window, select the port or host group where the volumes to be P-VOLs are located. Related volumes are shown in the volume list. 4. In the volume list, select the volumes that are the P-VOLs. Do not select reserved volumes. If you are creating an L2 pair, select an existing L1 pair. 5. Right-click your selections and select Paircreate. Pair operations (secondary window) D-3

166 6. In the Paircreate dialog box, verify that the desired P-VOLs are shown in the pair list. To remove a volume, right-click and select Delete. 7. Select the P-VOL that you want to pair. If you are creating an L2 pair, select an existing L1 pair. The L1 S-VOL becomes the L2 P-VOL. 8. In Copy Pace, select the pace at which data is to be copied, Slower, Medium, or Faster. System performance is affected by the pace you select, less for Slower, more for Faster. Note: The copy pace you assign is always reflected to any pairs that you added earlier and are still present in the Preview list. To maintain the copy pace given to the earlier pairs, click Apply before adding new pairs with a different copy pace. 9. Select an MU number for the pair. An MU number can be assigned to only one pair. Use 0, 1, or 2 for an L1 pair. Use 1 or 2 for an L2 pair. 10. Show the volumes available for S-VOLs by selecting the following filters from the Select S-VOL box: Select a Port to show associated volumes. Select a Volume Type to show internal or external volumes. You can select both if desired. D-4 Pair operations (secondary window)
167 Select an Attribute to show volumes previously reserved as S-VOLs, or volumes that are not reserved. You can select both if desired. You can also filter by existing pairs that may be used for creating L2 pairs (select the Pair check box). 11. Select the volume to be the S-VOL from the volume list in the Select S- VOL box. 12. Do one of the following: If creating an L1 pair, click Set. This places the volume as the S-VOL in the pair list. - You can add a second or third S-VOL to the same L1 P-VOL by repeating steps To create another pair with a new P-VOL, repeat steps If creating an L2 pair, click Cascade. This places a new L2 pair in the pair list. To add a second L2 pair, repeat steps If you need to change an S-VOL, highlight the pair then select the new volume in the S-VOL list and click Change. The changed pair is shown in the pair list. 14. Click OK when finished creating pairs. 15. In the Pair Operation window, review the information in the Preview list. To change a selection, right-click it, select Modify, and make your changes. 16. Click Apply to commit the pairs to the storage system. Splitting pairs, creating and splitting pairs Update copying continues until the pair is split. After the pair is split, updates continue to the P-VOL but not to the S-VOL; data in the S-VOL is ensured at the time of the split. All update data are stored in the differential bitmap for use when resynchronizing the pair. You can use one of the following options to split a pair: Steady split, which is a typical pair split operation in which any remaining differential data from the P-VOL is copied to the S-VOL and then the pair is split. Quick split, in which the pair is immediately split so that the S-VOL is immediately available for read and write I/O. Any remaining differential data is copied to the S-VOL in the background. Create and simultaneously split an L1 or L2 pair. This allows you to access S-VOLs as soon as possible. Prerequisite information Pair status must be one of the following: If you are splitting an existing pair, PAIR If you are creating and immediately splitting an L1 pair, SMPL status Pair operations (secondary window) D-5
168 If you are creating and immediately splitting an L2 pair, the L1 pair must be split ( PSUS status) For a split operation on an existing pair to complete faster, stop host access to the P-VOL. If you are performing multiple split operations before clicking Apply, both Copy Pace and Split Type that you set during the last operation are the settings that are used for all split operations (in the Preview list) when you click Apply. The split operation may take longer than normal if system option mode 459 is ON and the S-VOL is an external volume. The reason is because after differential data is copied to cache, it must also be destaged to the external storage system, which takes more time. 1. In SN, click Actions > Local Replications > SI/SS > Pair Operation. 2. Change to Modify mode by clicking the icon. 3. In the tree, in the Pair Operations window, select the port or host group where the pairs or volumes are located. Related volumes are shown in the volume list. If a volume is already paired, pair information is also shown. 4. Select one of the following: The pair or pairs to be split. When you create and split an L2 pair, the operation is begun using the L1 pair. Select the SMPL volumes or pair with which you will create and split a new pair. 5. Right-click the selection and from the menu, click Pairsplit. D-6 Pair operations (secondary window)
169 6. For Pairsplit, complete the following: a. Ensure the pairs that you want to split are shown. b. Select the volume that is not assigned to a pair ( SMPL status) that you want to be the P-VOL in an L1 pair-create-and-split operation. c. Select the L1 pair whose S-VOL are the P-VOL in an L2 pair create and split operation. 7. From Copy Pace, select the pace at which the pairs are to be split, Slower, Medium, or Faster. Copy Pace affects the host I/O performance: a slower pace minimizes impact, a faster pace has the greatest impact. The pace you select is used for all pairs in the operation. 8. For pairs being created and split, select an MU number. For L1 pairs, use 0, 1, or 2. For L2 pairs, use 1 or 2. Note: You cannot select an MU number for an L2 pair that is being used in the associated L1 pair. You cannot select an MU number that is being used for an SS pair. 9. From Select Split Type, select one of the following: Steady Split: Any remaining differential data between P-VOL and S- VOL is copied to the S-VOL before the split. Read and write access to the S-VOL is available only when the operation completes. Pair operations (secondary window) D-7
170 Quick Split: Read and write access to the S-VOL is available immediately. Any remaining differential data between P-VOL and S- VOL is copied to the S-VOL in the background. 10. If you are splitting an existing pair or pairs, click OK and go to the last two steps in this procedure. If you are creating and splitting a pair, continue to the next step. 11. Show the volumes available for S-VOLs by selecting the following filters from the Select S-VOL box: Select a Port to show associated volumes. Select a Volume Type to show internal or external volumes. You can select both if desired. Select an Attribute to show volumes previously reserved as S-VOLs, or volumes that are not reserved. You can select both if desired. You can also filter by existing pairs that may be used for creating L2 pairs (select the Pair check box). 12. Select the volume to be the S-VOL from the volume list in the Select S- VOL box. 13. Do one of the following: To create and split an L1 pair, click Set. This adds the pair to the Volume list as an L1 pair. To create and split an L2 pair, click Cascade. This adds the pair to the Volume list as an L2 pair. 14. To replace an S-VOL in the volume/pair list, select the pair, select the desired S-VOL in the Select S-VOL box and then click Change. 15. To complete the operation, click OK. 16. In the Pair Operation window, review the information in the Preview list. To change a selection, right-click it, select Modify, and make your changes. 17. Click Apply to commit the operation to the storage system. Splitting pairs in a consistency group Use consistency group pair-split to simultaneously split all the pairs in a consistency group. Prerequisite information Make sure to change the status of pairs in the same consistency group according to the copy group. 1. Define a consistency group for the SI pairs that you will split using consistency group pair-split. 2. Specify the consistency group split option, then create the pairs. 3. Split the pairs in the consistency group. The pairs are split simultaneously. D-8 Pair operations (secondary window)
171 Suspending pair creation Suspending the creation of pairs (initial copy to the S-VOL) changes the pair status to PSUE. The S-VOL continues accepting write I/O operations from the P-VOL and marks the entire P-VOL track as difference data. Resynchronizing a suspended pair changes the pair status to COPY(RS)/ COPY and copies the entire P-VOL to the S-VOL. While the pairresync operation for a split pair can be very fast, the pairresync operation for a suspended pair takes as long as the initial copy operation. The storage system automatically suspends a pair when it detects an error condition related to an update copy operation, or when it cannot keep the pair mirrored. 1. In SN, click Actions > Local Replications > SI/SS > Pair Operation. 2. Change to Modify mode by clicking the icon. 3. In the tree, in the Pair Operations window, select the port or host group where the pairs or volumes are located. Related volumes are shown in the volume list. If a volume is already paired, pair information is also shown. 4. Select the pairs that you want to suspend (or the volumes whose pairs you want to suspend), right-click the selected pairs to show the menu, and select the Pairsplit-E command to open the Pairsplit-E dialog box. 5. On the Pairsplit-E dialog box, select the pairs you want to suspend, and click OK to reflect the settings to the Preview List on the Pair Operation window. To remove pairs from the list, complete the following: a. Select the unneeded pairs. b. Right-click while selecting the pairs. Pair operations (secondary window) D-9
172 c. From the menu, select the Delete command. 6. Repeat steps 4 and 5 to suspend additional pairs in the Pair Operation window. 7. In the Pair Operation window, click Apply to suspend the specified pairs. The Pair Operation window shows the results of the Pairsplit-E operations, that is, the pair status changed to PSUE. Resynchronizing pairs You resynchronize a pair that was split by a user or suspended by the storage system. Resynchronizing updates the S-VOL so that it is again paired with the P-VOL. Caution: Resynchronizing the pair does not guarantee that P-VOL data is the same as S-VOL data. Data in the two volumes is the same only when the pair is split. You can forward resync, from P-VOL to S-VOL, and reverse resync, from S-VOL to P-VOL. You can perform a Normal Copy or a Quick Resync, in both directions. The P-VOL remains accessible to hosts for both read and write operations during a Normal Copy operation. The S-VOL is inaccessible to hosts during a Normal Copy operation. The P-VOL remains read-disabled during the Reverse Copy operation. In a forward Quick Resync from P-VOL to S-VOL, status changes to PAIR without actually resynchronizing the data in the S-VOL. Differential data is copied to the S-VOL when update copy operations are performed. The P-VOL remains accessible to all hosts for both read and write operations during a quick resync operation. In a forward Quick Resync you cannot be sure the data in the P-VOL and S-VOL is the same when an host I/O is not present during the operation. Split the pair to ensure that data is the same. In a Quick Restore (reverse Quick Resync), the P-VOL and S-VOL are swapped. No actual data is copied, and the pair is placed in PAIR status. The P-VOL and S-VOL are inaccessible during this operation. When the operation completes, the P-VOL is accessible. When differential data between P-VOL and S-VOL is small, the Reverse Copy operation may be completed faster than the Quick Restore operation. Performing LDEV maintenance work during the Quick Restore process increases the time for the operation to complete. Prerequisite information To Reverse Copy or Quick Restore, the pair must be split ( PSUS status). D-10 Pair operations (secondary window)
173 While you are performing a Quick Restore, make sure of the following: The SVP is in View mode, not Modify mode SN configuration and other tasks are stopped The Quick Restore cannot be used under the following conditions: If either pair volume is a DP-VOL If the S-VOL is also part of an SS pair The pairresync normally takes less time when the pair is split ( PSUS status) than when the pair is suspended ( PSUE status). This is because the amount of differential data accumulated for a split pair is usually far less than the total amount of data in the P-VOL, which must be copied in full when the pair was suspended by the storage system. If you use BEDs supporting encryption, you can create an SI pair by using an encrypted volume and a non-encrypted volume. For example, you can create the pair specifying an encrypted volume as the P-VOL and a nonencrypted volume as the S-VOL. In this case, data in the encrypted P-VOL changes to non-encrypted data in the S-VOL. If a pair consists of encrypted volumes and a non-encrypted volume, and the Quick Restore is run, the P-VOL and S-VOL encryption statuses are reversed. With a Quick Restore, SN may show outdated information. Click Refresh View to ensure the most up-to-date information. To keep the P-VOL and S-VOL unsynchronized when performing a Quick Restore, enable the Swap&Freeze option prior to performing the operation. Update copy operations are then suppressed when the Quick Restore is completed, and the pair is in PAIR status. If you perform a reverse or quick restore operation on a pair whose P-VOL is also paired with other S-VOLs, the P-VOL and other S-VOLs are no longer synchronized. For Reverse Copy or Quick Restore operation, the following restrictions apply: Pairs sharing the same P-VOL must be split ( PSUS status) or suspended ( PSUE status). If a Quick Format is being performed on either of the pair volumes, the Quick Restore operation cannot be performed. If the pair shares a volume with TC or UR, the TC or UR pair must be suspended to perform either backward resync operation. Quick Restore cannot be performed when SI and shared TC or UR volumes include an external volumes. You cannot create a TC or UR pair with a volume shared by SI during either backward resync operation. When the Reverse Copy or Quick Restore operation is in progress, you cannot create, split, or resync any pair sharing the same P-VOL. You can delete or suspend the pairs, however. 1. In SN, click Actions > Local Replications > SI/SS > Pair Operation. Pair operations (secondary window) D-11

174 2. Change to Modify mode by clicking the icon. 3. In the tree, in the Pair Operations window, select the port or host group where the pairs or volumes are located. Related volumes are shown in the volume list. If a volume is already paired, pair information is also shown. 4. In the volume list, select the pairs to be resynchronized, right-click, and select Pairresync. 5. In the Pairresync dialog box, select the Resync Type as follows: Normal Copy(P->S) to resynchronize the pairs normally. All differential data is updated to the S-VOL. Quick Resync(P->S) to immediately change pair status to PAIR. Resynchronization of data does not occur immediately. Differential data is copied during update copying. Reverse Copy(S->P) to copy the S-VOL data to the P-VOL. All differential data is updated to the P-VOL. Not available for L2 pairs. Quick Restore(S->P) to swap the P-VOL and S-VOL. Any differential data between the volumes is copied during update copying. Not available for L2 pairs. 6. From Copy Pace, select the pace at which the pairs are to be resynchronized, Slower, Medium, or Faster. Copy Pace affects the host I/O performance: a slower pace minimizes impact, a faster pace has the greatest impact. The pace you select is applied for all pairs in the operation. 7. Click OK. 8. In the Pair Operation window, review the information in the Preview list. To change a selection, right-click it, select Modify, and make any changes. 9. Click Apply to commit the operation to the storage system. D-12 Pair operations (secondary window)
175 10. Make sure that pair status changes to PAIR before attempting any other operation. Note: Note the following: If the reverse or Quick Restore ends abnormally, the pair is suspended ( PSUE status). In this case, the P-VOL is read/write-enabled for all hosts, but the data is not guaranteed. The S-VOL remains write-disabled (read-only) and data is not guaranteed. The status of other pairs sharing the same P-VOL does not change. Deleting pairs You can delete a pair when you do not need it. Deleting a pair unassigns the P-VOL and S-VOL from the pair ( SMPL status) and their data remains intact. After deletion, both volumes are available for use in another pair. Prerequisite information The pair cannot be in the process of Quick Split ( PSUS(SP)/PSUS status). When a pair is created, the processor blade allocated to the P-VOL's LDEV is also allocated to the S-VOL's LDEV. When a pair is deleted, the processor blade that was originally allocated to the S-VOL'S LDEV is allocated to it again. If the original processor blade was removed, another processor blade is allocated. If you delete a pair, the status of the volumes first changes to SMPL(PD) then to SMPL. SMPL status is not shown in SN. You can check pair status in the Pair Operation window. To distinguish between SMPL and SMPL(PD) volumes using CCI, run the pairdisplay and Inqraid commands. The pairdisplay command shows status but cannot distinguish between SMPL and SMPL(PD) ; and the Inqraid shows whether a volume is being used by SI. If the result of the pairdisplay command is SMPL, and the result of the Inqraid command is PVOL or SVOL, then SI is still using the pair and status is SMPL(PD). If the result of the pairdisplay command is SMPL, and the result of the Inqraid command is not PVOL or SVOL, SI is not using the volumes. Therefore, status is confirmed as SMPL. To perform tasks such as pair operation or event waiting, after deleting a pair, wait 10 seconds until the volume status changes from SMPL(PD) to SMPL as is unassigned from the pair. If you do not wait 10 seconds, the operation might end abnormally. 1. Synchronize the P-VOL and S-VOL before deleting the pair. Complete the following: a. Wait until all write I/Os to the P VOL are complete. b. Set the P-VOL offline. Pair operations (secondary window) D-13
176 c. Split the pair. This copies differential data to the S VOL. 2. In SN, click Actions > Local Replications > SI/SS > Pair Operation. 3. Change to Modify mode by clicking the icon. 4. In the tree, in the Pair Operations window, select the port or host group where the pairs or volumes are located. Related volumes are shown in the volume list. If a volume is already paired, pair information is also shown. 5. Select the pairs you want to delete, right-click, and from the menu, select Pairsplit-S. 6. If you selected a pair that you do not want to delete, select the pair on the Pairsplit-S dialog box, right-click, then click Delete. The pair is removed from the deletion list. 7. Click OK. 8. In the Pair Operation, review the information in the Preview list. 9. Click Apply to commit the operation to the storage system. D-14 Pair operations (secondary window)
177 E Monitoring and maintaining the system (secondary window) This appendix provides information and instructions for monitoring and maintaining the SI system using the previous SN GUI, which opens in a secondary window. Monitoring the system (secondary window) Maintaining the system (secondary window) Monitoring and maintaining the system (secondary window) E-1
178 Monitoring the system (secondary window) Monitoring helps you keep track of pairs and volumes and their current and past conditions. Monitoring should be an ongoing activity. This topic provides information for monitoring the following: Pair status. Pair and pair volume details. Status and other pair information for pairs in a consistency group. S-VOL path information. Number of pairs in the storage system, with remaining license capacity. A pair s history of operations. Monitoring pair activity, status (secondary window) Monitoring the SI system is necessary to maintain your pairs. Each operation requires a specific status or statuses. When you want to perform a pair command, first check the pair s status. Pair-status changes when an operation is performed. Check status to see that pairs are operating correctly and that status is changing to the appropriate state during and after the operation. Monitoring using the SN GUI is done at the user s discretion. Monitoring should be repeated frequently. notifications of problems in pair operations can be set up using the GUI. 1. In SN, click Actions > Local Replications > SI/SS > Pair Operation. 2. Locate the pair whose status you want to review. Review pair status in the Status column. You can view more details for the pair by right-clicking and selecting Detail. For more information about the fields, see Reviewing pair, volume details on page E-3. Pair status definitions (secondary window) When checking your pairs status in the SN secondary window, click Refresh View to make sure pair data is current. See the following topics related to pair status: Pair status definitions on page 6-3. Status, pair operations permitted (secondary window) on page E-3. Status for L1, L2 pairs and operations permitted on page 6-5. Status of unaffected S-VOLs, operations permitted on page 6-7. E-2 Monitoring and maintaining the system (secondary window)
179 Status, pair operations permitted (secondary window) A pair s status shows whether a desired operation can be performed. Each operation requires a specific status, or is permitted for multiple possible statuses. Supported operations and statuses are shown in the following tables. Pair operation Pair Status Create pairs Split pairs Resync pairs (forward) Resync pairs (reverse) Suspend pairs Delete pairs SMPL YES YES NO NO NO NO SMPL(PD) NO NO NO NO NO NO COPY(PD)/ COPY YES YES NO NO YES YES PAIR YES YES NO NO YES YES COPY(SP)/ COPY PSUS(SP)/ PSUS NO NO NO NO YES YES NO NO YES NO YES NO PSUS NO NO YES YES YES YES COPY(RS)/ COPY COPY(RS-R)/ RCPY NO NO NO NO YES YES NO NO NO NO YES YES PSUE NO NO YES NO NO YES Related information Status of unaffected S-VOLs, operations permitted on page 6-7 Status for L1, L2 pairs and operations permitted on page 6-5 Reviewing pair, volume details You can review the data related to L1 and L2 pairs and their volumes. This includes volume capacity, pair status, P-VOL and S-VOL identifiers, and several other details. Note: LDEVs for P-VOLs and S-VOLs listed in SN may end in the following special symbols: A pound or gate symbol (#), which indicates an external volume (for example, 00:00:01#). The letter X, which indicates that a virtual volume used by Dynamic Provisioning (for example, 00:00:01X). Monitoring and maintaining the system (secondary window) E-3

180 1. In SN, click Actions > Local Replications > SI/SS > Pair Operation. 2. In the tree, select the port or host group where the pairs or volumes are located. Related volumes are shown in the volume list. 3. From the volume list, complete the following: a. Select and right-click the volume or pair whose information you want to see. b. From the menu, select Detail. The Detail dialog box opens. Field descriptions are provided in the following table. Field P-VOL Information Volume Information Description Volume ID: Shows LUN information using LDKC number:cu number:ldev number format. CLPR: Shows CLPR number:clpr name. Shows the volume s emulation type, capacity, and number of blocks. Pair Information P-VOL: Shows LUN information using LDKC number:cu number:ldev number format. S-VOL: Shows LUN information using LDKC number:cu number:ldev number format. MU: The pair s MU number (mirror unit number). Status: The status of the pair. Sync: Percentage that P-VOL and S-VOL are synchronized. E-4 Monitoring and maintaining the system (secondary window)
181 Field Description CTG: The consistency group number shows if the pair is registered in the group. If the pair is not registered to the consistency group, dashes (---) are shown. CLPR(P): The identifier for the P-VOL s cache logical partition (CLPR) shows in CLPR number:clpr name format. CLPR(S): The identifier for the S-VOL s cache logical partition (CLPR) shows in CLPR number:clpr name format. Svol Mode: Indicates whether the S-VOL has been written to and whether it can be read. For more information about Svol Mode, see Volume list on page F-4. Copy Pace: Indicates the speed that data is copied according to the pair status. For more information about Copy Pace, see Volume list on page F-4. Refresh the window after this dialog box is closed. If you select the check box, the information shown in the Pair Operation window is updated after the Detail dialog box closes. If you do not select the check box, the information in the Pair Operation window is the same before and after you close the Detail dialog box. Reviewing S-VOL path information You can view path information for the S-VOL. You do this in the S-VOL Path dialog box. 1. In SN, click Actions > Local Replications > SI/SS > Pair Operation. 2. In the tree, select the appropriate port or host group for the desired pairs. Related volumes are shown. 3. Complete the following: a. Select a pair. b. Right-click and select S-VOL Path from the menu. The S-VOL Path dialog box opens. Field descriptions are provided in the following table. Monitoring and maintaining the system (secondary window) E-5
 Group number (GID) of the host group. For example: 00 LU number. For example: 000 LDKC number:cu number:ldev number. For example: 00:14:00 Port number, GID number, and LU number.")
182 Field Pair Information S-VOL Path Information Description P-VOL and S-VOL columns shows the following path information (examples below from P-VOL column): Port ID (cluster name and channel number. For example: CL3-D) Group number (GID) of the host group. For example: 00 LU number. For example: 000 LDKC number:cu number:ldev number. For example: 00:14:00 Port number, GID number, and LU number. Reviewing pair, license information You can check the current state of your pairs and licensed capacity. Do this using the Information dialog box. 1. In SN, click Actions > Local Replications > SI/SS > Pair Operation. 2. Complete the following: a. Right-click the volume list, in any location. b. From the menu, select Information. The Information dialog box opens. Field descriptions are provided in the following table. E-6 Monitoring and maintaining the system (secondary window)
 Remaining pair table(s) Remaining differential table(s) Description Shows the number of SI pairs/and the total number of pair tables for SI and SIz.")
183 SI pair(s) Field C.O.W. Snapshot pairs Reserve volume(s) Remaining pair table(s) Remaining differential table(s) Description Shows the number of SI pairs/and the total number of pair tables for SI and SIz. For example: 12/12. Notes: The maximum number of pairs allowed in one storage system is 16,384, including migration plans and relationships. For example, if a storage system contains TI or SS pairs, migration plans of Volume Migration, and relationships of Compatible FlashCopy V2 and Compatible FlashCopy SE, the maximum number of pairs allowed for SI would be 16,384 minus these. Volume size also limits the number of pairs. For more information, see Planning number of pairs on page 2-4. The number of SS pairs. The number total number of reserved volumes for SI and SIz. The number of remaining pair tables in the storage system/and the total number of pair tables in the system. For more information, see Planning number of pairs on page 2-4. The following software use pair tables: SIz Volume Migration (when migration plan is used) The number of remaining differential tables in the storage system/and the total number of differential tables in the system. For more information, see Planning number of pairs on page 2-4. The following software use pair tables: SIz Compatible FlashCopy V2 Compatible FlashCopy SE Monitoring and maintaining the system (secondary window) E-7
184 Field SS Volume Migration Description Used Capacity (TB) C.O.W. Snapshot Used Capacity (TB) Shows license information used by SI, and the total license capacity reserved for SI. Unlimited is shown when there is no limit on license capacity for SI. Shows license information used by SS, and the total license capacity reserved for SS. Unlimited is shown when there is no limit on license capacity for SS. Reviewing a pair s operation history You can review the operations that have been performed on a pair using the History window. 1. In SN, click Actions > Local Replications > SI/SS > History. If some of the pairs include LUSE volumes, or if the total number of the following pairs and migration plans is 500 or more in the storage system, you may need to wait for a while until the History window shows operation history. In addition, if you use 1,000 or more pairs concurrently, some operation history might not be recorded. The History window show the following pair types: SI TI SS Volume Migration migration plans E-8 Monitoring and maintaining the system (secondary window)
185 2. Locate the SI History list in the upper area. 3. To change the order in which items are listed, click a column title in the list. The list is sorted based on the items in the clicked column. If there are more than 16,384 records of operations, the list is divided into multiple pages and only the list which is currently shown is sorted. If you click the same column title again, you can switch the sorting order (Ascending or Descending). 4. If the information on the list is not updated, click File and then Refresh. The list is updated to the latest information. For operations involving the copying process, the History window does not show information about the operations until the copying process starts. If you perform an operation on a pair before the copying process starts, the History window does not show information about the operation. 5. If there are many records of operations, click the scroll button. The list scrolls and the operation history that was not previously shown is shown. Monitoring and maintaining the system (secondary window) E-9
186 If you click and drag down the frame border that divides the History window into upper and lower panes, you can expand the display area of the list. 6. If there are more than 16,384 records of operations, click Next. The list shows subsequent records of operations. If you click Previous, the list switches to the previous page. If there are 16,384 or fewer records of operations, you cannot click Previous and Next. The storage system saves up to 512,000 records of latest operations. Maintaining the system (secondary window) Some maintenance tasks are a response to behavior discovered during system monitoring. You can also change certain settings to keep the system in tune with your changing requirements. This topic provides maintenance information and instructions for Removing reserve attribute from a volume on page E-10. For other maintenance tasks, including maintaining pairs during system and device maintenance, see Maintaining the system on page Removing reserve attribute from a volume You can remove the S-VOL reserve attribute from a volume. Prerequisite information Before removing the reserve attribute from a volume, make sure that the status is SMPL. 1. In SN, click Actions > Local Replications > SI/SS > Pair Operation. 2. Click to change to the Modify mode. 3. In the tree, select the appropriate port or host group for the volumes from which you want to remove the reserve attribute. Related volumes display in the volume list. To show only reserved volumes ( SMPL status), click Display Filter, then complete the following: a. Make sure that the Pair attribute is cleared. b. Select Reserve. c. Click OK. 4. In the volume list, right-click the desired SMPL volumes, then click Change Reserve from the menu. The Reset Reserve Attribute dialog box opens. E-10 Monitoring and maintaining the system (secondary window)
187 5. Select the pairs from which you want to remove the attribute, then click OK. The selected volumes display in the Preview list. 6. To change a selection, right-click, select Modify, and make your changes. 7. When ready, on the Pair Operations window click Apply. Monitoring and maintaining the system (secondary window) E-11
188 E-12 Monitoring and maintaining the system (secondary window)
189 F ShadowImage GUI reference (secondary window) This appendix describes the SI windows and dialog boxes in the previous version of the SN GUI, which opens in a secondary window. Pair Operation window History window Option window ShadowImage GUI reference (secondary window) F-1

190 Pair Operation window Use this window to view SI pairs. You can perform the following procedures from the window: Creating L1 and/or L2 pairs on page D-2 Splitting pairs, creating and splitting pairs on page D-5 Suspending pair creation on page D-9 Resynchronizing pairs on page D-10 Deleting pairs on page D-13 Monitoring pair activity, status (secondary window) on page E-2 Select one of the following areas of the Pair Operations window for information: Note: The Pair Operation window opens and shows information for SI and SS pairs. This topic explains the items related to the SI pairs. For more information about the items related to the SS pairs, see the Hitachi Copy-on- Write Snapshot User Guide. F-2 ShadowImage GUI reference (secondary window)
191 Main components Field Description Tree Volume list Icons The connected port and host group. Select the desired port or host group to display related LUs. If you select storage system on the top of the tree, a volume is not shown. Pair information. For more information, see Volume list on page F-4. Note: P-VOLs and S-VOLs listed in SN may end in special symbols. An LDEV number that ends with a pound or gate symbol (#) indicates an external volume (for example, 00:00:01#). An LDEV number that ends with a letter X indicates that a virtual volume used by Dynamic Provisioning (for example, 00:00:01X). Indicate the following information: L1 pair L2 pair S-VOL Reserved volume. In Preview list, this is a preview item. Error. Is shown in Preview list. Port. Is shown in Tree. Host group. Is shown in Tree. SMPL volume. This icon indicates a volume in SMPL status when it is shown in the Volume list. Root. Is shown in Tree. Display Filter button Previous list Apply Cancel When clicked, the Display Filter dialog box appears. In it, you can filter the fields and volume types in the Volume list. Shows the operation(s) you have specified but not yet applied to the storage system. You can change or delete the operations when you right-click the item in the Preview list. Saves changes shown in the in the Preview list to the storage system. If an error occurs during an operation, the failed operation will remain in the Preview list with an error icon () shown on the left of the operation name. For more information about the SI error codes, see the Hitachi Storage Navigator Messages. Cancels the changes shown in the Preview list. ShadowImage GUI reference (secondary window) F-3
192 Volume list The Volume list shows the installed volumes on the selected port, with storage system and pair information for each volume. You can filter the information in the list to show the data you want, including the types of volumes that display such as SI. For more information, see Display Filter dialog box on page F-6. The maximum number of volumes on one screen is 1,024. If you have more than this to view, click Next above the list. Field Message P-VOL MU Status S-VOL CTG SvolMode Copy Pace Description A message displays if a volume or pair does not exist. If you see the message in the Volume list, click a different icon in the tree on the left area of the Pair Operation window. P-VOL information in AAA-BB-CCC(XX:YY:ZZ) format. AAA is the port ID (cluster and channel number) BB is the group number of host group CCC is the LU number XX:YY:ZZ is the LDKC number:cu number:ldev number The MU number of the SI pair formed with the P-VOL. MU#s are mirror unit numbers. The storage system assumes the same numbers of P-VOLs as S-VOLs. For example, when a P-VOL is paired with three S-VOLs, though just one P-VOL exists, the storage system assumes that there are three P-VOLs. These virtual P- VOLs are mirror units, MUs. Pair status. For more information, see Pair status definitions on page 6-3. S-VOL information in AAA-BB-CCC(XX:YY:ZZ) format. AAA is the port ID (cluster and channel number) BB is the group number of host group CCC is the LU number XX:YY:ZZ is the LDKC number:cu number:ldev number Only one path is listed, even for LUs with more than one. The path is connected to the first port configured for the path. The S-VOL s consistency group number. If you have not set a consistency group for the S-VOL, dashes (---) are shown. Indicates whether the S-VOL has been written to and whether it can be read. Dashes (---) indicate that it has not been written to and can be read. W indicates that it has been written to. The S-VOL pair status is PSUS(SP)/PSUS or PSUS, and the host writes to it. N indicates that it cannot be read because of the CCI -m noread specification. Indicates the speed that data is copied according to pair status. F-4 ShadowImage GUI reference (secondary window)
193 Field Description Slower, Medium, or Faster is shown if the pair status is COPY(PD)/COPY, COPY(SP)/COPY, PSUS(SP)/PSUS, COPY(RS)/COPY, or COPY(RS-R)/RCPY. Dashes (----) display if the pair status is none of the above. Note: When you create SI pairs by using CCI, the copy pace is set as follows: When the track size is 1 or 2, Slower is set. When the track size is 3, Medium is set. When the track size is 4 to 15, Faster is set. Sync Emulation Capacity (MB) CLPR (P) CLPR (S) Indicates the percentage of pair synchronization: Dashes (----) display for volumes or pairs in SMPL and SMPL(PD) status. The percentage of copied data is shown for pairs in COPY(PD)/ COPY, COPY(SP)/COPY, PSUS(SP)/PSUS, and PSUE status. The percentage of identical data in the P-VOL and S-VOL for volumes in PAIR, PSUS, COPY(RS)/COPY, or COPY(RS-R)/ RCPY status. The volume s emulation type. The volume s storage capacity is shown in megabytes The P-VOL s cache logical partition The S-VOL s cache logical partition Preview list The Preview list is shown below the Volume list. It shows the pair operations and changes you have made. You can review your changes, make modifications, and apply them to the storage system. Field Description P-VOL MU S-VOL Copy Pace P-VOL information in AAA-BB-CCC(XX:YY:ZZ) format. AAA is the port ID (cluster and channel number) BB is the group number of host group CCC is the LU number XX:YY:ZZ is the LDKC number:cu number:ldev number The MU number of the SI pair formed with the P-VOL. S-VOL information in AAA-BB-CCC(XX:YY:ZZ) format. AAA is the port ID (cluster and channel number) BB is the group number of host group CCC is the LU number XX:YY:ZZ is the LDKC number:cu number:ldev number Speed that data is copied according to the pair status. ShadowImage GUI reference (secondary window) F-5
194 Field CLPR (P) CLPR (S) Error Code P-VOL s cache logical partition S-VOL s cache logical partition Description If you click Apply and then the operations in the Preview list fail, an error code indicates the cause of the error. Data in the status bar below the Preview list indicate the number of changes, the type of change (the operation), and any command options. Pair Operation command menu Right-click a volume or pair to open the pair operation command menu. The following table describes the commands that display in the menu. Command Detail Paircreate Pairsplit Pairresync Pairsplit-E Pairsplit-S Change Reserve S-VOL Path Information Description Opens the Detail dialog box, which shows detailed information for the selected volume or pair. Opens the Paircreate dialog box, in which you create new pairs. Opens the Pairsplit dialog box, in which you split pairs. Opens the Pairresync dialog box, in which you resynchronize pairs. Opens the Pairsplit-E dialog box, in which you suspend pairs. Opens the Pairsplit-S dialog box, in which you delete pairs. Opens the Set/Reset Reserve Attribute dialog box, in which you set/reset the S-VOL reserve attribute. Opens the S-VOL Path dialog box, which shows S-VOL s port or host group. Opens the Information dialog box, which shows number of pairs or reserved volumes. Display Filter dialog box Use this dialog box to filter the volumes on the Pair Operations window. To open this dialog box, click Display Filter in the Pair Operation window. F-6 ShadowImage GUI reference (secondary window)
 Internal or external volumes are specified. Both boxes are selected by default. Clear the box you do not want.")
195 The filter settings you select are effective in the current session only. They reset when you select another software product. Field Description CLPR Volume Type Cache logical partition (CLPR) Internal or external volumes are specified. Both boxes are selected by default. Clear the box you do not want. Attribute Volume Attribute. If you select the Reserved check box, only reserved volumes display. Reserved volumes include volumes specified as S-VOLs. Pair Attribute. You can select pair volumes, non-pair volumes, or cascade levels (L1 or L2). Pair Status Status of the pairs you want to see. Note: If you select Cascade, you cannot select Reserved. If you select L1- L2, you cannot select any other check boxes. If you do not select ShadowImage or Copy-on-Write Snapshot, all the check boxes in each tab are unavailable. ShadowImage GUI reference (secondary window) F-7

196 History window Use this window to view the history of operations performed on SI, TI, and SS pairs and data associated with the operations. The upper pane shows SI history. The lower pane shows TI and SS history. Field Description Date P-VOL S-VOL Code Message Date and time of the operation. The LDKC:CU:LDEV of the P-VOL used in the operation. The LDKC:CU:LDEV of the S-VOL used in the operation. SI reference codes. The codes refer to the messages shown in the following table. The description of the operation or part of an operation. The following table shows reference codes. Code Message Description 4710 PAIR START The initial copy started. F-8 ShadowImage GUI reference (secondary window)
197 Code Message Description 4720 PAIR END The initial copy ended, and the pair status changed to PAIR PSUS START The pair split started PSUS END The pair split ended, and the pair status changed to PSUS COPY(RS)/COPY START COPY(RS-R)/RCPY START 4760 COPY(RS)/COPY END COPY(RS-R)/RCPY END Resynchronization of pairs started. Resynchronization of pairs ended, and the pair status changed to PAIR SMPL The pair was deleted, and the pair status changed to SMPL PSUE The pair was suspended, and the pair status changed to PSUE. 47D0 COPY ABNORMAL END A copy ended abnormally (reason other than above). 47E9 INITIALIZE START Initialization started. 47EA INITIALIZE END Initialization ended normally. 47EB INITIALIZE ENDED ABNORMAL Initialization ended abnormally. Option window Use this window to set the Swap&Freeze, the HOST I/O Performance, Copy Threshold, and Copy Pace options. For more information, see System options that affect performance on page 4-3. ShadowImage GUI reference (secondary window) F-9

198 F-10 ShadowImage GUI reference (secondary window)
Hitachi Virtual Storage Platform
 Hitachi Virtual Storage Platform Hitachi Copy-on-Write Snapshot User Guide Document Organization Product Version Getting Help Contents MK-90RD7013-13 December 2016 2010-2016 Hitachi, Ltd. All rights reserved.
Hitachi Virtual Storage Platform
 Hitachi Virtual Storage Platform Hitachi Thin Image User Guide Document Organization Product Version Getting Help Contents MK-90RD7179-06 2010-2016 Hitachi, Ltd. All rights reserved. No part of this publication
Hitachi Virtual Storage Platform G1000
 Hitachi Virtual Storage Platform G1000 Hitachi ShadowImage for Mainframe User Guide FASTFIND LINKS Contents Product Version Getting Help MK-92RD8020-04 2014-2015 Hitachi, Ltd. All rights reserved. No part
Hitachi Virtual Storage Platform G1000
 Hitachi Virtual Storage Platform G1000 Hitachi ShadowImage for Mainframe User Guide Product Version Getting Help Contents MK-92RD8020-09 June 2016 2014, 2016 Hitachi, Ltd. All rights reserved. No part
Hitachi Universal Storage Platform V Hitachi Universal Storage Platform VM Hitachi Copy-on-Write Snapshot User s Guide
 Hitachi Universal Storage Platform V Hitachi Universal Storage Platform VM Hitachi Copy-on-Write Snapshot User s Guide FASTFIND LINKS Document Organization Product Version Getting Help Contents MK-96RD607-15
HP XP7 Business Copy User Guide
 HP XP7 Business Copy User Guide Abstract This guide provides instructions for setting up, planning, and operating Business Copy on the HP XP7 Storage (HP XP7) system. Please read this document carefully
G200, G400, G600, G800
 Hitachi ShadowImage User Guide Hitachi Virtual Storage Platform G200, G400, G600, G800 Hitachi Virtual Storage Platform F400, F600, F800 Product Version Getting Help Contents MK-94HM8021-04 May 2016 2015,
Hitachi Virtual Storage Platform G1000
 Hitachi Virtual Storage Platform G1000 Global-Active Device User Guide Product Version Getting Help Contents MK-92RD8072-05 2014, 2015 Hitachi, Ltd. All rights reserved. No part of this publication may
Hitachi Virtual Storage Platform G1000
 Hitachi Virtual Storage Platform G1000 Hitachi Compatible FlashCopy User Guide Hitachi Compatible Mirroring for IBM FlashCopy V2 Hitachi Compatible Mirroring for IBM FlashCopy SE Product Version Getting
Hitachi Virtual Storage Platform G1000
 Hitachi Virtual Storage Platform G1000 Nondisruptive Migration User Guide MK-92RD8086-01 2015 Hitachi, Ltd All rights reserved No part of this publication may be reproduced or transmitted in any form or
Hitachi Virtual Storage Platform G1000
 Hitachi Virtual Storage Platform G1000 Hitachi Volume Shredder User Guide FASTFIND LINKS Contents Product Version Getting Help MK-92RD8025-01 2014 Hitachi, Ltd. All rights reserved. No part of this publication
Hitachi Virtual Storage Platform G1000
 Hitachi Virtual Storage Platform G1000 FASTFIND LINKS Contents Product Version Getting Help MK-92RD8019-02 2014 Hitachi, Ltd. All rights reserved. No part of this publication may be reproduced or transmitted
Hitachi ShadowImage for Mainframe
 Hitachi ShadowImage for Mainframe User Guide Hitachi Virtual Storage Platform G1000 and G1500 Hitachi Virtual Storage Platform F1500 MK-92RD8020-11 March 2017 2014, 2017 Hitachi, Ltd. All rights reserved.
Hitachi Virtual Storage Platform G1000
 Hitachi Virtual Storage Platform G1000 Hitachi Compatible FlashCopy User Guide FASTFIND LINKS Contents Product Version Getting Help MK-92RD8010-02 2014 Hitachi, Ltd. All rights reserved. No part of this
Hitachi Thin Image. User Guide. Hitachi Virtual Storage Platform G200, G400, G600, G800. Hitachi Virtual Storage Platform F400, F600, F800
 Hitachi Thin Image User Guide Hitachi Virtual Storage Platform G200, G400, G600, G800 Hitachi Virtual Storage Platform F400, F600, F800 Hitachi Virtual Storage Platform G1000 MK-92RD8011-08 May 2016 2014,
Hitachi Virtual Storage Platform G series and F series
 Hitachi Virtual Storage Platform G series and F series SVOS 7.3 Thin Image User Guide This document describes and provides instructions for using Hitachi Thin Image to plan, configure, and perform pair
Hitachi Thin Image. User Guide. Hitachi Virtual Storage Platform G1000 and G1500. Hitachi Virtual Storage Platform F1500
 Hitachi Thin Image User Guide Hitachi Virtual Storage Platform G1000 and G1500 Hitachi Virtual Storage Platform F1500 Hitachi Virtual Storage Platform G200, G400, G600, G800 Hitachi Virtual Storage Platform
Hitachi Unified Storage VM Block Module
 Hitachi Unified Storage VM Block Module Hitachi Volume Shredder User Guide FASTFIND LINKS Contents Product Version Getting Help MK-92HM7021-05 2012-2015 Hitachi, Ltd. All rights reserved. No part of this
Hitachi Virtual Storage Platform
 Hitachi Virtual Storage Platform Encryption License Key User Guide Document Organization Product Version Getting Help Contents MK-90RD7015-11 2010-2016 Hitachi, Ltd. All rights reserved. No part of this
Hitachi Command Suite. Automation Director. Messages MK-92HC221-02
 Hitachi Command Suite Automation Director Messages MK92HC22102 2015 Hitachi, Ltd. All rights reserved. No part of this publication may be reproduced or transmitted in any form or by any means, electronic
Hitachi Virtual Storage Platform
 Hitachi Virtual Storage Platform Performance Guide Document Organization Product Version Getting Help Contents MK-90RD7020-13 2010-2016 Hitachi Ltd. All rights reserved. No part of this publication may
Hitachi Universal Replicator
 Hitachi Universal Replicator User Guide Hitachi Virtual Storage Platform G1000 and G1500 Hitachi Virtual Storage Platform F1500 Hitachi Virtual Storage Platform G200, G400, G600, G800 Hitachi Virtual Storage
Hitachi Universal Storage Platform V Hitachi Universal Storage Platform VM Hitachi Storage Navigator Messages
 Hitachi Universal Storage Platform V Hitachi Universal Storage Platform VM Hitachi Storage Navigator Messages FASTFIND LINKS Document Organization Product Version Getting Help Contents MK-96RD613-18 Copyright
Hitachi Compute Rack Series RAID Driver Instruction Manual For Red Hat Enterprise Linux
 Hitachi Compute Rack Series RAID Driver Instruction Manual For Red Hat Enterprise Linux FASTFIND LINKS Document Organization Getting Help Contents MK-90CRC008-00 2011-2013 Hitachi, Ltd. All rights reserved.
Hitachi TrueCopy. User Guide. Hitachi Virtual Storage Platform G1000 and G1500. Hitachi Virtual Storage Platform F1500
 Hitachi TrueCopy User Guide Hitachi Virtual Storage Platform G1000 and G1500 Hitachi Virtual Storage Platform F1500 Hitachi Virtual Storage Platform G200, G400, G600, G800 Hitachi Virtual Storage Platform
Hitachi Compute Blade 2500 Intel LAN Driver Instruction Manual for SUSE Linux Enterprise Server
 Hitachi Compute Blade 2500 Intel LAN Driver Instruction Manual for SUSE Linux Enterprise Server FASTFIND LINKS Getting Help Contents MK-99CB2500054-02 2016 Hitachi, Ltd. All rights reserved. No part of
BBI Quick Guide Networking OS for 1/10Gb LAN Switch Module
 BBI Quick Guide Networking OS for 1/10Gb LAN Switch Module FASTFIND LINKS Product Version Getting Help Contents MK-99CB2500038-00 2014 Hitachi, Ltd. All rights reserved. No part of this publication may
Hitachi Data Ingestor
 Hitachi Data Ingestor Cluster Getting Started Guide Product Version Getting Help Contents MK-90HDI001-13 2010-2015 Hitachi, Ltd. All rights reserved. No part of this publication may be reproduced or transmitted
Hitachi Universal Replicator for Mainframe
 Hitachi Universal Replicator for Mainframe User Guide Hitachi Virtual Storage Platform G1000 and G1500 Hitachi Virtual Storage Platform F1500 MK-92RD8022-12 March 2017 2014, 2017 Hitachi, Ltd. All rights
Hitachi Virtual Storage Platform G1000
 Hitachi Virtual Storage Platform G1000 Hitachi TrueCopy User Guide Product Version Getting Help Contents MK-92RD8019-09 May 2016 2014, 2016 Hitachi, Ltd. All rights reserved. No part of this publication
Hitachi Universal Replicator for Mainframe
 Hitachi Universal Replicator for Mainframe User Guide Hitachi Virtual Storage Platform G1000 and G1500 Hitachi Virtual Storage Platform F1500 MK-92RD8022-11 October 2016 2014, 2016 Hitachi, Ltd. All rights
Performance Guide. Hitachi Performance Guide for Gx00 and Fx00 Models
 Performance Guide Hitachi Performance Guide for Gx00 and Fx00 Models Hitachi Performance Monitor Hitachi Server Priority Manager Hitachi Virtual Partition Manager Product Version Getting Help Contents
Hitachi Virtual Storage Platform
 Hitachi Virtual Storage Platform Hitachi Volume Shredder User Guide Document Organization Product Version Getting Help Contents MK-90RD7035-08 December 2016 2010-2016 Hitachi, Ltd. All rights reserved.
Use Restrictions for Hitachi Compute Blade 500 Series FASTFIND LINKS. Getting Help Contents MK-91CB
 Use Restrictions for Hitachi Compute Blade 500 Series FASTFIND LINKS Getting Help Contents MK-91CB500072-16 2010-2016 Hitachi, Ltd. All rights reserved. No part of this publication may be reproduced or
Hitachi Virtual Storage Platform G1000
 Hitachi Virtual Storage Platform G1000 Hitachi Universal Replicator for Mainframe User Guide Product Version Getting Help Contents MK-92RD8022-10 June 2016 2014, 2016 Hitachi, Ltd. All rights reserved.
Hitachi Compute Blade CB Base-T 4-port LAN Adapter User's Guide
 Hitachi Compute Blade CB2500 1000Base-T 4-port LAN Adapter User's Guide FASTFIND LINKS Getting Help Contents MK-99CB2500025-00 2014 Hitachi, Ltd. All rights reserved. No part of this publication may be
Hitachi Compute Blade 500/2500 LSI MegaRAID SAS 3004 (imr) firmware update User s Guide
 firmware update User s Guide") Hitachi Compute Blade 500/2500 LSI MegaRAID SAS 3004 (imr) firmware update User s Guide FASTFIND LINKS Document organization Product version Getting help Contents MK-99COM153-01 2010-2017 Hitachi, Ltd.
Hitachi Compute Blade 500/2500 LSI MegaRAID SAS 3004 (imr) firmware update User s Guide FASTFIND LINKS Document organization Product version Getting help Contents MK-99COM153-01 2010-2017 Hitachi, Ltd.
Hitachi Compute Blade HVM Navigator Installation Manual
 Hitachi Compute Blade HVM Navigator Installation Manual FASTFIND LINKS Document organization Product version Getting help Contents MK-99COM023-17 2012-2016 Hitachi, Ltd. All rights reserved. No part of
Replication Manager. Hitachi Command Suite. Application Agent CLI Reference Guide MK-90HC Document Organization. Product Version.
 Hitachi Command Suite Replication Manager Application Agent CLI Reference Guide Document Organization Product Version Getting Help Contents MK-90HC181-15 2014, 2015 Hitachi, Ltd. All rights reserved. No
Tuning Manager. Hitachi Command Suite. Getting Started Guide MK-96HC FASTFIND LINKS Document Organization. Product Version.
 Hitachi Command Suite Tuning Manager Getting Started Guide FASTFIND LINKS Document Organization Product Version Getting Help Contents MK-96HC120-23 2014, 2015 Hitachi, Ltd. All rights reserved No part
Nondisruptive Migration
 Nondisruptive Migration User Guide Hitachi Virtual Storage Platform G200, G400, G600, G800 Hitachi Virtual Storage Platform G1000, G1500 Hitachi Virtual Storage Platform F1500 MK-92RD8086-06 2015, 2016
Nondisruptive Migration Hitachi Virtual Storage Platform F series and G series
 Nondisruptive Migration Hitachi Virtual Storage Platform F series and G series User Guide This guide describes Hitachi Command Suite (HCS) nondisruptive migration and provides instructions for using nondisruptive
Hitachi Data Ingestor
 Hitachi Data Ingestor Cluster Getting Started Guide Product Version Getting Help Contents MK-90HDICOM001-02 2010-2016 Hitachi, Ltd. All rights reserved. No part of this publication may be reproduced or
Hitachi Data Ingestor
 Hitachi Data Ingestor Backup Restore Features Supplement for IBM Tivoli Storage Manager Product Version Getting Help Contents MK-90HDICOM010-02 2010-2014 Hitachi, Ltd. All rights reserved. No part of this
Hitachi Storage Adapter for Microsoft Windows PowerShell
 Hitachi Storage Adapter for Microsoft Windows PowerShell v06.2.0 Release Notes Contents About This Document... 2 System Requirements... 2 Software and Hardware Support... 3 HCP Requirement*... 5 Changes
Hitachi Command Suite
 Hitachi Command Suite Installation and Configuration Guide MK-90HC173-22 2014, 2015 Hitachi, Ltd. All rights reserved. No part of this publication may be reproduced or transmitted in any form or by any
Hitachi Server Adapter for the SAP HANA Cockpit
 Hitachi Server Adapter for the SAP HANA Cockpit v01.1.0 Release Notes Contents About This Document... 2 Intended Audience... 2 Getting Help... 2 About Release v01.1.0... 2 Supported Hardware and Software...
Hitachi Universal Storage Platform V Hitachi Universal Storage Platform VM Hitachi Compatible PAV for IBM z/os User's Guide (Including Hyper PAV)
") Hitachi Universal Storage Platform V Hitachi Universal Storage Platform VM Hitachi Compatible PAV for IBM z/os User's Guide (Including Hyper PAV) FASTFIND LINKS Document Organization Product Version Getting
Hitachi Universal Storage Platform V Hitachi Universal Storage Platform VM Hitachi Compatible PAV for IBM z/os User's Guide (Including Hyper PAV) FASTFIND LINKS Document Organization Product Version Getting
Hitachi Storage Command Portal Installation and Configuration Guide
 Hitachi Storage Command Portal Installation and Configuration Guide FASTFIND LINKS Document Organization Product Version Getting Help Table of Contents # MK-98HSCP002-04 Copyright 2010 Hitachi Data Systems
Hitachi Compute Blade 500 Series
 Hitachi Compute Blade 500 Series Server Blade Setup Guide Document Organization Product Version Getting Help Contents MK-91CB500012-09 2010-2015 Hitachi, Ltd. All rights reserved. No part of this publication
Hitachi Compute Blade 2000 LSI MegaRAID SAS 2208 RAID controller firmware update User s Guide
 Hitachi Compute Blade 2000 LSI MegaRAID SAS 2208 RAID controller firmware update User s Guide FASTFIND LINKS Document organization Product version Getting help Contents MK-99BDS2K105-02 2010-2014 Hitachi,
Hitachi Storage Connector for VMware vrealize Orchestrator
 Hitachi Storage Connector for VMware vrealize Orchestrator Contents v01.4.0 Release Notes Contents... 1 About this Document... 2 Intended Audience... 2 Getting Help... 2 Hardware and Software Support...
Hitachi NAS Platform F1000 Series
 Hitachi NAS Platform F1000 Series Backup Restore Features Supplement for Hitachi Data Protection Suite Product Version Getting Help Contents MK-92NAS069-07 2012-2015 Hitachi, Ltd. All rights reserved.
Hitachi Compute Blade HVM Navigator User s Guide - LPAR Configuration
 Hitachi Compute Blade HVM Navigator User s Guide - LPAR Configuration FASTFIND LINKS Document organization Product version Getting help Contents MK-99COM042-11 2012-2015 Hitachi, Ltd. All rights reserved.
Hitachi Compute Blade HVM Navigator User s Guide - LPAR Configuration
 Hitachi Compute Blade HVM Navigator User s Guide - LPAR Configuration FASTFIND LINKS Document organization Product version Getting help Contents MK-99COM042-09 2012-2015 Hitachi, Ltd. All rights reserved.
Hitachi Command Suite
 Hitachi Command Suite Installation and Configuration Guide MK-90HC173-20 2014, 2015 Hitachi, Ltd. All rights reserved. No part of this publication may be reproduced or transmitted in any form or by any
Hitachi Compute Blade Logical VGA SnapShot
 Hitachi Compute Blade Logical VGA SnapShot FASTFIND LINKS Getting Help Contents MK-99COM074-07 2010-2015 Hitachi, Ltd. All rights reserved. No part of this publication may be reproduced or transmitted
Hitachi Data Instance Director
 Hitachi Data Instance Director Quick Start Guide FASTFIND LINKS Software Version Getting Help Contents MK-93HDID002-01 2013-2015 Hitachi, Ltd. All rights reserved. No part of this publication may be reproduced
Hitachi Storage Adapter for the SAP HANA Cockpit
 Hitachi Storage Adapter for the SAP HANA Cockpit v01.1.0 Release Notes Contents About this Document... 2 Intended Audience... 2 Getting Help... 2 About Release v1.1.0... 2 Hardware and Software... 3 Hardware
Hitachi Device Manager Mainframe Agent Release Notes Contents
 Hitachi Device Manager Mainframe Agent 8.5.0-00 Release Notes Contents About this document... 2 Intended audience... 2 Getting help... 2 About this release... 2 Product package contents... 2 New features
Hitachi Compatible FlashCopy
 Hitachi Compatible FlashCopy User Guide Hitachi Virtual Storage Platform G1000 and G1500 Hitachi Virtual Storage Platform F1500 MK-92RD8010-10 March 2017 2014, 2017 Hitachi, Ltd. All rights reserved. No
Hitachi Compute Blade 2500 Series
 Hitachi Compute Blade 2500 Series Logical partitioning manager User Guide Document Organization Product Version Getting Help Contents MK-99CB2500006-01 2014-2015 Hitachi, Ltd. All rights reserved. No part
Hitachi Universal Storage Platform V Hitachi Universal Storage Platform VM Dynamic Provisioning User s Guide
 Hitachi Universal Storage Platform V Hitachi Universal Storage Platform VM Dynamic Provisioning User s Guide FASTFIND LINKS Document Organization Product Version Getting Help Contents MK-96RD641-19 2011
Mainframe Analytics Recorder v Release Notes
 Mainframe Analytics Recorder v8.2.1-00 Release Notes Contents About this document... 1 Intended audience... 1 Getting help... 2 About this release... 2 Product package contents... 2 New features and important
Tuning Manager Software
 Hitachi Command Suite Tuning Manager Software Getting Started Guide FASTFIND LINKS Document Organization Product Version Getting Help Contents MK-96HC120-08 Copyright 2010 Hitachi Ltd., Hitachi Data Systems
Hitachi WAN Optimizer VMware vsphere Setup Guide
 Hitachi WAN Optimizer VMware vsphere Setup Guide FASTFIND LINKS Contents Product Version Getting Help MK-95HWO002-00 July 2016 2007, 2016 Hitachi, Ltd. All rights reserved. No part of this publication
Hitachi Command Suite. Dynamic Link Manager. (for VMware ) User Guide. Document Organization. Product Version. Getting Help. Contents MK-92DLM130-12
 User Guide. Document Organization. Product Version. Getting Help. Contents MK-92DLM130-12") Hitachi Command Suite Dynamic Link Manager (for VMware ) User Guide Document Organization Product Version Getting Help Contents MK-92DLM130-12 2014, 2015 Hitachi, Ltd. All rights reserved. No part of this
Hitachi Command Suite Dynamic Link Manager (for VMware ) User Guide Document Organization Product Version Getting Help Contents MK-92DLM130-12 2014, 2015 Hitachi, Ltd. All rights reserved. No part of this
Hitachi Command Suite. Replication Manager. Configuration Guide. Document Organization. Product Version. Getting Help. Contents MK-98HC151-27
 Hitachi Command Suite Replication Manager Configuration Guide Document Organization Product Version Getting Help Contents MK-98HC151-27 2014, 2016 Hitachi, Ltd. All rights reserved. No part of this publication
Hitachi Command Suite. Automation Director. Installation and Configuration Guide MK-92HC204-02
 Hitachi Command Suite Automation Director Installation and Configuration Guide MK-92HC204-02 2015 Hitachi, Ltd. All rights reserved No part of this publication may be reproduced or transmitted in any form
Hitachi Data Ingestor
 Hitachi Data Ingestor Backup Restore Features Supplement for Hitachi Data Protection Suite Product Version Getting Help Contents MK-90HDICOM009-03 2010-2016 Hitachi, Ltd. All rights reserved. No part of
Use Restrictions for Hitachi Compute Blade 2500 Series FASTFIND LINKS. Getting Help Contents MK-99CB
 Use Restrictions for Hitachi Compute Blade 2500 Series FASTFIND LINKS Getting Help Contents MK-99CB2500053-02 2014-2015 Hitachi, Ltd. All rights reserved. No part of this publication may be reproduced
Hitachi Command Suite. Command Director. CLI Reference Guide MK-90HCMD004-04
 Hitachi Command Suite Command Director CLI Reference Guide MK-90HCMD004-04 2014 Hitachi. Ltd. All rights reserved. No part of this publication may be reproduced or transmitted in any form or by any means,
Hitachi Content Platform HCP Data Migrator 6.1 Release Notes HCP-DM Version June 27, 2014
 Hitachi Content Platform HCP-DM Version 6.1.0.9 June 27, 2014 RN-90ARC031-10 2014 Hitachi Data Systems Corporation. All rights reserved. No part of this publication may be reproduced or transmitted in
Hitachi Data Ingestor
 Hitachi Data Ingestor Single Node Getting Started Guide Product Version Getting Help Contents MK-90HDI028-09 2010-2015 Hitachi, Ltd. All rights reserved. No part of this publication may be reproduced or
Hitachi Data Instance Director Version 6.0
 Hitachi Data Instance Director Version 6.0 MS Exchange Server Application Guide MK-93HDID012-00 16th October 2017 2017 Hitachi, Ltd. All rights reserved. No part of this publication may be reproduced or
Hitachi Command Suite. Tuning Manager. Server Administration Guide. FASTFIND LINKS Contents. Product Version. Getting Help MK-92HC021-39
 Hitachi Command Suite Tuning Manager Server Administration Guide FASTFIND LINKS Contents Product Version Getting Help MK-92HC021-39 2014, 2015 Hitachi, Ltd. All rights reserved. No part of this publication
Hitachi NAS Platform F
 Hitachi NAS Platform F Plug-in for VMware vsphere Administrator's Guide Product Version Getting Help Contents MK-92NAS072-04 2013-2015 Hitachi, Ltd. All rights reserved. No part of this publication may
Hitachi Adapter for Oracle Enterprise Manager - Database Cloning
 Hitachi Adapter for Oracle Enterprise Manager - Database Cloning v02.0.0 Release Notes Contents About This Document... 2 Intended Audience... 2 Getting Help... 2 About This Release... 2 Hardware Requirements...
Compute Systems Manager
 Hitachi Command Suite Compute Systems Manager Messages FASTFIND LINKS Document Organization Product Version Getting Help Contents MK91HC19713 2014, 2015 Hitachi, Ltd. All rights reserved. No part of this
Hitachi Storage Adapter for Oracle Recovery Manager
 Hitachi Storage Adapter for Oracle Recovery Manager v07.1.0 Release Notes Contents About This Document... 2 Intended Audience... 2 Getting Help... 2 About This Release... 3 Hardware and Software... 3 Hardware
Hitachi Storage Adapter for Microsoft System Center Virtual Machine Manager
 Hitachi Storage Adapter for Microsoft System Center Virtual Machine Manager v01.3.0 Release Notes Contents About This Document... 2 Intended Audience... 2 Getting Help... 2 Hardware Requirements... 3 Volume
Hitachi Dynamic Link Manager (for AIX) Release Notes
 Release Notes") Hitachi Dynamic Link Manager (for AIX) 8.4.1-00 Release Notes Contents About this document... 1 Intended audience... 1 Getting help... 2 About this release... 2 Product package contents... 2 New features
Hitachi Dynamic Link Manager (for AIX) 8.4.1-00 Release Notes Contents About this document... 1 Intended audience... 1 Getting help... 2 About this release... 2 Product package contents... 2 New features
Compute Systems Manager
 Hitachi Command Suite Compute Systems Manager User Guide MK-91HC194-14 2014, 2015 Hitachi, Ltd. All rights reserved. No part of this publication may be reproduced or transmitted in any form or by any means,
Global Link Manager. Hitachi Command Suite. Installation and Configuration Guide MK-95HC Document Organization. Product Version.
 Hitachi Command Suite Global Link Manager Installation and Configuration Guide Document Organization Product Version Getting Help Contents MK-95HC107-18 2015 Hitachi, Ltd. All rights reserved. No part
Hitachi Data Ingestor
 Hitachi Data Ingestor Single Node Getting Started Guide Product Version Getting Help Contents MK-90HDI028-07 2010-2014 Hitachi, Ltd. All rights reserved. No part of this publication may be reproduced or
Hitachi Compute Blade Installation Guide for Oracle Linux OS Installation Guide
 Hitachi Compute Blade OS Installation Guide FASTFIND LINKS Getting Help Contents MK-99COM083-05 2010-2016 Hitachi, Ltd. All rights reserved. No part of this publication may be reproduced or transmitted
Hitachi TrueCopy for Mainframe
 Hitachi TrueCopy for Mainframe User Guide Hitachi Virtual Storage Platform G1000 and G1500 Hitachi Virtual Storage Platform F1500 MK-92RD8018-10 October 2016 2014, 2016 Hitachi, Ltd. All rights reserved.
Hitachi Compute Blade Installation Guide for Oracle Solaris OS Installation Guide
 Hitachi Compute Blade OS Installation Guide FASTFIND LINKS Getting Help Contents -99COM072-0 2010-2015 Hitachi, Ltd. All rights reserved. No part of this publication may be reproduced or transmitted in
Hitachi Dynamic Link Manager (for AIX) v Release Notes
 v Release Notes") Hitachi Dynamic Link Manager (for AIX) v8.2.1-00 Release Notes Contents About this document... 1 Intended audience... 1 Getting help... 2 About this release... 2 Product package contents... 2 New features
Hitachi Dynamic Link Manager (for AIX) v8.2.1-00 Release Notes Contents About this document... 1 Intended audience... 1 Getting help... 2 About this release... 2 Product package contents... 2 New features
Hitachi Infrastructure Director v1.0.0 Release Notes
 Hitachi Infrastructure Director v1.0.0 Release Notes Contents About this document... 1 Intended audience... 1 Getting help... 2 About this release... 2 Features... 2 System requirements... 3 Known issues...
Hitachi AMS 2000 Family TrueCopy Extended Distance User Guide
 Hitachi AMS 2000 Family TrueCopy Extended Distance User Guide FASTFIND LINKS Document organization Release notes and readme Getting help Table of Contents MK-97DF8054-23 2008-2015 Hitachi, Ltd. All rights
Hitachi Virtual Storage Platform
 Hitachi Virtual Storage Platform Documentation Roadmap FASTFIND LINKS Contents MK-90RD7039-06 2011 Hitachi Ltd, All rights reserved. No part of this publication may be reproduced or transmitted in any
Hitachi Dynamic Link Manager (for AIX) Release Notes
 Release Notes") Hitachi Dynamic Link Manager (for AIX) 8.1.4-00 Release Notes Contents About this document... 1 Intended audience... 1 Getting help... 2 About this release... 2 Product package contents... 2 New features
Hitachi Dynamic Link Manager (for AIX) 8.1.4-00 Release Notes Contents About this document... 1 Intended audience... 1 Getting help... 2 About this release... 2 Product package contents... 2 New features
Hitachi Data Instance Director Version 6.0
 Hitachi Data Instance Director Version 6.0 MS SQL Server Application Guide MK-93HDID011-00 16th October 2017 2017 Hitachi, Ltd. All rights reserved. No part of this publication may be reproduced or transmitted
Hitachi Data Ingestor
 Hitachi Data Ingestor Single Node Getting Started Guide Product Version Getting Help Contents MK-90HDI028-10 2010-2016 Hitachi, Ltd. All rights reserved. No part of this publication may be reproduced or
Hitachi Replication Manager Release Notes
 Hitachi Replication Manager 8.1.3-02 Release Notes Contents Contents... 1 About this document... 1 Intended audience... 1 Getting help... 1 About this release... 2 Product package contents... 2 New features
Hitachi Simple Modular Storage Copy-on- Write SnapShot User s Guide
 Hitachi Simple Modular Storage Copy-on- Write SnapShot User s Guide FASTFIND LINKS Document Organization Product Version Getting Help Table of Contents i# MK-97DF8018-00 2007 Hitachi Data Systems Corporation,
Hitachi Compute Blade Series Logical Partitioning Manager Version Upgrade / Revision Update Guide
 Hitachi Compute Blade Series Logical Partitioning Manager Version Upgrade / Revision Update Guide FASTFIND LINKS Getting Help Contents MK-99BDS2K004-03 2012-2013 Hitachi, Ltd. All rights reserved. No part
Hitachi Compute Blade 500 Series
 Hitachi Compute Blade 500 Series Logical partitioning manager User's Guide Document Organization Product Version Getting Help Contents MK-91CB500068-16 2012-2015 Hitachi, Ltd. All rights reserved. No part
Hitachi Compute Blade Emulex Adapter User's Guide for Driver
 Hitachi Compute Blade Emulex Adapter User's Guide for Driver FASTFIND LINKS Getting Help Contents MK-99COM103-13 2013-2015 Hitachi, Ltd. All rights reserved. No part of this publication may be reproduced