Overview. Top. Welcome to SysTools MailXaminer
|
|
|
- Maria Leonard
- 5 years ago
- Views:
Transcription
1 Table of Contents Overview... 2 System Requirements... 3 Installation of SysTools MailXaminer... 4 Uninstall Software... 6 Software Menu Option... 8 Software Navigation Option Complete Steps to Recover, Examine & Export Evidences from Multiple file Formats Create Case Open Existing Case Open, Export and Import Case Export Case Import Case Add/Scan File Scan Google Apps Admin without IMAP Scan Live Exchange Preview the Data Mode Preview Privilege Option Preview Bookmark Option Preview Sent Review Option Preview Tag Option Preview Log Report Option Preview Image Analysis Search Option Export Option Export Files Export Folders Preview the Result Demo Version Purchase Software Online Support
2 Overview Top Welcome to SysTools MailXaminer SysTools MailXaminer is an examination tool that helps to scan, search & export from file types of multiple platforms ( EML, Eudora, Lotus Notes, Microsoft Exchange Server, Microsoft Outlook, Mozilla Thunderbird and many more.) to multiple output formats(concordance, CSV, HTML, MSG, PDF, PST, TIFF, PRINT). MailXaminer allows & involves lawsuits that helps clients in the process of recovery and provides great productivity with less effort. The software is developed in in a corporate environment under the supervision of high-skilled professionals. Key Features of SysTools MailXaminer MailXaminer tool has provides an "Advance Keyword Search" feature that searches evidences from within the s. Software analyzes and recovers deleted mails that represents as evidence that suitable for the court of law. Download mailboxes from numerous web accounts such as : Office365, Live Exchange server & Google Apps admin without IMAP The software examines and filters s that have pornographic images by Skin tone analysis feature. Creation, Management and Analysis of evidences done with the creation of Case Repository. The software also exports carved out evidences into multiple output formats like Concordance, PST, MSG, PDF, TIFF etc. Provides team collaboration feature, allowing multiple investigators to work on the same case.
3 System Requirements Top System Requirements for SysTools MailXaminer: For proper working of the software, it is necessary that all the system based requirements are fulfilled. Below is a list of requirements that need to be fulfilled to get proper results out of the software. Minimal System Software Specifications Windows 7 (32-bit or 64-bit) Basic Hardware Requirements Platform - Intel Pentium 1 GHz processor (x86, x64) or equivalent) Memory - 4 GB RAM Disk Space - Around 200 MB for installation Additional Software Requirements Additional Software - Microsoft.NET Framework 4.5
. Click on the Run.")
4 Installation of SysTools MailXaminer Top You can install SysTools MailXaminer properly on your computer by performing the following steps: Download SysTools MailXaminer latest version from the website: Double click on download SysTools MailXaminer (setup-mailxaminer.exe). Click on the Run. Once you double click on set up, the setup will prompt, Do you want to run this file? Click on Run to continue the installation. After this, when you click on Run, and a welcome screen of SysTools MailXaminer setup will appear. Click on Next, to proceed. After clicking on Next, the set up will offer you a License agreement and you have to accept it to proceed. Once the agreement is accepted, the Next option will automatically get activated for you. Click on Next to proceed. When you click on Next, you will be asked to select a destination location for installation of software. By default, the software will get installed on this location C:\Program
5 Files\SysTools MailXaminer but, if you wish to change it then, you can also select a different destination location by clicking on Browse button. (Once you select the destination location, Click on Next to proceed). After doing this, you have to select the Start Menu Folder in which the program shortcuts need to be placed. Click Next. After selecting the Start Menu folder, the set up will ask you to perform Additional Tasks like Creating Desktop Icon or Creating a Quick Launch Icon. You can perform the additional tasks as per your need and proceed. After this, the set up will display a message stating that the software is ready to be installed on computer system. (Click on Install button in that Message Window to move to the last step of installation process) At last, you will get a confirmation message stating that setup process is complete, do you want to Launch SysTools MailXaminer. Click on Finish in that Message Window to launch the software after a successfully after installation.

6 Uninstall Software Top Un-Installation of SysTools MailXaminer You can uninstall SysTools MailXaminer software in two ways: From the Windows Start menu From the Control Panel Important Note: To uninstall the software, first make sure that SysTools MailXaminer is not running in the background. Using software uninstaller Click Start button from the Windows menu. Click All Programs» SysTools MailXaminer» Uninstall SysTools MailXaminer. A Warning message before un-installing the software will be displayed on the screen. Click Yes to uninstall the software: After this step, SysTools MailXaminer Software setup will start the uninstalling from the computer system. After this SysTools MailXaminer Software will be successfully uninstalled from the computer system. Click on OK to close the window. Uninstall Using Control Panel
7 Another alternative described here for software uninstallation is through Windows Control Panel which holds and maintains all system settings. This alternative is described here just for the sake of completeness. You can easily skip this step if uninstall is successfully done using the above mentioned process. Click on Start and look for Control Panel in start menu that appears. Find Add and Remove Programs within Control Panel. Add and Remove Program generates comprehensive listing of all binaries presently installed on Windows. Find out SysTools MailXaminer and double click on it to start it's uninstall procedures The Software prompts you asking whether you would like to remove SysTools MailXaminer and all of its related components. Go for Yes. Click OK on the message reporting about the successful uninstall of SysTools MailXaminer

8 Software Menu Option Top The first menu bar on the top left corner consists of Software menu options. SysTools MailXaminer consists of menus which are divided into several other menu items, as explained below: File Menu Option New Case Open Case Import Case Save Case Close Case Scan File Exit Description Create new Case Open existing Case Import Case Save the Case which user want to save Close current Case Scan the files Closes all the Applications Option Menu Option Language Settings Description Set the language Set the settings
9 Help Menu Option About Us Activate Product Description Display info about MailXaminer Activate the product key
10 Software Navigation Option Top The software has direct navigation options which let you perform some operations directly: Home Scan File Export Bookmark Mark As privilege Remove As privilege Logs Tag Activate Product Exit Option Description Home Page Scan Selected File Export Selected File Bookmark the File Mark Privilege of the file Remove privilege from file Show the Logs Add and Create the tag Activate Product through license key Close the Application
11 Complete Steps to Recover, Examine & Export Evidences from Multiple file Formats Top Steps to Recover, Examine, Export & Save from multiple s file type to CSV, EML, HTML, MSG, PDF, PST, TIFF. SysTools MailXaminer software offers to Load, Scan, and Search & Export from multiple s file types to various output formats such as: Concordance, CSV, HTML, MSG, PDF, PST, TIFF, PRINT. The software smoothly does the entire exportation with simple steps. Below mentioned are the steps and screenshots exhibiting the working of SysTools MailXaminer software Step 1 Create Case In the first step, user creates the case. Learn More Step 2 Open Existing Case In second step, open exist case. Learn More Step 3 Open, Export and Import Case In third step, Open case and export it to specific location and then import case. Learn More Step 4 Add/Scan File In fourth step, Add the files and scan it. Learn More Step 5 Scan Google App Admin without IMAP In fourth step, In fourth step, Show process to create backup of Google Apps data without IMAP setting synchronized. Learn More Step 6 Scan Live Exchange In fourth step, In fourth step, Process of Live Exchange Server Mailbox Analysis. Learn More Step 7 Preview the Data Mode Preview all data mode like Hex View, Normal View, Properties View, MIME View etc. Learn More
12 Step 8 Preview Privilege Option Preview Mark as Privilege and Remove Privilege option. Learn More Step 9 Preview Bookmark Option Create Bookmark in s. Learn More Step 10 Sent Review Option Send the analyzed evidences to other investigators for further analysis. Learn More Step 11 Preview Tag Option In this step, create Tag names with its description. Learn More Step 12 Preview Log Report In this step, preview all Log Report of Bookmark, Privilege, Export, Search etc. Learn More Step 13 Preview Skin Tone Analysis In this step, preview pornographic images by Skin tone analysis feature. Learn More Step 14 Search Option In this step, figure out evidence from generic data available by using search option. Learn More Step 15 Export Option Export option to export file into Concordance, CSV, EML, HTML, MSG, PDF, PST, and TIFF. Learn More Step 16 Preview the Result In this step, preview the output result of the process. Learn More
13 Create Case Top Go to Start» Programs» SysTools MailXaminer» SysTools MailXaminer. First window of the software appears as shown below: The software offers two options: 1. Create a New Case: User can create new case with all new facts and information. 2. Open Recent Case: User can open existing case also.

14 Then, choose "Create a New Case" and the following window will appear where user has to fill up all the details regarding the case such as; Title, Case Directory, Keywords etc. :
15 Now Click on Add button :

16 A pop up window will display the message of successfully adding the case along with the case name :

17 Open Existing Case Top Run the software and click on Open Recent Cases.: User can select from a list of recently created cases and click on Open:
18 Open, Export and Import Case Top Export Case You can also go to the software Home Screen and click on File Menu followed by Open Case to open a case. : Similarly, select the case from the list of Recent Cases and click on Open to open it :


19 Now you can Browse the specific location and Export it :

20 Case successfully export to its location : Import Case Choose Import Case from File Menu :


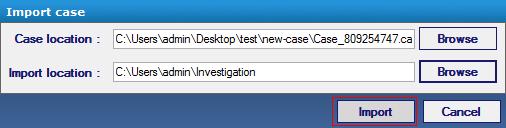
21 Choosing Import Case option the following pop up window will display, and then choose Browse option to browse the case file : Select the case and click Open to proceed : Using the second Browse Button, select an Import Location for saving the imported case on the computer. Click on Import to import the case. :
22
23 Add/Scan File Top After filling in the entire details of the case, the following window will be displayed on screen where the user needs to select the file to be scanned : File : Select "File" option and choose desired file type from multiple file types :
24 Click on Browse button to select the file from its storage location :

25 Web: User can select a desired Web Mail Account also. Just provide the corresponding User Name and Password for the admittance of account. Also, a Date Filter option is provided :

26 Image :You can also analyze EnCase Forensic Image File of disk i.e. E01:
27 Bulk : In bulk mode, software offers following 3 modes : 1. Add File: With this option multiple file selections can be made by using the Shift or Ctrl button during selection. 2. Add Folder : The software automatically fetches files from the folder selected 3. Remove : Removes any file from the selected ones

28 Add Folder: This option is to add multiple files at once. The software automatically fetches files from the folder selected as it shown in below screen :

29 Remove : This option is to add remove files from the list of files opened : Duplicate file will be skipped: The software allows skipping duplicate files too.

30 You can provide the login credentials for the encrypted files. If the files are not encrypted, then you can create your own new default login credentials by providing a Username and Password :
31 Now Add respective PST file by clicking on Add option :
32 After clicking on Add option the following window will appear in which the File Status, Mail Count, File Count, and File Size (GB) easily can be viewed :

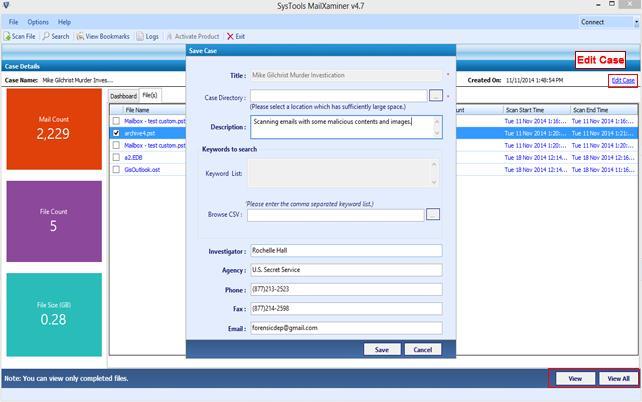
33 Edit Case: User can use Edit Case option to edit the case later and save it. Now Click on View or View all options to preview the mails :
34 Dashboard: You can view the complete overall details of s like: Mail Details, Attachments Categories, Mail Duplicate/deleted status, Mails Time Line.

35 The software also provides a facility to edit the case further, by using "Edit Case" option. Now click on View :
36
37 Scan Google Apps Admin without IMAP Top Click on Web tab and select Google Apps Admin option to download the s of GApps Admin : You must create a project to avail the facility of downloading GApps admin account s. Fill the details in the fields provided on Admin Options window : 1. Project Name 2. Service Address 3. P12 Password 4. Select File (P12 Key File) 5. Select File (User Account CSV file) 6. Date Filter: From and To dates (Optional) 7. Click on Add
38

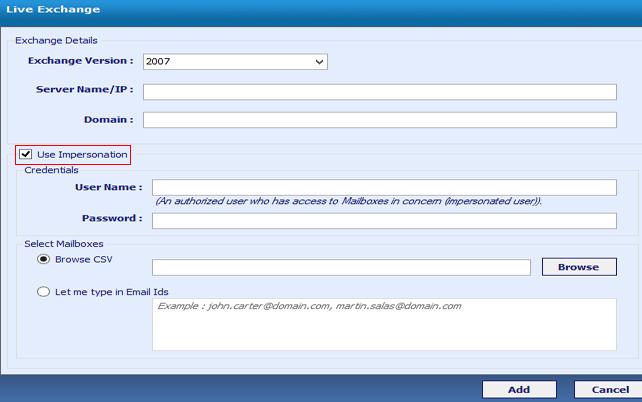
39 Scan Live Exchange Top Click on Web tab and select Live Exchange from the list of options : A Live Exchange window will appear. Select the version of Exchange Server (2007, 2010, and 2013) and provide the Server Name/IP and Domain :
 of the Mailbox for which Impersonation is owned. ii. Select the mailboxes: a. Browse CSV with list of Mailbox IDs b.")
40 If Impersonation Rights owned, select the checkbox for Use Impersonation.: i. Provide the Credentials (Username and Password) of the Mailbox for which Impersonation is owned. ii. Select the mailboxes: a. Browse CSV with list of Mailbox IDs b. Or choose, 'Let me type in IDs' to manually add the IDs iii. Click on Add
41

42 Preview the Data Mode Top After the software loads the PST File, select the items that you want to view. You can preview content in the desired View mode : Conversation View displays the messages arranged in conversations to make the context of messages easier to understand :

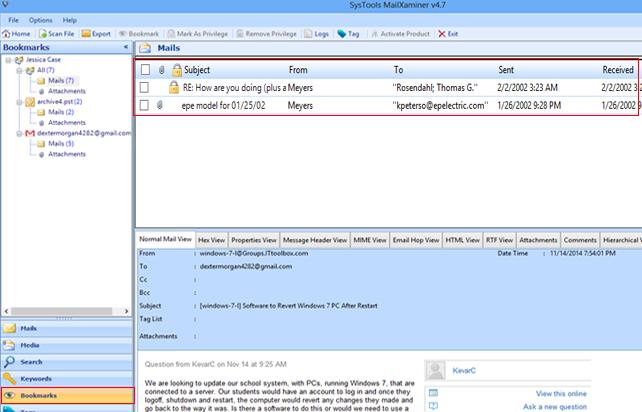
43 Normal Mail View displays the default view of mails that you view in software :


44 Hex View of is shown below. This view gives a complete preview of the hexadecimal coding of

45 Properties View of is shown below in which entire header information can be viewed: Message Header View of is shown below in which the entire header of corresponding mail is represented:

46 MIME View of is shown below. It gives forensic users a picture of the supported internet extensions:
47 Hop View : gives the forensic user the picture of supported internet extensions : HTML View is the standard view and basic HTML view :

48 RTF View of . It appears in case of those s which are rich text formatted::

49 Attachment View of is shown below in which user can view the embedded attachment of Hierarchical View shows the hierarchical structure or subfolders of the selected s folder:
50
 and right click on it.")
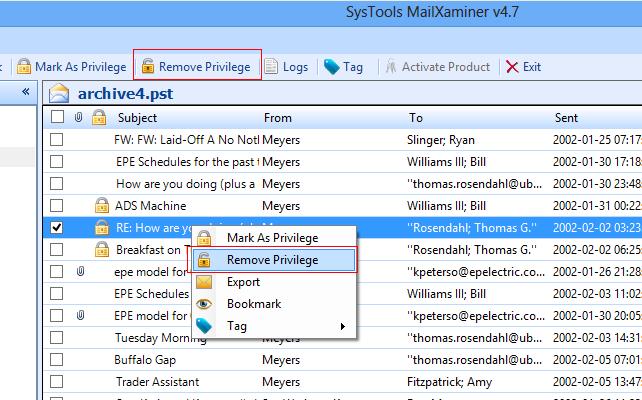
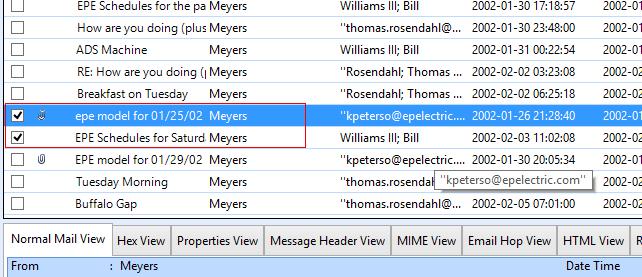
51 Preview Privilege Option Top To protect s from being exported, they can be marked as privilege. Select the (s) and right click on it. Click on Mark As Privilege Now, s marked as privilege will appear with a 'lock' icon :

52 When exporting s marked as privilege a popup window will notify the status as: 'Export Completed Successful. Total Number of Items Exported: 0'

53 Select the s marked as privilege and right click on them. Click on Remove Privilege to remove the privileges assigned on the particular s :
54

55 Preview Bookmark Option Top Evidences can be bookmarked for future reference. Select the (s) and right click on them. Click on Bookmark. This will bookmark the item for future On the successful bookmarking of items a pop up window will notify the following message: 'Bookmarked Item Count: 2. you can view bookmark(s) from 'Bookmarks' section.' Click on OK :

56 Now you can go to the Bookmark section from the left side pane to view the list of bookmarked items :
57
58 Preview Sent Review Option Top Right click on any bookmarked item and select Send For Review option to send the item to another investigator for review via any of the three options provided: 1. Via Mail 2. Via Shared Location 3. Smart Review On selecting Via Mail option a Settings window will open up. On the Mail Settings tab provide the following details 4. SMTP Server 5. Senders Address 6. Password 7. Port Click on Save:

59 A prompt will appear notifying that the mail settings have been added successfully. Click on OK : When you send bookmarks for review via mail a Send Mail screen will appear with the following fields to be filled out 8. To: Provide Recipient Address 9. Subject: Give a subject to the Mail 10. Attachment Icon: Bookmarks added as Attachments 11. Body: Write mail text


60 Choose Via Shared Location option to send bookmarks for review : A Send for Review screen will open. Provide the following details: 12. Path of the Shared Location 13. Recipient address (separated by semi colon, if multiple) 14. Subject 15. Message text

61 Click on Send: A 'Mail Sent Successfully' pop up will appear on screen. Click on Ok : Select Smart Review option to Send bookmarks for Review :

62 On the Smart Review screen provide the Login credentials: User Name and Password. Click on Sign in to proceed :

63 Preview Tag Option Top Select suspect s, right click on it and go to Tag. Select Add Tag option : Click on Create to create a new tag for s :

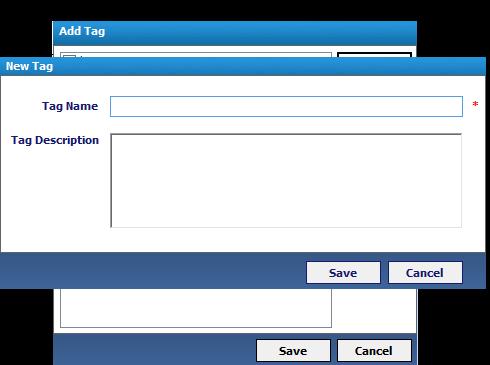
64 Provide a Tag Name and Tag Description.

65 Click on Save : A 'Tag Created Successfully' prompt will appear on screen. Click on Ok : Another prompt notifying about the selected Item added to the newly created Tag will appear. Click on Ok: Selected items will now appear with a Tag labeled to them :


66 Select Tagged items, right click on them and go to Tag. Click on Remove tag to remove tag from the selected items : Select the Tag under which the selected items were labeled and click on Save:
67 A pop up window will appear stating that tags were removed from the items along with the item count from which the tag was removed. Click on Ok: Go back to the list of items and they will no longer be labeled under any tag:
68
69 Preview Log Report Option Top Click on Logs from the software Menu bar to check the Case Activity Log. Click on Scan to view the data scanning log reports Click on Bookmark to view the items bookmarked in the case:
70 Click on Privilege option to view privilege items in the case:
71 Click on Export to view the details regarding exported items along with description, event time, and username :
72 Click on Search tab to view details of the searches carried out in the case :
73 Click on Tag tab to view details of the tag s in the case :
74 Click on General Tab to view the searches conducted using General Search option :

75 Clicking on Not Indexed will list the uncategorized activities taken place in the case. Click on Export to export this report :
76 Log Report can be saved by click on Export to CSV :
77 Thus, Export Report is saved :

78 Preview Image Analysis Top On the software menu click on Options, go to Settings and Select Advance Settings : Now go to on the Image Analysis tab Switch On Image Analysis and set a sensitivity level for performing skin tone analysis on image by dragging the slider from anywhere between "Very Low to Very High" accordingly. Click on Save :

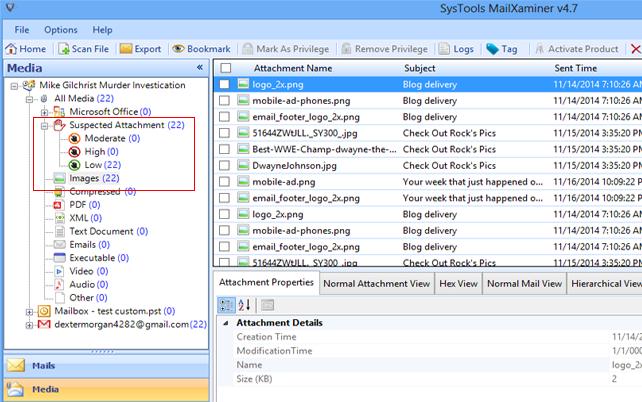
79 From the Media Tab user can view Suspected Attachment which consist obscene images. Expand it to view the suspected attachments categorized under Moderate, High & Low frequencies respectively.
80

81 Search Option Top General search is used for fetching information, relevant to the keyword(s) used to search over the entire or selected mail attributes with required logical operators used & any number of criteria, to narrow the search results : o Following are the Logical operators OR, AND, NOT can be used to refine your search. Operators used to create relation between two criteria : 1. OR Operator : Search will be optional between the two criteria 2. AND Operator : Searched term will be present in both criteria 3. NOT Operator : Searched term must not be present in results

82 Searching will be done between the "Subject" and "To" by using Logical Operator to make search results more specific:

83 Predefined: Search the predefined keywords that identify a particular pattern in the evidences. It is based on the algorithm of Regular Expressions Search :

84 Click Advance Search that allows searching in a more detailed manner by using Subject, Start With, Keyword and operator options. This can limit a search to s with specific words located in the header, specific categories or namespaces :
 of words between those two characters.")
85 Proximity allows input of two words & asks for providing an approx number (from zero to infinity) of words between those two characters. This search can be executed by the Hit & Trial method :
 : If any character or word is to be searched along with \"*\" symbol, then the entire possible outcome will be displayed with that character or word 5. Question Mark (?")
86 Wildcard Search is used to find out the expressions or patterns for single or multiple characters similar to : 4. Asterisk (*) : If any character or word is to be searched along with "*" symbol, then the entire possible outcome will be displayed with that character or word 5. Question Mark (?) It is used to search for a single unknown character; like "an?" results in and, any, ant etc.

87 Clear Search Result : Used for clearing all search :

88 Stem Search: Finds out all the possibilities for finding any uncertain words. Useful for those users who are uncertain about the specific word :

89 Fuzzy Search: Finds out all the searching results that are nearest and approximate from the given data. It is a logical implementation of search result from the given data :

90 Attachment : Used to switch to Attachment tab also for viewing the attachments of the mails:

91 Add Criteria : Add the required criteria & fill it with information you have regarding that field: 6. "Subject" can contain your keyword. 7. "To, From, Bcc Cc" can search for the entered term in head. 8. "Modification Date" to modify date. 9. "MD5" will search for the entered value in MD5 value of s 10. "Has attachment" gives option to select from yes or no.

92 Open Save Search Result: A pop up window will appear asking whether you want to save current searched results or not.

93 Save Searched Result: Allows saving search results with a name.

94 Clear Search Result: Used to clear all the search results.

95 Auto Preview : Use to switch to Auto Preview the applicable only for Mails :

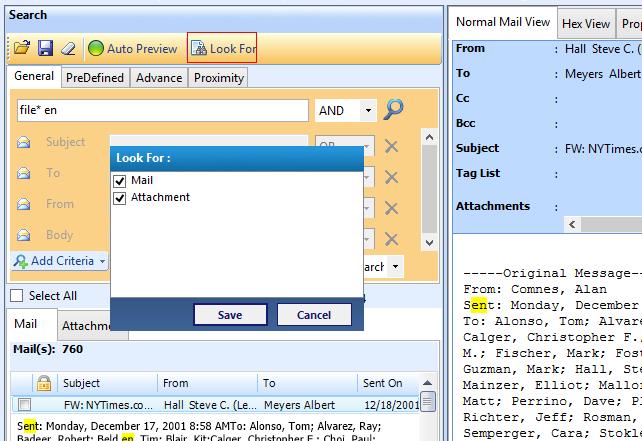
96 Look for: Used to define your search within an and/or attachment. Just check the box for the area where you want to look for the keyword; or Attachments. The search results will be displayed accordingly :
97
 in which user want to convert the")
98 Export Option Top Export Files Now user can select the s which user wants to export & right click on mails. After that select the Export all Selected Items option : Now select the Export Options(CSV, EML, HTML, MSG, PDF, PST, TIFF) in which user want to convert the selected s and click on Browse button :

99 Select the location where user want to save the exported files and click ok :

100 From the Export options select the Naming convention. This module of software helps in managing the name of saved file according to the options given in drop down menu. Following are naming conventions given in the drop down list : Software provides following options too : 1. Maintain folder hierarchy : Creates a folder tree of all the s 2. Create Top folder : Create Top folder by user requirement 3. Merge exported files : Compress total files into a single file or merge multiple exported files into one location 4. Exclude Duplicates: This option can be checked if you want to exclude duplicated s or data. Now Click OK:


101 After clicking on OK, Exporting status in terms of Export Count is shown by the software : As the process gets completed, the following pop up window will appear, with the message of process completion :
102 An export report will be created for the complete export process. Click on Export to Save this report on the local machine in CSV format : Browse the location and save the report with the name export-report and click on Save button :

103 A notification confirming the successful saving of CSV report will appear on screen. Click OK : Export Folders For converting the multiple folders use the Export option from the navigation bar :

104 Select a folder or multiple folders from the right pane of the software and click on OK button :

105 After clicking OK, Exporting status in terms of Export Count is shown by the software : As the process gets completed, the following pop up window will be displayed, with the message of process completion :

106 An export report is created for the complete export process. Click on Export to Save this report on your local machine in CSV format : Browse the location and save the report as name export-report-folder and click on Save button :


107 A successful notification message will confirm the successful export report saved. Click OK:

108 Preview the Result Top Now go to the location where all the files and reports are saved on your machine :
109 Demo Version Top The SysTools MailXaminer software is launched with a free of cost demo version that permits the users to export 50 items per folder and create a single case. The software can add up to 2 files of each type and only 10 files in a case on total. Demo version of the MailXaminer software allows files of 2GB size and analyzes only 5 suspected attachments per category. So it is recommended to work with the free MailXaminer tool version only to examine its features. Go ahead with the full version purchase of the software to export infinite numbers of files. SysTools Official Site to download demo from:
110 Purchase Software Top Working with the demo version further induces the need to purchase the full version of the software. Merchandise your best bargain as the software license is distributed in the following categories.. Personal License SysTools Official Page where you begin your Purchase from: Single User License: SysTools MailXaminer is a single user machine tool, usage of which is restricted upon a single machine. The software is available at the price of 1600 USD for 1 year validation. The software endlessly adds distinct file types and load files without any limit. User is not permitted to distribute or recreate the software copy without prior permission of SysTools; abandoning which makes the user liable for strict judicial actions.
111 Online Support Top Avail Online Support on SysTools MailXaminer Ask your queries related to SysTools MailXaminer direct to our software support team available 24x7 at your service. Get comprehensive online chat ancillaries upon software and other platform interoperability related issues free. Chat Support: Online Help: Visit Our Website: Support For Sales: For Support:
Stellar Phoenix Outlook PST Repair - Technician User Guide
 Stellar Phoenix Outlook PST Repair - Technician 8.0.0.0 User Guide Overview Stellar Phoenix Outlook PST Repair - Technician offers a complete solution to repair damaged Microsoft Outlook Personal Storage
Stellar OST to PST Converter - Technician 8.0. User Guide
 Stellar OST to PST Converter - Technician 8.0 User Guide Overview Stellar OST to PST Converter - Technician, offers a complete solution to convert OST files to MS Outlook (PST) files. The software converts
Cigati Outlook Recovery. (Version 18.0)
") Cigati Outlook Email Recovery (Version 18.0) Overview Cigati Outlook Email Recovery Tool lets you repair deleted as well as corrupt Outlook emails with ease. The software is an advanced recovery tool which
Cigati Outlook Email Recovery (Version 18.0) Overview Cigati Outlook Email Recovery Tool lets you repair deleted as well as corrupt Outlook emails with ease. The software is an advanced recovery tool which
Shoviv Exchange Recovery Manager
 - Exchange migration to recover and migrate corrupted EDB file, Office365 mailboxes, Live Exchange server, Outlook profile mailbox(s) into Office365(public/archive mailbox), Live Exchange(public/archive
Stellar Repair for Outlook Installation Guide
 Stellar Repair for Outlook 9.0.0.0 Installation Guide Overview Stellar Repair for Outlook offers a complete solution to repair damaged Microsoft Outlook Personal Storage (PST) files. The software repairs
Stellar OST to PST Converter - Technician 8.0. Installation Guide
 Stellar OST to PST Converter - Technician 8.0 Installation Guide Overview Stellar OST to PST Converter - Technician, offers a complete solution to convert OST files to MS Outlook (PST) files. The software
Contact Information. Contact Center Operating Hours. Other Contact Information. Contact Monday through Thursday Friday
 Contact Information Contact Center Operating Hours Contact Monday through Thursday Friday Phone: 1.801.796.0944 8 AM 5 PM Eastern Time 8 AM 3 PM Eastern Time Online chat: http://support.paraben.com 10
User Guide Online Backup
 User Guide Online Backup Table of contents Table of contents... 1 Introduction... 2 Getting Started with the Online Backup Software... 2 Installing the Online Backup Software... 2 Configuring a Device...
Stellar Phoenix Mailbox Exchange. Recovery 8.0
 Stellar Phoenix Mailbox Exchange Recovery 8.0 Overview Stellar Phoenix Mailbox Exchange Recovery offers a complete solution to recover corrupt MS Exchange database files. The software recovers corrupt
Kernel Office 365 Migrator for Lotus Notes
 Kernel Office 365 Migrator for Lotus Notes User Guide Version 17.0 2 Contents 1. Introduction to Kernel Office 365 Migrator for Lotus Notes...4 1.1 Using this Manual...4 1.2 About Kernel Office 365 Migrator
migration from iq.suite Store to contentaccess
 Email migration from iq.suite Store to contentaccess MAY 2, 2016 TECH-ARROW a.s. KAZANSKÁ 5, 821 06 BRATISLAVA, SLOVAKIA All Rights Reserved Table of Contents 1 Introduction... 2 2 Source and target environment...
Shoviv MBOX Converter
 - Convert in PST, Live Exchange, Office 365, MSG, EML Copyright 2018 Shoviv Software Private Limited Table of Contents 1. About 1.1 Introduction 1.2 Key Features 1.3 Supported Email Client 1.4 System Requirements
ELM Server Exchange Edition ArchiveWeb version 5.5
 ELM Server Exchange Edition ArchiveWeb version 5.5 Copyright 2016 Lexmark. All rights reserved. Lexmark is a trademark of Lexmark International, Inc., registered in the U.S. and/or other countries. All
DSS User Guide. End User Guide. - i -
 DSS User Guide End User Guide - i - DSS User Guide Table of Contents End User Guide... 1 Table of Contents... 2 Part 1: Getting Started... 1 How to Log in to the Web Portal... 1 How to Manage Account Settings...
Migration Manager For Domino to Exchange User Guide v2.2.5
 Migration Manager For Domino to Exchange User Guide v2.2.5 TABLE OF CONTENTS SYSTEM REQUIREMENTS... 3 SUPPORTED VERSIONS... 3 Lotus Notes & Domino... 3 MS Outlook & Exchange... 3 INSTALLATION & LICENSING...
Concord Print2Fax. Complete User Guide. Table of Contents. Version 3.0. Concord Technologies
 Concord Print2Fax Complete User Guide Table of Contents Version 3.0 Concord Technologies 2018 1 Concord Technologies concordfax.com premiumsupport@concordfax.com Copyright 2017 CONCORD Technologies. All
Copyright 2018 Shoviv Software Private Limited. Shoviv Lotus Notes to Outlook
 Table of Contents 1. About 1.1 Introduction 1.2 Key Features 1.3 System Requirements 2. Installation and Uninstallation 2.1 Installation 2.2 Uninstallation 3. User Interface 3.1 Introduction 3.2 Menu Bar
Sync User Guide. Powered by Axient Anchor
 Sync Powered by Axient Anchor TABLE OF CONTENTS End... Error! Bookmark not defined. Last Revised: Wednesday, October 10, 2018... Error! Bookmark not defined. Table of Contents... 2 Getting Started... 7
Dell Repository Manager Business Client Version 2.0 User s Guide
 Dell Repository Manager Business Client Version 2.0 User s Guide Notes, Cautions, and Warnings NOTE: A NOTE indicates important information that helps you make better use of your computer. CAUTION: A CAUTION
GRS Enterprise Synchronization Tool
 GRS Enterprise Synchronization Tool Last Revised: Thursday, April 05, 2018 Page i TABLE OF CONTENTS Anchor End User Guide... Error! Bookmark not defined. Last Revised: Monday, March 12, 2018... 1 Table
Stellar GroupWise to PST Converter -Technician Installation Guide
 Stellar GroupWise to PST Converter -Technician 3.0.0.1 Installation Guide Overview Novell GroupWise is a mail-server application used for mailing and messaging. The software also supports calendaring,
Colligo Engage Outlook App 7.1. Connected Mode - User Guide
 7.1 Connected Mode - User Guide Contents Colligo Engage Outlook App 1 Benefits 1 Key Features 1 Platforms Supported 1 Installing and Activating Colligo Engage Outlook App 2 Checking for Updates 3 Updating
USER MANUAL. TapCRM TABLE OF CONTENTS. Version: 1.4
 USER MANUAL TABLE OF CONTENTS Introduction... 1 Benefits of TapCRM... 1 Prerequisites... 1 Installation & Configuration... 2 TapCRM Plug-in Installation... 2 Front Side Instructions... 9 Contact Us...
Kernel for Exchange Server. Installation and Configuration Guide
 Kernel for Exchange Server Installation and Configuration Guide Table of Contents Table of Contents... 2 1. Introduction... 3 2. Requirements and Prerequisites... 3 2.1 Basic System Requirements... 3 2.2
End User Manual. December 2014 V1.0
 End User Manual December 2014 V1.0 Contents Getting Started... 4 How to Log into the Web Portal... 5 How to Manage Account Settings... 6 The Web Portal... 8 How to Upload Files in the Web Portal... 9 How
Shoviv GroupWise To Outlook
 Copyright 2018 Shoviv Software Private Limited Table of Contents 1. About 1.1 Introduction 1.2 Key Features 1.3 System Requirements 2. Installation and Uninstallation 2.1 Installation 2.2 Uninstallation
Movavi PDF Editor User Guide. Quick start guide Opening files Editing documents Saving files
 Movavi PDF Editor User Guide Quick start guide Opening files Editing documents Saving files Table of Contents Quick start guide...2 Removing trial restrictions...3 Getting an activation key...4 Activating
Exchange Protection Whitepaper
 Whitepaper Contents 1. 2. 3. 4. 5. 6. 7. 8. 9. 10. Introduction... 2 Documentation... 2 Licensing... 2 Exchange Server Protection overview... 3 Supported platforms... 3 Requirements by platform... 3 Remote
OYSTOR USER ADMIN GUIDE
 OYSTOR USER ADMIN GUIDE CONTENT 1. CREATING NEW USERS IN YOUR ACCOUNT 2. CREATING GROUPS OF CONTACTS 3. SETTING ACCESS RIGHTS ON SHARED FOLDERS 4. YOUR OYSTOR ACTIVITY PAGE 5. BACKUP ALL THOSE IMPORTANT
Anchor User Guide. Presented by: Last Revised: August 07, 2017
 Anchor User Guide Presented by: Last Revised: August 07, 2017 TABLE OF CONTENTS GETTING STARTED... 1 How to Log In to the Web Portal... 1 How to Manage Account Settings... 2 How to Configure Two-Step Authentication...
PCVITA Express Migrator for SharePoint (Lotus Notes Doc Lib) 2011
 2011") TABLE OF CONTENTS Chapter-1 ------------------------------------------------------------------------------------- Page No (2) Getting Started to Express Migrator for SharePoint (Lotus Notes): What is Express
TABLE OF CONTENTS Chapter-1 ------------------------------------------------------------------------------------- Page No (2) Getting Started to Express Migrator for SharePoint (Lotus Notes): What is Express
Colligo Engage Outlook App 7.1. Offline Mode - User Guide
 Colligo Engage Outlook App 7.1 Offline Mode - User Guide Contents Colligo Engage Outlook App 1 Benefits 1 Key Features 1 Platforms Supported 1 Installing and Activating Colligo Engage Outlook App 3 Checking
SUREedge DR Installation Guide for Windows Hyper-V
 SUREedge DR Installation Guide for Windows Hyper-V Contents 1. Introduction... 2 1.1 SUREedge DR Deployment Scenarios... 2 1.2 Installation Overview... 3 2. Obtaining SUREedge Software and Documentation...
Dell Repository Manager Business Client Version 2.1 User s Guide
 Dell Repository Manager Business Client Version 2.1 User s Guide Notes, cautions, and warnings NOTE: A NOTE indicates important information that helps you make better use of your computer. CAUTION: A CAUTION
Quick Start Guide. Takes only a few minutes to read. Quickest way to transfer leads into your ACT! database
 Quickest way to transfer email leads into your ACT! database Quick Start Guide Takes only a few minutes to read 1340 S. De Anza Blvd., Suite #106 San Jose, CA 95129 Phone: (408) 872-3103 Fax: (408) 861-9601
Amazon WorkMail. User Guide Version 1.0
 Amazon WorkMail User Guide Amazon WorkMail: User Guide Copyright 2017 Amazon Web Services, Inc. and/or its affiliates. All rights reserved. Amazon's trademarks and trade dress may not be used in connection
Contact Information. Contact Center Operating Hours. Other Contact Information. Contact Monday through Thursday Friday
 Contact Information Contact Center Operating Hours Contact Monday through Thursday Friday Phone: 1.801.796.0944 8 AM 5 PM Eastern Time 8 AM 3 PM Eastern Time Online chat: http://support.paraben.com 10
External Data Connector for SharePoint
 External Data Connector for SharePoint Last Updated: July 2017 Copyright 2014-2017 Vyapin Software Systems Private Limited. All rights reserved. This document is being furnished by Vyapin Software Systems
Colligo Manager 5.4 SP3. User Guide
 5.4 SP3 User Guide Contents Enterprise Email Management for SharePoint 2010 1 Benefits 1 Key Features 1 Platforms Supported 1 Installing and Activating Colligo Email Manager 2 Checking for Updates 4 Updating
Server Software Installation Guide. GlobalScan TM Server Software Installation Guide Ver. 1.4
 Server Software Installation Guide GlobalScan TM Server Software Copyright 2003 by Ricoh Corporation. All Rights Reserved. Manual Updated 1/4/03. No part of this publication may be reproduced, transmitted,
Secure Single Sign On with FingerTec OFIS
 Secure Single Sign On with FingerTec OFIS User Guide CONTENTS 3 1 INTRODUCTION Welcome to OFIS Gateway 4-11 2 INSTALLATION & SETUP Registering Your OFIS Gateway Installing & Setting Up Your OFIS Gateway
.-----~ IPSWITCH. IMail Server. Getting Started Guide
 .-----~ IPSWITCH IMail Server Getting Started Guide Welcome Welcome to the Ipswitch IMail Server software. Ipswitch IMail Server v10 is packaged in three editions: IMail Server, IMail Server Plus, and
Discovery Attender. Version 2.2. White Paper. Discovery Attender is a member of the Attender Utilities family.
 Discovery Attender Version 2.2 White Paper Discovery Attender is a member of the Attender Utilities family Table of Contents Introduction...3 Benefits...4 Product Overview...5 FAQ...8 Product History...12
Life after Lotus Notes
 Welcome to Gmail What's different, at a glance... Now that you've switched from Lotus Notes to Google Apps, here are some tips on beginning to use Gmail as your new mail program. In Lotus Notes, you...
Getting started with M-Files
 Getting started with M-Files This guide helps you to get up to speed with M-Files. M-Files Desktop M-Files Desktop is the full-featured client UI for M-Files users and is the primary user interface that
User Guide. Product: GreenFolders. Version: 3.8
 User Guide Product: GreenFolders Version: 3.8 Release Date: October 2014 GreenFolders 3.8 User Guide Introduction Table of Contents 1 Introduction... 6 2 General Information... 7 2.1 Login Procedure...
Acronis Backup & Recovery 11 Beta Advanced Editions
 Acronis Backup & Recovery 11 Beta Advanced Editions Quick Start Guide Table of contents 1 Main components... 3 2 Supported operating systems... 3 3 Where do I install the components?... 3 4 What you need
Shoviv Outlook Recovery
 To Recover Corrupted/Deleted emails of Outlook PST File Copyright 2018 Shoviv Software Private Limited Table of Contents 1. About 1.1 Introduction 1.2 Key Features 1.3 System Requirements 2. Installation
Installation Guide. Research Computing Team V2.0 RESTRICTED
 Installation Guide Research Computing Team V2.0 RESTRICTED Document History This document relates to the BEAR DataShare service which is based on the product Power Folder, version 10.3.232 ( some screenshots
Symantec Backup Exec Quick Installation Guide
 Symantec Backup Exec 2010 Quick Installation Guide 20047221 Installing Backup Exec This document includes the following topics: System requirements Before you install About the Backup Exec service account
Outlook Quick Start Guide
 Getting Started Outlook 2013 Quick Start Guide File Tab: Click to access actions like Print, Save As, etc. Also to set Outlook Options. Quick Access Toolbar: Add your mostused tool buttons to this customizable
FaxFinder Fax Servers
 FaxFinder Fax Servers Models: FF130 FF230 FF430 FF830 Client User Guide FaxFinder Client User Guide Fax Client Software for FaxFinder Series PN S000460B, Version B Copyright This publication may not be
DreamTeam Document Manager User Guide
 DreamTeam Document Manager User Guide Product Usage and Best Practices Guide By Adam Buxbaum September 10, 2009 Table of Contents Introduction... 3 Document Manager Views... 4 Working with Folders... 5
BACKUP APP V7 QUICK START GUIDE FOR SYNOLOGY NAS
 BACKUP APP V7 QUICK START GUIDE FOR SYNOLOGY NAS Revision History Date Descriptions Type of modification 29 Jun 2016 First Draft New 25 Nov 2016 Modified Ch 3 Download Backup App, Ch 3 Install Backup App
Unit III: Working with Windows and Applications. Chapters 5, 7, & 8
 Unit III: Working with Windows and Applications Chapters 5, 7, & 8 Learning Objectives In this unit, you will: Launch programs and navigate the Windows task bar. Perform common windows functions. Customize
Stellar GroupWise to PST Converter Installation Guide
 Stellar GroupWise to PST Converter 3.0.0.1 Installation Guide Overview Novell GroupWise is a mail-server application used for mailing and messaging. The software also supports calendaring, task reminder,
Granular Restore for Microsoft Exchange
 Granular Restore for Microsoft Exchange Table of Contents 1 Product Overview.................................................................. 3 1.1 Supported Exchange Mail Store Versions.............................................
MailNow! 6 New features introduction
 MailNow! 6 New features introduction InternetNow! www.internetnow.com.my 1 Out of 30 What is new in MailNow! 6 Table of Contents No Title Page No WebMail 4 1 Main Menu 4 1.1 Messenger 4 Messenger Notification
Table of Contents. Product Overview 3 System Requirements 4 Installing MicroView 5 Managing Users & Groups 8
 User s Manual Table of Contents Product Overview 3 System Requirements 4 Installing MicroView 5 Managing Users & Groups 8 Add a new user 8 Modify Group Privilege 9 How to Add a new camera 10 Add a new
Dell Repository Manager Business Client Version 2.2 User s Guide
 Dell Repository Manager Business Client Version 2.2 User s Guide Notes, cautions, and warnings NOTE: A NOTE indicates important information that helps you make better use of your computer. CAUTION: A CAUTION
Paraben Examiner 9.0 Release Notes
 Paraben E-mail Examiner 9.0 Release Notes 1 Paraben Corporation Welcome to Paraben s E-mail Examiner 9.0! Paraben s Email Examiner-EMX allows for the forensic examination of the most popular local e-mail
User Manual. ARK for SharePoint-2007
 User Manual ARK for SharePoint-2007 Table of Contents 1 About ARKSP (Admin Report Kit for SharePoint) 1 1.1 About ARKSP 1 1.2 Who can use ARKSP? 1 1.3 System Requirements 2 1.4 How to activate the software?
Intella Getting Started Guide
 Intella Getting Started Guide Intella evidence made visible Vound, LLC investigation and e-discovery software Document version 1.3.0 Contact To learn more about Intella please contact your nearest Vound
Office 365: . Accessing and Logging In. Mail
 Office 365: Email This class will introduce you to Office 365 and cover the email components found in Outlook on the Web. For more information about the Microsoft Outlook desktop client, register for a
Important Information
 May 2014 Important Information The following information applies to Proofpoint Essentials US1 data center only. User Interface Access https://usproofpointessentials.com MX Records mx1-usppe-hosted.com
Getting started with M Files Cloud Vault
 M-FILES CLOUD VAULT: GETTING STARTED Getting started with M Files Cloud Vault User's Guide Version: 7 01/10/2012 1/20 Content 1. INTRODUCTION... 3 1.1 Product support... 3 2. GETTING STARTED... 4 2.1 M-Files
e-storage Mail Archive e-storage Mai Archive
 e-storage Mai Archive 1 TABLE OF CONTENTS 1.0 Overview..... 4 2.0 e-storage Mail Archive..... 5 2.1 Introduction... 5 2.2 Requirements..... 6 2.3 Create new archive profile..... 7 2.3.1 Gmail Account......
Table of Contents. Chapter Pages (6 16) Setting and Configuration
 Setting and Configuration") Table of Contents Chapter-1 --------------------------------------------------------------------------------- Page (2) Getting Started to Express Migrator for SharePoint (SharePoint): What is PCVITA Express
Table of Contents Chapter-1 --------------------------------------------------------------------------------- Page (2) Getting Started to Express Migrator for SharePoint (SharePoint): What is PCVITA Express
PST for Outlook Admin Guide
 PST for Outlook 2013 Admin Guide Document Revision Date: Sept. 25, 2015 PST Admin for Outlook 2013 1 Populating Your Exchange Mailbox/Importing and Exporting.PST Files Use this guide to import data (Emails,
Droid Transfer - User Guide
 Droid Transfer - User Guide Contents Title Introduction 2 Wi-fi Connect 3 USB Connect 5 Backup Texts 8 Recover Texts 10 Print SMS 13 Transfer Contacts 15 Android Music to PC 17 PC Music to Android 19 itunes
Copyright PCVITA Software. All Rights Reserved
 This guide is provided to help the administrators or users to starts implement the job of Google Apps Migration for Microsoft Outlook without any hassles. PCVITA Software provides 24/7 online technical
BackupVault Desktop & Laptop Edition. USER MANUAL For Microsoft Windows
 BackupVault Desktop & Laptop Edition USER MANUAL For Microsoft Windows Copyright Notice & Proprietary Information Blueraq Networks Ltd, 2017. All rights reserved. Trademarks - Microsoft, Windows, Microsoft
User Guide: Windows Mac Android ios
 1 TM Laplink Software, Inc. For technical support issues or questions, please visit: http://www.laplink.com/contact For other inquiries, please see contact details below: E-mail: CustomerService@laplink.com
KYOCERA Net Admin User Guide
 KYOCERA Net Admin User Guide Legal Notes Unauthorized reproduction of all or part of this guide is prohibited. The information in this guide is subject to change without notice. We cannot be held liable
What's different, at a glance...
 Welcome to DCU Apps Email Now that you've switched from Mozilla Thunderbird to DCU Apps, here are some tips on beginning to use DCU Apps Email as your new mail program. What's different, at a glance...
LiveNX Upgrade Guide from v5.1.2 to v Windows
 LIVEACTION, INC. LiveNX Upgrade Guide from v5.1.2 to v5.1.3 - Windows UPGRADE LiveAction, Inc. 3500 Copyright WEST BAYSHORE 2016 LiveAction, ROAD Inc. All rights reserved. LiveAction, LiveNX, LiveUX, the
My Sysco Reporting Job Aid for CMU Customers. My Sysco Reporting. For CMU Customers (Serviced by Program Sales)
") My Sysco Reporting For CMU Customers (Serviced by Program Sales) 1 Accessing My Sysco Reporting... 2 Logging In... 2 The Reporting Dashboard... 3 My Sysco Reporting Process... 6 Generating a Report...
My Sysco Reporting For CMU Customers (Serviced by Program Sales) 1 Accessing My Sysco Reporting... 2 Logging In... 2 The Reporting Dashboard... 3 My Sysco Reporting Process... 6 Generating a Report...
Protegent Total Security Solution USER GUIDE Unistal Systems Pvt. Ltd. All rights Reserved Page 1
 Protegent Total Security Solution USER GUIDE 2007-2017 Unistal Systems Pvt. Ltd. All rights Reserved Page 1 Table of Contents PROTEGENT TOTAL SECURITY...3 INSTALLATION...4 REGISTERING PROTEGENT TOTAL SECURITY...
Applications. View All Applications. People. Contact Details
 View All, page 1 People, page 1 Email, page 7 Jabber, page 13 Meetings, page 17 WebEx, page 20 More, page 24 View All Tap to display all installed applications. People Use the People application to store,
Applications. View All Applications. . Inbox
 View All, page 1 Email, page 1 Jabber, page 7 Meetings, page 11 People, page 14 WebEx, page 20 More, page 23 View All Tap to display all installed applications. Email The Email application allows you to
700 Fox Glen Barrington, Illinois ph: [847] fx: [847] Webmail System User Guide
![700 Fox Glen Barrington, Illinois ph: [847] fx: [847] Webmail System User Guide](/thumbs/75/72263861.jpg "700 Fox Glen Barrington, Illinois ph: [847] fx: [847] Webmail System User Guide") 700 Fox Glen Barrington, Illinois 60010 ph: [847] 842-9570 fx: [847] 842-0190 www.excaltech.com support@excaltech.com Webmail System User Guide Last Updated November 7, 2017 -2- Table of Contents Welcome
700 Fox Glen Barrington, Illinois 60010 ph: [847] 842-9570 fx: [847] 842-0190 www.excaltech.com support@excaltech.com Webmail System User Guide Last Updated November 7, 2017 -2- Table of Contents Welcome
Settings tab. User guide
 Settings tab User guide Contents 1. Introduction... 2 Documentation... 2 Licensing... 2 Settings overview... 2 2. Settings tab selections... 3 Backup user identity... 3 Email server settings... 4 Email
 Trend Micro Incorporated reserves the right to make changes to this document and to the products described herein without notice. Before installing and using the software, please review the readme files,
Settings tab. User guide
 Settings tab User guide Contents 1. Introduction... 2 Documentation... 2 Licensing... 2 Settings overview... 2 2. Settings tab selections... 3 Backup user identity... 3 Email server settings... 4 Email
Getting Started with Soonr
 WWW.SOONR.COM Getting Started with Soonr A Quick Start Guide for New Users Soonr Inc. 12/19/2012 Revision 1.1 Copyright 2012, Soonr Inc., all rights reserved. Table of Contents 1 How Soonr Workplace Works...
Nextiva Drive The Setup Process Mobility & Storage Option
 Nextiva Drive The Setup Process The Setup Process Adding Users 1. Login to your account and click on the Account icon at the top of the page (this is only visible to the administrator). 2. Click Create
Installing Intellicus DotNet Client on Windows. Version: 16.0
 Installing Intellicus DotNet Client on Windows Version: 16.0 Copyright 2015 Intellicus Technologies This document and its content is copyrighted material of Intellicus Technologies. The content may not
Parish . User Manual
 Parish Email User Manual Table of Contents LOGGING IN TO PARISH EMAIL... 3 GETTING STARTED... 3 GENERAL OVERVIEW OF THE USER INTERFACE... 3 TERMINATE THE SESSION... 4 EMAIL... 4 MESSAGES LIST... 4 Open
Stellar WAB to PST Converter 1.0
 Stellar WAB to PST Converter 1.0 1 Overview Stellar WAB to PST Converter software converts Outlook Express Address Book, also known as Windows Address Book (WAB) files to Microsoft Outlook (PST) files.
3M Clean-Trace Hygiene Monitoring and Management System
 User Manual Supplement Number: TB. 378178 Effective Date: November 2018 Supersedes: (New) Technology Platform: 3M Clean-Trace Hygiene Monitoring and Management System Originating Location: St. Paul, MN
LepideAuditor for File Server. Installation and Configuration Guide
 LepideAuditor for File Server Installation and Configuration Guide Table of Contents 1. Introduction... 4 2. Requirements and Prerequisites... 4 2.1 Basic System Requirements... 4 2.2 Supported Servers
MEDIASEAL Encryptor Client Manual
 MEDIASEAL Encryptor Client Manual May 2018 Version 3.7.1 Fortium Technologies Ltd www.fortiumtech.com Copyright 2018 - Fortium Technologies Ltd Information contained in this document is subject to change
PRODUCT GUIDE. L e p i d e S o f t w a r e P r i v a t e L i m i t e d
 PRODUCT GUIDE Table of Contents 1. Kernel for Novell GroupWise to Lotus Notes... 5 1.1 Using this Manual... 5 1.2 Introducing Kernel for Novell GroupWise to Lotus Notes... 6 2. Getting Started... 8 2.1
User Guide. BlackBerry Workspaces for Windows. Version 5.5
 User Guide BlackBerry Workspaces for Windows Version 5.5 Published: 2017-03-30 SWD-20170330110027321 Contents Introducing BlackBerry Workspaces for Windows... 6 Getting Started... 7 Setting up and installing
Backup Recording Viewer for NS
 Backup Recording Viewer for NS Installation and Operation Manual Version 1.0 Poltys, Inc. 3300 N. Main Street, Suite D, Anderson, SC 29621-4128 +1 864 642 6103, sales@poltys.com www.poltys.com 2013 Poltys,
Desktop & Laptop Edition
 Desktop & Laptop Edition USER MANUAL For Mac OS X Copyright Notice & Proprietary Information Redstor Limited, 2016. All rights reserved. Trademarks - Mac, Leopard, Snow Leopard, Lion and Mountain Lion
An Overview of Webmail
 An Overview of Webmail Table of Contents What browsers can I use to view my mail? ------------------------------------------------------- 3 Email size and storage limits -----------------------------------------------------------------------
Quest Collaboration Services 3.6. Installation Guide
 Quest Collaboration Services 3.6 Installation Guide 2010 Quest Software, Inc. ALL RIGHTS RESERVED. This guide contains proprietary information protected by copyright. The software described in this guide
Series 6 Technical Admin Guide Page 1
 Series 6 Technical Admin Guide Page 1 TABLE OF CONTENTS PRODUCT REGISTRATION... 6 Free Trial Registration and the Wizard...7 How the Trial Works...8 Register Invu Document Management...8 Privileges for
Pulse LMS: User Management Guide Version: 1.86
 Pulse LMS: User Management Guide Version: 1.86 This Guide focuses on the tools that support User Managers. Please consult our separate guides for processes for end users, learning management and administration