MimioClassroom User Guide
|
|
|
- Shon Gibbs
- 5 years ago
- Views:
Transcription
1 MimioClassroom User Guide for Windows gkpglobalsolutions.com
2 Mimio LLC. All rights reserved. Revised 10/21/2010. No part of this document or the software may be reproduced or transmitted in any form or by any means or translated into another language without the prior written consent of Mimio LLC. Mimio, MimioClassroom, MimioTeach, MimioCapture, MimioVote, MimioView, MimioHub, and MimioStudio are registered marks in the United States and other countries. All other trademarks are the property of their respective holders.
3 Contents About MimioClassroom 1 MimioStudio 1 MimioTeach 1 MimioCapture 1 MimioVote 2 MimioView 2 Minimum System Requirements 2 Using this Guide 2 MimioStudio 5 About MimioStudio 5 About MimioStudio Notebook 6 About MimioStudio Tools 7 About MimioStudio Gallery 7 Getting Started with MimioStudio 9 Accessing MimioStudio Notebook 9 Accessing MimioStudio Tools 9 Accessing MimioStudio Gallery 9 Using MimioStudio Notebook 10 Working with Pages 10 Attaching Files 13 Using MimioStudio Tools 13 Creating Objects 13 Importing a Picture, Multimedia Object, or Document 15 Manipulating Objects 16 Adding Actions to Objects 19 Using MimioStudio Gallery 20 Importing Gallery Items into a Notebook 21 Customizing the Content of the Gallery 21 Exporting a Gallery Folder to a Gallery File 23 Working with Saved Annotation Snapshots 23 Viewing Screen Annotation Snapshots 23 Renaming an Annotation Snapshot 24 Adding Keywords to an Annotation Snapshot 24 Searching for an Annotation Snapshot 24 Importing an Annotation Snapshot 24 3
4 Pasting an Annotation Snapshot Into Another Application 24 Printing Annotation Snapshots 25 Deleting Annotation Snapshots 25 Delivering Interactive Notebook Lessons and Presentations 25 Using Fullscreen View 25 Navigating Through a Presentation 25 Working with Multimedia Objects 26 MimioTeach 27 What's Included 27 About MimioTeach 27 Status Lights 28 About MimioStudio Tools 28 Getting Started 29 Setting Up the MimioTeach Stylus 29 Setting Up the MimioTeach Bar 30 Setting Up Interactive Mode 32 Projecting Your Desktop 32 Calibrating Interactive Mode 32 Using MimioTeach 33 Using the MimioTeach Stylus 33 Focusing Attention Using the Reveal and Spotlight Tools 34 Using the Reveal Tool 34 Using the Spotlight Tool 34 Marking Up the Display Using Screen Annotations 35 Enabling Screen Annotation Mode 35 Annotating the Screen Using MimioStudio Tools 36 Clearing All Annotations from the Display 38 Inserting Text Into an Application Using MimioStudio Text Tools 38 Using the On-Screen Keyboard 39 Using Write Anywhere 39 Using Writing Pad 40 Using Gesture Recognition 40 Using the Web Browser, Calculator, and Magnify Tools 41 Recording Desktop Actions and Audio in Interactive Mode 41 Caring for MimioTeach 41 Cleaning MimioTeach 42 Inserting the Batteries 42 Mounting MimioTeach to a Non-Magnetic Whiteboard 42 4
5 MimioCapture 45 What's Included 45 About MimioCapture 45 Status Lights 46 About MimioStudio Notebook 46 Getting Started 47 Setting Up the MimioCapture Tray 47 Setting Up the MimioCapture Pens 49 Setting Up the MimioCapture Eraser 50 Charging the Pens and Eraser 50 Setting Up MimioStudio Notebook for Capture 50 Setting the Whiteboard Size 51 Starting Ink Capture Mode 51 Using MimioCapture 51 Capturing Digital Ink 51 Writing and Drawing Digital Ink 51 Adding, Copying, and Printing Notebook Pages 52 Caring for MimioCapture 53 Cleaning MimioCapture 53 Mounting MimioCapture to a Non-Magnetic Whiteboard 53 MimioVote 55 What's Included 55 About MimioVote 55 About the MimioVote Station 55 Status Lights 56 About the MimioVote Units 56 About the Software 57 About MimioStudio Notebook 57 About the Vote Toolbar 58 About MimioStudio Quick Vote 59 About MimioStudio Gradebook 59 Classes View 59 Class View 60 Date View 61 Activity View 62 Student Pane 63 Getting Started 64 Setting Up MimioVote 64 5
6 Adding a Second MimioVote System 66 Using MimioStudio Gradebook 66 Setting Up the Gradebook 66 Creating a Class 67 Adding Students 67 Importing a List of Students 67 Adding Activities 68 Modifying the Gradebook 68 Editing Student Information 68 Removing a Student 68 Editing Activities 69 Editing Questions 69 Generating Reports 69 Exporting a List of Students 70 Archiving Classes 70 Exporting Results 70 Opening Archived Classes 71 Creating Activities 71 Creating Activities in Notebook 71 Creating Activities in PowerPoint 72 Modifying Question Objects 72 Importing Standard Assessments 73 Printing Activities 73 Using the MimioVote Unit 73 Answering Questions 74 Answering Questions for Teacher-Led Activities 74 Answering Questions for Self-Paced Activities 74 Requesting Help 74 Using the Vote Toolbar 75 Taking Attendance 75 Using the Timer 75 Conducting Activities 75 Conducting a Teacher-Led Activity 75 Asking Questions Using Quick Vote 76 Conducting a Self-Paced Activity 76 Viewing Question Results 77 Viewing Activity Results 77 Viewing a List of Students that Have Not Responded 77 Viewing Requests for Help 78 6
7 Caring For MimioVote 78 Cleaning MimioVote 78 Storing MimioVote 78 MimioView 79 What's Included 79 About MimioView 79 Status Lights 80 About MimioStudio View 80 Getting Started 81 Installing MimioView 81 Opening the View Window 82 Closing the View Window 82 Using MimioView 82 Displaying an Image 82 Displaying a Document 82 Displaying an Object 83 Displaying a Microscope Slide 83 Freezing the Image 83 Adjusting the Image 84 Rotating the Image 84 Zooming the Image 84 Adjusting the Settings 85 Annotating an Image 85 Clearing All Annotations from the Image 85 Transferring an Image 86 Recording Video 86 Turning Off the Lamps 86 Caring For MimioView 86 Cleaning MimioView 86 Mounting MimioView Permanently 87 MimioStudio Recorder 89 Using MimioStudio Recorder 89 Recording a Presentation 89 Sharing the Whiteboard Remotely 91 Setting up MimioStudio with NetMeeting 91 Adjusting the NetMeeting Settings 91 Customizing MimioStudio 93 7
8 Adjusting the Classroom Devices Settings 93 Adjusting the Ink Capture Settings 93 Adjusting the Interactive Settings 95 General Settings 95 Actions and Commands Settings 95 Adjusting the Language Settings 95 Adjusting MimioStudio Notebook Settings 95 General Settings 96 Ink Capture Settings 96 Adjusting MimioStudio Recorder Settings 96 Adjusting the Vote Settings 96 Getting Help 99 Updating the Software 99 Troubleshooting 99 Contacting us 99 Technical and Environmental Information 101 Technical Specifications 101 MimioView 101 Declaration of Conformity 101 United States and Canada 102 MimioTeach, MimioCapture, and MimioVote 102 MimioView 102 European Union 103 MimioTeach 103 MimioCapture 104 MimioVote 104 MimioView 105 Environmental Information 105 Safety Precautions for Lithium-Ion Rechargeable Batteries 105 Documentation Feedback 106 viii
9 Chapter 1 About MimioClassroom MimioStudio MimioTeach MimioCapture MimioClassroom is a suite of tools for capturing, creating, and presenting information. The following MimioClassroom components are described in this User Guide: n MimioStudio n MimioTeach n MimioCapture n MimioVote n MimioView MimioStudio software includes all of the tools you need to make the most out of your MimioClassroom devices. You can also use the MimioStudio software without a MimioClassroom device to prepare presentations and manipulate previously created content. MimioStudio Notebook provides a multi-page workspace for creating lessons and presentations. Using the MimioStudio Notebook is very similar to using other word processing or presentation software applications. MimioStudio Notebook provides multiple authoring and editing tools for creating almost any type of content. You can use Notebook with MimioStudio Tools to create a variety of objects including text boxes, freehand writing and drawing, lines, arrows, and many basic shapes. Images can be imported into a Notebook, both as objects and as background images. Using MimioTeach with a projector, you can deliver lessons and presentations directly from your whiteboard. Using MimioStudio Interactive mode, you control the movement of the cursor on your screen with the MimioTeach stylus, much like you would with a mouse at your computer. MimioCapture is used with a MimioTeach-enabled whiteboard to record notes and drawings from your whiteboard. Using MimioStudio Ink Capture mode, you make notes and drawings on your whiteboard using the MimioCapture pens. Your notes are automatically captured in a MimioStudio Notebook. 1
10 About MimioClassroom MimioVote MimioView MimioVote is a wireless, interactive, student response system. Using MimioVote, you can easily and quickly gather student responses. This quick feedback from students allows you to make sure each student is keeping up and adjust your lesson accordingly. MimioView works seamlessly with MimioStudio software to display documents, threedimensional objects, and microscope slides for your entire class to view. You can use MimioView to display still images or live video. Minimum System Requirements Using this Guide The minimum system requirements for MimioStudio are: n Microsoft Windows -compatible computer with a Pentium II, 750 MHz processor n Microsoft Windows XP SP2, Microsoft Vista, or Microsoft Windows 7 operating system n 512 MB RAM minimum (1 GB RAM recommended) n 250 MB free disk space (English), 350 MB free disk space (International) n CD-ROM drive or Internet connection to download the software n Available USB port (required to use a MimioClassroom device) This User Guide includes information for using the different MimioClassroom components. Depending on the types of MimioClassroom devices you have, some sections of this User Guide may not apply to you. The following table provides a summary of the contents. 2
11 Using this Guide User Guide Chapter About MimioClassroom MimioStudio MimioTeach MimioCapture MimioVote MimioView Using MimioStudio Recorder Sharing the Whiteboard Remotely Customizing MimioStudio Getting Help Technical and Environmental Information Description This chapter gives an overview of the MimioClassroom products, including MimioStudio software, MimioTeach, MimioCapture, MimioVote, and MimioView. This chapter describes how to work with MimioStudio Notebook, Tools, and Gallery to create and deliver lessons and other presentations. This chapter describes how to set up and use MimioTeach with your whiteboard and a projector. This chapter also describes how to use MimioStudio in Interactive mode. This chapter describes how to set up and use MimioCapture. Included in this chapter are instructions for capturing notes and drawings from a MimioTeach-enabled whiteboard as digital ink using MimioCapture. This chapter describes how to set up and use MimioVote. Included in this chapter are instructions for creating and conducting MimioVote activities, as well as information about setting up and using MimioStudio Gradebook to save student grades and information. This chapter describes how to set up and use MimioView. Included in this chapter are instructions for displaying and annotating images in the MimioStudio View window. This chapter describes how to use MimioStudio Recorder to create movies (with audio) of your presentations. This chapter describes how to share your MimioTeach-enabled whiteboard using Microsoft NetMeeting. This chapter describes how to customize the features of the MimioStudio software and the MimioClassroom devices. This chapter gives troubleshooting information for some common problems, describes how to check for and install MimioStudio software updates, and describes how to contact Technical Support. This chapter contains technical, certification, and safety information for the MimioClassroom products. 3
12 4 This page intentionally left blank for double-sided printing.
13 Chapter 2 MimioStudio About MimioStudio MimioStudio software includes all of the tools you need to make the most out of your MimioClassroom devices. You can also use the MimioStudio software without a MimioClassroom device to prepare presentations and manipulate previously created content. The following are the three main MimioStudio software applications that are used to create and present information. n MimioStudio Notebook n MimioStudio Tools n MimioStudio Gallery For information about other MimioStudio applications, see the chapters of this User Guide that describe the MimioClassroom devices that you have. MimioStudio Notebook provides a multi-page workspace for creating lessons and presentations. Using the MimioStudio Notebook is very similar to using other word processing or presentation software applications. MimioStudio Notebook provides multiple authoring and editing tools for creating almost any type of content. You can use Notebook with MimioStudio Tools to create a variety of objects including text boxes, freehand writing and drawing, lines, arrows, and many basic shapes. Images can be imported into a Notebook, both as objects and as background images. The following figure shows the major components of MimioStudio software. 5
14 MimioStudio About MimioStudio Notebook You can create and present information with MimioStudio Notebook. Using Notebook is very similar to using other word processing or presentation software. Content created in Notebook can be saved asmimio INK files or a variety of other file formats including HTML, JPEG, PNG, GIF, BMP, TIF, WMF, EMF, and PDF. You can use Tab View to view a list of files that are attached to a Notebook or to view a thumbnail of each page in a Notebook. The following figure shows the MimioStudio Notebook. 6
15 About MimioStudio About MimioStudio Tools MimioStudio Tools provides a comprehensive set of interactive tools and resources to create and present information. MimioStudio Tools is used to modify MimioStudio Notebook pages and to make screen annotations on the whiteboard. The following figure shows the MimioStudio Tools toolbar. MimioStudio Tools has two views: a fully expanded view, for easy access to all features, and a compressed view, which takes up less space on the screen. To compress and expand MimioStudio Tools Double-click About MimioStudio Gallery at the top of the MimioStudio Tools toolbar. MimioStudio Gallery contains elements that can be used to create your lessons and presentations, such as images, templates, movies, and previously created lessons. MimioStudio Gallery also contains Screen Annotation snapshots. You can customize the Gallery by adding your own elements. The following figure shows the MimioStudio Gallery. 7

16 MimioStudio MimioStudio Gallery consists of the following four main folders: n Screen Annotations - contains all saved Screen Annotation snapshots. n Imported Content Packs - contains any imported content that you have not yet added to the Gallery folder. n Questions and Results - contains a variety of objects for use with MimioVote. n Gallery - contains a number of different folders used to categorize items, such as Geography, Mathematics, and so on. The Gallery folder and subfolders can contain five different types of objects: n Images - Images include pictures and graphics. n Templates - Templates include backgrounds and predefined page layouts. n Multimedia - Multimedia objects include movies, animation, and sound. n Questions and Results - Questions and Results include objects for creating and displaying the results of MimioVote activities. This section of the Gallery does not appear until you move objects from the Questions and Results folder to the Gallery folder or a Gallery subfolder. n Lessons - Lessons include lessons created using MimioStudio Notebook and imported documents. You can create your own lessons or import lessons created by someone else. 8
17 Getting Started with MimioStudio Getting Started with MimioStudio After installing MimioStudio, MimioStudio Notebook and MimioStudio Tools open on your desktop. You can access many of the features in MimioStudio in several ways; from the menu bar, the MimioStudio Tools buttons, and the right-click menus. The available features change depending on what you are doing in the software. Be sure to explore the right-click menu options as you work with MimioStudio. Accessing MimioStudio Notebook Several ways to access MimioStudio Notebook are shown in the following table. To start from the Do this Desktop Double-click on the desktop. Taskbar Right-click, and then choose Notebook. Start menu Point to Programs, MimioStudio, and then choose MimioStudio Notebook. Accessing MimioStudio Tools Several ways to access MimioStudio Tools are shown in the following table. To start from the Do this Desktop Double-click on the desktop. Taskbar Right-click, and then choose Tools. StartMenu MimioStudio Notebook Point to Programs, MimioStudio, and then choose MimioStudio Tools. Do one of the following: n Double-click on the status bar. n Choose MimioStudio Tools from the Tools menu. MimioTeach Press the Launch button,, on the MimioTeach bar, and then click Tools in the Launch window. Accessing MimioStudio Gallery Several ways to access MimioStudio Gallery are shown in the following table. 9
18 MimioStudio To start from StartMenu Do this Point to Programs, MimioStudio, Tools, and then choose MimioStudio Gallery. MimioStudio Tools Click on the MimioStudio Tools toolbar. MimioStudio Notebook Do one of the following: n Double-click on the status bar. n Choose Gallery from the Insert menu. Using MimioStudio Notebook Working with Pages You can create and present information with MimioStudio Notebook. Using Notebook is very similar to using other word processing or presentation software. Content created in Notebook can be saved asmimio INK files or a variety of other file formats including HTML, JPEG, PNG, GIF, BMP, TIF, WMF, EMF, and PDF. You can use Tab View to view a list of files that are attached to a Notebook or to view a thumbnail of each page in a Notebook. To open an existing Notebook 1. Start MimioStudio Notebook and click. 2. From the Open dialog box, navigate to and select the file to open and click Open. To save a Notebook 1. Click the Save button,. 2. From the Save As dialog box, enter a name for your file in the File name box. 3. Choose the desired format from the Save as type list. 4. Click Save. When saving in a format other than INK, the Select Pages dialog box appears. 5. From the Select Pages dialog box, do the following: l Select the pages to save under Page Selection. l Choose a size for the images from the Size list. 6. Click OK. Each lesson or presentation created in MimioStudio Notebook consists of a series of pages. Pages can be viewed, presented, and edited in the main Notebook window or in Full Screen view. You can view a thumbnail of each page in a Notebook using the Thumbnails pane in the Tab View. You can insert new pages, import pages from another Notebook, delete pages, and reorder pages. You can also change the size of a page, change the background of a page, and add transition effects between pages in your Notebook. To insert a new page 10
19 Using MimioStudio Notebook Do one of the following: l Click the New Page button,. l (Capture mode only) Press the New Page button, To select a page 1. In the Tab View, click to display the Thumbnails pane. 2. Do one of the following: l To select multiple pages, press CTRL and select each page., on your MimioCapture tray. l To select multiple pages that are close to each other, drag a selection rectangle over the pages to select. l To select a range of pages, select the first page, and then press SHIFT and select the last page. l To select all pages, choose Select All from the Edit menu. To insert a duplicate of an existing page 1. In the Tab View, click, and then select the page to duplicate. 2. Do one of the following: l Choose Duplicate Page from the Insert menu. l (Capture mode only) Press the Copy Page button, To delete a page 1. In the Tab View, click, and then select the page to delete. 2. Click the Delete button,. To import a page from another Notebook, on your MimioCapture tray. 1. In the Tab View of the source Notebook, click and then select the page to import. 2. Click the Copy button,. 3. Select the location in the target Notebook to insert the page. 4. Click the Paste button,. You can also import pages by dragging the pages from the source Notebook to the target Notebook. To insert the desktop as a new page 1. From MimioStudio Tools, click the Screen Clipping button,. The desktop is displayed with a transparent mask. 2. Click the text Click here to capture this Desktop as a New Page. The desktop is inserted as a new page in the Notebook. To change the page size 1. Choose Page Setup from the File menu. The Page Setup dialog box appears. 2. Do one of the following: l From the Page Size list, choose any of the available display or device sizes. l From the Page Size list, choose Custom, and then enter the desired valued into the Width and Height boxes. 11
20 MimioStudio 3. From the Apply To list, choose one of the following: l Current Page to apply the page size to the current page only. This option is not available if more than one page is selected in the Tab View. l Selected Pages to apply the page size to the selected pages. This option is only available if more than one page is selected in the Tab View. l Whole Document to apply the page size to all of the pages in the Notebook. 4. (Optional) Do one of the following: l To apply the page size to all new pages, select the All new pages check box. This option is only available if no MimioTeach device is connected. l To apply the page size to all new pages and the currently connected device, select the The connected device check box. This option is only available if a MimioTeach device is connected. 5. Click OK to apply your changes. To change the background color of a page 1. Choose Background from the Insert menu. 2. From the Background dialog box, click Color. 3. From the Color dialog box, select a color, and then click OK. 4. From the Apply To list, select the pages to apply the background color to. 5. To apply the background color to all new pages, select the All new pages check box. 6. Click OK to apply your changes. To change the background image of a page 1. Choose Background from the Insert menu. 2. From the Background dialog box, click Image. 3. From the Open dialog box, navigate to and select the image file that you want to use as your background. 4. Click Open. The image is displayed in the Preview area. You can also import an image from another application or from the MimioStudio Gallery to use as a background. To do this, select the image and drag to the Preview area. 5. Select the display mode for the new background from the Mode list. Mode Place Stretch Tile Center Result The image is placed in the top left corner of the page and is not resized. The image is resized to fill the entire page. The image is tiled repeatedly to fill the entire page and is not resized. The image is placed in the center of the page and is not resized. 6. From the Apply To list, select the pages to apply the background to. 12
21 Using MimioStudio Tools 7. To apply the background to all new pages, select the All new pages check box. 8. Click OK to apply your changes. To add a transition effect between pages 1. Choose Page Transition from the Insert menu. The Page Transition dialog box appears. 2. From the Transitions list, select the transition to apply. 3. From the Apply To list, select the pages to apply the transition to. 4. To apply the transition to all new pages, select the All new pages check box. 5. Click OK. To sort pages 1. In the Tab View, click to display the Thumbnails pane. 2. Select the pages to sort. 3. Drag the selected pages to the desired location. To print a page 1. In the Tab View, click to display the Thumbnails pane. 2. Select the pages to print. 3. Click the Print button,. To print the current page in Ink Capture mode, press the Print Page button, MimioCapture tray., on your Attaching Files You can attach any type of file to a MimioStudio Notebook. Once a file is attached to the Notebook, you can quickly open the file directly from within MimioStudio Notebook. To attach a file to a Notebook 1. In the Tab View, click to display the File Attachment pane. 2. On your computer, navigate to and select the file to attach to the Notebook. 3. Drag the file to the File Attachment pane. The file is attached to the Notebook. To open an attached file 1. In the Tab View, click to display the File Attachment pane. 2. Double-click the file to open. Using MimioStudio Tools Creating Objects Using MimioStudio Tools, you can create a wide variety of objects on any MimioStudio Notebook page, including lines, shapes, and freehand drawing and writing. See Accessing MimioStudio Tools for information on accessing MimioStudio Tools. MimioStudio Tools provides tools for inserting freehand writing or drawing into your MimioStudio Notebook, as well as lines, arrows, basic shapes, and formatted text. You can 13
22 MimioStudio also import images and multimedia objects, or insert a clipping of your screen into your Notebook using Tools. Once you select a drawing tool, that tool remains selected until you select a different drawing tool or the selection tool. To use the freehand pen 1. Click the Pen button,. 2. (Optional) To adjust the line width, drag the Thickness slider. 3. (Optional) To adjust the line color, select a color from the Color Palette. For additional color choices click. 4. (Optional) To adjust the transparency of the line, click the Transparency button,, and then choose a transparency percentage. 5. Place the cursor where you want the ink stroke to start on the page. 6. Drag the cursor to draw ink strokes. To highlight a portion of the display 1. Click the Highlighter button,. 2. (Optional) To adjust the highlighter width, drag the Thickness slider. 3. (Optional) To change the color, select a color from the Color Palette. For additional color choices click. 4. Place the cursor where you want the highlight stroke to start on the page. 5. Drag the cursor over the area you want to highlight. To erase ink and highlighting 1. Click the Eraser button,. 2. (Optional) To adjust the eraser width, drag the Thickness slider. 3. Drag the cursor over the ink or highlighter strokes you want to erase. 14
23 Using MimioStudio Tools To add a line 1. Click the Line button,. 2. To change the line type, right-click and choose a line type from the list. 3. (Optional) To adjust the line width, drag the Thickness slider. 4. (Optional) To change the color, select a color from the Color Palette. For additional color choices click. 5. (Optional) To adjust the transparency of the line, click the Transparency button,, and then choose a transparency percentage. 6. Place the cursor where you want the line to start on the page. 7. Drag the cursor to draw the line. To add a shape 1. Click the shape button,,,,, or. If the desired shape is not visible, right-click the shape button, and choose the shape from the list. 2. (Optional) To adjust the outline width, drag the Thickness slider. 3. (Optional) To change the outline color, select the Outline Color box, and then select a color from the Color Palette. For additional color choices click. 4. (Optional) To adjust the fill color, select the Fill Color box, and then select a color from the Color Palette. For additional color choices click. 5. (Optional) To adjust the transparency of the shape, click the Transparency button,, and then choose a transparency percentage. 6. Place the cursor where you want the shape to start on the page. 7. Drag the cursor to draw the shape. To add formatted text 1. Click the Text button,. 2. Place the cursor where you want the text to start on the page. For a fixed width text box, place the cursor where you want the text box to start on the page and then drag to the desired width. 3. Select a font style, size, color, and an alignment option for the text. 4. Enter text in the text box. Importing a Picture, Multimedia Object, or Document To import a picture, multimedia object, or document 1. From MimioStudio Tools, click the Insert File button,. 2. From the Open dialog box, select the file to import. 3. Click Open. The image or object is displayed on the Notebook page. You can also copy and paste images from another application, or drag images from another application into Notebook. To insert a screen clipping 15


24 MimioStudio 1. From MimioStudio Tools, click the Screen Clipping button,. The desktop is displayed with a transparent mask. 2. Drag the cursor to draw a selection box around the area to capture. The selected area is inserted in the Notebook page. Manipulating Objects Objects on a page can be moved, rotated, copied, deleted, locked, and have their properties adjusted. To select an object 1. From MimioStudio Tools, click the Selection button,. 2. Do one of the following: l Click the object to select. l To select multiple objects, press CTRL and select each object. l To select multiple objects that are close to each other, drag a selection rectangle over the objects to select. l To select all objects on a page, choose Select All from the Edit menu. To move an object 1. Select the object to move. 2. Position the cursor over the object. The cursor changes to the move cursor,. 3. Drag the object to the desired location. To resize an object 1. Select the object to resize. A frame is displayed around the object. 2. Position the cursor over one of the white sizing handles. The cursor changes to the resize cursor,. 16


25 Using MimioStudio Tools 3. Drag the cursor to resize the object. Press and hold the SHIFT key to constrain proportions during resizing. To rotate an object 1. Select the object to rotate. A frame is displayed around the object. 2. Position the cursor over the green rotation handle. The cursor changes to the rotation cursor,. 3. Drag the cursor to rotate the object. To snap to one of the predefined 45 increments, move the rotate cursor and release over the predefined rotation anchor point. To lock the position and properties of an object 1. Select the object to lock. 2. From the Format menu, point to Locking, and then choose Lock. A locked object cannot be selected. To unlock an object From the Format menu, point to Locking, and then choose Unlock All. Objects can only be unlocked collectively; you cannot unlock individual objects. To delete an object 1. Select the object to delete. 2. Drag the object to the trash can,. To reorder objects 17
26 MimioStudio 1. Select the object to reorder. 2. Choose Order from the Format menu. 3. Choose how to order the object. Option Front Back Forward Backward Action Brings the selected object to the front of the order. Sends the selected object to the back of the order. Steps the object forward in the order, by one. Steps the object backward in the order, by one. To group objects 1. Select the objects to group. 2. From the Format menu, point to Grouping, and then choose Group. To ungroup objects 1. Select the objects to ungroup. 2. From the Format menu, point to Grouping, and then choose Ungroup. To edit object properties 1. Select the object to edit. 2. To adjust the line width, drag the Thickness slider. 3. To adjust the color, select the Outline Color box or the Fill Color box, and then select a color from the Color Palette. For additional color choices, click. 4. To adjust the transparency, click the Transparency button,, and then choose a transparency percentage. To edit text 1. Double-click the text box. 2. Select the text to adjust, or enter new text. 3. Adjust the font style, size, color, or alignment. To import an object from another Notebook page 1. Select the object to import from the source Notebook page. 2. Click the Copy button,. 3. Navigate to the target Notebook page. 4. Click the Paste button,. You can also import an object by dragging the object from the source page to the target page. To convert ink to text 1. Select the objects to convert. All selected objects are combined into one text object. 18
27 Using MimioStudio Tools 2. Do one of the following: l Right-click, and then choose l Choose To snap objects to grid Recognize Ink. Recognize Ink from the Tools menu. 1. Choose Grid from the View menu. The Grid dialog box appears. 2. To force objects to snap to grid, select the Snap objects to grid check box. 3. To allow objects to snap to angles, select the Snap objects to angles check box. 4. To adjust the spacing between grid snap locations, enter the desired value into the Spacing box. 5. To display a grid on the screen, select the Display grid on screen check box. 6. To make the grid settings permanent for each new MimioStudio Notebook, select the Set as default for all new documents check box. 7. Click OK. Adding Actions to Objects Objects can have actions associated with them. You can associate an action with any object that you create or import into a MimioStudio Notebook; you cannot add an action to a template or background. You can choose to perform the associated action each time you click the object or each time you drag the object. You can associate two different actions with a single object. For example, you can choose to launch a hyperlink when you click an object and clone the object when you drag the object. However, you cannot associate two different hyperlinks or two different sounds with the same object. There are three types of actions that you can associate with objects: n Launch Hyperlink - opens a file, a web page, or a different page within a Notebook. n Clone - creates a copy of the object on the Notebook page. n Play Sound - plays a sound file. To add a hyperlink to an object 1. Select the object to add the hyperlink to. 2. Choose Hyperlink from the Insert menu. The Action Settings dialog box appears. 3. Select one of the following from the Action list: l On Click - to launch the hyperlink each time the object is clicked. l On Drag - to launch the hyperlink each time the object is dragged. 4. Select Launch Hyperlink from the Feature list. 5. Select Existing file or Web Page from the Link To list. Alternately, select a page from within the current Notebook from the Link To list. 6. Enter a file name or web address to link to in the Address box. 19
28 MimioStudio Alternately, click Browse to search for a file to link to. 7. Click OK to add the hyperlink to the object. To add cloning to an object 1. Select the object to add the clone action to. 2. Choose Action Settings from the Insert menu. The Action Settings dialog box appears. 3. Select one of the following from the Action list: l On Click - to create a copy of the object each time the object is clicked l On Drag - to create a copy of the object each time the object is dragged 4. Select Clone from the Feature list, and then click OK. You can also add the clone action to an object by choosing Clone from the Insert menu. By default, a copy of the object is created whenever you drag the object. To add a sound to an object 1. Select the object to link the sound file to. 2. Choose Action Settings from the Insert menu. The Action Settings dialog box appears. 3. Select one of the following from the Action list: l On Click - to play the sound file each time the object is clicked l On Drag - to play the sound file each time the object is dragged 4. Select Play Sound from the Feature list. 5. Click Load. The Open dialog box appears. 6. Navigate to and select the sound file to link to the object, and then click Open. 7. Click OK in the Action Settings dialog box. To remove an action from an object 1. Select the object with the action to remove. 2. Choose Action Settings from the Insert menu. The Action Settings dialog box appears. 3. Choose None from the Feature list, and then click OK. Using MimioStudio Gallery MimioStudio Gallery consists of the following four main folders: n Screen Annotations - contains all saved Screen Annotation snapshots. n Imported Content Packs - contains any imported content that you have not yet added to the Gallery folder. n Questions and Results - contains a variety of objects for use with MimioVote. n Gallery - contains a number of different folders used to categorize items, such as Geography, Mathematics, and so on. The Gallery folder and subfolders can contain five different types of objects: 20
29 Using MimioStudio Gallery n Images - Images include pictures and graphics. n Templates - Templates include backgrounds and predefined page layouts. n Multimedia - Multimedia objects include movies, animation, and sound. n Questions and Results - Questions and Results include objects for creating and displaying the results of MimioVote activities. This section of the Gallery does not appear until you move objects from the Questions and Results folder to the Gallery folder or a Gallery subfolder. n Lessons - Lessons include lessons created using MimioStudio Notebook and imported documents. You can create your own lessons or import lessons created by someone else. See Accessing MimioStudio Gallery for information on accessing MimioStudio Gallery. To navigate MimioStudio Gallery Click any folder to view the available items in that folder. Click the plus sign next to a Gallery folder to see any subfolders that are contained in that Gallery folder. To select a Gallery item 1. Navigate to the Gallery folder that contains the item you want to select. 2. Do one of the following: l Click the Gallery item to select. l To select multiple items, press CTRL and select each item. l To select multiple items that are close to each other, drag a selection rectangle over the items to select. l To select a range of items, select the first item, and then press SHIFT and select the last item. l To select all items, right-click, and then choose Select All. Importing Gallery Items into a Notebook You can import any Gallery item into a MimioStudio Notebook to add to your presentation. To import a Gallery item into a Notebook 1. Select the image, template, multimedia item, questions and results object, or lesson to import. 2. Drag the item into the Notebook. You can also import items by double-clicking or by copying and pasting the items into a Notebook. Customizing the Content of the Gallery The MimioStudio Gallery is fully expandable and modifiable, so you can add your own folders, pictures, templates, multimedia items, and lessons. You can also add Microsoft Word, Excel, PowerPoint, and PDF documents to the Gallery. All imported documents are placed in the Lessons section of the MimioStudio Gallery MimioStudio does not support network or shared galleries. To import a Gallery folder from a Gallery file 21
30 MimioStudio 1. Click the Import Content Pack button,. 2. From the Open dialog box, navigate to and select the Gallery file to import. 3. Click Open. The contents of the Gallery file are added to the Imported Content Packs folder in MimioStudio Gallery. 4. Review the imported content and make any desired changes. 5. To move the content to the Gallery folder, right-click the folder to move and then choose Install. The content is moved to the Gallery folder. To add a new Gallery folder 1. Select the main Gallery folder or a Gallery subfolder to add the new folder to. 2. Click the New Folder button,. The Gallery Item Properties dialog box appears. 3. Enter a name for the new folder in the Name box. 4. (Optional) Enter a keyword in the Keywords box to make the new folder searchable from the Gallery search bar. 5. Click OK. To add a new item to a folder 1. Select the folder to add the item to. 2. Click the Insert File button,. 3. From the Open dialog box, navigate to and select the file to import. 4. Click Open. The item is inserted in the appropriate area of the Gallery folder. You can also add new items by selecting one or more items, and then dragging and dropping or copying and pasting them into a Gallery folder. To create a template from a Notebook image 1. Right-click and drag the image into the Gallery. The right-click menu appears. 2. Choose Insert as template. To copy an existing Gallery item 1. Select the Gallery item to copy. 2. Click the Copy button,. 3. Select a Gallery folder to insert the new item into. 4. Click the Paste button,. The item is inserted in the appropriate area of the Gallery folder. To delete a Gallery item 1. Select the Gallery item to delete. 2. Click the Delete button,. A delete confirmation dialog box appears. 3. Click Yes. To find similar Gallery items 22
31 Working with Saved Annotation Snapshots 1. Right-click the Gallery item, and then choose Open Folder. 2. If the item is contained in more than one folder, choose the folder to open. The folder containing the selected item opens in MimioStudio Gallery. Exporting a Gallery Folder to a Gallery File Entire Gallery folders can be exported and imported into the MimioStudio Gallery as Gallery (MCF) files. You can then share Galleries that you have created with other MimioStudio users. MimioStudio does not support network or shared galleries. To export a Gallery folder to a Gallery file 1. Select the Gallery folder to export. 2. Click the Export Content Pack button,. 3. From the Save As dialog box, enter a name for the file in the File Name box. 4. Select a location to save the file to. 5. Click Save. Working with Saved Annotation Snapshots MimioStudio automatically saves a snapshot of the annotated screen each time you exit Screen Annotation mode. These snapshots are saved in the Screen Annotations folder in MimioStudio Gallery. For information about creating Screen Annotation snapshots, see Marking Up the Display Using Screen Annotations. Viewing Screen Annotation Snapshots You can view your saved screen annotations from the Screen Annotations folder in MimioStudio Gallery. To view Screen Annotation snapshots 1. Start MimioStudio Gallery. 2. Select the Screen Annotations folder. To select a snapshot Do one of the following: l Click on the snapshot to select. l To select multiple snapshots, press CTRL and select each snapshot. l To select multiple snapshots that are close to each other, drag a selection rectangle over the snapshots. l To select a range of snapshots, select the first snapshot and then press SHIFT and select the last snapshot. l To select all snapshots, right-click, and then choose Select All. 23
32 MimioStudio Renaming an Annotation Snapshot Screen Annotation snapshots are saved in chronological order, using the date and time that the snapshot was created as the name of the snapshot. You can rename a snapshot any time after it has been saved. To rename a snapshot 1. Select the snapshot to rename. 2. Right-click and choose Properties. 3. Enter a name for the snapshot in the Name box and click OK. Adding Keywords to an Annotation Snapshot You can add keywords to any snapshot so that you can use the search bar in MimioStudio Gallery to find that snapshot later. To add keywords to a snapshot 1. Select the snapshot to add keywords to. 2. Right-click and choose Properties. 3. Enter each keyword on a separate line in the Keywords box and click OK. Searching for an Annotation Snapshot You can search for a specific snapshot using the search bar in MimioStudio Gallery. You can search for a snapshot using a keyword or part of the snapshot name. To search for a specific snapshot 1. Select the Screen Annotations folder in the Gallery. 2. Enter text to search for in the Search box. All snapshots associated with the text appear in the preview area of the Gallery. Importing an Annotation Snapshot You can import a snapshot into an open Notebook. To import a snapshot 1. Open a MimioStudio Notebook. 2. Select the snapshot to import. 3. Drag the selected snapshot into the target Notebook. Pasting an Annotation Snapshot Into Another Application Annotation snapshots can be used in other applications such as Microsoft Word or PowerPoint. To paste a snapshot into another application 1. Select the snapshot to copy. 2. Click the Copy button,. 3. Navigate to the target application. 4. Right-click, and then choose Paste. Alternatively, you can drag the selected snapshot into the target application. 24
33 Delivering Interactive Notebook Lessons and Presentations Printing Annotation Snapshots You can print a snapshot directly from the Screen Annotations folder in MimioStudio Gallery. To print a snapshot 1. Select the snapshot to print. 2. Right-click and choose Print. Deleting Annotation Snapshots You can delete snapshots from the Screen Annotations folder. To delete a snapshot 1. Select the snapshot to delete. 2. Click the Delete button,. A delete confirmation dialog box appears. 3. Click Yes. Delivering Interactive Notebook Lessons and Presentations MimioStudio Notebook can be used to deliver lessons and presentations that were created in or imported into a MimioStudio Notebook. Using Fullscreen View For presenting information, the Fullscreen view can be used to fill the entire screen with the current page. The MimioStudio Notebook standard toolbar and all MimioStudio Tools are available in Fullscreen view. To access the Fullscreen view Click the Fullscreen button,. The current page fills the entire screen and the MimioStudio Notebook standard toolbar remains visible. Navigating Through a Presentation To navigate through a Notebook presentation Use the MimioStudio Notebook standard toolbar to navigate through the Notebook presentation. 25
34 MimioStudio Button Action Use this button to enter or exit the Fullscreen view. Use this button to insert a new page Use this button to return to the previous page in the Notebook. Use this button to advance to the next page in the Notebook. Working with Multimedia Objects You can play, pause, fast forward, and rewind movie, animation, and sound objects you added to your presentation. To play video or audio Click anywhere on the movie, animation, or sound object to play. To show and hide the video and audio controls 1. While the video or audio is playing, click once anywhere on the object to view the object controls. 2. Click the object again to hide the controls. To pause, fast forward, or rewind video or audio Do one of the following: l To pause the video or audio, click. l To fast forward the video or audio, drag the slider to the right. l To rewind the video or audio, drag the slider to the left. 26
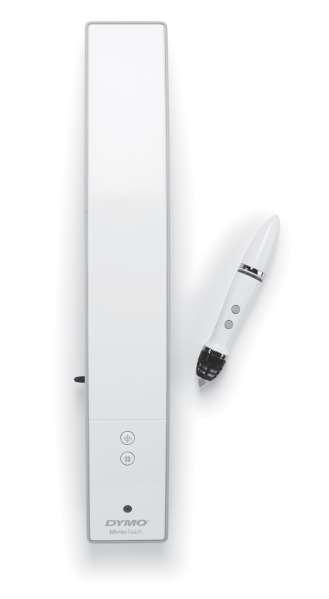
35 Chapter 3 MimioTeach What's Included Using MimioTeach with a projector, you can deliver lessons and presentations directly from your whiteboard. Using MimioStudio Interactive mode, you control the movement of the cursor on your screen with the MimioTeach stylus, much like you would with a mouse at your computer. The MimioTeach package contains the following items: About MimioTeach If you are missing any of the items above, contact Customer Support. You can use the MimioTeach bar and stylus in MimioStudio Interactive mode to deliver lessons and presentations. You can also use the MimioTeach bar with MimioCapture to capture notes from your whiteboard into MimioStudio Notebook. For more information about using MimioTeach with MimioCapture, see MimioCapture. The following figure shows the major components of the MimioTeach. 27
36 MimioTeach Status Lights The status light visually shows the status of the MimioTeach bar. Off Solid Green Flashing Green Solid Amber Not receiving power; USB/power cable is not connected or MimioTeach is turned off. MimioTeach is connected and receiving power; MimioStudio software is running. MimioTeach is connected or connecting, and receiving power; MimioStudio software is not running. MimioTeach cannot find an available MimioHub. Flashing Amber MimioTeach is searching for an available MimioHub. About MimioStudio Tools With the various presentation tools found in MimioStudio Tools you can focus your audience on a specific area of the screen by displaying only certain parts of the screen. You can also annotate the screen with the drawing tools available in MimioStudio Tools using the Screen Annotation feature. For more information about MimioStudio Tools, see Marking Up the Display Using Screen Annotations. The following figure shows the major components of MimioStudio Tools. 28

37 Getting Started Getting Started Review the following topics to install and start using your MimioTeach. n Setting Up the MimioTeach Stylus n Setting Up the MimioTeach Bar n Setting Up Interactive Mode Setting Up the MimioTeach Stylus The MimioTeach stylus is powered by a rechargeable lithium-ion battery. The battery recharges whenever the stylus is docked on the MimioTeach bar. To set up the MimioTeach stylus 1. Turn the top of the stylus counter-clockwise to separate the top from the body of the stylus. 2. Remove the plastic strip from the stylus. 29
38 MimioTeach 3. Replace the top onto the body of the stylus and turn clockwise to attach. Setting Up the MimioTeach Bar The MimioTeach bar comes pre-linked to the included MimioHub. You can also use this MimioHub to connect other MimioClassroom devices to your computer, such as MimioVote. When not in use, the MimioHub can be stored in the MimioHub dock on the back of the MimioTeach bar. MimioTeach is powered using the included USB cable and power adapter. Optionally, MimioTeach can be powered using three AAA batteries. For information about using batteries to power the MimioTeach bar, see Inserting the Batteries. To set up the MimioTeach bar 1. Plug the USB cable into the USB port on the power adapter. 2. Plug the other end of the USB cable into the USB port on the MimioTeach bar. 30
39 Getting Started 3. Plug the power adapter into a power outlet. 4. Place the MimioTeach bar along the left edge of the whiteboard as shown. The MimioTeach bar attaches securely to any magnetic whiteboard. See Mounting MimioTeach to a Non-Magnetic Whiteboard for information about mounting the bar to a non-magnetic whiteboard. 5. Plug the MimioHub into an available USB port on your computer. If you do not want to connect the MimioTeach bar to your computer wirelessly, you can link the bar to your computer using the included USB cable without the power adapter. The bar will be powered by USB through your computer. 31
40 MimioTeach Setting Up Interactive Mode Using MimioStudio Interactive mode, you can deliver lessons and presentations directly from your whiteboard. To use Interactive mode you need a projector, a MimioTeach-enabled whiteboard, and a MimioTeach stylus. Combined, these devices make for a powerful tool for delivering lessons and presentations. Projecting Your Desktop If you are presenting from a MimioStudio Notebook or another application, such as a PowerPoint presentation, you can open the application before or after Interactive mode is enabled and calibrated. To set up for Interactive mode 1. Project your desktop image onto your whiteboard. Refer to your projector s documentation for instructions on how to project your desktop image. 2. Adjust the projected image to have a 2-inch to 3-inch buffer between the edge of your projection and your MimioTeach. 3. Click the MimioTeach stylus anywhere on the whiteboard. Interactive mode starts and the calibration screen appears. To exit Interactive mode Do one of the following: l Press the Interactive button, l Start MimioStudio Tools, click Interactive, on the MimioTeach bar., and then click Exit. l Start MimioStudio Settings, select Interactive, and then click Disable. See Customizing MimioStudio for information on how to access MimioStudio Settings. Calibrating Interactive Mode Each time Interactive mode is enabled, you are prompted to calibrate using the MimioTeach stylus. When using a permanently installed whiteboard and projector, you do not need to recalibrate Interactive mode after the first session. See Adjusting the Interactive Settings. To calibrate Interactive mode 32
41 Using MimioTeach Using MimioTeach Using the MimioTeach Stylus 1. If the calibration screen does not appear when you start Interactive mode, do one of the following: l Start MimioStudio Tools, click the Interactive button, Recalibrate. l Press the Interactive button,, on your MimioTeach bar., and then click l Start MimioStudio Settings, select Interactive, and then click Calibrate. 2. Press the MimioTeach stylus down on the whiteboard at the center of each of the nine calibration targets. Make sure to hold the stylus perpendicular to the writing surface as you click. The calibration target disappears and the next calibration target appears. When the calibration screen disappears, Interactive mode is enabled. You can use the MimioTeach bar and stylus in MimioStudio Interactive mode to deliver lessons and presentations. In MimioStudio Interactive mode, you control the movement of the cursor on your screen with the MimioTeach stylus, much like you would with a mouse at your computer. You can also use the various presentation tools found in MimioStudio Tools to focus your audience on a specific area of the screen by displaying only certain parts of the screen. And, you can annotate the screen with the drawing tools available in MimioStudio Tools using the Screen Annotation feature. In Interactive mode, the MimioTeach stylus can be used to control your desktop and interact with applications on your computer from your whiteboard. The following table describes how to use the MimioTeach stylus to control your desktop from the whiteboard. To execute Left mouse click Double left mouse click Right mouse click Hover Do this Click in the projected area at the desired location with the tip of the stylus. Quickly click twice in the projected area at the desired location with the tip of the stylus. Press the B button on the stylus, and then click in the projected area at the desired location with the tip of the stylus. 1. Hold the stylus at the desired location, staying as close to the whiteboard as possible without touching it. 2. Press the B button on the stylus. 3. Move the stylus to the desired location. 4. Release the B button on the stylus. To change the functions of the MimioTeach stylus buttons, see Adjusting the Interactive. 33

42 MimioTeach Focusing Attention Using the Reveal and Spotlight Tools The Reveal tool and the Spotlight tool help you to focus your audience on a specific area of the screen by keeping parts of the screen hidden. Using the Reveal Tool The Reveal tool creates a shade that you can raise, lower, move left, and move right over the screen image, as if you are moving a shade up, down, or across the screen. You can then expose bullet points or other information progressively. To use the Reveal tool Do one of the following: l From MimioStudio Tools, click the Applications button, Reveal. l (Interactive mode only) Press the Launch button, then click To adjust the revealed area Reveal in the Launch window., and then choose, on the MimioTeach bar, and Click inside the shaded area and drag down, up, left, or right to reveal more or less of the displayed area. To adjust the transparency of the Reveal tool 1. Click, and then point to Transparent. 2. From the Transparent list, choose a percentage. Using the Spotlight Tool A transparency of 0% means that the shaded area will be completely opaque. The Spotlight tool masks the entire screen except for a small area, the spotlight. You can then focus audience attention on a specific area of the screen. The spotlight area can be 34
 Press the Launch button,, on the MimioTeach bar, and then click Spotlight in the Launch window. 2.")
43 Using MimioTeach reshaped, resized, and moved around the screen. To use the Spotlight tool 1. Do one of the following: l From MimioStudio Tools, click the Applications button, Spotlight., and then choose l (Interactive mode only) Press the Launch button,, on the MimioTeach bar, and then click Spotlight in the Launch window. 2. Click the shaded area outside of the spotlight border and drag the spotlight to the desired location. To adjust the shape of the spotlight 1. Click, and then point to Shape. 2. From the Shape list, choose a shape for the spotlight. To resize the spotlight 1. Click, and then point to Size. 2. From the Size list, choose a spotlight size. You can also resize the spotlight by dragging the colored border of the spotlight until the spotlight is the desired size. To adjust the spotlight transparency 1. Click, and then point to Transparent. 2. From the Transparent list, choose a transparency percentage. A transparency of 0% means that the shaded area will be completely opaque. Marking Up the Display Using Screen Annotations Screen Annotation mode allows you to annotate applications, web pages, and images. When in Annotation mode, a green border with a faded edge appears around your desktop. When you exit from Screen Annotation mode, all annotations are cleared from the whiteboard and automatically archived in the Screen Annotations folder in MimioStudio Gallery. Enabling Screen Annotation Mode To enable Screen Annotation mode 35
44 MimioTeach 1. Do one of the following l From MimioStudio Tools, click the Screen Annotation button, current desktop image., to freeze your l (Interactive mode Only) Press the Launch button,, on the MimioTeach bar, and then click Screen Annotation in the Launch window. A green border with a faded edge appears around your desktop. 2. Annotate the screen using MimioStudio Tools. All object, drawing, and manipulation features in MimioStudio Tools are available in Screen Annotation mode. To exit Screen Annotation mode Do one of the following: l From MimioStudio Tools, click the Mouse button,, to unfreeze the screen. l (Interactive mode only) Press the Launch button,, on the MimioTeach bar, and then click Screen Annotation in the Launch window. To disable the Annotation mode border 1. Right-click in the notification area of the taskbar and choose Settings. 2. Select Notebook from the MimioStudio Settings dialog box. 3. Under General, clear the Enable fullscreen border (Screen Annotation only) check box. 4. Click OK to save the settings. Annotating the Screen Using MimioStudio Tools MimioStudio Tools are used to annotate the screen. All object, drawing, and manipulation features in MimioStudio Tools are available in Screen Annotation mode. Once you select a drawing tool, that tool remains selected until you select a different drawing tool or the selection tool. See Manipulating Objects for a complete description of manipulating objects. All of the functions and features of the MimioStudio drawing tools that are available in MimioStudio Notebook are available in Screen Annotation mode. 36
 To adjust the line color, select a color from the Color Palette. For additional color choices click. 4.")
45 Using MimioTeach To use the freehand pen 1. Click the Pen button,. 2. (Optional) To adjust the line width, drag the Thickness slider. 3. (Optional) To adjust the line color, select a color from the Color Palette. For additional color choices click. 4. (Optional) To adjust the transparency of the line, click the Transparency button,, and then choose a transparency percentage. 5. Place the cursor where you want the ink stroke to start on the page. 6. Drag the cursor to draw ink strokes. To highlight a portion of the display 1. Click the Highlighter button,. 2. (Optional) To adjust the highlighter width, drag the Thickness slider. 3. (Optional) To change the color, select a color from the Color Palette. For additional color choices click. 4. Place the cursor where you want the highlight stroke to start on the page. 5. Drag the cursor over the area you want to highlight. To erase ink and highlighting 1. Click the Eraser button,. 2. (Optional) To adjust the eraser width, drag the Thickness slider. 3. Drag the cursor over the ink or highlighter strokes you want to erase. To add a line 1. Click the Line button,. 2. To change the line type, right-click and choose a line type from the list. 3. (Optional) To adjust the line width, drag the Thickness slider. 37
46 MimioTeach 4. (Optional) To change the color, select a color from the Color Palette. For additional color choices click. 5. (Optional) To adjust the transparency of the line, click the Transparency button,, and then choose a transparency percentage. 6. Place the cursor where you want the line to start on the page. 7. Drag the cursor to draw the line. To add a shape 1. Click the shape button,,,,, or. If the desired shape is not visible, right-click the shape button, and choose the shape from the list. 2. (Optional) To adjust the outline width, drag the Thickness slider. 3. (Optional) To change the outline color, select the Outline Color box, and then select a color from the Color Palette. For additional color choices click. 4. (Optional) To adjust the fill color, select the Fill Color box, and then select a color from the Color Palette. For additional color choices click. 5. (Optional) To adjust the transparency of the shape, click the Transparency button,, and then choose a transparency percentage. 6. Place the cursor where you want the shape to start on the page. 7. Drag the cursor to draw the shape. To add formatted text 1. Click the Text button,. 2. Place the cursor where you want the text to start on the page. For a fixed width text box, place the cursor where you want the text box to start on the page and then drag to the desired width. 3. Select a font style, size, color, and an alignment option for the text. 4. Enter text in the text box. Clearing All Annotations from the Display When you exit Screen Annotation mode, all annotations are cleared from the display and all annotations are automatically preserved as a snapshot of the display. See Working with Saved Annotation Snapshots for information about reviewing and using the snapshots. Inserting Text Into an Application Using MimioStudio Text Tools You can enter text into any text-entry box or page using the MimioStudio Text Tools. The Text Tool has three modes for entering text: n On-Screen Keyboard allows you to enter text through an on-screen keyboard application. n Write Anywhere allows you to enter text by writing anywhere on the screen. Your handwriting is automatically converted into text and entered into the current application. 38
47 Using MimioTeach Write Anywhere is only available on Windows XP 32-bit. n Writing Pad allows you to enter text through a small on-screen writing pad. Your handwriting is automatically converted into text and input into the current application. In addition, Write Anywhere and Writing Pad also supportgesture recognition, which allows handwritten shortcuts to be automatically recognized as commonly used keys. To access MimioStudio Text Tools 1. From MimioStudio Tools, click the Applications button,, and then choose Text Tools. 2. Right-click the Text Tools icon,, or in the notification area of the Windows taskbar. 3. Choose the Text Tool that you want to use. l l l Keyboard to enable the On-Screen Keyboard. Write Anywhere to enable Write Anywhere. Writing Pad to enable Writing Pad. To disable MimioStudio Text Tools Do one of the following: l Click the Text Tools icon,, or in the notification area of the taskbar. l From MimioStudio Tools, click the Applications button, Text Tools. Using the On-Screen Keyboard You can enter text into any application using the On-Screen Keyboard. To use the On-Screen Keyboard Using Write Anywhere 1. Start the On-Screen Keyboard., and then choose 2. Click in the text-entry box or on the page where you want to enter the text. 3. Using your mouse or MimioTeach stylus, press the virtual keys on the on-screen keyboard. The text is entered into the text-entry box or on the page that you selected. With Write Anywhere you can enter text into any text-entry box or page, by writing anywhere on the screen with the MimioTeach stylus while in Interactive mode. You can also use Write Anywhere with your mouse or other input device from your computer. Write Anywhere is only available on Windows XP 32-bit. To use Write Anywhere 1. Start Write Anywhere. The Write Anywhere on-screen buttons appear. 2. Click in the text-entry box or on the page where you want to enter the text. 3. Using your mouse or MimioTeach stylus, write anywhere on the screen. Your handwriting is automatically converted to text and entered into the text-entry box 39
48 MimioTeach 4. Use the on-screen buttons for commonly used keys. Button Description Backspace Enter Tab Space Write Anywhere also supports gesture recognition for commonly used keys. See Using Gesture Recognition. Using Writing Pad With Writing Pad you can enter text through a small on-screen writing pad using the MimioTeach stylus while in Interactive mode. You can also use Writing Pad with your mouse or other input device from your computer. To use Writing Pad 1. Start Writing Pad. The on-screen writing pad appears. 2. Click in the text-entry box or on the page where you want to enter the text. 3. Using your mouse or MimioTeach stylus, write within the yellow space of the onscreen writing pad. Your handwriting is automatically converted to text and entered into the textentry box or on the page that you selected. 4. Use the on-screen buttons for commonly used keys. Button Description Backspace Enter Tab Space Writing Pad also supports gesture recognition for commonly used keys. See Using Gesture Recognition. Using Gesture Recognition With gesture recognition, handwritten shortcuts are automatically recognized as commonly used keys. Both Write Anywhere and Writing Pad support gesture recognition. The following table describes how to use gestures to perform common functions. 40
49 Caring for MimioTeach To press Backspace Do this Draw a line from right to left. Enter Draw a connected line from top to bottom and then from right to left. Tab Draw a connected line from bottom to top and then from left to right. Space bar Draw a connected line from bottom to top and then from right to left. Using the Web Browser, Calculator, and Magnify Tools MimioStudio Tools includes shortcuts for accessing a Web browser, a calculator, and a magnifier. To use the tools 1. Start MimioStudio Tools. 2. Click the Applications button,, choose More Tools, and then choose one of the following tools: l l l Calculator Magnify Web Browser Recording Desktop Actions and Audio in Interactive Mode Caring for MimioTeach Using MimioStudio Recorder, you can record your interactions into an AVI movie file, with or without audio. See Using MimioStudio Recorder for more information on how to use MimioStudio Recorder. Review the following topics for information about cleaning, inserting the batteries, and permanently mounting your MimioTeach. n Cleaning MimioTeach n Inserting the Batteries n Mounting MimioTeach to a Non-Magnetic Whiteboard 41
50 MimioTeach Cleaning MimioTeach Inserting the Batteries MimioTeach is designed to give you long and trouble-free service while requiring very little maintenance. You can easily clean your MimioTeach using the following items: n Lint-free cloth. n Isopropyl alcohol, diluted dishwashing detergent, or diluted glass cleaner. If you use glass cleaner, make sure it does not contain ammonia. To clean the MimioTeach bar and stylus 1. Disconnect the USB cable from the MimioTeach bar. 2. Use the lint-free cloth to wipe the exterior of the MimioTeach bar and stylus. 3. Remove dirt and smudges with one of the cleaning solutions mentioned above. Avoid using liquids on any exposed charging contacts. Do not allow liquid into any openings on the equipment. 4. Reconnect the USB cable. MimioTeach is powered using the included USB cable and power adapter. Optionally, MimioTeach can be powered using three AAA batteries. To insert the batteries 1. Press down and slide off the battery compartment cover. 2. Insert three AAA batteries into the battery compartment. 3. Replace the battery compartment cover. Remove the batteries if the MimioTeach bar will not be used for a long period of time. Mounting MimioTeach to a Non-Magnetic Whiteboard The MimioTeach bar attaches securely to any magnetic whiteboard. If you do not have a magnetic whiteboard, you can mount the MimioTeach bar to your whiteboard using the included metal plates. If you are installing both MimioTeach and MimioCapture, you must mount MimioCapture before mounting MimioTeach. This will ensure proper placement of the MimioTeach bar. See Mounting MimioCapture to a Non-Magnetic Whiteboard for information on mounting MimioCapture. To mount MimioTeach to a non-magnetic whiteboard 1. Place the metal plates against the back of the MimioTeach bar as shown. Make sure that the recess on each plate is inserted into the recess on the back of the MimioTeach bar. 42

51 Caring for MimioTeach 2. Remove the paper backing from the adhesive strips to expose the adhesive. 3. Press the MimioTeach bar firmly along the left edge of the whiteboard as shown. 43
52 44 This page intentionally left blank for double-sided printing.
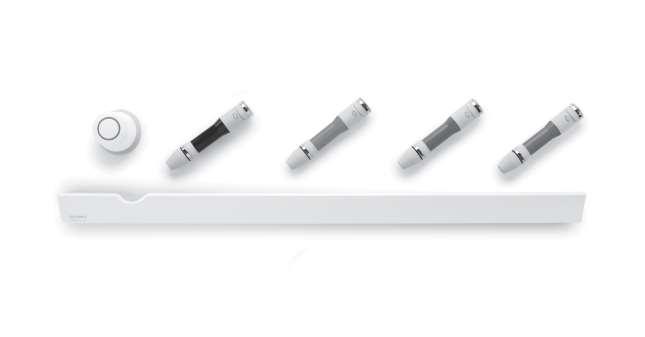
53 Chapter 4 MimioCapture What's Included MimioCapture is used with a MimioTeach-enabled whiteboard to record notes and drawings from your whiteboard. Using MimioStudio Ink Capture mode, you make notes and drawings on your whiteboard using the MimioCapture pens. Your notes are automatically captured in a MimioStudio Notebook. The MimioCapture package contains the following items: About MimioCapture If you are missing any of the items above, contact Customer Support. MimioCapture includes four pens and one eraser for making notes on your MimioTeachenabled whiteboard. The MimioCapture tray is used to store and charge the pens and eraser. You can also perform some common actions using the buttons on the MimioCapture tray. The following figure shows the major components of MimioCapture. 45
54 MimioCapture Status Lights The status lights visually show the status of each MimioCapture pen and the MimioCapture eraser. Off Amber Solid Green The MimioCapture pen or eraser is not receiving power. The status light is off when the pen or eraser is in use. The MimioCapture pen or eraser has a low battery. The battery should be recharged. The MimioCapture pen or eraser is charging. About MimioStudio Notebook As you make notes on your whiteboard using MimioCapture, you can automatically save those notes into MimioStudio Notebook. Once the information is in Notebook, you can save the Notebook as a MimioStudio INK file or a variety of other formats. For more information about using MimioStudio Notebook, see Working with MimioStudio Notebook. The following figure shows the major components of MimioStudio Notebook. 46

55 Getting Started Getting Started MimioCapture links directly to your MimioTeach for seamless integration with MimioStudio software. Before you can begin capturing digital ink, you must first set up your MimioCapture tray, MimioCapture pens, MimioCapture eraser, and MimioStudio Notebook. Setting Up the MimioCapture Tray The MimioCapture tray is powered using the USB cable and power adapter that were included with your MimioTeach. The MimioTeach bar connects to the MimioCapture tray using the connector bar that was included with your MimioCapture. To connect 1. Remove the MimioTeach bar from the whiteboard. 2. Unplug the USB cable from the MimioTeach bar. 3. Plug the USB cable into the USB port on the MimioCapture tray. 47
56 MimioCapture 4. Place the MimioCapture tray along the bottom-left edge of the whiteboard as shown. The MimioCapture tray attaches securely to any magnetic whiteboard. See Mounting MimioCapture to a Non-Magnetic Whiteboard for information about mounting the tray to a non-magnetic whiteboard. 5. Connect the connector bar to the MimioCapture tray as shown. 6. Connect the other end of the connector bar to the MimioTeach bar as shown. 7. Reattach the MimioTeach bar along the left side of the whiteboard. 48

57 Getting Started Setting Up the MimioCapture Pens MimioCapture comes with four colored MimioCapture pens and four Expo dry erase markers. Before you can start using MimioCapture, you must first set up your MimioCapture Pens. The MimioCapture pens are each powered by a rechargeable lithium-ion battery. The pens charge whenever they are docked on the MimioCapture tray. To set up the MimioCapture pens 1. Pull the plastic strip from the top part of the pen to activate the rechargeable battery. 2. Press the button on the side of the pen and pull the top part of the pen from the pen body. 3. Insert a colored Expo dry erase marker into the matching colored pen body. 4. Replace the top part of the pen onto the pen body. 49

58 MimioCapture 5. Place the pen cap onto the pen. Setting Up the MimioCapture Eraser The MimioCapture eraser is powered by a rechargeable lithium-ion battery. The eraser charges whenever the eraser is docked on the MimioCapture tray. To set up the MimioCapture eraser Pull the plastic strip from the top part of the eraser to activate the rechargeable battery. Charging the Pens and Eraser The MimioCapture pens and MimioCapture eraser recharge quickly whenever they are docked on the MimioCapture tray. To charge the pens and eraser Place each pen and the eraser into the appropriate part of the MimioCapture tray. The status lights turn solid green when the pen or eraser is charging. Setting Up MimioStudio Notebook for Capture To begin capturing digital ink, you must first do the following: n Set the size of your whiteboard in MimioStudio Settings. n Start MimioStudio Ink Capture mode. 50
59 Using MimioCapture Setting the Whiteboard Size Before you begin capturing digital ink, you must first set the size of your whiteboard in MimioStudio Settings. The default size is 96 inches by 48 inches. To set the whiteboard size for a MimioCapture device 1. Right-click in the notification area of the taskbar, and then choose Settings. The MimioStudio Settings dialog box appears. 2. Click Ink Capture. 3. If you have more than one MimioTeach bar connected to your computer, choose the device to change the size for from the Device list. 4. Do one of the following: Starting Ink Capture Mode Using MimioCapture l Choose a size from the Surface Size list. l Choose Custom from the Surface Size list and enter the desired values into the Width and Height boxes. l Click Auto Size and touch a MimioCapture pen to the whiteboard at the location shown in the Auto Size dialog box. Using MimioStudio Ink Capture mode, you can make notes on your whiteboard and instantaneously capture them into a MimioStudio Notebook. To start Ink Capture mode Touch the tip of any MimioCapture pen to the whiteboard. A new Notebook opens automatically for capturing your notes. MimioCapture can be used along with MimioTeach, without a projector, to record notes and drawings from your whiteboard. This is called capturing digital ink. Capturing Digital Ink When using Ink Capture mode, your notes are automatically captured in a MimioStudio Notebook. You can use the buttons on the MimioCapture tray to insert a new Notebook page, insert a copy of the current page into Notebook, or print the current Notebook page. To capture digital ink 1. If your MimioTeach bar is not on, turn on your MimioTeach bar. 2. Write or draw on your whiteboard using the MimioCapture pens. A new Notebook automatically opens on the connected computer and begins capturing digital ink. 3. Add, copy, and print pages as desired using the buttons on the MimioCapture tray. Writing and Drawing Digital Ink In Ink Capture mode, the MimioCapture pens and the MimioCapture eraser are used to draw and erase ink on your whiteboard. 51
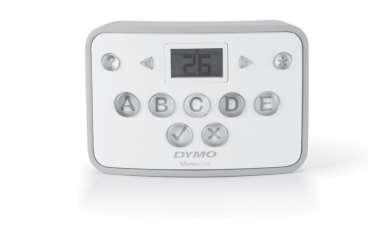
60 MimioCapture By default, the color recorded matches the color of the MimioCapture pen, regardless of the color of the marker that is inserted. The MimioTeach stylus is for use with Interactive mode only. The stylus does not work with Ink Capture mode. To draw digital ink 1. Choose one of the colored MimioCapture pens. 2. Draw on the whiteboard with the pen. Keep the pen within 15 degrees of its perpendicular position to the whiteboard to ensure that the data is accurately captured. To erase digital ink Erase the ink from the whiteboard using the MimioCapture eraser. Keep the eraser surface flat against the whiteboard to ensure that the data is accurately erased. Adding, Copying, and Printing Notebook Pages The buttons on the MimioCapture tray can be used to easily access features directly from your whiteboard. Using the buttons on the MimioCapture tray, you can insert a new Notebook page, insert a copy of the current page into Notebook, or print the current Notebook page. The following figure show the MimioCapture tray buttons. The following table describes the functions of the MimioCapture tray buttons. 52
61 Caring for MimioCapture New page Inserts a new page into MimioStudio Notebook. Copy page Inserts a duplicate of the current page into MimioStudio Notebook. Print page Prints the current page. Caring for MimioCapture Review the following topics for information about cleaning, storing, and mounting your MimioCapture to a non-magnetic whiteboard. n Cleaning MimioCapture n Mounting MimioCapture to a Non-Magnetic Whiteboard Cleaning MimioCapture MimioCapture is designed to give you long and trouble-free service, while requiring very little maintenance. You can easily clean your MimioCapture using the following items: n Lint-free cloth. n Isopropyl alcohol, diluted dishwashing detergent, or diluted glass cleaner. If you use glass cleaner, make sure it does not contain ammonia. To clean the MimioCapture 1. Disconnect the power cable and the connector bar. 2. Use the lint-free cloth to wipe the exterior of the MimioCapture tray, pens, and eraser. 3. Remove dirt and smudges with one of the cleaning solutions mentioned above. Avoid using liquids on any exposed charging contacts. Do not allow liquid into any openings on the equipment. 4. Reconnect the power cable and the connector bar. Mounting MimioCapture to a Non-Magnetic Whiteboard The MimioCapture tray attaches securely to any magnetic whiteboard. If you do not have a magnetic whiteboard, you can mount the MimioCapture tray to your whiteboard using the included metal plates. To mount MimioCapture to a non-magnetic whiteboard 53
62 MimioCapture 1. Place the metal plates against the back of the MimioCapture tray as shown. Make sure that the recess on each plate is inserted into the recess on the back of the MimioCapture tray. 2. Remove the paper backing from the adhesive strips to expose the adhesive. 3. Press the MimioCapture tray firmly along the bottom-left edge of the whiteboard as shown. 54

63 Chapter 5 MimioVote What's Included MimioVote is a wireless, interactive, student response system. Using MimioVote, you can easily and quickly gather student responses. This quick feedback from students allows you to make sure each student is keeping up and adjust your lesson accordingly. The MimioVote package contains the following items: About MimioVote If you are missing any of the items above, contact Customer Support. Your MimioVote system comes with a charging station and either 24 or 32 MimioVote units. You can combine two MimioVote systems for a total of up to 64 units. About the MimioVote Station The MimioVote station is used to recharge and store all of your MimioVote units. You can place any MimioVote unit into any slot on the MimioVote station. The number assigned to each unit is automatically determined by the number of the slot that the unit is inserted into. There is no need to match a particular unit to a particular slot on the 55

64 MimioVote MimioVote station. Once a unit is inserted into the MimioVote station, the unit number appears in the unit display. The following figure shows the major components of the MimioVote station. Status Lights The status light visually shows the status of the MimioVote station. Off Solid Green Flashing Green Not receiving power; Power cable is not connected. MimioVote is connected and receiving power; MimioStudio software is running. MimioVote is connected or connecting, and receiving power; MimioStudio software is not running. Solid Amber MimioVote cannot find an available MimioHub. Flashing Amber MimioVote is searching for an available MimioHub. About the MimioVote Units The MimioVote system includes either 24 or 32 MimioVote units. The MimioVote units slide into the MimioVote station to recharge or to store. When conducting activities, the buttons on the MimioVote unit light up depending on what answers are available to the student. The available answers are determined by the teacher when the question is created. For example, if the question is a True/False question, only the and buttons are illuminated on the MimioVote unit. The A, B, C, D, and E buttons will not light up and will not register a response if pressed. By default, each button on the MimioVote unit is illuminated with a different color light. You can choose to turn off the colors and have all the buttons illuminated with a white light. For information about changing the button colors, see Adjusting the Vote Settings. The following figure shows the major components of the MimioVote unit. 56
65 About the Software MimioStudio software includes several features especially for use with your MimioVote system. MimioStudio Notebook and Gallery include everything you need to create activities to conduct with your students. The MimioStudio Vote Toolbar and MimioStudio Quick Vote include all the tools you need for conducting activities and gathering student responses. And, the MimioStudio Gradebook stores the information and results for all of your class activities. About MimioStudio Notebook You can use MimioStudio Notebook to create any type of MimioVote activity. Activities are created by adding question objects to Notebook pages. The Questions and Results folder in MimioStudio Gallery includes a wide variety of pre-designed question objects to make creating activities in Notebook quick and easy. For more information about using MimioStudio Notebook and Gallery, see About MimioStudio. The following figure shows the major components of MimioStudio software. 57


66 MimioVote About the Vote Toolbar The Vote Toolbar includes all the tools you need for taking attendance, conducting class activities, gathering student responses, and viewing results. The Vote Toolbar is available in MimioStudio Notebook and Microsoft PowerPoint. The following figure shows the major features of the Vote Toolbar in MimioStudio Notebook. The following figure shows the major features of the Vote Toolbar in Microsoft PowerPoint. 58

67 About MimioStudio Quick Vote You can use MimioStudio Quick Vote to ask questions that are not a part of a Notebook or PowerPoint MimioVote activity. You can use Quick Vote to add a question at any time during a Teacher-Led activity. The following figure shows the major features of the MimioStudio Quick Vote. About MimioStudio Gradebook MimioStudio Gradebook stores the results for all of your class activities. Student responses gathered using the MimioVote system are automatically saved to the Gradebook along with complete information for each question. You can also manually add activities that were not conducted using the MimioVote system, making it easy to keep all your grades in one location. The following views are available in Gradebook, giving you easy access to the information you want to view: n Classes View n Class View n Date View n Activity View Classes View The classes view displays a list of all of your saved classes, the number of students in each class, and the average grade for all students in the class. 59

68 MimioVote Class View The Class view displays a list of all students in the selected class and all dates on which any activities were conducted. Each date column shows the average grade for each student, for all activities that were conducted on that date. From the Class view, you can also view the Class pane. The Class pane displays the name of the class, number of students in the class, and the number of activities that have been conducted with the selected class. 60

69 Date View The Date view displays a list of all students in the selected class. The Attendance column shows the attendance status for each student on the selected date. The activity columns show the grade that each student received for each activity conducted on the selected date. From the Date view, you can also view the Activity pane. The Activity pane displays the name of the activity, activity type, total number of question, and the weight of the activity. 61

70 MimioVote Activity View The Activity view displays a list of all students in the selected class. The Average column shows the grade for each student for the selected activity. Each question column shows the response that each student provided. The Activity pane displays the name, type, and weight of the selected activity. From the Activity view, you can also view the Question pane. The Question pane displays the question text, the available and correct answers, the question snapshot, and the question weight. 62
71 Student Pane You can view the Student pane from Class view, Date view, or Activity view. The Student pane displays the name, student ID number, MimioVote unit number, and address for the selected student. 63

72 MimioVote Getting Started Setting Up MimioVote Setting up the MimioVote system is quick and easy. You can link your MimioVote system to your computer using the included MimioHub. Or, if you have MimioTeach, you can link the MimioVote system to your computer using the MimioHub that you already have installed. Once you have installed the MimioStudio software on your computer, you can quickly set up MimioVote. Each MimioVote unit is powered by a rechargeable lithium-ion battery. The battery recharges whenever the unit is docked in the MimioVote station. Charging the battery for the first time will take approximately six hours; when fully discharged, recharging the battery will take approximately twelve hours. To set up MimioVote 64


73 Getting Started 1. Pull the plastic strip from each MimioVote unit to activate the rechargeable battery. 2. Insert each MimioVote unit into a slot on the MimioVote station. 3. Plug the power cord into the power connector on the back of the MimioVote station. 4. Plug the other end of the power cord into a power outlet. 5. Plug the MimioHub into an available USB port on your computer. If you already have a MimioHub installed on your computer, a dialog box appears asking if you want to connect the MimioHub to the MimioVote system. Click Yes 65
74 MimioVote to link the MimioVote system to your existing MimioHub. Adding a Second MimioVote System Each MimioVote system includes either 24 or 32 MimioVote units. For larger classes, you can combine two MimioVote systems for a total of up to 64 units. You can use the same MimioHub to connect all of your MimioClassroom devices to your computer. To add a second MimioVote system 1. Set up the MimioVote station and units as described in Setting Up MimioVote. Once the power is connected to the MimioVote system, the previously installed MimioHub will detect the new system. 2. When prompted by the software, click Yes to connect the new system to the MimioHub. The second system is connected to your computer and the appropriate numbers are assigned to each MimioVote unit automatically. Using MimioStudio Gradebook If you do not see the prompt, or you want to connect the system at a later time, see Adjusting the Classroom Devices Settings for information about connecting available devices to your computer. You can use MimioStudio Gradebook to store information for all of your classes, students, and class activities. Student responses gathered using the MimioVote system are automatically saved to the Gradebook along with complete information for each question. You can also manually add activities that were not conducted using the MimioVote system, making it easy to keep all your grades in one location. Several ways to access MimioStudio Gradebook are shown in the following table. To start from the Do this Desktop Double-click on the desktop. Taskbar Right-click, and then choose Gradebook. Start menu Point to Programs, MimioStudio, Tools, and then choose MimioStudio Gradebook. Setting Up the Gradebook Before you begin using your MimioVote system to conduct activities, you must first set up MimioStudio Gradebook. You can add as many classes as you want to Gradebook, and then add students to each of your classes. 66
75 Using MimioStudio Gradebook Creating a Class You can create as many classes as you want in Gradebook. Once you have created a class, you can add students to the class by manually entering all student names and information, or you can import a list of students. To create a class 1. Click on the Gradebook toolbar. The Add Class dialog box appears. 2. Enter a name for the class in the Name box, and then click Add. The class is added to your class list. Adding Students The number of students you can have in each class depends on the number of MimioVote units you have. You can combine two MimioVote systems for up to 64 units. Each student that you add to a class is automatically assigned a MimioVote unit number. To add a student to a class 1. Select the class to add a student to. 2. Click on the Gradebook toolbar. The Add Student dialog box appears. 3. Enter the name, student ID number, and address for the student. 4. Click Add. The MimioVote handset ID is assigned automatically. The student is added to the class. Importing a List of Students You can add students to a class manually by entering all student names and information, or you can import an existing list of students into a class. You can import students from a Unicode text file (TXT) or a Comma separated value file (CSV). Each student must have at least a first or last name assigned to them in order to be imported. The following fields are supported for importing into Gradebook. n StudentID n FirstName n MiddleName n LastName n Gender n Birthdate n Address n City n State n ZIP Code n Country Each student that you add to a class is automatically assigned a MimioVote unit number. To import a class list 1. In Gradebook, select the class you want to import the student list into. 2. From the File menu, choose Import, and then choose Students. The Open dialog box appears. 67
76 MimioVote Adding Activities 3. Navigate to and select the file you want to import, and then click Open. The students are added to the selected class. You can keep track of all of your student scores using Gradebook. Scores for all MimioVote activities are automatically saved to the Gradebook. You can also manually enter activities that were not performed using MimioVote. To add an activity 1. Select the class to add the activity to. 2. Click on the Gradebook toolbar. 3. In the Add Activity dialog box, do the following: a. Enter a name for the activity in the Name box. b. Choose the type of activity to add from the Type list. c. Choose the month, date, and year that the activity was performed. d. Enter a weight for the activity in the Weight box. e. Click Add. The activity is added and displayed in the Gradebook. 4. Enter a grade for each student in the Average column. Modifying the Gradebook You can modify the information in the MimioStudio Gradebook in the following ways: n Edit Student Information n Remove a Student n Editing Activities n Editing Questions Editing Student Information Removing a Student You can edit any information for an existing student, including the student name, student ID number, MimioVote unit ID number, and address. To edit student information 1. Select the student to edit. 2. Click Edit Student on the Student pane. The Edit Student dialog box appears. 3. Make any desired changes to the student information. 4. Click OK to save your changes. You can delete a student from a class at any time. Deleting a student permanently removes the student from the class and removes all of their activity results from the Gradebook. To remove a student from a class 1. Select the class that contains the student you want to remove. 2. Select the student to remove. 68
77 Using MimioStudio Gradebook Editing Activities Editing Questions Generating Reports 3. Choose Delete from the Edit menu. 4. Follow the instructions in the Confirm Delete dialog box, and then click OK. The selected student and all information for the selected student is permanently deleted from the Gradebook. You can edit the name, type, and weight for an activity at any time. To edit an activity 1. Select the activity to edit. 2. Click Edit Activity on the Activity pane. The Edit Activity dialog box appears. 3. In the Edit Activity dialog box, you can do any of the following: l Enter a new name for the activity in the Name box. l Choose a different activity type from the Type list. l Enter a new weight for the activity in the Weight box. 4. Click OK to save your changes. Each time you stop polling for a question, a copy of the question, along with the correct answer, is saved to the Gradebook. You can edit the question text, correct answer, question type, and question weight at any time in Gradebook. For example, if the answer that was selected as the correct answer in the question object is incorrect, you can change the answer in the Gradebook to automatically update the student scores. Changing the answer for a question in the Gradebook does not automatically change the answer in the question object in Notebook. To change the answer for subsequent activities, you must make the correction to the question object in Notebook. To edit a question 1. Select the question to edit. 2. Click Edit Question on the Question pane. 3. In the Edit Question dialog box, you can do any of the following: l Edit the question or answer text under Question Information. l Click the button to the left of the correct answer to change the correct answer for the question. l Choose a different question type from the Type list. l Enter a new weight for the question in the Weight box. 4. Click OK to save your changes. You can generate a variety of reports from MimioStudio Gradebook. Reports are generated as HTML files and are displayed in your default Web browser. You can generate the following types of reports: 69
78 MimioVote Exporting a List of Students n Class Grade Report- a grade report for all students in the selected class n Class Activity Report - a detailed report for the selected activity n Student Summary Report- a summary report of all activities for the selected student n Student Activity Report - a detailed report for all selected activities for the selected student You can generate reports from the Class, Activity, and Student panes in Gradebook or from the Report menu. You can export a list of students from any class you have saved in Gradebook to a Unicode tab-delimited text file (TXT). To export a list of students 1. Display the class that contains the students you want to export. 2. From the File menu, choose Export, and then choose Students. The Export Students dialog box appears. 3. Select Export student information, and then click OK. The Save As dialog box appears. Archiving Classes You can archive your classes by exporting a class to a MimioStudio Gradebook Archive (MVA) file. The archive file contains all student, activity, and results information. You can use this file to backup your classes or to move classes from one Gradebook to another. To archive a class 1. From the File menu, choose Export, and then choose Class. The Export Class dialog box appears. 2. Select Export class information, and then click OK. The Save As dialog box appears. Exporting Results You can export class and activity results from the Gradebook to a Unicode tab-delimited text file (TXT) for use in another application. You can export the following information: n Class results - includes the class average for each student in the selected class. n Class and activity results - includes the class average for each student as well as the grade each student received for each activity n Activity results - includes the grade for each student for the selected activity. To export class results 1. From the File menu, choose Export, and then choose Class. The Export Class dialog box appears. 2. Select Export class results, and then click OK. The Save As dialog box appears. 3. Enter a name for the file in the File name box, and then click Save. 70
79 Creating Activities To export class and activity results 1. From the File menu, choose Export, and then choose Class. The Export Class dialog box appears. 2. Select Export class and activity results, and then click OK. The Save As dialog box appears. 3. Enter a name for the file in the File name box, and then click Save. To export activity results 1. From the File menu, choose Export, and then choose Activity. The Export Activity dialog box appears. 2. Select Export activity results, and then click OK. The Save As dialog box appears. 3. Enter a name for the file in the File name box, and then click Save. Opening Archived Classes Creating Activities You can open your archived class files at any time by importing the archive (MVD) file into the Gradebook. Once imported, all classes in the archive file will appear along with your current classes in the Gradebook. To open archived classes 1. Choose Import Classes from the File menu. The Open dialog box appears. 2. Navigate to and select the archive file to import, and then click Open. You can create MimioVote activities in MimioStudio Notebook or Microsoft PowerPoint. You can also use MimioStudio Quick Vote to ask questions that you did not previously create in Notebook or PowerPoint. You can add the following types of questions to your activity: n TF - True/False, Yes/No, or Agree/Disagree n AB - Multiple choice, two possible answers n ABC - Multiple choice, three possible answers n ABCD - Multiple choice, four possible answers n ABCDE - Multiple choice, five possible answers Creating Activities in Notebook You can use MimioStudio Notebook to create any type of MimioVote activity. Activities are created by adding question objects to Notebook pages. The Questions and Results folder in MimioStudio Gallery includes a wide variety of pre-designed question objects to make creating activities in Notebook quick and easy. Each question object contains a single question, and each question must be on a separate Notebook page. 71
80 MimioVote Once you've added a question object to an activity, you can customize the object properties to change the appearance or behavior of the question object. To create an activity in Notebook 1. Open a new or existing Notebook. 2. In MimioStudio Gallery, click the plus sign next to the Questions and Results folder, and then select the Questions folder. 3. Drag the desired question object from the Gallery into the Notebook. Only one question object can be placed on each Notebook page. 4. Enter the question text in the Question box. 5. Enter an answer choice for the question in each of the Answer boxes. 6. Select the correct answer. 7. To add another question to the activity, do the following: a. Click to add a new page to the Notebook. b. Repeat steps 3-6 to add a question to the new page. Creating an Activity in PowerPoint Creating Activities in PowerPoint You can use the MimioStudio Vote Add-in to create any type of MimioVote activity in Microsoft PowerPoint. MimioVote activities are created by adding question slides to a PowerPoint presentation. The MimioStudio Vote Add-in includes a variety of pre-formatted question slide templates to make creating activities in PowerPoint quick and easy. To create an activity in PowerPoint 1. Open a new PowerPoint presentation. 2. Click Insert Slide on the Add-Ins toolbar, and then choose the type of question slide you want to add. The slide is added to the presentation. 3. Enter the question text in the Question box. 4. Enter an answer choice for the question in each of the Answer boxes. 5. Click Set Correct Answer on the Add-Ins toolbar. The Set Correct Answer dialog box appears. 6. Select the correct answer for the question. 7. Enter a weight for the question in the Question Weight box, and then click OK. 8. Repeat steps 2-7 to add all additional questions to the activity. Modifying Question Objects MimioStudio Gallery includes a variety of pre-designed question objects for creating MimioVote activities. Once you add a question object to a Notebook page, you can use the question objects as is or you can choose to change the properties of the question object. You can change the question type, animation for correct answers, and question weight. To modify a question object 1. Click at the bottom-right of the question object you want to modify. The question object properties appear. 72
81 Using the MimioVote Unit 2. In the question object properties, you can do any of the following: l To change the question type, select an available question type. l To change the correct answer animation, select an available animation. l To change the weight of the question, enter the weight for the question in the weight,, box. 3. Click to save your changes and display the question object. Creating an Activity in PowerPoint Importing Standard Assessments You can import standard assessments into MimioStudio Notebook for use with MimioVote. Only files that have been exported from ExamView as Blackboard ( ) format can be imported into Notebook. For information about installing ExamView, and downloading and exporting ExamView files, see the ExamView documentation. To import a standard assessment 1. Start MimioStudio Notebook, and then click. The Open dialog box appears. 2. Navigate to and select the file to import, and then click Open. The file is imported and displayed in Notebook. Creating an Activity in PowerPoint Printing Activities You can print an activity from Notebook to use as a self-paced activity. Normally, when you print a Notebook presentation, each page of the Notebook prints on a separate page. However, you can choose to print the activity so that multiple questions appear on a single page. When you choose to print an activity, an HTML file is created from the Notebook activity. The HTML file contains all question and answer text, but no images. You can choose to print or save the HTML file. To print an activity 1. Open the activity to print. 2. Click on the Vote Toolbar. The Select Class dialog box appears. 3. Select the class to print the activity for from the Class list, and then click OK. The activity is displayed as an HTML file in your default Web browser. 4. Choose Print from the File menu. Creating an Activity in PowerPoint Using the MimioVote Unit Each MimioVote unit is assigned to one student per class. Students should use their assigned MimioVote unit each time an activity is conducted. 73
82 MimioVote Answering Questions By default, each button on the MimioVote unit is illuminated with a different color light. You can choose to turn off the colors and have all the buttons illuminated with a white light. For information about changing the button colors, see Adjusting the Vote Settings. Depending on the type of question being asked, the appropriate buttons are illuminated on the MimioVote unit. For example, when polling is started for a True/False question, only the and buttons are illuminated on each MimioVote unit. The A, B, C, D, and E buttons are not illuminated and will not register a response if pressed. Answering Questions for Teacher-Led Activities For teacher-led activities, questions are answered one at a time as they are displayed. To answer a question Press the button on the MimioVote unit that corresponds to the correct answer for the displayed question. Answering Questions for Self-Paced Activities Requesting Help For self-paced activities, questions can be answered in any order. The current question number is displayed on the MimioVote unit. For each question, the available answer buttons are illuminated, as well as the next and previous buttons. To answer questions in a Self-Paced activity 1. Press the button on the MimioVote unit that corresponds to the correct answer for the first question. The unit automatically advances to the next question. The current question number appears in the unit display. 2. Repeat step 1 for each remaining question in the activity. You can change your answer to any question at anytime before submitting your answers. Use and to move through the questions and review or change any answers as desired. The currently selected answer button flashes. 3. When all questions in the activity have been answered, press. You must answer every question before submitting the activity. The become available until all questions have been answered. button will not A student can request help or request to ask a question at anytime using the MimioVote unit. To request help Press on the MimioVote unit. For information about viewing help requests, see Viewing Requests for Help. 74
83 Using the Vote Toolbar Using the Vote Toolbar The Vote Toolbar includes all the tools you need for taking attendance, conducting class activities, gathering student responses, and viewing results. Taking Attendance You can quickly take attendance and record the results using MimioVote. To take attendance 1. Select the class to take attendance for from the Class list. 2. Click on the Vote Toolbar. A list of all students in the selected class is displayed in the Attendance window. As each student indicates that they are present, the icon for that student is illuminated. A student indicates they are present by pressing on their MimioVote unit. 3. Close the Attendance window to stop taking attendance and save the results to the Gradebook. Using the Timer The timer on the Vote Toolbar displays the amount of time that has passed since you started polling. The timer automatically starts each time you start polling and automatically stops each time you stop polling. Conducting Activities Using MimioVote, you can perform teacher-led or self-paced activities. Review the following topics for information about conducting activities. n Conducting a Teacher-Led Activity n Asking Questions Using Quick Vote n Conducting a Self-Paced Activity n Viewing Question Results n Viewing Session Results n Viewing a List of Students that Have Not Responded Conducting a Teacher-Led Activity Once you have created an activity in Notebook or PowerPoint,you can perform the activity with your class. When performing a Teacher-Led activity, the questions are displayed one at a time for the students. You can ask questions that you did not previously create in Notebook or PowerPoint at any time during a Teacher-Led activity using MimioStudio Quick Vote. To conduct a teacher-led activity 1. Open the Notebook or PowerPoint presentation that contains the activity you want to conduct. 2. Select the class that will participate in the activity from the Class list. 75
84 MimioVote 3. (Required for PowerPoint only.) Set the display to Full Screen or Slide Show view. 4. Display the first question for the class. 5. Click on the Vote Toolbar to start polling for the question. In Notebook, you can also start and stop polling directly from the question object by clicking. When all students have responded, polling for the question stops and the results are saved to the Gradebook. 6. To stop polling for a question before all students have responded, click. Polling stops and the results are saved to the Gradebook. 7. Repeat steps 4-6 for each remaining question in the activity. 8. When all questions in the activity have been answered, close the presentation and the Vote Toolbar to stop the activity. Asking Questions Using Quick Vote Using the MimioStudio Quick Vote, you can ask questions that you did not previously create in Notebook or PowerPoint at any time during a Teacher-Led activity. To ask a question using Quick Vote 1. Do one of the following to start Quick Vote: l Right-click, and then choose Quick Vote. l (Interactive mode Only) Press the Launch button,, on the MimioTeach bar, and then click Quick Vote. 2. Select the class that will participate in the activity from the Class list. 3. Click, and then choose the question type to start polling for the question. When all students have responded, polling for the question stops. 4. To stop polling for a question before all students have responded, click. 5. Click the letter that corresponds to the correct answer for the question. The results for the current question are saved to the Gradebook along with a screen shot. Conducting a Self-Paced Activity Once you have created an activity in Notebook or PowerPoint,you can perform the activity with your class. When performing a Self-Paced activity, each student must have a printed copy of all questions in the activity. For information about printing activities, see Printing Activities. To conduct a self-paced activity 1. Open the Notebook or PowerPoint presentation that contains the activity you want to conduct. 2. Select the class that will participate in the activity from the Class list. 3. (Required for PowerPoint only.) Set the display to Full Screen view. 4. Click. The Self-Paced Test window appears. 5. (Optional) Use the and buttons to set the timer. 76
85 Using the Vote Toolbar The timer displays the amount of time left for the activity. If you do not set the timer, the timer displays the amount of time that has passed since polling started. 6. Click to start polling for all questions. Each student can move through the questions at their own pace using the buttons on their MimioVote unit. When all students have submitted their responses or when the timer runs out, polling for the activity stops and the results are saved to the Gradebook. 7. To stop polling for an activity before all students have submitted their response or before the timer runs out, click. All results for the activity are saved to the Gradebook. Viewing Question Results You can instantly view the results for a question as soon as you stop polling. There are a variety of ways to view the results for a question. To view the result for a question 1. Click, and then choose Question Results. The Question Results window appears. 2. To modify the appearance of the results, click. You can change the type and colors of the graph shown. You can also choose to show the number or percentage of correct answers. 3. Click to save your changes and view the results. Viewing Activity Results You can instantly view the results for an activity as soon as you stop polling. There are a variety of ways to view the results for an activity. To view the result for an activity 1. Click, and then choose Activity Results. The Activity Results window appears. 2. To modify the appearance of the results, click. 3. Click to save your changes and view the results. Viewing a List of Students that Have Not Responded While you are polling a class, the number of students that have responded to the current question is displayed on the Vote Toolbar. You can quickly view a list of all students that have not yet responded. To view a list of students that have not responded Click on the Vote Toolbar. A list of students that have not yet responded is displayed in a separate window. and 77
86 MimioVote Viewing Requests for Help Caring For MimioVote Using their MimioVote unit, a student can request help or request to ask a question at anytime. For information on using the MimioVote unit to request help, see Requesting Help. You can quickly view a list of all students that have requested help. To view students requesting help 1. Click on the Vote Toolbar. A list of students that have requested help is displayed in a separate window. 2. Click the icon for a student to remove that student from the list. Review the following topics for information about cleaning and storing your MimioVote system. n Cleaning MimioVote n Storing MimioVote Cleaning MimioVote The MimioVote is designed to give you long and trouble-free service, while requiring very little maintenance. You can easily clean your MimioVote using the following items: n Lint-free cloth. n Isopropyl alcohol, diluted dishwashing detergent, or diluted glass cleaner. If you use glass cleaner, make sure it does not contain ammonia. To clean the MimioVote station and units 1. Disconnect the power cable. 2. Use the lint-free cloth to wipe the exterior of the MimioVote station and each MimioVote unit. 3. Remove dirt and smudges with one of the cleaning solutions mentioned above. Avoid using liquids on any exposed charging contacts. Do not allow liquid into any openings on the equipment. 4. Reconnect the Power cable. Storing MimioVote The MimioVote system comes with a carrying case for your MimioVote station and MimioVote units. You can use this case to transport the system and to safely store your MimioVote system when not in use. 78
87 Chapter 6 MimioView What's Included MimioView works seamlessly with MimioStudio software to display documents, threedimensional objects, and microscope slides for your entire class to view. You can use MimioView to display still images or live video. The MimioView package contains the following items: About MimioView If you are missing any of the items above, contact Customer Support. You can use the MimioView camera to display documents, three-dimensional objects, and microscope slides. The MimioView camera and lamps are each attached to the MimioView base by a flexible, gooseneck. This allows you to precisely position the camera and each lamp for the best possible view of the object you are displaying. The following figure shows the major components of the MimioView camera. 79
88 MimioView Status Lights The status light visually shows the status of the MimioView camera. Off Solid Green Flashing Green Not receiving power; USB cable is not connected or computer is turned off. MimioView is connected and receiving power; MimioStudio software is running. MimioView is connected and receiving power; MimioStudio software is not running. About MimioStudio View The View window displays the image captured by the MimioView camera. From the View window, you can rotate or zoom the image, mark up the image using MimioStudio Tools, adjust the contrast and brightness settings, freeze the image, and so on. The following figure shows the major features of the MimioStudio View window. 80
89 Getting Started Getting Started Review the following topics to install and start using MimioView. n Installing MimioView n Opening the View Window n Closing the View Window Installing MimioView Once you have installed the MimioStudio software on your computer, you can quickly install MimioView. To install MimioView 1. Remove the protective covering from the MimioView camera lens. 2. Plug the USB cable into the Micro-B USB port on the back of the camera base. 81
90 MimioView Opening the View Window 3. Connect the other end of the USB cable into an available USB port on your computer. When you press the View button on the MimioView, the camera and lamps turn on and the MimioStudio View window opens automatically. To open the View window Press on the MimioView base. The MimioStudio View window opens and the camera and lamps turn on. Closing the View Window Using MimioView You can close the MimioStudio View window from the View window or directly from the MimioView camera. To close the View window Do one of the following: l Close the MimioStudio View window. The camera and lamps turn off automatically. l Press on the camera base. The camera and lamps turn off and the MimioStudio View window closes. You can use MimioView to display a still image or live video of documents, threedimensional objects, or microscope slides. You can also use MimioStudio Tools to mark up the still image or live video displayed in the View window; you can then save the image to a Notebook or the Gallery for later use. Displaying an Image You can use MimioView to display a still image or live video of documents, threedimensional objects, or microscope slides. Displaying a Document You can use MimioView to display a document, book, or other two-dimensional object. To display a document 82

91 Using MimioView Displaying an Object 1. Place the document under the MimioView camera. 2. Adjust the camera head so that the desired image is displayed in the View window. 3. Adjust the lamps to light the document as desired. 4. Press on the MimioView base. Using MimioView, you can display a three-dimensional object. The camera and lamps are each attached to the MimioView base by a flexible, gooseneck. This allows you to precisely position the camera and lamps for the best possible view of the object you are displaying. To display a three-dimensional object 1. Place the object under the MimioView camera. 2. Adjust the camera head so that the desired image is displayed in the View window. 3. (Optional) Press to rotate the image to the desired orientation. 4. Adjust the lamps to light the object as desired. 5. Press on the MimioView base. Displaying a Microscope Slide Using the included microscope adapter, you can display an image from a microscope with the MimioView camera. The microscope adapter can be used with a 28 mm microscope eyepiece. To display a microscope slide 1. Set up the microscope so that you have the desired view through the microscope eyepiece. 2. Twist and lock the microscope adapter onto the MimioView camera head. 3. Slowly and carefully slide the other end of the microscope adapter onto the microscope eyepiece. Use caution to make sure that the image stays in focus while attaching the microscope adapter. Freezing the Image The image from the microscope is displayed in the View window. 4. Make any adjustments necessary to the microscope to adjust the image. 5. Press on the MimioView base. The image captured by the MimioView camera is displayed in the View window. By default, a live image is displayed. However, you can choose to display a still image of the 83
92 MimioView object. To freeze the image Do one of the following: l Press on the MimioView base. l Click on the View toolbar. The image is paused in the View window. To return to displaying live video, press or click a second time. Adjusting the Image MimioView includes features that make it easy to adjust the image displayed in the MimioStudio View window without having to adjust the camera or the displayed object. You can do the following to adjust the displayed image: n Rotate the Image n Zoom the Image n Adjust the Settings Rotating the Image You can quickly rotate the image that is displayed in the View window directly from the MimioView camera or from the View window. To rotate an image from the MimioView camera Press on the MimioView. The image displayed in the View window rotates clockwise 90 degrees. To rotate an image from the View window Do one of the following: l To rotate the image clockwise, click. l To rotate the image counter-clockwise, click. The image displayed in the View window rotates 90 degrees in the selected direction. Zooming the Image You can quickly zoom the image displayed in the View window. You can also zoom the image displayed in the View window using the Zoom tool in MimioStudio Tools. To zoom the image Do one of the following: l To zoom in on the image, click l To zoom out on the image, click on the toolbar. on the toolbar. l To fit the image to the MimioStudio View window, click on the toolbar. If the area of the image that you want to display is not visible in the View window, use the scroll bars to display the desired area of the image. 84

93 Using MimioView Adjusting the Settings Annotating an Image You can adjust the brightness and contrast settings automatically or manually. To adjust the settings automatically n Do one of the following: l Press l Click on the MimioView base. on the View toolbar. To adjust the settings manually 1. Click on the View toolbar. The Advanced Settings toolbar appears. 2. Move the Brightness and Contrast sliders to the right or left to adjust the settings as desired. 3. Click to hide the Advanced Settings toolbar. You can use MimioStudio Tools to annotate the image displayed in the View window. All object, drawing, and manipulation features in MimioStudio Tools are available to use in the View window. You can also add objects to the View window from MimioStudio Gallery. See Adding Objects with MimioStudio Tools for information about using MimioStudio Tools. Clearing All Annotations from the Image You can quickly clear all annotations from the View window. To clear all annotations 85
MimioClassroom. User Guide. For Windows. mimio.com
 MimioClassroom User Guide For Windows mimio.com 2013 Mimio. All rights reserved. Revised 7/18/2013. No part of this document or the software may be reproduced or transmitted in any form or by any means
The MimioTeach package contains the following items: 1 MimioTeach bar 5 Mounting plates. 2 USB power adapter 6 MimioStudio DVD
 Chapter 3 MimioTeach What's Included Using MimioTeach with a projector, you can deliver lessons and presentations directly from your whiteboard. Using MimioStudio Interactive mode, you control the movement
OnPoint s Guide to MimioStudio 9
 1 OnPoint s Guide to MimioStudio 9 Getting started with MimioStudio 9 Mimio Studio 9 Notebook Overview.... 2 MimioStudio 9 Notebook...... 3 MimioStudio 9 ActivityWizard.. 4 MimioStudio 9 Tools Overview......
Hardware Reference Card
 MimioTeach Hardware Reference Card The MimioTeach interactive whiteboard easily turns any dry erase whiteboard into an interactive system. Button B = Tools Button A = Hover Depressing tip, while holding
2006 Virtual Ink Corporation 150 CambridgePark Drive Cambridge, Massachusetts USA. User s Guide for Windows
 2006 Virtual Ink Corporation 150 CambridgePark Drive Cambridge, Massachusetts 02140 USA User s Guide for Windows Contents Chapter 1: Introduction...1 1.1. What is mimio Studio?...1 1.2. Important Terminology...1
Overview Guide NEW. Improved Toolbar. Lockable Objects. Transparent Objects. Improved Gallery. Multimedia Support.
 Overview Guide NEW Improved Toolbar Lockable Objects Transparent Objects Improved Gallery Multimedia Support Import Documents mimio Toll Free Support: 877.846.3721 email: training@mimio.com Overview There
Software Reference Card
 MimioStudio Gradebook / Windows Software Reference Card Add Student Add Class Add Activity Class Selection Date Selection Activity Selection Features: + Imports/exports Class Lists quickly and easily.
CLEAR TOOL... 7 BASIC NAVIGATION... 7 PAGE SORTER... 7
 Interwrite Workspace WHAT IS WORKSPACE?...2 INSTALLATION...2 SETUP...2 CONNECTING DEVICES... 2 NAMING DEVICES... 3 CALIBRATING DEVICES... 3 THE PEN...3 INTERACTIVE MODE...4 THE TOOLBAR...4 MOVING THE TOOLBAR...
SMART Meeting Pro 4.2 personal license USER S GUIDE
 smarttech.com/docfeedback/170973 SMART Meeting Pro 4.2 personal license USER S GUIDE Product registration If you register your SMART product, we ll notify you of new features and software upgrades. Register
SMART Meeting Pro PE 4.1 software
 Help us make this document better smarttech.com/feedback/170973 SMART Meeting Pro PE 4.1 software USER S GUIDE Product registration If you register your SMART product, we ll notify you of new features
SMART Board Interactive Whiteboard Basics
 SMART Board Interactive Whiteboard Basics This Quick Reference Guide provides an overview of the information you need to begin using a SMART Board interactive whiteboard. Before you begin, make sure the
Part 1: Basics. Page Sorter:
 Part 1: Basics Page Sorter: The Page Sorter displays all the pages in an open file as thumbnails and automatically updates as you add content. The page sorter can do the following. Display Pages Create
What s New in Studio 6?
 What s New in Studio 6? mimio Toll Free Support: 877.846.3721 email: techsupport@mimio.com New Zoom Icon Right click on the Zoom Icon to choose from Zoom In, Zoom Out, and Zoom Full Import File Icon Insert
Fundamentals. Training Kit. Presentation Products, Inc. 632 W 28th St, 7th fl New York, NY f presentationproducts.
 Fundamentals Training Kit Presentation Products, Inc. 632 W 28th St, 7th fl New York, NY 10001 212.736.6350 f 212.736.6353 presentationproducts.com How Does the SMART Board Interactive Whiteboard Work?
SMART Board Quick Reference
 The Ready Light Your SMART Board interactive whiteboard includes a Ready Light that indicates the status of your interactive whiteboard. Color of Ready Light Not lit Solid green Flashing green Solid red
Interwrite Workspace v. 8.9 Beginning
 Interwrite Workspace v. 8.9 Beginning What is Workspace?... 2 Getting Started... 2 Charging the Interwrite Mobi... 2 Charging the Interactive Pens for the Interactive Whiteboard... 2 Installation of Software...
Interwrite Workspace v. 8.7 Intermediate Technology Integration Center
 Interwrite Workspace v. 8.7 Intermediate The Toolbar... 2 Moving the Toolbar... 2 Resizing the Toolbar... 2 Toolbar Settings... 2 Enable the K-6 Toolbar... 2 Enable Properties with Right Click... 2 Customized
Interwrite Workspace v. 8.9 Intermediate Technology Integration Center
 Interwrite Workspace v. 8.9 Intermediate The Toolbar... 2 Moving the Toolbar... 2 Resizing the Toolbar... 2 Toolbar Settings... 2 Enable the Primary Toolbar... 2 Enable Properties with Right Click... 2
Fundamentals. Training Kit. Presentation Products, Inc. 632 W 28th St, 7th fl New York, NY f presentationproducts.
 Fundamentals Training Kit Presentation Products, Inc. 632 W 28th St, 7th fl New York, NY 10001 212.736.6350 f 212.736.6353 presentationproducts.com Table of Contents Getting Started How Does the SMART
Customizing FlipCharts Promethean Module 2 (ActivInspire)
") Customizing FlipCharts Promethean Module 2 (ActivInspire) Section 1: Browsers The browsers (located on the left side of the flipchart) are menus for various functions. To view the browsers, click Main
Customizing FlipCharts Promethean Module 2 (ActivInspire) Section 1: Browsers The browsers (located on the left side of the flipchart) are menus for various functions. To view the browsers, click Main
Welcome & Introduction
 Welcome & Introduction Welcome to ebeam Interactive Suite 3. Overview ebeam Interactive Suite 3 allows you to create lessons with provided resources and enhances curriculum delivery with dynamic annotation
What if Mimio. What if someone. Interactive Teaching Technologies
 What if Mimio Interactive Teaching Technologies What if someone developed entirely new teaching technology that was better, more intuitive, more affordable and a lot easier for teachers? (Imagine that.)
Hardware Reference Card
 MimioPad Hardware Reference Card Power Button / Status Light: Push down and hold to sync the MimioPad wireless pen tablet to the MimioHub wireless receiver. Repeat this process to add multiple MimioPad
Was this document helpful? smarttech.com/docfeedback/ SMART Ink 5.2 USER S GUIDE
 Was this document helpful? smarttech.com/docfeedback/171190 SMART Ink 5.2 USER S GUIDE Trademark notice SMART Ink, SMART Notebook, SMART Meeting Pro, Pen ID, smarttech, the SMART logo and all SMART taglines
ActivInspire Layout and Tools Orientation
 ActivInspire Layout and Tools Orientation Here are some ideas on how to start using your board: Project What s on the Computer Most simply, you can use the interactive whiteboard as a screen to project
Hardware Basics for Front Projection SMART Board Interactive Whiteboards
 Hardware Basics for Front Projection SMART Board Interactive Whiteboards The SMART Board interactive whiteboard is touch sensitive and operates as part of a system that includes a computer and a projector.
Intermediate/Advanced. Faculty Development Workshop FSE Faculty retreat April 18, 2012
 Intermediate/Advanced Faculty Development Workshop FSE Faculty retreat April 18, 2012 Remote Desktop Sharing Quick Reference Guide for Moderators The Moderator or a Participant may request control of another
PowerPoint X. 1. The Project Gallery window with the PowerPoint presentation icon already selected. 2. Click on OK.
 PowerPoint X Launching PowerPointX 1. Start PowerPointX by clicking on the PowerPoint icon in the dock or finding it in the hard drive in the Applications folder under Microsoft PowerPoint. PowerPoint
PowerPoint Launching PowerPointX
 PowerPoint 2004 Launching PowerPointX 1. Start PowerPoint by clicking on the PowerPoint icon in the dock or finding it in the hard drive in the Applications folder under Microsoft Office 2004. PowerPoint
Introduction. Download. SMARTBoard
 Page 1 of 21 SMARTBoard Introduction Interactive whiteboards are an excellent way to involve students in classroom learning by providing the look and feel of a regular whiteboard with computer-based technology
Lesson Planning and Delivery with Notebook Software
 Lesson Planning and Delivery with Notebook Software Before you start Before you begin your lesson, ensure that your computer is turned on and the SMART Board interactive whiteboard is connected and oriented.
Help us make this document better smarttech.com/docfeedback/ SMART Ink 3.1 USER S GUIDE FOR WINDOWS OPERATING SYSTEMS
 Help us make this document better smarttech.com/docfeedback/170830 SMART Ink 3.1 USER S GUIDE F WINDOWS OPERATING SYSTEMS Trademark notice SMART Ink, SMART Notebook, SMART Meeting Pro, Pen ID, smarttech,
Microsoft PowerPoint 2013 Beginning
 Microsoft PowerPoint 2013 Beginning PowerPoint Presentations on the Web... 2 Starting PowerPoint... 2 Opening a Presentation... 2 File Tab... 3 Quick Access Toolbar... 3 The Ribbon... 4 Keyboard Shortcuts...
Center for Faculty Development and Support Creating Powerful and Accessible Presentation
 Creating Powerful and Accessible Presentation PowerPoint 2007 Windows Tutorial Contents Create a New Document... 3 Navigate in the Normal View (default view)... 3 Input and Manipulate Text in a Slide...
ENGAGING SOLUTIONS MOBI and Workspace Beginners Manual
 ENGAGING SOLUTIONS MOBI and Workspace Beginners Manual MOBI VIEW Your local sales team: Merianne Wininger Kristen Rush Joe Musgrave Kim Brewer 832.524.6487 support@iclick2engage.com www.iclick2engage.com
WORKSPACE PC FOR NEW USERS
 WorkSpace PC for New Users 1 WORKSPACE PC FOR NEW USERS Before Class Charging the MobiView The MobiView should arrive partially charged and ready to be installed. Turning Technologies recommends that MobiView
PowerPoint 2016 Building a Presentation
 PowerPoint 2016 Building a Presentation What is PowerPoint? PowerPoint is presentation software that helps users quickly and efficiently create dynamic, professional-looking presentations through the use
GETTING STARTED. Interwrite Mobi. for Windows and the Mac
 GETTING STARTED for Windows and the Mac We at einstruction TM are proud of our family of Interwrite products. We strive to continue to bring you the best the technology has to offer. We urge you to visit
KODAK Software User s Guide. Software Version 9.0
 KODAK Create@Home Software User s Guide Software Version 9.0 Table of Contents 1 Welcome to KODAK Create@Home Software Features... 1-1 Supported File Formats... 1-1 System Requirements... 1-1 Software
ScreenBeam Touch90 Interactive Whiteboard
 ScreenBeam Touch90 Interactive Whiteboard Software User Guide xxxx-xxxx-000 rev. 1 Table of Contents Installing the Software 2 Software Installation 2 Using the Software 5 Pages 6 Pens 7 Figures 10 Erasers
Magic-E-Board. User Manual
 Magic-E-Board Magic-E-Board Magic-E-Board...2 1) Included Parts and Optional Accessories...4 1.1) Package Checklist...4 1.2) Optional Accessories...4 2) Magic-E-Board Software Installation...5 3) Magic-E-Board
KODAK Software User s Guide
 KODAK Create@Home Software User s Guide Table of Contents 1 Welcome to KODAK Create@Home Software Features... 1-1 Supported File Formats... 1-1 System Requirements... 1-1 Software Updates...1-2 Automatic
Welcome To Smartboard Technology. What Will You Learn In This PPT.?
 Welcome To Smartboard Technology A Quick Fondy Tech Tutorial The Basics Of How To Get Started Using The Smartboard/Whiteboard What Will You Learn In This PPT.? This ppt. will focus on 6 basic areas of
INTERACTIVE WHITEBOARDS: SMART Board Overview
 INTERACTIVE WHITEBOARDS: SMART Board Overview SMART Notebook Basic 2 SMART Board Equipment The SMART interactive whiteboard uses several main components. They include: THE BOARD The SMART Board has a touch-
Interactive Whiteboard Learner Workbook
 Interactive Whiteboard Learner Workbook Bringing people and ideas together. TM 1207 11th Avenue SW, Suite 300, Calgary, AB, T3C 0M5 CANADA Toll-free 1.888.42.SMART, ext. 8536 Fax 403.228.2500 e-mail: training@smarttech.com
[Not for Circulation] This document provides a variety of shortcuts for working in PowerPoint 2007.
![[Not for Circulation] This document provides a variety of shortcuts for working in PowerPoint 2007.](/thumbs/72/67772637.jpg "[Not for Circulation] This document provides a variety of shortcuts for working in PowerPoint 2007.") PowerPoint Shortcuts This document provides a variety of shortcuts for working in PowerPoint 2007. Using Slides from Other Presentations To add a slide from an existing presentation to the current presentation,
PowerPoint Shortcuts This document provides a variety of shortcuts for working in PowerPoint 2007. Using Slides from Other Presentations To add a slide from an existing presentation to the current presentation,
MINT Interactive User s Guide
 MINT Interactive User s Guide MINT Interactive is very powerful board software including rich functions and gallery software, which are very useful for lecture environment. It will be continuously upgraded
Microsoft PowerPoint 2007 Beginning
 Microsoft PowerPoint 2007 Beginning Educational Technology Center PowerPoint Presentations on the Web... 2 Starting PowerPoint... 2 Opening a Presentation... 2 Microsoft Office Button... 3 Quick Access
SmartBoard & Smart Notebook Software
 SmartBoard & Smart Notebook Software A SMART Board is an interactive whiteboard that is connected to a computer, touch sensitive display acting as both a monitor and input device. SMART Notebook software
Copyright. Disclaimer
 Q Draw User Manual Copyright Copyright 2011 by BenQ Corporation. All rights reserved. No part of this publication may be reproduced, transmitted, transcribed, stored in a retrieval system or translated
Microsoft PowerPoint 2010 Beginning
 Microsoft PowerPoint 2010 Beginning PowerPoint Presentations on the Web... 2 Starting PowerPoint... 2 Opening a Presentation... 2 File Tab... 3 Quick Access Toolbar... 3 The Ribbon... 4 Keyboard Shortcuts...
Advanced technology with one goal. Create a better way to learn.
 A better way to learn Whether it s whole-group or small-group instruction, formative assessment, collaborative learning, or student-centered adaptive instruction, Mimio solutions help teachers put these
Promethean Board. Guide to Basics
 Promethean Board Guide to Basics 1 Table of Contents Introduction... 3 Aligning the Projector Image... 3 Calibrating the ACTIVboard... 4 Opening ACTIVstudio/Creating a Profile... 4 Features Located Within
creating files and saving for web
 creating files and saving for web the template files assume a default image size of 300 x 300 pixels images intended for the web should be produced in rgb mode name your images in a logical format, so
SMART Board Notebook Software, Version 10
 SMART Board Notebook Software, Version 10 Interactive Whiteboard is the generic name for SMART Board, Mimio, etc. SMART Board Notebook is an application that comes with SMART Board and works on the Mimio
PowerPoint 2010 Level 1 Computer Training Solutions Student Guide Version Revision Date Course Length
 Level 1 Computer Training Solutions Version 1.2 Revision Date Course Length 2012-Feb-16 6 hours Table of Contents Quick Reference... 3 Frequently Used Commands... 3 Manitoba ehealth Learning Management
SMART Board Training Packet. Notebook Software 10.0
 SMART Board Training Packet Notebook Software 10.0 Bob Mallory SMART Certified Trainer Bob.Mallory@avispl.com Brian Leeser SMART Certified Trainer Brian.Leeser@avispl.com Chris de Treville Chris.deTreville@avispl.com
Getting Started with ActivInspire
 Getting Started with ActivInspire In this guide, you will learn not only how to get started with ActivInspire, but also the basics of creating and delivering your own cutting-edge ActivInspire flipcharts.
INSERVICE DAY - 11/11/11 TECHNOLOGY
 INSERVICE DAY - 11/11/11 TECHNOLOGY Converting PowerPoints into Movies (examples using imovie& Windows MovieMaker) (More detailed tutorials with pictures can be found at http://www.whsd.net/olc/teacher.aspx?s=1452).
Creating SMART Notebook Files. Notebook 10 Collaborative Learning Software for Linux operating systems
 Creating SMART Notebook Files Notebook 10 Collaborative Learning Software for Linux operating systems Trademark Notice SMART Board, Sympodium, smarttech and the SMART logo are trademarks or registered
USING SMART NOTEBOOK SOFTWARE
 USING SMART NOTEBOOK SOFTWARE THE NOTEBOOK INTERFACE The Notebook interface is easy to use and many functions (such as inserting pictures, saving files etc.) will be famillar as they are simillar to those
This guide will show you how to create a basic multi-media PowerPoint presentation containing text, graphics, charts, and audio/video elements.
 This guide will show you how to create a basic multi-media PowerPoint presentation containing text, graphics, charts, and audio/video elements. Before starting the steps outlined in this guide, it is recommended
USB 2.0 Video/Audio Grabber User s Guide
 USB 2.0 Video/Audio Grabber User s Guide Contents: Chapter 1: Introduction... 1 1.1 Package Contents... 1 1.2 System Requirements... 1 Chapter 2: Getting Started... 2 2.1 Connect USB A/V Adapter... 2 2.2
Part 1. Module 3 MODULE OVERVIEW. Microsoft Office Suite Pt 3. Objectives. MS PowerPoint Screen. Microsoft PowerPoint
 Module 3 Microsoft Office Suite Pt 3 Microsoft PowerPoint MODULE OVERVIEW Part 1 Overview MS PowerPoint Screen Part 2 Creating your PowerPoint Presentation Part 3 Working with content graphics & slides
Workspace Level 1 Training Workbook
 Intermediate Toolbar The default setting for the Workspace toolbar is the Intermediate toolbar shown below. There are also basic, advanced, and customized toolbars. Minimize Toolbar Workspace menu Mouse
BASIC MICROSOFT POWERPOINT
 BASIC MICROSOFT POWERPOINT PART ONE PHONE: 504-838-1144 IT Training Team Jefferson Parish Library EMAIL: jpltrain@jplibrary.net In this class you will learn to: Launch, close, and interact with Microsoft
This guide will help you with many of the basics of operation for your Epson 485wi BrightLink Projector with interactive functionality.
 This guide will help you with many of the basics of operation for your Epson 485wi BrightLink Projector with interactive functionality. If you need further assistance with questions, you can refer to the
Business Products Quick Reference Bundle
 Business Products Quick Reference Bundle TABLE OF CONTENTS Section 1 Getting Started with Your SMART Board 800 Series Interactive Whiteboard 4 Subsection 1.1 Turning On Your Interactive Whiteboard 4 Subsection
Copyright. Disclaimer
 Q Draw User Manual Copyright Copyright 2010 by BenQ Corporation. All rights reserved. No part of this publication may be reproduced, transmitted, transcribed, stored in a retrieval system or translated
Starter. Getting Started Guide
 Starter Getting Started Guide Contents Introduction... 1 Installing and Licensing Easiteach... 1 Expand and Enhance your Use of Easiteach... 1 Key Features... 3 Screen Menus... 3 File... 3 Toolbars...
Kidspiration 3 Basics Website:
 Website: http://etc.usf.edu/te/ Kidspiration is the visual learning tool for K-5 learners from the makers of Inspiration. With Kidspiration, students can build graphic organizers such as webs, concept
Vision Pointer Tools
 Vision Pointer Tools Pointer Tools - Uses Pointer Tools can be used in a variety of ways: during a Vision Demo to annotate on the master station s screen during a Remote Control session to annotate on
SMART AirLiner Slate. Giving you the freedom to teach from anywhere in the classroom and even more options to make digital content interactive.
 SMART AirLiner Slate Giving you the freedom to teach from anywhere in the classroom and even more options to make digital content interactive. Olathe District Schools Instructional Technology Department
Microsoft PowerPoint 2016 Basics Unit 9 Final Review - Student Notes Directions: Fill in the blanks.
 Directions: Fill in the blanks. 1. PowerPoint Window Layout 2. File Tab When clicked, opens - automatically opens the Info option by default Holds the following options: - Info - New - Open - Save - Save
Promethean ActivInspire
 New Features What s New? The newest version of Promethean software, ActivInspire, can be used only on an Intel based Mac, such as a Macbook. It will not run on an ibook. The flipchart is already set to
The StarPanel. Introduction
 The StarPanel Table of Contents: Introduction... 1 The Hardware... 1 The Software... 2 Basic Operations... 2 Frequently Asked Questions and Troubleshooting... 4 Who to Contact... 5 Introduction The StarPanel
PowerPoint Creating Presentations 25
 Contents Contents 3 PowerPoint 00 7 What is PowerPoint? 8 PowerPoint Requirements 9 New and Improved Features 0 Installing PowerPoint 00 Starting PowerPoint 00 3 Exploring the Ribbon 4 003 Commands in
Kingsoft Presentation 2012
 Kingsoft Office 2012 1 CHAPTER FOUR Kingsoft Presentation 2012 Kingsoft Presentation is one of the components of Kingsoft Office 2012, the latest version of the Kingsoft Office Suite. Kingsoft Office is
SmartBoard and Notebook Part 2
 SmartBoard and Notebook Part 2 The SmartBoard is an Interactive Whiteboard that allows you to touch the board and interact with the computer using your finger as the mouse. 4/2009 Floating Tools Control
ActivInspire Main Tool Box
 Toolbox Options Docking Roll In/Out ActivInspire Main Tool Box Roll In must be unchecked to view the 3rd column of the Tool Box to display your Tool History.your most recently used tools. Constantly updates.
Getting Started with. PowerPoint 2010
 Getting Started with 13 PowerPoint 2010 You can use PowerPoint to create presentations for almost any occasion, such as a business meeting, government forum, school project or lecture, church function,
Interactive Presentation Products
 1 Interactive Presentation Products 1762262 MimioTeach Attaches to any whiteboard to turn it into an interactive whiteboard. Includes: MimioTeach bar, MimioHub wireless receiver, rechargeable stylus with
How to create interactive documents
 Adobe InDesign Guide How to create interactive documents You can use Adobe InDesign to create dynamic web content or interactive documents. InDesign supports export to web-ready HTML or interactive PDF.
POWERPOINT 2003 OVERVIEW DISCLAIMER:
 DISCLAIMER: POWERPOINT 2003 This reference guide is meant for experienced Microsoft Office users. It provides a list of quick tips and shortcuts for familiar features. This guide does NOT replace training
OPEN-SANKORE MANUAL. (Start) button and type Open-Sankoré in the search box, and then click on the Open Sankoré icon as displayed in
 button and type Open-Sankoré in the search box, and then click on the Open Sankoré icon as displayed in") 2015 TABLE OF CONTENTS Sankoré Interface 2 Menu Bar.3 Floating toolbar.. 6 Textbox....8 Drawing shapes and arrows... 11 Capture screen.. 22 Library.. 23 1. Videos...25 2. Pictures. 27 Copying pictures
2015 TABLE OF CONTENTS Sankoré Interface 2 Menu Bar.3 Floating toolbar.. 6 Textbox....8 Drawing shapes and arrows... 11 Capture screen.. 22 Library.. 23 1. Videos...25 2. Pictures. 27 Copying pictures
Interactive White Board
 Interactive White Board Handout: Level 1 elearning Department 16 Contents 1) Introduction to Interactive White Board... 3 1.1 Interactive White Board (IWB)... 3 1.2 HARDWARE used in IWB... 3 1.3 Operating
PowerPoint 2003 Intermediate PowerPoint: Tips and Tricks
 PowerPoint 2003 Intermediate PowerPoint: Tips and Tricks Table of Contents 1. Course Description 2. Recoloring Clip Art 3. Cropping Clip Art and Images 4. Ungrouping Clip Art 5. Using the Picture Toolbar
Creating Notebook Files. Notebook 10 Collaborative Learning Software for Windows Operating Systems
 Creating Notebook Files Notebook 10 Collaborative Learning Software for Windows Operating Systems Trademark Notice SMART Board, Notebook, Sympodium, Senteo, Bridgit, smarttech and the SMART logo are trademarks
COURSE OUTLINE. MS PowerPoint Last Updated: 19 July 2017
 MS PowerPoint 2016 Last Updated: 19 July 2017 1. Table of Contents 1. Table of Contents... 2 A. COURSE OUTLINES... 3 1. Free online pre-training assessments... 3 2. MS PowerPoint 2016 Level 1... 3 3. MS
PowerPoint 2003: Advanced Instructor s Edition
 PowerPoint 2003: Advanced Instructor s Edition ILT Series COPYRIGHT Axzo Press. All rights reserved. No part of this work may be reproduced, transcribed, or used in any form or by any means graphic, electronic,
PowerPoint 2016 Basics for Mac
 1 PowerPoint 2016 Basics for Mac PowerPoint 2016 Basics for Mac Training Objective To learn the tools and features to get started using PowerPoint more efficiently and effectively. What you can expect
Getting Started. Microsoft QUICK Source 7
 Microsoft QUICK Windows Source 7 Getting Started The Windows 7 Desktop u v w x u Icon links to a program, file, or folder that is stored on the desktop. v Shortcut Icon links to a program, file, or folder
9/29/2010. Slide title. Bulleted text. Clip art. SmartArt graphic. Microsoft Office Illustrated Introductory, Premium Video Edition
 Microsoft Office 2007- Illustrated Introductory, Premium Video Edition Creating A in PowerPoint 2007 A Typical Slide Bulleted text Slide title Clip art SmartArt graphic 2 Planning an Effective When planning
Application of Skills: Microsoft PowerPoint 2013 Tutorial
 Application of Skills: Microsoft PowerPoint 2013 Tutorial Throughout this tutorial, you will progress through a series of steps to create a presentation about yourself. You will continue to add to this
L E S S O N 2 Background
 Flight, Naperville Central High School, Naperville, Ill. No hard hat needed in the InDesign work area Once you learn the concepts of good page design, and you learn how to use InDesign, you are limited
Basic Classroom Tools Promethean Module 1 (ActivInspire)
") Basic Classroom Tools Promethean Module 1 (ActivInspire) Section 1: Power On The Promethean ActivBoard is activated when the power cord is plugged into the wall outlet. The flame icon in the upper right
Basic Classroom Tools Promethean Module 1 (ActivInspire) Section 1: Power On The Promethean ActivBoard is activated when the power cord is plugged into the wall outlet. The flame icon in the upper right
Microsoft Office 2007
 Microsoft Office 2007 Adding Slide Transitions Transition Sound Transitions Transition Speed Apply to All A slide transition is the way one slide changes to the next in Slide Show view. Animations Tab:
Contents I - Navigating is easy p. 2. III - Controls p. 7. II - Using Whiteboard Active pages: making a new page, saving, opening, printing p.
 Tutorial Getting started with Whiteboard Active Whiteboard Active range is simple to use. It has been designed to be used on an interactive whiteboard as a whole class resource. You can also use it on
PowerPoint 2010: Basics Learning Guide
 PowerPoint 2010: Basics Learning Guide What s a PowerPoint Slide? PowerPoint presentations are composed of slides, just like conventional presentations. Like a 35mm film-based slide, each PowerPoint slide
Created by: Leslie Arakaki
 Created by: Leslie Arakaki Fall, 2000 Page 1 Starting PowerPoint: 1. Double click on the icon. PowerPoint-ing your work! For PC computers with PowerPoint 97/2000 Using the Design Template feature to create