SPECIFICATION. Contents
|
|
|
- Phoebe Dorsey
- 5 years ago
- Views:
Transcription
1 SPECIFICATION PF1.0.1 Mode: PF19H1 / PF32H1 / PF40H1 Contents Chapter One Introduction to Shape and Interface Introduction to use: Packing list: Precaution in using CF SD USB Interfaces: Programs-importing method by USB flash disk: Scroll Text Editor:...3 Chapter Two Remote controller and Menu s settings Remote controller s Setting: Replacement of remote controller s battery : Introduction to Menu:...6 Chapter Three Introduction to ADPlayListEditor Software Overview: Menu Introduction: Introduction to creating play list: Schedule: About schedule/ date/time operations Multi-Media: Scroll Text: Program update:...20 Chapter Four Introduction to Machine s Unpacking and Installation Installation: Puncturing Installation Unsmooth Surface: Puncturing Installation Unsmooth Surface...23
2 Chapter One Introduction to Shape and Interface 1.1 Introduction to use: Our product can display programs of multi- file formats. Benefiting customers, most operation can be done by remote controller. To new users: Before turning on the Digital Poster, please check whether the power line is already plug-in and the multimedia card is right put. It displays pictures automatically when power is on. If there is no program, it shows the main menu or boot screen. Precaution in using: 1. Do not change any parameters when it is not necessary. 2. LOOP File folder storing all media documents and System systematic file folder storing font library are all stored in memory card or flash disk drive. 3. Keep far from the water when installing or using the product. 4. Precaution in using CF card: please turn off machine s power before plug in CF card, create sure the contact pin match right and please don t plug in it with over strength lest bend the contact pin and burn machine s decoder board or driver board easily. 1.2 Packing list: 1. Multi-media player host x 1 2. Power cable x 1 3. CD(User s manual, software) x 1 4. Remote Controller x 1 5. Key x 1 If any damage and shortage of accessories is found, please contact dealers or manufacturer in time. 1.3 Precaution in using CF SD USB Interfaces: 1. SD and CF card can t be used at the same time 2. When there is CF card in the machine, contents in flash disk drive can be directly imported to the memory card after plugging in flash disk drive. 3. Read contents in flash disk drive when there is no CF or SD card. 4. When import program by flash disk drive, the content of LOOP and SYSTEM file are imported according to parameter set. 5. When display video file, CF card is the best option.
3 Postscript: The content of flash disk drive will be copied to CF/ SD card when the CF or SD card is plugged in. 1.4 Programs-importing method by USB flash disk: You can import programs to memory card by USB flash disk, and plug in or pull out it while the machine is working. 1. Create programs of flash disk drive and update documents through play list. 2. Start up the machine, unlock the machine and plug USB flash disk in. 3. System modify the set parameter and copy the contents of USB flash disk into memory card automatically. 4. After finishing copying, the machine presents the information of copied and skipped quantity and restart up automatically in ten seconds after pulling out USB flash disk. If there is no play list, machine displays high definition pictures in a loop automatically; If there is a play list, machine displays according to the contents of the play list. 1.5 Scroll Text Editor: Text documents are stored in LOOP file, the root directory of memory card. SYSTEM file stores systematic font library.you must use AD Play List Editor editor software to add scroll text. ( the specific operating steps are seen in specification of AD Play List Editor editor software) 1. Create a text file 2. Edit the words,needing displaying, in created file (support both Chinese and English display) 3. Under single schedule, select add text check box to add a scroll text text file 4. You can add a scroll text text file for each schedule 5. Select create card after editing,, editor software will send the loading file created automatically to removable disk 6. After starting up, the lower part of screen displays the contents of text.(you can select on or off in system menu ) Note:The media format that the multi-media player support:: 1.Video: - MPEG-1(VCD;SVCD;.mpg;dat format); - MPEG-2 MP@ML(720x480@60Hz/720x576@50Hz 1.5Mbps-8Mbps); - MPEG-4 SP/ASP(720x480@60Hz/720x576@50Hz 100Kbps-2Mbps); - Dix3.11/4.x/5.0x(compatible); - MPEG-4(.asf.avi); 2.Audio: - LPCM(Sampling Frequency:32-48KHZ, Accuracy:16-24Bit); - MPEG1 Layer3(Sampling Frequency:32-48KHz, Bitrate:32-320Kbps); 3.Picture: - JPEG(Baseline:5120x3840, Progressive:2048x1536); - BMP; 4.Scroll Text: -.txt file(ascii and GB2312 Character Set);


4 Chapter Two Remote controller and Menu s settings 2.1 Remote controller s Setting:

5 2.2 Replacement of remote controller s battery : 1. Open the remote controller s battery-cover 2. Along arrow s direction, pull out battery box 3. Take out dead battery 4. Install new battery correctly according positive and negative direction 5. Push the battery box back


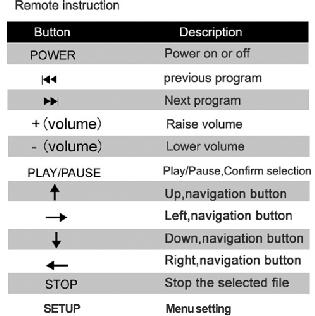
6 2.3 Introduction to Menu: When set the menu, you should first press the STOP button and then press the SETUP button to enter menu setup. Menu setup: System Setup, Setup Date & Time, On/Off Time Setup, Volume setup, Setup client s machine number, Display Setup, Preview list and Exit Menu. OSD Language: English,Chinese (default Chinese). 1.Press Play/Pause button in Set up menu s homepage to enter System Setup. 2.Select OSD language, move the cursor to right side by pressing RIGHT button, select Chinese or English by pressing UP /DOWN button and confirm the option by pressing Play/Pause button. 3.Press LEFT button to return to OSD Language option. 4.Select HOMEPAGE by pressing UP /DOWN button to return to the main menu.

7 Scroll Text Display: There are two options: Normal On and Off, Default: OFF. Support: Chinese and English. If select "OFF" mode, there will be no text; If select Normal on mode, system will display scroll text automatically according to the Scroll Text text file in play list. No scroll text displaying without GPL list or Scroll Text text file under schedule. 1. Press DOWN button in System Setup, select scroll text display. 2. Move the cursor to right side by pressing RIGHT button, select OFF or NORMAL ON by pressing UP /DOWN button and confirm the option by pressing Play/Pause button. 3. Press LEFT button to return to scroll text display. 4. Select HOMEPAGE by pressing DOWN button to return to the main menu. Clock Display: OFF, HALF CLOCK, FULL CLOCK, NORMAL ON OFF: NO time displaying on screen. HALF CLOCK: Only displaying time for 2 minutes every half clock. FULL CLOCK: Only displaying time for 2 minutes every full clock. NORMAL ON: Displaying time all the time. 1. Press DOWN button in System Setup, select Clock Display. 2. Move the cursor to right side by pressing RIGHT button, select OFF or NORMAL ON by pressing UP /DOWN button and confirm the option by pressing Play/Pause button. 3. Press LEFT button to return to Clock Display. 4. Select HOMEPAGE by pressing DOWN button to return to the main menu.
,and record the name of playing media file, starting time and ending time automatically,as long as the USB flash disk is plugged into USB")

8 Play Log: There are two option: Enable And Suspend. When you select Suspend,player will not record the play log of media; When you select Enable, system will create a xxxxxx.log file (the file is named by the ID number of machine),and record the name of playing media file, starting time and ending time automatically,as long as the USB flash disk is plugged into USB interface, system will first lead out play log to USB flash disk automatically, if there is already a play log file in USB flash disk, system will cover it automatically. Log file is seen in WordPad of WINDOS. 1. Press DOWN button in System Setup, select Play Log. 2. Move the cursor to right side by pressing RIGHT button, select OFF or NORMAL ON by pressing UP /DOWN button and confirm the option by pressing Play/Pause button. 3. Press LEFT button to return to Play Log. 4. Select HOMEPAGE by pressing DOWN button to return to the main menu.

: If the file name of media file in machine s memory card is the same as the file name")
9 Import Mode: There are two options: EMPTY and SKIP (when files names are same). Empty before importing /leading in: It means that all files in memory card should be emptied first before importing/leading in media files by USB flash disk. SKIP (when the files names are same): If the file name of media file in machine s memory card is the same as the file name of media file imported/ lead in by USB flash disk, there will be no import. Format Memory Card: Select Format to format CF and SD card.
 System Volume: 50 On/Off Time Setup: Same Mode")
10 Restore Factory Setting: Select "RESET" to restore all parameter to factory setting. Default Setting: OSD Language: Chinese Scroll Text Display: OFF Clock Display: Normal on Play Log: Suspend Import Mode: Skip (when files names are same) System Volume: 50 On/Off Time Setup: Same Mode (Normal On) Brightness: 50 Contrast Ratio: 50 Colour: 50 Setup Date & Time You can setup YEAR, MONTH, WEEK, HOUR or MINUTE separately. 1. Press DOWN button in Main Menu to select Setup Date & Time, and then press Play/Pause button to enter Setup Date & Time page. 2. Select the item needing modifying by pressing LEFT/RIGHT button, and modify it when the cursor on it lights. 3. Increase number by pressing UP button while decrease number by pressing DOWN button. 4. Select CONFIRM option by pressing RIGHT button to exit after finishing setting.

11 On/Off Time Setup: Two settings: "Same Setting" and "Set By Week Mode". When select "Set By Week", open On/Off Time Setup to set time by week mode. When select "Same Setting", open On/Off Time Setup to set time by same mode. 1. Press DOWN button in Main Menu to select On/Off Time Setup" and then press Play/Pause button to enter On/Off Time Setup page. 2. Select ON/OFF CONTROL MODE, Move the cursor to right side by pressing RIGHT button, and select the ON/OFF MODE by pressing UP /DOWN button and confirm the option by pressing Play/Pause button. 3. Press LEFT button to return to ON/OFF CONTROL MODE. 4. Select HOMEPAGE by pressing DOWN button to return to the main menu.

12 Three Settings:Normal on, Normal off and Time On/Off Normal On:The Poster will be on while the power is on. Even to shutdown the Poster by controller, the system will start automatically 2 minutes later. Normal Off:The Poster will be shutdown automatically when countdown 1 minute after the power is on or started by controller. Time On/Off:There are three groups of settings in this function. Set the time by pressing UP /DOWN button. Same Setting: 1. Press DOWN button in Main Menu to select On/Off Time Setup and then press Play/Pause button to enter On/Off Time Setup page. 2. Select ON/OFF CONTROL MODE, Move the cursor to right side by pressing RIGHT button, and select the Same Setting Mode by pressing UP /DOWN button and confirm the option by pressing Play/Pause button. 3. Select Same Setting by pressing DOWN button to enter the page of ON/OFF Same Setting. 4. There are three groups of settings in Time Setup, and you can separately set "Enable or Suspend for each group of setting, select the item needing modifying by pressing LEFT/RIGHT button, and adjust the time by pressing UP /DOWN button. 5. Select CONFIRM" option to return to main menu after finishing setting.
13 Week Mode: In the following interface, select the week needing setting. Create different starting and ending time of machine for 7 days in a week. Its setting method is the same as Same Setting s Volume Setup It can be divided into three periods of time to set, and each period can be set ENABLE and SUSPEND separately. When all is in OFF, it will play according default volume, the maximum default volume is Press DOWN button in Main Menu to select Volume Setup and then press Play/Pause button to enter Volume Setup page. 2. Select Default Volume, move the cursor to right side by pressing RIGHT button, and adjust the default volume level by pressing UP /DOWN button. 3. Select the period needing set button by pressing DOWN button, select the item
. 1.")
14 needing modifying by LEFT/RIGHT button, and modify it when the cursor on it lights. 4. Select CONFIRM option to exit after finishing setting. Setup client group number: Set the ID number of the client used for creating LOG text file (refer to Play Log function). 1. Press DOWN button in Main Menu to select "Setup client group number and then press Play/Pause button to enter Setup client group number page. 2. Select the item needing modifying by pressing LEFT/RIGHT button, and modify it when the cursor on it lights. 3. Increase number by pressing UP button while decrease number by pressing DOWN button. 4. Select CONFIRM option to exit after finishing setting.
15 Display Setting Display Setting includes: Brightness, Contrast Ratio and Colour setting. Default : 50 for each setting. The best parameter has been set before leaving factory, do not change any parameters when it is not necessary Press DOWN button in System Setup to select Display Setting and then press Play/Pause button to enter System Setup page. Then select "Brightness" option by pressing UP /DOWN button, and to save new data by pressing PLAY/ PAUSE button. AS the following picture. Increase number by pressing Right button while decrease number by pressing Left Button, and select Play/Pause option to exit after finishing setting.

16 Chapter Three Introduction to ADPlayListEditor Software 3.1 Overview: Please install Microsoft.Net Framework before using the ADPlayListEditor software. Install Dotnetfx.exe in user s manual disk or click: c5e04f5&displaylang=en to download Dotnetfx.exe. The following interface will appear after clicking ADPlayListEditor software. and running
 Pictures interval and switch mode: Click: tool option, to setup interval time and switch mode s default. 2) Language : English,Chinese 3.")
 Select the storage path in which media file is in local disk s browse frame, all valid media files under the present storage path will appear in media file s browse frame below.")
17 3.2 Menu Introduction: 1. File:Create, Open, Close, Save, Save as, Exit. 2. Tools:Option, Preview, Language. 1) Pictures interval and switch mode: Click: tool option, to setup interval time and switch mode s default. 2) Language : English,Chinese 3.3 Introduction to creating play list: 1) Run ADPlayListEditor.exe,click the shortcut key of Create to create a play list named Untitled-1.gpl. 2) Select the storage path in which media file is in local disk s browse frame, all valid media files under the present storage path will appear in media file s browse frame below. 3) Click Add button after selecting the needed media file, add this file to media edit bar on right side. 4) Click the shortcut key of SAVE, rename the play list and create the save path, and then save. 5) Click the shortcut key of Create Card, select the used movable disk, and software create card automatically after confirming.
 Support both single selection and multi-selection during adding media file,you can once select and add multi-media file by clicking")
 Under the condition of acting browse frame of media file, you can select all media files by pressing Ctrl and A buttons and can once add all media files by clicking Add button. 3.")
18 Notes: A. View: Picture modes B. Two options of adding media files:multi-selection, All-selection 1) Support both single selection and multi-selection during adding media file,you can once select and add multi-media file by clicking needed media file with Ctrl button being pressed. 2) Under the condition of acting browse frame of media file, you can select all media files by pressing Ctrl and A buttons and can once add all media files by clicking Add button. 3.4 Schedule: About schedule/ date/time operations You can edit schedule during creating play list 1) Check the check box of schedule. 2) Add new schedule by clicking ADD button in schedule edit bar. 3) Select a schedule at your will, click Edit button or dbl-click this schedule to edit it. 4) Select a schedule at your will, click Delete button to delete it. Different media files and texts can be added under the arrangement of every single schedule. The specific rules for schedule arrangements: 1) Unmarked Schedule means programs will be displayed according to the order files are added; 2) Mark Schedule to setup a schedule:date ----/--/--, Time--:-- unchanged means

19 the schedule is a default schedule,and at least a media file is added under this schedule. 3) Add: to add a schedule. No overlapping time allowed in two schedules. There is a red exclamation mark in edit window if error comes. 4) If there is a schedule setup for a playlist, programs in the list will be played on time; if not, programs in the default schedule will be played when no other playlist is on errand. 5) There are at most 30 pieces of schedules, and each can most possess 200 media files. 3.5 Multi-Media: You can edit the media file added to media edit bar during the period of creating play list. 1) Add: Select the corresponding schedule, add new media file by clicking add button, and all added media will play in the corresponding period of schedule; Media file also can be added by conventional method. 2) Edit:: Select the media file in media edit bar, and click edit button to setup program path, interval time and switch mode, and also can edit the media file by doubleclicking. 3) Remove: to remove selected media files in media edit bar by clicking remove button. 4) Up/Down: to adjust the order of program to be shown. 3.6 Scroll Text: You can add a scroll text for every single schedule during the period of editing play list. 1) Create a xxx.txt file and edit the text needing displaying, and then save. 2) When add media file to schedule, select the scroll text check box, and click "browse" button to select the path of txt text. 3) You can add a scroll text for every single schedule. 3.7 Function of Creating Card: User can create CF card or USB importing disk directly on software platform, and system write card automatically without
 Click Create Card menu, then there will pop up the following picture, select the disk in which need writing,and then finish it by pressing confirm button,information come next to be written into")
 When create card by CF card and card reader, you can plug CF card into CF card s slot of the terminal of multi-media player, and then the machine will play according to the play")
20 copying file by artificiality You can create card to write play list, saved after being edited, into movable disk. 1) Click Create Card menu, then there will pop up the following picture, select the disk in which need writing,and then finish it by pressing confirm button,information come next to be written into disk directly. 2) Two folders in disk : LOOP System. LOOP stores media file and GPL file while System stores font library. 3.8 Program update: 1) When create card by CF card and card reader, you can plug CF card into CF card s slot of the terminal of multi-media player, and then the machine will play according to the play list. 2) If USB flash disk is used to create card, please plug it directly into USB s slot of the terminal of multi-media player, system will load media file in USB flash disk and play list to the memory card of the terminal of multi-media player. Finishing loading, system will show the quantities of imported files, skipped files and covered files, and advise user to remove USB flash disk and restart machine. System will shutdown and restart automatically when count down 10 seconds after removing USB flash disk.
21

22 Chapter Four Introduction to Machine s Unpacking and Installation 4.1 Installation: Install iposter according to the following steps: 1. Open its package, take the machine and accessories out. 2. Put hanging board up by suitable method. 3. Check the power line, ensure the connection with A.C. power supply. 4. Hang up machine properly, plug power line in. 4.2 Puncturing Installation Unsmooth Surface: 1) Take hanging board out, paste double faced adhesive tape on its back fully. 2) Mark out the place where the hanging board is on wall ---confirmed by horizontal rule, please clean wall space by rag first. 3) Tear off the cover of double faced adhesive tape, and paste hanging board. 4) Lay glass cement all around. 5) Hang up the machine four hours later, and four screws holes should coincide completely.
23 4.3 Puncturing Installation Unsmooth Surface 1) Take hanging board out 2) According to needs, mark out the places where hanging board needing puncturing 3) Puncture the hanging board by drill gun 4) Mark out the place where the hanging board is on wall ---confirmed by horizontal rule 5) Mark out the puncturing place on wall confirmed by horizontal rule 6) Puncture the wall by drill gun 7) Plug wooden nails into the holes punctured in the wall 8) Paste up double faced adhesive tape on hanging board s back 9) Paste up hanging board on wall according to the confirmed place, then insert screws and strengthen them 10) After installing hanging board, hang up the machine on the hanging board, and four screws should coincide
High Definition AD Players. Universal User s Manual. L Series and PF Series
 High Definition AD Players Universal User s Manual L Series and PF Series Cautions 1. Do not install and use the unit in moisture, high temperature, outdoor, and closed environment. 2. Please turn off
Slimline Digital Advertising Display - Standalone (ANDROID) Hardware User Manual
 Hardware User Manual") Slimline Digital Advertising Display - Standalone (ANDROID) Hardware User Manual Manual Version PFHD5.3 Safety Instructions Please keep the display away from any heat sources. Place the display in a stable
Slimline Digital Advertising Display - Standalone (ANDROID) Hardware User Manual Manual Version PFHD5.3 Safety Instructions Please keep the display away from any heat sources. Place the display in a stable
19 32 Slimline High Definition Digital Advertising Display User s Manual
 19 32 Slimline High Definition Digital Advertising Display User s Manual Manual Version PF19-32HD2.0 Our Full Product Range Page 1 Safety Instructions Please keep the display away from any heat sources.
Ultra High Brightness Professional Monitor User Manual
 Manual Version UHBA1.0 Safety Instructions Please keep the display away from any heat sources. Place the display in a stable and well-ventilated place. Please handle with care as product contains glass.
High Definition LCD Digital Signage Display
 High Definition LCD Digital Signage Display User Manual Applicable Models L/PFxxH7(Android Version) MxxSA Cautions 1. Do Not install and use the unit in moisture, high temperature, outdoor and closed environment.
40 High Definition Digital Advertising Display User s Manual
 40 High Definition Digital Advertising Display User s Manual Manual Version PF40HD1.0 Our Full Product Range Page 1 Safety Instructions Please keep the display away from any heat sources. a stable and
10.1 HD Memory View Instruction Manual
 10.1 HD Memory View Instruction Manual Cautions Precautions and maintenance For indoor use only To avoid risk of fire or electric shock, do not expose the unit to moisture or condensation. To avoid overheating,
EVOBOOK 2. User s Manual.
 EVOBOOK 2 User s Manual www.evolio.ro 0 User s Manual Content Page Introduction.... 2 Parts and Controls.... 3 Getting Started...... 6 Turning On/Off EvoBook2. 6 Charging EvoBook2... 6 Inserting SD card....
Hi-Res 8 Wi-Fi Digital Picture Frame with MP3 player Table of Contents
 Hi-Res 8 Wi-Fi Digital Picture Frame with MP3 player Table of Contents Before Using the Digital Picture Frame...3 Introduction...3 Features and Specs...3 Package contents...4 Digital Picture Frame Layout...5
MICRO 2+ USER MANUAL
 MICRO2+ USER MANUAL Wintal MICRO2+ USER MANUAL Contents BRIEF INTRODUCTION... 1 FEATURE... 1 BASIC PERFORMANCE... 1 PRODUCT DETAILS... 2 PACKING LIST... 2 FRONT VIEW... 2 BACK VIEW... 3 REMOTE CONTROL...
Chapter 1: Introduction
 Chapter 1: Introduction Introduction: TVGo A11 turns your PC into a TV set. No need to buy an additional TV in your home as this will save both space and electric consumption. It lets you watch TV or listen
IMPECCA DFM-1512 USER S MANUAL
 IMPECCA DFM-1512 USER S MANUAL Table of Contents Introduction... 3 Installing your Unit... 3 Connecting to a computer... 4 Using Your Remote Control... 5 Using Your Digital Photo Frame... 6 Browsing Images...
High Definition Freestanding Digital Poster. Universal User s Manual
 High Definition Freestanding Digital Poster Universal User s Manual L Series Version LHD1.0 Our Full Product Range Page 1 Safety Instructions Please keep the display away from any heat sources. and well-ventilated
V2.0. HD60 Video Recorder Record Full HD Videos & Playback instantly
 V2.0 HD60 Video Recorder Record Full HD Videos & Playback instantly Important Safety Instruction Before using HD60 Video Recorder, please ensure that you read and understand the safety precautions below:
TECHNOLOGIES. P2jr Pico Projector. User Guide
 aaxa TECHNOLOGIES P2jr Pico Projector User Guide Caution! WARNING: Please use this product as instructed. Misuse may cause injury or death. DO NOT use while driving DO NOT expose to water or wet surfaces.
USER MANUAL Digital Screen
 USER MANUAL Digital Screen RBDIG7 Cautions Precautions and Maintenance For indoor use only To avoid risk of fire or electric shock, do not expose the unit to moisture or condensation. To avoid overheating,
USER MANUAL OF LCD ADVERTISING PLAYER
 USER MANUAL OF LCD ADVERTISING PLAYER CONTENTS 1.Warning 2 2.Features 2 3.Packet detail 3 4.Installs the method explanation 3 5.TV board connection explanation 6 6.Main function instruction 6 7.Repairing
Statement I. Thank you for purchasing the B05 Digital Audio Player produced by AGPTek. Before using the player, please read the manual carefully.
 Statement I. Thank you for purchasing the B05 Digital Audio Player produced by AGPTek. Before using the player, please read the manual carefully. If you have any question or any idea about this product,
Network Digital Menu Board Hardware User Manual
 Network Digital Menu Board Hardware User Manual Manual Version DMA1 Safety Instructions Please keep the display away from any heat sources. Place the display in a stable and well-ventilated place. Please
Windows 2000 Professional
 The American University in Cairo Academic Computing Services Windows 2000 Professional prepared by Soumaia Ahmed Al Ayyat 4 August 2003 Table of Contents Starting Up the Computer Windows Environment Start
ADPF10XN Instruction Manual
 ADPF10XN Instruction Manual 1 ADPF10XN Digital Photo Frame User Guide Thank you for purchasing the ADPF10XN 10.4 digital photo frame (DPF). Before operating your new digital photo frame please carefully
TL240C/TL321C Transparent Display User Manual
 TL240C/TL321C Transparent Display User Manual Disclaimer BenQ Corporation makes no representations or warranties, either expressed or implied, with respect to the contents of this document. BenQ Corporation
WISEreader B630. E-Book Reader. User Manual
 WISEreader B630 E-Book Reader User Manual Content QUICK START GUIDE... 4 DEVICE BUTTONS... 4 TIPS AND ADVICE... 7 BASIC OPERATIONS... 9 MAIN MENU... 9 READING INTERFACE... 9 RECENT FILES... 10 BOOKCASE...
*Do not operate the projector near water such as by the sink or bathtub as this may cause electric shock.
 Table of Contents Table of Contents 1 Warnings 2 Overview 3 Remote Control Functions 4 Packing List 5 General Operation 6 Startup and control Shutdown Positioning / Throw Distance / Focus 7 Connecting
Multi-Function Digital Viewer
 Multi-Function Digital Viewer User Manual About this Manual Preface This manual describes how to get the most out of the Multi-Function Digital Viewer. You should read through this manual before using
VSPlayer Software User Manual
 VSPlayer Software User Manual UD.6L0202D1505A01 Thank you for purchasing our product. This manual applies to VSPlayer software, please read it carefully for the better use of this software. This manual
WARNINGS. *Do not operate the Projector in direct sunlight or near heat sources such as heaters, fires, and stoves as this may cause a fire hazard.
 WARNINGS *Do not operate the Projector in direct sunlight or near heat sources such as heaters, fires, and stoves as this may cause a fire hazard. *Do not operate the projector close to sources of steam
CONTENTS CHAPTER I: BEFORE USE I. BEFORE USE
 I. BEFORE USE Foreword 1. Features 2. Accessories 3. Product Safety Information 4. Illustrations and Functions II. FAST OPERATION 1. Startup 2. Shutdown 3. Lock 4. Reset 5. Pause 6. Music File Select 7.
Veho VPA-001-QUDO USER MANUAL. Exploring your Qudo
 Veho VPA-001-QUDO USER MANUAL Exploring your Qudo 1 2 3 4 5 1 6 7 8 9 10 11 12 13 No Description 1 Holding the frame in Landscape: Move left button 2 On/Off Switch 3 SD Card Slot 4 USB Port 5 Charging
LED show User Manual
 LED show User Manual Setup & Environment Introduction LEDshow is designed for LED program play and management. It mainly applied to full color LED display, both synchronous and asynchronous control system.
MP3 HARD DISK. User Manual V1.0
 User Manual V1.0 Contents Before Using the Product 1 Introduction 1 System Requirements 1 Charging the Battery 2 Transferring Music Files 3 Music File Transferring Example 4 Basic Functions 5 Components
TL240C Transparent Display User Manual
 TL240C Transparent Display User Manual Disclaimer BenQ Corporation makes no representations or warranties, either expressed or implied, with respect to the contents of this document. BenQ Corporation reserves
Before Operation. Basic Operation. Operating Instructions
 PF1501 14 Before Operation Basic Operation 2 3 3 6 6 7 Connect to PC 7 Operating Instructions Set-Up... 9 Selecting Which Media to View... 9 Viewing Photos... 9 Adjust Speed of Slideshow... 10 Adjust the
XEMIO-950 MP5 PLAYER / 4GB MEMORY / TOUCH SCREEN. For information and support,
 XEMIO-950 MP5 PLAYER / 4GB MEMORY / TOUCH SCREEN For information and support, www.lenco.eu To the customer: Thank you for purchasing this MP5 player. When opening the box for the first time, please check
1080p HD Car Event Recorder
 User Manual 1080p HD Car Event Recorder QV 3842 Product description 1 2 3 4 5 9 6 7 10 8 11 1 GPS 5 Menu 9 Power On/Off 2 HDMI Out 6 Up 10 MicroSD Card Slot 3 Reset 7 Down 11 Play/Stop 4 Mini USB Out 8
Features. Warnings and Precautions READ BEFORE OPERATING EQUIPMENT SAVE THESE INSTRUCTIONS
 SENTA Warnings and Precautions READ BEFORE OPERATING EQUIPMENT SAVE THESE INSTRUCTIONS To prevent damage to your radio or possible injury to you or others, read these safety precautions and instructions
PRESTIGIO LIBRETTO. e-book Reader PER307.
 PRESTIGIO LIBRETTO e-book Reader PER307 www.prestigio.com Table of Contents Disclaimer 3 Introduction 3 Package Content 3 Getting Started 4 Charging the Reader 5 Power On/Off, Reset Device, Insert MicroSD
9.7 Digital Photo Frame
 Instruction Manual 9.7 Digital Photo Frame S10DPF13 Contents Safety Warnings...4 Unpacking...5 Product Overview...6 Front & Rear View...6 Top View...6 Preparations...7 Connecting to the Mains Power...7
DENVER DPF-537 User Manual. Digital Photo Frame. The power adapter cable/disconnect device shall remain easy to operate/disconnect.
 DENVER DPF-537 User Manual Digital Photo Frame WARNING The power adapter cable/disconnect device shall remain easy to operate/disconnect. 1 Introduction Congratulations on your purchase of Digital Photo
USER MANUAL Digital Screen
 USER MANUAL Digital Screen FDBF20BK Cautions Precautions and Maintenance For indoor use only To avoid risk of fire or electric shock do not expose the unit to moisture or condensation. To avoid overheating,
MDVR-14 SOLID STATE MINI DVR User Guide
 MDVR-14 SOLID STATE MINI DVR User Guide 1 Contents 1. SAFETY PRECAUTIONS...3 2. FEATURES...4 3. PACKING LIST...4 4. MDVR DESCRIPTION... 5 5. BASIC CONFIGURATION...7 6. DISPLAY...8 7. OPERATION...9 8. MAIN
User s Manual of Electronic Book Reader Precautions on using the device
 User s Manual of Electronic Book Reader Precautions on using the device 1.This product is a sophisticated electronic device; please pay more attention to the usage: 2. Keep the product away from electromagnetic
LED STUDIO USER MANUAL
 BLAIR COMPANIES LED STUDIO USER MANUAL Part # 33-19-14 5107 Kissell Avenue Altoona PA 16601 814-949-8287 blaircompanies.com TABLE OF CONTENTS Chapter 1 Introduction... 1 Chapter 2 Install and Uninstall...
SMPK4230 User Manual
 SMPK4230 User Manual Sylvania is a registered trademark of OSRAM Sylvania Inc. Used under License What s in the box? Operating Unit User Manual Quick Start Guide USB Cable Earphone Battery Charger 2 Content
Intelligent Security & Fire Ltd
 Copyright 2007-2009 Cortex Global Table of contents: Introduction... 3 1. Login... 3 1.1 Advanced login options... 4 2. Preview... 5 2.1 Main menu... 6 2.2 Camera list... 6 2.3 Main display... 6 2.4 Maps...
Slide the switch to On and the player will be powered on in 1 second. The player will prompt "Welcome" and then enter the main interface.
 NMV-179X For the correct use and good performance of the player, the user must fully understand the manual as well as strictly follow the instructions provided. Avoid high temperature (above 35 C) or
TV1 Digital Player User s Manual
 TV1 Digital Player User s Manual Note: Screen shots taken in this manual may appear different on the player itself. Table of Content: Computer System requirements... 1 Notes... 2 Product Introduction...
DENVER DPF-721 User Manual. Digital Photo Frame. The power adapter cable/disconnect device shall remain easy to operate/disconnect.
 DENVER DPF-721 User Manual Digital Photo Frame WARNING The power adapter cable/disconnect device shall remain easy to operate/disconnect. 1 Introduction Congratulations on your purchase of Digital Photo
IP65 Rated Freestanding Outdoor Monitor User s Manual
 IP65 Rated Freestanding Outdoor Monitor User s Manual Manual Version OTA1.0 Safety Instructions Please handle with care so as to not damage the LCD panel. The holes or openings on the display are designed
EYEZONE B1080PAM. User Manual CONTENTS. Feb 24, 11
 EYEZONE B1080PAM User Manual CONTENTS 1. Package Contents...... 1 2. Introduction...... 1 3. Features 1 4. Hardware Overview..... 2 5. Remote Control.... 3 6. Using the B1080PAM...... 4 6.1 Start the B1080PAM.....
Bringing memories to life!
 The moment keeps going Jackie on holidays - Great ocean road, Melbourne 15" Mirage Series Bringing memories to life! Product User Manual (Model No's: DF-F1504b & F1506t) 1. Welcome! Congratulations on
SecureShot HC Quick Start Instruction Page
 SecureShot HC Quick Start Instruction Page Your new SecurShot HC has been factory pre-programmed and tested to fit most applications. It is ready-to-go right out of the box. An SD card is installed, and
POS Android Digital Advertising Display (Network) Hardware User Manual
 Hardware User Manual") POS Android Digital Advertising Display (Network) Hardware User Manual Manual Version POSW3.0 Safety Instructions Please keep the display away from any heat sources. Place the display in a stable and well-ventilated
POS Android Digital Advertising Display (Network) Hardware User Manual Manual Version POSW3.0 Safety Instructions Please keep the display away from any heat sources. Place the display in a stable and well-ventilated
Network Digital Signage Player. Users Manual
 Network Digital Signage Player Users Manual Table of Contents I. Introduction II. Specifications III. Signage Player Kit IV. Playlist Operation V. Client Device Setup 1. Client Installation 2. Client Main
DV5-2. SC-DV5_Main.jpg. SC-DV5_Main.jpg. SC-DV5_Main.jpg
 DV5-2 SC-DV5_Main.jpg SC-DV5_Main.jpg SC-DV5_Main.jpg Overview Camera: Overview -screen Display: The DV5-2 body camera is an advanced recording system with many options and features available. Please review
49BDL5055P/11 V User Manual (English)
") /11 V1.10 www.philips.com/welcome User Manual (English) Safety Instructions Safety precautions and maintenance shock, electrical hazards and/or mechanical hazards. Read and follow these instructions when
/11 V1.10 www.philips.com/welcome User Manual (English) Safety Instructions Safety precautions and maintenance shock, electrical hazards and/or mechanical hazards. Read and follow these instructions when
< W&ϭϱyyy USER MANUAL
 USER MANUAL Safety Information Keep away from water, moisture and dusty areas. Working temperature of 0-40 C. Never store in a very hot or very cold place. Be careful not to drop or knock the Digital Photo
HD Video Recorder Manual
 HD Video Recorder Manual (Ball-point pen Type) Remark: This picture only for reference 1. Structure Remark: This picture only for reference 1: operation button 2: camera 3: MIC 4: reset button 5: status
DENVER DPF 742 User Manual. Digital Photo Frame. The power adapter cable/disconnect device shall remain easy to operate/disconnect.
 DENVER DPF 742 User Manual Digital Photo Frame WARNING The power adapter cable/disconnect device shall remain easy to operate/disconnect. 1 Introduction Congratulations on your purchase of Digital Photo
User s Manual of DVR ULTIMAX. Remote Client Software V wersja 2.40
 User s Manual of DVR ULTIMAX Remote Client Software V 4.0.1 ULTIMAX-304 ULTIMAX-308 ULTIMAX-316 ULTIMAX-504 ULTIMAX-508 ULTIMAX-516 ULTIMAX-704 ULTIMAX-708 ULTIMAX-716 wersja 2.40 Index 1 Software Install,
AV63L Manual. We are dedicated to keep improving product performance and product quality, and also
 AV63L Manual Foreword We are dedicated to keep improving product performance and product quality, and also make effort to ensure correctness and completeness of this manual, however the manual may be subject
XDS-2170 Hardware User Manual
 XDS-2170 Hardware User Manual Contents XDS-2170 Hardware User Manual 0 1. Introduction 1 1.1. Package contents 1 1.2. Physical view and features 1 1.3. Installation 1 1.4. Setting up 2 2. Technical Data
Simple Instructions for 808 HD Car Key Micro Camera (#16)
") Simple Instructions for 808 HD Car Key Micro Camera (#16) Thank you for your purchase of our 808 Car Key Micro-camera (#16). If this is the first time you are using a product of this kind, please follow
Simple Instructions for 808 HD Car Key Micro Camera (#16) Thank you for your purchase of our 808 Car Key Micro-camera (#16). If this is the first time you are using a product of this kind, please follow
INSTRUCTION MANUAL DRAWINGS AND SPECIFICATIONS ARE SUBJECT TO CHANGE WITHOUT NOTICE
 OK OAP 3040-8 INSTRUCTION MANUAL DRAWINGS AND SPECIFICATIONS ARE SUBJECT TO CHANGE WITHOUT NOTICE 1 Table of Contents Features... 3 Precautions... 3 Warning... 3 Buttons & Controls... 4 Main menu... 5
Make Your Pictures Come to Life with Photo Story 3
 Page 1 of 6 Click Here to Install Silverlight United States Change All Microsoft Sites Search Microsoft.com Submit Windows Media Home For Home Windows Media Player Music & Video Cool Devices For Professionals
RSE Overview > > > > > Fig. 1 RSE features (5 seat vehicle shown) > > > >
 > > > >") RSE Overview The Rear Seat Entertainment system (RSE) allows passengers in the rear compartment to access multimedia content and basic Infotainment functions using the Touch Screen Remote (TSR) or a suitable
RSE Overview The Rear Seat Entertainment system (RSE) allows passengers in the rear compartment to access multimedia content and basic Infotainment functions using the Touch Screen Remote (TSR) or a suitable
Wireless laser barcode collector User's Guide DC8050= wireless barcode collector scanner & wireless data collector
 Wireless laser barcode collector User's Guide DC8050= wireless barcode collector scanner & wireless data collector First, product introduction 1, Functional characteristics Welcome to this new concept
15" HD Digital Photo Frame
 15" HD Digital Photo Frame Table of Contents 2 SAFETY INFORMATION...3 PACKAGE CONTENTS...3 FEATURES...4 REMOTE...5 QUICK START...6-7 PHOTO PLAYBACK...8-9 MUSIC PLAYBACK...10-11 MOVIE PLAYBACK...12-13 CALENDAR...14
aaxa P4X Pico Projector TECHNOLOGIES User Guide
 aaxa TECHNOLOGIES P4X Pico Projector User Guide Caution! WARNING: Please use this product as instructed. Misuse may cause injury or death. DO NOT use while driving DO NOT expose to water or wet surfaces.
Branor Systems HD Camera Trucks "CamTruck" Hornby CTHD002
 Branor Systems HD Camera Trucks "CamTruck" Hornby CTHD002 Last update 11-2-2012: Thank you buying this Branor Systems CamTruck. We hope you get as much enjoyment out of this novel device as we had developing
Quick Guide 2017 ZOOM CORPORATION. You must read the Usage and Safety Precautions before use.
 Quick Guide You must read the Usage and Safety Precautions before use. The Operation Manual can be downloaded from the ZOOM website (www.zoom.co.jp). 2017 ZOOM CORPORATION Copying or reprinting this manual
DT800 Lane Timer Manual
 DT800 Lane Timer Manual Features: 1) 8000 Memories 2) Built-in PRINTER 3) Up to10 Lane Buttons 4) PC Upload Function 5) 12/ 24Hr User-selectable Clock 6) 4-Digit Bib Number 7) 4-Digit Place Counter 8)
HyperMedia User Manual
 HyperMedia User Manual Contents V3.0 Chapter 1 : HyperMedia Software Functions... 3 1.1 HyperMedia Introduction... 3 1.2 Main Panel... 4 1.2.1 Information Window... 4 1.2.2 Keypad... 4 1.2.3 Channel Index...
Rikomagic MK802 III User Manual. Andriod4.1 Dual-core Mini PC. Page0
 Andriod4.1 Dual-core Mini PC Shenzhen Rikomagic Tech Corp.,Ltd Page0 Table of Contents Declaration... 2 1.Connector...3 2. Device connection Instruction...4 3. Boot state...4 4. Main Screen Introduction...
Libraries. Multi-Touch. Aero Peek. Sema Foundation 10 Classes 2 nd Exam Review ICT Department 5/22/ Lesson - 15
 10 Classes 2 nd Exam Review Lesson - 15 Introduction Windows 7, previous version of the latest version (Windows 8.1) of Microsoft Windows, was produced for use on personal computers, including home and
The Fundamentals. Document Basics
 3 The Fundamentals Opening a Program... 3 Similarities in All Programs... 3 It's On Now What?...4 Making things easier to see.. 4 Adjusting Text Size.....4 My Computer. 4 Control Panel... 5 Accessibility
SmartView Versa+ User Manual. Table of contents
 Table of contents Overview... 1 What s in the box?... 2 Getting to know your SmartView Versa+.. 3 Getting started... 5 Inserting the battery... 5 Charging the battery... 6 Install SD card... 7 Install
WATCH MP4 PLAYER USER MANUAL. Ref.: WATCH04 BTH + WATCH04 BASIC FUNCTION PREPARATIONS BEFORE USE 1. KEY DEFINITION
 WATCH MP4 PLAYER Ref.: WATCH04 BTH + WATCH04 USER MANUAL BASIC FUNCTION 1 Display: 1.5 inch capacitive touch TFT, 128x128 resolution 2 Audio Format: MP3, WMA, AAC, OGG, FLAC, APE 3 Voice record format:
Recording Listening Recording mode / music mode Fas forward and rewind A-B repeat File browse Deleting
 MODE: TF-30 Recording Listening Recording mode / music mode Fas forward and rewind A-B repeat File browse Deleting Recording settings Record Format Set bitrate Subsection record Voice control mode Recording
USER MANUAL. 4.3 Video Door Phone
 USER MANUAL 4.3 Video Door Phone Table of Contents 1. Name and Functions of Each Part... 2 1.1 Front Part... 2 1.2 Rear Part... 3 2. Features and Functions... 4 2.1 Features... 4 2.2 Main Functions...
W-E
 Signage Suite V2.20 User Guide 605220-02-01-W-E-051613-02 Trademarks Windows XP, Windows Vista, Windows 7, and Microsoft are registered trademarks of Microsoft Corporation. All other trademarks are the
7" Digital Photo Frame with Interchangeable Frames
 7" Digital Photo Frame with Interchangeable Frames PF-A720C/PF-A720CE GB User Manual Thank you for purchasing this Digital Photo Frame. You can play your favorite JPEG files directly from a memory card
Digital Signage Player Software Android Edition
 Digital Signage Player Software Android Edition User Manual V1.0 欣威视通安卓版商用高清播放器主控软件 V1.0 1 http:// Revision history Revision Revision date Principle changes V1.0 Jun. 2014 Create based on Signway EP28
NEONODE N2 USER GUIDE
 NEONODE N2 USER GUIDE www.neonode.com N070802-1 Rev. XX 1 1 BASICS... 1 1.1 Insert the SIM card... 1 1.2 Release the SIM card... 1 1.3 Insert the Mini-SD card... 1 1.4 Charge the battery... 2 1.5 Turn
Line_In (Audio) Recording...
 Recording...") Contents Features... Warning... Introduction... Active Matrix OLED Display Screen... How to Use with PC System... Charging the MP3 Player... Files, Upload and Download... Formatting... Software Installation...
Contents Features... Warning... Introduction... Active Matrix OLED Display Screen... How to Use with PC System... Charging the MP3 Player... Files, Upload and Download... Formatting... Software Installation...
Quick Start Guide. Brief Introduction
 Quick Start Guide Brief Introduction The C-Pen DictionaryPen (C610D) is a portable digital tool powering linguistic understanding and work/study efficiency. Technically it is a Digital Highlighter pen
INTRODUCTION. i-tech Company LLC TOLL FREE: (888) WEB:
 WEB:") Table of Contents 1. Introduction 1 1.1. About the Product...1 1.2. Features...2 1.3. Notice...3 1.4. Check List...3 2. Playing System...5 2.1. Install Battery in the Remote Control...5 2.3. To Insert
Table of Contents 1. Introduction 1 1.1. About the Product...1 1.2. Features...2 1.3. Notice...3 1.4. Check List...3 2. Playing System...5 2.1. Install Battery in the Remote Control...5 2.3. To Insert
1. REMOVE BACK COVER 2. INSERT SIM CARDS AND MEMORY CARD
 QUICK START GUIDE 1. REMOVE BACK COVER 2. INSERT SIM CARDS AND MEMORY CARD 3. INSERT BATTERY 4. CHARGE FOR 8 HOURS BEFORE TURNING ON. 5. TURN CELL PHONE ON AND WAIT FOR INITIAL SETUP 6. MULTIMEDIA PLAYER
Basic Setup Guide: 21, 27 & 32 IP PVMs with Axis M3045 Camera
 DC24V LAN ANALOG OUTPUT POWER AUTO UP HDMI DOWN MENU ALARM Basic Setup Guide 21, 27 & 32 IP PVMs with Axis M3045 Camera CE-M21A-PIR / CE-M27A-PIR / CE-M32A-PIR 24V POWER SUPPLY REQUIRED. SOLD SEPARATELY
USER MANUAL. Please read this user manual carefully before using your unit.
 USER MANUAL MULTIMEDIA LED PROJECTOR Please read this user manual carefully before using your unit. CONTENTS Contents...1 Caution... 2 What's in the box...3 Product Introduction...4 Remote Control Introduction...5
Windows Me Navigating
 LAB PROCEDURE 11 Windows Me Navigating OBJECTIVES 1. Explore the Start menu. 2. Start an application. 3. Multi-task between applications. 4. Moving folders and files around. 5. Use Control Panel settings.
USER MANUAL MINI WILDLIFE CAMERA
 USER MANUAL MINI WILDLIFE CAMERA INTRODUCTION Thank you for purchasing our mini wildlife camera. This device is a special camera designed specifically for recording and observing wildlife. These easy to
MOBILE SAFETY DVR1543K. CLIP ON REARVIEW MIRROR KIT with 4.3-INCH LCD MONITOR FRONT & REAR CAR CAMCORDER with DUAL MOUNTING REVERSING CAMERA
 MOBILE SAFETY DVR1543K REARVIEW MIRROR CAR DRIVING RECORDER KIT CLIP ON REARVIEW MIRROR KIT with 4.3-INCH LCD MONITOR FRONT & REAR CAR CAMCORDER with DUAL MOUNTING REVERSING CAMERA 3.0 MEGA PIXEL CAMERA
Chapter 1: Introduction. Chapter 2: Getting Started
 Chapter 1: Introduction Media Player 200 is a Digital Media Player that includes a connector for a USB storage device and card reader. The Media Player 200 connects to your home entertainment center allowing
Mp3 Player with Speaker. Instruction Manual FOR MODEL NO FIESTA2. Please read this instruction carefully before the operation
 Mp3 Player with Speaker FOR MODEL NO FIESTA2 Instruction Manual Please read this instruction carefully before the operation EN User Manual KEY DEFINITIONS 9 1 3 2 5 6 4 8 7 Power ON/OFF Play: Play/Pause
xtab 7Q Tablet PC User s manual
 xtab 7Q Tablet PC User s manual TABLE OF CONTENTS INTRODUCTION... 3 I - GETTING STARTED... 3 Important Safety Precautions... 3 Cleaning the Panel... 3 Cleaning the Tablet... 3 Features... 4 Buttons Overview...
INSTRUCTION MANUAL DVR1 FLIP DOWN HD DVR SPECIFICATIONS
 DVR1 FLIP DOWN HD DVR SPECIFICATIONS GENERAL - Display: 2 LCD TFT - Rotates 180 - Image Sensor: 5MP, 1/3 Colour CMOS - Resolutions: HD 720p with 1080p Upscaling - Viewing Angle: 120 - Camera Adjustment:
Portable Hi-Res Movie Projector
 Care Instructions Portable Hi-Res Movie Projector Instructions Part No. COMP9256 B Portable Hi-Res Movie Projector Projector - Accessories 1 Projector 2 Lens cover 3 Remote control 4 Speaker 5 AV cable
2.4GHz Digital Wireless 7 LCD Surveillance Kit
 2.4GHz Digital Wireless 7 LCD Surveillance Kit User Manual QC-3762 Box Contents: 1 x 7 LCD Monitor 1 x Wireless Camera 2 x Mains Power Adaptors 1 x Camera Antenna 1 x Mounting Hardware Product Diagram:
Stealth Cam STC-CRV20 User s Manual
 Stealth Cam STC-CRV20 User s Manual Toll Free Customer Support 1-877-269-8490 www.stealthcam.net Version 1.1 08/08 For Customer Service or Warranty Information Call Toll Free 877-269-8490 Stealth Cam,