GedView User Guide. David A Knight. Website: [
|
|
|
- Emerald May
- 5 years ago
- Views:
Transcription

1 GedView User Guide David A Knight Support:support@gedview.org [mailto:support@gedview.org] Website: [
2 GedView 4.0.2: User Guide David A Knight Copyright 2017 David A Knight
3 Table of Contents 1. Introduction Concepts... 2 GEDCOM... 2 Trees... 2 Family groups... 2 Shared Records... 2 Privacy... 2 Field Actions... 3 Gestures... 3 Character Sets Trees... 4 Creating a new Tree... 6 Importing an existing file File Types Methods Deleting a Tree Deleting itunes Shared Files Exporting a Tree Share itunes Sharing Download From Device Cloud Storage Settings User Guide People Surnames People With Surname Person Events Facts Media Notes Sources Parents Family Bookmarking Reports Families Family list Family Parents Events Facts Media Notes Sources Children Bookmarking Reports Search / Bookmarks Surname iii
4 GedView Forename... Ancestral File Number... Bookmarks Events Timeline Notes Sources Places Media... Media Group List... Gallery About Note Event / Fact... Details... Address... Phone, , Fax, Web... Media... Notes... Sources LDS Sealing Place... Media... Notes... Events Source Citation... Details... Notes... Source... Media / Source Media Source... Details... Media... Notes... Citations Media Item... Notes... Sources... Events Reports... People... Descendants... Pedigree... Families... Family Sheet Settings... Allow GedView To Access... Import / Export... Person List... Person Details... Family Details... Security Legal... Privacy... General... iv
5 GedView Permission Requests... Licenses... Galuca Project... App Store EULA... Mozilla Public License v
6 List of Tables Features that will request permission vi
7 Chapter 1. Introduction GedView allows you to record and view your genealogy information no matter where you are, whether you are out and about researching local records, visiting locations such as graveyards looking for information, or even just sat at home. You can quickly checkup on family relationships, dates / locations of events, sources of information, view your notes, or record newly found information while you are out researching. Unlike other apps GedView does not require you to use any specific genealogy program on your computer, or pay for a subscription to a web site. So long as your favourite program or web site can export a GEDCOM file then you can copy your data into GedView. If it supports importing a GEDCOM file you can then transfer your changes back out of GedView. 1
8 Chapter 2. Concepts GEDCOM GEDCOM is a file format for transferring genealogy information and has gone through various iterations. The most recent official version was version 5.5, with a draft version, 5.5.1, also made available. GedView does not mind which version your file is when importing and will load all information it can. If you have a file that is older than version 5.5 and all the data is not loaded into GedView please contact support. Files exported from GedView will be version Trees All your information in GedView is stored in a database, which we will refer to as a tree. You can have any number of trees, either created from importing a GEDCOM file, or started from scratch from within GedView itself. Family groups GedView follows the GEDCOM model of family groups. A family group consists of up to two spouses, (while referred to as husband and wife due to how GEDCOM is defined, GedView allows a person of any gender to be assigned to either) and 0 or more children. If a couple are married then this is recorded as an event on a family group. Each person can be part of any number of groups, either as a spouse, or as a child. Shared Records When it comes to information such as notes, sources, places, or media it can be useful to attach these to multiple people, or family groups. As such GedView will keep a global list of all of these record types and allow you to select an existing item when adding to a person or family. Some desktop genealogy programs, such as RootsMagic, also support shared events. GedView understands these in GEDCOM files generated by RootsMagic but adds separate events to each of the participants instead of maintaining the shared event. This is because the GEDCOM standard does not support sharing events. Privacy Unlike a growing number of apps GedView stores your trees on your own device. At no point is your information sent to any server, processed, or released to any third party, or even to the GedView developers by the app. In addition to this your information is encrypted by ios if you have a passcode setup for your device. 2
9 Concepts A copy of a GEDCOM file may be requested when contacting support if you have problems. When sent it will be used for resolving the problem, and not kept, used, or passed on for any other purpose. Field Actions When editing a field there may be additional actions that can be performed rather than just typing. These will appear just above the on-screen keyboard if available, or at the bottom of the screen if you are using a physical keyboard, with the specific behaviour dependant on the field being edited. Gestures A number of actions may be available for a row of data. This can be accessed in the standard method for ios apps. Swipe left on the row to reveal them. e.g. Delete, Export, Bookmark etc. While GedView keeps information on each screen up to date with changes you make you can manually refresh a screen by scrolling to the top, and then dragging down until a refresh indicator appears. Character Sets Different computer systems store letters in a number of different ways. This can also depend on the language in use on that system. GedView supports GEDCOM files that are encoded with the following character sets: ASCII, ANSI, ANSEL, UTF-8, UTF-16. ANSI isn't straight forward, nor is it an officially supported format for GEDCOM files. In order to aid in reading this GedView will check the file to see if it specifies the language in use. e.g. if the file specifies Greek, then ANSI codepage 1253 will be used. If no language is given ANSI codepage 1252 (Latin 1 / Western European) will be used. 3
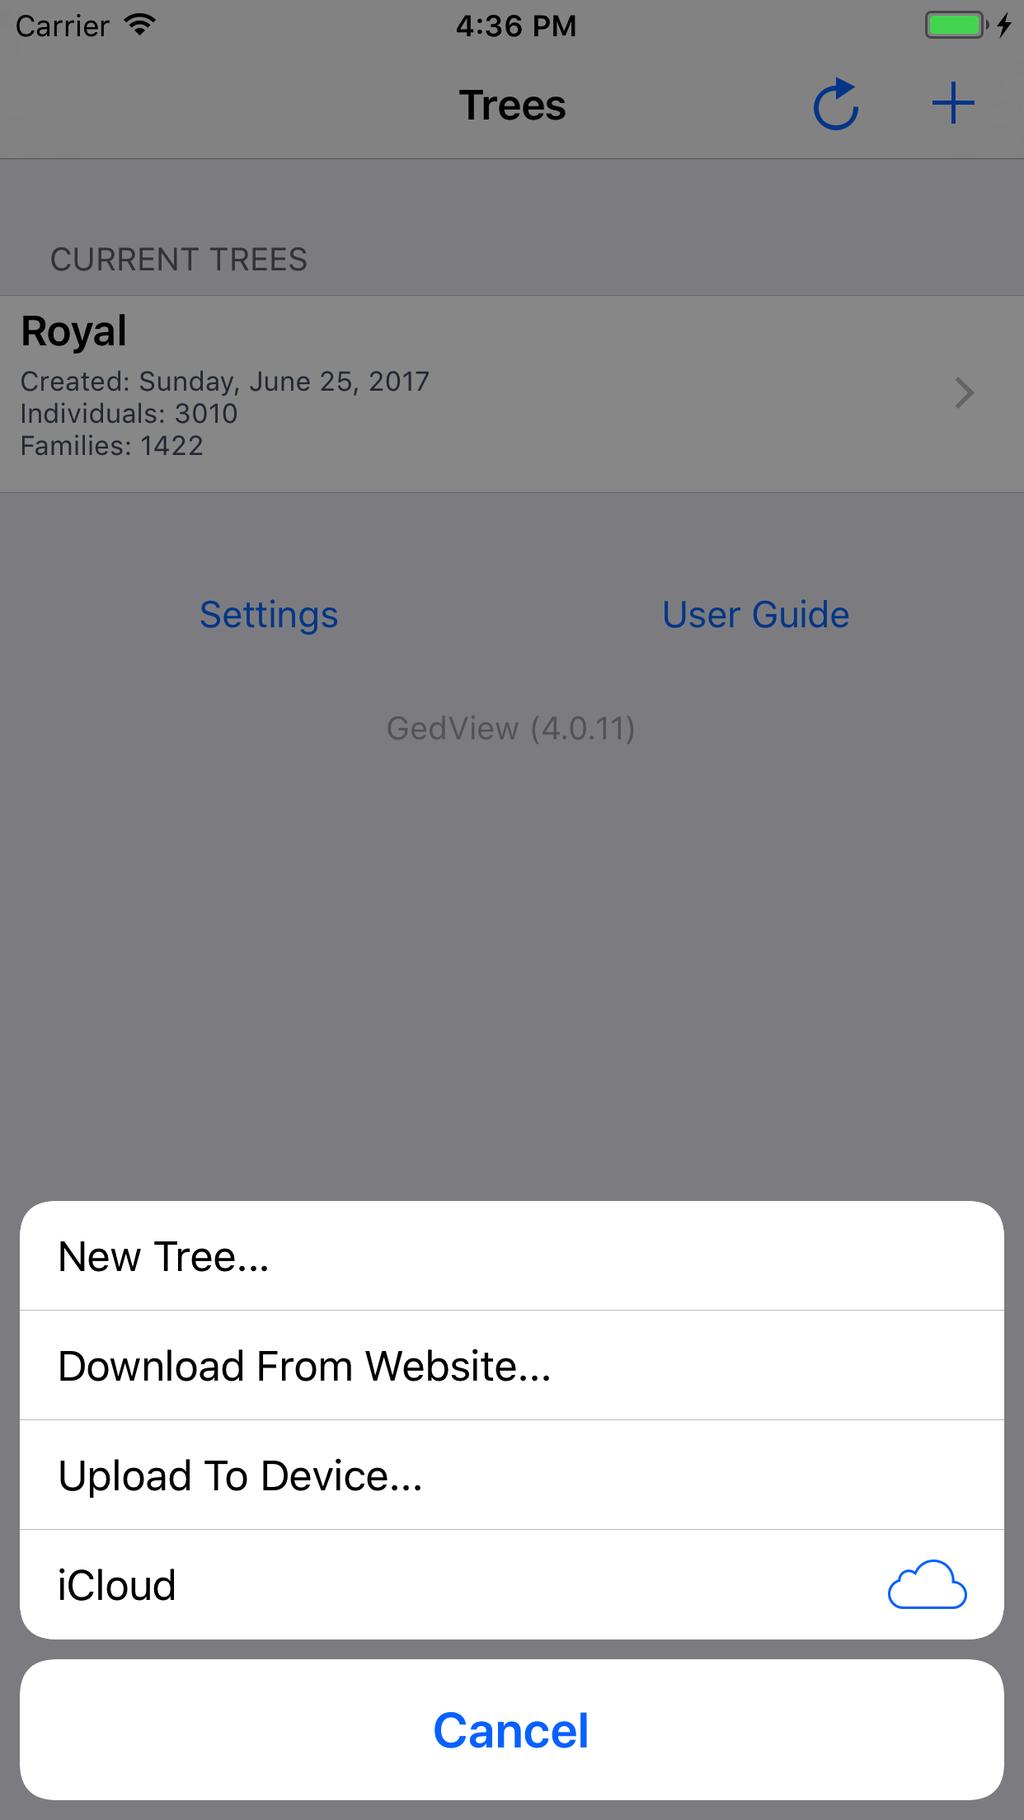
10 Chapter 3. Trees Upon first starting GedView you will be presented with the Trees screen. A sample tree containing the British royal family is included and will be listed under "Current Trees". You can use this to get to know how GedView works, or jump straight in by creating a new tree. 4
11 Trees 5
12 Trees Creating a new Tree To create a new tree tap the "+" button in the top right of the Trees screen. This will present you with a menu from which you can select "New Tree...". 6
13 Trees 7
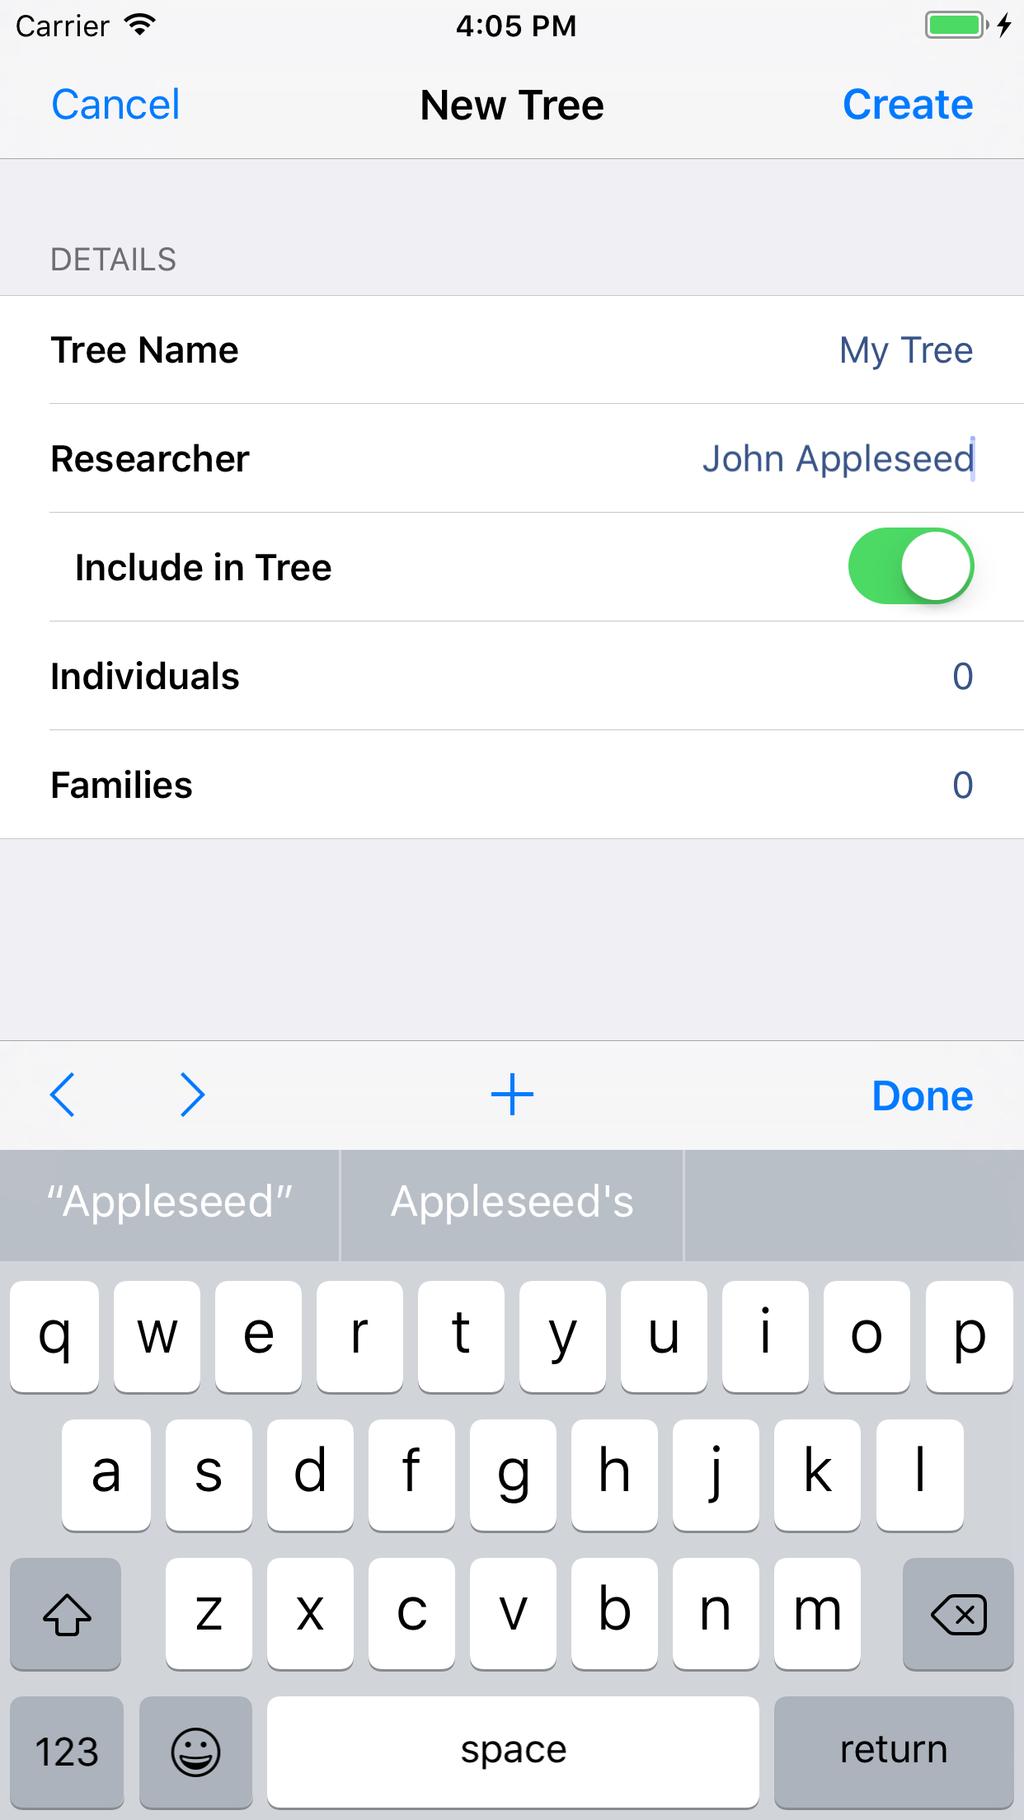
14 Trees This will show the "New Tree" screen. This will allow you to provide a name for your tree, and the name of the researcher (this would probably be yourself). You also have the option of including the researcher as a person in the new tree. On the researcher field there is a field action. A "+" button which when tapped will allow you to select a person from your contacts. If you select "Include in Tree", and your contacts includes relationship information then the relevant family groups and all those people will be added to your tree, including images. If your contacts include birthdays then these will also be added as events. Tapping "Create" in the top right will then create the tree. 8
15 Trees 9
16 Trees Importing an existing file File Types GedView allows importing GEDCOM files as a single file, or if you wish to import all your images etc. as well you can import a Zip file which contains them alongside your GEDCOM file. Methods Download From Website This method will allow you to download a file directly from a website. Tap the "+" button in the top right of the Trees screen and select "Download From Website..." from the menu that appears. This will show the Download GEDCOM screen. From here you can enter the address of the GEDCOM file, e.g. and enter a username and password to use if required. 10
17 Trees Username and password will only work for websites using Basic Authentication. It will not work for file sharing sites. 11
18 Trees Tap the "Fetch" button in the top right once you have entered the details. Once the file has finished downloading the Download GEDCOM screen will close, and the file will be listed under "itunes File Sharing". Upload To Device This method will allow you to upload a file directly to your device over WiFi. Tap the "+" button in the top right of the Trees screen and select "Upload To Device..." from the menu that appears. This will show the Upload GEDCOM screen. While this screen is displayed a server will be running on your device. This can be accessed from any machine connected to the same WiFi as your device. A list of addresses that can be entered in a web browser on your computer will be displayed. 12

19 Trees Your web browser should then show a page titled "GedView File Import". It will list all files already uploaded by other methods. Clicking the "Upload Files..." button will allow you to add more. After 13
20 Trees selecting a file and the upload completing the Upload To Device screen will close, and the file will be listed under "itunes File Sharing". itunes File Sharing With your device connected to your computer you can copy files directly from within itunes. For more information on how to do this read the Apple support page: Files transferred via this method will appear under "itunes File Sharing" on the Trees screen. 14
21 Trees Tapping on any file listed under "itunes File Sharing" on the Trees screen will start to import that file as a new tree with the same name as the file. If a tree already exists with the same name it will be replaced. 15
22 Trees Cloud Storage If you use a cloud storage provider, such as icloud Drive, Dropbox, One Drive, Google Drive etc. you can simply copy your GEDCOM file or Zip file to the cloud storage. Tapping the "+" button will show supported cloud storage providers in the menu, so long as you have installed their app from the App Store. Tapping the menu item will show a provider specific view for selecting your file. Selecting your file will start to import it as a new tree with the same name as the file. If a tree already exists with the same name it will be replaced. From Other Apps Other apps on your device may have access to zip files and GEDCOM files. If the those apps allow opening files in other apps you will be able to select GedView. Examples include: AirDrop Files sent to your device via AirDrop will allow you to selected GedView as the app to open the file. Via the built in mail app if you press and hold on the attachment you will be presented with a menu that shows a list of apps that can open the file. GedView should be in this list. Tapping "Copy to GedView" will start to import the file as a new tree with the same name as the file. If a tree already exists with the same name it will be replaced. Safari If you are browsing a site such as RootsWeb, Ancestry, or FamilySearch and there is a link to download a GEDCOM you can tap that link, and once the file downloads you should be presented with the option of launching GedView. Some websites however may not be configured in a way that Safari will know it is downloading a GEDCOM file. In these circumstances you will not be able to open the file in GedView via this method. It may be possible to resolve this by contacting the site owners and requesting that they setup their site so that "*.ged" is sent as "application/x-gedcom". Cloud Storage Apps If you have installed apps on your device for any cloud based storage you should be able to browse to your file in that app. That app should allow you to select another app to use to open the file. Select GedView and the file should import as a new tree with the same name as the file. If a tree already exists with the same name it will be replaced. Deleting a Tree If you no longer wish to have a tree in GedView, if you are short of storage space for instance, you can remove it from the Trees screen. Swipe left on the tree under the "Current Trees" list. The options that appear on the right include "Delete". Tapping that option will then delete the tree. 16
23 Trees 17
24 Trees Deleting itunes Shared Files Once you have imported a tree from a file listed under "itunes Shared Files" you can free up space on your device by swiping left on the file you want to remove. The option that appears on the right is a "Delete" button. Tapping that will delete the shared file. 18
25 Trees 19
26 Trees Exporting a Tree After making changes to your tree, or if you wish to share your information with someone else you can export your tree. To do so swipe left on the tree name under the "Current Trees" list. The options that appear on the right include "Export". Tapping that option will show the export screen. 20

27 Trees From here you can provide a name for the exported file. By default it will have the same name as the tree. 21
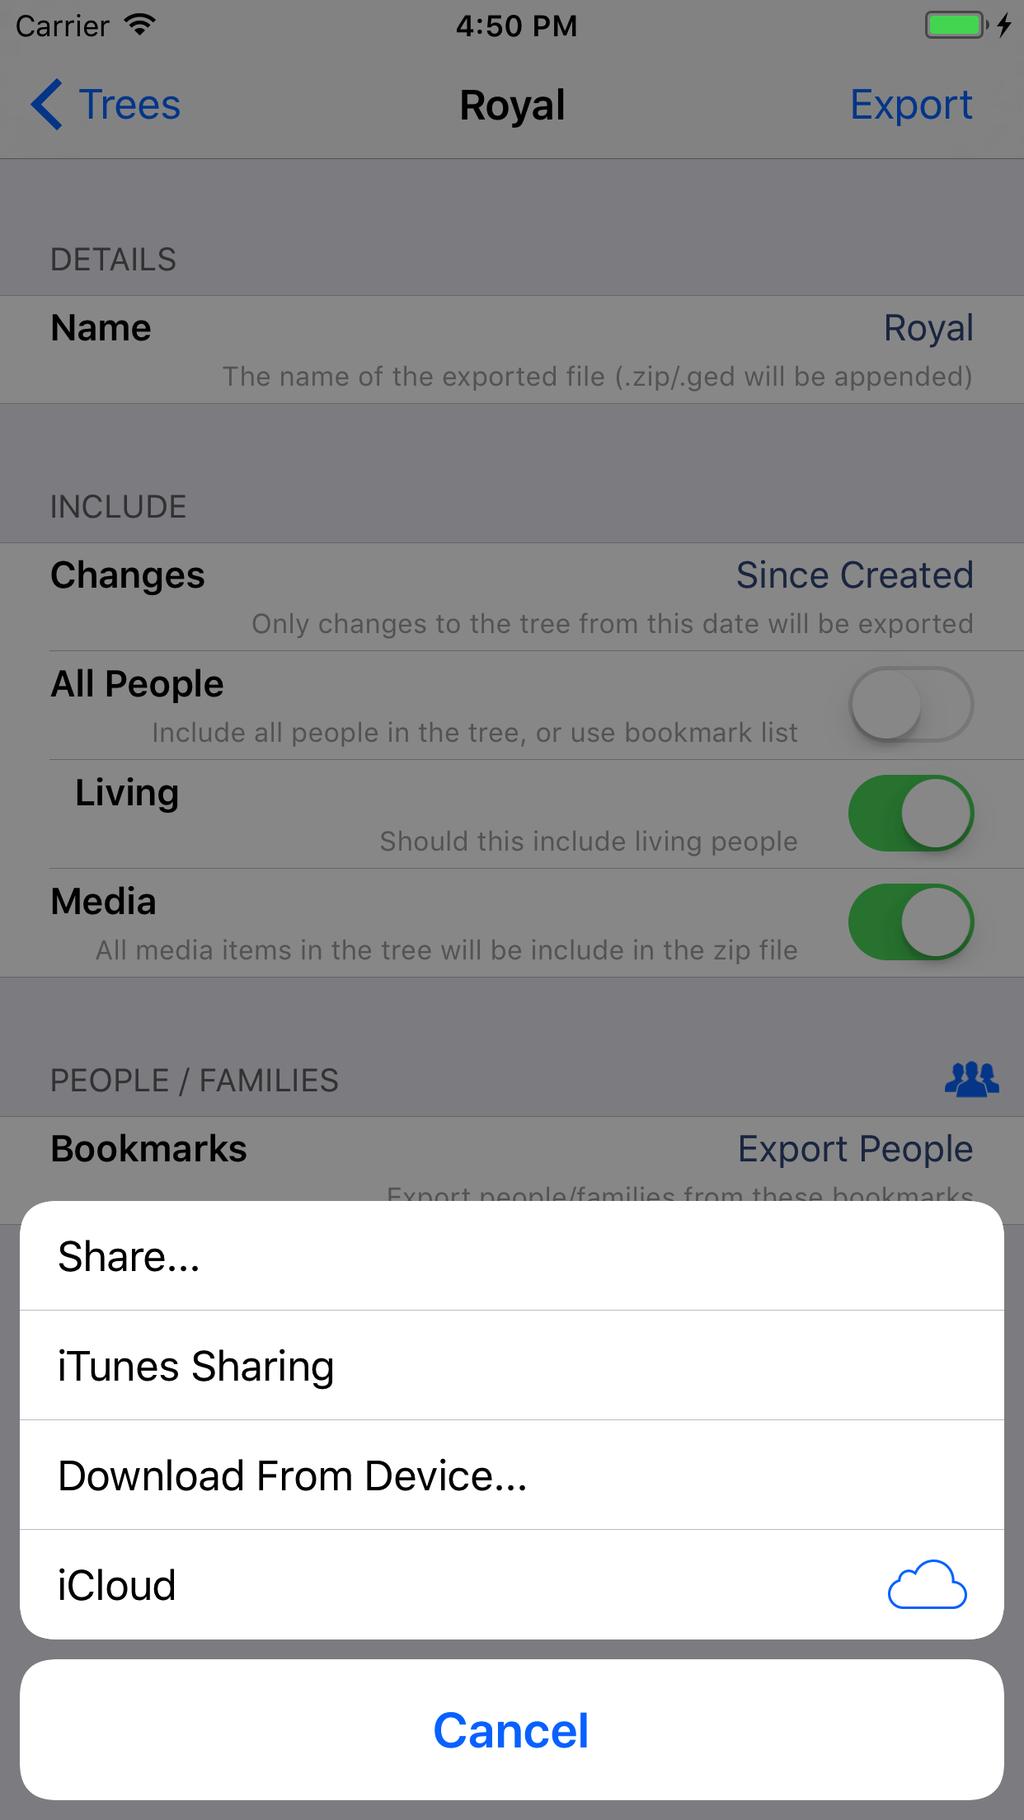
28 Trees You also have a number of options on how much of your tree will be included. These are listed under the "Include" section. "Changes" - defaults to since the tree was created. Tapping this item will allow you to select a date if your tree has been changed at all. "All People" - defaults to on. Switching this option off will allow you to select a bookmark list that contains the people/families to export. This will default to the "Export People" bookmarks. "Living" - defaults to on. Switching this option off will prevent details of living people being included in the tree. Instead a person will be included, but named as living, without any events. "Media" - defaults to on. Include photos, video etc. 22
29 Trees Under the "People / Families" section will be one item, if "All People" is switched off. Tapping that item will let you change which bookmark list you wish to use for exporting. To the right of the section heading, 23
30 Trees above the single item is a button showing a group of people. Tapping that will show you the selected bookmark, as well as allowing you to view your other bookmark lists. Once you have chosen your export options tap the "Export" button in the top right of the screen. Once the export has completed you will be presented with a menu allowing you to choose what to do with the file. 24
31 Trees 25
32 Trees Share This will show the standard ios share sheet. From here you can send your exported file via AirDrop, imessage, Mail, or any other app you have installed that is able to open Zip files or GEDCOM files. itunes Sharing Using itunes Sharing will save the file to the "itunes Shared Files" list shown on the main Trees screen. With your device connected to your computer you can copy files directly from within itunes. For more information on how to do this read the Apple support page: Download From Device Selecting this option will show the Download GEDCOM screen. 26
33 Trees 27
34 Trees While this screen is displayed a server will be running on your device. This can be accessed from any machine connected to the same WiFi as your device. A list of addresses that can be entered in a web browser on your computer will be displayed. Your web browser should then show a page titled "GedView File Export". It will the files available for export. Clicking on the file in your browser will all you to download to your computer. Cloud Storage If you use a cloud storage provider, such as icloud Drive, Dropbox, One Drive, Google Drive etc. you can simply copy your GEDCOM file or Zip file to the cloud storage. You will need to have installed the app for the provider you use from the App Store. Tapping the menu item will show a provider specific view for selecting where to export your file. Settings At the bottom of the Trees screen is a settings button. This will take you out of GedView and to the main settings app on your device. From here you will be able to modify the behaviour of GedView, and control what information on your device it can access. Full details of the available settings can be read in Chapter 21, Settings User Guide This user guide can be read within GedView by tapping the "User Guide" button at the bottom of the Trees screen. 28
35 Chapter 4. People You can browse the people in your tree via the People tab. In order to handle large trees this is broken down into a list of surnames, and beneath each surname a list of people with that surname, before then being able to access the details about a person. Surnames This is the top level list under people. It will display a list of all the surnames in your tree, order alphabetically (ignoring case and accents). 29
36 People Beside each surname the number of people in the tree with that surname will be shown. The number displayed on the People tab will change to show the total number of distinct surnames in your tree. 30
37 People You can quickly jump to a specific initial by using the alphabetic index at the side of the list. If you swipe the list down when already showing the first item a search box will be displayed which will allow you to filter the list to surnames that start with what you type. 31
38 People Tapping on a surname will take you to a list of people with that surname. 32
39 People People With Surname This list shows you all the people in your tree with a specific surname. The people will be shown alphabetically (ignoring case and accents), and grouped based on the initial of the person's given name. 33
40 People The number displayed on the People tab will change to show the total number of people with the same surname. 34
41 People You can quickly jump to a specific initial by using the alphabetic index at the side of the list. If you swipe the list down when already showing the first item a search box will be displayed which will allow you to filter the list to people with a given name that starts with what you type. 35
42 People 36
43 People Each persons name will be displayed along with details of any birth or death events you have added. If you have multiple birth or death events recorded due to it being unclear which is correct they will all be shown. The persons gender can be seen by the coloured globe to the left of their name. Tapping on a person will take you to the details for that person. If you which to add a person to your bookmarks, or add them to the list of people to export you can do so here by swiping left on the row. This will show you different options depending on if the person is already bookmarks. "Add (2 lists Available)", "Remove (In 2 lists)", or "Remove (In 1 list)" and "Add (1 list Available)". 37
44 People 38
45 People When more that 1 list is mentioned tapping that item will present a menu allowing you to select which bookmark list to add or remove the person from. When only a single list is mentioned the person will be added or removed from that list. Person The person details view is the main screen for viewing all the information about a specific individual. At the top of this screen you will see the name of the person, alongside the primary image you have chosen. If there is no image for the person a default image, based upon the persons gender will be displayed. 39

46 People If you have provided a reference number for the person it will be displayed below their name, along with their ancestral file number if one has been entered. 40
47 People Beneath the main header are a number of sections, the order of which can be configured in the app settings. The default order is: "Events, Facts, Media, Notes, Sources, Parents, Family". Events Here you will see a list, in chronological order of all the events you have recorded against this person. It will not include events related to any family groups, e.g. marriage. On the left of the row you will see the event type, and on the right the date the event occurred. Beneath these the place the event occurred at will be shown. To view the full details of an event tap the row and you will be taken to the Event screen. You can remove the event by swiping to the left and tapping the delete button that appears. Facts Facts are shown in the same fashion as Events. A list in chronological order, with the name of the fact on the left, the date on the right, and the place beneath that. As with events tapping the row will take you to the Fact screen where you can view / edit the full details for the fact. You can remove the fact by swiping to the left and tapping the delete button that appears. Media Each media type that you have added to the person will be listed here: "Audio, Documents, Images, Other, Video". Along side the type name the number of items of that type will be listed. Tapping on a row will take you either to a list of the media items, or in the case of images, a thumbnailed gallery. Notes The notes list will show a numbered list of notes you have added to this person. The row will show the first few words of the note. Tapping the row will take you to the note allowing you to read it in full or edit it. You can remove the note by swiping to the left and tapping the delete button. As notes can be shared between records when you choose to delete you will be presented with a prompt asking if you only want to remove the note from the person, or if you want to delete the note completely if it is not used by any other record. Sources The sources list will show a numbered list of sources that you have cited for this person. On the right will be the title of the source, and beneath that will be the certainty. Tap on the row to be taken to the Source Citation view which will show you full details of the citation and information about the source itself. You can remove the citation by swiping to the left and tapping the delete button that appears. As a citation is linked to a source you will then be presented with the option of just removing the citation, or removing the source itself if no other records are referencing it. 41
48 People Parents Parents differs slightly from the other sections described so far in that there can be multiple sections. These will be numbered, e.g. "Parents 1", "Parents 2" etc. To the right of the section title will be a button resembling the Families tab. Tapping that button will take you to the family group details for these parents with the current person as a child. As the name would suggest this section will show the parents of the person. On the left is the title for the parent, e.g. Father, Mother along with the usual gender globe. On the right you will see the name of the parent. Beneath these the birth and death details will be displayed in the same fashion as the People With Surname screen. Swiping left on a row will provide the option to add/remove that parent from bookmarks lists, again in the same way as the People With Surname screen. Family Just like the Parents section there can be multiple Family sections. These will be number. e.g. "Family 1", "Family 2" etc. You are also able to jump to the family group details in the same way, by tapping the button to the right of the section title. The people in the family are shown in the standard fashion, gender globe, title, e.g. Wife/Husband, Child, with their name on the right. For Wife or Husband the marriage date / place will be shown beneath this, for children, their birth and death event details. Children will be displayed in birth date order. Swiping left on a row will provide the option to add/remove that parent from bookmarks lists, again in the same way as the People With Surname screen. Bookmarking If you wish to add this person to one of the bookmark lists there is a button at the bottom right of this screen which will change between: "Add Bookmark", "Add / Remove Bookmark", "Remove Bookmark", depending on which bookmark lists the person is part of. Tapping the button will provide you the option of adding or removing from each list. Reports The Person screen is also where you can access a number of reports about an individual. Tapping the reports button will provide you a choice of a Descendants report, or a Pedigree report. 42
49 Chapter 5. Families Families in GedView are defined by family groups. You can browse all of the groups in your tree via the Families tab. Family list The family list is the top level screen under the Families tab. All of your family groups will be shown here. The names of each spouse in a group (maximum of 2) are shown at the top, with the husband on the left and wife on the right. Beneath the names the date and place of marriage events is displayed, following by the number of children. 43
50 Families The list is grouped into section based on surnames. If there is a husband specified then the group will appear in the section matching the first letter of the surname. If there is no husband then the wife will be used and 44
51 Families follow the same logic. If no spouse is defined the group will appear in the first section of the list. You can quickly jump to a specific section in the list by tapping on the appropriate letter of the index on the side. Tapping on a specific row will take you to the details for that family group. If you which to add a family to your bookmarks, or add them to the list of families to export you can do so here by swiping left on the row. This will show you different options depending on if the family is already bookmarks. "Add (2 lists Available)", "Remove (In 2 lists)", or "Remove (In 1 list)" and "Add (1 list Available)". 45
52 Families 46
53 Families When more that 1 list is mentioned tapping that item will present a menu allowing you to select which bookmark list to add or remove the family from. When only a single list is mentioned the family will be added or removed from that list. Family The family details view is the main screen for viewing all the information about a specific family group. At the top of this screen you will see the primary image chosen for the family group. Below this are a number of sections, the order of which can be configured in the app settings. The default order is: "Parents, Events, Facts, Media, Notes, Sources, Children". 47

54 Families 48
55 Families Parents As the name would suggest this section will show the parents of the family group. On the left is the title for the parent, e.g. Father, Mother along with the usual gender globe. On the right you will see the name of the parent. Beneath these the birth and death details will be displayed in the same fashion as the People With Surname screen. Swiping left on a row will provide the option to add/remove that parent from bookmarks lists, again in the same way as the People With Surname screen. Events Here you will see a list, in chronological order of all the events you have recorded against this family group. On the left of the row you will see the event type, and on the right the date the event occurred. Beneath these the place the event occurred at will be shown. To view the full details of an event tap the row and you will be taken to the Event screen. You can remove the event by swiping to the left and tapping the delete button that appears. Facts Facts are shown in the same fashion as Events. A list in chronological order, with the name of the fact on the left, the date on the right, and the place beneath that. As with events tapping the row will take you to the Fact screen where you can view / edit the full details for the fact. You can remove the fact by swiping to the left and tapping the delete button that appears. Media Each media type that you have added to the family will be listed here: "Audio, Documents, Images, Other, Video". Along side the type name the number of items of that type will be listed. Tapping on a row will take you either to a list of the media items, or in the case of images, a thumbnailed gallery. Notes The notes list will show a numbered list of notes you have added to this family group. The row will show the first few words of the note. Tapping the row will take you to the note allowing you to read it in full or edit it. You can remove the note by swiping to the left and tapping the delete button. As notes can be shared between records when you choose to delete you will be presented with a prompt asking if you only want to remove the note from the family, or if you want to delete the note completely if it is not used by any other record. Sources The sources list will show a numbered list of sources that you have cited for this family. On the right will be the title of the source, and beneath that will be the certainty. 49
56 Families Tap on the row to be taken to the Source Citation view which will show you full details of the citation and information about the source itself. You can remove the citation by swiping to the left and tapping the delete button that appears. As a citation is linked to a source you will then be presented with the option of just removing the citation, or removing the source itself if no other records are referencing it. Children Children in the family group will be listed in this section, ordered by birth date. Each row is displayed in the same fashion as the Parents section. Gender globe, "Child" as a label, and the child's name. Beneath the same will be the date and place of birth and death if available. Swiping left on a row will provide the option to add/remove that parent from bookmarks lists, again in the same way as the People With Surname screen. Bookmarking If you wish to add this family to one of the bookmark lists there is a button at the bottom right of this screen which will change between: "Add Bookmark", "Add / Remove Bookmark", "Remove Bookmark", depending on which bookmark lists the family is part of. Tapping the button will provide you the option of adding or removing from each list. Reports The Family screen is also where you can access a family group sheet report. Tapping the "Family Sheet" button will display the sheet. 50
57 Chapter 6. Search / Bookmarks The search tab provides more advanced searching for people than the filtering available on the Surname and People With Surname lists. There are three different methods of searching: Surname, Forename, Ancestral File Number. In each case the entered text will be searched for anywhere within the name or file number. In each case the results will be displayed in groups, which can be jumped to quickly by using the index at the side of the results. The people will be displayed in the usual manner. Gender globe, name, with birth and death dates and places listed below them. Tapping a row on the results will take you to the Person screen. Swiping left on a row will provide the option to add/remove that parent from bookmarks lists, again in the same way as the People With Surname screen. Surname Typing part of a surname and tapping "Search" will find any people with that text as part of their surname. If you wish to limit this so matching forenames as well simply type a comma and then enter the forename text to search for. The results will be grouped by the first letter of the surname. 51
58 Search / Bookmarks As with other lists of people you can bookmark / unbookmark a person by swiping left on the person and choosing add or remove. 52
59 Search / Bookmarks Forename Typing part of a forename and tapping "Search" will find any people with that text as part of their forename. The results will be grouped by the first letter of the forename. 53
60 Search / Bookmarks As with other lists of people you can bookmark / unbookmark a person by swiping left on the person and choosing add or remove. 54
61 Search / Bookmarks Ancestral File Number Typing part of a file number and tapping "Search" will find any people with that text as part of their ancestral file number. The results will be grouped by the first letter of the surname. Bookmarks It is also from the Search screen that you can access your bookmarks. In the top right of the screen is the bookmark button. Tap that and you will be taken to the bookmark screen. Alongside the title of the screen, "Bookmarks:" will be a button showing the name of the current bookmark list. Tapping that button will show you a dropdown from which you can select a different list to display. The available lists are: "People, Recent People, Export People, Families, Recent Families, Export Families". 55
62 Search / Bookmarks "Recent People" and "Recent Families" are automatically populated as you view people and families and will show the most recent 10 people or families. 56
63 Chapter 7. Events Timeline The Events tab allows you to view all the events / facts in your tree in a single timeline list. Events are grouped into 25 year blocks allowing you to quickly jump a number of years in the list. 57
64 Events Timeline 58
.")
65 Events Timeline By default all event and fact types will be shown. If you wish to only show specific types you can tap the button in the top right of the screen (which by default shows "All"). This will show a dropdown menu allowing you to choose a specific type. 59
66 Events Timeline As well as showing all events you can also show events that occurred "On This Day". By default this will show events that happened on the current day. As with the full list you can filter these by event type in the same way. Along side the event type filter is an additional option allowing you to choose the day (which by default shows "Today"). Tapping this will allow you to pick a day and month. 60

67 Events Timeline Tapping on a row will take you to that event, under either People, or Families, depending on the type of event or fact. 61
68 Chapter 8. Notes Notes in GedView can be shared by multiple records. As such you can view a list of all the notes in your tree from this screen. Notes are grouped by the first letter in the note. You can quickly jump between groups using the index at the side of the list. Each item in the list will show you the first few words of the note. Tapping on a row will take you to that note. You can search through the list by swiping down when already at the top of the screen. This will search for notes starting with the words you type in the search box. If you wish to remove a note you can swipe left on the row. After tapping the delete button that appears you will be asked to confirm that you want to remove the note as it will be removed from all records in your tree. 62
69 Chapter 9. Sources Just like notes, sources can be cited by multiple records. This screen allows you to see all the sources in your tree. Sources are grouped by the first letter of the title of the source. You can quickly jump between groups using the index at the side of the list. Each row shows the title of the source, followed by the first few words of the text description of the source. The number of records citing the source is then shown at the side of the row. Tapping on a row will take you to that source. You can search through the list by swiping down when already at the top of the screen. This will search for sources with a title starting with the words you type in the search box. If you wish to remove a source you can swipe left on the row. After tapping the delete button that appears you will be asked to confirm that you want to remove the source as it will be removed from all records in your tree. 63
70 Chapter 10. Places Places defined in events and facts are automatically added to a list of all places in your tree. Places are grouped by the first letter of their name. You can quickly jump between groups using the index at the side of the list. 64
71 Places Each row shows the name of the place, followed by the the latitude and longitude if entered.. The number of events/facts recorded as occurring at the place is then shown at the side of the row. 65
72 Places Tapping on a row will take you to that place. You can search through the list by swiping down when already at the top of the screen. This will search for place where the name contains the words you type. If you wish to remove a place you can swipe left on the row. After tapping the delete button that appears you will be asked to confirm that you want to remove the place as it will clear the place field on all events and facts that occurred at that location. 66
73 Chapter 11. Media The media list screen allows you to access all the media items in your tree directly without having to view the specific record. As with individual records the top level list shows you the available media groups. Audio, Documents, Images, Other, Video. You will only see a group in this list if there are media items of that type. Along side the group name will be a number showing how many items are in your tree. Tapping on a group row will take you to either a list of those items, or in the case of images, a thumbnail gallery. Media Group List Items which are not pictures are displayed in a standard list. Video files will have thumbnails created where possible, other files will show an icon for the file type. Alongside the thumbnail/icon the title for the media item will be shown, and beneath that will be the name of the item. Unlike other lists in GedView tapping on a media item in this list will open that item if possible, e.g. videos and audio will play. If GedView cannot handle that sort of item you will be presented with the standard ios share sheet allowing you to open the file in any supported app you have installed. If you wish to view the details of an item there is an info button on the row. Tapping that will take you to the Media Item screen. If you wish to remove a media item you can swipe left on the row. After tapping the delete button that appears you will be asked to confirm that you want to remove the item as it then be removed from all records. Gallery The gallery screen has two modes. Thumbs and Gallery. The thumbs mode will show all the images as small thumbnails allowing you to quickly scroll through to the image you want. Tapping on a thumbnail will switch to gallery mode. Gallery mode shows only a single image. You can swipe left or right to move between images, or use the toolbar at the bottom of the screen. The toolbar also includes a play button will will start a slideshow through the images. When showing a slide show the play button is replaced with a pause button. The toolbar also includes an action button. Tapping this will provide you the option of viewing the media item details for the image, editing the media item details, or setting the image as the primary image for the record. 67
74 Chapter 12. About The about screen shows in a more in-depth overview of your tree than is shown on the Trees screen. It is split into two sections. Details and Generated. 68

75 About If a note has been added to describe the tree it will be shown above the Details section. 69
76 About Details will show you the name of the researcher of the tree, the number of people in the tree, and the number of family groups. Generated contains information on when the tree, or the GEDCOM file it was imported from was created, which program and version created it, and the supplied of that program. 70
77 Chapter 13. Note The notes screen is the same whether the note is for an event, a fact, a person, or a family. You can change the size of the text by using the standard zoom pinch gesture. 71
78 Chapter 14. Event / Fact The event and fact screen follows a similar format to all the others. At the top will be a thumbnail of the primary image you have assigned to the record, followed by multiple sections: "Details, Address, Phone, , Fax, Web, Media, Notes, Sources" 72
79 Event / Fact 73
80 Event / Fact Details The details section allows you to enter the basic details for the event. The following describes the rows you will see for a fully populated event. The first row shows the event type, the section allows you to enter a classification, and the third a name for the event. The next row shows the date / date range when the event occurred. The next two rows show the place name, and latitude / longitude. Tapping on the place row will take you to the Place screen to view details about the place and a list of all events that occurred there. The following row displays the cause of the event, then the next two rows show the responsible agency, and the religious affiliation. Address The address fields can be used to record the exact address that an event took place at, in addition to the overall place name. It is broken down in the same way as a postal address. It will show up to three street sections, followed by a city, state / county, postcode / zip code, and then country. Phone, , Fax, Web These sections show up to 3 numbers / addresses related to the event. Depending on the section tapping the row will carry out an action. Tapping a phone number will allow you to call that number, tapping an address will allow you to write and send an , tapping on a web address will display that web page. Media Each media type that you have added to the event will be listed here: "Audio, Documents, Images, Other, Video". Along side the type name the number of items of that type will be listed. Tapping on a row will take you either to a list of the media items, or in the case of images, a thumbnailed gallery. Notes The notes list will show a numbered list of notes you have added to this event. The row will show the first few words of the note. Tapping the row will take you to the note allowing you to read it in full or edit it. You can remove the note by swiping to the left and tapping the delete button. As notes can be shared between records when you choose to delete you will be presented with a prompt asking if you only want to remove the note from the event, or if you want to delete the note completely if it is not used by any other record. Sources The sources list will show a numbered list of sources that you have cited for this event. On the right will be the title of the source, and beneath that will be the certainty. 74
81 Event / Fact Tap on the row to be taken to the Source Citation view which will show you full details of the citation and information about the source itself. You can remove the citation by swiping to the left and tapping the delete button that appears. As a citation is linked to a source you will then be presented with the option of just removing the citation, or removing the source itself if no other records are referencing it. 75
82 Chapter 15. LDS Sealing LDS sealings are treated as events / facts. As such the screen will show all the same fields as a standard event, with the following exceptions: The details section will show the sealing type, the date, place, latitude and longitude. The other event fields are not present. In their place will be the status of the sealing, and a temple code. 76
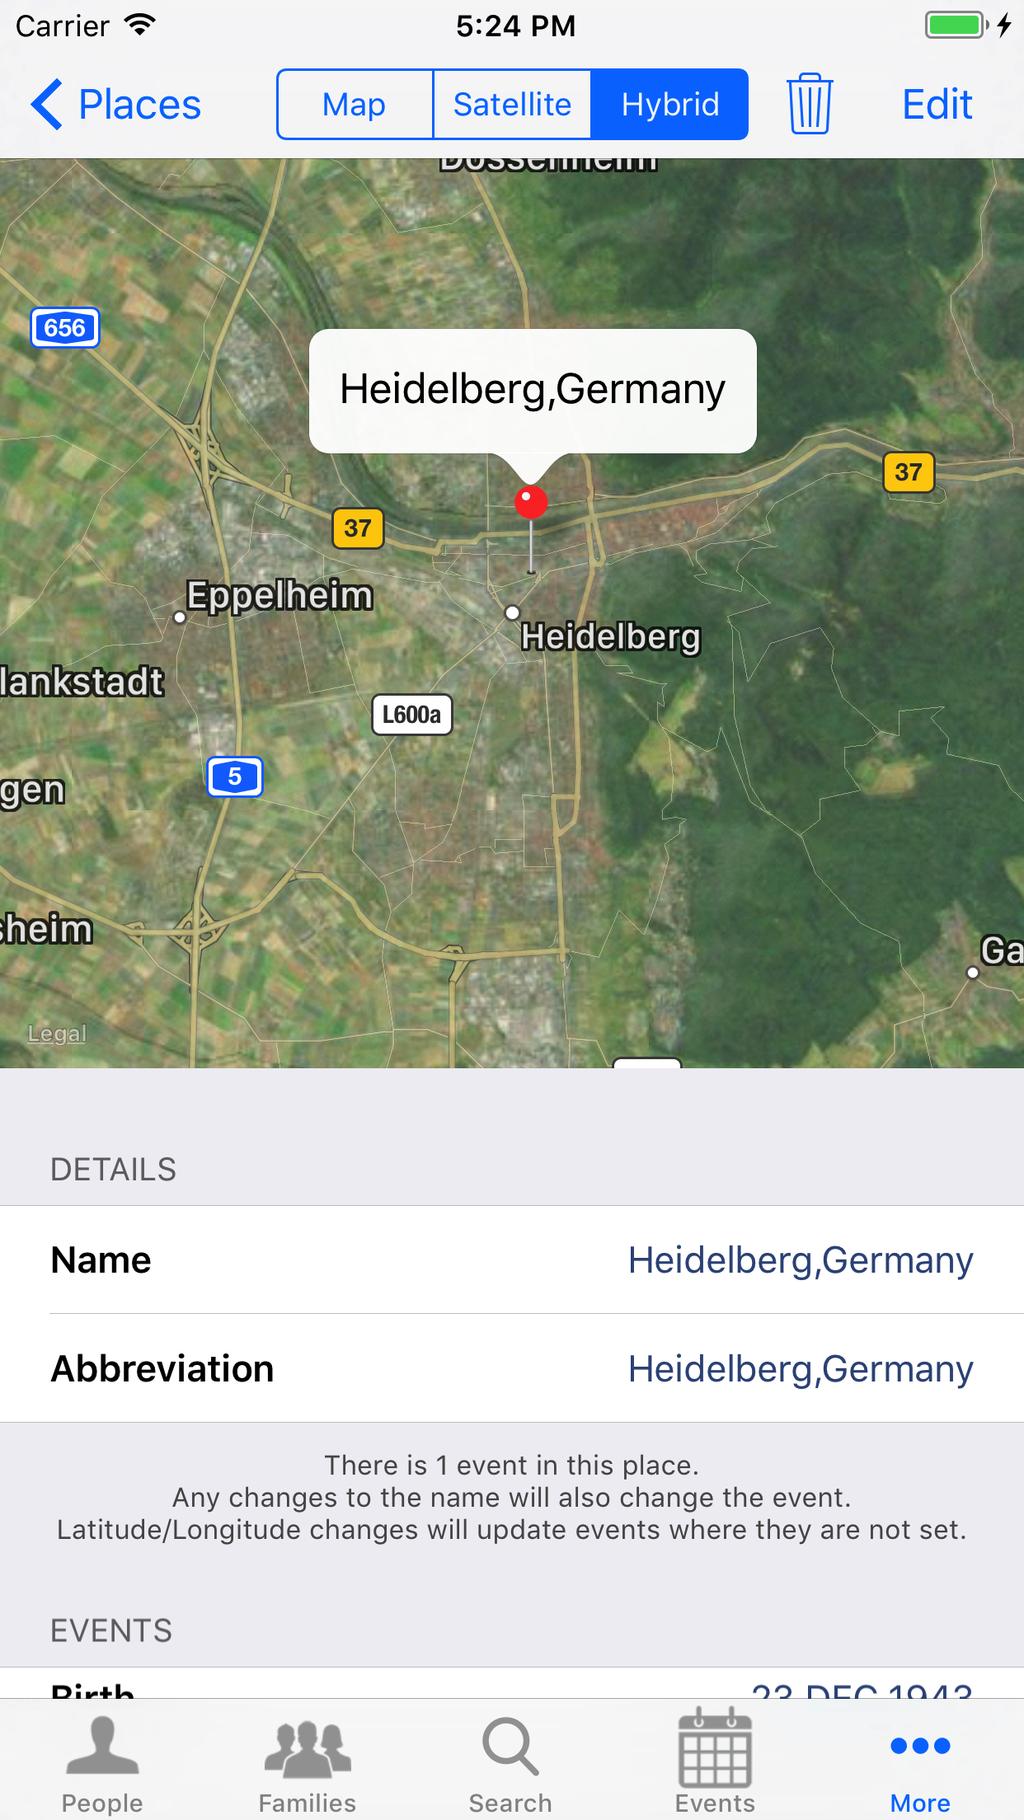
83 Chapter 16. Place More information on places used by events and facts can be accessed by viewing the place screen. This can be reached either from the Event or Fact screens, or from the full places list. From here you can view the place on a map, either with or without satellite imagery. If the place details do not contain exact latitude and longitude then a search will be performed. If the place cannot be found the next part of the place name will be checked. e.g. "Someplace, Some County, England" would first look for the full place name, and then "Some County, England", and finally "England". 77
84 Place 78
85 Place The details section will contain the place name and an abbreviated form of the name. Often this will be the full place name if a specific abbreviation has not been entered. Along with these fields will be the latitude and longitude if available. Media Each media type that you have added to the place will be listed here: "Audio, Documents, Images, Other, Video". Along side the type name the number of items of that type will be listed. Tapping on a row will take you either to a list of the media items, or in the case of images, a thumbnailed gallery. Notes The notes list will show a numbered list of notes you have added to this place. The row will show the first few words of the note. Tapping the row will take you to the note allowing you to read it in full or edit it. You can remove the note by swiping to the left and tapping the delete button. As notes can be shared between records when you choose to delete you will be presented with a prompt asking if you only want to remove the note from the place, or if you want to delete the note completely if it is not used by any other record. Events A list of events that reference the place will be listed here. The type of the event will be given, the date the event occurred at, and the name of the person, for individual events, or spouses, for family events will appear below that. Tapping on an event will take you to the event screen for that person or family group. 79
86 Chapter 17. Source Citation The citation screen starts with the standard header. If you have chosen a primary image for the citation it will be displayed here, along with the primary image for the related source. Citations show the following sections: Details, Media, Notes, Source, Source Media Details The citation details show the page, event type, role played in the event certainty, the date of the citation, and a free text field. Notes The notes list will show a numbered list of notes you have added to this citation. The row will show the first few words of the note. Tapping the row will take you to the note allowing you to read it in full or edit it. You can remove the note by swiping to the left and tapping the delete button. As notes can be shared between records when you choose to delete you will be presented with a prompt asking if you only want to remove the note from the citation, or if you want to delete the note completely if it is not used by any other record. Source The details for the source are shown along side the citation for reference. You can view the source screen by tapping the button to the side of the section title. The rows in this section will show the source title, agency, author, who filed the source, facts about the source, and some free text, which is usually a quote from the source itself. Media / Source Media Each media type that you have added to the citation or source will be listed in these two sections in the following groups: "Audio, Documents, Images, Other, Video". Along side the type name the number of items of that type will be listed. Tapping on a row will take you either to a list of the media items, or in the case of images, a thumbnailed gallery. 80
87 Chapter 18. Source The header on the source screen will display the primary image for the source if you have selected one. Beneath the header the following sections will appear: Details, Media, Notes, Citations. Details The rows in this section will show the source title, agency, author, who filed the source, facts about the source, and some free text, which is usually a quote from the source itself. Media Each media type that you have added to the source will be listed here: "Audio, Documents, Images, Other, Video". Along side the type name the number of items of that type will be listed. Tapping on a row will take you either to a list of the media items, or in the case of images, a thumbnailed gallery. Notes The notes list will show a numbered list of notes you have added to this source. The row will show the first few words of the note. Tapping the row will take you to the note allowing you to read it in full or edit it. You can remove the note by swiping to the left and tapping the delete button. As notes can be shared between records when you choose to delete you will be presented with a prompt asking if you only want to remove the note from the source, or if you want to delete the note completely if it is not used by any other record. Citations A list of events, individuals, and families that contain citations to the source will be listed here. The type of the event will be given, the date the event occurred at, and the name of the person, for individual events, or spouses, for family events will appear below that. Tapping on an event will take you to the event screen for that person or family group. Tapping on a person or family will take you to the person or family screen. 81
88 Chapter 19. Media Item The header of a media item will display either an icon representing the type of the file or, for videos and photos, a thumbnail image. Along side the image will be the name of the file. Beneath the header are fields showing the title for the item, and a field specifying the type of media this item was taken from. The standard values supported by GEDCOM files are: "audio, book, card, electronic, fiche, film, magazine, manuscript, map, newspaper, photo, tombstone, video" The other sections on the media items screen are: Notes, Sources, Events. Notes The notes list will show a numbered list of notes you have added to this event. The row will show the first few words of the note. Tapping the row will take you to the note allowing you to read it in full or edit it. You can remove the note by swiping to the left and tapping the delete button. As notes can be shared between records when you choose to delete you will be presented with a prompt asking if you only want to remove the note from the media item, or if you want to delete the note completely if it is not used by any other record. Sources The sources list will show a numbered list of sources that you have cited for this media item. On the right will be the title of the source, and beneath that will be the certainty. Tap on the row to be taken to the Source Citation view which will show you full details of the citation and information about the source itself. You can remove the citation by swiping to the left and tapping the delete button that appears. As a citation is linked to a source you will then be presented with the option of just removing the citation, or removing the source itself if no other records are referencing it. Events A list of events, individuals, and families that contain the media item will be listed here. The type of the event will be given, the date the event occurred at, and the name of the person, for individual events, or spouses, for family events will appear below that. Tapping on an event will take you to the event screen for that person or family group. Tapping on a person or family will take you to the person or family screen. 82
89 Chapter 20. Reports GedView supports three different reports. Two for people, and one for family groups. All report screens have an actions button at the top of the screen. Tapping that button will take you to the standard printer options screen allowing you to either send the report to a printer, or save the report as a PDF. People Descendants The decendants reports will display a tree of all the descendants of the selected person, numbering each generation. Each line in the report will show the name of a person, and their birth / death dates. A button to the right of the name is displayed which, when tapped, will take you to the Person screen for that person. 83
90 Reports 84
91 Reports Pedigree The pedigree report will show the currently selected person and three more generations of ancestors. Tapping on a person in the report will take you to the Person screen for that person. 85
92 Reports 86
93 Reports Families Family Sheet The family sheet provides a single report describing an entire family group. An overview of the spouses and children is given, followed by a more in depth display of each of the people in the family group. Tapping on the name of a person, or the person button to the right of the name, will take you to the Person screen for that individual. 87
94 Chapter 21. Settings There are a number of con guration options available to alter how information is displayed, accessed, and imported into GedView. These can be accessed via the main settings on your device, or via the Trees screen. There are currently five settings sections, plus an additional section to control what GedView can access, such as photos, contacts etc. The five sections are: Import / Export, Individuals List, Details Page, Family Page, Security. 88

95 Settings 89
96 Settings Allow GedView To Access The access section appears at the top of settings. Here you will see the permissions you have granted to GedView. You could see the following items for the reason given: Contacts - When creating a new tree you can pick a person from your contacts as the main researcher. When chosing a person from your contacts as a researcher you can opt to include them in your tree. If you do so then other family members of that person will also be included, along with dates of birth. This can only happen if your contacts includes this information. Siri & Search - This is a default item that appears for all apps. Notifications - When importing or exporting a tree GedView can notify when it has finished, the way this happens is configurable here, or can also be switched off. Cellular Data - Another default item that controls whether GedView can carry out downloads when not connected to wifi. Import / Export Here you can control a number of settings used when import GEDCOM files. Data About Prefix - The default behaviour is for approximate dates to use the prefix "ABT". This can be changed to instead use "c" (circa) instead. Remove duplicate media items - Some genealogy programs will include a photo multiple times in a GEDCOM file for the same image file. This option, enabled by default will remove the duplicate and store only one copy. Server Port - When using the "Upload to Device" method of importing this controls the port your device will listen on. Some antivirus / firewall software may prevent the default 8080 being used. You can change this here to any number above 1024 and below Person List Here you can modify the display in the list of people when browsing the index. Show User Reference - When enabled the user reference will be displayed on the right hand side of the row. 90

97 Settings 91
Getting Started with FamilySearch Family Tree
 Getting Started with FamilySearch Family Tree Welcome to the pilot launch of the FamilySearch Family Tree. As the eventual replacement of new.familysearch.org, Family Tree provides several significant
by AssistiveWare Quick Start
 Pictello - Visual Stories for Everyone by AssistiveWare Quick Start Pictello is a simple way to create talking photo albums and talking books. Each page in a Pictello Story can include a picture or short
ClaroPDF is an App for reading and commenting on PDF files and documents. ClaroPDF speaks back accessible text PDF files and documents with highqualit
 ClaroPDF User Guide ClaroPDF is an App for reading and commenting on PDF files and documents. ClaroPDF speaks back accessible text PDF files and documents with highquality speech and highlighting so you
Legacy 8.0. Family Tree. User Guide. For Microsoft Windows 98 or higher. Millennia Corporation
 User Guide Legacy 8.0 Family Tree For Microsoft Windows 98 or higher (to use the Mapping feature in Legacy you have to have Internet Explorer 7.0 or higher installed. These versions of IE are not supported
LIBRARY MEMBER USER GUIDE
 LIBRARY MEMBER USER GUIDE CONTENTS PAGE Part 1) How to create a new account...2 Part 2) How to checkout a magazine issue...4 Part 3) How to download Zinio Reader 4...10 a) For your PC...10 b) For your
Google Docs: ipad Technology Training and Development 6632 Bandera Rd, Building D San Antonio, Texas (210)
") Technology Training and Development 6632 Bandera Rd, Building D San Antonio, Texas 78238 (210)397-8126 Table of Contents Getting Started...3 G Suite...3 Sign in Glossary...3 ipad Passcode...3 Apple ID...3
Technology Training and Development 6632 Bandera Rd, Building D San Antonio, Texas 78238 (210)397-8126 Table of Contents Getting Started...3 G Suite...3 Sign in Glossary...3 ipad Passcode...3 Apple ID...3
GedScape User Guide. Version May GedScape is a registered trademark of Tenset Technologies Ltd in the United Kingdom.
 GedScape User Guide Version 3.2.01 May 2018 GedScape is a registered trademark of Tenset Technologies Ltd in the United Kingdom. Table of Contents Table of Contents Getting Started Main Menu Customizing
How to download your family from FamilySearch to Legacy. To prepare Legacy to integrate with FamilySearch Family Tree
 How to download your family from FamilySearch to Legacy To prepare Legacy to integrate with FamilySearch Family Tree (1. File name here) 1. Start Legacy. It will usually start up with the last file upon
ipad ereader User s Guide
 ipad ereader User s Guide MAY 2014 Table of Contents General information... 1 About Professional ebook... 1 About this Guide... 1 How does the Professional ebook System work?... 1 Where can I learn more
PAF 5.2 Class Instructions
 PAF 5.2 Class Instructions Instructor: Cathie Owens Home Phone: 942-5910 Class schedule: Each class will consist of a lecture using a LCD projector to illustrate how to use PAF. During the following weeks
Pocket Genealogist V4.00. Version POCKET GENEALOGIST Northern Hills Software LLC. Pocket Genealogist. User Guide
 Version 4.00 POCKET GENEALOGIST Northern Hills Software LLC Pocket Genealogist User Guide 1 Most examples in this user guide use the sample data from Legacy Family Tree (Millennia) and The Master Genealogist
Getting the Most Out of RootsMagic. Seventh Edition. Bruce Buzbee. RootsMagic, Inc. PO Box 495 Springville, Utah USA
 Getting the Most Out of RootsMagic Seventh Edition Bruce Buzbee RootsMagic, Inc. PO Box 495 Springville, Utah 84663 USA Copyright 2000-2015 by RootsMagic, Inc. All rights reserved. No part of this book
Workspace ios Content Locker. UBC Workspace 2.0: VMware Content Locker v4.12 for ios. User Guide
 UBC Workspace 2.0: VMware Content Locker v4.12 for ios User Guide Navigating Content Locker Content Locker centralizes all your enterprise data in a single container and integrates existing content repositories
New to Mac. Viewing Options in Finder:
 New to Mac Finder Preferences Finder helps you find and organize your files. To set Finder preferences, click on your desktop > Click Finder on the top left menu > Preferences. General Check External Hard
Kaltura App Things to Remember... 3 Downloading the App My Media... 4
 Table of Contents Kaltura App... 3 Things to Remember... 3 Downloading the App... 3 My Media... 4 To access My Media from the MediaSpace mobile app... 4 Actions List... 6 To publish a video... 7 To delete
Exporting and Importing Data
 Exporting and Importing Data Upload as a Google spreadsheet You can save your data as a Google spreadsheet by tapping the share button in the bottom right corner of the home screen and then tapping Upload
User Guide. POCKET GENEALOGIST Northern Hills Software LLC. Version. Pocket Genealogist. Pocket Genealogist V3.30
 Version 3.30 POCKET GENEALOGIST Northern Hills Software LLC Pocket Genealogist User Guide Note: Some screen prints in this document show versions of Pocket Genealogist older than the current 3.30 release.
Password & Tutorials Packet
 & Tutorials Packet Print, staple, and use this & Tutorials Packet Sign up for Secure Backup Service: visit rowleyservices.com for a free trial & setup info Follow attached: Check iphone Camera Settings
visitisleofman.com Extranet User Guide - Taste
 visitisleofman.com Extranet User Guide - Taste 1.0 VisitIsleofMan.com Page 2 2.0 Logging in and out of your account Page 3 3.0 Help Tutorial Videos Page 5 4.0 Updating Information Page 6 4.1 Product Details
Primal s 3D Anatomy and Physiology
 USER GUIDE Primal s 3D Anatomy and Physiology ON ipad Welcome to our user guide to 3D Anatomy and Physiology for ipad. Please read on, or select one of the links opposite to jump straight to a particular
Family Tree Maker Mac 3.1
 Family Tree Maker Mac 3.1 Overview Change Log: FTM Mac 3 (22.2.5.820) FTM Mac 3.1 (22.2.6.950) This document describes fixes and changes that were made in Family Tree Maker 3.1 (version 22.2.6.950) in
Salesforce Classic Guide for iphone
 Salesforce Classic Guide for iphone Version 35.0, Winter 16 @salesforcedocs Last updated: October 27, 2015 Copyright 2000 2015 salesforce.com, inc. All rights reserved. Salesforce is a registered trademark
myon ipad App Release Notes
 myon ipad App Release Notes Version 1.0 App Features Your myon subscription includes a free myon app! This app is available in itunes search for the keyword myon, and select the ipad app. The app: Lets
1.0 New visitisleofman.com Page Logging in and out of your account Page Help Tutorial Videos Page Updating Information Page 6
 1.0 New visitisleofman.com Page 2 2.0 Logging in and out of your account Page 3 3.0 Help Tutorial Videos Page 5 4.0 Updating Information Page 6 4.1 Product Details Page 7 4.2 Description Page 9 4.3 Media
iphones for beginners
 iphones for beginners This handout uses text and images from gcflearnfree.org. Check out www.gcflearnfree.org/iphonebasics for more information! The parts of the iphone: Note: The headphone jack was removed
20. Search Techniques in RootsMagic Recorded 1 June 2011, 74 minutes, 57.1 MB
 20. Search Techniques in RootsMagic Recorded 1 June 2011, 74 minutes, 57.1 MB You can find a person by name in RootsMagic, but do you know how to find all females born in England between 1780 and 1820
Organizing Your Electronic Genealogical Documents
 Organizing Your Electronic Genealogical Documents Leland K. Meitzler Lmeitzler@gmail.com (Sept 2017) A good genealogist will document every fact in their family history We can now do far more than cite
Getting to know your ipad exploring the settings, App store, Mail
 Getting to know your ipad exploring the settings, App store, Mail Exploring the settings Open the settings app from your homepage Wi-Fi Turn Wi-Fi on/off Add new Wi-Fi Connection Enter Network Name, any
imaps v2 QUICKSTART GUIDE
 imaps v2 QUICKSTART GUIDE http://maps.raleighnc.gov/imaps/index.html Search for Condo Units new! You can now search for individual condo records when you search by address in the property search. Or, select
Salesforce Classic Mobile Guide for iphone
 Salesforce Classic Mobile Guide for iphone Version 41.0, Winter 18 @salesforcedocs Last updated: November 30, 2017 Copyright 2000 2017 salesforce.com, inc. All rights reserved. Salesforce is a registered
Using Educreations for interactive teaching on ipad
 Signing up to Educreations Educreations is an application that is used to create and share video lessons on ipad and web browsers. To sign up, go to http://www.educreations.com/ and click Sign up for free.
Password & Tutorials Packet
 & Tutorials Packet Print, staple, and use this & Tutorials Packet Sign up for Secure Backup Service: visit rowleyservices.com for a free trial & setup info Follow attached: iphone users that use a Windows
YOUR SERVICE COMPANION APP. First Choice App V2.1 Guide (ios)
") YOUR SERVICE COMPANION APP First Choice App V2.1 Guide (ios) START Welcome to your guide on how to use the new First Choice app for ios devices. If you use an Android device we have an app for you too!
YOUR SERVICE COMPANION APP First Choice App V2.1 Guide (ios) START Welcome to your guide on how to use the new First Choice app for ios devices. If you use an Android device we have an app for you too!
EQ Showroom App Setup & Instructions
 EQ Showroom App Setup & Instructions Overview EQ Showroom brings your EQ product database to your mobile device. You can search across all catalogues, browse an individual catalogue, view product details,
Table of Contents. Revu ipad. v3.6. Navigation. Document Manager. File Access. Markups. Signature Tool. Field Verification Measurements
 Table of Contents Navigation Document Manager File Access Markups Signature Tool Field Verification Measurements Editing Properties Tool Sets & the Tool Chest Markups List Forms Studio Sessions Studio
What is a PDF? A PDF is the actual pattern you download and bring into knitcompanion.
 PDFs Contents PDFs Overview... 1 PDF List... 2 Using Open In... 4 PDF Viewer... 8 Swipe to Edit... 11 Creating a New Project... 12 Renaming the PDF... 14 Transferring the PDF to another app using Apple's
Pubzilla Online Pub Database 18 th October 2011
 Pubzilla Online Pub Database 18 th October 2011 Background Pubzilla is an online pub database that branches can use if they wish. It is centrally maintained and operated, so all a branch needs to use it
The WellComm Report Wizard Guidance and Information
 The WellComm Report Wizard Guidance and Information About Testwise Testwise is the powerful online testing platform developed by GL Assessment to host its digital tests. Many of GL Assessment s tests are
Oracle Cloud. Content and Experience Cloud ios Mobile Help E
 Oracle Cloud Content and Experience Cloud ios Mobile Help E82090-01 February 2017 Oracle Cloud Content and Experience Cloud ios Mobile Help, E82090-01 Copyright 2017, 2017, Oracle and/or its affiliates.
CONTENTS PAGE. Top Tip: Hold down the Ctrl key on your keyboard and using your mouse click on the heading below to be taken to the page
 USER GUIDE CONTENTS PAGE Top Tip: Hold down the Ctrl key on your keyboard and using your mouse click on the heading below to be taken to the page Part 1) How to create a new account...2 Part 2) How to
Administrative Training Mura CMS Version 5.6
 Administrative Training Mura CMS Version 5.6 Published: March 9, 2012 Table of Contents Mura CMS Overview! 6 Dashboard!... 6 Site Manager!... 6 Drafts!... 6 Components!... 6 Categories!... 6 Content Collections:
ConnectNow My Own Church User Guide
 2 ConnectNow My Own Church User Guide for Church Members Pub 113, July 2009 version 1.0 and later 825 Victors Way Suite 200 Ann Arbor, MI 48108-2830 Web: www.parishsoft.com Email: info@parishsoft.com support@parishsoft.com
Preserving Your Genealogy. Hope N. Tillman & Walt Howe Charlestown June 10, 2016
 Preserving Your Genealogy Hope N. Tillman & Walt Howe Charlestown June 10, 2016 1 ! We want the family history information we have created to survive after us so that it is findable by those who will be
Primal s 3D Human Anatomy and Physiology on Anatomy.tv
 USER GUIDE Primal s 3D Human Anatomy and Physiology on Anatomy.tv Welcome to our user guide to 3D Human Anatomy and Physiology on Anatomy.tv. Please read on, or select one of the links opposite to jump
Getting Started Guide
 Getting Started Guide for education accounts Setup Manual Edition 7 Last updated: September 15th, 2016 Note: Click on File and select Make a copy to save this to your Google Drive, or select Print, to
WORKSHARE TRANSACT USER GUIDE
 WORKSHARE TRANSACT USER GUIDE October 2016 Workshare Transact User Guide Table of Contents Chapter 1. Introducing Workshare Transact... 5 What is Workshare Transact?... 6 A safe place for data... 6 Workflow...
Page Topic 02 Log In to KidKare 02 Using the Navigation Menu 02 Change the Language
 Page Topic 02 Log In to KidKare 02 Using the Navigation Menu 02 Change the Language help.kidkare.com 03 Enroll a Child 03 Withdraw a Child 03 View Pending and Withdrawn Children 04 View Kids by Enrollment
User s Guide. Attainment s. GTN v4.11
 Attainment s User s Guide A printable PDF of this user guide is available from the Attainment Company website: https://www.attainmentcompany.com/gotalk-now Contents 1 Getting Started with GoTalk NOW 1
Mobile Apps Introduction Getting Started Features Resources
 Introduction 2 Install on Apple devices 2 Install on Android devices 2 Getting Started 3 Features 4 Librista for Apple 4 Librista for Android 7 AMI (Atriuum Mobile Interface) 10 AIR (Atriuum Inventory
VIEVU Solution App User Guide
 VIEVU Solution App User Guide INTRODUCTION VIEVU Solution is the next generation, fully-hosted, cloud evidence management system. This guide describes how to operate the VIEVU Solution. Additional support
2017 NMUG CLASSES MANAGING THE IPHONE AND IPAD IN IOS 10
 2017 NMUG CLASSES MANAGING THE IPHONE AND IPAD IN IOS 10 1 iphone Overview Your Apple ID is the account you use for just about everything you do with Apple. If you already have an Apple ID use it when
HughesFlex Cloud PBX Quick Start Guide
 HughesFlex Cloud PBX Quick Start Guide www.hughesflex.com 309-277-4111 info@hughestel.com WELCOME Welcome to HughesFlex Cloud PBX! This guide is intended to get you up and running with the basic features
Table of Contents. The Home and More screens... 14
 Table of Contents SmartMeet Overview...1 From SmartMeet, you can:...1 Setup... 2 System requirements... 2 Downloading SmartMeet....3 Starting SmartMeet for the first time... 4 Add user details...5 To add
User Guide. SaleSphere App and backend
 User Guide SaleSphere App and backend Version 2.0.1 20.07.2018 Content 1. Welcome to the world of SaleSphere... 1 System requirements... 1 Initial installation... 2 2. First Login... 3 3. Here we go: The
Propel PRO User Guide
 Propel PRO User Guide Propel PRO Version 3.2.0a Page 1 Welcome to the latest version of Propel PRO which offers fast performance and easy navigation. Please refer to this user guide for common features
Get Prepared app How-to guide
 Page 1 of 11 Get Prepared app How-to guide In partnership with Page 2 of 11 Table of Contents Installing the app... 3 To install the app:... 3 Setting up the app... 3 Where do you live?... 4 To enter your
Getting Started with your ipad 2
 Getting Started with your ipad 2 Getting Started with Your ipad 2, DCS Technology Department Page 1 In order to set up your ipad, you need an itunes Account. *You need to set up your itunes Account on
DSS User Guide. End User Guide. - i -
 DSS User Guide End User Guide - i - DSS User Guide Table of Contents End User Guide... 1 Table of Contents... 2 Part 1: Getting Started... 1 How to Log in to the Web Portal... 1 How to Manage Account Settings...
Anatomy.tv on ipad USER GUIDE GETTING STARTED
 USER GUIDE Anatomy.tv on ipad Thank you for subscribing to anatomy.tv from Primal Pictures. Please read on for our brief guide to using the site on ipad. GETTING STARTED Open your web browser and type
VIEVU Solution App User Guide
 VIEVU Solution App User Guide Contact Us If you need assistance or have any questions, please visit www.vievu.com/vievu-solutionsupport, contact us by phone at 888-285-4548, or email support@vievu.com.
TechSocial MODULE 3: APPLE DEFAULT APPLICATIONS
 MODULE 3: APPLE DEFAULT APPLICATIONS WELCOME TO TECHSOCIAL The following manual will provide an introduction to software and hardware specifications of Apple devices. Our goal is for you to familiarize
Table of Contents. iii
 TECHNICAL GUIDE Table of Contents MobileMeet Overview... 1 From MobileMeet, you can:... 1 Setup... 2 System requirements... 2 Bandwidth and Data Transfer... 3 Downloading MobileMeet... 4 Starting MobileMeet
Dropbox can be accessed from mobile devices as well.
 Dropbox provides storage space for users to grab files from any device that has Internet access. Dropbox gives you free storage up to 2 GB and the ability to easily share files with others. Dropbox can
Mintel Oxygen. User s Guide
 Mintel Oxygen User s Guide Welcome to Mintel Oxygen. This user guide will show you everything you need to know to access and utilize the wealth of information available from Mintel Oxygen. The Mintel program
Workshare Transact. User Guide
 Workshare Transact User Guide June 2017 Workshare Transact User Guide Table of Contents Chapter 1: Introducing Workshare Transact...5 What is Workshare Transact?... 6 A safe place for data...6 Workflow...6
iphone Basic Set-Up Guide Wolf Creek Public Schools
 iphone Basic Set-Up Guide Wolf Creek Public Schools Please note the following: 1. The iphone Set-Up guide is detailed in order to provide you with information on how to connect set up your phone for use
Online Photo Sharing with Flickr Website:
 Website: http://etc.usf.edu/te/ Flickr (http://flickr.com) is a website that allows you store, sort, search, and share your photos online. The free version of Flickr allows you to upload up to 100MB of
RBdigital eaudiobooks and emagazines for iphone, ipad, and ipod Touch. Contents
 RBdigital eaudiobooks and emagazines for iphone, ipad, and ipod Touch Contents Get an RBdigital Account Setting Up the RBdigital App Downloading eaudiobooks Playing eaudiobooks Renewing and Returning eaudiobooks
Introduction to 9.0. Introduction to 9.0. Getting Started Guide. Powering collaborative online communities.
 Introduction to 9.0 Introduction to 9.0 Getting Started Guide Powering collaborative online communities. TABLE OF CONTENTS About FirstClass...3 Connecting to your FirstClass server...3 FirstClass window
ipad Training Field Management
 ipad Training Field Management ipad User Guide ipad Training Topics Overview Navigation Connectivity Field Apps Tips and Tricks Contacts FaceTime icloud imessage Email Safari Calendar Camera 2 Overview
DESSC Parent Portal & isams Parent App Instructions to set up the Parent Portal and download the App
 DESSC Parent Portal & isams Parent App Instructions to set up the Parent Portal and download the App The Parent Portal and isams Parent App are the methods DESS and DESC use to communicate with parents.
NovoConnect B360. Wireless Presentation & Collaboration System. User Manual Version 0.99
 NovoConnect B360 Wireless Presentation & Collaboration System User Manual Version 0.99 Copyright 2013 DELTA Electronics, Inc. All rights reserved. Page 1 Table of Contents 1. GETTING STARTED...4 1.1 Package
doforms iphone User Guide
 doforms iphone User Guide Updated October 1, 2011 A Product of Mobile Data Technologies, LLC. Table of Contents Legal Notice... 3 Contact Support... 3 Overview... 4 Mobile Data Collection App... 4 Data
VEGA. Operation Manual T A B L E T P C. advent vega operation manaul_new.indd 1
 VEGA T A B L E T P C Operation Manual advent vega operation manaul_new.indd 1 advent vega operation manaul_new.indd 2 CONTENTS SETTING UP YOUR TABLET FOR THE FIRST TIME... 4 USING THE DEVICE S BUTTONS
ipad Beyond the Basics
 ipad Beyond the Basics Backup and Restore 2 Backup Using itunes 2 Backup Using icloud 3 Updating Device Software 5 Internet Browser 6 Bookmarks 6 Cut/Copy and Paste 7 Email 8 imessage 9 Maps 10 Editing
Independence Blue Cross Consumer Market Individual Products. Retail Platform User Guide
 Independence Blue Cross Consumer Market Individual Products Retail Platform User Guide Version 2 11.01.2015 Table of Contents 1. Logging on to the Retail Platform 3 2. Welcome to the Retail Platform Dashboard
ipads for Beginners For All HCPS Individual ipad Users
 ipads for Beginners For All HCPS Individual ipad Users May 2012 GETTING TO KNOW YOUR IPAD Buttons and Icons Sleep/Wake/Power- Press and release to put your ipad into sleep or wake mode. Press and hold
LIBRARY MEMBER USER GUIDE
 LIBRARY MEMBER USER GUIDE CONTENTS PAGE Part 1) How to create a new account...2 Part 2) How to checkout a magazine issue...4 Part 3) How to download Zinio Reader 4...10 a) For your PC...10 b) For your
Working with cloudlibrary and Downloadable Content
 Grande Prairie, Alberta www.peacelibrarysystem.ab.ca Working with cloudlibrary and Downloadable Content Prepared by Samantha Mercer, Digital Trainer & IT Assistant August 2016 Table of Contents 1 Definitions...
Using the home page 2 Using the home page (cont) 3. Main interface Overview 4. Finding content Menu tab 5 Index tab 6
 3. Main interface Overview 4. Finding content Menu tab 5 Index tab 6") USER GUIDE Primal s 3D Atlas ON ipad Welcome to our user guide to 3D Atlas titles on ipad. Please read on, or select one of the links opposite to jump straight to a particular topic. Anatomy.tv Using the
USER GUIDE Primal s 3D Atlas ON ipad Welcome to our user guide to 3D Atlas titles on ipad. Please read on, or select one of the links opposite to jump straight to a particular topic. Anatomy.tv Using the
PHOTO GALLERY USER MANUAL CHAPTER 3 SHARPSCHOOL. For more information, please visit: Chapter 3 Photo Gallery
 SHARPSCHOOL USER MANUAL CHAPTER 3 PHOTO GALLERY For more information, please visit: www.customernet.sharpschool.com www.sharpschool.com 0 TABLE OF CONTENTS 1. 2. 3. 4. 5. 6. INTRODUCTION... 1 KEY INFORMATION...
All about . Desktop versus Webmail applications Read the information here.
 All about Email Introduction My website has various documents related to email. This is an attempt to have them all available in one place. Also, I have added additional content such as the 2 sections
Supporting ios Devices
 Supporting ios Devices 2003-2018 BeyondTrust, Inc. All Rights Reserved. BEYONDTRUST, its logo, and JUMP are trademarks of BeyondTrust, Inc. Other trademarks are the property of their respective owners.
Part 4 - Using an Apple ipad
 Absolute Basics Series Part 4 - Using an Apple ipad Only Apple makes a tablet called ipad. It has an operating system called ios, that is also used on Apple s iphone. The ipad and iphone are similar in
Note-Taking Guide. ü To get the most out of this course you will need three things:
 Episode: Introduction ü This course provides teachers with a step-by-step walkthrough for using Google s free set of. ü Classroom tips will also be provided to help you with using these resources right
NiCHE Website Posting Guidelines & Best Practices (updated 22 December, 2013)
") NiCHE Website Posting Guidelines & Best Practices (updated 22 December, 2013) Getting oriented Registering for an account The WordPress Dashboard Editing your profile What to do if you ve lost your password
NiCHE Website Posting Guidelines & Best Practices (updated 22 December, 2013) Getting oriented Registering for an account The WordPress Dashboard Editing your profile What to do if you ve lost your password
PowerSchool Student and Parent Portal User Guide. https://powerschool.gpcsd.ca/public
 PowerSchool Student and Parent Portal User Guide https://powerschool.gpcsd.ca/public Released June 2017 Document Owner: Documentation Services This edition applies to Release 11.x of the PowerSchool software
Kwilt for Mobile. User Guide January 2019 Visit us at
 Kwilt for Mobile User Guide January 209 Visit us at www.mykwilt.com Table of contents Welcome to Kwilt 4.0... 3 Installing Kwilt Installing Kwilt2... 5 Installing Kwilt3... 6 Kwilt for mobile (ios and
SG Project OnePage User Guide
 SG Project OnePage User Guide Simple Genius Software November 2012 Document Version 4.0.1 Table of Contents Overview...3 Introduction...3 Data Management...3 Key Concepts...3 12-by-12 Project Management...
Pinterest. What is Pinterest?
 Pinterest What is Pinterest? Pinterest is like an electronic bulletin board that allows users to save and share photos they find on the internet. Usually when a user pins a photo it is linked to a blog
STORE LOCATOR USER GUIDE Extension version: 1.0 Magento Compatibility: CE 2.0
 support@magestore.com sales@magestore.com Phone: +1-606-657-0768 STORE LOCATOR USER GUIDE Extension version: 1.0 Magento Compatibility: CE 2.0 Table of Contents 1. INTRODUCTION 3 Outstanding Features...3
RURAL ROAD RAM APP QUICK START GUIDE
 RURAL ROAD RAM Mobile App Quick Start Guide v3.0 1 RURAL ROAD RAM APP QUICK START GUIDE The following provides the setup instructions and basic user guidance for the Rural Road RAM mobile application.
OrganiDoc Guide. OrganiDoc English Manual
 OrganiDoc English Manual 1 OrganiDoc Guide 1. How to export files from PC to iphone?...2 2. How to upload files from iphone to PC?...5 3. How to save attachments from mailbox to OrganiDoc?...6 4. How to
ipad for Beginners How to Work the ipad Buttons
 ipad for Beginners How to Work the ipad Buttons The On/Off, Sleep/Wake button: This button is on the top of your ipad, and you use it to put your ipad's screen to sleep or wake it up. Home button: No matter
Blackboard 5. Instructor Manual Level One Release 5.5
 Bringing Education Online Blackboard 5 Instructor Manual Level One Release 5.5 Copyright 2001 by Blackboard Inc. All rights reserved. No part of the contents of this manual may be reproduced or transmitted
SchoolMessenger App. Teacher User Guide - Web. West Corporation. 100 Enterprise Way, Suite A-300. Scotts Valley, CA
 SchoolMessenger App Teacher User Guide - Web West Corporation 100 Enterprise Way, Suite A-300 Scotts Valley, CA 95066 800-920-3897 www.schoolmessenger.com Contents Welcome!... 3 SchoolMessenger and the
SITE ADMINISTRATION.
 SITE ADMINISTRATION www.urbandalelibrary.org/wp-admin A P R I L 2 8, 2 0 1 1 HOW TO LOG IN Login as an admin: 1. In your web browser, go to www.urbandalelibrary.org/wp-admin Note: While in development,
Chromebook Basics. Headset /mic
 Chromebook Basics What is a Chromebook? Unlike most computers, Chromebooks do not run Windows. Instead, they use Chrome OS, which is similar to the Google Chrome web browser. This means you can use a Chromebook
Supporting Apple ios Devices
 Supporting Apple ios Devices 2017 Bomgar Corporation. All rights reserved worldwide. BOMGAR and the BOMGAR logo are trademarks of Bomgar Corporation; other trademarks shown are the property of their respective
VisitEye Tutorial for Admins
 VisitEye Tutorial for Admins Introduction By the end of this tutorial you will be able to: 1. Have a working account 2. Add new users manually with their respective security roles. Load locations in bulk