Lesson Objectives Page 4
|
|
|
- Jayson Hardy
- 5 years ago
- Views:
Transcription

1 Welcome Page 2
2 Navigation Page 3
3 Lesson Objectives Page 4
4 How Does FSI Work? Page 6

5 How Does FSI Work? Page 7
6 How Does FSI Work? Page 8
7 How Does FSI Work? Page 9
8 How Does FSI Work? Page 10
9 Download a Batch Page 11

10 Images and Records Page 12

11 Using a Lookup List Page 13
12 Quality Check Page 14

13 Help Resources Page 15

14 Batch Due Dates Page 16

15 Activity: How To Index Page 17

16 Indexing Guidelines Page 18

17 Unreadable Records Page 19

18 Unreadable Records: Practice 1 Page 20
19 Unreadable Records: Practice 2 Page 21

20 Blank Fields and Records Page 22
21 Blank Records: Practice 1 Page 23

22 Name Titles and Terms Page 24
23 Corrected Information Page 25
24 Corrected Information: Practice 1 Page 26
25 Punctuation Page 27

26 Abbreviations Page 28

27 Practice: Indexing Resources Page 30
28 Q1 Page 32
29 Q2 Page 33
30 Q3 Page 34

31 Download the Training Page 36
32 Survey Page 37
33 End of Lesson Page 38

34 Table of Contents Page 40

35 FamilySearch Indexing: Indexing Table of Contents Index a Batch Log in p. 1 Download a Batch p. 2 View Project Instructions p. 2 Enter the Image Type p. 2 Enter Information p. 2 Duplicate Fields and Records p. 3 Lookup Lists p. 3 Mark Blank and Unreadable p. 4 Insert and Add Records p. 4 Find Help p. 4 Quality Check p. 6 Submit a Batch p. 6 Return to the Start Page p. 6 Return a Batch p. 7 Basic Indexing Guidelines Type What You See p. 7 Interpreting Difficult Handwriting p. 7 Name Titles and Terms p. 8 Corrected Information p. 8 Punctuation p. 8 Abbreviations p. 8 Place-Names p. 8 Working with Images Image Size p. 9 Highlights p. 9 Ruler p. 10 Rotate p. 10 Show Previous or Next Image p. 10 Invert p. 10 Sharpen p. 11 Brightness and Contrast p. 11 Log in 1. On your desktop, click the FamilySearch Indexing icon, or on the FamilySearch indexing Web site click Begin Indexing. 2. Enter your user name and password. 3. Click OK. Index a Batch FamilySearch Indexing March Intellectual Reserve, Inc. All rights reserved. Page 1 of 11


36 Indexing Download a Batch 1. Click Download Batch. 2. Click the name of the project you want to work on. 3. Select the number of batches you want to work on. 4. Click OK. View Project Instructions 1. Click the Project Information tab on the right side of the data entry area. 2. If there are no instructions on the tab, click the Indexing Project Home Page link. 3. Read the project specific instructions. Enter the Image Type Click the Image Type field, and select an item from the drop-down list. For example: normal, blank, duplicate, unreadable, no extractable data, or a project-specific item, such as birth certificate. Note: For help, read the Field Help instructions on the right side of the data entry area. Enter Information 1. Click on the first field to start typing the information from the document image. 2. Type the information as it appears in the document. 3. To advance to the next field, press Tab or Enter. Note: For help, read the Field Help instructions on the right side of the data entry area. FamilySearch Indexing March Intellectual Reserve, Inc. All rights reserved. Page 2 of 11


37 Indexing Duplicate Fields and Records To duplicate a field, click the empty field, and press Ctrl+D. To duplicate a column, click the first empty field, drag down the column to highlight all the fields you need, and then press Ctrl+D. To duplicate an entire record, click the empty record, and press Ctrl+Shift+D. Lookup Lists A lookup list is a collection of common names, places, or other types of information that can help you decipher a field. The list does not include every spelling variation, especially for names. 1. To use a lookup list, click in the field you want to index. 2. Click the down arrow at the end of the field, and click Lookup. 3. In the appropriate fields, type the letters you can decipher. 4. Select the name or information that matches the information in the document. 5. If you find a match, click the match, and click Accept Selected. 6. If you do not find a match, click Cancel, and type what you see in the document. Note: A red wavy underline or colored background indicates that the name does not appear on the lookup list. It does not mean that what you typed is incorrect. FamilySearch Indexing March Intellectual Reserve, Inc. All rights reserved. Page 3 of 11
. If you cannot read one number or letter, use a question mark (?")
 to replace the numbers or letters you cannot read. For example: Di*son.")
. Insert and Add Records To add a record at the bottom of the list, click (Add Record button).")
.")
38 Indexing Mark Blank and Unreadable If a required field is blank, click in the field, and click (Mark the field blank button). If an entire record is blank, click in a field for the record, and click (Mark the record blank button). If you cannot read one number or letter, use a question mark (?) to replace the number or letter you cannot read. For example: H?ndley. If there are multiple numbers or letters you cannot read, use an asterisk (*) to replace the numbers or letters you cannot read. For example: Di*son. If you cannot read any of the numbers or letters for a single field, click in the field, and click (Mark the field unreadable button). If an entire record is unreadable, click (Mark the record unreadable button). Insert and Add Records To add a record at the bottom of the list, click (Add Record button). To insert a record, click on the record just below where you want to insert the missing individual, and click (Insert Record button). To delete extra record lines, click on the record to be deleted, and click (Delete Record button). Find Help Field Help: Click the Field Help tab for instructions on how to index a specific field. Project Instructions: Click the Project Information tab for project-specific instructions. If no instructions are listed, then click the Indexing Project Home Page link. FamilySearch Indexing March Intellectual Reserve, Inc. All rights reserved. Page 4 of 11


39 Indexing Handwriting Help: Click (Handwriting Help button) for examples of how different letters may have been written. System Help: Press F1 for instructions on how to use the FamilySearch indexing screens. Ask a Question: Click the Help menu, and then click Ask a Question to find answers to common questions. Support: Click the Help menu, and click Contact Support to find the contact information for your local leader or FamilySearch Support. Share a Batch: Click the File menu, and click Share Batch. Write down the number, and click OK. Give this number to a support person so he or she can view your batch to help you with a problem FamilySearch Indexing March Intellectual Reserve, Inc. All rights reserved. Page 5 of 11


. 2. On the Batch Submitted message, click OK.")
40 Indexing Quality Check When you are finished indexing, the Quality Checker window replaces the Field Help window on the right side of the data entry area. The first marked field appears, along with an explanation of why the information needs to be rechecked. Recheck the information you entered with what you see on the image. To keep what you entered, click Accept. To keep what you entered for the same field in all records, click Accept All. To change what you entered, type the new data in the field. To change what you entered for the same field in all records, type the new data in the field, and click Change all to new value. When you click an Accept or the Change all to new value button, the quality checker automatically moves to the next marked field. If it does not, click Next. Submit a Batch 1. After the quality check is complete, a message appears asking if you want to submit the batch. Click Yes. If it does not, click (Submit button). 2. On the Batch Submitted message, click OK. Return to the Start Page To return to the FamilySearch indexing start page, click (Return to Start Page arrow). FamilySearch Indexing March Intellectual Reserve, Inc. All rights reserved. Page 6 of 11

41 Indexing Return a Batch If after viewing a batch you realize that you will not be able to work on the batch, either because it is difficult to read or for any other reason, you may return the batch. 1. Click the File menu, and click Return Batch. To return a batch so it may be indexed by another indexer, click Give to Other Indexers. To indicate that the image has a problem and should be reviewed by an administrator, click Review Image Quality. Basic Indexing Guidelines Basic indexing guidelines are instructions that apply to all projects. You can use these guidelines to answer questions that you have while indexing. At times, there will be exceptions to these basic rules that will be noted in the field help and project instructions. Be sure to review the project instructions before indexing a batch. You can refer to the field help as you index. Type What You See Most of the time you will enter what you see on the record. If there is an exception, it will be listed in the field help and project instructions. Interpreting Difficult Handwriting Before you begin indexing a project, try to become familiar with the handwriting style used by the clerk. This will help you to more correctly interpret names, dates, and places. To interpret handwriting that is difficult to read, do the following: Compare how similar letters and numbers were written. If one or two letters are difficult to read, look for the same letters in familiar words that can be read. Compare the pincipal s name to the names of the father, mother, spouse, or other names in the record. If an index exists for the record, check to see if it will help clarify the entry. Or compare the name to supplementary documentation with the record, such as a certificate of correction. Use the Lookup list to see if a similar name is listed. Lookup lists may be helpful in clarifying names and places. It is important to use the lists to help read the entry, but the list should not replace what is actually on the record. If you still cannot read the handwriting, type as many letters as possible for each name. Use a question mark (?) to replace one missing letter and an asterisk (*) for several missing letters. FamilySearch Indexing March Intellectual Reserve, Inc. All rights reserved. Page 7 of 11

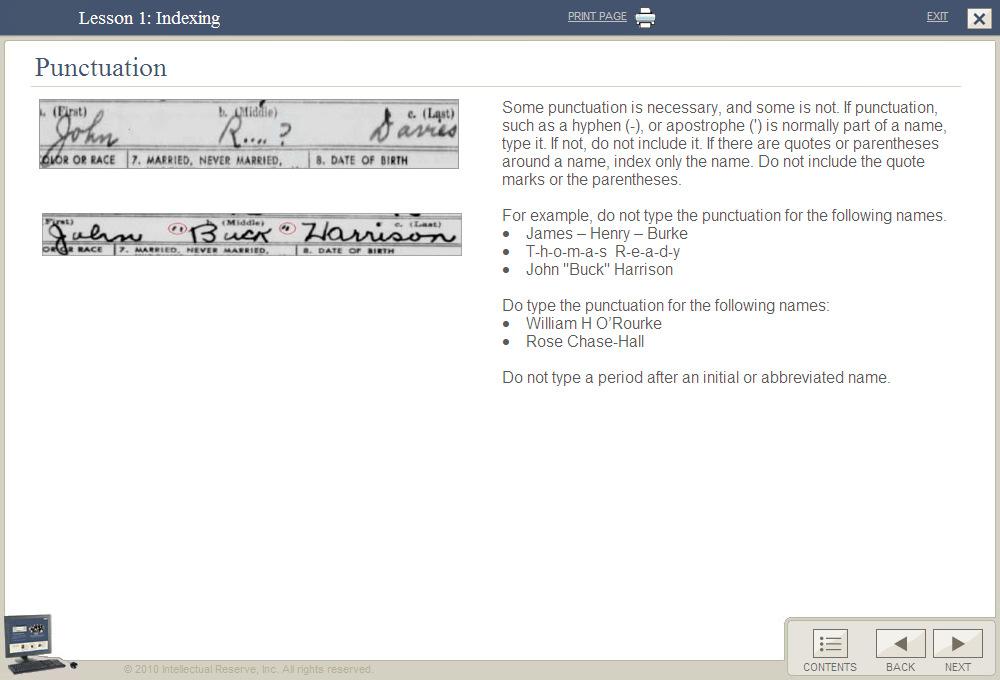
42 Indexing Name Titles and Terms Names are an important part of an index. As you index, type actual names in the Given Name and Surname fields. Do not type: Titles, such as Jr., Sr., Mrs., Señor, Señora, Don, Doña, Captain, Dr., and so forth. Terms, such as not named, unknown, stillborn, twin, infant, and so forth. Review the project instructions. Some projects have a Titles and Terms field for this information. Other projects may specify that titles and terms are not included in the index. Corrected Information On some records, a clerk may have corrected, crossed out, or replaced information. Type the replacement data. If information is crossed out and not replaced, then type the crossed out data. Punctuation Some punctuation is necessary, and some is not. If punctuation, such as a hyphen (-) or apostrophe ( ), is normally part of a name, type it. If not, do not include it. If there are quotes or parentheses around a name, index only the name. Do not include the quote marks or the parentheses. For example: William H O Rourke or Rose Chase-Hall Abbreviations Sometimes names are abbreviated or a portion of their letters are written raised above the rest of the name, resembling a ditto mark. Type the abbreviation as it is recorded on the document. Do not type a period at the end of the abbreviated name. Do not guess what the abbreviation stands for. For example: Benj I Conkle Place-Names Each project will provide specific instructions on how to type place-names. Generally, type only the name of the place (for example, London, not city of London ). Do not include terms such as county of, county, resided in, rural, of, and so on. Do not type periods, commas, parentheses, or semicolons between levels of localities. FamilySearch Indexing March Intellectual Reserve, Inc. All rights reserved. Page 8 of 11
.")


43 Indexing Image Size To increase the image size, click button). Working with Images (Zoom in To decrease the image size, click (Zoom out button). Click the Zoom drop-down list, and select a percentage size. Highlights To turn highlights on, click the (Highlighter Pen button). Note: Not all projects have highlights available. To adjust highlights, click the Highlight drop-down list, and select an option. To adjust the highlights further: 1. Click the View menu, and then click Adjust Highlights. 2. Move the mouse over the document image until you see a yellow grid of highlights with a thin red border. Move all the highlights at once by moving the cursor over a yellow box until the four-pointed arrow appears, and then click and drag the grid to line up the highlights with the fields to index. To better match rows and columns, click and drag the red squares on the corners and sides one at a time to line up the highlights with the rows and columns. To move a single yellow box or column of yellow boxes, click and drag the black square on the center of each yellow box. 3. To return to data entry mode, click the View menu, and then click Adjust Highlights. To change the highlight color or transparency, click the Tools menu, click Options, and then click the Display tab. FamilySearch Indexing March Intellectual Reserve, Inc. All rights reserved. Page 9 of 11


.")
. 2. Enter only the information you need.")
44 Indexing Ruler 1. Click the View menu, and click Show Ruler. 2. To move the ruler, click the ruler, and drag it to the position you want. 3. To move the image, click and drag the image to place the image line you want in the ruler. 4. To change the ruler width, click and drag the edge of the ruler. Rotate 1. To rotate the image 90 degrees counterclockwise, click (Rotate Left button). 2. To rotate the image 90 degrees clockwise, click (Rotate Right button). Show Previous or Next Image You may need to see an image previous to the one in your batch or following the one in your batch to include all the information for an individual. 1. Click (Show Previous or Next Image button). 2. Enter only the information you need. Do not index other information. 3. When you are finished, click (Show Previous or Next Image button) again to return to viewing just the image in your batch. Invert To invert an image (to white writing on a black background), click (Invert button). FamilySearch Indexing March Intellectual Reserve, Inc. All rights reserved. Page 10 of 11
. 2.")

45 Indexing Sharpen 1. Click the View menu, and click Sharpen. 2. Click and drag the slider to select the amount of sharpening. 3. Click OK. Brightness and Contrast 1. Click (Brightness and Contrast button). 2. To darken the image, move the brightness slider to the left of zero. 3. To lighten the image, move the brightness slider to the right of zero. 4. To change the contrast, click and drag the slider. 5. When you are finished, click OK. FamilySearch Indexing March Intellectual Reserve, Inc. All rights reserved. Page 11 of 11
46 View Information on Your Family FamilySearch Indexing Practice: Indexing For this practice exercise, go to the FamilySearch indexing Web site at click Begin Indexing, and sign in. This is a large practice which introduces you to several features of the indexing program. If needed, break the practice up into several sessions. You will be working on a real indexing batch. Practice Exercises Do the following: My Work Page: My Messages 1. In the My Messages section, double-click a message from the list to view. 2. Read the message, and click Close. My Work Page: Download a Batch 3. At the top, click Download Batch. Notice it shows your preferred projects with a highlight on the highest priority project. 4. At the top, click Show all projects. Notice that all projects are listed. Notice the difficulty level and points for various projects. 5. Click on a project to select it. Click View Sample. 6. This is a sample of what the images look like. Click Return to the Project Selection Dialog. 7. To download the batch, click OK. 8. On the message about project-specific instructions, click Close. Adjustments to the Indexing Screen 9. Click on the image area, and drag it to move the image. 10. Try using the scroll bars to move the image up and down or across. 11. On the lower right side, click the Image Navigation tab. 12. Click and drag the dark rectangle to move around the image. 13. At the top, click (Zoom In) or (Zoom out) to change the image size. 14. In the Zoom box, try selecting a different percentage to change the image size. 15. Click (Highlight) to turn on highlights if they are available. If available, click the Highlight drop-down list to see what options are available. 16. Click the View menu, and click Show Ruler. FamilySearch Indexing March Intellectual Reserve, Inc. All rights reserved. Page 1 of 4
47 [Type text] View Information Indexing Practice on Your Family 17. Try clicking and dragging the ruler to move it. You can use highlights and rulers to help you keep track of where you are indexing on an image. To turn off the ruler, click the View menu, and click Show Ruler again. Data Entry 18. On the lower right side, click the Project Information tab. Read through the information about this project. You should always read the project instructions before indexing a new project. 19. At the bottom left corner is an indication of the number of images and number of records in this batch. If there is more than one image, click on an image number on the lower left side. 20. Notice how you can jump to any image in the batch. Return to image 1. Image Type should be the first field. 21. On the right side, click the Field Help tab. Read the help for the Image Type field. 22. Click the Image Type field, and select the appropriate item from the drop-down list. 23. Press Tab. The system will automatically advance to the next field. 24. Fill in the information for several fields, using Tab to move to the next field. If needed, review the Field Help for instructions. 25. On a name field, click the arrow on the right, and select Lookup. 26. Try typing in a few letters of the name. If you find the name, click it, and click Accept Selected. Otherwise, click Cancel, and type what you see on the image. 27. Click (Handwriting Help). Notice the examples of how letters may have been written. Close the Handwriting Help window. 28. Click (International Letters). You can click one of these diacritic characters to add it. Close the International Characters window. 29. Click (Return to Start Page). Notice that the batch is listed in the My Work area. Notice the due date and percent complete. 30. Click Return Batch. Notice the options. Click Close. Help Resources 31. On the My Work page, click the batch to highlight it, and click Work on Batch. Notice that it starts where you left off. 32. Click Help, and then click Contact Support. Notice that it lists the contact information for your local administrator and FamilySearch Support. 33. Click Help, and then click Frequently Asked Questions. Notice that it opens a new page with the frequently asked questions. Close this page. 34. Click Help, and then click Resource Guide. 35. Under Indexers, click User Guide. This is a comprehensive guide to the indexing system. 36. Explore some of the other guides available, including language and handwriting guides. Then close the page. 37. Click Help, and then click Ask a Question. 38. Type in a question, and click Ask. 39. From the search results, read one of the answers. Then close the window. 40. Click the File menu, and click Share Batch. FamilySearch Indexing March Intellectual Reserve, Inc. All rights reserved. Page 2 of 4
48 [Type text] View Information Indexing Practice on Your Family 41. The system displays a number you can give to a support individual so he or she can view your batch and help you with questions or problems. The user guide includes the instructions on how to use the share batch feature. Click Copy. Finish the Batch 42. Finish indexing all the names and all the images for this batch. 43. When you are finished, the Quality Checker tab should show so you can recheck any fields with marked information. 44. Recheck all the fields displayed by the quality checker. 45. On the submit batch message, click Yes. You have now completed one batch. Changing Text Size or Language 46. Click the Tools menu, and click Options. 47. Click the Text Size tab. You can change the size of the field text. 48. Click the Language tab. You can select the language for the application, field names, and field help. 49. Click OK. If you made a change, the change will not show until the next time you sign in to indexing. My Work Page: My Goals 50. On the My Work page, from the My Goals tab, click Set New Goal. 51. In the Period Ending Date field, enter a desired date. Note: The current date will automatically be entered in the Period Beginning Date field. 52. In the Number of Records field, enter the desired value. 53. Click OK. 54. Notice your goals listed on the My Goals tab. My Work Page: My History 55. Click the My History tab. 56. Read how points are calculated. 57. Click Names Submitted to view your history. 58. Click Close. My Work Page: Indexing Links 59. Click the Indexing Links tab. 60. Click FamilySearch Indexing. 61. Click the Help tab, and then click the My Info link. 62. Sign in by entering your user name and password, and then click Sign in. 63. Review your information. Notice that you can edit your address and change your user name and password. 64. On the left, click the My Preferences link. FamilySearch Indexing March Intellectual Reserve, Inc. All rights reserved. Page 3 of 4
49 [Type text] View Information Indexing Practice on Your Family 65. Click the Edit button. 66. Select the level of project difficulty and any languages you would like for your preferred indexing projects. 67. Click Save. 68. At the top, click the Projects tab. This is a list of the projects currently being indexed. 69. At the top, click the Partner Projects link. This is a list of projects currently being indexed by participating genealogical and historical societies. 70. At the top, click the News tab. This is general news about FamilySearch indexing. 71. Return to the FamilySearch Indexing My Work page. Under the Indexing Links tab, click FamilySearch Record Search. If you want, try searching for an ancestor, and view their information in an original document. After records are indexed, they are made available on Record Search. 72. Return to the FamilySearch Indexing My Work page. Under the Indexing Links tab, click FamilySearch Research Wiki. This is a collection of information about genealogical research and records. FamilySearch Indexing March Intellectual Reserve, Inc. All rights reserved. Page 4 of 4
FamilySearch Indexing: Indexing
 FamilySearch Indexing: Indexing Table of Contents Index a Batch Log in p. 1 Download a Batch p. 2 View Project Instructions p. 2 Enter the Image Type p. 2 Enter Information p. 2 Duplicate Fields and Records
Quick Start to FamilySearch Indexing
 Quick Start to FamilySearch Indexing FamilySearch indexing is a volunteer project established in 2006 and run by FamilySearch. The project aims to create searchable digital indexes for scanned images of
Part II: Creating Visio Drawings
 128 Part II: Creating Visio Drawings Figure 5-3: Use any of five alignment styles where appropriate. Figure 5-4: Vertical alignment places your text at the top, bottom, or middle of a text block. You could
Microsoft Office Publisher
 Microsoft Office 2007- Publisher Opening Microsoft Publisher Using the Start Menu, click on All Programs and navigate to the Microsoft Office folder. Click on Microsoft Office Publisher 2007. Choosing
WEEK NO. 12 MICROSOFT EXCEL 2007
 WEEK NO. 12 MICROSOFT EXCEL 2007 LESSONS OVERVIEW: GOODBYE CALCULATORS, HELLO SPREADSHEET! 1. The Excel Environment 2. Starting A Workbook 3. Modifying Columns, Rows, & Cells 4. Working with Worksheets
Getting Started with FamilySearch Family Tree
 Getting Started with FamilySearch Family Tree Welcome to the pilot launch of the FamilySearch Family Tree. As the eventual replacement of new.familysearch.org, Family Tree provides several significant
Lesson 2: Creating a Business Letter with a Letterhead and Table Microsoft Word 2016 IN THIS CHAPTER, YOU WILL LEARN HOW TO
 Lesson 2: Creating a Business Letter with a Letterhead and Table Microsoft Word 2016 IN THIS CHAPTER, YOU WILL LEARN HOW TO Change Margins Convert a hyperlink to regular text Insert and Format a Shape
Contents. Launching Word
 Using Microsoft Office 2007 Introduction to Word Handout INFORMATION TECHNOLOGY SERVICES California State University, Los Angeles Version 1.0 Winter 2009 Contents Launching Word 2007... 3 Working with
Web-Based Electronic Death Registration (EDR) Texas Department of Health
 Texas Department of Health") Web-Based Electronic Death Registration (EDR) TX EDR THIN CLIENT Trainers Guide DEMOGRAPHIC SECTION Prepared for: Texas Department of Health December 03, 2005 Version 1.0 Prepared by: The Industry Standard
Web-Based Electronic Death Registration (EDR) TX EDR THIN CLIENT Trainers Guide DEMOGRAPHIC SECTION Prepared for: Texas Department of Health December 03, 2005 Version 1.0 Prepared by: The Industry Standard
Using Microsoft Word. Working With Objects
 Using Microsoft Word Many Word documents will require elements that were created in programs other than Word, such as the picture to the right. Nontext elements in a document are referred to as Objects
OnCOR Silverlight Viewer Guide
 Getting Around There are many ways to move around the map! The simplest option is to use your mouse in the map area. If you hold the left button down, then click and drag, you can pan the map to a new
Correcting Grammar as You Type
 PROCEDURES LESSON 11: CHECKING SPELLING AND GRAMMAR Selecting Spelling and Grammar Options 2 Click Options 3 In the Word Options dialog box, click Proofing 4 Check options as necessary under the When correcting
Study Guide. PCIC 3 B2 GS3- Key Applications-Excel. Copyright 2010 Teknimedia Corporation
 Study Guide PCIC 3 B2 GS3- Key Applications-Excel Copyright 2010 Teknimedia Corporation Teknimedia grants permission to any licensed owner of PCIC 3 B GS3 Key Applications-Excel to duplicate the contents
How to Request a Site
 Contribute Outline: How to request a site Connection Key Browse to page Edit Page View in Browser Formatting (text, photos ) Undo Insert horizontal line Publish, Save for Later, Cancel Rollback to Previous
The Fundamentals. Document Basics
 3 The Fundamentals Opening a Program... 3 Similarities in All Programs... 3 It's On Now What?...4 Making things easier to see.. 4 Adjusting Text Size.....4 My Computer. 4 Control Panel... 5 Accessibility
PARTS OF A WORKSHEET. Rows Run horizontally across a worksheet and are labeled with numbers.
 1 BEGINNING EXCEL While its primary function is to be a number cruncher, Excel is a versatile program that is used in a variety of ways. Because it easily organizes, manages, and displays information,
Word Getting Started The Word Window u vw. Microsoft QUICK Source. Creating a New Blank Document. Creating a New Document from a Template
 Microsoft QUICK Source Word 2007 Getting Started The Word Window u vw x y z u Quick Access Toolbar contains shortcuts for the most commonly used tools. v Microsoft Office Button contains common file and
Objective 1: Familiarize yourself with basic database terms and definitions. Objective 2: Familiarize yourself with the Access environment.
 Beginning Access 2007 Objective 1: Familiarize yourself with basic database terms and definitions. What is a Database? A Database is simply defined as a collection of related groups of information. Things
Word 2013 Beginning. Technology Integration Center
 Word 2013 Beginning Getting Started... 2 Quick Access Toolbar... 3 The Ribbon... 3 Help... 4 Compatibility Mode... 4 Document Views... 4 Navigating the Document... 5 Moving Around in the Document... 5
1) Merge the cells that contain the title and center the title
 Merge the cells that contain the title and center the title") Supplies: You will need a storage location to save your spreadsheet for use in Session 2. You will need the 2 handouts pertaining to Session 1 Instructions: Follow the directions below to create a budget
Supplies: You will need a storage location to save your spreadsheet for use in Session 2. You will need the 2 handouts pertaining to Session 1 Instructions: Follow the directions below to create a budget
Excel 2010: Getting Started with Excel
 Excel 2010: Getting Started with Excel Excel 2010 Getting Started with Excel Introduction Page 1 Excel is a spreadsheet program that allows you to store, organize, and analyze information. In this lesson,
Add Bullets and Numbers
 . Lesson 5: Adding Bullets and Numbers, If you have lists of data, you may want to bullet or number them. When using Microsoft Word, bulleting and numbering are easy. The first part of this lesson teaches
Microsoft Excel 2010 Handout
 Microsoft Excel 2010 Handout Excel is an electronic spreadsheet program you can use to enter and organize data, and perform a wide variety of number crunching tasks. Excel helps you organize and track
Title bar: The top most bar in Word window that usually displays the document and software names.
 1 MICROSOFT WORD Table of Contents LINC ONE Hiding Standard toolbar, Formatting toolbar, and Status bar: To hide the Standard toolbar, click View Toolbars on the Menu bar. Check off Standard. To hide the
How to Create a Cover Letter
 C h a p t e r 2 How to Create a Cover Letter In this chapter, we will learn the following to World Class standards: Using the Ribbon in Word 2010 Changing the Font and Font Size Setting the Margins Inserting
Computer Applications Info Processing
 Lesson 2: Modify the Structure and Appearance of Text Microsoft Word 2016 IN THIS CHAPTER, YOU WILL LEARN HOW TO: Apply styles to text. Change a document s theme. Manually change the look of characters
Labels and Envelopes in Word 2013
 Labels and Envelopes in Word 2013 Labels... 2 Labels - A Blank Page... 2 Selecting the Label Type... 2 Creating the Label Document... 2 Labels - A Page of the Same... 3 Printing to a Specific Label on
Excel 2013 Intermediate
 Excel 2013 Intermediate Quick Access Toolbar... 1 Customizing Excel... 2 Keyboard Shortcuts... 2 Navigating the Spreadsheet... 2 Status Bar... 3 Worksheets... 3 Group Column/Row Adjusments... 4 Hiding
Microsoft Word Basic Editing. Lesson , John Wiley & Sons, Inc. Microsoft Official Academic Course, Microsoft Word
 Microsoft Word 2013 Lesson 2 Basic Editing 2014, John Wiley & Sons, Inc. Microsoft Official Academic Course, Microsoft Word 2013 1 Objectives 2014, John Wiley & Sons, Inc. Microsoft Official Academic Course,
Creating a Website with Publisher 2016
 Creating a Website with Publisher 2016 Getting Started University Information Technology Services Learning Technologies, Training & Audiovisual Outreach Copyright 2017 KSU Division of University Information
EXCEL BASICS: MICROSOFT OFFICE 2010
 EXCEL BASICS: MICROSOFT OFFICE 2010 GETTING STARTED PAGE 02 Prerequisites What You Will Learn USING MICROSOFT EXCEL PAGE 03 Opening Microsoft Excel Microsoft Excel Features Keyboard Review Pointer Shapes
MS Excel Henrico County Public Library. I. Tour of the Excel Window
 MS Excel 2013 I. Tour of the Excel Window Start Excel by double-clicking on the Excel icon on the desktop. Excel may also be opened by clicking on the Start button>all Programs>Microsoft Office>Excel.
Microsoft PowerPoint 2013 Beginning
 Microsoft PowerPoint 2013 Beginning PowerPoint Presentations on the Web... 2 Starting PowerPoint... 2 Opening a Presentation... 2 File Tab... 3 Quick Access Toolbar... 3 The Ribbon... 4 Keyboard Shortcuts...
MS Excel Henrico County Public Library. I. Tour of the Excel Window
 MS Excel 2013 I. Tour of the Excel Window Start Excel by double-clicking on the Excel icon on the desktop. Excel may also be opened by clicking on the Start button>all Programs>Microsoft Office>Excel.
Microsoft PowerPoint 2010 Beginning
 Microsoft PowerPoint 2010 Beginning PowerPoint Presentations on the Web... 2 Starting PowerPoint... 2 Opening a Presentation... 2 File Tab... 3 Quick Access Toolbar... 3 The Ribbon... 4 Keyboard Shortcuts...
Acrobat X Professional
 Acrobat X Professional Toolbar Well Page Navigations/Page Indicator Buttons for paging through document Scroll Bar/box page indicator appears when using the scroll button to navigate. When you release
IT Services Financial Services. IT Services Financial Services.
 eledgers IT Services Financial Services IT Services Financial Services http://finserv.uchicago.edu Table of Contents Logging into eledgers... 3 17BThe eledgers Workspace... 4 Basic Search using Custom
Gloucester County Library System EXCEL 2007
 Gloucester County Library System EXCEL 2007 Introduction What is Excel? Microsoft E x c e l is an electronic s preadsheet program. I t is capable o f performing many diff e r e n t t y p e s o f c a l
Anleitungen für Word 2016 als Word-Dokument zum Ausdrucken und fürs Intranet
 Anleitungen für Word 2016 als Word-Dokument zum Ausdrucken und fürs Intranet 19 Text and Tabs Tabs (tab stops) help you to write a list, for example, for an order or invoice. Larger spaces should not be
Introduction. Inserting and Modifying Tables. Word 2010 Working with Tables. To Insert a Blank Table: Page 1
 Word 2010 Working with Tables Introduction Page 1 A table is a grid of cells arranged in rows and columns. Tables can be customized and are useful for various tasks such as presenting text information
EXCEL 2003 DISCLAIMER:
 EXCEL 2003 DISCLAIMER: This reference guide is meant for experienced Microsoft Excel users. It provides a list of quick tips and shortcuts for familiar features. This guide does NOT replace training or
Session 7 MS Word. Graphics. Inserting Clipart, and Graphics Modify graphics Position graphics
 Session 7 MS Word Graphics Inserting Clipart, and Graphics Modify graphics Position graphics Table of Contents Session 7 Working with Graphics... 1 The Toolbar... 1 Drawing Toolbar... 1 Picture Toolbar...
Help us make this document better smarttech.com/docfeedback/ SMART Ink 3.1 USER S GUIDE FOR WINDOWS OPERATING SYSTEMS
 Help us make this document better smarttech.com/docfeedback/170830 SMART Ink 3.1 USER S GUIDE F WINDOWS OPERATING SYSTEMS Trademark notice SMART Ink, SMART Notebook, SMART Meeting Pro, Pen ID, smarttech,
ACER Online Assessment and Reporting System (OARS) User Guide
 User Guide") ACER Online Assessment and Reporting System (OARS) User Guide January 2015 Contents Quick guide... 3 Overview... 4 System requirements... 4 Account access... 4 Account set up... 5 Create student groups
ACER Online Assessment and Reporting System (OARS) User Guide January 2015 Contents Quick guide... 3 Overview... 4 System requirements... 4 Account access... 4 Account set up... 5 Create student groups
Word 2010 Beginning. Technology Integration Center
 Word 2010 Beginning File Tab... 2 Quick Access Toolbar... 2 The Ribbon... 3 Help... 3 Opening a Document... 3 Documents from Older Versions... 4 Document Views... 4 Navigating the Document... 5 Moving
Building TPS Web Pages with Dreamweaver
 Building TPS Web Pages with Dreamweaver Title Pages 1. Folder Management 7 2. Defining Your Site 8-11 3. Overview of Design Features 12-22 4. Working with Templates 23-25 5. Publishing Your Site to the
Microsoft Word: Steps To Success (The Bare Essentials)
") Microsoft Word: Steps To Success (The Bare Essentials) Workbook by Joyce Kirst 2005 Microsoft Word: Step to Success (The Bare Essentials) Page Contents 1 Starting Word 2 Save 3 Exit 5 Toolbars, Alignment,
Microsoft Word: Steps To Success (The Bare Essentials) Workbook by Joyce Kirst 2005 Microsoft Word: Step to Success (The Bare Essentials) Page Contents 1 Starting Word 2 Save 3 Exit 5 Toolbars, Alignment,
Oskari UX Guide Cybercom Finland Oy
 Oskari UX Guide 18.11.2015 Cybercom Finland Oy Contents Principles of User Interface Design 3 General Layout 4 Main Navigation Layout 5 Map View Layout 6 Layouts of Different Box Types 7 Form Layout 8
Section 8 Formatting
 Section 8 Formatting By the end of this Section you should be able to: Format Numbers, Dates & Percentages Change Cell Alignment and Rotate Text Add Borders and Colour Change Row Height and Column Width
Baltimore Health and Mental Health Study Training Manual Page II - 1
 Baltimore Health and Mental Health Study Training Manual Page II - 1 II. COMPUTER SYSTEMS A. Blaise CAPI/CATI Instructions The ECA Survey s interview data will be collected using a computerized interview.
Correcting Grammar as You Type. 1. Right-click the text marked with the blue, wavy underline. 2. Click the desired option on the shortcut menu.
 PROCEDURES LESSON 11: CHECKING SPELLING AND GRAMMAR Selecting Spelling and Grammar Options 2 Click Options 3 In the Word Options dialog box, click Proofing 4 Check options as necessary under the When correcting
New York City College of Technology. Microsoft Word Contact Information:
 New York City College of Technology Microsoft Word 2016 Contact Information: 718-254-8565 ITEC@citytech.cuny.edu Opening Word 2016 Begin by clicking on the bottom left corner icon on the desktop. From
Lesson 1 Introduction to PowerPoint
 Lesson 1 Introduction to PowerPoint What It Is-- Presentation tool that allows you to view slides Can include text, graphics, animation, sound, video, charts, and transitions Can create handouts, speaker
Learning Worksheet Fundamentals
 1.1 LESSON 1 Learning Worksheet Fundamentals After completing this lesson, you will be able to: Create a workbook. Create a workbook from a template. Understand Microsoft Excel window elements. Select
EXCEL BASICS: MICROSOFT OFFICE 2007
 EXCEL BASICS: MICROSOFT OFFICE 2007 GETTING STARTED PAGE 02 Prerequisites What You Will Learn USING MICROSOFT EXCEL PAGE 03 Opening Microsoft Excel Microsoft Excel Features Keyboard Review Pointer Shapes
Access 2003 Introduction to Report Design
 Access 2003 Introduction to Report Design TABLE OF CONTENTS CREATING A REPORT IN DESIGN VIEW... 3 BUILDING THE REPORT LAYOUT... 5 SETTING THE REPORT WIDTH... 5 DISPLAYING THE FIELD LIST... 5 WORKING WITH
DOING MORE WITH EXCEL: MICROSOFT OFFICE 2013
 DOING MORE WITH EXCEL: MICROSOFT OFFICE 2013 GETTING STARTED PAGE 02 Prerequisites What You Will Learn MORE TASKS IN MICROSOFT EXCEL PAGE 03 Cutting, Copying, and Pasting Data Basic Formulas Filling Data
Introduction to Microsoft Office 2016: Word
 Introduction to Microsoft Office 2016: Word Last Updated: September 2018 Cost: $2.00 Microsoft Word is a word processing software. You can use it to type letters, reports, and other documents. This class
Lesson 18 Getting Started with Excel Essentials
 Getting Started with Excel Essentials Computer Literacy BASICS: A Comprehensive Guide to IC 3, 4 th Edition 1 Objectives Identify the parts of the Excel screen. Navigate through a worksheet and a workbook.
User Guide. FTR Reporter For more information, visit
 FTR Reporter 5.7.1 For more information, visit www.fortherecord.com TABLE OF CONTENTS INTRODUCTION... 5 Overview... 5 About This Document... 5 GETTING STARTED... 6 Installation... 6 Starting Reporter...
Kenora Public Library. Computer Training. Introduction to Excel
 Kenora Public Library Computer Training Introduction to Excel Page 2 Introduction: Spreadsheet programs allow users to develop a number of documents that can be used to store data, perform calculations,
QUARKXPRESS FOR MAC OS version 4.x KEYBOARD SHORTCUTS
 QUARKXPRESS FOR MAC OS version 4.x KEYBOARD SHORTCUTS s Dialog Boxes Palettes Documents Items Text Editing Pictures MENU SHORTCUTS File Action New Document New Library Open Close Save Save as Revert to
INTRODUCTION... 1 UNDERSTANDING CELLS... 2 CELL CONTENT... 4
 Introduction to Microsoft Excel 2016 INTRODUCTION... 1 The Excel 2016 Environment... 1 Worksheet Views... 2 UNDERSTANDING CELLS... 2 Select a Cell Range... 3 CELL CONTENT... 4 Enter and Edit Data... 4
Introduction to Microsoft Office PowerPoint 2010
 Introduction to Microsoft Office PowerPoint 2010 TABLE OF CONTENTS Open PowerPoint 2010... 1 About the Editing Screen... 1 Create a Title Slide... 6 Save Your Presentation... 6 Create a New Slide... 7
ViewONE User Manual. Genazim. The Friedberg Geniza Project. Daeja Image Systems. All Rights Reserved.
 Genazim The Friedberg Geniza Project ViewONE User Manual Daeja Image Systems. All Rights Reserved. Email: info@daeja.com Web site: http://www.daeja.com 1 Contents Introduction 3 The User interface 3 Toolbars
FamilySearch Research Wiki
 Indexing Wiki What is a Wiki? A wiki is a website where all available information on a topic is gathered in a central location for easy access. On some wikis users can add, modify, or delete its content.
Microsoft Word 2010 Tutorial
 1 Microsoft Word 2010 Tutorial Microsoft Word 2010 is a word-processing program, designed to help you create professional-quality documents. With the finest documentformatting tools, Word helps you organize
WORD XP/2002 USER GUIDE. Task- Formatting a Document in Word 2002
 University of Arizona Information Commons Training Page 1 of 21 WORD XP/2002 USER GUIDE Task- Formatting a Document in Word 2002 OBJECTIVES: At the end of this course students will have a basic understanding
How to download your family from FamilySearch to Legacy. To prepare Legacy to integrate with FamilySearch Family Tree
 How to download your family from FamilySearch to Legacy To prepare Legacy to integrate with FamilySearch Family Tree (1. File name here) 1. Start Legacy. It will usually start up with the last file upon
Creating a Business Letter with a Letterhead and Table
 Microsoft Word 00 3 Creating a Business Letter with a Letterhead and Table Objectives You will have mastered the material in this chapter when you can: Change margins Insert and format a shape Change text
Note: You may also toggle between your selected Chinese input method and English by using the key
 Selecting Simplified Input Method To type in simplified characters, click on the arrow to the right of the selected input language at the top left corner of your screen. Then select "Chinese (Simplified)"
Microsoft PowerPoint 2007 Beginning
 Microsoft PowerPoint 2007 Beginning Educational Technology Center PowerPoint Presentations on the Web... 2 Starting PowerPoint... 2 Opening a Presentation... 2 Microsoft Office Button... 3 Quick Access
Word 2016 Tips. Rylander Consulting
 Word 2016 Tips Rylander Consulting www.rylanderconsulting.com sandy@rylanderconsulting.com 425.445.0064 Word 2016 i Table of Contents Screen Display Tips... 1 Create a Shortcut to a Recently Opened Document
Quick Start Guide - Contents. Opening Word Locating Big Lottery Fund Templates The Word 2013 Screen... 3
 Quick Start Guide - Contents Opening Word... 1 Locating Big Lottery Fund Templates... 2 The Word 2013 Screen... 3 Things You Might Be Looking For... 4 What s New On The Ribbon... 5 The Quick Access Toolbar...
New User Orientation PARTICIPANT WORKBOOK
 New User Orientation PARTICIPANT WORKBOOK INTEGRATED SOFTWARE SERIES New User Orientation PARTICIPANT WORKBOOK Version 2.0 Copyright 2005 2009. Interactive Financial Solutions, Inc. All Rights Reserved.
Microsoft Word Intermediate March 25, Exercise 1: Open Word Click on Word. OR Click Start. Click All Programs. Click Microsoft Office.
 Microsoft Word Intermediate March 25, 2014 Exercise 1: Open Word Click on Word. OR Click Start. Click All Programs. Click Microsoft Office. Exercise 2: Create a new document Click File Tab. Select New.
A cell is highlighted when a thick black border appears around it. Use TAB to move to the next cell to the LEFT. Use SHIFT-TAB to move to the RIGHT.
 Instructional Center for Educational Technologies EXCEL 2010 BASICS Things to Know Before You Start The cursor in Excel looks like a plus sign. When you click in a cell, the column and row headings will
The Menu and Toolbar in Excel (see below) look much like the Word tools and most of the tools behave as you would expect.
 look much like the Word tools and most of the tools behave as you would expect.") Launch the Microsoft Excel Program Click on the program icon in Launcher or the Microsoft Office Shortcut Bar. A worksheet is a grid, made up of columns, which are lettered and rows, and are numbered.
Launch the Microsoft Excel Program Click on the program icon in Launcher or the Microsoft Office Shortcut Bar. A worksheet is a grid, made up of columns, which are lettered and rows, and are numbered.
Using Adobe Photoshop
 Using Adobe Photoshop 2 In this section we ll look at some essential things you need to know in order to use Photoshop effectively. First of all, we ll take a look at customising Photoshop s settings and
Microsoft Office Suite
 Module 3 MODULE OVERVIEW Part 1 Getting Familiar with Microsoft Word 2007 for Windows Part 2 Microsoft Word 2007 Basic Features Part 3 More Basic Features Microsoft Office Suite Microsoft Word 2007 Part
Animating Objects in Microsoft PowerPoint 2003
 Animating Objects in Microsoft PowerPoint 2003 Introduction Both text and objects can be animated in a similar way on a PowerPoint slide. You should be familiar with text animation before you work through
Changing Projects! Thanks to All. Passenger Lists. Passenger Lists and Naturalization Records. Highlights. Ruler
 Passenger Lists and Naturalization Records Thanks to All Thanks to all of you who helped index the 1940 US Census. Through the collective effort of more than 100,000 volunteers we indexed the names of
MICROSOFT WORD. Table of Contents. What is MSWord? Features LINC FIVE
 Table of Contents What is MSWord? MSWord is a word-processing program that allows users to insert, edit, and enhance text in a variety of formats. Word is a powerful word processor with sophisticated editing
PUBLISHER 2016 LINDA MUCHOW ALEXANDRIA TECHNICAL AND COMMUNITY COLLEGE 1601 JEFFERSON STREET, ALEXANDRIA, MN 56308
 PUBLISHER 2016 LINDA MUCHOW 320-762-4539 LINDAC@ALEXTECH.EDU ALEXANDRIA TECHNICAL AND COMMUNITY COLLEGE 1601 JEFFERSON STREET, ALEXANDRIA, MN 56308 Table of Contents Publisher Environment... 3 Rulers...
Introduction to Microsoft Word
 Chapter Microsoft Word is a powerful word processing program that allows you to enter text, make changes to it, format it, record and print it. You can use it to produce professional business letters,
Microsoft Office Excel
 Microsoft Office 2007 - Excel Help Click on the Microsoft Office Excel Help button in the top right corner. Type the desired word in the search box and then press the Enter key. Choose the desired topic
Computer Nashua Public Library Advanced Microsoft Word 2010
 WordArt WordArt gives your letters special effects. You can change the formatting, direction, and texture of your text by adding Word Art. When you click the WordArt icon on the Insert tab, you will see
Using Blending Modes for Simple Color Correction
 Using Blending Modes for Simple Color Correction In a previous lesson, you were introduced to blending modes using the Brush Tool. Blending modes are also a powerful feature of the Layers Panel and can
Unit D Lecture Notes Word 2003
 Unit D Lecture Notes Word 2003 Objectives: In this project you will learn: Set document margins Divide a document into sections Insert page breaks Insert page numbers Add headers and footers Edit headers
OS X keyboard shortcuts
 OS X keyboard shortcuts Summary Learn about common OS X keyboard shortcuts. A keyboard shortcut is a way to invoke a function in OS X by pressing a combination of keys on your keyboard. Original source:
SIMPLE TEXT LAYOUT FOR COREL DRAW. When you start Corel Draw, you will see the following welcome screen.
 SIMPLE TEXT LAYOUT FOR COREL DRAW When you start Corel Draw, you will see the following welcome screen. A. Start a new job by left clicking New Graphic. B. Place your mouse cursor over the page width box.
Customizing FlipCharts Promethean Module 2 (ActivInspire)
") Customizing FlipCharts Promethean Module 2 (ActivInspire) Section 1: Browsers The browsers (located on the left side of the flipchart) are menus for various functions. To view the browsers, click Main
Customizing FlipCharts Promethean Module 2 (ActivInspire) Section 1: Browsers The browsers (located on the left side of the flipchart) are menus for various functions. To view the browsers, click Main
Microsoft Excel 2010 Basic
 Microsoft Excel 2010 Basic Introduction to MS Excel 2010 Microsoft Excel 2010 is a spreadsheet software in the new Microsoft 2010 Office Suite. Excel allows you to store, manipulate and analyze data in
ShiftWizard User Guide. Version 4
 ShiftWizard User Guide Version 4 ShiftWizard Program and User Guide 2003 Emergency Medicine Informatics, LLC. All rights reserved. 2 Introduction...4 Running the ShiftWizard...4 Starting the ShiftWizard
Intermediate Microsoft Office 2016: Word
 Intermediate Microsoft Office 2016: Word Updated January 2017 Price: $1.20 Lesson 1: Setting Margins A margin is the distance from the text to the paper s edge. The default setting is 1 all around the
Changing Worksheet Views
 PROCEDURES LESSON 1: TOURING EXCEL Starting Excel 1 Click the Start button 2 Click All Programs 3 Click the Microsoft Office folder icon 4 Click Microsoft Excel 2010 Naming and Saving (Ctrl+S) a Workbook
It is recommended that you configure Internet Explorer to see the MLS as a trusted site.
 Tips for New Users Welcome to Rapattoni MLS! You now have access to the most advanced Internet-based multiple listing system on the market, with many exciting tools and features that will help you provide
Guide to User Interface 4.3
 Datatel Colleague Guide to User Interface 4.3 Release 18 June 24, 2011 For corrections and clarifications to this manual, see AnswerNet page 1926.37. Guide to User Interface 4.3 All Rights Reserved The
Barchard Introduction to SPSS Marks
 Barchard Introduction to SPSS 21.0 3 Marks Purpose The purpose of this assignment is to introduce you to SPSS, the most commonly used statistical package in the social sciences. You will create a new data
Section 6: Dreamweaver
 Section 6: Dreamweaver 1 Building TPS Web Pages with Dreamweaver Title Pages 1. Dreamweaver Storyboard Pages 3 2. Folder Management 4 3. Defining Your Site 5-8 4. Overview of Design Features 9-19 5. Working