Microsoft Word: Steps To Success (The Bare Essentials)
|
|
|
- Horatio Ashley Evans
- 6 years ago
- Views:
Transcription
1 Microsoft Word: Steps To Success (The Bare Essentials) Workbook by Joyce Kirst 2005
2 Microsoft Word: Step to Success (The Bare Essentials) Page Contents 1 Starting Word 2 Save 3 Exit 5 Toolbars, Alignment, Line Spacing 6 Open 7 Print 8 Close a File without Exiting 9 New File 10 Select Text 11 View/Zoom 12 Fonts and Format Painter 14 Undo 15 Cancel 16 Spell Check 17 Line Spacing & Alignment 19 Margins 20 Cut, Copy, Paste 22 Thesaurus 23 Show/Hide Codes & Word Count 24 Find & Replace Text 25 Pictures 27 Bullet & Number Lists 28 Tables 29 Page Numbers (Headers/Footers) 30 Columns 31 Help! 32 Organizing Files 34 a File Glossary
3 Microsoft Word: Steps to Success (The Bare Essentials) Introduction This workbook presents a brief overview of Microsoft Word s most basic functions. As you will see, most commands can be completed in a number of ways: Clicking your mouse on an icon (picture) Using the keyboard Choosing an action from a pull-down menu Sometimes right-clicking on the screen I designed the book with YOU in mind. For example, if you prefer not to use a mouse, keyboard commands are included. If you have trouble reading standard-sized print, you ll notice that larger print was used throughout the text. The book is available in alternate formats upon request. And if you need step -by -step directions, this book is for you! When you come to class I will show you many bonus commands, short-cuts, and tricks to make your work even easier in Word. In the meantime, happy computing! - Joyce Kirst
. Type your Login Name, press TAB. 3. Type your personal password, press Enter. 4.")
4 Starting Word + Underlined letter activates pull-down menu. Pull-Down Menu To move to next section of dialog box Click an icon to perform an action Begin typing here To Start Word: 1. Press CTRL + ALT + Delete 2. Click in the User Name box (ALT + U). Type your Login Name, press TAB. 3. Type your personal password, press Enter. 4. Click the WORD Icon in the Task Bar or Double click WORD Icon on the Desktop or Click START>Programs>MS Office>Word or Use the : Press CTRL + ESC>P>Right arrow, then arrow down to MS Office>Right arrow, then arrow down to Word 5. Begin Typing 1
 Drive Type a Title or Filename To Save and Continue: 1.")

5 Save Pull-Down Menus + Usually Choose Save. Use Save As to change A file s name or location. Choose 3½ Floppy (A:) Drive Type a Title or Filename To Save and Continue: 1. Click File or Press ALT + F, Click Save or Press S. or Click Save Icon or Press Ctrl + S. 2. Choose A Drive: Click Down Arrow by SAVE IN box, then on A: in list. Or type A: before your title. 3. In the FILE NAME box, type a TITLE (Word will add.doc ) 4. Click SAVE or Press ENTER. NOTE: You may save as often as you wish. 2

6 Save & Exit Pull-Down Menus + 3

7 Save & Exit (cont.) To Save and Exit: 1. Click File or Press ALT + F, Click Exit or Press X. or Click X in Upper Right Corner or Press ALT F4. 2. Word will ask if you want to save your document. 3. Click YES, or Press Y, or ENTER to save. 4. Choose A Drive: Click Down Arrow by SAVE IN box, then on A: in list. 5. In the FILE NAME box, type a TITLE (Word will add.doc ) To use the file in Windows 3.1, limit title to 8 letters. 6. Click OK or Press ENTER. 4
8 Toolbars Tables/ STANDARD TOOLBAR Copy Zoom Columns Format Painter Save Print Help Show/ Hide Spell Cut Preview Open Insert Table Undo Redo Paste New Highlight Number List Align Left Font Name Size Bold Center Font Color Bullet List Italic Right Underline Justify Line Spacing FORMATTING TOOLBAR NOTE: All activities performed by clicking icons on a toolbar can also be completed using the keyboard, for example: Alignment Shortcuts Line Spacing Shortcuts Single Space Ctrl + 1 Double Space Ctrl and ½ Space Ctrl + 5 Center Ctrl + E Left Ctrl + L Right Ctrl + R Justify (Full) Ctrl + J 5
. 2.")
. 3.")
9 Open Pull-Down Menu + 6 To Open an Existing File: 1. Click File, then Open or click the Open Icon (CTRL + O). 2. In the Look In box (Alt + i), Click the down arrow, then click on the drive where the file is located. (Press down arrow, then arrow up or down to drive). 3. If necessary, double click a folder to find your file. (Press Enter to open a folder) 4. Click on the file to open (arrow to file). 5. Click OPEN (press Enter)
. 4. Click OK or press Enter.")
10 Print Pull-Down Menu + Printing a Document: 1. Click on File, then Print, or click the Print Icon (Ctrl + P). 2. Select the Page Range (usually ALL). 3. Select the Number of Copies (usually 1). 4. Click OK or press Enter. Note: In BC labs, you must use your GADES card To pay for printing (10 cents per page) Use Print Preview determine number of pages 7
, click down arrow, click A: (Use down arrow on keyboard, press Enter on A:) 6.")
11 Close Pull-Down Menu Close Closing a Document without Closing Word: 1. Click on File, then Close (ALT+F, C). 2. A dialog box asks whether you want to save changes.. 3. Click Yes (Y or Enter) to save. 4. If you have not yet saved the document, the Save As dialog box appears. 5. In the Save In box (Alt + I), click down arrow, click A: (Use down arrow on keyboard, press Enter on A:) 6. Press TAB or click in File Name box. 7. Type a name for your document 8. Click SAVE (ALT + S or Enter). 8
. 3. Choose a document style (usually Blank Document). (Use TAB and arrows). 4.")
12 New Document Pull-Down Menu + To begin a new document: 1. First save your current document. You may close the current document or leave it open. 2. Click File, then New or click Icon for New (CTRL + N). 3. Choose a document style (usually Blank Document). (Use TAB and arrows). 4. Click OK (or press Enter) if you used the side frame. 9
13 Selecting Text SHORTCUTS FOR SELECTING TEXT To Select: A Word A Line Many lines A Paragraph Some Text Do This: Double-click it, or place cursor before or after the word, then hold Shift + arrow right or left over the word. Click in the left margin by the line, or place cursor at the beginning of the line, then hold Shift + END. Drag mouse down lines or left margin, or hold Shift while arrowing down or over lines. Triple-click it, or double-click left margin by the paragraph, or place cursor at the beginning of the paragraph, then hold CTRL + Shift + Down Arrow. Click at beginning of text, hold Shift, then click at the end of the text to be selected, or place cursor at the beginning of the text to be selected, then Shift + arrows From Cursor to End - CTRL + Shift + End A Document CTRL + click left margin, or triple-click left margin, or choose EDIT, SELECT ALL, or press CTRL + A. 10


14 View/Zoom + Pull-Down Menu Changing the View (Zooming in and out): 1. Click on View then Zoom, or click on the arrow beside the viewing percent identified on the standard toolbar (ALT+V, Z). 2. Click on a desired zoom level (in dialog box use arrows to move among options, press Enter or click OK). 3. Or type a zoom percentage into the percent box. Note: Zoom will not affect printout size. 11

15 Font Changes + Pull-Down Menu Format/ Font 12
16 Font Changes (Cont.) Changing Font Size and Style: 1. Select Text to be changed or set font before typing. 2. Click on Format, then Font (ALT+O, F) or Right-click on text, then click on Font. 3. Click in or tab to boxes to change Font, Style, Size, Underlining, Color, etc. 4. Notice how your text will look in the Preview box. 5. Click OK or press Enter when finished. 6. QUICK METHOD: Select text, then Click font name, size, or style icons Bonus: Copies the format from a selected object or text and applies it to the object or text you click. Format Painter 1. Place your cursor in the text that has the formatting you want to copy. 2. Click Format Painter Icon (Ctrl + Shift + C), then select the text where you want to apply the formatting (Ctrl + Shift + V). Tip: To copy the target formatting to several locations, double-click Format Painter. Click the icon again or press ESC when you re finished. 13
 in the list to undo. (Ctrl + Z repeatedly) 3.")
17 Undo Pull-Down Menu + The Undo Command: 1. To undo a typing or editing action, click the undo button or click Edit, then Undo (Ctrl + Z). 2. To undo more than one action, click the down arrow to the right of the undo button. Click the action(s) in the list to undo. (Ctrl + Z repeatedly) 3. To redo an action after undoing it, click the redo button or click Edit, then Redo. (Ctrl + Y) 4. To redo more than one action, click the down arrow to the right of the redo button. Select the number of actions to redo by clicking on the items in the list. 14
18 Cancel (When available) Cancel The Cancel Command: 1. In a dialog box where the Cancel button is available, click the Cancel button to close the dialog box without implementing any actions. 2. The ESC (escape) key also closes dialog boxes without implementing changes. Note: If you already clicked OK or Enter, you might be able to undo the action with the Undo Command (see page 14). 15
, click ignore (ALT+I). 4.")
 6. When finished, click OK or press Enter. 7.")
19 Spell Check Pull-Down Menu 16 Spell Checking: 1. Click Tools, then Spelling (ALT+T, S) or press F7 2. You ll see a word in red which may be misspelled 3. If it s correct (i.e.: A proper noun), click ignore (ALT+I). 4. If it s misspelled, click on a correction in the suggestions box or press tab, then arrow to a correction or correct your error by retyping the word in the top box. 5. Click Change (ALT+C) 6. When finished, click OK or press Enter. 7. Quick Method: Right-click (Shift + F10) on misspelled word, then click or arrow to a correction in the fly-out menu.


20 Spacing & Alignment Spacing Single Double 1½ Pull-Down Menus Right Click, Then Click on Paragraph... For step-by-step directions, see page
, or Right-click. 4. Click Paragraph or (P). 5. Click in box for Alignment or Line Spacing or tab to it. 6. Type the first letter of the word you want (eg.")
21 Spacing & Alignment (Cont.) Alignment Left Right Center Justify 18 Line Spacing and Alignment: 1. Spacing & Alignment may be changed before or after typing text. 2. Put cursor in text to be changed. 3. Click Format, (ALT+O), or Right-click. 4. Click Paragraph or (P). 5. Click in box for Alignment or Line Spacing or tab to it. 6. Type the first letter of the word you want (eg. L for Left), then press Enter, or click the option. 7. Click OK or press Enter. 8. If you prefer, use keyboard shortcuts or icon buttons. 9. To reveal Formatting, press Shift + F1
, then Page Setup (U) 2. Type a number for each margin area or use dials 3.")

22 Margins Pull-Down Menu + Click & Drag Ruler s Margins Changing Margins: 1. Click on File (ALT+F), then Page Setup (U) 2. Type a number for each margin area or use dials 3. Click from cell to cell or press tab or arrows 4. Click OK or Press Enter Note: The Apply to: box identifies if margins will apply to whole document or from this point forward. 5. Also click Layout Tab (ALT + L). Make sure section start is Continuous, not New Page. 19


23 Cut, Copy & Paste Text Cut Copy Paste Pull-Down Menu Right Click 20
24 Cut, Copy & Paste Text (cont.) Cut or Copy and Paste Text: Step-by-Step 1. Select text you want to cut or copy. (See Selecting Text on page 10). 2. Once text is selected, you can: a. Drag it to a new location with your mouse, or b. Choose EDIT, then CUT or COPY, (ALT+E, T for Cut or C for Copy). Click or arrow to a new location, then choose EDIT, PASTE (ALT+E, P for Paste), or c. Press CTRL + X for CUT or press CUT Icon. Press CTRL + C for COPY or press COPY Icon. After text is cut or copied into the computer s memory, click or arrow to a new location where you want the text, then press CTRL + V for PASTE or click PASTE Icon, or d. RIGHT CLICK and choose CUT or COPY, then PASTE. NOTE: Once something has been copied or cut into the computer s memory, you may paste the it multiple times without having to copy or cut it again. 21

25 Thesaurus Pull-Down Menu + Using the Thesaurus 1. Move cursor to the target word, choose TOOLS LANGUAGE, THESAURUS (Shift + F7). 2. Your target word is in the Search for box, and you see meaning in the Bold with corresponding synonyms below. 3. Some words even have Antonyms. 4. To find more synonyms, click a word (Tab, then arrow, then press Enter). 5. To go back to a previous word, click the Back icon (Tab, arrow) 6. To use a new word, click the down arrow to its right, then choose Insert (Shift + F10 or Right Click Button, I). Note: To switch between active frames in Word, press F6. 22
26 Show/Hide & Word Count + Show/Hide: While you view or edit a document, you can display characters - such as tab, spaces, and carriage returns that don t appear on the printed page. That way you can easily see if you added an extra space between words, typed spaces instead of a tab, etc. 1. Click the Show/Hide Icon 2. To hide the non-printing characters again, click the Show/Hide Icon again. Word Count: 1. For the total number of words in your document and other statistics, click Tools (ALT + T), then Word Count (W). 2. To see the number of words in a portion of your document, select text, the click Tools (Alt + T), Word Count (W). 3. To close the information box, click CLOSE or press ESC. 23
. 4. To find additional instances of the word or phrase, continue to click the Find Next button (ALT + F).")
. Extra Features: Click the More button (ALT + M).")
27 Find & Replace Text Pull-Down Menu + + Finding Text: 1. Click on Edit, then Find (CTRL + F). 2. Type a word or phrase to find. 3. Click Find Next button (ALT + F). 4. To find additional instances of the word or phrase, continue to click the Find Next button (ALT + F). Finding & Replacing Text: 1. Click on Edit, then Replace (CTRL + H). 2. Type a word or phrase to find. Press TAB. Type a replacement in Replace With box. 3. Click Replace button (ALT + R). Extra Features: Click the More button (ALT + M). Use check boxes, Format (ALT + O) or Special (ALT + E) buttons if desired. 24
. 3. Click NOW (Alt + N) so Word categorizes clip art.")
, choose COPY (arrow to copy, then press Enter), click in")
28 Pictures Pull-Down Menu + To Insert a Picture: 1. Click on Insert (ALT+), Picture (P), Clip Art (C)I 2. On the Clip Art frame, click Organize Clips (F6 to switch between frames, Tab and arrow within frame). 3. Click NOW (Alt + N) so Word categorizes clip art. 4. Click the + in front of Office Collections (Right arrow) 5. Clilck on any category (or click + to expand a category). -- TAB and Arrows to navigate 6. To paste a picture into your document, either drag it or Right click on the picture (Shift + F10), choose COPY (arrow to copy, then press Enter), click in your document (ALT + TAB) and click Paste icon (Alt + V) 25
29 Pictures (Cont.) To Resize a Picture: 1. Insert a picture from the clip art gallery or from a file. 2. Click on the picture and see the handles appear on all 4 corners and the center of the top and sides. 3. Move your cursor over the picture near the corners until the pointer turns into a double arrow. 4. Click and drag toward the center to shrink the picture, or away to enlarge it. The picture remains proportional. Note: If your drag a center handle, the picture will change sizes disproportionately. To restore the picture to its original size, click the last icon (Restore) on the Picture Toolbar. To Move a Picture: 1. Insert a picture from the clip art gallery or from a file. 2. Right-click the picture, then left click Format Picture (or choose the Format Picture Icon from the Picture Toolbar). 3. Click the Layout tab. 4. Select In Front of Text. 5. Click the Advanced button. 6. On the Picture Position tab, deselect the Option: Move object with text. 7. Click OK twice or press Enter twice. 8. Click on the picture and drag it anywhere on the page. 26
 2. Type text for the first item in the list. 3. Press Enter. Word will create another bullet or the next number in the sequence. 4.")
30 Bullets and Numbering Pull-Down Menu Type a number Bullet and Number Lists: 1. Click on the icon for Bullets or Numbering before or after typing text. (ALT+0149 for bullets, begin with a 1 for a numbered list.) 2. Type text for the first item in the list. 3. Press Enter. Word will create another bullet or the next number in the sequence. 4. Continue to type, then press Enter for each item. Note: If any items are longer than one line, Word will align them correctly with the previous text. 5. To start a new line without adding another bullet or number, press SHIFT+Enter. 6. After the last item in the list, press Enter, then press backspace or re-click the icon to stop the list. 7. To select other bullet or number styles, click Format, then Bullets (ALT + O, N). Note: Use Format>Paragraph>Line Spacing After to change the amount of space between each item in a list. 27
 or Insert Table Icon. 2.")


31 Tables + Pull-Down Menu Tables: 1. Click Table, Insert, Table (ALT + A, I) or Insert Table Icon. 2. Type the number of Columns, press TAB, number of rows, or use dials. Or drag mouse over desired number of rows/columns on Insert Table Icon. 3. Or draw a table: Table, Draw Table (ALT + A, B) or click Tables & Borders Icon. Drag mouse to draw. 4. Click from cell to cell or press tab or arrows. 5. In a table, press Enter within a cell to enlarge it. 6. Drag cell borders to resize them. 7. Right-click or use Table menu for more options. 28
 or Page Numbering Icon if available.")

, double click on dimmed page number or Click View, Header and Footer (ALT + V, H).")
32 Page Numbers (Headers/Footers) + Pull-Down Menu (If available) Page Numbers (and Header/Footer Info): 1. Click on Insert, Page Numbers (ALT + I, U) or Page Numbering Icon if available. Or click View, Header and Footer (Alt+V, H). 2. Click or TAB to select Position, Alignment, and whether you want page numbering on the first page. 3. Click OK or press Enter. 4. To add other Header or Footer information (Titles, Date, etc.), double click on dimmed page number or Click View, Header and Footer (ALT + V, H). A dotted box will appear showing the header or footer. 5. Type text (use normal font, size, and alignment tools) or choose from preset options. Click Close (ALT + C). 29
 or Columns icon. 3. Click or type number of columns. Click OK or Enter. 4.")
. 5.")
33 Columns Pull-Down Menu + Creating Columns: 1. Select text for columns or set columns before typing. 2. Click Format, Columns (ALT + O, C) or Columns icon. 3. Click or type number of columns. Click OK or Enter. 4. In the dialog box you may choose to apply columns to whole document, selected text, or this point forward (Alt + A, then arrow up or down, Enter). 5. Dialog box allows you to identify column widths and spacing, and if you want a line between columns. 30
 - Choose Help, Microsoft Office Word Help.")

34 HELP! Pull-Down Menu Help - Most dialog boxes have a HELP Icon next to the Exit Icon (F1) - Click the Help icon? On the Standard Toolbar (F1) - Choose Help, Microsoft Office Word Help. (F1) The Help frame will open at the right (F6 switches between frames). Type a word or phrase in the Search for: box, Click green arrow to go to that topic. (Enter) - For a list of help topics, click or TAB to Table of Contents. - For the Help Assistant, click Help, Show the Office Assistant (Alt + H, O). Click on the Assistant, then type a question, click Search (Alt + S). 31


35 Organizing Files (With Windows Explorer) + Pull-Down Menu (If available) 32
36 Organizing Files (With Windows Explorer) Cont. Organizing Files: 1. Launch Windows Explorer from START, PROGRAMS, ACCESSORIES, Windows Explorer (CTRL + ESC, P, Right Arrow, then Down Arrow to Explorer), or click the Windows Explorer Icon if available. 2. Click on 3½ Floppy (A:) or use Up or Down Arrows to navigate to your disk. Click in the Right Frame or press TAB to switch to the Right Frame (Shift + Tab returns). You may choose any file in the list by clicking on it or arrowing to it. 3. Double click or press Enter to open any files in right window. This shows the contents of the file. Close the file and return to Windows Explorer. 4. In the folders list (left frame) click on + sign or press right arrow to expand the folder and see sub-folders. 5. Click on FILE (Alt + F) or Right Click (Shift + F10) for a menu of available actions such as delete (D), or rename (M). 6. Follow the directions on screen. 7. To Close Windows Explorer, click the Red X or File, Close (Alt + F, C). 33
37 34
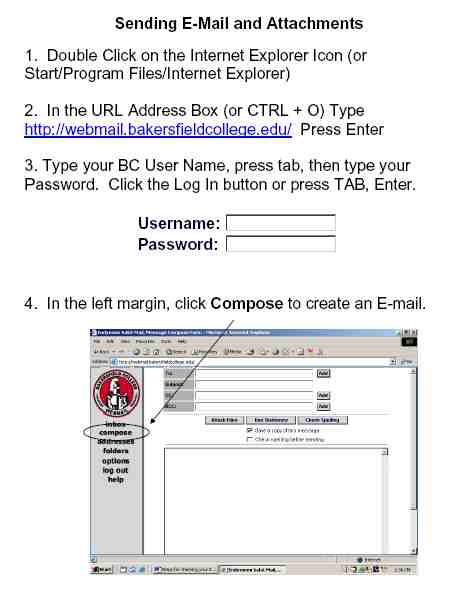
38 Sending and Attachments 5. Type the address of the person you are sending the message to in the To: Box Press tab. 6. In the Subject Box type a topic. (e.g., Research Project) 7. To attach a File with your , click on the Attach Files button. 8. Click on Browse Box. Click the down arrow next to Look In, and find the disk or folder for your document (A:) 9. Select your document in the list, and click Open button. 10. Click the Attach button. 11. Click the Compose button to return to the message box. 12. Click in the Message Box area and type your message. Remember to sign your name. 13. Click the Check Spelling button. 14. Scroll to the bottom of the screen and click the Send button. The screen will read Your message has been sent. 15. Click the Continue button. Close the Internet window. Close all windows and log off computer. 35
39 Glossary Page Topic Alignment CTRL + L, R, E, J Bold CTRL + B 27 Bullets ALT Cancel ESC Changing Fonts ALT + O, F 19 Changing Margins ALT + F, U 11 Changing the View ALT + V, Z 8 Close a File ALT + F, C Colored Te xt Alt + O, F 30 Columns ALT + O, C Copy Text CTRL + C 16 Correct Spelling F Cut, Copy, Paste CTRL + X, C, V Cut Text CTRL + X 32 Deleting Files Explorer, Delete key Double Space CTRL ing a File Internet 15 Escape, Cancel ESC 2-3 Exit Alt + F, X 24 Find & Replace Text CTRL + F or H Fonts ALT + O, F 29 Footers ALT + V, H 13 Format Painter Ctrl + Shift + C or V 26 Graphics ALT + I, P 29 Headers/Footers ALT + V, H 31 Help F Inserting a Picture ALT + I 28 Inserting a Table ALT + A, I Italics CTRL + I Justify CTRL + J 36
40 Glossary Page Topic Line Spacing CTRL + 1, 2, 5 19 Margins ALT + F, U Moving Text CTRL + X, V 9 New Document CTRL + N 27 Number Lists 1, 2, 3 6 Open CTRL + O 32 Organizing Files CTRL + Esc, Explorer 29 Page Numbers ALT + I, U 19 Page Setup ALT + F, U Paste CTRL + V 25 Pictures ALT + I 7 Print CTRL + P 14 Redo CTRL + Y 32 Renaming Files CTRL + Esc, Explorer 24 Replacing Text CTRL + H 2-3 Save and Exit ALT + F4 10 Selecting Text Shift + Arrows 23 Show/Hide ALT + T, O Spacing CTRL + 1, 2, 5 16 Spell Check F7 1 Starting Word CTRL + ESC 28 Tables ALT + A, I 22 Thesaurus SHIFT + F7 5 Toolbars ALT + V, T Underline CTRL + U 14 Undo CTRL + Z 11 View ALT + V, Z 23 Word Count ALT + T, W 11 Zoom ALT + V, Z 37
Microsoft Word Part I Reference Manual
 Microsoft Word 2002 Part I Reference Manual Instructor: Angela Sanderson Computer Training Coordinator Updated by: Angela Sanderson January 11, 2003 Prepared by: Vi Johnson November 20, 2002 THE WORD SCREEN
Word Getting Started The Word Window u vw. Microsoft QUICK Source. Creating a New Blank Document. Creating a New Document from a Template
 Microsoft QUICK Source Word 2007 Getting Started The Word Window u vw x y z u Quick Access Toolbar contains shortcuts for the most commonly used tools. v Microsoft Office Button contains common file and
Microsoft Office Training Skills 2010
 Lesson 3 - Creating Documents with MS word 2010 Introduction to Word Processing MS-Word 2010 is word processing application that is used create and edit documents such as: Books, letters, reports, newsletters,
In so many ways summary
 In so many ways summary Many of Word s functions can be activated in a variety of different ways. Often you can use the menu, a tool on the toolbar or a shortcut key to achieve the same result. Rather
Introduction to Microsoft Word 2010
 Introduction to Microsoft Word 2010 Microsoft Word is a word processing program you can use to write letters, resumes, reports, and more. Anything you can create with a typewriter, you can create with
MICROSOFT WORD 2010 BASICS
 MICROSOFT WORD 2010 BASICS Word 2010 is a word processing program that allows you to create various types of documents such as letters, papers, flyers, and faxes. The Ribbon contains all of the commands
MICROSOFT WORD 2010 Quick Reference Guide
 MICROSOFT WORD 2010 Quick Reference Guide Word Processing What is Word Processing? How is Word 2010 different from previous versions? Using a computer program, such as Microsoft Word, to create and edit
Tips and Tricks for Microsoft Word 2010
 Tips and Tricks for Microsoft Word 2010 TABLE OF CONTENTS Shortcuts for Selecting Text... 1 Create Automatic Borders... 1 Bulleted and Numbered List Shortcuts... 1 Insert Normal Text Within a List... 2
Mi c r o s o f t Wo r d Qu i c k Re f e r e n c e Ca r d
 Tech Talk # 5 Mi c r o s o f t Wo r d Qu i c k Re f e r e n c e Ca r d Introduction by Renae Schmidt Hello! Welcome to Tech Talk #5. This week we are sharing a Microsoft Word 2010 Quick Reference Card.
Microsoft Word 2010 Basics
 1 Starting Word 2010 with XP Click the Start Button, All Programs, Microsoft Office, Microsoft Word 2010 Starting Word 2010 with 07 Click the Microsoft Office Button with the Windows flag logo Start Button,
Microsoft Word 2011 Tutorial
 Microsoft Word 2011 Tutorial GETTING STARTED Microsoft Word is one of the most popular word processing programs supported by both Mac and PC platforms. Microsoft Word can be used to create documents, brochures,
Introduction to Microsoft Office PowerPoint 2010
 Introduction to Microsoft Office PowerPoint 2010 TABLE OF CONTENTS Open PowerPoint 2010... 1 About the Editing Screen... 1 Create a Title Slide... 6 Save Your Presentation... 6 Create a New Slide... 7
Understanding Word Processing
 Understanding Word Processing 3.0 Introduction In this chapter you are going to learn how to create a simple memo or note or a complex and complicated multi column business document using word processing
Computer Nashua Public Library Introduction to Microsoft Word 2010
 Microsoft Word is a word processing program you can use to write letters, resumes, reports, and more. Anything you can create with a typewriter, you can create with Word. You can make your documents more
MS Word Basics. Groups within Tabs
 MS Word Basics Instructor: Bev Alderman L e t s G e t S t a r t e d! Open and close MS Word Open Word from the desktop of your computer by Clicking on the Start>All programs>microsoft Office >Word 2010
Introduction to MS Word XP 2002: An Overview
 Introduction to MS Word XP 2002: An Overview Sources Used: http://www.fgcu.edu/support/office2000/word/files.html Florida Gulf Coast University Technology Skills Orientation Word 2000 Tutorial The Computer
Lesson 4 - Creating a Text Document Using WordPad
 Lesson 4 - Creating a Text Document Using WordPad OBJECTIVES: To learn the basics of word processing programs and to create a document in WordPad from Microsoft Windows. A word processing program is the
WORD XP/2002 USER GUIDE. Task- Formatting a Document in Word 2002
 University of Arizona Information Commons Training Page 1 of 21 WORD XP/2002 USER GUIDE Task- Formatting a Document in Word 2002 OBJECTIVES: At the end of this course students will have a basic understanding
button Double-click any tab on the Ribbon to minimize it. To expand, click the Expand the Ribbon button
 PROCEDURES LESSON 1: CREATING WD DOCUMENTS WITH HEADERS AND FOOTERS Starting Word 1 Click the Start button 2 Click All Programs 3 Click the Microsoft Office folder icon 4 Click Microsoft Word 2010 1 Click
Word - Basics. Course Description. Getting Started. Objectives. Editing a Document. Proofing a Document. Formatting Characters. Formatting Paragraphs
 Course Description Word - Basics Word is a powerful word processing software package that will increase the productivity of any individual or corporation. It is ranked as one of the best word processors.
Microsoft Word 2010 Part 1: Introduction to Word
 CALIFORNIA STATE UNIVERSITY, LOS ANGELES INFORMATION TECHNOLOGY SERVICES Microsoft Word 2010 Part 1: Introduction to Word Summer 2011, Version 1.0 Table of Contents Introduction...3 Starting the Program...3
Contents. Launching Word
 Using Microsoft Office 2007 Introduction to Word Handout INFORMATION TECHNOLOGY SERVICES California State University, Los Angeles Version 1.0 Winter 2009 Contents Launching Word 2007... 3 Working with
Introduction to Microsoft Word 2007 Quickguide
 Introduction to Microsoft Word 2007 Quickguide Opening Word -Click the Start button -Click Programs from the start menu -Select Microsoft Office -Click Microsoft Office Word 2007 -A new blank document
Introduction to Microsoft Word 2010
 Introduction to Microsoft Word 2010 Microsoft Word is a word processing program you can use to write letters, resumes, reports, and more. Anything you can create with a typewriter, you can create with
Excel Main Screen. Fundamental Concepts. General Keyboard Shortcuts Open a workbook Create New Save Preview and Print Close a Workbook
 Excel 2016 Main Screen Fundamental Concepts General Keyboard Shortcuts Open a workbook Create New Save Preview and Print Close a Ctrl + O Ctrl + N Ctrl + S Ctrl + P Ctrl + W Help Run Spell Check Calculate
PowerPoint 2010 Level 1 Computer Training Solutions Student Guide Version Revision Date Course Length
 Level 1 Computer Training Solutions Version 1.2 Revision Date Course Length 2012-Feb-16 6 hours Table of Contents Quick Reference... 3 Frequently Used Commands... 3 Manitoba ehealth Learning Management
What can Word 2013 do?
 Mary Ann Wallner What can Word 2013 do? Provide the right tool for: Every aspect of document creation Desktop publishing Web publishing 2 Windows 7: Click Start Choose Microsoft Office > Microsoft Word
San Pedro Junior College. WORD PROCESSING (Microsoft Word 2016) Week 4-7
 Week 4-7") WORD PROCESSING (Microsoft Word 2016) Week 4-7 Creating a New Document In Word, there are several ways to create new document, open existing documents, and save documents: Click the File menu tab and then
WORD PROCESSING (Microsoft Word 2016) Week 4-7 Creating a New Document In Word, there are several ways to create new document, open existing documents, and save documents: Click the File menu tab and then
Using Microsoft Word. Table of Contents
 Using Microsoft Word Table of Contents The Word Screen... 2 Document View Buttons... 2 Selecting Text... 3 Using the Arrow Keys... 3 Using the Mouse... 3 Line Spacing... 4 Paragraph Alignment... 4 Show/Hide
Word Select New in the left pane. 3. Select Blank document in the Available Templates pane. 4. Click the Create button.
 Microsoft QUICK Word 2010 Source Getting Started The Word Window u v w x z Opening a Document 2. Select Open in the left pane. 3. In the Open dialog box, locate and select the file you want to open. 4.
Microsoft Word 2007 Essential Skills
 The "Anatomy" of the Word Window The typical program window will look similar to that shown below. It is possible to customize your own display, but that is a topic for discussion later on. OFFICE BUTTON
11.1 Create Speaker Notes Print a Presentation Package a Presentation PowerPoint Tips... 44
 Contents 1 Getting Started... 1 1.1 Presentations... 1 1.2 Microsoft Office Button... 1 1.3 Ribbon... 2 1.4 Mini Toolbar... 2 1.5 Navigation... 3 1.6 Slide Views... 4 2 Customize PowerPoint... 5 2.1 Popular...
Reference Services Division Presents WORD Introductory Class
 Reference Services Division Presents WORD 2010 Introductory Class CLASS OBJECTIVES: Navigate comfortably on a Word page Learn how to use the Ribbon tabs and issue commands Format a simple document Edit,
Word 2016 Tips. Rylander Consulting
 Word 2016 Tips Rylander Consulting www.rylanderconsulting.com sandy@rylanderconsulting.com 425.445.0064 Word 2016 i Table of Contents Screen Display Tips... 1 Create a Shortcut to a Recently Opened Document
The first time you open Word
 Microsoft Word 2010 The first time you open Word When you open Word, you see two things, or main parts: The ribbon, which sits above the document, and includes a set of buttons and commands that you use
Spreadsheets Microsoft Office Button Ribbon
 Getting started with Excel 2007 you will notice that there are many similar features to previous versions. You will also notice that there are many new features that you ll be able to utilize. There are
Quick Access Toolbar. You click on it to see these options: New, Open, Save, Save As, Print, Prepare, Send, Publish and Close.
 Opening Microsoft Word 2007 in the practical room UNIT-III 1 KNREDDY 1. Nyelvi beállítások az Office 2007-hez (Language settings for Office 2007 (not 2003)) English. 2. Double click on the Word 2007 icon
WORD 2010 TIP SHEET GLOSSARY
 GLOSSARY Clipart this term refers to art that is actually a part of the Word package. Clipart does not usually refer to photographs. It is thematic graphic content that is used to spice up Word documents
Word 2013 Beginning. Technology Integration Center
 Word 2013 Beginning Getting Started... 2 Quick Access Toolbar... 3 The Ribbon... 3 Help... 4 Compatibility Mode... 4 Document Views... 4 Navigating the Document... 5 Moving Around in the Document... 5
Microsoft Office Word. Part1
 Microsoft Office 2010 - Word Part1 1 Table of Contents What is Microsoft Word?... 4 Creating a document... 5 Toolbar... 6 Typing in MS Word Text Area... 7 Cut, Copy and Paste Text... 9 Paste Preview...
MS Word Professional Document Alignment
 MS Word Professional Document Alignment Table of Contents CHARACTER VS. PARAGRAPH FORMATTING...5 Character formatting...5 Paragraph Formatting...5 USING SHOW/HIDE TO REVEAL NON-PRINTING CHARACTERS...5
Microsoft Word 2010 Guide
 Microsoft Word 2010 Guide 1 Microsoft Word 2010 These notes are devised for Word 2010. You should be aware that it is similar to Word 2007 but is quite different from earlier versions of Word, e.g. Word
KEYBOARD SHORTCUTS AND HOT KEYS
 KEYBOARD SHORTCUTS AND HOT KEYS Page 1 This document is devoted to using the keyboard instead of the mouse to perform tasks within applications. This list is by no means the "be all and end all". There
Microsoft Office 2000 & Microsoft Word 2000 Page 1. ***** Help Options ***** To access [? ] quickly & for specific use then
![Microsoft Office 2000 & Microsoft Word 2000 Page 1. ***** Help Options ***** To access [? ] quickly & for specific use then](/thumbs/90/104468223.jpg "Microsoft Office 2000 & Microsoft Word 2000 Page 1. ***** Help Options ***** To access [? ] quickly & for specific use then") Microsoft Office 2000 & Microsoft Word 2000 Page 1 ***** Help Options ***** Microsoft Help: Options and Search [ F1 ] Fastest way to get to Office Assistant and MS Office Help! ESC to Exit File > Help
Microsoft Office 2000 & Microsoft Word 2000 Page 1 ***** Help Options ***** Microsoft Help: Options and Search [ F1 ] Fastest way to get to Office Assistant and MS Office Help! ESC to Exit File > Help
MICROSOFT WORD. Table of Contents. What is MSWord? Features LINC FIVE
 Table of Contents What is MSWord? MSWord is a word-processing program that allows users to insert, edit, and enhance text in a variety of formats. Word is a powerful word processor with sophisticated editing
The American University in Cairo. Academic Computing Services. Word prepared by. Soumaia Ahmed Al Ayyat
 The American University in Cairo Academic Computing Services Word 2000 prepared by Soumaia Ahmed Al Ayyat Spring 2001 Table of Contents: Opening the Word Program Creating, Opening, and Saving Documents
Microsoft Word (97, 98, 2000) Word Processing Instructions
 Word Processing Instructions") Microsoft Word (97, 98, 2000) Word Processing Instructions Managing Toolbars Click on View. Select Toolbars. Click to select Standard, Formatting, and Drawing. Formatting Text 1. Once text is typed in,
Microsoft Word (97, 98, 2000) Word Processing Instructions Managing Toolbars Click on View. Select Toolbars. Click to select Standard, Formatting, and Drawing. Formatting Text 1. Once text is typed in,
Nauticom NetEditor: A How-to Guide
 Nauticom NetEditor: A How-to Guide Table of Contents 1. Getting Started 2. The Editor Full Screen Preview Search Check Spelling Clipboard: Cut, Copy, and Paste Undo / Redo Foreground Color Background Color
Changing Worksheet Views
 PROCEDURES LESSON 1: TOURING EXCEL Starting Excel 1 Click the Start button 2 Click All Programs 3 Click the Microsoft Office folder icon 4 Click Microsoft Excel 2010 Naming and Saving (Ctrl+S) a Workbook
Indispensable tips for Word users
 Indispensable tips for Word users No matter how long you've been using Microsoft Word, you can always learn new techniques to help you work faster and smarter. Here are some of TechRepublic's favorite
MS WORD. You can use it for writing letters, reports and so on.
 MS WORD MS WORD 2 You can use it for writing letters, reports and so on. Starting Word application 3 To start MS. Word do the following: 1. From the Start button on the taskbar, select All Programs. 2.
Basic Microsoft Word 2013
 Basic Microsoft Word 2013 1 Basic Microsoft Word 2013 General Notes: In Office 2013, tabs exist at the top; these are referred to as ribbons. The commands on each tab are organized into groups. The commands
Word 2010 Beginning. Technology Integration Center
 Word 2010 Beginning File Tab... 2 Quick Access Toolbar... 2 The Ribbon... 3 Help... 3 Opening a Document... 3 Documents from Older Versions... 4 Document Views... 4 Navigating the Document... 5 Moving
Microsoft Word Chapter 1. Creating, Formatting, and Editing a Word Document with Pictures
 Microsoft Word 2010 Chapter 1 Creating, Formatting, and Editing a Word Document with Pictures Objectives Enter text in a Word document Check spelling as you type Format paragraphs Format text Undo and
Lehigh University Library & Technology Services
 Lehigh University Library & Technology Services Start Word Open a file called day2 Microsoft WORD 2003 Day 2 Click the Open button on the Standard Toolbar Go to the A: drive and highlight day2 and click
Microsoft Word 2010 Introduction. 5/18/2010 Archdiocese of Chicago Mike Riley
 Microsoft Word 2010 Introduction 5/18/2010 Archdiocese of Chicago Mike Riley i VIDEO TUTORIALS AVAILABLE Almost 100,000 video tutorials are available from VTC. The available tutorials include Windows 7,
Using Microsoft Word. Paragraph Formatting. Displaying Hidden Characters
 Using Microsoft Word Paragraph Formatting Every time you press the full-stop key in a document, you are telling Word that you are finishing one sentence and starting a new one. Similarly, if you press
Intermediate Word for Windows
 Intermediate Word for Windows Version: 2002 Academic Computing Support Information Technology Services Tennessee Technological University September 2003 1. Opening Word for Windows In the PC labs, click
Excel Select a template category in the Office.com Templates section. 5. Click the Download button.
 Microsoft QUICK Excel 2010 Source Getting Started The Excel Window u v w z Creating a New Blank Workbook 2. Select New in the left pane. 3. Select the Blank workbook template in the Available Templates
PowerPoint Spring 2002
 PowerPoint 2000 Spring 2002 Table of Contents I. INTRODUCTION... 1 II. GETTING STARTED... 1 A. Opening PowerPoint... 1 B. The Mouse Pointer... 1 C. Working with Text... 2 1. Windows Control Buttons...
Microsoft PowerPoint 2007 Tutorial
 Microsoft PowerPoint 2007 Tutorial Prepared By:- Mohammad Murtaza Khan I. T. Expert Sindh Judicial Academy Contents Getting Started... 5 Presentations... 5 Microsoft Office Button... 5 Ribbon... 6 Quick
Microsoft Office Word. Help. Opening a Document. Converting from Older Versions
 Microsoft Office 2007 - Word Help Click on the Microsoft Office Word Help button in the top right corner. Type the desired word in the search box and then press the Enter key. Choose the desired topic
New York City College of Technology. Microsoft Word Contact Information:
 New York City College of Technology Microsoft Word 2016 Contact Information: 718-254-8565 ITEC@citytech.cuny.edu Opening Word 2016 Begin by clicking on the bottom left corner icon on the desktop. From
Minimize Restore Close. Top Level Tabs. Quick Access Toolbar. Title Bar. Ribbon. Group. Rulers. Status Bar View Buttons.
 Microsoft Word 2013 Quick Access Toolbar Top Level Tabs Title Bar Minimize Restore Close Ribbon Group Rulers Status Bar View Buttons Zoom Control Getting to Know Word Word is word processing software.
Microsoft. Computer Training Center 1515 SW 10 th Avenue Topeka KS
 Microsoft Computer Training Center 1515 SW 10 th Avenue Topeka KS 66604-1374 785.580.4606 class@tscpl.org www.tscpl.org Microsoft Word 2007 Introduction to Word Processing 1 How to Start Word is a full-featured
Unit D Lecture Notes Word 2003
 Unit D Lecture Notes Word 2003 Objectives: In this project you will learn: Set document margins Divide a document into sections Insert page breaks Insert page numbers Add headers and footers Edit headers
Microsoft Word Important Notice
 Microsoft Word 2013 Important Notice All candidates who follow an ICDL/ECDL course must have an official ICDL/ECDL Registration Number (which is proof of your Profile Number with ICDL/ECDL and will track
LESSON ONE AND TWO TOPIC: HOW TO USE MICROSOFT WORD. : Putu Putra Astawa, S.Kom.,M.Kom
 LESSON ONE AND TWO TOPIC: HOW TO USE MICROSOFT WORD Author : Putu Putra Astawa, S.Kom.,M.Kom Date : June 09, 2014 and June 16, 2014 Time : 08.30-10.45 Am. Materials Needed : Computer, Work Sheet Overview
Microsoft PowerPoint 2013 Beginning
 Microsoft PowerPoint 2013 Beginning PowerPoint Presentations on the Web... 2 Starting PowerPoint... 2 Opening a Presentation... 2 File Tab... 3 Quick Access Toolbar... 3 The Ribbon... 4 Keyboard Shortcuts...
Microsoft Word 2010 Tutorial
 1 Microsoft Word 2010 Tutorial Microsoft Word 2010 is a word-processing program, designed to help you create professional-quality documents. With the finest documentformatting tools, Word helps you organize
Getting Started with. Office 2008
 Getting Started with Office 2008 Copyright 2010 - Information Technology Services Kennesaw State University This document may be downloaded, printed, or copied, for educational use, without further permission
Title bar: The top most bar in Word window that usually displays the document and software names.
 1 MICROSOFT WORD Table of Contents LINC ONE Hiding Standard toolbar, Formatting toolbar, and Status bar: To hide the Standard toolbar, click View Toolbars on the Menu bar. Check off Standard. To hide the
Microsoft Word 2010 Lesson Plan
 Microsoft Word 2010 Lesson Plan Objective: This class is a brief introduction to Word 2010. It consists of 2 one and one-half hour sessions. By the end of this class you should be able to create a simple
Microsoft Excel Keyboard Shortcuts
 Microsoft Excel Keyboard Shortcuts Here is a complete list of keyboard shortcuts for Microsoft Excel. Most of the shortcuts will work on all Excel versions on Windows based computer. Data Processing Shortcuts
Mark for Follow Up. Address Book. To Delete a Message: Select the message and press the Delete key. To Create a New Message:
 Microsoft Outlook 2016 Quick Reference Card Outlook 2016 Screen Title Bar Free Quick References! Visit: qr.customguide.com Navigation Pane Ribbon Contains mail-related folders like your Inbox, Sent Items
Learning Word The ABCs of Microsoft Word. 8/19/2015 The Computor Tutor 1
 Learning Word 2013 The ABCs of Microsoft Word 8/19/2015 The Computor Tutor 1 The Program Open Word Margins are preset to Normal, 1 inch for Top, Bottom, Right & Left; change by clicking on Page Layout
Formula Bar. Scroll bars. View buttons. Zoom slider
 Microsoft Excel 2013 Quick Reference Card The Excel 2013 Screen Free Cheat Sheets! Visit: cheatsheet.customguide.com Keyboard Shortcuts File tab Name box Quick Access Toolbar Active cell Title bar Rows
Anleitungen für Word 2016 als Word-Dokument zum Ausdrucken und fürs Intranet
 Anleitungen für Word 2016 als Word-Dokument zum Ausdrucken und fürs Intranet 19 Text and Tabs Tabs (tab stops) help you to write a list, for example, for an order or invoice. Larger spaces should not be
Beginning a presentation
 L E S S O N 2 Beginning a presentation Suggested teaching time 40-50 minutes Lesson objectives To learn how to create and edit title and bullet slides, you will: a b c d Select slide types by using the
COMPILED BY: WESLEY M. NYANDIKA 1
 MICROSOFT WD Word processing is the activity of entering, editing formatting, storing and printing text. It involves the use of word processors. Word processor: is a program or software package that has
Word 2013 Quick Start Guide
 Getting Started File Tab: Click to access actions like Print, Save As, and Word Options. Ribbon: Logically organize actions onto Tabs, Groups, and Buttons to facilitate finding commands. Active Document
Microsoft Word Tutorial
 Microsoft Word Tutorial 1 GETTING STARTED Microsoft Word is one of the most popular word processing programs supported by both Mac and PC platforms. Microsoft Word can be used to create documents, brochures,
Introduction to Microsoft Office 2016: Word
 Introduction to Microsoft Office 2016: Word Last Updated: September 2018 Cost: $2.00 Microsoft Word is a word processing software. You can use it to type letters, reports, and other documents. This class
The major change in Word is the ribbon toolbar. The File menu has been replaced with a button.
 Word 2007 There are a lot of new changes to Office 2007. This handout will provide a few examples on how to do basic formatting. If at any point you get stuck, remember that Office has a feature that allows
Introduction to Microsoft Word 2008
 1. Launch Microsoft Word icon in Applications > Microsoft Office 2008 (or on the Dock). 2. When the Project Gallery opens, view some of the available Word templates by clicking to expand the Groups, and
Bridge Course Information and Communication Technology
 Bridge Course Information and Communication Technology Microsoft Word 1. Which bar is usually located below that Title Bar that provides categorized options? A. Menu bar B. Status Bar C. Tool bar D. Scroll
Microsoft Word Intermediate March 25, Exercise 1: Open Word Click on Word. OR Click Start. Click All Programs. Click Microsoft Office.
 Microsoft Word Intermediate March 25, 2014 Exercise 1: Open Word Click on Word. OR Click Start. Click All Programs. Click Microsoft Office. Exercise 2: Create a new document Click File Tab. Select New.
Changing Worksheet Views
 PROCEDURES LESSON 1: TOURING EXCEL Starting Excel From the Windows Start screen, click the Excel 2013 program tile 1 Right-click a blank area of the Windows Start screen 2 Click the All Apps button 3 Click
Study Guide. PCIC 3 B2 GS3- Key Applications-Excel. Copyright 2010 Teknimedia Corporation
 Study Guide PCIC 3 B2 GS3- Key Applications-Excel Copyright 2010 Teknimedia Corporation Teknimedia grants permission to any licensed owner of PCIC 3 B GS3 Key Applications-Excel to duplicate the contents
Microsoft Office. Microsoft Office
 is an office suite of interrelated desktop applications, servers and services for the Microsoft Windows. It is a horizontal market software that is used in a wide range of industries. was introduced by
WORD (2010) TIPS & TRICKS. Gail Weiss
 TIPS & TRICKS. Gail Weiss") WORD (2010) TIPS & TRICKS Gail Weiss Word (2010) Tips & Tricks Overview: Here are some tips and tricks to use in WORD to make you more productive. TABLE OF CONTENTS CUSTOMIZING THE QUICK ACCESS TOOLBAR...
WORD (2010) TIPS & TRICKS Gail Weiss Word (2010) Tips & Tricks Overview: Here are some tips and tricks to use in WORD to make you more productive. TABLE OF CONTENTS CUSTOMIZING THE QUICK ACCESS TOOLBAR...
Corel Ventura 8 Introduction
 Corel Ventura 8 Introduction Training Manual A! ANZAI 1998 Anzai! Inc. Corel Ventura 8 Introduction Table of Contents Section 1, Introduction...1 What Is Corel Ventura?...2 Course Objectives...3 How to
Microsoft PowerPoint 2007 Beginning
 Microsoft PowerPoint 2007 Beginning Educational Technology Center PowerPoint Presentations on the Web... 2 Starting PowerPoint... 2 Opening a Presentation... 2 Microsoft Office Button... 3 Quick Access
Microsoft Word Introduction to Word Processors
 Microsoft Word 2007 Introduction to Word Processors Practical Objectives After completing this practical, you will be able to: Perform basic tasks in a word processor. Edit and format text. Work with tables
Introduction. Getting Started. Selecting a Template. 1 of 1
 1 of 1 Introduction Visual materials are one of the most effective means of communicating a message. They can give a presentation a professional quality. Visuals help a speaker to be well prepared, organized,
INFORMATION TECHNOLOGY
 INFORMATION TECHNOLOGY PowerPoint Presentation Section Two: Formatting, Editing & Printing Section Two: Formatting, Editing & Printing By the end of this section you will be able to: Insert, Edit and Delete
Microsoft Word Basic Editing. Lesson , John Wiley & Sons, Inc. Microsoft Official Academic Course, Microsoft Word
 Microsoft Word 2013 Lesson 2 Basic Editing 2014, John Wiley & Sons, Inc. Microsoft Official Academic Course, Microsoft Word 2013 1 Objectives 2014, John Wiley & Sons, Inc. Microsoft Official Academic Course,
ECDL Module 6 REFERENCE MANUAL
 ECDL Module 6 REFERENCE MANUAL Presentation Microsoft PowerPoint XP Edition for ECDL Syllabus Four PAGE 2 - ECDL MODULE 6 (USING POWERPOINT XP) - MANUAL 6.1 GETTING STARTED... 4 6.1.1 FIRST STEPS WITH
Creating Accessible Microsoft Word 2003 Documents Table of Contents
 Table of Contents Creating Accessible Microsoft Word Documents...1 Introduction...2 Templates...2 Default Settings...2 Set the Language...2 Change Default Settings...2 To change the default Font:...2 To
DOING MORE WITH WORD: MICROSOFT OFFICE 2007
 DOING MORE WITH WORD: MICROSOFT OFFICE 2007 GETTING STARTED PAGE 02 Prerequisites What You Will Learn USING MICROSOFT WORD PAGE 03 Viewing Toolbars Adding and Removing Buttons MORE TASKS IN MICROSOFT WORD