Balsamiq manual. Balsamiq Main window. Image 1
|
|
|
- Jeffrey Moore
- 6 years ago
- Views:
Transcription


1 1 Balsamiq manual Overview Balsamiq Mockups is a program that is produced by Balsamiq Studios (founded 2008). It is a relatively new program that allow users to create wireframes that feels like hand drawing a digital form. Balsamiq makes it easier for designers, product managers, developers and clients to create, edit, modify and move around components to reach the best design before developing the actual code. Although it is new, it is one of the most widely used programs for creating wireframes in the industry of HCI design. Balsamiq Main window 1- Quick Add tool 2- UI Library 3- Mockup Canvas Image 1 4- Mockups Viewer 1- Quick Add tool: This is the fastest and easiest way to add UI controls. Enter the name of the control that you would like to add and click on the desired name to insert it to the mockup canvas. 2- UI Library: a tool to view all UI controls (UIC). To insert a UIC, select and drag it to the UI mockup or double click the UIC.

 which you can click to add a new The Property Inspector The property inspector is a group of control that appears automatically beside any UIC that you insert to the Mockup")
 in yellow.")
2 2 3- Mockup canvas: This is the main area where mockups will be created. You can add, edit, align, group etc your UICs using all available space. 4- Mockups viewer: This is a tool bar that shows all open mockups. The active mockup that is currently being edited in the mockup canvas is shown in blue. If you hover the mouse over the black part of the viewer, a plus sign shows mockup. Using UI controls (UIC) which you can click to add a new The Property Inspector The property inspector is a group of control that appears automatically beside any UIC that you insert to the Mockup canvas. It includes a set of standard operations such as edit, group, align, layering, size. It also includes special controls that appear only for a specific group of UICs. If you hover the mouse over any control inside the inspector, it should show its name and keyboard shortcut (if any) in yellow. Image 2 Property Inspector Adding UIC You can insert a new UIC using 1- UI Library described above. 2- Quick add tool 3- Copy and paste an existent UIC on the canvas by clicking on Copy command in the property inspector or hold down ALT (OPTION key on Mac) and drag the selection. Layering Layering is a way of changing the order that UICs appear in relation to each other on the canvas i.e. which is on top, which is below etc. You can use any of the following commands for ordering from the property inspector: Layer 1 Layer 2 Layer 3 Send to Back: Position the selected UIC at the very last layer of the canvas. Send backward: send the selected UIC only one layer backward. Bring to Front: Make the selected UIC in the first layer Bring Forward: Bring the selected UIC only one layer forward Image 3

3 3 Remark: remember that you can always hover over a control in the property panel to know its name and keyboard shortcut. Selecting There are three ways to select multiple UICs. 1- Hold the shift key and click the controls you would like to select. 2- Click on an empty place on the canvas then draw a rectangle around the UICs you would like to select. 3- Click Ctrl+a (Cmd+a on Mac) to select all UICs in the canvas. Grouping Grouping allows the user to treat several controls as one control. In order to move, align or resize or apply the same settings to more than one control, it is easy to group them. For example, if you have a Window Name, Text Area and a bottom (As in image 4a), and you would like to move all of them to another position in the canvas, you can select all of them and choose the group icon from the property inspector. When you select UICs that are grouped, they become purple. This is to distinguish grouped and ungrouped controls. (see image 4b) Image 4a Image 4b Ungrouping: You can always ungroup the controls by selecting them and choosing the ungroup icon from the property inspector. Naming a group: you might need name the groups of UICs that you have so that you can easily keep track of them. Grouping is particularly important in creating templates and Project assets (for more details, see the templates section). You can name a group by selecting it then entering a name in the property inspector. Remark: You need to SAVE the file first to be able to name a group. Editing a specific UIC in a group:

4 4 Editing a group To edit a specific UIC, double click the grouped UICs or select + Enter. The sign appears on the top left corner of the canvas indicating that you are in the edit mode of the group. To exit the editing mode, click on the home icon of the sign. Locking You can lock a UIC or a group of UICs to prevent it from accidental movement or editing. Locked UICs cannot be selected, moved nor edited. In some complex wireframes, it is recommended to lock UICs that you are done with to avoid accidental movement/editing. Unlocking To unlock a UIC, right click on it and choose Unlock [name of the control] or unlock group if you are unlocking a grouped UICs Icons Balsamiq has built in icons that you can put on some UICs e.g. arrows, media, mobile etc. UICs that support Icons The following UICs support icons (i.e you could edit its shape to look like a built in icon) Icon Icon and Text Label Button Menu Bar ComboBox Add an Icon You can add an icon by writing its name in the icon search in the property inspector or the icon library that can be displayed by clicking the little arrow on the right. The icon library allows you to browse all categories of available icons as in Image 5. Image 5

5 5 Exercise 1 1- Insert a window to the canvas, a button and a text area. 2- Name the button Home and let the home icon show to the left of the text. 3- Write in the text area the following Hello World, this is my first mockup and format it to be italic, size 16. a. Hint: resize the text area so that all text becomes visible if needed. 4- Align the text area and button to the left for a more organized look. 5- Lock the window so that it cannot be moved, edited and selected. 6- Group the text box and button and move them to the top left corner of the window. 7- At the end, your mockup should look like below Working with projects There is no built in feature in Balsamiq to manage multiple mockups in projects. However, there are best practices in the Balsamiq community to create/manage projects to make full use of available functions. Files Balsamiq saves a mockup using its default file extension.bmml. Also, a single project might have several images and other files that are used as resources for the project. For easily storing and managing a project, always start by creating a folder in your system to save all mockups that you are going to create. Inside this folder create a folder called Assets and another folder called Resources. Main folder: Save.bmml (i.e Mockups) in this folder. Image 6 Resources Folder: In this folder, it is suggested to save all files that you might need in a project, for example a photoshop source file of a banner that you designed, a pdf file of one of your mockups etc

 Also, if you import an image to the Canvas (again via the Property Inspector), you have the option to automatically save the image into the assets folder.")


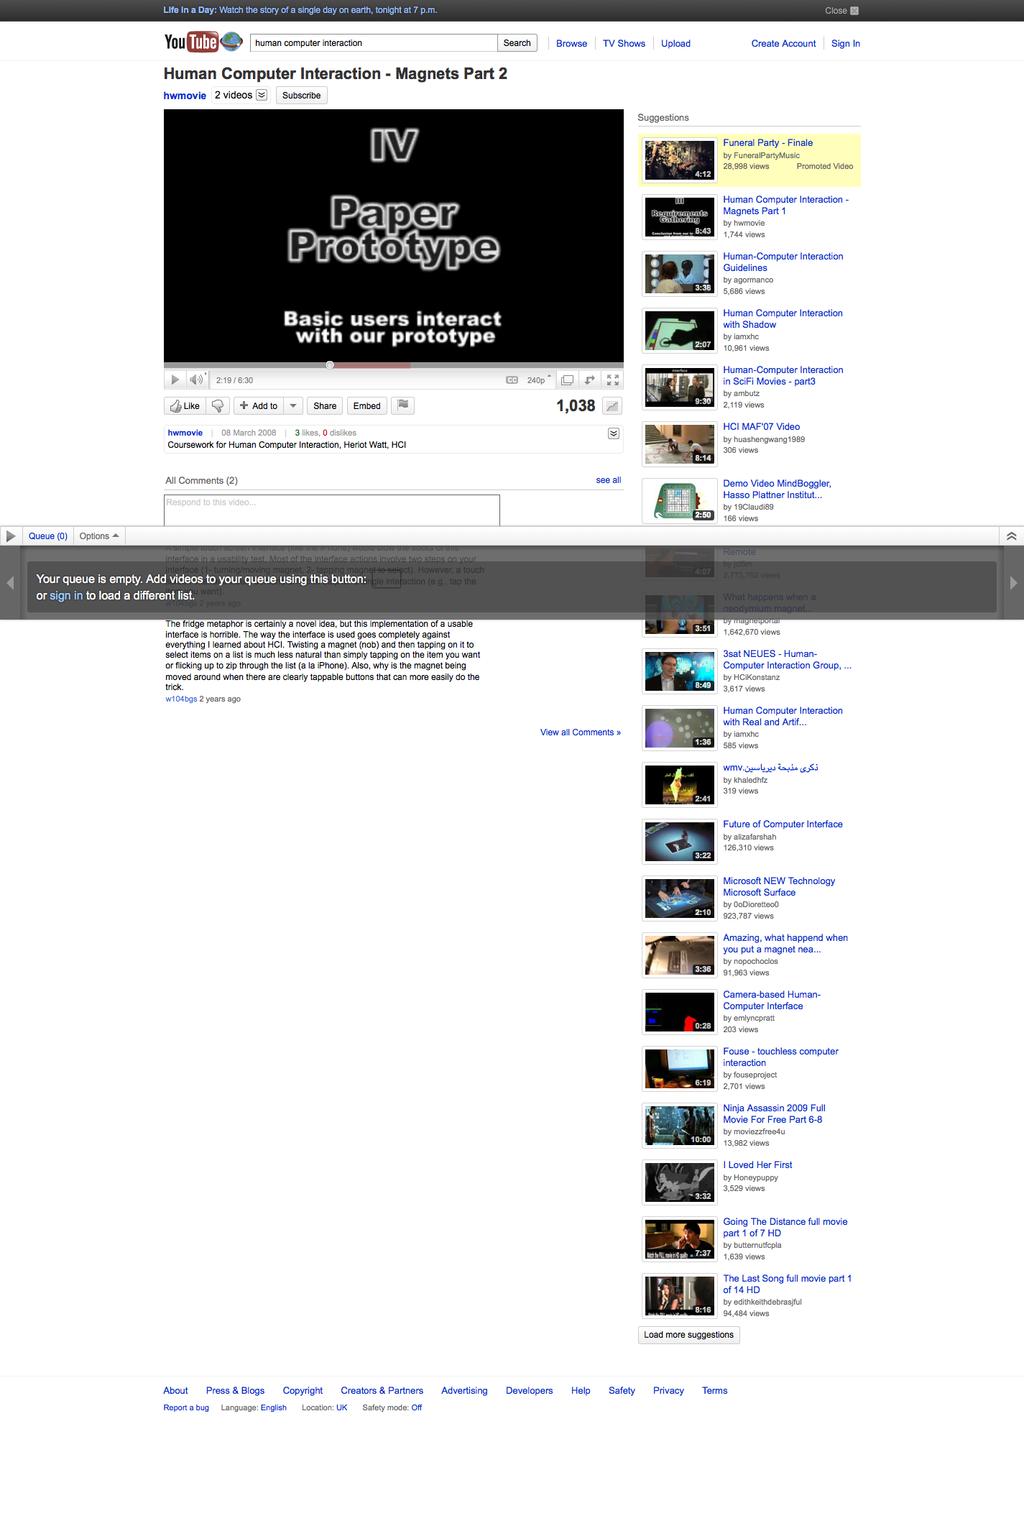
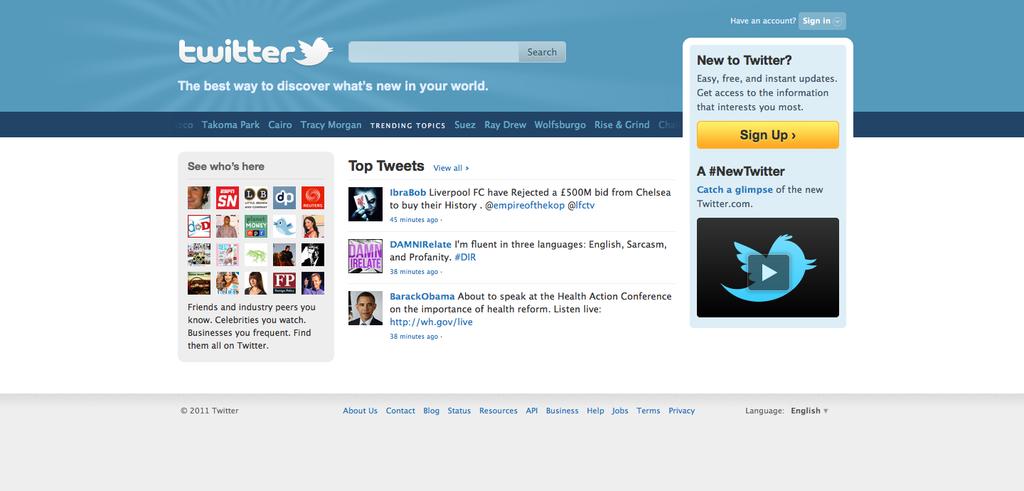
6 6 Assets Folder: Save all images and external resources (if any) in this folder. If you save your images into this folder, Balsamiq will automatically show all the names of the saved images for you when you try to insert an image to the canvas (from the Property Inspector). (see image 8) Also, if you import an image to the Canvas (again via the Property Inspector), you have the option to automatically save the image into the assets folder. (see image 7) Image 7 Image 8 Naming Convention The recommended way to name files is to use meaningful names in which words start with capital letters and have no spaces. For example, if you want to have a wireframe that shows registration of a website, call the wireframe RegistrationForm.bmml. Sticking to one naming convention makes it easier to find files, manage them and share them amongst a team. Linking Sometimes, you might need to make your mockup more interactive. You might want a mutli- page mockup that you or users can interactively navigate through this can be valuable for demonstrations and user- evaluations. For example, for a website you might design a homepage where registered users can log in. You might also have another page were new users can sign up. Linking could allow the user to see the sign- up page by clicking a register now link on the homepage (See Image 9). Remark: you have to save the mockup first to be able to link any UIC to another mockup. How to link Image 9
.")
 Exercise 2 1- Use the mockup")


7 7 Linkable controls Most UICs support linking. In order to link a UIC to another mockup, go to the Link option in the property panel. If you click on the little arrow to the right, Balsamiq will show you all available mockups that you have in your project (see Working with Projects section for more information). Simply select the mockup that you would like your UIC to link to. To indicate that you have successfully linked the UIC to another mockup, a little red arrow should show on the upper right corner of your UIC as shown in this image ( ) Exercise 2 1- Use the mockup that you created in the last mockup 2- Create and save a mockup called MyHomePage 3- Insert a text area and write This is my home page 4- Insert a link and name it Click to view MyMap 5- Create a new mockup, name it as MyMap then save it. 6- Insert a Browser window and a map. 7- Make the link in the MyHomePage mockup link to MyMap mockup. 8- Do not delete this mockup, you will need it in the next exercise. Non- Linkable Controls Sometimes you might need to link some UICs that do not support linking or make a small part of a specific UIC link to another mockup. For example, you would like to make a line chart link to an illustration page once clicked (in other words, define a Hot area in a line chart). You need to do the following: 1- Insert a canvas control and place it over the area that you want to turn into a link (i.e. the line chart). 2- Format the canvas control so that it becomes transparent by changing the capacity bar and removing borders by changing the Border Style (so that that Line chart in the back becomes visible). 3- Link the canvas to the desired mockup (in our example, LineChartInfo mockup). 4- Group the canvas and the Line chart together. (See Image 10) 1- Insert Canvas Control + Line Chart on the back 2- Format the Canvas 4- Group the Canvas and Chart Image Link the Canvas
. 2- Insert a canvas control and carefully edit, place it above the map.")


8 8 Exercise 3 Since maps does not support linking, lets try to make the map linkable by inserting a canvas control. 1- Use the same mockups that you created in the last exercise. (i.e MyHomePage and MyMap). 2- Insert a canvas control and carefully edit, place it above the map. 3- Make the canvas link to the MyHomePage mockup so that when a user click on the map, the MyHomePage mockup is activated. Symbols A symbol is a set of grouped UICs that can be reused. For example, if you have created a form that you think you will use in another mockup, you can convert it into a symbol. All symbols will be shown under Project Assets in the UI library. How to create symbols: 1- Select all the UICs that you would like to convert to a symbol. 2- Group the selected UICs. 3- Name the group by writing the name in the property inspector 4- Press convert to symbol. 5- The group will become green to indicate that it has been converted to a symbol. 6- You can view and reuse the symbol that you created (just like any normal UIC) under project assets tab in the UI library. 5- The green color to show that Image 11 It has been converted to a symbol Reminder: you will not be able to see Project assets if your mockup is not saved. Remember to always save your mockup to get full functionality of the program activated. Remark: Balsamiq will save your symbols as groups of UICs in a file called symbols.bmml in the assets folder of the project. For more information, refer to working with projects section. 3- Enter name of group here Editing Symbols There are two modes for editing symbols: 1- Editing the source: by editing the source of the symbol, your changes will change all instances of this symbol across the project. For example, in the MyForm symbol above that we created, if you are in the source editing mode and change the text from Last name to Family name, your changes will apply to all mockups in the project that contain this form. a. You can edit the source of a symbol by selecting the symbol then choosing Edit source as shown in Image 11 above.
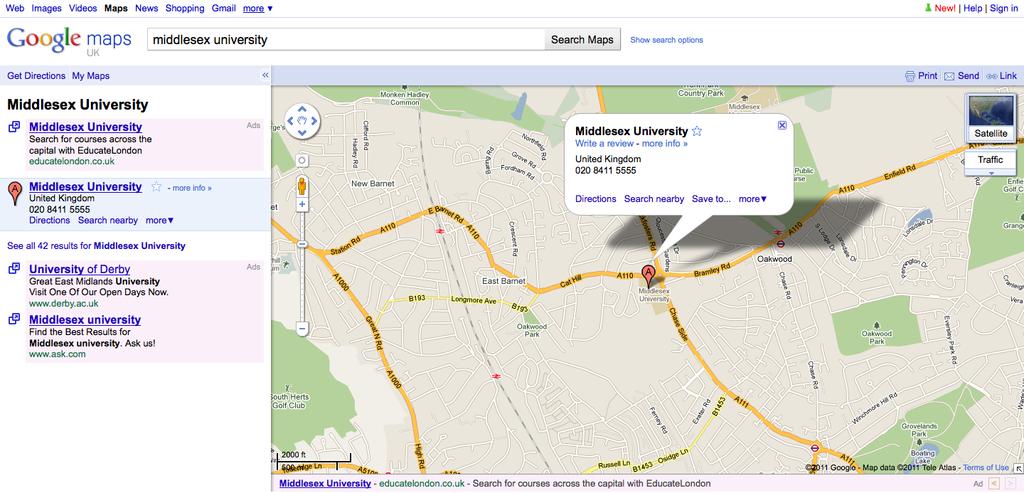
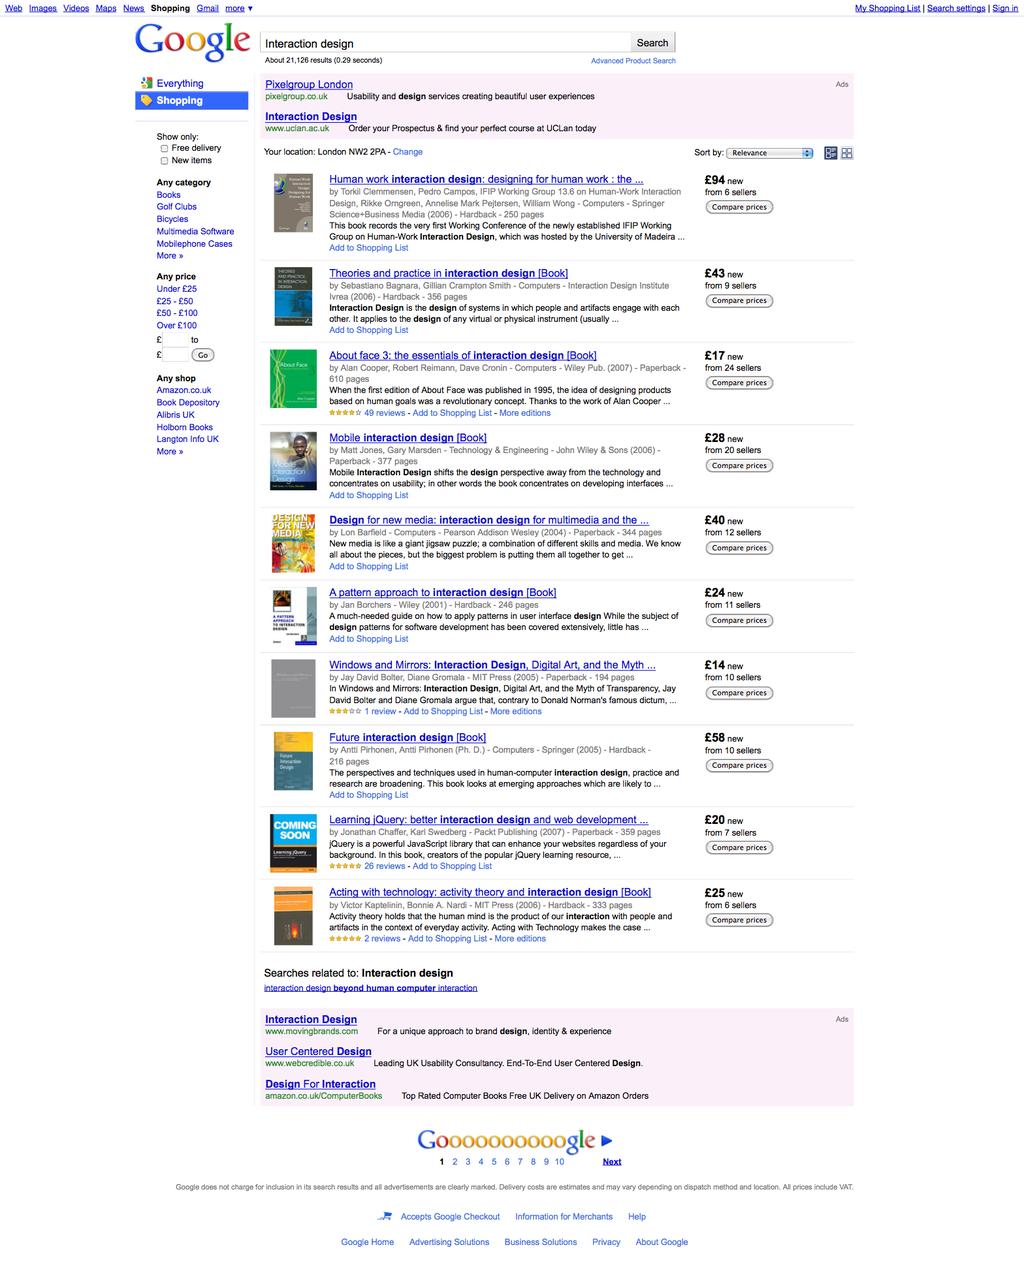
9 9 2- Editing an instance of the symbol: sometimes you might need to edit the MyForm symbol in one page only (Balsamiq calls this overriding properties of the instance ). a. You can edit an instance of a symbol by double clicking on the instance. A green label should show in the top of the canvas stating that you are currently editing an instance of a symbol ( ). When you are done, click on the home symbol to continue working on your mockup. Remark: Balsamiq applies a concept called Local wins when it comes to editing. (i.e if you have changed a property of an instance of a symbol, it will override any property changes that you might do on the symbol itself). For example, if in Mockup1, you changed the first row to forename, then you edited the source of the symbol and made it FirstName, the first row will always show as forename regardless the changes that you will make to the symbol. Uses of Symbols: Repetitive controls: create a symbol of a group of UICs if you will frequently need to use it in different mockups in the project. Templates: In some cases, you might need to have some controls always appearing across all mockups. For example, if you are creating a website, you might need the menu, header and footer of the website to appear in all mockups. Exercise 4 1- Create a new mockup called MyGoogle 2- Insert a browser window, a tabs bar and resize it to fit all screen and a text field in the bottom of the page. 3- Edit the tabs to the following names: Home, News, Maps, Shopping. 4- Write This is the footer, all rights reserved in the text field. 5- Group all controls. 6- Convert them into a symbol and call it MyHomeSymbol. 7- Create another mockup called MyShopping. 8- Insert MyHomeSymbol fron the UI library. Account Assets The disadvantage of Project assets is that the symbols that you create can only be seen and used by one project. This is rather limiting, as often you might want to use a symbol across various projects. (i.e create a symbol that could be permanently added to your UI library). In order to permanently use a symbol and add it to the UI library, create a mockup and insert various UICs and group them. Save this mockup under Documents>>Balsamiq Mockups>> assets. Now, all groups in that mockup will show as UICs under the Project Assets tab in the UI Library.
10 10 Remark: All project and account symbols can be treated as any other built in UIC when you would like to insert, group, lock, align..etc. Importing new UICs Suppose that you found some interesting symbols that you want to add to your library. To insert them, save the.bmml files under Documents>>Balsamiq Mockups>>assets. If this path does not exist, create it yourself. Note that the name of the folder has to be called Balsamiq Mockups. Any mockup that you save to this path will show in the UI library under Account Assets Exercise 5 1- Download the following symbol from this link (mockup downloaded from mockupstogo.net by Oskar Austegard) 2- Save ipadlandscape.bmml file into your Documents>>Balsamiq Mockups>>assets. 3- Go to Account assets in the UI library and experiement with the new ipad symbols that were added. Importing and Exporting Mockups Now that you are able to create mockups for various purposes, it is essential to discuss how to save and share your mockups with stakeholders and group members. There are three ways to save your mockups, each have advantages and disadvantages. 1- Image (.PNG): This method exports the current mockup to an image that you could share with group members and stakeholders. However, all links between mockups will be lost. 2- Pdf: This method creates a fully linked Pdf file that shows all mockups on different pages. It is recommended for user testing (see user testing and presentations section) File Format Can be edited once imported? Supports linking? Can be viewed without installing Balsamiq Mockups Image (.PNG) No No Yes No Pdf No Yes Yes No To Clipboard Yes Yes - - Yes (XML Code) Compressed file Yes Yes No Yes Possible data loss? (i.e need source files accompanying the mockup) Table 1
11 11 Remark: Note that you cannot edit the mockup once imported using the above methods. However, all project symbols and templates will be viewable without the need to send along any other source files. For example, if you have inserted a logo on a website mockup, you do not need to send the logo.jpeg source file along your imported mockup 3- To Clipboard (XML Code): All balsamiq mockups can be represented by simple XML code. You could export your mockup as XML code that you could easily paste into an or share it with your group. a. To import XML code into balsamiq, simply do the following: i. Click File>>Import XML code. ii. A text box will appear asking you to paste the XML code that you have. iii. Paste the XML code that you have and click import. iv. Your mockup should appear on the Canvas showing all links and symbols. User Testing and Presentations Presentations/Full Screen Mode: This mode is used for user- testing and presenting your mockups to clients/group members. You can start the Full screen mode by clicking on the small rectangle on the top right corner of Balsamiq, go to View>>Full Screen Presentation or press Cmd + F (Ctrl + F for windows users). Balsamiq Online Community Useful links: 1- : Here you can find the official Balsamiq documentation, tutorials, videos and much more : A website for designers to upload and share their mockups and symbols to be used by others.
12 12 Complete Exercises (Estimated time: 45minutes 1 hour) Each mockup should have at least one link that links to another page with the same layout but which shows some changes that have taken place. Students to work in groups of 2-3 to create a mockup of one of the following pages: Exercises
13 13
14 14
15 15
16 16
17 17
18 18
19 19

20 20
AGENDA. :: Homework Upload. :: Photoshop Lesson 4: Creating a PSD Wireframe [Homepage] I. DOCUMENT SET-UP: II. DRAWING SHAPES III.
![AGENDA. :: Homework Upload. :: Photoshop Lesson 4: Creating a PSD Wireframe [Homepage] I. DOCUMENT SET-UP: II. DRAWING SHAPES III.](/thumbs/85/92596427.jpg "AGENDA. :: Homework Upload. :: Photoshop Lesson 4: Creating a PSD Wireframe [Homepage] I. DOCUMENT SET-UP: II. DRAWING SHAPES III.") CLASS :: 04 MULTIMEDIA TOOLS :: CLASS NOTES 10.02 2017 AGENDA :: Homework Upload [ A-2 ] Ultimate Composite! Upload A-2 Project to Student PSD Folder :: Photoshop Lesson 4: Creating a PSD Wireframe [Homepage]
CLASS :: 04 MULTIMEDIA TOOLS :: CLASS NOTES 10.02 2017 AGENDA :: Homework Upload [ A-2 ] Ultimate Composite! Upload A-2 Project to Student PSD Folder :: Photoshop Lesson 4: Creating a PSD Wireframe [Homepage]
:: MULTIMEDIA TOOLS :: CLASS NOTES
 CLASS :: 04 02.15 2017 AGENDA :: Homework Upload [ A-2 ] Ultimate Composite! Upload A-2 Project to Student PSD Folder :: Photoshop Lesson 4: Creating a PSD Wireframe [Homepage] I. DOCUMENT SET-UP: a. Dimensions
InDesign Part II. Create a Library by selecting File, New, Library. Save the library with a unique file name.
 InDesign Part II Library A library is a file and holds a collection of commonly used objects. A library is a file (extension.indl) and it is stored on disk. A library file can be open at any time while
How to create a prototype
 Adobe Fireworks Guide How to create a prototype In this guide, you learn how to use Fireworks to combine a design comp and a wireframe to create an interactive prototype for a widget. A prototype is a
Microsoft Word Tutorial
 Microsoft Word Tutorial 1 GETTING STARTED Microsoft Word is one of the most popular word processing programs supported by both Mac and PC platforms. Microsoft Word can be used to create documents, brochures,
Getting Acquainted with Office 2007 Table of Contents
 Table of Contents Using the New Interface... 1 The Office Button... 1 The Ribbon... 2 Galleries... 2 Microsoft Help with Changes... 2 Viewing Familiar Dialog Boxes... 2 Download Get Started Tabs from Microsoft...
Tutorials. Lesson 3 Work with Text
 In this lesson you will learn how to: Add a border and shadow to the title. Add a block of freeform text. Customize freeform text. Tutorials Display dates with symbols. Annotate a symbol using symbol text.
Password Memory 7 User s Guide
 C O D E : A E R O T E C H N O L O G I E S Password Memory 7 User s Guide 2007-2018 by code:aero technologies Phone: +1 (321) 285.7447 E-mail: info@codeaero.com Table of Contents How secure is Password
Adobe illustrator Introduction
 Adobe illustrator Introduction This document was prepared by Luke Easterbrook 2013 1 Summary This document is an introduction to using adobe illustrator for scientific illustration. The document is a filleable
Prezi: Moving beyond Slides
 [ Prezi: Moving beyond Slides ] by: Charina Ong Centre for Development of Teaching and Learning National University of Singapore Table of Contents About the Workshop... i Workshop Objectives... i Session
Numbers Basics Website:
 Website: http://etc.usf.edu/te/ Numbers is Apple's new spreadsheet application. It is installed as part of the iwork suite, which also includes the word processing program Pages and the presentation program
BASIC MICROSOFT POWERPOINT
 BASIC MICROSOFT POWERPOINT PART ONE PHONE: 504-838-1144 IT Training Team Jefferson Parish Library EMAIL: jpltrain@jplibrary.net In this class you will learn to: Launch, close, and interact with Microsoft
StitchGraph User Guide V1.8
 StitchGraph User Guide V1.8 Thanks for buying StitchGraph: the easy way to create stitch layouts for hardanger and other complex embroidery stitch types. StitchGraph is intended to allow you to create
Microsoft Word 2016 LEVEL 1
 TECH TUTOR ONE-ON-ONE COMPUTER HELP COMPUTER CLASSES Microsoft Word 2016 LEVEL 1 kcls.org/techtutor Microsoft Word 2016 Level 1 Manual Rev 11/2017 instruction@kcls.org Microsoft Word 2016 Level 1 Welcome
Create a Scrapbook Page
 Create a Scrapbook Page You are now going to create a scrapbook page that will contain an arrangement of pictures and text. 1. Open Photoshop start > programs > Adobe Master Collection > Photoshop CS5
5. Canvas overview. Cricut Design Space User Manual. Design Panel
 5. Canvas overview The Canvas is where you ll design your projects. On the Canvas, you can add and edit projects, images, and text. You can also set a project template, which doesn t cut but helps you
On the Web sun.com/aboutsun/comm_invest STAROFFICE 8 DRAW
 STAROFFICE 8 DRAW Graphics They say a picture is worth a thousand words. Pictures are often used along with our words for good reason. They help communicate our thoughts. They give extra information that
PowerPoint 2010 Level 1 Computer Training Solutions Student Guide Version Revision Date Course Length
 Level 1 Computer Training Solutions Version 1.2 Revision Date Course Length 2012-Feb-16 6 hours Table of Contents Quick Reference... 3 Frequently Used Commands... 3 Manitoba ehealth Learning Management
PowerPoint Module 2: Modifying a Presentation
 1. In the Outline pane, a highlighted slide icon next to the slide number indicates that the slide is selected. True PowerPoint 26 LEARNING OBJECTIVES: BESK.OFIN.16.297 - Enter text in Outline view 2.
Lab #3: Web Design with Graphics
 English 413: Electronic Documents and Publications Dr. Jablonski Spring 2004 What You Need to Complete this Lab Lab #3: Web Design with Graphics 1. HTML editing software, preferably Dreamweaver MX 2. UNLV
Shape Cluster Photo Written by Steve Patterson
 Shape Cluster Photo Written by Steve Patterson Before After Step 1: Create A New Document Let's begin by creating a new Photoshop document. Go up to the File menu in the Menu Bar along the top of the screen
UNIVERSITY OF ENGINEERING AND TECHNOLOGY, TAXILA FACULTY OF TELECOMMUNICATION AND INFORMATION ENGINEERING SOFTWARE ENGINEERING DEPARTMENT LAB 14
 LAB 14 Easy Interface Prototyping with BALSAMIQ Wireframing is an important part of designing applications, but current methods can be time-consuming and expensive. Balsamiq is different. Balsamiq is an
Logo Editing Video Tutorial
 The following is a step by step guide to customising your MetaMorph logo image by replacing the logo text with your own organisation or company's name and logo. In order to utilise the Fireworks Source
Microsoft Word 2010 Basics
 1 Starting Word 2010 with XP Click the Start Button, All Programs, Microsoft Office, Microsoft Word 2010 Starting Word 2010 with 07 Click the Microsoft Office Button with the Windows flag logo Start Button,
Adobe Dreamweaver CS5 Tutorial
 Adobe Dreamweaver CS5 Tutorial GETTING STARTED This tutorial focuses on the basic steps involved in creating an attractive, functional website. In using this tutorial you will learn to design a site layout,
MICROSOFT WORD 2010 Quick Reference Guide
 MICROSOFT WORD 2010 Quick Reference Guide Word Processing What is Word Processing? How is Word 2010 different from previous versions? Using a computer program, such as Microsoft Word, to create and edit
Many of your assessments will require submission as a word document (.doc).
.") WORD HOW TO CREATE A WORD DOCUMENT Many of your assessments will require submission as a word document (.doc). 1. To open Microsoft Word, left click once on the blue window in the bottom left hand corner
WORD HOW TO CREATE A WORD DOCUMENT Many of your assessments will require submission as a word document (.doc). 1. To open Microsoft Word, left click once on the blue window in the bottom left hand corner
Chapter 3 Using Styles and Templates
 Getting Started Guide Chapter 3 Using Styles and Templates Using Consistent Formatting in Your Documents Copyright This document is Copyright 2010 2016 by the LibreOffice Documentation Team. Contributors
INTRODUCTION... 1 UNDERSTANDING CELLS... 2 CELL CONTENT... 4
 Introduction to Microsoft Excel 2016 INTRODUCTION... 1 The Excel 2016 Environment... 1 Worksheet Views... 2 UNDERSTANDING CELLS... 2 Select a Cell Range... 3 CELL CONTENT... 4 Enter and Edit Data... 4
Creating Reports in Access 2007 Table of Contents GUIDE TO DESIGNING REPORTS... 3 DECIDE HOW TO LAY OUT YOUR REPORT... 3 MAKE A SKETCH OF YOUR
 Creating Reports in Access 2007 Table of Contents GUIDE TO DESIGNING REPORTS... 3 DECIDE HOW TO LAY OUT YOUR REPORT... 3 MAKE A SKETCH OF YOUR REPORT... 3 DECIDE WHICH DATA TO PUT IN EACH REPORT SECTION...
TABLE OF CONTENTS TABLE OF CONTENTS... 1 INTRODUCTION... 2 USING WORD S MENUS... 3 USING WORD S TOOLBARS... 5 TASK PANE... 9
 TABLE OF CONTENTS TABLE OF CONTENTS... 1 INTRODUCTION... 2 USING WORD S MENUS... 3 DEFINITIONS... 3 WHY WOULD YOU USE THIS?... 3 STEP BY STEP... 3 USING WORD S TOOLBARS... 5 DEFINITIONS... 5 WHY WOULD
Adobe Fireworks CS Essential Techniques
 Adobe Fireworks CS4 HOW-TOs 100 Essential Techniques Jim Babbage 170 Adding Structure to # 79 Your Documents Creating a Master Page You can only have one Master Page per file, and you can easily set any
Microsoft Office Publisher
 Microsoft Office 2007- Publisher Opening Microsoft Publisher Using the Start Menu, click on All Programs and navigate to the Microsoft Office folder. Click on Microsoft Office Publisher 2007. Choosing
Using New Google Sites
 Using New Google Sites With the New Google Sites, building websites is easy. Just drag content where you need it. Create a onestop destination for all important information, including videos, images, calendars,
PowerPoint 2016 Basics for Mac
 1 PowerPoint 2016 Basics for Mac PowerPoint 2016 Basics for Mac Training Objective To learn the tools and features to get started using PowerPoint more efficiently and effectively. What you can expect
Communicate: In Print
 Communicate: In Print Helpful hints when using an Interactive White Board Adjusting Toolbars and Layout There are four levels of toolbars. Advanced Intermediate Basic Easiest this is ideal for students
Clip Art and Graphics. Inserting Clip Art. Inserting Other Graphics. Creating Your Own Shapes. Formatting the Shape
 1 of 1 Clip Art and Graphics Inserting Clip Art Click where you want the picture to go (you can change its position later.) From the Insert tab, find the Illustrations Area and click on the Clip Art button
Introduction to Microsoft Word 2010
 Introduction to Microsoft Word 2010 Microsoft Word is a word processing program you can use to write letters, resumes, reports, and more. Anything you can create with a typewriter, you can create with
Chapter 3 Using Styles and Templates
 Getting Started Guide Chapter 3 Using Styles and Templates Using consistent formatting in your documents Copyright This document is Copyright 2010 2014 by the LibreOffice Documentation Team. Contributors
Chapter 3 Using Styles and Templates
 Getting Started Guide Chapter 3 Using Styles and Templates Using Consistent Formatting in Your Documents Copyright This document is Copyright 2017 by the LibreOffice Documentation Team. Contributors are
Adobe Fireworks CS Essential Techniques
 Adobe Fireworks CS4 HOW-TOs 100 Essential Techniques Jim Babbage 140 64 Creating Graphic Symbols Resizing Symbols When you resize any bitmap to a smaller size, pixel information is discarded. This is normally
What is Publisher, anyway?
 What is Publisher, anyway? Microsoft Publisher designed for users who need to create and personalize publications such as marketing materials, business stationery, signage, newsletters and other items
Adobe CC as Wireframe and Web Design Tool
 Start designing by doing very rough sketches on paper, or lately more often, if not near my office desk, on my ipad or smartphone screen. These sketches focus thoughts regarding the chosen concept and
Banner 9 Transition - Quick Reference
 Banner 9 is a major upgrade to the Banner Student System, providing a completely new look and feel. It is easily compatible with all mobile devices. It introduces the Application Navigator, a single web
Publisher 2007 Creating Flyers and Brochures
 MS Publisher 2007 User Guide Publisher 2007 Creating Flyers and Brochures THE NATURE OF DESKTOP PUBLISHING - INTRODUCTION Publisher is a desktop publishing program. You can create publications that
Publisher 2007 Creating Flyers and Brochures
 MS Publisher 2007 User Guide Publisher 2007 Creating Flyers and Brochures THE NATURE OF DESKTOP PUBLISHING - INTRODUCTION Publisher is a desktop publishing program. You can create publications that use
Chapter 3 Using Styles and Templates
 Getting Started Guide Chapter 3 Using Styles and Templates Using Consistent Formatting in Your Documents Copyright This document is Copyright 2018 by the LibreOffice Documentation Team. Contributors are
Getting started with HotGloo (V5.0)
") Getting started with HotGloo (V5.0) Your first steps to a whole new wireframing experience. 2016 HotGloo Wireframing with HotGloo Welcome dear wireframe rookie, sensei, guru or ninja. No matter which level
Getting started with HotGloo (V5.0) Your first steps to a whole new wireframing experience. 2016 HotGloo Wireframing with HotGloo Welcome dear wireframe rookie, sensei, guru or ninja. No matter which level
PAGES, NUMBERS, AND KEYNOTE BASICS
 PAGES, NUMBERS, AND KEYNOTE BASICS Pages, Numbers, and Keynote are applications developed by Apple that are comparable to Microsoft Office and Google Docs. Pages, Numbers, and Keynote comes free with your
How to lay out a web page with CSS
 Activity 2.6 guide How to lay out a web page with CSS You can use table design features in Adobe Dreamweaver CS4 to create a simple page layout. However, a more powerful technique is to use Cascading Style
CounselLink Reporting. Designer
 CounselLink Reporting Designer Contents Overview... 1 Introduction to the Document Editor... 2 Create a new document:... 2 Document Templates... 3 Datasets... 3 Document Structure... 3 Layout Area... 4
Building TPS Web Pages with Dreamweaver
 Building TPS Web Pages with Dreamweaver Title Pages 1. Folder Management 7 2. Defining Your Site 8-11 3. Overview of Design Features 12-22 4. Working with Templates 23-25 5. Publishing Your Site to the
ADOBE DREAMWEAVER CS4 BASICS
 ADOBE DREAMWEAVER CS4 BASICS Dreamweaver CS4 2 This tutorial focuses on the basic steps involved in creating an attractive, functional website. In using this tutorial you will learn to design a site layout,
With ClaroIdeas you can quickly and easily create idea maps using a combination of words, symbols and pictures.
 Welcome to ClaroIdeas ClaroIdeas is a fresh tool to support the creation and editing of concept maps or idea maps using visual and audio components. It has been specifically developed to support people
Microsoft Word 2007 on Windows
 1 Microsoft Word 2007 on Windows Word is a very popular text formatting and editing program. It is the standard for writing papers and other documents. This tutorial and quick start guide will help you
Hands-on Session. Styles Tool. Bullets & Numbering
 Styles Tool 1. The Styles tool gives the ability to define a pre-set collection of font styles that make it easy and automatic to use branding throughout a document. 2. The Styles tool is located on the
MICROSOFT WORD 2010 BASICS
 MICROSOFT WORD 2010 BASICS Word 2010 is a word processing program that allows you to create various types of documents such as letters, papers, flyers, and faxes. The Ribbon contains all of the commands
How to Use Internet Explorer 9
 How to Use Internet Explorer 9 The Basics: 1. The Address Bar is located at the very top of your open webpage. This is where you will type in the address of the website you d like to visit. For example,
This Tutorial is for Word 2007 but 2003 instructions are included in [brackets] after of each step.
![This Tutorial is for Word 2007 but 2003 instructions are included in [brackets] after of each step.](/thumbs/72/67280806.jpg "This Tutorial is for Word 2007 but 2003 instructions are included in [brackets] after of each step.") This Tutorial is for Word 2007 but 2003 instructions are included in [brackets] after of each step. Table of Contents Just so you know: Things You Can t Do with Word... 1 Get Organized... 1 Create the
This Tutorial is for Word 2007 but 2003 instructions are included in [brackets] after of each step. Table of Contents Just so you know: Things You Can t Do with Word... 1 Get Organized... 1 Create the
Creating a Website Using Weebly.com (July 2012 Update)
") Creating a Website Using Weebly.com (July 2012 Update) Weebly.com is a website where anyone with basic word processing skills can create a website at no cost. No special software is required and there
Creating a Website Using Weebly.com (July 2012 Update) Weebly.com is a website where anyone with basic word processing skills can create a website at no cost. No special software is required and there
PowerPoint 2016 Building a Presentation
 PowerPoint 2016 Building a Presentation What is PowerPoint? PowerPoint is presentation software that helps users quickly and efficiently create dynamic, professional-looking presentations through the use
5 Setting Preferences 15 Preferences 15 Configure Chart Colors 16
 CRITERION Vantage 3 Acquire Training Manual Contents 1 Introduction 3 Collecting Data 3 2 Starting the Program 3 Logging In and Logging Out 3 Logging In 3 Logging in as an Administrator 3 Logging in as
COPYRIGHTED MATERIAL. Making Excel More Efficient
 Making Excel More Efficient If you find yourself spending a major part of your day working with Excel, you can make those chores go faster and so make your overall work life more productive by making Excel
Using Adobe Photoshop
 Using Adobe Photoshop 2 In this section we ll look at some essential things you need to know in order to use Photoshop effectively. First of all, we ll take a look at customising Photoshop s settings and
Getting Started with. PowerPoint 2010
 Getting Started with 13 PowerPoint 2010 You can use PowerPoint to create presentations for almost any occasion, such as a business meeting, government forum, school project or lecture, church function,
Microsoft Word Important Notice
 Microsoft Word 2013 Important Notice All candidates who follow an ICDL/ECDL course must have an official ICDL/ECDL Registration Number (which is proof of your Profile Number with ICDL/ECDL and will track
Section 6: Dreamweaver
 Section 6: Dreamweaver 1 Building TPS Web Pages with Dreamweaver Title Pages 1. Dreamweaver Storyboard Pages 3 2. Folder Management 4 3. Defining Your Site 5-8 4. Overview of Design Features 9-19 5. Working
PowerPoint Introduction. Video: Slide Basics. Understanding slides and slide layouts. Slide Basics
 PowerPoint 2013 Slide Basics Introduction PowerPoint presentations are made up of a series of slides. Slides contain the information you will present to your audience. This might include text, pictures,
Using Microsoft Word. Paragraph Formatting. Displaying Hidden Characters
 Using Microsoft Word Paragraph Formatting Every time you press the full-stop key in a document, you are telling Word that you are finishing one sentence and starting a new one. Similarly, if you press
Introduction to Microsoft Word 2010
 Introduction to Microsoft Word 2010 THE BASICS PAGE 02! What is Microsoft Word?! Opening Microsoft Word! The Title Bar! Page View and Zoom MENUS...PAGE 03! Quick Access Toolbar! The Ribbon! File Tab! Home
Overview of Adobe Fireworks CS6
 Overview of Adobe Fireworks CS6 Lesson topics: Work with the Adobe Fireworks CS6 workspace: tools, Document windows, menus, and panels. Customize the workspace. Change the magnification of a document.
[Not for Circulation] This document provides a variety of shortcuts for working in PowerPoint 2007.
![[Not for Circulation] This document provides a variety of shortcuts for working in PowerPoint 2007.](/thumbs/72/67772637.jpg "[Not for Circulation] This document provides a variety of shortcuts for working in PowerPoint 2007.") PowerPoint Shortcuts This document provides a variety of shortcuts for working in PowerPoint 2007. Using Slides from Other Presentations To add a slide from an existing presentation to the current presentation,
PowerPoint Shortcuts This document provides a variety of shortcuts for working in PowerPoint 2007. Using Slides from Other Presentations To add a slide from an existing presentation to the current presentation,
Introduction to Microsoft Word 2010
 Introduction to Microsoft Word 2010 Microsoft Word is a word processing program you can use to write letters, resumes, reports, and more. Anything you can create with a typewriter, you can create with
Application of Skills: Microsoft PowerPoint 2013 Tutorial
 Application of Skills: Microsoft PowerPoint 2013 Tutorial Throughout this tutorial, you will progress through a series of steps to create a presentation about yourself. You will continue to add to this
Overview of Adobe Fireworks
 Adobe Fireworks Overview of Adobe Fireworks In this guide, you ll learn how to do the following: Work with the Adobe Fireworks workspace: tools, Document windows, menus, and panels. Customize the workspace.
FILE ORGANIZATION. GETTING STARTED PAGE 02 Prerequisites What You Will Learn
 FILE ORGANIZATION GETTING STARTED PAGE 02 Prerequisites What You Will Learn PRINCIPLES OF FILE ORGANIZATION PAGE 03 Organization Trees Creating Categories FILES AND FOLDERS PAGE 05 Creating Folders Saving
Intermediate Microsoft Office 2016: Word
 Intermediate Microsoft Office 2016: Word Updated January 2017 Price: $1.20 Lesson 1: Setting Margins A margin is the distance from the text to the paper s edge. The default setting is 1 all around the
Using Adobe Contribute 4 A guide for new website authors
 Using Adobe Contribute 4 A guide for new website authors Adobe Contribute allows you to easily update websites without any knowledge of HTML. This handout will provide an introduction to Adobe Contribute
Installation and Activation of Foody pro theme
 Installation and Activation of Foody pro theme Installation 1. Install Word Press from http://codex.wordpress.org/installing_wordpress. 2. Upload via Word press Admin: - Go to your WordPress admin panel,
Microsoft Office Word 2016 for Mac
 Microsoft Office Word 2016 for Mac Formatting Your Document University Information Technology Services Learning Technologies, Training & Audiovisual Outreach Copyright 2016 KSU Division of University Information
Basic Concepts. Launching MultiAd Creator. To Create an Alias. file://c:\documents and Settings\Gary Horrie\Local Settings\Temp\~hh81F9.
 Page 1 of 71 This section describes several common tasks that you'll need to know in order to use Creator successfully. Examples include launching Creator and opening, saving and closing Creator documents.
SMART Meeting Pro 4.2 personal license USER S GUIDE
 smarttech.com/docfeedback/170973 SMART Meeting Pro 4.2 personal license USER S GUIDE Product registration If you register your SMART product, we ll notify you of new features and software upgrades. Register
Creating an with Constant Contact. A step-by-step guide
 Creating an Email with Constant Contact A step-by-step guide About this Manual Once your Constant Contact account is established, use this manual as a guide to help you create your email campaign Here
Table of Contents The University of Akron These materials were developed and are owned by The University of Akron. All rights reserved.
 Table of Contents COURSE OVERVIEW... 2 CONVENTIONS USED IN THIS MANUAL... 3 LESSON 1: SYMBOLS... 4 INSERTING SYMBOLS... 4 USING AUTOCORRECT TO INSERT SYMBOLS... 5 TURN ON AUTOCORRECT... 5 LESSON 2: SPECIAL
Using SymPrint to Make Overlays, Templates & More...
 Welcome to SymPrint SymPrint is an easy-to-use tool for creating communication overlays, worksheets, classroom activities and more using a modern toolbar and common-sense interface modeled after the programs
Contents. Launching Word
 Using Microsoft Office 2007 Introduction to Word Handout INFORMATION TECHNOLOGY SERVICES California State University, Los Angeles Version 1.0 Winter 2009 Contents Launching Word 2007... 3 Working with
A Step-by-step guide to creating a Professional PowerPoint Presentation
 Quick introduction to Microsoft PowerPoint A Step-by-step guide to creating a Professional PowerPoint Presentation Created by Cruse Control creative services Tel +44 (0) 1923 842 295 training@crusecontrol.com
How do I make a basic composite or contact sheet?
 How do I make a basic composite or contact sheet? FotoFusion enables you to make a grid-style layout and use text tags to create labels under image frames. This is useful for making simple composites and
Week 5 Creating a Calendar. About Tables. Making a Calendar From a Table Template. Week 5 Word 2010
 Week 5 Creating a Calendar About Tables Tables are a good way to organize information. They can consist of only a few cells, or many cells that cover several pages. You can arrange boxes or cells vertically
ITP 101 Project 2 - Photoshop
 ITP 101 Project 2 - Photoshop Project Objectives Learn how to use an image editing application to create digital images. We will use Adobe Photoshop for this project. Project Details To continue the development
Introduction to MS Word XP 2002: An Overview
 Introduction to MS Word XP 2002: An Overview Sources Used: http://www.fgcu.edu/support/office2000/word/files.html Florida Gulf Coast University Technology Skills Orientation Word 2000 Tutorial The Computer
The purpose of this tutorial is to introduce you to the Construct 2 program. First, you will be told where the software is located on the computer
 Learning Targets: Students will be introduced to industry recognized game development software Students will learn how to navigate within the software Students will learn the basics on how to use Construct
How to set up a local root folder and site structure
 Activity 2.1 guide How to set up a local root folder and site structure The first thing to do when creating a new website with Adobe Dreamweaver CS3 is to define a site and identify a root folder where
Veco User Guides. Grids, Views, and Grid Reports
 Veco User Guides Grids, Views, and Grid Reports Introduction A Grid is defined as being a list of data records presented to the user. A grid is shown generally when an option is selected from the Tree
SoftChalk-Style Builder
 SoftChalk-Style Builder This feature is used to create a personal style for a lesson. It also can be used to import a style that has been created for your institution or department. This type of style
OnPoint s Guide to MimioStudio 9
 1 OnPoint s Guide to MimioStudio 9 Getting started with MimioStudio 9 Mimio Studio 9 Notebook Overview.... 2 MimioStudio 9 Notebook...... 3 MimioStudio 9 ActivityWizard.. 4 MimioStudio 9 Tools Overview......
Microsoft Excel 2010 Part 2: Intermediate Excel
 CALIFORNIA STATE UNIVERSITY, LOS ANGELES INFORMATION TECHNOLOGY SERVICES Microsoft Excel 2010 Part 2: Intermediate Excel Spring 2014, Version 1.0 Table of Contents Introduction...3 Working with Rows and
Getting Started Guide. Chapter 3 Using Styles and Templates
 Getting Started Guide Chapter 3 Using Styles and Templates Copyright This document is Copyright 2010 2013 by its contributors as listed below. You may distribute it and/or modify it under the terms of
Microsoft Excel 2010 Basics
 Microsoft Excel 2010 Basics Starting Word 2010 with XP: Click the Start Button, All Programs, Microsoft Office, Microsoft Excel 2010 Starting Word 2010 with 07: Click the Microsoft Office Button with the
CLASS 6: March 5, 2014 MULTIMEDIA TOOLS: DGIM 601-W01 (127469)
") CLASS 6: March 5, 2014 MULTIMEDIA TOOLS: DGIM 601-W01 (127469) AGENDA: Homework Review: Website Logo (Save As: YourInitials_logo.psd ) Photoshop Lesson 6: Start Midterm Set-Up OBJECTIVE: Set-Up Photoshop
CLASS 6: March 5, 2014 MULTIMEDIA TOOLS: DGIM 601-W01 (127469) AGENDA: Homework Review: Website Logo (Save As: YourInitials_logo.psd ) Photoshop Lesson 6: Start Midterm Set-Up OBJECTIVE: Set-Up Photoshop