Software installation
|
|
|
- Scott Bruce
- 5 years ago
- Views:
Transcription
1
2
3 Table of contents 1 Introduction Software installation Protection Minimum recommended configuration Installation Uninstall the application Software presentation Meanings and functions of the home menu buttons Meanings and functions of menu bar buttons Meanings and functions of menu bar buttons Connect the device Transfer files Manage customers and operators Create a customer or an operator Remove a customer or an operator Modify a customer or an operator Manage the devices park Modify the information of devices, probes and modules Remove a device, a probe or a module registered in the park Study the registration datasets Open a dataset Description of the dataset display Customize the display Global view Legend and statistics Take action on the graphic Display the tables Export the datasets Export the graphic Export the table Export the report Manage the calculated functions Add a calculated function Add a customised function : the operations Add a customised function : the mathematical functions Add a predefined function Modify a calculated function Delete a calculated function Datalogger parameters General parameters Data Printing options Graphic Set time on the device Clear memory Languages management Updating the device Make a manual updating Make an automatic updating...34
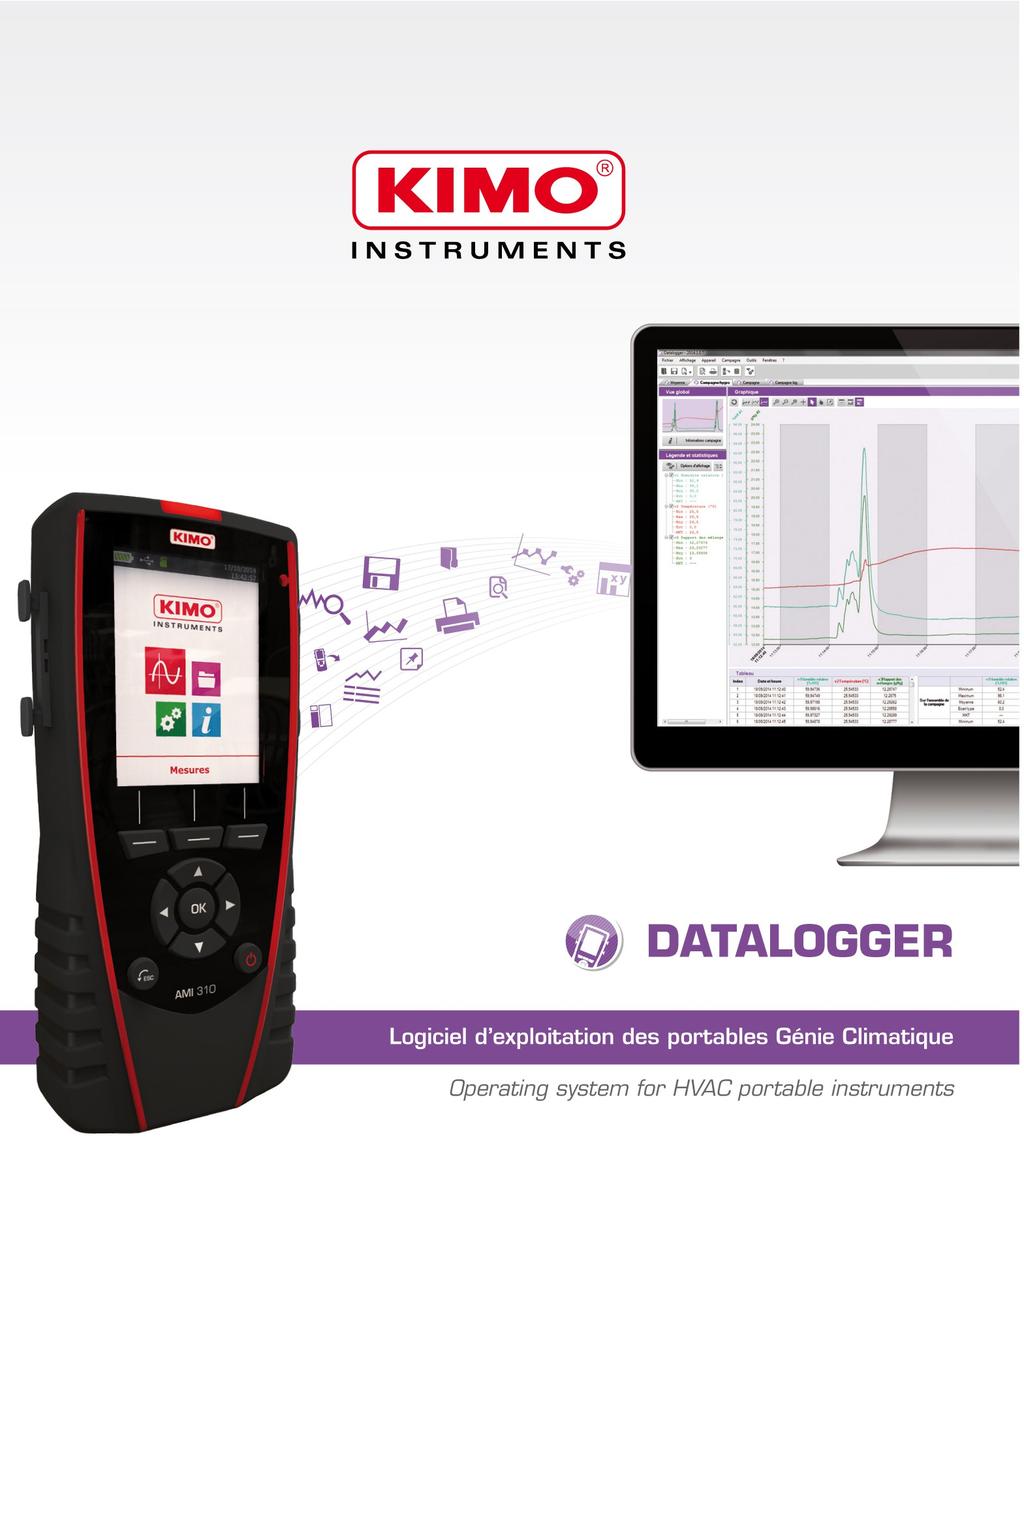
4 1 Introduction Available as an option with class 210 and 310 portable instruments and with the flow meter DBM610, the Datalogger enables visual indication and exploitation of measurement datasets. Its main functions : Visual indication and results of measurement datasets. Zoom function for a more precise study of a period. Shaping and editing measurement reports. Controlling appliances. Recovery of data and file creation in text format Software installation Protection A CD-ROM copy for saving is possible and also its installation on several workstations Minimum recommended configuration Windows XP SP3, Windows Vista, Windows 7 or Windows 8 USB port for communication with the device CD player for software installation Internet connection to update devices RAM 1024 Mo Installation You need necessary rights. If this is not the case, contact the administrator. Insert the CD-ROM. The installation program automatically starts. Note : if the installation program does not start automatically, go in My Computer or Windows explorer and doubleclick on "setupdatalogger.exe". Follow instructions on the screen. Note : depending on existing software, or not, on the computer (especially NET Framework), waiting times can be non negligible Please wait. The software is now installed, the Datalogger icon is on the desktop. 3 Uninstall the application To uninstall the Datalogger, you need suitable rights and use the Windows tool provided for that purpose : Go to the menu "Start", "Parameters", "Control panel", then "Add/Remove programs". In the index "Install/Uninstall", click on the "Datalogger" line and follow Windows indications. 4 Introduction


5 4 Software presentation To open the software, double-click on the Datalogger icon. 4.1 Meanings and functions of the home menu buttons Enables the software to recognize the device connected on the computer Opens an existing file on computer Enables an access to the devices base registered on the computer Enables an access to the software options Software presentation 5
6 4.2 Meanings and functions of menu bar buttons File Open : Open an existing file on computer Add file : Adds a dataset file to the current dataset Save : Saves the current dataset Save as : Saves the current dataset in an other location Save all : Saves all the open datasets Export : Exports the current dataset in a picture file, CSV, TXT or PDF Recent files : Recently opened files list Print preview : Preview of the dataset report before print Print : Print of the current dataset Exit : Exit application Display Tool bar : Show or hide the tool bar MKT : Show or hide the MKT for temperature measurements Device Device reading : Reads the information of the connected device Consult the product base : management of the devices park Dataset Dataset information : Current dataset information Calculated functions : Add, remove or modify a calculated function Tools Language : Choice of the software language Management of customers and operators database : Enables an access to the registered customers and operators Display data files : Opens the data folder in Windows Explorer Preferences : Opens the software options Windows Reorganize : Reorganize the opened datasets? 6 About : Software information Software presentation
7 4.3 Meanings and functions of menu bar buttons Opens an existing file on the computer Saves the current dataset Exports the current dataset in a picture file, CSV, TXT or PDF Preview of the dataset report before print Print the current dataset Reading the information of the connected device Management of the devices park Software options Software presentation 7


8 5 Connect the device Connect the device in USB on the computer. Switch on the device. Activate the Datalogger software by clicking on the icon Click on the "Connection" button. Then the following window opens for the first connection of the device : Please enter the certificate number of the device. Click on "OK". If a module or a probe is connected, please enter its certificate number. Click on "OK". The device is added in the database. The information of the device opens. 8 Connect the device

9 This window gives the following information : Serial number of the device Software version of the device Date of the last adjustment Certificate number When a device is already registered in the device database, the window "Device information" directly opens after detection of the device. Connect the device 9


10 6 Transfer files Transfer files enables to copy the measuring dataset saved in the device on the computer. From the window "Device information" : Click on the button "Download". The following window opens with its progression bar. When the loading is finished, the following window opens : 10 Transfer files


11 This window presents on the left the dataset list existing on the device. Tick the boxes of the dataset to discharge on the computer Click on the button "Next" below right of the window. The following window opens which enables to choose the operator who carried out the dataset and the customer for whom the dataset has been carried out. Click on the button "Select record" in the part "Customer". Transfer files 11
.")

12 Select a customer in the list or click on the button "+" to create one (see on page 14 for creation of customers and operators). Select a customer and click on "Select record" below right of the window. Do the same operation to select an operator. Click on the button "Next" of the window "Data transfer". 12 Transfer files

13 This window enables : to modify the location where the measuring dataset will be saved in the computer : Click on the button "Browse" then select the required folder. To select the action to realise when a folder already exists : Click on the required bullet. Click on the button "Finish". At the end of the unloading datasets, a window opens asking to display or not the datasets unloaded. Click on YES to display the datasets or on NO, then the software comes back on the homepage. Transfer files 13
14 7 Manage customers and operators It is possible to create a base with the customers to whom the datasets are destinated for and the operators who carried out the datasets. 7.1 Create a customer or an operator Click on "Tools" in the menu bar then on "Management of customers and operators database". Click on the button "Customers" or "Operators" on the left of the window according to the type of contact to create. Click on the button A customer or an operator appears in the list. 14 Manage customers and operators
15 Click on the line of this customer or operator. Details of contacts on the left of the window become accessible and can be completed. Complete the details of the contact : name, company, address, phone number, fax, . Click on the button "Validate". The name of the customer or operator and his company appear in the list. Click on the button "Close" below right to exit and come back on the homepage. Manage customers and operators 15

16 7.2 Remove a customer or an operator Click on the menu "Tools" then on "Management of customers and operators database". Click on the customer or operator to remove. Click on the button The customer or operator disappears of the list. Click on the button "Close" to close the window. 7.3 Modify a customer or an operator From the window "Management of the customers and operators database" : Click on the customer or operator to modify. Modify the required information in the part "Contact details". Click on the button "Validate" to save the modifications. Click on the button "Close" to close the window. 16 Manage customers and operators

17 8 Manage the devices park The management of the devices park enables to manage the certificates of all the devices, probes and modules which have been connected to the "Datalogger". Click on the menu "Device" then on "Consult the product base". An icon at the start of each line enables to determine the state of the certificate : The certificate is valid The certificate is in the warning period The certificate is no more valid. 8.1 Modify the information of devices, probes and modules From the window "Management of devices park", it is possible to modify the following information : Certificate number Certificate validity Warning delay Click on the information to modify. Enter the required information. Click on the button "Close". 8.2 Remove a device, a probe or a module registered in the park Click on the line of the element to remove. Click on the button The element is removed from the park. Manage the devices park 17


18 9 9.1 Study the registration datasets Open a dataset Click on the button "Open" on the homepage. Click on a dataset on the left of the window. Details of the selected dataset display on the right of the window : date, type of dataset,... Click on the button "Open" below right of the window. 18 Study the registration datasets

19 The dataset opens : 9.2 Description of the dataset display This window is divided in four parts : the global view the legend and statistics the graphic the tables Customize the display It is possible to display or not the different parts. For this purpose click on the following buttons : Display or not the legend and statistics Display or not the global view Display or not the single table Display or not the single curves Display or not curves and table At least one of the three last buttons must be active. Study the registration datasets 19


20 9.2.2 Global view The global view enables to have permanently a view on the whole curve of the measuring dataset. In the case of a zoom on a precise area of the dataset, the zoomed zone will be valorised on the global view : Global view without zoom Global view with zoom The button "Dataset information" enables to open the details window of the dataset : Click on the button. The window above opens. It lists the following elements : Type of dataset Date of start and end Optional comment Type of device used Customer and operator It is possible to select a customer and/or an operator by clicking on the button "Select record" Legend and statistics The part "Legend and statistics" displays the statistics related to the measuring dataset. The statistics of a way are displayed in the corresponding colour of the curve displayed in the part "Graphic". It is possible to display : the statistics on the whole graphic the statistics on the visible zone (zoomed period) the statistics on the whole graphic and on the visible zone Ex : Statistics on the whole dataset Statistics on the zoomed period Statistics on the whole dataset and on the zoomed period The statistics on the zoomed period are specified between"< >". Ex : < 25.7 >. 20 Study the registration datasets
21 9.3 Take action on the graphic It is possible to carry out several actions on the graphic with its specific tool bar : Details of the different buttons : Reinitialize the graphic Zoom out Display the curves in 3D Dynamic zoom Display or mask the points Browse cursor Display or mask the curve Selection pointer Zoom in Hand of displacement Add a note Reinitialize the graphic : Click on this button to return to the global view of the graphic Make a zoom in Click on the button Click and keep clicking at the begin of the zoom period required. Slide the mouse until the end of the zoom period required. Release the mouse button. The graphic displays exclusively the zoomed period. Make a zoom out Click on the button Click on the graphic. A zoom out is realized. Make a dynamic zoom Click on the button Click and keep clicking in the graphic. Slide the mouse towards the right to make a zoom in or slide the mouse towards the left to make a zoom out. Browse the curves Click on the button Click and keep clicking on the graphic. Slide the browse cursor with the mouse towards the right or towards the left. The cursor browses the curves and frames the corresponding values to the browse cursor at the level of the scales in ordinate axis. The table of measuring points displays also these values. Browse the whole graphic Click on the button Click on the graphic and slide the mouse towards the left or the right to browse the whole graphic. Study the registration datasets 21


22 Selection pointer Click on the button to come back to the selection pointer. Add a note on a specific point : Click on this button and go on the point of the curve where place the note. Make a click with the mouse. The window above opens : Enter the note. Click on OK. A triangle coloured as the curve appears at the level of the point indicating that a note is existing. Positionning of the note Green triangle indicating the presence of the note Add a general note (in relation with all the curves) : Click on the button The cursor browses the curve(s). Make a click with the mouse. The window above opens : Enter the note. Click on OK. A white triangle appears on the top of the part "Graphic" indicating that a note is existing. To read a previously added note, run the mouse over the triangle : the date, the time and the note appear. 9.4 Remove a note : Click on the triangle of the note. The window of the note appears. Delete the text of the note and click on "OK". The note is removed. Display the tables Two types of table can be displayed : the table of the whole measuring points of the datasets the table of the dataset statistics 22 Study the registration datasets

23 The display of the single tables or of the tables and the curve must be active. Enables to display only the graphic Enables to display only the table Enables to display table and graphic Click on the button Then on the button The table of the dataset points is displayed : This table displays the date and the time of the registered points for each measuring channel. Click on the button The tables of the dataset statistics is displayed : This table displays the minimum, the maximum, the average, the standard deviation and the MKT value of each way for the whole dataset and for the visible part of the graphic (in the case of zoom for example). Study the registration datasets 23
24 10 Export the datasets It is possible to export the graphic of a dataset and its values table Export the graphic The exportation of the graphic can be made in.jpeg or in pdf. At least one dataset must be opened. Click on the menu "File" then go on "Export". Click on "Graphic to image file" or "Graphic to PDF file".. Select the folder in which the file must be saved. Click on "OK". The exportation concerns the displayed graphic in the graphic part and table part. If a zoom is made for example, the exportation will concern the zoomed period Export the table The exportation of the table can be done in.csv, type of file which can be read by a spreadsheet like Excel or in pdf. At least one dataset must be opened. Click on the menu "File" then go on "Export". Click on "Table to CSV file" or "Table to PDF file".. Select the folder in which the file must be saved. Click on "OK". The exportation concerns table displayed in the graphic part and table. If a zoom is carried out for example, the exportation will concern this zoomed period Export the report The report brings together the following elements of the measuring dataset : a first page indicating the device and the probes and modules used, the dataset parameters a page concerning the dataset graphic one or several page(s) concerning the values table. 24 Click on the menu "File" then go to "Export". Click on "Report to PDF file". Select the folder in which the file must be saved. Click on "OK". Export the datasets

25 11 Manage the calculated functions 11.1 Add a calculated function Click on the menu "Dataset" then go on "Calculated functions". Click on "Add function". It is possible to add a customised function or a predefined function Add a customised function : the operations Click on the button "Customised functions". Create the formula : double click on the concerned way(s) and double click on the operator (see below the tables of operators). Ex : #001 - #008. Verify the syntax. If the syntax is correct, take the next step, or correct the formula. Determine the properties of the way (name, unit, decimals). Click on the button "Validate". +, -, *, / Addition, subtraction, multiplication and division. % Modulo (remainder of division of integers). Example : 13 % 3 = Add a customised function : the mathematical functions Create the formula : double click on the mathematical function (see on page 26 the table of mathematical functions) then double click on the concerned way(s) or insert the appropriate number. Verify the syntax. If the syntax is correct, take the next step, or correct the formula. Determine the properties of the way (name, units, decimals). Click on the button "Validate". Manage the calculated functions 25
26 Mathematical functions : abs (<expr>) Gives the absolute value of the expression. ABSV(Way1Name) gives the value of the way Way1Name if it is positive, or its opposite value. ABS(V(Way1Name)*10.3+V(Way2Name)) evaluates the expression V(Way1Name)*10.3+V(Way2Name) and gives its absolute value. acos (<expr>) Arc cosine of the expression in radians acos (0) gives acos (-1) gives Asin (<expr>) Arc sine of the expression in radians asin (1) gives asin (0) gives Atan (<expr>) Tangent arc of the expression in radians atan (1) gives atan (0) gives 0 Ceiling (<expr>) Integer number above or equal to the expression CEIL (2.9) gives 3 CEIL (-2.9) gives -2 Cosinus (<expr>) Cosinus of the expression in radians cos (1.5708) gives 0 cos (3.1416) gives -1 Exp (<expr>) Exponential of the expression Floor (<expr>) Integer number below or equal to the expression Floor (2.9) gives 2 Floor (-2.9) gives -3 Ln (<expr>) Neperian logarithm of the expression (The expression must be positive) Log10 (<expr>) Decimal logarithm of the expression Log 100 gives 2. Log(V(Way1Name)*10.3+V(Way2Name)) evaluates the expression V(Way1Name)*10.3+V(Way2Name) and gives its decimal logarithm. The expression must be positive. Pow (<expr> ; <pw>) Raising to a power : <expr> raised to a power <pw>. Ex : pow (5;3) = 125 Round (<expr>) Round the operator value to the closer integer. Round (2.4) gives 2 Round (2.6) gives 3 Sin (<expr>) Sine of the expression in radians Sin (1.5708) gives 1 Sin (3.1416) gives 0 Sqrt (<expr>) Square root of the expression Tangent (<expr>) Tangent of the expression in radians Tan (0.7854) gives 1 Tan (3.1416) gives 0 Manage the calculated functions 26
. Click on the button \"Validate\".")
27 Add a predefined function Click on the button "Predefined functions". Choose the function (see the table below for details). Choose the corresponding ways to the involved parameters in the calculation. Determine the properties of the way (name, unit and decimal). Click on the button "Validate". Combination ratio The combination ratio of an air volume appoints to the ratio of the water vapour mass it contains to the dry air mass. g/kg. Absolute humidity Mass of water vapour in an unitary humid air volume on a temperature and pressure given. g/kg. Dew-point The air dew-point is the temperature in which, all in keeping unchanged the current barometric conditions, the air becomes saturated in water vapour. C td. Wet temperature Value which puts through the dry air temperature and the relative humidity percentage contained in the air. C tw. Enthalpy State function of thermodynamics which variation enables to express the amount of the heat involved during a system transformation when it receives or provides a mechanical work. Kj/Kg. Indoor WBGT Wet Bulb Globe Temperature (black ball). Globe temperature and in humid et au thermometer. Calculates the WBGT index indoor and outdoor. Outdoor WBGT Enthalpy Function which enables to convert a currant or voltage way in a range specified by the user. (Ex : input 0-10 V corresponding to a pressure of 0 to 500 Pa) 11.2 Modify a calculated function Click on the menu "Dataset" then on "Calculated functions". Click on "Modify function". The window of the calculated functions opens. Select the function to modify then click on the button "Validate". 27 Manage the calculated functions
28 Modify the function. Click on the button "Validate" Delete a calculated function Click on the menu "Dataset" then go on "Calculated functions". Click on "Delete function". The window of the calculated functions opens. Select the function to delete then click on the button "Validate". Manage the calculated functions 28

 enables to express on an easy way the global effect of temperature variations when perishable goods are stored or transported. 12.")
29 12 Datalogger parameters 12.1 General parameters Click on the menu "Tools" then on "Preferences" or on "Options" from the homepage of the software. In the part "General parameters" : Mark "Tabs" or "Windows" to display the datasets Tick the box in the part "Certificates" : the software will verify the validity of the certificates at every start. Click on the button "Clear history" to remove the recently opened files. Tick the box "Display MKT value" to display it. The MKT value (Mean Kinetic Temperature) enables to express on an easy way the global effect of temperature variations when perishable goods are stored or transported Data Click on the button "Data". 29 Datalogger parameters


30 This window enables to select the folder where the dataset files are saved. Tick "Default location". The files will be saved in the following folder : C:\Users\Public\Documents\KIMO Instruments\Datalogger\Data OR Tick "Customised location". Click on the button "Browse" and select the folder location required Printing options Click on the button "Printing options". Click on the button "Browse" to select the required logo. Tick or not the boxes to print the graphic background. Tick or not the boxes to frame the graphic notes. Select the frame opacity of the graphic notes Graphic Click on the button "Graphic". Datalogger parameters 30
31 Select the default colour of curves. Select the default colour of the time axis. Select the different default properties of the background. 31 Datalogger parameters


32 13 Set time on the device Click on the button "Device reading". The window "Device information" opens. Click on the button "Date and time". In "Automatic synchronisation" : Tick the box. Time will be automatically synchronized with the computer at every connection of the device to the PC. OR In "Manual modification" : Tick "Synchronize with the PC date and time" to adjust the device on the PC date and time. OR Tick "Customize" then choose the date and time in the calendar. Click on the button "Validate". 14 Clear memory Click on the button "Device reading". The window "Device information" opens. Click on "Clear memory". Select the delete mode. The preview displays in red the dataset which will be deleted. Click on the button "Remove selection". This operation is irreversible. The selected datasets will be permanently deleted. Clear memory 32

33 15 Languages management Click on the button "Device reading". The window "Device information" opens. Click on the button "Language". Click on the button "Download the latest languages". The list of the available languages displays in the part "Available languages". Click on the language to install in the device. Click on the button to send the selected language in the device. In the part "Available languages", it is possible to tick the box at the top left. The software will select all the available languages in the limit of 10. The device can contain up to 10 languages. To delete one : Click on the language to delete in "Device languages". Click on the button To update the list of the existing languages in the device : Click on the button "Refresh". 33 Languages management

34 16 Updating the device It is possible to update the device by connecting it on the datalogger. Click on the button "Device reading". The window "Device Information" opens. Click on the button "Updating" Make a manual updating Click on the button "Manual updating" to update the device. Take the file of updating given by the after-sales service of the company (file type.zip). The progress of the updating displays in the progression bar. A message indicates that the updating is finished displays at the end and the device switches off. Restart the device. A grey screen with a progression bar displays on the device. At the end of this step, the device displays the homepage. Go in the menu "Information" to verify the effective updating Make an automatic updating The automatic updating necessitates an internet connection to internet. The connection can be protected by a proxy server. In that case : Tick the box "Use a proxy server". Choose "Default Proxy" : the datalogger uses the Proxy parameters of the computer's internet connection OR Choose "Customised Proxy" : enter the Proxy address then the user name and the password. Then : Click on the button "Automatic updating" to update the device. The updating progression displays in the progression bar. A message indicating that the updating is finished displays at the end and the device switches off. Restart the device. A grey screen with a progression bar displays on the device. At the end of this step, the device displays the homepage. Go in the menu "Information" to verify the effective updating. Updating the device 34
35
36 NT_ang Datalogger /01/15 RCS 24 (24) Périgueux Non-contractual document We reserve the right to modify the characteristics of our products without prior notice.
Summary I Minimum system requirements...2
 Logiciel 1 Summary I Minimum system requirements...2 I 1 Minimum configuration required...2 I 2 uninstallation...2 I 3 Launching application...2 II installation...2 III presentation...3 III 1 Home page...3
Before starting installation process, make sure the USB cable is unplugged.
 Table of contents 1 Introduction...4 2 Software installation...4 2.1 Minimum configuration required...4 2.2 Software installation on Windows 7 / Vista / 8...4 2.3 Software installation on Windows XP...4
Table of contents. Minimum required configuration...3 Software installation...3 Launching application...8 Software Un-installation...
 Table of contents I. Installation procedure...3 A B C D Minimum required configuration...3 Software installation...3 Launching application...8 Software Un-installation...8 II. General overview...9 A Instrument
SUMMARY. Minimum required configuration... Software installation... User logo customisation... Software Un-installation... Launching application...
 1 SUMMARY I. Installation procedure...3 A B C D E Minimum required configuration... Software installation... User logo customisation... Software Un-installation... Launching application... 3 3 3 3 3 II.
Supplied with. Calibration certificate. HD 200 Hygrometer
 Supplied with Calibration certificate HD 200 Hygrometer Table of contents 3 I Technical specifications...4 Technical features......4 Specifications......4 II Introduction......5 Description......5 Connections......6
Excel R Tips. is used for multiplication. + is used for addition. is used for subtraction. / is used for division
 Excel R Tips EXCEL TIP 1: INPUTTING FORMULAS To input a formula in Excel, click on the cell you want to place your formula in, and begin your formula with an equals sign (=). There are several functions
The Graphing Calculator
 Chapter 23 The Graphing Calculator To display the calculator, select Graphing Calculator from the Window menu. The calculator is displayed in front of the other windows. Resize or re-position the Graphing
Excel Tool: Calculations with Data Sets
 Excel Tool: Calculations with Data Sets The best thing about Excel for the scientist is that it makes it very easy to work with data sets. In this assignment, we learn how to do basic calculations that
LDB23. Download and data processing software
 LDB23 Download and data processing software 3 Table of contents I Introduction...4 II Software installation...4 III Driver installation...4 IV Software presentation...5 IV1- Meaning and functions of the
ANALYSIS SOFTWARE. CAmReport
 ANALYSIS SOFTWARE CAmReport ENGLISH User Manual CONTENTS 1. INSTALLATION... 3 2. GETTING STARTED... 4 2.1 Starting and Exiting CAmReport... 4 2.2 Setup... 4 2.2.1 Language... 4 2.2.2 Units... 4 2.2.3 CAmReport
HYGROCHIP 1/5 Humidity sensors LabKit with USB-Interface
 HYGROCHIP 1/5 Characteristic features PC for all HYGROCHIP Supports HYT 221, HYT 271 and HYT 939 Measurement of temperature and relative humidity Calculation of further humidity parameters Inclusive of
testo EasyClimate Software Instruction manual
 testo EasyClimate Software Instruction manual 1 Contents 1 Contents 1 Contents... 3 1.1. About this document... 5 2 Specifications... 5 2.1. Use... 5 2.2. System requirements... 6 3 First steps... 6 3.1.
Macro Programming Reference Guide. Copyright 2005 Scott Martinez
 Macro Programming Reference Guide Copyright 2005 Scott Martinez Section 1. Section 2. Section 3. Section 4. Section 5. Section 6. Section 7. What is macro programming What are Variables What are Expressions
Boxed messages as shown below need your special attention. Read them carefully.
 Introduction Thank you for choosing MEQNET WINDRIVER for Lactate Pro TM 2. This Operating Manual explains how to use this software in order to obtain blood lactate data stored in lactate analyzers manufactured
TOSHIBA DesignAIRS. Help & Guide Manual
 TOSHIBA DesignAIRS Help & Guide Manual Contents 1. MAIN TOOLBAR... 3 1.1. Tools / Options... 3 1.1.1. Application Settings... 3 1.1.2. Email Settings... 4 1.1.3. Internet Connection Settings... 4 1.1.4.
Podium Plus Data Analysis Software. User Manual. SWIS10 Version
 SWIS10 Version Issue 1.10 February 2005 Contents 1 Introduction 6 1.1 What is Podium Plus? 6 1.2 About This Manual 6 1.3 Typographical Conventions 7 1.4 Getting Technical Support 7 2 Getting Started 8
Spectrometer Visible Light Spectrometer V4.4
 Visible Light Spectrometer V4.4 Table of Contents Package Contents...3 Trademarks...4 Manual Driver and Application installation...5 Manual Application Installation...6 First Start of the Application...8
KYOCERA Net Viewer 5.3 User Guide
 KYOCERA Net Viewer. User Guide Legal Notes Unauthorized reproduction of all or part of this guide is prohibited. The information in this guide is subject to change without notice. We cannot be held liable
KYOCERA Net Viewer User Guide
 KYOCERA Net Viewer User Guide Legal Notes Unauthorized reproduction of all or part of this guide is prohibited. The information in this guide is subject to change without notice. We cannot be held liable
This is an simple startup guide for Vista Data Vision. Here below we go through the basic functions and configurations after VDV installation
 Vista Data Vision Evaluation It is our purpose to help you Evaluating Vista Data Vision Successfully. Contact us to get trial version of Vista Data Vision. You can get fully functional 90 day Evaluation
Legal Notes. Regarding Trademarks KYOCERA MITA Corporation
 Legal Notes Unauthorized reproduction of all or part of this guide is prohibited. The information in this guide is subject to change without notice. We cannot be held liable for any problems arising from
PC APPLICATION SOFTWARE WEATHER OS (MODEL: WMR100 / WMR200 / WMRS200 / I300 / I600 / EMS100 / RMS300 / RMS600) USER GUIDE IMPORTANT: LAUNCH SOFTWARE
 USER GUIDE IMPORTANT: LAUNCH SOFTWARE") PC APPLICATION SOFTWARE WEATHER OS (MODEL: WMR100 / WMR200 / WMRS200 / I300 / I600 / EMS100 / RMS300 / RMS600) USER GUIDE CONTENTS Launch Software...1 Installation...1 Select language...1 Select cities
PC APPLICATION SOFTWARE WEATHER OS (MODEL: WMR100 / WMR200 / WMRS200 / I300 / I600 / EMS100 / RMS300 / RMS600) USER GUIDE CONTENTS Launch Software...1 Installation...1 Select language...1 Select cities
DwyerLog Logger Interface Software
 DwyerLog Logger Interface Software USER S GUIDE Version 1.4x March 21, 2013 Dwyer Instruments, Inc 102 Indiana Hwy 212 Michigan City, IN 46360 Phone: (219) 879-8868 Fax: (219) 872-9057 http://www.dwyer-inst.com
JUN / 04 VERSION 7.0
 JUN / 04 VERSION 7.0 PVI EWEXEME www.smar.com Specifications and information are subject to change without notice. Up-to-date address information is available on our website. web: www.smar.com/contactus.asp
Logger Pro 3. Quick Reference
 Logger Pro 3 Quick Reference Getting Started Logger Pro Requirements To use Logger Pro, you must have the following equipment: Windows 98, 2000, ME, NT, or XP on a Pentium processor or equivalent, 133
User Manual. Recorder of environmental conditions THBR. Version: 2.0.2
 User Manual Recorder of environmental conditions THBR Version: 2.0.2 2 TABLE OF CONTENTS 1. INTENDED USE... 4 2. INSTALLATION... 5 2.1. System requirements... 5 2.2. Installation process... 5 2.3. Program
testo Comfort Software Professional 4
 99 Washington Street Melrose, MA 02176 Phone 781-665-1400 Toll Free 1-800-517-8431 Visit us at www.testequipmentdepot.com testo Comfort Software Professional 4 Instruction manual 1 Contents 1 Contents
testo Comfort Software Professional 4 Instruction manual
 testo Comfort Software Professional 4 Instruction manual 2 1 Contents 1 Contents 1 Contents...3 2 About this document...5 3 Specifications...6 3.1. Use...6 3.2. System requirements...6 4 First steps...7
Reference and Style Guide for Microsoft Excel
 Reference and Style Guide for Microsoft Excel TABLE OF CONTENTS Getting Acquainted 2 Basic Excel Features 2 Writing Cell Equations Relative and Absolute Addresses 3 Selecting Cells Highlighting, Moving
LAB 1 General MATLAB Information 1
 LAB 1 General MATLAB Information 1 General: To enter a matrix: > type the entries between square brackets, [...] > enter it by rows with elements separated by a space or comma > rows are terminated by
SCAD Soft. Slope. User manual. Stability analysis of slopes. Version 1.5
 SCAD Soft Slope Stability analysis of slopes Version 1.5 User manual UDC 539.3+624.014 Developed by M.A. Perelmuter, V.G. Fedorovsky «Slope». Stability analysis of slopes. USER MANUAL. Version 1.5. The
CONTENTS BEFORE USE. Button menu System settings menu Deleting an item
 CONTENTS BEFORE USE Important information Care and maintenance Warning Product description Computer requirements PRODUCT AT A GLANCE Package contents Product overview Product specification GETTING STARTED
Manual Lindab Analysis. PC-Software Lindab PC 410 and LT 600 for data management and online measurement with logger function. Art. n.
 Art. n. 23110 2016-05-17 Manual Lindab Analysis PC-Software Lindab PC 410 and LT 600 for data management and online measurement with logger function Application Contents 1 Application... 3 2 System requirements...
NETWORK PRINT MONITOR User Guide
 NETWORK PRINT MONITOR User Guide Legal Notes Unauthorized reproduction of all or part of this guide is prohibited. The information in this guide is subject to change for improvement without notice. We
67 Series Spectrophotometer PC Software
 67 Series Spectrophotometer PC Software Instruction Manual 670 004/Rev D/04-17 IMPORTANT Please ensure the SD Card is fitted into the socket as detailed in the image below. -------------------------------------------------------------------------------------------------------------------------
User pages for RM Portico
 Using gives you access to your files on your school or college network from a browser on any computer (including desktops, laptops, tablets, netbooks and smartphones; for more information see Appendix
Operating Manual. Version 7.3.4
 Operating Manual Version 7.3.4 March 2011 Index Page 1. Installation instructions 4 1.1 System requirements 4 1.2 Installation procedure 4 1.3 Meitav-tec USB adaptor installation 7 2. Open Maxinet and
1001ICT Introduction To Programming Lecture Notes
 1001ICT Introduction To Programming Lecture Notes School of Information and Communication Technology Griffith University Semester 1, 2015 1 M Environment console M.1 Purpose This environment supports programming
HW4 Software version 3. HP23 Humidity Temperature Indicator
 Page 1 of 27 HW4 Software version 3 2010-2011; E-M-HW4v3-F2-012_11 Page 2 of 27 Table of contents 1 ORGANIZATION OF THE HW4 MANUALS... 3 2 OVERVIEW... 4 2.1 Functions and settings overview... 4 2.2 Detecting
USB Temperature Logger User Guide
 PR0455 For Products: - PR0710, PR0711, PR0720, PR0721 Resource Data Management Ltd 80 Johnstone Avenue, Hillington Industrial Estate, Glasgow, Scotland, G52 4NZ, UK +44(0)141 810 2828 Switchboard support@resourcedm.com
Users Manual Software DDS 32
 Users Manual Software DDS 32 2 DDS 32 Content 1 Using these Instructions.......... 5 2 Installing DDS 32................ 6 2.1 Installing DDS 32................................ 6 2.2 Uninstall DDS 32................................
Math 2250 MATLAB TUTORIAL Fall 2005
 Math 2250 MATLAB TUTORIAL Fall 2005 Math Computer Lab The Mathematics Computer Lab is located in the T. Benny Rushing Mathematics Center (located underneath the plaza connecting JWB and LCB) room 155C.
SensIT Test and Measurement Version Software Manual
 SensIT Test and Measurement Version 2.1.4000.0 Software Manual 10 Thomas, Irvine, CA 92618, USA Toll Free: (800) 23-FUTEK Telephone: (949) 465-0900 Fax: (949) 465-0905 futek@futek.com www.futek.com 2 Table
Basic types and definitions. Chapter 3 of Thompson
 Basic types and definitions Chapter 3 of Thompson Booleans [named after logician George Boole] Boolean values True and False are the result of tests are two numbers equal is one smaller than the other
Single row numeric functions
 Single row numeric functions Oracle provides a lot of standard numeric functions for single rows. Here is a list of all the single row numeric functions (in version 10.2). Function Description ABS(n) ABS
ConsolePlus (EA- SWP- PLUS) User Manual Ver. 3.2
 User Manual Ver. 3.2") ConsolePlus (EA- SWP- PLUS) User Manual Ver. 3.2 Contents 1. Quick start Guide... 3 2. Features... 4 3. Dependences... 5 4. Accessories... 6 5. Installation... 7 6. Introduction... 9 6.1. General Tab...
ConsolePlus (EA- SWP- PLUS) User Manual Ver. 3.2 Contents 1. Quick start Guide... 3 2. Features... 4 3. Dependences... 5 4. Accessories... 6 5. Installation... 7 6. Introduction... 9 6.1. General Tab...
VANGUARD LOAD TAP CHANGER ANALYZER (LTCA) VERSION 2.xx SOFTWARE MANUAL. LTCA-10, LTCA-40, WRM-10P, WRM-40, TRM-20, TRM-40, TRM-203, and TRM-403
 VERSION 2.xx SOFTWARE MANUAL. LTCA-10, LTCA-40, WRM-10P, WRM-40, TRM-20, TRM-40, TRM-203, and TRM-403") VANGUARD LOAD TAP CHANGER ANALYZER (LTCA) VERSION 2.xx SOFTWARE MANUAL For Use with Vanguard s LTCA-10, LTCA-40, WRM-10P, WRM-40, TRM-20, TRM-40, TRM-203, and TRM-403 Load Tap Changer Analyzers and Winding
VANGUARD LOAD TAP CHANGER ANALYZER (LTCA) VERSION 2.xx SOFTWARE MANUAL For Use with Vanguard s LTCA-10, LTCA-40, WRM-10P, WRM-40, TRM-20, TRM-40, TRM-203, and TRM-403 Load Tap Changer Analyzers and Winding
Procom PPC Software User s Manual
 Procom PPC Software User s Manual Version 1.1 Procom Engineering Inc. 66 Maxwell, Irvine, CA 92618, USA Tel: 949-748 6338 Fax: 949-748 6339 Email: info@procomengineering.com www.procomengineering.com Contents
Daily Monthly Report Software EcoMeasure III. User manual (Detailed version) Model MES3-SW1-DR-EN
 Model MES3-SW1-DR-EN") Daily Monthly Report Software EcoMeasure III Model User manual (Detailed version) Make sure to read this user manual before using the product. Please ensure that this manual is delivered to the end user
Daily Monthly Report Software EcoMeasure III Model User manual (Detailed version) Make sure to read this user manual before using the product. Please ensure that this manual is delivered to the end user
Daily Monthly ReportSoftware EcoMeasureIII MODEL MES3-SW1-DR-FR (English Version) User s manual (Detailed version)
 User s manual (Detailed version)") Daily Monthly ReportSoftware EcoMeasureIII MODEL MES3-SW1-DR-FR (English Version) User s manual (Detailed version) Before operating the instrument, you should first read thoroughly this operation manual
Daily Monthly ReportSoftware EcoMeasureIII MODEL MES3-SW1-DR-FR (English Version) User s manual (Detailed version) Before operating the instrument, you should first read thoroughly this operation manual
GET TO KNOW FLEXPRO IN ONLY 15 MINUTES
 GET TO KNOW FLEXPRO IN ONLY 15 MINUTES Data Analysis and Presentation Software GET TO KNOW FLEXPRO IN ONLY 15 MINUTES This tutorial provides you with a brief overview of the structure of FlexPro and the
Basics of Keithley Interactive Test Environment
 Basics of Keithley Interactive Test Environment 0 Launching KITE Power Up and Log On ACTION 1. From Power-up: disconnect DUTs, stay clear of SMU output connectors/probes Log-on: KIUSER (no password) or
Cal-Bay Systems XY Plotter, Time-Base Recorder, Automated Tester. Users Guide. Rev 3.1
 Cal-Bay Systems XY Plotter, Time-Base Recorder, Automated Tester Users Guide Rev 3.1 Contents... 1 Quick Start Guide... 2 Selecting a Test Specification... 3 Clearing Traces... 4 Saving Traces...4 Loading
HD32MTLogger Software Manual for the instrument HD32MT.1 Introduction
 HD32MTLogger Software Manual for the instrument HD32MT.1 Introduction WARNING: The software must always be run as administrator! The HD32MTLogger program allows management of the HD32MT.1 datalogger from
Microsoft Excel 2007
 Microsoft Excel 2007 1 Excel is Microsoft s Spreadsheet program. Spreadsheets are often used as a method of displaying and manipulating groups of data in an effective manner. It was originally created
DCS-100A. Dynamic Data Acquisition Software SOFTWARE. Monitors measurement data with various graphs and numerical windows. Acquires data efficiently.
 4-3 DCS-100A Dynamic Data Acquisition Software SOFTWARE Software Monitors measurement data with various graphs and numerical windows. Acquires data efficiently. The basic operation does not depend on the
User s Manual. CW500Viewer IM CW500-61EN. 2nd Edition
 User s Manual CW500Viewer 2nd Edition Thank you for purchasing the CW500 Power Quality Analyzer. This manual explains the operating procedures of CW500Viewer, a software application included with the CW500.
OPERATION MANUAL. USB Datalogger (Temp./RH/Thermocouple)
") OPERATION MANUAL USB Datalogger (Temp./RH/Thermocouple) INTRODUCTION & OPERATION A very smart and cost-effective mini USB logger, save your cost without logger cradle! Many different parameters are selectable
OPERATION MANUAL USB Datalogger (Temp./RH/Thermocouple) INTRODUCTION & OPERATION A very smart and cost-effective mini USB logger, save your cost without logger cradle! Many different parameters are selectable
INSTALLING THE PS3 XBOX READY SOFTWARE:
 INSTALLING THE PS3 XBOX READY SOFTWARE: 1. Insert the Installation CD to CD-ROM drive and execute Ready_Setup.exe NOTE: If it is the first time for the target USB disk using under this software, the software
IMPORTANT INFORMATION FOR INSTALLING COMPLAY
 IMPORTANT INFORMATION FOR INSTALLING COMPLAY 3.5.48 NOTE: This page is for Microsoft Windows 98, SE, NT, 2000, and XP. See page #2 for installing Complay on a Vista P. C. See page #3 for installing Complay
-Table of Contents- 1. Overview Installation and removal Operation Main menu Trend graph... 13
 Thank you for buying Data Analysis Software. In order to use this software correctly and safely and to prevent trouble, please read this manual carefully. Notice 1. No part of this manual can be reproduced
14 / 10 / 2013 M3 SOFT V3.0 AC8 NEW FEATURES
 14 / 10 / 2013 M3 SOFT V3.0 AC8 NEW FEATURES SUMMARY Import / Export of macros : Key Benefits Import a Macro Consult a Macro help file Link a help file to a Macro Export a Macro How to use the Macro tab
Getting to Know FlexPro in just 15 Minutes
 Getting to Know FlexPro in just 15 Minutes This tutorial provides you with a brief overview of the structure of FlexPro and the basic command methods. 3 Managing Data with FlexPro FlexPro stores all objects
N2KExtractor. Maretron Data Extraction Software User s Manual
 N2KExtractor Maretron Data Extraction Software User s Manual Revision 3.1.6 Copyright 2017 Maretron, LLP All Rights Reserved Maretron, LLP 9014 N. 23rd Ave #10 Phoenix, AZ 85021-7850 http://www.maretron.com
testo Comfort Software Professional 4 Instruction manual
 testo Comfort Software Professional 4 Instruction manual 2 1 Contents 1 Contents 1 Contents... 3 2 About this document... 5 3 Specifications... 6 3.1. Use... 6 3.2. System requirements... 6 4 First steps...
QTrail, 6 Glamis Close Hemel Hempstead, Hertfordshire HP2 7QB Tel: 00 (44) Fax: 00 (44)
 Fax: 00 (44)") GPRS QTRAIL Vehicle Tracking System User Manual QTrail, 6 Glamis Close Hemel Hempstead, Hertfordshire HP2 7QB Tel: 00 (44) 1442 232434 Fax: 00 (44) 1442 232366 Email: enquiries@qtrail.com QTrail 2005 Every
GPRS QTRAIL Vehicle Tracking System User Manual QTrail, 6 Glamis Close Hemel Hempstead, Hertfordshire HP2 7QB Tel: 00 (44) 1442 232434 Fax: 00 (44) 1442 232366 Email: enquiries@qtrail.com QTrail 2005 Every
ACSON MDS Selection Software
 ACSON MDS Selection Software Table of Content 1.0 What is MDS selection software. 3 2.0 Required information and results. 4 2.1 Required information. 4 2.2 Results. 6 3.0 Using this software. 7 3.1 Executing
LCC-S Configuration software for transmitters
 LCC-S Configuration software for transmitters Table of contents 1. Introduction...5 2. Software installation...5 2.1. Minimum system requirement...5 2.2. Installing the software...5 3. Start with the
First Steps - Ball Valve Design
 COSMOSFloWorks 2004 Tutorial 1 First Steps - Ball Valve Design This First Steps tutorial covers the flow of water through a ball valve assembly before and after some design changes. The objective is to
USER MANUAL WINATEQ300 SOFTWARE Full version 1.01
 USER MANUAL WINATEQ300 SOFTWARE Full version 1.01 Reference: UM-Winateq300Fa-U AVERTISSEMENTS This document and the software which is provided with it are the exclusive property of ATEQ. The Winateq300
USB Instruments EasyLogger for PS40M10 "Swordfish" Help
 USB Instruments EasyLogger for PS40M10 "Swordfish" Help I EasyLogger for PS40M10 Help Table of Contents Part I Introduction 3 1 Welcome to... EasyLogger for PS40M10 3 2 EasyLogger... Features 4 Part II
DOWNLOAD KIT CYCLOCOMPUTER INTRODUCTION. Download unit & Download Software [e-train Data Ver.3] for Windows 98/ME/2000/XP
![DOWNLOAD KIT CYCLOCOMPUTER INTRODUCTION. Download unit & Download Software [e-train Data Ver.3] for Windows 98/ME/2000/XP](/thumbs/78/78392561.jpg "DOWNLOAD KIT CYCLOCOMPUTER INTRODUCTION. Download unit & Download Software [e-train Data Ver.3] for Windows 98/ME/2000/XP") CYCLOCOMPUTER Download unit & Download Software [e-train Data Ver.3] for Windows 98/ME/2000/XP 0365510 (ENG) 3 INTRODUCTION The CC-TR100 Download Kit contains the software e-train Data TM Ver. 3 and the
CYCLOCOMPUTER Download unit & Download Software [e-train Data Ver.3] for Windows 98/ME/2000/XP 0365510 (ENG) 3 INTRODUCTION The CC-TR100 Download Kit contains the software e-train Data TM Ver. 3 and the
Class meeting #2 Wednesday, Aug. 26 th
 GEEN 1300 Introduction to Engineering Computing Class meeting #2 Wednesday, Aug. 26 th Announcements Introduction to Spreadsheet Problem Solving Historical perspective Overview of Excel coverage Homework
Temperature/Rh Data logger. Users Manual. USB Datalogger IP 65 Water Proof
 Temperature/Rh Data logger Users Manual USB Datalogger IP 65 Water Proof TABLE OF CONTENTS FEATURES & SPECIFICATIONS... 3 START UP AND GENERAL OPERATION... 7 LCD Display... 8 Sampling Rate... 9 Recording
CENTAUR S REAL-TIME GRAPHIC INTERFACE V4.0 OPERATOR S MANUAL
 CENTAUR S REAL-TIME GRAPHIC INTERFACE V4.0 OPERATOR S MANUAL TABLE OF CONTENTS Installation... 6 Introduction to Centaur s real-time Graphic Interface... 6 Computer Requirements... 7 Operating System
Model. Instruction Manual. WBGT Heat Stress Meter. reedinstruments. www. com
 R6200 Model WBGT Heat Stress Meter Instruction Manual reedinstruments com Table of Contents Features...2 Specifications... 3-4 Product Description... 4-5 Operating Instructions... 6-12 Features Measures
FUTEK USB Software Version User s Manual
 FUTEK USB Software Version 2.0.0.0 User s Manual 10 Thomas, Irvine, CA 92618, USA Toll Free: (800) 23-FUTEK Telephone: (949) 465-0900 Fax: (949) 465-0905 futek@futek.com www.futek.com 2 Table of Contents
Datalogger Graph Software Help
 Datalogger Graph Software Help Version 1.2, March 9, 2007 For additional information refer to the user guide included on the supplied program disk. CONTENTS Quick Start Guide Installing Graph Software
Hand-held thermometer Model CTH6200
 Calibration technology Hand-held thermometer Model CTH6200 WIKA data sheet CT 51.01 for further approvals see page 3 Applications Calibration service companies and service industry Measurement and control
e-bridge Color Profile Tool Quick Start Guide
 e-bridge Color Profile Tool Quick Start Guide 1 Contents 1. Installation... 3 1.1. Installing the e-bridge Color Profile Tool Software... 3 1.1. Removing the e-bridge Color Profile Tool... 4 1.2. Installing
Mini Mini GlobiLab Software Quick Start Guide
 Mini Mini GlobiLab Software Quick Start Guide This Guide is intended to help you get your Mini up and running quickly. For more detailed instructions, please see the Getting to Know Your Mini document
Welcome to the DriveWindow basics training module.
 DriveWindow basics ABB industrial drives ACS800 April 4, 2011 Slide 1 Welcome to the DriveWindow basics training module. 1 Objectives Explain how to use DriveWindow for basic operations, e.g. Browsing
Loudness Logger 1/12. Software Tools. Features of release and higher
 The Loudness Logging Toolset offers the customers of Junger Audio leveling processors an easy way to monitor the development of the loudness over time. This can be done in real time or by analyzing previously
MYSQL NUMERIC FUNCTIONS
 MYSQL NUMERIC FUNCTIONS http://www.tutorialspoint.com/mysql/mysql-numeric-functions.htm Copyright tutorialspoint.com MySQL numeric functions are used primarily for numeric manipulation and/or mathematical
Unimake. Thank you for purchasing our USB Digital Microscope, it is a slim type tool and can be easily used. in different fields, including:
 Thank you for purchasing our USB Digital Microscope, it is a slim type tool and can be easily used in different fields, including: 1. Textile industrial for textile inspection 2. Printing inspection 3.
Computational Physics
 Computational Physics Python Programming Basics Prof. Paul Eugenio Department of Physics Florida State University Jan 17, 2019 http://hadron.physics.fsu.edu/~eugenio/comphy/ Announcements Exercise 0 due
Hand-held thermometer Model CTH6200
 Calibration technology Hand-held thermometer Model CTH6200 WIKA data sheet CT 51.01 Applications Calibration service companies and service industry Measurement and control laboratories Industry (laboratory,
KMnet Viewer. User Guide
 KMnet Viewer User Guide Legal Notes Unauthorized reproduction of all or part of this guide is prohibited. The information in this guide is subject to change for improvement without notice. We cannot be
RF-Monitor B User's Guide
 www.loggerteknik.se Newsteo RF-Monitor B User's Guide for Monitoring Logger Version 1.2 TEL 031-760 60 16 Phone int. +46 31 760 60 16 Purpose User guide for Newsteo RF-Monitor B v3.0.7 Technical support
MDS Selection Software
 User Manual UM-07-M03-MSS MDS Selection Software Engineered for flexibility and performance. TM 1 Table of Contents What is MDS selection software? Required information and results Using this software
Hand-Held Thermometer Model CTH 6200
 Testing and Calibration Technology Hand-Held Thermometer Model CTH 6200 WIKA Data Sheet CT 51.01 Applications Service industry Measurement and and control laboratories Industry (laboratory, workshop and
Operation Manual. rev Software. FanTestic (ATTMA) Retrotec Inc.
 Retrotec Inc.") Operation Manual rev-2014-01-09 Software FanTestic (ATTMA) Retrotec Inc. Many new features including: FanTestic Retrotec s Latest Building Air Leakage Test Software Small and versatile XML data storage
Operation Manual rev-2014-01-09 Software FanTestic (ATTMA) Retrotec Inc. Many new features including: FanTestic Retrotec s Latest Building Air Leakage Test Software Small and versatile XML data storage
Function Example. Function Definition. C Programming. Syntax. A small program(subroutine) that performs a particular task. Modular programming design
 that performs a particular task. Modular programming design") What is a Function? C Programming Lecture 8-1 : Function (Basic) A small program(subroutine) that performs a particular task Input : parameter / argument Perform what? : function body Output t : return
What is a Function? C Programming Lecture 8-1 : Function (Basic) A small program(subroutine) that performs a particular task Input : parameter / argument Perform what? : function body Output t : return
SD Model. Instruction Manual. Heat Stress Meter and Datalogger. reedinstruments
 Model Heat Stress Meter and Datalogger Instruction Manual SD-2010 reedinstruments com 1-877-849-2127 info@reedinstruments.com.reedinstruments.com Table of Contents Features... 3 Specifications...4-5 Instrument
WinView. Getting Started Guide
 WinView Getting Started Guide Version 4.3.12 June 2006 Copyright 2006 Mincom Limited All rights reserved. No part of this document may be reproduced, transferred, sold or otherwise disposed of without
ATS System Monitoring Software ATS
 ATS System Monitoring Software ATS Table of Contents Chapter 1 Installation and Setup... 2 1.1. Requirements... 2 Chapter 2 Functions... 7 2.1. Real-time surveillance screen... 7 2.2. Single-machine real-time
Content of this short manual:
 This short manual describes some functions of the 2D dashes, which are not yet described in the general dashboard manual or may differ from the explanations there. You can find the general dashboard manual
Automatic Reporting. Real-Time and Wireless Recording and Alarming
 Automatic Reporting The software's Automatic Report Generator offers the ability to combine and analyze data from multiple loggers into a single report. The delta,minimum, and maximum statistics can be
Built-in Types of Data
 Built-in Types of Data Types A data type is set of values and a set of operations defined on those values Python supports several built-in data types: int (for integers), float (for floating-point numbers),
Lesson #3. Variables, Operators, and Expressions. 3. Variables, Operators and Expressions - Copyright Denis Hamelin - Ryerson University
 Lesson #3 Variables, Operators, and Expressions Variables We already know the three main types of variables in C: int, char, and double. There is also the float type which is similar to double with only