Instructions for Using the Databases
|
|
|
- Dwain McGee
- 5 years ago
- Views:
Transcription
1 Appendix D Instructions for Using the Databases Two sets of databases have been created for you if you choose to use the Documenting Our Work forms. One set is in Access and one set is in Excel. They are both available on the FVPSA Outcomes Project website: user name and password are both: outcomes Instructions for using these databases are provided separately for each type (Access or Excel), in the following sections: downloading the databases, data entry, and analyzing the data. If you have Access on your computer, we recommend that you use the Access database. More programming has already been done for you in the Access versions.
2 Instructions for Access Downloading the Access Databases There are five separate sets of Access files. Each one is used with each of the individual DOW forms we have made available: Shelter 1 Shelter 2 Counseling Support Group Support Services Each set also has different versions, depending on the version of Access you have. Access 2003 is the latest version at the moment, and is probably the one most programs have. Most other programs will have Access Programs that have Access 2002 can use the version for Access There are also versions for Access To find out which version of Access you have, open up your Access program. Click on help on your toolbar, then double-click on About Microsoft Access. The first screen will tell you what version you have. To get ready First, create separate folders for each type of form. That means you will have five different folders if you are using all five of the DOW forms available on the website. You might name each folder with the name of its form, such as shelter 2 ; you could also keep your copy of the form in the same folder. Next, you will need to uncompress the zipped folder associated with the form you are working with. To do that: Double-click on the zipped folder. On the left you will see extract all files. (If you don t, click on File, then Extract All) Double-click on extract all files, and click on next. Click on the browse button to make sure you extract the files to the folder you have created for the database. You will see the name of the folder displayed in the space under files will be extracted to this directory. Click on next. Click on finish. You re ready to begin! You will have two Access files in the folder for each form: one with DataEntry in the name (e.g. Shelter2DataEntry2003), and one with Storage in the name (e.g. Shelter2Storage2003). Both of these must be extracted and in the same folder. If they are not in the same folder, the database will not work. If you get a message that says security will not allow you to open the files
3 1. Save the file onto your computer as outlined above. 2. Click Start, click My Computer, and navigate to the file that you saved. 3. Right-click the file that you saved, and then click Properties. 4. Click Unblock near the bottom of the dialog box. Entering Data in Access Data entry is the term used for recording the information on the forms. To start: Double-click on the folder for the form you are working with. These instructions will apply in the same way to all of the forms, but we will use shelter2 and Access version 2003 as an example. Double-click on shelter2dataentry2003. You will get a message that the files have been connected. That is good! You will then see a box that has forms highlighted on the left, and three choices on the right. Double-click on frmshelter2. That stands for the shelter 2 form. [The other two choices begin with create form. You may never need to use those!] You will see what looks like a very close copy of the Shelter 2 form. You are ready to start recording the information ( entering the data ) from the paper forms! Recording the information: Put your cursor (click) in the first space where you find information on the form. The first space on shelter 2 is Approximate number of days you stayed in the shelter this stay. If the survivor who completed the form wrote 10 on the form, type 10 in the space and press enter. The cursor will automatically move to the next space. For shelter 2, that space is the ID letter/number combination. Type in what the survivor wrote, and press enter. Again, the cursor will move to the next space. For all the choices in question #1, the cursor will go to the choice on the left first, then move across to the one on the right. In other words, the first space is safety for myself. When you have put in the number the survivor wrote and pressed enter, the cursor will move across to transportation. If a survivor left a space blank you just press enter and the cursor will move to the next item. If a whole section is left blank, you can just put the cursor on the next space where the survivor wrote something, type that in, and press enter. For the places where the survivor wrote in words, you just type in the words in the space provided (there is lots of room for lengthy answers!), and press enter when you are finished. If you typed in a mistake, just put your cursor in that space, delete (use backspace ) what you typed, put in the correct information, and press enter.
4 To save what you have done: it is done automatically when you press enter. When you are finished, just exit from the file! If you want to delete everything from a form, right-click on the far left margin, underneath the pencil. You will get a menu that asks if you want to cut, copy, etc. Click on cut and the information you recorded for that entire form is gone. Frequencies in Access Analyzing Access Data All of the counts, or frequencies have already been programmed for you. All you need to do is right-click on the form on the space for the response you are interested in. At the prompt for dates, enter the date range you are interested in. The number of survivors who have made each type of response will be shown. For the two required FVPSA outcomes, you have another alternative. Exit from the forms section where you have been recording information. Move your cursor to reports, and click on that. The two FVPSA outcomes will be shown there..click on the outcome you are interested in either rptcount_me_knowmoreresources ( I know more about community resources ) or rptcount_me_knowmoresafety ( I know more ways to plan for my safety. ) Crosstabs in Access Crosstabs in Access are a bit more complicated, since they have not been programmed for you. To explain it clearly, we have copied pictures of what you will see as you go through the process. Remember that crosstabs can be very useful for understanding how two pieces of information are related, as we described in Chapter 10. A crosstab displays data on two different planes. Row Headings show values along the left edge of the report, Column Headings are across the top. The data Values are displayed at the row/column intersections. To create a crosstab, then, you ll need to identify three sets of variables or Fields. (DON T GET DISCOURAGED THE FIRST FEW STEPS ARE THE MOST DIFFICULT): 1) Open the data entry database. When the form appears, make a note of the text for the questions on the form that you want to use for your query. You ll need to know these so you can identify the fields you want on your crosstab.. a) This example will create a crosstab that summarizes entries by Age and by Gender. So we identify the question texts as My age is: (the question for age) and I am: (the question for gender).
, click the Tables tab to display the list of tables that make up the database. Open the table named AFieldData by double-clicking it.")
5 2) Close the data entry form using the red X in the upper right corner. This will reveal the Database Window. The database window displays all the elements that make up the database. Using the tabs along the left side (they are on top in Access 97), click the Tables tab to display the list of tables that make up the database. Open the table named AFieldData by double-clicking it. 3) Two of the columns are named Fname and Caption. The Fname column lists the names of the fields; the Caption column lists the matching text that appears on the data entry form. Scroll down the Caption column until you find the matching text you chose from step 1) above. Write down the Fname values in the same rows. For our example, the values are us_age and us_gender. These are the actual names of the fields in the database. 4) Close the AFieldData table. Note that the name of the file you re using appears at the top of the Database Window. For example, Shelter2DataEntry2003 or CounselingDataEntry2000. This tells you what form you re using. Scroll down the list of tables and find the matching table. In this example, we re using Shelter2DataEntry2003, so we find the table named Sshelter2. This is the main table used by this database. 5) From the menu at the top, choose Insert, Query. 6) In the New Query window, choose Crosstab Query Wizard, then OK. 7) In the first screen of the Crosstab Query Wizard, scroll down the list of tables until you find the main table you identified in step 4) above. Highlight the main table and click the Next button.
 Click the Next button.")
6 8) In the next window, scroll down the Available Fields list and double-click on one (only one!) of the fields you identified in step 3) above. After you double-click, the name should appear in the Selected Fields column on the right. 9) Click the Next button. In the next window, select the other field from step 3) above and click Next.

7 10) At the next screen, highlight the first field in the list. It will have the same name as the table plus the letters ID. So for our example, it will be Shelter2ID. In the right column Functions, select Count, then click Next.
 and double-clicking on the name of the query.")
 The query only displays the codes of the answers, not the text. To match the code to a text answer, use the tables identified in step 3) above.")
8 11) At the last screen, put in a descriptive name for your query, then click Finish. The query appears. If you close the query, you can reopen it by going to the Queries tab (see step 2 above) and double-clicking on the name of the query. The query will automatically include new records you ve added after the time you created it. 12) The query only displays the codes of the answers, not the text. To match the code to a text answer, use the tables identified in step 3) above. In this example, it would be answer tables 10 and 14, which correspond to the tables named Question10Answers and Question14Answers.
 or using Excel. Here are the steps using Excel, since they are easier.")
9 13) NOTE: Displaying the text answers on the crosstab query is an advanced topic and requires several more steps. There are two ways to do this, using Access alone (see the document Linking Access tables.doc) or using Excel. Here are the steps using Excel, since they are easier. 14) If the crosstab query is open, leave it open. If you closed it, go to the Queries tab and highlight the crosstab query s name, but do not open the query. 15) From the menu at the top, choose File, Export.The Export Query window opens. 16) In the window, change the Save as Type selection to Microsoft Excel (*.xls) Check the Save formatted checkbox, then select the proper folder in the Save in box at the top. Click the Export button. 17) A copy of the crosstab query has been exported to Excel. You can now use Excel to open the Excel file and type over the Row and Column Headings based on the answer tables you identified in step 3) above. You can then print the report in Excel. 18) NOTE: As you add entries to the database, the crosstab query will automatically update itself in Access so you will only have to create the crosstab one time! However, since you exported a copy of the report into Excel to create the labels, the Excel file will not automatically update. To refresh the Excel file and incorporate the updated data, follow steps again.
10 Instructions for Excel Downloading the Excel Databases The process for downloading the Excel files is the same as for the Access files. There is only one file for each form in Excel, however, and it is not necessary to create separate folders for each one. We recommend that you do it, however, because the databases will be easier for you to find. Entering Data in Excel The Excel database looks much like the Access database they both look almost exactly life the form. To begin, click on the file, for example, Shelter2DataEntry, to open it. In the upper left corner of the window is the Show Form button. Click this to open the data entry form. When the form opens, there will be several buttons at the top. Click the New button to add data from a new form. Put your cursor (click) in the first space where you find information on the form. The first space on shelter 2 is Approximate number of days you stayed in the shelter this stay. If the survivor who completed the form wrote 10 on the form, type 10 in the space and press enter. The cursor will automatically move to the next space. For shelter 2, that space is the ID letter/number combination. Type in what the survivor wrote, and press enter. Again, the cursor will move to the next space. For all the choices in question #1, the cursor will go to the choice on the left first, then move across to the one on the right. In other words, the first space is safety for myself. When you have put in the number the survivor wrote and pressed enter, the cursor will move across to transportation. When you ve completed the first page, go to the next page by clicking the Page2 tab in the upper left corner of the form. After you ve completed entering the data from one form, click the New button again to add another one. If you wish to return to data you have already entered, use the First, Next, Previous and Last buttons to move from record to record. If a survivor left a space blank you just press enter and the cursor will move to the next item. If a whole section is left blank, you can just put the cursor on the next space where the survivor wrote something, type that in, and press enter. For the places where the survivor wrote in words, you just type in the words in the space provided (there is lots of room for lengthy answers!), and press enter when you are finished. If you typed in a mistake, just put your cursor in that space, delete (use backspace ) what you typed, put in the correct information, and press enter.
11 To save what you have done: it is done automatically when you press enter. When you are finished, just exit from the file! If you want to delete all the data you have entered from a form, click the delete.button. Frequencies in Excel Analyzing Excel Data All you need to do is right-click on the form on the space for the response you are interested in. At the prompt for dates, enter the date range you are interested in. The number of survivors who have made each type of response will be shown. NOTE: If you right-click on a field and you do not jump to the report screen, this is because you ve picked a field with too many possible answers. For example, if you right-click on a field where the answers are Yes, No or (blank), you will jump to the report screen because this field has only 3 possible answers. If however, you right-click on the space for the question How many minor children do you have with you?, you won t jump to the report window, because this question has too many possible answers to be reported in this way. When you ve finished looking at the report, click the Show Form Again button to return to the form window. NOTE: You can see statistics on only one field at a time in the reports window. When you are finished, you can close the form window in the same way you would close any window, using the X in the upper right corner of the form. Crosstabs in Excel A crosstab is sometimes called a Pivot Table. It allows you to see a summary of data showing the relationship between.two different pieces of information ( variables or fields ). As an example, we will create a crosstab that summarizes data by Age and by Gender. A crosstab needs three variables, or fields. One field (for Row Headings) is used to display categories along the left side of the table. Another field (for Column Headings) displays categories across the top of the table. The third field (the Values) is used to summarize (sum, count, average, etc.) the numbers in the middle of the table. The way a field is displayed is not the same as the way it is named. The first step is to find out the names of the three fields we need. Open the data entry form, then click in the middle of the first field you need to use. Then right-click on the field. This will jump you to the Reporting tab. At the top of the sheet will be the summary table for the field. The name of the field will appear to the left of the word Total. In this example, the name of the field is us_age.
 Click on one (any one) of the field names in bold at the top.")
. You may need to also hold down the shift key to accomplish this. This will highlight the entire database.")
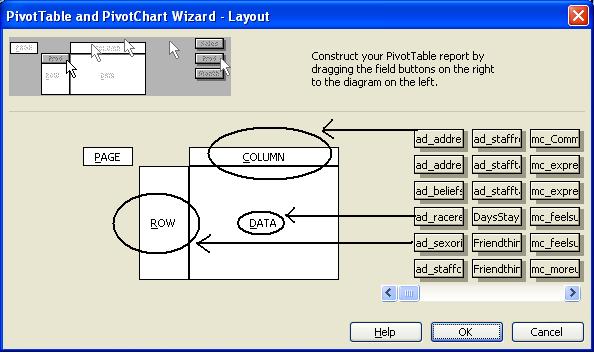
12 Repeat this step for the other field. In this example it will be us_gender. At the bottom left of the spreadsheet there are two tabs. Click the List tab. This brings you into the database itself. Then follow the steps listed below. 1) Click on one (any one) of the field names in bold at the top. (As a check, you should be able to find the names of the two fields you want to use, but you can click on any field name) 2) With the cursor on one of the field names, hold down <control> and tap * (asterisk). You may need to also hold down the shift key to accomplish this. This will highlight the entire database. 3) From the menu at the top, choose Data, PivotTable and PivotChart Report 4) The PivotTable and PivotChart Wizard Step 1 of 3 window appears. Select Microsoft Office Excel list or database and PivotTable, then click Next. 5) At the PivotTable and PivotChart Wizard Step 2 of 3 window click Next. 6) At the PivotTable and PivotChart Wizard Step 3 of 3 window click Layout. 7) The PivotTable and PivotChart Wizard Layout screen appears. Find your field names in the list on the right, age and gender in our example (use the scroll bar below the list to see more fields), then hold down the mouse button and drag one of the fields on top of the word ROW, then the other field onto the word COLUMN. Then drag either of the fields onto the word DATA.
13
 NOTE: The field names you chose will appear in the upper left corner of the crosstab. To the right of the field names are drop-down arrows.")
14 8) When you have finished doing this, click OK. 9) Back at the PivotTable and PivotChart Wizard Step 3 of 3 window click Finish. Your crosstab table will appear on a separate sheet. 10) NOTE: The field names you chose will appear in the upper left corner of the crosstab. To the right of the field names are drop-down arrows. Clicking the arrows opens a list, where you can choose which items you want to see and uncheck the ones you want to hide. Final Thoughts on Analysis There is clearly a lot you can do to learn more about what survivors have reported about your services. Frequencies and crosstabs can be very powerful. The steps we have just outlined to create them may seem daunting, but once you have done the first few, the process gets easier. Like anything else, it s a matter of practice. And then your interest and curiosity will lead you to lots of helpful information about your program.
Instructions for Using the Databases
 Appendix D Instructions for Using the Databases Two sets of databases have been created for you if you choose to use the Documenting Our Work forms. One set is in Access and one set is in Excel. They are
Microsoft Access 2010
 Microsoft Access 2010 Chapter 2 Querying a Database Objectives Create queries using Design view Include fields in the design grid Use text and numeric data in criteria Save a query and use the saved query
Microsoft Access 2013
 Microsoft Access 2013 Chapter 2 Querying a Database Objectives Create queries using Design view Include fields in the design grid Use text and numeric data in criteria Save a query and use the saved query
Microsoft Access 2013
 Microsoft Access 2013 Chapter 2 Querying a Database Objectives Create queries using Design view Include fields in the design grid Use text and numeric data in criteria Save a query and use the saved query
Export a PROTECT Report to Excel (User s Guide Lesson 21 : Reports) Tips for Using Microsoft Excel and Exported Reports
 Tips for Using Microsoft Excel and Exported Reports") Export a PROTECT Report to Excel (User s Guide Lesson 21 : Reports) 1. Run a PROTECT Export report 2. Click the Export button which is at far left on the toolbar in the PROTECT report window. 3. The Export
Export a PROTECT Report to Excel (User s Guide Lesson 21 : Reports) 1. Run a PROTECT Export report 2. Click the Export button which is at far left on the toolbar in the PROTECT report window. 3. The Export
Microsoft Access 2013
 Microsoft Access 2013 Chapter 1 Databases and Database Objects: An Introduction Objectives Describe the features of the Access window Create a database Create tables in Datasheet and Design views Add records
Table of Contents COURSE OVERVIEW... 5
 Table of Contents COURSE OVERVIEW... 5 DISCUSSION... 5 THE NEW DATABASE FORMAT... 5 COURSE TOPICS... 6 CONVENTIONS USED IN THIS MANUAL... 7 Tip Open a File... 7 LESSON 1: THE NEW INTERFACE... 8 LESSON
MAKING TABLES WITH WORD BASIC INSTRUCTIONS. Setting the Page Orientation. Inserting the Basic Table. Daily Schedule
 MAKING TABLES WITH WORD BASIC INSTRUCTIONS Setting the Page Orientation Once in word, decide if you want your paper to print vertically (the normal way, called portrait) or horizontally (called landscape)
-Using Excel- *The columns are marked by letters, the rows by numbers. For example, A1 designates row A, column 1.
 -Using Excel- Note: The version of Excel that you are using might vary slightly from this handout. This is for Office 2004 (Mac). If you are using a different version, while things may look slightly different,
Pivot Tables in Excel Contents. Updated 5/19/2016
 Pivot Tables in Excel 2010 Updated 5/19/2016 Contents Setup a Pivot Table in Excel 2010... 2 General Field List Features... 4 Summing and Counting Together... 6 Grouping Date Data... 7 Grouping Non-Date
This book is about using Microsoft Excel to
 Introducing Data Analysis with Excel This book is about using Microsoft Excel to analyze your data. Microsoft Excel is an electronic worksheet you can use to perform mathematical, financial, and statistical
Using Mail Merge in Microsoft Word XP/2002
 Using Mail Merge in Microsoft Word XP/2002 Open Microsoft Word XP/2002 Beginning the Merge You may start Mail Merge with a blank document or one that you have already created. We will use a blank document
Excel 2013 PivotTables and PivotCharts
 Excel 2013 PivotTables and PivotCharts PivotTables... 1 PivotTable Wizard... 1 Creating a PivotTable... 2 Groups... 2 Rows Group... 3 Values Group... 3 Columns Group... 4 Filters Group... 5 Field Settings...
Excel Tables and Pivot Tables
 A) Why use a table in the first place a. Easy to filter and sort if you only sort or filter by one item b. Automatically fills formulas down c. Can easily add a totals row d. Easy formatting with preformatted
course notes quick reference guide
 course notes quick reference guide Microsoft Excel 2010 Welcome to Excel 2010 Excel 2010 is the premier spreadsheet application from Microsoft. Excel 2010 makes it easier to analyze data quickly with new
Les s on Objectives. Student Files Us ed. Student Files Crea ted
 Lesson 10 - Pivot Tables 103 Lesson 10 P ivot T ables Les s on Topics Creating a Pivot Table Exercise: Creating a Balance Summary Formatting a Pivot Table Creating a Calculated Field Les s on Objectives
Rev. C 11/09/2010 Downers Grove Public Library Page 1 of 41
 Table of Contents Objectives... 3 Introduction... 3 Excel Ribbon Components... 3 Office Button... 4 Quick Access Toolbar... 5 Excel Worksheet Components... 8 Navigating Through a Worksheet... 8 Making
Adobe Dreamweaver CS5 Tutorial
 Adobe Dreamweaver CS5 Tutorial GETTING STARTED This tutorial focuses on the basic steps involved in creating an attractive, functional website. In using this tutorial you will learn to design a site layout,
New Finance Officer & Staff Training
 New Finance Officer & Staff Training Overview MUNIS includes many programs and tools to allow for the management of the District financials. As newer finance officers and staff, you are charged with understanding,
Advanced Excel Reporting
 SedonaOffice Users Conference San Francisco, CA January 21 24, 2018 Advanced Excel Reporting Presented by: Matt Howe This Page Intentionally Left Blank Page 2 of 20 Table of Contents Overview... 4 Making
Using Mail Merge in Microsoft Word 2003
 Using Mail Merge in Microsoft Word 2003 Mail Merge Created: 12 April 2005 Note: You should be competent in Microsoft Word before you attempt this Tutorial. Open Microsoft Word 2003 Beginning the Merge
Excel Level 1
 Excel 2016 - Level 1 Tell Me Assistant The Tell Me Assistant, which is new to all Office 2016 applications, allows users to search words, or phrases, about what they want to do in Excel. The Tell Me Assistant
TLMC SHORT CLASS: THESIS FORMATTING
 Table of Contents Introduction... 2 Getting Help... 2 Tips... 2 Working with Styles... 3 Applying a Style... 3 Creating A New Style... 3 Setting Margins... 4 Adding Page Numbers... 5 Step 1: Using Sections
Excel Basics Rice Digital Media Commons Guide Written for Microsoft Excel 2010 Windows Edition by Eric Miller
 Excel Basics Rice Digital Media Commons Guide Written for Microsoft Excel 2010 Windows Edition by Eric Miller Table of Contents Introduction!... 1 Part 1: Entering Data!... 2 1.a: Typing!... 2 1.b: Editing
Microsoft Office 2010: Introductory Q&As Access Chapter 2
 Microsoft Office 2010: Introductory Q&As Access Chapter 2 Is it necessary to close the Navigation Pane? (AC 78) No. It gives you more room for the query, however, so it is usually a good practice to hide
EXCEL BASICS: MICROSOFT OFFICE 2010
 EXCEL BASICS: MICROSOFT OFFICE 2010 GETTING STARTED PAGE 02 Prerequisites What You Will Learn USING MICROSOFT EXCEL PAGE 03 Opening Microsoft Excel Microsoft Excel Features Keyboard Review Pointer Shapes
Excel Tables & PivotTables
 Excel Tables & PivotTables A PivotTable is a tool that is used to summarize and reorganize data from an Excel spreadsheet. PivotTables are very useful where there is a lot of data that to analyze. PivotTables
Microsoft Access 2010
 www.jwalkonline.org/main michael@jwalkonline.org @MichaelJWalk Microsoft Access 2010 Part 3 Michael J. Walk It's about control: use advanced features of Access to control data entry, automate processes,
Creating a Brochure in Publisher
 Creating a Brochure in Publisher If you closed the Flyer, as indicated above, you will see the Microsoft Publisher Task Pane on the left side of your screen. Click the Brochures selection in the Publication
Microsoft Excel 2010 Basic
 Microsoft Excel 2010 Basic Introduction to MS Excel 2010 Microsoft Excel 2010 is a spreadsheet software in the new Microsoft 2010 Office Suite. Excel allows you to store, manipulate and analyze data in
Using Microsoft Word. Text Editing
 Using Microsoft Word A word processor is all about working with large amounts of text, so learning the basics of text editing is essential to being able to make the most of the program. The first thing
On the Web sun.com/aboutsun/comm_invest STAROFFICE 8 DRAW
 STAROFFICE 8 DRAW Graphics They say a picture is worth a thousand words. Pictures are often used along with our words for good reason. They help communicate our thoughts. They give extra information that
Learn more about Pages, Keynote & Numbers
 Learn more about Pages, Keynote & Numbers HCPS Instructional Technology May 2012 Adapted from Apple Help Guides CHAPTER ONE: PAGES Part 1: Get to Know Pages Opening and Creating Documents Opening a Pages
ADOBE DREAMWEAVER CS4 BASICS
 ADOBE DREAMWEAVER CS4 BASICS Dreamweaver CS4 2 This tutorial focuses on the basic steps involved in creating an attractive, functional website. In using this tutorial you will learn to design a site layout,
The Basics of PowerPoint
 MaryBeth Rajczewski The Basics of PowerPoint Microsoft PowerPoint is the premiere presentation software. It enables you to create professional presentations in a short amount of time. Presentations using
Filter and PivotTables in Excel
 Filter and PivotTables in Excel FILTERING With filters in Excel you can quickly collapse your spreadsheet to find records meeting specific criteria. A lot of reporters use filter to cut their data down
DOING MORE WITH POWERPOINT: MICROSOFT OFFICE 2013
 DOING MORE WITH POWERPOINT: MICROSOFT OFFICE 2013 GETTING STARTED PAGE 02 Prerequisites What You Will Learn USING MICROSOFT POWERPOINT PAGE 03 Slide Views MORE TASKS IN MICROSOFT POWERPOINT PAGE 05 Formatting
Outlook Web Access. In the next step, enter your address and password to gain access to your Outlook Web Access account.
 Outlook Web Access To access your mail, open Internet Explorer and type in the address http://www.scs.sk.ca/exchange as seen below. (Other browsers will work but there is some loss of functionality) In
Section 1 Microsoft Excel Overview
 Course Topics: I. MS Excel Overview II. Review of Pasting and Editing Formulas III. Formatting Worksheets and Cells IV. Creating Templates V. Moving and Navigating Worksheets VI. Protecting Sheets VII.
Using Microsoft Access
 Using Microsoft Access USING MICROSOFT ACCESS 1 Interfaces 2 Basic Macros 2 Exercise 1. Creating a Test Macro 2 Exercise 2. Creating a Macro with Multiple Steps 3 Exercise 3. Using Sub Macros 5 Expressions
Excel Shortcuts Increasing YOUR Productivity
 Excel Shortcuts Increasing YOUR Productivity CompuHELP Division of Tommy Harrington Enterprises, Inc. tommy@tommyharrington.com https://www.facebook.com/tommyharringtonextremeexcel Excel Shortcuts Increasing
Microsoft Access 2010
 Microsoft Access 2010 Chapter 1 Databases and Database Objects: An Introduction Objectives Design a database to satisfy a collection of requirements Describe the features of the Access window Create a
Creating Automated Dashboard Excel 2013 Contents
 Creating Automated Dashboard Excel 2013 Contents Summarize Data Using Pivot Table... 2 Constructing Report Summary... 2 Create a PivotTable from worksheet data... 2 Add fields to a PivotTable... 2 Grouping
Microsoft Office 2016 Mail Merge
 Microsoft Office 2016 Mail Merge Mail Merge Components In order to understand how mail merge works you need to examine the elements involved in the process. In any mail merge, you'll deal with three different
Creating a Pivot Table
 Contents Introduction... 1 Creating a Pivot Table... 1 A One-Dimensional Table... 2 A Two-Dimensional Table... 4 A Three-Dimensional Table... 5 Hiding and Showing Summary Values... 5 Adding New Data and
Pivot Tables, Lookup Tables and Scenarios
 Introduction Format and manipulate data using pivot tables. Using a grading sheet as and example you will be shown how to set up and use lookup tables and scenarios. Contents Introduction Contents Pivot
Word: Print Address Labels Using Mail Merge
 Word: Print Address Labels Using Mail Merge No Typing! The Quick and Easy Way to Print Sheets of Address Labels Here at PC Knowledge for Seniors we re often asked how to print sticky address labels in
HOW TO USE THE EXPORT FEATURE IN LCL
 HOW TO USE THE EXPORT FEATURE IN LCL In LCL go to the Go To menu and select Export. Select the items that you would like to have exported to the file. To select them you will click the item in the left
How to Create and Use a Pivot Table in Excel
 How to Create and Use a Pivot Table in Excel Nikki Casasanto What you need Microsoft Office: Excel 2013 Data Why use a Pivot Table? Microsoft Excel pivot tables offer a way to quickly summarize data. It
A Document Created By Lisa Diner Table of Contents Western Quebec School Board October, 2007
 Table of Contents A Document Created By Lisa Diner Western Quebec School Board October, 2007 Table of Contents Some Basics... 3 Login Instructions... 4 To change your password... 6 Options As You Login...
EXCEL BASICS: MICROSOFT OFFICE 2007
 EXCEL BASICS: MICROSOFT OFFICE 2007 GETTING STARTED PAGE 02 Prerequisites What You Will Learn USING MICROSOFT EXCEL PAGE 03 Opening Microsoft Excel Microsoft Excel Features Keyboard Review Pointer Shapes
Using Reports. Access 2013 Unit D. Property of Cengage Learning. Unit Objectives. Files You Will Need
 Unit D CASE Samantha Hooper, a tour developer at Quest Specialty Travel, asks you to produce some reports to help her share and analyze data. A report is an Access object that creates a professional looking
The Newsletter will contain a Title for the newsletter, a regular border, columns, Page numbers, Header and Footer and two images.
 Creating the Newsletter Overview: You will be creating a cover page and a newsletter. The Cover page will include Your Name, Your Teacher's Name, the Title of the Newsletter, the Date, Period Number, an
The first time you open Word
 Microsoft Word 2010 The first time you open Word When you open Word, you see two things, or main parts: The ribbon, which sits above the document, and includes a set of buttons and commands that you use
PHLI Instruction (734) Introduction. Lists.
 Introduction. Lists.") INTERMEDIATE EXCEL Introduction Microsoft Excel has many purposes. In addition to being an excellent data manger, Excel provides the means to perform complex analysis and evaluation of data. This brief
INTERMEDIATE EXCEL Introduction Microsoft Excel has many purposes. In addition to being an excellent data manger, Excel provides the means to perform complex analysis and evaluation of data. This brief
Microsoft Access II 1.) Opening a Saved Database Music Click the Options Enable this Content Click OK. *
 Opening a Saved Database Music Click the Options Enable this Content Click OK. *") Microsoft Access II 1.) Opening a Saved Database Open the Music database saved on your computer s hard drive. *I added more songs and records to the Songs and Artist tables. Click the Options button next
Microsoft Access II 1.) Opening a Saved Database Open the Music database saved on your computer s hard drive. *I added more songs and records to the Songs and Artist tables. Click the Options button next
Getting Started. Custom Reports Software
 Getting Started Custom Reports Software Custom Reports software Custom reporting The Custom Reports software lets you transfer quantitative results from Data Analysis into the Custom Reports spreadsheet
DOING MORE WITH EXCEL: MICROSOFT OFFICE 2013
 DOING MORE WITH EXCEL: MICROSOFT OFFICE 2013 GETTING STARTED PAGE 02 Prerequisites What You Will Learn MORE TASKS IN MICROSOFT EXCEL PAGE 03 Cutting, Copying, and Pasting Data Basic Formulas Filling Data
Creating a Spreadsheet by Using Excel
 The Excel window...40 Viewing worksheets...41 Entering data...41 Change the cell data format...42 Select cells...42 Move or copy cells...43 Delete or clear cells...43 Enter a series...44 Find or replace
Business Process Procedures
 Business Process Procedures 14.40 MICROSOFT EXCEL TIPS Overview These procedures document some helpful hints and tricks while using Microsoft Excel. Key Points This document will explore the following:
Tutorial 5: Working with Excel Tables, PivotTables, and PivotCharts. Microsoft Excel 2013 Enhanced
 Tutorial 5: Working with Excel Tables, PivotTables, and PivotCharts Microsoft Excel 2013 Enhanced Objectives Explore a structured range of data Freeze rows and columns Plan and create an Excel table Rename
Getting Started Guide
 Getting Started Guide Sage MAS Intelligence 90/200 Table of Contents Getting Started Guide... 1 Login Properties... 1 Standard Reports Available... 2 Financial Report... 2 Financial Trend Analysis... 3
DOING MORE WITH WORD: MICROSOFT OFFICE 2010
 DOING MORE WITH WORD: MICROSOFT OFFICE 2010 GETTING STARTED PAGE 02 Prerequisites What You Will Learn USING MICROSOFT WORD PAGE 03 Viewing Toolbars Adding and Removing Buttons MORE TASKS IN MICROSOFT WORD
Basic Software Maintenance. Ham Station Ultra Software Package
 1 Carl Skip Glover, Jr. K1SPG Custom Software & Hardware Solutions 4 Valley of Industry Boscawen, NH 03303 (603) 369-7015 Email: pctech.skip@gmail.com Email: k1spg@arrl.net Basic Software Maintenance Ham
Using Microsoft Excel
 About Excel Using Microsoft Excel What is a Spreadsheet? Microsoft Excel is a program that s used for creating spreadsheets. So what is a spreadsheet? Before personal computers were common, spreadsheet
Getting Started Guide. Sage MAS Intelligence 500
 Getting Started Guide Sage MAS Intelligence 500 Table of Contents Getting Started Guide... 1 Login Properties... 1 Standard Reports Available... 2 Financial Report... 2 Financial Trend Analysis... 3 Dashboard
Excel Basic: Create Formulas
 Better Technology, Onsite and Personal Connecting NIOGA s Communities www.btopexpress.org www.nioga.org [Type Excel Basic: Create Formulas Overview: Let Excel do your math for you! After an introduction
Light Speed with Excel
 Work @ Light Speed with Excel 2018 Excel University, Inc. All Rights Reserved. http://beacon.by/magazine/v4/94012/pdf?type=print 1/64 Table of Contents Cover Table of Contents PivotTable from Many CSV
Dealing with the way Mail Merge changed in MS Word 2003
 Dealing with the way Mail Merge changed in MS Word 2003 Go From This: To This: The New and Improved Mail Merge Mail Merge has changed dramatically from the older versions of Word. They just forgot to tell
Lab 11-1 Lab User Profiles and Tracking
 In the following lab instructions, you will be setting up groups, users, and passwords to require password-protected login to Kofax Capture modules. Rights will be assigned to the groups and users that
eschoolplus+ Cognos Query Studio Training Guide Version 2.4
 + Training Guide Version 2.4 May 2015 Arkansas Public School Computer Network This page was intentionally left blank Page 2 of 68 Table of Contents... 5 Accessing... 5 Working in Query Studio... 8 Query
DOING MORE WITH EXCEL: MICROSOFT OFFICE 2010
 DOING MORE WITH EXCEL: MICROSOFT OFFICE 2010 GETTING STARTED PAGE 02 Prerequisites What You Will Learn MORE TASKS IN MICROSOFT EXCEL PAGE 03 Cutting, Copying, and Pasting Data Filling Data Across Columns
NCMail: Microsoft Outlook User s Guide
 NCMail: Microsoft Outlook 2003 Email User s Guide Revision 1.0 11/10/2007 This document covers how to use Microsoft Outlook 2003 for accessing your email with the NCMail Exchange email system. The syntax
Geography 281 Mapmaking with GIS Project One: Exploring the ArcMap Environment
 Geography 281 Mapmaking with GIS Project One: Exploring the ArcMap Environment This activity is designed to introduce you to the Geography Lab and to the ArcMap software within the lab environment. Please
Excel & Business Math Video/Class Project #01 Introduction to Excel. Why We Use Excel for Math. First Formula.
 Excel & Business Math Video/Class Project #01 Introduction to Excel. Why We Use Excel for Math. First Formula. Topics Covered in Video: 1) USB Drive to store files from class... 2 2) Save As to Download
GIS LAB 1. Basic GIS Operations with ArcGIS. Calculating Stream Lengths and Watershed Areas.
 GIS LAB 1 Basic GIS Operations with ArcGIS. Calculating Stream Lengths and Watershed Areas. ArcGIS offers some advantages for novice users. The graphical user interface is similar to many Windows packages
Table of Contents. 1. Creating a Microsoft Excel Workbook...1 EVALUATION COPY
 Table of Contents Table of Contents 1. Creating a Microsoft Excel Workbook...1 Starting Microsoft Excel...1 Creating a Workbook...2 Saving a Workbook...3 The Status Bar...5 Adding and Deleting Worksheets...6
Creating an Excel resource
 Excel Mobile Excel Mobile is a Microsoft application similar to Excel, but designed to run on handhelds. This mobile version of Excel is a spreadsheet application that allows you to manipulate numbers,
PIVOT TABLES IN MICROSOFT EXCEL 2016
 PIVOT TABLES IN MICROSOFT EXCEL 2016 A pivot table is a powerful tool that allows you to take a long list of data and transform it into a more compact and readable table. In the process, the tool allows
Microsoft Excel 2007
 Learning computers is Show ezy Microsoft Excel 2007 301 Excel screen, toolbars, views, sheets, and uses for Excel 2005-8 Steve Slisar 2005-8 COPYRIGHT: The copyright for this publication is owned by Steve
Excel. Spreadsheet functions
 Excel Spreadsheet functions Objectives Week 1 By the end of this session you will be able to :- Move around workbooks and worksheets Insert and delete rows and columns Calculate with the Auto Sum function
Open Microsoft Word: click the Start button, click Programs> Microsoft Office> Microsoft Office Word 2007.
 Microsoft Word 2007 Mail Merge Letter The information below is devoted to using Mail Merge to create a letter in Microsoft Word. Please note this is an advanced Word function, you should be comfortable
download instant at
 CHAPTER 1 - LAB SESSION INTRODUCTION TO EXCEL INTRODUCTION: This lab session is designed to introduce you to the statistical aspects of Microsoft Excel. During this session you will learn how to enter
Access Intermediate
 Access 2010 - Intermediate 103-134 Unit 6 - Data Integration Quick Links & Text References Overview Pages AC418 AC419 Showing Data on the Web Pages AC420 AC423 CSV Files Pages AC423 AC428 XML Files Pages
University of North Dakota PeopleSoft Finance Tip Sheets. Utilizing the Query Download Feature
 There is a custom feature available in Query Viewer that allows files to be created from queries and copied to a user s PC. This feature doesn t have the same size limitations as running a query to HTML
Become strong in Excel (2.0) - 5 Tips To Rock A Spreadsheet!
 - 5 Tips To Rock A Spreadsheet!") Become strong in Excel (2.0) - 5 Tips To Rock A Spreadsheet! Hi folks! Before beginning the article, I just wanted to thank Brian Allan for starting an interesting discussion on what Strong at Excel means
Become strong in Excel (2.0) - 5 Tips To Rock A Spreadsheet! Hi folks! Before beginning the article, I just wanted to thank Brian Allan for starting an interesting discussion on what Strong at Excel means
Sample A2J Guided Interview & HotDocs Template Exercise
 Sample A2J Guided Interview & HotDocs Template Exercise HotDocs Template We are going to create this template in HotDocs. You can find the Word document to start with here. Figure 1: Form to automate Converting
PST for Outlook Admin Guide
 PST for Outlook 2013 Admin Guide Document Revision Date: Sept. 25, 2015 PST Admin for Outlook 2013 1 Populating Your Exchange Mailbox/Importing and Exporting.PST Files Use this guide to import data (Emails,
Chapter-2 Digital Data Analysis
 Chapter-2 Digital Data Analysis 1. Securing Spreadsheets How to Password Protect Excel Files Encrypting and password protecting Microsoft Word and Excel files is a simple matter. There are a couple of
Microsoft Access Lesson 3: Creating Reports
 Microsoft Access Lesson 3: Creating Reports In the previous lesson the information you retrieved from a database always was in the form of a table. This may be all you need if you are the only person using
Use signatures in Outlook 2010
 Use e-mail signatures in Outlook 2010 Quick Reference Card Download and use a signature template Note This procedure will take you away from this page. If necessary, print this page before you follow these
BusinessObjects Frequently Asked Questions
 BusinessObjects Frequently Asked Questions Contents Is there a quick way of printing together several reports from the same document?... 2 Is there a way of controlling the text wrap of a cell?... 2 How
1 Ctrl + X Cut the selected item. 2 Ctrl + C (or Ctrl + Insert) Copy the selected item. 3 Ctrl + V (or Shift + Insert) Paste the selected item
 Copy the selected item. 3 Ctrl + V (or Shift + Insert) Paste the selected item") Tips and Tricks Recorder Actions Library XPath Syntax Hotkeys Windows Hotkeys General Keyboard Shortcuts Windows Explorer Shortcuts Command Prompt Shortcuts Dialog Box Keyboard Shortcuts Excel Hotkeys
Tips and Tricks Recorder Actions Library XPath Syntax Hotkeys Windows Hotkeys General Keyboard Shortcuts Windows Explorer Shortcuts Command Prompt Shortcuts Dialog Box Keyboard Shortcuts Excel Hotkeys
Data. Selecting Data. Sorting Data
 1 of 1 Data Selecting Data To select a large range of cells: Click on the first cell in the area you want to select Scroll down to the last cell and hold down the Shift key while you click on it. This
Lab 7 Macros, Modules, Data Access Pages and Internet Summary Macros: How to Create and Run Modules vs. Macros 1. Jumping to Internet
 Lab 7 Macros, Modules, Data Access Pages and Internet Summary Macros: How to Create and Run Modules vs. Macros 1. Jumping to Internet 1. Macros 1.1 What is a macro? A macro is a set of one or more actions
Microsoft Access 2007 Tutorial. Creating a Database using Access 2007
 Creating a Database using Access 2007 Created: 12 December 2006 Starting Access 2007 Double click on the Access 2007 icon on the Windows desktop (see right), or click-on the Start button in the lower left
New Perspectives on Microsoft Excel Module 5: Working with Excel Tables, PivotTables, and PivotCharts
 New Perspectives on Microsoft Excel 2016 Module 5: Working with Excel Tables, PivotTables, and PivotCharts Objectives, Part 1 Explore a structured range of data Freeze rows and columns Plan and create
Query Studio Training Guide Cognos 8 February 2010 DRAFT. Arkansas Public School Computer Network 101 East Capitol, Suite 101 Little Rock, AR 72201
 Query Studio Training Guide Cognos 8 February 2010 DRAFT Arkansas Public School Computer Network 101 East Capitol, Suite 101 Little Rock, AR 72201 2 Table of Contents Accessing Cognos Query Studio... 5
1. AUTO CORRECT. To auto correct a text in MS Word the text manipulation includes following step.
 1. AUTO CORRECT - To auto correct a text in MS Word the text manipulation includes following step. - STEP 1: Click on office button STEP 2:- Select the word option button in the list. STEP 3:- In the word
Lecture- 5. Introduction to Microsoft Excel
 Lecture- 5 Introduction to Microsoft Excel The Microsoft Excel Window Microsoft Excel is an electronic spreadsheet. You can use it to organize your data into rows and columns. You can also use it to perform