Getting Started with EMS Desktop Client
|
|
|
- Wesley Hunt
- 5 years ago
- Views:
Transcription
1 Getting Started with EMS Desktop Client Getting Started with EMS Desktop Client What is the EMS Desktop Client? Reservations and Bookings What is an Everyday User Reservation? Starting EMS Managing Database Connections The EMS Window Toolbar Buttons Toolbar Cheatsheet What is a Wizard? What You Should Know About EMS Browser Windows User Settings Using the Dashboard Working With the Dashboard Managing Requests for Managed Space Guest Requests Tab Notifications Tab Reminders Tab Everyday User Reservations Tab Wait List Tab Reconfirm Dates Tab Building Hours Exceptions Tab Analytics Tab At A Glance Tab 1
2 Getting Started with EMS Desktop Client This page was not added to the PDF due to the following tag(s): article:topic-guide Updated: Tue, 21 Nov :38:27 GMT 2

3 What is the EMS Desktop Client? EMS Desktop Client is the "core" administration system for all EMS Everyday User applications This desktop application is used by expert users to automate workflows and communications for maximum scheduling efficiency. This tool enables Everyday users to request space and services, see available space, check their calendar, check into meetings, change event details, end and cancel events, resolve booking conflicts, delegate space management to other users, send invitations, invoices, and notifications, approve requests, track resource usage, and track space utilization. Concept: Configuration elements (click to expand) in EMS Desktop Client control what users can see and do in EMS Everyday User Applications. Expert users include conference center managers, event coordinators, registrars, facility and real estate managers, and service providers. They can use this tool to set up and control the booking process and booking templates, define space (buildings, rooms, floors, areas, and regions), define services, manage security and user permissions, grant access, initiate notifications and reports, and integrate with other applications, servers, databases, and systems. Everyday users, such as an employee who needs to book a conference room or a consultant who needs to book a hoteling space for the day, can use it to make reservations and book meetings. Who Uses EMS? There are two different user types for EMS software: Updated: Tue, 21 Nov :38:27 GMT 3
4 1. Administrators: These users create and maintain the EMS application within your organization, and manage or approve usage of space. This user type may also include Service Providers (Catering, Audio Visual, IT Support Staff), Security, and Receptionist Staff. These users will primarily use the EMS Desktop Client. 2. Everyday Users: This is the majority of the users in the organization. Everyday users are typically requesting rooms and services. These users do not use the EMS Desktop Client. They generally use web-based EMS applications such as EMS Web App and EMS Mobile App. Updated: Tue, 21 Nov :38:27 GMT 4
5 Reservations and Bookings The two essential EMS components for meeting and event scheduling are reservations and bookings. To use the EMS Web Client efficiently and effectively, you must understand the structure of a reservation in EMS, the concept of an event timeline for a reservation booking, and how to make a reservation. This section covers the following topics: Reservation Structure Event Timeline Making a Reservation Using the Reservation Wizard Viewing and Editing Reservations in the Reservation Book Reservation Structure An event in EMS Desktop Client is comprised of the following: 1. A Reservation 2. One or more Bookings 3. Booking details These three components exist in a hierarchy a reservation contains one or more bookings and each booking can have one or more details associated with it. Reservations A reservation is the who and the what of an event. For example, Group X (the who) can reserve some space for an Event Y (the what). A booking is the where and the when of an event. For example, Group X can schedule the conference room (the where) for a staff meeting on the second Monday in January (the when). Group X now has a single reservation with a single booking in EMS. If, however, Group X schedules the conference room (the where) for a staff meeting on the second Monday of each month for a calendar year (the when), then Group X now has a single reservation with twelve bookings in EMS. Booking Details A booking can have one or more booking details associated with it. Booking details are the resources or services that are needed for an event, the notes for the event, the activities for the event, the room charges for the event, or any combination of these. For example, for Group X s staff meeting, the resources could include the requested catering (coffee service, bagels and muffins, and so on) and the A/V equipment (a projector, a speaker s podium, and so on). Updated: Tue, 21 Nov :38:27 GMT 5
6 Event Timeline The following time designators are used for an event in EMS Desktop Client: Event Time: The time period during which the event actually takes place. Setup/Teardown Hours: The hours, or fractions of hours, that you add to the event time to allow staff to prepare a room for the event or to clean up after the event. Reserved Time: The total time for which the space (the where) is reserved. This time is the event time plus the setup/teardown time. Variable Reserved Start Time Setup Hours Event Start Time Event End Time Teardown Hours Reserved End Time Reserved Time Time 8:00 a.m. 1 hour 9:00 a.m. 4:00 p.m. 1.5 hours 5:30 p.m. 9.5 hours Making a Reservation Using the Reservation Wizard The Reservation Wizard allows you to check for available space and make a reservation for an event. You can search for rooms that are available for a particular time on one day (a simple reservation with one booking) or on multiple days (a series reservation with multiple bookings). You can also create a series reservation by selecting one date and time, but multiple rooms. To make a reservation using the wizard, you must: Specify the event date and time information. Specify the event time and status. Select the event location. Specify the event information. Note: The following procedure describes how to make a reservation by selecting values for the required and optional fields. If your EMS administrator has configured reservation wizard templates, then a Reservation Wizard Template dropdown list is displayed at the top of the Reservation Wizard. You can facilitate the making of a reservation in the Reservation Wizard by selecting the appropriate template from the list, which automatically sets the default values for many of the fields in the Reservation Wizard. Updated: Tue, 21 Nov :38:27 GMT 6
7 If your job entails making multiple reservations that require the same information, and you are not using reservation wizard templates, then you can set your own default values for many of the fields in the Reservation Wizard. To specify the event date and time information: 1. On the EMS Desktop Client toolbar, click the Wizard icon. The Reservation Wizard page opens. 2. If needed, use the scroll features on the top of the Calendar to open the calendar for a different month (< or >), or click a month at the top of the calendar to open a dropdown list from which you can select a different month. You can also click a year at the top of the calendar to open a dropdown list from which you can select a different year. 3. If the event dates do not follow a pattern, use one or more of the following options for entering a date: Click on the dates on the calendar that the event is to take place. To select all five weekdays in a week, click in the blank space that is to the left of the week. To select all seven days in a week, double-click in the blank space that is to the left of the week. To select every occurrence of a specific day of the week for the displayed month (for example, all Sundays in June, 2017), click the heading (S, M, T, and so on) for the day. To select every occurrence of a specific day of the week that is currently displayed onscreen (regardless if the day falls within the same month), double-click the heading (S, M, T, and so on) for the day. 4. If the event dates do follow a pattern, (for example, the third Friday of every month), click Date Pattern at the bottom of the Calendar to open the Date Pattern dialog box and enter your event date information. As you specify the event dates, the following occurs: The Selected Dates tab at the top of the Calendar is automatically updated with the selected dates. If your EMS administrator has configured any of the dates as a holiday or closed, then holiday dates are displayed in green on the Calendar tab and closed dates are displayed in red. For any date, after you select the date on the Calendar tab, you can: Toggle between the Calendar tab and the Selected Date tab. Open the Selected Dates tab, select the date, and then click Go To Date. You can remove a date from the list of selected dates by opening the Selected Dates tab, selecting the date (or CTRL-click to select multiple dates), and clicking Remove. For dates that are configured as a holiday or as closed, you can: Place your cursor on a holiday date to open a tooltip that shows the name of the holiday. View information about the date from the Selected Dates tab. Open the Selected Dates tab, scroll to the date, and then click Holidays to open a Holidays dialog box that displays information about the holiday. Place your cursor on a closed date to open a message that states that you cannot select the date because the date is closed. 5. Continue to specify the event time and status. To specify the event time and status: 1. Specify the start time and end time for the event in one of two ways: Click the Time Picker icon to open a dropdown list from which you can select a time for each field Updated: Tue, 21 Nov :38:27 GMT 7
8 Under the Time section, manually enter the start and end times from the dropdowns. If applicable, select the appropriate Time Zone for the event 2. Specify the Setup and Teardown times in one of two ways: To use the default setup and teardown times that your EMS administrator has assigned to the rooms in your system, leave the Use Default checkbox selected Override the default setup/teardown times by clearing the Use Default checkbox, and selecting Minutes or Hours, and entering your own setup and teardown times 3. Indicate the status for the event. 4. Continue to select the event location. To select the event location: You have three options for selecting the event location, which are indicated on the first page of the Reservation Wizard: I. Standard: Use this option to display a list of all the available rooms that meet all the requested dates. II. III. Best Fit: Use this option if no one room can meet all the requested dates. The system lists rooms along with the number of bookings for which you can reserve the room. You can piece together the entire reservation using Best Fit, or just part of it. Specific Room: Use this option to confirm the availability and reserve of one specific room for the scheduled event. I. To search for a standard room: 1. Select Standard. 2. Choose one of the following for room specifications: Type is the class or category of the room, for example a meeting room, a workspace, and so on. Leave Type set to the default of (all) to search for all pre-configured room types or select a specific room type from the Type dropdown list. Floor is optional information when you are searching for a room. Leave Floor set to the default value of (all) to search for all pre-configured floors or select the floor from the Floor dropdown list. Setup Type is the physical layout or arrangement of a room, for example, rounds of 6 or theater-style. Leave Setup Type set to the default value of (all) to search for all pre-configured setup types or select the setup type from the Setup Type dropdown list. Setup Count is the anticipated attendance for the event. If you selected a specific setup type, then you must enter the setup count. 5. To select a Feature, open the Features tab, select the Feature, or CTRL-click to select the multiple features that the room must have. 6. Click Next. Up to two tabs are displayed: The Available tab, which is the active tab and is always displayed, lists all the rooms that meet all your event criteria. If you have elected to show the Available All Day Indicator, the rooms that are available all day are marked with an asterisk (*). By default, the available rooms are sorted alphabetically by room code. If your EMS administrator has configured the rooms for your EMS implementation with a book sequence, then under Options, select Sort Rooms by Book Sequence to sort the rooms from lowest to highest book sequence. (If two rooms have the same sequence, then the rooms are sorted alphabetically by name within the sequence.) Updated: Tue, 21 Nov :38:27 GMT 8
9 The Conflicts tab is displayed only if there are rooms that are not available for the requested dates/times. Optionally, you can open the Conflicts tab to view the list of rooms that were not available for scheduling as well as list of the events that are scheduled for each room. 7. Select the room, or CTRL-click to select the multiple rooms that you are scheduling for the event. 8. Click Room Info to open the Room Info dialog box and view information about the room properties, notes, Room URL, Building URL, setup type and capacity, and features. Click Close. 9. Click Building Hours to open the Building Hours dialog box which displays the hours that the selected room/ building is open on the reserved date. Click Close. 10. Click the Move button (>) to move the rooms to the Selected list. 11. Click Next to specify the event information. II. To search for a best fit room: 1. Select Best Fit. 2. Leave Building set to the default value of (all), or select a specific Building, Area, or View in which to search for a best fit room. 3. Choose one of the following for room specifications: Type is the class or category of the room, for example a meeting room, a workspace, and so on. Leave Type set to the default of (all) to search for all pre-configured room types or select a specific room type from the Type dropdown list. Floor is optional information when you are searching for a room. Leave Floor set to the default value of (all) to search for all pre-configured floors or select the floor from the Floor dropdown list. Setup Type is the physical layout or arrangement of a room, for example, rounds of 6 or theater-style. Leave Setup Type set to the default value of (all) to search for all pre-configured setup types or select the setup type from the Setup Type dropdown list. Setup Count is the anticipated attendance for the event. If you selected a specific setup type, then you must enter the setup count. 5. Open the Features tab, and then select the feature, or CTRL-click to select the multiple features that the room must have. 6. Click Next. Up to two tabs are displayed: The Available tab, which is the active tab and is always displayed, has two lists. The list in the left pane is a list of all the rooms that meet some or all of your event criteria. The list in the right pane is a list of all the event dates that must be fulfilled. The Conflicts tab is displayed only if there are rooms that are not available for the requested dates. Optionally, you can open the Conflicts tab to view the list of rooms that were not available for scheduling for the event as well as list of the events that are scheduled for each room. 7. Choose one or both of the following: Click Room Info to open the Room Info dialog box and view information about the room properties, notes, Room URL, Building URL, setup type and capacity, and features. Click Close. Click Building Hours to open the Building Hours dialog box which displays the hours that the selected room/ building is open on the reserved date. Click Close. 8. Choose one of the following: If one is available, select the single room that is available for all the requested dates, and then click the Move button (>) to move the room to the Event Dates list. Updated: Tue, 21 Nov :38:27 GMT 9
10 If a single room is not available, select a room that is available for some of your requested dates, and then click the Move button (>) to move the room to the Event Dates list. Repeat this step as needed to fulfill all the event dates. 9. Click Next to specify the event information. III. To search for a specific room: You can use the Specific Room search to book a standard EMS room or a room or area that is not managed in EMS. An override room, or override description, is used to book an event in a space that has not been configured in your EMS system. For example, your EMS administrator might have configured an override room named Other Area in the Engineering building. To book an event in Dr. Wilson's office, which is a room that is not defined in EMS, in the Engineering building, you can select the Other Area room and specify Dr. Wilson's Office for the location. EMS does not track availability for events booked in override rooms; however, EMS reports on events that are scheduled in an override room just like any other event scheduled for any other room. 1. Select Specific Room. The Room Selector dialog box opens. By default, (all) buildings is selected. 2. Do one of the following: To select a room from a list of all rooms in all available buildings: Leave (all) selected on the Buildings dropdown list. Click the Add icon next to a room to select it. If the room is configured as an override room, continue to the next step. To select a room from a list of rooms in a specific building, area, or view: Select a specific building, area, or view. Click the Add icon next to a room to select it. If the room is configured as an override room, continue to the next step: In the Location field, enter the location of the override room, and then click Next. Two results are possible: If the event is scheduled for a single date and the room is available, then continue to the next step. In all other cases, (for example, the event is scheduled for a single date but the room is not available or it is a multiple date event), the Available tab opens. This tab lists all the event dates for which the specific room is available. 5. Optionally, before you move a date to the Selected list, click Building Hours to open the Building Hours dialog box which displays the hours that the selected room/building is open on the selected date. 6. Optionally, before you move a date to the Selected list, do one or both of the following: Click Room Info to open the Room Info dialog box and view information about the room properties, setup type, features, and pricing. Click Building Hours to open the Building Hours dialog box which displays the hours that the selected room/ building is open on the reserved date. 7. Do one of the following: If the specific room is available for all the event dates, then click the Move All button (>>) to schedule the room for all the event dates. If the specific room is not available, try another approach such as reserving a different specific room, or using the Standard or Best Fit search method. Updated: Tue, 21 Nov :38:27 GMT 10
11 8. Click Next. To specify the event information: After you select an event location(s), you must specify other information for the event. 1. Enter the event information. Field Description Event Event Name Event Type VIP Event Source Video Conference A name or description for the event. The classification for the event. Select this option to mark the event as a Very Important event. The reservation source. Select this option for a video conference event. Employee/Contact Click the Search icon to open an Employees dialog box in which you search for and select a specific employee from a list all employees that are available in your system for hosting/sponsoring an event. To search a list of all employees, leave the Find field in the Lookup dialog box blank, and then click the Search icon Employee To search for a specific employee, enter a search string in the Find field, and then click Search icon. Your search is limited to the exact order of the characters in the string, but the string can appear anywhere in the search results and it is not case-sensitive. For example, the search string sim returns Paske, Simon and Simington, Chance. To select an employee, click the Add icon next to the employee. If the employee that you want to select for the reservation is not available on the pre-configured list, then you can click the Employee icon to open the Employee dialog box and add the employee. Note: After you select an employee, you can click Employee Info at the bottom of the Reservation Wizard page to open a dialog box that displays the properties for the employee, any user-defined fields for the employee, and any comments that are associated with the employee. 1st Contact Temp Contact When you select a group, if a default contact has been defined for the group, then this field is automatically populated with the name of the contact; otherwise, the field is blank. You have several options for defining the 1st Contact for a reservation: Updated: Tue, 21 Nov :38:27 GMT 11
12 Field Description If the field is blank, but contacts have been configured for the group, you can select a contact from the pre-configured list. If the field is populated with a default value, but other contacts have been configured for the group, you can select a different contact from the pre-configured list. If you want to create a temporary contact just for this event, then select (temporary contact), and in the Temp Contact field, enter the name for the temporary contact. Note: If a default contact has been configured for the employee, then any modifications that you make for the contact apply to this reservation only. The next time you or anyone else creates a reservation for this group, the 1st Contact field is again automatically populated with the name of the default contact. 2nd Contact Temp Contact Define if necessary for the event. One more of these fields might be automatically populated depending on how a selected contact has been configured. You can manually edit these values if needed. Phone Fax Address Note: The Phone and Fax fields have a dropdown list available on which you can select a different value (Cellular, Fax, Office, Other, Primary) for the field label, or you can enter a user-defined value. To enter a user-defined value, double-click the current field label to select it, and then enter the userdefined value over the selected label. Note: If default values have been configured for a selected contact, then any modifications that you make apply to this reservation only. The next time you or anyone else creates a reservation for the same contact, these fields are again automatically populated with the default information. Room Setup tab Setup Type Setup Count If you selected a specific value for the setup type when searching for an event location, this value is carried forward to this field; otherwise, the field is blank. You can select a setup type for this field, or if the field is already populated, you can select a different setup type. If you entered a specific value for the setup type when searching for an event location, this value is carried forward to this field; otherwise, the field is blank. You can enter a value in this field, or if the field is populated, modify the value. Billing tab Note: Depending on the group that you select, one or more of these fields might be automatically populated with default values. You can edit these default values but any modifications that you make Updated: Tue, 21 Nov :38:27 GMT 12
13 Field Description apply to this reservation only. The next time you or anyone else creates a reservation for the same group, these fields are again automatically populated with the default billing information. Pricing Plan Indicates what type of pricing is to be used for the event. Cost Center Number The internal alphanumeric billing code that is associated with the group. You can manually enter a value in this field, or if a master list of billing reference numbers has been configured for the group, you can click the Search icon to open a Cost Center Numbers dialog box, and select the appropriate value from this list. Note: To search for a specific cost center number, enter a search string in the Find field, and then click the Search icon. The string is not case-sensitive, but your search is limited to the exact order of characters in the string and it must begin with the information for which you are searching. For example, a string of co returns CO-123, but not 123-CO. Sales Category Payment Type How the group is sorted for purposes of tracking sales figures (e.g., local, regional, national, etc.). Indicates how the group paid for the event (cash, check, charged, and so on). Dept. Code/ PO Number Salesperson The internal alphanumeric purchase order number that is associated with the group. You can manually enter a value in this field, or if a master list of purchase order numbers has been configured for the group, you can click the Search icon to open a Purchase Order Numbers dialog box, and select the appropriate value from this list. Note: To search for a specific purchase number, enter a search string in the Find field, and then click the Search icon. The string is not case sensitive, but your search is limited to the exact order of characters in the string and it must begin with the information for which you are searching. For example, a string of co returns CO-123, but not 123-CO. The user who sold the event. Other tab Event Coordinator Estimated Event Attendance The Event Coordinator assigned to the event. The estimated number of people who are expected to attend the event. Updated: Tue, 21 Nov :38:27 GMT 13
14 Field Calendar Style URL Description Dropdown list of all the available formats for printing this event on the Event Calendar and Event Schedule reports. The event URL. Virtual tab To specify the everyday users who can view/manage this reservation in VEMS, click the Search icon to open the Everyday Users search dialog box and search from a list of registered everyday users. You can search by User Name or Address To search a list of all available everyday users, leave the Find field in the Lookup dialog box blank, and then click the Search icon Everyday User To search for a specific everyday user, enter a search string in the Find field, and then click Search icon Note: The string is not case-sensitive, but your search is limited to the exact order of characters in the string and it must begin with the information for which you are searching. For example, if searching by Address, a search string of bb returns bbosworth@dea.com but not dbobbett@dea.com. To select an everyday user, click the Add icon next to the user. Note: To return this field to the (no change) value at any time, click Reset. Process Template The process template that defines the functions that are available for the selected everyday user. Note: An everyday user might be assigned to more than one process template, so make sure to select the template that is applicable for this reservation. User Defined Fields tab User-defined fields are additional fields that store custom data for a reservation. Your EMS administrator configures the types of fields that are available as well as the allowed values for these fields. To enter or modify a value for a field, select the field, and then click Set Value. To clear a value for a field, select the field, and then click Clear Value. Note: If a user-defined field is not required here, you can always supply a value for it at a later date in the Navigator. 2. Click Finish. Two results are possible: Updated: Tue, 21 Nov :38:27 GMT 14
15 a. If you did not enter information into required fields, then these fields are outlined in red. You must enter values into these fields and then click Finish again to open the Navigator page. b. The Navigator opens. The reservation information is displayed in the Navigator. You use the Navigator to add booking details and to make any needed modifications to the reservation and its bookings. Warning: A reservation is not complete and rooms are not removed from the Available list until you click Finish. Although unlikely, it is possible for another user to select and reserve a room during the time period after you have selected the room but before you have finalized the reservation. If this occurs, after you click Finish, a message opens stating that your reservation conflicts with an existing reservation. Viewing and Editing Reservations in the Reservation Book The Reservation Book provides a graphical view of all the confirmed reservations (the reserved time as well as the room for which the reservation is scheduled) for your organization. (Canceled bookings are not shown.) You use the Reservation Book to the view information for a reservation, to edit an existing reservation, and to make a new reservation. In addition, when the Reservation Book first opens, before you edit or make a reservation, you can change the Reservation Book view so that it better suits your working needs. This section will provide information on the following topics: Opening the Reservation Book Changing the Reservation Book display Viewing Reservation Information Making a New Reservation Editing an Existing Reservation To open the Reservation Book 1. From the toolbar, click the Book icon. The first time that you open the Reservation Book for your EMS implementation, by default, the Filter dialog box opens on top of a blank Reservation Book. You can leave the room filtering criteria set to their default values, or you can select different values as needed, and then click OK. All reservations that meet the filtering criteria and that are scheduled for the current day s date are displayed in the book in the Daily view. Tip: You might need to use the book s scroll features to scroll through all the reservations that are scheduled for the current day s date. If an event is scheduled for a room that is a component of a combination room, then the reservation text is displayed in black. A duplicate reservation is also shown for the combination room; however, the reservation text is displayed in gray to indicate that a component of the combination room is currently booked for the indicated time and therefore, the combination room is not available Conversely, if an event is scheduled for a combination room, then the reservation text for the combination room is displayed in black and the reservation text for each component is displayed in gray. This reversed color Updated: Tue, 21 Nov :38:27 GMT 15
16 coding indicates that the component room is currently booked for the selected time and that none of the components is available. Tip: The Reservation Book has the following appearance: Minimum and maximum capacities are displayed next to room descriptions The current time is shown by a vertical line in the grid, called the Current Time Indicator If building hours have been configured for a building, then this information is displayed for the building The reservations are displayed with three components: A left bar that indicates the setup time A middle bar that indicates, by default, the event name A right bar that indicates the teardown time To change the Reservation Book display: 1. On the EMS Web Client toolbar, click the Book icon. The Reservation Book opens in the Daily view. 2. You can change the Reservation Book display in the following ways: Change the list of rooms that are displayed in the Reservation Book based on room properties. Change the list of rooms that are displayed in the Reservation Book based on a specific room(s). Change the Reservation Book view. Change multiple display options for a reservation. Select which items to include in the tooltip that opens when you place the cursor over an event in the Reservation Book. Change the display date using the calendar. Change the display date using the Reservation Book scroll features. 3. To change the list of rooms based on room properties: a. Click Filter if the Filter dialog box is not already open. b. Select Room Properties and customize one or more of the following: Leave the Building dropdown list set to the default value of (all) buildings, or select a specific building, area, or view. Select a specific floor. Select a specific room type. Select Capacity and then enter a capacity. Select Academic to limit the search to academic rooms. Select a Room Availability option. c. Click OK. The Filter Rooms dialog box closes. The room display in the Reservation Book is changed accordingly. 4. To change the list of rooms that are displayed in the Reservation Book based on a specific room or rooms: Updated: Tue, 21 Nov :38:27 GMT 16
17 a. If the Filter Rooms dialog box is not already open, then above the Rooms list, click Filter to open the dialog box and select Specific Room. b. Select the room, or CTRL-click to select multiple rooms on the Available list. c. Click the Move (>) button to move the selected rooms to the Selected list. The Reservation Book is updated to show bookings only for the selected rooms 5. To change the Reservation Book view: a. From the View dropdown list, select Daily, Weekly, or Monthly. 6. To change multiple display options for a reservation: a. Click Options (upper right hand corner of Reservation Book) to open the Book Options dialog box (the General tab is the active tab). b. Change multiple display options not only for the Reservation Book, but also a reservation in the book. Option Start Hour Display Time Display Interval Maximum Number of Rooms Booking Colors Based On Rooms Without Bookings Room Display Building Display Description The daily start time for the Reservation Book display. The information that is displayed in the middle bar for a reservation. Changes the granularity of the time display interval. The maximum number of rooms to display in the Reservation Book. The color of the bookings in the reservation. Select one: Status, Event Type, or Check-in Status (for EMS Workplace only.) Whether to highlight rooms without bookings and if so, the highlight color. If both Highlight Rooms and Booked Space Status Only are selected, then only those rooms that do not have a Booked Space status are highlighted. Display the room code or the room name for a reservation. Display the building code or the building name for a reservation. Updated: Tue, 21 Nov :38:27 GMT 17
18 Option Go To Today on Startup Always Prompt for Room Filter on Startup Description If selected, the Reservation Book opens to the current day s date; otherwise, it opens to the last date viewed. If Show (all) in Building List is also selected, then when you open the Reservation Book, the Filter dialog box opens on top of the Reservation Book. You can select different options on this dialog box to display only specific reservations in the book, for example, bookings only for selected rooms. If you do not select any options on this dialog box, but instead simply close it, then all reservations for all rooms in all buildings are displayed in the book. Hide Current Time Indicator Show or hide the vertical bar that indicates the current time for current day. Note: The Current Time indicator is displayed only if the view is the Daily or Weekly view and the view includes the current day s date. Show (all) in Building List Show the all option on the Building dropdown list; otherwise, a user must select a specific building. If this option is selected in conjunction with Always Prompt for Room Filter on Startup, then when you open the Reservation Book, then the Filter dialog box always opens on top of the Reservation Book. If you are setting your Reservation Book options, and you do not want to the Filter dialog box to open on top of the Reservation Book when you open the book, then do the following: Clear Always Prompt for Room Filter on Startup. Clear Show ( all ) in Building List. On the Building dropdown list in the Reservation Book, select any building, area, or view. Note: The building, area, or view that you select is not important. This last step just clears the all building option from the Reservation Book cache and ensures that the Filter dialog box does not open on top of the Reservation Book. Going forward, you can always select all buildings, or any specific building, area, or view as needed when you are working in the Reservation Book. Show Capacity Hide Booking Shadow Show the minimum and maximum capacities next to the room description. Hide the vertical shadow bar that highlights the reserved and/or event start times and end times when a user moves a booking in the Reservation Book. 7. To select which items to include in the tooltip that opens when you place the cursor over an event in the Reservation Book: a. Click Options (upper right hand corner of Reservation Book) to open the Book Options dialog box. b. Open the Tooltip Display tab and select which items to include in the tooltip that opens when you rest the mouse pointer on an event in the Reservation Book. Updated: Tue, 21 Nov :38:27 GMT 18
19 8. To change the display date using the calendar: a. From the Date field, click the dropdown arrow to open the Calendar. b. Use the (< and >) scroll features at the top of the calendar to change the month or use the (>) scroll features at the top of the calendar to change the year. c. To select a different date for a month, click the date. 9. To change the display date using the Reservation Book scroll features: a. Use the scroll features at the top of the reservation book display to scroll to a different day, week, month, or any different combination of these. b. To reset the display immediately to the current day s date, click Today. To view reservation information: 1. On the EMS toolbar, click the Book icon. The Reservation Book opens in the Daily view. 2. To view the reservation in the Navigator, double-click the middle bar for the reservation entry or right-click the reservation entry and on the context menu that opens, click Open. 3. You can view the reservation information in the following ways: View the bookings for a room View the properties for a room View the pricing for a booked room View the setup information, event information, or teardown information for a reservation. 4. To view the bookings for a room: a. Click the room name or code in the Rooms list to open the Bookings tab for the Room Info dialog box. The tab on this dialog box lists all the bookings for the selected and on the date that is shown in the Date field. b. To view a booking in the Navigator, select the booking, and then click Open. 5. To view room properties: room based on the current view (Daily, Weekly, Monthly) a. Click the room name or code in the Rooms list to open the Bookings tab for the Room Info dialog box. b. Open the Room tab. The tab on this dialog box lists all the properties for the room, such as the room code, the room name, the room classification, etc. It also lists the setup type and capacity for the room, and any notes that have been entered for the room. 6. To view the pricing for a booked room: a. Click the room name or code in the Rooms list to open the Bookings tab for the Room Info dialog box. b. Open the Pricing tab. This tab displays any pricing information that was defined for the room. Updated: Tue, 21 Nov :38:27 GMT 19
20 7. To view the room setup information, event information, or teardown information for a reservation: a. Rest the mouse pointer on the left bar, middle bar, or right bar for the reservation entry. A tooltip showing the respective setup, event, or teardown information opens. b. If buildings that are located in multiple time zones are currently displayed, you can specify the time zone in which to view all of your bookings. To make a new reservation: 1. On the EMS toolbar, click the Book icon. The Reservation Book opens in the Daily view. 2. Change the display to show the room for which you are making the reservation. 3. Select the date for which you are making the reservation. 4. In the Time Grid for the room, click and hold the left mouse button, drag the mouse to schedule the room and time, and then release the mouse button to open the Reservation Wizard. See Making a Reservation Using the Reservation Wizard. To edit an existing reservation: 1. On the EMS toolbar, click the Book icon. The Reservation Book opens in the Daily view. 2. Optionally, you can do one or more of the following to edit an existing reservation: Step Action Change the setup time for a reservation Drag the left bar horizontally to a new time. Click Yes in the Confirm Change dialog box. Change the event time Drag the middle bar horizontally to a new time. Click Yes in the Confirm Change dialog box. Change the teardown time for a reservation Drag the right bar horizontally to a new time. Click Yes in the Confirm Change dialog box. Edit the reservation building, room, time, or both Drag and drop the reservation to a new room that is the same building or in a different building, and/or to a new time. Click Yes in the Confirm Change dialog box. 3. Optionally, you can right-click on a reservation in the Reservation Book, and on the context menu that opens, select one of the following: Option Open Move Forward Description Opens a reservation in the EMS Navigator. Move the reservation date forward by one day or one week. Updated: Tue, 21 Nov :38:27 GMT 20
21 Option Move Backward Move to a Specific Date Change Status Description Move the reservation date backward by one day or one week. Move the reservation to a specific date. Change the status of the reservation. Copy Bookings Swap Rooms With Another Booking Highlight Related Reservations N/A Note: Although this option is available on the context menu for a reservation, its associated functionality is currently under development. Swap the room assignments of two events. The swap option is applicable only for two events that have identical meeting patterns. Highlights the bookings that belong to the same reservation. Updated: Tue, 21 Nov :38:27 GMT 21
22 What is an Everyday User Reservation? Concept: An Everyday User Reservation is any reservation that a user has submitted through EMS Web App. The everyday user reservation searching tool in the EMS Desktop Client is identical to the Browser searching tool with one exception: when the Browser opens for the first time, the Browse for function is set to Reservations whereas the Everyday User Reservation tool is set to Everyday User Reservations. As a result, although this section is written from the perspective of using the Browser, all the information can be applied when using the Everyday User Reservation searching tool. To open this tool in EMS Desktop Client, click the Everyday User Reservations icon on the EMS toolbar. 22

23 Starting EMS After EMS has been installed on your desktop, a shortcut icon for the application is placed on your desktop. An option for the application is also available from your Start menu. You can double-click the desktop icon to launch the EMS application, or you can select the option from your Start menu. 1. On your desktop, double-click the EMS icon, or, in the Windows start menu in the Search field, enter EMS and then select the EMS option. The application launches, prompting you to enter your credentials. 2. Enter your User ID and Password. Tip: If you have an EMS Enterprise license, you can change the server and database you are connecting to by right-clicking on the About EMS Enterprise option. 23


24 This launches a pop-up window where you can choose a different server and database. 4. Click OK. The EMS Desktop Client application opens. The main menu is open in the application. 24
25 Managing Database Connections If EMS Desktop Client has been installed on your desktop using the EMS Desktop Client Web Deployment, you can point to a different database through EMS Desktop Client. Contact your system administrator for guidance in databases to use. Changing Databases 1. On the EMS Menu select File > Change Database to bring up the Database Connections window. Note: Any database connection listed in blue is a system record inherited from the EMS Desktop Client Web Deployment that can not be deleted. 2. To connect to a database that is not the system database select it from the list of Database Connections then press the 'Connect' button. This will close and reopen the EMS Desktop Client connected to the selected database. Note: The user will need to log in again after changing databases. 25
 to bring up the Database Connection window. 2.")

26 Creating New Database Connections 1. To create a New connection select 'New' in the Database Connections window (shown above) to bring up the Database Connection window. 2. Type in the SQL server and EMS database name then select 'OK' to save the connection. You can delete connections later when you no longer need them. 3. For EMS to save this connection it will first check to see if it is a valid connection. If the connection is invalid, it will not be created you will see this error message: 26
 and system tools. The EMS Main window has four major components: 1. The Title bar. 2.")
27 The EMS Window The EMS main window is your starting point for the EMS application. The window provides quick access to all the EMS functions (Reservations, Reports, Configuration, and so on) and system tools. The EMS Main window has four major components: 1. The Title bar. 2. The Menu bar. 3. The Toolbar. 4. Main Menu. Title Bar The name of the software, EMS Software, and the version number of the application appear in the title bar across the top of the main window. Menu Bar The menu bar is set up in a standard Windows menu format with menu commands grouped into menus (File, Settings, Reservations, and so on) across the menu bar. Some of these menu commands are also available in the main menu. Toolbar The toolbar provides quick access to the most commonly used functions. The toolbar buttons that are always displayed by default are the buttons for Book, Calendar, Wizard, Navigator, Browser, Everyday User Reservations, Clients, , Dashboard, and Manage Services. Other buttons for other functions are also displayed by default depending on the 27

28 version of EMS that you are running, for example, EMS Academic Planning or EMS Workplace. Some of the functions that are available on the toolbar are also available from the main menu. You can customize the appearance of this toolbar to best suit your business needs. See Also: Toolbar Buttons. Main Menu The main menu gives you access to the main EMS functions: Reservations, Reports, Billing, Configuration, and System Administration. The main menu is arranged in a hierarchical folder structure. The top-level folders are the system functions of Reservations, Reports, Billing, Billing, Configuration, and System Administration. The available tasks for each top-level folder are further organized into subfolders. For example, to perform a system administration task, you must first open the top-level System Administration folder, and then open the correct subfolder to view the list of available tasks. 28
29 You can always close the main menu by clicking the Close button in the upper right corner. To open the main menu again, on the menu bar, click File > Show Main Menu. 29
 and additional components your organization may have")
30 Toolbar Buttons The toolbar always displays buttons for Book, Calendar, Wizard, Navigator, Browser, Everyday User Reservations, Groups, , Dashboard, and Manage Services. Other buttons for other functions may also display, depending on the version of EMS that you are running (such as EMS Campus or EMS Workplace) and additional components your organization may have installed, such as EMS Glance or the EMS Polycom Interface. Some of the functions that are available on the toolbar are also available from the main menu. You can customize the appearance of this toolbar to best suit your business needs; keep in mind that your System Administrator may have re-labeled these options with different names than the examples shown in this topic. Tip: If you are new to EMS Desktop Client, we recommend that you print out this Quickstart Guide. Book Often called the "Reservation Book," this window shows all confirmed reservations (time and room) for your organization. Canceled bookings are not shown. You can use the Book to view and edit existing reservation, and to make new reservations. For detailed instructions, See Also: Using the Reservation Book. Calendar You use the Calendar to quickly find for reservations, bookings, and service orders using basic or advanced criteria; results are displayed in a calendar view. See Also: Using the Calendar. 30
31 Wizard You use the Reservation Wizard to make reservations using a streamlined booking template. See Also: Using the Reservation Wizard. Navigator The Navigator enables you to to view and manage all aspects of a reservation including bookings and booking details. This window also presents whenever you open a reservation for editing from other pages in EMS Desktop Client. See Also: The Navigator Overview. Browser & Everyday User Reservations Authorized users can use the Browser or Everyday User Reservations Browser to search at a very detailed level for reservations, web reservations, bookings, service orders, resources, and queries. See Also: Searching with the Browser. Groups Your organization may have re-labeled this button, "Customers" or "Employees." You can use this browser to search for groups or individuals and reservations and bookings made on their behalf. See Also: Groups and Contacts. 31
32 If your system is configured to use SMTP , clicking this button launches a generic window. For detailed instructions, See Also: Sending from EMS. Dashboard Authorized users can access this window for centralized information about reservations in a single location. They typically use this feature to plan day-to-day tasks, such as set and check reminders, send or read notifications, approve or check the status of meeting and service order requests, and review the latest changes to events. See Also: Overview of the EMS Dashboard. Manage Services You use Manage Services to search for and view the resources with and without service orders for all bookings on a particular day as well as the current state of the resources and their Reviewed status. After viewing a resource, if applicable, you can change the state for a resource. You can review a resource, or you can mark a resource as unreviewed. You can also open a resource in the Navigator, and edit it if necessary. See Also: Managing Services. Group Reservations If your organization has licensed EMS Workplace, you may see Group Reservation icon in your toolbar. This feature enables you to manage and make reservations for Groups in a centralized location. See Also: Working With Information For a Group. 32
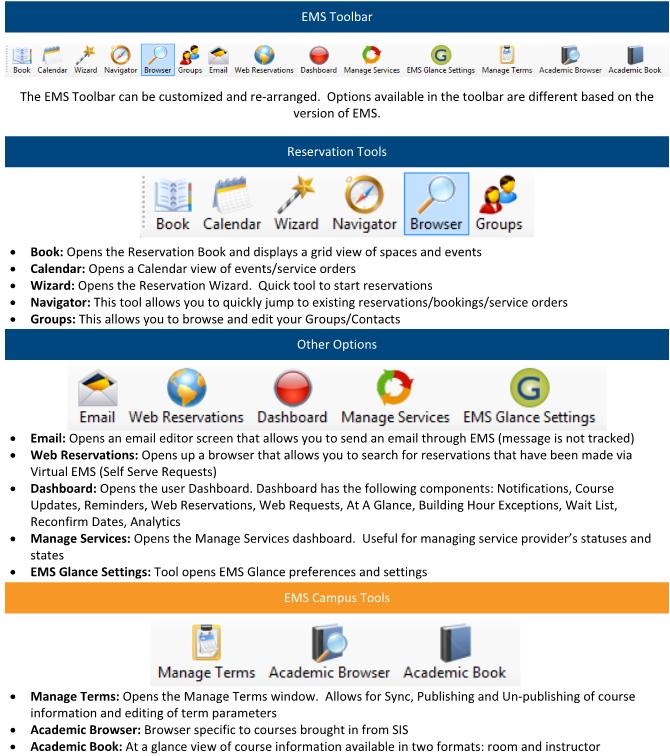
33 Toolbar Cheatsheet 33


34 What is a Wizard? Concept: Wizards are pop-up windows that enable end-users to make the same changes to more than one record at a time These powerful tools are available in several areas of EMS software applications, including EMS Desktop Client and EMS for Outlook. Additional wizards are provided for System Administrators to help them quickly configure elements on the back-end, such as currencies, rooms, resources, and building hours. Reservation Wizards in EMS Desktop Client Authorized users have access to the following wizards in the Navigator for making batch-changes to multiple reservations and their child bookings at once: Booking Wizards in EMS Desktop Client Four Wizards are available from Navigator in EMS Desktop Client for changing the when and where information for multiple bookings in a reservation. See Also: 34
35 Change Booking Date/Time Wizard Change Booking Status Wizard (which includes canceling multiple bookings in a single step) Change Rooms Wizard Change Miscellaneous Booking Information Wizard (which includes type, setup type, and setup count) Move Bookings Wizard Copy Reservation Wizard Copy Bookings Wizard Add Item Wizard Reservation Wizard Delete Booking Details Wizard Delete Item Wizard 35


36 What You Should Know About EMS Browser Windows This topic guides you in working with elements of most pages or "browser windows" in EMS Desktop Client as you find and work with information. Click-and-Drag Column headers and borders enable you to change column location, order, or width. When a window offers the option shown below, you can click and drag a column header to group data by that column. Right-Click Column Menu These menus let you sort, hide, and group lists and resize. Column Sort Arrows Use the up/down arrows in each header to quickly sort a column in ascending or descending order. 36

37 Column Filters Filtering options help narrow down lists. 37
38 User Settings As a Desktop Client user, you can manage multiple aspects of your account for a superior user experience. This section provides information on the following settings: User Preferences and Default Values Changing Your Password Resetting Window Coordinates Resetting Column Settings Defining Your Views To set user preferences and default values: Preferences, like system parameters, are settings that affect the basic functioning of your EMS system. The difference is that system parameters are global settings that affect all users on the system, whereas preferences are applicable only to your user account. You can set the values for many preferences for your EMS instance to better suit your working needs. These preferences include the time interval for Time dropdown fields, the size of the paper on which reports, confirmations, and invoices are to be printed, the format in which to send s from your computer, and the default values for specific fields in the Reservation Wizard and other EMS client windows. 1. On the EMS main menu, click Settings > Preferences. The Preferences dialog box opens. The Preferences tab is the active tab. 2. Edit your user preferences as needed. Field Description Close Report Setup After Running Reports Time Drop Down Interval Paper Size The time interval displayed on a Time dropdown list i.e., if you select 30 minutes, then options on the dropdown list are displayed as 1:00 1:30, 2:00 and so on. All Time dropdown lists are 24 hour lists. The size of the paper on which reports, confirmations, and invoices are printed. Values are Letter, Legal, and A
39 Field Review Notifications When Navigator Opens Description If this option is selected, then a notification in the Dashboard is automatically marked as Reviewed if you select the notification, and then click Go To. If this option is not selected, then you must select a notification, and then click Reviewed to manually mark the notification as Reviewed. Do Not Save Window Coordinates Format Send s Using Department Address Use Global Settings The format in which your s are sent HTML or Plain Text. Select this option if you want the From address for all the s that you send from EMS to be the address of the department that is associated with your user account. If you want to use the global settings that your EMS administrator has defined, then select this option. Use Gmail Use Microsoft Outlook Contact your EMS administrator with assistance in specifying these values. SMTP Note: If you are using SMTP settings that are specific to your account, then you also have the option of creating a signature that is to be included in all the s that you send from EMS. You can design the signature in plain text on the Design tab or in HTML format on the HTML tab. You can always preview the signature on the Preview tab. 3. Open the Defaults tab, and set the default values for the indicated items. Fields Description Building Status The values that you select here automatically populate the appropriate fields in the Reservation Wizard, and other EMS client pages. Note: The event name can be a maximum of 30 characters, including spaces. 39
40 Fields Description Event Type Event Name Event Time Reservation Source Time Zone/Display Audit Times in This Time Zone Drawing Application Payments Currency 4. Click OK to close the Preferences dialog box and apply your edited preferences and default values. To change your password: When your EMS administrator first sets up your user account, your password is predefined for you. You can change this password if you want. 1. On the EMS main menu, click Settings > Change Password. The Change Password dialog box opens. 2. In the Old Password field, enter your current EMS password. 3. In the New Password field, enter the new password. 4. In the Re-enter New Password field, enter your new password again, exactly as you entered it in the New Password field. 5. Click OK to close the Change Password dialog box. The next time that you log in to EMS, you must use your new password. To reset window coordinates: 1. On the EMS main menu, click Settings > Reset Window Coordinates. 2. You will receive a prompt notifying you that window coordinates have been successfully reset. To reset column settings: 1. On the EMS main menu, click Settings > Reset Column Settings. 40
41 2. You will receive a prompt notifying you that the column settings have been successfully reset. To define your views: 1. On the EMS main menu, click Settings > My Views. The My Views dialog box appears. 2. To create a new view, click New. 3. Under the View tab, provide a Description and Notes. 4. Under the Rooms tab, you can search for rooms by Building or Room Type. To search by Room Type, choose a Room from the Room Type dropdown. A list will appear on the left-hand side of the View screen, including the available rooms, description, building, and room type To search by Building, choose a Building from the Building dropdown. A list will appear on the left-hand side of the View screen, including the available rooms, description, building, and room type Highlight the desired room and click > to select the room. To select multiple rooms, click >>. Click << to remove the selected rooms. 5. Click the Audit tab to view details on the View, including the date it was added, who it was added by, the date it was changed and who it was changed by. 6. Click OK to save your View. 41
42 Using the Dashboard The Dashboard is a window that centralizes critical information about reservations in a single location. The information that is displayed on this window, including notifications, reminders, web reservations, and so on, provides you with the necessary input to manage your work in EMS. In This Section (click to expand) Working With the Dashboard Managing Requests for Managed Space Guest Requests Tab Notifications Tab Reminders Tab Everyday User Reservations Tab Wait List Tab Reconfirm Dates Tab Building Hours Exceptions Tab Analytics Tab At A Glance Tab 42

43 Working With the Dashboard The Dashboard is often used by administrative users to supervise, review, process, and approve many types of activities in the system. When the window first opens, it has the following tabs: 1. Notifications Tab 2. Reminders Tab 3. Everyday User Reservations Tab 4. Guest Requests Tab 5. Wait List Tab 6. Reconfirm Dates Tab 7. Building Hours Exceptions Tab 8. Analytics Tab 9. At A Glance Tab You can sort columns on a tab in ascending or descending order, and you can rearrange columns by dragging the column heading, and you can change their widths. Tip: Click the Dashboard icon at any time to open the Dashboard window. See Also: Managing Requests for Managed Space Customizing Your Dashboard Options You can customize the appearance and behavior of your Dashboard under Options in the upper right corner. 43

44 Option Open Dashboard At Startup If Items Exist Show Reminders Show Everyday User Reservations Show Guest Requests Show Analytics Show Wait List Show Reconfirm Dates Show Building Hours Exceptions Show At A Glance Thru Today includes xx Days Prior to Today Activate Flashing Indicator For: Notifications Reminders Everyday User Reservations Guest Requests Description Selected by default. The Dashboard window opens automatically after you log into EMS if any tab displays at least one item. Selected by default. Indicates the tabs that are to be displayed on the Dashboard window. Indicates how far into the past that reminders are to be displayed in the Thru Today view. The default value is seven. Set on a per tab basis. Indicates when the Dashboard icon on the EMS toolbar is to flash if at least one item is displayed on any tab. Values are: Automatically Immediately when there is at least one record that is displayed on the indicated tab, even when you are working in EMS. At Startup Only Never 44
45 Option Activate Flashing Indicator For: Wait List Reconfirm Date Reminders Building Hours Exceptions Description Set on a per tab basis. Indicates when the Dashboard icon on the EMS toolbar is to flash if tasks on the tab require your attention. Values are: At Startup Only Never 45
, he or she can")
46 Managing Requests for Managed Space This topic guides you in approving "pending requests," which are requests for space that require supervisory approval and appear in your Dashboard. Concept: You Use the Request/Approval Model to Oversee "Managed Space" Once your system administrator has configured facilities (rooms, categories, services, resources, and so on), he or she can configure special process templates for "managed space," which is meeting space that may require additional oversight and an approval process to finalize a reservation. For example, your organization may need specialized space like the Presiden'ts Conference room, or a large banquet hall, to be treated as managed space to ensure that any request to use it is approved by a supervisor. Typically, managed space involves services, expenses, and invoicing that affect multiple stakeholders and departments, and templates designed for this model are typically assigned to Everyday Users of EMS Web App. By contrast, such templates are not available for EMS for Outlook users since Microsoft Outlook does not show the request status of such a reservation. See Also: EMS Terminology: Types of Users 1. Click the Dashboard icon in the EMS Desktop Client toolbar. 2. Click the Guest Requests tab, which displays requests for space that require supervisory approval. Such requests are submitted through EMS Web App using process templates designated for "Unauthenticated Users." An unprocessed request is in Pending status. 46

47 The tab enables you to filter the list by status, building, room, and to work with the requests. If you filter the list, click Refresh. Approving or Working With a Pending Request 1. Select the request you wish to work with, and click Edit to launch the launch the Guest Request dialog box, which shows all the information submitted for the request through EMS Web App. The dialog box always has a Description tab, a Web Questions tab, and an Audit tab. If the request included resources or setup notes, it also has a Services tab. 2. To ask the requestor for further clarification before approving the request, edit the request without processing it: You can ask questions and add comments about the request (for example, Will alcohol be served at the event? ) in the Notes field on the Description tab. When the user checks the request in EMS Web App, these notes will display. To indicate to the guest user that you are reviewing the request, you can set the Request Status to In Progress. To see the guest's answers to any predefined questions in EMS Web App, open the Web Questions tab. To see service requests, click the Services tab. Double-click a category to see details on the right. When you have finished interacting with the request, click OK to save your changes and notify the requestor. 3. To process the request and create a reservation, change the Request Status field to a new status (such as Approved) and click Process on the Description tab. The reservation opens in the Reservation Wizard and you must finish making the reservation in the Reservation Wizard window that appears. If the reservation includes services, the Process Guest Request Details window opens next. To process the services immediately, use the options on this window, or to process the services later, click Cancel. (You can later open the reservation on the Dashboard > Guest Requests tab, and on the Services tab, click Process). 47

48 Deleting a Request 1. Select the guest request, or CTRL-click to select the multiple requests, and then click Delete. 2. Click Yes. The message closes. The selected guest requests are deleted. Printing a Request 1. Select the guest request, or CTRL-click to select the multiple requests, and then click Print. An preview of the selected requests opens,with options to print a hard copy, export the requests to a.pdf, and the requests. 2. Select the option or options that best fit your working needs. 48

49 Guest Requests Tab The Guest Requests tab displays requests for space that require supervisory approval. Such requests are submitted through EMS Web App using process templates designated for "Unauthenticated Users." An unprocessed request is in Pending status. Concept: You Use the Request/Approval Model to Oversee "Managed Space" Once your system administrator has configured facilities (rooms, categories, services, resources, and so on), he or she can configure special process templates for "managed space," which is meeting space that may require additional oversight and an approval process to finalize a reservation. For example, your organization may need specialized space like the President's Conference room, or a large banquet hall, to be treated as managed space to ensure that any request to use it is approved by a supervisor. Typically, managed space involves services, expenses, and invoicing that affect multiple stakeholders and departments, and templates designed for this model are typically assigned to Everyday Users of EMS Web App. By contrast, such templates are not available for EMS for Outlook users since Microsoft Outlook does not show the request status of such a reservation. See Also: EMS Terminology: Types of Users The tab enables you to filter the list by status, building, room, and to work with the requests. If you filter the list by Status or Building (on the left panel), click Refresh. 49
50 Notifications Tab Concept: Changing Events Can Automatically Notify Users Your Administrator can automate alerts to be sent to you (or groups of which you are a member) when changes or additions have been made in EMS for bookings and reservations, service orders, room types, setup types, user accounts, and so on. When you create a reservation or booking that has these notifications turned on, users will receive these alerts without requiring additional effort from you. Be sure to review these notification settings during the process of creating or modifying events. If your EMS Web App implementation uses the Integration with Exchange, you can handle notifications using Outlook. Concept: Integration to Microsoft Exchange Enables You to Use Outlook If your organization deploys our Integration to Microsoft Exchange, you can view the availability of meeting rooms and attendees, and send Microsoft Outlook meeting invitations, all from within EMS Web App. You must be licensed for EMS Desktop Client, EMS Web App, and Integration to Microsoft Exchange in order to configure and use this capability. If you are unsure if your organization is licensed for Integration to Microsoft Exchange, or if you would like to learn more about it, please contact your EMS Account Executive. Notifications Tab Overview When the Notifications tab first opens, all the notification rules that include you are listed in the Notification Rule pane (upper left pane) of the tab. Next to each rule, the number of new notifications (notifications with the current day s date) is displayed. 50

51 The tab is interactive. For Notification Rules, you can: Select a rule, and under Show, select Unreviewed to view all unreviewed notifications for future bookings. Select a rule, and under Show, select Reviewed to view all reviewed notifications for future bookings. Select a rule, and under Show, select Old to view all notifications for past bookings. For Notifications, you can: Select a notification to view detailed information about the notification (such as new bookings, the changes made to a booking, and the users who were notified of the changes) in a pane at the bottom of the window. Select Show New Only to show only new notifications (notifications with the current day s date) for the notification rules. Select a notification, and then click Reviewed to mark a notification as Reviewed. Select a notification and then click Go To to open the item to which the notification refers. If the notification is attached to a reservation, booking, or booking detail, then the reservation opens in the Navigator, and the appropriate folder (Reservation, Booking, or Booking Detail) is automatically selected. If the notification is attached to a group, then the Group window opens with the group information displayed in the window. Click Refresh to check for notifications that have been issued since you opened the Dashboard. Select a notification, or CTRL-click to select multiple notifications, and then click Delete to delete the notifications from the Notifications tab. 51

52 Reminders Tab A comment is a text entry that explains or clarifies a reservation, booking, group, or service order. A reminder is a comment that has a due date associated with it. The Reminders tab displays all the reminders for which you are the responsible user and that, by default, have a due date through the current day s date. Process Overview: To work with reminders, you can: Change the Reminders View Create Unattached Reminders Change a Reminder Delete a Reminder Print a Reminder View an Item To Which a Reminder is Attached Mark a Reminder Complete Reassign Multiple Reminders Between EMS Users Changing the Reminders View By default, when the Dashboard window first opens, the Reminders tab displays all the reminders for which you are the responsible user and that have a due date through the current day s date. You can do one or more of the following to change this view: To view the reminders for which other users are responsible, simply select the user or users in the Responsible User pane. 52
53 To view only a specific group of reminders for which you or others are the responsible users, change the viewing criteria. Option Description View View reminders that have the indicated due date. The default value is Thru Today. If a value from the pre-configured list does not meet your needs, then select (user specified) and in the Date Due fields, enter at least a Starting due date. The Ending due date is optional. Reminder Type The default value is (all). Attached To The default value is (all). To view reminders that are not attached to any item (reservation, booking, group, or service order), select (none). See To create an unattached reminder. Search in Text Enter the string by which to search for specific reminders. (The search is carried out on the Notes field for the reminder.) Your search is limited to the exact order of the characters in the string, but the search string is not-case sensitive and it can appear anywhere in the search results. For example, a search string of cat returns reminders that have catering or Mary s catering in the Notes field. Date Completed Available only if Exclude Complete is not checked. Exclude Completed Selected by default. Clear this option to display completed reminders in the Reminders list. To display completed reminders that meet the other viewing criteria, regardless of their completion dates, leave the Date Completed fields blank; otherwise, to view completed reminders that were completed by a specific date, you can enter a Starting date or a date range in the Date Completed fields. Hide Cancelled Not selected by default. Select this option to display canceled reminders in the Reminders list. Creating Unattached Reminders When you create reminder on the Navigator, the reminder is attached to a specific reservation, booking, or booking detail. Similarly, when you create a reminder on the Groups window, the reminder is attached to a specific group. If needed, however, you can create a reminder that addresses just your general business needs and is not attached to 53

54 any specific item. For example, you can create a reminder about preparing for your organization s yearly safety inspection. Any reminder that you create from the Reminders tab on the Dashboard window is an unattached reminder. 1. Click New. The Reminder dialog box opens. 2. Do one of the following: Select a Reminder Type. If none of the pre-configured Reminder Types meets your working needs, then select (user-specified), and in the Description field, enter a description for the reminder type. The Responsible User field is populated with your User ID and the Date Due field is populated with the current day s date. 3. Optionally, change the Responsible User, Date Due, or both. 4. If you are completing the reminder today, select a Date Completed; otherwise, leave this field blank. (This field is populated automatically when you or another user completes the reminder. See To complete a reminder.) 5. Optionally, in the Notes field, enter any further explanation or information about the reminder. Click Spelling to spellcheck the reminder before you save it. 6. Click OK. The Reminder dialog box closes. The newly created reminder is not attached to an item. It might or might not be displayed in the Reminders list depending on the values that you have set for filtering the display. Changing a Reminder 1. On the Reminders list, select the reminder that you are editing, and then click Edit. The Reminder dialog box opens. The dialog box is populated with the current information for the reminder. 2. Edit the reminder as needed. Optionally, click Spelling to spell-check the reminder before you save the edited reminder. 3. Click OK. The Reminder dialog box closes. If the reminder is attached to an item such as a reservation, then the reminder remains attached; otherwise, it is saved as an unattached reminder. 54
55 Deleting a Reminder You can delete any reminder (attached or unattached) regardless of its due date and regardless if it is completed. 1. On the Reminders list, select the reminder that you are deleting, and then click Delete. A message opens asking you if it is OK to delete the reminder. 2. Click Yes. The message closes and the reminder is deleted. Printing a Reminder 1. On the Reminders list, select the reminder that you are printing, and then click Print. An onscreen preview of the reminder opens. The preview window contains options for printing a hard copy of the reminder, for ing the reminder, and so on. Onscreen preview for a printed reminder 2. Select the option or options that best fit your working needs. Viewing an Item To Which a Reminder is Attached On the Reminders list, select a reminder, and then click Go To.The Attached To column for the reminder must state anything other than Unattached. If the reminder is attached to a reservation, booking, or booking detail, then the reservation opens in the Navigator, and the appropriate folder (Reservation, Booking, or Booking Detail) is automatically selected. If the reminder is attached to a group, then the Group window opens, with the group information displayed in the window Marking a Reminder Complete 1. On the Reminders list, select the reminder, or CTRL-click to select the multiple reminders that you are completing. 2. Click Completed. A message opens asking you if it is OK to set the selected reminders as completed. 3. Click Yes. The message closes. The reminders are completed with a date equal to the current day s date. The reminders might or might not be displayed in the Reminders list depending on the values that you have set for filtering the display. 55

56 Reassigning Multiple Reminders Between EMS Users 1. On the Reminders list, select the reminder, or CTRL-click to select the multiple reminders that you are reassigning. 2. Click Reassign. The Select User dialog box opens. This dialog box lists all the users for your EMS implementation. 3. Select the user to whom you are reassigning the reminder. To search for a user, enter a search string in the Search field. The search string is limited to the exact order of the characters in the string, but the search string is not case-sensitive and it can appear anywhere in the search results. For example, a search string of Admin returns both Admin users and SysAdmin. The list of users that meet your search string is dynamically updated as you enter the string. 4. Click OK. A message opens, asking you if you are sure that you want to reassign the selected reminders to the user. 5. Click Yes. The Select User dialog box and message close and the reminder is reassigned. 56

57 Everyday User Reservations Tab The Everyday User Reservations tab displays any reservation that was submitted through EMS Web App made in Self Serve mode. You can select options to filter the reservations list. Status and Building/Area/View filters show on the left pane of the tab. You can select one or more statuses, or you can select all statuses in a single step. You can select a specific building, area, and/or view, or you can select all buildings, areas, and views in a single step. Date filters show on the View list at the top of the right pane of the tab. You can view reservations for the indicated due date. The default value is Thru Today. If a value from the pre-configured list does not meet your needs, then select (user specified) and in the Date Due fields, enter at least a Starting due date. The Ending due date is optional. After you select or edit the filtering options, click Refresh. Select the reservation in the Reservations list, and then click Go To to open the reservation in the Navigator. 57

58 Wait List Tab The Wait List tab provides you a way of monitoring wait-listed reservations. It also provides an indicator when the requested room becomes available. The tab is interactive. You can: Select options to filter the reservations that are displayed on the tab. After you select or edit the filtering options, click Refresh. Status and Building/Area/View options are displayed on the left pane of the tab. You can select one or more statuses, or you can select all statuses in a single step. You can select a specific building, area, and/or view, or you can select all buildings, areas, and views in a single step. Date options are displayed on the View list at the top of the right pane of the tab. You can view reservations for the indicated due date. The default value is Thru Today. If a value from the pre-configured list does not meet your needs, then select (user specified) and in the Date Due fields, enter at least a Starting due date. The Ending due date is optional. Select the reservation in the Reservations list, and then click Go To to open the reservation in the Navigator. 58
59 Reconfirm Dates Tab The Reconfirm Dates tab displays reservations that have been booked in a status that requires the Reconfirm Date option (for example, a Tentative or Hold status). The list of reservations is automatically sorted in ascending order by Reconfirm Date. You use this tab as a reminder to reconfirm such reservations. The tab is interactive. You can: Select options to filter the reservations that are displayed on the tab. After you select or edit the filtering options, click Refresh. Status and Building/Area/View options are displayed on the left pane of the tab. You can select one or more statuses, or you can select all statuses in a single step. You can select a specific building, area, and/or view, or you can select all buildings, areas, and views in a single step. Date options are displayed on the View list at the top of the right pane of the tab. You can view reservations for the indicated due date. The default value is Thru Today. If a value from the pre-configured list does not meet your needs, then select (user specified) and in the Date Due fields, enter at least a Starting due date. The Ending due date is optional. Select the reservation in the Reservations list, and then click Go To to open the reservation in the Navigator. 59
60 Building Hours Exceptions Tab The Building Hours Exceptions tab displays reservations that occur outside of configured building hours. The tab is interactive. You can: Select options to filter the reservations that are displayed on the tab. After you select or edit the filtering options, click Refresh. Status and Building/Area/View options are displayed on the left pane of the tab. You can select one or more statuses, or you can select all statuses in a single step. You can select a specific building, area, and/or view, or you can select all buildings, areas, and views in a single step. Date options are displayed on the View list at the top of the right pane of the tab. You can view reservations for the indicated due date. The default value is Thru Today. If a value from the pre-configured list does not meet your needs, then select (user specified) and in the Date Due fields, enter at least a Starting due date. The Ending due date is optional. Select the reservation in the Reservations list, and then click Go To to open the reservation in the Navigator. 60

61 Analytics Tab The Analytics tab provides quick access for queries that have been defined using the Query builder and to which you have access as a user. You can run these queries from the Analytics tab. To run a query from the Analytics tab 1. In the upper left corner of the Analytics tab, click Select Queries. The Queries dialog box opens. This dialog box lists the queries that have been defined using the Query builder and to which you have access. 2. Select the queries that you want to run, and then click OK. The Queries dialog box closes. The selected queries are displayed in the Queries pane (upper left) on the Analytics tab. 3. In the Queries pane, select the query that you want to run, and then select the date for which the data in your EMS database is to be queried. Option Description Custom The starting date is set to the first day of the month and the ending date is set to the last day of the month but you can edit one or both of these dates. Note: For some queries, if you select Custom, a Use Specific Times option becomes available. If you enter the same date for the starting date and ending date, you can select Use Specific Times, and then enter a starting time and ending time to query the data for in specific time range on the same day. 61
62 Option Description Last Month The starting date is set to the first day of the previous month and the ending date is set to the last day of the previous month. Last Quarter This Quarter This Quarter To Date Quarters are based on a calendar year: First quarter is 1/1 through 3/31. Second quarter is 4/1 through 6/30. Third quarter is 7/1 through 9/30. Fourth quarter is 10/1 through 12/31. For example, if the current day s date is 11/22/2010, and you select Last Quarter, then the starting date is set to 7/1/2010 and the ending date is set to 9/30/2010. Last Year The starting date is set to 1/1 of the previous year, and the ending date is set to 12/31 of the previous year. This month The starting date is set to the first day of the current month and the ending date is set to the last day of the current month. This Year The starting date is set to 1/1 of the current year, and the ending date is set to 12/31 of the current year. This Year to Date The starting date is set to 1/1 of the current year, and the ending date is set to the current day s date. 4. Optionally, in the Report Comment field, enter a description or explanation of the query. 5. Click Get Data. If the query returns data, then the results are displayed in the Results pane on the Analytics tab. 6. Optionally, do one or more of the following: To export the query results to an Excel spreadsheet or to an XML file, click Export, and then select the appropriate file type. A dialog box opens in which you can specify the file name (the default file name is the name of the query, but you can always edit this), and the location to which to save the file. 62

63 The file type for an Excel spreadsheet is.xl or.xls and you cannot change this. The file type for an XML file is.xml and you cannot change this. To generate an onscreen preview of the printed query results, click Print. The preview window contains options for printing a hard copy of the query results, for ing the results, and so on. Select the option or options that best fit your working needs. Onscreen preview of a query results If the query has been defined with a Chart, the Chart option is enabled. Click Chart to generate an onscreen preview of the charted data. The preview window contains options for printing a hard copy of the chart, for ing the chart, and so on. Select the option or options that best fit your working needs. Onscreen preview of query results that are charted/graphed 63

64 At A Glance Tab The At A Glance tab provides quick access to high-level booking statistics for events at your organization or facility. You can select to show booking statistics by category, by event type, by group type, by reservation source, by room type, or by status. By default, when the tab first opens, the date is set to the current day s date, and category is the selected display type. To view booking statistics for your facility on a given date 1. Select options (Status and Building) on the left pane of the tab to filter the results that are displayed on the tab. 2. Change the date and/or the display type as needed to view the bookings statistics for a selected date. Updated: Tue, 21 Nov :38:29 GMT 64
EMS WEB APP Configuration Guide
 EMS WEB APP Configuration Guide V44.1 Last Updated: August 14, 2018 EMS Software emssoftware.com/help 800.440.3994 2018 EMS Software, LLC. All Rights Reserved. Table of Contents CHAPTER 1: EMS Web App
EMS WEB APP User Guide
 EMS WEB APP User Guide V44.1 Last Updated: August 14, 2018 EMS Software emssoftware.com/help 800.440.3994 2018 EMS Software, LLC. All Rights Reserved. Table of Contents CHAPTER 1: EMS Web App User Guide
Jewish Federation of Metropolitan Chicago. Author DP 3/23/2010 5/17/2010 2/6/2012 Reviewer Approver Publisher
 VIRTUALL EVENT MANAGEMENT SYSTEM EVENT MANAGEMENT SYSTEM TRAINING RELEASE 2. 0 Jewish Federation of Metropolitan Chicago 30 South Wells Chicago, IL 60606 Jewish Federation of Metropolitan Chicago Rev 1
EMS MASTER CALENDAR User Guide
 EMS MASTER CALENDAR User Guide V44.1 Last Updated: May 2018 EMS Software emssoftware.com/help 800.440.3994 2018 EMS Software, LLC. All Rights Reserved. Table of Contents CHAPTER 1: Introduction to the
Astra Schedule User Guide Scheduler
 Astra Schedule User Guide 7.5.12 Scheduler 1 P a g e ASTRA SCHEDULE USER GUIDE 7.5.12... 1 LOGGING INTO ASTRA SCHEDULE... 3 LOGIN CREDENTIALS... 3 WORKING WITH CALENDARS... 4 CHOOSING A CALENDAR AND FILTER...
 Information Technology Virtual EMS Help https://msum.bookitadmin.minnstate.edu/ For More Information Please contact Information Technology Services at support@mnstate.edu or 218.477.2603 if you have questions
TABLE OF CONTENTS CHAPTER
 TABLE OF CONTENTS CHAPTER 1...1 A QUICK OVERVIEW OF THE MICROSOFT EXCHANGE CLIENT...1 BASIC CONCEPTS AND FEATURES...1 STARTING THE MICROSOFT EXCHANGE CLIENT...1 SETTING OPTIONS FOR YOUR MESSAGES...3 LOOKING
The PeopleSoft Financials System
 The PeopleSoft Financials System 2 Introduction...................... 14 Signing In and Out.................... 14 Signing In to the System.............. 14 Signing Out................... 17 Navigation
INSERVICE. Version 5.5. InService Easily schedule and monitor attendance for your training programs, even at remote locations.
 INSERVICE Version 5.5 InService Easily schedule and monitor attendance for your training programs, even at remote locations. 5/15/2014 Page 0 of 11 Table of Contents 1.1 Logging In... 2 1.2 Navigation...
BASIC NAVIGATION & VIEWS...
 Content Overview VISUAL TOUR... 5 NEW FEATURES IN OUTLOOK 2010... 6 BASIC NAVIGATION & VIEWS... 7 SETTING PREFERENCES... 7 Creating an Outlook Shortcut... 7 Choosing a Startup View... 7 CUSTOMIZING INBOX
Caterease User Training Guide
 Caterease User Training Guide Copyright: 2016 Table of Contents Unit 1: Introducing Event Manager 15 Entering General Event Information 17 Searching for Events 19 Using the Event Finder 20 Reviewing and
Getting Started with NCC Reservations. Logging into NCC Reservations. Overview of the Reservations Menu
 Getting Started with NCC Reservations NCC Reservations is a web-based application that allows users to submit and manage room reservations and service requests, view facility information and browse events
Microsoft Outlook Basics
 Microsoft Outlook 2010 Basics 2 Microsoft Outlook 2010 Microsoft Outlook 2010 3 Table of Contents Getting Started with Microsoft Outlook 2010... 7 Starting Microsoft Outlook... 7 Outlook 2010 Interface...
Outlook 2007 Web Access User Guide
 Outlook 2007 Web Access User Guide Table of Contents Page i TABLE OF CONTENTS OUTLOOK 2007 MAIL... 1 Launch Outlook Web Access... 1 Screen Elements... 2 Inbox... 3 Read Mail... 3 Delete a Message... 3
Clearspan Web Interface Getting Started Guide
 Clearspan Web Interface Getting Started Guide RELEASE 22 March 2018 NOTICE The information contained in this document is believed to be accurate in all respects but is not warranted by Mitel Networks Corporation
ASTRA USER GUIDE. 1. Introducing Astra Schedule. 2. Understanding the Data in Astra Schedule. Notes:
 ASTRA USER GUIDE 1. Introducing Astra Schedule Astra Schedule is the application used by Academic Space Scheduling & Utilization to schedule rooms for classes and by academic colleges, schools, and departments
Easy Time Control Training Manual
 Easy Time Control Training Manual Copyright 2008, Trinity Enterprise Solutions Inc Easy Time Control Training Manual Table of Contents Preface...iii Module 1...5 Getting Started...5 1.1. Opening the System...6
Table of Contents COURSE OVERVIEW... 3 LESSON 1: OUTLOOK 2010 CALENDAR INTERFACE... 5
 Table of Contents COURSE OVERVIEW... 3 LESSON 1: OUTLOOK 2010 CALENDAR INTERFACE... 5 OPEN OUTLOOK CALENDAR... 5 Ribbon... 6 Navigation Pane... 6 Appointment Area... 6 Task Pane... 6 To-Do Bar... 6 THE
Office 365 Training For the
 Office 365 Training For the 1 P age Contents How to Log in:... 3 Change Your Account Password... 3 Create a Message... 4 Add a Signature... 4 Learn About Inbox Rules... 5 Options > Automatic Replies...
EMS FOR OUTLOOK User Guide
 EMS FOR OUTLOOK User Guide V44.1 Last Updated: March 5, 2018 EMS Software emssoftware.com/help 800.440.3994 2018 EMS Software, LLC. All Rights Reserved. Table of Contents CHAPTER 1: EMS for Microsoft Outlook
EMS DESKTOP CLIENT Installation Guide
 EMS DESKTOP CLIENT Installation Guide Version 44.1 Last Updated: March 5, 2018 EMS Software emssoftware.com/help 800.440.3994 2018 EMS Software, LLC. All Rights Reserved. Table of Contents CHAPTER 1: Introduction
N C MPASS. Getting Started. Version 6.8
 N C MPASS Getting Started Version 6.8 Ontario Telemedicine Network (OTN) All rights reserved. Last update: May 24, 2018 This document is the property of OTN. No part of this document may be reproduced
Outlook Calendar
 Outlook Calendar - 2003 The Calendar feature in Outlook can be used to add appointments to your own or another person s agenda or to schedule meeting for which you invite other people to attend. Open the
My Sysco Reporting Job Aid for CMU Customers. My Sysco Reporting. For CMU Customers (Serviced by Program Sales)
") My Sysco Reporting For CMU Customers (Serviced by Program Sales) 1 Accessing My Sysco Reporting... 2 Logging In... 2 The Reporting Dashboard... 3 My Sysco Reporting Process... 6 Generating a Report...
My Sysco Reporting For CMU Customers (Serviced by Program Sales) 1 Accessing My Sysco Reporting... 2 Logging In... 2 The Reporting Dashboard... 3 My Sysco Reporting Process... 6 Generating a Report...
Quick Reference Card for Timestamp Hourly View Employees
 Time & Attendance Quick Reference Card for Timestamp Hourly View Employees Navigator Version 7.0 The following instructions describe a typical Navigator configuration. The names and location of widgets
Lesson 4: Using the Calendar
 Microsoft Office Specialist 2013 Series Microsoft Outlook 2013 Certification Guide Lesson 4: Using the Calendar Lesson Objectives In this lesson, you will explore the features of the Calendar module and
User Reference Guide
 LEARNING CENTRE http://lms.toyota.com.au User Reference Guide Page 1 Learning Centre User Overview Reference Guide Last Modified 23/07/10 2010 Toyota Institute Australia. All rights reserved. All brand
Introduction to 9.0. Introduction to 9.0. Getting Started Guide. Powering collaborative online communities.
 Introduction to 9.0 Introduction to 9.0 Getting Started Guide Powering collaborative online communities. TABLE OF CONTENTS About FirstClass...3 Connecting to your FirstClass server...3 FirstClass window
 www.insightsoftware.com for JD Edwards World and EnterpriseOne Version: 2.1 Last Updated: August 31, 2011 Contents 1. Introduction... 4 Welcome... 4 Using this Guide... 4 2. The Console Interface... 5
Outlook: Web Access. Outlook: Web Access AIS Vienna
 Outlook: Web Access AIS Vienna Table of Contents Introduction to OWA...1 Log On... 1 OWA Workspace... 2 Hiding/Displaying the Reading Pane... 3 Collapsing/Expanding the Outlook Bar... 4 Log Off... 5 Sending
Outlook - an Introduction to Version 2003 Table of Contents
 Outlook - an Introduction to E-mail Version 2003 Table of Contents What is Outlook Starting Outlook The Navigation Pane Getting Help Creating and Sending a Message Using the College Exchange Directory
Outlook 2010 Calendar
 Outlook 2010 Calendar Table of Contents The Calendar... 4 The Week View... 5 Day View... 6 Month View... 7 Schedule View... 8 Scheduling Appointments... 9 Appointments... 10 Meetings... 10 Creating Appointments/Meetings...
How to Use: Outlook Web Access (OWA)
") How to Use: Outlook Web Access (OWA) All About Me Day April 19. 2012 What is Outlook Web App 2010? The Outlook Web App allows you to access your College e-mail and calendar from any computer that has Internet
How to Use: Outlook Web Access (OWA) All About Me Day April 19. 2012 What is Outlook Web App 2010? The Outlook Web App allows you to access your College e-mail and calendar from any computer that has Internet
Marquette University Time and Attendance
 2012 Marquette University Time and Attendance TM01 Employee Time and Attendance This guide helps you learn the most commonly used employee functions in EmpCenter Time and Attendance. The intended audience
ZENworks Reporting System Reference. January 2017
 ZENworks Reporting System Reference January 2017 Legal Notices For information about legal notices, trademarks, disclaimers, warranties, export and other use restrictions, U.S. Government rights, patent
Get Started. Estimating Explorer
 Get Started Estimating Explorer NOTICE This document and the Sage Timberline Office software may be used only in accordance with the accompanying Sage Timberline Office End User License Agreement. You
Scheduler Updated: 9/24/2010
 Updated: 9/24/2010 Table of Contents 1. Schedule Setup... 4 1.1 To be Scheduled/Billed Provider... 4 1.2 My Provider Sequence... 6 1.3 Provider s Availability... 7 1.4 Room... 10 1.5 To be Scheduled Room...
Outlook Webb App quick guide
 What is Outlook Web App 2010? Outlook Webb App quick guide Updated 7/17/2012 The Outlook Web App allows you to access your County e-mail and calendar from any computer that has Internet access via a Web
Once you click on the Enterprise Icon found on your desktop you will be asked for your password. This Default Code Is
 Once you click on the Enterprise Icon found on your desktop you will be asked for your password. This Default Code Is You should now see the main screen which is called the main screen or menu screen.
version 7.6 user manual
 version 7.6 user manual 2 Copyright JAVS 1981-2014 Table of Contents Introduction... 4 Getting Started... 5 Login... 5 JAVS Publisher 7 Overview... 6 Search Tool Overview... 7 Search Tool-Detailed Operation...
Bill Analyser User Guide
 Bill Analyser User Guide emobile.ie/business Contents 1.0 Basic Concepts... 3 1.1 Users and Roles... 3 Standard Users... 3 Global Users... 3 eircom User Roles... 3 Available user roles... 3 1.2 Data Structure...
McGovern Medical School Internal User Guide
 McGovern Medical School Internal User Guide Welcome to McGovern Medical School s Internal User Guide for the Ad Astra Event Scheduling application! The MMS Internal User Guide has been created to introduce
Welcome to the Building Rental Room Reservation System. To learn how to use our new system, please choose from one of the following menus:
 Welcome Welcome Welcome to the Building Rental Room Reservation System. To learn how to use our new system, please choose from one of the following menus: Browse Menu Browse Menu The Browse menu contains
Quick Reference Card for Managers
 Time & Attendance Quick Reference Card for Managers Navigator Version 7.0 The following instructions describe a typical Navigator configuration. The names and location of widgets and commands may differ
EMS Walk. Browse Events: Events in University Housing Space
 EMS Walk This guide explains the various components of University Housing s Event Management System (EMS) and provides step-by-step instructions for new users. EMS Web App Home Page (formerly Virtual EMS)
IBM Unica Distributed Marketing Version Publication Date: June 7, Administrator's Guide
 IBM Unica Distributed Marketing Version 8.5.0 Publication Date: June 7, 2011 Administrator's Guide Copyright Copyright IBM 2011 IBM Corporation Reservoir Place North 170 Tracer Lane Waltham, MA 02451-1379
Outlook Web Access (OWA) PTHS District 209
 PTHS District 209") Outlook Web Access (OWA) PTHS District 209 Table of Contents Welcome to Outlook Web Access (OWA)... 1 To Access Your Proviso E-mail:... 1 If You Use Windows 95 or 98 or 2000 at Home... 2 About the Navigation
Outlook Web Access (OWA) PTHS District 209 Table of Contents Welcome to Outlook Web Access (OWA)... 1 To Access Your Proviso E-mail:... 1 If You Use Windows 95 or 98 or 2000 at Home... 2 About the Navigation
Marquette University Time and Attendance
 2016 Marquette University Time and Attendance TM01 Student Employee Time and Attendance This guide helps you learn the most commonly used student employee functions in EmpCenter Time and Attendance. The
Meeting Room Manager User Guide
 Meeting Room Manager User Guide Carnegie Mellon University 1 Contents Getting Started... 2 Getting an MRM account... 2 Initial Login... 2 Accessing MRM... 2 MRM Terminology... 3 Reservation... 3 Resources...
RONA e-billing User Guide
 RONA e-billing Contractor Self-Service Portal User Guide RONA e-billing User Guide 2015-03-10 Table of Contents Welcome to RONA e-billing What is RONA e-billing?... i RONA e-billing system requirements...
User Guide. Customer Self Service (CSS) Web Application Progress Software Corporation. All rights reserved.
 Web Application Progress Software Corporation. All rights reserved.") User Guide Customer Self Service (CSS) Web Application 1993-2017 Progress Software Corporation. Version 2.1 March 2017 Table of Contents Welcome... 3 Accessing the Customer Self Service (CSS) Web Application...
User Guide Customer Self Service (CSS) Web Application 1993-2017 Progress Software Corporation. Version 2.1 March 2017 Table of Contents Welcome... 3 Accessing the Customer Self Service (CSS) Web Application...
Scheduling WebEx Meetings with Microsoft Outlook
 Scheduling WebEx Meetings with Microsoft Outlook About WebEx Integration to Outlook, page 1 Scheduling a WebEx Meeting from Microsoft Outlook, page 2 Starting a Scheduled Meeting from Microsoft Outlook,
UTHealth Medical School Internal User Guide
 UTHealth Medical School Internal User Guide Welcome to UTHealth Medical School Internal User Guide for the Ad Astra Event Scheduling application! The MS Internal User Guide has been created to introduce
SwatCal. Swarthmore College s integrated mail and calendar system
 SwatCal Swarthmore College s integrated mail and calendar system [SWATCAL] Learn how to use Swarthmore College s integrated email and calendar system. Import/export your meeting maker calendar, create
ebilling Training g g For the Vendor
 ebilling Training g g For the Vendor All Users Log In 1. Click Cc the LAUNCH APPLICATION buo button. 2. Enter your User ID and Password 3. Click the LOGIN button. 4. If you do not have a User ID please
SharePoint User Manual
 SharePoint User Manual Developed By The CCAP SharePoint Team Revision: 10/2009 TABLE OF CONTENTS SECTION 1... 5 ABOUT SHAREPOINT... 5 1. WHAT IS MICROSOFT OFFICE SHAREPOINT SERVER (MOSS OR SHAREPOINT)?...
30-Minute Time Scale. Available & Shared Calendars
 CALENDAR WINDOW The Calendar Information viewer can be configured in a variety of different views that resemble traditional planner books. The common view is the Day/Week/Month view. This view provides
Rooms Management Manual
 Fidelio Suite 7 Rooms Management Manual Front Office Version 7.13 Creation Date: March 2002 Delphi is a trademark of Borland. MSDOS, Windows 95, Windows-NT and Microsoft Word are trademarks of Microsoft
Welcome to the Investor Experience
 Welcome to the Investor Experience Welcome to the Black Diamond Investor Experience, a platform that allows advisors to customize how they present information to their clients. This document provides important
What s New in EMS. EMS Workplace 7.0 EMS Campus 4.0 EMS Enterprise 7.0 EMS Legal 7.0 EMS District 7.0. Dean Evans & Associates, Inc.
 EMS Workplace 7.0 EMS Campus 4.0 EMS Enterprise 7.0 EMS Legal 7.0 EMS District 7.0 Dean Evans & Associates, Inc. Copyright Copyright 2012 Dean Evans & Associates, Inc. All rights reserved. No part of this
Outlook Web Access Exchange Server
 Outlook Web Access Exchange Server Version 2.0 Information Technology Services 2008 Table of Contents I. INTRODUCTION... 1 II. GETTING STARTED... 1 A. Logging In and Existing Outlook Web Access... 1 B.
Managing Your Website with Convert Community. My MU Health and My MU Health Nursing
 Managing Your Website with Convert Community My MU Health and My MU Health Nursing Managing Your Website with Convert Community LOGGING IN... 4 LOG IN TO CONVERT COMMUNITY... 4 LOG OFF CORRECTLY... 4 GETTING
What s New in Amicus Attorney 2010 Small Firm Edition
 What s New in Amicus Attorney 2010 Small Firm Edition Contents This document describes the new features in Amicus Attorney 2010 Small Firm Edition. This Edition is designed for smaller firms, as a partner
Provider Secure Portal User Manual
 Provider Secure Portal User Manual Copyright 2011 Centene Corporation. All rights reserved. Operational Training 2 August 2011 Table of Contents Provider Secure Portal... 5 Registration... 6 Provider -
HGC SUPERHUB HOSTED EXCHANGE
 HGC SUPERHUB HOSTED EXCHANGE EMAIL OUTLOOK WEB APP (OWA) 2010 USER GUIDE V2013.6 HGC Superhub Hosted Email OWA User Guide @ 2014 HGC. All right reserved. Table of Contents 1. Get Started... 4 1.1 Log into
UltraTime Enterprise WebTime User Guide
 UltraTime Enterprise WebTime User Guide This guide will explain how to use the WebTime view of UltraTime Enterprise. Sample screens have been provided for guidance. The WebTime time entry screen is the
Marquette University Time and Attendance
 2016 Marquette University Time and Attendance TM02 Manager/Timekeeper Functions This guide helps you learn the most commonly used manager/timekeeper functions in EmpCenter Time and Attendance. The intended
User s Guide. (Virtual Terminal Edition)
") User s Guide (Virtual Terminal Edition) Table of Contents Home Page... 4 Receivables Summary... 4 Past 30 Day Payment Summary... 4 Last 10 Customer Transactions... 4 View Payment Information... 4 Customers
User s Guide (Virtual Terminal Edition) Table of Contents Home Page... 4 Receivables Summary... 4 Past 30 Day Payment Summary... 4 Last 10 Customer Transactions... 4 View Payment Information... 4 Customers
Wise Technologies Ltd.,
 User manual Wise Timetable online system Wise Technologies Ltd., In front of you is a short document for all the users and administrators of Wise Timetable, describing the important part of the whole system:
ControlPoint. for Office 365. User Guide VERSION 7.6. August 06,
 ControlPoint for Office 365 User Guide VERSION 7.6 August 06, 2018 www.metalogix.com info@metalogix.com 202.609.9100 Copyright International GmbH., 2008-2018 All rights reserved. No part or section of
Instructions for Using CuestaView
 Instructions for Using CuestaView CuestaView is Cuesta College s new room information system. With it you can view room availability and features (size, furniture, equipment, etc.). If you are a Scheduler
SAS IT Resource Management 3.3
 SAS IT Resource Management 3.3 Gallery Manager User's Guide SAS Documentation The correct bibliographic citation for this manual is as follows: SAS Institute Inc. 2012. SAS IT Resource Management 3.3:
Access Review. 4. Save the table by clicking the Save icon in the Quick Access Toolbar or by pulling
 Access Review Relational Databases Different tables can have the same field in common. This feature is used to explicitly specify a relationship between two tables. Values appearing in field A in one table
Legistar Administration Guide
 Legistar Administration Guide Legistar Administration Use Legistar Administration to configure the settings in your Legistar database. We've organized the Administration topics as follows: Legistar Administration
Order Management Bookings - Getting Started Guide for Manufacturers
 Order Management Bookings - Getting Started Guide for Manufacturers Table Of Contents Order Management Bookings Getting Started Guide... 3 Purpose of this Document... 3 What is Order Management Bookings?...
Keep It Easy Software Cloud User Manual
 Keep It Easy Software Cloud User Manual 2015 Keep It Easy Software 1 CONTENTS How to Login... 5 Functions... 5 System Preferences... 6 General... 7 Receipt Categories... 9 Expense Categories... 10 Service
Learning Series. Volume 8: Service Design and Business Processes
 Learning Series Volume 8: Service Design and Business Processes NOTICES ServicePRO Learning Series Edition November 2014 HelpSTAR and ServicePRO are registered trademarks of Help Desk Technology International
Office365 End User Training & Self-Service Migration Manual Simplified
 Office365 End User Training & Self-Service Migration Manual Simplified Version 1.0 University Systems and Security 5/25/2016 1 P a g e Table of Contents 2 P a g e Table of Contents Introduction to Office365...
CHRIS Introduction Guide
 1 Introduction... 3 1.1 The Login screen... 3 1.2 The itrent Home page... 5 1.2.1 Out of Office... 8 1.2.2 Default User Preferences... 9 1.2.3 Bookmarks... 10 1.3 The itrent Screen... 11 The Control Bar...
Policy Commander Console Guide - Published February, 2012
 Policy Commander Console Guide - Published February, 2012 This publication could include technical inaccuracies or typographical errors. Changes are periodically made to the information herein; these changes
EMS Web App User Manual https://oitems.seattleu.edu/emswebapp/
 EMS Web App User Manual https://oitems.seattleu.edu/emswebapp/ This is a user manual for the EMS Web App (formerly VEMS). The EMS Web App is the online component of the desktop application EMS and is used
Getting Started The Outlook Web Access Window
 QUICK Source Microsoft Outlook Web Access in Exchange Server 2003 Getting Started The Outlook Web Access Window ❶ ❷ ❸ ❹ ❺ ❻ ❼ ❽ Using the Reading Pane The Reading Pane allows you to view your e-mail messages
Monash University Policy Management. User Guide
 Monash University Policy Management User Guide 1 Table of Contents 1. GENERAL NAVIGATION... 4 1.1. Logging In to Compliance 360 - Single Sign On... 4 1.2. Help... 4 1.2.1. The University Policy Bank...
Perceptive Data Transfer
 Perceptive Data Transfer User Guide Version: 6.5.x Written by: Product Knowledge, R&D Date: September 2016 2015 Lexmark International Technology, S.A. All rights reserved. Lexmark is a trademark of Lexmark
Single User Guide Version 4.0.x
 Single User Guide Version 4.0.x Copyright 1992-2001 Milum Corporation. All rights reserved. Office Tracker Single-User Guide Version 4.0.x This manual, as well as the software described in it, is furnished
Administrator Manual
 Administrator Manual CURA Technical Support Email: cura_support@mindscope.com Phone: 1.888.322.2362 x 55 Administrator Manual Page 1 Table of Contents The Setup Module... 3 Skills... 3 Adding or Modifying
OUTLOOK WEB ACCESS UOW USER GUIDE INDEX
 OUTLOOK WEB ACCESS UOW USER GUIDE INDEX ACCESSING MAIL... 2 SETTING UP... 2 OPTIONS... 3 VIEWING... 4 ARRANGE MESSAGES... 4 CREATING/SENDING A NEW MESSAGE... 5 REPLYING TO MESSAGES... 5 FORWARDING MESSAGES...
CELCAT Timetabler Live Getting Started Guide
 CELCAT Timetabler Live Getting Started Guide Introduction... 1 Creating a Timetable... 2 Timetable Wizard... 3 SQL Server... 3 Timetable Name... 3 Administrator Password... 3 Week Scheme... 3 Timetable
Business Insight Authoring
 Business Insight Authoring Getting Started Guide ImageNow Version: 6.7.x Written by: Product Documentation, R&D Date: August 2016 2014 Perceptive Software. All rights reserved CaptureNow, ImageNow, Interact,
Substitute Quick Reference (SmartFindExpress Substitute Calling System and Web Center)
") Substitute Quick Reference (SmartFindExpress Substitute Calling System and Web Center) System Phone Number 578-6618 Help Desk Phone Number 631-4868 (6:00 a.m. 4:30 p.m.) Write your Access number here Write
Substitute Quick Reference (SmartFindExpress Substitute Calling System and Web Center) System Phone Number 578-6618 Help Desk Phone Number 631-4868 (6:00 a.m. 4:30 p.m.) Write your Access number here Write
WebEx Meeting Center User Guide
 WebEx Meeting Center User Guide For Hosts, Presenters, and Participants 8.17 Copyright 1997 2010 Cisco and/or its affiliates. All rights reserved. WEBEX, CISCO, Cisco WebEx, the CISCO logo, and the Cisco
Using the VSOM Operator Pages
 CHAPTER 8 The VSOM Operator Pages provide access to features that video surveillance operators can use to view, record, search, and control video. This chapter describes the Operator Pages in detail. It
Customizing and Administering Project Server Access
 WEB Customizing and Administering Project Server Access In this chapter Creating and Deleting Users from Project Server 2 Managing User Groups Project Server User Security 4 Using Categories to Control
User Manual. perfectionlearning.com/technical-support
 User Manual perfectionlearning.com/technical-support 1 User Manual Accessing Math X... 3 Login... 3 Forgotten Password... 3 Navigation Menu... 4 Logout... 4 Admin... 5 Creating Classes and Students...
User Guide. Avery Dennison Web Ordering Solution for Steinmart
 User Guide Avery Dennison Web Ordering Solution for Steinmart March 2012 Copyright 2012 A very Dennison The information in this document is subject to change without notice and should not be construed
TMW Asset Maintenance. TMW AMS - SQL Road Calls Guide
 TMW Asset Maintenance TMW AMS - SQL Guide Table of Contents Introduction... 2 Setting Road Call Options... 3 Starting the Module... 5 Changing Shops... 5 Searching... 5 Road Call Options... 7 Enter Road
Solar Eclipse Scheduler. Release 9.0
 Solar Eclipse Scheduler Release 9.0 Disclaimer This document is for informational purposes only and is subject to change without notice. This document and its contents, including the viewpoints, dates
Navigation Reference Guide
 FISCAL AFFAIRS FINANCIAL MANAGEMENT SYSTEM (FMS) Navigation Reference Guide June 2004 Table of Contents Introduction to Financial Management System... ii Navigation Reference Guide... ii Overview...ii
Facilities and Safety How-To Guide: Scheduling Appointments and Meetings in Outlook 2010
 The Outlook Calendar The calendar is divided into three sections: The Navigation Pane The Calendar Grid The To-Do Bar The calendar may be viewed in several formats. Under the Home tab, in the Arrange section,
Microsoft Outlook 2003 Microsoft screen shots used in accordance with Microsoft rules to be viewed at URL
 Microsoft Outlook 2003 Microsoft screen shots used in accordance with Microsoft rules to be viewed at URL http://www.microsoft.com/permission/copyrgt/cop-img.htm#screenshot Compiled by: Charmaine Morris