Building level Rail embankments and correcting heights with XML. (V1.0) (Tangram)
|
|
|
- Anis Wheeler
- 5 years ago
- Views:
Transcription
 (Tangram) 1 This tutorial has been created to illustrate a few techniques in providing raised level embankments for railway lines but is equally suitable for creating level roads and other built")
1 Building level Rail embankments and correcting heights with XML. (V1.0) (Tangram) 1 This tutorial has been created to illustrate a few techniques in providing raised level embankments for railway lines but is equally suitable for creating level roads and other built up areas. The technique is cumbersome but worth the visual result as the Blitzkreig map editor is awful at preserving level ground areas and all to often the only recourse is to zero the ground level undoing much hard work. The operation is in two parts initially using the Fields composer, then by saving the map as an XML file and editing it accordingly. Remember to rename and save your map frequently ie. Blitkreigmap1a, Blitkreigmap1b etc both in BZM and XML where and when appropriate and every other time in between, mistakes are made and programs crash so be warned. Firstly the map created here is the smallest size possible 1x1 patches or 16x16 VIS tiles it was created purely to illustrate the point, so anything larger than this will have to be scaled accordingly, see the XML section later on. 2 Open the Blitzkreig map editor select File, New, Enter a map size 1x1 or 1 and tick the Square map box. (You could create a bigger map but lets keep it simple for now). Give your map a name (be unique) and select a season, any one will do. I then selected a sand terrain tile and filled the entire map with the Fill button just to highlight the raised areas. Use the Fields Composer to create the initial raised embankments and level areas on top. Page 1

2 2.01 Using the Fields Composer select the add button and give your new field a name and hit OK, now use your cursor to highlight the field name in the Fields panel you ll notice the Terrain window has now been populated with field textures. There are 3 tabs for Terrain, Objects and Heights we ll go through each one Terrain / Field textures can be made relatively complex by including differing textures with varied sizes and varied tile counts a bit of experimentation is required to get things right but being textures the map can always be altered manually or using Fields at a later time. (Note: that Fill Terrain and Update Map should be ticked, Modify Terrain Heights should be switched off and Place Objects well that one s up to you, if you want to add trees etc. then okay, otherwise switch it off). Hopefully I ll put together a more thorough tutorial on fields. I ve selected only one tile Garden2 purely to highlight the map with a tiles size of 5.00, for an actual field you d require a larger size but this is only for a railway embankment. Now onto the Objects tab. Page 2

3 2.03 First go to the Objects shells window and press the Add key to the left of the window, you can add a number of object Shells but for now, one will do. Highlight the line No.0 in the Objects Shells Window with your cursor and then click on the properties button on the left, a pop up box will appear allowing you to alter the size of the terrain in VIS tiles, as well as step and probability both of these control the number of objects placed on the texture. Of more importance here is the size, a size of 1 or 2 VIS tiles will place any objects within the first 1 or 2 tiles in from the edge of your field (an easy way of creating hedgerows around a field) leaving the central area bare, step is set at 4 and probability at 30%. Now go to the drop down Objects box that allows you to select any available object, for our purposes, we ll only use Flora. Selecting this gives either a list or thumbnails (choose your preferred method), and simply click on an item and press the Add key to the left of the Shell Objects window. I ve added a few tree stumps, shrubs etc. the usual rail side vegetation. Page 3
. Now press Save All and then OK.")
4 2.04 Now for heights, select the Heights tab, within Profile you ll probably have the address as scenarios\profile\profile or something like this, Height i ve set at 5, Size min. and max. are both set at 2 and Positive at 100%. Positive ensures that there is no height variance (feel free to explore different settings). Now press Save All and then OK. Page 4
5 3 We re now back with the map editor and about to apply our field, select Terrain and then the Fields tab from the left of the screen. My settings here are Randomize Polygon ticked on, Min. length VIS tiles 2.00, Width 0.10, Disturbance 0.00 (this last one is important otherwise your level areas will simply not happen), Fill Terrain ticked on, Place Objects ticked on, Modify Terrain Heights ticked on, Check Passability off (don t know how or if this works yet) and finally Update map ticked on Selecting your field, if it fails to appear in the drop down fields list use the browse button to find where you ve saved it, they are saved as XML files and I normally store mine in the maps folder but they could be anywhere (root of your C drive anyone?) Once selected you're almost ready to go, however a few pointers, rail lines in Blitzkreig should be set at width 6.00 with 100% opacity, a width of 6 is approximately equal to one VIS tile so our embankment has to have a level area of at least 1 VIS tile for a single track railway and 3 VIS tiles for a double track. Now the setting I ve already given produces an embankment area of 3 VIS tiles on either side, so for a single track you need a field outline at least 7 VIS tiles wide and 9 VIS tiles for double track While figuring out where to put your railway lines bear in mind the width required, ensure you toggle on the Displaying Terrain Tile Grid on the map editor toolbar, it makes life much easier you can use this for precise locating of node points, the counting in of VIS tiles and just getting a straight line, it could also be worth while to lay out a track on the map and place some marker object a tree or post at either side of the track at the edge of the 7 or 9 VIS tile range and then deleting the track. Want to copy a previous layout other than counting and writing it down you could use a piece of clear acetate (the sort used for laminators or overhead slides) place it on your screen surface (it will normally be held by static) and mark the required grid points with a drywipe marker pen (works a treat). Remember that scrolling in the map editor is available only from the keyboard arrow keys Now pick the points with your cursor (you ll see a small pink circle at each node). The embankment here is rectangular so i ve picked only 4 points for my field, the start point is outside the edge of the map as the rail line is going off the map edge, the next 3 points once again are all past the edge of the map to produce my rectangle, on a bigger map you ll need an awful lot more node points for your field. If you place a wrong node at this stage you can right click on your mouse and the last node will be deleted this can be repeated until you re back at your origin point. Once you ve placed your 4 th node you can press the SPACEBAR, ENTER or RETURN key but only press one and only once, this will close the polygon, you now have the possibility of moving your node points to correct any errors, left click on the node and drag it to its correct location, you cannot insert new node points and there is no undo command (so make sure you saved the map), finally press the SPACEBAR, ENTER or RETURN key and hey presto your field. Page 5
6 Pick the node points. The field has now created the embankment below shrubs and all. Page 6
7 Laying a mesh over the map highlights the contours and shows how our embankment is not consistent at the map edges, this is a flaw in the field generator as it always levels out to the height of the existing terrain at the map edge. I m now placing the rail track using Entrenchments, Roads tabs on the left of the screen, railroad width 6 opacity 100. A space at least equal to the track width gives a reasonable double track. Page 7
8 The double track below (the shrubs can be manually edited at any time). Make sure you go to the Terrain, Heights tab and press Update, your track should appear as below. The mesh just highlights the contours again (note: this is not the grid display but the Height brush, it is bright red so it highlights the point a bit better). Page 8
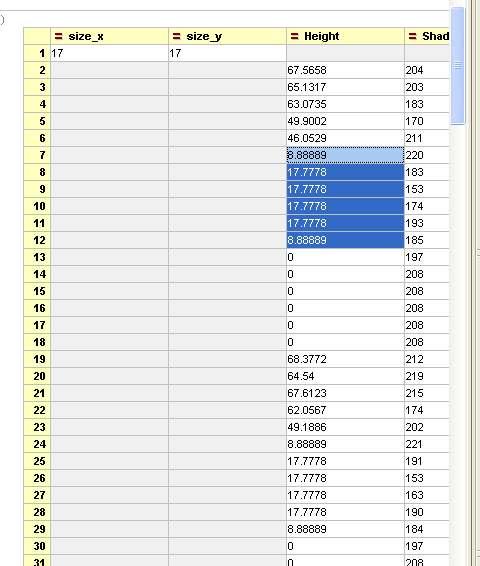
9 4 Hope you ve been saving the map frequently, things now get a bit awkward so if you re happy at each stage, save it otherwise reload your map or start again. Now go to File and save as XML. Just when you thought you d figured out the map origin points (VIS and Script origins are taken from the Western corner of the map), life gets rather screwy, in XML the first node point on the map is in the Northern corner and progresses East to the far end of the map, it then steps one node West from the Northern origin point and progresses East again it does this at all node points until reaching the Southern corner of the map, (see figure below) This map is only 1x1 patch or 16x16 VIS tiles or 1024x1024 Script points or 17x17 node points. We re concerned with the XML node points which produces 289 points or items, however the map coding in XML gives item 1 in the Terrain\Altitudes\Items table as a measurement of the node points 17x17 for the overall map and so our 289 items become items 2 to.290 these are the height points we re concerned with. So you must always add 1 to your maps total node points to figure out exactly where you are in the XML table. Note: A map of 2x2 (32x32 VIS tiles) = (32+1)x(32+1) node points = 1089 node points + 1 for XML A map of 3x3 (48x48 VIS tiles) = (48+1)x(48+1) node points = 2401 node points + 1 for XML A map of 4x4 (64x64 VIS tiles) = (64+1)x(64+1) node points = 4225 node points + 1 for XML And so on (hope that doesn t sound like gobbledygook). Page 9
 shop around, XMLspy works for me if anyone knows of something better or cheaper then let the whole community know. 5.")
10 5 I ve used XMLspy (home edition, there is a demo copy available, fully functioning for 30 days) from Altova, you can use other programs even Notepad but you don t get the nicely laid out tables just a long text string (pile of spaghetti more like) shop around, XMLspy works for me if anyone knows of something better or cheaper then let the whole community know You can see item 1 in the table above gives the map size in node points 17x17, items 2 and onwards have both a height and shade value, we re really concerned with the height value but I suppose the shade value should be corrected as well to match similar height points. Page 10

11 5.02 The table above shows item 41 to 46 with lower height points than 58 to 63 we can also see that there are 11 zero height points between our raised elevations, it s also the case that at the edge of the map the points are all zeroed so if we count back up the table 11 items 30 to 40 are zeroed correctly but items 24 to 29 should be given a raised elevation. So we copy the values from items 58 to 63 and paste them to line 41 and 24 respectively. We then have to do the same at the opposite end of the table, save the XML file and then reload the map in the Blitkreig map editor (Note: you must reload otherwise the newly edited XML will be overwritten by the map editor). Page 11
12 5.03 And voilà, well not yet only one end of this map has been altered to highlight the difference (yep and those with good observation will have noticed it s not the same map, did I not go and overwrite some of my screen captures, sods law, save rename save rename blah blah get the point, it s a must). Yeah that s it. (What happens if I place a hill next to the track.?##~~, (see below)). Page 12
.")
13 6 Well to illustrate the point with hills and other deformations, I created a small hill in the Northern corner of the map using Terrain, Height tools (at least we know that this corner will be item 2 in the XML table). Page 13
14 Press the update button and there s the hills with a deformed rail track, not so good. Here s the mesh again just to emphasise the point, how often have you seen this on a map. Page 14

15 6.01 Rename and Save the map again in XML, (at least you ll have something to fall back on if things go a bit pear shaped). We can see below the differing heights at item 2 etc. etc. Fortunately we can use our copy and paste trick in XMLspy, counting the points on the map as before. So here I ve copied the same values as before, ones we already know to be consistent with our embankment heights. Page 15

16 Now it s all just a click and paste away from rectifying our map Page 16

17 The correct heights are now entered, so once again it s time to save our XML file in XMLspy and then reload the map in the Blitzkreig map editor. Page 17
18 Page 18
19 6.02 And voilà a nice level track with a hill alongside, without deformation. Now we should save the map again both as an XML and then a BZM file so we can edit as normal and add it to a PAK file. (Note of warning: CDV/Nival do not recommend using an XML editor and encourage you to use the map editor, you ll notice that while in XML many if not all functions can be changed so be careful, all we ve altered here were height values but much more can be done including ruining considerable map making time if you get it wrong, be careful rename at each stage and constantly save your map and or XML version). Cheers for now, I m off to rest my burned out eyes. Tangram Page 19
SNOWFLAKES PHOTO BORDER - PHOTOSHOP CS6 / CC
 Photo Effects: Snowflakes Photo Border (Photoshop CS6 / CC) SNOWFLAKES PHOTO BORDER - PHOTOSHOP CS6 / CC In this Photoshop tutorial, we ll learn how to create a simple and fun snowflakes photo border,
HAPPY HOLIDAYS PHOTO BORDER
 HAPPY HOLIDAYS PHOTO BORDER In this Photoshop tutorial, we ll learn how to create a simple and fun Happy Holidays winter photo border! Photoshop ships with some great snowflake shapes that we can use in
Let s Make a Front Panel using FrontCAD
 Let s Make a Front Panel using FrontCAD By Jim Patchell FrontCad is meant to be a simple, easy to use CAD program for creating front panel designs and artwork. It is a free, open source program, with the
EXCEL BASICS: MICROSOFT OFFICE 2007
 EXCEL BASICS: MICROSOFT OFFICE 2007 GETTING STARTED PAGE 02 Prerequisites What You Will Learn USING MICROSOFT EXCEL PAGE 03 Opening Microsoft Excel Microsoft Excel Features Keyboard Review Pointer Shapes
DecisionPoint For Excel
 DecisionPoint For Excel Getting Started Guide 2015 Antivia Group Ltd Notation used in this workbook Indicates where you need to click with your mouse Indicates a drag and drop path State >= N Indicates
UV Mapping to avoid texture flaws and enable proper shading
 UV Mapping to avoid texture flaws and enable proper shading Foreword: Throughout this tutorial I am going to be using Maya s built in UV Mapping utility, which I am going to base my projections on individual
Unit 21 - Creating a Navigation Bar in Macromedia Fireworks
 Unit 21 - Creating a Navigation Bar in Macromedia Fireworks Items needed to complete the Navigation Bar: Unit 21 - House Style Unit 21 - Graphics Sketch Diagrams Document ------------------------------------------------------------------------------------------------
EXCEL BASICS: MICROSOFT OFFICE 2010
 EXCEL BASICS: MICROSOFT OFFICE 2010 GETTING STARTED PAGE 02 Prerequisites What You Will Learn USING MICROSOFT EXCEL PAGE 03 Opening Microsoft Excel Microsoft Excel Features Keyboard Review Pointer Shapes
UDK Basics Maya Export/UDK Import/Viewport and placing content
 UDK Basics Maya Export/UDK Import/Viewport and placing content By Sarah Taylor http://sarahtaylor3d.weebly.com In this tutorial I will explain some of the problems you need to look out for when transferring
ORGANIZING YOUR ARTWORK WITH LAYERS
 9 ORGANIZING YOUR ARTWORK WITH LAYERS Lesson overview In this lesson, you ll learn how to do the following: Work with the Layers panel. Create, rearrange, and lock layers and sublayers. Move objects between
Word 3 Microsoft Word 2013
 Word 3 Microsoft Word 2013 Mercer County Library System Brian M. Hughes, County Executive Action Technique 1. Insert a Text Box 1. Click the Insert tab on the Ribbon. 2. Then click on Text Box in the Text
DOING MORE WITH WORD: MICROSOFT OFFICE 2013
 DOING MORE WITH WORD: MICROSOFT OFFICE 2013 GETTING STARTED PAGE 02 Prerequisites What You Will Learn USING MICROSOFT WORD PAGE 03 Viewing Toolbars Adding and Removing Buttons MORE TASKS IN MICROSOFT WORD
Photoshop tutorial: Final Product in Photoshop:
 Disclaimer: There are many, many ways to approach web design. This tutorial is neither the most cutting-edge nor most efficient. Instead, this tutorial is set-up to show you as many functions in Photoshop
POWERPOINT BASICS: MICROSOFT OFFICE 2010
 POWERPOINT BASICS: MICROSOFT OFFICE 2010 GETTING STARTED PAGE 02 Prerequisites What You Will Learn USING MICROSOFT POWERPOINT PAGE 03 Microsoft PowerPoint Components SIMPLE TASKS IN MICROSOFT POWERPOINT
FrontPage 98 Quick Guide. Copyright 2000 Peter Pappas. edteck press All rights reserved.
 Master web design skills with Microsoft FrontPage 98. This step-by-step guide uses over 40 full color close-up screen shots to clearly explain the fast and easy way to design a web site. Use edteck s QuickGuide
Using Microsoft Excel
 About Excel Using Microsoft Excel What is a Spreadsheet? Microsoft Excel is a program that s used for creating spreadsheets. So what is a spreadsheet? Before personal computers were common, spreadsheet
Understanding the Interface
 2. Understanding the Interface Adobe Photoshop CS2 for the Web H O T 2 Understanding the Interface The Welcome Screen Interface Overview Customizing Palette Locations Saving Custom Palette Locations Customizing
Creating Vector Shapes Week 2 Assignment 1. Illustrator Defaults
 Illustrator Defaults Before we begin, we are going to make sure that all of us are using the same settings within our application. For this class, we will always want to make sure that our application
Quick Crash Scene Tutorial
 Quick Crash Scene Tutorial With Crash Zone or Crime Zone, even new users can create a quick crash scene diagram in less than 10 minutes! In this tutorial we ll show how to use Crash Zone s unique features
Interactive Tourist Map
 Adobe Edge Animate Tutorial Mouse Events Interactive Tourist Map Lesson 1 Set up your project This lesson aims to teach you how to: Import images Set up the stage Place and size images Draw shapes Make
DOING MORE WITH POWERPOINT: MICROSOFT OFFICE 2013
 DOING MORE WITH POWERPOINT: MICROSOFT OFFICE 2013 GETTING STARTED PAGE 02 Prerequisites What You Will Learn USING MICROSOFT POWERPOINT PAGE 03 Slide Views MORE TASKS IN MICROSOFT POWERPOINT PAGE 05 Formatting
Fig. A. Fig. B. Fig. 1. Fig. 2. Fig. 3 Fig. 4
 Create A Spinning Logo Tutorial. Bob Taylor 2009 To do this you will need two programs from Xara: Xara Xtreme (or Xtreme Pro) and Xara 3D They are available from: http://www.xara.com. Xtreme is available
Making use of other Applications
 AppGameKit 2 Collision Using Arrays Making use of other Applications Although we need game software to help makes games for modern devices, we should not exclude the use of other applications to aid the
DOING MORE WITH WORD: MICROSOFT OFFICE 2010
 DOING MORE WITH WORD: MICROSOFT OFFICE 2010 GETTING STARTED PAGE 02 Prerequisites What You Will Learn USING MICROSOFT WORD PAGE 03 Viewing Toolbars Adding and Removing Buttons MORE TASKS IN MICROSOFT WORD
On the Web sun.com/aboutsun/comm_invest STAROFFICE 8 DRAW
 STAROFFICE 8 DRAW Graphics They say a picture is worth a thousand words. Pictures are often used along with our words for good reason. They help communicate our thoughts. They give extra information that
In this lesson, you ll learn how to:
 LESSON 5: ADVANCED DRAWING TECHNIQUES OBJECTIVES In this lesson, you ll learn how to: apply gradient fills modify graphics by smoothing, straightening, and optimizing understand the difference between
In this lesson you are going to create a drawing program similar to Windows Paint. 1. Start with a new project and remove the default cat sprite.
 Drawing Program In this lesson you are going to create a drawing program similar to Windows Paint. 1. Start with a new project and remove the default cat sprite. 2. Create a new sprite. 3. The new sprite
A Step-by-Step Guide to getting started with Hot Potatoes
 A Step-by-Step Guide to getting started with Hot Potatoes Hot Potatoes Software: http://web.uvic.ca/hrd/hotpot/ Andrew Balaam Objectives: To put together a short cycle of exercises linked together based
An Animated Scene. Pick a color for the street. Then use the Paint can to fill the lower part of the page with grass.
 An Animated Scene In this project, you create a simple animated scene with graphics, a bit of text, a simple animation and some music. Click on the Steps below and be creative! Remember: if you must leave
creating files and saving for web
 creating files and saving for web the template files assume a default image size of 300 x 300 pixels images intended for the web should be produced in rgb mode name your images in a logical format, so
Learning to use the drawing tools
 Create a blank slide This module was developed for Office 2000 and 2001, but although there are cosmetic changes in the appearance of some of the tools, the basic functionality is the same in Powerpoint
How to Create Greeting Cards using LibreOffice Draw
 by Len Nasman, Bristol Village Ohio Computer Club If you want to create your own greeting cards, but you do not want to spend a lot of money on special software, you are in luck. It turns out that with
Graphing on Excel. Open Excel (2013). The first screen you will see looks like this (it varies slightly, depending on the version):
. The first screen you will see looks like this (it varies slightly, depending on the version):") Graphing on Excel Open Excel (2013). The first screen you will see looks like this (it varies slightly, depending on the version): The first step is to organize your data in columns. Suppose you obtain
Graphing on Excel Open Excel (2013). The first screen you will see looks like this (it varies slightly, depending on the version): The first step is to organize your data in columns. Suppose you obtain
Tutorial: Making your First Level
 Tutorial: Making your First Level This tutorial walks you through the steps to making your first level, including placing objects, modifying the terrain, painting the terrain and placing vegetation. At
HOW TO. In this section, you will find. miscellaneous handouts that explain. HOW TO do various things.
 In this section, you will find miscellaneous handouts that explain do various things. 140 SAVING Introduction Every time you do something, you should save it on the DESKTOP. Click Save and then click on
Printing Envelopes in Microsoft Word
 Printing Envelopes in Microsoft Word P 730 / 1 Stop Addressing Envelopes by Hand Let Word Print Them for You! One of the most common uses of Microsoft Word is for writing letters. With very little effort
Making ecards Can Be Fun!
 Making ecards Can Be Fun! A Macromedia Flash Tutorial By Mike Travis For ETEC 664 University of Hawaii Graduate Program in Educational Technology April 4, 2005 The Goal The goal of this project is to create
Introducing Activstudio
 Introducing Activstudio Version 3 COPYRIGHT INFORMATION Introducing Activstudio Version 3 Copyright 2007 Promethean Limited. All rights reserved. If this guide is distributed with Activstudio software,
FACULTY AND STAFF COMPUTER FOOTHILL-DE ANZA. Office Graphics
 FACULTY AND STAFF COMPUTER TRAINING @ FOOTHILL-DE ANZA Office 2001 Graphics Microsoft Clip Art Introduction Office 2001 wants to be the application that does everything, including Windows! When it comes
Background on Kingdom Suite for the Imperial Barrel Competition 3D Horizon/Fault Interpretation Parts 1 & 2 - Fault Interpretation and Correlation
 Background on Kingdom Suite for the Imperial Barrel Competition 3D Horizon/Fault Interpretation Parts 1 & 2 - Fault Interpretation and Correlation Wilson (2010) 1 Fault/Horizon Interpretation Using Seismic
Making parchments and parchment scrolls
 Making parchments and parchment scrolls I am delighted to accept an invitation from Profantasy to present the methods I use to make parchment and parchment scrolls for use as backgrounds in CC3. I hope
_Tutorials. Arcmap. Linking additional files outside from Geodata
 _Tutorials Arcmap Linking additional files outside from Geodata 2017 Sourcing the Data (Option 1): Extracting Data from Auckland Council GIS P1 First you want to get onto the Auckland Council GIS website
Your First Windows Form
 Your First Windows Form From now on, we re going to be creating Windows Forms Applications, rather than Console Applications. Windows Forms Applications make use of something called a Form. The Form is
Basic Tools. Chapter 1. Getting started
 Chapter 1 Basic Tools Getting started Jasc Paint Shop Pro is a powerful art package which you can use to paint, write text, retouch photos and make images ready for the web. After only a few lessons you
lundi 7 janvier 2002 Blender: tutorial: Building a Castle Page: 1
 lundi 7 janvier 2002 Blender: tutorial: Building a Castle Page: 1 www.blender.nl this document is online at http://www.blender.nl/showitem.php?id=4 Building a Castle 2000 07 19 Bart Veldhuizen id4 Introduction
Krita Advanced Coloring Tutorial!
 Krita Advanced Coloring Tutorial! So I m going to now teach you some methods to coloring your lineart REMEMBER: Save lots during your project and save different versions so you can go back into your older
TUTORIAL SESSION Technical Group Hoda Najafi & Sunita Bhide
 TUTORIAL SESSION 2014 Technical Group Hoda Najafi & Sunita Bhide SETUP PROCEDURE Start the Altium Designer Software. (Figure 1) Ensure that the Files and Projects tabs are located somewhere on the screen.
DOING MORE WITH WORD: MICROSOFT OFFICE 2007
 DOING MORE WITH WORD: MICROSOFT OFFICE 2007 GETTING STARTED PAGE 02 Prerequisites What You Will Learn USING MICROSOFT WORD PAGE 03 Viewing Toolbars Adding and Removing Buttons MORE TASKS IN MICROSOFT WORD
How to Create a Simple Animation Using MAYA
 How to Create a Simple Animation Using MAYA Jennifer Soltz July 29, 2011 0 Table of Contents Introduction Safety Information. 2. 3 What you need Materials Overview Diagram. 4. 4 Instructions Setup Modeling
Easy Windows Working with Disks, Folders, - and Files
 Easy Windows 98-3 - Working with Disks, Folders, - and Files Page 1 of 11 Easy Windows 98-3 - Working with Disks, Folders, - and Files Task 1: Opening Folders Folders contain files, programs, or other
Creating a Title Block & Border Using Chief Architect. Architectural Design & Residential Construction Penncrest High School
 Creating a Title Block & Border Using Chief Architect Architectural Design & Residential Construction Penncrest High School 2017-2018 Select New Layout to begin designing your Title Block. Note: Once the
Tutorial 3: Using the Waveform Viewer Introduces the basics of using the waveform viewer. Read Tutorial SIMPLIS Tutorials SIMPLIS provide a range of t
 Tutorials Introductory Tutorials These tutorials are designed to give new users a basic understanding of how to use SIMetrix and SIMetrix/SIMPLIS. Tutorial 1: Getting Started Guides you through getting
Microsoft Word 2010 Guide
 Microsoft Word 2010 Guide 1 Microsoft Word 2010 These notes are devised for Word 2010. You should be aware that it is similar to Word 2007 but is quite different from earlier versions of Word, e.g. Word
An Approach to Content Creation for Trainz
 An Approach to Content Creation for Trainz Paul Hobbs Part 6 GMax Basics (Updates and sample files available from http://www.44090digitalmodels.de) Page 1 of 18 Version 3 Index Foreward... 3 The Interface...
Shape and Line Tools. tip: Some drawing techniques are so much easier if you use a pressuresensitive
 4Drawing with Shape and Line Tools Illustrator provides tools for easily creating lines and shapes. Drawing with shapes (rectangles, ellipses, stars, etc.) can be a surprisingly creative and satisfying
9 Using Appearance Attributes, Styles, and Effects
 9 Using Appearance Attributes, Styles, and Effects You can alter the look of an object without changing its structure using appearance attributes fills, strokes, effects, transparency, blending modes,
A Guide to Autodesk Maya 2015
 A Guide to Autodesk Maya 2015 Written by Mitchell Youngerman Table of Contents Layout of Toolbars...pg 1 Creating Objects...pg 2 Selecting & Deselecting Objects...pg 3 Changing Perspective... pg 4 Transforming
DTM Mapping Addition of Customisable Toolbars
 Well another year has passed here at the office and another version of the NRG Survey System for Windows is being released. Version 7 will be available from September 2003 onwards. We feel that the User
Audacity Stereo Wave Recorder and Editor
 Audacity Stereo Wave Recorder and Editor Here s a brief rundown on First connect the cable from the headphone jack on the boombox to the microphone jack on the front of the computer in your room. Next
Create and edit word processing. Pages.
 Create and edit word processing documents with Pages. In this chapter, we begin to get work done on the ipad by using Pages to create and format documents. Creating a New Document Styling and Formatting
Tips & Tricks for Microsoft Word
 T 330 / 1 Discover Useful Hidden Features to Speed-up Your Work in Word For what should be a straightforward wordprocessing program, Microsoft Word has a staggering number of features. Many of these you
Transforming Selections In Photoshop
 Transforming Selections In Photoshop Written by Steve Patterson. In previous tutorials, we learned how to draw simple shape-based selections with Photoshop s Rectangular and Elliptical Marquee Tools. Using
1 Introduction to Using Excel Spreadsheets
 Survey of Math: Excel Spreadsheet Guide (for Excel 2007) Page 1 of 6 1 Introduction to Using Excel Spreadsheets This section of the guide is based on the file (a faux grade sheet created for messing with)
seminar learning system Seminar Author and Learning System are products of Information Transfer LLP.
 seminar learning system Seminar Author and Learning System are products of Information Transfer LLP. Burleigh House 15 Newmarket Road Cambridge UK CB5 8EG E-mail: support@seminar.co.uk Phone: +44 (0)1223
All textures produced with Texture Maker. Not Applicable. Beginner.
 Tutorial for Texture Maker 2.8 or above. Note:- Texture Maker is a texture creation tool by Tobias Reichert. For further product information please visit the official site at http://www.texturemaker.com
Part 6 - Constructing Railroad Bridges
 Part 6 - Constructing Railroad Bridges Bridges are a vital part of every railroad, and in Train Simulator we are fortunate to have a large variety of them, both in the game itself and available through
Step 1: Create A New Photoshop Document
 Snowflakes Photo Border In this Photoshop tutorial, we ll learn how to create a simple snowflakes photo border, which can be a fun finishing touch for photos of family and friends during the holidays,
Intro To Excel Spreadsheet for use in Introductory Sciences
 INTRO TO EXCEL SPREADSHEET (World Population) Objectives: Become familiar with the Excel spreadsheet environment. (Parts 1-5) Learn to create and save a worksheet. (Part 1) Perform simple calculations,
Designed by Jason Wagner, Course Web Programmer, Office of e-learning NOTE ABOUT CELL REFERENCES IN THIS DOCUMENT... 1
 Excel Essentials Designed by Jason Wagner, Course Web Programmer, Office of e-learning NOTE ABOUT CELL REFERENCES IN THIS DOCUMENT... 1 FREQUENTLY USED KEYBOARD SHORTCUTS... 1 FORMATTING CELLS WITH PRESET
PowerPoint 2003 for Windows Version Technology Workshop: Basic PowerPoint Animation for Music Presentations
 PowerPoint 2003 for Windows Version! Technology Workshop: Basic PowerPoint Animation for Music Presentations Edmond Johnson February 13, 2008 Three Basic Animation Techniques 1. Making things appear 2.
Adobe Photoshop CS2 Reference Guide For Windows
 This program is located: Adobe Photoshop CS2 Reference Guide For Windows Start > All Programs > Photo Editing and Scanning >Adobe Photoshop CS2 General Keyboarding Tips: TAB Show/Hide Toolbox and Palettes
Tangents. In this tutorial we are going to take a look at how tangents can affect an animation.
 Tangents In this tutorial we are going to take a look at how tangents can affect an animation. One of the 12 Principles of Animation is called Slow In and Slow Out. This refers to the spacing of the in
Introduction To Inkscape Creating Custom Graphics For Websites, Displays & Lessons
 Introduction To Inkscape Creating Custom Graphics For Websites, Displays & Lessons The Inkscape Program Inkscape is a free, but very powerful vector graphics program. Available for all computer formats
PowerPoint Basics: Create a Photo Slide Show
 PowerPoint Basics: Create a Photo Slide Show P 570 / 1 Here s an Enjoyable Way to Learn How to Use Microsoft PowerPoint Microsoft PowerPoint is a program included with all versions of Microsoft Office.
Using Microsoft Word. Working With Objects
 Using Microsoft Word Many Word documents will require elements that were created in programs other than Word, such as the picture to the right. Nontext elements in a document are referred to as Objects
Interface. 2. Interface Adobe InDesign CS2 H O T
 2. Interface Adobe InDesign CS2 H O T 2 Interface The Welcome Screen Interface Overview The Toolbox Toolbox Fly-Out Menus InDesign Palettes Collapsing and Grouping Palettes Moving and Resizing Docked or
This guide will help you with many of the basics of operation for your Epson 485wi BrightLink Projector with interactive functionality.
 This guide will help you with many of the basics of operation for your Epson 485wi BrightLink Projector with interactive functionality. If you need further assistance with questions, you can refer to the
S A M P L E C H A P T E R
 SAMPLE CHAPTER Anyone Can Create an App by Wendy L. Wise Chapter 5 Copyright 2017 Manning Publications brief contents PART 1 YOUR VERY FIRST APP...1 1 Getting started 3 2 Building your first app 14 3 Your
Creating Digital Illustrations for Your Research Workshop III Basic Illustration Demo
 Creating Digital Illustrations for Your Research Workshop III Basic Illustration Demo Final Figure Size exclusion chromatography (SEC) is used primarily for the analysis of large molecules such as proteins
1 Interface Fundamentals
 1 Interface Fundamentals Windows The Media Composer interface is focused on three primary windows: the Composer, the Timeline and the Project. The Composer window contains the source and record monitors
Introduction to PowerPoint 2007
 Introduction to PowerPoint 2007 PowerPoint is one of the programs included in the Microsoft Office suite. It s used to create presentations, also called slide shows, that are typically displayed via a
SlickEdit Gadgets. SlickEdit Gadgets
 SlickEdit Gadgets As a programmer, one of the best feelings in the world is writing something that makes you want to call your programming buddies over and say, This is cool! Check this out. Sometimes
Create a Seating Chart Layout in PowerTeacher
 Nova Scotia Public Education System Create a Seating Chart Layout in PowerTeacher Revision Date: 1 Seating Chart Overview...3 2 How to Create a Seating Chart Layout...4 3 How to Create Additional Layouts
4. If you are prompted to enable hardware acceleration to improve performance, click
 Exercise 1a: Creating new points ArcGIS 10 Complexity: Beginner Data Requirement: ArcGIS Tutorial Data Setup About creating new points In this exercise, you will use an aerial photograph to create a new
The purpose of this tutorial is to introduce you to the Construct 2 program. First, you will be told where the software is located on the computer
 Learning Targets: Students will be introduced to industry recognized game development software Students will learn how to navigate within the software Students will learn the basics on how to use Construct
Sims 3 Custom Paintings with EA Meshes
 Sims 3 Custom Paintings with EA Meshes With the public release of the TSR Workshop everyone is anxious to get busy making all sorts of custom content. But, if you re like me and can t mesh yet! But, still
Adobe Premiere: Getting Started
 Prepared by Ansel Herz for the UW Department of Communication http://www.com.washington.edu/tech/irc/ Questions? Comments? Contact Kristina Bowman at kriscb@uw.edu. Adobe Premiere: Getting Started This
Get comfortable using computers
 Mouse A computer mouse lets us click buttons, pick options, highlight sections, access files and folders, move around your computer, and more. Think of it as your digital hand for operating a computer.
HYPERSTUDIO TOOLS. THE GRAPHIC TOOL Use this tool to select graphics to edit. SPRAY PAINT CAN Scatter lots of tiny dots with this tool.
 THE BROWSE TOOL Us it to go through the stack and click on buttons THE BUTTON TOOL Use this tool to select buttons to edit.. RECTANGLE TOOL This tool lets you capture a rectangular area to copy, cut, move,
Create Geomark in Google Earth Tutorial
 Create Geomark in Google Earth Tutorial General business example a potential applicant / user wants to create an area of interest that can be shared electronically to another party eg: another agency,
Tricking it Out: Tricks to personalize and customize your graphs.
 Tricking it Out: Tricks to personalize and customize your graphs. Graphing templates may be used online without downloading them onto your own computer. However, if you would like to use the templates
Copyright 2018 MakeUseOf. All Rights Reserved.
 15 Power User Tips for Tabs in Firefox 57 Quantum Written by Lori Kaufman Published March 2018. Read the original article here: https://www.makeuseof.com/tag/firefox-tabs-tips/ This ebook is the intellectual
Create a Swirly Lollipop Using the Spiral Tool Philip Christie on Jun 13th 2012 with 12 Comments
 Advertise Here Create a Swirly Lollipop Using the Spiral Tool Philip Christie on Jun 13th 2012 with 12 Comments Tutorial Details Program: Adobe Illustrator CS5 Difficulty: Beginner Es timated Completion
Pen Tool, Fill Layers, Color Range, Levels Adjustments, Magic Wand tool, and shadowing techniques
 Creating a superhero using the pen tool Topics covered: Pen Tool, Fill Layers, Color Range, Levels Adjustments, Magic Wand tool, and shadowing techniques Getting Started 1. Reset your work environment
Beginning Tutorial the Lego
 Beginning Tutorial the Lego In this tutorial, you will construct a simple hollowed-out block with a hole in it (looks like a Lego). You will learn the basics of creating and modifying sketches and features.
Survey of Math: Excel Spreadsheet Guide (for Excel 2016) Page 1 of 9
 Page 1 of 9") Survey of Math: Excel Spreadsheet Guide (for Excel 2016) Page 1 of 9 Contents 1 Introduction to Using Excel Spreadsheets 2 1.1 A Serious Note About Data Security.................................... 2 1.2
Survey of Math: Excel Spreadsheet Guide (for Excel 2016) Page 1 of 9 Contents 1 Introduction to Using Excel Spreadsheets 2 1.1 A Serious Note About Data Security.................................... 2 1.2
The Polygonal Lasso Tool In Photoshop
 The Polygonal Lasso Tool In Photoshop Written by Steve Patterson. Photoshop s Polygonal Lasso Tool, another of its basic selections tools, is a bit like a cross between the Rectangular Marquee Tool and
Lab 3: Digitizing in ArcGIS Pro
 Lab 3: Digitizing in ArcGIS Pro What You ll Learn: In this Lab you ll be introduced to basic digitizing techniques using ArcGIS Pro. You should read Chapter 4 in the GIS Fundamentals textbook before starting
Vectorworks Essential Tutorial Manual by Jonathan Pickup. Sample
 Vectorworks Essential Tutorial Manual by Jonathan Pickup Table of Contents 0.0 Introduction... iii 0.1 How to Use this Manual... iv 0.2 Real World Sizes... iv 0.3 New Ways of Drawing... v 1.0 Introduction
Part 1: Basics. Page Sorter:
 Part 1: Basics Page Sorter: The Page Sorter displays all the pages in an open file as thumbnails and automatically updates as you add content. The page sorter can do the following. Display Pages Create