Comodo Endpoint Security Manager Professional Edition Software Version 3.0
|
|
|
- Meredith Jefferson
- 6 years ago
- Views:
Transcription
1 Comodo Endpoint Security Manager Professional Edition Software Version 3.0 Administrator Guide Guide Version Comodo Security Solutions 1255 Broad Street STE 100 Clifton, NJ 07013
2 Table of Contents 1.Introduction to Comodo Endpoint Security Manager - Professional Edition Software Components and System Requirements Removing Incompatible Products Installing and Configuring the Service Key Concepts Best Practices Quick Start Guide The Administrative Console Logging-in to the Administrative Console The Computers Area Viewing Details and Managing Endpoints Viewing General Properties Viewing and Managing Group and Security Policy Details Viewing and Managing Endpoint Security Software Viewing and Managing Installed Applications Viewing and Managing Currently Running Services Viewing and Managing Currently Running Processes Viewing and Managing Drives and Storage Viewing Event Log Adding Endpoint Computers to CESM Importing Computers by Automatic Installation of Agent Adding Computers by Manual Installation of Agent Updating Comodo Software on Managed Computers Running On-Demand Scan on Selected Endpoints Updating Virus Database on Individual Endpoints Accessing Endpoints through Remote Desktop Sharing Session The Groups Area Creating New Groups and Importing Existing Endpoints Viewing and Managing Groups Running On-Demand Scan on Endpoint Groups Updating Virus Signature Database on Endpoint Groups Generating Reports for Selected Group The Policies Area Creating a New Security Policy Editing a Security Policy General Properties Selecting Target Groups Configuring Antivirus Settings Configuring Firewall Settings Configuring Defense+ Settings Configuring File Rating Settings Configuring General CES Settings Configuring Agent Settings Configuring System Settings
3 5.3.Re-applying Security Policies to Endpoint Groups Viewing and Managing Installed Applications Viewing and Managing Currently Running Processes Viewing and Managing Services The Reports Area Antivirus Updates Report CES Configuration Report CES Log Report Computer Details Report Computer Infections Report Malware Statistics Report Policy Compliance Report Policy Delta Report Quarantined Items Report Top 10 Malwares Report Viewing ESM Information Viewing Server Information Viewing Support Information Viewing License Information Upgrading Your License Viewing the About Screen Viewing and Managing Preferences Downloading ESM Packages Configuring General Settings Managing Notifications Viewing and Managing Dependent Servers Adding a Dependent Server Logging into a Dependent Server Importing Endpoints to a Dependent Server Managing Endpoints Controlled by a Dependent Server Editing Dependent Servers Removing Dependent Servers Appendix 1 - The Service Configuration Tool Start and Stop the ESM Service Main Settings Server Certificate Internet and Mail Settings Caching Proxy Settings Viewing Database Event Log About Appendix 2 - How to... Tutorials How to Configure CES policies - An Introduction How to Setup External Access from Internet How to Install CES on Endpoints Added by Manually Installing the Agent About Comodo
4 1.Introduction to Comodo Endpoint Security Manager - Professional Edition Comodo Endpoint Security Manager (CESM) Professional Edition is designed to help administrators of corporate networks deploy, manage and monitor Comodo Endpoint Security software on networked computers. Total Protection for networked computers The most powerful & intuitive all-purpose Endpoint manager in its class, CESM PE manages not only the security of your workstations, laptops and netbooks, but now also manages their system status. Once installed through the simplified wizards, endpoints are quickly and efficiently discovered via Active Directory query or IP address range. They can then be grouped as required and administrative policies applied. CESM will automatically reapply those policies to endpoints not compliant with their required configurations. More efficient, effective and easier management This ability to roll out and centrally manage security policies to a network that is protected with a proven and fully integrated security suite can save thousands of man-hours per year. Administrator time that would otherwise be lost to repetitive configuration and vendor interoperability problems can be re-directed towards more productive and profitable core business interests. Furthermore, because CESM policies can be deployed immediately across all protected nodes, administrators can respond more quickly to protect an entire network against the latest, zero hour threats. CESM's intuitive interface provides fingertip access to task wizards, important network and task related data and support resources. Features: Total visibility and control over endpoint security through a centralized, web-based console. New, panorama-style, interface compatible with touch-screen computers. 4
5 Seamless import and control of Microsoft Active Directory Domain into the CESM Administrative Console. Proven endpoint protection from Comodo Endpoint Security software including real-time antivirus, packet-filtering firewall, automatic sand-boxing of untrusted files and strict host intrusion prevention. Provides granular software and hardware details for each endpoint including OS version, installed applications, CPU and RAM usage and more. Effortless endpoint management. Remotely restart endpoints, manage running applications, processes and services. initiate remote desktop sessions through the CESM interface and more. Highly configurable policies allow admins to enforce power options and device availability controls on endpoints. New 'Internet policy' supports different CES configuration for devices when inside or outside of the network. Real time notifications lower emergency response time to emerging threats. Supports Linux and MacOS based computers (device management only). New reports with built in drill down to computers and in-report remediation. Guide Structure This guide is intended to take you through the configuration and use of Comodo Endpoint Security Manager Professional Edition and is broken down into the following main sections. The Computers Area - Plays a key role in the CESM Administrative Console interface by providing system administrators with the ability to import, view and manage networked computers. Add/Import computers to CESM for centralized management. View complete details of the endpoints that are managed by CESM. Assign and re-assign endpoints to groups. Manage quarantined items, currently running applications, processes and services in remote endpoints. Managing drives and storage at the endpoints. Run on-demand antivirus scans on individual or a bunch of selected endpoints. Start shared remote desktop session with remote endpoints. The Groups Area - Allows administrators to create endpoint groups in accordance with your organization's structure and apply appropriate security policies. Create computer Groups for easy administration. Apply security policies to groups. Run on-demand antivirus scans on individual or multiple endpoints. Generate granular reports for grouped endpoints. The Policies Area - Allows administrators to create, import and manage security policies for endpoint machines. View and modify the configuration of any policy - including name, description, CES components, target computers and whether the policy should allow local configuration. Create new policies by importing settings from another computer or by modifying an existing policy. Apply policies to entire endpoint groups. The Applications area - View all applications installed on endpoints and uninstall unwanted applications. The Processes area - View the processes running currently on all the endpoints in real time and terminate unnecessarily running processes at selected endpoints. The Services Area - View the Windows Services, Unix Daemons and Mac Services that are loaded on all the managed endpoints and start or stop services on selected endpoints. The Reports Area - Generate highly informative, graphical summaries of the security and status of managed endpoints. Drill-down reports can be ordered for anything from a single machine right up to the entire managed network. Each report type is highly customizable according to administrator's requirements. Reports can be exported to.pdf and.xls formats for printing and/or distribution. 5
6 Available reports include endpoint CES configuration, policy compliance, malware statistics, policy delta, CES logs, quarantined items and more. The Help Area - Allows the administrator to view CESM version and update information, view and upgrade licenses, and view support information. View the version and update information. View the license information and activate/upgrade licenses. View details of the server upon which CESM is installed and download agent setup files for different operating systems for manual installation on endpoints connected through external networks. View support contact information and different ways to get help on CESM. The Preferences Area - Allows the administrators to configure report archives, notifications and dependent CESM servers and to download CESM agents for offline installation on remote endpoints. Download CESM Agent for installation on to remote endpoints, to manually add them to CESM Configure the lifetime of the generated reports generated and retained in CESM server. Configure automated notifications from CESM. CESM can send notification mails to administrator on the occurrence of certain events like virus outbreaks, malware found and more. Configure 'dependent' CESM servers. Centrally manage and configure any subordinate CESM server currently managing endpoints on a different network. 1.1.Software Components and System Requirements Software Components CESM Professional Edition consist of three interdependent software components: The Administrative Console The Central Service The Remote Agent Administrative Console The Administrative Console provides access to all functionality of Comodo Endpoint Security Manager through a friendly and highly configurable interface. Administrators can use the console to deploy, manage and monitor Comodo Endpoint security software on networked computers. Click here to go to the Admin console help pages. Click here for system requirements for endpoint machines that run the administrative console. Central Service Click here to read about logging into the console. The Central Service is the main functional module responsible for performance of all CESM system tasks. Central Service also keeps and updates information on all current and past system's activities. Click here for a guide that explains how to install Central Service. Click here for system requirements for machines that run the central service. Click here to read about the central service configuration tool. Remote Agents Remote Agents are intermediaries between remotely managed PC's and CESM Central Service and must be installed on every managed PC. CESM Remote Agents are responsible for receiving tasks and requests from the Central Service and executing those tasks on the Managed Computers. ('Tasks' from Central Service include operations such as installing or uninstalling software, fetching report information and applying security policy). Endpoints imported into a CESM service can be managed only by the same CESM service - meaning the agent cannot be reconfigured to connect to any other CESM service - a feature which increases security. Click here for system requirements for endpoint machines that run the agent. Click here to read how to install and deploy the agent. 6
7 System Requirements CESM Central Service Computer (the PC that will run the Endpoint Security Manager software) CENTRAL SERVICE COMPUTER - SYSTEM REQUIREMENTS Hardware Component 32 bit 64-Bit Processor 1 GHz 32 bit processor 1 GHz 64 bit processor Memory 1 GB RAM minimum (2-4 GB recommended) 2 GB RAM minimum (4 GB recommended) Hard Disk 16 GB 20 GB Display Super VGA (1024x768) or higher resolution video adapter and monitor Super VGA (1024x768) or higher resolution video adapter and monitor Software Operating System Software Environment Database The following operating systems are supported: The following operating systems are supported: Microsoft Windows Server Family: Microsoft Windows Server Family: Windows Server 2003 SP2 or higher Windows Server 2003 SP2 or higher Windows Server 2003 Small Business Server Windows Server 2003 Small Business Server Windows Server 2003 R2 Windows Server 2003 R2 Windows Server 2008 SP2 or higher Windows Server 2008 SP2 or higher Windows Server 2008 Small Business Server Windows Server 2008 Small Business Server Windows Server 2012 Windows Server 2008 R2 Microsoft Windows Client Family: Windows Server 2012 Windows XP SP3 or higher Microsoft Windows Client Family: Windows Vista Windows Vista Windows 7 Windows 7 Windows 8 Windows 8 Microsoft.NET Framework 4.5 Microsoft.NET Framework 4.5 Microsoft ReportViewer 2010 SP1 Microsoft ReportViewer 2010 SP1 (Note - The above components will be installed automatically if not present) (Note - The above components will be installed automatically if not present) Microsoft SQL Server 2012 Express LocalDB Microsoft SQL Server 2012 Express LocalDB (Note - The above component will be installed automatically if not present) (Note - The above component will be installed automatically if not present) 7
8 CENTRAL SERVICE COMPUTER - SYSTEM REQUIREMENTS Other Requirements The CESM program modules (Console, Service and Agent) may require Windows Firewall and/or personal firewall configuration changes in order to operate successfully. By default, the CESM Central Service is assigned: TCP Port 9901 open to the Internet for inbound connections from Agents on portable computers TCP Ports 57193, open to the Internet for inbound http: and https: console connections These ports can be opened in Windows Firewall by opening the control panel, selecting 'Windows Firewall > Exceptions > Add Port...' then specifying each of the ports above in turn. CESM Administrative Console computer - (PCs that will run the browser-based interface for configuring and managing the CESM Central Service (this computer may also be the Central Service PC) ADMINISTRATIVE CONSOLE COMPUTER - SYSTEM REQUIREMENTS Hardware Component Display 32 bit 64-Bit Minimum 1024x768 display with windowed browser Touch capable display interface and operating system (optional) Minimum 1024x768 display with windowed browser Touch capable display interface and operating system (optional) Software Operating System Browsers and software The following operating systems are supported: The following operating systems are supported: Microsoft Windows Server Family: Microsoft Windows Server Family: Windows Server 2003 SP2 or higher Windows Server 2003 SP2 or higher Windows Server 2003 Small Business Server Windows Server 2003 Small Business Server Windows Server 2003 R2 Windows Server 2003 R2 Windows Server 2008 SP2 or higher Windows Server 2008 SP2 or higher Windows Server 2008 Small Business Server Windows Server 2008 Small Business Server Windows Server 2012 Windows Server 2008 R2 Microsoft Windows Client Family: Windows Server 2012 Windows XP SP3 or higher Microsoft Windows Client Family: Windows Vista Windows Vista Windows 7 Windows 7 Windows 8 Windows 8 Microsoft Silverlight 5.1 Microsoft Silverlight 5.1 Microsoft Internet Explorer 7.0 or higher Microsoft Internet Explorer 7.0 or higher Mozilla Firefox 3.0 or higher Mozilla Firefox 3.0 or higher Google Chrome 4.0 or higher Google Chrome 4.0 or higher Comodo Dragon 15.0 or higher Other 8
9 ADMINISTRATIVE CONSOLE COMPUTER - SYSTEM REQUIREMENTS Requirements TCP Ports 57193,57194 will be used for http: and https: connections Endpoint Computer - (a managed PC that will run Comodo Endpoint Security and the Agent) ENDPOINT COMPUTER - SYSTEM REQUIREMENTS Hardware Component 32 bit 64-Bit Processor recommended 1 GHz 32 bit processor 1 GHz 64 bit processor Memory recommended 1 GB RAM 2 GB RAM Software Operating System Other Requirements The following operating systems are supported: The following operating systems are supported: Microsoft Windows Server Family: Windows Server 2003 SP2 or higher Windows Server 2003 Small Business Server Windows Server 2003 R2 Windows Server 2008 SP2 or higher Windows Server 2008 Small Business Server Windows Server 2012 Microsoft Windows Client Family: Windows XP SP3 or higher Windows Vista Windows 7 Windows 8 Microsoft Windows Server Family: Windows Server 2003 SP2 or higher Windows Server 2003 Small Business Server Windows Server 2003 R2 Windows Server 2008 SP2 or higher Windows Server 2008 Small Business Server Windows Server 2008 R2 Windows Server 2012 Microsoft Windows Client Family: Windows Vista Windows 7 Windows 8 The CESM program modules (Console, Service and Agent) may require Windows Firewall and/or personal firewall configuration changes in order to operate successfully. By default, the CESM Central Service is assigned: TCP Port 9901 for connections with the CESM Agent. These ports can be opened in Windows Firewall by opening the control panel, selecting 'Windows Firewall > Exceptions > Add Port...' then specifying each of the ports above in turn. Also for ESM Agent installation using the Deployment wizard, target computer should be prepared as follows: The registry key HKLM\SYSTEM\CurrentConrolSet\Control\Lsa\forceguest must be set to «0»; On Windows Vista and higher, if the account is not a built-in Administrator, check if HKLM\SOFTWARE\Microsoft\Windows\CurrentVersion\Policies\System\LocalAccountTokenFilterP olicy DWORD registry value is set to «1». 1.2.Removing Incompatible Products For Comodo Endpoint Security to operate correctly, incompatible security software must first be removed from endpoint machines. 9
10 During the installation process, CESM PE can detect and automatically remove some brands of incompatible software. However, certain software can be detected by CESM PE, but must be removed manually. The following table contains a list of incompatible software and states whether CESM PE can detect and remove it or only detect it. Vendor Product Name Uninstall Type Components Agnitum Outpost Security Suite Pro 7.1 Detect only Outpost Security Suite Pro 7.1 AVAST Software avast! Free Antivirus Detect only avast! Free Antivirus AVG Technologies AVG Internet Security Detect only AVG 2011 Avira GmbH Avira AntiVir Premium Detect only Avira AntiVir Desktop Comodo Group Comodo Internet Security 4.1, Automatic 5.8 Comodo Internet Security Dr.Web anti-virus for Windows Detect only 6.0 (x86/x64) Dr.Web anti-virus for Windows 6.0 (x86/x64) Dr.Web Security Space 6.0 (x86/x64) Detect only Dr.Web Security Space 6.0 (x86/x64) ESET ESET Smart Security ESET Smart Security Automatic ESET Smart Security Kaspersky Lab. Kaspersky Antivirus Detect only Kaspersky Antivirus Doctor Web, Ltd. McAfee SecurityCenter 11.0 McAfee VirusScan 15.0 McAfee Personal Firewall 12.0 McAfee SiteAdvisor 3.3 McAfee Total Protection Detect only McAfee Anti-Spam 12.0 McAfee Parental Controls 13.0 McAfee Anti-Theft File Protection 2.0 McAfee Online Backup 3.0 McAfee QuickClean and Shredder 11.0 McAfee, Inc. McAfee SecurityCenter 11.0 McAfee VirusScan 15.0 McAfee Personal Firewall 12.0 McAfee Internet Security Detect only McAfee Anti-Spam 12.0 McAfee Parental Controls 13.0 McAfee Online Backup 3.0 McAfee QuickClean and Shredder 11.0 McAfee VirusScan Enterprise Automatic Sophos Limited Symantec Corporation Sophos Endpoint Security and Automatic Control Symantec Endpoint Protection Automatic McAfee VirusScan Enterprise Sophos AutoUpdate Sophos Anti-Virus Sophos Client Firewall Symantec Endpoint Protection If your product is detected but not automatically removed, please consult your vendor s documentation for precise uninstallation 10
; Control Panel > Add or Remove Programs (XP). Select your current antivirus or firewall program(s) from the list.")
11 guidelines. However the following steps will help most Windows users: Click the Start button to open the Windows Start menu. Select Control Panel > Programs and Features (Win 7, Vista); Control Panel > Add or Remove Programs (XP). Select your current antivirus or firewall program(s) from the list. Click Remove/Uninstall button. Repeat process until all required programs have been removed. 1.3.Installing and Configuring the Service 1. Downloading and running the installer Download and save the CESM setup file to the computer that will be used for the Central Service. This unified installer can be used to setup both the Central Service and CESM configuration tool. You have a choice of two installation files, 'CESM_Setup_3.0.<version>.exe' or 'CESM_Setup_3.0.<version>_Full.exe'. The '..._FULL.exe' file is a larger file that also contains additional, required software (.net Framework 4,5, SSQL Server 2012 Express LocalDB and Microsoft Report Viewer 2010 SP1). The other file does not contain this additional software but will download it from the Internet if it is not detected on your server. To start the installation, double click on the setup file The installer welcome screen will be displayed. The installer will first check whether all the required supporting software are installed in the server. If not, it will install the supporting software first. You can continue the installation only after installing the additional software by clicking the setup icon again. If the additional software are already available, the installation of CESM will start. 2. Welcome Screen The welcome screen will be displayed. 11

12 Click 'Next'. 3. License Agreement The End-User License Agreement will be displayed: To complete the initialization phase you must read and accept to the License Agreement. After you have read the End-User License Agreement, check the 'I accept the terms in the License Agreement' box and click 'Next' to continue installation. If you decline, you cannot continue with the installation. The release notes for the current version of CESM will be displayed. 12
 to the default location of c:\program Files > Comodo >")

13 Read the notes and click 'Next'. 4. Choosing Installation Preferences The next stage is to choose the setup type: Typical - Installs all components (CESM Server and Documentation) to the default location of c:\program Files > Comodo > Endpoint Security Manager. This is the option recommended for most users. After installation you have to enter the license key in the 'License Information' screen. Refer to Help > License Information for more details. On selecting 'Typical' and clicking 'Next', the setup progress will move to Selecting Database Server. Note: If you choose to install CESM PE in Typical mode, after installation the administrator needs to enter the license key in the Help > License Information screen, in order to start using the application. Custom - Enables the administrator to choose which components are installed and modify the installation path if required and to enter the license key. On selecting Custom and clicking 'Next', the Custom Setup dialog will be displayed: 13

14 Note: If you choose to install CESM PE in Custom mode, you will be prompted to provide a valid license key during setup. The installation will continue only if you enter the license key and register the product. On selecting 'Custom' and clicking 'Next', the setup progress will move to Selecting Components Complete - Installs all components (CESM Server and Documentation) to the default location of C:\Program Files > Comodo > Endpoint Security Manager. This is the option recommended for most users. On selecting 'Complete' and clicking 'Next', the setup progress will move to Selecting Database Server. 5. Selecting Components Choose the components that you want to install. Custom Setup - Key Control Description Icons with the symbol to the right are the currently selected installation option. Clicking this icon will open a menu allowing the user to select alternative installation options. These alternative installation options are explained in the next four rows of this table. Indicates that the component named to the right of the icon will be installed on the local drive. Indicates that the component named to the right of the icon and all of its associated subcomponents will be installed on the local drive. Indicates that the component named to the right of the icon will be installed as and when the user requires. Choosing this option will create a shortcut to the Comodo folder on the Windows start menu - allowing the feature to be installed when the shortcut is selected. Indicates that the component named to the right of the icon will not be installed. Browse... The 'Browse...' button allows to select another location folder for CESM to be installed. Reset The 'Reset' button allows to roll back to default installation options. Disk Usage The combined disk space that will be taken up if the currently selected components are installed. Back The 'Back' button allows to roll back to 'Release Notes' dialog. 14

15 Custom Setup - Key Next The 'Next' button confirms your choices and continues onto the next stage of the installation process. Cancel The 'Cancel' button annuls the installation and quits the installation wizard. Click the 'Browse...' button to change installation directory (default = 'C:\Program Files\COMODO\Endpoint Security Manager'). Click 'Next' to move to the next step. 6. Entering the License Key Enter the license key you received through and click Register. The setup will communicate with Comodo in order to register your product. Once the registration process is complete, the license summary will be displayed. 15


16 Click 'Next' to continue the installation. 7. Selecting Database Server The next step is to select the SQL database server for CESM. If you do not have a SQL database configured in your server, select Microsoft SQL Server 2012 Express LocalDB. The setup will automatically install and configure an SQL Database. On clicking Next, the installation will move to Finalization. If you already have an SQL database configured in your server, select Use an existing Microsoft SQL Server instance and click 'Next'. 16


17 Enter the parameters of the existing SQL server instance. If you want to test the connection to the SQL server 'Test connection' The result will be displayed immediately. Click Next. 8. Finalizing the Installation On completion of the configuration, the 'Ready to Install' screen will be displayed. Click 'Install'. The installation will be started and the progress will be displayed. 17


18 Once installation is completed the finish dialog is displayed - offering admins the opportunity to either finish and exit the installer or finish and start the configuration tool. Select the 'Launch CESM Configuration Tool' check box to open the configuration utility immediately after exiting the installer. This utility will allow admins to: Start or Stop the service. View and configure hostnames or IP addresses that will connect to the server. View and configure console and agent ports. View and configure Internet (proxy) and mail server settings. Manage SSL server certificates for the administrative console. View a log of database events. Click here for more details on CESM Configuration Tool. Click 'Finish' to complete installation and exit the wizard. Further reading: 18
19 Key Concepts - Definitions of key terms in CESM. Quick Start Guide - Importing endpoints to central management. The Administrative Console - Explains how to use the console to manage endpoints, view reports and deploy tasks. The Configuration Tool - This utility is used to start or stop the CESM service, configure port and address settings and specify internet and mail settings. 1.4.Key Concepts Endpoint - Endpoint refers to any desktop, laptop or any other computing device that is connected to a corporate network. CESM allows network and system administrators to install, manage and monitor the security software Comodo Endpoint Security (CES) at each endpoint, remotely, from a central location. Managed Endpoint - Refers to any desktop, laptop or any other computing device that is running the Agent and CES, managed by the CESM central service. Dependent Server A 'dependent server' is another CESM central server in a different network. You may, for example, have different CESM servers in each of your branch offices to handle endpoints located in that office. Administrators can log into a dependent server via the CESM console and so manage endpoints connected to the remote server's network. Setting up dependent servers in remote offices will reduce server workloads and improve operational efficiency. Agent - A CESM agent is a client program to be installed on each and every managed endpoint for connection to and communication with the CESM server. The agent is responsible for receiving tasks like applying security policy to CES at the managed computer, running AV scans etc. from the central Service and executing them on the managed computer. The agent is also responsible for gathering reports as requested by the central service and to pass them to the central service. The endpoints imported into a CESM service by installing the agent can be managed only by the same CESM service - meaning the agent cannot be reconfigured to connect to any other CESM service, increasing the security. Groups - CESM allows computer groups to be created as required by the structure of the corporate organization. Once groups have been created sorting the computers in the network, admins can run tasks (such as applying security policy, running AV scans and deploying agents) as required for specific groups. Remote Mode - CESM can apply a security policy and can run tasks like AV scans and database updates only if CES in an endpoint is maintained in Remote Management Mode (i.e., it is being remotely administered through CESM). Unassigned Group - The 'Unassigned' group is the default computer group in CESM. Any target computer, imported into CESM by installing the agent automatically through the CESM admin console or manually, will be first placed in the 'Unassigned' group and will be assigned the 'Locally Configured' Policy. The administrator can create new groups as required and import computers into those groups from the 'Unassigned' group. 'Locally Configured' Policy - 'Locally Configured' is a security policy that allows CES settings to be changed by the local user without being monitored for compliance with settings policy. Reports - CESM allows the administrators to generate highly informative, real-time and active graphical summaries of the security and status of managed endpoints. Each type of report is fully customizable and can be ordered for anything from a single machine right up to the entire managed environment. Next: Best Practices Quick Start Guide 1.5.Best Practices 1. In CESM, security policies should be applied to 'groups' of computers rather than individual endpoints. So the administrator should first create computer groups that mirror their organization from the administrative console, before importing policy. See Creating New Endpoint Groups for explanation on creating new groups. 2. It is recommended to maintain the default group 'Unassigned' with the policy 'Locally Configured' until all the required endpoints in the network are imported. This will prevent CESM from overwriting existing CES security settings on a new endpoint at the instant it becomes managed after deploying the agent. 3. Policy is implemented in a typical PC environment 'imaging' strategy - just as a PC is 'imaged' for replicating it to others. A policy can be created or edited at an endpoint and tested to ensure it works as required before creating an 19
20 image. The image can then be imposed on other endpoints. The purpose of the administrative console is to alert, centrally deploy software and enforce policy. 4. If the policy of a remote computer is to be changed, it can be pushed to a special test/imaging PC or any nearby PC. The CES on the test/imaging computer can be set to local administration mode in order to edit its configuration. The configuration can be then and imported as a new policy for application to remote computers. If needed the test/imaging computer can be reverted to its original policy. 5. An endpoint serving as a test/imaging computer can be left in 'Local Administration Mode' so that administrators can easily use it to create/modify and import new policies. Even if the PC has an assigned policy other than 'Locally Configured', the endpoint will not be overwritten with policy from the ESM console until it is returned to remote management mode (even if the PC reboots). 6. Regardless of whether the agent and CES are installed automatically from the administrative console or manually at the endpoints using the 'Manage this Endpoint' feature of CES or offline deployment, they should be updated only through CESM. Next: Quick Start Guide 1.6.Quick Start Guide This tutorial briefly explains how an administrator can setup Comodo Endpoint Security Manager Professional Edition (CESM PE) then install and monitor installations of Comodo Endpoint Security (CES) on networked computers. We recommend admins to have read the 'Best Practices' section before putting this tutorial into practice. The guide will take you through the following processes - click on any link to go straight to that section as per your current requirements. Step 1 - Install Step 2 - Login to the Admin Console Step 3 - Import Endpoints and Install Agents (and optionally Comodo Endpoint Security) Step 4 - Open the dashboard - check that target endpoints are reporting correctly Step 5 - Create Groups of computers Step 6 - Import security policy from an endpoint and apply to groups Step 7 - View Reports Step 1 - Install Comodo Endpoint Security Manager Professional Edition (see Installing and Configuring the Service if you need more help with this) 1. Download and run the CESM PE setup file. A link to this file is provided in your license confirmation . This file will install the central service on the machine you intend to use as the CESM server. Supported Operating Systems are Win XP SP3, Win Vista SP2, Win 7, Win 8, Windows Server 2003, Windows Server 2003 Small Business Server, Windows Server 2008, Windows Server 2008 R2, Windows Server 2008 Small Business Server and Windows Server There is a choice of two setup files. The '..._FULL.exe' file contains all additional, required software (.net Framework 4.5, SQL Server 2012 Express LocalDB and Microsoft Report Viewer 2010 SP1). The other is a lightweight web installer that does not contain this additional software but will download it from the Internet if it is not detected on your server. 2. Run the setup file. Any missing software components will be automatically installed (CESM requires.net, SQL Server 2012 Express LocalDB and Microsoft report viewer). 3. Choose the installation type: Select 'Typical' as the installation type for fastest setup experience; after installation you will need to provide a valid license key in the License Information screen of the console interface to start using the service. The License Information screen can be accessed by selecting 'Help' from the drop-down at the top left and clicking 'License Information' from the left hand side navigation. Refer to Viewing License Information for 20

21 more details. Select 'Custom' if you wish to change install location or select which components are installed; you will be required to provide your license during setup. Select 'Complete' if you want to install full set of CESM components. 4. At the setup finalization dialog, make sure 'Launch CESM Configuration Tool' is selected before clicking 'Finish'. 5. In the configuration tool, take note of the hostname/ip address of the server and the port settings. You will need these if you wish to access the console from remote machines and if you want to setup protection for laptops and other computers that are outside the local network (you will also need to open these ports to the Internet on your enterprise firewall). 6. This tool also allows you to modify Internet connection settings and specify mail server settings (required for notifications). 7. Since the ESM console can be accessed via the Internet, you may desire to obtain an SSL certificate and apply it using the Configuration Tool or you can distribute the self-signed certificate already installed to computers that you will use to administer ESM. Step 2 - Login to the Admin Console (see logging into the console if you need more help with this) 1. After setup is complete, there are two ways that you can access the admin console: On the server itself - open the console by clicking 'Start > All Programs > Comodo > Endpoint Security Manager > CESM Console' From remote machines via Internet browser - use the following address format to access the console: server hostname or IP address>:57194 Tip: You can find the server hostname/ip and the CESM port numbers by opening the configuration tool on the server. Click 'Start > All Programs > Comodo > Endpoint Security Manager > CESM Configuration Tool'. 2. Login to the console using the Windows administrator login and password of the system that CESM was installed on to begin using your software. 3. To log out of the console, close the browser window or tab containing the console, or press the 'Refresh' button or choose 'Logout' from the drop-down at the top left of the interface. Step 3 Import Endpoints and Install Agents (and optionally Comodo Endpoint Security) Next, we need to import endpoints and install the agent and Comodo Endpoint Security on them. The agent is a small piece of software that facilitates communication between the endpoint and the CESM server. 21
22 There are two ways to accomplish this: Remotely, using a console wizard to automatically push the agent and (optionally) CES onto target machines. This wizard is started by clicking Add from the Computers interface of the console. Locally. You can download the agent setup file from the admin console, transfer the file to the endpoints to be managed through any media like DVD, CD, USB memory and install the agent at the endpoints. Detailed explanation on using this method can be found in Adding Computers by Manual Installation of Agent and CES. The remainder of step 3 describes the first method - remote installation. 1. Open the 'Computers' interface by selecting Computers from the drop-down at the top left. 2. Click 'Add' from the 'Computers' interface. The 'Add Computer' wizard will start. 22

23 3. The first stage is to choose how you want to import (Target Type). Computers can be imported using one of three methods: Active Directory, Workgroup or by IP Address. Administrators should, of course, repeat this wizard until they have imported all computers in their network. 23
24 4. Select the appropriate import method then swipe the screen to the move to the next stage. 'Swiping' is done by holding left-click button down in gray space and dragging the mouse to the left. If you have a touch-sensitive screen then you can swipe between screens with your finger. A third alternative is to click the arrows in the middle on the left and right side of the interface. These arrows turn blue in color when the mouse cursor is placed on them. If you chose 'Active Directory', you next have to choose whether to import from the current domain or a custom domain. The 'current' domain means whichever domain the CESM server is a member of - not the current domain of the endpoint being used to manage the server. If you choose 'custom domain' then you will need to enter the IP or name of the domain controller and the administrator username and password for that domain. If you chose 'Workgroup', you next have to specify which workgroup to import from. You can specify manually by typing the workgroup name or use the 'Find Workgroups' option to have the wizard present you with a choice of workgroups detected on the server machine's local network. You can only import from one workgroup at a time so you may have to repeat this wizard. If you chose 'IP Addresses', you next have to specify the IP, IP range, host name or subnet of the target machines. Click the 'Add' button to confirm your choice. Repeat until you have added all IP addresses or ranges that you wish to scan. Click the right arrow button to continue. 5. The next stage, 'Select Targets', allows you to choose those imported computers onto which you want to install the Agent and Comodo Endpoint Security. Select the check-boxes next to your intended targets and swipe the screen left to continue (or click the right arrow button). 6. The next step 'Target Summary' provides you the summary such as status, IP address of the endpoint(s) that you want to install the agent or CES. Select the check box beside the computer that you want to install the packages. If you want to select all the computers, select the check box beside the 'Target Computer'. Swipe left (or click the right arrow button) to move onto the next step. 7. Credentials. Next up is to choose whether the agent has to be installed under the currently logged in user account or the network administrator account. If you choose 'Custom Credentials', enter the user name and password of an account with administrative privileges on the machine - such as Administrator, hostname\administrator, domain\administrator as the login ID. Swipe left (or click the right arrow button) to move onto the next step. 8. The next stage 'Packages' displays the version details of ESM Agent and CES. You can also check for updates of these applications and download it in your server for deployment on to the end-points. Swipe left (or click the right arrow button) to move onto the next step. 9. The final step prior to deployment is to decide whether you want to install Comodo Endpoint Security (CES) also at this time. If you want to continue with this process and install CES now then make sure 'Install Comodo Endpoint Security' is enabled and: (1) Choose the CES version you wish to install from the drop down (most recent is recommended in virtually all cases). (2) Choose components to install - Firewall, Antivirus or All Components. (3) Check 'Suppress Reboot' if you do not want the target endpoint to automatically restart after installation. Reboot is required to complete installation, but you may want to postpone this until later. (4) 'Uninstall all incompatible products' - Check this option to uninstall select third party antivirus, firewall and other desktop security software from the endpoints, prior to the installation of CES. Performing this step will remove potentially incompatible products and thus enable CES to operate correctly. Some incompatible products can be detected, but not automatically uninstalled and must be removed manually. If your product is detected but not uninstalled, please consult your vendor s documentation for precise uninstallation guidelines. Click Here to see the full list of incompatible products. Click the right arrow button to continue to move onto the next step to move to deployment step. 10. Deployment. Click 'Start Deployment'. You will see installation progress per-endpoint. Once installation is complete, you should see a results screen similar to the following screenshot. 24
25 If deployment fails, click on the words 'Deployment Failed' to discover the reason. The info box also contains advice that may remediate the issue. 25

26 Once deployment is successful, click the 'Finish' icon at the base of the interface to exit the wizard. If you have chosen to install both the agent & CES then those endpoints should now be reporting to CESM. Step 4 - Check that target endpoints are reporting correctly 1. Open the 'Computers' interface by selecting Computers from the drop-down at the top left. 2. The details on all the computers added will be displayed in the 'Computers' interface. Check whether all the computers are added from the 'Total' and 'Online' fields in the title bar. The title bar also provides a snapshot information regarding connectivity, virus outbreaks and security policy compliance. After checking that all computers are reporting correctly, it is a good idea to make sure the latest virus databases are installed. Select all the computers and click the 'Update AV' at the base of the interface. After updating, we advise running a virus scan on all computers. Select all the computers and click 'Run a scan' at the base of the interface to do this. Note - real-time AV protection is already running on all endpoints. If any malware is discovered, it will be brought to your attention by change in color of status indicators. General advice regarding navigation and other functional areas can be found in The Administrative Console. Step 5 - Create Groups of computers In CESM, security policies are applied to 'groups' of computers rather than individual endpoints. Once a group has been created, admins can run tasks on entire groups of computers (such as applying policy, running AV scans, deploying agents, updating AV 26
27 databases and more). 'Policies' are the security configuration of CES and are imported from specific, already configured, endpoints then applied to groups (we will cover this in step 6). By default, all newly imported computers are placed into a group named 'Unassigned' and inherit that group's security policy of 'Locally Configured'. Effectively, this means remote management is not in operation and the endpoints will continue to use the security policy that is already in effect on the endpoint. If needed, the administrator can assign a policy to 'Unassigned' group so that the policy will be applied to any imported computer and remote management is enabled immediately. We advise admins to create groups corresponding to the structure of their organization THEN import policy (from an endpoint) and apply it to selected groups. Policies can also later be changed for individual computers in a group, overriding group policy defaults. To start, Open 'Groups' area by selecting 'Groups' from the drop-down at the top left. Click 'Add' from the bottom to start the 'Create Group' Wizard, Select required computers, Leave policy as (Locally Configured), Type a name for the group then finish. If you wish to create multiple groups, repeat the previous step until all computers have been assigned. See 'Creating New Endpoint Groups' if you need help with this wizard. See 'The Groups area' for an overview of functionality. Step 6 - Import security policy from an endpoint and apply to groups A policy is the security configuration of Comodo Endpoint Security (CES) deployed on a group of endpoints. Each policy determines the antivirus settings, Internet access rights, firewall traffic filtering rules and Defense+ application control settings for an endpoint. Policies are imported from already tested and configured endpoint machines then applied to groups. In the previous step, you assigned computers into groups but left the policy as 'Locally Configured' - which means remote management is effectively switched off (CESM will not enforce policy compliance and each endpoint in the group will simply continue to use the CES settings it is currently using). The next tasks are to import a policy from a tested and configured endpoint, apply the policy to a group and (optionally), switch on remote management for computers in that group. To set the parameters of a particular security policy, you need to place the endpoint in 'locally managed' mode by selecting 'Manage Locally' in CES settings on the endpoint itself - either by physically sitting at the machine or by a remote connection. Once you have set and tested the policy at the endpoint, you should return to the CESM console and prepare to import this policy. Note - leave the endpoint in locally managed mode while doing this. At the console, Open the 'Policies' interface by selecting 'Policies' from the drop-down at the top left, Click 'Add' from the 'Policies' interface to start the 'Create Policy' wizard, Select 'Create New' and choose the specific computer from which you want to import. Modify 'Settings' and 'Agent Settings' if required. For 'Targets', choose which groups you want to apply the policy to and how you want it applied. 'For local policy' and 'For Internet policy' are the policies to be used depending on whether the machine connects from inside or outside of the VPN. Also, select 'Override individual computer's policy' to make sure this policy is applied correctly. Selecting 'Force target computers to be managed remotely upon policy assignment' means CESM will engage 'Remote Mode' and thus enforce policy compliance on the selected endpoint. if the policy becomes altered, CESM will automatically re-apply it. If not selected, the endpoints will remain in locally managed mode (although your policy will still be applied, it could become changed over time at the local level). Finally, give the policy a name and description and select 'Apply policy after finish' to immediately implement. Do not select this if you wish to deploy later. Please see Policies - Key Concepts for more explanation of policies - including how to create, import, export and deploy. Step 7 Viewing Reports 27
28 The reports area contains a wealth of valuable information for administrators. Admins can also drill-down to individual endpoints from any report. Reports can be exported, printed and cover the following categories: Antivirus Updates CES Configuration CES Logs Antivirus Logs Firewall Logs Defense+ Logs Computer Details Computer Infections Malware Statistics Policy Compliance Policy Delta Quarantined Items Top 10 Malwares Click here to read more about reports. 2.The Administrative Console The Administrative Console is the nerve center of Comodo Endpoint Security Manager, allowing administrators to deploy, manage and monitor Comodo endpoint security software on networked computers. 28

29 Built using the latest Microsoft Silverlight technology, the interface consists of seven main areas that can be selected from the drop-down menu near the top left - 'Computers', 'Groups' 'Policies', 'Applications', 'Processes', 'Services', 'Reports', 'Help', 'Preferences' and 'Logout': Main Functional Areas Groups - View, manage and add endpoint groups. Specify policies on a group basis. Run an on-demand scan and update virus signature database on all target computers in a group. See The Groups Area for more details. Computers - View, manage and add computers. Add individual computers to groups and apply policies on a percomputer basis. Run an on-demand scan and update virus signature database on target computers. Start a Remote Desktop Sharing session with a remote computer. See The Computers Area for more details. Policies - View and manage the security policies that apply to managed endpoints. Also contains a step-by-step wizard that enables administrators to create and import a policy from existing endpoints, modify that policy, then reexport to other computers or groups of computers. See The Policies Area for more details. Applications - View the Applications running currently in all the endpoints. Stop the unwanted applications in all the endpoints at-once. See Viewing and Managing Currently Running Applications for more details. Processes - View the Processes running currently in all the endpoints. Terminate the unwanted processes in specific endpoints or in all the endpoints at-once. See Viewing and Managing Currently Running Processes for more details. Reports - Allows administrators to generate a wide range of reports for managed endpoints - including malware statistics, policy compliance, activity logs, update status, infections and more. The reports can be downloaded in.pdf or spreadsheet formats for analysis and archival purposes. See The Reports Area for more details. Help - Allows administrators to view version, license, support and server information. Administrators can use the interface to purchase additional endpoint licenses, to get online help and to get product updates. See ''Viewing ESM Information section for more details. Preferences - Allows administrators to configure report archives, notifications and dependent CESM servers. Administrators can also download CESM agents to install on remote endpoints that they wish to manually add to the CESM network. See 'Viewing and Managing Preferences' section for more details. 29
30 Logout- Allows administrators to logout of the CESM Console. 2.1.Logging-in to the Administrative Console After installing CESM central service on a Windows server, admins can access the console in the following ways: On the server itself by opening: Start > All Programs > Comodo > Endpoint Security Manager >CESM Console Via web-browser from any other PC Use the following address convention to access the console hostname or IP address>:57194 Where <server hostname or IP address> is the server upon which CESM central service is installed is the DEFAULT https port configured for the service. If you changed this port number during installation or by using the Configuration Tool then modify the address accordingly. If you wish to check which server names, IP addresses and port numbers are currently in use, please open the Configuration Tool on the server by opening. Start > All Programs > Comodo > Endpoint Security Manager >CESM Configuration Tool Note: If you receive a browser security error, you have not installed an SSL certificate from a Certification Authority. If you will not be installing a custom certificate, you can download the self-signed certificate in your browser by clicking 'Get server certificate' at the bottom of the login screen. You can then install the certificate in the Trusted Root Certification Authorities section on machines which will be accessing the console to eliminate the browser warning. Login to the console using the Windows administrator login and password of the system that CESM was installed on to begin using your software. The context of the login is that of the server computer on which the CESM Server service is running (not the computer running the administrative console). If the CESM Service is running on a domain, use the domain\username syntax to specify the user name (e.g. contoso\administrator). Next - The Computers Area. 3.The Computers Area The 'Computers' area plays a key role in the CESM Administrative Console interface by providing system administrators with the ability to import, view and manage networked computers. In grid and panorama views, each 30
31 endpoint is represented by a box containing key information about that computer's address, operating system and security status. Endpoints can be filtered according to status using the buttons above the main display. You can add endpoints or perform actions on selected endpoints using the options along the bottom of the interface. The 'Computers' area allows administrators to: View the list of endpoints that are managed by CESM. Add/Import computers to CESM for centralized management. Assign computers to Endpoint Groups for easy administration. View full details of a target computer: CPU/RAM & Drive metrics; Network metrics; Currently running services and processes with ability to stop/start services or terminate running processes; Installed applications with ability to uninstall unwanted.msi based applications; Disk drives with ability to discover 10 largest files consuming disk space and delete selected files. Apply security policies to computers. Run an on-demand scan on target endpoints. Update virus signature database on target endpoints. Start a Remote Desktop Sharing session with a target endpoint. Generate CES Reports for a target endpoint. Reboot endpoints where required, Once the agent is installed, the endpoint computer is added into CESM and is ready to be managed through CESM. See the section 'Adding Endpoint Computers to CESM' for complete instructions. View and Filter Options 31


32 The Computers area can display the computers connected to CESM in tile view or list view or 3D Panoramic view. Tile View The Computers area displays the computers added to CESM as tiles in grid view. If you wish to switch from other views to tile view, click the tile view button in the gray stripe. Each computer is represented by a tile with its status details: The icons at the bottom indicate the current status of the endpoint. Status Icon Indication 32

33 Power The endpoint is powered ON The endpoint is powered OFF Comodo Endpoint Security CES is installed CES is not installed Compliancy Status Endpoint is compliant with the policy applied Endpoint is not compliant with the policy applied Virus Database Status The virus signature database is up-to-date The virus signature database is outdated Infection Status The endpoint is not infected The endpoint is infected List View To switch the Computers area to List View, click the List View button Column Heading from the gray stripe. Description Computer Displays the name of the Endpoint computer. Group Displays the Group to which the endpoint belongs. Status Indicates whether the endpoint is online or offline. The connection state can be one of the following: Online - The endpoint agent is connected to CESM. Offline - The endpoint agent is not connected to CESM at this moment. 33
34 CES/CAS Policy Indicates whether the CES/CAS is installed to the endpoint or not and if it's version is supported by CESM or too old to manage. Local - The CES installation at the endpoint is being managed locally. Remote - The CES installation at the endpoint is being managed remotely. Unknown - The management mode of CES at the endpoint cannot be established. This may be because CES is not installed; is not active or because of network problems. Displays the compliance status of the CES installation on the endpoint with the applied security policy. The local connection and Internet connection security policies applied for the endpoint are displayed beneath the compliance status. The compliance status can be one of the following: Non-Compliant - The CES installation at the endpoint is not compliant to the applied security policy. Pending - The compliance status of the CES installation at the endpoint is yet to be assessed. For further reading on 'Policies', please see 'The Policies Area'. Actions Displays the current action and/or the last action executed of the endpoint like AV scan or AV update. 3D Panoramic View The 3D Panoramic view displays the computer tiles in a 360 canvas, and is helpful to view and manage individual computers, if you have large number of managed endpoints. To switch to 3D Panoramic view, click the 3D View button from the gray stripe. Note: For CESM to render the 'Computers' area in 3D Panoramic view, usage of 3D Graphics display drivers should be 34

35 allowed for CESM server in your Microsoft Silverlight installation. To enable 3D Graphics display driver 1. Open the Microsoft Silverlight configuration interface by right clicking on the gray stripe and selecting Silverlight from the context sensitive menu or by clicking Start > All Programs > Microsoft Silverlight from your Windows Start menu. 2. Click 'Permissions' tab. 3. Select 3D Graphics: use blocked display drivers and click Allow button. 4. Click OK in the configuration dialog. 5. Restart the browser and login to CESM. Filter Options The filter options in the gray stripe, gives at-a-glance statistics of the computers in the network and allow the administrator to filter the computers based on the criteria. The search field in the right allows the administrator to search for a specific computer by entering its name or IP address, partially or fully. Refer to the sections below for more information on tasks accomplished from the 'Computers' area. Viewing details and managing computers Adding Endpoint Computers to CESM Running on-demand scan on individual Endpoints Updating virus database on individual Endpoints Accessing Endpoints through Remote Desktop Sharing Session 35
36 3.1. Viewing Details and Managing Endpoints From the 'Computer Properties' screen, the administrator view a detailed breakdown of information about the endpoint and perform various management tasks on the endpoint. These include applying/re-applying security policies, managing CES configuration, assigning the endpoint to groups, running a virus scan, viewing and modifying currently running applications and services and launching a remote desktop sharing session. To open the Computer Properties screen Open the 'Computers' interface by selecting 'Computers' from the drop down at the top left Select an endpoint from the list and either. Click 'Properties' from the options at the bottom. or Right click on the computer and select 'Open' from the context sensitive menu. or Double click on a computer. The Computer Properties screen allows the administrator to: View General Properties View and Manage Group and Security Policy Details View and Manage Internet Security Software View and Manage installed applications View and Manage currently running services View and Manage currently running processes View and Manage Drives and Storage 36

37 View Event Log Viewing General Properties 'General Properties' displays a detailed summary of information about the selected endpoint. This includes online status, infection status, compliance status, network address, CES version, agent version, group membership, policy applied and current user. The summary also contains detailed hardware and operating system/software information about the endpoint. The General Properties pane is displayed by default when you first open details about a computer. Clicking on the numbers beside 'Processes Running', CPU load, 'Physical Memory Usage' and 'Committed Memory Usage' opens the 'System Processes' pane that allows you to view the currently running processes at the endpoint and to terminate unnecessarily running processes in order to optimize the system's performance. Refer to Viewing and Managing Currently Running Processes for more details. Clicking on the number beside 'Applications Installed' opens the 'Installed Applications' pane that allows you to view the applications installed in the system and to uninstall unwanted applications (msi based applications only). Refer to Viewing and Managing installed applications for more details. Clicking on the numbers beside 'Services Running' and 'Services Stopped' opens the 'System Services' pane that allows you to view the currently running Windows services at the endpoint and to terminate unnecessarily running services in order to optimize the system's performance. Refer to Viewing and Managing Currently Running Services for more details Viewing and Managing Group and Security Policy Details The Advanced Properties pane displays the details of the group to which the endpoint belongs and the security policy applied. The administrator can reapply the security policy for non-compliant endpoints or even change the security policy as needed. The pane also displays the warranty status for the CES installation on the endpoint and enables the administrator to enable or disable the warranty, depending on requirement and number of CES licenses purchased. To open the 'Advanced' pane, click Advanced from the left hand side navigation of Computer Properties screen. 37

38 Group Details The 'Group Details' area displays the details of the group to which the endpoint belongs and the security policy applied to the group. Group - Name of the group. Clicking on the group name opens the Group properties interface. Refer to Viewing and Managing Endpoint Groups for more details. Group Local Policy - Displays the Local network connection security policy assigned for the group. Clicking on the policy name opens the Policy Properties interface. Refer to Editing a Security Policy for more details. Internet Group Policy - Displays the Internet connection security policy assigned for the group. Clicking on the policy name opens the Policy Properties interface. Refer to Editing a Security Policy for more details. Policy Details The 'Policy Details' area displays the security policy applied to the endpoint individually. It also allows the administrator to change the security policy applied to the endpoint, if required. Current Policy - Displays the current security policy applied to the endpoint as per the current connection mode. Clicking on the policy name opens the Policy Properties interface. Refer to Editing a Security Policy for more details. Current Policy Status - Displays whether the endpoint is in complaint or non-compliant policy mode applied to it. If it is non-complaint, the administrator can click the 'Reapply Policy' button to drive the endpoint to be compliant to the policy. Local Policy - The drop-down displays the current local network connection security policy applied to the endpoint. The administrator can change it by selecting the required policy from the drop-down. Internet Policy - The drop-down displays the current Internet connection security policy applied to the endpoint. The administrator can change it by selecting the required policy from the drop-down. Current Connection Mode - Indicates whether the endpoint is connected to CESM through local network or Internet, which determines whether the computer will be using the Local Policy or Internet Policy. Last Poll Time - Indicates the date and time at which CESM has polled the endpoint to check the compliancy status. 38

39 The policy will be re-applied to non-compliant endpoints to make them compliant, during the next polling. Warranty Details The Warranty Details area displays whether the CES warranty is enabled or disabled for the endpoint. If needed, the administrator can enable or disable the warranty depending on the endpoint requirement and the number of CES licenses purchased, by clicking 'Enable' or 'Disable' button respectively. Click 'Refresh' to renew the currently viewed screen. To close the currently open detailed summary of information about the selected endpoint click 'Close'. To start the a currently running process remotely, select it and click 'Desktop' Viewing and Managing Endpoint Security Software The 'Endpoint Security' pane displays the details of the CES installation on the endpoint. The administrator can run scans ondemand antivirus scans on the endpoint and manage items quarantined by the CES at the endpoint. To open the Endpoint Security pane, click the 'Endpoint Security' tab from the left hand side navigation of the Computer Properties screen. The pane has two tabs: General Quarantined Items General The general tab displays the version, virus database update status of the CES installation. The administrator can run antivirus scans from this area. General Product Version - Displays the version of CES installed on the endpoint 39
40 Installed Components Displays the components, Antivirus, Firewall or All Components of CES installed on the endpoint. Virus Signature Database Version - Displays the version number of virus signature database on the endpoint. Last Updated - Displays the date and time of last scheduled or manual database update operation. State - Indicates whether the virus signature database is up-to-date or outdated. It is recommended to keep the virus database up-to-date always to protect your endpoints from zero-hour threats. If the database is out-dated, the administrator can manually run the update operation by clicking the 'Update' button. Update Status - Displays the result of last update operation. Antivirus Scan The Antivirus Scan area allows the administrator to commence on-demand antivirus scans directly on the selected endpoint. To run an antivirus scan Select the Scan Profile from the Antivirus drop-down, depending on the areas to be scanned on the endpoint. The default scan profiles are: Full Scan - This profile covers every local drive, folder and file on the endpoint. Quick Scan - Covers critical areas in the endpoint which are highly prone to infection from viruses, rootkits and other malware. This includes system memory, auto-run entries, hidden services, boot sectors, important registry keys and system files. These areas are responsible for the stability of the computer and keeping them clean is essential. More scan profiles can be defined when creating a policy and applying the policy to the group or the endpoint. For more details on scan profiles, please refer to CES online help guide at Click 'Scan'. Tip: Alternatively, you can run a scan on an individual endpoint by right-clicking on the endpoint and selecting 'Scan' from the context sensitive menu or selecting an endpoint and clicking 'Run a Scan' or clicking 'Antivirus' > 'Scan' > 'Full Scan from the 'Computers' area. The scan will start immediately and the progress will be displayed beside Scan Status. If malware is discovered during the scan that is not handled successfully (deleted, disinfected or quarantined) then the endpoint will be indicated as Infected in the 'Computers' area. The results of the scan can be viewed as an Infection report from the Reports area - click 'Reports' then the 'Computer Infections'. The report can also be exported as a pdf file or a spreadsheet file for printing purposes. Refer to Reports > Computer Infections for more details. Quarantined Items The 'Quarantined Items' tab displays the list of items found as malicious and moved to quarantine by CES installation on the endpoint from real-time and on-demand scans. The administrator can analyze the trustworthiness of the items and delete them permanently or restore them to their original location from this interface. 40
 that are malicious, select the item(s) and click 'Delete'. The items will be permanently deleted from the endpoint.")
41 To restore item(s) which are not malicious, select the item(s) and click 'Restore'. The items will be restored to their original locations in the endpoint. To remove item(s) that are malicious, select the item(s) and click 'Delete'. The items will be permanently deleted from the endpoint. To close the currently open detailed summary of information about the selected endpoint click 'Close'. Click 'Refresh' to renew the currently viewed screen. To start the a currently running process remotely, select it and click 'Desktop' Viewing and Managing Installed Applications The 'Installed Applications' pane displays the list of applications that are currently installed in the selected endpoint. The administrator can analyze the list and, if unwanted applications are present, the administrator can uninstall. To open the 'Installed Applications' pane, click the 'Installed Applications' tab from the left hand side navigation of the 'Computer Properties' screen. 41
42 To uninstall an application, select it and click 'Uninstall'. The application will be uninstalled form the endpoint. Click 'Refresh' to renew the currently viewed screen. To start the a currently running process remotely, select it and click 'Desktop'. To close the currently open detailed summary of information about the selected endpoint click 'Close'. Note: You can uninstall only MSI based applications from this interface Viewing and Managing Currently Running Services The 'System Services' pane displays the list of Windows Services or Unix Daemons that are currently loaded on to the selected Windows based or Linux based endpoint with their running status. The administrator can also view a short description of the service and stop/start services as required. To open the 'System Services' pane, click the 'Services' tab or 'Daemons' tab from the left hand side navigation of the Computer Properties screen. 42

43 To view a short description of a service, hover the mouse cursor over the service. Click 'Refresh' to renew the currently viewed screen. To stop a running service, select it and click 'Stop'. 43
44 To start a stopped service, select it and click 'Start'. To start the a currently running process remotely, select it and click 'Desktop'. To close the currently open detailed summary of information about the selected endpoint click 'Close' Viewing and Managing Currently Running Processes The 'System Processes' pane displays the list of Processes that are currently running in the selected endpoint with their attributes like process identity, user account that has started the process, its CPU usage, memory usage and peak memory usage. The administrator can analyze the list and terminate unnecessarily running processes if required. To open the 'System Processes' pane, click the 'Processes' tab from the left hand side navigation of the Computer Properties screen. To stop a currently running process, select it and click 'End Process'. To start the a currently running process remotely, select it and click 'Desktop'. Click 'Refresh' to renew the currently viewed screen. To close the currently open detailed summary of information about the selected endpoint, click 'Close' Viewing and Managing Drives and Storage The 'File System' pane displays the list of physical drives that are mounted on the selected endpoint. The contents of each drive can be browsed by double-clicking it. The 'Get Largest Files' feature allows admins to identify the top 10 largest files in a drive and to delete them if required. To open the 'File System' pane, click the 'File System' tab from the left hand side navigation of the Computer Properties screen. 44
45 To browse through the folders and files in a drive, double click on the drive > Folder and so on. 45

46 To delete an unwanted folder or file, select the item and click 'Delete' or right click on the item and choose 'Delete' from the context sensitive menu. To identify top ten space consuming files in a drive, select the drive and click 'Largest Files' or right click on a drive and choose 'Largest Files' from the context sensitive menu. The administrator can delete unwanted files from the large files list, to conserve disk space and improve system performance. To open a remote session above the current file system, select it and click 'Desktop' Viewing Event Log The 'Event Log' pane allows administrators to browse endpoint events, such as a failure to start a component or complete an action at the selected endpoint. To open the 'Event Log' pane, click the 'Event Log' tab from the left hand side navigation of the 'Computer Properties' screen. 46


47 You can filter the results based on the kinds of the events from the drop-down at the left. You can filter the results based on the sources from the drop-down at the right. 3.2.Adding Endpoint Computers to CESM Each managed endpoint requires a small software agent to be installed to facilitate communication with the CESM console. Depending on the method by which the agent is installed, the endpoints can be imported into CESM in two ways: 47
48 Installing the agent directly from the CESM Admin Console and importing computers from Active Directory, Workgroup or by specifying the IP addresses. This method is suitable for computers in the local network. Refer to Importing Computers by Automatic Installation of Agent. Downloading the agent as an executable and installing manually, transferring it onto media such as DVD, CD, USB memory or uploading it to a network share then installing onto the endpoint computers. This method is more suitable for computers connected through external networks like the Internet. Refer to Adding Computers by Manual Installation of Agent. Once the agent is installed, the endpoint computer is automatically discovered and added into CESM to the Unassigned group where it will be given the configured policy (see 'The Policies Area' for more details) and is then ready to be managed. The 'Computers' area also allows the administrators to arrange the added computers into 'Groups' as per the structure of the organization for easy administration. Once created administrators can run tasks on entire groups of computers (such as applying security policy for CES, running AV scans, deploying agents, updating AV databases and more). Refer to The Groups Area for more details Importing Computers by Automatic Installation of Agent The 'Add Computer' wizard will install the CESM agent software and CES software on network endpoints that can be reached from the CESM service computer. Computers can be imported from Active Directory, from a Workgroup or by specifying individual IP addresses. The wizard also allows to update installed Comodo software in managed computers. See 'Updating Comodo Software on Managed Computers' for more details. To import endpoints Click the 'Add' from the 'Computers' area to start the wizard: Step 1 - Select the Target Type Computers can be imported into CESM in the following ways: Active Directory - imports computers from an Active Directory Domain. Workgroup - imports computers from a Workgroup. Network Addresses - imports individual computers specified by their IP Addresses. 48

49 Managed Computers - allows to update installed Comodo software in managed computers. See 'Updating Comodo Software on Managed Computers' for more details. Note: Targets are contacted by the CESM service computer and its network connection, not the computer running the management console. CESM Professional Edition can manage a large number of networked computers so, administrators should repeat this process until all computers for which management is required have been successfully imported. Note: In most editions, licenses are required for each computer you wish to manage. Explanations of importing using the sources can be found below in the sections that follow: Import from Active Directory, Import from Workgroup and Import Computers by IP Address. Select the appropriate method to import the computers from Active Directory or Workgroup or select Network Addresses if you want to import computers by specifying their IP addresses or DNS names. Importing from Active Directory Choose 'Active Directory' and move to the next step by clicking the right arrow or swiping the screen to the left. Step 2 - Domain Name Select Current Domain or Custom Domain. Current Domain should be chosen if the CESM service computer is currently a member of the domain you wish to use to target for installation. If you select Custom Domain, you have to enter the details of domain controller, an administrator user name and password. 49
50 Domain Import Settings - Table of Parameters Current Domain (Selected by default) Selecting this option will import any computers from the Active Directory domain that the CESM server is a member of. Custom Domain controller Selecting this option allows the administrator to specify an alternative Active Directory domain from which computers will be imported. Choosing this option requires administrators to specify the following details: Domain Controller: Enter the IP address or host name of the Active Directory domain controller from which they wish to import. User Name: Enter the user-name of a user with administrative rights to the domain controller. Password: Enter the password of the user specified in the 'User Name' field. Click the right arrow. The wizard moves to next step to select the target endpoints. Select Targets The Active Directory structure for the selected domain will be listed. 50
51 Click the icon to expand or collapse the tree structure. Select the target endpoints onto which you wish to install the agent and import into CESM. Click the right arrow or swipe left to move to step 3 to select the endpoints. Importing Computers from Workgroup Choose 'Workgroup' and move to the next step by clicking the right arrow. Step 2 - Workgroup Name The next step is to select the Workgroup(s) from which the endpoints are to be imported. 51
52 CESM enables the administrator to specify the workgroup name in two ways: Find Workgroups - Makes CESM to search for the workgroups associated with the network and enables. administrator to select the workgroup(s) from which the endpoints are to be imported in the next step. 52
53 Select the workgroup(s) and click the right arrow to move to step 3 to select the endpoints. Specify Workgroup manually - allows the administrator to enter the name of the Workgroup from which the endpoints are to be imported in the 'Workgroup:' text box. Note: The Workgroup is discovered from the local area network attached to the CESM service computer. 53
54 Enter the name of a network Workgroup and click the right arrow to move to step 3 to select the endpoints. Importing Computers by Network or IP Addresses Choose 'Network Addresses' and move to the next step by clicking the right arrow. Step 2 - Adding Network Addresses The next step is to add the target computers by specifying their IP address(es). 54

55 Computers can be added in four ways: Import individual computers by specifying their IP addresses one-by-one - Enter the IP address of the computer and click the 'Add' button. The IP address will be added and displayed below the text box. To add more computers, repeat the process. Import individual computers by specifying their names one-by-one - Enter the name of the target computer as identified in the network and click the 'Add' button. The computer name will be added and displayed below the text box. To add more computers, repeat the process. Import a group of computers by specifying their IP Address range - Enter the IP Address range of the target computers with the Start address and End address separated by a hyphen (e.g ) and click the 'Add' button. The entered IP address range will be added and displayed below the text box. To add more IP address ranges, repeat the process. Import a group of computers by specifying IP Addresses and Subnet mask - Enter the IP Address and Subnet mask (e.g /24 or / ) in the text field and click the 'Add' button. The entered IP address/subnet mask will be added and displayed below the text box. To add more IP address/subnet mask, repeat the process. To remove a computer/computer group added by mistake, select the item and click the 'Remove' button. Click the right arrow to move to the next step. Note: IP addresses are specified relative to the CESM service computer. Step 3 Targets Summary In this step, all the endpoints included in the previous Step 2 will be displayed. 55
56 Select the endpoint(s) that you want to deploy the agent and CES to. You can use the filter option to select the endpoints from the list displayed. Click the filter icon 'Apply'. in the 'Target Computer' column header to search for a particular endpoint and click Click the filter icon in the 'IP' column header to search for endpoints with particular IP(s) and click 'Apply'. Click the filter icon in the 'Status' column header to search for endpoints that are 'Ready' or 'Unavailable' and click 'Apply'. Click the filter icon in the 'Managed' column header to search for endpoints that are 'Managed' or 'No' and click 'Apply'. Click the right arrow or swipe left to move to the next step. Step 4 - Credentials The next step is to select the administrative account (login) credentials that will be used to remotely upload the installation package using the administrative share on all target computer(s). 56

57 Credentials - Table of Parameters Current User Credentials (Selected by default) Selecting this option will install the agent using the credentials of the currently logged -in CESM administrator account in each endpoint. Custom Credentials Selecting this option allows the administrator to specify an administrative account for installation of the agent. Choosing this option requires administrators to specify the following details: User Name: Enter the user-name of the dedicated network administrator. Password: Enter the password of the dedicated network administrator. Click the right arrow after entering the credentials to move to the next step. Step 5 - Checking for Updated Software The next stage 'Packages' displays the version details of ESM Agent and CES. You can also check for updates of these applications and download it in your server for deployment on to the end-points. 57

58 Click 'Check for Updates' to find out if any newer version of ESM Agent and CES are available. If any newer versions are available, you can choose to download them to the CESM server by clicking 'Download'. Click the right arrow to move to the next step. Step 6 Endpoint Security The next step is to choose installation options for Comodo Endpoint Security (CES): Select 'Install Comodo Endpoint Security' check box if you wish CES to be installed along with the agent. 58
59 Note: If the option to install CES is not selectable, your license for Comodo Endpoint Security Manager did not include CES software. Select the version of CES you wish to install on the selected endpoints from the drop-down. Note the drop-down will be empty the first time CESM is run. You must first click 'Check For Updates' then 'Update' to populate the drop-down as explained in the previous Step 5 - Checking for Updated Software. Select whether you want to include all the components (Firewall and Antivirus), Antivirus only or Firewall only from the Components drop-down. Suppress reboot after installation - CES installation will restart of the endpoints for the installation to take effect. If you do not want the endpoints to be restarted on completion of installation, select this check box. CES installation will complete but will take effect only on the next restart of the endpoint. Uninstall all incompatible products - Selecting this option uninstalls select third party antivirus, firewall and other desktop security software from the endpoints, prior to the installation of CES. Performing this step will remove potentially incompatible products and thus enable CES to operate correctly. Some incompatible products can be detected, but not automatically uninstalled and must be removed manually. If your product is detected but not uninstalled, please consult your vendor s documentation for precise uninstallation guidelines. However the following steps will help most Windows users: Click the Start button to open the Windows Start menu. Select Control Panel > Programs and Features (Win 7, Vista); Control Panel > Add or Remove Programs. (XP). Select your current antivirus or firewall program(s) from the list. Click Remove/Uninstall button. Repeat process until all required programs have been removed. Click Here to see the full list of incompatible products. Click the right arrow to move to the next step. Tip: You can also: Install CES manually onto endpoint computers. Refer to How to Install CES; and Import stand-alone CES application pre-installed at the endpoints under the management of CESM. Step 7 - Deployment Progress Click 'Start Deployment'. 59
60 CESM will start installing the agent/ces on to the selected endpoints and the progress per endpoint will be displayed. 60
61 If any of the selected endpoints have older versions of CES than the one selected in the previous Step 6, they will be automatically uninstalled and the selected version will be installed. Step 8 - Deployment Complete On completion of installation, the results screen will appear. 61
62 If deployment fails, click on the words 'Deployment Failed' to discover the reason. The info box also contains advice that may remediate the issue. Click the 'Finish' or swipe the screen to the left to exit the wizard. 62
63 The endpoints selected in Step 3 are now added to CESM and are ready for management through CESM. Refer to the section 'The Computers Area' for more details on how to view the list of imported endpoints. The newly added computers will be added to the default group 'Unassigned'. If this group has been changed to use a specific policy, that policy will be applied after the agent installation is completed. The administrator can create and name new groups according to the structure of the organization and move the added computers into them from 'Unassigned' group. Once created, admins can run tasks on entire groups of computers (such as applying security policy to CES, running AV scans, deploying agents, updating AV databases and more). Refer to 'The Groups Area' for more details Adding Computers by Manual Installation of Agent Installing the CESM agent locally is an alternative way of establishing connectivity between an endpoint and the CESM Central Service server. This is useful for scripting installation, or should the endpoint not be reachable from the CESM server s network. The CESM Agent setup file can be downloaded as an executable from the admin console. The file can be transferred onto media such as DVD, CD, USB memory so that the agent can be installed manually onto target machines rather than via the CESM interface. A single copy of the installation files can be used to install the agent on any number of target machines. Upon successful installation, the agent automatically establishes connection to the CESM Central Service Server and the endpoint can be controlled by the Administrator in the same way as it would if it were imported via the Add Computers wizard. The endpoint security software, Comodo Endpoint Security (CES) can be remotely installed on the endpoint and managed by CESM once installation of the Agent is completed. If the Agent is installed first (with the endpoint having no CES), the deployment wizard can be used to install CES via the installed Agent. The newly added computer will be included to the default group 'Unassigned'. The administrator can then import the computer into the required group to which the computer is allotted. Downloading the Offline Agent Installer Agent installation files for Windows, Linux and Mac OS are available from the administrative console of CESM. The administrator can choose to download agent installation file(s) according to the Operating System of the endpoints to be added to CESM. To download the installer Open the 'Agent Packages' screen by choosing 'Preferences' > 'Agent Packages' from the drop-down at the top-left Select Agent setup file corresponding to the Operating System of the endpoint(s) onto which the agent has to be 63
64 installed. Click 'Save' in the 'File Download' dialog and save the file in the location of your choice. Important Note: Web browsers run on server OS may not allow downloading files through it by default, due to policy restrictions. For this reason, in order to download the agent setup file through the CESM admin console accessed through a web browser like Internet Explorer installed on a server, the local computer policy of the server has to be configured to disable the file download restrictions. Installing the Agent onto the Endpoint The agent setup file can be copied to the target endpoint computer from DVD, CD, USB memory or by any other means and saved in a desired location. The agent can also be deployed using a third-party software distribution package. The installation process can be started in the following ways: For Linux Computers First use the change mode command chmod +x DebianAgentSetup.run to make the downloaded agent setup file as an executable. Then use sudo command to execute the installer with administrative privileges "sudo./debianagentsetup.run [IP] [port]". For Mac OS Computers Drag and drop the MacAgentSetup.dmg file into your Applications directory. For Windows Computers By double clicking the setup file to start the installation wizard. From the Windows CMD line. Command line options are as follows: The command should be entered in the following format: <file path in which agent setup file is stored>/ AgentSetup.exe /Options The options are explained in the following table. Some Options have multiple notations. These are separated by ' ' in the following table. Option Description /s /server <Server Host> Pointing the endpoint to the ESM server by specifying its host name or address. /p /port <port number> To specify the port number of the ESM Server. Default port numbers are: for connecting using HTTPS port for connecting using HTTP port. /l /log <logfile.log> To specify the path and file name to store the log file. /q /quiet To agent the agent in silent mode. The agent installation will not require any user interaction. /help Display the help information on installing the agent. Step 1 - Welcome Screen The welcome screen of the agent installation wizard will be displayed. 64


65 Click 'Next' to continue. Step 2 Specifying Server Address and Port In the next step you must enter the host or IP address of the server in which CESM is installed and the port number the endpoint should be connected. By default, these fields will be populated with the details of the server from which the agent is downloaded. If you want to connect the endpoint to another CESM server, enter that server host or IP address and the port number and click 'Next'. Step 3 - Selecting Products to be Installed The next stage is to select the products to be installed. The installer will first check whether any of these items are already installed. You must first uninstall any older versions of CES or the Agent that are detected. 65


66 Ensure that the required products are selected in then click 'Next'. Step 4 - Ready to Install The next step allows you to confirm the choices made in the previous step. Click 'Back' if you want to review and change the choices made. To commence the installation, click 'Install'. Step 5 - Installation Progress The installation progress will be displayed. 66


67 Step 6 - Installation Complete Upon setup completion, the 'Finish' dialog will be displayed. If you want to view the installation log file after completion of installation, leave View log file check box selected, else de-select it. Click 'Finish' to exit the wizard. The agent will now automatically establish the connection to your CESM Service Server. Once the endpoint is connected, the administrator can start managing it and install CES on to it. Refer to Updating Comodo Software on Managed Computers for more details Updating Comodo Software on Managed Computers Once an endpoint is managed, CESM allows the administrator to update the CESM agent as well as install/update CES through the 'Add Computer' wizard. To update software on managed computers Click 'Add' from the 'Computers' area to start the 'Add Computers' wizard. 67
68 Select 'Managed Computers' and click the right arrow or swipe left to proceed to the next step. All the managed computers will be listed. 68
69 Select the endpoints that you want to check and update CESM Agent and CES application from the list. Click the filter icon in the 'Name' column header to search for a particular endpoint, enter the endpoint name and click 'Apply'. After selecting the endpoints, click the right arrow or swipe left to proceed to the next step. The next stage 'Packages' displays the version details of ESM Agent and CES. You can also check for updates of these applications and download it in your server for deployment on to the selected endpoints. 69
70 Click 'Check for Updates' to find out if any newer version of CESM Agent and CES are available. If any newer versions are available, you can choose to download them to the CESM server by clicking 'Download'. Click the right arrow or swipe left to move to the next step. The next step is to choose installation options for Comodo Endpoint Security (CES): 70
71 Select 'Install Comodo Endpoint Security' check box if you wish CES to be installed along with the agent. Select the version of CES you wish to install on the selected endpoints from the drop-down. Select whether you want to include all the components (Firewall and Antivirus), Antivirus only or Firewall only from the Components drop-down. Suppress reboot after installation - CES installation will restart of the endpoints for the installation to take effect. If you do not want the endpoints to be restarted on completion of installation, select this check box. CES installation will complete but will take effect only on the next restart of the endpoint. Uninstall all incompatible products - Selecting this option uninstalls select third party antivirus, firewall and other desktop security software from the endpoints, prior to the installation of CES. Performing this step will remove potentially incompatible products and thus enable CES to operate correctly. Some incompatible products can be detected, but not automatically uninstalled and must be removed manually. If your product is detected but not uninstalled, please consult your vendor s documentation for precise uninstallation guidelines. Click here to see the full list of incompatible products. Click the right arrow to move to the next step. The next step is the deployment process. 71
72 Click 'Start Deployment'. The deployment progress will be displayed. 72
73 On completion of installation, the results screen will appear. 73

74 Click the 'Finish' icon or swipe the screen to the left to exit the wizard. Note: If you have selected 'Suppress reboot after installation' checkbox, the endpoints that were updated have to be restarted for the update to take effect. 3.3.Running On-Demand Scan on Selected Endpoints The 'Computers' area allows the administrators run instant scan on selected endpoints, irrespective of the groups they belong to. The administrator can choose to run a full scan or selected areas of the endpoint, by choosing a scan profile. Tip: The administrators can also run a scan on a selected single endpoint from the Computer Properties > Endpoint Security interface. Refer to the section Viewing and Managing Internet Security Software for more details. To run a full scan on selected endpoints 1. Select 'Computers' from the area selection drop-down menu to open the 'Computers' interface. 2. Choose the endpoints to be scanned. You can select multiple endpoints at once by pressing and holding the Ctrl or Shift key, from list, grid or 3D Panoramic view. Note: You can select only the endpoints on to which CES is installed and AV is enabled. 3. Click 'Antivirus' > 'Scan' from the options at the bottom. Select a type of a scan of the endpoint. It will be commenced and the progress will be displayed. You can also run the scans from the right click options with choices to select the areas to be scanned in the endpoints. To run scan on selected areas of endpoints 1. Select 'Computers' from the area selection drop-down menu to open the 'Computers' interface. 2. Choose the endpoints to be scanned. You can select multiple endpoints at once by pressing and holding the Ctrl or Shift key, from list, grid or 3D Panoramic view. Note: You can select only the endpoints on to which CES is installed and AV is enabled. 3. Right click and select 'Scan' from the context sensitive menu. 74

75 4. Select the Scan Profile from the drop-down, depending on the areas to be scanned on the endpoints. The default scan profiles are: Full Scan - This profile covers every local drive, folder and file on the endpoint. Quick Scan - Covers critical areas in the endpoint which are highly prone to infection from viruses, rootkits and other malware. This includes system memory, auto-run entries, hidden services, boot sectors, important registry keys and system files. These areas are responsible for the stability of the computer and keeping them clean is essential. The on-demand scan will be started on the selected endpoints and the progress will be displayed. More scan profiles can be defined when creating a policy and applying the policy to the group or the endpoint. For more details on scan profiles, please refer to CES online help guide at On completion of scanning: If malware is discovered during the scan that is not handled successfully (deleted, disinfected or quarantined) then the endpoint will be indicated as Infected in the 'Computers' area. The results of the scan can be viewed as an Infection report from the Reports area - click 'Reports' then the 'Computer Infections'. The report can also be exported as a pdf file or a spreadsheet file for printing purposes. Refer to Reports > Computer Infections for more details. 3.4.Updating Virus Database on Individual Endpoints The 'Computers' area allows the administrators to update the virus signature database on selected endpoints, identified as outdated computers, irrespective of the groups they belong to. To update selected computers 1. Select 'Computers' from the area selection drop-down menu to open the 'Computers' interface. 75

76 2. Select the endpoints to be updated. You can select multiple endpoints at once by pressing and holding the Ctrl or Shift key, from list, tile or 3D Panoramic view. 3. Click 'Antivirus'> 'Update AV Bases' from the bottom or right click on a selected endpoint and choose Update AV Bases from the context sensitive menu. The Progress will be displayed. and on completion, the virus signature database at the endpoints will be made up-to-date. 3.5.Accessing Endpoints through Remote Desktop Sharing Session CESM allows the administrators to have a desktop sharing session with a remote computer for inspection, configuration, installing third party software or help the end user to solve any issues. To start a remote sharing session 1. Select 'Computers' from the area selection drop-down menu to open the 'Computers' interface. 76


77 2. Select the endpoints to be controlled. 3. Click 'Desktop' from the bottom or right-click the endpoint and select 'Open Remote Session' from the context sensitive menu. 4. A new tab will be opened in the browser, displaying the desktop of the remote computer. The administrator can take control of the remote computer, through the desktop sharing session. 77
78 4.The Groups Area Creating groups of computers allows the administrator to split large networks up into convenient and/or logical groupings. For example, an administrator may create groups of computers called 'Sales Department', 'Accounts Department', 'Vista Workstations', 'XP Workstations', 'Domain Controllers', '64 bit Machines' or 'All Managed Computers'. Once created, the administrator can manage all machines belonging to that group together. Some of the benefits of grouping the computers are: The CES security policies can be applied to the endpoints belonging to various groups as per their requirements Antivirus (AV) scans can be run on endpoints in a group together. The AV signature database in the endpoints can be updated together. Various reports can be generated for the endpoints belonging to a group as a single file. CESM is shipped with a default group 'Unassigned'. All the computers which are imported into CESM and yet to be assigned to other groups, will be added to the Unassigned group. To open the Groups area, choose 'Groups' from the drop-down at the top left of the administrative console. Column Heading Description Group Displays the name of the group Computers Count Displays the number of endpoints in the group Local Policy Indicates the security policy applied to the endpoints connected to CESM through the local network. Internet Policy Indicates the security policy applied to the endpoints connected to CESM through the Internet. For further reading on 'Policies', please see 'The Policies Area'. The 'Groups' area enables the administrator to: Define groups and to add previously imported endpoint computers into them as desired Edit existing groups to add or remove endpoints and to change security policies applied Run on-demand scans on all endpoints in a selected group 78
79 Update virus signature database on all the endpoints Generate reports on endpoints belonging to a group 4.1.Creating New Groups and Importing Existing Endpoints Administrators can create endpoint groups as required, import computers into it and apply security policies in the Create Group wizard. To create a new group 1. Open 'Groups' area by selecting 'Groups' from the drop-down at the top left. The existing Groups and the security policies applied to them will be displayed. 2. Click 'Add' from the bottom to start the 'Create Group' Wizard. Step 1 - Selecting Computers All the computers managed by CESM will be displayed as a list with their IP address and existing group details. 79
 and click 'Apply'.")


80 Click the filter icon in the 'Name' column header to search for a particular endpoint and click 'Apply'. Click the filter icon in the 'IP' column header to search for endpoints with particular IP(s) and click 'Apply'. Click the filter icon in the 'Group' column header to search for endpoints belonging to a specific group and click 'Apply'. Select the endpoint computers to be added to the new group and click the right arrow/swipe the screen left to move to the next step. Step 2 - Selecting Security Policy The next step is to assign a security policy for the CES installations in the endpoints of the newly created group. The specifics of each policy are set in the Comodo Endpoint Security software in one endpoint and can be imported and applied to other endpoints. The 'Select Policy' step allows the administrator to assign a local security policy and Internet security policy for the CES installations in the endpoints of the group from the policies that are previously imported into CESM. Refer to Creating a New Security Policy for more details on importing policies into CESM from the configurations made in the individual endpoints. Step 3 - Naming the Group The next step is to set a name for the created group. 80

81 Enter a name as the group has to identified by CESM in the 'Name' text field. Select the Local Security Policy and Internet Security Policy for the CES installations from the respective drop-downs and click the right arrow to move to the next step. For more details on CESM policies, see the section 'The Policies Area'. Enter a short description for the created group in the 'Description' text field. This description will appear in the 'Groups' area Interface. Click the 'Finish' from the bottom to exit the wizard. The new group will be created with the endpoints selected in Step 1 as members. The CES installations in all the member endpoints will be applied with the security policy as chosen in step 2. Note: The policy can be changed for individual endpoints as desired from the 'Computers' area. 81
82 4.2.Viewing and Managing Groups The Group Properties interface provides the system administrators with the ability to view and manage groups and their networked computers. The interface displays all defined groups and the managed endpoints within each group. From this interface the administrator can: View a summary on details such as security policy applied and the member endpoints of the selected group. Drive the CES installations of endpoints in local administration mode to remote administration mode. Edit a 'Group' to rename, add or remove member endpoints and to change default security policies assigned to the endpoints. Generate reports for the endpoints belonging to a group as a single file. To access the 'Group Properties' interface 1. Open 'Groups' area by selecting 'Groups' from the drop-down at the top left. The existing Groups and the security policies applied to them will be displayed. 2. Open the Group Properties interface for a selected group by: Select the Group and click 'Properties' from the options at the bottom; or Right on the Group and select 'Properties' from the context sensitive menu. The 'Group Properties' screen contains two tabs: General Screen - Displays the name, description and default policies assigned to the group and enables the administrator to edit those details. Computers Screen - Displays the list of all endpoint computers added to CESM, with the members of the group preselected, allowing administrator to add more computers to the group and remove existing members. Computers that are removed from a specific group but are not re-assigned to another named group, will be automatically added to the 'Unassigned' group. Viewing General Properties of a Group The General Properties screen displayed by clicking the 'General' tab from the left hand side navigation, shows the name and description of the group and allows the administrator to rename the group if required. Also, it displays the default local 82


83 connection mode and internet connection mode security policies applied to the member endpoints of the selected group and allows the administrator to change them. To change the name of the group, directly edit the 'Name:' text field. To change the description of the group, directly edit the 'Description:' text field. To change the default security policy applied to the member endpoints in local connection mode, select the mode from the 'Local Policy' drop-down. To change the default security policy applied to the member endpoints in Internet connection mode, select the mode from the 'Internet Policy' drop-down. Alternatively, you can change the default security policy of a group directly by right clicking on it and selecting 'Apply Local Policy' or 'Apply Internet Policy' from the context sensitive menu and choosing the required policy from the sub menu or select the Groups, click Policy > 'Apply Local Policy', 'Apply Internet Policy', apply 'Both Policies' and choosing the required policy or 'Reapply Policy'. Click 'Save' for your changes to take effect. Adding or Removing Endpoints from a Group The Computers screen, displayed by clicking the Computers tab from the left hand side navigation, shows a list of all the computers added to CESM along with details of the group they belong to, IP address. Endpoints that are member of the selected group are preselected. 83

84 To add new member endpoint from a different group or 'Unassigned' group, select the endpoint. To remove an endpoint from the group de-select the endpoint. Click 'Save' for your changes to take effect. Tip: You can move individual endpoints from one group to another from the Computers area. Refer to the section Viewing and Managing Group and Security Policy Details for more details. 4.3.Running On-Demand Scan on Endpoint Groups The 'Groups' area allows the administrator to run on-demand Antivirus (AV) scans on all the endpoints in selected Group(s) simultaneously. The administrator can choose to run a full scan or selected areas of the endpoints, by choosing a scan profile. To run a full scan on the endpoints 1. Open the 'Groups' area by choosing Groups from the drop-down at the top left. 2. Select the group(s) whose endpoints are to be scanned. You can select multiple groups at once by pressing and holding the Ctrl or Shift key. Note: You can select only the Groups with endpoints having CES installed and AV enabled. 3. Click 'Antivirus' > 'Scan' > Full Scan/Quick Scan from the options at the bottom. 84

85 A Full Scan or Quick Scan of the endpoints will be commenced immediately. You can view the progress at the 'Computers' area. The administrator can also run the scans from the right click options with choices to select the areas to be scanned in the endpoints. To run scan on selected areas of endpoints in a group 1. Open the 'Groups' area by choosing Groups from the drop-down at top left. 2. Select the group(s) whose endpoints are to be scanned. You can select multiple groups at once by pressing and holding the Ctrl or Shift key. 85

86 Note: You can select only the Groups with endpoints having CES installed and AV enabled. 3. Right click and select 'Antivirus'> Scan from the context sensitive menu from the bottom or right- click on the selected endpoint. 4. Select the Scan Profile from the drop-down, depending on the areas to be scanned on the endpoints. The default scan profiles are: Full Scan - This profile covers every local drive, folder and file on the endpoints. Quick Scan - Covers critical areas in the endpoints which are highly prone to infection from viruses, rootkits and other malware. This includes system memory, auto-run entries, hidden services, boot sectors, important registry keys and system files. These areas are responsible for the stability of the computer and keeping them clean is essential. More scan profiles can be defined when creating a policy and applying the policy to the group or the endpoint. For more details on scan profiles, please refer to CES online help guide at The on-demand scan will be started on the selected endpoints and the progress will be displayed in the 'Computers' area. On completion of scanning: If malware is discovered during the scan that is not handled successfully (deleted, disinfected or quarantined) then the endpoint will be indicated as Infected in the 'Computers' area. The results of the scan can be viewed as an Infection report from the Reports area - click 'Reports' then the 'Computer Infections'. The report can also be exported as a pdf file or a spreadsheet file for printing purposes. Refer to Reports > Computer Infections for more details. 4.4.Updating Virus Signature Database on Endpoint Groups The 'Groups' area allows the administrators to update the virus signature database on all the endpoints in selected group(s), identified as outdated computers. To update endpoints in a group 1. Open the 'Groups' area by choosing Groups from the drop-down at the top left. 2. Select the group(s) whose endpoints are to be updated. You can select multiple groups at once by pressing and holding the Ctrl or Shift key. 86

87 3. Click Update AV from the bottom or right click on a selected group and choose Update AV Bases from the context sensitive menu. The Progress will be displayed in the Computers area... and on completion, the virus signature database at the endpoints will be made up-to-date. 4.5.Generating Reports for Selected Group The Groups area allows the administrators to generate various reports on all the endpoints in a group as a single file. The generated report can be accessed from the Reports area. To generate reports on the endpoints in a group 1. Open the 'Groups' area by choosing Groups from the drop-down at the top left. 2. Select the group(s) for which you wish to generate report. You can select multiple groups at once by pressing and holding the Ctrl or Shift key. 87
, right click, choose 'Build Report' from the context sensitive menu and")

88 3. Click 'Report' and select the type of report to be generated. Alternatively, select the group(s), right click, choose 'Build Report' from the context sensitive menu and select the report to be generated. The report generation will be started and the progress will be displayed in the Reports area. On completion, the administrator can download the report from the Reports area. Refer to the Reports area for more details. 88

89 5.The Policies Area A policy is the security configuration of Comodo Endpoint Security (CES) deployed on an endpoint or a group of endpoints. Each policy determines the antivirus settings, Internet access rights, firewall traffic filtering rules, Defense+ application control and system settings for an endpoint. The 'Policies' area allows administrators to import and manage security polices for endpoint machines. Create a new policy - A step-by-step wizard that takes admins through the policy import, specification and deployment process. View and managing security policies - Allows administrators to view, reconfigure and export ESM polices. Before proceeding with creating a policy, read the 'Key Concepts' section below to gain a baseline understanding first. Policies - Key concepts Policies are security settings for the installed components of CES configured and tested on a local machines via the standard CES interface. Policies can be imported from an endpoint into the ESM console then applied to target computers or groups of computers. The machine chosen for this purpose can be considered a template of sorts for other equivalently configured machines in the organization (i.e. having the same hardware/software a computer used to image other endpoints in the organization is ideal for this purpose). This allows admins to create a 'model' configuration on one machine that can be rolled out to other computers. Policies can also be created by: Importing CES configuration from a previously saved.xml file or image. Importing an existing policy to use as the starting point for a new policy. Policies can be named according to criteria deemed suitable by the administrator. For example, policies based on security levels could be named 'Highly Secure', 'Medium Security' and 'Low Security'. At the administrator's discretion, a policy can cover settings for all or only some of the three CES components that may be installed on an endpoint:- Antivirus, Firewall, and Defense + settings and system settings:- Power and Device settings management. A policy which excludes settings for one of the CES components installed on the endpoint receiving policy is considered as locally configured (see below) for the settings of that component. The ESM agent installed at each endpoint is responsible for connecting the target machine to the respective ESM 89
90 server and the remote management of the CES installation. Only the agent applies the security policy settings to different components of the CES application and checks whether the application is compliant to policy. Each endpoint has two types of policy assigned to it: directly, or via the group that an endpoint is a member, 'Local Policy' and 'Internet Policy': A 'local policy' which describes the CES security settings that will apply when the endpoint is within the local network. An 'Internet policy' which is automatically applied when the endpoint connects to ESM from an IP address outside the local network. Policy, as mentioned earlier, refers to the actual security configuration of CES. An endpoint can have any chosen policy and can be in either 'Remote' or 'Local' mode. 'Locally Configured' policy. 'Locally Configured' policy means that CES settings can be managed by the local user and policy compliance will not be enforced by ESM. Machines or groups with this policy will always report compliance status of 'OK'. Changes made to the CES settings on to the machine with 'Locally Configured' policy are dynamically stored in the policy. If a machine is switched back to 'Locally Configured' policy from an applied security policy, the last stored local CES configuration settings will be restored to it. 5.1.Creating a New Security Policy The 'Create Policy' wizard enables administrators to create new security policies and to apply them to groups of target computers. The new policies can be created by: Importing the local security settings from a computer. Using another, pre-existing, policy as a base. Importing from a saved.xml file. Policies can be created according to the security requirements of different groups of computers which are in turn, created according to the requirements of the organization. So it is recommended to first create groups and then to create policies, so that the policies can be applied to the groups as required. It is also recommended to retain the group 'Unassigned' with the 'Locally Configured' policy until all the computers have been imported into ESM, so that ESM will not overwrite the policy on new discovered computers once the agent is installed in it. To start the 'Create Policy' wizard Select 'Policies' from the drop-down at the top left. Click 'Add' from the 'Policies' area. 90
91 The wizard will start with Step 1- Create. The remaining steps are displayed below the title bar with the current step highlighted in bold. To move backwards or forwards between steps, use the arrows on either side of the main interface (or left click and drag to swipe the screens left or right) or click a step with a click-able active link below the title bar. Step 1 Create a New Policy The new policies can be created from three types of sources: Computers - Imports the security settings configured locally from a selected source computer to create a new policy. Another Policy - Enables to choose an existing policy and use it as the starting point to create a new policy. A saved Policy XML file - Imports the policy from the policy xml file from the computer running the administration console. Explanations on importing from different source types can be found in the following sections: Importing from Computers, Importing from Another Policy and Importing from XML File. Select the source type and click the right arrow to move to step 2. 91
 for a particular endpoint or group.")
92 Tip: You might create a policy from another policy if you want to exclude a CES component from policy but use the settings in other components, or change the agent-specific settings of the policy(such as to have a different compliance polling interval, or to disallow local mode access) for a particular endpoint or group. Importing from Computers Choose 'Create New' if you wish to import the security settings from a target endpoint as the new policy and click the right arrow to move to Step 2 - Import Settings from another Computer. Step 2 - Import Settings from another Computer All endpoint computers added to ESM will be displayed. Click the filter icon in the 'Computer' column header to search for a particular endpoint, enter its name partially or fully and click 'Apply'. Click the filter icon in the 'Group' column header to search for an endpoint belonging to particular group, enter its name partially or fully and click 'Apply'. Click the filter icon and click 'Apply'. Click the filter icon in the 'CES Mode' column header to search for endpoints with CES in Local, Remote or Unknown mode and click 'Apply'. Click 'Reset' to display all the items. Select the computer from which you wish to import the settings. The computer should have CES installed and be in local mode, configured as per requirements, and should be online to enable ESM to import the settings. Options: in the 'Status' column header to search for an endpoint with a particular status, select the status Force source computer to be remotely managed after policy import is complete - To configure the settings locally, the source computer would have been switched to local administration mode. If you wish the computer to be switched to Remote administration mode after policy is read, select this option. Click the right arrow to move to Step 3 Settings. Importing from Another Policy Choose 'Create from Another Policy' if you wish to import the security settings from an existing Policy and click the right arrow to move to Step 2 - Selecting Source Policy. Step 2 - Selecting Source Policy 92


93 A list of all the existing policies with their descriptions and the CES components configured by them are displayed. Click the filter icon in the respective column header to search for a particular policy or component, enter its name partially or fully click 'Apply'. Click 'Reset' to display all the items. Select the source policy from which you wish to create a new policy and click the right arrow to move to Step 3 Settings. Importing from a saved XML File Choose 'Create from XML file' if you wish to import the security settings from a previously saved policy xml file in the computer running the administration console. Click the right arrow to move to Step 2 - Selecting Source File. Step 2 - Selecting Source File 93
94 Click 'Browse' and navigate to the required policy XML file and click 'Open'. Click the right arrow to move to Step 3 Settings. Step 3 - CES Settings The next step is to select the components of CES for which the security settings are to be imported into the policy. All Available Settings - Imports all the settings from the source selected in the chosen step 2, above. Custom components settings - Enables the administrator to select the components of CES so that only those settings corresponding to the selected components are imported into the policy from the source selected in step 2. Antivirus Settings - Imports the settings relevant to the Antivirus component. Firewall Settings - Imports the settings relevant to the Firewall component. Defense+ Settings - Imports the settings relevant to the Defense+ component. Include Trusted Vendors - Imports trusted vendors, if any, from the source policy. Include Trusted Files - Imports trusted files, if any, from the source policy. Make your selections and click the right arrow to move to step 4 - Agent Settings. Step 4 - Agent Settings The next step allows the administrator to configure the ESM agent installed at the target computers, for which the policy has to be applied. 94

95 Allow CES Local Administration - Configures the agent to allow the CES installation at the target machine to be switched to local administration mode should the user desire to change the security settings. The administrator may choose to not allow the user to alter the security settings in his/her computer, so as to not lead to a security hole in the network. On selecting the 'Allow Local Administration' check box, the administrator should specify how the access to local administration has to be restricted by selecting an option from the following check boxes: Computer administrator - Selecting this option will require the computer user to either have administrative credentials or enter credentials while switching CES at the target machine to local administration mode. ESM Administrator (password is required) - Allows the administrator to specify a password in the text box below this option. This password should be entered for switching the CES to local administration mode. Local Server Address - The administrator can specify the address of the server machine in the local network, on which the ESM central service is installed. Internet Server Address - The administrator can specify the address of the external server on which the ESM central service is installed if the endpoint should connect to the ESM server through Internet. Policy compliance polling interval - The administrator can set the time interval (in hours and minutes) for the agent to periodically check whether the CES at the target computer is compliant with the applied security policy. The result will be dynamically displayed in the Policy Status tile and System Status - Compliancy status tile on the dashboard. (Default = 1 hour, up to but not including 24 hours). Tip: Local Server Address and Internet Server Address values are used by the Agent to determine when Local Policy or Internet Policy should be applied. What's more, these addresses have a priority over addresses that are in the Server Network Addresses list specified in the Configuration Tool such that: 1. The Local Server Address value, mandatory in policy settings, specifies that if this connection is established Local Policy should be applied. 2. Internet Server Address value is optional in policy settings. If specified it is tried to be reached ONLY if the specified local address connection fails, Internet Policy should be applied. If none of these addresses succeeded or if Internet Server Address value wasn't specified, the Agent will try the remaining hosts in the Server Network Addresses list, applying the corresponding policy based upon analysis per RFC 3330 of a connection succeeding via a special use address as indicating Local policy, and a public address indicating Internet policy. Click the right arrow to move to the step 5 System Settings. Step 5 - System Settings The next step allows the administrator to configure the system settings at the target computers, for which the policy has to be applied. 95

96 Enable power options management - Allows the administrator to configure power settings. On selecting the 'Enable power options management' check box, the administrator can specify the power settings from the options below: Turn off the display - Allows the administrator to select the period after which the display will be switched off. Turn off hard disk - Allows the administrator to select the period after which the hard disk will be turned off. System standby - Allows the administrator to select the period after which the system will go into standby mode. System hibernates - Allows the administrator to select the period after which the system will go into hibernate mode. Enable device settings management - The administrator can configure device settings by the selecting this check box and from the options below: Disable USB mass storage devices(s) - Selecting this option will disable USB mass storage devices at the target computers. Disable optical device(s) - Selecting this option will disable optical devices at the target computers. Disable floppy device(s) - Selecting this option will disable floppy devices at the target computers. Click the right arrow to move to the step 6 Selecting Targets. Step 6 - Selecting Targets The administrator can select the target computer group(s) onto which the created policy has to be applied. 96

97 Check 'Assign policy to groups after finish' if you want to apply the newly created policy after it is imported to an existing group. You can also assign this policy at a later stage to groups if you do not want to do so now. See Editing a Security Policy section for more details. For the group(s) of computers connected through the local network you wish to apply the new policy, select 'For Local Policy' check box. For the group(s) of computers connected through the Internet you wish to apply the new policy, select 'For Internet Policy' check box. Options: Override individual computers policy - Selecting this option will apply the new policy onto target computers in the selected groups that currently have individual policies that differ from the group policy, thereby reverting their policies to come from their group membership. Apply policy after finish - Selecting this option will apply newly created policy to all it's targets right after policy creation is finished. Make your selections and click the right arrow to move to step 7 - Importing the Settings and Creating the Policy. Step 7 - Importing the Settings and Creating the Policy The next step requires the administrator to specify a name and provide a description for the policy created. 97
98 Name - Enter a name according to criteria deemed suitable to the security settings. Description - Enter short text that best describes the policy. Make your selection and click the 'Finish' icon On completion: or swipe the screen to left to complete the policy creation process. The 'Policy' interface will open with the new policy added. The new policy will be applied to the target computers selected in step 6 as per the options selected in the same. 5.2.Editing a Security Policy The 'Policies' interface enables the administrator to: View a list of all policies along with their descriptions and the CES component covered by the policy. View and modify the details of any policy - including name, description, CES components, target computers and whether the policy should allow local configuration. Configure various settings such as Antivirus settings, Firewall settings, Defense+ settings, General CES settings, Agent settings and System settings of any policy. Add or remove policies as per requirements. Export any policy to.xml file. Assign or reassign policies to endpoint groups. To open the interface, select 'Policies' from the drop-down at the top left. The 'Policies' interface will open with the default view being a list of all policies: 98
99 At the top of the interface a summary of policies including the total number of policies, the number of components used for the policies are displayed. To search for a particular policy, enter the name of the policy fully or partially in the search box at the top right side of the interface and either press the enter button or wait for few seconds for the searched policy to be displayed. Delete the entered text in the search box to view all the policies again. View All Policies Interface - Table of Column Descriptions Column Heading Description Policy Displays the name of the Policy. Components Indicates the components of CES for which the policy applies the configuration settings. The 'Policies' interface also allows the administrator to: Create a new policy Export a policy into an xml file for importing to ESM at a later time Remove policies View details, edit and apply policies to groups Creating a Policy Click the Add Policy icon from the bottom of the interface. The 'Create Policy' Wizard will be started. Refer to the section Creating a New Policy for a detailed description on the wizard. 99

100 Exporting a Policy Any policy added to ESM can be saved as a.xml file to the computer running the administration console. The.xml file can be imported into ESM and a new policy can be created from it at a later time. To export an existing policy Select the policy by clicking or touching the desired policy from 'Policies' interface to highlight it. Click the Export icon. Alternatively, right click on the selected policy and select 'Export...' from the context sensitive menu. The Windows 'Save As' dialog will appear. Select the destination in the computer from which you are accessing ESM, provide a file name and click 'Save'. The policy will be saved as an xml file. The file can be imported into ESM at any time. Removing Policies The administrator can remove one or more unwanted policies by simply selecting them by clicking or touching the desired policy to highlight it and clicking the Delete context sensitive menu. icon. Alternatively, right click on the selected policy and select 'Delete' from the A confirmation dialog will be displayed. Click 'Yes' to remove the selected item(s). Note: Policies which are currently applied and used by groups or endpoints cannot be deleted. Before removing an unwanted policy, the administrator has to apply a different policy to the groups/endpoints to which this policy is currently applied. Tip: Hold Shift or CTRL to select multiple items. Viewing details and reconfiguring a policy Selecting a policy and clicking the Properties icon from the Policy screen opens the policy details interface with its name displayed at the top. The interface can also be opened by right clicking on the policy and selecting 'Properties' from the context sensitive menu. The interface allows administrators to configure Antivirus settings, Firewall settings, Defense+ settings, General CES settings, File Rating, Agent settings and System settings for the selected policy. The policy can also be assigned to other groups from this interface. 100
 on which the selected policy has to be applied.")
101 Refer to the following sections for more details. General Properties - Displays the general details like name and description of the policy. The administrator can edit these details directly. Policy Targets - Enables the administrator to select target group(s) on which the selected policy has to be applied. Antivirus Settings - Enables the administrator to configure Antivirus settings for the policy. Firewall Settings - Enables the administrator to configure Firewall settings for the policy. Defense+ Settings - Enables the administrator to configure Defense+ settings for the policy. File Rating - Enables the administrator to configure File Rating settings for the policy. General CES Settings - Enables the administrator to configure General CES settings for the policy. Agent Settings - Enables the administrator to configure the ESM agent deployed onto the endpoints as per the policy. System Settings - Enables the administrator to Power and Device management settings fro the policy. The administrator can switch between these areas by using the up or down arrow located at the top and bottom in the left pane General Properties The General screen shows the name and description of the policy as well as the CES components for that policy. To open the interface, click on the 'General' icon in the left pane. The General properties of the selected policy will be displayed. 101

102 To change these details, the administrator can directly edit the respective text boxes in the upper pane and click the 'Save' icon at the bottom of the page. The lower pane displays the details of the security settings. You can change the security settings in this screen or in the 'Antivirus Settings', 'Firewall Settings' and 'Defense+ Settings' screens for more granular configuration Selecting Target Groups The 'Policy Targets' screen displays the computer groups to which the policy is applied for local network connection and Internet connection. It also enables the administrator to: Apply the policy to other groups. Remove the policy from already applied groups. To open the interface, click on the 'Targets' icon in the left pane. All the groups configured in CESM will be displayed. 102
 of computers connected through the Internet you wish to apply the new policy, select 'For Internet Policy' check box.")

103 For the group(s) of computers connected through the local network you wish to apply the new policy, select 'For Local Policy' check box. For the group(s) of computers connected through the Internet you wish to apply the new policy, select 'For Internet Policy' check box. Options: Override individual computers policy - Selecting this option will apply the new policy onto target computers in the selected groups that currently have individual policies that differ from the group policy, thereby reverting their policies to come from their group membership. Click the 'Save' icon for any changes to the settings to take effect. Alternatively, a policy can also be applied to different groups by using right-click options and selecting the group from the context sensitive menu or by clicking the 'Policy' icon in the Policies screen and selecting the group from the menu Configuring Antivirus Settings The Antivirus Settings configuration screen allows an administrator to customize various options related to Real Time Scanning (On-Access Scanning) and Exclusions (a list of the files you consider safe). To open the interface, click on the 'Antivirus' icon in the left pane. The Antivirus Settings screen will be displayed. 103

104 The options that can be configured in the Antivirus settings screen are: Real Time Scanning - To set the parameters for on-access scanning. Exclusions - To add trusted files and applications for excluding from a virus scan. Real Time Scanning The Real time Scanning (aka 'On-Access Scanning') is always ON and checks files in real time when they are created, opened or copied. (as soon as a user interacts with a file, Comodo Antivirus checks it). This instant detection of viruses assures the user, that the system is perpetually monitored for malware and enjoys the highest level of protection. The Real Time Scanner also scans the system memory on start. If a program or file which creates destructive anomalies is launched, then the scanner blocks it and alerts the user immediately - giving you real time protection against threats. You also have options to automatically remove the threats found during scanning and to update virus database before scanning. It is highly recommended that you enable the Real Time Scanner to ensure the endpoints remains continually free of infection. Enable Realtime Scan - Allows the administrator to enable or disable real-time scanning. Comodo recommends to leave this option selected.(default=enabled) Do not show antivirus alerts - This option allows to configure whether or not to show antivirus alerts when malware is encountered. Choosing 'Do not show antivirus alerts' will minimize disturbances but at some loss of user awareness. If you choose not to show alerts then you have a choice of default responses that CES should automatically take either 'Block Threats' or 'Quarantine Threats'. Quarantine Threats - Moves the detected threat(s) to quarantine for your later assessment and action. (Default) Block Threats - Stops the application or file from execution, if a threat is detected in it. Use heuristics scanning - Allows the administrator to enable or disable Heuristics scanning and define scanning level. (Default = Enabled) Heuristic techniques identify previously unknown viruses and Trojans. 'Heuristics' describes the method of analyzing the code of a file to ascertain whether it contains code typical of a virus. If it is found to do so then the application deletes the file or recommends it for quarantine. Heuristics is about detecting virus-like behavior or attributes rather than looking for a precise virus signature that match a signature on the virus blacklist. This is a quantum leap in the battle against malicious scripts and programs as it allows the engine to 'predict' the existence of new viruses - even if it is not contained in the current virus database. Leave this option selected to keep Heuristics scanning enabled. Else, deselect this checkbox. If enabled, you can select the level of Heuristic scanning from the drop-down: Low - 'Lowest' sensitivity to detecting unknown threats but will also generate the fewest false positives. This setting combines an extremely high level of security and protection with a low rate of false positives. Comodo recommends this setting for most users. (Default) 104


105 Medium - Detects unknown threats with greater sensitivity than the 'Low' setting but with a corresponding rise in the possibility of false positives. High - Highest sensitivity to detecting unknown threats but this also raises the possibility of more false positives too. Set new maximum file size limit to - This box allows the administrator to set a maximum size (in MB) for the individual files to be scanned during on-access scanning. Files larger than the size specified here, will not be not scanned. (Default = 40 MB) Exclusions In the Excluded Paths area, you can specify files and folders that you trust and want to exclude them from all future scans of all types. You can add files and folders in Exclusions list by selecting the folder from the drop-down and entering the path in the text field or enter the entire path in the field after selecting 'None' in the drop-down. Click the 'Add' button. If you want to remove an item from the list, select it and click the 'Remove' button. Click the 'Save' icon for any changes to the settings to take effect. For more details on the Antivirus Settings, see for Comodo Endpoint Security. 105
106 Configuring Firewall Settings Firewall Settings screen allows an administrator to quickly configure the firewall security of an endpoint and the frequency of alerts that are generated. To open the Firewall Settings interface, click on the 'Firewall' icon displayed. in the left pane. The Firewall Settings screen will be Click the links below for more details: General Settings Alert Settings General Settings The Enable Firewall check box is enabled by default and if disabled, all incoming and outgoing connections are allowed irrespective of the restrictions set by the user. Comodo strongly advise against this setting unless you are sure that you are not currently connected to any local or wireless networks. Selecting the Enable Firewall check box allows an administrator to customize firewall security from the options in the drop-down: The choices available are: Block All Custom Ruleset Safe Mode Training Mode Block All Mode: The firewall blocks all traffic in and out of a computer regardless of any user-defined configuration and rules. The firewall does not attempt to learn the behavior of any applications and does not automatically create traffic rules for any applications. Choosing this option effectively prevents a computer from accessing any networks, including the Internet. Custom Ruleset Mode: The firewall applies ONLY the custom security configurations and network traffic policies specified by the administrator. New users may want to think of this as the 'Do Not Learn' setting because the firewall does not attempt to learn the behavior of any applications. Nor does it automatically create network traffic rules for those applications. The user will receive alerts every time there is a connection attempt by an application - even for applications on the Comodo Safe list (unless, of course, the administrator has specified rules and policies that instruct the firewall to trust the application's connection attempt). If any application tries to make a connection to the outside, the firewall audits all the loaded components and checks each against the list of components already allowed or blocked. If a component is found to be blocked, the entire 106
107 application is denied Internet access and an alert is generated. This setting is advised for experienced firewall users that wish to maximize the visibility and control over traffic in and out of their computer. Safe Mode (Default): While filtering network traffic, the firewall automatically creates rules that allow all traffic for the components of applications certified as 'Safe' by Comodo, if the checkbox Create rules for safe applications is selected. For non-certified new applications, the user will receive an alert whenever that application attempts to access the network. The administrator can choose to grant that application Internet access by selecting 'Treat this application as a Trusted Application' at the alert. This deploys the predefined firewall policy 'Trusted Application' onto the application. 'Safe Mode' is the recommended setting for most users - combining the highest levels of security with an easy-tomanage number of connection alerts. Training Mode: The firewall monitors network traffic and create automatic allow rules for all new applications until the security level is adjusted. The user will not receive any alerts in 'Training Mode' mode. If you choose the 'Training Mode' setting, we advise that you are 100% sure that all applications installed on endpoints are assigned the correct network access rights. Tip: Use this setting temporarily while playing an online game for the first time. This suppresses all alerts while the firewall learns the components of the game that need Internet access and automatically create 'allow' rules for them. You can switch back to your previous mode later. Alert Settings Create rules for safe applications: Comodo Firewall trusts the applications if: The application/file is included in the Trusted Files list under File Rating Settings; The application is from a vendor included in the Trusted Software Vendors list under File Rating Settings; The application is included in the extensive and constantly updated Comodo safelist. By default, CES does not automatically create 'allow' rules for safe applications. This helps saving the resource usage, simplifies the rules interface by reducing the number of 'Allowed' rules in it, reduces the number of pop-up alerts and is beneficial to beginners who find difficulties in setting up the rules. Enabling this check box instructs CES to begin learning the behavior of safe applications so that it can automatically generate the 'Allow' rules. These rules are listed in the Application Rules interface of CES. The Advanced users can edit/modify the rules as they wish. Background Note: Prior to version 4.x, CES would automatically add an allow rule for 'safe' files to the rules interface. This allowed advanced users to have granular control over rules but could also lead to a cluttered rules interface. The constant addition of these 'allow' rules and the corresponding requirement to learn the behavior of applications that are already considered 'safe' also took a toll on system resources. In version 4.x and above, 'allow' rules for applications considered 'safe' are not automatically created - simplifying the rules interface and cutting resource overhead with no loss in security. Advanced users can re-enable this setting if they require the ability to edit rules for safe applications (or, informally, if they preferred the way rules were created in CES version 3.x). Set alert frequency level: Administrators can configure the amount of alerts that Comodo Firewall generates, from the drop-down. It should be noted that this does not affect your security, which is determined by the rules you have configured (for example, in 'Application Rules' and 'Global Rules' in CES'). For the majority of users, the default setting of 'Low' is the perfect level - ensuring you are kept informed of connection attempts and suspicious behaviors whilst not overwhelming you with alert messages. The Alert settings refer only to connection attempts by applications or from IP addresses that you have not (yet) decided to trust. For example, you could specify a very high alert frequency level, but not receive any alerts at all if you have chosen to trust the application that is making the connection attempt. 107


108 The options available are: Very High: The firewall shows separate alerts for outgoing and incoming connection requests for both TCP and UDP protocols on specific ports and for specific IP addresses, for an application. This setting provides the highest degree of visibility to inbound and outbound connection attempts but leads to a proliferation of firewall alerts. For example, using a browser to connect to your Internet home-page may generate as many as 5 separate alerts for an outgoing TCP connection alone. High: The firewall shows separate alerts for outgoing and incoming connection requests for both TCP and UDP protocols on specific ports for an application. Medium: The firewall shows alerts for outgoing and incoming connection requests for both TCP and UDP protocols for an application. Low: The firewall shows alerts for outgoing and incoming connection requests for an application. This is the setting recommended by Comodo and is suitable for the majority of users. Very Low: The firewall shows only one alert for an application. Click the 'Save' icon for any changes to the settings to take effect. For more details on the Firewall Settings, see for Comodo Endpoint Security Configuring Defense+ Settings Defense+ is a collective term that covers the Host Intrusion Prevention (HIPS), sandboxing and behavior blocker components of Comodo Endpoint Security. Together, these technologies ensure all applications, processes and services on endpoints behave in a secure manner - and are prevented from taking actions that could damage endpoints or the data. To open the Defense+ Settings interface, click on the 'Defense+' icon be displayed. in the left pane. The Defense+ Settings screen will 108

109 The Defense+ settings area allows an administrator to configure the following: HIPS Behavior Settings Behavior Blocker HIPS Behavior Settings HIPS constantly monitors system activity and only allows executables and processes to run if they comply with the prevailing security rules that have been enforced by the user. For the average user, Comodo Endpoint Security ships with a default HIPS ruleset that works 'out of the box' - providing extremely high levels of protection without any user intervention. For example, HIPS automatically protects system-critical files, folders and registry keys to prevent unauthorized modifications by malicious programs. Advanced users looking to take a firmer grip on their security posture can quickly create custom policies and rulesets using the powerful rules interface. Note for beginners: This page often refers to 'executables' (or 'executable files'). An 'executable' is a file that can instruct your computer to perform a task or function. Every program, application and device you run on your computer requires an executable file of some kind to start it. The most recognizable type of executable file is the '.exe' file. (e.g., when you start Microsoft Word, the executable file 'winword.exe' instructs your computer to start and run the Word application). Other types of executable files include those with extensions.cpl.dll,.drv,.inf,.ocx,.pf,.scr,.sys. Unfortunately, not all executables can be trusted. Some executables, broadly categorized as malware, can instruct your computer to delete valuable data; steal your identity; corrupt system files; give control of your PC to a hacker and much more. You may also have heard these referred to as Trojans, scripts and worms. Enable HIPS Allows the administrator to enable/disable the HIPS protection.(default=disabled) If enabled, the administrator can choose the security level and configure the monitoring settings for the HIPS component. The security level can be chosen from the drop-down that becomes active only on enabling HIPS: The choices available are: Paranoid Mode: This is the highest security level setting and means that Defense+ monitors and controls all executable files apart from those that you have deemed safe. Comodo Endpoint Security does not attempt to learn the behavior of any applications - even those applications on the Comodo safe list and only uses your configuration settings to filter critical system activity. Similarly, the Comodo Endpoint Security does automatically create 'Allow' rules for any executables - although you still have the option to treat an application as 'Trusted' at the Defense+ alert. Choosing this option generates the most amount of Defense+ alerts and is recommended for advanced users that require complete awareness of activity on their system. Safe Mode: While monitoring critical system activity, Defense+ automatically learns the activity of executables and applications certified as 'Safe' by Comodo. It also automatically creates 'Allow' rules these activities, if the checkbox 'Create rules for safe applications' is selected. For non-certified, unknown, applications, you will receive an alert whenever that application attempts to run. Should you choose, you can add that new application to the safe list by choosing 'Treat this application as a Trusted Application' at the alert. This instructs the Defense+ not to generate an alert the next time it runs. If your machine is not new or known to be free of malware and other threats as in 'Clean PC Mode' then 'Safe Mode' is recommended setting for most users - combining the highest levels of security with an easyto-manage number of Defense+ alerts. Clean PC Mode: From the time you select 'Clean PC Mode' option, Defense+ learns the activities of the applications currently installed on the computer while all new executables introduced to the system are monitored and controlled. This patent-pending mode of operation is the recommended option on a new computer or one that the user knows to be clean of malware and other threats. From this point onwards Defense+ alerts the user whenever a new, unrecognized application is being installed. In this mode, the files in 'Unrecognized Files' are excluded from being 109

110 considered as clean and are monitored and controlled. Training Mode: Defense+ monitors and learn the activity of any and all executables and create automatic 'Allow' rules until the security level is adjusted. You do not receive any Defense+ alerts in 'Training Mode'. If you choose the 'Training Mode' setting, we advise that you are 100% sure that all applications and executables installed on your computer are safe to run. Checkbox Options Block all unknown requests if the application is closed - Selecting this option blocks all unknown execution requests if Comodo Endpoint Security is not running/has been shut down. This is option is very strict indeed and in most cases should only be enabled on seriously infested or compromised machines while the user is working to resolve these issues. If you know your machine is already clean and are looking just to enable the highest CES security settings then it is OK to leave this box unchecked. (Default = Disabled) Create rules for safe applications - Automatically creates rules for safe applications in HIPS Ruleset. (Default = Disabled) Note: HIPS trusts the applications if: The application/file is included in the Trusted Files list. The application is from a vendor included in the Trusted Software Vendors list. The application is included in the extensive and constantly updated Comodo safelist. By default, CES does not automatically create 'allow' rules for safe applications. This helps saving the resource usage, simplifies the rules interface by reducing the number of 'Allowed' rules in it, reduces the number of pop-up alerts and is beneficial to beginners who find difficulties in setting up the rules. Enabling this checkbox instructs CES to begin learning the behavior of safe applications so that it can automatically generate the 'Allow' rules. These rules are listed in the HIPS Rules interface. Administrators can edit / modify the rules as they wish. Behavior Blocker The Behavior Blocker is an integral part of the Defense+ engine and is responsible for authenticating every executable image that is loaded into the memory. The Behavior Blocker intercepts all files before they are loaded into memory and intercepts prefetching/caching attempts for those files. It calculates the hash of the executable at the point it attempts to load into the memory. It then compares this hash with the list of known / recognized applications that are on the Comodo safe list. If the hash matches the one on record for the executable, then the application is safe and the Behavior Blocker allows it to run. If no matching hash is found on the safelist, then the executable is 'unrecognized' and is run inside the auto-sandbox. You will be notified via an alert when this happens. To access the Behavior Blocker settings screen, click the 'Behavior Blocker' tab in the 'Defense+ Settings' interface. Auto-sandbox unknown applications as - Allows the administrator to enable or disable the Behavior Blocker. If enabled, the Behavior Blocker runs unrecognized applications inside the auto-sandbox with the access restriction as selected in the drop down menu. (Default = 'Enabled' with 'Partially Limited') 110
.")
111 Note: The 'auto-sandbox' referred to here is distinct to the fully virtualized sandbox/virtual Kiosk discussed in Sandbox Tasks in CES. The 'auto-sandbox' is a non-virtual environment under which unrecognized applications are run allowed to run under a set of access restrictions (default='partially Limited'). These restrictions prevent the application from taking actions that are damaging to your system. Advanced users can, however, make a registry change to enable 'Full Virtualization' of autosandboxed files. Access restriction levels determine the amount of privileges an auto-sandboxed application has to access other software and hardware resources on your computer: Partially Limited - The application is allowed to access all operating system files and resources like the clipboard. Modification of protected files/registry keys are not allowed. Privileged operations like loading drivers or debugging other applications are also not allowed.(default) Limited - Only selected operating system resources can be accessed by the application. The application is not allowed to execute more than 10 processes at a time and is run without Administrator account privileges. Restricted - The application is allowed to access very few operating system resources. The application is not allowed to execute more than 10 processes at a time and is run with very limited access rights. Some applications, like computer games, may not work properly under this setting. Untrusted - The application is not allowed to access any operating system resources. The application is not allowed to execute more than 10 processes at a time and is run with very limited access rights. Some applications that require user interaction may not work properly under this setting. Blocked - The application is not allowed to run at all. Fully Virtualized - This option is not available by default but can be enabled by adding a registry key (advanced users only). To do this, open the registry editor and browse to HKLM >SYSTEM > software > Comodo > Firewall Pro. Add a DWORD key to this hive named EnableDefaultVirtualization and set the value to 1. 'Fully Virtualized' will now be listed in the auto-sandbox restriction level drop down. Click the 'Save' icon for any changes to the settings to take effect. For more details on the Defense+ Settings, see for Comodo Endpoint Security Configuring File Rating Settings The CES rating system is a cloud-based file lookup service (FLS) that ascertains the reputation of files on your computer. Whenever a file is first accessed, CES will check the file against our master whitelist and blacklists and will award it trusted status if: The application/file is included in the Trusted Files list; The application is from a vendor included in the Trusted Software Vendors list; The application is included in the extensive and constantly updated Comodo safelist. Trusted files are excluded from monitoring by HIPS - reducing hardware and software resource consumption. On the other hand, files which are identified as malicious will be added to the Blocked Files list and denied all access rights from other processes or users - effectively cutting them off from the rest of your system. Files which could not be recognized by the rating system are added to the list of 'Unrecognized Files'. You can review files on the unrecognized list and manually choose to trust/block/delete them or investigate further by sending them to Comodo for analysis/running another file lookup. 111
112 To open the File Rating interface, click on the 'File Rating' icon in the left pane. The File Rating screen will be displayed. The 'File Rating' area allows you to view and manage the list of Trusted Files and Trusted Vendors. Click on the following links for more details: File Rating Settings Trusted Files Trusted Vendors File Rating Settings The File Rating Settings screen allows you to configure the overall behavior of File Rating feature of Comodo Endpoint Security. Check box options: Enable Cloud Lookup - Allows you to enable or disable File Rating.(Default and recommended =Enabled) Analyze unknown files in the cloud by uploading them for instant analysis - Instructs CES to upload files whose trustworthiness could not be assessed by cloud lookup to Comodo for analysis immediately. The experts at Comodo will analyze the file and add to the whitelist or blacklist according to the analysis. (Default =Enabled) Trust applications signed by trusted vendors - When this option is enabled, CES will award trusted status to the executables and files that are digitally signed by vendors in the Trusted Vendors list using their code signing certificates. (Default =Enabled) Trust files installed by trusted installers - When this option is enabled, CES will consider the executable and files stored by applications that are assigned with Installer or Updater rule under HIPS Rules or the applications. (Default =Enabled) Trusted Files Files added to the Trusted Files list are automatically given Defense+ trusted status. If an executable is unknown to the Defense+ safe list then, ordinarily, it and all its active components generate HIPS alerts when they run. Of course, you could choose the 'Treat this as a Trusted Application' option at the alert but it is often more convenient to classify entire directories of files as 'Trusted Files'. CES allows you to define a personal safe list of files to complement the default Comodo safe list. By adding executables to this list (including sub folders containing many components) you can reduce the amount of alerts that HIPS generates whilst maintaining a higher level of Defense+ security. This is particularly useful for developers that are creating new applications that, by their nature, are as yet unknown to the Comodo safe list. Files can be transferred into this module by clicking the 'Move to' button in the 'Unrecognized Files' area. Adding files to Trusted Files list CES allows you to add files and executables to the list of Trusted Files so that those files will be given Trusted status. For the files added manually, it generates a hash or a digest of the file using a pre-defined algorithm and saves in its database. On 112
113 access to any file, its digest is created instantly and compared against the list of stored hashes to decide on whether the file has 'Trusted' status. By this way, even if the file name is changed later, it will retain its Trusted status as the hash remains same. However you can also add files by their file names, but if you happen to change the file name later, it looses its 'Trusted' status. To add new file(s) to Trusted Files list Click the 'Add Local' button to add files from the computer through which the console is accessed. Click the 'Add Remote' button to add files from the endpoints that are connected to CESM. Navigate to the file(s) that you want to add and click 'Open'. The selected file(s) will be added to the Trusted Files list. To remove an included entry from the Trusted Files list Select the entry to be removed from the 'Trusted Files' list. You can select several entries to be removed at once by using Shift or Ctrl keys. Click the Remove button. Click 'Save' for the changes to take effect. Trusted Vendors In Comodo Endpoint Security, there are two basic methods in which an application can be treated as safe. Either it has to be part of the Safe List (of executables/software that is known to be safe) or that application has to be signed by one of the vendors in the 'Trusted Vendor List'. A software application can be treated as a 'Trusted' one if it is published by a Trusted Software publisher/vendor. To ensure the authenticity, the publisher/vendor digitally sign their software using a code signing certificate obtained from a Trusted Certificate Authority (CA). Ensuring whether a software/application is signed by a vendor ensures that the software is trusted. Refer to the Background details given below for more information. Background Many software vendors digitally sign their software with a code signing certificate. This practice helps end-users to verify: Content Source: The software they are downloading and are about to install really comes from the publisher that signed it. Content Integrity: That the software they are downloading and are about to install has not be modified or corrupted since it was signed. In short, users benefit if software is digitally signed because they know who published the software and that the code hasn't been tampered with - that are are downloading and installing the genuine software. The 'Vendors' that digitally sign the software to attest to it's probity are the software publishers. These are the company names you see listed in the first column in the graphic above. However, companies can't just 'sign' their own software and expect it to be trusted. This is why each code signing certificate is counter-signed by an organization called a 'Trusted Certificate Authority'. 'Comodo CA Limited' and 'Verisign' are two examples of a Trusted CA's and are authorized to counter-sign 3rd party software. This counter-signature is critical to the trust process and a Trusted CA only counter-signs a vendor's certificate after it has conducted detailed checks that the vendor is a legitimate company. If a file is signed by a Trusted Software Vendor and the user has enabled 'Trust Applications that are digitally signed by Trusted Software Vendors' then it will be automatically trusted by Comodo Endpoint Security (if you would like to read more about code signing certificates, see One way of telling whether an executable file has been digitally signed is checking the properties of the.exe file in question. Browse to the folder containing the.exe file. Right click on the.exe file. Select 'Properties' from the menu. Click the tab 'Digital Signatures (if there is no such tab then the software has not been signed). This displays the name of the CA that signed the software. Select the certificate and click the 'Details' button to view digital signature information. Click 'View Certificate' to inspect the actual code signing certificate. 113

114 To add trusted vendors Enter the name of the vendor as given in the code signing certificate in the text field. Click the 'Add' button. The vendor will be added to the list. If you want to remove a vendor from the list, select it and click the 'Remove' button. Click the 'Save' icon for any changes to the settings to take effect. For more details on the File Rating Settings, see for Comodo Endpoint Security Configuring General CES Settings In the General CES Settings screen, administrators can configure various options related to the operation of Comodo Endpoint Security. To open the General CES Settings interface, click on the 'CES Settings' icon screen will be displayed. in the left pane. The General CES Settings 114
115 Click the following links for more details: User Interface Updates Proxy and Host Settings User Interface Settings The 'User Interface' tab allows the administrator to enable / disable CES notification messages and / or messages from Comodo Message Center. Show messages from COMODO Message Center - If enabled, Comodo Message Center messages will periodically appear to keep you abreast of news in the Comodo world. They contain news about product updates, occasional requests for feedback, info about other Comodo products you may be interested to try and other general news. (Default = Enabled) Show notification messages - These are the CES system notices that appear in the bottom right hand corner of your screen (just above the tray icons) and inform you about the actions that CES is taking and any CES status updates. For example ' Comodo Firewall is learning ' or 'Defense+ is learning ' are generated when these modules are learning the activity of previously unknown components of trusted applications. Antivirus notifications will also be displayed if you have selected 'Do not show antivirus alerts' check box in Antivirus > Real-time Scan settings screen. Clear this check box if you do not want to see these system messages. (Default = Enabled) Update Settings The 'Updates' area allows the administrator to configure settings that govern CES program and virus database updates. Automatically check for updates - If this is option is enabled, CES automatically checks for program and virus database updates automatically. You can also specify which servers and connections to use for updates in Proxy and Host Settings screen. Comodo recommends automatic update checks are left enabled to ensure your system enjoys maximum protection against the latest threats.(default=enabled) Automatically download program updates and notify me - Instructs CES to automatically download program and virus database updates as soon as they are available then notify you that they are ready for installation. (Default=Enabled) Do not automatically download updates but notify me about them - Selecting this option means CES will notify you when updates are available but will not download them until after your approval. Proxy and Host Settings The Proxy and Host Settings screen allows administrators to select the host from which the updates are to be downloaded. By default, CES will directly download updates from Comodo servers. However, advanced users and network admins may wish to 115

116 first download updates to a proxy/staging server and have individual CES installations collect the updates from there. The 'Proxy and Host Settings' interface allows you to point CES at this proxy/staging server. This helps conserve overall bandwidth consumption and accelerates the update process when large number of endpoints are involved. Note: You first need to install Comodo Offline Updater in order to download updates to your proxy server. This can be downloaded from Select 'Use proxy' check box if you want Comodo Endpoint Security to use the Proxy Server. Enter the host name and port numbers. If the proxy server requires access credentials, select the 'Use Authentication' check-box and enter the login / password accordingly. You can add multiple servers from which updates are available. To do this, click the 'Add' button beside the 'Servers' column then enter the address in the server field. Activate or deactivate each update server by selecting or deselecting the check-box alongside it Use the 'Move Up' and 'Move Down' buttons to specify the order in which each server should be consulted for updates. CES will commence downloading from the first server that contains new updates Configuring Agent Settings In the Agent Settings screen, administrators can edit the Agent settings for the selected policy. To open the Agent Settings interface, click on the 'Agent' icon in the left pane. The Agent Settings screen will be displayed. 116

117 Allow CES Local Administration for- Configures the agent to allow the CES installation at the target machine to be switched to local administration mode should the user desire to change the security settings. The administrator may choose to not allow the user to alter the security settings in his/her computer, so as to not lead to a security hole in the network. On selecting the 'Allow Local Administration' check box, the administrator should specify how the access to local administration has to be restricted by selecting an option from the following check boxes: Computer administrator - Selecting this option will require the computer user to either have administrative credentials or enter credentials while switching CES at the target machine to local administration mode. ESM Administrator (password is required) - Allows the administrator to specify a password in the text box below this option. This password should be entered for switching the CES to local administration mode. Policy compliance polling interval - The administrator can set the time interval (in hours and minutes) for the agent to periodically check whether the CES at the target computer is compliant with the applied security policy. The result will be dynamically displayed in the Policy Status tile and System Status - Compliancy status tile on the dashboard. (Default = 1 hour, up to but not including 24 hours). Local Server Address - The administrator can specify the address of the server machine in the local network, on which the ESM central service is installed. Internet Server Address - The administrator can specify the address of the external server on which the ESM central service is installed if the endpoint should connect to the ESM server through Internet. Tip: Local Server Address and Internet Server Address values are used by the Agent to determine when Local Policy or Internet Policy should be applied. What's more, these addresses have a priority over addresses that are in the Server Network Addresses list specified in the Configuration Tool such that: 1. The Local Server Address value, mandatory in policy settings, specifies that if this connection is established Local Policy should be applied. 2. Internet Server Address value is optional in policy settings. If specified it is tried to be reached ONLY if the specified local address connection fails, Internet Policy should be applied. If none of these addresses succeeded or if Internet Server Address value wasn't specified, the Agent will try the remaining hosts in the Server Network Addresses list, applying the corresponding policy based upon analysis per RFC 3330 of a connection succeeding via a special use address as indicating Local policy, and a public address indicating Internet policy. Click 'Save' for any changes to take effect. 117
118 Configuring System Settings The System Settings screen allows the administrator to edit the system settings configured for the selected policy. To open the System Settings interface, click on the 'System' icon Options interface will be displayed. in the left pane. The System Settings screen with Power Power Options Enable power options management - Allows the administrator to configure power settings. On selecting the 'Enable power options management' check box, the administrator can specify the power settings from the options below: Turn off the display - Allows the administrator to select the period after which the display will be switched off. Turn off hard disk - Allows the administrator to select the period after which the hard disk will be turned off. System standby - Allows the administrator to select the period after which the system will go into standby mode. System hibernates - Allows the administrator to select the period after which the system will go into hibernate mode. Devices Management Click the 'Device Management' tab to open the device settings interface. 118
 - Selecting this option will disable optical devices at the target computers.")
119 Enable device settings management - The administrator can configure device settings by the selecting this check box and from the options below: Disable USB mass storage devices(s) - Selecting this option will disable USB mass storage devices at the target computers. Disable optical device(s) - Selecting this option will disable optical devices at the target computers. Disable floppy device(s) - Selecting this option will disable floppy devices at the target computers. Click the 'Save' icon for any changes to take effect. 5.3.Re-applying Security Policies to Endpoint Groups Newly created security policies or edited polices can be assigned or reassigned to endpoint groups or endpoints in multiple ways. Re-applying policies to endpoint groups: From the 'Policies' area - Administrators can reassign polices to different endpoint groups from this interface also. Select the policy that you want to reassign to a group and use any of the following options: Right click options in the Policies interface. (Refer to the section Selecting Target Groups for more details). Policy Target screen of the selected group. (Refer to the section Selecting Target Groups for more details). Using the More icon in the Groups interface (Refer to the section Selecting Target Groups for more details). From the 'Groups' area - Administrators can reassign polices to different endpoint groups from this interface. Select the group that you want to reassign a policy and use any of the following options: Right click options in the Groups interface. (Refer to the section Viewing and Managing Groups for more details). General screen of the selected group.(refer to the section Viewing and Managing Groups for more details). Using the Policy icon in the Groups interface. (Refer to the section Viewing and Managing Groups for more details). Re-applying policies to endpoints: From the 'Computers' area - Administrators can reassign polices to different endpoints from this interface. Select the endpoint that you want to reassign a policy and use any of the following options: Right click options in the Computers interface. 119
120 Advanced screen of the Computers interface. (Refer to the section Viewing and Managing Group and Security Policy Details for more details). Using the More icon in the Computers interface. 6. Viewing and Managing Installed Applications CESM enables the administrator to have a great control over the applications installed on the endpoints. The administrator can view the list of applications and programs installed on all the endpoints running on different Operating Systems, with their version numbers and publisher details. If found suspicious, resource consuming or unnecessary, the administrator can uninstall the application(s) from the selected endpoints. The 'Applications' area displays the list of applications installed in all the endpoints connected to CESM. To open the 'Applications' area, choose 'Applications' from the drop-down at the top left. Column Heading Description Application Displays the name of the application. Version Displays the version number of the application. OS Type Displayes the Operating System of the endpoint(s) on which the application is installed. Publisher Indicates the software vendor that has distributed the application. Computers Count Indicates the number of endpoint computers on which the application was detected. Filter Options The filter options in the gray stripe, gives at-a-glance statistics of the number of applications identified from computers running 120

121 on different Operating Systems and allow the administrator to filter the computers based on the criteria. The search field in the right allows the administrator to search for a specific application by entering its name partially or fully. Managing Applications To view the details of a selected application, select the application and click 'Properties' or right click on the application and choose 'Properties' from the context sensitive menu. The Application Properties interface will open. 121
122 The interface contains two areas: General - Displays the general information on the application. Computers - Displays the list of endpoints up on which the application was identified and allows the administrator to uninstall the application from the selected endpoints. General Properties Screen The General Properties screen can be displayed by clicking the 'General' tab from the left hand side navigation. 122

123 The General Properties screen displays the details on name, version number, publisher, OS and number of endpoints on which the application was identified. Computers Screen The 'Computers' screen can be opened by clicking the Computers tab in the 'Application Properties' interface. The 'Computers' screen displays the list of endpoints on which the application was identified and allows the administrator to uninstall the application, if it is an unwanted one. To uninstall the application from selected endpoints 1. Select the endpoints. You can select multiple endpoints simultaneously by pressing and holding the 'Ctrl' or 'Shift' keys in the key board. 2. Click 'Uninstall'. The application will be uninstalled from the selected endpoints immediately. Note: You can uninstall only MSI based applications from this interface. Clicking the 'Location' will open the File System. Click Viewing and Managing Drives and Storage for more details. 7.Viewing and Managing Currently Running Processes The 'Processes' area allows administrators to view and manage processes running on all endpoints. Administrator can use this feature to troubleshoot problems and terminate unnecessarily running processes if required. To open the 'Processes' area, choose 'Processes' from the drop-down at the top left. 123
 on which the process is running. Location Displays the process location.")
124 Column Heading Description Process Displays the name of the process. Description Displays a short description of the process. OS Type Displays the Operating System of the endpoint(s) on which the process is running. Location Displays the process location. Computers Count Indicates the number of endpoint computers on which the process is running 124

125 To view process properties Select a process from the list and click 'Properties' from the options at the bottom Right click on the process and select 'Properties' from the context sensitive menu or Double click on the process. The Properties screen has two tabs: General - Displays the name of the process name, a short description of the process, vendor of the executable that has initiated the process, number of computers at which the process is running and the Operating System of the endpoints on which the process is running. Computers Displays the name of endpoints on which the process is running, their OS and status. 125
126 To terminate the process from selected endpoints, select the endpoints and click the 'End Process' from the options at the bottom. 8.Viewing and Managing Services The 'Services' area allows administrators to view and manage Windows Services, Mac Services or Unix Daemons that are currently loaded on to all the Windows based, MacOS based or Linux based managed endpoints, with the number of computers on which the service is loaded. Administrator can use this feature to troubleshoot problems and start/stop the services if required. To open the 'Services' area, choose 'Services' from the drop-down at the top left. 126
 on which the service is loaded. Location Displays the service location. Status Displays the service status.")
127 Column Heading Description Service Displays the service key name. Display Name Displays the short name of the service. OS Type Displays the Operating System of the endpoint(s) on which the service is loaded. Location Displays the service location. Status Displays the service status. Computers Count Indicates the number of endpoint computers on which the service is loaded To view process properties Select a Service from the list and click 'Properties' from the options at the bottom Right click on the Service and select 'Properties' from the context sensitive menu or Double click on the Service The Properties screen has two tabs: General - Displays the key name of the service, display name of the service and the Operating System and the number of computers at which the service is loaded. Computers - Displays the name of endpoints on which the service is loaded, their OS and running status. 127
128 To stop a running service, select the computer and click 'Stop' from the options at the bottom. To start a stopped service, select the computer and click 'Start' from the options at the bottom. To open service location, select the computer and click 'Location' at the bottom. 128

129 9.The Reports Area CESM Reports are highly informative, graphical summaries of the security and status of managed endpoints. Each type of report is fully customizable, features 'in-report remediation and can be ordered for anything from a single machine right up to the entire managed environment. Reports can be exported to.pdf or spreadsheet. To open the Reports area, choose Reports from the drop-down at top left. Column Heading Description Report Indicates the type of the report requested/generated. For the complete list of Report types available from CESM, refer to the section Report Types given below. Status Indicates whether the report generation is 'Completed' or 'Running'. Date Requested Indicates the date and time of request for the report by the administrator. Date Completed Indicates the date and time of completion of report generation. Report File Enables the administrator to download the completed reports. Report Types Antivirus Updates - Information on versions of AV signature databases at the endpoints. CES Configuration - Information on components of CES installed at the endpoints and their configuration status. CES Log - Logs of events related to CES at the endpoints. Computer Details - General information about target endpoint(s) such as operating environment and hardware details. Computer Infections - Information on malware discovered during the antivirus (AV) scans and not handled 129
130 successfully (deleted, disinfected or quarantined) locally by CES and the endpoints affected by them. Malware Statistics - Statistical information on the malware detected at various AV scans run on the target endpoint(s), with the actions taken against them. Policy Compliance - A summary of compliance of the endpoints to their assigned security policies and a detailed information on the security policies applied to the endpoints. Policy Delta - Provides a investigation report on the differences in components between the policy applied from the CESM server side and the actual state of the policy as in the target endpoint side to analyze reasons for an endpoint being non-compliant. This report can be generated only for endpoint with Non-Compliant status. Quarantined Items - Information on virus and other malware identified by AV scans and quarantined locally by CES. Top 10 Malwares - A list of top-ten malware discovered during the antivirus (AV) scans from the target endpoints during the specified time period. Filter Options The filter options in the gray stripe, gives at-a-glance statistics of the reports requested, completed and under generation. Clicking a category displays only the reports falling into that category. The search field lets the administrator search for report(s) by endpoint or report completion/request date. More filters can be applied by clicking the funnel icon beside the column heading. Click the filter icon in the 'Report' column header to search for a specific report type: Click the filter icon queue. in the 'Status' column header to search for reports that were completed, running, failed or in Click the filter icon specific date range. in the 'Date Requested' column header to search for reports that were requested within a 130

131 Click the filter icon specific date range. in the 'Date Completed' column header to search for reports that were completed within a Click 'Reset' to display all the items. Generating a Report Administrators can generate reports for defined groups of endpoints, individual endpoints or selected endpoints. Group reports can be generated from the 'Groups' area, Reports for individual endpoints can be generated from the 'Computers' area. To generate reports for a selected group 1. Open 'Groups' area by selecting 'Groups' from the drop-down at the top left. 2. Right click on a Group and choose 'Build Report' 3. Choose the report type from the context sensitive menu Select the group, select 'Report' from the bottom of the interface and choose the report type. or 131

132 The report generation will be started or added to the queue. The progress will be displayed in the 'Reports' area. On completion, the report can be opened from the 'Reports' area. Refer to the sections below for detailed explanations on each report type. To generate reports for a selected endpoint 1. Open 'Computers' area by selecting 'Computers' from the drop-down at the top left. 2. Right click on a computer and choose 'Build Report' and choose the report type from the context sensitive menu OR Select the computer, click 'Report' on the bottom, and choose the report type. 132

133 The report will now be generated. Progress will be displayed in the 'Reports' area. On completion, the report can be opened from the 'Reports' area. Refer to the sections below for detailed explanations on each report type. Downloading the Report If the administrator had opted for generating a downloadable report file in step 2 - Options, the report can be downloaded by clicking the download link beside the report in the 'reports' area or by selecting the report(s) and clicking the download icon at the bottom of the 'Reports' area. The administrator can choose the printable file to be generated in portable document (.pdf) or spreadsheet (.xls) format. Viewing the Report Selecting a report from the list and clicking 'Open' from the options at the bottom or right clicking a report and choosing 'Open' from the context sensitive menu will open the report. The following sections explain each of these report types in detail. 9.1.Antivirus Updates Report The Antivirus Updates report provides details on the antivirus (AV) signature database versions in the target computers and whether they are up-to-date. The report assists the administrators to decide on the target computers whose AV databases are to 133
134 be updated and to run an Update AV base task on the computers. Comodo advises administrators to maintain the AV databases up-to-date in all the managed end-points to get protection against any threats discovered by our AV labs. To generate a 'Antivirus Updates' report Open the 'Reports' area by choosing 'Reports' from the drop-down at the top left. Click 'Add' and choose 'Antivirus Updates Report'. The 'Create Antivirus Updates Report' wizard will start. Step 1 - Selecting Targets The list of all the endpoint computers connected to CESM is displayed. 134
135 Select the endpoint(s) for which you wish to generate the AV Updates report. The filter options in the header provides at-a-glance statistics of the computers in the network and allow the administrator to filter the computers based on the criteria. You can also filter the computers by clicking the funnel icon on the column headers. Click the right arrow or swipe the screen to the left to move to the next step. Step 2 Options The second step allows you to configure the options for report generation. Include computers with outdated virus databases only - The report will ignore the endpoints that have the most up-to-date AV signature database in the report and give details only on those having outdated databases. Generate downloadable report file - Select this option if you need to print or archive the report. You can choose the printable file to be generated in portable document (.pdf) or spreadsheet (.xls) format. On completion, the report generated can downloaded to the administrator's computer. Select required options Click the 'Finish' icon to start generating the report. The report generation will be started or added to the queue. The progress will be displayed in the 'Reports' area. View the Report The administrator can view the report at anytime after the completion. To view the report Select the report and click Open or right click on the report and choose Open from the context sensitive menu. 135

136 The report will contain the AV signature database update details at each endpoint selected in step 1. The summary pie chart in the upper portion provides an at-a-glance comparison report on numbers of computers that have outdated/up-to-date AV databases as compared to the latest database version indicated. Following the summary, details of each computer, with their IP Addresses and the installed AV database versions are 136

137 displayed. Downloading the Report If the administrator had opted for generating a downloadable report, it can be downloaded by selecting the Report in the 'Reports' area and clicking the download icon at the bottom. 9.2.CES Configuration Report The 'CES Configuration' report provides information on components of CES installed and enabled on the target computers according to their applied policies. To generate a CES Configuration report Open the 'Reports' area by choosing 'Reports' from the drop-down at the top left. Click 'Add' and choose 'CES Configuration Report'. The 'Create CES Configuration Report' wizard will start. Step 1 - Selecting Targets The list of all the endpoint computers connected to CESM is displayed. 137
138 Select the endpoint(s) for which you wish to generate the CES Configuration report. The filter options in the header provides at-a-glance statistics of the computers in the network and allow the administrator to filter the computers based on the criteria. You can also filter the computers by clicking the funnel icon on the column headers. Click the right arrow or swipe the screen to the left to move to the next step. Step 2 Options The second step allows you to configure the options for report generation. Generate downloadable report file - Select this option if you need to print or archive the report. You can choose the printable file to be generated in portable document (.pdf) or spreadsheet (.xls) format. On completion, the report generated can downloaded to the administrator's computer. Select required options. 138
139 Click the 'Finish' icon to start generating the report. The report generation will be started or added to the queue. The progress will be displayed in the 'Reports' area. View the Report The administrator can view the report at anytime after the completion. To view the report Select the report and click 'Open' or right click on the report and choose 'Open' from the context sensitive menu. 139
140 The report will contain the details on CES versions and CES components installed/activated on the endpoints selected in step
141 The summary pie chart in the upper portion provides an at-a-glance information of CES versions installed in the selected endpoints. The bar-graph displays a comparison of CES components installed and activated in the selected endpoints Following the graphical summary, details of each computer, with CES versions, installed and enabled components are displayed. Downloading the Report If the administrator had opted for generating a downloadable report, it can be downloaded by selecting the Report in the 'Reports' area and clicking the download icon at the bottom. 141

142 9.3.CES Log Report The CES installation in each target computer maintains a log of events for each of the Antivirus, Firewall and Defense+ components. Antivirus - The Antivirus component documents the results of all actions it performed in an extensive but easy to understand log report. A detailed scan report contains statistics of all scanned objects, settings used for each task and the history of actions performed on each individual file. Log entries are also generated during real-time protection, and after updating the anti-virus database and application modules. Firewall - The Firewall component records a history of all events/actions taken. Firewall 'Events' are generated and recorded for various reasons - including whenever an application or process makes a connection attempt that contravenes a rule in the Network Security Rulesets, or whenever there is a change in Firewall settings. Defense+ - The Defense+ component records a history of all events/actions taken. Defense+ 'Events' are generated and recorded for various reasons. Examples include changes in Defense+ settings, when an application or process attempts to access restricted areas or when an action occurs that contravenes the Computer Security Rulesets. The CES Log report shows the log of events stored in the target computers for the selected component. The administrator can generate different log report for each of the component for viewing and printing/archival purpose. To generate a CES Logs report Open the 'Reports' area by choosing 'Reports' from the drop-down at the top left. Click 'Add' and choose 'CES Logs Report'. The 'Create CES Logs Report' wizard will start. Step 1 - Select Report Type The first step is to choose the CES component for which you want to generate a log report. 142

143 Choose the component from Antivirus, Firewall and Defense+ and swipe the screen to the left or click the right arrow to move to step 2 - Selecting targets. Step 2 - Selecting Targets The list of all the endpoint computers connected to CESM is displayed. 143
144 Select the endpoint(s) for which you wish to generate the CES Configuration report. The filter options in the header provides at-a-glance statistics of the computers in the network and allow the administrator to filter the computers based on the criteria. You can also filter the computers by clicking the funnel icon on the column headers. Click the right arrow or swipe the screen to the left to move to the next step. Step 3 Report Parameters The next step is to choose the time period, that the report should include the log saved during it. Specify the period start and end dates in the respective text fields in MM/DD/YYYY format. Alternatively, clicking the calendar icon at the right end of the text box displays a calendar to select the dates. Step 4 - Options The fourth step allows you to configure the options for report generation. Generate downloadable report file - Select this option if you need to print or archive the report. You can choose the printable file to be generated in portable document (.pdf) or spreadsheet (.xls) format. On completion, the report generated can downloaded to the administrator's computer. Select required options. 144
145 Click the 'Finish' icon to start generating the report. The report generation will be started or added to the queue. The progress will be displayed in the 'Reports' area. View the Report The administrator can view the report at anytime after the completion. To view the report 145
146 Select the report and click Open or right click on the report and choose Open from the context sensitive menu. The report will contain the log entries for the component selected in step 1, recorded at the target endpoints selected at step 2 for the time period selected in step 3. If more than one computer is selected in step 2, the log reports are given for them one by one. Examples of: Antivirus Log Report Firewall Log Report and Defense+ Log Report... are shown below. Antivirus Log Report 146
147 The summary bar-graph in the upper portion provides an at-a-glance information of number of different AV events at the selected endpoints. 147
148 Following the graphical summary, details of each AV event detected at each endpoint are displayed as a table. Column Descriptions Computer Name endpoint at which the event was logged. Malware Name - Name of the malware event that has been detected. Location - Indicates the location where the application detected with a threat is stored. Date - Indicates the date and time of the event. Action - Indicates action taken against the malware through Antivirus. Firewall Log Report 148
149 The summary bar-graph in the upper portion provides an at-a-glance information of number of different Firewall events at the selected endpoints. Following the graphical summary, details of each Firewall event detected at each endpoint are displayed as a table. Column Descriptions Computer Name - endpoint at which the event was logged. Application - Name of the application or program that initiated the connection attempt. Protocol - The protocol of the connection attempt. Source - The source IP and port combination of the connection attempt. Destination - The destination IP and port combination of the connection attempt. Date - Indicates the date and time of the event. Action - Indicates action taken against the connection attempt by the firewall. Defense+ Log Report The summary bar-graph in the upper portion provides an at-a-glance information of number of different Defense+ events logged at the selected endpoints. Following the graphical summary, details of each Defense+ event detected at each endpoint are displayed as a table. Column Descriptions Application - Indicates which application or process propagated the event. 149
150 Target - Represents the location of the target file. Date - Contains precise details of the date and time of the access attempt. Action - Indicates action taken against the access attempt. 9.4.Computer Details Report The 'Computer Details' report provides information on the hardware configuration, network addresses, Operating System (OS) installed and installed programs (optional) of the selected target computer(s) in several pages. It also gives a comparison on OS versions installed, if you select multiple endpoints. To generate a Computer Details report Open the 'Reports' area by choosing 'Reports' from the drop-down at the top left. Click 'Add' and choose 'Computer Details Report'. The 'Create Computer Details Report' wizard will start. Step 1 - Selecting Targets The list of all the endpoint computers connected to CESM is displayed. 150
151 Select the endpoint(s) for which you wish to generate the Computer Details report. The filter options in the header provides at-a-glance statistics of the computers in the network and allow the administrator to filter the computers based on the criteria. You can also filter the computers by clicking the funnel icon on the column headers. Click the right arrow or swipe the screen to the left to move to the next step. Step 2 Options The second step allows you to configure the options for report generation. Include software details into report - Select this option if you want the details on the software installed on the target computer(s) to be included in the report. Generate downloadable report file - Select this option if you need to print or archive the report. You can choose the printable file to be generated in portable document (.pdf) or spreadsheet (.xls) format. On completion, the report generated can downloaded to the administrator's computer. Select required options 151

152 Click the 'Finish' icon to start generating the report. The report generation will be started or added to the queue. The progress will be displayed in the 'Reports' area. View the Report The administrator can view the report at anytime after the completion. To view the report Select the report and click 'Open' or right click on the report and choose 'Open' from the context sensitive menu. 152
 of the selected target endpoints.")
153 The report will contain the hardware, software details of the endpoints selected in step 1 in several pages depending on the number of endpoints chosen. The first page of the report will contain pie charts providing a comparison of versions of Operating Systems (OS) of the selected target endpoints. The successive pages will contain: General Information including computer name, logged-on user and so on Network Information including DNS name, domain, MAC address and so on Operating System/Hardware Information Installed Software of each endpoint. 153
154 154
155 Downloading the Report If the administrator had opted for generating a downloadable report, it can be downloaded by selecting the Report in the'reports' area and clicking the download icon at the bottom. 9.5.Computer Infections Report The 'Computer Infections' report provides information on the number of target computers infected by malware. It details the malware detected by AV scans that have not been successfully handled (deleted, disinfected or quarantined) by the local installation of CES. To generate a Computer Infections report Open the 'Reports' area by choosing 'Reports' from the drop-down at the top left. Click 'Add' and choose 'Computer Infections Report'. The 'Create Computer Infections Report' wizard will start. Step 1 - Selecting Targets The list of all the endpoint computers connected to CESM is displayed. 155
156 Select the endpoint(s) for which you wish to generate the Computer Infections report. The filter options in the header provides at-a-glance statistics of the computers in the network and allow the administrator to filter the computers based on the criteria. You can also filter the computers by clicking the funnel icon on the column headers. Click the right arrow or swipe the screen to the left to move to the next step. Step 2 Options The second step allows you to configure the options for report generation. Generate downloadable report file - Select this option if you need to print or archive the report. You can choose the printable file to be generated in portable document (.pdf) or spreadsheet (.xls) format. On completion, the report generated can downloaded to the administrator's computer. Select required options. 156
157 Click the 'Finish' icon to start generating the report. The report generation will be started or added to the queue. The progress will be displayed in the 'Reports' area. View the Report The administrator can view the report at anytime after the completion. To view the report Select the report and click Open or right click on the report and choose Open from the context sensitive menu. 157
158 The report will contain a pie chart that provides an at-a-glance comparison of computers that are affected/not affected by malware from the selected target endpoints. Following this is a list of affected computers along with their IP addresses, online/offline statuses and the name and location of malware detected on that computer. 158
159 Downloading the Report If the administrator had opted for generating a downloadable report, it can be downloaded by selecting the Report in the 'Reports' area and clicking the download icon at the bottom. 9.6.Malware Statistics Report The Malware Statistics report provides a graphical representation of the total malware identified at the target endpoints and the actions taken against them by CES during a selected period and a list of those malware with details on the target computers from which they are identified. The report enables the administrator to learn the trend of malware attacks that have occurred during a certain period of time. 159
160 To generate a Malware Statistics report Open the 'Reports' area by choosing 'Reports' from the drop-down at the top left. Click 'Add' and choose 'Malware Statistics Report'. The 'Create Malware Statistics Report' wizard will start. Step 1 - Selecting Targets The list of all the endpoint computers connected to CESM is displayed. 160
161 Step 2 - Selecting Report Duration The next step is to select the period for which you wish the report to be created. The time period options available are: Year - Generates statistics from any year (from 1st January YYYY). Month - Generates statistics from the beginning of the current month (from 1st MM YYYY). Week - Generates statistics for any of the weeks between Sunday and Saturday. The week can be selected from a calendar in the next step 'Select Period'. 161
162 Day - Generates statistics for any one day. The day can be selected from a calendar in the next step 'Select Period'. Select the time period for which you wish to generate the statistics report. Options: Include details on actions taken - Select this option if you want the Malware Statistics report t contain 'Details per computer' that gives details on each and every malware detected, its detection location and time and the action taken on it by CES at the endpoint(s). The report will contain only graphical representations of the statistics of malware detected from various target computers if this option is not selected. Swipe the screen or click the right arrow to move to step 3 - Select Period. Step 3 - Select Period The next screen allows you to choose the specific time period as per the selection made in step 2. Swipe the screen or click the right arrow to move to step 4 Options. Step 4 Options The next step allows you to configure the options for report generation. Generate downloadable report file - Select this option if you need to print or archive the report. You can choose the printable file to be generated in portable document (.pdf) or spreadsheet (.xls) format. On completion, the report generated can downloaded to the administrator's computer. Select required options. 162

163 Click the 'Finish' icon to start generating the report. The report generation will be started or added to the queue. The progress will be displayed in the 'Reports' area. View the Report The administrator can view the report at anytime after the completion. To view the report Select the report and click Open or right click on the report and choose Open from the context sensitive menu. 163

164 The report will contain a graphical representation malware statistics of the selected target computers for the selected time period. If the option 'Include details on actions taken' is chosen in step 2, the report will also contain 'Details per Computer' with granular details on the malware found at each endpoint and the action taken against them. Example 1 - Malware Statistics only: 164
165 'Deleted', 'Ignored' and 'Quarantined' are the decisions taken by CES in reaction to each piece of detected malware. The first chart indicates that a total of malware alerts were generated in the time period. The 2nd chart breaks down 10 alerts by the decisions taken by CES. Example 2 - Malware Statistics report with Details per Computer: The screenshot on the next page shows an example of 'Malware Statistics' Detailed Report. The detailed report shows the comparison graphs and details on the malware identified from the selected endpoints. 165
166 166

167 Downloading the Report If the administrator had opted for generating a downloadable report, it can be downloaded by selecting the Report in the 'Reports' area and clicking the download icon at the bottom. 9.7.Policy Compliance Report Each target computer in CESM can receive a security policy that dictates the security settings of each of the antivirus, firewall and Defense+ components of CES installed on it. The CES installation at the target endpoint will automatically be configured as per the applied policy when CES is in remote management mode. If the end-user or the network administrator changes any of the security settings in their local installation of CES by switching it to local administration mode, the computer becomes 'non-compliant' with its designated (or 'applied') policy. If the computer is switched back to remote management mode, its designated policy will be automatically reapplied at next polling time (as per the agent settings made to the policy) and the computer's status will return to 'compliant'. The target computers applied with the 'Locally Configured' policy will always be retained in 'Compliant' status as CESM does not enforce any policy compliance on to them. Also, 'Locally Configured' policy allows the user to change the CES configuration settings locally and stores the changes dynamically. If the target computer is switched back to Local Configuration policy from any other CESM applied security policy, the last stored configuration is restored on to it. Administrators are advised to regularly check whether imported computers are compliant with their assigned policy. Noncompliance can indicate unauthorized changes to power and/or device and/or CES security settings. The Policy Compliance report provides a summary of the compliance of the target computers and details of computers which are non-compliant to the policy. The report also enables administrators to remediate non-compliant computers by resetting their CES security configuration and thus returning them to 'Compliant' status. To generate a Policy Compliance report Open the 'Reports' area by choosing 'Reports' from the drop-down at the top left. Click 'Add' and choose 'Policy Compliance Report'. The 'Create Policy Compliance Report' wizard will start. Step 1 - Selecting Targets 167
168 The list of all the endpoint computers connected to CESM is displayed. Select the endpoint(s) for which you wish to generate the Policy Compliance report. The filter options in the header provides at-a-glance statistics of the computers in the network and allow the administrator to filter the computers based on the criteria. You can also filter the computers by clicking the funnel icon on the column headers. Click the right arrow or swipe the screen to the left to move to the next step. Step 2 Options The second step allows you to configure the options for report generation. Include only non-compliant computers - The report will contains details of only the computers that are non-compliant. Generate downloadable report file - Select this option if you need to print or archive the report. You can choose the printable file to be generated in portable document (.pdf) or spreadsheet (.xls) format. On completion, the report generated can downloaded to the administrator's computer. Select required options. 168

169 Click the 'Finish' icon to start generating the report. The report generation will be started or added to the queue. The progress will be displayed in the 'Reports' area. View the Report The administrator can view the report at anytime after the completion. To view the report Select the report and click Open or right click on the report and choose Open from the context sensitive menu. 169

170 The report will contain a summary pie chart providing at-a-glance comparison on numbers of computers that are compliant, non-compliant and are pending to be applied with the policy. Following the summary, details of each computer, with their associated group, IP addresses, applied Policy, compliancy status, last compliancy checked time, when the non-compliant computers went non-compliant are displayed. 170

171 Downloading the Report If the administrator had opted for generating a downloadable report, it can be downloaded by selecting the Report in the'reports' area and clicking the download icon at the bottom. 9.8.Policy Delta Report The Policy Delta report provides a summary of the changes in the configuration of components of CES at the 'Non-Compliant' endpoints, with respect to the security policy applied to them. During report generation, CESM compares two configurations (source policy on the server side and target policy on the endpoint) component by component and provides details on the components that are unchanged, changed or missing from the applied policy. The details in the report are helpful to the administrator for investigating the changes made to CES settings in the target computer and the reason(s) the computer received its non-compliant status. To generate a Computer Infections report 171
172 Open the 'Reports' area by choosing 'Reports' from the drop-down at the top left. Click 'Add' and choose 'Policy Delta Report'. The 'Create Policy Delta Report' wizard will start. Step 1 - Selecting Targets The list of all the endpoint computers connected to CESM is displayed. 172

173 Select the endpoint(s) for which you wish to generate the Policy Delta report. You can select only the endpoints with 'Non-Compliant' status. The filter options in the header provides at-a-glance statistics of the computers in the network and allow the administrator to filter the computers based on the criteria. You can also filter the computers by clicking the funnel icon on the column headers. Click the right arrow to move to the next step. Step 2 Options The second step allows you to configure the options for report generation. Generate downloadable report file - Select this option if you need to print or archive the report. You can choose the printable file to be generated in portable document (.pdf) or spreadsheet (.xls) format. On completion, the report generated can downloaded to the administrator's computer. Select required options Click the 'Finish' icon to start generating the report. The report generation will be started or added to the queue. The progress will be displayed in the 'Reports' area. View the Report The administrator can view the report at anytime after the completion. To view the report Select the report and click Open or right click on the report and choose Open from the context sensitive menu. 173

174 The report will contain bar-graph summary of changes in components of CES in the selected computers followed by the list of selected computers with the status of each component of CES in them. 174
175 175
176 The status of each component indicates the difference in configuration of the component with respect to the actual setting as per the policy applied. Absent - means component is present on the endpoint, but the settings for it are not contained in the policy applied by CESM. The administrator can apply a different policy imported from a different source that contains settings for all the components. Missing - means either the component is absent on both the policy and the endpoint sides or on the endpoint side. Changed - means the configuration of the component in the endpoint side is different from the policy applied. Not Changed - means the configuration of the component is the same on both the policy and the endpoint sides. Downloading the Report If the administrator had opted for generating a downloadable report, it can be downloaded by selecting the Report in the 'Reports' area and clicking the download icon at the bottom. 9.9.Quarantined Items Report The 'Quarantined Items' report provides details on the malware detected and successfully quarantined at the target computers. The report also allows the administrator to remove the quarantined items or restore them to their original locations after analyzing the report. Note: For the local CES installations at the endpoints to quarantine the threats detected during scanning, the policy applied to them should have been derived from a computer in which CES has been configured to automatically quarantine the threats identified from various scans. For more details on configuring CES refer to the online help guide at To generate a Quarantined Items report Open the 'Reports' area by choosing 'Reports' from the drop-down at the top left. Click 'Add' and choose 'Quarantined Items Report'. The 'Create Quarantined Items Report' wizard will start. 176
177 Step 1 - Selecting Targets The list of all the endpoint computers connected to CESM is displayed. Select the endpoint(s) for which you wish to generate the Quarantined Items report. The filter options in the header provides at-a-glance statistics of the computers in the network and allow the administrator to filter the computers based on the criteria. You can also filter the computers by clicking the funnel icon on the column headers. Click the right arrow or swipe the screen to the left to move to the next step. Step 2 Options The second step allows you to configure the options for report generation. Generate downloadable report file - Select this option if you need to print or archive the report. You can choose the printable file to be generated in portable document (.pdf) or spreadsheet (.xls) format. On completion, the report generated can downloaded to the administrator's computer. Select required options 177

178 Click the 'Finish' icon to start generating the report. The report generation will be started or added to the queue. The progress will be displayed in the 'Reports' area. View the Report The administrator can view the report at anytime after the completion. To view the report Select the report and click 'Open' or right click on the report and choose 'Open' from the context sensitive menu. 178

179 The report will contain a pie-chart summary of quarantined items at endpoints of different groups and a table showing the malware quarantined at each endpoint selected in step 1. Downloading the Report If the administrator had opted for generating a downloadable report, it can be downloaded by selecting the Report in the 'Reports' area and clicking the download icon at the bottom. Top 10 Malwares Report The 'Top 10 Malwares' report provides information on the malware that has most affected the selected endpoints in the network. CESM ranks the malware identified at various target computers based on their number of appearances. The 'Top 10 Malwares' report gives details on the malware that are at the first ten positions. The report enables the administrator to learn on what type of malware the network is prone to and to take necessary actions to safeguard the network against them. To generate a Top 10 Malwares report Open the 'Reports' area by choosing 'Reports' from the drop-down at the top left. 179

180 Click 'Add' and choose 'Top 10 Malwares Report'. The 'Create Top 10 Malwares Report' wizard will start. Step 1 - Selecting Targets The list of all the endpoint computers connected to CESM is displayed. 180
181 Select the endpoint(s) for which you wish to generate the Top 10 Malwares report. The filter options in the header provides at-a-glance statistics of the computers in the network and allow the administrator to filter the computers based on the criteria. You can also filter the computers by clicking the funnel icon on the column headers. Click the right arrow or swipe the screen to the left to move to the next step. Step 2 - Selecting the Report Period The next step is to choose the time period that the report should include the top 10 malwares identified. 181
182 Specify the period start and end dates in the respective text fields in MM/DD/YYYY format. Alternatively, clicking the calendar icon at the right end of the text box displays a calendar to select the dates. Click the right arrow to move to the next step. Step 3 Options The next step allows you to configure the options for report generation. Generate downloadable report file - Select this option if you need to print or archive the report. You can choose the printable file to be generated in portable document (.pdf) or spreadsheet (.xls) format. On completion, the report generated can downloaded to the administrator's computer. Select required options Click the 'Finish' icon to start generating the report. The report generation will be started or added to the queue. The progress will be displayed in the 'Reports' area. View the Report The administrator can view the report at anytime after the completion. To view the report Select the report and click Open or right click on the report and choose Open from the context sensitive menu. 182
 at which the malware is detected.")
183 The report will a bar graph representation of comparison of the malware in terms of their number of occurrences and a list of top 10 malwares with details on number of appearances and the target computer(s) at which the malware is detected. 183

184 Downloading the Report If the administrator had opted for generating a downloadable report, it can be downloaded by selecting the Report in the 'Reports' area and clicking the download icon at the bottom. 10. Viewing ESM Information The 'Help' interface provides administrators with version, license, support and server information. Administrators can use the interface to purchase additional endpoint licenses, to get online help and to get product updates. The 'Help' interface can be accessed by clicking the CESM icon at the top left or choosing 'Help' from the drop-down in the title bar. 184
185 Server Information - Displays details about the server computer on which CESM central console is installed. Refer to Viewing Server Information for more details. Support Information - Displays CESM support contact information and informs admin about different ways to get help on CESM. Refer to Viewing Support Information for more. License Information - Displays license details and allows admins to purchase additional licenses if more computers are to be added to the same CESM console. Refer to Viewing License Information for more details. About - Displays CESM version number, copyright information, End-user license agreement and contains links for getting support. The screen also indicates if any newer version of CESM is available and allows you to download and install the latest version. Refer to Viewing the About Screen for more details Viewing Server Information The 'Server Information' screen displays details of the server computer(s) on which CESM console is installed. To access the Server Information screen Open the 'Help' area by clicking CESM icon at the top left and click 'Server Information' from the left hand side navigation or Choose 'Help' > 'Server Information' from the drop-down at the top left 185
186 Supported Host Names - Displays the host names and DNS names of the server on which the CESM console is installed. Console HTTP Port - Displays the port number of the server through which the CESM console can be accessed through a non-secure connection. Console HTTPS Port - Displays the port number of the server through which the CESM console can be accessed through a secure SSL connection. Agent TCP Port - Displays the port number of the server through which the agents installed in the endpoints communicate with the server. Refer to Appendix 1 for more information on the configuration of the host names and connection ports of CESM service through the configuration tool Viewing Support Information The 'Support Information' screen displays details on getting support in different ways for CESM. To access the Support Information screen Open the 'Help' area by clicking CESM icon at the top left and click 'Support Information' from the left hand side navigation or Choose 'Help' > 'Support Information' from the drop-down at the top left. 186
187 support: If you are unable to find a solution for a problem, you can send your query through mail to ESMsupport@comodo.com. Your query will be attended as soon as possible. Also You can also send your suggestions for improvements to this mail address. Comodo Forums: The fastest way to get further assistance on Comodo Endpoint Security Manager is by posting your question on Comodo Forums, a message board exclusively created for our users to discuss anything related to our products. Registration is free and you'll benefit from the expert contributions of developers and fellow users alike. Phone Support: You can get phone support for CESM by contacting the following phone numbers: USA: International: Make sure to have your order number or subscription information available. Chat Support: Comodo LivePCSupport is a personalized computer support service provided by friendly computer experts at Comodo, available 24/7. To get LivePCSupport, click 'LivePCSupport' link from the License Information screen. If you are accessing the service for the first time, the LPCS client will be downloaded and installed on your computer. A chat session will be started enabling you to explain your problem to the support technician. After requesting your permission, they ll establish a remote connection to your computer and fix the problems right in front of your eyes. Refer to Live PCsupport help guide at Viewing License Information The 'License Information' screen displays details on the number of licenses purchased, their type and validity status. The 'License Information' screen also allows the administrator to purchase additional licenses, upgrade licenses, renew licenses and to get live chat support. To access the License Information screen Open the 'Help' area by clicking CESM icon at the top left and click 'License Information' from the left hand side 187


188 navigation or Choosing 'Help' > 'License Information' from the drop-down at the top left. To purchase new licenses Click 'Buy License(s) Online': You will be taken to the Comodo website to purchase the new licenses. After payment is complete, you will receive the license activation key through
189 Upgrading Your License If you have purchased new licenses to add more endpoints, you need to upgrade your license by entering the new license key obtained via . To upgrade your license Click Change License beside 'Computers' from the 'License Information' screen. The Change License wizard will be started. Enter the new license activation key you received via . Note: If you do not have a new license key, click 'Get new License Key online' link to purchase it online from Comodo website. Click the right arrow or swipe the screen to the left to move to the next step. The details of your new license will be displayed. 189

190 Click 'Finish' to exit the wizard. Your license will be upgraded Viewing the About Screen The 'About' screen displays the version information of CESM currently installed on your server and copyright information. The screen also informs you if an updated version is available and, if so, enables you to download and install it. The screen contains links to get support on CESM from the online help portal and Comodo Forums. To view the About screen Open the 'Help' area by clicking CESM icon at the top left and click 'About' from the left hand side navigation or Choosing 'Help' > 'About Endpoint Security Manager' from the drop-down at the top left. 190

191 Clicking Update available. Download version will start downloading the latest version of CESM Setup <version number>full.exe. Clicking End-user license agreement will open the CESM End-user license agreement in a new browser window. Clicking Online help will take you to online help guide for Comodo Endpoint Security. The CESM help guide contains detailed explanations of the functionality and usage of the application. Clicking Support forums will take you to Comodo Forums. The fastest way to get assistance on Comodo Endpoint Security Manager is by posting your question on Comodo Forums, a message board exclusively created for our users to discuss anything related to our products. Registration is free and you'll benefit from the expert contributions of developers and fellow users alike. Clicking will take you to comodo.com home page. 11. Viewing and Managing Preferences The 'Preferences' area allows administrators to configure report archives, notifications and dependent CESM servers. Administrators can also download CESM agents to install on remote endpoints that they wish to manually add to the CESM network. 191
192 Packages - Enables administrators to download CESM Agent for installation on to remote endpoints, to manually add them to CESM. Refer to Downloading ESM Agents Packages for more details. General Settings - Enables administrators to configure lifetime of archived reports. Refer to Configuring General Settings for more details. Notifications Enables administrators to configure for receiving notifications from CESM. Refer to Managing Notifications for more details. Dependent Servers - Enables administrators to add and manage dependent servers for managing computers at remote networks Refer to Viewing and Managing Dependent Servers for more details Downloading ESM Packages To connect to the CESM Central Service Server, each endpoint needs a CESM agent installed. For the network endpoint computers that can be reached by the CESM server, the agent will be auto-installed while importing the computer. Refer to Importing Computers by Automatic Installation of Agent for more details. But for endpoint computers that are not reachable from the CESM server s network and can be connected through external network like Internet, the agent has to be installed manually in order to establish a connection to the CESM server. The Agent setup file can be downloaded as an executable file from the admin console. The file can be transferred onto media such as DVD, CD, USB memory for manual installation onto target machines. A single copy of the installation files can be used to install the agent on any number of target machines. Once installed, the agent will establish the connection to the CESM server automatically and enables managing the endpoint from the console. Refer to Adding Computers by Manual Installation of Agent for more details. The Administrator can download CESM Agent setup for different Operating Systems from the 'Preferences' > Packages screen. To access the Agent Packages screen Click 'Preferences' > 'Packages' area from the drop-down at the top left. The interface contains two areas: Changed In Package displays the all downloaded and registered packages in the system. Available Packages tab displays all available packages for downloading, allows administrator to check for updates and download them. 192
193 To download CESM agent setup file for Windows as.exe file, select the package file and click download offline package. To download CESM agent setup file for Linux as.deb file, select the package file and click download offline package. To download CESM agent setup file for Mac OS as.dmg file, select the package file and click download offline package. Refer to Adding Computers by Manual Installation of Agent for more details on installing the agent on to target endpoints Configuring General Settings The 'Report Settings' screen allows administrators to configure the length of time that reports should be stored on the CESM server and the language of the report. To access the Report Settings screen Click 'Preferences' > 'General Settings' area from the drop-down at the top left. 193
194 If you want the older reports to be deleted from the server, select 'Remove old reports' checkbox and select the time period for which the reports can be maintained in the server from the 'Age' drop-down. Click 'Save' for your settings to take effect Managing Notifications CESM can send notifications on the occurrence of virus outbreaks, when malware found on the network exceeds a certain threshold, when the number of non-reporting and outdated endpoints exceeds a certain number, and when your license is nearing expiry. notifications are configured from the ' Notifications' area. Important Note: In order to send automated s, the STMP server settings and addresses are to be configured under the 'Internet and Mail Settings' tab in the CESM Configuration Tool. The server will have to be restarted for the configuration to take effect. Refer to the section Internet and Mail Settings in Appendix 1 -The Service Configuration Tool for more details. To access the Notifications screen Click 'Preferences' > ' Notifications' area from the drop-down at the top left. 194

195 To enable automated notifications select the 'Send Notifications' check box. Configure the notification parameters under the respective tabs as shown in the table below: Event Type Description Configurable parameters Outbreak Configure automated Number of infected computers - A notification will be notification when number of endpoints sent when the number of endpoints infected by malware infected by virus or other malware equals to or exceeds this Value. Default = 1. reaches a set threshold. Infections occur within total number of minutes Period of time used to define an outbreak. A notification will be sent when the number of infected computers is met or exceeded during the set time period. Default = 15. Malware Found Configure automated notification when the number of malware samples identified but not handled by the CES on an endpoint reaches a set threshold. Number of Infected Computers - A notification will be sent when the number of endpoints infected by detected malware equals to or exceeds this Value. Default = 1. Non-Reporting Configure automated notifications when the number of nonreporting computers reaches a certain number. Number of non-reporting computers - CESM will send a notification mail if the number of non-reporting endpoints equals or exceeds this value. Default = 1. Non-Compliant Configure a notification mail to be sent when the number of connected computers that are not compliant with the security policy applied to them reaches a set threshold. Number of non-compliant computers - Specify the number of non-compliant endpoints before CESM will send a notification . Default = 1 Outdated Send a notification mail when the Number of AV outdated - CESM will send an notification Minutes idle - Specify the period of time that CESM should wait after the endpoint first fails to report before sending the notification. Default =
196 Licensing number of endpoints using an outdated virus database reaches a set threshold. when it detects this number of endpoints are using outdated databases. Default = 1 Configure automated notifications when your license is about to expire. License expiration days - Number of days before expiry that CESM will send a reminder mail. Default = 30. Unused endpoints threshold, % - If the number of unused endpoints equals or falls below this value then CESM will send a notification that your licensing limit is approaching. For example, if you have you 100 total licenses and set this figure to 10%, then a notification mail will be sent when you have used 90 licenses. Default = 10. Viewing and Managing Dependent Servers CESM allows administrators to define and manage 'dependent' CESM servers to manage remote networks of endpoints. A master administrator can log into the admin consoles of dependent CESM servers to directly manage endpoints on the remote network. This login can be done seamlessly through the master admin console. Setting up a dependent CESM server to handle the endpoints of remote networks will render significant speed and resource advantages while allowing a master administrator to maintain full control and visibility over the remote endpoints. Accessing the dependent servers screen Adding a dependent server Logging into a Dependent server Importing endpoints to a dependent server Managing endpoints controlled by a dependent server Editing dependent servers Removing dependent servers To access the Dependent Servers screen Click 'Preferences' > 'Dependent Servers' from the drop-down at the top-left. 196
197 From here, administrators can add, edit and remove dependent servers Adding a Dependent Server Before adding a remote server as a dependent server, please make sure that the following prerequisites are satisfied: The server certificate obtained for the central CESM server contains the DNS name or the IP address of the dependent server in the Subject Alternative Name (SAN) field. You should have entered the SANs in the SAN field when generating the certificate signing request (CSR). The same certificate has been installed on the remote CESM server. The CESM central service console has been installed on the remote server. To add a dependent server Open the 'Dependent Servers' area by choosing 'Preferences' from the drop-down at the top left and clicking 'Dependent Servers' from the left hand side navigation. Click 'Add' from the 'Dependent Servers' screen. The 'Add server' dialog will be displayed. 197

198 Reminder: The server certificate of the central CESM server needs to be installed in the remote server. If not installed previously, click 'Get server certificate' in the dialog shown above and install It on the remote server. Add Server - Table of Parameters Server address/port Enter the DNS name or the IP address of the dependent server and the port through which CESM console can be reached in the Server Address/Port fields (The default port for secure SSL connection to the console is 57194). Alias Enter the Alias name of the dependent server. Current User Credentials (Selected by default) Selecting this option will add the server using the credentials of the current CESM administrator. Deselecting this box will allow you specify an alternative administrative account on the remote server. After clicking the 'Add' button, the remote server will be added to the Dependent Servers list. By accessing this dependent server, administrators will be able to manage endpoints connected to it Logging into a Dependent Server To log-in to a dependent server, just click on the server address in the 'Dependent Servers area'. The console interface of the remote server will open in a new browser tab, with the 'Computers' area displayed. You will not be asked to enter login 198
199 credentials as those were included when successfully adding the dependent server. You can add new endpoints to the remote server and manage existing endpoints of the remote server from the console Importing Endpoints to a Dependent Server Administrators can import computers connected to the network of the dependent server and manually add endpoints connected through external networks like the Internet. To import or add endpoints to the dependent server On the master console, open the 'Dependent Servers' area by choosing 'Preferences' from the drop-down at the top left and clicking 'Dependent Servers' from the left hand side navigation. Log-in to the required dependent server by clicking its address. The CESM console interface of the remote server will open in a new tab within the browser window. Start the 'Add Computer' wizard on the remote console by opening the 'Computers' area then clicking 'Add'. Follow the instructions in Importing Computers by Automatic Installation of Agent if you need help with the rest of the process. To add computers connected to the remote network through an external network like the Internet, download the CESM agent from the CESM console of the remote server and manually install it on the remote computers. For more details on manually adding endpoints, refer to the section Adding Computers by Manual Installation of Agent Managing Endpoints Controlled by a Dependent Server Once you have logged into the console of the dependent server, management of its endpoints is much the same as managing local endpoints with local/master CESM server. The drop-down at the top-left of the CESM console interface of the remote server enables the administrator to navigate to different areas of the interface: The Computers Area - Enables administrators with the ability to import/add endpoints to the remote server, view and manage networked computers. Add/Import computers to the remote CESM console. View complete details of the endpoints that are managed by the remote CESM console. Assign and re-assign endpoints to groups. Manage quarantined items, currently running applications, processes and services in remote endpoints. Managing drives and storage at the endpoints. Run on-demand antivirus scans on individual or a bunch of selected endpoints. Start shared remote desktop session with remote endpoints from the remote server's CESM console. Refer to The Computers Area for more details. The Groups Area - Allows administrators to create endpoint groups in the remote server's CESM console, as per the organization's structure and apply appropriate security policies. Create computer Groups for easy administration. Apply security policies to groups. Run on-demand antivirus scans on individual or multiple endpoints. Generate granular reports for grouped endpoints. Refer to The Groups Area for more details. The Policies Area - Allows administrators to create, import and manage security policies for remote endpoint machines. Create new policies by importing settings from another computer or by modifying an existing policy View and modify the configuration of any policy - including name, description, CES components, target computers and whether the policy should allow local configuration 199
200 Apply policies to entire endpoint groups of the remote CESM console Refer to The Policies Area for more details. The Applications area - View all applications installed on endpoints connected to remote CESM sever and uninstall unwanted applications. Refer to The Applications area for more details. The Processes Area View all processes launched on endpoints connected to remote CESM server and stop the process. Refer to Viewing and Managing Currently Running Processes. The Reports Area - Enables to generate highly informative, graphical summaries of the security and status of endpoints connected to the remote server. The administrator can view and download the reports from the 'Reports' area of the CESM console of the remote server. Drill-down reports can be ordered for anything from a single machine right up to the entire managed network. Each report type is highly customizable according to administrator's requirements. Reports can be exported to.pdf and.xls formats for printing and/or distribution. Available reports include endpoint CES configuration, policy compliance, malware statistics, policy delta, CES logs, quarantined items and more. Refer to The Reports Area for more details. The Help Area - Allows the administrator to view CESM version and update information of the CESM installation and view and upgrade licenses. View the version and update information. View the license information and activate/upgrade licenses. View details of the server upon which CESM is installed and download agent setup files for different operating systems for manual installation on endpoints connected through external networks. Configure 'dependent' CESM servers. Centrally manage and configure any subordinate CESM server currently managing endpoints on a different network. Refer to The Help Area for more details. The Preferences Area - Allows the administrator to download the CESM agent for manually adding remote endpoints, configure dependent servers and manage endpoints on remote networks, configure for automated notifications and configure reports archival. Download the Agent setup file to to connect to the CESM Central Service Server. Configure the lifetime of the reports generated and retained in CESM server. Configure for notifications when security parameters exceed set thresholds. Define and manage 'dependent' CESM servers to manage remote networks of endpoints Refer to Viewing and Managing Preferences for more details Editing Dependent Servers The master CESM console allows the administrator to edit the server/port details and the admin login credentials of existing dependent servers. The administrator can also use the 'Edit' interface to download the remote server certificate so it can be installed onto computers from which the console is to be accessed in future. To edit a dependent server Open the 'Dependent Servers' area by choosing 'Preferences' from the drop-down at the top left and clicking 'Dependent Servers' from the left hand side navigation. Select the dependent server to be edited and click the 'Edit' button, alternatively double click on the dependent server 'Name' or 'Status'. The 'Edit Server' dialog will open. 200
. Alias Enables to edit the Alias name of the dependent server.")
201 Edit Server - Table of Parameters Server address/port Enables to edit the DNS name or the IP address of the dependent server and the port through which CESM console can be reached in the Server Address/Port fields (The default port for secure SSL connection to the console is 57194). Alias Enables to edit the Alias name of the dependent server. Get server certificate Enables the master CESM administrator to download the server certificate of the remote CESM server. The certificate needs to be installed on the computers from which the master administrator wishes to access the CESM console of the remote server through the master CESM console. 201
202 Use current credentials Selecting this option enables the master CESM console to log in to the remote server using the credentials of the currently logged in CESM administrator account. Leaving this option unselected enables the administrator to to specify an administrative account of the remote server with the following details: User name: Enter the user-name of the dedicated network administrator. Password: Enter the password of the dedicated network administrator. Click 'Save' for your changes to take effect Removing Dependent Servers The dependent servers can be removed from the master CESM server. To remove a dependent server Open the 'Dependent Servers' area by choosing 'Preferences' from the drop-down at the top left and clicking 'Dependent Servers' from the left hand side navigation. Select the dependent server to be removed and click 'Remove'. A confirmation dialog will be displayed. Click 'Yes'. 202
203 Appendix 1 - The Service Configuration Tool The Service Configuration Tool enables the administrator to start and stop the ESM central service, change server and agent ports settings, change database connection settings and view a log of database events. The tool is installed as a separate application in the CESM server and can be accessed from the Windows Start Menu. To open the Service Configuration Tool, Click Start > All Programs > COMODO > Endpoint Security Manager > CESM Configuration Tool. 203
204 The main interface of the tool will be opened. It contains four areas: Service Status Area - Indicates the current service ESM status and allows administrator to start or stop the service. Main Settings - Enables the administrator to view and modify the connection and port settings. Server Certificate -Enables the administrators to manage server SSL certificates. Internet and Mail Settings - Enables the administrator to view and modify proxy server and outgoing mail settings. Caching Proxy Settings - Enables administrators to manage access to resources. Event Log - Enables the administrator to view the log of database events. About - Indicates the current service ESM version. Start and Stop the ESM Service The Service Status area at the top of the interface displays the current running status of the ESM Service as 'Running' or 'Stopped'. 204

205 To stop the running service, simply click the 'Stop' button. To start the service, simply click the 'Start' button. Main Settings The Main Settings page displays the ESM server IP addresses and/or hostnames in the 'Server Network Addresses' field and Database connection settings, Console Port, Secure Console Port and Agent Ports at the right. To add an IP or Hostname, simply begin typing in the blank row beneath those already listed. Click 'OK' to confirm. To change port numbers, simply type the new port number in the appropriate field. 205

206 To change the database connection settings, directly edit the parameters at the 'Connection String' click 'Change connection settings'. The SQL Server Connection Properties dialog will open. You can configure the SQL server connection settings from this dialog. For configuring advanced connection properties, click the 'Advanced' button. 206

207 Edit the parameters directly in the 'Connection Properties' dialog and click OK. To test whether the connections settings are appropriate click 'Test Connection' in the 'SQL server connection Properties' dialog. Click OK in the 'SQL server connection Properties' dialog for your changes to take effect. You will need to enter the hostname/ip and console port in the address bar of your browser to connect to the ESM server. For example, will open the ESM console hosted at that IP address using the secure console port. To facilitate external connections, you may have to open the listed port numbers on your corporate firewall. Server Certificate The Server Certificate tab allows administrators to manage server certificate such as to view the details of current certificate installed on the server, import new certificate, create certificate signing request and install new SSL certificate. 207

208 To view the details of the currently installed server certificate, click the 'View' button. If multiple SSL certificates are used in the server, a certificate name error may occur when a HTTPS connection is established. To avoid this, you can bind the CESM to the required certificate using the 'Bind Other Certificate' option. To import certificates from other locations, click the 'Import' button. Certificate Enrollment The options in the Certificate Enrollment area allows you to enroll for a new server certificate. To create a Certificate Signing Request (CSR) for your server, click the 'Create Certificate Signing Request' button and fill in the required details in the 'Request Certificate' dialog. 208

209 The generated CSR can be used for applying for a certificate. Click the 'Install SSL Certificate' button to install new SSL certificate in the server. Click the 'Get a Free SSL Certificate from Comodo' link to obtain a free SSL certificate from Comodo, using the CSR generated. Internet and Mail Settings The Internet and Mail Settings tab allows administrators to specify mail settings for receiving alerts from ESM and to specify any Internet proxy connection settings. 209

210 The alerts will appear to come from ESM Server by default if the 'From' field contains a simple address. Your personal mail configuration may be useful in completing the mail server section. To locate mail settings in: Outlook Start Outlook 2003 and click Tools > Accounts > select the account for which you want to view the settings and click Change... > More Settings... Outlook Start Outlook 2007 and click Tools > Account Settings > on the tab, select the account for which you want to view the settings and click Change... > More Settings... Outlook Start Outlook 2010 and click Tools > Account Settings > on the tab, select the account for which you want to view the settings and click Change... > More Settings... Thunderbird - Start Thunderbird and click Tools > Account Settings... Caching Proxy Settings The Caching Proxy tab allows administrators to specify the proxy server settings for storing cache content. The proxy server will store antivirus updates. CES on endpoints that are configured to connect to this proxy server will receive the latest updates, which will be considerably reduce Internet traffic. 210

211 Click the 'Start' or Stop' button to enable or disable the proxy server. The settings panel allows the administrator to configure the proxy server port, validity period of the cache content in hours and to define a path for the cache folder. Click the 'Clean Cache Folder...' button to remove the content in the cache folder. Select the check box 'Provide cached content if content source is not available' for the endpoints to update from the proxy server if the content source is not available via Internet. Viewing Database Event Log The 'Event Log' contains a list of notifications from ESM central service that may assist administrators to troubleshoot problems. 211

212 The type of alerts that are displayed can be filtered by clicking the 'Errors', 'Warnings' and 'Information' buttons Alternatively, type a specific search term into the text field then click the 'Apply Filter' button. Each cell can be individually selected by clicking it. Multiple cells can be selected whilst holding down the 'Shift' or 'CTRL' keys and left-clicking on target cells. Cells can be copied to the clipboard by clicking the 'Copy' button. Column Types/Format Type (of event) Definition / Description Error - 'Errors' are those events whereby the ESM Central Service failed to execute a command. Warning - High severity errors that may (or already have) prevented the ESM service from connecting to the data source. For example, a critical application crash. Information - 'Information' events typically inform the administrator of the successful completion of task by the ESM service. Time Message MM/DD/YYY HH:MM:SS Text Displays the precise time that the event was generated on the endpoint machine. Contains a description of the event. Use the control to view the full message. 212
213 Column Control Types/Format Control Type Definition / Description Use the control to view a condensed version of the message (this is the default view). Use the control to copy the contents of the message to the clipboard. Description Filter by event Click this button to add or remove events of type 'Error' from the displayed list. Filter by event Click this button to add or remove events of type 'Warning' from the displayed list. Filter by event Click this button to add or remove events of type 'Information' from the displayed list. Remove filters and refresh list Clears any active filters so all event types are displayed. Also loads the latest event entries. Filter by string Allows the administrator to filter events by typing a specific text string. Administrator should then click the 'Apply Filter' button. Apply Filter Implements the filter typed into the text field. Select Event Selects a particular event row. Once selected, clicking the 'Expand Rows' control will highlight the information pertaining to this event. Expand Rows Displays the complete 'Message' for all event rows. The event row that is selected using the 'Select Event' control will be highlighted. Information of this detail level may be required for troubleshooting purposes. Contract Rows Displays the condensed 'Message' (all events). This is the default view. Copy Copies the contents of the selected cells to the clipboard. About The 'About' tab provides the copyright information and the current ESM version number and license information. 213
214 Appendix 2 - How to... Tutorials The 'How To...' section of the guide contains guidance on using CESM PE effectively. Click on the links below to go the respective tutorial page for guidance of the respective feature. How to configure CES policies - an introduction How to Setup External Access from Internet How to Install CES on Endpoints Added by Manually Installing the Agent How to Configure CES policies - An Introduction A CESM policy is the security configuration of Comodo Endpoint Security (CES) deployed on an endpoint or a group of endpoints. Each policy determines the antivirus settings, Internet access rights, firewall traffic filtering rules and Defense+ application control settings for an endpoint. The CESM Policy can be derived from the configuration of Antivirus, Firewall and Defense+ components of CES on an endpoint and can be rolled out to any number of endpoints or endpoint groups. In order to configure Antivirus, Firewall and Defense+ settings in CES on an endpoint computer, the administrator has to ensure that the endpoint computer is either 'Locally Configured' (it has no policy) or it is in local mode (or CESM will remotely re-apply the endpoint's security policy and override any changes made by the administrator). Click 'Manage Locally' at the lower left of the CES interface to enable local administration mode: 214


215 Select user account for CES to access your computer CES requires administrative privileges in order to change the configuration. If you have logged in as administrator, leave 'Current Windows User' selected. If you have logged in as a user with limited privileges, select Computer Administrator or Local Administration Mode Access and enter the credentials accordingly. Click OK. The administrator can now configure the settings for Antivirus, Firewall and Defense+ components of CES for importing into the policy created. Once the administrator has created the policy on the new machine, it can be imported in CESM from this machine then applied to target computers as required (including the one from which the settings are imported). See 'Creating a New Security Policy' for more details. The remainder of this page is a quick primer to key areas within CES for modifying Antivirus, Firewall and Defense+ settings along with links to the appropriate section in the dedicated CES user-guide should further help be required. Antivirus Settings 215
216 Comodo Antivirus leverages multiple technologies, including Real-time/On-Access Scanning, On Demand Scanning and a fully featured Scan Scheduler to immediately start cleaning or quarantining suspicious files from your hard drives, shared disks, s, downloads and system memory. To configure Antivirus Behavior Settings Click the 'Tasks' arrow from the CES home screen to switch to 'Tasks' pane. Click 'Advanced Tasks' then 'Open Advanced settings' Click 'Security Settings' > 'Antivirus' from the left hand side navigation of Advanced Settings interface. The Antivirus Behavior Settings interface will open. 216
217 Click 'Realtime Scan' from the LHS navigation to configure real time or on access scanner settings. 217
218 Click 'Scans' from the LHS navigation to create or edit custom scan profiles, that allow you to define areas to be scanned, schedule scans and to specify the behavior of the scan engine for each profile. Click 'Exclusions' from the LHS navigation to add files folders and programs that are to be excludes scanning. If more details are required for these settings, see for Comodo Endpoint Security. Firewall Settings The firewall component of Comodo Endpoint Security offers the highest levels of security against inbound and outbound threats, can stealth endpoint ports against hackers and can prevent malicious software from transmitting confidential data over the Internet. To configure Firewall Behavior Settings Click the 'Tasks' arrow from the CES home screen to switch to 'Tasks' pane. Click 'Advanced Tasks' then 'Open Advanced settings'. Click 'Security Settings' > 'Firewall' from the left hand side navigation of 'Advanced Settings' interface. 218
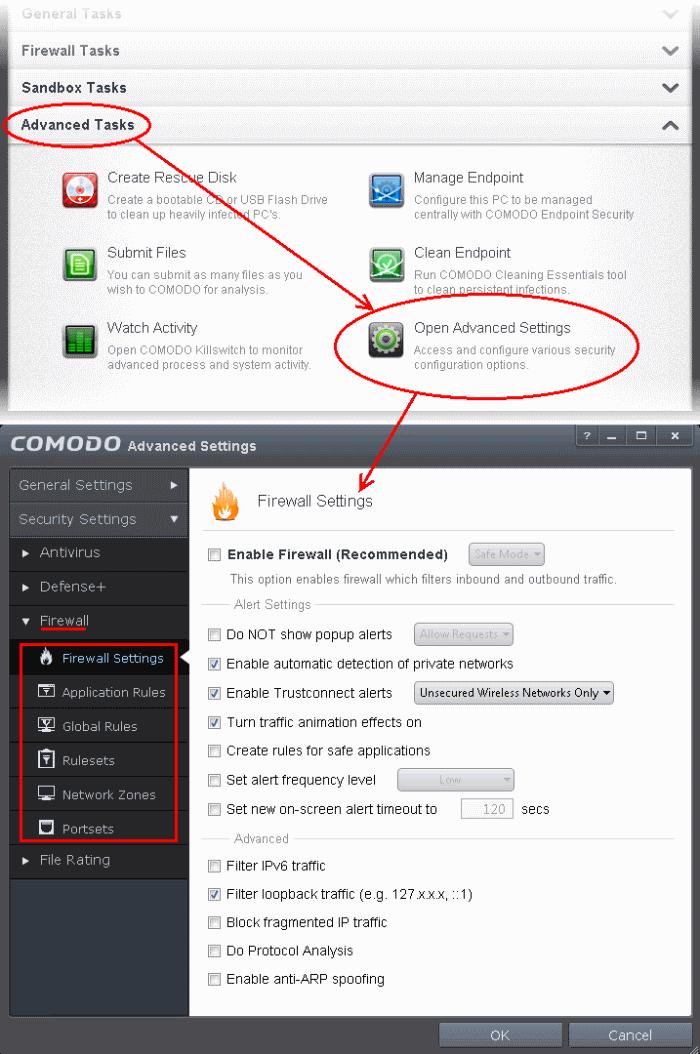
219 219
220 Click 'Firewall Settings' from the LHS navigation to configure overall Firewall behavior settings. Click 'Application Rules' from the LHS navigation to configure individual firewall rules for specific applications containing instructions that determine whether the application should be allowed or blocked; which protocols it is allowed to use; which ports it is allowed to use and so forth. The individual Application Rules can be used to constitute a Firewall Rule set. Click 'Global Rules' from the LHS navigation to configure rules to be applied to all traffic traveling in and out of your computer. Individual Global Rules can be used to constitute a Firewall Rule set. Click 'Rulesets' from the LHS navigation to configure rulesets, containing a set of one or more individual network control rules that have been saved and which can be re-deployed on multiple applications. Comodo Firewall allows or denies network access requests from an application based upon the Firewall Ruleset that has been specified for that application. Click 'Network Zones' from the LHS navigation to define trusted network zones to allow access and untrusted network zones to be blocked access to them. Click 'Portsets' from the LHS navigation to define handy, predefined groupings of one or more ports that can be reused and deployed across multiple Application Rules and Global Rules. If more details are required for these settings, see for Comodo Endpoint Security. Defense+ Settings The Defense+ component of Comodo Endpoint Security is a collection of prevention based security technologies designed to preserve the integrity, security and privacy of your operating system and user data. Behavior Blocker Authenticates every executable and process running on your computer and prevents them from taking actions that could harm your computer. Unrecognized processes and applications will be auto-sandboxed and run under a set of restrictions so they cannot harm your computer. This gives untrusted (but harmless) applications the freedom to operate whilst untrusted (and potentially malicious) applications are prevented from damaging your PC or data. Host Intrusion Protection (HIPS) - A rules-based intrusion prevention system that monitors the activities of all applications and processes on your computer. HIPS blocks the activities of malicious programs by halting any action that could cause damage to your operating system, system-memory, registry keys or personal data. To configure Defense+ Settings Click the 'Tasks' arrow from the CES home screen to switch to 'Tasks' pane. Click 'Advanced Tasks' then 'Open Advanced settings'. Click 'Security Settings' > 'Defense+' from the left hand side navigation of 'Advanced Settings' interface. 220
221 221

222 Click 'Hips' and then the options below it from the LHS navigation to configure the overall behavior of host intrusion prevention system. Click 'Behavior Blocker' from the LHS navigation to define how proactive the Behavior Blocker should be and which types of files it should check. Click 'Sandbox' from the LHS navigation to add applications to be run in sandbox always and to configure the sandbox. If more details are required for these settings, see for Comodo Endpoint Security. File Rating Settings CES allows the administrators to add trusted files that should be excluded from monitoring by HIPS, Unrecognized files that should be blocked and add trusted software vendors to Trusted Vendors list so that the applications from trusted vendors will not be monitored by HIPS. To configure File Rating Settings Click the 'Tasks' arrow from the CES home screen to switch to 'Tasks' pane. Click 'Advanced Tasks' then 'Open Advanced settings'. Click 'Security Settings' > 'File Rating' from the left hand side navigation of 'Advanced Settings' interface. 222
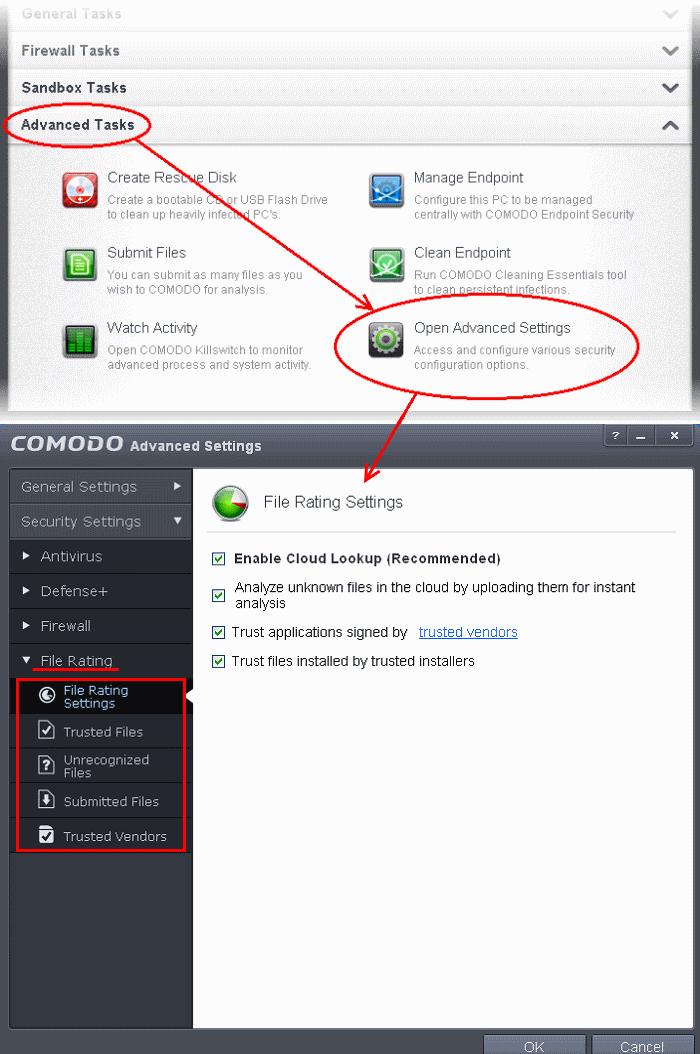
223 223

224 Click 'File Rating Settings' from the LHS navigation to configure settings that govern the overall behavior of file rating. Click 'Trusted Files' from the LHS navigation to view the list of trusted files and manually add files to it. Click 'Unrecognized Files' from the LHS navigation to view and manage unrecognized items. Click 'Submitted Files' from the LHS navigation to view the list of files submitted for analysis to Comodo. Click 'Trusted Vendors' from the LHS navigation to view the list of trusted software vendors and manually add vendors. If more details are required for these settings, see for Comodo Endpoint Security. How to Setup External Access from Internet The following guide explains how to configure CESM so that it can remotely manage endpoints that are connected via the Internet: Make sure that the CESM server has an externally accessible IP address. Open the CESM configuration tool - click 'Start > All Programs > COMODO > Endpoint Security Manager > CESM Configuration Tool'. Add the Internet reachable server IP address (alternatively hostname or FQDN) to the 'Server network addresses' list (just begin typing in the first blank row). 224

225 Restart CESM service. See the 'Service Status' at the top of this interface, and after you click Apply, accept the prompt to restart the service: If your network is equipped with a router or other similar device, it should be configured with CESM ports forwarding (list of ports to be forwarded are listed in the 'Server Ports' on the right. Default ports are 57193, (console) and 9901 (agent). To install agents on endpoints that are not on the local network Open 'Packages' screen by choosing 'Preferences' > 'Packages' from the drop-down at the top left. 225
226 To download CESM agent setup file for Windows as.exe file, click download offline package To download CESM agent setup file for Linux as.deb file, click download offline package To download CESM agent setup file for Mac OS as.dmg file, click download offline package Click 'Save' in the 'File Download' dialog and save the file in the location of your choice. The Agent Setup file enables the agent to be installed on any computers or laptops that will be used outside the network. The agent setup file can be copied to the target endpoint computer from DVD, CD, USB memory or by any other means and saved in a desired location. The agent can also be deployed using a third-party software distribution package. Double clicking on the setup file will start the installation wizard. For more details, please see Adding Computers by Manual Installation of Agent and CES. Applying Policy for Endpoints Connected in Local Network and for Endpoints Connected via Internet An administrator can create two policies for applying to a group of endpoints, where some endpoints are connected in local network and some are connected via the Internet. For example, the group may be named as 'HR Department' and the administrator can create two policies named as 'Policy for HR department - High Security' and 'Policy for HR department Medium Security'. Now the administrator can select 'Policy for HR department - Medium Security' as Local Policy and 'Policy for HR department - High Security' as Internet Policy for this group. The endpoints in the 'HR Department' group that connect to CESM through local network will be applied 'Policy for HR department - Medium Security' and for endpoints that connect via Internet will be applied 'Policy for HR department - High Security'. See section Creating New Endpoint Groups and importing Exising Endpoints for more details on creating endpoint groups. See section Creating a New Security Policy for more details on creating a new policy. See section Key Concepts to know about CESM Key Concepts. See section 'Best Practices' to know how to use CESM effectively. 226

227 How to Install CES on Endpoints Added by Manually Installing the Agent The endpoint security software Comodo Endpoint Security can be remotely installed on to endpoints added to CESM by manually installing the agent and connected through external networks from the CESM administrative console. To install CES 1. Open the 'Computers' area by selecting Computers from the drop-down at the top left. 2. Click 'Add' from the 'Computers' area to start the wizard. 3. Select 'Managed Computers' and click the right arrow button to proceed to the next step. 227
228 All the managed computers will be listed. 228
229 4. Select the endpoints on which you want to install CES application from the list. Click the filter icon in the 'Name' column header to search for a particular endpoint, enter the endpoint name and click 'Apply'. After selecting the endpoints, click the right arrow or swipe left to proceed to the next step. The next stage 'Packages' displays the version details of ESM Agent and CES. You can also check for updates of these applications and download it in your server for deployment on to the selected endpoints. 5. Click 'Check for Updates' to find out if any newer version of CESM Agent and CES are available. 6. If any newer versions are available, you can choose to download them to the CESM server by clicking 'Download' Click the right arrow or swipe left to move to the next step. The next step is to choose installation options for Comodo Endpoint Security (CES): 229
, Antivirus only or Firewall only from the Components drop-down.")
230 7. Select 'Install Comodo Endpoint Security' check box. 8. Select the version of CES you wish to install on the selected endpoints from the drop-down. 9. Select whether you want to include all the components (Firewall and Antivirus), Antivirus only or Firewall only from the Components drop-down. Suppress reboot after installation - CES installation will restart of the endpoints for the installation to take effect. If you do not want the endpoints to be restarted on completion of installation, select this check box. CES installation will complete but will take effect only on the next restart of the endpoint. Uninstall all incompatible products - Selecting this option uninstalls select third party antivirus, firewall and other desktop security software from the endpoints, prior to the installation of CES. Performing this step will remove potentially incompatible products and thus enable CES to operate correctly. Some incompatible products can be detected, but not automatically uninstalled and must be removed manually. If your product is detected but not uninstalled, please consult your vendor s documentation for precise uninstallation guidelines. Click here to see the full list of incompatible products. Click the right arrow to move to the next step. The next step is the deployment process. 230
Comodo Endpoint Security Manager Business Edition Software Version 2.0
 Comodo Endpoint Security Manager Business Edition Software Version 2.0 Administrator Guide Guide Version 2.0.020212 Comodo Security Solutions 525 Washington Blvd. Jersey City, NJ 07310 Table of Contents
Comodo Endpoint Security Manager Professional Edition Software Version 3.3
 Comodo Endpoint Security Manager Professional Edition Software Version 3.3 Quick Start Guide Guide Version 3.2.022615 Comodo Security Solutions 1255 Broad Street Clifton, NJ 07013 Comodo Endpoint Security
Comodo Endpoint Security Manager Professional Edition Software Version 3.5
 1 Comodo Endpoint Security Manager Professional Edition Software Version 3.5 Quick Start Guide Guide Version 3.5.030116 Comodo Security Solutions 1255 Broad Street Clifton, NJ 07013 Comodo Endpoint Security
Comodo Endpoint Security Manager Software Version 1.6
 Comodo Endpoint Security Manager Software Version 1.6 Administrator Guide Guide Version 1.6.092711 Comodo Security Solutions 525 Washington Blvd. Jersey City, NJ 07310 United States Table of Contents 1
Endpoint Security Manager
 Comodo Endpoint Security Manager Software Version 1.6 CIS Configuration Editor Version 1.6.010511 Comodo Security Solutions 1255 Broad Street STE 100 Clifton, NJ 07013 Table of Contents 1.Introduction
Comodo Internet Security Software Version 11.0
 Comodo Internet Security Software Version 11.0 Installation Guide Guide Version 11.0.080918 Comodo Security Solutions 1255 Broad Street Clifton, NJ, 07013 United States 1. CIS Installation Please read
Comodo One Software Version 3.3
 rat Comodo One Software Version 3.3 Patch Management Module Administrator Guide Guide Version 2.2.101316 Comodo Security Solutions 1255 Broad Street STE 100 Clifton, NJ 07013 Table of Contents 1 Introduction
Comodo. Endpoint Security Manager Software Version 1.6. CIS Configuration Editor Guide Guide Version
 Comodo Endpoint Security Manager Software Version 6 CIS Configuration Editor Guide Guide Version 6.010511 Comodo Security Solutions 1255 Broad Street STE 100 Clifton, NJ 07013 Table of Contents Introduction
Comodo SecureBox Management Console Software Version 1.9
 6. Comodo SecureBox Management Console Software Version 1.9 Quick Start Guide Guide Version 1.9.041918 Comodo Security Solutions 1255 Broad Street Clifton, NJ 07013 Comodo SecureBox Management Console
Comodo Internet Security Software Version 10.1
 Comodo Internet Security Software Version 10.1 Installation Guide Guide Version 10.1.012218 Comodo Security Solutions 1255 Broad Street Clifton, NJ, 07013 United States 1. CIS Installation Please read
Deployment Guide Installing WhatsUp Gold Distributed Edition to Central and Remote Sites
 Deployment Guide Installing WhatsUp Gold Distributed Edition to Central and Remote Sites This guide provides information about installing and configuring WhatsUp Gold Central and Remote Sites. Contents
Installation Guide. EventTracker Enterprise. Install Guide Centre Park Drive Publication Date: Aug 03, U.S. Toll Free:
 EventTracker Enterprise Install Guide 8815 Centre Park Drive Publication Date: Aug 03, 2010 Columbia MD 21045 U.S. Toll Free: 877.333.1433 Abstract The purpose of this document is to help users install
Symantec Endpoint Protection Installation Guide
 Symantec Endpoint Protection 11.0 Installation Guide SYMANTEC ENDPOINT PROTECTION 11.0 TABLE OF CONTENTS A NEW SECURITY APPLICATION... 1 INTRODUCTION... 1 WHAT IS SYMANTEC ENDPOINT PROTECTION (SEP) 11.0?...
Getting Started Guide. This document provides step-by-step instructions for installing Max Secure Anti-Virus and its prerequisite software.
 Getting Started Guide This document provides step-by-step instructions for installing Max Secure Anti-Virus and its prerequisite software. Contents 2 Contents Introduction... 3 System Requirements... 4
Comodo SecureBox Management Console Software Version 1.9
 6. Comodo SecureBox Management Console Software Version 1.9 Administrator Guide Guide Version 1.9.032817 Comodo Security Solutions 1255 Broad Street Clifton, NJ 07013 Table of Contents 1.Introduction to
Comodo LoginPro Software Version 1.0
 Comodo LoginPro Software Version 1.0 User Guide Guide Version 1.0.102512 Comodo Security Solutions 1255 Broad Street STE 100 Clifton, NJ 07013 Table of Contents 1.Introduction to Comodo LoginPro... 3 1.1.System
KYOCERA Net Admin User Guide
 KYOCERA Net Admin User Guide Legal Notes Unauthorized reproduction of all or part of this guide is prohibited. The information in this guide is subject to change without notice. We cannot be held liable
Comodo Network Center Software Version 1.1
 Comodo Network Center Software Version 1.1 User Guide Guide Version 2.3.112311 Comodo Security Solutions 1255 Broad Street STE 100 Clifton, NJ 07013 Table of Contents Comodo Network Center - Introduction...
BCPro Installation Instructions Code No. LIT Software Release 3.0 Issued September 2017
 Code No. LIT-12011910 Software Release 3.0 Issued September 2017 Welcome...2 Summary of Changes...2 Related Documentation...2 Installation Overview...2 Prerequisite Software Checklist for Installation
Comodo One Software Version 3.26
 rat Comodo One Software Version 3.26 Network Assessment Tool Administrator Guide Guide Version 1.3.113018 Comodo Security Solutions 1255 Broad Street Clifton, NJ 07013 Table of Contents 1 Introduction
Installation Guide Install Guide Centre Park Drive Publication Date: Feb 11, 2010
 EventTracker Install Guide 8815 Centre Park Drive Publication Date: Feb 11, 2010 Columbia MD 21045 U.S. Toll Free: 877.333.1433 Abstract The purpose of this document is to help users install and configure
F-Secure Client Security. Quick Installation Guide
 F-Secure Client Security Quick Installation Guide F-Secure Client Security TOC 3 Contents Chapter 1: Introduction...5 Chapter 2: Installing Client Security...7 System requirements...8 Stand-alone installation...9
Agent and Agent Browser. Updated Friday, January 26, Autotask Corporation
 Agent and Agent Browser Updated Friday, January 26, 2018 2018 Autotask Corporation Table of Contents Table of Contents 2 The AEM Agent and Agent Browser 3 AEM Agent 5 Privacy Mode 9 Agent Browser 11 Agent
Comodo Endpoint Security Manager Software Version 3.4
 Cert dialog Comodo Endpoint Security Manager Software Version 3.4 How to Upgrade CESM from Version 3.3 to 3.4 Guide Version 3.4.072415 Comodo Security Solutions, Inc. 1255 Broad Street Clifton, NJ 07013
Veriato Recon / 360. Version 9.0.3
 Veriato Recon / 360 Version 9.0.3 1/3/2018 Upgrade Guide January 3, 2018 Table of Contents Before You Begin... 1 What's New... 1 How the System Works... 1 Upgrade Support... 6 Update Antivirus Exclusions...
KASPERSKY LAB. Kaspersky Administration Kit version 6.0. Reference Book
 KASPERSKY LAB Kaspersky Administration Kit version 6.0 Reference Book KASPERSKY ADMINISTRATION KIT VERSION 6.0 Reference Book Kaspersky Lab Ltd. Visit our website: http://www.kaspersky.com/ Revision date:
Comodo Internet Security Software Version 10.0
 Comodo Internet Security Software Version 10.0 Installation Guide Guide Version 10.0.010918 Comodo Security Solutions 1255 Broad Street Clifton, NJ, 07013 United States 1. CIS Installation Before you install
F-Secure Client Security. Administrator's Guide
 F-Secure Client Security Administrator's Guide F-Secure Client Security TOC 2 Contents Chapter 1: Introduction...7 1.1 System requirements...8 1.1.1 Policy Manager Server...8 1.1.2 Policy Manager Console...8
KYOCERA Net Admin Installation Guide
 KYOCERA Net Admin Guide Legal Notes Unauthorized reproduction of all or part of this guide is prohibited. The information in this guide is subject to change without notice. We cannot be held liable for
Patch Manager INSTALLATION GUIDE. Version Last Updated: September 25, 2017
 INSTALLATION GUIDE Patch Manager Version 2.1.5 Last Updated: September 25, 2017 Retrieve the latest version from: https://support.solarwinds.com/success_center/patch_manager/patch_manager_documentation
Sophos Enterprise Console
 quick startup guide Product Version: 5.5 Contents About this guide... 1 What do I install?...2 What are the key steps?... 3 Download the Enterprise Console installer...4 If you have a Sophos license...
Kaseya 2. Installation guide. Version R8. English
 Kaseya 2 Kaseya Server Setup Installation guide Version R8 English October 24, 2014 Agreement The purchase and use of all Software and Services is subject to the Agreement as defined in Kaseya s Click-Accept
Comodo One Software Version 3.3
 rat Comodo One Software Version 3.3 Remote Monitoring and Management Administrator Guide Guide Version 6.1.032817 Comodo Security Solutions 1255 Broad Street Clifton, NJ 07013 Table of Contents 1 Introduction
rat Comodo EDR Software Version 1.7 Administrator Guide Guide Version Comodo Security Solutions 1255 Broad Street Clifton, NJ 07013
 rat Comodo EDR Software Version 1.7 Administrator Guide Guide Version 1.1.120318 Comodo Security Solutions 1255 Broad Street Clifton, NJ 07013 Table of Contents 1 Introduction to Comodo EDR...3 1.1 Purchase
This guide details the deployment and initial configuration necessary to maximize the value of JetAdvantage Insights.
 HP JetAdvantage Insights Deployment Guide This guide details the deployment and initial configuration necessary to maximize the value of JetAdvantage Insights. 1. Overview HP JetAdvantage Insights provides
Comodo Offline Updater Utility Software Version
 Comodo Offline Updater Utility Software Version 1.2.30701.2 i User Guide Guide Version 1.2.011811 Comodo Security Solutions 525 Washington Blvd. Jersey City, NJ 07310 Table of Contents 1.Introduction to
F-Secure Policy Manager Administrator's Guide
 F-Secure Policy Manager Administrator's Guide 17-10-25 TOC F-Secure Policy Manager Contents Chapter 1: Introduction...7 1.1 What's new...8 1.2 System requirements...8 1.2.1 Policy Manager Server...8 1.2.2
Administration Guide
 Administration Guide VIPRE Endpoint Security VIPRE Business Premium VIPRE Antivirus Business Copyright 2016 ThreatTrack Security, Inc. All Rights Reserved. VIPRE is a product of ThreatTrack Security, Inc.
Comodo ONE Software Version 3.2
 rat Comodo ONE Software Version 3.2 Remote Monitoring and Management Quick Start Guide Guide Version 6.1.082316 Comodo Security Solutions 1255 Broad Street Clifton, NJ 07013 Comodo ONE - Remote Monitoring
Installation on Windows Server 2008
 USER GUIDE MADCAP PULSE 4 Installation on Windows Server 2008 Copyright 2018 MadCap Software. All rights reserved. Information in this document is subject to change without notice. The software described
McAfee MVISION Endpoint 1811 Installation Guide
 McAfee MVISION Endpoint 1811 Installation Guide COPYRIGHT Copyright 2019 McAfee, LLC TRADEMARK ATTRIBUTIONS McAfee and the McAfee logo, McAfee Active Protection, epolicy Orchestrator, McAfee epo, McAfee
Sophos Enterprise Console
 secure network quick startup guide Product Version: 5.5 Contents About this guide... 1 Limitations on the secure network...2 What do I install?...3 What are the key steps?... 4 Download the installers...5
Print Audit 6. Print Audit 6 Documentation Apr :07. Version: Date:
 Print Audit 6 Version: Date: 37 21-Apr-2015 23:07 Table of Contents Browse Documents:..................................................... 3 Database Documentation.................................................
Comodo Dome Shield - Admin Guide
 rat Comodo Dome Shield Software Version 1.12 Administrator Guide Guide Version 1.12.111717 Comodo Security Solutions 1255 Broad Street Clifton, NJ 07013 Table of Contents 1 Introduction to Comodo Dome
Comodo IT and Security Manager Software Version 6.6
 Comodo IT and Security Manager Software Version 6.6 End User Guide Guide Version 6.6.053117 Comodo Security Solutions 1255 Broad Street Clifton, NJ 07013 Table of Contents 1. Introduction to Comodo IT
Jetico Central Manager. Administrator Guide
 Jetico Central Manager Administrator Guide Introduction Deployment, updating and control of client software can be a time consuming and expensive task for companies and organizations because of the number
Comodo Antivirus Software Version 2.2
 Comodo Antivirus Software Version 2.2 User Guide Guide Version 2.2.082318 Comodo Security Solutions Inc. 1255 Broad Street Clifton, NJ 07013 Table of Contents 1.Introduction to Comodo Antivirus... 4 1.1.System
VI-CENTER EXTENDED ENTERPRISE EDITION GETTING STARTED GUIDE. Version: 4.5
 VI-CENTER EXTENDED ENTERPRISE EDITION GETTING STARTED GUIDE This manual provides a quick introduction to Virtual Iron software, and explains how to use Virtual Iron VI-Center to configure and manage virtual
Comodo IT and Security Manager Software Version 5.4
 Comodo IT and Security Manager Software Version 5.4 End User Guide Guide Version 5.4.090716 Comodo Security Solutions 1255 Broad Street Clifton, NJ 07013 Table of Contents 1. Introduction to Comodo IT
Manually Remove Of Xp Internet Security Protect Virus Manually
 Manually Remove Of Xp Internet Security Protect Virus Manually We show you how to remove malware from a PC or laptop. You may also wish to read: Windows users: how to protect your PC from Check now: do
KASPERSKY LAB. Kaspersky Administration Kit version 6.0. Administrator s manual
 KASPERSKY LAB Kaspersky Administration Kit version 6.0 Administrator s manual KASPERSKY ADMINISTRATION KIT VERSION 6.0 Administrator s manual Kaspersky Lab Visit our website: http://www.kaspersky.com/
AVG Business Edition Remote Administration
 AVG Business Edition Remote Administration User Manual Document revision AVG.02 (1/7/2018) Copyright AVG Technologies CZ, s.r.o. All rights reserved. All other trademarks are the property of their respective
Sophos Enterprise Console Help. Product version: 5.3
 Sophos Enterprise Console Help Product version: 5.3 Document date: September 2015 Contents 1 About Sophos Enterprise Console 5.3...6 2 Guide to the Enterprise Console interface...7 2.1 User interface layout...7
ESET Remote Administrator 6. Version 6.0 Product Details
 ESET Remote Administrator 6 Version 6.0 Product Details ESET Remote Administrator 6.0 is a successor to ESET Remote Administrator V5.x, however represents a major step forward, completely new generation
Welcome to PDQ Inventory
 Getting Started Contents Welcome to PDQ Inventory........ 1 Licensing.................... 2 PDQ Inventory Licensing Mode Comparison.................. 2 PDQ Inventory Product Feature Comparison..................
SafeConsole On-Prem Install Guide. version DataLocker Inc. July, SafeConsole. Reference for SafeConsole OnPrem
 version 5.2.2 DataLocker Inc. July, 2017 SafeConsole Reference for SafeConsole OnPrem 1 Contents Introduction................................................ 2 How do the devices become managed by SafeConsole?....................
Comodo cwatch Network Software Version 2.23
 rat Comodo cwatch Network Software Version 2.23 Administrator Guide Guide Version 2.23.060618 Comodo Security Solutions 1255 Broad Street Clifton, NJ 07013 Table of Contents 1 Introduction to Comodo cwatch
FieldView. Management Suite
 FieldView The FieldView Management Suite (FMS) system allows administrators to view the status of remote FieldView System endpoints, create and apply system configurations, and manage and apply remote
Comodo Unknown File Hunter Software Version 2.1
 rat Comodo Unknown File Hunter Software Version 2.1 Administrator Guide Guide Version 2.1.061118 Comodo Security Solutions 1255 Broad Street Clifton, NJ 07013 Table of Contents 1 Introduction to Comodo
Comodo ONE Software Version 3.3
 rat Comodo ONE Software Version 3.3 Remote Monitoring and Management Quick Start Guide Guide Version 6.1.032817 Comodo Security Solutions 1255 Broad Street Clifton, NJ 07013 Comodo ONE - Remote Monitoring
Comodo Device Manager Software Version 4.0
 Comodo Device Manager Software Version 4.0 End User Guide Guide Version 4.0.112316 Comodo Security Solutions 1255 Broad Street Clifton, NJ 07013 Table of Contents 1.Introduction to Comodo Device Manager...
User Manual Avira SMC Security Management Center More Than Security
 www.avira.com User Manual Avira SMC Security Management Center More Than Security Chapter 1. About this Manual...3 1.1 Introduction... 3 1.2 Structure of the Manual... 3 1.3 Signs and Symbols... 4 1.4
Quick Start Guide TABLE OF CONTENTS COMMCELL ARCHITECTURE OVERVIEW COMMCELL SOFTWARE DEPLOYMENT INSTALL THE COMMSERVE SOFTWARE
 Page 1 of 35 Quick Start Guide TABLE OF CONTENTS This Quick Start Guide is designed to help you install and use a CommCell configuration to which you can later add other components. COMMCELL ARCHITECTURE
Practice Labs User Guide
 Practice Labs User Guide This page is intentionally blank Contents Introduction... 3 Overview... 3 Accessing Practice Labs... 3 The Practice Labs Interface... 4 Minimum Browser Requirements... 5 The Content
Zemana Endpoint Security Administration Guide. Version
 Zemana Endpoint Security Administration Guide Version 1.9.290 Introduction 4 What is Zemana Endpoint Security? 4 What is Zemana Control Center? 4 How do Endpoint Agents and Control Center communicate with
SafeConsole On-Prem Install Guide
 SafeConsole On-Prem Install Guide This guide applies to SafeConsole 5.0.5 Introduction This guide describes how to install a new SafeConsole server on Windows using the SafeConsole installer. As an option,
McAfee MVISION Endpoint 1808 Installation Guide
 McAfee MVISION Endpoint 1808 Installation Guide COPYRIGHT Copyright 2018 McAfee, LLC TRADEMARK ATTRIBUTIONS McAfee and the McAfee logo, McAfee Active Protection, epolicy Orchestrator, McAfee epo, McAfee
DefendX Software Control-Audit for Hitachi Installation Guide
 DefendX Software Control-Audit for Hitachi Installation Guide Version 4.1 This guide details the method for the installation and initial configuration of DefendX Software Control-Audit for NAS, Hitachi
Symantec Endpoint Protection, Symantec Endpoint Protection Small Business Edition, and Symantec Network Access Control 12.1.
 Symantec Endpoint Protection, Symantec Endpoint Protection Small Business Edition, and Symantec Network Access Control 12.1.3 Release Notes Symantec Endpoint Protection, Symantec Endpoint Protection Small
Installation Guide. Cimatron Site Manager 2.0 Release Note
 Installation Guide Cimatron Site Manager 2.0 Release Note Installation Guide i Table of Contents Introduction... 1 Cimatron Site Manager Components... 2 Installation... 3 Hardware Requirements... 3 Software
Installation Guide. for 6.5 and all add-on modules
 Kaseya Server Setup Installation Guide for 6.5 and all add-on modules February 11, 2014 Agreement The purchase and use of all Software and Services is subject to the Agreement as defined in Kaseya s Click-Accept
Comodo IT and Security Manager Software Version 6.4
 Comodo IT and Security Manager Software Version 6.4 End User Guide Guide Version 6.4.040417 Comodo Security Solutions 1255 Broad Street Clifton, NJ 07013 Table of Contents 1. Introduction to Comodo IT
Covene Cohesion Server Installation Guide A Modular Platform for Pexip Infinity Management October 25, 2016 Version 3.3 Revision 1.
 Covene Cohesion Server Installation Guide A Modular Platform for Pexip Infinity Management October 25, 2016 Version 3.3 Revision 1.0 Table of Contents 1. Overview... 3 2. Upgrading an Existing Installation...
Kaspersky Administration Kit 8.0 REFERENCE GUIDE
 Kaspersky Administration Kit 8.0 REFERENCE GUIDE P R O G R A M V E R S I O N : 8. 0 C R I T I C A L F I X 1 Dear User! Thank you for choosing our product. We hope that this documentation will help you
Avira Ultimate Protection Suite. Short guide
 Avira Ultimate Protection Suite Short guide 01 Trademarks and Copyright Trademarks Windows is a registered trademark of the Microsoft Corporation in the United States and other countries. All other brand
Performing an ObserveIT Upgrade Using the Interactive Installer
 Performing an ObserveIT Upgrade Using the Interactive Installer ABOUT THIS DOCUMENT This document contains detailed procedures and instructions on how to upgrade ObserveIT by using the interactive "One
Perceptive TransForm E-Forms Manager 8.x. Installation and Configuration Guide March 1, 2012
 Perceptive TransForm E-Forms Manager 8.x Installation and Configuration Guide March 1, 2012 Table of Contents 1 Introduction... 3 1.1 Intended Audience... 3 1.2 Related Resources and Documentation... 3
AMD RAID Installation Guide
 AMD RAID Installation Guide 1. AMD BIOS RAID Installation Guide.. 3 1.1 Introduction to RAID.. 3 1.2 RAID Configurations Precautions 4 1.3 Installing Windows 8 / 8 64-bit / 7 / 7 64-bit / Vista / Vista
Comodo Next Generation Security Information and Event Management Software Version 1.4
 rat Comodo Next Generation Security Information and Event Management Software Version 1.4 Administrator Guide Guide Version 1.4.101915 Comodo Security Solutions 1255 Broad Street Clifton, NJ 07013 Table
Comodo SecureBox Management Console Software Version 1.9
 np2 Comodo SecureBox Management Console Software Version 1.9 End User Guide Guide Version 1.9.032817 Comodo Security Solutions 1255 Broad Street Clifton, NJ 07013 Table of Contents 1.Comodo Secure Box
McAfee Network Security Platform 8.3
 Revision J McAfee Network Security Platform 8.3 (Integration Guide) COPYRIGHT Copyright 2018 McAfee, LLC TRADEMARK ATTRIBUTIONS McAfee and the McAfee logo, McAfee Active Protection, epolicy Orchestrator,
College of Pharmacy Windows 10
 College of Pharmacy Windows 10 Windows 10 is the version of Microsoft s flagship operating system that follows Windows 8; the OS was released in July 2015. Windows 10 is designed to address common criticisms
Avalanche Remote Control User Guide. Version 4.1
 Avalanche Remote Control User Guide Version 4.1 ii Copyright 2012 by Wavelink Corporation. All rights reserved. Wavelink Corporation 10808 South River Front Parkway, Suite 200 South Jordan, Utah 84095
Comodo Antivirus Software Version 2.1
 Comodo Antivirus Software Version 2.1 User Guide Guide Version 2.1.030515 Comodo Security Solutions Inc. 1255 Broad Street Clifton, NJ 07013 Table of Contents 1.Introduction to Comodo Antivirus... 4 1.1.System
Comodo Unknown File Hunter Software Version 5.0
 rat Comodo Unknown File Hunter Software Version 5.0 Administrator Guide Guide Version 5.0.073118 Comodo Security Solutions 1255 Broad Street Clifton, NJ 07013 Table of Contents 1 Introduction to Comodo
VIRTUALIZATION MANAGER ENTERPRISE EDITION GETTING STARTED GUIDE. Product: Virtual Iron Virtualization Manager Version: 4.2
 VIRTUALIZATION MANAGER ENTERPRISE EDITION GETTING STARTED GUIDE This manual provides a quick introduction to Virtual Iron software, and explains how to use Virtual Iron Virtualization Manager to configure
Comodo IT and Security Manager Software Version 6.9
 Comodo IT and Security Manager Software Version 6.9 End User Guide Guide Version 6.9.072817 Comodo Security Solutions 1255 Broad Street Clifton, NJ 07013 Table of Contents 1. Introduction to Comodo IT
NTP Software File Auditor for Windows Edition
 NTP Software File Auditor for Windows Edition An NTP Software Installation Guide Abstract This guide provides a short introduction to installation and initial configuration of NTP Software File Auditor
USER GUIDE. CTERA Agent for Windows. June 2016 Version 5.5
 USER GUIDE CTERA Agent for Windows June 2016 Version 5.5 Copyright 2009-2016 CTERA Networks Ltd. All rights reserved. No part of this document may be reproduced in any form or by any means without written
Veritas System Recovery 18 Management Solution Administrator's Guide
 Veritas System Recovery 18 Management Solution Administrator's Guide Documentation version: 18 Legal Notice Copyright 2018 Veritas Technologies LLC. All rights reserved. Veritas and the Veritas Logo are
Desktop & Laptop Edition
 Desktop & Laptop Edition USER MANUAL For Mac OS X Copyright Notice & Proprietary Information Redstor Limited, 2016. All rights reserved. Trademarks - Mac, Leopard, Snow Leopard, Lion and Mountain Lion
SynapSense Software. Installation Manual. Release 7.1 Issue 1
 SynapSense Software Installation Manual Release 7.1 Issue 1 Copyright 2017 Panduit Corp. All rights reserved. No part of this book shall be reproduced, stored in a retrieval system, or transmitted by any
How To Manually Uninstall Symantec Antivirus Corporate Edition 10.x Client
 How To Manually Uninstall Symantec Antivirus Corporate Edition 10.x Client Download Symantec Norton AntiVirus Definition Update (Upgrade/Patch). proactively block attacks and detect and remove threats
Comodo APT Assessment Tool
 rat Comodo APT Assessment Tool Software Version 1.1 Administrator Guide Guide Version 1.1.102815 Comodo Security Solutions 1255 Broad Street Clifton, NJ 07013 Table of Contents 1 Introduction to Comodo
SonicWALL Security Software
 Email Security SonicWALL Email Security 7.2.4 Software System Compatibility SonicWALL Email Security 7.2.4 Software is supported on systems with the following: Operating Systems Windows 2003, SP2 Windows
Upgrading an ObserveIT One-Click Installation
 Upgrading an ObserveIT One-Click Installation This document was written for ObserveIT Enterprise version 7.6.1. This document uses screenshots and procedures written for Windows Server 2012 R2 and SQL
T E KLYNX CENTRAL I N S T A L L A T I O N G U I D E
 TEKLYNX CENTRAL I N S T A L L A T I O N G U I D E Note TEKLYNX CENTRAL Installation Guide The information in this manual is not binding and may be modified without prior notice. Supply of the software
Comodo One Home Edition - FAQ
 Comodo One One Home Home Edition Edition -- FAQ FAQ Comodo What is Comodo One Home Edition? Comodo One Home Edition allows you to keep track of your family's mobile devices, laptops and desktop computers
NovaBACKUP CMon v19.0
 June 2017 NovaBACKUP CMon v19.0 User Manual Features and specifications are subject to change without notice. The information provided herein is provided for informational and planning purposes only. 2017
ForeScout Extended Module for Symantec Endpoint Protection
 ForeScout Extended Module for Symantec Endpoint Protection Version 1.0.0 Table of Contents About the Symantec Endpoint Protection Integration... 4 Use Cases... 4 Additional Symantec Endpoint Protection