Model RL1600 QUICK REFERENCE GUIDE TDN THIS AREA FOR SERVICE PROVIDER CONTACT INFORMATION:
|
|
|
- Melvyn Woods
- 6 years ago
- Views:
Transcription


1 Model RL1600 QUICK REFERENCE GUIDE THIS AREA FOR SERVICE PROVIDER CONTACT INFORMATION: TDN May
2

3
 TO CLOSE. A CHECK MARK ( ) IDENTI- FIES WHICH CASSETTE(S) ARE SELECTED.")

 IN SERVICE. PRESS <EN- TER>.")
.")
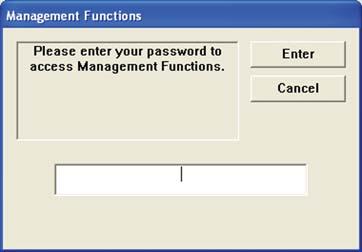
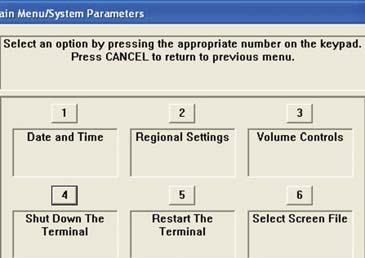
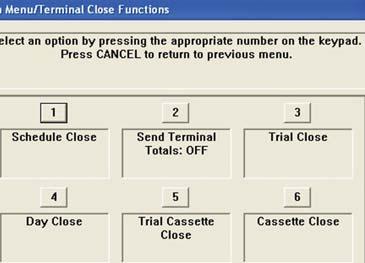
4 CASSETTE CLOSE FUNCTIONS FOLLOW ACCESS INSTRUCTIONS TO ENTER MANAGEMENT FUNCTIONS. SELECT TERMINAL CLOSE FUNCTIONS. SELECT CASSETTE CLOSE. SELECT CASSETTE(S) TO CLOSE. A CHECK MARK ( ) IDENTI- FIES WHICH CASSETTE(S) ARE SELECTED. PRESS <ENTER>. AFTER CASSETTE(S) HAVE BEEN REINSERTED IN THE DIS- PENSER, PRESS <ENTER>. A CLOSE REPORT IS DISPLAYED TO BE PRINTED OR SAVED. THIS OPERATION WILL RESET THE NUMBER OF BILLS IN THE CASSETTE(S) TO ZERO (0). PRESS <ENTER>. PLACE SELECTED CASSETTE(S) IN SERVICE. PRESS <EN- TER>. ENTER CASSETTE QUANTITY (NUMBER OF NOTES, NOT VALUE) FOR THE SELECTED CASSETTE(S). PRESS <ENTER> TO ACCEPT ENTRY. REPEAT FOR EACH SELECTED CASSETTE. REMOVE AND REPLENISH THE SELECTED CASSETTE(S). PROCEDURES FOR SPECIFIC DISPENSING MECHANISMS CAS- SETTE REPLENISHMENT ARE ON THE FOLLOWING PAGES. A TRIAL CASSETTE CLOSE REPORT AUTOMATICALLY IS DISPLAYED TO BE PRINTED OR SAVED. PRINT AND RETAIN A COPY FOR STARTING POINT REFERENCE. PRESS <ENTER> TO RETURN TO CLOSE FUNCTIONS. 4

5 REPLENISH MINI MECH CASSETTE 1 UNLOCK/OPEN DISPENSER SECURITY DOOR. GRASP TRAY HANDLE AND REMOVE NOTE CASSETTE 5 PLACE CURRENCY IN THE CASSETTE. SLOWLY PUSH PACKER FORWARDS AGAINST THE NOTES. 2 REMOVE ANY REJECTED NOTES FROM THE REJECT COMPARTMENT. DO NOT RECYCLE REJECTED NOTES! 6 GRASP THE HANDLE AND SLIDE THE NOTE CASSETTE FULLY INTO THE DISPENSER. 3 MOVE THE PUSHER PLATE TO THE REAR OF THE TRAY (TOWARDS THE HANDLE). 4 COUNT THE NUMBER OF BILLS THAT REMAIN IN THE CASSETTE, IF ANY. COUNT THE NUMBER OF BILLS THAT ARE BEING ADDED TO THE REMAINING NOTES. THE TOTAL OF THESE AMOUNTS WILL BE ENTERED IN THE ENTER CASSETTE QUANTITY PROMPT FOR CASSETTE CLOSE PROCEDURE. 5


6 REPLENISH RECEIPT PAPER NOTE: THIS PROCEDURE REQUIRES TERMINAL TO BE POWERED UP. 1 OPEN CONTROL PANEL. IF PAPER REMAINS ON 4 ROLL, CUT OR TEAR PAPER BETWEEN ROLL AND PRINTER. INSTALL NEW PAPER ROLL ONTO SPINDLE. 2 PRESS THE MANUAL FEED BUTTON TO CLEAR 5 REMAINING PAPER FROM FEED PATH. INSERT PAPER/SPINDLE INTO PAPER BRACKET. PAPER FEEDS FROM TOP OF ROLL! REMOVE SPENT PAPER ROLL AND SPINDLE FROM 3 6 PAPER BRACKET. FEED END OF PAPER INTO PRINTER TAKE-UP SLOT. PAPER WILL FEED AUTOMATICALLY THROUGH THE PRINTER AND SLIGHTLY OUT FRONT OF UNIT. 6
7 COMBINATION LOCKS INTRODUCTION THE SECURITY CABINET CAN BE SECURED USING EITHER A MECHANICAL OR ELECTRONIC COMBINATION LOCK. THIS PAGE COVERS HOW TO OPERATE THE COMBINATION OF EITHER LOCK. TO CHANGE COMBINATIONS, SEE ATTACHMENT TO THE USER MANUAL. UNLOCKING THE LOCK OPERATING THE MECHANICAL LOCK THERE ARE TWO MARKS ON THE DIAL RING. THE INDEX AT THE TOP IS USED FOR OPENING THE LOCK, THE INDEX 30 DEGREES TO THE LEFT IS USED ONLY WHEN CHANGING THE COMBINATION. THE DIAL SHOULD ALWAYS BE TURNED SLOWLY AND EVENLY. A REVOLUTION IS COUNTED EACH TIME THE SELECTED NUMBER IS ALIGNED WITH THE OPENING INDEX. DO NOT TURN THE DIAL BACK TO COMPENSATE FOR OVER-DIALING A NUMBER. IF, WHEN DIALING THE COMBINATION, ANY NUMBER IS TURNED BEYOND THE INDEX, THE ENTIRE SEQUENCE MUST BE REPEATED. UNLOCKING 3-NUMBER COMBINATIONS (FOR EXAMPLE, ) SEE USER MANUAL FOR DEFAULT COMBINATION. 1. TURN THE DIAL TO THE LEFT AT LEAST FOUR (4) COMPLETE TURNS TO CLEAR THE COMBINATION LOCK TO ACCEPT THE COMBINATION. 2. USING THE OPENING INDEX, TURN THE DIAL TO THE LEFT, STOPPING WHEN 25 IS ALIGNED WITH THE OPENING INDEX, THE FOURTH TIME. 3. TURN THE DIAL TO THE RIGHT, STOPPING WHEN 10 IS ALIGNED WITH THE OPENING INDEX, THE THIRD TIME. 4. TURN THE DIAL TO THE LEFT, STOPPING WHEN 25 IS ALIGNED WITH THE OPENING INDEX, THE SECOND TIME. 5. TURN THE DIAL SLOWLY TO THE RIGHT UNTIL THE BOLT RETRACTS. OPERATING THE ELECTRONIC LOCK THE ELECTRONIC LOCK COMBINATION CONSISTS OF SIX DIGITS. UPON ARRIVAL, THE COMBINATION OF THE LOCK SHOULD ALREADY BE PRESET TO NOTE: CHANGE THIS COMBINATION! SEE USER MANUAL FOR COMBINATION CHANGE PROCEDURES. ENTERING THE COMBINATION 1. ENTER THE CURRENT COMBINATION AND CHECK FOR PROPER OPERATION. AFTER EACH KEYPRESS, THE LOCK WILL BEEP. AFTER THE FINAL DIGIT HAS BEEN ENTERED, THE LOCK WILL BEEP TWICE, AND THE OPEN PERIOD WILL BEGIN. 2. WHEN A VALID COMBINATION HAS BEEN ENTERED, THE OPERATOR WILL HAVE APPROXIMATELY 4 SECONDS TO OPEN THE LOCK. 3. TO OPEN THE LOCK, TURN THE OUTER DIAL CLOCKWISE. 4. AFTER THE LOCK IS OPENED, THE CABINET DOOR MAY BE OPENED. LOCKOUT FEATURE THE LOCK INCLUDES A WRONG TRY PENALTY LOCKOUT FEATURE THAT PREVENTS ENTRY FROM UNAUTHORIZED PERSONNEL. THIS FEATURE PERFORMS AS FOLLOWS: - LED FLASHES RED AT TEN (10) SECOND INTERVALS. 5-MINUTE DELAY. 7
TDM To MiniMech conversion ProceDure
 TDM To MiniMech conversion ProceDure (Model 9100 ATM) TDN 07102-00079 Apr 1 2009 CorporATe HeAdquArTers: 522 E. Railroad Street Long Beach, MS 39560 PHONE: (228) 868-1317 FAX: (228) 868-0437 COPYRIGHT
TDM-100/150 TO NMD-50 CONVERSION PROCEDURES RL5000
 TDM-00/50 TO NMD-50 CONVERSION PROCEDURES RL5000 TDN 0702-00062 March 7, 204 Corporate Headquarters 2405 B Street Long Beach, MS. 39560 Phone: (800) 259-6672 Fax: (228) 868-9445 COPYRIGHT NOTICE 204 Triton.
ECASH 2000 MERCHANT OPERATIONS MANUAL
 ATM ID No. ECASH 2000 MERCHANT OPERATIONS MANUAL Version 1.1 Last Modification Date 23 Aug 2002 1 INTRODUCTION...3 1.1 About the ecash 2000...4 1.2 Features...4 1.3 Dimensions...5 1.4 Operating Environment...6
Lock-Duo Redundant Lock & Keypad
 Lock-Duo Redundant Lock & Keypad USER INSTRUCTIONS ATTENTION: For instructions on changing the lock code, please see page 3. The mounting of your particular Lock-Duo may have a different orientation, or
Peel/Rewind Upgrade Kit
 Peel/Rewind Upgrade Kit Installation Instructions This kit includes the parts and documentation necessary to install the Peel/Rewind upgrade kit on the following printers: ZM400 ZM600 Read these instructions
INSTALLATION INSTRUCTIONS
 INSTALLATION INSTRUCTIONS 19 20 21 01 07 22 23 13 10 12 08 17 18 11 02 14 15 04 03 16 WELCOME PARTS LIST Thank you for purchasing this HealthPoint Technology Cabinet from Humanscale! Before you begin installing
User Guide/Operations
 VersaSafe User Guide/Operations TDN 07103-00336 June 8, 2011 Corporate Headquarters: 21405 B Street Long Beach, MS. 39560 PHONE: (800) 259-6672 FAX: (228) 868-9445 2012 Triton. All Rights Reserved. TRITON
CASH DISPENSING UNIT (MODEL: GLOBAL BILL MODULE, GBM) OPERATOR MANUAL
 OPERATOR MANUAL") CASH DISPENSING UNIT (MODEL: GLOBAL BILL MODULE, GBM) OPERATOR MANUAL Jun. 2002. Taenam Information and Communication Co.Ltd., R&D Laboratory Checked 05-07-19 1 Document History NO History Date Writer
CASH DISPENSING UNIT (MODEL: GLOBAL BILL MODULE, GBM) OPERATOR MANUAL Jun. 2002. Taenam Information and Communication Co.Ltd., R&D Laboratory Checked 05-07-19 1 Document History NO History Date Writer
Prepare the Media for Loading
 39 You can use roll media or fanfold media in your printer. Roll media hangs on and is loaded from the media supply hanger. Fanfold media is stored away from or in the bottom of the printer and can drape
Product Parts Front view... 2 Rear view... 2 Inside the product... 3 Scanner parts... 3 Control panel... 4
 Table of Contents Product Parts Front view................................................................. 2 Rear view.................................................................. 2 Inside the product...........................................................
1-1 Specifications How to open the Electronic lock How To Switch On and Off How To Insert and remove Flash Card...
 1 Contents Section 1 Introduction 1-1 Specifications............. 2 Section 2 Operating Instructions 2-1 How to open the Electronic lock........ 4 2-2 How To Switch On and Off..... 5 2-3 How To Insert
Quick Start Guide. LabelWriter
 Quick Start Guide LabelWriter 450 Duo Copyright 2010 Sanford, L.P. All rights reserved. Revised 12/10. No part of this document or the software may be reproduced or transmitted in any form or by any means,
Peel & Present Option Rev.C
 Peel & Present Option 92-2479-01 Rev.C Contents of the Peel & Present Kit This kit contains the following items: Peel and Present Mechanism Assist Roller Bushing Follow the steps below to install these
Operating Instructions
 The S&G 2740B Model Electromechanical Safe Lock combines and simplifies the familiar operation of a mechanical lock with the advanced security features of a sophisticated electronic device. Follow these
Load the Media. To load media, complete these steps: Use the instructions in this section for loading roll or fanfold media in any print mode.
 60 Printer Setup Use the instructions in this section for loading roll or fanfold media in any print mode. Caution While performing any tasks near an open printhead, remove all rings, watches, hanging
39E Electronic Combination Lock SETUP INSTRUCTIONS
 The ComboGard Pro Lock has three states of operation: Factory Default, Manual Setup, and Active. ComboGard Pro locks are shipped from LA GARD in Factory Default state without Users or features enabled.
Toll Free: Main Office: 24/7 Technical Support: Fax: WRG Apollo Manual
 www.atmofamerica.com Toll Free: Main Office: 24/7 Technical Support: Fax: (866) 5ATM-INC (248) 932-5400 (866) 638-5918 (248) 932-5404 WRG Apollo Manual TABLE OF CONTENTS Manufacturer 1 Warranty Information
Troubleshooting: Installation 10. Troubleshooting: Door Jamming and Door Handing 11. Troubleshooting: Touchscreen 14. Troubleshooting: Battery 15
 Programming and Troubleshooting Guide 1 2 3 4 5 6 Mastercode 2 Troubleshooting: Installation 10 Troubleshooting: Door Jamming and Door Handing 11 Troubleshooting: Touchscreen 14 Troubleshooting: Battery
Setup Instructions. LA GARD ComboGard Pro 39E Electronic Lock
 Setup Instructions LA GARD ComboGard Pro 39E Electronic Lock P/N 731.018 Rev I - 05/2018 ComboGard Pro locks can either be configured using the ComboGard Pro Setup software or through a series of keypad
KEYPAD ONLY SETUP INSTRUCTIONS
 COMBOGARDPRO 39E Electronic Combination Lock KEYPAD ONLY SETUP INSTRUCTIONS ComboGard Pro locks can either be configured using the ComboGard Pro Setup software or through a series of keypad commands. This
Money Order Terminal User Guide for VeriFone Vx570
 Money Order Terminal User Guide for VeriFone Vx570 5/2013 Equipment Contents...3 Chapter 1 - VeriFone Terminal Front Panel Features...4 Figure 1 VeriFone Terminal Front Panel Features... 4 Chapter 2 -
Wall-Mounted Laptop Cabinet NOR-HNA1000-SO
 Wall-Mounted Laptop Cabinet NOR-HNA1000-SO Safety Instructions CAUTION: Install the cabinet in a location where it will not get wet or damaged. Do not use this cabinet in a high-humidity location. Humidity
Keypad Lock. Operation and Service Manual. Order parts online
 Keypad Lock Order parts online www.follettice.com Operation and Service Manual 801 Church Lane Easton, PA 18040, USA Toll free (800) 523-9361 (610) 252-7301 Fax (610) 250-0696 www.follettice.com 00163345R00
AMERICAN CHANGER CORP.
 AMERICAN CHANGER CORP. 1400 NW 65 TH PLACE Sales: (800) 741-9840 FORT LAUDERDALE, FL 33309 Parts & Service: (888) 741-9840 www.americanchanger.com Fax: (954) 917-5204 AC7076 & AC7076.1 AUDIT PRINTER USER
Users Manual. Operating and Installation Instructions Buffalo River Black Dimaond. Model:ECSL-0601A Electronic Combination Controller
 Users Manual Operating and Installation Instructions Buffalo River Black Dimaond Model:ECSL-0601A Electronic Combination Controller b. If no user code exists, push button 1, One Beep sounds, which prompts
1500SE UPGRADE DOCUMENT
 1500SE UPGRADE DOCUMENT Version 1.03 September 4, 2014 2014 Nautilus Hyosung, Inc. All Rights Reserved. Table of Contents Overview... 1 Installation Procedures... 1 1. Unlock and Open the Front Panel...
TT1220 Printed Quick Reference on Guide. S4M Quick Reference Guide. External View
 9//05 9L-00 Rev. A TT0 Quick Reference Guide S4M Quick Reference Guide External View Use this guide to operate your printer on a daily basis. For more detailed information, refer to the TT0 User Guide
OPERATING INSTRUCTIONS AUDITCON LOCK 100, 200, 400, 500 SERIES
 OPERATING INSTRUCTIONS AUDITCON LOCK 100, 200, 400, 500 SERIES Trademarks The following items are trademarks or registered trademarks of Kaba Mas in the United States and/or other countries: Auditcon PowerSaver
OPERATING INSTRUCTIONS
 OPERATING INSTRUCTIONS X-08 TM /CEX-08 TM Type 1F HIGH SECURITY ELECTRONIC LOCK Please read all instructions carefully before putting your X-08/CEX-08 into operation. 1 Table of Contents INTRODUCTION...
QL-1110NWB. Applications for Use with Computers. Applications for Use with Mobile Devices. Quick Setup Guide (English) NOTE
 NOTE") D00ZC6001 QL-1110NWB Quick Setup Guide (English) Thank you for purchasing the QL-1110NWB Label Printer! Read the Product Safety Guide first, then read this Quick Setup Guide for the correct setup procedure.
D00ZC6001 QL-1110NWB Quick Setup Guide (English) Thank you for purchasing the QL-1110NWB Label Printer! Read the Product Safety Guide first, then read this Quick Setup Guide for the correct setup procedure.
TACC Parts List Description
 644-0037-003S AC ADAPTER, THERMAL PRINTER 83.49 FOR CII & IV WITH THERMAL PRINTER ONLY. Does not include power cord. 00050103S ANCHOR KIT 25.71 Includes 4 anchors, bolts and washers. Requires 5/8" masonry
Hantle Inc. Hantle 1700 Operator Manual
 Hantle Inc. Hantle 1700 Table of Contents TABLE OF CONTENTS 1. INTRODUCTION 1.1 Features 1.1.1 About the Hantle 1700 1.2 Specifications Hantle 1700 Specifications 1.2.1 Dimensions and Component Locations
X-SCALE TO X2 CONVERSION
 X-SCALE TO X2 CONVERSION FIELD UPGRADE PROCEDURES (MODELS RL/FT5000/RT2000) TDN 0700-0008-0 July 24, 202 CORPORATE HEADQUARTERS: 2405 B Street Long Beach, MS 39560 Phone: (800) 259-6672 Fax: (228) 868-9445
AUDITGARD. LGA Electronic Combination Locks. manager instructions PROGRAMMABLE LOCK FEATURES STANDARD LOCK FEATURES
 AUDITGARD LGA Electronic Combination Locks manager instructions LOCKS ENTRY DEVICE OPTIONS Dual-Handed Swing Bolt Dead Bolt 3750-K Round Entry 3125 Round Entry 8130 (Optional) 3190 Privat II (Optional)
Zebra XiII-Series Printer Quick Reference Guide
 Zebra XiII-Series Printer Quick Reference Guide Contents Media and Ribbon Loading...67 Media Loading...67 Ribbon Loading...70 Operator Controls...72 Front Panel Keys...72 Front Panel Lights...72 Calibration...74
Quick Installation Guide
 Quick Installation Guide 16-Channel DVR Networkable with 120/160GB Hard Drive and 4/8/16 Cameras DGR116888-S DGR116882-S DGR116841-S The following steps will assist you in setting up your DVR, Cameras,
NH-1500 OPERATOR MANUAL
 OPERATOR MANUAL Copyrightc Nautilus Hyosung Inc. 2004 All right reserved Table of Contents Revision Record Date Page Version Description of Change April 2004 All 1.0 New Publication Jan 2007 All 1.1 All
MX-8000 User Manual MX Rev
 MX-8000 Rev. 070202 Greeting Thank you for purchasing PAITEC USA products. This manual is prepared to provide guidelines on how to properly operate and maintain MX-8000. Copyright Any of the contents should
Money Order Training Guide for VeriFone Vx570
 Money Order Training Guide for VeriFone Vx570 1/2012 Package Contents and Unpacking... 2 Chapter 1- Terminal Front Panel Features... 3 Chapter 2- Connecting the Document Printer and Terminal... 4 Chapter
eforce 150 Keyless Entry Owner s manual & User s guide For Model 3090
 eforce 150 Keyless Entry Owner s manual & User s guide For Model 3090 This manual contains important operation, maintenance & warranty information. Save this manual for future reference TABLE OF CONTENTS
Toll Free: Main Office: 24/7 Technical Support: Fax: WRG Genesis Manual
 www.atmofamerica.com Toll Free: Main Office: 24/7 Technical Support: Fax: (866) 5ATM-INC (248) 932-5400 (866) 638-5918 (248) 932-5404 WRG Genesis Manual TABLE OF CONTENTS Manufacturer 1 Warranty Information
Nikon D610 Flash Capacitor Replacement
 Nikon D610 Flash Capacitor Replacement This guide will help to show you how to replace the D610's Flash Capacitor. Written By: Daniel Eagan ifixit CC BY-NC-SA www.ifixit.com Page 1 of 10 INTRODUCTION In
AMERICAN CHANGER & HOFFMAN MINT. We Are Changing the Industry
 AMERICAN CHANGER & HOFFMAN MINT We Are Changing the Industry 1400 N. W. 65 th Place, Fort Lauderdale, Florida 33309 T: (+1) 954-917-3009 F: (+1) 954-917-3079 www.americanchanger.com www.hoffmanmint.com
MVPplus Quick Reference Guide
 MVPplus Quick Reference Guide Use this guide to operate your printer on a daily basis. For more detailed information, refer to the User Guide. Contents External View...........................................................
ATTENTION! IMPORTANT UPDATE!
 ATTENTION! This Honeywell Executive Safe includes a new Dual User Code Digital Lock. This update replaces the User Code Programming Instructions located on Page 3 of the Owner s Manual for Executive Safe
Keypad Programming Instructions For the Access 800 Series Locks
 FM226 3/05 (617417440) Keypad Programming Instructions For the Access 800 Series Locks 1 2 3 4 5 6 7 8 9 * 0 # 1 2 3 4 5 6 7 8 9 * 0 # CYLINDRICAL 1 2 3 4 5 6 7 8 9 * 0 # EXIT MORTISE For programming assistance,
Use the instructions in this section for loading roll or fanfold media in any print mode.
 34 Printer Setup and Operation Use the instructions in this section for loading roll or fanfold media in any print mode. Caution While performing any tasks near an open printhead, remove all rings, watches,
Fuser Assembly Removal
 Fuser Assembly Removal Figure 6-20 C a u t i o n Fuser Assembly Screws The Fuser Assembly may be hot. Allow plenty of time for the fuser to cool before beginning the fuser removal procedure. 1 Open the
TURN-O-MATIC INSTALLATION GUIDE
 TURN-O-MATIC INSTALLATION GUIDE WIRELESS SYSTEM WIRELESS SYSTEM (1) Dispenser (1) Dispenser Mounting Bracket (3) Large Slotted Screw (2) Large Slotted Bolt (2) Nut (1) Display Wall Mount Bracket (1) Wireless
Operating Instructions
 Operating Instructions S&G Model 2740 Electromechanical Safe Lock The S&G 2740 Model Electromechanical Safe Lock combines the familiar operation of a mechanical lock with the advanced security features
Floor Standing Pedestal
 2336 K052 Floor Standing Pedestal Kit Instructions Issue C Revision Record Issue Date Remarks A Feb 20021 First issue B June 2007 Added pedestal floor bolting procedure C Mar 2011 Added Universal Mounting
Xi4 Quick Reference Guide
 Xi4 Quick Reference Guide Use this guide to operate your printer on a daily basis. For more detailed information, refer to the User Guide. Printer Components Figure shows the components inside the media
TABLE OF CONTENTS. 2. INSTALLATION 2.1 Tranax 1700w Installation Unpacking Physical Installation Hardware Setup
 Table of Contents TABLE OF CONTENTS 1. INTRODUCTION 1.1 Features 1.1.1 About the Tranax 1700w 1.2 Specifications Tranax 1700w Specifications 1.2.1 Dimensions and Component Locations 1.2.2 LCD & Customer
MONARCH 9416 XL QUICK REFERENCE
 MONARCH 9416 XL QUICK REFERENCE This Quick Reference contains ribbon loading, supply loading, and general care, maintenance, and troubleshooting procedures for the 9416 XL Thermal Direct and 9416 XL Thermal
NKL CX Series. Customer Manual. Version /23/2012 P/N
 NKL CX Series Customer Manual Version 1.1 02/23/2012 P/N 15239005 Table of Contents Introduction... 3 Technical Support... 3 Screen Types... 4 Standard Keypad Display... 4 Touch Screen Display... 5 CX
Using your Spire Terminal
 A NetPay Guide to... Using your Spire Terminal Models: SPc50 / SPw60 / SPw70 / SPp10 / SPc5 / SPg7 intelligent payments www.netpay.co.uk www.netpay.ie A guide to using your Spire terminal This booklet
Use the instructions in this section for loading roll or fanfold media in the appropriate print mode for your needs.
 32 Load the Media Load the Media Use the instructions in this section for loading roll or fanfold media in the appropriate print mode for your needs. Caution While performing any tasks near an open printhead,
ColorMaxLP Label Roll Rewinder
 ColorMaxLP Label Roll Rewinder 5/2017 INSTALLATION/OPERATOR MANUAL Included: Rewinder Base plate Power supply Power Cord Thumb screws Assembly instructions 1. Install base plate Lift front of printer and
LC SERIES OPERATING INSTRUCTIONS MODELS LCLX, LCMX, TLCL, TLCM
 LC SERIES MODELS LCLX, LCMX, TLCL, TLCM OPERATING INSTRUCTIONS The following instructions cover lock operations for LC Series locks. The lock models are battery powered (PowerSaver TM technology). See
CHECK LIST 2 QUICK START 3 SAFE OPERATION & PROGRAMMING 3 HOW TO OPEN YOUR SAFE 3 CHANGING THE USER CODE 3 LOW BATTERY WARNING 4
 CATEGORY PAGE CHECK LIST 2 QUICK START 3 SAFE OPERATION & PROGRAMMING 3 HOW TO OPEN YOUR SAFE 3 CHANGING THE USER CODE 3 LOW BATTERY WARNING 4 CHANGING YOUR BATTERIES 4 OVERRIDE KEY INSTRUCTIONS 5 2015
Controller PC Hard Drive
 Controller PC Hard Drive Remove and Replace Procedure Guide (Models RL/FT5000 XP ) TDN 07103-00194 08/2008 Corporate Headquarters: 522 E. Railroad Street Long Beach, MS 39560 Phone: (228) 868-1317 Fax:
REVISED 5/1/01. AT&T and the globe symbol are registered trademarks of AT&T Corp. licensed to Advanced American Telephones.
 REVISED 5/1/01 1 USER S MANUAL Part 2 1818 Digital Answering System Speakerphone Fold open this manual for information about this product s installation and operation. Please also read Part 1 Important
JCM TRAINING OVERVIEW VEGA Banknote Acceptor
 July, 2013 JCM TRAINING OVERVIEW VEGA Banknote Acceptor Phone # (800) 683-7248 (702) 651-0000 Technical Support # (702) 651-3444 Fax # (702) 651-0214 E-mail techsupport@jcmglobal.com Web Address http://www.jcmglobal.com
SOLAR Basic. Operating instructions for electronic high-security locks
 SOLAR Basic Operating instructions for electronic high-security locks Gebäude Sicherheitstechnik Vertriebs GmbH, 34123 Kassel Solar-Basic (DE, EN, FR)-17000000 Rev. 1.3 / 01-2015 Table of contents General
S H O P P R I N T E R S
 SHOP PRINTERS Shop Printers CONFIDENTIAL 2013 Flame Technologies, Inc. All rights reserved. Updated 04/22/14. 38 CONTENTS Identifying Printer Models... 40 HP Business Inkjet 1200 (ship labels - color)....
Living. Keyfree Connected Smart Lock Manual. smart. The smarter way to protect your home
 smart Living Keyfree Connected Smart Lock Manual Please read the intructions before fitting and using the Keyfree Connected lock. The functions and design of this product can be changed without prior notice
Hongda USA Inc. Preface
 Preface Thank you for purchasing HONGDA Shepherd 240 Biometric Fingerprint Lock. Please read this User Manual carefully before unpacking. Store this User Manual for future reference (Do not discard). Keep
FRESHMARX 9417 QUICK REFERENCE
 FRESHMARX 9417 QUICK REFERENCE For more detailed information, refer to the Operator s Handbook available on our Web site (www.monarch.com). Review the printer safety information in the Safety Sheet provided
Loading paper and specialty media Learning about the printer. Stop all printer activity. 7 Back button Return to the previous screen.
 Quick Reference Use the 6 Stop or Cancel button To Stop all printer activity. Loading paper and specialty media Learning about the printer Using the printer control panel 0 Use the 9 To Display View the
OPERATING INSTRUCTIONS
 AUDITCON 2 SEIES MODELS 252 & 552 OPEATING INSTUCTIONS Lock Modes A lock is shipped from the factory with default lock setup values and a pre-set PIN for unlocking the lock. This is referred to as Factory
NVR Spare Hard Drive Replacement
 NVR Spare Hard Drive Replacement Quick Start Guide This document describes the spare hard drive replacement process for Avigilon network video recorders (NVRs). To replace the hard drive: 1. Determine
NH-2700 (Front Load) Operator Manual
 Operator Manual") (Front Load) Operator Manual Copyrightc 2010 Nautilus Hyosung Inc. All right reserved Revision Record Date Page Version Description of Change March 2010 All 1.0 New Publication April 2010 All 1.1 May 2010
(Front Load) Operator Manual Copyrightc 2010 Nautilus Hyosung Inc. All right reserved Revision Record Date Page Version Description of Change March 2010 All 1.0 New Publication April 2010 All 1.1 May 2010
Owner s manual. Hyosung 2700CE. ATM Network service department
 Owner s manual Hyosung 2700CE ATM Network service department 1-800-929-0228 www.atmnetwork.net Revision Record Date Page Version Description of Change March 2010 All 1.0 New Publication April 2010 All
SAFE - QUICK - STRONG - SMART
 SAFE - QUICK - STRONG - SMART TacVault TV 4810 TacVault TVB 4810 OWNER S MANUAL SERIAL NO.. Attach Receipt Here P a g e 1 DO NOT LOCK THE MANUAL IN YOUR SAFE IMPORTANT: FILL OUT THE INFORMATION BELOW AND
XEA207 Frequently asked questions.
 XEA207 Frequently asked questions. How do I prepare my XEA207 for set-up? Take the XEA207 out of its box, remove the packing materials. Place the XEA207 on a flat stable surface, close to a power outlet.
E2460GS Oscilloscope Upgrade Kit
 Installation Instructions for E2460GS Oscilloscope Upgrade Kit Agilent 1670G-Series Logic Analyzers This kit upgrades either the Agilent Technologies 1670G, Agilent 1671G, Agilent 1672G, or the Agilent
Clearing paper jams. Identifying paper jam areas. Printing. Using color. Paper handling. Maintenance. Troubleshooting. Administration.
 By carefully selecting print media and loading them properly, you should be able to avoid most paper jams. If jams do occur, follow the steps outlined in this section. 1 To resolve the paper jam messages,
Xerox 8264E Color Wide Format Printer 100kg Unwinder / Winder
 November 2009 70P3070 Xerox 8264E Color Wide Format Printer 00kg Unwinder / Winder 2009 Xerox Corporation. All rights reserved. Xerox, the sphere of connectivity design, and Xerox 8264E Color Wide Format
Ultraloq UL3 Series Fingerprint and Touchscreen Smart Lock
 Ultraloq UL3 Series Fingerprint and Touchscreen Smart Lock Installation Instructions ( V1.4 ) Welcome Installation Video Please watch our easy step by step installation video before attempting to install
Installers & User guide Smart Mortise.
 Installers & User guide Smart Mortise. Version 0.2 05/18 IGM1 As our igloohome app is frequently updated, there may be changes to this manual. Please refer to our website igloohome.co/support for the latest
Datacard CR500 Instant Issuance System. User Reference Guide. July Rev B
 Datacard CR500 Instant Issuance System User Reference Guide July 2015 527495-001 Rev B Datacard CR500 User Reference Guide The CR500 Instant Issuance System Contents The CR500 Instant Issuance System The
Serial No. OWNER S MANUAL. Installation & Operation
 Serial No. OWNER S MANUAL Installation & Operation Table of Contents Safety & Warranty Warnings 01 Parts List 02 GhostBed Electronics Quick Reference Guide... 03 Installation Guide 04 GhostBed Remote Control
Fuser. Figure Remove the fuser assembly (1 of 2) 184 Chapter 5 Removal and replacement ENWW
 184 Chapter 5 Removal and replacement ENWW") Fuser 1. Remove the following assemblies. Scanner assembly. For the HP LaserJet 3015, see Scanner assembly. For the LaserJet 3020 and 3030, see Scanner assembly. Left cover. See Printer side covers. Rear
Fuser 1. Remove the following assemblies. Scanner assembly. For the HP LaserJet 3015, see Scanner assembly. For the LaserJet 3020 and 3030, see Scanner assembly. Left cover. See Printer side covers. Rear
Product Guide. Key Button. Pull Handle
 Aspire locks with a keypad interface are operated by a 4-7 digit User Code or by an ADA compliant User Key. Manager Keys provide management access and external power. Programming is accomplished via a
Product Guide. Key Button. Pull Handle
 Aspire locks with a keypad interface are operated by a 4-7 digit User Code or by an ADA compliant User Key. Manager Keys provide management access and external power. Programming is accomplished via a
XS US Software Release Notes
 Triton Systems of Delaware, LLC XS 3.1.0 US Software Release Notes Affected products RL1600, RL2000, RL5000, FT5000, RT2000 June 6, 2012 Version 1.4 Triton Systems of Delaware, LLC 21405 B Street Long
INSTALLATION MANUAL KIOSK SX6 SF6
 INSTALLATION MANUAL KIOSK SX6 SF6 Boink Systems Inc SX6 Installation Manual 1 REVISION RECORDS DATE DESCRIPTION OF CHANGE APPROVED Oct-12-2003 First draft specifications L.P. Nov-18-2003 Change to SX6
2007 Sanford, L.P. All rights reserved. DYMO and LabelWriter are registered trademarks of Sanford, L.P. All other trademarks are the property of
 Quick Start Guide 2007 Sanford, L.P. All rights reserved. DYMO and LabelWriter are registered trademarks of Sanford, L.P. All other trademarks are the property of their respective holders. Switching Adapter
Congratulations on the purchase of your new Clover Mobile
 Congratulations on the purchase of your new Clover Mobile Set Up the Hardware What s included Optional Accessories USB wall charger USB cable Clover Mobile Dock Clover Mobile Printer Clover Mobile Clover
Codonics Horizon User s Manual
 Codonics Horizon User s Manual GS/G2/G1 Addendum Codonics Horizon User s Manual Addendum Summary The latest versions of Horizon GS/G2/G1 Imager utilize hardware and software that is not compatible with
Quick Installation Guide Direct and Transfer Thermal Printer
 Quick Installation Guide Direct and Transfer Thermal Printer Overview The enclosed printer is currently comprised of two models: 203dpi (dots per inch) model 300dpi (dots per inch) model Unpacking 1. Remove
200 lb (90.7 kg) 2 People Required. 250 lb (113.4 kg)
 2 People Required. 250 lb (113.4 kg)") Weight Capacity 200 lb (90.7 kg) 2 People Required Weight Capacity 250 lb (113.4 kg) 2 People Required x2 x4 x4 For patent and trademark information, visit VARIDESK.com/patents 2018 VARIDESK. All Rights
Weight Capacity 200 lb (90.7 kg) 2 People Required Weight Capacity 250 lb (113.4 kg) 2 People Required x2 x4 x4 For patent and trademark information, visit VARIDESK.com/patents 2018 VARIDESK. All Rights
Cause and Description
 2 0 0 0 1 2 0 0 0 2 2 0 0 0 3 2 0 0 0 4 2 0 0 1 0 The Cash Dispenser Unit cassette is not installed. The Control Electronics checks if the Cash Dispenser Unit cassette is in the right position with the
FORTE. User Instructions. Be Intelligent. Be Safe. (Hotel Mode) Note: Home users may switch to home mode as per instructions given on page no.
 Note: Home users may switch to home mode as per instructions given on page no.") FORTE (Hotel Mode) User Instructions Note: Home users may switch to home mode as per instructions given on page no. 5 Be Intelligent. Be Safe. FORTE SAFE Attractive design, suitable for use in hotels,
FORTE (Hotel Mode) User Instructions Note: Home users may switch to home mode as per instructions given on page no. 5 Be Intelligent. Be Safe. FORTE SAFE Attractive design, suitable for use in hotels,
XEA217 Frequently asked questions.
 XEA217 Frequently asked questions. How do I prepare my XEA217 for set-up? Take the XEA217 out of its box, remove the packing materials. Place the XEA217 on a flat stable surface, close to a power outlet.
QC-7600A. Instruction Manual. Anztec, P.O. Box 3288, Christchurch, New Zealand Phone ,
 QC-7600A Instruction Manual Anztec, P.O. Box 3288, Christchurch, New Zealand Phone +64 3 338 3139, www.anztec.com email:sales@anztec.com Serial # Key # Software Ver. QC-7600A Rev 1.2 Page 2 Contents Warning...6
QUICK START GUIDE. Android or Windows Tablet. 1 Tower PC. Mount the RazorGage to your Own Table. Assembling the RazorGage ST with RazorGage Table
 QUICK START GUIDE Android or Windows Tablet If you have a Tablet Style Interface (PC or Android) then skip this step. 1 Mount monitor and attach legs to control tower using hardware provided and place
DIGITAL Server Rackmount Installation Guide
 DIGITAL Server Rackmount Installation Guide Part Number: ER-PCSRA-IA. E01 Digital Equipment Corporation December 1997 The information in this document is subject to change without notice and should not
T9 EPP KEYPAD FIELD UPGRADE
 T9 EPP KEYPAD FIELD UPGRADE TDN 07103-00237 July 1, 2014 Corporate Headquarters 21405 B Street Long Beach, MS 39560 Phone: (800) 259-6672 Fax: (228) 868-9445 COPYRIGHT NOTICE 2014 Triton. All Rights Reserved.
CARK 11 Bluetooth Receiver User s Manual
 CARK 11 Bluetooth Receiver User s Manual Preface This publication, including all photographs, illustrations and software, is protected under international copyright laws, with all rights reserved. Neither