Now IMP Server v1.10. Table of Contents
|
|
|
- Joan Shaw
- 6 years ago
- Views:
Transcription
1 Now IMP Server v1.10 October 14, 2005 Copyright 2005, Now Wireless Ltd. Table of Contents Now IMP Server... 2 System Requirements... 3 Basic Configuration... 4 Basic Configuration Step 1: Define the Server's TCP/IP Ports... 5 Basic Configuration Step 2: Start the Now IMP Server...7 Basic Configuration Step 3: Define User Accounts... 8 Basic Configuration Step 4a: Connect with a Mobile IM Client Configuring (Most) SonyEricsson Phones Configuring (Most) Nokia Series 60 Phones Configuring (Most) Nokia Series 40 Phones Configuring (Most) Motorola Phones (V80) Basic Configuration Step 4b: Connect with a Desktop IM Client Advanced Configuration Service Page Server Page Options Page Push Page WAP Push over UDP CIR TCP Push Channel (STCP) WAP Push over SMS SMTP Page Users Page SSL/TLS Page Serial # Page User Account Provisioning via HTTP Automated Agents OTA Provisioning for IMPS OTA Provisioning for IMPS: SonyEricsson OTA Provisioning for IMPS: Nokia (and other OMA Compliant Devices)...49 Self-User Provisioning via the Web External Transports (AOL, MSN, etc.) MSN Transport AIM Transport Now IMP Client Getting Started with the Now IMP Client Adding a Contact To be continued
2 Now IMP Server The Now IMP Server is an Instant Messaging and Presence Server that supports both mobile phones and PC desktop clients. Users can communicate with each other using instant messaging technology whether they are connected on the same Local Area Network, or connected through mobile wireless technology. Mobile phone clients are supported through the Now IMP Server's implementation of the Open Mobile Alliance (Wireless Village) Instant Messaging and Presence Services (IMPS) specification. The current release of Now IMP supports the Client Server Protocol (CSP) version 1.1 or 1.2, with support for both text and binary (WBXML) protocol variants. As a published standard of the Open Mobile Alliance, many of the new mobile phone models from major manufacturers include an instant messaging and presence client that supports this specification. PC desktop clients are supported through the Now IMP Server's implementation of the XMPP (Extensible Messaging and Presence Protocol). A Windows based desktop client supporting XMPP is bundled with the Now IMP Server to enable instant communications. XMPP is an internet standard, published by the Internet Engineering Task Force (IETF) in RFC 3920 and RFC The Now IMP Server supports the Presence, Instant Messaging (IM) and Group features of both the IMPS and XMPP specifications, in addition to the fundamental, common and core features of those specifications. External connectivity is supported with a built-in gateway, allowing IM users to send messages to recipients, and allowing users to send messages to IM recipients. connectivity provides a simple built-in API for alert management, allowing automated applications to interface with the Instant Messaging network. It is also possible to use the Now IMP Server to allow mobile IM clients to connect to MSN and/or AOL instant messaging networks, via add-on XMPP transport connectors. The Now IMP Server allow organisations of any size to deploy their own private instant messaging network, with SSL/TLS encryption, to enable individuals to interact with each other across the office or around the world with secure instant messaging technology. The alert management interface allows corporate applications to quickly disseminate time critical information to employees. The Now IMP Server provides a web-based administrative interface for user account maintenance. The administrative interface also supports a programmatic HTTP interface for user account definition. 2
3 System Requirements The Now IMP Server runs on Windows 2000, Windows XP or Windows Memory requirements are minimal, and we recommend that you follow the suggested memory guidelines for the version of Windows that you are running. Now IMP will consume approximately 4MB of memory plus 16KB per active user session. Disk space requirements are not a significant consideration for Now IMP. Each defined user account will consume approximately 16KB worth of disk space. Allow sufficient disk space to facilitate log files. Running the Now IMP Server requires a dedicated IP address, or at minimum an always connected IP address with a dedicated host name (i.e., dynamic DNS should be used if you a dedicated IP address is not available). Mobile phone IM clients will need to be able to make HTTP connections to the Now IMP Server. The port number for these connections is user configurable. However, there must be a path to allow mobile phones to make HTTP connections to the configured port on the Now IMP Server. Desktop IM clients will need to be able to make a TCP/IP connection to the Now IMP Server. The port number for these connections is user configurable, however by default IM clients will expect to connect to the server over TCP/IP port The Now IMP Client runs on Windows 98, Windows ME, Windows 2000, Windows XP or Windows It requires Internet Explorer v5.5 or later, 5MB of hard disk space, and 64MB of RAM. 3
4 Basic Configuration To install the Now IMP Server, run the IMPServer.exe program from the distribution media (CD or web download). After installing the Now IMP Server software, run the Now IMP Server configuration utility to configure the software. For a basic configuration, you will need to perform the following steps: 1.) Define the TCP/IP port number(s) on which the Now IMP server will listen for connections from IM clients. 2.) Start the Now IMP Server, and optionally configure the server to automatically startup as a Windows service. 3.) Define user accounts on the Now IMP Server. 4.) Configure IM clients to connect to the Now IMP Server, logging in via defined user accounts. (a)if you have any mobile IM clients, these clients will be configured to connect to the Now IMP Server using the Wireless Village/OMA IMPS Protocols. (b)if you have any desktop IM clients, these clients will be configure to connect to the Now IMP Server using the XMPP Protocol. The Now IMP Server includes licenses to allow user accounts to connect using the Windows based Now IMP Client. 4
5 Basic Configuration Step 1: Define the Server's TCP/IP Ports The TCP/IP port number, on which the Now IMP Server will listen for HTTP connections from mobile IM clients, is configured on the Server page of the configuration dialog, under the setting HTTP Port Number. To enable the XMPP Server interface, you must define the XMPP Domain Name. This is normally the host name on which the Now IMP Server is installed. When connecting to the Now IMP Server, it is customary to login with an XMPP client by specifying a user name of user@xmppdomain.name, where xmppdomain.name is the host name of the Now IMP Server. (The Now IMP Client can be configured to assume a default domain name when it is installed, so that users need only supply their user name to 5
6 login. This is described in Step 4b.) Instead of using a host name, a special DNS SRV record can be used. It is similar in concept to DNS MX records used by servers. For XMPP clients to properly connect to the Now IMP Server using SRV records, the SRV record needs to be defined in the format _xmppclient._tcp.xmppdomain.name with the port set to 5222, and the host name set to the specific A (host address) record for your server. Desktop IM clients will connect to the Now IMP Server using the XMPP Protocol, which by default uses TCP/IP Port It is easy to override this default port assignment if you are using SRV records in DNS. However, in cases where you are connecting to the host by its host name, clients will assume port 5222, and the default XMPP Port Number setting should not be changed. Please note that the SSL port number assignments are not available until an SSL/TLS certificate has been generated. This is an advanced topic that is covered later in this document, and is not necessary for a basic configuration. 6
7 Basic Configuration Step 2: Start the Now IMP Server To start the Now IMP Server, press the Start button on the Service page of the configuration dialog. Or check the Run as a Service option to install the Now IMP Server as a service which will automatically start every time the PC is rebooted. 7
8 Basic Configuration Step 3: Define User Accounts IM User accounts are defined on the Users page of the configuration dialog. To define a new user account, press the Add button. 8

9 The User Name and Password fields are required for a user account definition. The additional user settings are used only as informational settings. These settings are used primarily to facilitate search functionality, allowing a user to locate another user by searching on the supplied settings. For standard user accounts, leave User account is an automated agent unchecked. Automated agents are IM user accounts where an application program is configured to send and receive messages for the account, instead of an actual user. Automated agents are described later in this document on page 42. 9
10 Basic Configuration Step 4a: Connect with a Mobile IM Client The process of configuring a mobile phone IM client to connect to the Now IMP Server will vary by client. In some cases, it may be possible to send an OTA (Over The Air) configuration message to automatically send the settings. The Now SMS/MMS Gateway product supports sending IMPS configuration documents to mobile phones over SMS, however that process is beyond the scope of this document. To configure a mobile phone IM client to connect to the Now IMP Server, you must be familiar with some of the internet and/or WAP configuration settings for the mobile operator to which your phone is subscribed. In most cases, you can duplicate the settings that are used by the Web/WAP Browser on the mobile phone, and simply add the URL for connecting to the Now IMP Server. The configuration settings that you will usually need to know include the APN (Access Point Name) that is used for connecting to GPRS/EDGE/UMTS. You may also need to know the IP address of a WAP proxy/gateway. (Note: For some IM clients, such as those on SonyEricsson phones, it is advantageous to install the Now IMP Server in conjunction with a Now.WAP Proxy Server. In this configuration, the Now IMP Server is able to send WAP push messages through the Now.WAP Proxy to alert the mobile phone IM client to new IM messages without requiring polling. The Now IMP Server also directly supports a separate TCP/IP push channel, which is used by Nokia IM clients. For more information on Push notification support, refer to the Advanced Configuration section of this document.) Finally, you will need to supply the HTTP URL for connecting to the HTTP Port on the Now IMP Server, as well as a valid user name and password for an account on the server. Configuring (Most) SonyEricsson Phones In most SonyEricsson phones, the IM Client configuration can be found under the My Friends application on the mobile phone, under the menu option More/Accounts. The available configuration settings are: Username - This setting should contain the name of the user account defined to the Now IMP Server. Domain - This setting should be left blank. Password - This setting should contain the password of the user account defined on the Now IMP Server. Server - This setting should contain the HTTP URL for connecting to the Now IMP Server. For example, or The :port suffix is required unless the HTTP Port Number for the Now IMP Server is the default HTTP port of 80. Internet Profile - This setting points to an existing internet profile configured on the mobile phone. Use an appropriate profile that will facilitate connectivity to the HTTP URL of the Now IMP Server. 10
11 Auto-Login - Set to Yes if you want the IM Client to automatically startup and connect to the IM Server when the mobile phone is powered on. Allow Connection - This setting allows you to specify whether the IM Client can be used when connected to any network, or if it should only be used when connected to your home network operator. Specify Home Network in most cases to avoid unexpected, and often exorbitant, data roaming charges. Some SonyEricsson phones will have additional settings, such as Check Interval which specifies an interval in seconds for polling the IMP Server. Refer to the documentation for your mobile phone for more information. Configuring (Most) Nokia Series 60 Phones For Nokia Series 60 (Symbian) phones, IM settings can be configured under the Chat or Presence applications. Select Options and then Settings to access the Server Settings configuration for the IM Client. The Server Settings include the following settings: Server Name - This is a descriptive name for the server which is used only within the IM Client for display purposes. Access Point in Use - This specifies the internet access point (settings profile) that should be used for IM client connections. Use an appropriate profile that will facilitate connectivity to the HTTP URL of the Now IMP Server. Web Address - This setting should contain the HTTP URL for connecting to the Now IMP Server. For example, or The :port suffix is required unless the HTTP Port Number for the Now IMP Server is the default HTTP port of 80. User ID - This setting should contain the name of the user account defined to the Now IMP Server. Password - This setting should contain the password of the user account defined on the Now IMP Server. Configuring (Most) Nokia Series 40 Phones For Nokia Series 40 phones, IM settings can be found under by selecting Messages from the main menu. Then select Chat and Connect. Settings. For these devices, it is difficult to select an existing configuration setting that is used by the mobile phone browser, and adapt it for use by the IM Client. You may need to manually copy the settings that are used by the WAP browser on the phone by writing them on paper, and re-entering them into the IM Client settings. When you edit the active chat and presence settings, the following settings are included: Chat and presence service name - This is a descriptive name for the server which is 11
12 used only within the IM Client for display purposes. Homepage - This setting should contain the HTTP URL for connecting to the Now IMP Server. For example, or The :port suffix is required unless the HTTP Port Number for the Now IMP Server is the default HTTP port of 80. User ID - This setting should contain the name of the user account defined to the Now IMP Server. (Note that the phone might automatically add a wv: prefix to the name. This is not a problem, as it is standard syntax for the IMPS protocol.) Password - This setting should contain the password of the user account defined on the Now IMP Server. Connection Settings - This opens another menu to define IP connectivity settings. Settings' name - This is a descriptive name for the settings which is only used within the settings menus. Proxies - This setting specifies whether or not connections will be routed through a proxy. Enable this setting if you will be connecting to the Now IMP Server via a proxy. Primary Proxy and Secondary Proxy refer to the address(es) of the WAP or HTTP proxy server(s) through which you will be connecting. Enter the proxy information if required for your configuration. Data Bearer specifies the data bearer that will be used for the connection (e.g., GPRS, EDGE, UMTS). Bearer Settings - This opens another menu to define settings specific to the selected Data Bearer. Typical settings on the sub menu include an Access Point Name (APN), and settings for a username and password if they are required for connecting to the APN. Configuring (Most) Motorola Phones (V80) The IM Client on the Motorola V80 is not as sophisticated as the clients on the Nokia and SonyEricsson phones. It is definitely a first generation effort and is likely to improve in future phones. One consideration to be aware of with the Motorola V80 is that it uses a text based version of the IM protocol to communicate with the Now IMP Server. This results in considerable overhead, with typical transactions, including polling transactions, transmitting ten times as much data. This phone should definitely only be used as an IM client in environments where you have an unlimited GPRS data subscription plan. The configuration settings for the IM Client can be found under the IM option of the main menu. Select Offline Settings, and ISP Settings to access the configuration settings. GPRS APN - This specifies the Access Point Name (APN) on the GPRS network that should be used for establishing IP connectivity for the IM client. 12
13 User name - This setting should contain the name of the user account defined to the Now IMP Server. Password - This setting should contain the password of the user account defined on the Now IMP Server. IM Server - Unlike other phones, where the IMP Server is specified as an HTTP URL, this setting is split among 3 separate configuration settings on this phone. This setting should contain the IP address or DNS host name of the Now IMP Server. IM Port - This setting should contain the HTTP Port Number of the Now IMP Server. Post URL - This setting is ignored by the Now IMP Server. It is recommended to leave this setting blank, or specify /. Secure Login - This setting specifies whether or not the password for the account is ever transmitted in the clear. Both available settings are supported by the Now IMP Server. 13
14 Basic Configuration Step 4b: Connect with a Desktop IM Client The Now IMP Client for Windows is included with the Now IMP Server. The installation program, IMPClient.exe, is run to install the Now IMP Client on a PC running Windows 98, Windows ME, Windows NT 4.0, Windows 2000, Windows XP, or Windows After installing the Now IMP Client, select its link from the Windows Start menu. A login screen will be displayed: In the Address field, specify username@xmppdomain.name, where username is the user account defined on the Now IMP Server, and xmppdomain.name is the host name of the Now IMP Server (see Step 1). The Password field should contain the password for the user accuont as defined on the Now IMP Server. Check Remember my password if you would like the client to remember your password so that you do not need to enter it every time you login with the Now IMP Client. Check Automatically log in if you would like the client to automatically login to the server every time it is started. Press the Login button to attempt to login with the supplied Address and Password. 14
15 After you have logged in, the main screen for the Now IMP Client will be displayed. The main screen for the Now IMP Client would normally display the status of those individuals who are on your instant messaging contact list. However, since this is the first login, your account will not yet have any instant messaging contacts configured. 15
16 If you are running Windows XP Service Pack 2, the first time that you run the Now IMP Client, the following warning screen might be displayed: This warning is normal. The Now IMP Client uses an internal library which identifies itself as the Instant Messenger for XMPP. If you select Keep Blocking, this will disable the ability to perform file transfers via the IM client. If you select Unblock, this will allow file transfers via the IM client. (Note that file transfers are only available between two computers that are on the same Local Area Network.) Now you will want to configure your instant messaging contacts. Either select the link on the main screen that is labeld Add someone to your contact list, or select Actions/Add a contact from the menu bar. 16
17 Searching for a user via the directory is the default option, so press Next. It is necessary to supply some information to search for a user. Enter this information, and press Search. 17
18 If any search results are returned, highlight that entry and press Next, or simply click on the entry. An authorisation request will be sent to the user, asking if it is permissable for you to add them to your contact list. 18
19 The server will not display presence information for another user unless that user has authorised it. (Note that some mobile IM clients do not accept presence authorisation requests. Instead, affected clients have configuration parameters that specify whether authorisation is granted to anyone who asks, or if it is granted only to those that have been added to the mobile's contact list.) Press Finish to send the authorisation request. Please note that the contact will not appear in your contact list until: They have authorised your presence request, or it is automatically authorised based upon settings defined in the mobile IM client. The user must be on-line. Contacts will not display in your contact list unless they are connected to the IM server. (A user's status can be busy or away, and they will appear in the contact list. However, if they are not connected, they will not appear.) Additional information on using the Now IMP Client can be found elsewhere in this document, beginning on page 65 19
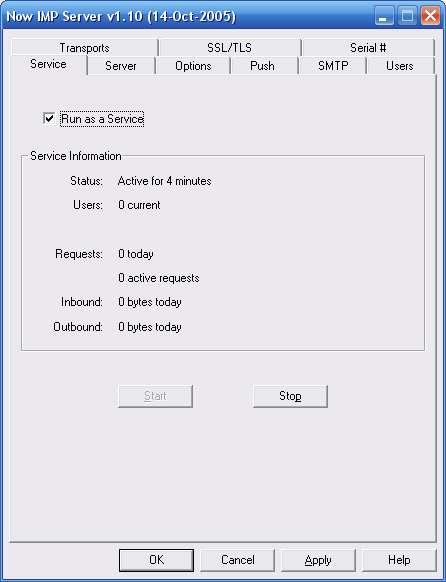
20 Advanced Configuration This section describes the advanced configuration settings available for the Now IMP Server. Service Page This page is used to start and stop the Now IMP Server. It is also used to install Now IMP as a Windows service, so that it is automatically started every time the PC is rebooted. The following settings are available on this page: Run as a Service - Check this setting to install Now IMP as a Windows service. Remove the check to remove Now IMP from running as a Windows Service. Start - This button is enabled if the Now IMP Server is not running. Press this button to start the Now IMP Server. Stop - This button is enabled if the Now IMP Server is currently running. Press this button to stop the Now IMP Server. Service Information - This box contains information about the running service. 20
21 21

22 Server Page This page contains general server configuration settings for the Now IMP Server. IP Address This box contains a list of the of the IP Addresses available on the computer. For configurations where multiple IP addresses are configured on the computer, it is possible to configure the Now IMP Server to listen for HTTP connections on the specified port for only a specific IP address. Select one of the listed IP addresses, or select all available to have the Now IMP Server listen for connections on any IP address bound to the computer. HTTP Port Number - This specifies the TCP/IP Port Number on which the Now IMP Server should listen for connections from mobile IM Clients (Wireless Village / OMA IMPS Protocol). HTTPS Port Number - This specifies the TCP/IP Port Number on which the Now IMP Server should listen for SSL/TLS connections from mobile IM Clients (Wireless Village / OMA IMPS Protocol). This option is only enabled if an SSL/TLS certificate has been generated on the SSL/TLS page of the configuration dialog. To enable the XMPP Server interface, you must define the XMPP Domain Name. This 22
23 is normally the host name on which the Now IMP Server is installed. When connecting to the Now IMP Server, it is customary to login with an XMPP client by specifying a user name of user@xmppdomain.name, where xmppdomain.name is the host name of the Now IMP Server. (The Now IMP Client can be configured to assume a default domain name when it is installed, so that users need only supply their user name to login. This is described in Step 4b.) Instead of using a host name, a special DNS SRV record can be used. It is similar in concept to DNS MX records used by servers. For XMPP clients to properly connect to the Now IMP Server using SRV records, the SRV record needs to be defined in the format _xmppclient._tcp.xmppdomain.name with the port set to 5222, and the host name set to the specific A (host address) record for your server. Desktop IM clients will connect to the Now IMP Server using the XMPP Protocol, which by default uses TCP/IP Port It is easy to override this default port assignment if you are using SRV records in DNS. However, in cases where you are connecting to the host by its host name, clients will assume port 5222, and the default XMPP Port Number setting should not be changed. SSL/TLS can also be used for XMPP Protocol connections. Many IM clients, including the Now IMP Client, can negotiate an SSL/TLS connection over the standard XMPP port (using the STARTTLS protocol option). However, some XMPP clients expect to use a separate port for SSL/TLS connections. For those clients, the XMPP SSL Port Number field specifies a port on which the server will listen for XMPP connections using SSL. Clients that use a separate port for XMPP SSL/TLS connections will assume the default port assignment of Web Admin User Name and Web Admin Password - If these settings are non-blank, an administrative interface is available via the web, which allows for an administrative user to define user accounts on the Now IMP Server. When the web administrative interface is enabled, it is possible to connect to this interface by connecting to the HTTP port of the Now IMP Server, and including /ADMIN in the URL (e.g., Web administration functionality can be limited to a specified list of IP addresses by entering one or more IP addresses in the Web Admin IP Address Restrictions field. The IP address restrictions field can contain a comma-delimited list of IP addresses, with the ability for wild cards to be specified (e.g., *, ). 23

24 Options Page This page contains general configuration settings for the Now IMP Server. Session Timeout - This specifies the number of seconds of inactivity before which a client session is considered inactive. (Note: Even though a session may become inactive, provisions are in place to allow a session to automatically reconnect without user intervention.) Keep Alive Time for Clients - This specifies a time interval, in seconds, that is broadcast by the server to connected IM Clients. The server informs clients that it expects to receive a request within this time interval before it may consider a session inactive. (Note that while this is similar in concept to Session Timeout, that setting refers to the actual session timeout used by the server, while this is the setting that is broadcast to IM clients.) Some IM clients will use this is a suggestion for clients as to the amount of time between polling requests issued by the client. Minimum Server Poll Interval This is the minimum amount of time that is required to elapse between client polling requests of the server. This setting does not control how often the client polls the server, but rather if the client needs to make multiple requests 24
25 of the server, it will impose a delay between requests. Idle Polling Response Delay When the server receives a polling request from a client, and there is no updated information to send to the client, the server can display the response by a number of seconds in order to slow down requests from the client. Setting this value larger than 15 seconds is not recommend, as it may cause clients to report errors. Force disconnect of idle polling clients In some public server configurations, it may be advantageous to forcibly disconnect idle users who are actively polling the server, but not sending or receiving messages. If this option is enabled, and a client is only sending polling and keep-alive requests to the server, without sending or receiving any messages within the "Idle Session Timeout" period, the server will force the client to disconnect from the server. Created groups are temporary (deleted after participants leave) By default, when a user creates a group (conference room) using the Wireless Village protocol, the group is considered to be permanent, in that it is not deleted until the group creator deletes the group. This is different from the XMPP protocol, in which conference rooms are considered temporary by default. When a group is temporary, it is automatically deleted when all participants leave the discussion. Checking this option causes the server to consider groups created by Wireless Village protocol users to be temporary. This setting can help avoid cluttering up the server with groups. Allow all users to create public groups If checked, this option indicates that any user is allowed to create a public group (chat room) on the server. A public group can appear in search lists, allowing other users to find and join the group. A non-public group can only be accessed if you receive an invite or manually enter the group name (subject to member access restrictions which can also limit access to groups). If this option is unchecked, then users cannot create public groups unless their user name is listed in the Users allowed to create public groups field, which can contain a comma delimited list of users allowed to create public groups. If a user attempts to create a public group, but their account is not allowed to do so, the group is created, but the group will be created as a private group only. Delete group if no activity for x days If a group has not seen any activity (no members joining, no messages posted) for a configurable number of days, the server can be configured to automatically delete the group. This setting can help avoid cluttering up the server with inactive groups. 25
26 Push Page Most mobile phone IM clients will connect to the Now IMP Server via a WAP Proxy server. The typical mode of operation is for an IM client to establish an IP connection (GPRS/EDGE/UMTS), and poll the server for new messages. For some IM clients, such as those on SonyEricsson phones, it is advantageous to install the Now IMP Server in conjunction with a Now.WAP Proxy Server. In this configuration, the Now IMP Server is able to send WAP push messages through the Now.WAP Proxy to alert the mobile phone IM client to new IM messages without requiring polling. The Now IMP Server also directly supports a separate TCP/IP push channel, which is used by Nokia IM clients. The Now IMP Server supports three types of WAP Push notification for IM events: 1.) WAP Push over UDP 2.) CIR TCP Push Channel (STCP) 3.) WAP Push over SMS 26
27 WAP Push over UDP WAP Push over UDP is used when a mobile phone connects to Now IMP Server via a WAP proxy. This type of connection is commonly used in the IM clients built into SonyEricsson phones. To support WAP Push over UDP, the Now IMP Server needs to be able to identify the IP address of the IM client. In a typical configuration, the Now IMP Server will only see the IP address of the WAP proxy. To identify the IP address of the IM client, Now IMP must receive the IP address via an HTTP header that is forwarded by the WAP proxy. The Now IMP Server automatically looks for X-WAP-Client-IP: and X-Network-Info: headers that are generated by the Now.WAP Proxy. If the Now IMP Server needs to be configured to look at additional headers, these headers can be specified as a comma delimited list under the HTTP Headers for IP Address setting. Note that in most configurations of a Now IMP Server residing outside of an operator network, having the IP address of the IM Client is not sufficient for allowing WAP Push over UDP. This is because in most operator configurations, the mobile phones are assigned a private IP address on the operator network, and connect to the external world via a Network Address Translation (NAT) router. This private IP address is not accessible to the outside world. For the reason detailed above, the Now IMP Server has special hooks to integrate with the Now.WAP Proxy Server v2.55 or later. When Now IMP connections are proxied via the WAP protocols by a Now.WAP server, the Now IMP Server and Now.WAP Proxy can cooperate to ensure that WAP Push messages over UDP can be delivered, even when the mobile phone is connected to a private IP address. The Now IMP Server and Now.WAP Proxy will detect each other automatically to facilitate this cooperation. However, it is necessary that in the Now.WAP Proxy, the Forward X-MSISDN: header in content server requests setting is enabled, and that the domain name and/or IP address of the Now IMP Server be listed in the Content Domains to receive X-MSISDN: header. This is required even if the Now.WAP Proxy is not able to actually receive MSISDN information via RADIUS, as these settings will also enable the enhanced cooperation between the two servers. (Note: The Now.WAP Proxy server can be installed outside of the operator network.) 27
28 CIR TCP Push Channel (STCP) CIR is an acronym for Communications Initiation Request. When an IM client connects to an IM Server using HTTP over TCP (with or without a proxy), it is possible for the client to establish a persistent CIR connection to the Now IMP Server. The Now IMP Server will send a notification over this connection whenever an IM event has occurred (presence notification, new message, invitation, etc.). The Now IMP Server uses the same port for this CIR TCP Push Channel as is used for standard IM client connections. However, the Now IMP Server needs to be able to advertise this capability to IM clients in order for them to be able to take advantage of this capability. To do this, the Now IMP Server needs to publish the external IP address and port number that should be used for connecting to the Now IMP Server. This is required because it is common for the Now IMP Server to be sitting on a private IP address that is routed via a firewall and/or NAT router. The public IP address for the Now IMP Server should be specified in the Advertised IP Address field, and the external port number for connecting to the HTTP Port Number of the Now IMP Server should be specified in the Advertised Port field. 28
29 WAP Push over SMS The Now IMP Server can use WAP Push notifications over SMS by routing them via a WAP Push Proxy Gateway (PPG), such as the Now SMS/MMS Gateway. WAP Push requests are delivered to the PPG using the Push Access Protocol (PAP). To send WAP Push notifications via a WAP Push Proxy Gateway, check Enable SMS Push via WAP Push Proxy Gateway (PPG), and supply the settings to connect to the WAP Push Proxy Gateway. The PPG Server URL is an HTTP URL for connecting to the Push Proxy Gateway. For the NowSMS PPG, this URL is generally of the format where ip.address is the IP address or DNS host name of the NowSMS server, and port is the port number for the web interface. /PAP is a path in the URL that tells NowSMS that the request is using the Push Access Protocol (PAP). User Name and Password are optional parameters, that if present, are used to build a basic authentication ( Authorization: ) header in the PAP request. In most situations, this is how the Now IMP Server will authenticate to the PPG. PPG Push Domain is a configuration setting that is required by some PPGs. When Now IMP generates a PAP push request, if a PPG Push Domain value is present, it will be included in the destination push address. For example, if no PPG Push Domain value is present, the destination push address will be of the format WAPPUSH= /TYPE=PLMN. If a PPG Push Domain of operator.net is present, the destination push address will be of the format WAPPUSH= /TYPE=PLMN@operator.net. Whether or not a PPG Push Domain is required depends on the PPG, and you will need to check with the administrator of the PPG. (For NowSMS, the PPG Push Domain field can be left blank.) If WAP Push over SMS is enabled, Now IMP will only use WAP Push over SMS for accounts that have a phone number defined. By default, WAP Push over SMS will only be used to notify the client of new messages, and not for updated presence information. If you wish to have the Now IMP Server also generate WAP Push over SMS for presence updates, you must manually add a configuration setting to NOWIMPS.INI. Under the [NOWIMPS] header, add PushMessagesOnly=No. When this setting is present, Now IMP will generate WAP Push over SMS messages for both notification of new messages and for updated presence information. If Enable Direct WAP Push over UDP" is also enabled, and the server has an IP address to which to attempt to send a WAP Push over UDP, the server will first attempt to send the WAP Push over UDP. If the client does not respond to the push within a timeout period, a WAP Push over SMS will then be attempted. (The default timeout for WAP Push over UDP is 12 seconds, and can be configured by editing NOWIMPS.INI, and placing UDPPushTimeout=### under the [NOWIMPS] header.) 29

30 SMTP Page The Now IMP Server supports external connectivity via a built-in gateway, allowing IM users to send messages to recipients, and allowing users to send messages to IM recipients. To enable this capability, you must configure settings for the SMTP server that is built into the Now IMP Server. These settings are configured on the SMTP page of the configuration dialog. To enable SMTP connectivity, check Enable SMTP Server. You should then configure a host and domain name for the SMTP server. The Host Name should be a host name for the server which has been configured for internet DNS. When initiating outbound SMTP connections, the SMTP server will identify itself with this host name. The Domain Name will be used as the domain name for routing SMTP messages to IM user (e.g., user@domain). Internet DNS should be configured with a mail exchange (MX) record to route for this domain to the Now IMP Server (or to another SMTP server that relays the mail to the Now IMP Server). The SMTP Port Number is the port number on which the server will listen for inbound 30
31 SMTP deliveries. The standard port number for SMTP is 25. This standard port number should be used unless you are using a specialised SMTP relay that relays messages to a non-standard port. IP Address This box contains a list of the of the IP Addresses available on the computer. For configurations where multiple IP addresses are configured on the computer, it is possible to configure the Now IMP Server to listen for SMTP connections on the specified port for only a specific IP address. Select one of the listed IP addresses, or select all available to have the Now IMP Server listen for connections on any IP address bound to the computer. For delivering SMTP messages sent by IM users to SMTP users, the Now IMP Server will attempt to act as a smart mailer, connecting directly to recipient servers. If you prefer to use an SMTP relay host in your environment, check the Use SMTP Relay Host setting, and specify an IP address or host name for the relay host in the SMTP Relay Host field. The Character Limit setting specifies the maximum number of characters that will be extracted from an message when routing the message from SMTP to an IM user. 31

32 Users Page IM User accounts are defined on the Users page of the configuration dialog. To define a new user account, press the Add button. 32
33 The User Name and Password fields are required for a user account definition. The additional user settings are used only as informational settings. These settings are used primarily to facilitate search functionality, allowing a user to locate another user by searching on the supplied settings. For standard user accounts, leave User account is an automated agent unchecked. Automated agents are IM user accounts where an application program is configured to send and receive messages for the account, instead of an actual user. Automated agents are described later in this document on page

34 SSL/TLS Page The SSL/TLS page allows you to configure setting related to the use of secure protocols for client connections to the Now IMP Server. When Now IMP is initially installed, you must generate an SSL/TLS server certificate before any secure connections will be allowed. Press Generate Server Certificate to start the process of generating an SSL/TLS server certificate. 34

35 Host Name This should be the host name of the server. XMPP clients will expect this to match the XMPP Domain Name setting. Wireless Village/OMA IMPS clients will expect this to match the host name that they use for connecting to the server (not configured in Now IMP, but configured in DNS.) Administrator Address This should be a valid address for an administrative user that can receive regarding the server. Company or Organization Name This is the company or organisation's legal name. Department Name This is an optional setting, reflecting the department of the company to which this server belongs. City Name and State or Province Name These provide location information to which the server certificate is registered for the company or organisation. Country Name (2 letter code) This provides additional location information to which the server certificate is registered for the company or organisation. Example country codes are US for the United States and GB for Great Britain. Challenge Password and Re-enter Password This password provides security for protecting the server certificate. Press Generate Server Certificate to create the server certificate. Now IMP Server generates a self-signed server certificate, which is sufficient for most basic SSL/TLS connections. 35

36 After you generate the server certificate, Now IMP will explain that SSL/TLS (HTTPS) support has been enabled for this server to accept connections, and instruct that you now review the SSL/TLS related port number assignments on the Server page of the configuration dialog. However, the certificate is only self-signed. This only enables SSL/TLS to be used for encryption purposes, so that a client can connect to the server over an encrypted channel. A self-signed certificate does not provide any authentication, or verification that the information presented in the certificate is valid. In the SSL/TLS model, independent trusted parties, known as certificate authorities, validate that the information presented in a certificate is valid. And these authorities will sign a certificate to indicate that they trust it. Web browsers are usually configured with a predefined list of known trusted certificate authorities. If a web browser connects to a server via SSL/TLS, and is presented with a certificate that has not been signed by a certificate authority that is trusted by the browser, and a security warning message is typically displayed to the end user. The end user must then decide whether or not to accept the connection. The Now IMP Client does not validate certificates, and will simply use the channel for encryption, without presenting a warning. 36

37 However, some IM clients may require that the certificate be signed by a trusted certificate authority. More information on certificate authorities can be found at the independent web site, To have your certificate signed by a certificate authority (CA), press the Request or Install Certificate from CA button. This will cause the Now IMP Server to display additional information. To request a certificate from a certificate authority, you will need to deliver a certificate sign request (CSR) to the authority. Now IMP has created a file named SSL.CSR in the NowIMP program directory which contains the CSR. This file is in text format and can be opened with a simple text editor, such as Notepad. When you receive a signed certificate back from the authority, that certificate should be saved in a text file named SSL.CA, and located in the NowIMP Directory. You must restart the Now IMP Server in order to recognise any certificate changes. 37

38 Serial # Page The serial number page is used to enter serialisation information for a purchased copy of the Now IMP Server product. 38
39 User Account Provisioning via HTTP A web interface is available for provisioning Now IMP user accounts. To enable this interface, the Web Admin User Name and Web Admin Password settings on the Options page of the configuration dialog must be non-blank. Web administration functionality can be limited to a specified list of IP addresses by entering one or more IP addresses in the Admin IP Address Restrictions field. The IP address restrictions field can contain a comma-delimited list of IP addresses, with the ability for wild cards to be specified (e.g., *, ). When the web administrative interface is enabled, it is possible to connect to this interface by connecting to the HTTP port of the Now IMP Server, and including /ADMIN in the URL (e.g., Additionally, an HTTP-based interface has been added to allow for account provisioning by external applications. This interface is accessed with a URL of "/provision" followed by a series of "HTTP GET" parameters. (The admin username and password must be supplied in the HTTP GET request within an "Authorization:" header.) The following parameters are supported in this interface: AdminAction=Add, Modify, Delete, or Query UserName= Password= Firstname= Lastname= Alias= PhoneNumber= Address= AgentURL= Assuming that the user is authorized to issue a provisioning command (valid username/password, and supported IP address for originating the request), the server will return a normal HTTP response code of 200 with a MIME content type of text/plain. The response will start with OK if the request was successful, or ERROR if the request failed. An example URL for defining a new user is provided below: ssword&firstname=first&lastname=last&phonenumber=% 2B & Address=user@domain.com (Note: In the above example notice that some characters must be URL escaped for HTTP. This includes the space character as %20 and the + character as %2B.) 39
40 If the AgentURL parameter is non-blank when provisioning a user, the user account is provisioned as an automated agent (see page 42). AdminAction=Query is a special case which allows an application to retrieve information about defined users. When the AdminAction=Query command is issued, the server will search for user accounts that match the supplied parameters. For example, the following command will search for any user accounts that have the address user@domain.com associated with them: If multiple search parameters are supplied, the server will look for a match on all suplied parameters. Search parameters can include wildcard characters * (match zero or more characters) and/or? (match exactly one character). For example, the following command will search for all accounts that have an address associated with them from a particular domain: Or the following command could be used to return a list of all defined users: The search results will be returned in an XML document using the following format: <NowIMPInfo> <UserList> <UserInfo> <UserName>bryce</UserName> <FirstName>Bryce</FirstName> <LastName>Norwood</LastName> <Alias>bryce</Alias> <PhoneNumber>123</PhoneNumber> < Address>nowsms@now.co.uk</ Address> </UserInfo> </UserList> </NowIMPInfo> If multiple users match the query, the UserInfo element will be repeated for each user. Fields that are not defined for a user, or are left blank (e.g., Alias, PhoneNumber, Address), will not be included in the XML response. For user accounts that are Automated Agents (see page 42), two additional fields will be included in UserInfo section of the response: <IsAgent>TRUE</IsAgent> <AgentURL> 40
41 Additional parameters are available for AdminAction=Query to allow for searches of active users and active conference rooms. Including the parameter ActiveUsers=Yes will cause a list of currently active uses to be returned, while ActiveRooms=Yes will cause a list of currently active conference rooms to be returned. For example, the following command: would return a response similar to the following: <NowIMPInfo> <ActiveUserList> <UserInfo> <UserName>bryce</UserName> <Protocol>XMPP</Protocol> <Resource>Now IMP</Resource> </UserInfo> <UserInfo> <UserName>kent</UserName> <Protocol>IMPS</Protocol> </UserInfo> </ActiveUserList> <ActiveConferenceRoomList> <ConferenceRoomInfo> <ConferenceRoomID>/test.conference.room</ConferenceRoomID> <ConferenceRoomActiveUserList> <UserName>bryce</UserName> <UserName>kent</UserName> </ConferenceRoomActiveUserList> </ConferenceRoomInfo> </ActiveConferenceRoomList> </NowIMPInfo> ActiveUsers=Yes causes the <ActiveUserList> element list to be returned. Each active user will be represented by a <UserInfo> element. At a minimum, this user information will contain their UserName and the Protocol that is being used to connect to the server. (XMPP users will also have a Resource name associated with the user. This is because XMPP allows a user to connect simultaneously under multiple resources.) ActiveRooms=Yes causes the <ActiveConferenceRoomList> element list to be returned. Each active conference room will be represented by a <ConferenceRoomInfo> element. At a minimum, this conference room information will contain the ConferenceRoomID, and a list of active users in the conference room. 41

42 Automated Agents Automated agents are IM user accounts where an application program is configured to send and receive messages for the account, instead of an actual user. Automated agents are defined similar to standard IM user accounts, using the Users Page of the configuration dialog. When adding an automated agent user account, the setting User account is an automated agent should be checked. Every time the Now IMP server receives an instant message for the agent, it will connect to an HTTP script to allow the agent to process the message. The URL for the script that you want to associate with the agent should be defined in the Agent URL parameter of the account. Now IMP will pass information about the received message to the URL using standard HTTP GET (CGI style) parameters. The from= parameter will contain the sender's IM address. The to= parameter will contain the agent's IM address. The text= parameter will contain the text of the received message. For example: Parameters are escaped using standard URL escaping. Notice in the example above that space characters have been replaced with %20. 42
43 Please note that all message text will be encoded in the UTF-8 character set. If an agent wishes to reply back to the sender, it is possible for the agent to return an HTTP response of the content type text/plain, with the text of the response in the body of the HTTP response. (If the response is blank, or returns a different content type, no response will be sent.) Please note that the agent must respond with a standard HTTP 200 OK response, otherwise the server will retry the request. Most web server environments will return this HTTP 200 OK response automatically, but if you need to do this manually, the following is a valid empty response (no response sent back to the sender). HTTP/ OK Content-Type: text/plain Content-Length: 0 <blank line> A good example of a simple interactive agent is an echo agent, which simply echos back any text received from a user. If you wish to test your system, you can specify an agent URL of which is a simple echo agent installed on one of Now's web servers. The source for echo.asp is included below: <% Response.ContentType = "text/plain" If (Request.QueryString("text") = "") Then Response.Write (" ") Else Response.Write ("ECHO : ") Response.Write (Request.QueryString("text")) End If %> Alternative, a PHP version, echo.php, is presented below: <? header ("Content-Type: text/plain"); if (isset($_request['text'])) { echo "ECHO : ". $_REQUEST['text']; }?> While extremely simplistic, both of the above examples illustrate how an agent script can process received URL parameters, and generate a reply. 43
44 It may also be desirable for an agent to send a message that is not in direct response to a received message. For example, the agent may wish to broadcast information to subscribers. To send such a message, the agent must make an HTTP request to the server's HTTP Port Number, as configured on the Server page of the configuration dialog. The request should be an HTTP GET request to with the following parameters specified as standard HTTP GET (CGI style) parameters. Required parameters: User User account defined for agent Password Password associated with agent user account Text Text of the message to be sent Plus one of the following parameters: To One or more message recipients, usually the user account name(s) of the intended recipient(s). If more than one recipient is desired, separate recipients with either a comma (,) or semicolon (;). Broadcast Set to allonline to send a message to all instant messaging users that have added the agent to their contact list (i.e., subscribed to the agent's presence information). SystemBroadcast Set to allonline to send a message to all users that are currently connected to the server. Set to alldefined to send a message to all user accounts that are defined to the server. This setting can only be used if Agent can broadcast to all users is enabled for an account. Examples: essage+to+all+who+have+added+the+agent+to+their+contact+list.&broadcast=allon line 2+user+accounts.&to=bryce,kent 2+user+accounts.&to=bryce%2Ckent essage+to+all+connected+users.&systembroadcast=allonline 44
45 OTA Provisioning for IMPS Most mobile phones that support IMPS have the ability to receive settings for the IMPS client over-the-air (OTA). This means that the IMPS settings can be sent to the mobile phone in an SMS message (actually a series of SMS messages are sent that are treated as a single message by the receiver). Currently there are two different formats for these OTA messages. SonyEricsson utilises the format defined by the Nokia/SonyEricsson OTA Specification v7.1. Nokia (and other vendors) use the format defined by the Open Mobile Alliance (OMA) Provisioning Content specification. Both of these OTA formats use XML based documents, however the XML schema is significantly different between the two formats. When the documents are sent out via SMS, they are encoded in a wireless binary XML (WBXML) format. One way of sending out these settings documents is using the Now SMS/MMS Gateway product. From the Send XML Settings option of the NowSMS web interface, it is possible to send an XML document containing IMPS settings to a mobile phone. Programatically, it is possible to post the XML settings document to the NowSMS server to request that it be sent out via SMS. An example HTTP POST of an XML settings document to a NowSMS server looks like this: POST /?PhoneNumber=xxxxxxxx&OTA=POST HTTP/1.0 Content-Length: yyyyyy (*blank line*) <xml settings document> The Content-Length: header specifies the length of the XML document that follows. (This tells the server how much data to expect in the XML document.) Optionally, the POST line can be modified to include a username and password to authenticate to the NowSMS server: POST /?PhoneNumber=xxxxxxxx&user=username&password=password&OTA=POST HTTP/1.0 Content-Length: yyyyyy (*blank line*) <xml settings document> Note that some Nokia phones require that OTA settings be signed with a PIN code. The receiving user is then prompted to enter that PIN code when opening the message 45
46 that contains the settings. To include a PIN code when posting settings to a NowSMS server, include &OTAPIN=1234 in the POST URL, where 1234 is the 4 digit PIN code that you wish to be associated with the message. For full documentation on the format of the XML settings documents, please refer to the Nokia/SonyEricsson OTA Settings Specification v7.1, available for download from the SonyEricsson developer web site ( and the OMA Provisioning Content v1.1 specification, available for download from the Open Mobile Alliance web site ( Nokia also has OTA settings information specific to their mobile phones available from the Nokia developer web site ( To help get you started, we have provided basic examples for settings documents for each of these protocols in the following sections. 46
47 OTA Provisioning for IMPS: SonyEricsson The following document is an example OTA document for provisioning the IM client on a SonyEricsson phone. <WVSettings> <WVOTAVersion>1.0</WVOTAVersion> <WVCommon> <WVSettingsName>NowIMP</WVSettingsName> <WVRefName>Internet Profile</WVRefName> <WVSupportedVersion>1.0</WVSupportedVersion> <WVSupportedVersion>1.1</WVSupportedVersion> <WVUserID>username</WVUserID> <WVPassword>password</WVPassword> <WVPreferredProtocol></WVPreferredProtocol> </WVCommon> <WVHTTP> <WVSAPURI> <WVSAPFourWaySupported>T</WVSAPFourWaySupported> </WVHTTP> </WVSettings> Note that in the above settings that there are five fields that you will need to replace with your settings. WVSettingsName This text contains a descriptive name for the settings. (Note that current SonyEricsson phones seem to ignore this value.) WVRefName This text should contain the name of an existing Internet Profile that has been configured in the mobile phone. Note that it is not possible to provision a new internet profile at the same time as sending IM settings. If you also need to configure an internet profile to be used with the settings, a separate configuration message must be sent with the internet profile settings first. It is possible to remove this statement from the settings message, in which case the IM client will prompt to select a profile. WVUserID This text should contain the name of the user account on the server. WVPassword This text should contain the password of the user account on the server. WVSAPURI This text should contain the HTTP URL for connecting to the Now IMP Server. 47
48 If it is necessary to send internet profile settings to the phone, a simple example is presented below: <CHARACTERISTIC-LIST> <CHARACTERISTIC TYPE="ADDRESS"> <PARM NAME="BEARER" VALUE="GPRS"/> <PARM NAME="PROXY" VALUE=" "/> <PARM NAME="GPRS_ACCESSPOINTNAME" VALUE="gprs.apn"/> <PARM NAME="PPP_AUTHTYPE" VALUE="PAP"/> <PARM NAME="PPP_AUTHUSER" VALUE="GPRSusername"/> <PARM NAME="PPP_AUTHSECRET" VALUE="GPRSpassword"/> </CHARACTERISTIC> <CHARACTERISTIC TYPE="URL" VALUE=" <CHARACTERISTIC TYPE="NAME"> <PARM NAME="NAME" VALUE="Internet Profile"/> </CHARACTERISTIC> </CHARACTERISTIC-LIST> To adapt the above example to your environment, several changes are required. The PARM NAME= PROXY value should be changed to reference the IP address of the WAP proxy to be used. (We recommend using a conventional WAP proxy via the WSP stack instead of the HTTP stack, as this is the only way to support push notifications over IP to these devices.) The PARM NAME= GPRS_ACCESSPOINTNAME value should be changed to reference the GPRS Access Point Name (APN) of the subscriber's mobile operator. The lines containing PARM NAME= PPP_AUTHUSER and PPP_AUTHSECRET can be removed if no username and password is required for connecting to the GPRS APN. If a username and/or password is required, the values should be edited as appropriate for the connection. The CHARACTERISTIC TYPE= URL value will contain the home page associated with the internet profile being created. Although there is not strictly a home page associated with this connection, it is a good idea to specify a valid WAP portal entry page here. The PARM NAME= NAME value should be changed to contain a descriptive name for the settings. Note that the value here will correspond to the WVRefName value in an IM Settings message. 48
49 OTA Provisioning for IMPS: Nokia (and other OMA Compliant Devices) The following document is an example OTA document for provisioning the IM client using OMA (Open Mobile Alliance) Provisioning Content, as deployed on Nokia phones. <wap-provisioningdoc> <characteristic type="bootstrap"> <parm name="name" value="nowimp"/> </characteristic> <characteristic type="napdef"> <parm name="name" value="nowimp"/> <parm name="napid" value="nowimp_napid"/> <parm name="bearer" value="gsm-gprs"/> <parm name="nap-address" value="grps.apn"/> <parm name="nap-addrtype" value="apn"/> <characteristic type="napauthinfo"> <parm name="authtype" value="pap"/> <parm name="authname" value="gprsusername"/> <parm name="authsecret" value="gprspassword"/> </characteristic> </characteristic> <characteristic type="pxlogical"> <parm name="name" value="nowimp"/> <parm name="proxy-id" value="nowimp_proxy"/> <characteristic type="pxphysical"> <parm name="physical-proxy-id" value="nowimp_phproxy"/> <parm name="pxaddr" value=" "/> <parm name="pxaddrtype" value="ipv4"/> <parm name="to-napid" value="nowimp_napid"/> <characteristic type="port"> <parm name="portnbr" value="8080"/> </characteristic> </characteristic> </characteristic> <characteristic type="application"> <parm name="appid" value="wa"/> <parm name="to-proxy" value="nowimp_proxy"/> 49
50 <parm name="name" value="nowimp"/> <parm name="addr" value=" <characteristic type="appauth"> <parm name="aauthname" value="username"/> <parm name="aauthsecret" value="password"/> </characteristic> </characteristic> </wap-provisioningdoc> To adapt the above example to your environment, a number of changes are required. There are several places in the settings document where parm name= NAME value= NowIMP appears. In these cases, NowIMP is a descriptive name that is being associated with the settings. This name is displayed in the user interface of the mobile phone as a name associated with the IM server and settings, and you should set this to a name to an appropriate descriptive name for your environment. You will notice that there are also a number of other places where NowIMP appears as a prefix in the value parameter. This is done to indicate that portions of the settings are related. While these settings are not displayed anywhere in the phone's user interface, you may want to change the prefix to one that is specific to your environment. The parm name= NAP-ADDRESS value should be changed to reference the GPRS Access Point Name (APN) of the subscriber's mobile operator. The lines containing parm name= AUTHUSER and AUTHSECRET should be removed if no username and password is required for connecting to the GPRS APN. If a username and/or password is required, the values should be edited as appropriate for the connection. The parm name= PXADDR value should be changed to reference the IP address of the WAP/HTTP proxy to be used. Note that all Nokia phones that support these configuration parameters are expecting to connect to an HTTP/WAP2 proxy server. The parm name= PORTNBR value should be changed to reference the port number to be used on the WAP/HTTP proxy. The parm name= ADDR value should contain the HTTP URL for connecting to the Now IMP Server. The parm name= AAUTHNAME value should contain the username of the account on the Now IMP Server, and the parm name= AAUTHSECRET value should contain the password for that same account. 50
51 Self-User Provisioning via the Web The Now IMP Server includes an interface for allowing users to self-register with the IMP Server via the web. This interface is designed primarily to help simplify the process of evaluating the product, and allowing product evaluators an easy way to create accounts. When this interface is enabled, it is possible to connect to this interface by connecting to the HTTP port of the Now IMP Server, and including /SIGNUP in the URL (e.g., The interface will prompt for a valid address. It will then send a sign-up authorisation code to that address, and require that the user supply this authorisation code in order to complete the registration process. To enable this interface, it is necessary to manually edit the NOWIMPS.INI file (located in the NowIMP program directory), and under the [NOWIMPS] header, add SignupSupported=Yes. It is also necessary to enable the SMTP server that is built into the Now IMP Server. The self-user provisioning interface uses HTML template files that are located in the WEB\SIGNUP subdirectory of the NowIMP installation. The index.htm template file is used to construct the initial screen that is displayed when connecting to the /SIGNUP URL, as displayed below: 51


52 If the address is already registered with a user account on the Now IMP Server, the server will indicate that the address is already registered to the system. The user can select the Recover Lost Password link to have their password sent to their address. 52

53 The password.htm template file is used to generate the Recover Password screen. After the password has been sent to the address, the passwordsent.htm template file is used to generate the confirmation screen. Under normal conditions, when the address being entered is not already associated with a user account on the Now IMP Server, the server will send an message containing 4 character authorisation code. The web interface will display a screen (authcode.htm template) that prompts for that authorisation code before the user can complete the registration process. After entering the authorisation code that was received via , the user is presented with a screen (account.htm template) that allows them to define an account on the Now IMP Server. 7 53


54 The User ID, Password and Confirm Password fields are required. The other fields are optional, and are used primarily to facilitate user searches on the server. Assuming that the account is created, the succes.htm template will be used to generate a confirmation message. The Server URL in the template is read from an entry in the NOWIMPS.INI file. Under 54
![the [NOWIMPS] header, the setting IMPSServerURL=http://server:port/ is used to construct the URL that is displayed.](/docs-images/72/66590737/images/55-0.jpg "When the OK or Close ( X ) button is pressed, the interface will redirect the user to a configurable web address. To specify this web address, in the NOWIMPS.")
55 the [NOWIMPS] header, the setting IMPSServerURL= is used to construct the URL that is displayed. When the OK or Close ( X ) button is pressed, the interface will redirect the user to a configurable web address. To specify this web address, in the NOWIMPS.INI file, under the [NOWIMPS] header, include CancelRedirectURL= After creating an account, it is also possible for a user to connect back to the web interface to change their user information, or to delete their account. This is done by connecting to the HTTP port of the Now IMP Server, and including / USER in the URL (e.g., The Now IMP Server will prompt for the username and password of the account. If this information is provided correctly, the following display is generated from the index.htm template file in the WEB\USER subdirectory. Note that it is not possible for the user to change the address associated with an account. This can only be changed through the administrative interface. 55
 will be used to generate")
56 If the user selects Edit Account, the editaccount.htm template (WEB\USER directory) will be used to generate the display: 56
57 The text of the messages generated by the self-user provisioning interface can be modified through the following settings in the NOWIMPS.INI file, with all settings located in the [NOWIMPS] section of the file. This setting specifies the From address that is used when sending out messages that contain an authorisation code. AuthSubject=IMPS Authorisation Code This setting specifies the subject line of the message that is sent out with an authorisation code. The default subject is displayed above. AuthTemplate=Your authorisation code for registering an account with the IMP Service is This setting specifies the message text of the message that is sent out with an authorisation code. The default text is displayed above. Note that the placeholder will be replaced with the appropriate authorisation code. This setting specifies the From address that is used when sending out messages to recover a lost password. PasswordSubject=IMPS User Account Information This setting specifies the subject line of the message that is sent out to recover a lost password. The default subject is displayed above. PasswordTemplate=Your IMPS User Account This setting specifies the message text of the message that is sent out to recover a lost password. The default text is displayed above. Note that placeholder will be replaced with the user account name, placeholder will be replaced with the password for the account, and placeholder will be replaced with the IMPSServerURL setting from the NOWIMPS.INI file. \r\n are used to indicate a line break. 57
58 External Transports (AOL, MSN, etc.) Adding an external transport connector to Now IMP allows users to connect to external Instant Messaging systems such as MSN and AIM (AOL Instant Messenger). Now IMP does not provide external transports to connect to these external IM systems. However, Now IMP does support the XMPP (Jabber) gateway protocol, so that many external transport connectors that were written to work with Jabber, can work with Now IMP. This section of the documentation describes some experience and advice in configuring popular connectors. Please note that each user that wishes to connect to an external Instant Messaging system MUST HAVE AN ACCOUNT with the external system. When using Now IMP, the user can specify their account details with the external IM system, so that Now IMP can proxy to the external IM system via an installed external transport connector. When the user logs in to Now IMP, Now IMP will also log the user into the external IM system. The user can then exchange messages with local Now IMP users, or with users defined to the external IM system. External IM account attributes can be defined via the Now IMP server admin interface, or users can register their details using the Tools/Transports option in the Now IMP desktop client. Once a transport has been registered, Now IMP will automatically connect to the account on the external transport each time the user logs in to the Now IMP Server. Please note that there may be legal issues involved in providing a commercial service that connects to a public IM network, and we encourage you to review the terms of use of any public IM networks with which you wish to interconnect. 58
59 MSN Transport An MSN transport that is compatible with Now IMP is PyMSNt (Python based MSN Transport for Jabber). The web site for PyMSNt is The latest version of PyMSNt that has been tested with Now IMP is v This version of PyMSNt requires Python v2.3 ( Twisted v2.0 ( PyOpenSSL ( and PyCrypto ( Because web site links can change, we have copied all of the necessary modules into a single download, This download contains all of the necessary requirements to install PyMSNt on a Windows PC (Windows 2000, XP, 2003). PyMSNt can be installed on the same machine as the Now IMP server, or it can be installed on a separate machine. We recommend following these steps to install PyMSNt: 1.) Define the MSN transport to Now IMP. Go to the "Transports" page of the configuration dialog. Specify a "Transport Port Number" upon which Now IMP will listen for connections from external transports. Many transports default to using port 5347, which is usually a good choice. Enter this value, and press "Apply". Next click, "Add". Specify "MSN" as the "Transport Name". "Password" can be any value that you choose. Under "Domains routed via Transport", enter "hotmail.com" and press "Add". Then enter "msn.com" and press "Add" again. Check "Replace '@' with '%' (transport handles multiple domains)". Press "OK". The "Transports" list should now show "MSN - NOT connected". (The status will change to "MSN - connected" once you complete this installation process.) 2.) If it is not already installed, install Python 2.3 by running Python exe from the ZIP download. The default installation settings are sufficient. 3.) If it is not already installed, install Twisted 2.0 for Python 2.3 by running Twisted_NoDocs win32-py2.3.exe from the ZIP download. The default installation settings are sufficient. 4.) Install PyOpenSSL 0.6 for Python 2.3 by running pyopenssl-0.6.win32-py2.3.exe from the ZIP download. The default installation settings are sufficient. 5.) Install PyCrypto 2.0 for Python 2.3 by running pycrypto-2.0.win32-py2.3.exe from the ZIP download. The default installation settings are sufficient. 59
60 6.) Install PyMSNt by opening PyMSNt zip from the ZIP download. Use a ZIP utility to extract all of the files from this ZIP to a directory on your PC. Be sure that the ZIP utility is configured to preserve folder names when extracting (with WinZIP, the "Use folder names" button should be checked when extracting). 7.) Go to the directory that PyMSNt was extracted to. You will find the PyMSNt files in a subdirectory beneath that directory named PyMSNt Copy CONFIGEXAMPLE.XML over as CONFIG.XML. Edit CONFIG.XML with a text editor (note that Notepad will not display this file properly, so instead of Notepad, use Wordpad, which can be accessed from the command line by typing WRITE CONFIG.XML). Edit the following sections of CONFIG.XML: a.) The <jid> value should be msn.xmpp.domain.name, where "xmpp.domain.name" is the "XMPP Domain Name" value defined on the "Server" page of the Now IMP configuration dialog. ***IMPORTANT*** The <jid> value should be all lower case, even if you have used mixed or upper case in the NowIMP configuration. b.) The <mainserver> value should contain the IP address of the Now IMP server. If the Now IMP server is running on the same machine, specify c.) The <port> value should match the "Transport Port Value" defined in Step #1. d.) The <secret> value should match the "Password" value defined in Step #1. 8.) Change your current directory to the "src" subdirectory of the PyMSNt directory. Type "c:\python23\python main.py" to start the external transport. (Do not include quotes, those are just for highlighting in this document.) 9.) The "Transports" list should in Now IMP should now show "MSN - Connected", indicating that the transport has successfully connected to the Now IMP server. You can now configure a user account to register with the transport. The easiest way to do this for an initial test is using the Tools/Transports option in the Now IMP desktop client. Be sure to include "@msn.com" or "@hotmail.com" in your MSN user id, as appropriate. Internally, Now IMP will represent MSN contacts with an address of "user% msn.com@msn.xmpp.domain.name" or "user% hotmail.com@msn.xmpp.domain.name". However, you can also address these contacts in short form as as "user@msn.com" or "user@hotmail.com". 10.) If the transport is installed on the same PC as Now IMP, it is possible to configure Now IMP to automatically load the transport in the background, so that the transport is automatically started every time the PC running the Now IMP Server is restarted. This configuration should be attempted only after you have confirmed that the transport is properly installed and working. Begin by stopping the currently running transport. This can be done by pressing CTRL 60
61 C or CTRL-BREAK in the console window where the transport is running. Next, manually edit the NOWIMPS.INI file, and add the following section to this file: [TransportAutostart-MSN] Directory=c:\PyMSNt-0.9.3\src CommandLine=c:\python23\python main.py The above assumes that "MSN" was specified as the "Transport Name" in Step #1. Change the "Directory=" parameter to reference the "src" subdirectory in which you installed the MSN transport. Change the "CommandLine=" parameter to reference the directory in which Python is installed (this directory should contain python.exe). After you save this change to the NOWIMPS.INI file, the Now IMP Server will attempt to launch the transport in the background within the next 60 seconds. Once the transport has been launched, the "Transports" list should in the Now IMP configuration should now show "MSN - Connected", indicating that the transport has successfully connected to the Now IMP server. 61
62 AIM Transport An AIM transport that is compatible with Now IMP is PyAIMt (Python based AIM Transport for Jabber). The web site for PyAIMt is The latest version of PyAIMt that has been tested with Now IMP is v0.5. This version of PyAIMt requires Python v2.3 ( and Twisted v2.0 ( These requirements are similar to those of the PyMSNt transport, and it is not necessary to re-install those components if they are already installed. Because web site links can change, we have copied all of the necessary modules into a single download, This download contains all of the necessary requirements to install PyAIMt on a Windows PC (Windows 2000, XP, 2003). PyAIMt can be installed on the same machine as the Now IMP server, or it can be installed on a separate machine. We recommend following these steps to install PyAIMt: 1.) Define the AIM transport to Now IMP. Go to the "Transports" page of the configuration dialog. Specify a "Transport Port Number" upon which Now IMP will listen for connections from external transports. Many transports default to using port 5347, which is usually a good choice. Enter this value, and press "Apply". Next click, "Add". Specify "AIM" as the "Transport Name". "Password" can be any value that you choose. Under "Domains routed via Transport", enter "aim.com" and press "Add". "Replace '@' with '%' (transport handles multiple domains)" should NOT be checked. Press "OK". The "Transports" list should now show "AIM - NOT connected". (The status will change to "AIM - connected" once you complete this installation process.) 2.) If it is not already installed, install Python 2.3 by running Python exe from the ZIP download. The default installation settings are sufficient. 3.) If it is not already installed, install Twisted 2.0 for Python 2.3 by running Twisted_NoDocs win32-py2.3.exe from the ZIP download. The default installation settings are sufficient. 4.) The PyAIMt transport has a bug where the server may end up running at 100% utilisation after installing the AIM transport, and when this occurs, the only solution to this problem is to reboot the server. The version of PyAIMt included in the aimtransport.zip distribution includes a patch to fix this problem. However, to prevent the possibility of this problem occurring if you 62
63 should install an updated version of the PyAIMt transport, we recommed adding the Python directory to your search path, which will prevent the 100% utilisation problem from occurring. To add the Python directory to your path, go into the Windows Control Panel, then select System/Advanced/Environment Variables, and edit the Path variable to add c:\python23 (or the directory in which Python is installed) to the end of your path. 5.) Install PyAIMt 0.5 by opening PyAIM-t-0.5.zip from the ZIP download. Use a ZIP utility to extract all of the files from this ZIP to a directory on your PC. Be sure that the ZIP utility is configured to preserve folder names when extracting (with WinZIP, the "Use folder names" button should be checked when extracting). 6.) Go to the directory that PyAIMt was extracted to. You will find the PyAIMt files in a subdirectory beneath that directory named PyAIM-t-0.5. Copy CONFIG_EXAMPLE.XML over as CONFIG.XML. Edit CONFIG.XML with a text editor (note that Notepad will not display this file properly, so instead of Notepad, use Wordpad, which can be accessed from the command line by typing WRITE CONFIG.XML). Edit the following sections of CONFIG.XML: a.) The <jid> value should be aim.xmpp.domain.name, where "xmpp.domain.name" is the "XMPP Domain Name" value defined on the "Server" page of the Now IMP configuration dialog. ***IMPORTANT*** The <jid> value should be all lower case, even if you have used mixed or upper case in the NowIMP configuration. b.) The <mainserver> value should contain the IP address of the Now IMP server. If the Now IMP server is running on the same machine, specify c.) The <port> value should match the "Transport Port Value" defined in Step #1. d.) The <secret> value should match the "Password" value defined in Step #1. 7.) Change your current directory to the "src" subdirectory of the PyAIM-t-0.5 directory. Type "c:\python23\python main.py" to start the external transport. (Do not include quotes, those are just for highlighting in this document.) Please note that some warning messages will be displayed, specifically "Deprecation warnings". This is because PyAIMt was written to be compatible with earlier versions of the Twisted framework. However, our testing shows that it works ok with Twisted 2.0, and we recommend using Twisted 2.0, because that is the version of the Twisted framework required by the latest version of the MSN transport. 8.) The "Transports" list should in Now IMP should now show "AIM - Connected", indicating that the transport has successfully connected to the Now IMP server. You can now configure a user account to register with the transport. The easiest way to do this for an initial test is using the Tools/Transports option in the Now IMP desktop client. Internally, Now IMP will represent AIM contacts with an address of "user@aim.xmpp.domain.name". However, you can also address these contacts in short form as as "user@aim.com". 63
64 9.) If the transport is installed on the same PC as Now IMP, it is possible to configure Now IMP to automatically load the transport in the background, so that the transport is automatically started every time the PC running the Now IMP Server is restarted. This configuration should be attempted only after you have confirmed that the transport is properly installed and working. Begin by stopping the currently running transport. This can be done by pressing CTRLC or CTRL-BREAK in the console window where the transport is running. Next, manually edit the NOWIMPS.INI file, and add the following section to this file: [TransportAutostart-AIM] Directory=c:\PyAIM-t-0.5\src CommandLine=c:\python23\python main.py The above assumes that "AIM" was specified as the "Transport Name" in Step #1. Change the "Directory=" parameter to reference the "src" subdirectory in which you installed the AIM transport. Change the "CommandLine=" parameter to reference the directory in which Python is installed (this directory should contain python.exe). After you save this change to the NOWIMPS.INI file, the Now IMP Server will attempt to launch the transport in the background within the next 60 seconds. Once the transport has been launched, the "Transports" list should in the Now IMP configuration should now show "AIM - Connected", indicating that the transport has successfully connected to the Now IMP server. 64
65 Now IMP Client The Now IMP Client is an instant messaging desktop client for Windows. The Now IMP Client runs on Windows 98, Windows ME, Windows 2000, Windows XP or Windows It requires Internet Explorer v5.5 or later, 5MB of hard disk space, and 64MB of RAM. The installation program, IMPClient.exe, is run to install the Now IMP Client on a PC. Before using the Now IMP Client, you will need to install the Now IMP Server and create one or more user accounts on the server. When the Now IMP Client is run on a workstation, it will login to a user account on the Now IMP Server. In most installations, it is desirable to pre-configure the Now IMP Client so that it will connect to a specific server. Normally, when logging in to the server, a user of the Now IMP Client needs to specify a user name of username@xmppdomain.name, where xmppdomain.name is the host name of the Now IMP Server. To avoid user confusion, it is possible to pre-configure the Now IMP Client for a specific server. To do this, create a text file named override.xml, and place the following content in that file: <?xml version="1.0" encoding="utf-8"?> <override> <!-Configure client to connect to a only a specific IMP server --> <fixedserver>xmppdomain.name</fixedserver> </override> Place override.xml in the same directory as the IMPClient.exe installation program. If you are distributing the installation program to your users electronically, we recommend renaming IMPClient.exe to setup.exe, and then placing setup.exe and override.xml in a ZIP archive. ZIP archive utilities will then present an install option which extracts the files from the archive into a temporary directory before running setup.exe. In this way, setup.exe can find the override.xml file that was included with it in the ZIP archive. 65
66 Another useful option for override.xml is if you want to add a Sign Up button to the client login screen, where this Sign Up button links to a URL on your web site for user registration. To enable this functionality, include the following within the override section of override.xml: The following settings will enable a "Sign Up" button on the login screen, where clicking on the "Sign Up" button loads up a web page: <showsignup>yes</showsignup> <websignup> If you want to use the built-in User Self Provisioning, specify a websignup URL of 66

67 Getting Started with the Now IMP Client After installing the Now IMP Client, select its link from the Windows Start menu. A login screen will be displayed: In the Address field, specify username@xmppdomain.name, where username is the user account defined on the Now IMP Server, and xmppdomain.name is the host name of the Now IMP Server (see Step 1). (Note if you have pre-configured the Now IMP Client to connect to a specific server using the override.xml file, it is only necessary to specify the user account name in this field, e.g., username.) The Password field should contain the password for the user accuont as defined on the Now IMP Server. Check Remember my password if you would like the client to remember your password so that you do not need to enter it every time you login with the Now IMP Client. Check Automatically log in if you would like the client to automatically login to the server every time it is started. Press the Login button to attempt to login with the supplied Address and Password. After you have logged in, the main screen for the Now IMP Client will be displayed. 67

68 The main screen for the Now IMP Client would normally display the status of those individuals who are on your instant messaging contact list. However, since this is the first login, your account will not yet have any instant messaging contacts configured. 68

69 If you are running Windows XP Service Pack 2, the first time that you run the Now IMP Client, the following warning screen might be displayed: This warning is normal. The Now IMP Client uses an internal library which identifies itself as the Instant Messenger for XMPP. If you select Keep Blocking, this will disable the ability to perform file transfers via the IM client. If you select Unblock, this will allow file transfers via the IM client. (Note that file transfers are only available between two computers that are on the same Local Area Network.) Now you will want to configure your instant messaging contacts. Either select the link on the main screen that is labeld Add someone to your contact list, or select Actions/Add a contact from the menu bar. 69

70 Adding a Contact To add a contact, select Actions/Add a contact from the menu bar. The easiest way to add a contact is to search for another user via the directory. Searching for a user via the directory is the default option, so press Next. 70


71 It is necessary to supply some information to search for a user. Enter this information, and press Search. 71

72 If any search results are returned, highlight that entry and press Next, or simply click on the entry. An authorisation request will be sent to the user, asking if it is permissable for you to add them to your contact list. The server will not display presence information for another user unless that user has authorised it. (Note that some mobile IM clients do not accept presence authorisation requests. Instead, affected clients have configuration parameters that specify whether authorisation is granted to anyone who asks, or if it is granted only to those that have been added to the mobile's contact list.) Press Finish to send the authorisation request. Please note that the contact will not appear in your contact list until: They have authorised your presence request, or it is automatically authorised based upon settings defined in the mobile IM client. The user must be on-line. Contacts will not display in your contact list unless they are connected to the IM server. (A user's status can be busy or away, and they will appear in the contact list. However, if they are not connected, they will not appear.) 72
User Manual. Admin Report Kit for Exchange Server
 User Manual Admin Report Kit for Exchange Server Table of Contents 1 About ARKES-Admin Report Kit for Exchange Server 1 1.1 System requirements 2 1.2 How to activate the software? 3 1.3 ARKES Reports Primer
Interdomain Federation Guide for IM and Presence Service on Cisco Unified Communications Manager, Release 11.5(1)SU2
SU2") Interdomain Federation Guide for IM and Presence Service on Cisco Unified Communications Manager, Release 11.5(1)SU2 First Published: 2017-11-29 Last Modified: 2017-12-01 Americas Headquarters Cisco Systems,
Interdomain Federation Guide for IM and Presence Service on Cisco Unified Communications Manager, Release 11.5(1)SU2 First Published: 2017-11-29 Last Modified: 2017-12-01 Americas Headquarters Cisco Systems,
Configuration Tab. Cisco WebEx Messenger Administration Guide 1
 Overview, page 2 Organization Information, page 2 Domain Information, page 3 Resource Management Information, page 4 URL Configuration, page 5 Security Settings, page 6 Directory Settings, page 8 Password
Overview of this Integration
 CHAPTER 1 June 18, 2013 Basic Federated Network, page 1-1 About SIP Federation with AOL, page 1-4 About Intercluster and Multi-node Deployments, page 1-5 High Availability for SIP Federation, page 1-7
MDaemon Vs. Zimbra Network Edition Professional
 Comparison Guide Vs. The following chart is a side-by-side feature comparison of Email Server and. Flex Licensing Maximum Accounts Unlimited Unlimited SMTP, POP3, DomainPOP, and MultiPOP SSL / TLS / StartTLS
Wireless-G Router User s Guide
 Wireless-G Router User s Guide 1 Table of Contents Chapter 1: Introduction Installing Your Router System Requirements Installation Instructions Chapter 2: Preparing Your Network Preparing Your Network
MDaemon Vs. Kerio Connect
 Comparison Guide Vs. The following chart is a side-by-side feature comparison of Email Server and. Flex Licensing Maximum Accounts Unlimited Unlimited SMTP, POP3, DomainPOP, and MultiPOP SSL / TLS / StartTLS
VI. Corente Services Client
 VI. Corente Services Client Corente Release 9.1 Manual 9.1.1 Copyright 2014, Oracle and/or its affiliates. All rights reserved. Table of Contents Preface... 5 I. Introduction... 6 II. Corente Client Configuration...
Configuration Tab. Cisco WebEx Messenger Administration Guide 1
 Overview, page 2 Organization Information, page 2 Domain Information, page 3 Resource Management Information, page 4 URL Configuration, page 5 Security Settings, page 6 Directory Settings, page 8 Password
Solution Integration Guide for Multimedia Communication Server 5100/WLAN/Blackberry Enterprise Server
 Solution Integration Guide for Multimedia Communication Server 5100/WLAN/Blackberry Enterprise Server NN49000-302 Document status: Standard Document version: 0101 Document date: 24 May 2007 All Rights
MDaemon Vs. SmarterMail Enterprise Edition
 Comparison Guide Vs. Enterprise Edition The following chart is a side-by-side feature comparison of and Enterprise Edition. Flex Licensing û Maximum Accounts Unlimited Unlimited SMTP, POP3, DomainPOP,
Installing and Configuring VMware Identity Manager Connector (Windows) OCT 2018 VMware Identity Manager VMware Identity Manager 3.
 OCT 2018 VMware Identity Manager VMware Identity Manager 3.") Installing and Configuring VMware Identity Manager Connector 2018.8.1.0 (Windows) OCT 2018 VMware Identity Manager VMware Identity Manager 3.3 You can find the most up-to-date technical documentation on
Installing and Configuring VMware Identity Manager Connector 2018.8.1.0 (Windows) OCT 2018 VMware Identity Manager VMware Identity Manager 3.3 You can find the most up-to-date technical documentation on
MDaemon Vs. IceWarp Unified Communications Server
 Comparison Guide Vs. The following chart is a side-by-side feature comparison of Email Server and. Flex Licensing Maximum Accounts Unlimited Unlimited SMTP, POP3, DomainPOP, and MultiPOP SSL / TLS / StartTLS
MDaemon Vs. Kerio Connect
 Comparison Guide Vs. The following chart is a side-by-side feature comparison of and. Flex Licensing Maximum Accounts Unlimited Unlimited SMTP, POP3, DomainPOP, and MultiPOP SSL / TLS / StartTLS Account
MDaemon Vs. SmarterMail Enterprise Edition
 Comparison Guide Vs. Enterprise Edition The following chart is a side-by-side feature comparison of and Enterprise Edition. Flex Licensing û Maximum Accounts Unlimited Unlimited SMTP, POP3, DomainPOP,
MDaemon Vs. MailEnable Enterprise Premium
 Comparison Guide Vs. Enterprise Premium The following chart is a side-by-side feature comparison of Email Server and. Flex Licensing Maximum Accounts Unlimited Unlimited SMTP, POP3, DomainPOP, and MultiPOP
MDaemon Vs. MailEnable Enterprise Premium
 Comparison Guide Vs. Enterprise Premium The following chart is a side-by-side feature comparison of Email Server and. Flex Licensing Maximum Accounts Unlimited Unlimited SMTP, POP3, DomainPOP, and MultiPOP
MDaemon Vs. Microsoft Exchange Server 2016 Standard
 Comparison Guide Vs. The following chart is a side-by-side feature comparison of and. Flex Licensing Maximum Accounts Unlimited Unlimited SMTP, POP3, DomainPOP, and MultiPOP POP3 & SMTP Only SSL / TLS
DPX8000 Series Deep Service Switching Gateway User Configuration Guide BRAS Service Board Module v1.0
 DPX8000 Series Deep Service Switching Gateway User Configuration Guide BRAS Service Board Module v1.0 i Hangzhou DPtech Technologies Co., Ltd. provides full- range technical support. If you need any help,
MDaemon Vs. Microsoft Exchange Server 2016 Standard
 Comparison Guide Vs. The following chart is a side-by-side feature comparison of and. Flex Licensing Maximum Accounts Unlimited Unlimited SMTP, POP3, DomainPOP, and MultiPOP POP3 & SMTP Only SSL / TLS
IceWarp Unified Communications. SyncML Push Guide. Version 11.3
 IceWarp Unified Communications SyncML Push Guide Version 11.3 Published on 1/6/2015 Contents SyncML Push... 4 What is SyncML Push?... 4 What Is Push Email?... 5 How does SyncML Push Work?... 6 SMS Push...
Avalanche Remote Control User Guide. Version 4.1
 Avalanche Remote Control User Guide Version 4.1 ii Copyright 2012 by Wavelink Corporation. All rights reserved. Wavelink Corporation 10808 South River Front Parkway, Suite 200 South Jordan, Utah 84095
Configuration Guide. BlackBerry UEM Cloud
 Configuration Guide BlackBerry UEM Cloud Published: 2018-04-18 SWD-20180411125526296 Contents About this guide... 7 Getting started... 8 Configuring BlackBerry UEM Cloud for the first time... 8 Administrator
Sophos Mobile as a Service
 startup guide Product Version: 8 Contents About this guide... 1 What are the key steps?... 2 Change your password... 3 Change your login name... 4 Activate Mobile Advanced licenses...5 Check your licenses...6
Use a class C setting for maximum security. The class C setting is Click RoomWizard Setup.
 Use a class C setting for maximum security. The class C setting is 255.255.255.0. 2 Click RoomWizard Setup. The Default Gateway is the IP address of the router or gateway that provides internet access.
Appliance Installation Guide
 Appliance Installation Guide GWAVA 5 Copyright 2009. GWAVA Inc. All rights reserved. Content may not be reproduced without permission. http://www.gwava.com 1 Contents Overview... 2 Minimum System Requirements...
Cisco TelePresence Conductor with Cisco Unified Communications Manager
 Cisco TelePresence Conductor with Cisco Unified Communications Manager Deployment Guide XC2.2 Unified CM 8.6.2 and 9.x D14998.09 Revised March 2014 Contents Introduction 4 About this document 4 Further
Getting Started with Cisco WebEx Meeting Applications
 CHAPTER 6 Getting Started with Cisco WebEx Meeting Applications Revised: September, 2010, Contents Modifying Your Provisioned Cisco WebEx Account, page 6-1 Setting Proxy Permissions, page 6-5 Productivity
Interdomain Federation for IM and Presence Service on Cisco Unified Communications Manager, Release 10.5(1)
") Interdomain Federation for IM and Presence Service on Cisco Unified Communications Manager, Release 10.5(1) First Published: 2014-01-29 Last Modified: 2017-12-01 Americas Headquarters Cisco Systems, Inc.
Interdomain Federation for IM and Presence Service on Cisco Unified Communications Manager, Release 10.5(1) First Published: 2014-01-29 Last Modified: 2017-12-01 Americas Headquarters Cisco Systems, Inc.
RX3041. User's Manual
 RX3041 User's Manual Table of Contents 1 Introduction... 2 1.1 Features and Benefits... 3 1.2 Package Contents... 3 1.3 Finding Your Way Around... 4 1.4 System Requirements... 6 1.5 Installation Instruction...
Interdomain Federation for the IM and Presence Service, Release 10.x
 First Published: 2014-01-29 Last Modified: 2018-11-05 Americas Headquarters Cisco Systems, Inc. 170 West Tasman Drive San Jose, CA 95134-1706 USA http://www.cisco.com Tel: 408 526-4000 800 553-NETS (6387)
System Administration
 Most of SocialMiner system administration is performed using the panel. This section describes the parts of the panel as well as other administrative procedures including backup and restore, managing certificates,
MDaemon Vs. SmarterMail Enterprise Edition
 Comparison Guide Vs. Enterprise Edition The following chart is a side-by-side feature comparison of Email Server and Enterprise Edition. Flex Licensing û Maximum Accounts Unlimited Unlimited SMTP, POP3,
VII. Corente Services SSL Client
 VII. Corente Services SSL Client Corente Release 9.1 Manual 9.1.1 Copyright 2014, Oracle and/or its affiliates. All rights reserved. Table of Contents Preface... 5 I. Introduction... 6 Chapter 1. Requirements...
Cisco Unified Communications XMPP Federation
 Cisco Unified Communications XMPP Federation Deployment Guide First Published: December 2014 Last Updated: March 2018 Cisco Expressway X8.10 IM and Presence Service 9.1.1 or later Cisco Systems, Inc. www.cisco.com
Sophos Mobile SaaS startup guide. Product version: 7.1
 Sophos Mobile SaaS startup guide Product version: 7.1 Contents 1 About this guide...4 2 What are the key steps?...5 3 Change your password...6 4 Change your login name...7 5 Activate SMC Advanced licenses...8
Electronic Mail Paradigm
 Electronic Mail Paradigm E-mail uses the client-server model. E-mail was designed as an electronic extension of the old paper office memo. - A quick and easy means of low-overhead written communication.
IP Office Platform R11.0
 Issue 03d - (09 October 2018) Contents 8. Remote SIP Deskphones 8.1 Provisioning... the Deskphones 59 8.2 Configuring... Application Rules 61 1.1 Example Schematic... 4 8.3 Configuring... Media Rules 61
MDaemon Vs. SmarterMail Enterprise Edition
 Comparison Guide Vs. Enterprise Edition The following chart is a side-by-side feature comparison of Email Server and Enterprise Edition. Flex Licensing û Maximum Accounts Unlimited Unlimited SMTP, POP3,
Chat Setup and Management
 Chat Deployments, page 1 Chat Administration Settings, page 3 Chat Node Alias Management, page 9 Chat Room Management, page 14 Group Chat and Persistent Chat Interactions and Restrictions, page 18 Chat
Installation guide for Choic Multi User Edition
 Installation guide for ChoiceMail Multi User Edition March, 2004 Version 2.1 Copyright DigiPortal Software Inc., 2002 2004 All rights reserved ChoiceMail Multi User Installation Guide 1. Go to the URL
Broadband Router. User s Manual
 Broadband Router User s Manual 1 Introduction... 4 Features... 4 Minimum Requirements... 4 Package Content... 4 Note... 4 Get to know the Broadband Router... 5 Back Panel... 5 Front Panel... 6 Setup Diagram...7
Jabber Messenger Online Help
 Jabber Messenger 3.2.1 Online Help Table Of Contents Welcome... 1 Welcome... 1 What's New in this Release?... 2 Getting Started... 3 Logging In... 3 Creating a New Account... 6 Using Jabber Messenger...
Avaya Contact Center Express Release 4.1 XMPP Gateway
 Avaya Contact Center Express Release 4.1 XMPP Gateway Release 4.1 January 2010 2005 to 2009 Avaya Inc. All Rights Reserved. Notice While reasonable efforts were made to ensure that the information in this
Oracle Beehive. Before Using Oracle Beehive Client and Communicator. Using BlackBerry with Oracle Beehive Release 2 ( )
") Oracle Beehive Using BlackBerry with Oracle Beehive Release 2 (2.0.1.6) November 2011 Document updated November 4, 2011 This document describes how to access Oracle Beehive from your RIM BlackBerry device
Oracle Beehive Using BlackBerry with Oracle Beehive Release 2 (2.0.1.6) November 2011 Document updated November 4, 2011 This document describes how to access Oracle Beehive from your RIM BlackBerry device
LifeSize Control Installation Guide
 LifeSize Control Installation Guide January 2009 Copyright Notice 2005-2009 LifeSize Communications Inc, and its licensors. All rights reserved. LifeSize Communications has made every effort to ensure
Step-by-Step Configuration
 Step-by-Step Configuration Kerio Technologies C 2001-2006 Kerio Technologies. All Rights Reserved. Printing Date: May 3, 2006 This guide provides detailed description on configuration of the local network
Jabber Interoperability Options AIM Gateway from Jabber, Inc. LCS Gateway Sametime Gateway Setup Guide Product: SIP Gateways 5.2 Document Version: B
 Jabber Interoperability Options AIM Gateway from Jabber, Inc. LCS Gateway Sametime Gateway Setup Guide Product: SIP Gateways 5.2 Document Version: B Disclaimers Trademarks Copyright 2008 Jabber, Inc. The
Migrating from Citrix XenApp (IMA / FMA) to Parallels Remote Application Server
 to Parallels Remote Application Server") Parallels Remote Application Server Migrating from Citrix XenApp (IMA / FMA) to Parallels Remote Application Server Contents 1. Introduction a. Why Should You Migrate from Citrix to Parallels RAS b. Overview
Parallels Remote Application Server Migrating from Citrix XenApp (IMA / FMA) to Parallels Remote Application Server Contents 1. Introduction a. Why Should You Migrate from Citrix to Parallels RAS b. Overview
Cisco TelePresence Conductor with Cisco Unified Communications Manager
 Cisco TelePresence Conductor with Cisco Unified Communications Manager Deployment Guide TelePresence Conductor XC4.0 Unified CM 10.5(2) January 2016 Contents Introduction 6 About this document 6 Related
Kaseya 2. Quick Start Guide. for Network Monitor 4.1
 Kaseya 2 Router Monitor Quick Start Guide for Network Monitor 4.1 June 5, 2012 About Kaseya Kaseya is a global provider of IT automation software for IT Solution Providers and Public and Private Sector
App Orchestration 2.0
 App Orchestration 2.0 Getting Started with Citrix App Orchestration 2.0 Prepared by: Jenny Berger Commissioning Editor: Erin Smith Version: 1.0 Last Updated: April 4, 2014 Page 1 Contents Welcome to App
Partitioned Intradomain Federation for IM and Presence Service on Cisco Unified Communications Manager, Release 11.5(1)SU2
SU2") Partitioned Intradomain Federation for IM and Presence Service on Cisco Unified Communications Manager, First Published: 2017-01-10 Americas Headquarters Cisco Systems, Inc. 170 West Tasman Drive San Jose,
Partitioned Intradomain Federation for IM and Presence Service on Cisco Unified Communications Manager, First Published: 2017-01-10 Americas Headquarters Cisco Systems, Inc. 170 West Tasman Drive San Jose,
Configure the IM and Presence Service to Integrate with the Microsoft Exchange Server
 Configure the IM and Presence Service to Integrate with the Microsoft Exchange Server Configure a Presence Gateway for Microsoft Exchange Integration, page 1 SAN and Wildcard Certificate Support, page
Table of Contents 1 AQL SMS Gateway How to Guide...1
 Table of Contents 1 AQL SMS Gateway How to Guide...1 2 AQL...2 3 Overview...3 4 Trial Account with 50 free SMS messages...4 5 Prerequisites...5 6 Configuring the AQL transport...6 6.1 Configuring one or
Important Information
 May 2014 Important Information The following information applies to Proofpoint Essentials US1 data center only. User Interface Access https://usproofpointessentials.com MX Records mx1-usppe-hosted.com
Destiny Library Manager
 Destiny Library Manager Setting Up One Search Your teachers and students can take advantage of your school s subscription databases all in one place through Destiny One Search. One Search saves staff and
Transport Gateway Installation / Registration / Configuration
 CHAPTER 2 Transport Gateway Installation / Registration / Configuration This chapter covers the following areas: Transport Gateway requirements. Security Considerations When Using a Transport Gateway.
Sophos Mobile Control Technical guide
 Sophos Mobile Control Technical guide Product version: 1.1 Document date: July 2011 Contents 1. About Sophos Mobile Control... 3 2. Integration... 4 3. Architecture... 6 4. Workflow... 12 5. Directory
MeetingPlace. for Outlook System Manager s Guide
 MeetingPlace for Outlook System Manager s Guide 9900-7439-01, Rev. A0 Copyright Notice 2003 All Rights Reserved. Printed in the U.S.A. This manual is copyrighted by. You may not reproduce, transmit, transcribe,
Deploying VMware Identity Manager in the DMZ. JULY 2018 VMware Identity Manager 3.2
 Deploying VMware Identity Manager in the DMZ JULY 2018 VMware Identity Manager 3.2 You can find the most up-to-date technical documentation on the VMware website at: https://docs.vmware.com/ If you have
Step-by-Step Configuration
 Step-by-Step Configuration Kerio Technologies Kerio Technologies. All Rights Reserved. Release Date: March 16, 2007 This guide provides detailed description on configuration of the local network which
KYOCERA Net Admin User Guide
 KYOCERA Net Admin User Guide Legal Notes Unauthorized reproduction of all or part of this guide is prohibited. The information in this guide is subject to change without notice. We cannot be held liable
Content 1 OVERVIEW HARDWARE DESCRIPTION HARDWARE INSTALLATION PC CONFIGURATION GUIDE... 5 WEB-BASED MANAGEMENT GUIDE...
 Content 1 OVERVIEW...1 1.1FEATURES...1 1.2 PACKETCONTENTS...3 1.3 SYSTEM REQUIREMENTS... 1.4 FACTORY DEFAULTS...4 1.5 WARNINGS AND CAUTIONS...4 2 HARDWARE DESCRIPTION... 6 3 HARDWARE INSTALLATION...8 4
CCNA Exploration Network Fundamentals. Chapter 03 Application Functionality and Protocols
 CCNA Exploration Network Fundamentals Chapter 03 Application Functionality and Protocols Updated: 27/04/2008 1 3.1 Applications: The Interface Between Human and Networks Applications provide the means
PROXY Pro Web Console Operations v10.0. User Guide October 2017
 PROXY Pro Web Console Operations v10.0 User Guide October 2017 Table of contents 1. Intro and Overview...5 Web Console Landing Page...6 Definitions...7 Account Users...9 Common Header Fields...10 Menu
Table of Contents 1 AAA Overview AAA Configuration 2-1
 Table of Contents 1 AAA Overview 1-1 Introduction to AAA 1-1 Authentication 1-1 Authorization 1-1 Accounting 1-2 Introduction to ISP Domain 1-2 Introduction to AAA Services 1-2 Introduction to RADIUS 1-2
Horizon Cloud with On-Premises Infrastructure Administration Guide. VMware Horizon Cloud Service Horizon Cloud with On-Premises Infrastructure 1.
 Horizon Cloud with On-Premises Infrastructure Administration Guide VMware Horizon Cloud Service Horizon Cloud with On-Premises Infrastructure 1.3 Horizon Cloud with On-Premises Infrastructure Administration
Barracuda Link Balancer
 Barracuda Networks Technical Documentation Barracuda Link Balancer Administrator s Guide Version 2.3 RECLAIM YOUR NETWORK Copyright Notice Copyright 2004-2011, Barracuda Networks www.barracuda.com v2.3-111215-01-1215
CHAPTER 7 ADVANCED ADMINISTRATION PC
 ii Table of Contents CHAPTER 1 INTRODUCTION... 1 Broadband ADSL Router Features... 1 Package Contents... 3 Physical Details... 4 CHAPTER 2 INSTALLATION... 6 Requirements... 6 Procedure... 6 CHAPTER 3 SETUP...
Microsoft Microsoft TS: MS Internet Security & Acceleration Server 2006, Configuring. Practice Test. Version:
 Microsoft 70-351 Microsoft 70-351 TS: MS Internet Security & Acceleration Server 2006, Configuring Practice Test Version: 2.2 QUESTION NO: 1 Your network consists of a single Active Directory domain named
Step-by-Step Configuration
 Step-by-Step Configuration Kerio Technologies C 2001-2004 Kerio Technologies. All Rights Reserved. Printing Date: April 25, 2004 This guide provides detailed description on configuration of the local network
VMware Horizon View Deployment
 VMware Horizon View provides end users with access to their machines and applications through a unified workspace across multiple devices, locations, and connections. The Horizon View Connection Server
Kaseya 2. Quick Start Guide. for Network Monitor 4.1
 Kaseya 2 IIS Monitor Quick Start Guide for Network Monitor 4.1 June 5, 2012 About Kaseya Kaseya is a global provider of IT automation software for IT Solution Providers and Public and Private Sector IT
Internet Platform Management. We have covered a wide array of Intel Active Management Technology. Chapter12
 Chapter12 Internet Platform Management The Internet is like alcohol in some sense. It accentuates what you would do anyway. If you want to be a loner, you can be more alone. If you want to connect, it
How to Configure Authentication and Access Control (AAA)
") How to Configure Authentication and Access Control (AAA) Overview The Barracuda Web Application Firewall provides features to implement user authentication and access control. You can create a virtual
How to Configure Authentication and Access Control (AAA) Overview The Barracuda Web Application Firewall provides features to implement user authentication and access control. You can create a virtual
Avaya Contact Center Express Release 5.0 XMPP Gateway
 Avaya Contact Center Express Release 5.0 XMPP Gateway Release 5.0 August 2010 2005 to 2010 Avaya Inc. All Rights Reserved. Notice While reasonable efforts were made to ensure that the information in this
Installing Sentry-go Quick Monitors, Sentry-go Plus!, Client Tools & Enterprise Reporting
 Installing Sentry-go Quick Monitors, Sentry-go Plus!, Client Tools & Enterprise Reporting 3Ds (UK) Limited, November, 2013 http://www.sentry-go.com Be Proactive, Not Reactive! This guide gives full details
LabTech Ignite Installation
 LabTech LabTech Ignite Installation LABTECH IGNITE INSTALLATION... 1 Overview... 1 Readiness Checklist... 1 Server Installation... 2 Creating a Client Import File... 17 Using SSL Connections... 18 SSL
BlackBerry Enterprise Server for Microsoft Office 365. Version: 1.0. Administration Guide
 BlackBerry Enterprise Server for Microsoft Office 365 Version: 1.0 Administration Guide Published: 2013-01-29 SWD-20130131125552322 Contents 1 Related resources... 18 2 About BlackBerry Enterprise Server
Identity Firewall. About the Identity Firewall
 This chapter describes how to configure the ASA for the. About the, on page 1 Guidelines for the, on page 7 Prerequisites for the, on page 9 Configure the, on page 10 Monitoring the, on page 16 History
Administrator Guide. Find out how to set up and use MyKerio to centralize and unify your Kerio software administration.
 Administrator Guide Find out how to set up and use MyKerio to centralize and unify your Kerio software administration. The information and content in this document is provided for informational purposes
Getting Started with VMware View View 3.1
 Technical Note Getting Started with VMware View View 3.1 This guide provides an overview of how to install View Manager components and provision virtual desktops. Additional View Manager documentation
Dameware ADMINISTRATOR GUIDE. Version Last Updated: October 18, 2017
 ADMINISTRATOR GUIDE Dameware Version 12.0 Last Updated: October 18, 2017 Retrieve the latest version from: https://support.solarwinds.com/success_center/dameware_remote_support_mini_remote_control 2017
Cisco TelePresence Conductor with Unified CM
 Cisco TelePresence Conductor with Unified CM Deployment Guide TelePresence Conductor XC3.0 Unified CM 10.x Revised February 2015 Contents Introduction 5 About this document 5 Related documentation 5 About
Chat Setup and Management
 Chat Deployments, page 1 Chat Administration Settings, page 4 Chat Node Alias Management, page 6 Chat Deployments You can set up chat for different deployment scenarios. Sample deployment scenarios are
Ciphermail Webmail Messenger Administration Guide
 CIPHERMAIL EMAIL ENCRYPTION Ciphermail Webmail Messenger Administration Guide October 27, 2017, Rev: 8630 Copyright 2013-2017, ciphermail.com. CONTENTS CONTENTS Contents 1 Introduction 4 2 Admin login
VMware Identity Manager Connector Installation and Configuration (Legacy Mode)
") VMware Identity Manager Connector Installation and Configuration (Legacy Mode) VMware Identity Manager This document supports the version of each product listed and supports all subsequent versions until
VMware Identity Manager Connector Installation and Configuration (Legacy Mode) VMware Identity Manager This document supports the version of each product listed and supports all subsequent versions until
DHCP and DDNS Services for Threat Defense
 The following topics explain DHCP and DDNS services and how to configure them on Threat Defense devices. About DHCP and DDNS Services, on page 1 Guidelines for DHCP and DDNS Services, on page 3 Configure
Installing and Configuring vcloud Connector
 Installing and Configuring vcloud Connector vcloud Connector 2.6.0 This document supports the version of each product listed and supports all subsequent versions until the document is replaced by a new
Step 3 - How to Configure Basic System Settings
 Before configuring the IP address and network settings, complete Step 2 - How to Configure IP Address, network Settings, and Firewall. Verify the computer and the are connected to the same network, with
SIP Proxy Deployment Guide. SIP Server 8.1.1
 SIP Proxy Deployment Guide SIP Server 8.1.1 5/4/2018 Table of Contents SIP Proxy 8.1 Deployment Guide 3 SIP Proxy Architecture and Deployment 4 Supported Features 7 Prerequisites 9 Deploying SIP Proxy
System Architecture Model Version 1.1 WV Tracking Number: WV-020
 System Architecture Model Version 1.1 WV Tracking Number: WV-020 Notice Copyright 2001-2002 Ericsson, Motorola and Nokia. All Rights Reserved. Implementation of all or part of any Specification may require
ProxyCap Help. Table of contents. Configuring ProxyCap Proxy Labs
 ProxyCap Help 2016 Proxy Labs Table of contents Configuring ProxyCap The Ruleset panel Loading and saving rulesets Delegating ruleset management The Proxies panel The proxy list view Adding, removing and
Message Networking 5.2 Administration print guide
 Page 1 of 421 Administration print guide This print guide is a collection of system topics provided in an easy-to-print format for your convenience. Please note that the links shown in this document do
Enforced Client Policy & Reporting Server (EPRS) 2.3. Administration Guide
 2.3. Administration Guide") Enforced Client Policy & Reporting Server (EPRS) 2.3 Copyright 2016 Dell Inc. All rights reserved. This product is protected by U.S. and international copyright and intellectual property laws. Dell, the
Enforced Client Policy & Reporting Server (EPRS) 2.3 Copyright 2016 Dell Inc. All rights reserved. This product is protected by U.S. and international copyright and intellectual property laws. Dell, the
User Identity Sources
 The following topics describe Firepower System user identity sources, which are sources for user awareness. These users can be controlled with identity and access control policies: About, on page 1 The
 Trend Micro Incorporated reserves the right to make changes to this document and to the products described herein without notice. Before installing and using the product, please review the readme files,
Comprehensive Setup Guide for TLS on ESA
 Comprehensive Setup Guide for TLS on ESA Contents Introduction Prerequisites Requirements Components Used Background Information Functional Overview and Requirements Bring Your Own Certificate Update a
Implementing DVN. directpacket Product Guide
 Implementing DVN directpacket Product Guide directpacket Research www.directpacket.com 2 1 DVN and the IPC Community The Secure Dedicated Versatile Network (DVN) Server is a hardened internet facing device