4/27/2018 Blackbaud Internet Solutions 4.5 US 2015 Blackbaud, Inc. This publication, or any part thereof, may not be reproduced or transmitted
|
|
|
- Kathleen Nelson
- 5 years ago
- Views:
Transcription
1 Guide
2 4/27/2018 Blackbaud Internet Solutions 4.5 US 2015 Blackbaud, Inc. This publication, or any part thereof, may not be reproduced or transmitted in any form or by any means, electronic, or mechanical, including photocopying, recording, storage in an information retrieval system, or otherwise, without the prior written permission of Blackbaud, Inc. The information in this manual has been carefully checked and is believed to be accurate. Blackbaud, Inc., assumes no responsibility for any inaccuracies, errors, or omissions in this manual. In no event will Blackbaud, Inc., be liable for direct, indirect, special, incidental, or consequential damages resulting from any defect or omission in this manual, even if advised of the possibility of damages. In the interest of continuing product development, Blackbaud, Inc., reserves the right to make improvements in this manual and the products it describes at any time, without notice or obligation. All Blackbaud product names appearing herein are trademarks or registered trademarks of Blackbaud, Inc. All other products and company names mentioned herein are trademarks of their respective holder
3 Contents 5 Campaigns 6 Create Campaigns 6 Create Efforts 7 Templates 15 Mobile Friendly Templates 16 Template Data Sources 20 Add Conditional Content 23 Preview Conditional Content 29 Messages 32 View sent statistics 38 Bounced Management 43 Delivery Status 44 Newsletters 45 Acknowledgements 53 Notifications 58 Lists 66 Test Lists 74 Invalid Accounts 75 ecard Templates 76 Sample ecard Templates 86 ecard Template Merge Fields 87 ecard Message Merge Fields 88 Scheduled s 88 Delivery and Deliverability 91 Blackbaud's Role in Delivery 91 External Blacklists 93 Suppression Lists 93 Shared IP Addresses 94 Client's Role in Deliverability 95 List Quality 96 Engaged Recipients 97
4 Spam Traps 97 Sender Authentication 98 Best Practices 99 Communication Plans 100 Content 100 Design 102 FAQs 104 FAQs- Processing 104 FAQs Best Practices 107 FAQs Delivery 108 Bounced 111 Hard Bounce Failures 111 Soft Bounce Failures 114 Block Failures 115 Technical Failures 119

5 chapter 1 Campaigns 6 Create Campaigns 6 Create Efforts 7 Templates 15 Mobile Friendly Templates 16 Template Data Sources 20 Add Conditional Content 23 Preview Conditional Content 29 Messages 32 View sent statistics 38 Bounced Management 43 Delivery Status 44 Newsletters 45 Acknowledgements 53 Notifications 58 Lists 66 Test Lists 74 Invalid Accounts 75 ecard Templates 76 Sample ecard Templates 86 ecard Template Merge Fields 87 ecard Message Merge Fields 88 Scheduled s 88 contains Messages, Newsletters, Templates, Lists, Acknowledgements, ecards templates, Invalid accounts, Campaigns, and Notifications. When you create an message in the program, you first create an template. Next, you create the list of recipients. Lastly, you select the type of to send: message, newsletter, or acknowledgement. Tip: For best practice information about , refer to Blackbaud Delivery Best Practices.
6 6 CHAPTER 1 In Invalid accounts, you can view address accounts reported as invalid by their host Internet Service Provider (ISP). For example, an ISP may report an address account as invalid due to a nonexistent or canceled account. Typical causes of an invalid account occur when the address contains a typographical error or the account is canceled due to inactivity. When you host multiple sites, you can create for individual sites. To do this, log in to the site and create the . For more information, see the Administration Guide. Show Me: Watch an overview of the process. Campaigns In Campaigns, you can create campaigns using sent to targeted lists. For example, during tax season, your organization asks its members to donate their tax refunds to help buy food for rescued animals living in a shelter. You can create a series of messages that are tailored for specific audiences. With A/B split testing, you can identify the messages that are most effective for each list. Create Campaigns Campaigns records store related efforts and their associated lists and messages. You can create multiple campaign folders to organize related campaigns. Create an campaign 1. From , click Campaigns. Campaigns appears. 2. Click New campaign. The New Campaign screen appears. 3. In the Name field, enter a name for your campaign. 4. In the Description field, enter a description such as the campaign s goal or theme. 5. In the Folder field, select a folder to store the campaign. If you do not select a folder, the program saves the campaign in the root Campaigns folder. 6. To assign security rights for the campaign, select the Targeting and security tab. For each user role, you can manage rights to view, edit, delete, and change security. To add users or roles, click Add users and roles. 7. Click Save. You return to Campaigns.

7 EM AIL 7 Create Efforts You can create multiple efforts and test the effectiveness of each message. The Effort Wizard is a series of tabs that guides you through creating one. On these tabs, you select the lists and messages for the effort, send test and final messages, and view the results. You can view message and target list summary reports to monitor the success of individual messages and target lists. You can also view the effort summary report to evaluate the success of all messages and lists associated with the effort. The flowchart provides an overview of the effort creation process. Create an effort 1. From Campaigns, find the campaign to add the effort to. In the upper right pane, the campaign appears. In the bottom pane, any efforts previously created for the campaign appear. To find a campaign from the Folders tab, select the folder that contains the campaign. To find a campaign from the Search tab, search for the campaign by name. 2. Click New effort. The New Effort screen appears.
8 8 CHAPTER 1 3. In the Name field, enter a name for the effort. 4. In the Description field, enter a description that identifies the effort. 5. Click Next. The Effort Wizard appears and opens to the 1: Target Lists tab. For information about this tab, see Complete the 1: Target Lists tab on page 8. Complete the 1: Target Lists tab On the 1: Target Lists tab, you select lists containing the primary recipients you are targeting for your effort. You select lists saved in Lists; these can be query-based or imported. For more information about lists, see Lists on page From the 1: Target Lists tab, click Insert target list. The Select Lists screen appears. 2. To add an list, select the list on the left and click Add to move it into the Selected lists box. Add each list as required. 3. Click OK. You return to the 1: Target Lists tab. In the grid, the selected lists appear. 4. In the Action column, view a summary report or the properties of the selected target list. You can also remove the selected target list from the effort. To view a summary report for the selected target list, click Click here to view report. The tabs on this report display the same information as the Target List Results on the Results tab. For more information, see Complete the 7: Results tab on page 12. To view the selected target list s properties, click Click here to view/edit this target list s properties. On the List Properties tab, view the list s data source and query or import file name. The List status box displays whether the program loaded the list successfully or if there are any errors. On the View List tab, view a list of all recipients included in the list. On the List Templates tab, view a list of all templates associated with the selected list. On the List Messages tab, view a list of all messages sent to the selected list. To remove the selected target list from the effort, click Click here to delete this target list. 5. In the Data source column, view the data source for the lists, such as a query of constituents or an imported list. 6. If a problem exists with a selected list, the error appears in the Loaded status column. To resolve the error, exit Campaigns and open the list in Lists, where you can edit the
9 EM AIL 9 queries that make up the list or replace the *.csv file that creates an imported list. If the list is imported, you can also change the field mapping for the address and the recipient display name. For information about how to edit a list, see Lists on page 66. Note: Each recipient in a target list receives one from the effort. After you add a target list, you can run a duplicate search to identify any addresses that appear in more than one target list. For more information about duplicate searches, see Search for duplicate addresses on page To select the seed lists that contain the recipients to copy on all test messages, select the 2: Seed Lists tab. For information about this tab, see Complete the 2: Seed Lists tab on page 9 To save and return to Campaigns, click Return. Complete the 2: Seed Lists tab On the 2: Seed Lists tab, you select seed lists that contain the recipients to copy on all test messages. These are typically people in your organization who track the progress of the effort. On the Lists tab of the effort summary report, you can view the statistics for test messages sent to seed lists. Seed lists are excluded from statistics on all other tabs of the report, such as the Messages Sent and Click-throughs tab. 1. From an open effort, select the 2: Seed Lists tab. 2. Click Insert seed list. The Select Lists screen appears. 3. To add a seed list, select the list on the left and click Add to move it into the Selected lists box. Add each list as required. 4. Click OK. You return to the 2: Seed Lists tab. In the grid, the selected lists appear. 5. In the Action column, you can view a summary report or the properties of the selected seed list. You can also remove the selected seed list from the effort. To view a summary report for the selected seed list, click Click here to view report. To view the selected seed list s properties, click Click here to view/edit this Seed List s properties. On the List Properties tab, view the list s data source and query or import file name. The List status box displays whether the program loaded the list successfully or if there are any errors. On the View List tab, view a list of all recipients included in the list. On the List Templates tab, view a list of all templates associated with the selected list. On the List Messages tab, view a list of all messages sent to the selected list. To remove the selected seed list from the effort, click Click here to delete this Seed List. 6. In the Data source column, view the data source for the lists, such as a query of constituents or an imported list. 7. If a problem exists with a selected list, the error appears in the Loaded status column. To resolve the error, exit Campaigns and open the list in Lists, where you can edit the queries that make up the list or replace the *.csv file that creates an imported list. If the list is imported, you can change the field mapping for the address and the recipient display name. For information about how to edit a list, see Lists on page To select the exclusion lists that contain the recipients to exclude from all sent for this effort, select the 3: Exclusion Lists tab. For information about this tab, see Complete the 3: Exclusion Lists tab on page 10. To save and return to Campaigns, click Return.
10 10 CHAPTER 1 Complete the 3: Exclusion Lists tab On the 3: Exclusion Lists tab, you select exclusion lists that contain recipients to exclude from all sent for the effort. Exclusion lists allow you to exclude recipients without editing the existing target list. For example, if you send a follow-up to an effort, you can exclude recipients who donated as a result of the previous From an open effort, select the 3: Exclusion Lists tab. 2. Click Insert exclusion list. The Select Lists screen appears. 3. To add an exclusion list, select the list and click Add. It appears under Selected lists. Repeat for each list to add. 4. Click OK. You return to the 3: Exclusion Lists tab. In the grid, the selected lists appear. 5. In the Action column, view the properties of the selected exclusion list. You can also remove the selected exclusion list from the effort. To view the selected exclusion list s properties, click Click here to view/edit this Exclusion List s properties. On the List Properties tab, view the list s data source and query or import file name. The List status box displays whether the program loaded the list successfully or if there are any errors. On the View List tab, view a list of all recipients included in the list. On the List Templates tab, view a list of all templates associated with the selected list. On the List Messages tab, view a list of all messages sent to the selected list. To remove the selected exclusion list from the effort, click Click here to delete this Exclusion List. 6. In the Data source column, view the data source for the lists, such as a query of constituents or an imported list. 7. If a problem exists with a selected list, the error appears in the Loaded status column. To resolve the error, exit Campaigns and open the list in Lists, where you can edit the queries that make up the list or replace the *.csv file that creates an imported list. If the list is imported, you can also change the field mapping for the address and the recipient display name. For information about how to edit a list, see Lists on page To create test messages for each target list, select the 4: Messages tab. For information about this tab, see Complete the 4: Messages tab on page 10. To save and return to Campaigns, click Return. Complete the 4: Messages tab On the 4: Messages tab, you create test messages for each target list. 1. From an open effort, select the 4: Messages tab. 2. For all the target lists, create each message. a. Select a list in the Target List pane and click New message. The Select Template screen appears. b. In the Template field, select an template for the message. The templates that appear in the list are those associated with the target lists type. For example, if the target list is
11 EM AIL 11 based on a query of constituents, templates with Constituents or Generic selected in the Data source field appear. c. Click Next. The Properties screen appears. d. In the Name field, enter a unique name to help identify the . e. In the Issue date field, the current date and time appear automatically. To edit the issue date, enter a different date and time. f. The bottom pane displays the s default content. You can use the HTML editor to change the message s content, appearance, and layout. Warning: Blackbaud recommends that you use inline styles, such as <div style= backgroundcolor:blue; >Welcome color</div>, when you create and design the content. Do not define classes or use external references because vendors, such as Gmail or Outlook, are not guaranteed to render the styles correctly when the recipient reads the . g. To save the message, click Save. You return to the 4: Messages tab. 3. To set test parameters for each message, select the 5: Send Tests tab. For information about this tab, see Complete the 5: Send Tests tab on page 11. To save and return to Campaigns, click Return. Complete the 5: Send Tests tab On the 5: Send Tests tab, you set test parameters for each message. You can test variables for each message, such as the message s content, subject line, scheduled time of departure, and the name and address used for sending. You can also define the sample size for each test message. 1. From an open effort, select the 5: Send Tests tab. 2. To create test parameters for a message, select a list in the Target List pane and select a message in the Messages for <Target List> pane. 3. For each message, set the test parameters. a. In the Test Message Parameters pane at the bottom, the Subject, Send date, and From fields display the default values from the message s template. You can enter new values for these fields. b. In the Sample size field, specify how many recipients included in the target list are to receive the test message. To send the test message to a percentage of the recipients, select Percent of list and enter the percentage of recipients. To send the test message to a specific number of the recipients, select Recipients and enter the number of recipients. Note: To send the test message to the entire target list, select Percent of list and enter 100%, or select Recipients and enter the total number of eligible records in the target list. c. Specify whether to send the test message now or later. To send the test message now, click Send test message. The test parameters are disabled, and the Status displays Processing as the messages processes. After the is processed, click Refresh. The Status displays Sent.
12 12 CHAPTER 1 To save the test parameters and send the test message at a later time, click Save. When you later open the effort, you can then click Send test message to send the message. 4. To send the message that has the best test results to all remaining recipients for each target list, select the 6: Send Final tab. For information about this tab, see Complete the 6: Send Final tab on page 12. To save and return to Campaigns, click Return. Complete the 6: Send Final tab On the 6: Send Final tab, you can send the message with the best test results to all the remaining recipients, such as those who did not yet receive an , in a target list. This message is not sent to any seed list recipients. 1. From an open effort, select the 6: Send Final tab. 2. Select a target list. In the Results of Test Messages pane on the right, all the test messages for that list appear. 3. To identify the most successful test message, select each message and view its results. 4. Select the message to send as the final message to all remaining recipients in that target list and click Send as final. A confirmation message appears. 5. Click OK. The Final Status displays Processing as the final messages are sent. 6. After the is processed, click Refresh. The Final Status displays Sent. 7. To view the results for each target list, select the 7: Results tab. For information about this tab, see Complete the 7: Results tab on page 12. To save and return to the Campaigns, click Return. Complete the 7: Results tab On the 7: Results tab, you can view the results for each target list. 1. From an open effort, select the 7: Results tab. 2. In the Target lists box on the left, select a list. In the box on the right, information about the target list appears. To view information about the list s results, select the applicable tab. To view a pie chart of the percentage of messages that are sent and not sent to the selected list, select the Summary tab. A table displays the number of sent and not sent messages to the list and the total number of recipients. To view a pie chart of the opened, unopened, and undelivered messages sent to the selected list, select the Sent tab. A table breaks down the number of opened, unopened, and undelivered messages by the total number sent to the list, the percentage of sent , and the percentage of total messages. The % of Sent column displays the percentage of opened and unopened , excluding those that are undelivered. The % of Total column includes all , including the undelivered. To view the pages the recipients in the target list access from links in the message, select the Click-throughs tab.
13 EM AIL 13 To view the transactions generated by the recipients in the target list as a result of the message, select the Conversions tab. To view summary information about each message sent to the target list, select the Message tab. To view a summary report about a specific message, click the message s name in the Test message column. For more information about the message summary report, see View a message summary report on page Click Save. 4. To return to Campaigns, click Return. View a message summary report The message summary report contains information about a specific message. 1. From an open effort, select the 7: Results tab. To view the delivery status of the message, select the Delivery summary tab. A pie chart displays the percentage of messages sent and not sent and a table displays the total number of messages sent and not sent. To view a pie chart of the opened, unopened, and undelivered messages, select the Messages sent tab. A table breaks down the number of opened, unopened, and undelivered messages by the total number sent , the percentage of sent , and the percentage of total messages. The % of Sent column displays the percentage of opened and unopened , excluding those that are undelivered. The % of Total column includes all , including the undelivered. To view the pages the recipients access from links in the message, select the Click-throughs tab. To view the transactions generated by the recipients as a result of the message, select the Conversions tab. To view a breakdown of message results for each target list, select the List details tab. To view a summary report about a specific target list, click the list s name. If the message included conditional content, the Conditional Content tab appears. The grid lists statistics about how each condition in a content block performed. It includes the number of recipients that received the condition, the number who opened the , the number of click-throughs, the number of conversions (transactions), and the total gift amounts. For more information about conditional content, see Add Conditional Content on page 23. Note: To view an Status Report, click Status report on the Summary tab. The Status report contains the time and date the program created, prepared, processed, uploaded, and accepted the message. 2. To view all the recipients of the message, select the Recipients tab. The grid displays each recipient s name and address and the date and time the message was sent. If the message bounced or was opened, the date and time are also included. 3. To view details about the and preview the message s content, select the Properties tab. 4. To close the report, click OK. You return to the 7: Results tab. 5. To return to Campaigns, click Return.
14 14 CHAPTER 1 View an effort summary report The effort summary report provides a current snapshot of the effort s results. This report includes information about all messages sent to lists as part of the effort. 1. From Campaigns, under efforts, select the effort. 2. In the Action column, click Click here to review report. The Effort Summary Report screen appears. On this screen, you can select tabs to view information about the results. To view the recipient summary of all messages sent for the effort, select the Delivery summary tab. A pie chart displays the percentage of messages sent and not sent, and a table displays the total number of messages sent and not sent. To view a pie chart of the opened, unopened, and undelivered messages, select the Messages sent tab. A table breaks down the number of opened, unopened, and undelivered messages by the total number of sent , the percentage of sent , and the percentage of total messages. The % of Sent column displays the percentage of opened and unopened , excluding those that are undelivered. The % of Total column includes all , including the undelivered. To view a pie chart showing the percentage of messages that were not sent for the effort because of opt-outs, no addresses, and invalid accounts, select the Messages not sent tab. A table breaks down the number of opt-outs, no addresses, and invalid accounts by the total number of messages not sent, the percentage of messages not sent, and the percentage of total messages. The % of Not Sent column displays the percentage of messages not sent. The % of Total column includes all sent and not sent, including those delivered successfully. To view the pages the recipients access from links in messages sent for the effort, select the Click-throughs tab. To view the transactions generated by the recipients as a result of messages sent for the effort, select the Conversions tab. To view a breakdown of message results for each target list, select the List details tab. To view a summary report about a specific target list, click the list s name. The tabs on this report display the same information as the Target Lists Summary Report on the Results tab. 3. To close the report, click OK. You return to the Wizard screen. Search for duplicate addresses You can search for addresses that appear in more than one target list. 1. Access the Search for Duplicates screen. From Campaigns, click the Duplicate search button for the effort to search for duplicates. From the Effort Wizard screen for the effort, click Duplicate search to search for duplicates. 2. Select the Duplicate Search tab. 3. To run the duplicate search, click Start. The Search Status displays This effort has been queued for searching. The amount of time the search is queued can be longer than 30 minutes. These items determine how long a search is queued:
15 EM AIL 15 The intervals set under List acquisition and refresh on the Settings tab in Sites & settings. If you start a duplicate search while a list is being refreshed, there may be a delay because the search cannot begin until the list refresh is complete. For more information, see the Administration Guide. The number of lists queued for refresh before the search. Those lists must refresh before the duplicate search can begin. 4. When the search is queued, close the Duplicate Search screen. 5. After the search is complete, open the Duplicate Search screen again. The Search Status displays This effort has been successfully searched and a grid displays any lists that contain duplicate addresses. 6. To view addresses that appear in multiple target lists, select the Duplicate Records tab. 7. The grid displays the addresses that appear in multiple target lists. Using the filter options at the top of the grid, you can filter the list of duplicates by address, recipient name, or target list. Note: Search results on the Duplicate Records tab are not dynamic. The records that appear in the grid are those from the last search. Any changes made to target lists since the last search, such as due to reacquiring, adding, and removing, do not appear. To update the search results, click Start to run the search again. 8. To close the Duplicate Records screen, click Close. Templates Warning: It is important that your organization assigns full Administrator rights to only a select number of users for Templates. Any changes can affect multiple web pages. We strongly encourage users knowledgeable in all areas of website design to perform tasks in Templates. In Templates, you design and maintain templates to provide consistency for various types of . For example, you can have an organization template with a header and font used to send to all alumni. On the Properties tab, you set defaults for the messages created from the template, such as the from name and subject. On the Design tab, you design the basic layout for the template, including any graphics or pictures. Show Me: Watch how to create an template. When you create an message, you base the message on a template to save time and effort. All the elements exist in the template. You can change a specific message, but the template provides a base that helps maintain consistency. Note: In each you send, you must include links to the pages on your website that contain your organization s privacy statement and the User Preferences Form so recipients can opt out of your communications. We recommend you include these links in templates.

16 16 CHAPTER 1 Mobile Friendly Templates To improve your marketing for mobile users, six mobile friendly templates are available for you to copy and use as new templates. These templates are more narrow in width and include larger fonts for improved usability for a specific mobile device, such as a smartphone or tablet. You can easily identify these in the templates grid by viewing templates with Placeholder in the Description column. One copy of each mobile friendly template exists in the program. When you host multiple websites, you access them in each site's Templates area. To use these templates, create a copy of one and update the placeholder text in the new template with your unique content. For example, you can replace the merge field placeholder text with merge fields in the HTML editor. You can also replace the sample logo banner with your organization's logo banner. Tip: These templates are mobile friendly but not responsive; they do not render differently across diverse devices. To learn about designing a responsive template for multiple devices, such as smartphones, tablets, browsers, desktop, and web-based programs, visit Responsive Page Design in the Developer Guide. Design an template You do not send messages or select recipients from Templates. You send messages from Messages and save recipients as lists in Lists. For more information about how to send messages, see Messages on page 32. For more information about lists, see Lists on page 66. Show Me: Watch how to create an template. 1. From , click Templates. Templates appears. 2. Click New template. The New template page appears.
17 EM AIL On the Properties tab, enter a name for the template in the Template name field. Keep in mind that you use the template for all messages of this type. 4. In the Description field, enter additional information about the template such as a brief description or notes about the template. 5. In the Data Source field, select the data source. The Data source determines which type of list can be used for messages created from the template and which merge fields are available when you write content. When you set a data source on a template, messages created from the template can be sent to only lists that use the same type of data source. For more information about the types of data sources, see Template Data Sources on page If you select "Constituents" or "Chapter," the Export definition field appears. In this field, click the binoculars to select an export definition from Blackbaud CRM. The fields you include in the Selected Fields box on the export definition screen in Blackbaud CRM appear as merge fields in the design pane. This provides a way for you to include any applicable field in Blackbaud CRM as a merge field in Blackbaud Internet Solutions. Note: You can only select export definitions with a record type of Constituent in the Export definition field. To verify the record type, go to Administration, Export definitions in Blackbaud CRM. The program automatically includes the CMS Constituent Export Definition by default. For information about export definitions, see the Blackbaud CRM Query and Export Guide. If you select Constituents, the address type field also appears and defaults to use the constituent s primary address. To use a different type when messages are sent using this template, select it from the list. When a constituent does not have the address type you select in the field, the message is sent to their primary address. Note: To change the address type a message inherits from its template, select it from the

18 18 CHAPTER 1 address type field when you create the message. For more information, see Design and send an message on page In the Appeal field, select the appeal you want to associate with the template. You can add or change the appeal when you create messages that use this template. 8. In the Subject, From Name, and From Address fields, enter a default subject to include in the Subject field of messages you create with the template, as well as an address and name to include in the From field of messages. When you create messages, you can overwrite the subject. Note: Because you do not send from Templates, the program does not include recipients in the Send to field in the template. The program saves the recipients as an list in Lists. For information about lists, see Lists on page To receive responses from recipients at a different address than the one you use to send the message, enter a return address in the Reply Address field. 10. To receive failure messages when messages are not delivered, select Failure to send notification. In the Notification address field, enter an address to receive failure messages. Note: Failures are addresses that do not receive the messages. Failure can also be called nondelivery receipts, bouncebacks, UnDeliverables, or Delivery Status Notifications (DSN). For information about how the program handles failures, see Bounced Management on page To assign security rights for the template, select the Targeting & Security tab. For each user role, you can manage rights to view, edit, delete, and change security. 12. To add users or roles, click Add users and roles. 13. To assign rights, select View, Edit, Delete, or Change Security. Note: Edit rights allow users to edit the template and its defaults. To use the template to create messages, users only need View rights. If users edit a template, the changes do not affect messages previously created based on the template. For more information about security and user roles, see the Users & Security Guide. 14. Click Save. The template opens to the Design tab.
19 EM AIL 19 Note: To see the scroll bar on an template, you must use a screen resolution of greater than 800 x Enter the default content for all messages created from this template. To have personalized information from other Blackbaud programs appear in messages created from this template, add merge fields. a. To display the list of available merge fields, click Merge fields on the Insert tab in the toolbar. To expand the list, click the plus sign next to a field category. If the template uses a "Constituents" or "Chapter" data source, the merge fields that appear are based on the export definition you select in the Export definition field on the Properties tab. b. To add a merge field to the message, double-click or drag and drop a field in the content area. c. Put fields where you want them to appear in the body of the . For example, enter Hello, First Name." In the , Hello, [recipient s first name] appears. To move a field, click and drag it to the new location. For example, you can create an template for messages sent to existing program users who attempt to register again. In the bottom pane, you can enter the content required to remind the user he is already a registered user and to provide the existing username and password information. 16. To add conditional content to the message to customize it for different types of recipients, click Conditional content on the Insert tab in the toolbar. For more information about conditional content, see Add Conditional Content on page Create links to the pages of your website that contain the User Preferences Form and your organization s privacy statement. You must include these links in each you send. 18. To format the template s appearance and layout, use the HTML editor. For information about the HTML editor, see the Program Basics Guide.
20 20 CHAPTER 1 Warning: Blackbaud recommends that you use inline styles, such as <div style= backgroundcolor:blue; >Welcome color</div>, when you create and design the content. Do not define classes or use external references because vendors, such as Gmail or Outlook, are not guaranteed to render the styles correctly when the recipient reads the Click Save. Warning: If you select the Messages tab before you click Save, you lose the information you entered on the Design tab. 20. To send a message based on the new template, select the Messages tab and click New message. The New Message screen appears. For more information about how to send a message, see Design and send an message on page To save the template, click Save. 22. To return to Templates, click Return. Template Data Sources You can select a data source for each template you create. The data source determines which type of list can be used for messages created from the template and which merge fields are available when you write content. When you set a data source on a template, messages created from the template can be sent to only lists that use the same type of data source. There are several types of data sources available to serve different purposes: Constituents: Use the Constituents data source to send s to lists based on queries of constituents from Blackbaud Internet Solutions. The Constituents data source provides the largest variety of merge fields for personalized messages. This is the option you will use most often. Registered Users: Select the Blackbaud Internet Solutions data source for s sent to users who have forgotten their login credentials and are attempting to register again or for s sent automatically to imported users with their usernames and passwords. Imported lists: If you import lists from CSV files, those lists appear as data sources in this field. Select an imported list when you want to use a particular list for all messages created from a template. Appeal: Select the Appeal data source for messages sent to constituents and anonymous users who subscribe to communications, such as newsletters. Subscribers receive the message once their subscription is fully processed. Chapter: Select the Chapter data source for messages sent to members of a chapter. None: When you select None for the data source, you can send the message to any type of list, but the message will not include any merge field options for you to personalize messages. Note: For more information about data sources for lists, see Lists on page 66. View the tabs of an template After you create an template, you can view its properties, design, and any messages created based on it. If you have applicable security rights, you can also edit the properties and design of
21 EM AIL 21 the template. Changes made to the template do not affect individual messages already created based on the template. 1. From , click Templates. Templates appears. 2. To search for a template, enter its name or subject, or select its data source in the filter fields and click Filter. The templates that match your criteria appear. Note: The grid can display up to 50 results at a time. If you have more than 50 results, click Prev or Next to page through the results, or select the page number to view. 3. Next to the template to view, click Click here to edit this template. The template Properties screen appears. 4. On the Properties tab, view the properties and security settings entered when the template was created. To help you navigate through the information, the Properties tab contains the Properties and Targeting & Security tabs. On the Properties tab, view the name, description, data source, and default mailing options entered when the template was created. If the template message contains merge fields, you cannot change the selected data source. When you host multiple sites, the Assign to site field appears on the Properties tab so you can move a template from its current site to another site. If the template is in use on the source site, it continues to be on that site. However, the template is now associated with the target site and its security. On the Targeting & Security tab, view the security rights assigned to user roles for the template.


22 22 CHAPTER 1 5. To view the default content for all messages based on the template, select the Design tab. 6. To view the messages created based on the template, select the Messages tab. 7. To return to Templates, click Return. View a message created from an template 1. From , click Messages. Messages appears. 2. In the Filter by Template field select a template. 3. Click Filter. Messages that use the template appear. To view a sent message, select it and click Click here to view report. The Message Report screen appears. For information about the tabs on this screen, see View the tabs of a sent message on page 1. To view a message the program has not yet sent, select it and click Click here to edit this message. The Editor page appears. For information about how to edit the message, see Design and send an message on page 32.
23 EM AIL 23 Note: The grid can display up to 50 results at a time. If you have more than 50 results, click Prev or Next to page through the results, or select the page number to view. 4. To return to Messages, click Return. Copy an template Save yourself time and effort. When you need to create a new template and a similar one exists, copy and tweak the existing template to create the new one rather than start with a blank template. 1. From , click Templates. Templates appears. 2. To search for a template, enter its name or subject, or select its data source in the filter fields and click Filter. The templates that match your criteria appear. Note: The grid displays up to 50 results at a time. If you have more than 50 results, click Prev or Next to page through the results. 3. Select a template and click Click here to copy this template. The New template page appears with settings from the existing template. Note: To improve your marketing for mobile users, six mobile friendly templates are available for you to copy and use as new templates. You can easily identify these in the templates grid by viewing templates with Placeholder in the Description column. When you create a copy of one, make sure you update the placeholder text in the new template with your unique content. For example, you can replace the merge field placeholder text with merge fields in the HTML editor. You can also replace the sample logo banner with your organization's logo banner. To secure the content in these templates, you cannot edit or delete them. 4. On the Properties tab, enter a new name in the Template Name field. 5. Edit the template settings as necessary. For information about how to design an template, see Design and send an message on page Click Save. The template opens to the Design tab with a layout based on the original template. 7. Edit the layout as necessary. For information about how to design an template, see Design and send an message on page Click Save. 9. To return to Templates, click Return. Add Conditional Content Add conditional content to an message to customize the message for different types of recipients. For example, you may send a message to alumni and the parents of current students where most content is the same but you need to customize some sections for the two groups of recipients. With conditional content blocks, you can create a single message that generates the two versions of the content. A conditional content block works as a container that holds different pieces of content and determines where the content appears in the message. Within the content block, you add conditions, which are chunks of content associated with a query or list of recipients.

24 24 CHAPTER 1 The example below demonstrates how this works. This message includes a conditional content block containing two conditions a paragraph specifically for parents and another for alumni. When you send the message, recipients in the query or list of parents view the Parents paragraph and recipients in the query or list of alumni view the Alumni paragraph. Conditional content workflow Determine your targets Create lists or queries that include the recipients to customize content for. Add a condition block In the area where you want the content to appear, click Conditional content on the Insert tab in the toolbar. Add condition Add the default condition. To add other conditions, define the content and select the group of recipients who can view it. Note: The order of conditions is important because recipients may fall into more than one query or list. In that case, the recipient receives the most top-level condition. For example, you have a condition for each of these groups Alumni, Parents, and Current Students. Because a parent could also be an alumnus, you need to order the conditions so the Parents condition appears at the highest level. This ensures that parents who are alumni receive the message intended for parents. Verify content Use Conditional content preview on the View tab in the toolbar to verify that content appears as expected for each group of recipients.


25 EM AIL 25 Report on message results After the message is sent, view the Message Report to evaluate how each condition performed. Add conditional content 1. From an open message, click Conditional content on the Insert tab in the toolbar. The Conditional Content screen appears. 2. Enter a name for the conditional content block and click OK. You return to the message and the new conditional content block appears in the message. 3. The conditional content block includes a default condition automatically. The default content appears for any recipients not included in a condition specified for the block. You can leave the default condition blank or click Edit to access the Enter the default content screen.
26 26 CHAPTER 1 4. Use the HTML editor to add text, merge fields, and images for the default content. Warning: Blackbaud recommends that you use inline styles, such as <div style= backgroundcolor:blue; >Welcome color</div>, when you create and design the content. Do not define classes or use external references because vendors, such as Gmail or Outlook, are not guaranteed to render the styles correctly when the recipient reads the Click OK and you return to the message. If you added content to the default, it is now labeled with a brief preview of the text included in the condition. 6. To add the first condition, click Add condition. The Conditional Content screen appears.
27 EM AIL To define the condition based on a query, select Query and click Change. The Query Search screen appears so you can select a query. To define the condition based on an list, select List and click Change. The Select Lists screen appears so you can select a list. 8. Enter the content for this condition.

28 28 CHAPTER 1 9. Click OK. You return to the message and the new condition appears in the conditional content box. The condition is labeled with the selected query or list and contains a brief preview of the text entered.
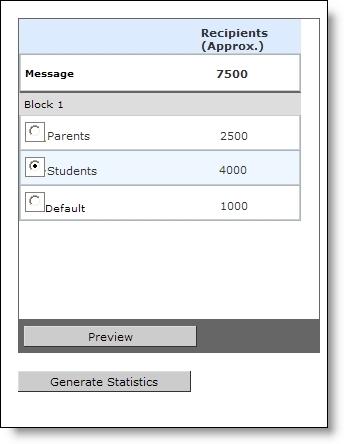
29 EM AIL Continue to add conditions to the block as needed. 11. To edit a condition, click Edit. 12. To move a condition, click the up or down arrow. 13. To delete a condition, click Remove. 14. To preview each version of the message, click Conditional content preview on the View tab in the toolbar. The View Message screen appears. For more information about how to preview content, see Preview Conditional Content on page 29. Click Close to return to the message. 15. Click Save. If you have created a message or newsletter, you can send the message to recipients. After you send the message, the Conditional Content tab in the Message Report displays statistics about how each condition in the message performed. The report includes the number of recipients that received the condition, the number who opened the , the number of click-throughs, the number of conversions (transactions), and the total gift amounts. Note: Test messages do not display merge field data or conditional content as they will appear in the final message. Instead, the test message includes placeholders where these items will appear in the final message. To test merge fields and conditional content, select the test list in the To field and then select Send final. Preview Conditional Content After you create a message that contains conditional content, you can preview each version of the message to verify that content appears as expected for each group of recipients. You can also view the approximate number of recipients who will receive each condition. Note: You must add conditional content and select a target list before you can preview conditions or generate statistics. Preview conditional content 1. From a message containing conditional content, click Conditional content preview on the View tab in the toolbar. The View Message screen appears. 2. Select the conditions in each block to view and click Preview. The message appears on the right.

30 30 CHAPTER 1 3. To view the number of recipients who will receive each condition, click Generate statistics. The Recipients column displays the approximate number of recipients for each condition.
31 EM AIL 31

32 32 CHAPTER 1 Note: Generate statistics does not appear on the View Message screen for templates or messages without a selected target list. 4. Click Close to close the View Message screen and return to the message. Messages In Messages, you can add, delete, and view messages. To ensure consistency and save time, you can create an message from an existing template. You create templates in Templates. We recommend only users with Administrator rights create and edit templates. Tip: When you delete an message, it removes from the grid on the Messages page, but it remains in the database. To run a process that improves performance by permanently deleting these messages, schedule the Delete permanently setting in Administration. For more information, refer to Delete permanently on page 1. You can also use an existing message to create one. To do this, open and copy the existing . You can change the copy as required, save it as a new , and send the message. Note: On the Messages screen, if Click here to edit this message appears in the Action column, the program has not sent the . Before you send an , you can edit it in Messages. To make changes, click Click here to edit this message. Design and send an message When you create and design an in Messages, it is sent only once. You can edit the before you send it, but not after. 1. From , click Messages. Messages appears. 2. Click New message. The Select Template screen appears.
33 EM AIL In the Template field, select a template. To decide on a template, consider the type of you will write. For information about templates, see Templates on page In the Site to select template from field, select a site to narrow the list of templates you can use for the message. You can select a template from another site even though the message is for the site you are currently on. If you do not host multiple websites, your single site defaults in the field. 5. Click OK. The New message page appears. Note: To see the scroll bar on an message, use a screen resolution greater than 800 x In the Recipient lists field, select the lists of recipients to include on the message. a. If the message uses a template with a data source other than "Appeal," click the binoculars. The Select Target Lists screen appears. The grid displays the saved lists that you have security rights for and that match the data source type selected on the template. Tip: For more information about data sources, see Template Data Sources on page 20.
34 34 CHAPTER 1 You create and store lists in Lists. Lists include individuals from offline constituent queries and imported lists. When the message uses a list with "Constituents" as the data source, individuals must have an address that matches the type selected in the address type field on the template or message. Otherwise, the message is sent automatically to the primary address on the individual's constituent record. When an individual s record is marked Requests no , the individual is excluded from the list and does not receive the message. For more information about Lists, see Lists on page 66. Note: If the message uses a template with "Appeal" as the data source, the Recipients field automatically populates with the appropriate subscribers list. This list is based on the people who subscribed to the appeal category on an Signup form, which can include both registered and anonymous website users. To include additional recipients, click Add additional recipient lists. For information about the Signup Form, see the Forms Guide. b. Enter criteria to narrow the list and click Filter. The grid displays the lists that meet the criteria. Note: When the template s data source is Chapter, you can filter chapters by the Chapter Manager part name. In the Filter by Name field, enter the name of the Chapter Manager part. The grid displays the available chapters in a Chapter Manager part name Chapter name List format. For example, Alumni Chapter Manager San Diego List contains the members of the San Diego chapter created by the Chapter Manager part named Alumni Chapter Manager. To send the message to the members of a chapter, add it to the Selected Lists box. c. To add a list, select it and click Add. The list appears in the Selected Lists box. You can
35 EM AIL 35 include multiple lists. Depending on your website environment and configuration, sending to a large list of recipients may cause performance issues. If you experience this, we recommend you include smaller queries or fewer queries in the list. For more information, see Create an list on page 67. d. To remove a list from the Selected Lists box, select it and click Remove. e. Click OK. You return to the New message page. 7. To send the message to a test group, such as people in your organization that need to approve the message, in the Test lists and Test s fields, specify recipients for a test version of the message. In the Test lists field, click the binoculars to select the lists of recipients for the test version. The Select Test Lists screen that appears has the same options as the Select Target Lists screen. In the Test s field, enter addresses if you do not use lists or if you want to include recipients who are not in your lists. Note: We recommend that you send the message to test recipients before the final recipients. The test recipients can review the message and verify its design in multiple client readers. You can create lists of test recipients in Lists. For information about lists, see Test Lists on page In the identifier fields, enter a name for the message, a subject to include in its Subject field, and an address and name to include in the From field. Note: If the template includes a subject, it automatically appears in the Subject field. You can edit the subject as necessary. 9. In the Issue date field, enter when you created the message. By default, the current date and time appear. 10. In the Send after date field, enter when to send the message. By default, the current date and time appear. However, you can schedule the for a future date or time. For example, you may be out of the office for the next month but need to send your regular weekly during that time. Or you may design an event marketing campaign and schedule messages to send as reminders one week, three days, and the day before the event. To send the at a future date or time, enter the date and time. The website does not process the until the date and time you enter when you click Send final. If you delete the before the date you enter in the Send after date field, the program does not process the and it is not sent to recipients. To immediately send the when you click Send final, leave the current date and time. 11. The Appeal field defaults to the appeal selected for the template the message uses. When this field is blank or if you want to change the appeal, click Change. The Appeal Search screen appears. For information about how to use the search screen, see the Program Basics Guide. 12. The address type field defaults to the type selected for the template the message uses. When this field is blank or if you want to change the type, select it from the list. 13. To receive responses from recipients at a different address than the one you use to send
36 36 CHAPTER 1 the message, click More Options and enter the address in the Reply Address field. 14. Under Notifications are to be sent to the following addresses, select Failures to receive failure messages when messages are not delivered. In the field beside the checkbox, enter an address to receive failure messages. Note: Failures are addresses that do not receive messages. Failure can also be called nondelivery receipts, bouncebacks, UnDeliverables, or Delivery Status Notifications (DSN). For information about how the program handles failures, see Bounced Management on page The bottom pane displays the 's default content. To format the message s appearance and layout, use the HTML editor. For information about the HTML editor, refer to the Program Basics Guide. Warning: Blackbaud recommends that you use inline styles, such as <div style= backgroundcolor:blue; >Welcome color</div>, when you create and design the content. Do not define classes or use external references because vendors, such as Gmail or Outlook, are not guaranteed to render the styles correctly when the recipient reads the . When you design an message, you must include hyperlinks to the Privacy Page specified on the Settings tab in Sites & settings and a User Preferences Form on your website. For more information, see the Administration Guide. To personalize the message with information about the constituent, add merge fields. a. To display the list of available merge fields, click Merge fields on the Insert tab in the toolbar. If the message is based on a template with a "Constituents" or "Chapter" data source, the merge fields that appear are based on the export definition selected for the template. For more information about templates and export definitions, see Design an template on page 16. b. To add a merge field to the message, double-click or drag and drop the field in the content area. c. In the body of the , put fields where you want them to appear. For example, enter Hello, First Name. In the , the recipient reads Hello, [the recipient s first name]. To move a field, click and drag it to the new location. Note: When you add a link in your message to a Blackbaud Internet Solutions web page, the URL contains valuable information to track data and to automatically populate biographical information on your web page. Use this example to identify each piece of data the URL includes: ID]&srctid=[source type ID]&erid=[ recipient ID]&trid=[tracking ID]. d. To add conditional content to the message to customize it for different types of recipients, click Conditional content on the Insert tab in the toolbar. For more information about conditional content, see Add Conditional Content on page Click Save.
37 EM AIL 37 Send the message To send the message to the test recipients, click Send test. The message may take a few minutes to send if you use a large list. When the program sends the message, you return to Messages. When you receive the test , verify the message and its components look and work correctly before you send the final . Note: Test messages do not display merge field data. Instead, the program includes placeholders where the merge data will appear in the final message. Also, the program disregards the value in the Send after date field when you click Send test and immediately sends the test message. To send the message to its final recipients now or at the scheduled date and time, click Send final. The Send Status tab appears for you to view the target lists, the number of recipients in each list, and when the lists were last refreshed. To make sure the latest recipients are in the queries that the lists use, click Refresh Lists. An informational message then appears for your review before clicking Start Refresh to begin the process. After it completes, click Yes on the tab to actually send the final to recipients. Note: You are not required to refresh the lists before sending the message. When you send the final , one more refresh occurs automatically for lists that use dynamic queries. This may cause the recipient numbers on the Sent Status tab to differ from the final sent numbers that appear in reports. If your lists use static queries, this does not apply. For more information about statuses, refer Delivery Status on page 44. To send the message to the test or final recipients at a later time, click Return. You return to Messages. The new appears at the top of the list. To send the , click Click here to edit this message. When the message opens, click Send test or Send final. Note: Each is sent with a text version in addition to its HTML-formatted version. client readers that display text only either display this text version or generate a text version fro the HTML. You cannot alter the text version of the . Copy an message Each sent contains a text version in addition to its HTML-formatted version. client readers set to display text only show either this text version of the or its own text version, generated from the HTML. You cannot alter the text version of the From , click Messages. Messages appears. 2. Enter criteria to narrow the messages in the grid and click Filter. The messages that match your criteria appear. Note: The grid displays up to 50 results at a time. If you have more than 50 results, click Prev or Next to page through the results. 3. Select a message and click Click here to copy this message. The New message page appears.
38 38 CHAPTER 1 Note: To copy a message, you can also open it and click Copy message. 4. In the Name field, enter a new name. 5. Edit the message as necessary. For information about how to design an message, see Design and send an message on page From , click Messages. Messages appears. If the message includes an list of test recipients, send the message to the test recipients. Click Send Test. Depending on the size of the selected test list, the message may take a few minutes to send. When the program sends the message, you return to Messages. After the test recipients verify the message and its components look and work correctly, send the to its final recipients. From Messages, click Click here to edit this message. When the message opens, click Send Final. To send the message to its final target recipients now, click Send Final. Depending on the size of the selected list, the message may take a few minutes to send. When the program sends the message, you return to Messages. To send the message to the test or final recipients at a later time, click Return. You return to Messages. The new appears at the top of the list. To send the , click Click here to edit this message. When the message opens, click Send Test or Send Final. View sent statistics Show Me: Watch how to view and learn about statistics. When you analyze the statistics for an message, you evaluate how effective the is and you can also use the information to help determine areas of improvement for your future messages. After you send a message, you can view its status log and performance statistics from the Messages page. View the performance statistics for an message 1. From , click Messages. Messages appears. 2. Select a message and click Click here to view report ( ) in the Action column. The performance statistics grid displays below the message row. Tip: If the button doesn't display, the has not yet been sent and therefore there are no statistics to view.

39 EM AIL 39 Note: To ensure the latest statistics display in the grid after the job is completed, click Refresh report ( ) next to the Completed job status. 3. In the top row of the grid, view the following activity percentages and average gift amount: Tip: Hover over each statistic title to view a description of how the value was calculated. Open rate: Displays the percentage of delivered s opened by recipients. Messages are considered open when the recipient allows an image to display or clicks a link. Click rate: Displays both the click-through rate (CTR) and the click-to-open rate (CTOR). The CTR is the percentage of unique recipients who clicked links in the over the number of delivered messages. The CTOR is the percentage of unique recipients who clicked links in the over the number of opened messages. To track click-throughs, the program associates IDs with messages. When you include a link in an message, the program appends a destination link value that includes the ID to the site URL that you specify in Sites & settings. When an recipient clicks the link, the program redirects the user to the page through the site and then associates any resulting activity with the ID. If a user clicks multiple links in the , both percentages only count one click per user. Transaction rate: Displays both the transaction rate and the transactions to click rate. The transaction rate is the percentage of unique recipients who completed transactions from the over the number of delivered messages. The transactions to click rate is the percentage of unique recipients who completed transactions from the over the number of opened messages. Average gift: Displays the average gift amount that users gave in response to the for donation, event registration, and membership transactions. 4. In the bottom row of the grid, view the following activity statistics and the total amount raised: Recipients: Displays how many people received the message. Click the amount to display the list of recipients, including addresses, names, and actions. Opens: Displays how s were opened. Click the amount to display the list of recipients who opened the . The message is considered open when the recipient allows an image to display or clicks a link. Clicks: Displays how many recipients clicked links in the message. Click the amount to display a list of recipients and which links they clicked.

40 40 CHAPTER 1 Transactions: Displays how many transactions (including donations, event registrations, and membership transactions) your organization received as a result of the message. Click the amount to display a list of recipients whose transactions were received. Note: For the statistics above, when displaying the list of recipients, you can search the list by entering an address, first name or last name in the Search field. You can click each address to view performance statistics specific to that individual, including how many s he received, his open rate, click rate, and conversion rate, and the total gift amount of his transactions. Note: When an recipient forwards your message to other recipients, their statistics are also captured in the grid for all percentages and counts. For example, Mark Adamson receives your latest Annual Fund and forwards it to Jane Smith. Jane opens the and clicks the Annual Fund link to submit a donation on your website. The grid updates to include Jane's data in all applicable statistics and her address also appears in lists related to the counts in the bottom row. Total raised: Displays the total amount of money raised as a result of the message. This total includes donation, event registration, and membership transactions. 5. Next to the grid, you can view the following additional statistics: a. Click the link beside Lists to display the distribution list names and view the number of recipients for each list. You can then click on each list name to view details about the messages that were not sent.
41 EM AIL 41 b. Beside Not Sent, Bounces and Opt-outs, click the amount to display more information associated with the statistic, such as addresses, recipient names, and types. Not Sent: Displays the number of s that were not sent due to missing addresses or invalid accounts. Bounces: Displays the number of bounced s. For more information, see Bounced Management on page 43. Opt-outs: Displays the number of recipients who opted out of receiving from your organization. When someone informs you they did not receive a message, refer to these statistics first to determine why. Click the corresponding value for Not Sent, Bounces and Opt-outs, then review the addresses and types to see if this clarifies why the was not received. It may be possible that the was overlooked in the recipient's inbox.
42 42 CHAPTER 1 To search the data, enter your criteria in the address, Name, or Type fields, then click Search. To save the displayed data as a *.csv file, click. If the is query-based, you can make sure the recipient appears in your query results. If you used an import list for the recipients, make sure the individual appears in the import file. Note: If delivery fails because the recipient s Internet Service Provider (ISP) reports that the address is invalid, the address is automatically added to Invalid accounts. Typical causes of an invalid account occur when the address contains a typographical error or the account is canceled due to inactivity. Accounts that bounce for another reason, such as a temporary network issue, a full mailbox, or a content filter, do not appear in Invalid accounts. For information about Invalid accounts, see Invalid Accounts on page 75. For information about how the program handles accounts that bounce but are still valid, see Bounced Management on page Click Additional Information, then click the following tabs to view more statistics: Click Map: Displays the links included in the . Hover over a text or image link to view the corresponding statistics. Click Report: Displays a listing of total click-throughs by page, including the total number of views (the number of times the links were clicked) and the number of unique viewers (the number of recipients who clicked the links). Conversions: Displays the number of online transactions, such as donations and event registrations, generated as a direct result of the message. For each conversion type, the total amount of money raised, the payment method, and the number of transactions for each method are shown. Properties: Displays the message content and properties. 7. You can export statistics to a *.csv file. To do this, under Additional Information, click Export. Next, select Summary or Details for the format. The summary version displays a brief summary of each statistic; the detailed version includes all recipients and actions. 8. To close the statistics grid, click in the Action column for the message. Warning: When you delete an message, its performance statistics are also removed. View the status report for an message For additional information about the status of the message, click Status Log in the Action column or to the right of the statistics grid next to Status. Depending on the status of the job, the icon displays as one of the following: - Completed - In progress - Failed Click the icon to display the status report which shows the status and time of your job at different points in the process. Click Show details to view specific information about the status. After you check the status, close the report.
43 EM AIL 43 Bounced Management A bounced is one that is sent but cannot be delivered. The Message Report includes details about two types of bounces: hard and soft. A hard bounce occurs when you send the message to an invalid account. A soft bounce occurs if the message reaches the recipient s mail server but cannot be delivered. This may happen, for example, if the recipient s mailbox is full or the size of the message is too large. You can view a breakdown of how many messages bounced and the type of bounce that occurred. To view a breakdown of how many copies of a sent message bounced, click the Bounces link on the statistics grid on the Messages page. For more information, see View sent statistics on page 38. To view a breakdown of how many copies of a sent newsletter issue bounced, select the Issues Sent tab of the Issue Report tab on the Issue Report screen. For information about the Issues Report tab, see View the tabs of a sent newsletter issue on page 51. To view a breakdown of how many copies of a sent acknowledgement bounced, select the Acknowledgements Sent tab of the Acknowledgements Report tab on the Acknowledgements
44 44 CHAPTER 1 Report screen. For information about the Acknowledgements Report tab, see View the tabs of a sent acknowledgement on page 57. If a sent bounces, you can view the bounce error. For a message or newsletter, you can view bounce information on the Recipients tab on the Message Report or Issue Report screen. For an acknowledgement, you can view bounce information on the Messages tab on the Acknowledgement Report screen. To view a bounce error of an , click Click here to view detailed bounce information in the Actions column. The Bounce Information screen appears and displays the exact wording of the bounce error. For information about the Recipients tabs, see View sent statistics on page 38 or View the tabs of a sent newsletter issue on page 51. For information about the Messages tab, see View the tabs of a sent acknowledgement on page 57. How the program handles a bounced depends on the type of delivery failure. If the bounce error is caused by a temporary failure such as a network error, full mailbox, or content filter, the program tries to send the again periodically for up to 8 hours. For a message or newsletter, you can view the latest bounce information on the Recipients tab on the Message Report or Issue Report screen. For an acknowledgement, you can view the latest bounce information on the Messages tab on the Acknowledgement Report screen. Note: If an Acknowledgement bounces due to a temporary failure, you can click Click here to resend in the Action column to attempt to send the again. If the bounce error is caused by a permanent failure, such as an unknown user or address, the account is marked invalid. You can also view bounce information about these accounts in Invalid accounts. For information about how to manage your invalid accounts, see Invalid Accounts on page 75. Note: To prevent your address from being blacklisted, the program does not send to an account that is marked invalid. Export bounced details You can export the information that appears on the Recipients tab grid as a *.csv file. The details for each message include the bounce error, if any, that appears when you click Click here to view detailed bounce information in the Actions column of the grid. 1. From the Message Report screen, select the Recipients tab. 2. Click the Export to.csv button. You can open the file or save it to a new location. Note: You can export only information that appears in the grid. If you filter the entries, you limit the information you can export to the *.csv file. Delivery Status When you send an , the program prepares the , retrieves any merge data from other Blackbaud programs, processes the , and then uploads the to the Blackbaud Internet Solutions mail server to be sent to its recipients. After you send an , you can view the current status of the sent message or newsletter issue. To view the delivery status of an , access its Message Report or Issue Report screen and select the Summary tab. In the Delivery status frame, the Status field displays the current status of the . For
45 EM AIL 45 information about the Summary tab, see View sent statistics on page 38 or View the tabs of a sent newsletter issue on page 51. Created The is created but is not yet prepared for processing. Prepared The is in the queue to be processed. Processing The is being processed. This includes retrieving merge data from another Blackbaud program. Processed The program processed the , and it is in the queue to upload to the mail server. No Valid Recipients The cannot be delivered to the selected list. For example, the list may not contain any recipients or its recipients may not have valid addresses. Uploading The website is uploading the to the Blackbaud Internet Solutions mail server. Upload Failed The website could not upload the to the mail server. When this happens, the website automatically tries to upload the again. Accepted The mail server received the and put it in the queue to be processed. Active The mail server is processing the to prepare it for delivery. Completed The mail server processed the , and it was sent or is in the queue to be sent. Note: When the Status field displays Completed, the mail server may be in the process of sending the to its recipients. Some messages or newsletter issues in the may not yet be sent. Exception The could not be uploaded to the Blackbaud Internet Solutions mail server due to an error when the website processed the . Exception on Server The could not be sent due to an error on the Blackbaud Internet Solutions mail server. For Support assistance, visit Blackbaud's website. Newsletters In Newsletters, you can create a newsletter template for each type of newsletter you send by . For example, you can create a newsletter for your alumni and another for your foundation donors. Within each saved newsletter, you can generate the current issue of the newsletter to send from the Issues tab. After you send the issue via , the program stores the newsletter on the Issues tab for reference. Note: Newsletters are sent only to users who subscribe to the newsletter on the User Preferences Form. For more information about the User Preferences Form part type, see the Parts Guide. To share with users what newsletters are available, we recommend you link the page users are directed to after they register to the Preferences page so they can subscribe to mailings as soon as they register. You can also include information about newsletters in messages with a link to the Preferences page. Warning: It is important your organization assigns full Administrator rights to only a select number of users for Newsletters. Any change can affect multiple web pages. We strongly encourage only users knowledgeable in all areas of website design and this program perform tasks in Newsletters.
46 46 CHAPTER 1 Design a newsletter 1. From , click Newsletters. Newsletters appears. 2. Click New newsletter. The New newsletter page appears. 3. On the Properties tab, enter a name in the Newsletter name field. 4. In the Description field, enter additional information, such as notes about the template layout. Note: The Send to field is disabled. The program automatically generates a mailing list that includes only users who subscribe to the newsletter on the User Preferences Form. 5. In the Subject, From Name, and From Address fields, enter a default subject for the Subject field of newsletters you create with this template, as well as an address and name for the From field. When you create individual newsletters, you can overwrite the subject. 6. To receive responses at a different address than the one you use to send the newsletter, enter a return address in the Reply address field. 7. To receive failure messages when messages are not delivered, select Failure to send notification. In the Notification address field, enter an address to receive failure messages. Note: Failures are addresses that do not receive the newsletters. Failure can also be called nondelivery receipts, bouncebacks, UnDeliverables, or Delivery Status Notifications (DSN). For information about how the program handles failures, see Bounced Management on page To assign the security rights for the newsletter, select the Targeting & Security tab. For each user role, you can manage rights to view, edit, delete, and change security.

47 EM AIL To add users or roles, click Add users and roles. 10. To assign rights, select View, Edit, Delete, or Change Security. Note: Edit rights allow users to edit the newsletter template and its defaults. To create newsletters from this template, users only need View rights. For more information about security and user roles, see the Users & Security Guide. 11. Click Save. The newsletter template opens to the Design tab. 12. To format the appearance and enter the default content for the newsletter, use the HTML editor. For information about the HTML editor, see the Program Basics Guide. Warning: To communicate your website s privacy policy and to provide a global opt-out option from your communications, you must include links to the privacy page specified in Sites & settings and to a User Preferences Form part on a web page when you design a newsletter. This also applies to newsletters you design for the Anonymous Newsletter Subscription part so anonymous recipients can also review your privacy policy and have the option to opt out of the
48 48 CHAPTER 1 newsletter at another time. 13. To have personalized information from another program appear in the newsletter for each recipient, add merge fields. For example, when you select the First name field, recipients receive a newsletter addressed directly to them. a. To display the list of available merge fields, click Merge fields on the Insert tab in the toolbar. b. To add a field to the newsletter, double-click or drag and drop a field in the content area. c. Put fields where you want them to appear in the body of the newsletter. For example, enter Hello, First Name after it. In the , the recipient reads Hello, [his or her first name]. To move a field, click and drag it to the new location. 14. To add conditional content to the newsletter to customize it for different types of recipients, click Conditional content on the Insert tab in the toolbar. For more information about conditional content, see Add Conditional Content on page To format the newsletter s appearance and layout, use the HTML editor. Warning: Blackbaud recommends that you use inline styles, such as <div style= backgroundcolor:blue; >Welcome color</div>, when you create and design the content. Do not define classes or use external references because vendors, such as Gmail or Outlook, are not guaranteed to render the styles correctly when the recipient reads the Click Save. 17. To send an issue of the newsletter, select the Issues tab. For information about how to send an issue from the Issues tab, see Design and send an issue of a newsletter on page To return to Newsletters, click Return. Design and send an issue of a newsletter 1. From , click Newsletters. Newsletters appears. 2. To search for a newsletter, enter its name or subject in the filter fields and click Filter. The newsletters that match your criteria appear. Note: The grid displays up to 50 results at a time. If you have more than 50 results, click Prev or Next to page through the results. 3. Select a newsletter and click Click here to edit this newsletter. The Issues page appears. 4. On the Issues tab, click New issue. The New issue page appears.

49 EM AIL In the Name and Subject fields, enter a name for the issue of the newsletter and a subject in the Subject field of the message. 6. In the Issue Date field, enter when you created the issue. By default, the current date and time appear. 7. In the Send After Date field, enter when to send the issue. By default, the current date and time appear. However, you can schedule the newsletter for a future date or time. For example, you may be out of the office for the next month but need to send your regular weekly newsletter during that time. To send the issue at a future date or time, enter the date and time. After you design the newsletter, click Send final. The website does not process the until the date and time you enter. If you delete the issue before the date you enter in the Send After Date field, the program does not process the issue and it is not sent to recipients. Tip: When you delete a newsletter issue, it removes from the user interface, but it remains in the database. To run a process that improves performance by permanently deleting these issues, schedule the Delete permanently setting in Administration. For more information, refer to Delete permanently on page 1. To send the issue immediately, leave the current date and time. After you design the newsletter, click Send final. The website processes the . Note: Whether you schedule to send the issue of a newsletter in the future or immediately, you cannot edit it once you click Send final. 8. In the Send To field, the newsletter list automatically appears so the issue only sends to subscribed users.

50 50 CHAPTER 1 Note: If recipients do not want to receive your newsletter, they can unsubscribe from the list. To enable a recipient to unsubscribe, use the Formatted Text and Images part type to create an unsubscribe footer. For more information, see the Parts Guide. To send the newsletter issue to test recipients before you send it to its final recipients, select the lists of test recipients to include on the message. Note: Before you send a newsletter issue to its final recipients, we recommend you first send it to an list of a few test recipients. The test list recipients can review the newsletter, such as to verify its design displays correctly in multiple client readers. You can create the list of test recipients in Lists. For more information about test lists, see Test Lists on page 74. a. Click Test Lists. The Select Test Lists screen appears. b. Enter criteria to narrow the list and click Filter. The grid displays the lists that meet the criteria. c. To add a test list to the message, select it and click Add. The list appears in the Selected lists box. You can include multiple lists. d. Click OK. You return to the New issue page. 9. Edit the default newsletter for this issue. You can edit the layout, design, and text, as well as add or edit articles. 10. Click Save. 11. Send the issue of the newsletter.
51 EM AIL 51 If the issue includes an list of test recipients, send the newsletter to the test recipients. Click Send test. Depending on the size of the selected test list, the issue may take a few minutes to send. When the program sends the newsletter issue, you return to Newsletters. After the test recipients verify the newsletter issue and its components look and work correctly, send the to its final recipients. From Newsletters, click Click here to edit this newsletter. On the Issues tab, click Click here to edit this newsletter issue. When the issue opens, click Send final. To send the issue to its final target recipients now, click Send final. The website processes the message at the date and time entered in the Send after date field. To send the issue to the test or final recipients at a later time, click Return. You return to Newsletters. To send the issue, click Click here to edit this newsletter. On the Issues tab, click Click here to edit this newsletter issue. When the issue opens, click Send test or Send final. Note: Each sent contains a text version in addition to its HTML-formatted version. client readers set to display text only show either this text version of the or its own text version, generated from the HTML. The text version of the cannot be altered. View the tabs of a sent newsletter issue 1. From , click Newsletters. Newsletters appears. 2. Select a newsletter and click Click here to edit this newsletter. The Issues page appears. 3. On the Issues tab, select an issue of the newsletter and click Click here to view report. The issue report screen appears. Note: To create an issue based on an existing issue, you can click Click here to copy this newsletter issue. For information about how to design an issue of a newsletter, see Design and send an issue of a newsletter on page 48. Note: If Click here to view report does not appear, the program has not sent the issue. 4. On the Issue report tab, you can view summary information and statistics about the issue on a series of tabs. The Delivery summary tab displays the status of the issue and how many recipients it was sent to. For information about the statuses, see Delivery Status on page 44. On the Issues sent tab how newsletters were opened, not opened, and not delivered. Opened indicates the recipient displayed the newsletter's images or clicked a link in the . Not opened indicates the newsletter was delivered but the recipient did not display its images or click a link. Not delivered indicates the newsletter "bounced," or could not be delivered. delivery may fail for multiple reasons, such as a temporary network issue, a full mailbox, a content filter, or an invalid account. For information about bounced , see Bounced Management on page 43. Note: If delivery fails because the recipient s Internet Service Provider (ISP) reports that the address is invalid, the address is automatically added to Invalid accounts. An ISP considers an account invalid if it does not recognize the address or recipient. For information about Invalid accounts, see Invalid Accounts on page 75.
52 52 CHAPTER 1 The Issues not sent tab displays how many newsletters were not sent because of opt-outs, missing addresses, and invalid accounts. Note: The Issues not sent tab does not appear if the program sends all copies of a newsletter. To prevent your address from being blacklisted, the program does not send to invalid accounts. For information about invalid accounts, see Invalid Accounts on page 75. The Click-throughs tab displays all web pages that the newsletter links to, along with how many times recipients click the links and how many unique recipients click the links. For example, if you include a link to an events page, it appears in the grid on the Click-throughs tab. If a recipient clicks that link three times, the Total views column for the events page increases by three and the Unique viewers column increases by one. To track click-throughs, the program associates IDs with messages. When you include a link in an message, the program appends a destination link value that includes the ID to the site URL that you specify in Sites & settings. When an recipient clicks the link, the program redirects the user to the page through the site and then associates any resulting activity with the ID. The Conversions tab displays how many transactions your organization receives as a result of the newsletter. Conversions include donations, and event registrations. For each type of conversion, the tab displays the payment methods used in response to the newsletter, along with the number of transactions for each method and the total amount of those transactions. If the newsletter included conditional content, the Conditional Content tab displays statistics about how each condition in a content block performed. It includes the number of recipients that received the condition, the number who opened the , the number of click-throughs, the number of conversions (transactions), and the total gift amounts. For information about conditional content, see Add Conditional Content on page For additional summary information about your message, view the Status Report. To generate this report, click Status report. The Status Report screen appears and displays valuable information about your , such as a [Prepared] date and time stamp. 6. To view who received the issue, select the Recipients tab. 7. In the grid, view the address that the program sends the to for each recipient. You can limit the addresses that appear in the grid. a. In the Filter list by frame, enter the criteria of the address to view. You can enter the name of the recipient, address, or type. b. Click Go. In the grid, the addresses that meet the criteria entered appear. 8. For each address, view the name of the recipient, when the program sent the , and when the was open or bounced. If an message cannot be delivered to a recipient, the Bounced column displays the bounce details. If the recipient opens the message, the Opened column displays the receipt details. 9. To open a constituent record offline, select a recipient and click Click here to open this recipient. If the link does not appear for a user mapped to Blackbaud CRM, make sure a Blackbaud CRM constituent page appears in the Blackbaud Internet Solutions link page field when you configure integration in Blackbaud CRM.
53 EM AIL If the program cannot deliver an issue, click Click here to view detailed bounce information in the Actions column to view the bounce error. The Bounce Information screen appears and displays the exact wording of the bounce error. You can use this information to help determine the cause of the bounce error. For more information about bounced , see Bounced Management on page To view the properties and content of the issue, select the Properties tab. 12. In the Job details frame, view information such as whom the issue was sent to and from and the sent date. 13. In the Message content frame, view the body of the issue. 14. To leave the Issue Report screen, click Return. Acknowledgements Note: This functionality is deprecated. In current versions, all acknowledgements on new forms are created with a standard default message that is stored in the database and is non-configurable. To modify acknowledgement text for a part, navigate to the part type that uses the acknowledgment functionality and update the message that appears. You can generate acknowledgement from part types that contain acknowledgement functionality. For example, you generate acknowledgements from the Donation Form part. Acknowledgements contains the default acknowledgement for your website. You can use this as the default template for acknowledgement for part types. In addition, you can view acknowledgement statistics from Acknowledgements. Warning: It is important your organization assigns full Administrator rights to only a select number of users for Acknowledgments. Any change can affect multiple web pages. We strongly recommend only users knowledgeable in all areas of website design and the program perform tasks in Acknowledgements. To prevent acknowledgements from inadvertently sending from a test environment, your System Administrator can use the setting BlockAll s in both web.config files for Blackbaud Internet Solutions and Blackbaud CRM to block sending them. By default, this setting is <add key="blockall s" value="false" />. To prevent sending messages, you must enter True in each web.config file for both programs. Design a default acknowledgement 1. From , click Acknowledgements. Acknowledgements appears. 2. Beside the Acknowledgement Defaults , click Click here to view/edit this acknowledgement s properties. The Acknowledgement Defaults page appears.

54 54 CHAPTER 1 3. On the Properties tab, enter an address and name for the From field of the message. 4. To receive responses at a different address than the one you use to send the message, enter a return address in the Reply address field. 5. Under Notifications are to be sent to the following addresses, select Failures to receive failure messages when messages are not delivered. In the field beside the checkbox, enter an address to receive failure messages. Note: Failures are addresses that do not receive the acknowledgement . Failures can also be called non-delivery receipts, bouncebacks, UnDeliverables, or Delivery Status Notifications (DSN). For information about how the program handles failed delivery, see Bounced Management on page Under Template Security, assign the security rights for the acknowledgement. For each user role, you can manage rights to view, edit, delete, and change security. 7. To add users or roles, click Add users and roles. 8. To assign rights, select View, Edit, Delete, or Change Security. Note: Edit rights allow users to edit the template and its defaults. To create messages from this template, users only need View rights. For more information about security and user roles, see the Users & Security Guide. 9. To design the content and appearance of the acknowledgement, select the Content tab.
55 EM AIL Enter the default text for all acknowledgement . When you create an acknowledgement sent from the Donation Form or Event Registration Form part types, this text automatically appears. 11. To format the default content s appearance and layout, use the HTML editor. For information about the HTML editor, see the Program Basics Guide. Warning: Blackbaud recommends that you use inline styles, such as <div style= backgroundcolor:blue; >Welcome color</div>, when you create and design the content. Do not define classes or use external references because vendors, such as Gmail or Outlook, are not guaranteed to render the styles correctly when the recipient reads the . Note: You do not add merge fields on the acknowledgement default template. Merge fields are available for the individual message created from donation parts. 12. Click Save. 13. To return to Acknowledgements, click Return. Design an acknowledgement for a transaction You can generate an acknowledgement from part types that contain acknowledgement functionality, such as the Donation Form part or Event Registration Form part. The acknowledgement appears on your website after the site user completes a transaction. In addition, this message is automatically sent in an to the site user. For the site user to receive an acknowledgement, you must design and create an acknowledgement for the part type. 1. From the Edit Part screen, access the Acknowledgement screen.

56 56 CHAPTER 1 Note: How to access the Acknowledgement screen depends on the part. For example, on an Event Registration Form part, you click Acknowledgement , while on a Donation Form part, you click Next after you design the rest of the form. Note: The screen shown above is the Acknowledgement screen for an Event Registration Form part. Depending on the part type you use, your Acknowledgement screen may differ slightly. Note: For Payment parts, you create a summary acknowledgement . If you select to send the summary acknowledgement on both the Payment part and the Donation or Event Registration parts that use the Payment part, a donor receives one that details all transactions, rather than separate acknowledgement s for each payment the donor makes during a visit to your website. For information about how to send a summary acknowledgement , see the Parts Guide. 2. Enter a name for the acknowledgement, a subject to include in the Subject field of the message, and an address and name to include in the From field of the message. 3. To receive responses from recipients at a different address than the one you use to send the message, click More Options and enter the address in the Reply Address field. 4. Under Notifications are to be sent to the following addresses, select Failures to receive failure messages when messages are not delivered. In the field beside the checkbox, enter an address to receive failure messages. Note: Failures are addresses that do not receive the acknowledgement . Failures can also be called non-delivery receipts, bouncebacks, UnDeliverables, or Delivery Status Notifications (DSN). For information about how the program handles failures, see Bounced Management on page If this part uses a Payment part, you can select whether to send a summary acknowledgement . This details all donations or event registrations payments the donor makes with the Payment part during a visit to your website.
57 EM AIL 57 Select Send this acknowledgement only when a summary is not available to send the Payment part s summary acknowledgement . If the part does not use a Payment part, the donor receives the acknowledgement you create on this screen. Select Always send this acknowledgement to send the you create for this part. If the part uses a Payment part with the summary acknowledgement option selected, the donor receives both individual and summary acknowledgement s. 6. In the box, the text from the default acknowledgement appears. To enter or edit the content of the as required, use the HTML editor. For information about the HTML editor, see the Program Basics Guide. To customize content, click Merge fields on the Insert tab in the toolbar. To format the content s appearance and layout, use the HTML editor. Note: You can include conditional fields in your acknowledgement . Conditional fields do not appear in the final if they do not apply to the transaction being acknowledged. For example, for a donation acknowledgement, you can enter We greatly appreciate <Company Name> s support! If the donation is not from a company, this sentence does not appear in the final acknowledgement. To identify conditional fields, look for begin section and end section indicators. For example, <Corporate.Begin Section> and <Corporate.End Section> indicate that the sentence with <Company Name> is conditional. 7. Click Save. You return to the Edit Part screen. 8. Click Save. You return to Parts. View the tabs of a sent acknowledgement 1. From , click Acknowledgements. Acknowledgements appears. 2. Select an acknowledgement and click Click here to view report. The acknowledgement report appears. 3. On the Acknowledgement report tab, you can view summary information and statistics about the acknowledgement on a series of tabs. The Delivery summary tab displays the status of the and how many recipients it was sent to. For information about statuses, see Delivery Status on page 44. The Acknowledgements sent tab displays how many acknowledgements were opened, not opened, and not delivered. Opened indicates the recipient displayed the acknowledgement's images or clicked a link in the . Not opened indicates the acknowledgement was delivered but the recipient did not display its images or click a link. Not delivered indicates the acknowledgement "bounced," or could not be delivered. delivery may fail for multiple reasons, such as a temporary network issue, a full mailbox, a content filter, or an invalid account. For information about bounced , see Bounced Management on page 43. Note: If delivery fails because the recipient s Internet Service Provider (ISP) reports that the address is invalid, the address is automatically added to Invalid accounts. An ISP considers an account invalid if it does not recognize the address or recipient. For information about Invalid accounts, see Invalid Accounts on page 75.
58 58 CHAPTER 1 The Acknowledgements not sent tab displays how many acknowledgements were not sent because of missing addresses and invalid accounts. Note: The Acknowledgements not sent tab does not appear if the program sends all copies of an acknowledgement. To prevent your address from being blacklisted, the program does not send to invalid accounts. For information about invalid accounts, see Invalid Accounts on page 75. The Click-throughs tab displays all web pages that the acknowledgement links to, along with how many times recipients click the links and how many unique recipients click the links. For example, if you include a link to an events page, it appears in the grid on the Click-throughs tab. If a recipient clicks that link three times, the Total views column for the events page increases by three and the Unique viewers column increases by one. To track click-throughs, the program associates IDs with messages. When you include a link in an message, the program appends a destination link value that includes the ID to the site URL that you specify in Sites & settings. When an recipient clicks the link, the program redirects the user to the page through the site and then associates any resulting activity with the ID. 4. To view the acknowledgement s recipients, select the Messages tab. The grid displays names and addresses of recipients, along with dates and times for when the program sent the and when it was opened or bounced. Note: Users continue to receive acknowledgement s even if they select the global opt-out checkbox on your user preferences form. 5. To search for a recipient, enter a name or address or select a status, and click Filter. The recipients that match your criteria appear. If a recipient opens the message, receipt details appear under Opened. If an message cannot be delivered, bounce details appear under Bounced. To view the bounce error, click Click here to view detailed bounce information. The Receipt Information screen displays the bounce error. You can use this information to help determine the cause. For information about bounced s, see Bounced Management on page 43. If an address is invalid, No Valid Recipients appears under Status. For information about how to manage invalid accounts, see Invalid Accounts on page To open a constituent record offline, select a recipient and click Click here to open this record. If the link does not appear for a user mapped to Blackbaud CRM, make sure a Blackbaud CRM constituent page appears in the Blackbaud Internet Solutions link page field when you configure integration in Blackbaud CRM. 7. To open a website user s online record, select a recipient and click Click here to view this user s record. The User editor page in Users & security appears. 8. To return to Acknowledgements, click Return. Notifications A notification is an message designed to notify constituents or staff members about a specific action. For example, a website user can select to send a notification when he receives a new personal
59 EM AIL 59 message, friend request, or group invitation. A staff member can receive a notification when a website user submits a donation. You create and design most notifications in Notifications. However,you can also design and edit associated notification types on some parts. For example, you can create user network notifications when you design the User Networking Manager part. Note: Even if a user selects the global opt-out checkbox on your website to decline communications, she continues to receive requested notifications. Design a constituent notification Tip: When you create a notification, consider the volume recipients will receive. For example, if you are expecting a high volume of donations on your website, you may not want to create a notification for those transactions because the recipients will receive numerous notifications. 1. From , click Notifications. Notifications appears. 2. Click New notification. The Select Notification Type screen appears. 3. Select whether the notification is for a constituent or a staff member. 4. In the Notification Type field, select the type of constituent notification to create. To create a notification for a user networking member who receives a personal message from another member, select Personal Message Notification. To create a notification for a user networking member who receives a request from another member to be in a contact list, select Friend Request Notification. To create a notification for a user networking member who receives an invitation to join a user networking group, select Group Invitation Notification. To create a notification for a user networking member who receives a personal message from another member sent from the directory results, select Directory Message Notification. 5. Click OK. The New Notification page appears and defaults to the Notification tab.
60 60 CHAPTER 1 6. In the Display name field, edit the name of the notification so that users can identify it. By default, the notification type appears. 7. When you no longer want to send the notification to recipients, clear Enabled. Tip: As you create the notification, consider the volume the notification will generate. For example, if you expect a high volume of donations on your website, recipients are likely to receive numerous s from a transaction donation notification. To avoid sending a large volume of notifications to recipients, clear Enabled to disable the notification until donation transactions return to normal. 8. Under Parts, select the checkbox for each part to use the constituent notification. 9. To design the , select the template tab.
61 EM AIL Enter a subject in the Subject field and an address and name in the From fields for the message. Note: You cannot view the notification template in Templates. You can only access it from Notifications. 11. The bottom pane displays default text for the notification. You can use this text or enter your own. To format the appearance and layout, use the HTML editor. For more information, see the Program Basics Guide. Warning: Blackbaud recommends that you use inline styles, such as <div style= backgroundcolor:blue; >Welcome color</div>, when you create and design the content. Do not define classes or use external references because vendors such as Gmailand Outlook are not guaranteed to render the styles correctly when the recipient reads the . To personalize the with offline information about the constituent, add merge fields. a. To display the list of available merge fields, click Merge fields on the Insert tab in the toolbar. b. To add a merge field to the , double-click it or drag and drop the field in the content area. c. In the body of the , add fields where you want them to appear. To move a field, click and drag it. 12. Click Save. You return to Notifications. Design a staff notification Tip: When you create a notification, consider the volume recipients will receive. For example, if you are expecting a high volume of donations on your website, you may not want to create a
62 62 CHAPTER 1 notification for those transactions because the recipients will receive numerous notifications. 1. From , click Notifications. Notifications appears. 2. Click New notification. The Select Notification Type screen appears. 3. Select Staff notification. 4. In the Notification Type field, select the type of staff notification to create. To create a notification for a staff member in the approval role when someone submits a Formatted Text and Images or Formatted Text and Images (Secured) part for approval, select Part Approval Ready for Approval Notification. To create a notification for a content author staff member whose Formatted Text and Images or Formatted Text and Images (Secured) part is approved, select Part Approval Published Notification. To create a notification for a content author staff member whose Formatted Text and Images or Formatted Text and Images (Secured) part is rejected, select Part Approval Rejected Notification. To create a notification for a staff member when a website user submits a donation, select "Transaction Donation Notification." Note: The program sends this notification when a user submits a donation on the Donation Form, Payment, or Payment 2.0 parts. To create a notification for a staff member when a website user submits an event registration, select "Transaction Event registration notification." 5. Click OK. The New Notification page appears and defaults to the Notification tab.
63 EM AIL 63

64 64 CHAPTER 1 6. In the Display name field, edit the name of the notification so that users can identify it. By default, the notification type appears. 7. When you no longer want to send the notification to recipients, clear Enabled. Tip: As you create the notification, consider the volume the notification will generate. For example, if you expect a high volume of donations on your website, recipients are likely to receive numerous s from a transaction donation notification. To avoid sending a large volume of notifications to recipients, clear Enabled to disable the notification until donation transactions return to normal. 8. Under Recipients, to send the notification to staff members in a role, click Add roles. The Select Roles screen appears so you can include one or more roles. a. To send the notification to an individual staff member, enter an address under addresses. Note: You can select to send the notification to staff members in roles instead of, or in addition to, staff members you enter addresses for. When you enter multiple addresses, separate them by a comma or semicolon. 9. When you design a transaction notification, such as "Transaction Donation Notification," under Parts, select the checkbox for each part to use the staff notification. When you design a "Part Approval" notification, such as "Part Approval Ready for Approval Notification," under Workflows, select the checkbox for each workflow to use the staff notification. 10. To design the , select the template tab. 11. Enter a subject in the Subject field and an address and name in the From fields for the message.
65 EM AIL 65 Note: You cannot view the notification template in Templates. You can only access it from Notifications. 12. The bottom pane displays default text for the notification. You can use this text or enter your own. To format the appearance and layout, use the HTML editor. For more information, see the Program Basics Guide. Warning: Blackbaud recommends that you use inline styles, such as <div style= backgroundcolor:blue; >Welcome color</div>, when you create and design the content. Do not define classes or use external references because vendors such as Gmailand Outlook are not guaranteed to render the styles correctly when the recipient reads the . To personalize the with offline information about the constituent, add merge fields. a. To display the list of available merge fields, click Merge fields on the Insert tab in the toolbar. b. To add a merge field to the , double-click it or drag and drop the field in the content area. c. In the body of the , add fields where you want them to appear. To move a field, click and drag it. 13. Click Save. You return to Notifications. View the tabs of a notification 1. From , click Notifications. Notifications appears. 2. To search for a notification, enter criteria to narrow the list in the grid and click Filter. The notifications that match your criteria appear. 3. Select a notification and click Click here to edit this Notification. The notification appears.

66 66 CHAPTER 1 4. Edit the notification as necessary. For information about the Notification and template tabs, seedesign a constituent notification on page 59 or Design a staff notification on page 61. Note: You cannot change the notification type. To do this, you must delete the notification and create a new one. For information about how to delete a notification, see Delete a notification on page Click Save. You return to Notifications. To return to Notifications without saving any changes, click Return. Delete a notification 1. From , click Notifications. Notifications appears. 2. To search for a notification, enter criteria to narrow the list in the grid and click Filter. The notifications that match your criteria appear. 3. Select the notification to delete and click Click here to delete this Notification. A confirmation message appears. 4. Click OK. You return to Notifications. The grid no longer displays the notification. Lists In Lists, you can use queries from our programs to create and view lists. You can create multiple lists, each one targeted at a different group of your users. For example, you can create an offline query of all constituents in your database who have an attribute of Sports on their records. You can use

67 EM AIL 67 the query online to create an list of constituents interested in sports and invite them to your sporting event fundraisers. In the message, you can include a link to the page of your website where the recipient can sign up for the event. Tip: We recommend you create a list of users to receive an message as a test before you send the message to its final recipients. The test list recipients can review the message to verify that the message appears correctly in multiple client readers. For more information about test lists, see Test Lists on page 74. You can use static or dynamic queries but not queries that contain ask at runtime operators. If the query is dynamic, the program automatically updates the list in Lists. However, if the query is static, the list does not automatically update. To update a list that uses a static query, refresh the query in the other program. For more information about how to create and refresh a query, see the Query section of the help file of the other Blackbaud program. The grid in Lists contains all lists created in Lists but also those automatically generated when you send a newsletter. Newsletter lists contain only users who subscribe to the newsletter so the generated list name is always [Newsletter Name] Subscribers. You can add, delete, and view lists in the grid. Tip: For best practice information about , refer to Blackbaud Communication Services Best Practices for . Create an list Show Me: Watch how to create an list. 1. From , click Lists. Lists appears. 2. Click New list. The Select Data Source screen appears.
68 68 CHAPTER 1 3. In the Data Source field, select the type of recipients to include in the list. The data source determines the pool of people that are available. To create a list of recipients based on a constituent query, select "Constituents." From the Properties tab, click Add query to select a constituent query created in your offline database. When you select this option, the recipients include only constituents who are individuals. To include constituents that are organizations, you must select "Imported Lists" as the data source and choose an import file that contains the organizations to include. Individuals in a "Constituents" data source list must have an address that matches the type selected in the address type field on the template or message. Otherwise, the message is sent automatically to the primary address on the individual's constituent record. When an individual s record is marked Requests no , the individual is excluded from the list and does not receive the message. In Blackbaud CRM, a record is created for the messages that you send to a list with the "Constituents" data source. And if recipients opt out of future communications, this is noted on their constituent records. When you use a Constituent or Imported List, and you want to send one to multiple recipients with the same address, clear the Send a unique to each constituent who shares the same address checkbox in Sites & settings. You typically select this when you want constituents, such as parents and children, who share addresses to each receive a copy of messages. For more information, refer to the Administration Guide. To create a list of recipients that includes all your Blackbaud Internet Solutions users, select "Registered Users." This source includes all registered website users who did not opt out of communications, including those who are linked to constituents. Note: Only users with Supervisor rights can select Registered Users. messages to a list with the "Registered Users" data source are not recorded in Blackbaud CRM. If recipients opt out of communications, this is noted in Blackbaud Internet Solutions but not on constituent records in Blackbaud CRM. To create a list based on information you will import from a list in *.csv format, select "Imported Lists." From the Properties tab, click Browse under Load file to search for the file to import. After you select an import file, click Next. Under Field mapping, select the import file fields that correspond to the and display name fields in your online database. Note: If you previously linked an import file to the list, click Replace this file under Uploaded file details to select a different import list. This button is available until you use the list to send an from Messages. The program removes the Replace this file option when you use the list as the data source for Templates. To create a test list for a limited number of recipients, select User Defined. For example, before you send a mass , you may want to send the message to accounts you have with different services to determine how the text and graphics appear in the client readers. From the New List screen, you can enter a name for the list and a description. Click Save, then open the new list. From the View/Edit List tab, enter each recipient to include. Select Enabled to allow the recipient to receive the message. 4. Click OK. The New List page appears.
69 EM AIL On the Properties tab, the Data Source field displays the data source you selected. Tip: You also select a data source on each template. Messages created from the template can be sent to only lists that use the same type of data source. For more information, see Template Data Sources on page In the List Name field, enter a unique name to distinguish this group for specific messages, such as Class of In the Description field, enter any additional information. For example, enter a brief description of who the mailing list includes or the types of messages this list receives, such as Class of 1994 Alumni. When a user creates an in Messages and clicks Send to, the program displays all saved lists that the user has security rights to. 8. If you select Constituents as the data source, the Constituent Queries frame appears.

70 70 CHAPTER 1 To add a query, click Add Query. The Query Search screen appears. Select a query for the list. For a query to appear as a selection, it must first be created in the other program. To add another query, click Add Query. You can add queries until you select all queries required for the list. Tip: Depending on your website environment and configuration, sending an message to a large list of recipients may result in performance issues. If you experience this, we recommend you include smaller queries in the list. You can also remove queries from the list. To replace a query, click Change beside the query. The Query Search screen appears. To remove a query, click Remove beside the query. 9. If you select Imported Lists as the data source, the Load File frame appears. In the File field, select the comma-separated values (*.csv) file to import for the list. To map to the location of the import file, click Browse and use the Choose File screen.


71 EM AIL 71 Note: The first row of the imported *.csv file must contain the field names. After you select the import file, the Uploaded file details and Field mapping frames appear. a. In the Uploaded file details frame, the File name field displays the selected import file. To import a different file, click Replace this file. The Load file frame appears. b. In the Field mapping frame, select the fields from the import file to use as the address and recipient display name in the list. 10. To assign security rights for the list, select the Targeting & Security tab. For each user role, you can manage rights to view, edit, delete, and change security. 11. To add users or roles, click Add users and roles. 12. To assign rights, select View, Edit, Delete, or Change Security. For more information about security and user roles, see the Users & Security Guide. 13. Click Save. You return to Lists.

72 72 CHAPTER 1 View the tabs of an list 1. From , click Lists. Lists appears. 2. Select a list and click Click here to edit this list. The list appears. 3. To view the messages created based on the list: a. Select the List Messages tab. b. Under Filter list by, enter the criteria of the messages to view. You can enter the message s name or subject. You can also select to view results by the template used. c. Click Go. The grid displays the messages that meet the criteria. Note: The grid can display up to 50 results at a time. If you have more than 50 results, click Prev or Next to page through the results, or select the page number to view. 4. To view the properties and security settings entered when the list was created, select the List Properties tab. To help you navigate through the information, the List Properties tab contains the Properties and Targeting & Security tabs.


73 EM AIL 73 On the Properties tab, view the data source, list name, description, and the queries or load file entered when the list was created. When you host multiple sites, the Assign to site field appears on the Properties tab so you can move a list from its current site to another site. If the list is in use on the source site, it continues to be on that site. However, the list is now associated with the target site and its security. On the Targeting & Security tab, view the security rights assigned to each user of the list. 5. If the list is based on a query of records, the View List tab appears. To view the recipients included in the list: a. Select the View List tab.

74 74 CHAPTER 1 b. Under Filter list by, enter the criteria for the record to view. You can enter the record s display name or address. You can also select to view results by the source query or status or whether to view opt-outs. Note: If you create a query in another program, you may need to refresh Blackbaud Internet Solutions for it to appear as a selection. To refresh, select View, Refresh from the menu bar. Note: If you create a query in another area, you may need to refresh for it to appear as a selection. To refresh, select View, Refresh from the menu bar. c. Click Go. The grid displays the records in the list that meet the criteria. Note: The grid can display up to 50 results at a time. If you have more than 50 results, click Prev or Next to page through the results, or select the page number to view. 6. To view the templates created that use the list: a. Select the List Templates tab. b. In the Filter list by frame, enter the criteria for the template to view. c. Click Go. The grid displays the templates that meet the criteria. Note: The grid can display up to 50 results at a time. If you have more than 50 results, click Prev or Next to page through the results, or select the page number to view. 7. To return to Lists, click Return. Test Lists In Lists, you can create a list of users to receive an message or a newsletter issue as a test before you send the to its final recipients. The test list recipients can review the message or newsletter to confirm that its design displays correctly in multiple client readers. From Lists, create a list based on the User Defined data source. Save the list, then open it and select the View/Edit list tab. From this tab, you can manually enter addresses for the recipients to receive the test message. When you design the message or newsletter issue, you can select its test list and perform a test send to the users in the list. For information about how to create an list, see Lists on page 66. For information about how to design an message, see Messages on page 32. For information about how to design a newsletter issue, see Newsletters on page 45. Note: Test messages do not display merge field data; placeholders are included where the merge data will appear in the final message. To test merge fields, select the test list in the To field and then select Send final.

75 EM AIL 75 Invalid Accounts In Invalid accounts, you can view address accounts that have been reported as invalid by their hosting Internet Service Provider (ISP). For example, an ISP may report an address account as invalid due to a nonexistent or canceled account. Typical causes of an invalid account occur when the address contains a typographical error or the account is canceled due to inactivity. Accounts that bounce for another reason, such as a temporary network issue, a full mailbox, or a content filter, do not appear in Invalid accounts. Note: For information about how the program handles accounts that bounce but are still valid, see Bounced Management on page 43. To prevent your address from being blacklisted, the program does not send to invalid accounts. For each address in Invalid accounts, you can view the bounce error that caused the ISP to report the account as invalid. If you think an account was incorrectly marked invalid, you can mark it as valid to include it in mailings. View invalid address accounts 1. From , click Invalid accounts. Invalid accounts appears. The grid displays any address that a hosting ISP reports as invalid. The Attempts column displays the number of bounce errors you receive for an account, while the Created and Updated columns display when you receive the first and last bounce errors. Note: The program does not send to invalid addresses, so typically the Attempts column displays a single bounce error and the Created and Updated columns display the same date and time. However, if you mark an account as valid and it returns a bounce error, the Attempts column

76 76 CHAPTER 1 displays multiple bounce errors and the Updated column displays the date and time of the most recent bounce error. 2. To export the addresses in the grid to a *.csv file, click Export to.csv. You can open the file or select a location to save it. 3. To search for an address, enter it in the address field and click Filter. 4. To view bounce error details, select an account and click the edit icon in the Mark as valid column. The invalid account page appears. For each bounce error, the grid displays the subject of the , when you sent the message, when you received the bounce error, and the exact wording of the bounce error you received from the hosting ISP. 5. To mark the account as valid so that you can send , click Mark as valid. You return to Invalid accounts, the address no longer appears in the grid. If you send to the address and the hosting Internet service provider (ISP) reports it as invalid, the address returns to Invalid accounts. 6. To return to Invalid accounts, click Return. ecard Templates ecard templates stores the ecard designs for your website. After you create an ecard template, you can use it with as many parts that contain ecard functionality as you want. For example, you can save a holiday theme ecard in ecard templates and use it with multiple ecards and Donation Form parts. You can provide a selection of ecard templates that website users can personalize and send for free or as an incentive to donate. ecards can also help promote your organization and drive new users to your website. From ecard templates, you manage your organization s ecard templates in one location. On the Samples tab, ecard templates also provides sample ecard templates. You can copy these samples to create ecard templates. For information about the sample templates, see Sample ecard Templates on page 86. Note: ecards do not apply to the BlockScheduled s setting in both web.config files for Blackbaud Internet Solutions and Blackbaud CRM. Therefore, if you have this setting set to True to prevent from sending from a test environment, recipients will continue to receive them.
77 EM AIL 77 Design an ecard template To add an ecard template to an ecards part or Donation Form part that contains ecard functionality, you must first create the template in ecard templates. ecard templates stores the templates within categories. When you add an ecard template, you specify how the template appears on parts and select the categories in ecard templates where it belongs. On your website, users select the template and use it to send personalized ecards to others as messages. 1. From , click ecard templates. ecard templates appears. Tip: On the Samples tab, ecard templates provides sample ecard templates. To save time, you can copy a sample template to create an ecard template. For information about how to copy a sample ecard template, see Sample ecard Templates on page Click Add ecard template. The Add ecard template screen appears. 3. Select the Properties tab. 4. Under Display options, enter how the template appears for users in ecard templates or Parts and on your website. a. In the Name field, enter a name so users can identify the ecard template. Note: When program and website users browse through ecard templates, such as on the ecards part or your website, the templates appear in alphabetical order by name. When you enter a name for the ecard template, consider where the template name appears when sorted alphabetically.
78 78 CHAPTER 1 b. In the Preview image field, select the path to the image to use as the thumbnail image for the ecard. To search for the image, click Browse and use the Choose file screen. After you map to the image location, click Open. You return to the Add ecard Template screen. Note: On your website, the image entered in the Preview image field appears as a thumbnail image. The specifications selected on the ecards or Donation Form part determine the size of the thumbnail image on your website. c. In the Caption field, enter the caption text to appear for the ecard template. When a website user hovers the cursor over the thumbnail image of the template, the caption text appears as a tooltip. 5. Under options, in the subject line field, enter the subject line to appear for all ecard messages based on the template. For example, for a seasonal holiday ecard, enter Happy Holidays! 6. ecard templates stores every ecard template within a category. Under ecard categories, select the category the template belongs to. For example, you can store a Happy Holidays ecard under a category of Holiday. You can add the template to multiple categories. To add the template to an existing category, select its checkbox in the Categories box. To add the template to a new category, in the And/or a new category field, enter the name of the new category. 7. Select the Design tab. 8. Use the HTML editor to format the template s appearance and layout. For more information about the HTML editor, see the Program Basics Guide. Warning: Blackbaud recommends that you use inline styles, such as <div style= backgroundcolor:blue; >Welcome color</div>, when you create and design the content. Do not define classes or use external references because vendors, such as Gmail or Outlook, are not guaranteed to render the styles correctly when the recipient reads the .
79 EM AIL 79 Tip: When you design an ecard template, you can insert images from the Image Library. If you reference an image in an ecard template and then remove the image from the Image Library, ecards based on the template cannot display the image. To allow website users to personalize ecards based on the template with sender and recipient information, add merge fields. To display the list of available merge fields, click Merge fields on the Insert tab in the toolbar. To expand the list, click the plus sign next to ecard fields. For information about the merge fields that appear when you design an ecard template, see ecard Template Merge Fields on page 87. Note: To allow website users to send a personal message with ecards based on the template, you must include the <Sender s personal message> merge field. If you do not use this merge field on a template, the option to add a personal message does not appear when the user personalizes the ecard on your website. 9. Click Save. You return to ecard templates. Edit an ecard template 1. From , click ecard templates. ecard templates screen appears. 2. Browse the Categories tab or click the Search tab to find the ecard template to edit. 3. The ecard templates frame displays the templates that meet your criteria.
80 80 CHAPTER 1 Note: In ecard templates, you can preview an ecard template to verify it is the one to edit. Under ecard templates, click the image of the template. A larger version of the image appears. To return to ecard templates, click the larger image. 4. Under ecard templates, click Edit under the template to edit. The ecard Template Properties screen appears and opens to the Properties tab. 5. Adjust the display options, subject line, or categories for the ecard template. When you host multiple sites, the Assign to site field appears on the Properties tab so you can move a template from its current site to another site. If the template is in use on the source site, it continues to be on that site. However, the template is now associated with the target site and its security. 6. To adjust the design of the ecard template, select the Design tab. Use the HTML editor to format the template s appearance and layout.

81 EM AIL 81 For information about how to design an ecard template, see Design an ecard template on page 77. Note: If you adjust the design of an ecard template, the change affects only the ecards that are based on the template and sent after the adjustment. The adjustment does not affect ecards sent before the design change. 7. Click Save. You return to ecard templates. Copy an ecard template 1. From , click ecard templates. ecard templates appears. 2. Browse the Categories tab or click the Search tab to find the ecard template to copy.
82 82 CHAPTER 1 3. The ecard templates frame displays the templates that meet your criteria. Note: In ecard templates, you can preview an ecard template to verify it is the one to copy. Under ecard templates, click the image of the template. A larger version of the image appears. To return to ecard templates, click the larger image. 4. Under ecard templates, click Copy under the template to edit. The Add ecard template screen appears.
83 EM AIL In the Name field, the program adds Copy of to the name of the original ecard template. Enter a unique name so users can identify the new ecard template. 6. Edit the information as required to design the new ecard template. For information about how to design an ecard template, see Design an ecard template on page Click Save. You return to ecard templates. Delete an ecard template 1. From , click ecard templates. ecard templates appears. 2. Browse the Categories tab or click the Search tab to find the ecard template to delete.

84 84 CHAPTER 1 3. The ecard templates frame displays the templates that meet your criteria. Note: In ecard templates, you can preview an ecard template to verify it is the one to delete. Under ecard templates, click the image of the template. A larger version of the image appears. To return to ecard templates, click the larger image. 4. Under ecard templates, click Delete under the ecard template to delete. A confirmation message appears to verify the deletion of the template. 5. Click OK. You return to ecard templates. In the ecard templates frame, the template no longer appears. Design an ecard message When you design an ecard message, you can use merge fields to create a message that contains the content of the ecard or a link to a web page that contains the content. For information about the merge fields that appear for an ecard message, see ecard Message Merge Fields on page From the Edit Part screen, click ecard . The ecard screen appears.

85 EM AIL 85 Note: The screen shown above is the ecard screen for a Donation Form part. Depending on the part type you use, your ecard screen may differ slightly. Some ecard screens contain default text and merge fields. You can use the default text provided or enter different text. 2. Enter a name for the and an address and name to include in the From field of the message. Note: When you create an ecard template in ecard templates, you enter the subject line to appear for all ecard messages that use the template. 3. To receive responses from recipients at a different address than the one you use to send the message, click More Options and enter the address in the Reply Address field. 4. Under Notifications are to be sent to the following addresses, select Failures to receive failure messages when messages are not delivered. In the field beside the checkbox, enter an address to receive failure messages. Note: Failures are addresses that do not receive the acknowledgement . Failures can also be called non-delivery receipts, bouncebacks, UnDeliverables, or Delivery Status Notifications (DSN). For information about how the program handles failures, see Bounced Management on page In the box, enter the content to appear in the ecard message. To format the content s appearance and layout, use the HTML editor. To have information appear in the message that is specific for each ecard, sender, or recipient, click Merge fields on the Insert tab in the toolbar and select the merge fields to include in the message. For information about the merge fields that appear for an ecard message, see ecard Message Merge Fields on page Click Save. You return to the Edit Part screen.
Contents INDEX...83
 Email Guide 012511 Blackbaud NetCommunity 2011 Blackbaud, Inc. This publication, or any part thereof, may not be reproduced or transmitted in any form or by any means, electronic, or mechanical, including
10/31/2016 Spark US 2016 Blackbaud, Inc. This publication, or any part thereof, may not be reproduced or transmitted in any form or by any
 Email Guide 10/31/2016 Spark Email US 2016 Blackbaud, Inc. This publication, or any part thereof, may not be reproduced or transmitted in any form or by any means, electronic, or mechanical, including
Blackbaud StudentInformationSystem. NetSolutions Guide
 Blackbaud StudentInformationSystem NetSolutions Guide 102411 2011 Blackbaud, Inc. This publication, or any part thereof, may not be reproduced or transmitted in any form or by any means, electronic, or
Website Design Guide
 Website Design Guide 8/28/2017 Spark Website Design US 2017 Blackbaud, Inc. This publication, or any part thereof, may not be reproduced or transmitted in any form or by any means, electronic, or mechanical,
2/21/2018 Blackbaud NetCommunity 7.1 Parts US 2017 Blackbaud, Inc. This publication, or any part thereof, may not be reproduced or transmitted in any
 Parts Guide 2/21/2018 Blackbaud NetCommunity 7.1 Parts US 2017 Blackbaud, Inc. This publication, or any part thereof, may not be reproduced or transmitted in any form or by any means, electronic, or mechanical,
Blackbaud NetCommunity 7.1 SP3 New Features Guide
 Blackbaud NetCommunity 7.1 SP3 New Features Guide 2/20/2018 Blackbaud NetCommunity 7.1 SP3 New Features US 2017 Blackbaud, Inc. This publication, or any part thereof, may not be reproduced or transmitted
4/27/2018 Blackbaud Internet Solutions 4.96 Parts US 2017 Blackbaud, Inc. This publication, or any part thereof, may not be reproduced or transmitted
 Parts Guide 4/27/2018 Blackbaud Internet Solutions 4.96 Parts US 2017 Blackbaud, Inc. This publication, or any part thereof, may not be reproduced or transmitted in any form or by any means, electronic,
Team Fundraising Guide
 Team Fundraising Guide 012511 Blackbaud NetCommunity 2011 Blackbaud, Inc. This publication, or any part thereof, may not be reproduced or transmitted in any form or by any means, electronic, or mechanical,
Administration Guide
 Administration Guide 04/11/2018 Blackbaud Altru 4.96 Administration US 2017 Blackbaud, Inc. This publication, or any part thereof, may not be reproduced or transmitted in any form or by any means, electronic,
Blackbaud Direct Marketing New Features Guide
 Blackbaud Direct Marketing New Features Guide 05/09/2018 Blackbaud Direct Marketing 5.0 Blackbaud Direct Marketing New Features US 2018 Blackbaud, Inc. This publication, or any part thereof, may not be
Batch and Import Guide
 Batch and Import Guide 06/13/2017 Blackbaud Altru 4.96 Batch and Import US 2017 Blackbaud, Inc. This publication, or any part thereof, may not be reproduced or transmitted in any form or by any means,
Administration Guide
 Administration Guide 12/22/2016 Blackbaud Internet Solutions 4.0 Administration US 2016 Blackbaud, Inc. This publication, or any part thereof, may not be reproduced or transmitted in any form or by any
Blackbaud StudentInformationSystem. Mail Guide
 Blackbaud StudentInformationSystem Mail Guide 102411 2011 Blackbaud, Inc. This publication, or any part thereof, may not be reproduced or transmitted in any form or by any means, electronic, or mechanical,
Text Messaging Guide
 Text Messaging Guide 031208 2008 Blackbaud, Inc. This publication, or any part thereof, may not be reproduced or transmitted in any form or by any means, electronic, or mechanical, including photocopying,
The Raiser s Edge & Microsoft Office Integration Guide
 The Raiser s Edge & Microsoft Office Integration Guide 020912 2012 Blackbaud, Inc. This publication, or any part thereof, may not be reproduced or transmitted in any form or by any means, electronic, or
General Features Guide
 General Features Guide 11/01/2017 Blackbaud Altru 4.98 General Features US 2017 Blackbaud, Inc. This publication, or any part thereof, may not be reproduced or transmitted in any form or by any means,
User Training Manual. Polit v4.7
 User Training Manual PoliteMail v4.7 2 Welcome to PoliteMail This training manual is designed for users new to PoliteMail. It provides a basic overview for each function within the tool. For more detailed
07/20/2016 Blackbaud Altru 4.91 Reports US 2016 Blackbaud, Inc. This publication, or any part thereof, may not be reproduced or transmitted in any
 Reports Guide 07/20/2016 Blackbaud Altru 4.91 Reports US 2016 Blackbaud, Inc. This publication, or any part thereof, may not be reproduced or transmitted in any form or by any means, electronic, or mechanical,
IBM emessage Version 9 Release 1 February 13, User's Guide
 IBM emessage Version 9 Release 1 February 13, 2015 User's Guide Note Before using this information and the product it supports, read the information in Notices on page 471. This edition applies to version
The Raiser s Edge & Microsoft Office Integration Guide
 The Raiser s Edge & Microsoft Office Integration Guide 041211 2011 Blackbaud, Inc. This publication, or any part thereof, may not be reproduced or transmitted in any form or by any means, electronic, or
Administration Guide
 Administration Guide 10/31/2016 Blackbaud NetCommunity 7.1 Administration US 2016 Blackbaud, Inc. This publication, or any part thereof, may not be reproduced or transmitted in any form or by any means,
Post Installation Manual Steps Guide
 Post Installation Manual Steps Guide 12/4/2014 Blackbaud CRM 3.19 Post Installation Manual Steps US 2014 Blackbaud, Inc. This publication, or any part thereof, may not be reproduced or transmitted in any
Marketer's Guide. User guide for marketing analysts and business users
 Marketer's Guide Rev: 18 November 2014 Email Campaign Manager 2.2 for Sitecore CMS 7.5 Marketer's Guide User guide for marketing analysts and business users Table of Contents Chapter 1 Introduction...
Marketer's Guide. User guide for marketing analysts and business users
 Marketer's Guide Rev: 2014-06-11 Marketer's Guide User guide for marketing analysts and business users Table of Contents Chapter 1 Introduction... 4 Chapter 2 Quick Start Guide... 5 2.1 Accessing the Email
08/02/2017 Blackbaud Altru 4.97 Web Forms US 2017 Blackbaud, Inc. This publication, or any part thereof, may not be reproduced or transmitted in any
 Web Forms Guide 08/02/2017 Blackbaud Altru 4.97 Web Forms US 2017 Blackbaud, Inc. This publication, or any part thereof, may not be reproduced or transmitted in any form or by any means, electronic, or
Campaign Manager 2.0 for Sitecore CMS 6.6
 E-Mail Campaign Manager 2.0 Marketer's Guide Rev: 2014-06-11 E-Mail Campaign Manager 2.0 for Sitecore CMS 6.6 Marketer's Guide User guide for marketing analysts and business users Table of Contents Chapter
The Raiser's Edge Sphere Connector Guide
 The Raiser's Edge Sphere Connector Guide 8/13/2013 Sphere 9.4.3 The Raiser's Edge Sphere Connector US 2013 Blackbaud, Inc. This publication, or any part thereof, may not be reproduced or transmitted in
Blackbaud NetCommunity 7.1 SP2. New Features Guide
 Blackbaud NetCommunity 7.1 SP2 New Features Guide 2/21/2018 Blackbaud NetCommunity 7.1 SP2 New Features US 2017 Blackbaud, Inc. This publication, or any part thereof, may not be reproduced or transmitted
TheFinancialEdge. Crystal Reports Tutorial
 TheFinancialEdge Crystal Reports Tutorial 101911 2011 Blackbaud, Inc. This publication, or any part thereof, may not be reproduced or transmitted in any form or by any means, electronic, or mechanical,
Blackbaud StudentInformationSystem. Queue Guide
 Blackbaud StudentInformationSystem Queue Guide 102711 2011 Blackbaud, Inc. This publication, or any part thereof, may not be reproduced or transmitted in any form or by any means, electronic, or mechanical,
The Raiser's Edge and everydayhero Integration Guide
 The Raiser's Edge and everydayhero Integration Guide 01/22/2015 The Raiser's Edge 7.93 Raiser's Edge & everydayhero Integration UK 2014 Blackbaud, Inc. This publication, or any part thereof, may not be
TheFinancialEdge. Configuration Guide for Cash Receipts
 TheFinancialEdge Configuration Guide for Cash Receipts 102711 2011 Blackbaud, Inc. This publication, or any part thereof, may not be reproduced or transmitted in any form or by any means, electronic, or
04/23/2012 ResearchPoint 2.91 Prospects US
 Prospects Guide 04/23/2012 ResearchPoint 2.91 Prospects US 2011 Blackbaud, Inc. This publication, or any part thereof, may not be reproduced or transmitted in any form or by any means, electronic, or mechanical,
05/08/2018 etapestry SEPA US 2016 Blackbaud, Inc. This publication, or any part thereof, may not be reproduced or transmitted in any form or
 SEPA Guide 05/08/2018 etapestry 7.22.0 SEPA US 2016 Blackbaud, Inc. This publication, or any part thereof, may not be reproduced or transmitted in any form or by any means, electronic, or mechanical, including
Contents. Mapping. Mapping 2. Constituent Density Map 3 Address Geocodes 4 Map Entities 4 Map Instances 8
 Mapping Last Updated: 08/05/2016 for ResearchPoint 4.91 Contents Mapping 2 Constituent Density Map 3 Address Geocodes 4 Map Entities 4 Map Instances 8 chapter 1: MAPPI NG Mapping To geographically locate
06/12/2017 Blackbaud Altru 4.96 Memberships US 2017 Blackbaud, Inc. This publication, or any part thereof, may not be reproduced or transmitted in
 Memberships Guide 06/12/2017 Blackbaud Altru 4.96 Memberships US 2017 Blackbaud, Inc. This publication, or any part thereof, may not be reproduced or transmitted in any form or by any means, electronic,
TIE1.80InstallationGuideUK
 Installation Guide 112206 2006 Blackbaud, Inc. This publication, or any part thereof, may not be reproduced or transmitted in any form or by any means, electronic, or mechanical, including photocopying,
The Raiser's Edge and everydayhero Integration Guide
 The Raiser's Edge and everydayhero Integration Guide 12/16/2016 The Raiser's Edge & Everyday Hero Integration US 2016 Blackbaud, Inc. This publication, or any part thereof, may not be reproduced or transmitted
An Integrated Solution for Nonprofits
 An Integrated Solution for Nonprofits 072104 2004 Blackbaud, Inc. This publication, or any part thereof, may not be reproduced or transmitted in any form or by any means, electronic, or mechanical, including
An Integrated Solution for Nonprofits
 An Integrated Solution for Nonprofits 100411 2011 Blackbaud, Inc. This publication, or any part thereof, may not be reproduced or transmitted in any form or by any means, electronic, or mechanical, including
Blackbaud, Inc. This publication, or any part thereof, may not be reproduced or transmitted in any form or by any means, electronic, or
 7.93 Update Guide 092513 2013 Blackbaud, Inc. This publication, or any part thereof, may not be reproduced or transmitted in any form or by any means, electronic, or mechanical, including photocopying,
Contents. Announcer Pro Version 4.6 Page 2 of 35 Version V4.6
 User Guide Contents 1. Introduction... 3 1.1. Getting Started... 3 1.2. Navigation... 4 2. Create a Newsletter... 6 2.1. Confirm Company Details... 6 2.2. Choose Template... 8 2.3. Edit Newsletter... 8
Team Approach Synchronization Guide
 Team Approach Synchronization Guide 012511 Enterprise CRM, version 2.9 US 2011 Blackbaud, Inc. This publication, or any part thereof, may not be reproduced or transmitted in any form or by any means, electronic,
The Raiser s Edge Mobile Application Guide
 The Raiser s Edge Mobile Application Guide 040313 2013 Blackbaud, Inc. This publication, or any part thereof, may not be reproduced or transmitted in any form or by any means, electronic, or mechanical,
This document contains information that will help you to create and send graphically-rich and compelling HTML s through the Create Wizard.
 This document contains information that will help you to create and send graphically-rich and compelling HTML emails through the Create Email Wizard. or warranty by AT&T and is subject to change. 1 Contents
BeetleEye Application User Documentation
 BeetleEye Application User Documentation BeetleEye User Documentation 1 Table of Contents Welcome to the BeetleEye Application... 6 Overview... 6 Navigation... 6 Access BeetleEye... 6 Update account information...
Receipting Guidelines for Canada
 Receipting Guidelines for Canada 022608 2008 Blackbaud, Inc. This publication, or any part thereof, may not be reproduced or transmitted in any form or by any means, electronic, or mechanical, including
Creating an with Constant Contact. A step-by-step guide
 Creating an Email with Constant Contact A step-by-step guide About this Manual Once your Constant Contact account is established, use this manual as a guide to help you create your email campaign Here
Tribute Data Entry Guide
 Tribute Data Entry Guide 020112 2008 Blackbaud, Inc. This publication, or any part thereof, may not be reproduced or transmitted in any form or by any means, electronic, or mechanical, including photocopying,
Content Author's Reference and Cookbook
 Sitecore CMS 7.2 Content Author's Reference and Cookbook Rev. 140225 Sitecore CMS 7.2 Content Author's Reference and Cookbook A Conceptual Overview and Practical Guide to Using Sitecore Table of Contents
Blackbaud, Inc. This publication, or any part thereof, may not be reproduced or transmitted in any form or by any means, electronic, or
 MatchFinder Guide 013112 2008 Blackbaud, Inc. This publication, or any part thereof, may not be reproduced or transmitted in any form or by any means, electronic, or mechanical, including photocopying,
AFN-ProjectsandGrantsGuide
 011602 2002 Blackbaud, Inc. This publication, or any part thereof, may not be reproduced or transmitted in any form or by any means, electronic, or mechanical, including photocopying, recording, storage
The Raiser's Edge and Luminate Online Integration Guide
 The Raiser's Edge and Online Integration Guide 042312 2013 Blackbaud, Inc. This publication, or any part thereof, may not be reproduced or transmitted in any form or by any means, electronic, or mechanical,
Create and Edit a Capacity Formula 2 Apply a Capacity Formula 7
 Prospects Configuration Last Updated: 01/18/2018 for ResearchPoint in Altru 4.7 Contents Prospects Configuration 1 Capacity Formula Management 1 Create and Edit a Capacity Formula 2 Apply a Capacity Formula
Blackbaud, Inc. This publication, or any part thereof, may not be reproduced or transmitted in any form or by any means, electronic, or
 7.94 Update Guide 011615 2015 Blackbaud, Inc. This publication, or any part thereof, may not be reproduced or transmitted in any form or by any means, electronic, or mechanical, including photocopying,
RE-LO Integration Guide
 RE-LO Integration Guide 05/06/2016 Edge 4.5 RE-LO Integration US 2015 Blackbaud, Inc. This publication, or any part thereof, may not be reproduced or transmitted in any form or by any means, electronic,
Banner Communication Management User Guide. Release 9.3 May 2017
 Banner Communication Management User Guide Release 9.3 May 2017 Notices Notices 2015-2017 Ellucian. Contains confidential and proprietary information of Ellucian and its subsidiaries. Use of these materials
Prospect Data Entry Guide
 Prospect Data Entry Guide 020112 2010 Blackbaud, Inc. This publication, or any part thereof, may not be reproduced or transmitted in any form or by any means, electronic, or mechanical, including photocopying,
Blackbaud NetCommunity 7.1 SP4. New Features Guide
 Blackbaud NetCommunity 7.1 SP4 New Features Guide 10/10/2018 Blackbaud NetCommunity 7.1 SP4 New Features US 2017 Blackbaud, Inc. This publication, or any part thereof, may not be reproduced or transmitted
Blackbaud StudentInformationSystem. Import Guide
 Blackbaud StudentInformationSystem Import Guide 102411 2011 Blackbaud, Inc. This publication, or any part thereof, may not be reproduced or transmitted in any form or by any means, electronic, or mechanical,
Manual. The Salvation Army Southern Territorial Headquarters 2015 InterChange University
 Email Manual The Salvation Army Southern Territorial Headquarters 2015 InterChange University 52 Table of Contents 5: Email... 4 An Overview of the Email Process... 5 Important Points to Remember... 6
Table of Contents RE:QUEUE C HAPTER 1 RE :Q UEUE BASICS C HAPTER 2 RE :Q UERY
 RE:QUEUE Table of Contents C HAPTER 1 RE :Q UEUE BASICS Overview... 2 RE:Query... 2 RE:Batch... 2 Reports... 3 RE:Mail... 3 RE:Export... 3 Database Administration... 4 Security... 4 Working with Basic
Creating an with Constant Contact. A step-by-step guide
 Creating an Email with Constant Contact A step-by-step guide About this Manual Once your Constant Contact account is established, use this manual as a guide to help you create your email campaign Here
EFT Overview Guide for Canada
 EFT Overview Guide for Canada 051812 2012 Blackbaud, Inc. This publication, or any part thereof, may not be reproduced or transmitted in any form or by any means, electronic, or mechanical, including photocopying,
Creating Custom Crystal Reports Tutorial
 Creating Custom Crystal Reports Tutorial 090705 2005 Blackbaud, Inc. This publication, or any part thereof, may not be reproduced or transmitted in any form or by any means, electronic, or mechanical,
All-In-One Cloud-Based Blaster
 All-In-One Cloud-Based Email Blaster Page 1 Index 04 What is Email Magix 05 How Email Magix Works 06 Email Magix Features 08 Email Design Features 10 Email Campaign Features 13 Autoresponder Features 14
April Communication Manager User s Guide
 April 2012 Communication Manager User s Guide Table of Contents Overview... 4 Navigating ecentral... 5 WebSync Wizard... 8 WebSync Setup... 8 Login Setup... 9 Schedule WebSync... 9 WebSync Options... 9
Online Presence Guide
 Online Presence Guide 08/16/2018 etapestry 7.22.0 Online Presence US 2016 Blackbaud, Inc. This publication, or any part thereof, may not be reproduced or transmitted in any form or by any means, electronic,
EFM Community 3.1 Portal Administration Guide
 EFM Community 3.1 Portal Administration Guide WHITE PAPER For technical support please call: 1-800-787-8755 Or visit: Hwww.Vovici.comH Please contact Vovici technical support if you believe any of the
Get to know Inxmail Professional 4.4 in five easy steps
 How-to Get to know Inxmail Professional 4.4 in five easy steps Use this document as an introduction to help get you started with Inxmail Professional. The five steps presented here take you through the
Contents. Raiser's Edge Integration. Overview of Raiser s Edge Integration 2
 Raiser's Edge Integration Last Updated: 08/05/2016 for ResearchPoint 4.91 Contents Overview of Raiser s Edge Integration 2 Set Up Integration 2 ResearchPoint Search of Raiser's Edge Records 7 Raiser's
Business Intelligence Launch Pad User Guide SAP BusinessObjects Business Intelligence Platform 4.1 Support Package 1
 Business Intelligence Launch Pad User Guide SAP BusinessObjects Business Intelligence Platform 4.1 Support Package 1 Copyright 2013 SAP AG or an SAP affiliate company. All rights reserved. No part of this
To request a new selection, navigate to the GAIL resources website at and click the Request Help button at the top of the page.
 How to Process an Email Direct Marketing Effort Step 1. Request the Selection (A selection is the list of individuals you are trying to reach with your communication.) Important Note: If you have already
AuctionMaestro Pro Integration Guide
 AuctionMaestro Pro Integration Guide 012312 2008 Blackbaud, Inc. This publication, or any part thereof, may not be reproduced or transmitted in any form or by any means, electronic, or mechanical, including
SAS Web Report Studio 3.1
 SAS Web Report Studio 3.1 User s Guide SAS Documentation The correct bibliographic citation for this manual is as follows: SAS Institute Inc. 2006. SAS Web Report Studio 3.1: User s Guide. Cary, NC: SAS
Membership Scanning Guide
 Membership Scanning Guide 021312 2012 Blackbaud, Inc. This publication, or any part thereof, may not be reproduced or transmitted in any form or by any means, electronic, or mechanical, including photocopying,
SmartView. User Guide - Analysis. Version 2.0
 SmartView User Guide - Analysis Version 2.0 Table of Contents Page i Table of Contents Table Of Contents I Introduction 1 Dashboard Layouts 2 Dashboard Mode 2 Story Mode 3 Dashboard Controls 4 Dashboards
RE7.8-MapPointUK
 Mapping Guide 033108 2008 Blackbaud, Inc. This publication, or any part thereof, may not be reproduced or transmitted in any form or by any means, electronic, or mechanical, including photocopying, recording,
KYOCERA Net Admin User Guide
 KYOCERA Net Admin User Guide Legal Notes Unauthorized reproduction of all or part of this guide is prohibited. The information in this guide is subject to change without notice. We cannot be held liable
Inxmail Professional 4.4 in five steps (test accounts)
") How-to Inxmail Professional 4.4 in five steps (test accounts) Use this document as an introduction to help get you started with Inxmail Professional. The five steps presented here take you through the
How-to Inxmail Professional 4.4 in five steps (test accounts) Use this document as an introduction to help get you started with Inxmail Professional. The five steps presented here take you through the
Q New Features Guide
 Q3 2010 New Features Guide 080410 2010 Blackbaud, Inc. This publication, or any part thereof, may not be reproduced or transmitted in any form or by any means, electronic, or mechanical, including photocopying,
Edition 3.2. Tripolis Solutions Dialogue Manual version 3.2 2
 Edition 3.2 Tripolis Solutions Dialogue Manual version 3.2 2 Table of Content DIALOGUE SETUP... 7 Introduction... 8 Process flow... 9 USER SETTINGS... 10 Language, Name and Email address settings... 10
2.9 New Features Guide
 2.9 New Features Guide 042111 Enterprise CRM, version 2.9 US 2011 Blackbaud, Inc. This publication, or any part thereof, may not be reproduced or transmitted in any form or by any means, electronic, or
Online Presence Guide
 Online Presence Guide 06/26/2017 etapestry 7.22.0 Online Presence US 2016 Blackbaud, Inc. This publication, or any part thereof, may not be reproduced or transmitted in any form or by any means, electronic,
Table of Contents RE:S EARCH C HAPTER 1 O VERVIEW C HAPTER 2 C HANGES IN THE RAISER S EDGE. Brief Summary of Changes...2 Electronic Interface...
 RE:S EARCH Table of Contents C HAPTER 1 O VERVIEW Brief Summary of Changes...2 Electronic Interface...2 C HAPTER 2 C HANGES IN THE RAISER S EDGE Configuration...4 Security Tab...4 Tables Tab...4 Constituent
Campaign Manager for Sitecore CMS 6.3
 E-Mail Campaign Manager Marketer's Guide Rev: 2013-01-24 E-Mail Campaign Manager for Sitecore CMS 6.3 Marketer's Guide User guide for marketing analysts and business users Table of Contents Chapter 1 Introduction...
Oracle Eloqua s User Guide
 http://docs.oracle.com Oracle Eloqua Emails User Guide 2017 Oracle Corporation. All rights reserved 08-Dec-2017 Contents 1 Emails Overview 6 2 Examples of emails 7 3 Creating emails 19 4 Email authoring
Content Author's Reference and Cookbook
 Sitecore CMS 7.0 Content Author's Reference and Cookbook Rev. 130425 Sitecore CMS 7.0 Content Author's Reference and Cookbook A Conceptual Overview and Practical Guide to Using Sitecore Table of Contents
Videos...31 Training Videos...32 Webinar recording: Monday 5th December
 GATORCREATOR Table of Contents Articles... 3 Drag and Drop Email Editor (Overview)... 4 Hidden Elements...15 Tracked Mailto: Links...18 Template Restrictions Custom Templates...21 Nifty Images User Guide...22
Newsletter Popup v3.x Configuration for Magento 2
 Newsletter Popup v3.x Configuration for Magento 2 From Plumrocket Documentation Contents 1. Configuring Newsletter Popup 3.x Extension for Magento 2 2. Managing Newsletter Popups 3. Managing Newsletter
UTAS CMS. Easy Edit Suite Workshop V3 UNIVERSITY OF TASMANIA. Web Services Service Delivery & Support
 Web Services Service Delivery & Support UNIVERSITY OF TASMANIA UTAS CMS Easy Edit Suite Workshop V3 Web Service, Service Delivery & Support UWCMS Easy Edit Suite Workshop: v3 Contents What is Easy Edit
SECTION 5 USING STUDENT
 SECTION 5 USING STUDENT EMAIL 5. USING STUDENT EMAIL On enrolling at the University all students automatically have an email account created. Account creation depends on a student successfully enrolling
Benevon Next Step Guide
 Benevon Next Step Guide 09/15/2016 etapestry 7.22.0 Benevon Next Step US 2016 Blackbaud, Inc. This publication, or any part thereof, may not be reproduced or transmitted in any form or by any means, electronic,
CollabNet Desktop - Microsoft Windows Edition
 CollabNet Desktop - Microsoft Windows Edition User Guide 2009 CollabNet Inc. CollabNet Desktop - Microsoft Windows Edition TOC 3 Contents Legal fine print...7 CollabNet, Inc. Trademark and Logos...7 Chapter
PostalSaver Guide for Australia
 PostalSaver Guide for Australia 022608 2008 Blackbaud, Inc. This publication, or any part thereof, may not be reproduced or transmitted in any form or by any means, electronic, or mechanical, including
SAP BusinessObjects Live Office User Guide SAP BusinessObjects Business Intelligence platform 4.1 Support Package 2
 SAP BusinessObjects Live Office User Guide SAP BusinessObjects Business Intelligence platform 4.1 Support Package 2 Copyright 2013 SAP AG or an SAP affiliate company. All rights reserved. No part of this
Update Guide
 7.91.50 Update Guide 111209 2009 Blackbaud, Inc. This publication, or any part thereof, may not be reproduced or transmitted in any form or by any means, electronic, or mechanical, including photocopying,
What do I do...? Error Messages
 SUPPORT FAQ'S Table of Contents What do I do...? Error Messages... 3 Editor Disabled - Invalid HTML: Unsupported Extensions Error... 4 Initiate Check Screen - The campaign start date is later than the
Oracle Eloqua s User Guide
 http://docs.oracle.com Oracle Eloqua Emails User Guide 2018 Oracle Corporation. All rights reserved 11-Jan-2018 Contents 1 Emails Overview 6 2 Examples of emails 7 3 Creating emails 19 4 Email authoring
JustGiving & etapestry Integration FAQs
 JustGiving & etapestry Integration FAQs Never miss a single donor with the Blackbaud etapestry and JustGiving integration. After a quick set up, just let it go and do its thing; data collected by JustGiving