Making University Deposits Direct Journal
|
|
|
- Alannah Miles
- 5 years ago
- Views:
Transcription


1 Making University Deposits Direct Journal VERSION: 2/5/2016
2
3 Table of Contents 1 Direct Journal University Deposits 3 Understanding University Deposits for Incoming Payments 5 Entering Direct Journal University Deposits - to Cashier's Office or General Administration 9 Entering Direct Journal University Deposits - to Accounting Services 21 Updating a University Deposit Record 32 Viewing a University Deposit and Attachments 39 Running the Daily Cash Transmittal Report 42 Running the Deposit Status Report 48 InfoPorte Finance Transactions 55 1
4
5 1 Direct Journal University Deposits 1 Direct Journal University Deposits In this chapter, you will learn to: Understand the University deposit process Enter a deposit to University Cashier's Office or General Administration which may include: Cash and/or check Electronic deposits, such as credit card receipts, Automated Clearing House (ACH), lockbox or wire transfers Enter an electronic deposit to Accounting Services which may include: credit card receipts Automated Clearing House (ACH) wire transfers lockbox deposits made directly to the bank by the department 3
6
7 Understanding University Deposits for Incoming Payments Overview University deposits: 1. Identify and track incoming payments 2. Provide a record of money received by the University and the bank account to which it was deposited 3. Are a source of internal information for financial accounting, controlling, and budgeting purposes Within a University deposit transaction, departmental users log incoming payments which may include cash, check, automated clearing house (ACH), credit card, wire transfer, lockbox, or deposits made directly to the bank by departments. There are three designated cashier's offices for the University, and they are all charged with reconciling their assigned depositing unit's deposits. The cashier's offices are the University Cashier's Office, Accounting Services, and General Administration. The reconciliation process ensures that the right amount of money is deposited, and that the appropriate accounting is applied to the incoming payment. If the deposit is irregular or unacceptable, the reconciling cashier will reject the deposit. Rejecting the deposit sends an to the depositor, which includes written notes about why the deposit was rejected and instructions to correct the issue. The depositor then changes or corrects the existing deposit record and resubmits it. University deposits can be broken down into two broad categories: direct journal deposits, when there are no accounts receivable invoices in the system payment predictor deposits, when departments such as the Office of Sponsored Research (OSR), Housing and Residential Education, and Procurement Services match incoming payments against an accounts receivable invoice in the system. 5

8 University Deposits: Direct Journal In direct journal accounting, when you create a deposit record, you enter appropriate chartfield accounting information to designate the appropriate accounts for incoming payments. Departments that don't use ConnectCarolina's billing or accounts receivable functionality do direct journal deposits. 6

9 University Deposits: Payment Predictor - Against Accounts Receivable Invoices OSR, Housing and Residential Education, Procurement Services, and General Administration receive some payments that are matched against accounts receivable invoices in the system. This is done using the "payment predictor" process. 7
10
11 Entering Direct Journal University Deposits - to Cashier's Office or General Administration Overview A University deposit record is created by schools and divisions to account for incoming payments within the ConnectCarolina system. A "direct journal is the type of University deposit that requires department personnel to enter the appropriate chartfield values. Gifts, contributions, and donations are processed by the Development Office. There are controls built into the system, called combo edits, that will not allow deposits to giftdesignated accounts by non-development Office personnel. If you need to deposit gifts, contributions, and donations, forward them to the Development Office. Standard Deposit or Other Deposit This document covers the steps for processing incoming deposits that are processed and reconciled through the University Cashier's Office or through General Administration. Cash, check, and electronic deposits such as credit card receipts, Automated Clearing House (ACH) payments, or wire transfers are handled slightly differently within the same transaction. Physical cash amounts are entered in the Cash Total Amount field, check amounts are entered in the Non-Cash Total Amount field, and credit card, ACH payments, and wire transfers are entered in the Total Amount field. Deposits to University Cashier's Office or General Administration Related Reference For instructions on changing a deposit that has not been submitted, deleting a deposit, or revising a deposit that has been rejected, seeupdating a University Deposit Record, page 32 Menu Path Main Menu > Finance Menu > Accounts Receivable > Payments > Online Payments > Regular Deposit 9

12 Steps Entering Direct Journal University Deposits - to Cashier's Office or General Administration 1. Choose this menu option: Main Menu > Finance Menu > Accounts Receivable > Payments > Online Payments > Regular Deposit 2. Click the Add a New Value tab. Add a New Value Tab 3. Complete the fields: In this field: Deposit Unit Deposit ID Do the following: Enter the unit ID for the deposit. Each deposit unit ID is configured to deposit to specific bank accounts and drive the path for follow-on reconciliation. Note: This information is filled in by default based on your unique user profile, but can be changed if necessary. Always leave the default value NEXT. When you save the deposit, the system will assign the next available deposit ID. 4. Click the Add button. Totals Tab 1. Complete the fields: 10
13 In this field: Accounting Date Bank Code Bank Account Deposit Type Department Phone # Campus Box # Do the following: Leave the default value of today s date. The bank code value is filled in based upon the deposit unit you initially entered and cannot be changed. Note: Users in the General Administration Miscellaneous (GAMSC) and (CHSTU) deposit units can change the default bank code if necessary. The bank account value is filled in based on the deposit unit you initially entered and cannot be changed. Note: Users in the General Administration Miscellaneous (GAMSC) and (CHSTU) can be change the bank account if necessary. The deposit type is filled in based on the deposit unit you initially entered. Leave the deposit type value. Note: Deposit type is primarily used for reporting purposes, and does not have any Accounting-related impacts. Enter the department ID for the department receiving the payment. Note: This field is primarily used for reporting purposes, and does not have any Accounting-related impacts. Enter the phone number of the person to contact if there are questions about the deposit. Enter the campus mailbox number to be used for any follow up correspondence. 2. In the Standard Deposit and Other Deposit sections, complete the fields: Note: Cash and Check Standard deposits cannot be included in the same deposit record as electronic Other deposits. 11

14 Standard Deposit In this field: Cash Total Amount Non-Cash Total Amount Do the following: Enter the total amount of incoming cash in the deposit. Enter the total amount of incoming checks in the deposit. Other Deposit In this field: Total Amount Do the following: Enter the total amount of incoming credit card, ACH, lockbox, and wire payments in the deposit. 3. Click the Calculate Totals button. Result: The system displays the calculated deposit total amount. 4. In the Control Totals and Control Data section on the Totals tab, complete the fields: In this field: *Count Settlement Date Entered Assigned Do the following: Leave the default value of 1 when making a deposit that has one payment. Standard deposits may have more that one payment. If this deposit has more than one payment, enter the number of payment lines for the deposit. It's important that this number is accurate for the deposit to be in balance. Note: For more information on using multiple payments, see the section later in this reference Multiple Payments for Standard Cash/Check Deposits to the University Cashier. For cash and check deposits, accept the default value of today s date. For credit card, ACH, lockbox, or wire payments, enter the bank settlement date. Accept the default value of today s date. The system fills in the field with your user ID. Accept this default value. Note: This value can be used later for reporting and inquiry purposes. 12
15 5. Click the Payments tab. Payments Tab 1. In the Payment Information section, complete the fields: In this field: Do the following: Payment/ Merchant ID For credit card, ACH, wire, or lockbox payments, enter the last six digits of the merchant ID that appears on the bank statement. This is used for follow-on reconciliation purposes. For cash and check deposits, enter values specified by your department for tracking purposes. Note: This value is printed on the Daily Cash Transmittal (DCT) form, and can be used for historical reference and reporting. Accounting Date Amount The system fills in this date based on the accounting date entered on the Totals tab. Leave the filled in date. Enter the total amount for the payment. When creating a single payment for the deposit record, this amount should match the systemcalculated deposit total amount from the Totals tab. 2. To attach a reference file to the payment, click the Attachments link. Otherwise, skip this step. 3. Mark the Journal Directly checkbox on the payment line. Caution! For the following step, use the refresh button within the system, and not the refresh button in your browser. 4. At the bottom of the screen, click the Refresh button. 13
16 Result: The system validates your entries. Additionally, in the upper right portion of the screen, the system indicates if the payment is Balanced with the amounts entered on the Totals tab. Caution! The deposit record must be Balanced before payment accounting can be entered. If the system indicates Not Balanced, but you suspect it should be, click the Calculate Totals button on the Totals tab to try to rectify the discrepancy. Verify that the amounts you entered on the Totals and Payments tabs balance each other. If the value in the Cash Amount or Non-Cash Amount field on the Totals tab is incorrect, make the necessary change, click Calculate Totals to ensure that the Control Total Amount equals the Entered Total Amount, click Save, and then continue with the Accounting Entries on the Payments tab. If the amount entered on the Payments page is incorrect, change it to agree with the Control Total Amount on the Totals tab, click Save, and verify that the transaction is Balanced before continuing with the Accounting Entries. 3. Click the Save button. Result: If you marked the Journal Directly checkbox before saving the transaction, the system displays the Accounting Entries link in the Payment Information section. Caution! Be sure your transaction is Balanced before moving on to the next step, and do not click the Accounting Entries link if the system indicates your deposit is Not Balanced. If you do, the system will display the Create Accounting Entries screen. If this happens, you will have to re-access and edit the voucher to process it further. If you do click the Accounting Entries link when the system shows the deposit is "Not Balanced", navigate to the Find an Existing Value tab of the Regular Deposit screen and enter your User ID to search for the deposit you just started. The system will display a list of all deposits in New status if you have more than one, or display the original deposit if it is the only new one, providing you an opportunity to balance it. 14

17 4. Click the Accounting Entries link. Result: The system displays the Accounting Entries tab that corresponds with the payment line. Accounting Entries Tab 1. Enter the chartfield accounting and line amount on the Chartfields tab of the Distribution Lines section. Notes: For incoming payments, always enter the Line Amount as a negative value. For outgoing payments and refunds, the Line Amount will always be positive. The sum of the distribution lines you enter need to be the opposite of the payment amount. For example, if the incoming payment amount is $100, the sum of the distribution lines should be -$100. You can distribute the payment amount to multiple distribution lines. The total value for the distribution lines needs to equal the payment amount. To create an additional line, scroll to the right and click the Add a New Row button. In the Line Description field on the Currency Details tab of the distribution lines, enter values specified by your department for tracking purposes. Whatever you enter in this field in printed on the DCT form, and can be used for historical reference and reporting. 15

18 For more information on entering chartfield values, see Chartfield Structure and Chartfield Structure Insert. Additionally, consult with the key accounting personnel in your department for guidance. Caution! For the next step, use the refresh button within the system, and not the refresh button in your browser. 2. Click the Refresh button located in the lower right section of the screen. 3. Click the Lighting Bolt icon to automatically generate offsetting cash entries. Result: The system generates additional offsetting line items. These additional accounting lines are for a debit to a cash clearing account. Notes: After generating the additional lines, by default the system prevents you from changing your distribution line entries. If you need to make a change, click on the Delete icon next to the Lightning Bolt icon to reverse the automated creation of the line entries. Then make changes as necessary. The Net amount in the Totals section should be zero. This is the combination of the payment amount and the distribution line total amount. 16

19 3. Mark the Complete checkbox. 4. Click the Apply button. 5. If you receive a Combo Edit error, click on the ChartField Comb Error tab on the distribution line to view and resolve the error. Notes on combo edit errors: When the Complete checkbox is marked, and the Apply button is clicked, the system will perform a combo edit check. This is a validation of the chartfield distribution entries, and their use in combination, with a pre-configured table of valid entries. If the combination of chartfield distribution entries is not valid, the record cannot be saved or processed. If you receive an error message, double check your entries, see Chartfield Structure and Chartfield Structure Insert, or consult with the key accounting personnel in your department for assistance. There are specifically-designed combo edit controls that prevent non-development Office personnel from making a deposit to a gift-designated account 6. Click OK to return to the Payments tab. 17
20 Multiple Payments For Standard Cash or Check Deposits to the University Cashier For standard cash or check deposits to the University Cashier, you can enter multiple payments. The total of all payments must equal the Deposit Total Amount entered on the Totals tab. Additionally, if you enter multiple payments, you must change the Count field on the Totals tab to match the number of payments you enter. To create additional payment lines, click the Add a New Row button on an existing payment. Each payment must have its own accounting distribution lines. One reason why you may want to enter multiple payments is to create a logical grouping or segmentation of deposits, based on criteria your department finds useful. These may include chartfield distributions, type of deposit, or payment source. You can use the free-form Payment/Merchant ID field as a label for your grouping, and can view it in your reports. Payments Tab 1. Click the Submit button to save and finalize the deposit record. Results: Clicking submit enables follow-on reconciliation and processing by your department or school's designated cashier. Once you click Submit, the Print Daily Cash Transmittal button is enabled. 3. Click the Print Daily Cash Transmittal button. Note: The Print Daily Cash Transmittal button is disabled until you click the Submit button. 18
21 Result: The system opens a new browser tab that displays the DCT form. Daily Cash Transmittal Form 1. Use the browser's print function, typically File > Print, to print the DCT form. 2. When finalizing the University deposit record, department personnel can print or save a copy to keep on file in the department, and one to accompany the monetary payments to the Cashier's office. 3. Deliver the monetary payments and accompanying DCT form to your department's designated cashier. 19
22 20

23 Entering Direct Journal University Deposits - to Accounting Services Overview A University deposit record is created by school or division personnel to account for incoming payments within the ConnectCarolina system. A "direct journal is the type of University deposit that requires department personnel to enter the appropriate chartfield values. Standard Deposit or Other Deposit This document covers the steps to process incoming deposits that are processed and reconciled through Accounting Services. This includes electronic deposits such as credit card receipts, Automated Clearing House (ACH), wire transfers, lockbox, and deposits made directly to the bank by the department. These deposits to Accounting Services are entered differently than deposits to the University Cashier's Office or through General Administration. Deposits to Accounting Services Related Reference For instructions on changing a deposit that has not been submitted, deleting a deposit, or revising a deposit that has been rejected, seeupdating a University Deposit Record, page 32 Menu Path Main Menu > Finance Menu > Accounts Receivable > Payments > Online Payments > Regular Deposit Steps Entering Direct Journal University Deposits - to Accounting Services 1. Choose this menu option: 21

24 Main Menu > Finance Menu > Accounts Receivable > Payments > Online Payments > Regular Deposit 2. Click the Add a New Value tab. Add a New Value Tab 3. Complete the fields: In this field: Deposit Unit Deposit ID Do the following: Enter the unit ID for the deposit. Each deposit unit ID is configured to deposit to specific bank accounts and drive the path for follow-on reconciliation. Note: This information is filled in by default based on your unique user profile, but can be changed if necessary. Always leave the default value NEXT. When you save the deposit, the system will assign the next available deposit ID. 4. Click the Add button. Totals Tab 1. Complete the fields: In this field: Accounting Date Bank Code Do the following: Leave the default value of today s date. The bank code value is filled in based upon the deposit unit you initially entered, and cannot be changed. Note: Users in the General Administration Miscellaneous (GAMSC) and (CHSTU) deposit units can change the default bank code if necessary. 22
25 In this field: Bank Account Deposit Type Department Phone # Campus Box # Do the following: The bank account value is filled in based on the deposit unit you initially entered and cannot be changed. Note: Users in the General Administration Miscellaneous (GAMSC) and (CHSTU) deposit units can change the default bank account if necessary. The deposit type is filled in based on the deposit unit you initially entered. Leave the deposit type value. Note: Deposit type is primarily used for reporting purposes, and does not have any Accounting-related impacts. Enter the department ID for the department receiving the payment. Note: This field is primarily used for reporting purposes, and does not have any Accounting-related impacts. Enter the phone number of the person to contact if there are questions about the deposit. Enter the campus mailbox number to be used for any follow-up correspondence. 2. In the Standard Deposit and Other Deposit sections, complete the fields: Standard Deposit In this field: Cash Total Amount Non-Cash Total Amount Do the following: Leave the field blank. Do not use this field for electronic deposits that are reconciled with Accounting Services, unless specifically directed to do so. Enter the total amount of the electronic payments included in the deposit. 23


26 Other Deposit In this field: Total Amount Do the following: Leave the field blank. Do not use this field for electronic deposits that are reconciled with Accounting Services, unless specifically directed to do so. 3. Click the Calculate Totals button. Result: The system displays the calculated deposit total amount. 4. In the Control Totals and Control Data section of the Totals Tab, complete the fields: In this field: *Count Settlement Date Entered Assigned Do the following: Leave the default value of 1 when making a deposit that has one payment. Standard deposits may have more that one payment. If this deposit has more than one payment, enter the number of payment lines for the deposit. It's important that this number is accurate for the deposit to be in balance. For cash and check deposits, accept the default value of today s date. For credit card, ACH, lockbox, or wire, enter the bank settlement date. Accept the default value of today s date. The system fills in the field with your user ID. Accept the default. Note: This value can be used later for reporting and inquiry purposes. 24

27 5. Click on the Payments tab. Payments Tab 1. In the Payment Information section, complete the fields: In this field: Do the following: Payment/ Merchant ID For credit card, ACH, wire, or lockbox payments, enter the last six digits of the merchant ID that appears on the bank statement. This is used for follow-on reconciliation purposes. Note: What you enter in this field is printed on the Daily Cash Transmittal (DCT) form, and may be used for historical reference and reporting. Accounting Date Amount The system fills in this date based on the accounting date entered on the Totals tab. Leave the filled in date. Enter the total amount for the payment. When creating a single payment for the deposit record, this amount should match the systemcalculated deposit total amount from the Totals tab. 2. To attach a reference file to the payment, click the Attachments link. Otherwise, skip this step. 3. Mark the Journal Directly checkbox on the payment line. Caution! For the following step, be sure to use the refresh button within the system, and not the refresh button in your browser. 4. At the bottom of the screen, click the Refresh button. 25

28 Result: The system validates your entries. Additionally, in the upper right corner of the screen, the system indicates if the payment is Balanced with the amounts entered on the Totals tab. Caution! The deposit record must be "Balanced" before you can enter payment accounting information. If the system indicates Not Balanced, but you suspect it should be, click the Calculate Totals button on the Totals tab to try to rectify the discrepancy. Verify that the amounts you entered on the Totals and Payments tabs balance each other. If the Cash or Non-Cash Amount on the Totals tab is incorrect, make the necessary changhe, click Calculate Totals to ensure that teh Control otal Cmount = Entered Total Amount, click Save, and then continue with the Accounting Entries on the Payments tab. If the amount entered on the Payments tab is incorrect, change it to agree with the Control Total Amount on the Totals tab, click Save, and verify that Balance shows "Balanced" before continuing with the Accounting Entries. 3. Click the Save button. Result: The system displays the Accounting Entries link in the Payment Information section if you marked the Journal Directly checkbox before saving. 4. Click the Accounting Entries link. Result: The system displays the Accounting Entries tab that corresponds to the payment line. Caution! Do not click the Accounting Entries link if the system indicates your deposit is Not Balanced. If you do, the system will display the Create Accounting Entries screen. If this happens, you will have to re-access and edit the voucher to process it further. 26
29 In this case, navigate to the Find an Existing Value tab of the Regular Deposit screen and enter your User ID to search for the deposit you just started. The system will display a list of all deposits in New status if you have more than one, or display the original deposit if it is the only new one, providing you an opportunity to balance it. Accounting Entries Tab 1. Enter the chartfield accounting and line amount on the Chartfields tab of the Distribution Lines section. Notes: For incoming payments, always enter the Line Amount as a negative value. For outgoing payments and refunds, the Line Amount will always be positive. The sum of the distribution lines you enter must be the opposite of the payment amount. For example, if the incoming payment amount is $100, the sum of the distribution lines should be -$100. You can distribute the payment amount to multiple distribution lines. The total value for the distribution lines must equal the payment amount. To create an additional line, scroll to the right and click the Add a New Row button. In the Line Descr field on the Currency Details tab of the distribution lines, you can enter a description of this payment, or other information specified by your department for tracking purposes. For more detailed information on completing chartfield accounting entries, see the reference Chartfield Structure. Additionally, consult with the key accounting personnel in your department for guidance. Caution! For the following step, use the refresh button within the system, and not the refresh button in your browser. 27

30 5. Click the Refresh button located in the lower right section of the screen. 6. Click the Lighting Bolt icon to automatically generate offsetting cash entries. Result: For each distribution line you entered, the system automatically generates an accounting line for a debit to the cash clearing account. Result: The system generates additional offsetting line items. These additional accounting lines are for the debit cash clearing account and intra-fund accounting. Notes: After generating the offsetting lines, the system prevents you from changing your distribution line entries. If you need to make a change, click on the Delete icon next to the Lightning Bolt icon to reverse the automated creation of the line entries. Then make changes as necessary. There are specifically-designed combo edits that prevent deposits to giftdesignated accounts by non-development Office personnel. The Net amount in the Totals section should be zero. This is the combination of the payment amount and the distribution line total amount. 4. Mark the Complete checkbox. 5. Click the Apply button. 6. If you receive a "Combo Edit" error, click on the ChartField Comb Error tab on the distribution line to view and resolve the error. 28


31 Notes on combo edit errors: When the Complete checkbox is marked, and the Apply button is clicked, the system will perform a "combo edit" check. This is a validation of the chartfield distribution entries, and their use in combination with each other, with a preconfigured table of valid entries. If the combination of chartfield distribution entries is not valid, the record cannot be saved or processed. If you receive an error message, double check your entries or consult with the key accounting personnel in your department for assistance. There are specifically-designed combo edit controls that prevent deposits to giftdesignated accounts by non-development Office personnel. 3. Click the OK button. 29

32 Result: The system takes you to the Payments tab. Payments Tab 1. Click the Submit button to save and finalize the deposit record. Result: Clicking submit enables follow-on reconciliation and processing by Accounting Services. Clicking the Submit button enables the Print Daily Cash Transmittal button. 2. Click the Print Daily Cash Transmittal button. Note: The Print Daily Cash Transmittal button is disabled until you click the Submit button. 30
33 Result: The system opens a new browser tab that displays the Daily Cash Transmittal (DCT) form. Daily Cash Transmittal Form 1. Use the browser's print function, typically File > Print, to print the DCT form. 2. When finalizing the University deposit record, department personnel should print two copies of the DCT form, keeping one locally on file in the department, and one to accompany any required supporting documentation to Accounting Services. 3. Deliver the receipts and accompanying DCT form to Accounting Services. 31
34 Updating a University Deposit Record Overview Use this transaction to update a University deposit record prior to submitting it, or after it has been rejected by your designated reconciling cashier. Things to know about rejected deposit records: If the deposit is irregular, the reconciling cashier may reject the deposit. When a deposit is rejected, the depositor receives an which includes notes about why the deposit was rejected, and when appropriate, instructions to correct the issue. Rejected deposits have a reconciliation status of "Out of Balance" after rejection. Things to know about deposits that you want to change after they have been saved, but before they have been submitted: You can make changes to a deposit at any time prior to submitting it. Deposits that have been saved, and not yet submitted, have a reconciliation status of "New." Delete a University deposit record that was created in error: You can delete a University deposit that has a status of "New" or "Out of Balance". Related Reference Entering Direct Journal University Deposits - to Cashier's Office or General Administration, page 9 Entering Direct Journal University Deposits - to Accounting Services, page 21 32
35 Menu Path Main Menu > Accounts Receivable > Payments > Online Payments > Regular Deposit Steps - Updating a University Deposit Record Follow these steps: 1. Choose this menu option: Main Menu > Accounts Receivable > Payments > Online Payments > Regular Deposit 2. Click the Find an Existing Value tab. Find an Existing Value Tab 3. Complete the fields to refine your search results. Common searches include: Deposit Unit, Deposit ID, and User ID, which will take you directly to the deposit you are looking for. In this field: Deposit Unit Deposit ID User ID Assigned Operator ID Do the following: Enter the unit ID for the deposit. Each deposit unit ID is configured to deposit to specific bank accounts and drive the path for follow-on reconciliation. If you know it, enter the deposit ID. Enter the user ID of the person who created the deposit record you are searching for. Enter the assigned operator ID, which typically is the same as the user ID, indicating the person who created the deposit record. 4. Click the Search button. 33
36 Result: The system displays the search results list, or goes directly to the deposit Totals Tab. If a search results list is displayed, click on the deposit record you want to update or display. Then, the system displays the Totals tab. Totals tab 1. View and change the data on the Totals tab as necessary. 2. If necessary, view the Recon Status (reconciliation status). The reconciliation statuses include the following: New, if the record has been created but is not in balance Balanced, if the payments are in balance with the total on the Totals tab Submitted, if the record is in balance, has proper accounting, and has been submitted for reconciliation Out of Balance, if the record has been rejected by the designated cashier's office Reconciled, if the overall deposit record has been reconciled by the designated cashier's office 3. Change the deposit totals if necessary, then click the Calculate Totals button. 34
37 Caution! You should only delete a deposit record when it is no longer relevant and will ultimately not be submitted. The designated cashier's office rejecting a deposit is not justification for you to delete it. Instead, change it and resubmit it. 4. If you want to delete the deposit, click on the Delete Deposit button, then click on the Save button. Otherwise, skip this step. 5. Click the Payments tab. Payments Tab Note: If you've changed the totals on the Totals tab, you'll have to also change the payment amount and the payment distribution lines amounts. 1. View or change the payment data as necessary. 2. The Attachments link indicates the number of attachments, if any. To view, add or delete attachments, click the Attachments link. Caution! For the following step, be sure the deposit is Balanced before you click on the Accounting Entries link. 35

38 3. If the Journal Directly checkbox is marked, click the Accounting Entries link to view or change the chartfield accounting details, if necessary. Result: The system displays the Accounting Entries tab. Accounting Entries Tab 1. View or change the accounting entries for the payment. If you need to make a change to the distribution lines, click the Delete icon next to the Lightning Bolt icon to reverse the automated creation of the line entries. Then make changes as necessary. For detailed information on entering accounting distribution lines see Entering Direct Journal University Deposits - to Cashier's Office or General Administration, page 9 or Entering Direct Journal University Deposits - to Accounting Services, page Click OK to return to the Payments tab. 36

39 Payments Tab 1. Click the Submit button to save and finalize the deposit record. Result: Clicking Submit enables follow-on reconciliation and processing by your department or school's designated cashier. Once you click Submit, the Print Daily Cash Transmittal button is enabled. 2. Click the Print Daily Cash Transmittal button. Result: The system generates a new browser tab that displays the Deposit Transmittal Report. 37
40 Deposit Transmittal Report 1. Use your browser's print function, typically File > Print, to print the Deposit Transmittal Report, also known as the Daily Cash Transmittal (DCT) Form. Note: When finalizing the University deposit record, follow your department's guidance about how many Deposit Tranmittal Reports to print. Some departments only print a single copy to accompany the monetary payments to the cashier's office, while others want an additional copy one to keep on file. 2. If necessary, deliver the monetary payments and accompanying Deposit Transmittal Report to your department's designated cashier. Note: If you're resubmitting a deposit that was previously rejected, the Deposit Status will be "Resubmit". 38
41 Viewing a University Deposit and Attachments Overview Use this transaction to view high-level deposit information including attached supporting documentation. Related Reference For viewing or updating a University deposit before it has been reconciled and posted, see Updating a University Deposit Record, page 32 Menu Path Main Menu > Finance Menu > Accounts Receivable > Payments > Review Payments > Payment Status Steps - Viewing a University Deposit and Attachments Follow these steps: 1. Choose this menu option: Main Menu > Finance Menu > Accounts Receivable > Payments > Review Payments > Payment Status Payment Status 2. Complete the fields. Common searches include: Deposit Unit and Deposit ID, which will take you directly to the deposit you are looking for. In this field: Deposit Unit Deposit ID Do the following: Enter the depositing unit for the deposit. Note: Each deposit unit ID is configured to deposit to specific bank accounts and drive the path for follow-on reconciliation. If you know it, enter the deposit ID. 39
42 In this field: Payment ID User ID Assigned Operator ID Payment Status Accounting Date Entered Date Payment Type Do the following: If you know it, enter the payment ID for the deposit. Note: Depending on the nature of the deposit, the payment ID may be either the merchant ID for electronic deposits or your department's custom label for cash and check deposits. If you know it, enter the user ID of the user who created the deposit. If you know it, enter the user ID of the user who created the deposit. Leave this field blank. If you know it, enter the accounting date for the deposit. If you know it, enter the date the deposit was created. Leave the default value of Regular Payments Only. 3. Click the Search button. Result: The system displays the search results list, or goes directly to the All Payments page. If a search results list is displayed, click on the deposit you want to view. Then, the system displays the All Payments page. 40

43 All Payments 4. View the deposit details. 5. To view an attachment, click the Attachments link. Result: The system displays the Attachments screen. Attachments 6. Click the hyperlinked name of the file you want to view. Result: The system displays the file you selected. 41

44 Running the Daily Cash Transmittal Report Use this transaction to generate Daily Cash Transmittal (DCT) reports, in PDF format, based on criteria you specify. Related Reference For more information about run controls, see Understanding Run Controls, page 1 Menu Path Main Menu > Accounts Receivable > UNC Account Receivable > DCT Receipt Steps - Running the Daily Cash Transmittal Report Follow these steps: 1. Choose this menu option: Main Menu > Accounts Receivable > UNC Account Receivable > DCT Receipt Single Action Invoice Page 2. Click on the Add a New Value tab. In this field: Run Control ID Do the following: Enter the name you re giving this run control. Note: For more information on run control IDs see Understanding Run Controls, page Click the Add button. Result: The system displays the Nc Ar Dct001 Run tab. 42
45 Nc Ar Dct001 Run Tab 4. Complete the Deposit Unit and as many other fields as necessary to refine your search results. In this field: Deposit Unit Do the following: Look up, or enter, one of the following Accounts Receivable Depositing Units. CHSTR State Treasurer CHDEV Development Office CHFIN Finley Golf Course CHFPH Faculty Physicians (P&A) CHOSP Office of Sponsored Research CHPRK Parking CHSPC Generic - Memo Bank 01 - Accounting Services CHSST Student Stores CHTKT Athletics Ticket Office CHHRE Housing and Residential Education CHOSR Office of Sponsored Research CHPRO Procurement Services CHSTU Generic - Memo Bank 02 - ASV GAMSC Miscellaneous GAOSR Office of Sponsored Research - General Administration Depositing Unit Depositing ID Department Depositor Date From Leave this field blank. Enter the deposit ID. Enter the depositing department. This is the department on the Totals tab of the deposit and is not the department identified in the chartfield string. Enter the Onyen of the person who created the deposit. To see a report of DCTs for a given date range, enter the starting date of the range in this field. This date is the earliest in the range when the deposit would have been created. Note: If you enter a date in this field, you also need to enter a date in the Date To field. 43
46 In this field: Date To Do the following: If you entered a date in the Date From field, enter the ending date of the range in this field. This date is the last date in the range when the deposit would have been created. Note: If you enter a date in this field, you also need to enter a date in the Date From field. 5. If you want to save the run control and its criteria for future use, click on the Save button. Otherwise, skip this step. 6. Click on the Run button. Result: The system displays the Process Scheduler Request page. Process Scheduler Request 7. Click OK. 44
47 Result: The system displays the Nc Ar Dct001 Run tab. Nc Ar Dct001 Run 8. Click on the Report Manager link to access the report. List Tab Result: The system displays the List tab. 1. In the Reports list, click on the.pdf link that corresponds with the date and time you generated the report. 45

48 2. In the Distribution Details section of the page, click the file name in the File List for the.pdf report you want to view. Result: The system opens a new browser window and displays the report. 46

49 3. Using your computer's PDF viewer's or browser's functionality, save, print, or view the report. 47
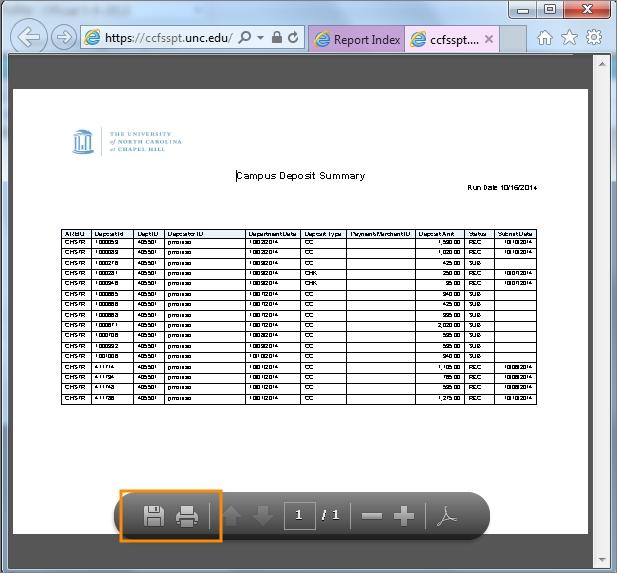
50 Running the Deposit Status Report Use this report to generate the Deposit Status Report, based on criteria you specify. The system generates the report in PDF format, and you can choose between: Summary, for the report to display high-level deposit information for a collection of deposits Non Summary, for the report to display a page of detail for each deposit Related Reference For more information about run controls, see Understanding Run Controls, page 1. Menu Path Main Menu > Accounts Receivable > UNC Accounts Receivable > Deposit Status Steps - Running the Deposit Status Report Follow these steps: 1. Choose this menu option: Main Menu > Accounts Receivable > UNC Account Receivable > Deposit Status Deposit Status Report Page 2. Click on the Add a New Value tab. In this field: Run Control ID Do the following: Enter the name you re giving this run control. Note: For more information on run control IDs, see Understanding Run Controls, page Click the Add button. 48

51 Result: The system displays the Campus Deposit All Statuses tab. Campus Deposit All Statuses Tab 1. Mark the Summary Report checkbox if you want the report to show high-level deposit information. If you'd rather have a page of detail for each deposit, leave this checkbox unmarked. 2. Complete the Department and as many other fields as necessary to refine your search results. In this field: Department Department Date Department Oprid (% for all) Do the following: Enter the depositing department. This is the department on the Totals tab of the deposit, and is not the department identified in the chartfield string. Enter the date the deposit was first created and saved. Enter the Onyen of the person who created the deposit, or enter % to report on all depositors. 49
52 In this field: Transaction Type Do the following: Choose one deposit status you want to report on. To see a report for another deposit status, run the report again. Balanced: Do not choose this option. New: for deposits that have been saved, but have not yet been submitted. Out of Balance: for deposits that have been rejected by the Central Office cashier, Accounting Services, or General Administration. Reconciled: for deposits that have been reconciled by the Central Office cashier, Accounting Services, or General Administration. Resubmit: for deposits that have been resubmitted by the department after previously being rejected. Submitted: for deposits that have been submitted to the Central Office cashier, Accounting Services, or General Administration, and have not yet been reconciled. Depositor Enter the Onyen of the deposit creator. 3. Mark the radio button for the option you want: All to report on all deposits, regardless of the fields that amounts were entered on the Totals tab. CC/ACH/Wire to report on amounts that were entered on the Totals tab in the Other Deposit: Total Amount field. Cash/Check to report on values that were entered on the Totals tab in either of these two Standard Deposit fields. 4. If you want to save the run control and its criteria for future use, click on the Save button. Otherwise, skip this step. 5. Click on the Run button. 50
53 Result: The system displays the Process Scheduler Request screen. Process Scheduler Request 1. Click OK. Result: The system displays the Campus Deposit All Statuses tab. Campus Deposit All Statuses 2. Click on the Report Manager link to access the report. 51

54 Result: The system displays the List tab. List Tab 1. In the Reports list, click on the.pdf link that corresponds with the date and time you generated the report. 2. In the Distribution Details section of the page, click the file name in the File List for the.pdf report you want to view. 52

55 Result: The system opens a new browser window and displays the report. 3. Using your computer's PDF viewer's or browser's functionality, save, print, or view the report. 53
56 54

57 InfoPorte Finance Transactions Overview InfoPorte is the principal reporting tool for finding balances, individual transactions, and various other information. The purpose of this document is to show you how to sign on to InfoPorte and find finance transactions. This document is not intended to be the complete training on InfoPorte. To attain the necessary understanding of InfoPorte, you need to attend the Financial Reporting with InfoPorte class. Access to InfoPorte is controlled by your InfoPorte Administrator. Generally, you are granted access to the pages and departments within the purview of your job. New users need to request access through their InfoPorte Administrator. To access the request form and to see the list of InfoPorte Access Administrators, go to: In the first column, look for Infoporte Admin/Access Request Coordinator list. In the column to the far right, click Download to view the list in Excel. Accessing InfoPorte and Finding Finance Transactions Follow these steps to access InfoPorte and find finance transactions: There are two ways to access InfoPorte. Choose either Step 1 or From the Home page, click Enterprise Reporting > InfoPorte from the left menu. 2. Enter the InfoPorte URL in your browser: 55


58 3. Click the Login button. Result: The buttons that you have access to appear in the top toolbar. A useful button is the Tools button. This button contains the following tabs: Data Dictionary > Account Mapping tab. This tab allows you to look up the translation from an FRS account to the equivalent chartfield string in ConnectCarolina. Data Dictionary > Chartfield Lookup tab. This tab allows you to search for ConnectCarolina chartfields by an alpha or numeric search. Data Dictionary > General Info tab. This tab contains a list of forms and files, such as the Access Request Form for InfoPorte and a list of the InfoPorte Administrators 4. Click the Finance button. Result: The system displays the landing page for the Finance tab, which is the Dept Accounting tab. 5. Click the Transactions tab. Result: The system displays the basic search fields. There is also an Advanced search field section beneath the Basic search section, which allows you to search at an additional level of detail. 56
59 6. Click the Advanced link to open the Advanced search section. 7. The Fiscal Year, Budget Year, and Acct Period fields default to the current period. Change these fields if you are looking for a transaction in a different accounting period. Note: For each accounting period you select, you will see transactions for just those accounting periods, rather than transactions life-to-date up to the period selected. 8. Complete the search fields per the table below. Keep in mind the following: The list in the table below focuses on finding each transaction type, but it is not an exhaustive list of ways you can search. For example, you could search by a specific cost code, but that is not listed in this table. Your complete set of search fields impacts your overall search results. For example, if you select STAT_EX_EX ledger in the Basic search section, and then enter a journal ID in the Advanced section that does not have a State fund, you will get no results. There is an optimal set of chartfield combinations for reconciling. Those combinations are listed in the table at the end of this document. To find this transaction: purchase requisitions vendor catalog orders Note: These requisitions will have an associated voucher if they have been invoiced to the vendor. From the Basic search section, enter: one or a combination of pre-encumbrance ledgers: o o o o F&A_PRE OSR_PRE STAT_EX_PR TRST_EX_PR your department From the Advanced section, enter: REQ_PREENC in the Trans Type field - to see all reqs for your dept Requisition ID in the Trans ID field - to see one specific requisition Acct Date From and Acct Date To - to see requisitions within a date range 57
60 To find this transaction: vouchers Note: This includes travel vouchers, and purchase requisitions and vendor catalog orders that have been invoiced to the vendor. From the Basic search section, enter: one or a combination of expense ledgers: o o o o F&A_EXP OSR_EXP STAT_EX_EX TRST_EX_EX your department From the Advanced section, enter: AP_VOUCHER in the Trans Type field - to see all vouchers for your department Voucher ID in the Trans ID field - to see one specific voucher Campus journals leave blank Journal ID in the Trans ID field - to search for a single journal expenses from data collect batches, such as FEDEX, medical insurance, and core data fees one or a combination of expense ledgers: o o o o F&A_EXP OSR_EXP STAT_EX_EX TRST_EX_EX your department GL_JOURNAL in the Trans Type field deposits your department AR_MISCPAY in the Trans type field - to see all deposits Deposit ID in the Trans ID field - to see a specific deposit budget journals or transfers one or a combination of budget ledgers: o o o o STAT_EX_BD STAT_RV_BD TRST_EX_BD TRST_RV_BD your department GL_BD_JRNL in the Trans type field - to see all budget journals Budget Journal ID in the Trans ID field - to see a specific budget journal 58

61 9. Click the Search button. Result: The system displays the journals based on your search criteria. The table below shows the information in key fields by transaction type. Transaction type Description Trans Type Trans ID Reference 1 Reference 2 Purchase requisitions vendor catalog orders Vendor ID_ Vendor name AP_VOUC HER Voucher ID_ Invoice # Payment Ref #_Payment Date Requisition ID Campus vouchers Vendor ID_ Vendor name AP_ VOUCHER Voucher ID_ Invoice # Payment Ref #_Payment Date not used Travel vouchers Vendor ID_ Vendor name AP_ VOUCHER Travel ID_ Invoice # Payment Ref #_Payment Date not used 59
RECONCILING EXPENSE AND REVENUE TRANSACTIONS
 RECONCILING EXPENSE AND REVENUE TRANSACTIONS VERSION: 5/22/2015 Table of Contents 1 Overview of the InfoPorte Finance Application 3 Overview of the InfoPorte Finance Application 4 2 Financial Concepts
Banking in QuickBooks Online
 QuickBooks Online Student Guide Chapter 6 Banking in QuickBooks Online Chapter 2 Chapter 6 The Banking page is where you connect your accounts and download transactions. This is sometimes known as bank
Client-Account Receivable
 Nexsure Training Manual - Accounting Client-Account Receivable In This Chapter Client Accounts Receivable Entity Definition Receive Payments from Clients Relating to Policies Allocation of Payment Leave
MaineStreet Financials 8.4
 MaineStreet Financials 8.4 General Ledger Excel Journal Entry 1 Overview A Journal Entry is used to update the General Ledger for many types of transactions, including cash receipts, transfers of revenue
Creating a Basic Financial Analysis Created on 2/25/2013 4:24:00 PM
 Creating a Basic Financial Analysis Created on 2/25/2013 4:24:00 PM Table of Contents Creating a Basic Financial Analysis... 1 Page ii Creating a Basic Financial Analysis Overview Understanding the Creating
Your Guide To P-Card in PeopleSoft 9.2
 Your Guide To P-Card in PeopleSoft 9.2 Guide to P-Card on PeopleSoft 9.2 Table of Contents GETTING STARTED WITH THE NEW PCARD SYSTEM... 5 PCARD HOME PAGE... 6 APPROVING UNPOSTED TRANSACTIONS... 7 ADDING
TRAVEL AUTHORIZATIONS
 TRAVEL AUTHORIZATIONS TABLE OF CONTENTS Overview... 2 Responsibilities... 2 Delegate Entry Authority to Other Users... 2 Travel Authorization Tips & Reminders... 3 Create and Manage... 4 Create a Travel
User Documentation for School Activity Funds Accounting
 User Documentation for School Activity Funds Accounting By: Applied Business Services, Inc. 800 S. Frederick Avenue, Suite 101 Gaithersburg, MD 20877 1-800-451-7447 ext. 130 www.appliedbusinessservices.com
Lockbox. Chapter 13. Lockbox Integration Setup. Nexsure Training Manual - Admin. In This Chapter
 Lockbox In This Chapter Lockbox Integration Setup Notification Setup Accounting Setup Invoice Defaults Setup Territory Level Lockbox Sestup Lockbox Exceptions Handling Lockbox Integration Setup Lockbox
Web Departmental Deposits
 Web Departmental Deposits Accounts Receivable Financial Operations and Business Technology Wichita State University Ext. 3070 wsuaccountsreceivable@wichita.edu Room 201 Jardine Hall Page 1 Revised, January
What's New in General Ledger Munis - Financials: General Ledger
 [MU-FN-4-F] [MU-FN-10-E] What's New in General Ledger Munis - Financials: General Ledger CLASS DESCRIPTION This session will highlight some of the new functionality available in the version 11.2 of the
Banner Gateway Billing
 Gateway Banner Gateway Billing The Banner Finance Transaction Gateway System (Gateway) allows departments to submit files and spreadsheets of accounting transactions to Banner Finance for posting. Please
State of Oklahoma COR121 Deposit Entry Manual Revised: October 1, 2007
 State of Oklahoma COR121 Deposit Entry Manual Authorized by: [_CORE_] Original Issue: [11/01/2003] Maintained by: [ General Ledger Lead ] Current Version: [10/01/2007] Review Date: [01/31/2008] COR121
The PeopleSoft Financials System
 The PeopleSoft Financials System 2 Introduction...................... 14 Signing In and Out.................... 14 Signing In to the System.............. 14 Signing Out................... 17 Navigation
SMU Financials Created on April 29, 2011
 Created on April 29, 2011 Notice 2011, Southern Methodist University. All Rights Reserved. Published 2011. The information contained in this document is proprietary to Southern Methodist University. This
Nexsure Training Manual - Accounting. Chapter 7
 Nexsure Training Manual - Accounting Vendor Entries In This Chapter Vendor Entries at the Organization and Territory Level Vendor Entity Definition Disbursements to Vendors Line Item Distribution Receiving
General Procedure for Approving PCard Charges
 General Procedure for Approving PCard Charges PCard Approvers must follow a general procedure when approving a cardholder s charges. Use the procedure only when the PCard charges comply with the following
CAMS Enterprise. Billing. Unit4 Education Solutions, Inc. Published: 27 July Abstract. Page 1 of 78
 CAMS Enterprise Billing Unit4 Education Solutions, Inc. Published: 27 July 2016 Abstract The Billing module serves as the hub for financial activities within CAMS. All transactions regardless of origin
Kuali Financial System Training Guide. University of Hawaii Accounts Receivable Processors Basic
 University of Hawaii Accounts Receivable Processors Basic pg. 1 3/6/2013 Table of Contents Objectives... 3 Resources... 3 Copy an AR Organization... 4 Process... 4 Process a Full AR Payment (Deposits Cash
SUBJECT: UHCL Journal Entry Workflow Training Page 1 of 40
 SUBJECT: Page 1 of 40 General Ledger Journal Entry training is done in FSTST environment. In this training, we will create a deposit journal entry. To proceed with the training, follow the steps below:
PeopleSoft (9.1): Journals and Internal Funds Transfer (IFT)
: Journals and Internal Funds Transfer (IFT)") Financial Services Training Guide PeopleSoft (9.1): Journals and Internal Funds Transfer (IFT) Page 1 Table of Contents 1 Journals: an overview... 3 1.1. What is a journal?... 3 1.2. Journal types/sources...
Financial Services Training Guide PeopleSoft (9.1): Journals and Internal Funds Transfer (IFT) Page 1 Table of Contents 1 Journals: an overview... 3 1.1. What is a journal?... 3 1.2. Journal types/sources...
Financials Module: General Ledger
 The Priority Enterprise Management System Financials Module: General Ledger Contents Introduction... 2 Chart of Accounts... 2 Entry Journal... 4 Reconciliations... 7 Financial Statements... 9 Cash Flow...
Table of Contents. OTC End-of-Month Local Revenue Disbursements Process
 Table of Contents PROCESSING LOCAL REVENUE DISBURSEMENTS... 2 STEP 1: Verify Data... 2 STEP 2: Create Local Revenue Bills... 3 STEP 3: Run the Billing Interface... 5 STEP 4: Run Disbursement Reports...
Budget Transfer and Workflow Instructions. Table of Contents
 and Workflow Instructions Table of Contents 1. Guidelines...2 2. Workflow Scenarios...3 3. Denial Codes, Choices and Explanations...5 4. Step-by-step Instructions...6 5. Checklist for Working on a...10
Procurement and Team Card Procedure Creating a Card Statement Expense Report
 Procurement and Team Card Procedure Creating a Card Statement Expense Report Objectives... 4 Tips and Tricks... 4 Navigation... 4 Card Statement Expense Report Overview... 4 Valid Chartstrings... 5 After
To enter a cash receipt, click New in the menu bar on the left side of the page. You will be asked to sign in using your eraider name and password.
 All Departments must use the Cash Receipts system to record receipt of all cash, checks, wires and credit card payments. Cash receipts for revenue contracts interface to the Contract Database and Contract
Bank Reconciliation Release 2015
 Bank Reconciliation Release 2015 Disclaimer This document is provided as-is. Information and views expressed in this document, including URL and other Internet Web site references, may change without notice.
GL Account Documents (JV)
") GL Account Documents (JV) FI_GU_310 General Ledger Account Documents FI_GU_310 v5 1 General Ledger Account Documents FI_GU_310 v5 1 Course Content Introduction Unit 1 Parking General Ledger Documents (JV
GL Account Documents (JV) FI_GU_310 General Ledger Account Documents FI_GU_310 v5 1 General Ledger Account Documents FI_GU_310 v5 1 Course Content Introduction Unit 1 Parking General Ledger Documents (JV
New Finance Officer & Staff Training
 New Finance Officer & Staff Training Overview MUNIS includes many programs and tools to allow for the management of the District financials. As newer finance officers and staff, you are charged with understanding,
P-Card Reconciliation
 P-Card Reconciliation To reconcile a transaction, a user must have either the CT_F_A_CC_COORDINATOR or CT_F_A_CC_RECONCILER role. When a P-Card transaction is waiting to be reconciled, it has a status
User's Guide. Alpha Five Accounting. Accounting Made Easy. Version 3.0. Copyright BetaSoft LLC - All Rights Reserved
 User's Guide Alpha Five Accounting Copyright 1995-2002 BetaSoft LLC - All Rights Reserved Accounting Made Easy Version 3.0 Alpha Five is a trademark of Alpha Software Corp. i ii Table of Contents INTRODUCTION...1
CashLink Quick Reference Guide
 CashLink Quick Reference Guide Navigating your Account Summary Page After you log in, you will see the Account Summary Page screen. This screen gives you access to all other functions and displays important
Chartfields and Combo Edits...39 Viewing ChartField Definitions...40 SBCTC COA Design (1/15/2016)...43 ChartField Value Sets...44
...43 ChartField Value Sets...44") GENERAL LEDGER Table of Contents - 03... 3 Using the GL WorkCenter - 03... 4 Building Summary Ledgers 03b...28 Monthly Mass Closing of Sub-modules and - 03...33 Monthly Closing of Sub-Modules and - 03...36
GENERAL LEDGER Table of Contents - 03... 3 Using the GL WorkCenter - 03... 4 Building Summary Ledgers 03b...28 Monthly Mass Closing of Sub-modules and - 03...33 Monthly Closing of Sub-Modules and - 03...36
Business Online Banking
 » Flagstar business Banking Business Online Banking Reference Guide Flagstar Bank Corporate Headquarters 5151 Corporate Drive Troy, MI 48098 (888) 324-4100 flagstar.com/business Member FDIC 1 Table of
Accounting Table of Contents
 Accounting Table of Contents Accounting Table of Contents 1 About Church Windows Accounting 4 Chart of Accounts Setup 6 Adding and Removing Accounts 7 Managing the Chart of Accounts 9 Detail tab 9 Balance
Munis General Journal Entry/Proof
 Munis General Journal Entry/Proof Procedural Documentation For more information, visit www.tylertech.com. General Journal Entry/Proof Objective This document provides instructions on how to enter a manual
Purchasing for Purchasing Agents
 Purchasing for Purchasing Agents VERSION: 9/20/2014 New Table of Contents About the Purchasing Process 2 Entering a Request for Quote (RFQ) or Invitation for Bid (IFB) 4 Entering Vendor Responses 15 Awarding
CASHNet - Departmental Deposits Instructions for Departments
 CASHNet - Departmental Deposits Instructions for Departments Getting Started... 2 Logging in to CASHNet... 2 Home Page Menu / Accessing Departmental Deposits Module... 2 Adding a New Deposit... 4 Reference
TRAVEL AND EXPENSE CENTER REPORTS USER GUIDE
 TRAVEL AND EXPENSE CENTER REPORTS USER GUIDE Please note: This user guide is intended for online use, and has a number of embedded links. Printing of these documents is discouraged, as they are updated
Table of Contents. OTC End-of-Month Local Revenue Disbursements Balt City DC
 Table of Contents PROCESSING LOCAL REVENUE DISBURSEMENTS... 2 STEP 1: Verify Data... 2 STEP 2: Create Local Revenue Bills... 3 STEP 3: Run the Billing Interface... 5 STEP 4: Run Disbursement Reports...
Tabs3 General Ledger Guide
 Tabs3 General Ledger Guide Tabs3 General Ledger Guide Copyright 2013-2015 Software Technology, Inc. 1621 Cushman Drive Lincoln, NE 68512 (402) 423-1440 Tabs3.com Tabs3, PracticeMaster, and the "pinwheel"
The Cash Receipts system site is available at:
 All Departments must use the Cash Receipts system to record receipt of all cash, checks, wires and credit card payments. Cash receipts for revenue contracts interface to the Contract Database and Contract
The TxEIS How To Guide Series. Business. How to: CLOSE END OF FISCAL YEAR. Developed by the TEXAS COMPUTER COOPERATIVE
 The TxEIS How To Guide Series Business How to: CLOSE END OF FISCAL YEAR Developed by the TEXAS COMPUTER COOPERATIVE Copyright 2016 by Texas Computer Cooperative All rights reserved 1314 Hines Avenue San
BUSINESS BANKING ONLINE. Deskside User Guide
 BUSINESS BANKING ONLINE Deskside User Guide INTRODUCTION TO BUSINESS BANKING ONLINE Business Banking Online (BBOL) offers our business customers both large and small the tools and features needed to manage
Nexsure Training Manual - Accounting. Chapter 13
 Tax Authority In This Chapter Tax Authority Definition Reconciling Tax Authority Payables Issuing Disbursement for Tax Authority Payables Paying the Tax Authority Prior to Reconciling Tax Authority Definition
Tabs3, PracticeMaster, and the pinwheel symbol ( trademarks of Software Technology, Inc. Portions copyright Microsoft Corporation
 Tabs3 General Ledger Software Reseller/User Tutorial Version 16.1 for November 2011 Sample Data Copyright 1983-2013 Software Technology, Inc. 1621 Cushman Drive Lincoln, NE 68512 (402) 423-1440 http://www.tabs3.com
9.2 Financials Delta Session. February 2017 General Ledger - Accounts Receivable - Billing
 9.2 Financials Delta Session February 2017 General Ledger - Accounts Receivable - Billing Agenda O Introduction O Timeline O New Functionality O WorkCenters O General Ledger O Accounts Receivable O Billing
OVERVIEW Feature Summary... 3 CONFIGURATION System Requirements... 4 ConnectWise Manage Configuration... 4
 Contents OVERVIEW... 3 Feature Summary... 3 CONFIGURATION... 4 System Requirements... 4 ConnectWise Manage Configuration... 4 Configuration of Manage Login... 4 Configuration of GL Accounts... 5 Configuration
OSR Reporting Series. OSR Payments Report
 OSR Reporting Series OSR Payments Report Webinar logistics and materials Scheduled for 60 minutes The audio is one-way. Use the chat window to type your questions. We will answer questions at the end This
Creating Actuals Journals Using NUFinancials
 NUIT Administrative Systems Creating Actuals Journals Using Journals record the effects of financial transactions on Northwestern University s ledger. This training guide explains how to create, update,
v.5 Accounts Payable: Best Practices
 v.5 Accounts Payable: Best Practices (Course #V210) Presented by: Dave Heston Shelby Consultant 2017 Shelby Systems, Inc. Other brand and product names are trademarks or registered trademarks of the respective
Reference Guide (IRIS)
") Reference Guide For Santander Bank s Interactive Reporting & Initiation Services (IRIS) Equal Housing Lender. Santander Bank, N.A. is a Member FDIC and a wholly owned subsidiary of Banco Santander, S.A.
Reference Guide For Santander Bank s Interactive Reporting & Initiation Services (IRIS) Equal Housing Lender. Santander Bank, N.A. is a Member FDIC and a wholly owned subsidiary of Banco Santander, S.A.
Kuali Financial System (KFS) New User Training. Presented by: Accounting Purchasing
 New User Training. Presented by: Accounting Purchasing") Kuali Financial System (KFS) New User Training Presented by: Accounting Purchasing KFS Overview Kuali is a community of universities, colleges, and commercial affiliates that have partnered to build and
Kuali Financial System (KFS) New User Training Presented by: Accounting Purchasing KFS Overview Kuali is a community of universities, colleges, and commercial affiliates that have partnered to build and
KFS Training Manual Purchasing Basics
 KFS Training Manual Purchasing Basics Table of Contents University of Maryland Objectives... v Resources... v Kuali Financial Systems... 1 Creating a Requisition... 1 Exercise One: Create a Requisition...
These materials may not be reproduced in whole or in part without the express written permission of The University of Akron.
 Table of Contents Chapter 1 : Course Objectives...1-1 Chapter 2 : PeopleSoft Financials at...2-1 Database Terms...2-1 PeopleSoft Modules...2-2 Obtaining Security to Access PeopleSoft Financials Records...2-3
ShelbyNext Financials: Accounts Payable Best Practices (Course #N210)
") ShelbyNext Financials: Accounts Payable Best Practices (Course #N210) Presented by: Carmen Dea, Shelby Consultant 2017 Shelby Systems, Inc. Other brand and product names are trademarks or registered trademarks
ShelbyNext Financials: Accounts Payable Best Practices (Course #N210) Presented by: Carmen Dea, Shelby Consultant 2017 Shelby Systems, Inc. Other brand and product names are trademarks or registered trademarks
Bank Reconciliation Documentation
 Bank Reconciliation Documentation Table of Contents MCSJ v4.2 Changes... 2 Highlights of Bank Reconciliation... 2 Preparing to Reconcile... 3 Cash Receipts Batch... 3 Budget (Expenditure) Batch... 4 Reporting...
This Job Aid covers the process of creating, approving, and processing vouchers in the upgraded ONEPeralta system. Log on to ONEPeralta 3
 Vouchers Table of Contents This Job Aid covers the process of creating, approving, and processing vouchers in the upgraded ONEPeralta system. Creation Page Log on to ONEPeralta 3 Create Vouchers 6 Run
Enterprise Information Systems
 Enterprise Information Systems Financial Management + Human Resources + Student Administration Posting Charges in Groups Business Process Guide August, 2004 Updates Date Action Page(s) 8/01/2004 Created.
Certify User Guide PROCESSING EXPENSE REPORTS
 Certify User Guide PROCESSING EXPENSE REPORTS Copyright 2017 All Rights Reserved This version is current as of December 31, 2017 For continuously updated instructions, please visit our Help Center within
SAP ONLINE PAYMENT USER GUIDE
 SAP ONLINE PAYMENT USER GUIDE JHM SAP Training www.hopkinsmedicine.org/sap saptraining@jhmi.edu June 5, 2013 CONTENTS Contents... 2 Accessing The Online Payment Request (AP Electronic Check Request) -
MV Advanced Features Overview. MV Advanced Features Workshop: Steps: 1. Logon to Multiview 1. Username: MANAGER 2. Password: manager 3.
 MV Advanced Features Workshop: Ever wonder what some of the screens actually do in Multiview? Well this is the session for you! During this handson session, we'll explore some of the little used but very
PROMAS Landmaster. Questions and Answers. Questions below. Questions with answers begin on page 5. Questions
 PROMAS Landmaster Questions and Answers Questions below. Questions with answers begin on page 5 Questions NAVIGATION Q. How can I keep the find list active? Q. I received an email from fishcatcher27@gmail.com.
TTUHSC Cash Receipts
 TTUHSC Cash Receipts All Departments must use the Cash Receipts system to record receipt of all cash, checks, wires and credit card payments. Cash receipts for revenue contracts interface to the Contract
Tabs3 General Ledger Guide
 Tabs3 Tabs3 Copyright 2013-2018 Software Technology, LLC 1621 Cushman Drive Lincoln, NE 68512 (402) 423-1440 Tabs3.com Tabs3, PracticeMaster, and the pinwheel symbol ( ) are registered trademarks of Software
Processing a Deposit via ipayments
 Processing a Deposit via ipayments Several items must be considered prior to engaging in the sale of goods or services. Does the department have written cash handling procedures? Are the persons accepting
Accounts Receivable WalkThrough
 PRACTICE CS Accounts Receivable WalkThrough Version 2014.x.x TL 30465 9/8/16 Copyright Information Text copyright 2004-2016 by Thomson Reuters. All rights reserved. Video display images copyright 2004-2016
Journal Entries. Financial Management System (FMS) User s Guide. Montgomery County Public Schools. Version 2.2 October 2008
 User s Guide. Montgomery County Public Schools. Version 2.2 October 2008") Montgomery County Public Schools Financial Management System (FMS) User s Guide Journal Entries Version 2.2 October 2008 The Office of Information and Organizational Systems Copyright and Trademarks Copyright
Montgomery County Public Schools Financial Management System (FMS) User s Guide Journal Entries Version 2.2 October 2008 The Office of Information and Organizational Systems Copyright and Trademarks Copyright
RG Connect 2015 Microsoft Dynamics GP Tips and Tricks October Prepared by Sheri Carney
 RG Connect 2015 Microsoft Dynamics GP Tips and Tricks October.23.2015 Prepared by Sheri Carney 600 SW 39 th Street, Suite 250 Renton, WA 98057 425.277.4760 www.resgroup.com Contents GLOBAL TIPS... 4 1.
Michigan Tech University Banner Finance Self-Service User Guide. Revised 1/11/17
 Michigan Tech University Banner Finance Self-Service User Guide Revised 1/11/17 TABLE OF CONTENTS Chart Terminology... 3 MTU Fiscal Year... 3 Web Resource Banner and Reporting... 3 Reports Listing your
Running GL Inquiry Reports
 Document Generation Date 4/14/2009 Last Changed by Status Final Concept System Office Running GL Inquiry Reports This topic describes how to use GL Inquiry to access current or historical, summary or detailed
Nexsure Training Manual - Accounting. Chapter 14
 Nexsure Training Manual - Accounting Deposits In This Chapter Handling Deposits Posting the Deposit and Printing the Deposit Handling Deposits Before adding any deposits to Nexsure, the receive payment
Contents OVERVIEW... 3
 Contents OVERVIEW... 3 Feature Summary... 3 CONFIGURATION... 4 System Requirements... 4 ConnectWise Manage Configuration... 4 Configuration of Manage Login... 4 Configuration of GL Accounts... 5 Configuration
Heritage Bank Correspondent Lockbox. Lockbox. User Guide
 Heritage Bank Correspondent Lockbox Lockbox User Guide Contents Accessing Lockbox... 1 Messages... 2 Moving messages... 4 Batch messages... 5 Message administration... 6 Creating a message... 6 Recalling
Getting Comfortable with PeopleSoft Navigation
 FMS120,, FMS714, FMS721 Getting Comfortable with Navigation The purpose of this guide is to explain the general layout of the pages and provide explanations of commonly used navigational buttons and links.
North Dakota University System. Financial Systems 9.2. User Preferences
 North Dakota University System Financial Systems 9.2 User Preferences July 2017 Table of Contents Overview... 1 User Preferences... 1 General Preferences... 2 Overall Preference... 2 OLE Information...
Table of Contents Billing Mass Data Entry Form (TSAMASS) BANNER ID/Name Search Feature...4-5
 BANNER ID/Name Search Feature...4-5") Documentation Table of Contents... 1 Billing Mass Data Entry Form (TSAMASS)...2-3 BANNER ID/Name Search Feature...4-5 Journal Voucher Entry Form (FGAJVCD) or Journal Voucher Quick Form (FGAJVCQ)...6-10
Documentation Table of Contents... 1 Billing Mass Data Entry Form (TSAMASS)...2-3 BANNER ID/Name Search Feature...4-5 Journal Voucher Entry Form (FGAJVCD) or Journal Voucher Quick Form (FGAJVCQ)...6-10
System Process Document Create, Post, and Review Group Transactions. Department Responsibility/Role File Name
 Department Responsibility/Role File Name Create, Post, and Review Group Transactions_SPD_20141211092841 Revision Document Generation Date Date Modified Last Changed by ctbrand2 12/11/2014 Status 12/11/2014
Studio Designer Basic
 Studio Designer Pricing Studio Designer Basic Studio Designer Professional $35 / User / Month $45 / User / Month Feature Basic Professional Address Client and Vendor Address Maintenance X X Client and
Financials: nvision Financial Reports User s Guide
 Financials: nvision Financial Reports User s Guide Revised May 2009 TABLE OF CONTENTS SOLAR Financials User s Guide... 3 Who Do I Call For Help?... 3 SOLAR nvision Reporting Tools... 4 Available Reports...
If you want to specify the account code itself, there are several ways to enter the code:
 Guidelines ENTERING ACCOUNT CODES There are a number of ways to enter account codes. You can enter: account codes If an Account Code is locked in the CSIU Fund Accounting application, it typically cannot
SAP ONLINE PAYMENT USER GUIDE
 SAP ONLINE PAYMENT USER GUIDE JHM SAP Training www.hopkinsmedicine.org/sap saptraining@jhmi.edu June 5, 2013 CONTENTS Accessing The Online Payment Request (AP Electronic Check Request) - WinGUI... 4 Accessing
IMS Funds Receivables/ Transaction Processing User Guide
 IMS Funds Receivables/ Transaction Processing User Guide Financial & Membership Services Membership Management Services Version 4.0 Date of last update: 7/28/2010 Page 1 of 42 CONTENTS IMS Funds Receivables/Transaction
Quick Reference Guide: Kuali User Access Request Document
 Quick Reference Guide: Kuali User Access Request Document In the USC Kuali system, transactions and database changes are submitted in electronic documents called edocs. This guide presents instructions
Project and Award Searches
 Project and Award Searches Contents Find Awards/Projects Search... 2 Award Page... 4 Project Inclusion... 4 Financials... 5 Summary View... 5 Calculator... 7 Projects View... 7 Period Summary... 8 AR...
Journal Entries Overview
 Journal Entries Overview To access the Journal Entries screen: Option 1: 1. From the Desktop, click on the Accounting Icon 2. Click on Account Transactions in the left navigation 3. Click on the Journal
core user guide business gateway TABLE OF CONTENTS BANKING > WEALTH > INSURANCE
 business gateway core user guide TABLE OF CONTENTS Getting Started... 2 Administration Approval... 8 Logging In... 2 Administration Report... 8 Electronic Report Delivery (ERD)... 17 Security Key... 2
RELEASE NOTES: FEBRUARY 23, 2016
 RELEASE NOTES: 2.16.01 FEBRUARY 23, 2016 Highlights from this release Report Criteria Favourites Change Name on WO/LOT/INV with blend Save report criteria so you can run it the same way next time. Read
MaineStreet Financials 8.4. General Ledger
 MaineStreet Financials 8.4 General Ledger Excel Journal Entry General Ledger Page 1 of 47 Excel Journal Entry TABLE OF CONTENTS 1. PEOPLESOFT FINANCIALS GENERAL LEDGER... 4 2. EXCEL JOURNAL ENTRY PROCESS...
ACCEO Transphere- User Guide. User Guide. ACCEO Transphere - Acomba
 User Guide ACCEO Transphere - Acomba Contents Activation... 3 Activating the Company... 4 Testing the Communication... 7 Transphere Customers... 8 Configuration... 8 Company Information... 8 Accounts Receivable...
University of North Dakota PeopleSoft Finance Tip Sheets. Journal Inquiry
 How do I inquire on a Journal? Navigation: >General Ledger >Review Financial Information >Journals You can use the menu on the left or you can use the folders on the main screen to navigate to the. Following
JOURNAL ENTRY GENERAL LEDGER USER MANUAL Chapter 6
 JOURNAL ENTRY GENERAL LEDGER USER MANUAL Chapter 6 The Spectrum System PeopleSoft Financials Version 7.5 1. INTRODUCTION... 3 1.1. USE OF THE GENERAL LEDGER JOURNAL ENTRIES... 3 2. HOW TO ENTER A JOURNAL
Review Financial Information - Ledger Inquiry Step 1
 Step 1 View ledger detail and summary information based on selected criteria. The example below shows how to run the report for a capital project. Screen shots at the end show the criteria to use to run
A NS Financials Self Service Portal is becoming available in myunsw. Staff who wish to use self service can now: QUICKLINKS
 A NS Financials Self Service Portal is becoming available in myunsw. Staff who wish to use self service can now: enter and submit their own expense claims reconcile their own credit cards submit the paperwork
Business Online Banking
 First State Community Bank Business Online Banking End User Guide Table of Contents Logging In... 3 Navigation... 5 Account Activity Options... 7 Transactions... 8 Transfers... 9 Stop Payments...10 Statements...12
First Financial Bank Transaction Management System User Guide
 First Financial Bank Transaction Management System User Guide Please note: The options available to you in the Transaction Management System (TMS) depend upon your product configuration. This modular approach
LOGON. Citizens Bank CentreSuite Website for Single Cardholders. Navigate to Citizens Bank s CentreSuite website at
 Navigate to Citizens Bank s CentreSuite website at http://www.centresuite.com. LOGON Enter your User ID and Password as provided to you by the Purchasing Department and click on Log On to proceed. Please
Manual Journal Entries
 Manual Journal Entries Chapter 2 11/5/2008 Chapter 2 - Page 1 Section Objectives At the end of this section, you should be able to: Create manual journal entries Review existing journal entries Modify
NOTE: You may see an Adjusting Period 998. It is not used in Local Council Systems. Fiscal Software User s Guide, BSA
 Section 5 General Ledger This Section Includes: 5.1 Accounting Periods 5.2 Ledgers 5.3 Open and Closed Periods 5.3.1 Processing a Period Close or Opening a Period 5.4 Creating Journals 5.4.1 General Journals
User s Guide. (Virtual Terminal Edition)
") User s Guide (Virtual Terminal Edition) Table of Contents Home Page... 4 Receivables Summary... 4 Past 30 Day Payment Summary... 4 Last 10 Customer Transactions... 4 View Payment Information... 4 Customers
User s Guide (Virtual Terminal Edition) Table of Contents Home Page... 4 Receivables Summary... 4 Past 30 Day Payment Summary... 4 Last 10 Customer Transactions... 4 View Payment Information... 4 Customers