Gig Performer User Guide
|
|
|
- Hilary Hoover
- 5 years ago
- Views:
Transcription

1 Gig Performer User Guide v. 2.4 July
2 Version 2.4 update by Larry the O, Toys In the Attic Communications Original manual written by Howard Massey Copyright Deskew Technologies, LLC All rights reserved.
3 INTRODUCTION... 1 Gig Performer Features... 2 Going Above and Beyond: GP Script... 4 Basic Terminology... 5 Before You Start... 7 A Word About Cross-Platform Usage... 9 TUTORIALS Controlling Plugins From Your Midi Controller Using Rig Manager Configuring Audio Plugins Capturing a Performance with the Audio Input Recorder The Audio Mixer/Router Controlling Gig Performer Using OSC REFERENCE Main Screen Top Toolbar Bottom Toolbar Connections View Performer View Rig Manager Musical Utilities Tuner Metronome Tempo and Time Signature Plugin Manager Supplied Plugins Audio In Audio Out Gain Control Gain and Balance Gain and Balance (m->s) Audio Mixer/Router Audio File Player MIDI In (OMNI) and MIDI In (OSC) MIDI Filter MIDI Monitor
4 MIDI Out Widget and Rack editing (Edit Mode) Edit Mode screen Widget types list Widget Properties inspector (Edit mode) Rackspace Properties Variation Properties Tuner View Preferences General Audio setup OSC setup Global MIDI Recording Advanced Scripting Main Menus File Edit Options Window Help Right-Click menus Rack Panel Plugin MIDI Controller Additional key shortcuts TROUBLESHOOTING APPENDIX A: OSC APPENDIX B TAP AND TIP Creating a Tap Tempo button Tip: Creating Two Instances of Gig Performer with a Single Client ASIO Driver APPENDIX C - LICENSE AGREEMENT
5 INTRODUCTION Welcome to Gig Performer the world s most versatile plugin host application for live performance. Gig Performer lets you take complete control of your entire rig and provides instant access to all of your instrument and effects plugins no DAW software necessary. Whether you re a keyboard player, a guitarist, a vocalist, a drummer, or a live sound engineer, Gig Performer has something to offer: Keyboardists can control all their software synths, samplers, and sequencers as well as effects directly from the sliders, knobs and switches on their instruments. Using their MIDI pedalboards, guitarists can freely switch between multiple amp/cabinet models and digital effects in real time without any audio glitching. Singers can easily add compression, EQ and other desired effects to their vocals. Live sound engineers can use Gig Performer to intercept audio coming from the FOH or monitor system, add desired effects processing, and then send the results directly back to the mixing board. Gig Performer can simultaneously record multichannel audio from the mixing board for later processing and mixing in your favorite DAW. You can even run multiple Gig Performer instances simultaneously, allowing different members of a band to access different plugin setups independently! Gig Performer s intuitive interface makes it remarkably fast to start with, and easy to use. Beneath the surface, however, are many advanced features, which we will cover in the pages of this User Guide. The User Guide is basically divided into two sections: a series of Tutorials to familiarize you with basic operation, and a Reference section that documents all of the details. 1
6 Gig Performer Features Supports VST2 and VST3 (OS X and Windows) and AU (OS X only) plugins Easily play multiple instruments, layer sounds, and add effects Intuitive user interface: simply connect any plugin to any other plugin in any configuration no confusing busses, sends or inserts Automatic mixing of signals when multiple outputs are connected to a single input Deactivate any plugin at any time to remove a sound or bypass an effect Build fully customizable rackspaces consisting of one or more front panels Instantaneous glitch-free switching between sounds even while holding notes for seamless transition from one song to the next or from one part of a song to another Use keyboards, MIDI pedals, and control surfaces to alter plugin parameters in real time by connecting them to knobs, sliders, buttons, labels, meters, and other widgets Learn mode for easy assignment of MIDI controls to widgets and widgets to plugin parameters Widget scaling allows full motion while restricting the parameter range Widget groups for making cross-faders, grouped level controls, and other ganged behaviors. Rig Manager simplifies switching a Gig Performer rig to different physical controllers Audio Mixer plug-in for centralized gain controls and instant rerouting of sources to effects LEDs show input/output levels on each channel as well as audio and MIDI activity 2
7 Built-in full screen chromatic tuner Audio metronome using built-in or user-supplied sounds Create multiple independent running instances for different members of the band or for when you want to control some plugins while leaving others alone Audio Input Recorder captures audio from input channels to WAV files for postproduction editing, processing, and mixing in a DAW Runs on both Mac (OS X) and Windows platforms so you can create, share, and modify your files on any computer, even if some plugins are missing Minimal CPU usage Support for multiple audio interfaces Predictive Loading reduces RAM and CPU demand in systems with limited resources Automatic detection of new MIDI devices connect and reconnect on the fly Full MIDI remapping, transposition, layering, and keyboard splitting Send program change and other messages to external MIDI devices automatically VST Bus Layout support OSC support for remote control via tablets and smartphones Compatible (via OSC) with MaxMSP and Bidule for the development of complex interactive control algorithms GP Script proprietary programming language for complex or custom needs Be sure to check for a full list of current features. 3
8 Going Above and Beyond: GP Script Most users will find everything they need in Gig Performer s extensive feature set, but there are always some users that require sophisticated custom functions that go beyond Gig Performer s main feature set. For those users, we have created a proprietary programming language called GP Script. GP Script enables you to perform incredible transformations and perform complex tasks. While any language takes some understanding of programming, GP Script is written to be accessible. If you can program spreadsheet macros or in a language such as VBA, you are likely to be comfortable with GP Script. Because GP Script will not be needed by most people and requires substantial documentation of its own, we will not cover it in this manual. However, if you are interested, you can find an introduction to the GP Script language in this blog entry: GP documentation can be found here: For discussion of GP Script and help getting it to do what you need, check out the GP Script section of the Gig Performer forums: 4
9 Basic Terminology Connections View: The Gig Performer screen in which you can connect plugins to one another. Gig: A Gig Performer file containing all the data you have created rackspaces, variations, and all widgets and widget groups. Instance: Multiple copies of Gig Performer can be launched and run simultaneously on a single computer. Each of these independent copies, running in its own window, is called an instance of Gig Performer. This is useful for applications like giving different band members the ability to change the rackspace affecting their particular instrument without changing the rackspaces affecting different instruments. Click here for more information. MIDI: An acronym for Musical Instrument Digital Interface a standard protocol for the interchange of musical information between computers, controllers, and hardware-based electronic musical instruments such as synthesizers and samplers. MIDI controller: A physical device such as a keyboard or pedalboard typically connected to your computer via USB. OSC: An acronym for Open Sound Control a communications protocol that is optimized for modern networking technology. Click here for more information. Panel: In Gig Performer, a virtual screen space (visually similar to hardware rack-mounted sound modules and signal processors) containing all the widgets needed to control the plugins in a rackspace. A rackspace can contain multiple panels, each containing one or more widgets. Performer View: The Gig Performer screen containing the panels and widgets used to control your sounds during performance. Plugin: A package of functionality that can be employed by any compatible host software. There is a tremendous variety of plugins available in the audio/music marketplace, but many popular plugins are software emulations of physical instruments or hardware devices. Originally developed for use within DAW (Digital Audio Workstation) applications, some plugins (called virtual instruments ) generate audio, for example, emulations of musical instruments and synthesizers, while effects plugins alter incoming audio signals, such as from a microphone, electric guitar, or virtual instrument, offering processes like equalization, filtering, compression, limiting, reverb, delay, flanging, chorusing, phasing, and the like. 5
10 Rackspace: A collection of interconnected plugins, along with one or more panels containing widgets to control plugin parameters in real time. A rackspace can actually be pretty much anything you like: It could represent a single sound or all the elements you need for an entire song or even just one part of a song. You can switch from one rackspace to another instantaneously and with no interruption of sound either from your laptop, with up/down pedals, or via MIDI program change messages. Variation: These are essentially rackspace presets. Variations contain the same plugins and interconnections but with different parameter settings. For example, you can create a rackspace to add phasing to a piano sound, then add several variations, each with different degrees of phase intensity. As with rackspaces, you can switch from one variation to another instantaneously and with no interruption of sound either from your laptop, with up/down pedals, or via MIDI program change messages. Widget: A virtual object (such as a knob, slider, button, or meter) used to control and/or display plugin settings. Widgets can be operated either with your laptop s mouse or trackpad, or remotely from a MIDI controller. With the use of OSC, widgets can also be operated from ios / Android tablets or smartphones. Widget group: A collection of widgets that operate ganged together, where changing one widget in the group changes all of the others in the group, as well. This is a powerful method for controlling multiple plugin parameters simultaneously. For example, you could create several slider widgets that control the volume of various plugins and then raise or lower the volume of all of them by moving any one of them. In addition, individual widget scaling allows simple implementation of effects such as cross-fading. For more information, see the widget group reference section. 6

11 Before You Start Before launching Gig Performer, make sure that all audio and MIDI interfaces connected to your system are powered on. If no external audio interface is connected, Gig Performer will use your computer s built-in input and output. If you have more than one interface connected, you ll be able to choose among them after the app launches. Note that you can use different interfaces for input and output if desired. When Gig Performer is first launched, the following dialog will appear: If you have purchased a license, click on Enter Activation Number and type or paste in the activation code ed to you. (Make sure your anti-spam blocker doesn t prevent the confirmation with your license from being received). If you have not yet purchased a license, click on Continue Trial to access a fully operational trial version of Gig Performer for a period of 14 days. (The dialog shows you how many days you have remaining.). You can purchase an activation code at any time by clicking on the Buy License... button. Before using Gig Performer, please make sure you agree to the license agreement, a copy of which is included here. Immediately after launching Gig Performer, it will scan your system looking for plugins and the following dialog will appear: 7
12 When running Gig Performer on Mac (OS X) systems it will scan for both VST (Virtual Studio Technology) and Audio Unit (AU) plugins; when running on Windows systems it will look for all VST plugins. Note: If you are a Windows user, you will have to tell Gig Performer what folders to search, since there are no default locations where all plugins are guaranteed to be installed. To do so, go to the Windows menu, then select Plugin manager. In the resultant window, click on Manage, then choose the Set VST folders for scanning option. We suggest you begin by having Gig Performer search in the folder C:\Program Files\VstPlugins. If you have additional plugins stored in other folder locations (as some plugin and DAW manufacturers automatically create), the Plugin manager allows you to easily add other folders to scan. Click here for more information.) This scanning process can take some time the first time you use Gig Performer but will be nearly instantaneous on subsequent launches unless you have installed or updated any plugins since the last usage. (If you like, you can later disable this scan completely with an option in the Preferences dialog.) Gig Performer does not include any synth or effects plugins because there are so many available plugins out there both free and commercial we re sure that most users will want to use their own favorites. (Click here for a list of some of our favorite free ones.) However, it does come with a number of specialized plugins to handle basic MIDI and audio operations. 8
13 A Word About Cross-Platform Usage Files created by Gig Performer can be opened by both Mac (OS X) and Windows computers. If the computer you re using to access the file is missing some of the plugins that were present when the original file was created, Gig Performer will create a chameleon plugin that mimics all the properties of the original plugin except the actual processing. This will allow you to modify the file, save it and later re-open it on a computer that has all required plugins installed. Similarly, if the audio interface connected to the current system does not have enough inputs or outputs to accommodate the setup utilized by the file, Gig Performer will prompt you to create Virtual channels that produce no input or output but retain all connections. Doing so will allow you to modify the file, save it and later reopen it on a computer that is connected to the original audio interface. 9

14 TUTORIALS This section presents a series of tutorials to familiarize you with Gig Performer s major features. For more detail, please see the Reference section. Controlling Plugins From Your Midi Controller This tutorial will show you how to use Gig Performer to play plugins from your MIDI controller. 1. Launch Gig Performer, then click on the Connections View icon (circled in blue) to enter Connections View: This screen allows you to insert plugins and connect them to other plugins any way you like. (Note: Your screen may look slightly different from the one shown above, since the audio input and output blocks will reflect the name of your connected audio interface as well as the number of inputs and outputs it provides.) The orange block at top left represents the MIDI input to your system, typically from a MIDI keyboard or other MIDI controller. The red block at the top represents the input of your audio interface, typically from microphones, instruments connected 10
 provides metering and virtual faders for each of your audio interface s")
15 via DI (such as electric guitars), and line-level sources. The brown block at the bottom represents the output of your audio interface, and the panel beneath it (indicated by the arrow) provides metering and virtual faders for each of your audio interface s inputs and outputs. (Flickering in the input meters indicates presence of signal.) If no audio interface is connected, Gig Performer will use your computer s built-in input and output. If an audio interface is connected but does not appear, see the Troubleshooting section in this User Guide. 2. Choose a plugin. Right-click (or two-finger tap if you re using a trackpad) anywhere in the main screen to bring up the plugin selector menu, which allows you to choose the plugin you want to access. The built-in Gig Performer plugins (including MIDI In and MIDI Out blocks for each connected MIDI controller) appear above the line separator (indicated by the arrow), grouped together by category: Gain Controls, Audio Mixers, MIDI Inputs, MIDI Outputs, MIDI Processors, and Media Players. All other plugins appear under the separator, arranged alphabetically by the name of the plugin manufacturer: TIP: You can also insert a plug-in by using the Cmd-P keyboard shortcut. This option is actually preferable since it opens a Quick plugin finder window that allows you to search for a particular plugin by name. Click here for more information. As soon as you select a plugin block (or double-click on it), Gig Performer opens the editor window for that plugin, allowing you to alter the sound. (You can disable the opening on selection action with an option in the Preferences dialog.) Let s start with a Hammond organ plugin. For this example, we have selected C3 Blues from 11

 By default, the name of the plugin is displayed, but you can easily rename it with something that represents the actual sound very useful for distinguishing among")
16 Native Instruments Kontakt 5 Player (you can choose your favorite). Its editor window is shown below: 3. Give your plugin a custom name. Close the plugin editor window to return to Connections View. Sound-generating plugins such as the one you selected appear as green blocks. (Effects processing plugins, as we will see in the next tutorial, appear as blue blocks.) By default, the name of the plugin is displayed, but you can easily rename it with something that represents the actual sound very useful for distinguishing among multiple copies of the same plugin. Accordingly, right-click on the green block and select the Caption... option, then type in the name Organ. 12

17 4. Set the audio output. Every plugin block has several pins both above and below it. These pins are used to make connections both MIDI and audio to other plugin blocks. Orange pins are for MIDI signals and blue pins are for audio signals. Pins at the top provide input to the plugin, while pins at the bottom send output from the plugin. If you connect the outputs of multiple plugins to the input of another plugin, the signals will be mixed automatically. Kontakt 5 Player creates a stereo audio signal, so there are two blue pins on the bottom. To be able to hear its sound, we need to connect its output to two inputs of the audio interface. To make these connections, simply click on an output pin and, while holding down the mouse button (or keeping your finger on the trackpad), drag the cursor over the desired input pin and then release the mouse button. (Click here for a shortcut method of making stereo connections.) Audio connections between plugins are represented by blue lines. 13
18 TIP: Connections and plugin blocks can be moved anywhere in the screen by clicking and dragging on them. To remove (disconnect) a connection, rightclick on it and select Remove this connection or simply click and drag the connection until it detaches from a plugin and then let go. To remove a plugin block, right-click on it and select Delete. To remove all connections from a plugin block, right-click on the block and select Disconnect. 5. Set the MIDI input and play your sound. Using the same click-and-drag technique, make a connection between the orange output pin on the bottom of the MIDI In (OMNI) block and the orange input pin on the top of your plugin. MIDI connections between plugins are represented by orange lines. The MIDI In (OMNI) plugin is included with Gig Performer and is the default MIDI input until you specify a controller-specific one (see below). In addition to passing MIDI messages generated by any connected MIDI controller, it also provides a virtual keyboard, so you can play your plugins even if you are not using an external MIDI controller. 14
 block to open its editor, then play the organ sound by clicking notes on the virtual keyboard.")
19 At this point, if you play a few notes on your controller (assuming your audio system is turned up), you should be hearing an organ sound coming from your connected audio interface. Alternatively, you can double-click on the MIDI In (OMNI) block to open its editor, then play the organ sound by clicking notes on the virtual keyboard. You can also opt to substitute a plugin representing your particular MIDI controller (thus allowing the plugin to be played only by that controller and/or via a specific MIDI port offered by that controller) by right-clicking on the MIDI In (OMNI) block and selecting the Replace Plugin option. 15
, grouped together by category: Gain Control, MIDI Inputs, MIDI Outputs, MIDI Processors, and Media Players.")
20 Again, all built-in Gig Performer plugins (including MIDI In (OMNI), as well as MIDI In and MIDI Out blocks for each connected MIDI controller) appear above the line separator (indicated by the arrow), grouped together by category: Gain Control, MIDI Inputs, MIDI Outputs, MIDI Processors, and Media Players. For more information about the MIDI In (OMNI) plugin, see the Supplied Plugins section in this User Guide. 6. Go to Performer View. Click on the top left icon (circled) to switch Gig Performer to Performer View. 16
21 This screen, which is designed to look like a rack of one or more devices, allows you to create widgets (virtual knobs, sliders, buttons, etc.) that can be used to control various aspects of the sound created by your plugins. These widgets can be adjusted manually from your laptop and/or via physical controls (such as real knobs, sliders, and buttons) on your MIDI controller; with the use of an OSC app, they can also be adjusted remotely from ios / Android tablets or smartphones. (See the OSC tutorial in this user guide for more information.) When you switch to Performer View for the first time, you will see a rackspace containing a single empty panel (indicated by the arrow) into which you can insert widgets. (Extra panels can be added to group your widgets as desired; more about this below). You can create multiple rackspaces each representing a collection of interconnected plugins and you can switch from one rackspace to another manually from your laptop or via MIDI program change messages (with optional bank switching messages), or by using UP/DOWN commands from a MIDI pedalboard controller. You can also switch rackspaces with OSC commands (see Appendix A in this User Guide for more information). 17

22 7. Create a widget. Click on the Widget Layout Designer icon (circled) to enter Edit mode. In the screen shown below, the list of rackspaces on the left is replaced by a list of Gig Performer widgets, including virtual knobs and sliders of different shapes and colors, along with text labels, meters, buttons, and toggle switches. 18

23 Widgets can be placed anywhere in a panel by simply dragging them to the desired location. To start, scroll down the list of widgets and drag a toggle switch from the left column somewhere into the panel. It will appear highlighted within a white rectangle and you can resize it by dragging any of the corner points. (The smaller section directly beneath the white rectangle displays a caption for the widget.) 19

24 When a widget is highlighted, a Widget Properties inspector area appears below (indicated by the arrow). The New Panel button above it allows you to create additional panels within the rackspace if desired. The inspector is divided into two sections: Properties and Mapping. The Properties section on the left allows you to associate the widget with a physical button, knob or slider on a connected MIDI controller; it also allows you to optionally assign it a name that can be used with GP Script and OSC. The Mapping section on the right allows you to assign the widget to control a particular plugin parameter. Together, this enables you to use the buttons, pads, sliders and knobs on your controller to change parameters in real time. Note: There are no technical differences between the various knob and slider widgets only cosmetic differences. They all do the same thing: they generate values when you move them. But their different appearances allow you to easily group related items or have certain kinds of parameters (for example, all volume parameters) stand out clearly. 8. Assign the widget to a plugin. We re going to use this toggle switch to select fast or slow Leslie speeds for our Hammond organ sound. (Pretty much every Hammond 20
.")
 plugin, and your Organ plugin and select")

25 organ plugin offers such a parameter). Start by telling Gig Performer to which plugin you want to apply the widget. This is accomplished by clicking on the plugin list dropdown menu beneath the word Plugin in the mapping section of the inspector (indicated by the arrow). The default selection when you first create a widget is always (no plugin), as indicated by the checkmark to the left. Scroll down the list of plugins currently, there are just four of them: your audio interface input and output, the built-in MIDI In (Omni) plugin, and your Organ plugin and select Organ. 9. Assign the widget to a plugin parameter. Next, we have to tell Gig Performer which parameter we want to have the widget control. This is done in the Parameter area of the mapping section of the Widget Properties inspector, immediately below the plugin list menu. As soon as you select a plugin, this area is populated with a list of available parameters that can be controlled via MIDI. This always begins with the Bypass plugin option, enabling you to use a widget to simply bring the selected 21
, in which case all you need to do is to select the parameter you want the widget to affect, and you re done with this part of the process.")
26 plugin in or out of the signal chain. The remainder of the controllable parameters are plug-in specific. Many plugins provide a list that is easily readable (i.e., volume, overdrive, reverb level, etc.), in which case all you need to do is to select the parameter you want the widget to affect, and you re done with this part of the process. However, other plugins simply offer a list of parameter numbers, leaving you to decipher which number affects what aspect of the sound. Even if that s the case, no problem, thanks to Gig Performer s a handy Learn mode, which enables it to instantly recognize and learn the appropriate parameter. To use Learn mode, simply click on the Learn button in the right-hand Plugin section (as indicated by the arrow) so that it turns red. Doing so immediately opens the selected plugin s editor window. Now all you have to do is use your mouse to move the control you want the widget to affect, and Gig Performer instantly learns the parameter. In the case of the C3 Blues instrument, the parameter is called R Speed Jazz Organ (circled below). 10. Use the widget to control the sound. If you now close your plugin s editor screen, the mapping section of the Widget Properties inspector will display the parameter assigned to your widget (in this case, R Speed - Jazz Organ ). 22

27 At this point, if you exit Edit mode by clicking on the Widget Layout Designer icon in red (above your rackspace), you will see a panel with your toggle switch, in this case also named R Speed Jazz Organ. (We ll show you how to change the name in a moment.) More importantly, if you click on the toggle switch with your mouse or trackpad, it will flip between the ON and OFF positions, and your organ sound will switch between a slow Leslie and a fast Leslie speed. (Try it!) When you re done, disable Learn mode by clicking on the Learn button again so that it no longer lights red. If for some reason a widget works the opposite way you d like it to (for example, if the ON position of a toggle switch gives you a slow Leslie speed instead of the fast speed), you can easily change that in Edit mode. Just click on the widget to open the Inspector, then click on the Invert value button in the Properties section on the left; alternatively, you can set the MIN value higher than the MAX value. Click here for more information. Edit mode also gives you the ability to rename the caption below a widget. To do so, simply click on the Customize caption button (circled below) in the Properties section and type in a new name. Let s enter Leslie speed as the caption: As you may notice, a name of more than a few characters may not display properly within the default caption space. No problem! As mentioned earlier, the white rectangle that appears around the selected widget (and caption below) in Edit mode 23

28 allows you resize it (and the accompanying caption) by dragging any of the corner points. Here we ve made it considerably larger so as to accommodate the new Leslie speed caption: Tip: Not sure how a widget movement is affecting your sound? It s easy to see for yourself. Simply double-click on the widget while in Edit mode and the associated plugin editor will open. When you exit Edit mode, the plugin editor remains open. Now all you have to do is move the widget and you can see the assigned parameter changing a knob turning, a slider moving, or a switch/button going on or off in real time. 24

29 11. Associate a widget with a physical device. The real power of Gig Performer is that it gives you the ability to associate widgets with physical devices like the knobs, sliders, pads, buttons, and switches on your MIDI controller, as well as any pedals connected to it. You can even control widgets by playing specific notes, or by pressing down on keys harder. Once again, this process is made easy by a Learn mode, which enables Gig Performer to instantly recognize which physical device you want to use to control the selected widget. To enter this mode, simply click on the Learn button in the left-hand Properties section of the inspector (indicated by the arrow) so that it turns red. Now all you have to do is touch or move any switch, button, knob, slider, or pad on your MIDI controller, play any note on your keyboard, or step on any connected pedal. Gig Performer instantly learns the MIDI message transmitted by that device, and the toggle switch widget moves at the same time. Try it! If your keyboard controller has pads, they likely transmit MIDI note-on / note-off messages (unlike switches and buttons, which typically transmit MIDI controller messages). For that reason, when using notes or a pad to control an on-off widget such as the toggle switch, you may need to click on the Treat momentary as latching button in the MIDI section of the Widget Properties inspector for them to work correctly. Click here for more information. When you re satisfied with the physical controller you ve selected, click the Learn button again so that it no longer lights red. 25
30 Tip: While in Learn mode, you can click on different widgets and keep associating them with plugin parameters or physical controls useful if you want to create all your widgets first and then associate them with parameters and physical controls later. Important note: While you can use continuous physical controllers like knobs or sliders to control on-off widgets such as buttons or toggle switches (and vice versa: physical on-off controllers such as switches, buttons, or pads can be used to control continuous widgets such as knobs or sliders), this can get awkward and is not recommended practice! Important note: Using keys to control widgets requires some extra care. When you first press a key while Gig Performer is in Learn mode, it will recognize and learn a Note On event. However, if you release the key while Learn is still enabled, Gig Performer will recognize and learn a Note Off message. In addition, if your keyboard controller generates aftertouch (channel pressure) messages, they will occur as you push the key harder in-between the Note On and Note Off messages. If Learn mode is still enabled while a note is being held, Gig Performer may well recognize and learn one of those values instead of the desired Note On or Note Off message. 12. Name your rackspace. Double-clicking on the rackspace name (currently the default name Rackspace ) in the upper left-hand corner of the screen brings up the Rackspace Properties dialog: 26

31 There are a number of options provided here, all of which are discussed in the Reference section of this User Guide. For now, simply type in a new name let s use Organ with Leslie speed control and click on Apply, which will close the dialog. 13. Create a variation. As discussed in the Basic Terminology section of this User Guide, a variation is essentially a rackspace preset which contains the same plugins and interconnections but with different parameter settings. Their usage allows you to create complex arrangements of plugins in a single rackspace without having to duplicate rackspaces to craft those different sounds it s also a great way to save on memory! For example, you could have multiple plugins followed by gain controls, with different plugins muted in different variations. Or you could connect multiple effects (i.e., phasing, flanging, tremolo, reverb, echo, etc.) and have each individually turned on/off or adjusted in different variations. This saves you having to create a separate rackspace for a plugin with phasing, and another for the same plugin with flanging, etc. As an example, let s create one variation of our Organ with Leslie speed control rackspace that is set to a slow Leslie speed, and another that is set to a fast Leslie speed. You can freely switch between variations instantaneously and with no interruption of sound either manually, with up/down pedals, or via MIDI program change messages. 27

32 Variations contain only the value of widgets, as opposed to information about the plugins being used and their interconnections. However, since those widgets are connected to plugin parameters, whenever the widgets change, the parameter values will also change. To create a new variation, either go to Edit >New variation or type Cmd-N. A dialog will open asking you to type in a new name. Let s call this variation Leslie Fast. You ve probably noticed that there s already a variation for the Organ with Leslie speed control rackspace you created, with the name Default : Every rackspace automatically comes with at least one variation, initially named Default. (The reason is that, technically, only variations not the rackspaces themselves can be selected with MIDI program change messages.) Now that we ve created a second variation, let s go ahead and rename the first one. To do so, doubleclick on the name, which will bring up the Variation Properties window: 28

33 Enter the name Leslie slow in the Name field and click on Apply, which will close the dialog. Now all that remains is to make sure the toggle switch widget is set to the Off position something you can do either manually from your laptop or by moving the associated physical device on your MIDI controller (as set in step 11 above) and that it is set to the On position when you click on the Leslie fast variation. For more information about switching between variations with MIDI pedals or a MIDI controller, click here. 14. Create a new rackspace with multiple variations. As discussed in the Basic Terminology section of this User Guide, a rackspace can actually be pretty much anything you like: It can represent a single sound or all the elements needed for an entire song or even just one part of a song. You can switch from one rackspace to another instantaneously, either manually, with up/down pedals, or via MIDI program change messages. With that in mind, let s create a new rackspace by going to Edit>New rackspace, by using the Shift-Cmd-N / Ctrl-Shift-N keystroke commands, or by clicking on the + icon above the list of rackspace names. In the Rackspace Properties window that opens, rename it Piano and strings, then, following the procedures outlined earlier in this tutorial, insert two plugins: one generating a piano sound and the other generating a string sound. Rename them Piano and Strings respectively, and make the appropriate MIDI and audio connections. Your Connections View screen should now look something like this: 29

34 Gig Performer allows a single MIDI input block to play two or more sounds simultaneously, so if you now play your keyboard controller, you should hear both sounds, layered together. However, we re going to create a keyboard split so that the strings only layer with the piano when notes above Middle C are played. Doing this requires separate MIDI input blocks, so right-click in the Connections View screen and add a second MIDI In (OMNI) block and rename it Top Layer, then move the orange connection from the first MIDI In (OMNI) block to the Top Layer block. Finally, rename the first MIDI In (OMNI) block as Bottom Layer. Your screen should now look something like this: 30


35 Next, we ll create the keyboard split. Double-click on the Top Layer MIDI Input block to open its plugin editor: 31
36 Click on the Learn button above the MIN note parameter (circled above) and play C3 on your MIDI keyboard or other controller; the notes below C3 on the virtual keyboard become darkened, indicating that they are inactive. (Notes outside the specified MIN and MAX note range are always darkened this way.) Your keyboard split is complete! If you now play your keyboard controller, you ll only hear strings when Middle C or higher notes are played. (If you d prefer hearing the strings on their own when notes Middle C or higher are played instead of layering them with the piano, simply set the Max note for the Bottom Layer MIDI In block to B2.) Now let s add widgets that allow the two sounds to be turned on and off individually. Switch to Performer View and enter Edit mode, then drag two LED Button widgets into the rack panel. Assign one to the Bottom Layer MIDI In block (controlling the piano sound) and set it to the Bypass plugin parameter, then assign the other to the Top Layer MIDI In block (to control the strings sound) and set it to the Bypass plugin parameter as well. Bypassing the MIDI In block instead of the synth plug-in means that a string of Note Off messages are sent when the block is bypassed, shutting off any notes still sounding when you mute the instrument. 32
37 Click Invert value (in the left-hand Properties section) so that the On (button lit) position of the LED allows the associated plugin to be heard and the Off (button unlit) position causes the associated plugin to be bypassed. Caption each widget accordingly and test to make sure everything is working as expected. (Feel free to assign either or both widgets to physical devices on your MIDI controller if you like.) Your rackspace should now look like this: Next, we ll add a new panel and slider widgets to control the levels of the two sounds. (Rackspaces can contain multiple panels, and Gig Performer provides options to resize them if your laptop provides limited screen real estate.) Although some plugins offer master volume parameters, many do not, and so the best way to accomplish this is with the use of the Gain and Balance plugin bundled with Gig Performer. Accordingly, return to Connections View and insert two Gain and Balance plugin blocks. Connect one between the audio outputs of your Piano plugin and your audio interface s output block, and rename it Piano gain. Then connect the other between the audio outputs of your Strings plugin and your audio interface s output block, and rename it Strings gain. If you connect the audio outputs of multiple plugins to the input of another plugin, the signals will be mixed automatically. If you d like to take control of that mix and create custom blends, simply insert one of Gig Performer s bundled Audio Mixer/Router plugins, or one of its Gain plugins (Gain Control, Gain and Balance, or Gain and Balance (m->s)) in-between, then adjust their volume controls as desired. These plugins can also be used as sends to effects such as reverb plugins. See the Configuring Audio Plugins tutorial in this User Guide for an example of how to do this. 33

38 Your screen should now look like this: Return to Edit mode and click on the New panel button (circled below) that appears between the first panel and the Properties area below. (Depending upon the screen size of your laptop, you may need to resize your screen or scroll down below the current panel to see this button.) Select New 2U panel ( U stands for Rack Units ; you can always change the size later if necessary) and then double-click on the panel. From the Style menu that 34
 and the white slider to the Gain parameter of the Strings gain plugin (NOT the Strings plugin).")
39 appears under Rack Unit Properties, select a custom color for the new panel. Next, drag one vertical black slider and one vertical white slider into the new panel. Assign the black slider to the Gain parameter of the Piano gain plugin (NOT the Piano plugin) and the white slider to the Gain parameter of the Strings gain plugin (NOT the Strings plugin). Finally, assign the black slider to control the Piano gain plugin s Gain parameter, and the white slider to control the Strings gain plugin s Gain parameter. Feel free to assign either or both widgets to physical devices on your MIDI controller if you like. (If you have an expression pedal connected to your controller, that would be an excellent way to fade the strings in and out you can even substitute an Expression Pedal widget for the white slider.) Finally, caption the two sliders Piano level and Strings level, respectively. (You may need to resize them to view the entire caption.) Listen and test to make sure everything is working as expected. Your Performer View screen should now look like this: Want to cross-fade between two different sounds (such as the Piano and Strings in this tutorial), or two different effects? It s easily accomplished with Widget Groups. See an example of how to do this in the Configuring Audio Plugins tutorial. 35
40 15. Add variations. Finally, add a number of variations to the rackspace, following the procedures described earlier in this tutorial. For example, you might want to have one variation that provides piano sound only (with the Strings LED widget unlit) and another that provides both sounds (both LED widgets lit) at full volume, with a third variation that provides strings at half volume. Go on experiment! The sheer flexibility of Gig Performer means that the sky is the limit. 16. Save your work. Last but by no means least, be sure to save your work by going to File> Save As... and typing in a filename. The saved file, with the extension.gig, contains complete information about all rackspaces and variations. You can also opt to save just the current rackspace for later importation into another Gig Performer session by selecting Export current rackspace... in the File menu. Click here for more information. Using Rig Manager The Rig Manager is designed to speed workflow by eliminating the need to teach controllers to Gig Performer every time you use a different keyboard or controller setup. Rig Manager constructs a map of physical input devices like keyboards, and the controllers they host, like sliders, buttons, faders, and knobs, to virtual controllers that are linked to widgets. Virtual controllers decouple the physical controller from the control paths in Gig Performer, which makes it easier to swap out different physical controllers while maintaining your usual controls. Say, for example, you re sharing backline instruments with another performer and so have to use someone else s keyboard controller for your performance. Rig Manager s controller mapping means that you only need to map the new physical controllers to the existing virtual ones and all of your widget controls are reestablished. That can be accomplished in a few minutes around soundcheck. Similarly, if you use one controller for rehearsal and a different one for gigs, Rig Manager can make it much easier to switch between them. If you play multiple identical keyboards, Rig Manager simplifies distinguishing between those. See the Reference section on the Rig Manager for additional details. What s a rig? In Gig Performer, a rig is a collection of three sets of information: a set of physical MIDI controllers, a set of virtual controllers that can be attached to widgets, and a map that relates the two sets, thereby connecting your physical controller, through widgets, to parameter controls. 36

41 A MIDI Input Device is a physical controller, which often has multiple knobs, sliders, buttons, or other individual controllers on its surface, while MIDI Controls are the virtual controllers that get mapped to parameters. Once the lists of MIDI Input Devices and MIDI Controls are established, they appear as drop-down menus in fields where they are used, for example, as MIDI sources in plugins. The following tutorial walks through adding MIDI Input devices and MIDI Controls, and linking them appropriately to let you quickly switch between a rehearsal setup and a performing setup. 1. Press Cmd/Ctrl (Mac/Win) R or choose the Window>Rig Manager command to open the Rig Manager. The Rig Manager window will open showing a default configuration. The main area of the window is divided between two columns. On the left are the MIDI Input Devices physical control devices like keyboards, pad controllers, and control surfaces. In the screenshot above, none of the devices shown have been given global names. 37


42 The column on the right is MIDI Controls. 2. Click the Rename Rig button and enter a new name for your rig. 3. Let s add another input device. Click the plus sign at the top of the MIDI Input Device list. If you needed to remove a device, you just would click the three dots button next to the device and choose Remove this global name from the popup menu. 4. In the dialog that appears, give the device a global name. This step is key to using the Rig Manager. 38


43 5. The new device name needs to be linked to a physical MIDI controller. Click on the three dots button or right-click on the input device and choose a source device from the Associate MIDI Device submenu. 6. Now let s add a new MIDI control by clicking the plus sign at the top of the MIDI Controls column. In the dialog that appears, name the MIDI control. 7. Now it remains to map the new virtual controller to a physical controller. Right-click on the MIDI control you just created and choose Learn MIDI from the popup menu. 39
.")
44 8. Move a knob, fader, or other physical controller and it will be mapped to the virtual controller. The MIDI Control right-click menu also enables renaming the virtual control or removing it from the rig (by removing its name). Finally, you can disconnect a physical controller from a virtual one with the Remove MIDI association command. 9. Repeat the Learn MIDI process for each parameter you want controlled from your MIDI input device. By now, Rig Manager should look something like this: 10. Connect the virtual controllers to widgets to control parameters. The MIDI controls that have been named and defined show up as sources, for example, in this list of sources to be mapped to a switch widget. 40


45 In the studio, QUNEO and QuNexus are the primary controllers. In performance, however, the controllers are a malletkat and an old Roland PAD80. We will setup another rig for live performance. 11. Click the large plus button at the top of the window and choose Duplicate current rig to make a copy of the rig. 12. Rename the new copy MyRig2 13. Create two new MIDI Input devices and rename them. In this example, they are named Octapad and malletkat. 14. Choose Learn midi for each of the new input devices and play on them to establish the link. This performance rig now looks like this: 41

46 15. Each MIDI Control must be trained once for a new physical controller. Click the three dots button for a control in the MIDI Controls list and choose Learn midi, then move a knob or other physical control. 16. When MIDI events from the physical control arrive, the item lights up in the MIDI Input Devices and Controls lists, and the events that came in will be displayed at the top of the window. 42


47 17. Repeat the Learn midi process for each controller. 18. Save your work. 19. Switch back and forth between the studio and performance rigs by clicking on the arrowheads and choosing a rig from the dropdown menu. Note messages Rig Manager handles remapping switch and continuous controls, which is the hard part of changing to a different controller. The easier part is redirecting the typical stream of note messages from your keyboard, pad controller, or other musical controller. That is handled 43

48 with MIDI plugins in the Connections view, so there is the other place where the change in controllers must be accommodated. One method is to use the MIDI In (OMNI) plugin. Omni, in this case, means not simply that it responds to messages on any MIDI channel, but also that it hears all connected MIDI devices. When you unplug a keyboard at rehearsal and plug a different in for live performance, it makes no difference, since the plugin responds to note messages from any source. If you use MIDI In (OMNI) in your rackspaces, you need worry only about setting up rigs in Rig Manager for each set of controllers you use. Just to be clear, while the Connections view is where note messages for pitch are routed, individual note messages can be assigned to virtual controllers in Rig Manager, so that notes can trigger actions or perform other control functions aside from playing pitches. An alternative approach is create a rackspace with one of the controllers, say, the one used at rehearsal, then duplicate it, and modify the MIDI In block to change the MIDI Input source to the performance controller. Now you have rackspaces that are identical except for the controller used. 44
49 Configuring Audio Plugins This tutorial describes how to add effect plugins to vocals and/or guitar. 1. Launch Gig Performer. If you have previously created a.gig file, it will automatically load (unless you have unchecked Load last GIG file on startup on the Options>General Preferences tab). If so, go to File>New Gig to start with a clean slate. 2. Create a signal chain for voice. We ll start by constructing a typical signal chain for live vocals. Since we won t be using a MIDI controller for this tutorial, start by rightclicking on the MIDI In (Omni) block, then selecting Delete from the popup menu that appears. Then turn off all speakers and connect a microphone to an input of your audio interface, then enter Connections View and, using the procedures described in the previous tutorial, add the compressor plugin of your choice (because it is an effects processor, its block will be colored blue, as opposed to sound generating plugins, which are colored orange), rename it Compressor, and make audio connections to the red and brown interface blocks. Slowly turn up the volume of your sound system (to avoid feedback), then double-click on the plugin to open its editor and adjust its parameters until you are satisfied with the degree of compression. Close the editor to return to Connections View. The main area of the screen should look something like this: (Your screen may look slightly different, since the audio input and output blocks will 45
50 reflect the name of your connected audio interface as well as the number of inputs and outputs it provides.) Tip: If you re running Gig Performer on a Mac OS X system, the Audio MIDI Setup utility allows you to create Aggregate Devices, each consisting of multiple audio interfaces. Click here for more information. Note: If you have multiple audio interfaces connected to your system and you want to use an interface other than the one being displayed, choose the Options>Audio setup command and select the desired interface on the Audio I/O tab. You can even specify different interfaces for input and output. Next, for metering purposes, we ll add two bundled Gig Performer plugins. Insert a Gain Control (mono) plugin before the compressor and rename it Pre-compressor gain, then insert a Gain and Balance Control (mono to stereo) plugin after the compressor and rename it Post-compressor gain. (The latter has the benefit of converting a mono source such as a microphone to stereo, which will allow us to add stereo reverb and echo effects.) The main area of the Connections View screen should now look like this: 46
51 Tip: There are two ways to modify connections: You can delete an existing connection by right-clicking on it and selecting Remove this connection (or by dragging it to any empty space) and then create a new connection. Alternatively, you can click near one end of a connection and drag it to a new pin. Let s complete the signal chain with the reverb and echo/delay plugins of your choice. Rename the two plugins Reverb and Echo, respectively. The main area of the Connections View screen should now look like this: Note: Plugin blocks that are bypassed are overlaid with a red see-through rectangle, as shown in the illustration above. Important note: There is a difference between bypassing a plugin and muting it. Bypassing actually turns off processing for that plugin, thus stopping the sound from being generated or processed. Muting, which is accomplished by inserting a Gain Control, Gain and Balance, or Gain and Balance (m->s) plugin and clicking the Mute button or setting its volume slider to 0, causes an audio signal to continue to be generated, but with the output silenced. If you re playing back a loop or click track during live performance but you don t want the audience to hear it for a period of time, mute the plugin instead of bypassing it. That way, it will continue to play (in your headphones, if so routed) until you re ready for the audience to hear it again. 47
52 3. Add widgets to control the vocal sound. It can be very helpful to be able to adjust the amount of reverb added to singer s voices during live performance, and you almost certainly will be want to be able to bring echo in and out as needed. Accordingly, go to Performer View and click on the Widget Layout Designer icon to enter Edit mode. Drag a blue knob, a green knob, and a red LED into the panel and arrange them roughly this way: Add captions and assignments to these widgets as follows: Blue knob o Caption: Dry/Wet mix o Assignment: Dry/Wet parameter of your reverb plugin. Green knob o Caption: # of repeats o Assignment: Feedback parameter of your echo plugin. (This determines the number of repeats you hear.) Red LED o Caption: On/Off o Assignment: Bypass plugin parameter for your echo plugin. (Click on Invert value so that the plugin is bypassed when the LED is unlit and active when it is lit.) Finally, for purely cosmetic reasons, drag two Text label widgets into the panel. Position one over the blue knob and caption it Reverb, then position the other over the green knob and red LED and caption it Echo. Exit Edit mode and return to Performer View. Your panel should now look like this: 48
 give you the ability to visually monitor levels at any point in the signal chain.")
53 4. Add metering. Metering can be very helpful to verify proper gain structure and ensure that a signal is not being overloaded and distorted. The meter widgets provided by Gig Performer (available in both vertical and horizontal configurations) give you the ability to visually monitor levels at any point in the signal chain. To add metering, simply insert Gain Control (or Gain and Balance Control) plugins wherever you want to be able to view signal (as we did in step # 2 above) and assign meter widget(s) to their Magnitude parameter. Accordingly, drag two horizontal meter widgets into the left-hand side of the panel and add captions and assignments as follows: Top horizontal level meter o Caption: Pre-compressor o Assignment: Magnitude parameter for the Pre-compressor gain plugin. Bottom horizontal level meter o Caption: Post-compressor o Assignment: Magnitude parameter for the Post-compressor gain plugin. Your panel should now look like this: 49
54 5. Add scaling. Most singers like to have at least some reverb on their voice at all times, but rarely will they want their sound to be swimming in reverb. This is where Gig Performer s scaling control comes in handy. It allows you to specify a minimum and maximum range for each widget, while still allowing full range of motion. To demonstrate, take your Reverb plugin out of bypass, then go back into Edit mode and click on the blue knob to select it. In the Properties section of the inspector, you ll see an area labeled Parameter range and control (circled): Enter a Min (minimum) value of 30 and Max (maximum) value of 60. (The numbers can be typed in directly, or you can use the + and buttons below to increment or decrement the value.) Now, when the blue knob widget is at its fully counterclockwise 0 position, you ll hear a dry/wet mix of 30% (which, for most plugins, will result in a small amount of reverb), while at its fully clockwise 10 position, you ll hear a dry/wet mix of 60% (which, for most plugins, will result in a significant, but not overwhelming amount of reverb. (Feel free to adjust the Min and Max values to taste!) Similarly, an infinite number of echo repeats can be a very unpleasant thing the sound can quickly spiral out of control so set the Max value for the green knob widget to 70. That way, when the green knob is at its fully counterclockwise 0 position, you ll hear a single echo, while at its fully clockwise 10 position, you ll hear several but not too many echoes. Again, feel free to adjust to taste. 6. Test, tweak, and save. Test that all is working as expected by moving the blue and green knob widgets manually with mouse-dragging operations and turning the red LED on and off by clicking on it. (Take your echo plugin out of bypass before doing so.) If you have a MIDI controller or pedalboard connected to your system, you can associate each of these three widgets with physical devices such as knobs, sliders, buttons, and pads on your controller. Obviously the two knob widgets are best controlled from knobs and sliders, but the echo on/off widget (the red LED) can be controlled from buttons, pads, a pedal, or even a note being played! For example, you can assign it to the highest note on your keyboard one which is probably 50
55 rarely played in normal circumstances and the echo will turn on only when that key is depressed. (Click here for an important note about using keys to control widgets.) Again, thanks to the flexibility of Gig Performer, the only limit here is your imagination. When you ve got everything tweaked to your satisfaction, add any variations you want and name your rackspace for the purposes of this tutorial, we ll call it Vocal. Finally, be sure to save your work. 7. Create a new instance. Next, we re going to be constructing a signal chain for guitar, but before we do so, we ll be placing it in a separate instance. Instances are simply multiple copies of Gig Performer running simultaneously in the same computer. Their use allows each member of a band to have independent control over his or her own rackspaces without affecting the rackspaces of other bandmembers. For example, a guitarist can freely switch between rhythm and lead settings without affecting the reverb and echo settings being applied to vocals. Go to Options>Advanced Settings... and make sure the Enable multi-instance support option is checked. (For more information, click here.) Then go to File>Create New Instance and type in a name. For the purposes of this tutorial, let s call the new instance Guitar. A dialog box will appear informing you that you have created a new instance. Click OK to close the dialog and your new instance will appear a complete new iteration of Gig Performer with no plugins, no connections, and no widgets. 8. Create signal chains for guitar. Now it s time to build a typical signal chain for guitar actually, two of them. Begin by once again deleting the MIDI In (OMNI) block and then connect a guitar (via a DI box if necessary) to an input of your audio interface other than the one used for the microphone earlier in this tutorial. 51
56 Then enter Connections View and connect that input to the amp/cabinet model plugin of your choice, followed by the chorusing plugin of your choice and the flanging plugin of your choice. Add a Gain Control plugin and the reverb plugin of your choice. Rename the amp/cabinet plugin Rhythm amp/cab, the chorusing plugin Chorus, the flanging plugin Flanger, the Gain Control plugin Reverb Send (since it s taking on that function; see the text box below) and the reverb plug-in Reverb. Connect the output of the Flanger plugin to the Reverb send plugin, and the output of the the Reverb send plugin to the Reverb plugin. Finally, connect an output from both the Flanger and Reverb plugins to one of your audio interface s outputs (choose an output other than the one being used for the microphone signal), as shown in the illustration below: Tweak the parameters in the various plugin editors until you get a sound you like (use the Gain Control to set the desired amount of reverb), then double-click on the rackspace name. In the Rackspace Properties dialog that appears, rename the rackspace Rhythm, then click on Apply to close the dialog. 52
57 Gig Performer makes it easy to create reverb sends, where signal is routed to a reverb (or other type of signal processing plugin) from multiple sources: Simply insert a Gain plugin between the output of each source and the reverb plugin. The volume of each Gain plugin provides independent control over how much signal is sent to the reverb. Next, we ll create a second rackspace for soloing. Since we re going to use the same audio connections (although we ll be substituting different plugins), go to Edit>Duplicate the current rackspace (or use the Shift-Cmd-D / Ctrl-Shift-D keystroke commands) to add a new rackspace, then double-click on its name. In the Rackspace Properties dialog that appears, change the name of this new rackspace from Rhythm_1 to Solo. In Connections View, substitute an amp/cabinet model if you prefer (you can also opt to simply use the same one you used for the Rhythm sound Gig Performer allows you to use the same plugin multiple times, up to the limits of your RAM and CPU resources), followed by the distortion/overdrive plugin of your choice, then delete the flanging plugin. Rename the amp/cabinet plugin Solo amp/cab and rename the distortion/overdrive plugin Overdrive. Your main Connections View screen should now look like this: 53

58 Guitarists especially will appreciate the handy fullscreen chromatic tuner provided in Gig Performer, available at any time with the click of a mouse or the press of a MIDI footswitch even with the touch of a button on a smartphone or tablet running an OSC app. Click here for more information. 9. Add widgets to control the guitar sounds. Go to Performer View and select the Rhythm rackspace, then click on the Widget Layout Designer icon to enter Edit mode. Drag an Old school knob and a The 11 knob (our Spinal Tap version of the Old school knob it goes to 11!) into the panel. Add captions and assignments to these as follows: Old school knob o Caption: Chorus intensity o Assignment: Effect level parameter of your Chorus plugin. The 11 knob o Caption: Flanger intensity o Assignment: Dry/Wet parameter of your Flanger plugin. Apply widget scaling and MIDI controller assignments to taste, then, purely for cosmetic reasons, add a text label widget and caption it Rhythm, then double-click on the panel and in the Rack Unit Properties menu that appears, change its Style (actually, its color) to blue. It should now look like this: Now go to the Solo rackspace and drag a text label widget and an 11 knob widget into the panel. Caption the 11 knob Overdrive and assign it to the Drive parameter of your Overdrive plugin. Apply widget scaling and MIDI controller assignments to taste, then caption the text label widget Solo and change the rack panel Style (color) to green. It should now look like this: 54
59 The advantage to putting different sounds into different rackspaces (as opposed to creating one complex rackspace with multiple signal chains and complicated switching) is that you can go from one to the other, glitch-free, with the use of simple MIDI program change messages transmitted via a MIDI controller, such as up-and-down switches on a pedalboard or even via a smartphone or tablet running an OSC app. What s more, Gig Performer s Tail length function allows you to set the maximum time before a sound is cut off up to 5 seconds when you switch rackspaces something that s particularly useful in situations like this, where reverb or echo is being applied to a sound. Try it! 9. Create a widget group to crossfade between the chorus and flanging effects. Now it s time to explore Gig Performer s powerful widget group feature. The concept behind it is simple: Any widget assigned to a group can be controlled by any or all other widgets assigned to the same group. This enables you to change multiple parameters together. (There are two other ways to control multiple parameters simultaneously: one is to assign the same MIDI control to multiple widgets, the other is using GP Script to contol any number of parameters with a single widget.) To demonstrate, go to Connections View, select the Rhythm rackspace, and add two Gain Controls, renaming one of them Chorus volume and the other one Flanger volume. Connect the output of the Chorus plugin to the input of the Chorus volume plugin and the output of the Flanger plugin to the input of the Flanger volume plugin. Then connect the outputs of both the Chorus volume and Flanger volume plugins to the same output of your audio interface that you ve been using for both the Rhythm and Solo rackspaces. Your main Connections View screen should now look like this: 55
60 Next, go to Performer View and move the two knob widgets to set moderate amounts of both Chorus intensity and Flanger intensity. Then go into Edit mode and drag a horizontal slider widget into the same panel, positioning it below the two knob widgets. Next, in the Properties section of the inspector, click on the dropdown menu below for the widget group (circled below) and select Group A. (Gig Performer provides 26 widget groups, lettered A through Z.) Caption the widget Chorus <-> Flanger but don t assign it to any plugin; that s because we re going to use it as the master to control two other widgets we ll be placing in a separate panel. Accordingly, click on the New Panel button beneath the current panel (depending on the screen size of your laptop, you may need to scroll down or resize the window to see this button). From the dropdown menu that 56
61 appears, click on Create a new 1U panel. This is the smallest size panel provided by Gig Performer, but it will work fine for our purposes since we won t actually need to see its widgets during live performance. Drag a blue knob widget into the left side of the new panel and a green knob widget into the right side. Caption the blue knob Chorus volume and assign it to the Gain parameter for the Chorus volume plugin. Then caption the blue knob Flanger volume and assign it to the Gain parameter for the Flanger volume plugin. Next and this is important click on Invert Value (in the Properties section of the inspector) for the blue knob widget only. Finally, assign both knob widgets to Widget Group A the same group as the horizontal slider in the panel above. Because all three widgets are assigned to the same group, they will all move together. When the green knob widget is turned up, it will, as expected, cause the volume of the flanging effect to increase, but turning up the blue knob widget will do the opposite because it is set to Invert Value : it will cause the volume of the chorus effect to decrease, and vice versa. (Another method of achieving inversion of the blue knob s action that provides greater precision is to use scaling: instead of clicking Invert Value, simply enter the maximum value in the Min field in the Parameter range and control (for example, set it to 84), and the mininum value in the Max field (say, 10). In this example, the blue knob will now go from a value of 84 when it is all the way down to a value of 10 when it is turned all the way up.) As a result, when you move the horizontal slider from left to right, you ll hear the chorusing effect crossfade into the flanging effect, and vice versa. Try it! If you want visual evidence that all is working correctly, go momentarily to Connections View and double-click on the Chorus volume and Flanger volume plugin blocks to open their editors, then return to Performer View. The editors will remain open and you ll be able to see the effect of moving the horizontal slider. Your final Rhythm rackspace should look like this: 57

62 If you find the two knobs in the small bottom panel visually distracting, Edit mode provides a couple of easy ways to fix that: a) Right-click on the top panel, then select the Convert to 4U panel option from the drop-down menu. This will enlarge its size, thus hiding the panel below from view. or b) Create one or more new panels and move them in-between your master blue panel and the small panel containing the blue and green knob widgets. 10. Test, tweak, and save. Test that all is working as expected by moving widgets manually with mouse-dragging operations or from your MIDI controller. When you re satisfied with all settings, be sure to save your work by going to File>Save As... and typing in a filename. Like all Gig Performer files, those saved when working within an instance are given the extension.gig and contain complete information about all rackspaces and variations. Bear in mind also that, because we created them in separate instances, the vocal signal chain created earlier in this tutorial continues to be completely active along with the guitar signal chain just created, and that making changes in one instance does not in any way affect other instances. Important note: When multiple instances are open, be sure to exit from each one separately. 58
63 Capturing a Performance with the Audio Input Recorder The Audio Input Recorder is a basic utility to allow live performance to be captured raw, before it has entered your Gig Performer plugin network. Assuming you save your Gig Performer gig, you can make a quick capture recording, and in post-production use the WAV files that are captured in a DAW or other music or audio program. Also see Audio Input Recorder in the reference section. 1. Click the Recorder button or choose Options>Recording Settings to open the Recording Options dialog. 2. Click the Set Destination Folder button and navigate to a destination for the recorded files. 59
64 3. Choose a bit depth for the files from the menu in the lower left corner. The sample rate is set by the audio interface. Technically, the 32-bit setting uses floating point representation, whereas the other settings use fixed point. 4. We only want to record from a few inputs, so the fastest way to set up for that is to click the Clear All button to disable all inputs, then record-enable the channels you want to capture. 60
65 5. Make sure that Start Mode is set to Start immediately. Recording begins the moment the Start button is clicked. 6. Click the Start button to begin recording. The Recorder button changes to a small record panel that tells you how many channels you are recording and at what bit depth, along with the current record time. The Recorder button changes into a small record panel with information and a stop button. 7. Click the Stop button in the record panel to stop recording. 8. Now let s try a recording set to start at some other time. For instance, we might want to set Gig Performer at sound check to begin recording at the show s scheduled start time. Set Record start mode to Delayed start. New Start time fields appear. Enter the time when you want the recording to start in hours and minutes. 61


66 9. Click the Start button to start recording. The Recorder button changes to a countdown panel. The panel flashes green while it is counting down, then turns to red when it begins recording. When you are done recording, click the record stop button to stop recording. 10. Your recordings are located in the destination folder chosen in the Recording Options dialog. Inside that top-level folder is a folder named for the current Rackspace, and inside of that are folders named with date and time of the recordings. These folders contain the WAV files recorded at the indicated dates and times. 62

67 Since each recording session will include the show date as part of the name, you can start a recording session every night of a tour without having to worry about documenting when the recordings were made. 63

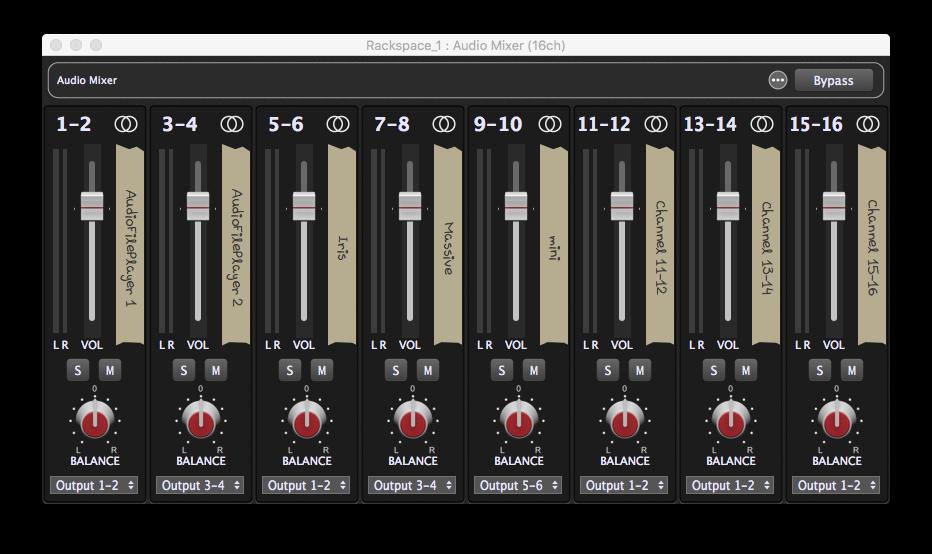
68 The Audio Mixer/Router The Audio Mixer/Router is a flexible plugin that eliminates the need for a Gain plugin on the output of each source. Functions like level, mute, and output routing can be controlled from widgets so you can, for example, mute and unmute different sources, route channels to various effects devices connected to the outputs, or, of course, mix levels. There are two versions of the plugin, one with four inputs that can be stereo or mono, for a total of up to eight input channels, and the other with eight inputs for up to 16 input channels. Each input has a fader, mute button, and solo button, and can be routed to one of four stereo output pairs (or eight output pairs for the 16-channel mixer). For more details, see Audio Mixer/Router in the Reference section. Tutorial: Make a new Rackspace and add a few sound sources. Your screen should look something like this: Now click the Add a plugin button and choose an eight-channel mixer. 64


69 Drag from the outputs of the source on the left (in this example, Massive) to mixer inputs 1 and 2 to feed them into the mixer. To route stereo pairs, you can shift-drag, but you have to respect odd/even pair numbering: the left output from a plugin has to be dropped on an odd-numbered input of the mixer, or the right output dropped on an even-numbered input. Try shift-dragging from an output of one of the other sources. Shift-drag from output 1 of the mixer to an odd-numbered interface output, and the outputs 1 and 2 will be connected for monitoring. Double-click the mixer in the Connections view to open the editor for the plugin. 65


70 Let s rename a channel. Double-click on a label to edit the name. 66

71 Now add an effect of some sort. Drag from mixer outputs 3 and 4 to the inputs of the effect, and from the outputs of the effect to inputs 1 and 2 of the interface. These will simply mix in equal amounts to other signals connected directly to those interface inputs. We can send the Audio File Player through our effects. Click at the bottom of the third channel strip and choose 3-4 as the outputs. Now the file player is feeding the effects, and the output of the effects is being summed with the outputs from the mixer. 67


72 Now that our mixer is configured, we can save the setup as a preset. Click on the Presets menu button. Choose Save from the popup menu and name your setup. 68


73 Now, let s attach a few widgets to mixer controls. Click the Rackspace front view button in the upper left corner so you can see the rack panels, then click the Edit Mode button to start editing the panel. Now add some widgets. In the example below, there are mute buttons, balance controls, level faders, and meters for two inputs to the mixer. All except the meters can easily be mapped to physical controllers, such as on a keyboard. For more information on how to do that, see the Controlling Plugins From the MIDI Controller tutorial. 69

74 Click the Edit Mode button to return to using the Rackspace and you are ready to mix. 70

75 Applications There are many tasks that can be accomplished with the mixer/router plugin. Here are a few examples to get you going. Simple Mixer In this example we have four synths with stereo pair outputs feeding the mixer s eight inputs. Each input has gain and balance controls in the Audio Mixer plugin, so it is unnecessary to add gain and balance plugins on each individual synth output. All the inputs feeding the mixer in the figure are then routed to outputs 1 and 2 of the mixer plugin, which is connected to the first stereo pair of audio interface outputs. Each channel pair can be soloed or muted as desired and of course these can be controlled from front panel widgets (and so from your keyboard controller, once you map them to those widgets) as needed. You can easily add a master volume for a mixer output pair, if you need, by feeding the mixer outputs to a Gain and Balance plugin. For a classic VCA-style approach, create a 71


76 widget for the level of each output pair, then form them into a widget group and map them to a single physical knob or slider. 72
 Audio Mixer are connected to the inputs of four different effects.")
77 Input router On the right, in the Connections view of a rackspace, you can see that we have a single synth (the Modartt Pianoteq) connected to the Audio Mixer. The four output pairs of the (eight-channel) Audio Mixer are connected to the inputs of four different effects. If you look at the first channel strip in the mixer on the left, the Pianoteq is currently being routed to Output 3-4, which feeds the Flanger. By changing the output routing, you can quickly switch from one effect to another. Output routing also can be attached to a slider, knob, or switch widget, letting you control effects switching from your controller. 73

78 Feed multiple effects (aux sends) Assigning the source to all of the inputs turns the mixer into a bank of aux sends. Each channel sends the source signal to one pair of outputs, with a separate level control for each. In this case, the outputs of the effects and the original synth source are all mixed at the end through another eight-channel mixer. 74

79 Multiple submixers in one plugin Since inputs can be independently assigned to outputs, a single 16-channel mixer can be used as if it were a few small submixers in one package. The first and third channel strips, channels 1-2 and 5-6, feed one mix, the second and fourth strips a different mix, and the fifth strip, for the moment, is routed out a third output pair that feeds an effect. 75
80 76
 to chorus and echo. By using rackspace variations in Gig Performer you can instantly switch among arbitrary combinations, using a controller to switch, if you like.")
81 Mixer and Router Together In this example, we can instantly route combinations of inputs to combinations of outputs so you can route your piano to the phaser and chorus while routing your pads (ARP 2600) to chorus and echo. By using rackspace variations in Gig Performer you can instantly switch among arbitrary combinations, using a controller to switch, if you like. 77
82 Controlling Gig Performer Using OSC As described in Appendix A of this user guide, OSC (Open Sound Control) is a communications protocol that allows you to view and move Gig Performer s widgets wirelessly from your ios or Android tablet or smartphone. This tutorial will show you how to use Gig Performer with an OSC app. 1. Establish wireless communications. For Gig Performer and an OSC app to work with one another, both your computer and the device running the app must be connected to the same wireless network, so ensure that they are communicating correctly. 2. Establish OSC communications. Launch Gig Performer and then go to Options> OSC setup... The dialog window shown below will appear. Click on the Enable OSC button (circled in the image) so that it is checked in blue, then enter the IP address of the device running the OSC app in the Remote client IP address box (indicated by the arrow). (Consult your OSC app s documentation app for directions as to how to locate the IP address.) Next, enter the port number of the OSC app in the Remote client port box. (Consult your OSC app s documentation app for directions as to how to locate the port number.) Note that the Gig Performer listening port value cannot be changed as this is permanently set. If you re using the OSC app Lemur, check the Lemur style string format box. If you re using any other OSC app, leave it unchecked. Note: If you re running an OSC app on multiple devices say a tablet and a smartphone and you want to use both devices onstage (or if you want to give one to your FoH engineer to have access to your controls), there s a simple way to accomplish that, using something called Broadcast Mode. Assuming you re using standard class C addressing (with IP numbers beginning with x), simply replace the last value of the OSC app s IP address with 255 (i.e., ) and restart Gig Performer. Now all devices whose IP addresses are on the same LAN (i.e., those devices with IP addresses all starting with x) and are listening on the OSC app s port number will communicate simultaneously with Gig Performer. Click here to access our Knowledge Base article with more information. 78

83 3. When done configuring options, close the dialog and quit Gig Performer. 4. If you re using Lemur or TouchOSC, download a Gig Performer template. For your convenience, we have created templates that makes it easy to control Gig Performer widgets from the popular OSC apps Lemur and TouchOSC. If you are using either of these apps, click here to download the Lemur file, or click here to download 79

84 the TouchOSC file. Note that these templates merely provide a starting point for your own OSC programming and you certainly are not required to use them in fact, we encourage you to construct your own custom OSC environments. The Lemur template (as viewed in a tablet or smartphone) looks like this: Along the top of the screen are ten knobs; underneath them are ten sliders, and underneath those are ten buttons. Below is a field named Song Notes, and at the bottom of the screen are dedicated buttons to set Tap Tempo, turn Tuner View on and off, and move Up and Down through rackspaces and variations, plus a screen Refresh button (touching it after making any changes to a Gig Performer rackspace updates the screen). The TouchOSC template, as viewed in an iphone (the only device it can run on), looks like this: 80

85 Note that our Lemur template has been designed for general use, while the TouchOSC template has been designed specifically for guitarists. (An instructional video about using the Lemur template can be found here, and an instructional video about using the TouchOSC template can be found here.) Both templates display the currently selected rackspace and variation prominently; the Lemur template also displays the caption of a text label in the Songnotes field. If you d like to experiment with either template, relaunch Gig Performer (remember, you quit it in step 3 above) and then touch the Tuner On/Off button in the template. Gig Performer should immediately go to Tuner View. (If for some reason the Tuner On/Off button doesn t work, double-check that the directions in steps #1 and #2 above have been followed precisely to ensure correct bidirectional communications between the device running your OSC app and the computer running Gig Performer.) In Lemur, if you have a microphone or instrument connected to one or more inputs of your audio interface, the virtual knob to the left of the Tuner On/Off button will move and the note number to the left of that knob will change to reflect the note coming in on the channel(s) Gig Performer is currently listening to. In TouchOSC, the box at top center will display the note coming in, and the slider below it will show the tuning offset in cents, with the center position indicating that you are exactly in tune. 81
86 Touch the Tuner On/Off button again to return Gig Performer to Performer View. If you are using Lemur, touch the Tap button presented by the template several times. You should see the Tempo display in the upper-right hand corner of Gig Performer s screen change bpm value as you do so; the shorter the intervals between taps, the higher (faster) the bpm value. 5. Give your widgets the appropriate OSC names. One of the requirements of OSC is that each object in both the host computer and remote device must have matching unique case-sensitive names. You can make up any names you like, as long as they are comprised of ASCII characters only, with no spaces. If you re running Lemur or TouchOSC, here are the OSC names used in the templates we ve created: Object Lemur template TouchOSC template Rotary knobs (Reverb and Wah Wah in Touch OSC template) Knob1 through Knob 10 knob1 and knob2 Sliders / drawbars Slider1 through Slider10 (none) Buttons (Reverb, Delay, Wah Wah in Touch OSC template) Button1 through Button 10 button1, button2 and button3 respectively Text label caption Songnotes (none) To use the templates, simply put Gig Performer into Edit mode, select a widget, and in the Widget Properties inspector, check the Enable OSC box, enter one of the OSC names in the Name field (circled in blue), then press Enter (this is important). For example, if you re using the Lemur template, add a knob widget and name it Knob1 ; if you re using the TouchOSC template, name the knob widget knob1. 82
87 Then take Gig Performer out of edit mode and move the knob widget with your mouse. As you do so, the identically named knob in the Lemur or TouchOSC screen changes the same way. Because OSC is bi-directional (meaning that changes can be made in either the device running the OSC app or the host computer running the target software in this case, Gig Performer), the opposite occurs too: You can move the onscreen knob in Lemur or TouchOSC and the knob widget in Gig Performer changes the same way. Do the same with a switch or LED button widget, changing its OSC name to Button1 (for use with the Lemur template) or button1 (for use with the TouchOSC template). Exit Edit mode and test to make sure that touching the corresponding button in your tablet or smartphone turns the associated Gig Performer widget on or off, and vice versa. 6. Make your existing rackspaces OSC-compatible. It s easy to make any rackspace OSC-compatible: All you have to do is assign OSC names to your widgets that match the names being used in the environments you create in your OSC app editor. For example, load any of the rackspaces created in the Controlling Plugins From Your Midi Controller and Configuring Audio Plugins tutorials presented earlier in this User Guide, go into edit mode, and select each widget in turn. The only change you have to make to each is in the Name field in the Properties area of the inspector and checking the Enable OSC box below it; all MIDI device and plugin parameters remain the same. The only difference is that you can now move these widgets remotely from the tablet or smartphone running your OSC app, and vice versa (i.e., any widget adjustments you make from your laptop or from a connected MIDI controller are reflected in the tablet/smartphone screen). Please note that this tutorial only scratches the surface of what can be accomplished when using an OSC app with Gig Performer. Again, the Lemur and TouchOSC templates provided on our website make good jumping-off points towards constructing your own custom OSC environments. Consult the documentation of your OSC app and Appendix A in this User Guide for more information. 83
. 4.")
88 REFERENCE Main Screen The Connections and Performer views share top and bottom tool bars with key global functions. Top Toolbar 1. Performer view Click here to show Performer View. 2. Connections view Click here to show Connections View. 3. Tuner icon Click here to toggle Tuner View (the icon turns red). 4. Rackspace and variations list A list of all rackspaces and variations that have been created. The current rackspace is outlined in green. Click on a rackspace in the list to select it. Double-click on a rackspace in the list to open the Rackspace Properties dialog. Drag rackspaces up and down in the list to reorder them. 5. Add rackspace ( + ) button Click here to add a new rackspace and open the Rackspace Properties dialog. 6. More menu Click on the button with the ellipsis (three dots) and the More menu drops down. 7. Edit Mode button Click this button to enter Edit Mode. 8. Transpose Enter a global transposition value that will be applied to the outputs of all MIDI In blocks by clicking on the field and entering a number of semitones directly, or using the increment (+) and decrement (-) buttons to set the number of semitones. 9. Play/Stop button Click to start playback, click again to stop it. When playing, all plugins that provide playback control (for example, sample, loop, or beat playback plugins) play back. When disengaged ( stop ), they are all put in a stopped state. 84
89 10. Audio metronome on/off Click to turn on the audio metronome, click again to turn it off. See Audio metronome for more information. 11. Tempo display Shows the current tempo being used by all connected plugins (for example, sample/loop/beat-playback plugins, as well as those generating echoes, delays, and reverbs). You can override this by entering a new value, or by using the increment/decrement buttons below the display. 12. Global output volume (Trim) knob Use this to temporarily change the overall volume of your Gig. An increase in volume is highlighted in red and a decrease is highlighted in blue. Double-click on the knob to reset its value to 0 db. The Trim knob can be remotely controlled; map it to a MIDI controller in the Global MIDI Assignments section of the Global MIDI tab of the Options dialog. 13. MIDI Panic button Click this to issue turn all notes off messages on all MIDI channels, along with a Sustain OFF message and a Center PitchBend message, thus stopping stuck notes in their tracks. Double-click this button to reset the audio engine. 14. Time signature display Shows the current time signature being used by all connected plugins (for example, sample/loop/beat-playback plugins, as well as those generating echoes, delays, and reverbs). You can override this by clicking on the dropdown menu, which enables you to enter any time signature, up to 99/ CPU usage indicator Shows the percentage amount of CPU overhead currently being used by Gig Performer for audio processing. (Actually, Gig Performer itself is only responsible for a very small percentage; most of the CPU overhead is taken up by the plugins currently loaded in memory.) It is normal for this value to change in real time as incoming MIDI data is received, and as widgets are moved. 16. MIDI activity indicator Flickering here indicates the presence of MIDI data. The top bar lights green when incoming MIDI messages are received (via a MIDI In block), while the bottom bar flickers when MIDI messages are being transmitted (via a MIDI Out block). If the Sync with external clock option is selected for the current rackspace, a thin yellow bar above the two flickers to indicate the presence of incoming MIDI Clock data and also serves as a visual tempo indicator. Open the MIDI Monitor window if you want to see detailed information about the MIDI messages being received. 85

90 Bottom Toolbar 1. Recorder button Click this to open the Recording Options dialog. 2. Interface input levels A set of meters and sliders that allow you to view and adjust the levels of your audio interface s various inputs. Flickering here indicates the presence of input signal. Double-click a fader to set it to 0 db. 3. Next/Previous channel group buttons Gig Performer displays up to 16 input or output interface channels at a time. If your interface has more, the remaining the inputs and outputs are accessed by clicking the Next or Previous button to scroll the display. 4. Interface output levels A set of meters and sliders that allow you to view and adjust the levels of your audio interface s various outputs. Double-click a fader to set it to 0 db. 86
 known to the operating system. 3.")
91 Connections View 1. Plugin connections area This large area of the screen is used to display your plugins and their interconnections. Drag a plugin to move or reposition it. Doubleclicking a plugin opens its plugin editor. 2. Audio interface input module Gig Performer automatically shows inputs for audio interface device(s) known to the operating system. 3. A MIDI In device Gig Performer inserts a MIDI In (OMNI) plugin by default. Other MIDI devices can be added in the same fashion as any other plugin. MIDI plugins are colored orange. 4. MIDI connections Shown as orange lines between from MIDI Out ports to MIDI In ports. 87

92 5. Audio plugin Virtual instruments are colored green, audio processors are colored blue, Gig Performer included plugins are colored black. 6. Plugin edit button Clicking this button opens the editor for the plugin. A plugin editor also can be opened by double-clicking the plug-in or right-clicking and choosing Edit plugin from the menu that pops up. 7. Audio connections Shown as blue lines from audio outputs to audio inputs. 8. Audio interface output module Gig Performer automatically shows outputs for audio interface device(s) known to the operating system. Hovering the cursor over a plugin brings up a tool tip with basic information: The tooltip can be disabled by unchecking the Show plugin information when mouse is over the plugin block box on the General preferences tab. Right-clicking on any plugin opens a popup menu that allows you to do the following: Bypass - Places the plugin in bypass mode. Click here for more information. Remove Deletes the plugin. This is the only way to remove a plugin. Disconnect - Removes all connections to and from this plugin. Caption Changes the displayed name (useful if you are using the same plugin more than once). Duplicate Creates a duplicate of the plugin. 88

93 Bus Layout Opens the Channel and Bus Layout dialog. OSC/GPScript Allows you to set a name to be used by GP Script and/or OSC, as well as to enable OSC and/or GPScript. Edit plugin Opens the plugin s editor. Replace plugin Choose a plugin from the menu that pops up to replace the current plugin with another. Channel and Bus Layout dialog Each plugin supports some configurations of inputs and outputs, usually stereo, sometimes mono, sometimes even multichannel. In a DAW environment, the DAW deals with configuring these input and output buses. In Gig Performer, you can access a plugin s bus options directly in the Channel and Bus Layout dialog. Many plugins will simply show a stereo output bus, but some plugins, such as the eightchannel Zynaptiq Unfilter shown here, offer many more configurations. 89
")


94 Performer View 1. Layout Designer (Edit Mode) button click this to enter Edit Mode and configure widgets on your panels. 2. Label widget Label widgets have no function; they are for display only. 90


95 3. Control widgets Knobs, switches, faders, and other controls attach to plugin parameters to give you fast and easy control over the parameters you adjust in performance. 4. Rackspace One or more panels containing the widgets in the current rackspace and variation. (You may need to scroll down if there are many panels being used.) Add Panel To add a new panel to the rack: 1. Click the Edit Mode button. 2. Click the New Panel button below the last panel in the rack. You may need to scroll down to see it. 3. Choose a panel height from the popup menu. 91
96 Right-Click Menu Panel Functions Right-clicking on a rack panel pops up a menu with several important functions for managing panels. Remove a Panel To delete a panel from the rack: Sizing 1. Right-click the panel you want to remove and choose Remove this panel from the popup menu. 2. Click OK in the confirmation dialog to delete the panel, or Cancel to exit the operation without deleting the panel. To change the height of a panel, right-click on the panel and choose a desired size to convert to between 1U (rack unit) and 4U from the popup menu. Moving a panel within the rack Right-click on the panel you want to move and choose the Move UP or Move DOWN command from the popup menu. Save as template Panel layouts can be saved as templates. The widgets and their layout are saved, but their mappings to parameters are not and must be established each time a template is loaded. To load a template, click the New panel button and choose the New from template command. 92

97 Rig Manager 1. Add MIDI Input Device button - Click this to add a physical controller to the MIDI Input Devices list. 2. Assigned MIDI Control Green background indicates that the indicated virtual controller is mapped to a plugin parameter. On the far left is the name assigned to the virtual controller, for instance QNeo vert strip1. The arrow indicates that the virtual controller is mapped to the MIDI Input Device, channel and controller message shown. 3. Unassigned MIDI Control This virtual controller ( QNeo vert strip3 ) was created, so the parameter control is in place, but the red background indicates it has yet to be mapped to a physical controller. 4. Rig list Clicking this drops down a menu of currently available rigs. Choose one from the list. 93

98 5. Rename this rig Click this to customize the name of a rig. 6. Add a new MIDI Control Click this to add a named MIDI control to the list. The new control needs to be assigned to a physical controller to be used. 7. Add a new rig Click this button to duplicate the rig or add a new one. 8. Remove this rig Click this button to remove the current rig. A confirmation dialog offers you the chance to cancel, if you change your mind. 9. Export Rig button Click this to save the state of the rig to a new file that can be moved to a new computer and then imported. 10. Import Rig button Click this to load an existing rig file. 11. Unnamed MIDI Input Device Gig Performer recognizes the control device, but no global name has been defined for it yet. 12. Named MIDI Input Device This device has been given a global name by clicking on the Options button and choosing Add global name for this item. 13. Options button Clicking this button pops up the MIDI Input Options menu. 14. Apply button Click this to apply changes you have made. 15. Close button Click this to close the Rig Manager view. 16. Save button Click this to save the state of the rig to the current rig file. Use this when you will be opening the saved file on the same computer it was created on. MIDI Input Options menu The MIDI Input Options menu pops up when the Options button is clicked for a MIDI input device in the list. 94
99 Add global name for this item Choose this command, when it is available, to give a global name (alias) to a MIDI input device. Once a device has been named, this command is grayed out. Rename Choose this to change the global name of the device. Remove this global name This command removes the global name, returning the device to (no name) status. Associate MIDI Device You can keep a global name as it is but change the device it applies to by associating the device in the list with a different physical device. Choose this command and a submenu pops up with all of the available MIDI devices. Choose the one you want from the list. Learn midi Often, the fastest way to associate a device in the list with a physical device is to choose this command and then move a control on the physical device. The global name will be mapped to the physical device detected. Remove midi association Choosing this command retains the global name but disconnects it from the MIDI device to which it was mapped when the command was chosen. Steps to Make a Rig See Using Rig Manager for a full tutorial. Here are the basic steps to using Rig Manager: 1. Create one or more MIDI input devices and give them global names. 2. Create one or more MIDI controls and give them global names. 3. Link the MIDI controls to physical controllers on the MIDI input device. 4. In the Widget Editor, choose a global MIDI control to link to the widget. 5. When all controls have been mapped, save your rig. 6. Duplicate and modify the rig or build a new one for a different use, for instance, performing versus rehearsing. Name the second rig. 7. Switch between rigs as needed to accommodate different MIDI input devices. 95

100 Musical Utilities Tuner 1. Use all channels Click here for a dropdown menu if you want to have the Tuner listen to signal coming from a specific input channel of your connected audio interface. The default is to have it listen to signals coming from all channels. 2. Tuning indicator Shows whether input pitch is sharp or flat, with an exact amount in displayed in cents. 3. Show tuned within Allows you to specify a range within which the main display changes from red (out of tune) to green (in tune). Available values are +/- 1 cent to +/- 5 cents; default is +/- 3 cents. Metronome Gig Performer offers two separate metronomes for different purposes. 96

101 MIDI Metronome Included in the Audio File Player is a MIDI metronome optimized for working with short loops. Tell the MIDI metronome the musical length of a loop and it will generate MIDI notes for a metronome. The MIDI metronome does not do tempo detection and is unrelated to the audio metronome. The MIDI metronome plays when the master audio file starts playing. MIDI channel and note settings for the metronome are accessed in the Audio File Player by clicking the metronome on/off button. Naturally, the MIDI Out from this plugin needs to drive MIDI In on a MIDI sound source plugin. For more detail on the MIDI metronome, see the Audio File Player section. Using the MIDI metronome 1. Load a file into the player in Single mode, or multiple files in Multi mode. In Multi, the longest file will be designated as the Master and used to calculate the metronome. 2. Click the Metronome On/Off button to activate the metronome. 3. Enter the duration of the loop in bars into the Bars field on the lane of the Master track, by typing it in directly or using the +/- arrows beneath the field. 4. Enter the number of beats per bar in the loop into the Beats field on the lane of the Master track, by typing it in directly or using the +/- arrows beneath the field. 97
102 5. Choose or add a plugin as the sound source for the metronome. Choose the sound you want to use for the metronome and set a MIDI channel for it. Don t forget to make audio connection from the sound source to your interface outputs. 6. In the Connections view, connect the MIDI Out port of the Audio File Player to the MIDI In port of the plugin you are using to generate the metronome sound. 7. Define the MIDI note, velocity, and duration (Length) to be used for both the Accent and Beat metronome sounds. 8. Set the MIDI Channel field to the channel number of the metronome sound. 9. Click the Play/Pause button and the metronome will play, along with the audio files. Note: The MIDI metronome assumes the loop contains an exact number of bars, with the beginning of the file being bar 1, beat 1. If this is not the case, the metronome may not sync correctly with the Master track. 98
103 Audio Metronome Setup for the audio metronome is done on the General tab of Gig Performer's preferences. or Choose the Options>Preferences command to open the Options dialog, or on Mac OS X, press Cmd-, (comma). 1. Metronome on/off button - Click this to activate the metronome. 2. Metronome playback volume To set the volume of the metronome, drag the slider or click in the field and enter the value directly. 3. Metronome output routing Check boxes for all outputs to which you want the metronome routed. 99
104 4. Metronome sound select area Click on the button to select a sound file (aif, wav, or mp3). The audio metronome is simple to use: 1. Set the outputs to which you want the metronome routed in the General prefs tab. 2. Set the desired global tempo 3. Set the desired time signature 4. Activate the metronome. The metronome on/off buttons in the top toolbar and on the General prefs tab are identical; changing one changes the other, as well. The first beat of each bar is accented, regardless of the specified global time signature Tempo and Time Signature Tempo and time signature for the metronome can be set globally in the upper toolbar. 1. Global transpose This value is the number of semitones added to or subtracted from the output of each MIDI In block. 2. Metronome on/off This button activates and deactivates the audio metronome 3. Global tempo This is the tempo of Gig Performer s audio metronome. Click in the field and enter a tempo or use the +/- keys above it. 4. Global time signature Click on the numerator and enter the number of beats per measure, click on the denominator and choose the number of beats per measure from the dropdown menu. 100
105 Audio Input Recorder The Audio Input Recorder is a simple means of capturing audio arriving at your audio interface s inputs, before it has passed through any of the plugins. By capturing the audio and saving your gig, you can replicate the performance and modify it in post-production. Files are recorded in WAV format. Each time you start the recorder, a folder is created within the target folder and named with the date of the recording. All files from that recording are placed within that folder. This makes it very easy to keep straight recordings made at different performances. A delayed start feature lets you set a time for recording to automatically begin, so that the recorder can be configured and tested at soundcheck, then set to start recording at the proper time. 1. Target folder display All files are recorded into this folder. 2. Available space display Shows the amount of recording space available on the disk on which the target folder is located. 3. Clear All button Clicking this button deselects all inputs, so that no channels will be recorded. When you only need to record a few channels, it can be quickest to deselect all and then select only the ones you need. Similarly, when setting up recording for a new situation, it may be most efficient to deselect all inputs and enable those you need. 4. Select All button Clicking this button enables all channels for recording. When you want to record most or all channels, it can be quickest to select all channels and then deselect the ones you do not need. 5. Set target folder button Clicking this brings up a file navigator that enables you to choose a target folder. 6. Bit depth field Click this to select 8, 16, 24, or 32-bit (floating point) depth for recording. 7. Recording space required display Shows the amount of disk space required to record the selected channels per minute or per hour. This display adjusts as you select or deselect channels. 101

106 8. Record Start mode field Click on this and choose Start immediately to begin recording as soon as the red Start button is clicked, or choose Delayed start and enter a start time in the minutes and seconds fields, as seen below. 102

107 9. Channel record enable checkboxes Click a checkbox to enable a channel for recording. A channel is record-enabled when the box is blue and checked; recording is disabled for the channel when the button is gray and unchecked. 10. Record Start button Clicking this button immediately begins recording of record-enabled channels. The button changes state when recording: 1. Stop button Click this to stop recording. 2. Recording beacon Flashes red while Gig Performer is recording audio. 3. Number of channels being recorded 4. Bit depth (resolution) of recording 5. Elapsed recording time 103
, manufacturer name, and version name. Click on Name, Format, Category, or Manufacturer in the top line to sort the list by that category.")
108 Plugin Manager The Plugin Manager lets you view all of the plugins installed in your system, categorized by name, format (AudioUnit or VST), category (Effect, tone Generator, Synth, Panner, etc.), manufacturer name, and version name. Click on Name, Format, Category, or Manufacturer in the top line to sort the list by that category. Click that category a second time to reverse the order of the list. Right-clicking on any plugin name opens a pop-up menu that allows you to Enable or Disable any plugin, or to specify its Loading type ( Normal or Delayed ). If you encounter third-party plugins that regularly fail to reinitialize successfully (i.e., they don t launch or display with the last saved value when recalling a.gig file), try designating them here as Delayed. (They will be overlaid with a light green see-through bar.) Gig Performer will then slightly delay their loading time the next time it is launched, which may help solve the problem. 104

109 Clicking on the Scan for new or updated plugins button (to the right of the Manage button) causes Gig Performer to immediately scan your system for any newly installed or updated plugins; any found will be added to the Plugin Manager list. Important note: Plugins labeled as Disabled in the Plugin Manager are overlaid with a red see-through bar and will not appear in the list of available plugins when you right-click in the Plugin Connections area. This enables you to reduce clutter if you are sure you won t need to access particular plugins when creating a rackspace. Clicking on the Manage button (in the bottom right-hand corner) opens the following popup menu: Clear list - Clears the listing of all plugins. Note: While this does not actually erase any plugins from your computer, it does remove them from Gig Performer s memory, so a new scan is required after this operation. Click on the Scan for new or updated plugins button next to the Manage button to begin the scan. Remove selected plugin from list - Select a plugin first to make this operational. Show folder containing selected plugin- Select a plugin first to make this operational. Remove any plugins whose files no longer exist - Use this to clean up your plugins list. Set VST folders for scanning... Opens the window shown below, which allows you to change, add, or delete the VST plugin folders to be scanned. (See Troubleshooting for more information.) 105

110 Set VST3 folders for scanning... Opens a window that allows you to change, add, or delete the folders to be scanned for VST3 plugins. (See Troubleshooting for more information.) 106
 buttons in the upper right-hand corner, as shown circled here: Clicking on the Bypass button causes the plugin to be muted (not bypassed). Click here for more information.")
111 Supplied Plugins Note: Like all third-party plugins, the plugins supplied with Gig Performer include Bypass and... ( three dots or More ) buttons in the upper right-hand corner, as shown circled here: Clicking on the Bypass button causes the plugin to be muted (not bypassed). Click here for more information. Clicking on the... button causes the Plugin Presets pop-up menu to appear: This allows you to load factory-created presets, or to load or save presets you create yourself. Audio In The Audio In plugin represents the current connected physical interface used to receive audio. The actual number of sliders displayed is a function of the capabilities of the 107
 provided by the connected Digi 002 interface.")
112 interface connected to your system. For example, in the graphic above, 18 sliders are shown since those are the number of inputs (16 individual, plus stereo) provided by the connected Digi 002 interface. Audio Out The Audio Out plugin represents the current connected physical interface used to send audio. The actual number of sliders displayed is a function of the capabilities of the interface connected to your system. For example, in the graphic above, 18 sliders are shown since those are the number of outputs (16 individual, plus stereo) provided by the connected Digi 002 interface. Important note: Audio In and Audio Out plugins cannot be removed from your rackspace. However, you can specify different audio interfaces for Audio In and Audio Out. 108
. Click here for more information.")
113 Gain Control This plugin provides a single audio input pin and a single audio output pin. It allows the gain of a mono audio signal to be adjusted. Clicking on the Mute button or setting the Volume slider to 0 causes the plugin to be muted (not bypassed). Click here for more information. Gain Control widget control The following parameters for the Gain Control plugin can be widget-controlled: Gain Balance Magnitude The magnitude parameter is used for level metering. Click here for more information. 109
114 Gain and Balance This plugin provides stereo audio input pins and stereo audio output pins. It allows the gain and Left/Right balance of a stereo audio signal to be adjusted. Clicking on the Mute button or setting the Volume slider to 0 causes the plugin to be muted (not bypassed). Click here for more information. Gain and Balance widget control The following parameters for the Gain and Balance plugin can be widget-controlled: Gain Balance Channel 1 Magnitude Channel 2 Magnitude Magnitude parameters are used for level metering. Click here for more information. 110


115 Gain and Balance (m->s) This plugin provides a single audio input pin and stereo audio output pins. It converts a mono audio signal to stereo and allows its gain to be adjusted. Clicking on the Mute button or setting the Volume slider to 0 causes the plugin to be muted (not bypassed). Click here for more information. A balance control enables the incoming mono source to be panned across Left/Right channels. Gain and Balance (m->s) widget control The following parameters for the Gain and Balance (m->s) plugin can be widget-controlled: Gain Balance Channel 1 Magnitude Channel 2 Magnitude Magnitude parameters are used for level metering. Click here for more information. 111
116 If you connect the audio outputs of multiple plugins to the input of another plugin, the signals will be mixed automatically. To create custom blends, insert one of the Audio Mixer/Router plugins and balance as desired. Audio Mixer/Router plugins can also be used to create reverb sends, where signal is routed to a reverb (or other type of signal processing plugin) from multiple sources. Simply insert an Audio Mixer/Router plugin and route the output of each source to its inputs and a pair of outputs to the reverb plugin. Audio Mixer/Router The Audio Mixer/Router is a simple but powerful function available as either an eightchannel or 16-channel plugin. Inputs and outputs are in stereo pairs, so the eight-channel plugin has four channel strips and the 16-channel version has eight strips. Each channel strip can be switched between mono (left channel only) or stereo input, and assigned to any of the four output channel pairs. All channel strip functions can be attached to widgets. Because the Audio Mixer/Router combines several basic functions, with widget control of any of them, it can be configured to meet pretty sophisticated needs. For applications ideas and information, see Audio Mixer applications. 112

117 1. Channel level meter Displays the post-fader output level from the channel. 2. Channel level fader Adjusts level from the channel to the selected output pair. Option/Alt-click the fader to return it to the 0 db position. Control-drag to adjust level in 0.1 db steps. 3. Channel label To edit a channel name, double-click the tape strip. 4. Mono/Stereo channel switch Click this icon to toggle the channel strip between mono (left channel) and stereo input. 5. Presets menu Mixer/router setups can be stored as presets. Click this button for a popup menu with commands for storing and loading mixer/router presets. 6. Mixer bypass Bypasses the mixer. Inputs 1 and 2 are routed to outputs 1 and 2; other inputs are not routed to outputs. 7. Output channel select Click this field to choose an output pair for a strip from the dropdown menu. 113
118 8. Channel Balance/Pan knob For stereo channels, this is a left/right balance control, while on mono channels it is a pan control. Option-click (Mac) or Controlclick (Win) on this control to return it to center. 9. Channel Mute button Mutes the channel. 10. Channel Solo button Solos the channel, effectively muting all others. Presets menu Load preset Loads a previously stored mixer preset. Save preset Saves the current state of the mixer as a preset file with a.gpp_internal extension. Built-in Presets Whatever preset information the individual plugin makes accessible to Gig Performer is displayed here. Often, there will be only one preset showing, which represents the preset currently running in the plugin. Cancel This simply exits the menu, just as clicking outside of the menu does. Widget Control The following settings for each channel can be attached to widgets: Volume Balance/Pan 114
119 Solo Mute Output Left meter Right meter The plugin Bypass button can also be attached to a widget. 115

, either one at a time or simultaneously.")
120 Audio File Player The Audio File Player plugin provides a MIDI input pin, eight audio output pins, and a MIDI output pin. It allows you to load and play up to eight audio files (in AIF, WAV or MP3 formats), either one at a time or simultaneously. You can use this plugin as a backing track 116
121 player or for looping short samples, switching seamlessly from one to another while running. Up to eight audio output channels are available, singly or in pairs. The Audio File Player plugin provides eight lanes for playback. You can think of these as roughly equivalent to tracks on a DAW. Its editor provides controls that enable the following advanced operations: 1. Single/Multi Switch between playing back one audio file at a time versus multiple files simultaneously. 2. Loop Turns looping on or off for all lanes. 3. Go To Beginning Instantly go to the beginning of all files. 4. Time/Tracks display Displays the current time, in hours/minutes/ seconds/hundredths of a second, as well as the number of tracks (channels) loaded with audio files. 5. Play/Pause Start or pause file playback. (Note: The pause function does not return the file to the beginning; it simply pauses it wherever it is. Clicking on the button a second time resumes playback from the point at which it was stopped.) 6. Sync When turned on (lit green), Gig Performer will play and pause the Audio File Player automatically when its global Play/Stop button is engaged. This allows you to begin playback of audio files at the same time you start a drum machine emulation plugin, for example. 7. Load Full Directory Loads a full directory of audio files at once, up to the number of available (empty) lanes. If, for example, you have six empty lanes and you try loading eight files using this button, only the first six files will get loaded, into lanes 3 8. With this feature, you can create a directory with all of the files you will need, then load the entire player with them at the gig by invoking only a single command. 8. Metronome Clicking on this icon provides a number of additional controls that allow you to create a MIDI click track in sync with the tempo of your Master track. See the MIDI metronome information for more details. In addition, the Audio File Player editor offers the following lane-specific controls: 9. Play Enable Enables or mutes playback of the file loaded into the lane. 117
122 10. Load New Audio File (file cabinet icon) Click this to load an audio file into the lane. 11. Remove Audio File (trashcan icon) Click this to delete the audio file from the lane. 12. File name Displays the name of the file currently loaded in the lane. 13. Master indicator When lit, indicates that the file in the lane is being used as the Master, determining the playback length of all other files. Note that this is not a parameter that can be changed; instead, Gig Performer automatically designates the lane loaded with the longest audio file as the Master. If you load other lanes with new files, the Master designation may change accordingly (if the new files are longer than the one in the currently designated Master lane). 14. Output assignment Allows you to set the output for that lane s playback. A stereo file should ideally be set to a pair of outputs (i.e., Output 1&2, Output 3&4, etc.) but if it is sent to a mono output, the two channels will automatically be mixed to mono. Conversely, sending a mono file to a pair of outputs will result in the same signal being routed to both outputs. 15. Level indicators Shows the current playback level for that lane. 16. Volume control Allows you to adjust the volume of the lane. 17. Oneshot on/off Allows you to turn looping off for that lane, even if the master Loop button is on (lit). Clicking on the Oneshot button (causing it to light) during playback will cause the file in that lane to play to the end and then stop. If you then turn Oneshot for that lane off again, the file will resume playback when the file loaded into the Master lane ends. 18. File duration Displays the duration in seconds and samples of the file currently loaded in the lane. Basic Audio File Player Operation To load audio files file, do any of these: Click the Load New Audio File button in a lane and navigate to the desired file. Drag and drop the file from the OS X Finder or Windows Explorer onto the lane into which you want it loaded. 118
123 Click the Load full directory button and navigate to a source folder of audio files to be loaded in the Audio File Player. The Audio File Player allows files of different sample rates to be loaded into separate lanes and played simultaneously. To play audio files: To play a single audio file, be sure the Single/Multi button is set to single and that the lane is play-enable2d, then click the Play/Pause button to start playback. To play multiple files simultaneously 1. Load all of the files you want to play. 2. Set the Single/Multi button to Multi. This allows you to enable or mute multiple lanes. 3. Set muting for tracks you don t want to hear. 4. Click the Play/Pause button to start playback. Things to note about the Audio File Player The Audio File Player designates the longest file loaded as the Master, whether or not it is play-enabled. The duration of the Master track becomes the loop length when loop playback is enabled. The MIDI metronome is generated based on the length of the Master track, and information you supply about the number of bars in the loop and the number of beats in each bar. Lanes can be muted and enabled in real-time while the player is in playback. As this is muting, not stopping playback, all files always stay in sync with the master track s location, so if a lane is muted during playback and then enabled 10 seconds later, it resumes playing 10 seconds later than the point at which it was muted. When a file is muted, you will still be able to see ghost meter activity for it. Beneath the file duration on the right of each lane is a bar that turns blue as the file plays. The length of the bar represents the full duration of the file in that lane and the progress through it of the play cursor. So, while working in Multi mode, in 10 seconds, the blue bar in a lane with a 20 second-long file is filled to one half, where 119

124 as the blue bar for a two-minute loop running at the same time in another lane is only filled 1/12 th of the way across, just a small chunk. To move the playhead to locations in the Master file other than the start, create a knob or slider widget and map it to the Playhead position parameter of the Audio File Player. MIDI Metronome The metronome section of the Audio File Player dialog (shown below) offers a number of additional controls that allow you to create a MIDI click track in sync with the tempo of your Master track. The idea is that you define the length in bars of a loop and the number of beats in a bar, and the MIDI metronome generates MIDI notes for Accent and Beat as defined in the dialog. The MIDI metronome does not do tempo detection, and is unrelated to the audio metronome. 1. MIDI Channel Allows you to enter the MIDI channel you want to use for the click. 2. Detailed time display Automatically derives the tempo from the Master track and displays it in BPM, along with bars/beats/divisions/ticks (the latter is 24 per quarter note, same as MIDI clock). 3. Accent MIDI Note/Velocity/Length Allows you to set the MIDI note you want to use for the clock, along with its velocity and length. 4. Loop length For a metronome to be generated you must specify the length in bars of the loop on the Master track. This field is not part of a time signature or bars/beats location. 120
125 5. Beats per bar For a metronome to be generated you must specify the number of beats in each bar of the loop on the Master track. This field is not part of a time signature or bars/beats location. 6. Beat MIDI Note/Velocity/Length Allows you to set the MIDI note you want to use for the accent (played on the first beat of each bar), along with its velocity and length. Note: MIDI click tracks work well when loops are perfect, as will be the case with most commercially purchased loops. However, if the loop in your Master track is not perfect, or if the Master track contains an audio file with numerous tempo changes or an inexact rhythm (such as might occur with a live drummer who sometimes slips ahead of or behind the beat), you re probably better off creating an audio click track in your DAW and loading it into one of the lanes so it can play back alongside of the Master track in perfect synchronization. Audio File Player widget control The following parameters for the Audio File Player plugin can be widget-controlled: Play/Pause allows you to start or pause playback from a widget. Play from beginning causes playback to start from the beginning in response to a widget movement. Play from marker causes playback to start from the marker position (see below) in response to a widget movement. LOOP On/Off allows you to turn looping on or off from a widget. Playhead position allows you to change the playback start point from a widget. Using a continuous widget (such as a knob or a slider) for this purpose enables you to seek particular points or even to scrub one or more tracks while they are playing. Marker position allows you to change the marker position from a widget. Set Marker now allows you to set the marker position on the fly from a widget. Click Generation On/Off allows you to use a widget to turn the MIDI click track on or off. Play mode (single/multi) allows you to use a widget to switch between Single and Multi playback. 121

126 Lane 1 8 Playing allows you to use a widget to start playback from the specified lane. Lane 1 8 Oneshot On/Off allows you to use a widget to turn Oneshot mode on or off for the specified lane. Lane 1 8 Volume allows you to use a widget to adjust the volume of the specified lane. Lane 1 8 Output Assignment allows you to use a widget to change the output assignment for the specified lane. We recommend the use of on-off widgets, such as one of the LED buttons, for real-time control over most Audio File Player parameters. However, Playhead position, Marker position, Lane 1 8 Volume, and Lane 1 8 Output Assignment are better controlled from continuous widgets such as knobs and sliders. MIDI In (OMNI) and MIDI In (OSC) These plugins provide a single MIDI output pin and are used to receive incoming MIDI messages and pass them on to other plugins. They are identical, except in one respect: the MIDI In (OMNI) block receives messages from external devices such as connected MIDI controllers, while the MIDI In (OSC) block receives MIDI messages from OSC sources. (For more information on OSC, click here.) MIDI In (OMNI) is a generic plugin which listens to all incoming MIDI messages coming from all connected controllers, on all channels and on all ports. It is the default MIDI input block in any new rackspace, although it can be deleted if not needed (for example, if you are using plugins to process incoming audio signal only). If one or more MIDI controllers are connected to your system, Gig Performer automatically generates additional controllerspecific MIDI In blocks when you right-click in the Plugin connections area and select MIDI Inputs, as shown below: 122


127 These can (and, in most cases, should) be substituted for the generic MIDI In (OMNI) plugin. Because they listen to specific MIDI controllers and/or ports, their usage is generally preferable, especially if your rig contains multiple keyboards or controllers. Like other plugins, a MIDI In block has numerous parameters that can be controlled by widgets. These parameters include any MIDI note or continuous controller message. This makes it possible to remap MIDI messages coming from a physical controller without using the MIDI Filter plugin, like this: 1. In rack edit mode, create a new widget. 2. In the widget properties area, choose a MIDI In block for the plugin in the Mapping section. 3. Choose a note or continuous controller from the Parameter list in the Mapping section. 4. Click the Learn button in the MIDI section and move the physical controller. Incoming messages from the physical controller will now get remapped to the note or continuous controller you chose. Of course, this incoming CC could as easily be remapped to pitchbend, aftertouch, or mod wheel messages. 123
128 124
129 The MIDI In plugin editors provide controls that enable the following advanced operations: Key transposition Transpose incoming note messages over a range of +/- 48 semitones. Channel blocking and mapping Specified MIDI channels can be blocked (uncheck the box) or rerouted to a different channel (click on the destination channel and enter a different number). Keyboard splits Create keyboard splits by specifying MIN and MAX note range values. Notes below the MIN value and/or above the MAX value are blocked; only notes between those values are allowed through. The MIN and MAX values can be entered in one of these ways: Click on the MIN note or MAX note field and choose the desired note from the dropdown menu, OR Click the Learn button above the MIN note or MAX note field and play the desired note on your controller. Click the Learn button again to complete the setting. Click the Learn button above the MIN note field and shift-click the desired low note on the plugin s keyboard, or click the Learn button above the MAX note field and option/alt-click the desired high note on the plugin s keyboard. Remember to click the Learn button again after the note is learned to exit Learn mode. It is easy to see the valid split range because the keyboard in the MIDI In block plugin shows the physical key being pressed when you play your controller, rather than the output value, which might be transposed. Velocity layering Velocities below the MIN value and/or above the MAX value are blocked; only velocities between those values are allowed through. If the same value is entered for MIN and MAX, all incoming notes will have their velocity changed to that value. This allows you to create velocity layers by specifying whether notes are heard depending on how hard (or soft) you press a key. 125
130 Velocity scaling By selecting Scale in the dropdown box and entering From and To values, the velocity of all incoming note messages are adjusted so as to reduce their dynamic range (i.e., softer notes will be heard louder, or louder notes will be heard more softly). Using velocity layering with velocity scaling The MIDI In plugin editor s velocity range control is particularly useful if you want to have multiple sounds available but hear only some when you play softly and others when you play harder. If connected to a piano plugin, for example, you can opt to only hear the piano sound when you play the keyboard forcefully. In addition, after you have defined a velocity range, you may want to change the actual velocities that are sent to your sound-generating plugin. For example, you may have created a piano sound that you only want to be heard if the velocity value is greater than 80. However, you may still want the piano to respond as if it was being played quietly. In such a case, set the Min/Max velocity values to 80 and 127 respectively so that you only hear the piano when you hit the keys hard. Then choose Scale and set the From/To values to 1 and 50 respectively. As a result, notes received with a velocity of 80 will produce notes with velocity of 1, while notes received with a velocity of 127 will produce notes with a velocity of 50. Notes in-between those values will be mapped somewhere in between. Velocity constraining By selecting Constrain in the dropdown box, any incoming note messages with a velocity below the From value are given that value exactly; at the same time, any incoming note messages with a velocity above the To value are given that value exactly. For example, if you enter a From value of 60, and a To value of 80, all incoming note messages with velocities of 60 or less are given a velocity of 60 exactly, while all incoming messages with velocities of 80 or more are given a velocity of 80 exactly; only velocity values from are preserved. Constraining allows you to create hard velocity splits. 126
131 Event Blocking: Note and CC blocking Sometimes it is desirable to block certain note or continuous controller messages coming from a controller. Although the MIDI Filter plugin is capable of this kind of filtering and much more, MIDI In blocks include an event blocking section that conveniently provides basic blocking capabilities to reduce the number of situations requiring the MIDI Filter plugin. The Other CC events box, when checked, blocks all continuous controller messages except for the three that have their own boxes: ModWheel (CC1), Volume (CC7), and Sustain (CC64). Monophonic options The Monophonic options area at the bottom of the editor filters the note messages from the controller down to a monophonic stream of notes. The Lowest only box, when checked, produces a mono part extracted from the lowest note as played on the instrumemt. The Highest only box, unsurprisingly, produces a mono part extracted from the highest note as played on the instrumemt. These options can be useful for doubling melodies, or extracting a bass part from what might have been written as a piano part. Most often, users choose to check one or the other of these boxees, but you could check both, in which case you would be extracting lines from both the top and bottom of what is being played. Playing plugins without an external MIDI controller A virtual keyboard is provided to allow sound-generating plugins to be played even when an external MIDI controller is not connected. MIDI In widget control The following parameters for MIDI In plugins can be widget-controlled: Bypass plugin Channel 1 16 Output MinNote (minimum note) 127
132 MaxNote (maximum note) Transpose StopAllNotes StickyNoteChannel StickyNoteVelocity Note On C-2 through G8 (MIDI note numbers 0 127) MinNoteVelocity (minimum note velocity) MaxNoteVelocity (maximum note velocity) MinScaledNoteVelocity (minimum note velocity) MaxScaledNoteVelocity (maximum note velocity) OutputVelocityMode PC (Program Change) Continuous controller (CC) Pitchbend Aftertouch MonoLowestOnly MonoHighestOnly BlockNoteOn BlockNoteOff BlockPitchbend BlockAftertouch BlockPolytouch BlockControllers BlockModWheel BlockVolume BlockSustain Channel 1 16 Output allows you to change MIDI channel blocking or remapping in real time. MinNote / MaxNote allow you to alter the MinNote or MaxNote settings in real time. Transpose allows you to alter the key transposition in real time. Caution: Do not change this setting while holding notes, or stuck notes may result. If you do get a stuck note, don t panic just click on the Panic icon to turn all notes off. StopAllNotes issues a turn all notes off message, along with a sustain OFF message and a Center PitchBend message, same as the Panic icon. One usage is to turn off MIDI notes when switching variations. Although you normally wouldn t do this (because the whole 128
133 point of variations is to allow you to continue holding notes down while changing plugin parameter values), it is useful if you want to use variations to actually change the underlying sound you re creating, in which case any notes from the previous sound need to stop immediately once you change variations. Just associate this parameter with a widget (typically, a button), and it will trigger automatically when you change variations. Sticky notes allow you to trigger loops or sample playback from a widget. It works by sending Note On events only, as if you played a note but didn t release it. To use sticky notes, create an on-off widget (a switch or button) and assign it to the MIDI In plugin and a Note On parameter. Then add a second continuous (knob or slider) widget and assign it to the MIDI In plugin as well, but to the StickyNoteVelocity parameter. When you activate the switch or button widget, a note will play continuously in the connected sound-generating plugin, with the knob widget determining the velocity of the MIDI note message. (You can also add a widget assigned to StickyNoteChannel to select the MIDI channel.) When the button widget is turned off, an appropriate note off event will be sent to the plugin to stop the sound. MinNoteVelocity / MaxNoteVelocity and MinScaledNoteVelocity / MaxScaled NoteVelocity allow you to alter these settings, respectively, in real time. OutputVelocityMode allows you to change between Scaled and Constrained velocity. PC (Program Change) allows widget movements to send MIDI program change messages to plugins to call up different presets. Note that doing so prevents Patch Persist from working and can result in stuck notes depending on the plugin implementation. For those reasons, this feature is not recommended for normal use. Continuous controller (CC) Incoming MIDI messages to the widget are remapped to the specified CC number. Pitchbend Incoming MIDI messages to the widget are remapped to pitchbend messages Aftertouch Incoming MIDI messages to the widget are remapped to mono aftertouch messages. The following parameters switch the indicated checkboxes: Monophonic options MonoLowestOnly MonoHighestOnly 129
134 Event blocking BlockNoteOn BlockNoteOff BlockPitchbend BlockAftertouch BlockPolytouch BlockControllers BlockModWheel BlockVolume BlockSustain Note: If you have an audio interface or MIDI controller connected to your system that provides a MIDI output, Gig Performer will expose that output with a corresponding MIDI Out block. Click here for more information. 130

135 MIDI Filter This plugin provides a single MIDI input pin and a single MIDI output pin. It allows specified MIDI messages to be blocked and/or remapped. (MIDI note messages can be blocked, but not remapped.) Clicking on any line in the MIDI Filter plugin editor causes a popup menu to appear in which you can make one of three choices: Allowed Blocked Messages of this type are passed through. Messages of this type are blocked. -> Messages of this type are remapped (converted into messages of another type). 131
136 Typically inserted between a MIDI In plugin and a sound-generating plugin, common usages include blocking sustain pedal messages, converting modulation wheel messages into volume messages, and mapping aftertouch messages to mod wheel messages. There is also an option to block all MIDI messages. If you enable this option, everything, including Notes, will be blocked. This can be very useful if you use multiple variations and want to allow MIDI messages to go to some plugins but not others, depending on which variation is selected. You should, however, exercise caution when doing this in real time as you could get left with a hanging note if you block notes before the Note Off message is sent out. If this occurs, don t panic just click on the Panic icon to turn all notes off. MIDI Filter widget control Every MIDI Filter plugin parameter can be widget-controlled. When using on-off widgets (switches or LED buttons), the selected parameter will be allowed when in the ON position, and blocked when in the OFF position. The use of continuous widgets (knobs and sliders) allows you to scroll through all remapping options in the in-between settings. (The minimum setting will allow the selected message, while the maximum setting will block the message.) 132

137 MIDI Monitor This plugin provides a single MIDI input pin and a single MIDI output pin. It displays MIDI messages from the plugin block to which it is connected and is used primarily for diagnostic purposes. MIDI Monitor widget control The MIDI Monitor plugin provides no parameters that can be widget-controlled. 133


138 MIDI Out This plugin is created only for connected MIDI controllers that offer one or more MIDI outputs. It provides a single MIDI input pin and is used to send outgoing MIDI messages to external devices such as synthesizers or samplers. The MIDI Out editor provides controls that enable the following advanced operations: MIDI Channel sets the channel of the MIDI output. Map all incoming MIDI to this channel turns off channel mapping so that MIDI data coming from a sequencer retains its channel information. Note that program change transmission (described below) is still associated with the specified MIDI channel even if this box is checked. Program Change and Bank Select allows Gig Performer to automatically transmit a program change and/or Bank Select message every time a rackspace containing the MIDI Out block is activated so that each of your external MIDI devices (keyboard and rackmount synths, drum machines, etc.) load with the correct sounds and are instantly ready for use. Transpose all notes by allows you to alter the key transposition of the MIDI output. Note filtering allows you to set up keyboard splits for each MIDI Out block. Notes below the MIN value and/or above the MAX value are blocked; only notes between those values are allowed through. MIDI Out widget control 134
139 The following parameters for the MIDI Out plugin can be widget-controlled: ChannelNumber MinNote (minimum note) MaxNote (maximum note) Transpose CC #0 127 MapChannel PC (Program Change) ChannelNumber allows you to alter the MIDI output channel number in real time. MinNote / MaxNote allow you to alter the MinNote or MaxNote settings in real time. Transpose allows you to alter the key transposition in real time. Caution: Do not change this setting while holding notes, or stuck notes may result. If you do get a stuck note, don t panic just click on the Panic icon to turn all notes off. CC allows you to transmit the specified CC (control change) messages as the widget is moved. MapChannel causes all MIDI events being transmitted to be mapped to a specific MIDI channel. PC (Program Change) allows widget movements to send MIDI program change messages to external MIDI tone generators in order to call up different presets. 135

140 Widget and Rack editing (Edit Mode) Edit Mode screen When you click the Edit Mode button, you enter into rack edit if a panel is selected, or widget edit if a widget is selected. Shown here first is rack edit mode. 1. Widget types list To add a widget to a panel, simply drag it from this list to the panel 2. Edit Mode button Click this to enter Edit Mode or to exit to Performer mode and use Gig Performer 3. Panel area Panels host all of the widgets. Panels can be set to any of four heights by right-clicking in the panel area. Choose the height you need to accommodate widgets. 136

141 4. New Panel button Click here to create a new, blank panel in the rack. 5. Panel backgrounds To change a panel s background, click the panel to select it and then click one of the textures displayed in this area. Widget types list This list shows all of the available types of widgets. A dropdown menu at the top allows you to filter the list to just one type of widget at a time. Widget types include: Labels and indicators Inactive widgets that simply allow labeling Knobs of different colors and designs (including our Spinal Tap The 11 it goes to 11!) These are all active widgets that provide continuous control. Expression pedal Another continuous control, visually emulating the movement of an expression pedal. Sliders and organ drawbars of different colors and designs Active widgets that provide continuous control. Meters (one vertical and one horizontal) Used to provide continuous level metering. Buttons and switches of different colors and designs. All of these active widgets provide simple on-off control. 137


142 Here is what all of the widgets look like: Widget Properties inspector (Edit mode) Adding or double-clicking on a widget in Edit mode opens the Widget Properties inspector: Properties section Customize caption Check to have the widget display a custom caption, then type in a new name. If unchecked, the default caption will be defined by the selected parameter. Normally the caption will be assigned the parameter name only. However, if you hold the 138
143 Shift key down while selecting a parameter, the caption will include the plugin name as well as the parameter name. If you also hold the Option/ALT key down, the caption will include the plugin name only. Text label widgets are capable of displaying the current Now value. To do so, simply assign it to a plugin and parameter, then check Customize caption and enter the term [value] (make sure the word value is inside square brackets) along with, optionally, a text label name. Whenever that same parameter is altered by another widget, the Text label widget will display the current value. For example, if you have a slider widget controlling the Gain of a plugin, as you move the slider, the value inside the Text label will change. You can also use a Text label widget to act as a very cool visual cue (to remind you of pretty much anything) when switching between variations. To do so, check Customize caption and enter any name, but don t assign the Text label widget to any plugin (select (no plugin in the Mapping section of the inspector), then enter a Now value. The lower the value, the dimmer the label will be; the higher the value, the brighter it will be! Learn Click on this button to have Gig Performer learn the physical controller you want to associate with the widget. When actively in Learn Mode, the button is lit red; to exit Learn mode, click on it again and it will return to its normal gray color. Clear Click on this to clear the current controller assignment. Jump/Catch This dropdown box allows you to choose between Jump and Catch modes. When a widget is in Jump mode, moving the associated physical controller will cause the widget to immediately jump to the position of the controller. When a widget is in Catch mode, the widget will not respond to the associated physical controller until the controller s value matches the current value of the widget, at which point the widget will respond. Treat momentary as latching (Displayed only when editing an on-off widget i.e., a switch or a button). When checked, the widget remains in its ON position until you click on it (or touch the associated physical controller), and vice versa. This is useful when you want to have a widget carry out an operation until stopped; i.e., staying at a fast Leslie speed until you are ready to return to a slow Leslie speed.) Parameter range and control Each widget has a range of 0 to 100. Note that this is a percentage, not an absolute value. For example, if the plugin parameter it is controlling has an absolute range from 0.0 to 1.0, then when the widget is at its 100 setting it is actually changing that parameter to 1.0 (i.e., 100% of 1.0). 139
144 By entering Min and Max values other than 0 and 100, you can scale the range of the widget movement. For example, if you set Min to 10 and Max to 20, then the associated plugin parameter will change from 0.1 to 0.2. Finer resolution can be accomplished by entering decimal point values, in tenths of a decimal. Scaling can be inverted by setting the MIN value to a higher number than the MAX value. You can also directly enter MIDI data values in the Min and Max fields, by adding the letter m at the end of the value. For example, if you type in 64m, Gig Performer will interpret it as an exact value of 50.4 (roughly 50% of the maximum MIDI value of 127). The Now field simply indicates the current setting of the widget. Recall value on load Gig Performer normally restores all widgets to the position they were last in when a.gig file is saved. Checking this button allows you to take a snapshot of the current position of the selected widget so that it is that position that gets recalled and loaded instead. This can be useful if you are playing, for example, a song where the volume of your piano always starts softly but gets quite loud by the end. When you come back to that song again, you don t want the piano to still be loud you want it to always start soft. The concept is that, even if you play around with widgets during the course of your live performance, when you next reload a.gig file, your originally stored values will return. Snap (Displayed only when Recall value on load is checked.) Click on this button to take a snapshot of the current widget position Also recall on activate Gig Performer normally restores all widgets to the position they were last in when a rackspace is activated. Checking this button allows you to take a snapshot of the current position of the selected widget so that it is that position that gets loaded instead when the rackspace is again activated. The concept is that, even if you play around with widgets during the course of your live performance, when you next return to a rackspace, your originally stored values will return. Display range When checked, the widget shows the Min and Max values as a white shadow around the outside of the knob or slider. Invert value - When checked, the widget does the opposite of the expected operation; i.e., a switch or button will cause a parameter to go to minimum when in the ON (lit) position, and vice versa. Widget groups Each widget can only be associated with a single plugin parameter. However, the 26 Widget Groups provided by Gig Performer enable you to control multiple parameters from any or all of the widgets assigned to that group. Clicking below the words Widget Group opens a dropdown menu with the letters A - Z. All widgets with the same 140
145 letter are grouped together so that moving one widget will cause all the other widgets in that group to move as well, adjusting various plugin parameters simultaneously. Note that you can use each widget s Min/Max range controls to specify how much each individual widget affects its associated parameter. You can even make some parameters go in reverse, either by clicking on that widget s Invert value button or by setting the MIN value to a higher number than the MAX value. This makes it possible to implement special effects like crossfades, for example. Name Allows you to set a name for use in GP Script and/or OSC. Enable OSC Check this box to make the Name field also be available to OSC. For more information on OSC, click here. Show back plate (Displayed only when editing a knob or toggle switch.) When checked, back plate information such as numbers or an on/off legend is displayed. Ignore variations When checked, the selected widget will be excluded from variation changes and will instead remain at its current value. This is useful if you have, for example, several different variations that change the widget settings controlling effects such as phasing or flanging, but you want the widget controlling overall volume to remain constant. Mapping section Plugin Click in this box for a dropdown list of plugins currently being used by the rackspace, then select the plugin you want the widget to access. Open plugin (Displayed only when a plugin is selected.) Click on this button to open the editor for the selected plugin. Parameter (Displayed only when a plugin is selected.) A list of available controllable parameters is displayed here. Select the one you want to have the widget control. Alternatively, you can press the Learn button. Learn (Displayed only when a plugin is selected.) Click on this button to have Gig Performer learn the plugin parameter you want to associate with the widget. When actively in Learn Mode, the button is lit red; to exit Learn mode, click on it again and it will return to its normal gray color. Rackspace Properties 141
 and time signature.")
146 Double-clicking on a rackspace name opens a dialog that displays rackspace properties. Name To rename the rackspace, type a new name here. Set time information Check this box if you want the rackspace to have its own tempo value, then enter the desired bpm (beats per minute) and time signature. If this box is unchecked, the rackspace will use the global tempo information set in the Performer View Tempo Display. Sync with external clock Check this box if you want the rackspace to adjust its tempo to incoming MIDI clock messages (24 ticks per quarter note), thus enabling echo/delay or arpeggiator plugins capable of receiving MIDI clock to automatically synchronize. Tail length Sets the maximum time before a sound is cut off when you switch rackspaces. Maximum length is 5 seconds. Often known as an audio tail, this feature is useful when using effects such as reverb or echo. Patch Persist If enabled (checked), whenever you switch to another rackspace, notes that you are holding down (either on your keyboard or via your sustain pedal) will continue sounding until you release the keys or pedal. (This actually works with any number of rackspaces, up to the limits of your system s available RAM and CPU resources, so you could conceivably keep the sound of five or more rackspaces going simultaneously.) If disabled (unchecked), whenever you switch from one rackspace to another, the sound is immediately silenced even if you are holding notes down or have pressed the sustain pedal. 142
 used to switch to this variation.")
147 Variation Properties Double-clicking on a variation name opens a dialog that displays variation properties. Name To rename the variation, type a new name here. Assign program change number When checked, allows you to specify the program change number (and, optionally, the bank change number) used to switch to this variation. If a program change number has been assigned, that number will appear to the left of the variation name. If there is only one variation of the rackspace, the program change number will also appear to the left of the rackspace name; if there is more than one variation, an asterisk will appear there instead. If unchecked, Gig Performer will assign program change numbers in ascending order; i.e., the first variation in the first rackspace will be called up when program change 1 is received; the first variation in the next rackspace will be called up when program change 2 is received, etc. 143

148 ... ( More ) Menu Clicking on the three dots button in the rackspace list in Performer or Connections View opens the More menu: Rackspaces New rackspace Creates a new rackspace. Duplicate current rackspace Duplicates the current rackspace. Remove current rackspace Deletes the current rackspace. Show rackspace properties... Opens the Rackspace Properties dialog. Revert rackspace to last saved version Reverts the current rackspace to the last version saved. (Important: Click OK in the resultant Are you sure? dialog only if you are sure that you want to do this, because all changes made since the file was last saved will be permanently lost. If you want the opportunity to save your work first, click Cancel, then go to File>Save or File>Save As...) Save (update) rackspace to gig file Saves the selected rackspace to the currently open.gig file. 144

149 Variations New variation Creates a new variation. Remove current variation Deletes the current variation. Show variation properties... Opens the Variation Properties dialog. Widgets Widget Operations submenu This submenu deals with how widget values are handled when a gig is loaded. Enable recall on load/activate for all widgets When this command is chosen, the current values of all widgets are stored for recall when the gig is loaded. (Individual widget values can be stored using the Recall value on load and Also recall on activate buttons in the Parameter range and control section of the Widget Properties inspector.) Update existing recall values only When this command is chosen, the stored values of any widgets set to have values recalled on load are updated with the current values of the widgets. This is useful if, for example, you have edited a gig loaded with stored values and now want to save the changes, as it saves the values of all edited widgets at once. Disable recall on load/activate for all widgets When this command is chosen, global recall of widget values is disabled, and stored values will be recalled only for widgets with recall enabled by one or both checkboxes in the Parameter range and control section of the Widget Properties inspector. Tuner View This button opens Gig Performer s Tuner View for details on the tuner, see TunerView. 145

150 Preferences Gig Performer s preferences tabs are accessible from the Options menu. 146

151 General The General tab appears when the Preferences command is chosen in the Options menu, or when its shortcut is used. 147
152 Scan for new/changed plugins on startup When enabled, Gig Performer will check for new or updated plugins every time it starts. It s generally a good idea to leave this enabled unless you re certain that your plugins have not been updated since you last used Gig Performer. If you re wondering why your latest plugin or update isn t appearing, not scanning for plugins is the most probable cause. (See Troubleshooting for more information.) Load last GIG file on startup When enabled, Gig Performer will load the last.gig file that was used. Switch to last active rackspace When enabled, Gig Performer will switch to the rackspace that was active when the.gig file was last saved. Otherwise, the first rackspace will be activated. Check for updates automatically Unless you re actually on tour, it s probably useful to keep this option enabled so that you are informed of updates. Check Now Click on this button to manually check for updates. Note: This requires an internet connection. Show plugin information when mouse is over the plugin block When enabled, moving the mouse over blocks in the connection view will cause a popup tooltip to appear with information about the plugin. Maximum number of channels to display in blocks This option prevents plugins from showing more than a specified number of audio channels. Some plugins have a large number of audio channels, most of which may never be used, making their blocks unwieldy to view and causing them to take up a lot of space in Connections View. Note that the value entered here does not apply to the audio interface Audio In and Audio Out blocks. Open plugin window when inserted When checked, the plugin editor window will open automatically whenever a plugin is inserted. Disable this feature if you prefer to create many plugin blocks first and edit them all later. Keep plugin windows on top When enabled, open plugin window editors always appear on top of other windows Always show widget groups When you gang multiple widgets together, the widget group to which they belong (lettered A through Z) is displayed on the top left of the widget while editing. If you would like that widget group name to stay on while NOT editing, enable this option. 148
153 Audio metronome settings The lower half of the General tab contains settings for the audio metronome. These settings are detailed in the Audio Metronome section. Audio setup Output Device Select the audio output device you want to use. If you re running Gig Performer on a Mac OS X system and have created any Aggregate Devices (consisting of 149
154 multiple interfaces) in the Audio MIDI Setup utility, they will appear here as options as well. Input Device Select the audio input device you want to use. If you re running Gig Performer on a Mac OS X system and have created any Aggregate Devices (consisting of multiple interfaces) in the Audio MIDI Setup utility, they will appear here as options as well. Note: Changing the audio output or input device will cause your entire.gig file to be reloaded immediately, so we recommend making such changes immediately after creating a new.gig file. Active output channels/active input channels Determines how many input and output channels are to be made available to Gig Performer. If you are using an audio interface with many channels, you may not want to access them all. For example, you may have an interface with 8 analog output channels and another 16 lightpipe (ADAT optical) channels that you re not using. So instead of displaying audio IN/OUT blocks with 24 or more channels, you can disable the ones you don t need by unchecking them in the list Sample rate The sample rate determines the quality of the audio signal. Typical values in the live world are 44.1 khz and 48 khz. Note that there is a tradeoff between higher sample rates and CPU utilization. To view our website article about audio latency, buffer size, and sample rate, click here. Audio buffer size The buffer size determines how often samples are actually processed. The smaller the buffer size (or the higher the sample rate), the lower (better) the latency but at the cost of higher CPU utilization. Depending on your plugins and your computer, you may need to find a compromise that gives you the best tradeoff between CPU utilization and latency. If you start using too many CPU cycles, you will begin to hear clicks and other noise in the output. To view our website article about audio latency, buffer size, and sample rate, click here. Apply Settings This button will appear if you make any changes to the parameters in this dialog. Click on it to accept the changes, or simply close the Preferences dialog to maintain the current settings. 150
155 OSC setup 151
156 Enable OSC Check to turn on OSC. Click here for more information about available OSC commands. Remote client IP address The address of the remote device that is running an OSC application. Remote client port The port on the remote device that is listening for OSC messages over UDP (User Datagram Protocol). Gig Performer listening port The port on which Gig Performer is listening for incoming OSC messages over UDP (User Datagram Protocol). Note: This is permanently set to Lemur style string format Gig Performer automatically sends some text and label contents to remote devices. If you are using Lemur then you will want to enable this checkbox so that Gig Performer prefixes strings with attribute which Lemur expects. Click here for more information. 152
 in order to accomplish the following")
157 Global MIDI In this dialog, Gig Performer can learn MIDI messages, either from a continuous controller or a momentary switch (in which case you ll need to click on the accompanying Momentary box so that it is checked) in order to accomplish the following actions: 153
158 Move up Move to the previous variation, or to the previous rackspace if you are at the first variation. Move down Move to the next variation in the current rackspace, or to the first variation of the next rackspace if you are at the last variation of the current rackspace. Variation switching only If this option is enabled, you will only be able to move up or down within a single rackspace. Direct access Direct access allows you to use a slider or knob to switch between variations in a rackspace. If you had a pedalboard with five MIDI switches, each switch would be set to the same channel and controller number, but assigned a different control value. This value would select a variation in a rackspace, so if the five pedals were assigned values of 0, 1, 2, 3, and 4, they would recall the first five variations. Next Rackspace Move to the next rackspace. This function is useful when you wish only to move between rackspaces, not between variations in a rackspace. Previous Rackspace Move to the previous rackspace. This function is useful when you wish only to move between rackspaces, not between variations in a rackspace. Toggle tuner Switch to or from Tuner View. Tap Tempo Gig Performer can receive taps from a pedal or button on a connected MIDI controller or via OSC messages and use that information to set the tempo of delay, echo, or looping plugins so that they can be synced to the tempo in which you are playing. To enter Tap Tempo, click on the Learn button and tap on the button or pedal you want to use for setting tempo. (You will most likely need to enable the Momentary option as well.) Once you start tapping, the BPM display at the top right of the main Performer View screen will display the current tempo that has been detected. All plugins that respond to global tempo will now synchronize to this tempo. (It may be necessary to enable sync to external tempo on individual plugins. Please check your plugin documentation for more information.) Note: The tempo used by connected plugins is always the global tempo set here unless it has been overriden in the Rackspace Properties dialog. Play/Stop Start or stop playback of audio files from a third-party media player plugin or from the supplied Audio File Player plugin. 154
159 MIDI Panic Generate all notes off messages on all MIDI channels, along with a sustain OFF message and a Center PitchBend message, thus stopping stuck notes in their tracks. This performs the same action as clicking on the MIDI panic button in the upper right-hand corner of the screen. Master Fader Gig Performer s master fader can be remotely controlled by a MIDI controller by clicking the Learn button and moving the physical control. Clear all assignments Clear all learned assignments. (Note: Holding the Shift key down while clicking any of the Learn buttons clears just that assignment.) Accept Program Change Messages from any Device Determines whether Gig Performer should respond to MIDI program change messages from all external devices, or only from specific external devices. Pass through unused incoming Program Change messages When enabled, if a program change is received for which there is no corresponding rackspace, the message will instead be sent to the first plugin in the current rackspace. For example, if you have created 10 rackspaces and a program change message of 11 or higher is received, it will not cause the rackspace to change but will instead affect the first plugin in the current rackspace. Most plugins respond to incoming program change messages by changing presets; however, the behavior is entirely dependent upon the particular plugin. Consult your plugin s documentation for further information. Use zero-based program change numbers Causes Gig Performer to display program change numbers in a range of instead of Ignore bank switch controls and map to bank # - Selecting this causes Gig Performer to ignore incoming MIDI program bank switch messages and stay on the specified bank. Only accept program change messages on specific channel Gig Performer can change variations, rackspaces, and even instances in response to incoming MIDI program change messages. Checking this box limits Gig Performer to responding only to program change messages on the channel specified in the box. 155

160 Recording Details on this dialog are in the Audio Input Recorder section. 156
161 Advanced Enable multi-instance support Checking this option gives you the ability to launch Gig Performer multiple times in the same computer, with each such instance operating independently. 157
162 This has many different practical applications. For example, each bandmember can have the ability to change the rackspace affecting their particular instrument without changing the rackspaces affecting different instruments; they can even use separate MIDI controllers or pedalboards to do so. Instances also make it far more efficient to process vocals, since in many circumstances only a couple of rackspaces are required to manage all vocal sounds. If those rackspaces live in a separate instance, you no longer have to duplicate them in every single rackspace you create. Keyboardists that want to dedicate one of their controllers (such as an 88-note weighted keyboard) to one particular sound say a grand piano will also find instances useful. Simply create an instance with just a single rackspace containing the grand piano plugin and the appropriate MIDI In block. Now you no longer have to include that controller and grand piano plugin in every single rackspace you create, something that can help simplify your overall design and be a real timesaver. There are also many advanced usages: For example, you can use a MIDI In plugin to send program change messages from one instance to another so that one instance can be used to change the rackspace in another instance. The number of instances you will be able to successfully have open at any one time is dependent upon your system s RAM and CPU resources. Each instance can access entirely different plugins and MIDI In blocks; however, their Audio In/Out blocks must be consistent. (In other words, separate instances cannot access different audio interfaces.) Note that when multi-instance support is enabled, three new options are added to the File menu, allowing you to create new instances, and to open or delete existing instances. A demonstration of how to implement instances is provided in the Configuring Audio Plugins tutorial in this user guide. Predictive loading One of the biggest problems for live performers is how much memory and CPU cycles are required to keep all the desired plugins available. In particular, plugins that use a significant number of samples can use many gigabytes of RAM to hold the required data. In normal operation, Gig Performer loads all plugins for all rackspaces and does some optimization to reduce the impact of hosting a large number of plugins simultaneously while still allowing you to switch quickly from one rackspace to another. However, this comes at the cost of RAM and CPU usage, which may create issues in systems with limited resources and/or significant audio hosting requirements. The alternative loading just one rackspace (i.e., one set of plugins) at a time would certainly reduce RAM and CPU 158
163 requirements considerably, but at the cost of having to wait while each new rackspace is loaded. Enabling the predictive loading option provides a creative solution: Load only those rackspaces that will be needed in the immediate future (e.g. while playing the current song). Other rackspaces are not loaded and will therefore not consume any memory. As an added benefit, startup time is significantly shortened since not all plugins need to be loaded. You may also see some reduced overall CPU utilization. Predictive loading provides glitch-free instant switching among those rackspaces that are currently loaded, but with the tradeoff that you might not always be able to jump to an arbitrary rackspace without a short delay, depending on the particular plugin requirements. As a result, when using this option, you should configure your rackspaces in such a way that they are in rough order of when they will be needed in a performance; i.e., song intro -> first verse -> first chorus, etc. In that way, you can best ensure that you will never have to jump to another rackspace that is farther away that the specified number of loaded rackspaces (see Max loaded rackspaces below). Note that rackspaces can easily be reordered by dragging them up and down using your mouse or trackpad; holding down the Shift key while doing so results in the dragged rackspace not being loaded, making it more efficient to do setlist reordering without having to wait for each rackspace to load. More details about predictive loading can be found on the Gig Performer website: Click here. Important note: While we have tested predictive loading extensively, it is impossible to test it with all of the thousands of plugins out there. We therefore recommend that you test this feature ahead of time before using predictive loading in a live situation to ensure that the particular plugins you want to use are stable enough to withstand repeated initialization in a short period of time. Max loaded rackspaces Specifies the maximum number of rackspaces that will be preloaded around the currently selected rackspace. The default value is 5, where the current rackspace as well as the next two and previous two rackspaces are also loaded and instantly accessible. Optimal use of this feature assumes you will be moving from your current rackspace to rackspaces that are close to it (within two, if the default value of 5 is being used). As you move to a new rackspace, Gig Performer will then load and unload other rackspaces so that there are always two available before and two after where you are. This happens in the background and does not affect your audio. 159

164 Graphics engine (experimental) This field selects the graphics library that Gig Performer uses for its displays. Mac OS X users will likely never need to change this setting from CoreGraphics Renderer, as shown below. Depending on the graphics card in their machine, Windows users may find that OpenGL Renderer delivers better quality than Software Renderer. Software Renderer This choice means that Gig Performer uses your computer s CPU to render the display without the help of any graphics library optimizations. Windows users without high-performance graphics in their machines will likely get the best results with this setting. CoreGraphics Renderer Mac OS X uses its CoreGraphics engine to render the display. Most Mac users will use this setting. OpenGL Renderer On systems with high-performance graphics capabilities, OpenGL may provide better visual quality, as high-quality graphics cards are typically optimized to run OpenGL. Learn more A link to a Gig Performer website article about the Advanced options described above. 160
165 Scripting Prefix log entries with rackspace name Checking this box causes messages in the Script Log window to be identified by the rackspace that generated them. Since there is 161
166 only one log window for all rackspace scripts, troubleshooting is greatly aided when the log is formatted this way. Ignore script errors when loading gigfiles - Normally, attempting to load a rackspace that has an invalid script triggers a warning dialog. Checking this option removes this warning. CAUTION: This is an expert function. Checking this box is not recommended unless you know exactly what you re doing, as a rackspace with a broken script may behave in unexpected ways. 162
.")
167 Main Menus File New Gig Clears all memory and opens a new rackspace with all default values. Open... Opens a saved.gig file. Open Recent Provides a popup menu listing the five most recent.gig files. Save Saves your work in a.gig file. Save As... Saves your work in a.gig file but allows you to enter a new name first (thus preventing previously saved.gig files from being overwritten). Import rackspace Allows you to import a single rackspace from a list of previously exported rackspaces. The newly imported rackspace is simply added to your currently created rackspaces it does not overwrite or delete any of your work. Note that you can also drag and drop one or more rackspaces from a folder directly into Gig Performer, making it fast and easy to create a complete new setlist from existing rackspaces. Export current rackspace... Allows you to export a single rackspace for use in another Gig Performer project. Export all rackspaces... Allows you to export all rackspaces for use in another Gig Performer project. 163
 Create new instance Allows you to create a new instance. (For more information click here.) Open Existing Instance A popup menu allows you to open a previously created and saved instance.")
168 (Note: The following three menu items appear only when the Enable multi-instance support option is checked in the Advanced tab of the Preferences dialog.) Create new instance Allows you to create a new instance. (For more information click here.) Open Existing Instance A popup menu allows you to open a previously created and saved instance. (For more information click here.) Delete Existing Instance A popup menu allows you to delete a previously created and saved instance. (For more information click here.) Open script from file Choosing the command brings up a standard Open File dialog for you to navigate to and select a script to open. Click for more information on GP Script. Open Recent Script File A popup submenu lists all GP script files that have been worked on recently. Select one to open. Click for more information on GP Script. Save script to file Saves a GP script you have been working on to a new file. Click for more information on GP Script. Quit Quit Gig Performer. If you have any unsaved work, a dialog will ask you if you want to save your data first. Edit 164

169 New rackspace Creates a new rackspace. Duplicate the current rack space Duplicates the current rackspace. Delete selected rackspace Deletes the currently selected rackspace. Show rackspace properties... Opens the Rackspace Properties dialog. New variation Creates a new variation in the current rackspace. Delete selected variation Deletes the currently selected variation. Show variation properties... Opens the Variation Properties dialog. Copy Copies the current selection to the Clipboard. Paste Pastes the data from the Clipboard. Sort rackspaces by program change numbers An easy way to sort your rackspaces by the program change numbers associated with each. (For more information click here.) Sort rackspaces by name Sorts your rackspaces alphabetically. Reset program change numbers... Resets all the program change numbers associated with all rackspaces and variations so that the first variation in the first rackspace is assigned Program Change 1 and the first variation in the second rackspace is assigned Program Change 2, etc. (For more information click here.) Insert plugin... Opens the Quick plugin finder. (Gig Performer will switch to Connections View automatically if you are currently in Performer View.) Options 165

170 Preferences... Opens the General tab of the Preferences dialog. Audio setup... Opens the Audio I/O tab of the Preferences dialog. OSC setup... Opens the OSC tab of the Preferences dialog. Global MIDI Settings setup... Opens the Global MIDI tab of the Preferences dialog. Advanced Settings setup... Opens the Advanced tab of the Preferences dialog. Scripting Settings setup Opens the Scripting Options tab of the Preferences dialog Window Performer view Switch to Performer View. Connections view Switch to ConnectionsView. Switch view Switches to Performer View if you are currently in Connections View, and vice versa. Toggle widget edit view Takes Gig Performer in and out of Edit mode. Plug-in manager... Opens the Plugin Manager Rig manager Opens the Rig Manager 166
 messages.")
171 MIDI Monitor Opens the MIDI Monitor window (shown below). This is similar to the supplied MIDI Monitor plugin, except that it shows all MIDI messages being received into Gig Performer itself except MIDI clock and system exclusive (SYSEX) messages. Show MIDI Assignments This command opens the MIDI Assignment List window. This window displays the information from the Global MIDI Assignments section of the Global MIDI preferences. 167

172 Show Script Logger This command opens the Script Logger window for help in developing GP Scripts. For more information on GP Script, see Going Above and Beyond: GP Script. Show Script Editor This command opens the Script Editor window for use in developing GP Scripts. For more information on GP Script, see Going Above and Beyond: GP Script. 168

173 Help Search Opens a Search dialog in which you can type your Search subject. Send us a message... Opens a Feedback Form dialog in which you can us a detailed description of your problem, suggestion, bug report, or question. If you do experience a problem with Gig Performer, we strongly urge you to let us know about it so that we can fix it for the benefit of all users. License activation/deactivation Opens a dialog that allows you to activate your license or, if it is already activated, deactivate your license. Warning: Do not deactivate your license unless you are sure that you want to run Gig Performer on another system. About... Opens a dialog that shows the current version of Gig Performer, along with a link to our website. 169

174 Right-Click menus Rack Panel This menu is discussed in the Rack panel Right-click menu section. Plugin This menu is discussed in the Plugin Right-click menu section. 170
175 MIDI Controller The MIDI Controller plugin right-click menu is the same as other plugins, but with the addition of: Change MIDI Input Device Reassigns the MIDI In or MIDI Out block to the MIDI controller chosen from the popup menu. Keystroke shortcuts File management Mac OS X Windows Function Cmd-O Ctrl-O Open a.gig file Cmd-S Ctrl-S Save to the current.gig file Shift-Cmd- S Ctrl-Shift-S Save the current work to a.gig file with a new name Shift-Cmd-I Ctrl-Shift-I Import a single rackspace from a file Shift-Cmd-E Ctrl-Shift-E Export the current rackspace to a file Screen management Mac OS X Windows Function Cmd-T Ctrl-T Cycle between Performer View and Connections View 171
176 Cmd-G Ctrl-G Toggle widget edit view Rackspace management Mac OS X Windows Function Shift-Cmd- N Ctrl-Shift-N Add a new rackspace Shift-Cmd- D Ctrl-Shift-D Duplicate the current rackspace Shift-Cmd- BACKSPACE Ctrl-Shift-BACKSPACE Delete the current rackspace Cmd-N Ctrl-N Add a new variation to the current rackspace Cmd-BACKSPACE Ctrl-BACKSPACE Delete the current variation Cmd-, Ctrl-, Open the General preferences dialog Connections management Mac OS X Windows Function Cmd-P Ctrl-P Insert a new plugin (Gig Performer will switch to Connections View automatically if you are currently in Performer View.) Note: The Cmd-P /Ctrl-P keyboard shortcut provides a more efficient way to create a plugin than right-clicking since it opens the Quick plugin finder dialog (shown below), which allows you to type a partial plugin name, with the resultant list restricted to those that match. Checking the Also add gain control box in this dialog causes a Gain and Balance plugin to be inserted immediately after the selected plugin. 172

177 Additional key shortcuts Startup Hold the Shift key down while Gig Performer is starting and it will not reload the previous Gig, even if you have the preference Load last GIG file on startup checked. Hold down the Option/Alt key during startup to block Gig Performer from autoloading and executing a startup script. Dragging rackspaces Holding the Shift key while dragging rackspaces prevents the dragged rackspace from being activated. (This can be very useful for adjusting your setlist order when Predictive Loading is enabled). Quick stereo connection To make a quick stereo connection, hold the Shift key down while dragging a plugin until its output pins touch the input pins of another plugin, then release (unclick) 173
178 the mouse. If there is already a connection, this operation will cause it to be removed instead. Fine control Hold down the Cmd (Mac OS X) or Ctrl (Windows) key for fine control while adjusting a widget. MIDI In plugin channel toggling In the MIDI In (OMNI) and MIDI In (OSC) plugin editors, if you hold the Shift key down while enabling or disabling individual MIDI channels by clicking on their respective checkboxes, the other checkboxes will be set to their opposite states. This is a convenient way to quickly enable a single channel while blocking all others. Preferences>Global MIDI LEARN buttons Holding the Shift key while clicking any of the LEARN buttons in the Preferences>Global MIDI dialog clears that assignment. Widget captions Normally the widget caption will be assigned the parameter name only. However, if you hold the Shift key down while selecting a parameter, the widget caption will include the plugin name as well as the parameter name. If you also hold the ALT key down, the widget caption will include the plugin name only. 174
179 TROUBLESHOOTING No sound Test your audio system to make sure it is receiving signal from your connected audio interface. Make sure one or more plugins have connections from their audio output(s) to one or more audio input(s) on your connected audio interface. If you have multiple audio interfaces connected to your system, make sure the correct one is selected. Gig Performer isn t finding my plugins Normally Gig Performer scans only certain standard folders for plugins, such as (in Mac OS X systems) Library/Audio/Plug-ins/VST or (in Windows systems) C:\Program Files\VstPlugins. However, some plugin and DAW manufacturers install their plugins in different folders. If Gig Performer isn t finding your plugins, that s the likely cause. To instruct it to scan different folders, open the Plugin Manager (from the Window menu) and click on the Manage button in the bottom left-hand corner, then select Set VST folders for scanning.... A dialog will appear allowing you to add or delete folders to the list of those scanned by Gig Performer. Audio interface does not appear in Connections View In most cases, Gig Performer will automatically detect all audio interfaces connected to your system. If it does not, check to make sure that the interface is connected and powered on, and relaunch Gig Performer. If your audio interface still does not appear, take the following steps: Mac OS X: Start up the Audio MIDI Setup app in the Utilities folder and make sure that your interface appears in the list of input and output devices on the left-hand side of the Audio Devices window. If it does not appear, consult the documentation for your interface. Windows: Go to Control Panel>Hardware and Sound>Sound and make sure that your interface appears in the list of playback and recording devices. If it does not appear, consult the documentation for your interface. 175
180 MIDI controller does not appear in Connections View In most cases, Gig Performer will automatically detect all MIDI controllers connected to your system via USB. If it does not, check to make sure that the controller is powered on, and relaunch Gig Performer. If your MIDI controller still does not appear, take the following steps: Mac OS X: Go to Utilities>Audio MIDI Setup and select Show MIDI Studio from the Window menu, then make sure that your controller appears in the window and is not grayed out. If it is grayed out or does not appear, consult the documentation for your controller. Windows: Go to Control Panel>Hardware and Sound>Devices and Printers>Device Manager and make sure that your controller appears in the Sound, video and game controllers category. If it appears with a yellow question mark or exclamation point, right-click and choose the Update Driver Software option. If it does not appear, consult the documentation for your controller. Widget not working Double-click on the widget to open the Widget Properties inspector and make sure that it is assigned to a plugin and a plugin parameter. If your question is not answered here, please check our website s Knowledge Base and troubleshooting tips. If your problem is still not addressed, feel free to reach out to us through our support page. 176
181 APPENDIX A: OSC Gig Performer provides extensive support for OSC (Open Sound Control) a networking protocol that can be used to control one application from another, with a particular focus on apps used for live performance. OSC names can be associated with plugins and widgets, allowing you to transform your tablet or smartphone into a remote display and control surface, with virtual knobs, sliders, and buttons for full wireless control. For example, you can use OSC to change the output levels of each plugin independently or adjust the cutoff frequency of a synth plugin. It can also be used to set Tap Tempo, turn Tuner View on and off, and select the desired rackspace and variation. In addition to well-known OSC products like Lemur and TouchOSC, it is also possible to use programming tools like MaxMSP to create very sophisticated applications that can also work interactively with Gig Performer. For the most current version of Gig Performer s OSC implementation, see: MIDI over OSC Gig Performer s supplied MIDI In (OSC) plugin is designed to receive MIDI messages from remote OSC sources. As described in the Controlling Gig Performer Using OSC tutorial in this user guide, one of the requirements of OSC is that each object in both the host computer and remote device must have matching unique case-sensitive names comprised of characters only (no spaces). These names must be unique within a single Gig Performer rackspace, although they can be reused in different rackspaces. 177
 Choose the Options>Global MIDI Settings command, or type Cmd-, (comma) to open the Options dialog and then click the Global MIDI tab.")
182 APPENDIX B Tap and Tip Creating a Tap Tempo button Using a MIDI Key or Button to Tap It is often easiest to tap in a tempo from a keyboard or other MIDI controller. To set this up in Gig Performer: 1) Choose the Options>Global MIDI Settings command, or type Cmd-, (comma) to open the Options dialog and then click the Global MIDI tab. 2) Click the Learn button to the right of Tap Tempo in the Global MIDI Assignments list. 3) Tap on your MIDI controller to complete the link. Creating an onscreen button to tap (for touch surfaces) When controlling Gig Performer from a tablet, it may be easiest to tap a tempo in using an onscreen button, rather than a MIDI controller. GP Script can provide this functionality. Just follow these instructions exactly (or you can download this Rackspace and import it into a gig). 1. Switch to edit mode and drag a button (here, a red LED) on to a rack. 178
 from Tapper End Tap() 4.")
183 2. Select the button and, in the Name: field at the bottom of the Widget Properties area, type in Tapper and press return. 3. Open the Script Editor from the Windows menu and type in the following code exactly as shown in the image below. Var Tapper : Widget On WidgetValueChanged(newValue : double) from Tapper End Tap() 4. When you ve entered this code, press the Compile button and you should see a message with the current date indicating a successful compilation 179

184 4) You re done. Tap on the LED button and the tempo should change accordingly. Tip: Creating Two Instances of Gig Performer with a Single Client ASIO Driver Creating a second instance of Gig Performer is easy. Just select File>Create new instance (or open an existing one) and you re all set. This works great on OS X and on many Windows machines. Unfortunately, some Windows ASIO drivers still allow only one application to use the audio interface at a time. These are known as single-client drivers. Multi-client audio drivers started coming out years ago, but, sadly, there still are many single-client drivers in place. Two instances of Gig Performer count as two applications, which is a problem when running on a single-client driver. If you find yourself in this situation, first check whether there is a multi-client update for your audio device driver available. Consider also contacting the company providing the driver; if they hear from enough people, perhaps they ll fix the issue. If there is no update, there s still a way just follow these instructions: 1. Install the ASIO4ALL drivers on your computer 2. Open a second GP instance and choose Options>Audio setup to open the Audio preferences tab. 3. Select the ASIO and ASIO4ALL driver matching the sample rate of your main instance. 4. Click on the Control Panel button once you have switched to the ASIO4ALL driver and make sure that your real audio interface is selected within the ASIO4ALL driver. 180
Gig Performer User Guide
 Gig Performer User Guide v. 1.5.2 April 2017 Written by Howard Massey for On The Right Wavelength professional consulting services otrw@earthlink.net Copyright 2017 Deskew Technologies, LLC All rights
MainStage 2. Exploring MainStage
 MainStage 2 Exploring MainStage KKApple Inc. Copyright 2011 Apple Inc. All rights reserved. Your rights to the software are governed by the accompanying software license agreement. The owner or authorized
Gig Performer - Quick Start Guide
 Gig Performer - Quick Start Guide Revision 1.5 February 5th, 2017 Welcome to Gig Performer, the cross-platform audio plugin host for Mac and Windows. Gig Performer makes it easy to put your audio plugins
LiveProfessor 2. User Manual. Rev audiostrom.com
 LiveProfessor 2 User Manual Rev 1.0 - audiostrom.com Contents Introduction 4 System Requirements 4 License files 4 First Run 5 Installing Plugins Plugin Manager Audio Settings MIDI Inputs 7 Replacing A
Inear Display AMALGAME
 Inear Display AMALGAME User Guide Version 1.1 Table Of Contents Introduction 3 Overview 4 Installation and First Launch 5 Interface Overview 6 Loading and Saving Presets 7 Effects 8 XY Pad 9 Sequences
and close the various Traktor Panels. Setup: click on the setup icon to open the setup dialog. Close: clicking this icon will close TRAKTOR DJ Studio.
 Welcome... TRAKTOR DJ Studio 2 Quick Reference...to TRAKTOR DJ Studio 2, the latest and most advanced version of the software that changed the way DJs think about computers. We ve introduced a number of
User Manual V
 By User Manual V1.0 http://polyversemusic.com/support support@polyversemusic.com Gatekeeper User Manual Table of Contents Getting Started 4 Installation 4 Presets 5 With or Without MIDI? 5 Ableton Live
Using the 01X with Cubase SX 3. To all 01X users thank you for your continued use of the Yamaha 01X Digital Mixing Studio!
 Supplementary Manual Using the 01X with Cubase SX 3 To all 01X users thank you for your continued use of the Yamaha 01X Digital Mixing Studio! Since the 01X was first released, software programs that can
Gig Performer - Quick Start Guide
 Gig Performer - Quick Start Guide Revision 1.1 December 19th, 2016 Welcome to Gig Performer, the cross-platform audio plugin host for Mac and Windows. Gig Performer makes it easy to put your audio plugins
MIDI HARMONISER PLUGIN
 Obelisk by FrozenPlain 1 MIDI HARMONISER PLUGIN www.frozenplain.com Obelisk by FrozenPlain 2 1 - WHAT IS OBELISK? Obelisk is a MIDI plugin instrument. Rather than produce audio, it produces MIDI. Obelisk
Workshop. Automation ÂØÒňΠMV-8000
 ÂØÒňΠMV-8000 Workshop Automation 2006 Roland Corporation U.S. All rights reserved. No part of this publication may be reproduced in any form without the written permission of Roland Corporation U.S.
MV-8000 Production Studio. When asked So what s up with the new MV-8000? Here are the opening points to hit The MV-8000 has:
 The Main Points When asked So what s up with the new MV-8000? Here are the opening points to hit The MV-8000 has: Integrated Sampling, MIDI Sequencing, and Audio Recording 2 Samplers In One High Quality
WAVES CLA UNPLUGGED USER GUIDE
 WAVES CLA UNPLUGGED USER GUIDE Table of Contents Chapter 1 Introduction...3 1.1 Welcome...3 1.2 Product Overview...3 1.3 Concepts and Terminology...4 1.4 A Few Words from CLA...4 1.5 Components...5 Chapter
Worlde TUNA MINI MIDI Controller User s Manual
 HANGZHOU WORLDE DIGITAL PIANO CO.,LTD WEBSITE: WWW.WORLDE.COM.CN EMAIL:SALES@WORLDE.COM.CN TEL:86 571 88730848 Worlde TUNA MINI MIDI Controller User s Manual -1- Contents 1. INTRODUCTION... 3 2. FEATURES...
MOX6/MOX8 Editor VST Owner s Manual
 MOX6/MOX8 Editor VST Owner s Manual Contents What is the MOX6/MOX8 Editor VST?...2 Data Structure of the MOX6/MOX8 Editor VST...3 Starting the MOX6/MOX8 Editor VST...4 An Example of MOX6/MOX8 Editor VST
WAVES CLA BASS USER GUIDE
 WAVES CLA BASS USER GUIDE Table of Contents Chapter 1 Introduction...3 1.1 Welcome...3 1.2 Product Overview...3 1.3 Concepts and Terminology...4 1.4 A Few Words from Chris...4 1.5 Components...5 Chapter
Customizing DAZ Studio
 Customizing DAZ Studio This tutorial covers from the beginning customization options such as setting tabs to the more advanced options such as setting hot keys and altering the menu layout. Introduction:
SonicCell. Using SonicCell with SONAR LE. Workshop ÂØÒňÎ. Expandable Synthesizer Module and Audio Interface SCWS03 1
 ÂØÒňΠWorkshop SonicCell Expandable Synthesizer Module and Audio Interface Using SonicCell with SONAR LE 2008 Roland Corporation U.S. All rights reserved. No part of this publication may be reproduced
New Features in Nuendo 4.2
 New Features in Nuendo 4.2 Cristina Bachmann, Heiko Bischoff, Marion Bröer, Sabine Pfeifer The information in this document is subject to change without notice and does not represent a commitment on the
User Guide. Manual Version 1.0
 User Guide Manual Version 1.0 Table of Contents Introduction... 3 System Requirements and Product Support... 3 Installation... 3 Windows... 3 Mac OS X... 3 Quick Start... 4 Operation... 5 Global Controls...
Introduction: -The Beat Kangz
 Introduction: Thank you for choosing Beat Thang Virtual as part of your creative process. As artists ourselves, we know how important this decision is. We understand that you have many products to choose
Using BOSS TONE STUDIO for ME-80
 This document explains operation of BOSS TONE STUDIO for ME-80 (subsequently referred to as TONE STUDIO ). Getting Ready to Use TONE STUDIO Important terms in TONE STUDIO Library This is a storage area
Emote 1.0 Users Manual
 Emote 1.0 Users Manual Part No: 141318 Rev A 2018 Eventide Inc., One Alsan Way, Little Ferry, NJ, 07643 USA 1 Table of Contents Introduction... 3 Downloading the Installer... 3 Making Sure Your H9000 Hardware
Waves GTR3 ToolRack Manual
 Waves GTR3 ToolRack Manual Waves GTR ToolRack Manual 1 TABLE OF CONTENTS CHAPTER 1 INTRODUCTION...3 1.1 WELCOME...3 1.2 PRODUCT OVERVIEW...3 1.3 COMPONENTS...4 1.4 AUTOMATION...4 MIDI Automation...4 CHAPTER
Kameleono. User Guide Ver 2.1
 Kameleono Ver 2.1 Table of Contents Overview...4 MIDI Processing Chart...5 Kameleono Inputs...5 Kameleono Core...5 Kameleono Output...5 Getting Started...6 Installing...6 Manual installation on Windows...6
WAVES JJP GUITARS User Guide
 WAVES JJP GUITARS TABLE OF CONTENTS CHAPTER 1 INTRODUCTION...3 1.1 WELCOME...3 1.2 PRODUCT OVERVIEW...3 1.3 COMPONENTS...4 1.4 A FEW WORDS FROM JJP...4 CHAPTER 2 QUICKSTART GUIDE...5 CHAPTER 3 CONTROLS,
MOTIF XS Editor VST Owner s Manual
 MOTIF XS Editor VST Owner s Manual Contents What is the MOTIF XS Editor VST?...2 Data Structure of the MOTIF XS Editor VST...3 Starting the MOTIF XS Editor VST...4 An Example of MOTIF XS Editor VST in
AUDIO VIDEO MEDIA CONTROLLERS. EuCon Application Setup Guide. Document Revision: K
 EuCon Application Setup Guide Document Revision: K MC Control, MC Mix, MC Transport, Studio Monitor Express, Studio Monitor Pro, EuControl, EuCon and EuCon Powered are trademarks of Euphonix Inc. All other
Remixvideo for Mac FAQ
 Remixvideo for Mac FAQ This is a short list of the most frequently asked questions. For more information about Remixvideo for Mac or Mixvibes, or if you need support, please email support@mixvibes.com.
Chaos Culture. Multiclip Editor / Multiclip Note preview 1.5. Edited by Jason Cowling
 Chaos Culture Introduction... 2 Important stuff... 2 Setup... 3 Editing clips... 4 Using the editor... 5 Settings... 9 Workflow settings... 10 Performance... 13 Future updates... 13 Editor 1.6.61 / Note
MOTIF XF Editor Owner s Manual
 MOTIF XF Editor Owner s Manual Contents What is the MOTIF XF Editor?...2 Studio Manager...2 Studio Connections...2 About Open Plug-in Technology...3 Data Structure of the MOTIF XF Editor...4 Starting the
Push. Figure A4.1 Push.
 Push Figure A4.1 Push. Push is a hardware controller designed by Ableton and Akai to drive Live s Session View. Simply connect the Push unit using the provided USB cable to your computer and off you go.
KURZWEIL Artis PlugSE
 KURZWEIL Artis PlugSE SoundTower PlugSE for KURZWEIL Artis Stage Piano VST (PC/Mac) AudioUnits (Mac) SoundEditor, PlugSE, and ipad Products Reach Inside... SoundTower Inc. 2014 www.soundtower.com Special
TRAKTOR DJ Studio 2 Quick Reference. Welcome... The TRAKTOR Panels
 Welcome... TRAKTOR DJ Studio 2 Quick Reference...to TRAKTOR DJ Studio 2, the latest and most advanced version of the software that changed the way DJs think about computers. We ve introduced a number of
manual mix. create. repair.
 mix. create. repair. contents welcome to proximity:eq + 3 install 4 authorization 5 updates 6 stay up to date user interface 7 an overview user interface 8 menu bar user interface 9 parameter section user
MCS 2 USB Software for OSX
 for OSX JLCooper makes no warranties, express or implied, regarding this software s fitness for a particular purpose, and in no event shall JLCooper Electronics be liable for incidental or consequential
Spreading a Sample Across the Pads
 ÂØÒňΠMV-8000 Workshop Spreading a Sample Across the Pads 2005 Roland Corporation U.S. All rights reserved. No part of this publication may be reproduced in any form without the written permission of
Groove Agent 4. Version history Known issues & solutions. Januar 2015 Steinberg Media Technologies GmbH
 Groove Agent 4 Version history Known issues & solutions Januar 2015 Steinberg Media Technologies GmbH Table of contents Table of contents... 2 About... 3 Groove Agent 4.2.0... 4 New features... 4 Last
Accusonus Inc. Lexington, Massachusetts USA
 The information in this document is subject to change without notice and does not represent a commitment on the part of Accusonus Inc. The software described by this document is subject to a License Agreement
Blaze Audio Karaoke Sing-n-Burn
 Blaze Audio Karaoke Sing-n-Burn Manual Copyright 2005 by Singing Electrons, Inc. Contents 1.0 Getting Started...3 1.1 Welcome to Karaoke Sing-n-Burn!...3 1.2 Features...3 1.3 Learning to Use Karaoke Sing-n-Burn...3
Garageband Basics. What is GarageBand?
 Garageband Basics What is GarageBand? GarageBand puts a complete music studio on your computer, so you can make your own music to share with the world. You can create songs, ringtones, podcasts, and other
Home Concert Xtreme 3 for ios User Guide
 Home Concert Xtreme 3 for ios User Guide Copyright 2014, 2017 TimeWarp Technologies Inc. All rights reserved worldwide. No part of this publication may be reproduced, stored in a retrieval system, or transmitted,
Manual addendum written by Nadine Raihani, Cornelius Lejeune Manual version: 1.3 (09/2008) Software version: 2.0.4
 Software version: 2.0.4") MANUAL ADDENDUM The information in this document is subject to change without notice and does not represent a commitment on the part of NATIVE INSTRUMENTS GmbH. The software described by this document
MANUAL ADDENDUM The information in this document is subject to change without notice and does not represent a commitment on the part of NATIVE INSTRUMENTS GmbH. The software described by this document
Waves. MultiRack SoundGrid V9. Outboard Processing Host for Your DiGiCo Console
 Waves MultiRack SoundGrid V9 Outboard Processing Host for Your DiGiCo Console Contents The Rack in Detail... 3 Adding Plugins to a Rack... 6 Rack View: Controlling Your Plug-ins... 7 WaveSystem Toolbar
POD HD300 Edit. Pilot s Guide. A user guide to the features and functionality of the POD HD300 Edit application
 POD HD300 Edit Pilot s Guide A user guide to the features and functionality of the POD HD300 Edit application POD HD300 Edit: Table of Contents Table of Contents Graphical User Interface...1 1 What s in
WAVES BASS RIDER USER GUIDE
 WAVES BASS RIDER USER GUIDE TABLE OF CONTENTS Chapter 1 Introduction...3 1.1 Welcome...3 1.2 Product Overview...3 1.3 Concepts and Terminology...4 1.4 Components...5 Chapter 2 Quick Start Guide...6 Chapter
LivePrompter And Cantabile
 LivePrompter And Cantabile This document describes how to make LivePrompter work with Cantabile a host for VST plugins and instruments, specialized on using them in a live situation. Find out everything
User Guide. English. Manual Version 1.0
 User Guide English Manual Version 1.0 Table of Contents (Click a chapter/section to skip to it.) Introduction... 5 Box Contents... 5 Support... 5 About This User Guide... 5 Initial Setup... 6 1. Software/Driver
Transcribing and Coding Audio and Video Files
 Transcribing and Coding Audio and Video Files Contents TRANSCRIBING AND CODING AUDIO AND VIDEO FILES... 1 GENERAL INFORMATION ABOUT THE ANALYSIS OF AUDIO AND VIDEO FILES... 1 THE MEDIA PLAYER TOOLBAR...
Remixvideo for PC FAQ
 Remixvideo for PC FAQ This is a short list of the most frequently asked questions. For more information about Remixvideo for PC or Mixvibes, or if you need support, please email support@mixvibes.com. Last
Basic notions for voice recording on an arrangement. Introduction to Reaper by Ambrogio Riva
 Basic notions for voice recording on an arrangement. Introduction to Reaper by Ambrogio Riva www.ambrogioriva.com 1 Premise On various singing forums I have seen a lot of enthusiasm and listened to talented
MCS3 USB Software for OSX
 MCS3 USB Software for OSX JLCooper makes no warranties, express or implied, regarding this software s fitness for a particular purpose, and in no event shall JLCooper Electronics be liable for incidental
Sono 61. English User Guide
 Sono 61 English User Guide 1 Introduction.............................................................. 3 ProKeys Sono 61 Features............................................... 4 What s in the Box?.......................................................
WAVES JJP CYMBALS & PERCUSSION User Guide
 WAVES JJP CYMBALS & PERCUSSION TABLE OF CONTENTS CHAPTER 1 INTRODUCTION...3 1.1 WELCOME...3 1.2 PRODUCT OVERVIEW...3 1.3 COMPONENTS...4 1.4 A FEW WORDS FROM JJP...4 CHAPTER 2 QUICKSTART GUIDE...5 CHAPTER
User Guide. English. Manual Version 1.1
 User Guide English Manual Version 1.1 Table of Contents Introduction... 4 Editing the Controls... 10 Information & Support... 4 Installation... 4 Overview... 10 Graphical User Interface... 10 Control Panel...
Blue Cat's PatchWork User Manual
 "The virtual patchbay for audio plug- ins" 1 Table Of Content Introduction Description Features System Requirements Installation First Launch Using Blue Cat's PatchWork Introduction The User Interface
MPC Essentials Release Notes
 MPC Essentials Release Notes About Akai Professional is continually updating and enhancing MPC Essentials. This document lists the new features, fixes and improvements made to your MPC Essentials software.
StepPolyArp Unit. Step Polyphonic Arpeggiator / Sequencer App & Audio Unit MIDI effect for ios
 StepPolyArp Unit Step Polyphonic Arpeggiator / Sequencer App & Audio Unit MIDI effect for ios Presentation... 1 Application setup... 2 MIDI connections between ios applications... 2 MIDI over WiFi on macos...
Welcome Installation Authorization The T-Pain Engine: Quick Start Interface Sound Check... 10
 CONTENTS Welcome... 5 Installation... 5 Authorization... 6 The T-Pain Engine: Quick Start... 8 Interface... 8 Sound Check... 10 The T-Pain Engine: First Steps... 11 Beat... 11 Vocals... 14 FX... 15 Mixdown...
FM 4/100 USB Software for OSX
 FM 4/100 USB Software for OSX JLCooper makes no warranties, express or implied, regarding this software s fitness for a particular purpose, and in no event shall JLCooper Electronics be liable for incidental
Using BOSS TONE STUDIO for SY-300
 This document explains operation of BOSS TONE STUDIO for SY-300 (subsequently referred to as TONE STUDIO ). Getting Ready to Use TONE STUDIO Important terms in TONE STUDIO Library This is a storage area
I. Introduction General Introduction Features Requirements Design View Device View... 4 II.
 I. Introduction... 2 1. General Introduction... 2 2. Features... 3 3. Requirements... 3 4. Design View... 3 5. Device View... 4 II. Build-in Devices... 5 1. ASIO Audio Interface... 5 2. MIDI In/MIDI Out...
A Quick Tour GETTING STARTED WHAT S IN THIS CHAPTER?
 1 A Quick Tour WHAT S IN THIS CHAPTER? Installing and getting started with Visual Studio 2012 Creating and running your fi rst application Debugging and deploying an application Ever since software has
vst-ch4_a.qxd 10/7/02 4:58 PM Page 90
 vst-ch4_a.qxd 10/7/02 4:58 PM Page 90 4 Meet your hosts This chapter describes the installation and basic use of VST Instruments within two of the main MIDI + audio sequencers, Steinberg s Cubase VST and
The Kurzweil K2000 & Galaxy Intro: Phase One: Phase Two:
 The Kurzweil K2000 & Galaxy Intro: The Kurzweil K2000 is arguably the most powerful synthesizer in the OU MIDI Lab. It is definitely the most flexible and programmable. But to realize this power and flexibility
WAVES MASERATI B72 User Guide
 WAVES MASERATI B72 TABLE OF CONTENTS CHAPTER 1 INTRODUCTION...3 1.1 WELCOME...3 1.2 PRODUCT OVERVIEW...3 1.3 A FEW WORDS FROM TONY MASERATI...4 1.4 COMPONENTS...4 CHAPTER 2 QUICKSTART GUIDE...5 CHAPTER
2.0. Fender FUSE Compatible Products in this manual:
 Fender FUSE Compatible Products in this manual: Contents Firmware Update 2 Preset Editor 3 Pedal Effects 4 Rack Effects 5 Advanced Amplifier Settings 6 Preset Info Screen 7 Band Track Screens 8 Utility
Contents. Introducing Clicker Paint 5. Getting Started 7. Using The Tools 10. Using Sticky Points 15. Free resources at LearningGrids.
 ClickerPaintManualUS.indd 2-3 13/02/2007 13:20:28 Clicker Paint User Guide Contents Introducing Clicker Paint 5 Free resources at LearningGrids.com, 6 Installing Clicker Paint, 6 Getting Started 7 How
1 Interface Fundamentals
 1 Interface Fundamentals Windows The Media Composer interface is focused on three primary windows: the Composer, the Timeline and the Project. The Composer window contains the source and record monitors
BeatMaker 3 User Manual. Revision:
 BeatMaker 3 User Manual Revision: 3.0.10 What s new in version 3.0.10 of this manual - Updated section Quick Start Guide: 1.3 Transport toolbar - Added section Performance View: 2.7 Select mode - Updated
MV-8800 Production Studio
 ÂØÒňΠWorkshop MV-8800 Production Studio Working with External MIDI Instruments 2007 Roland Corporation U.S. All rights reserved. No part of this publication may be reproduced in any form without the
Grooving with Cyclone DXi
 } bonus Cyclone DXi is a virtual instrument included with both the Producer and Studio Editions of SONAR. It represents a major step forward in manipulating audio loops, allowing you to go beyond mere
Eventide Inc. One Alsan Way Little Ferry, NJ
 Copyright 2017, Eventide Inc. P/N: 141254, Rev 4 Eventide is a registered trademark of Eventide Inc. AAX and Pro Tools are trademarks of Avid Technology. Names and logos are used with permission. Audio
PowerPoint Creating Presentations 25
 Contents Contents 3 PowerPoint 00 7 What is PowerPoint? 8 PowerPoint Requirements 9 New and Improved Features 0 Installing PowerPoint 00 Starting PowerPoint 00 3 Exploring the Ribbon 4 003 Commands in
Eventide Inc. One Alsan Way Little Ferry, NJ
 Copyright 2017, Eventide Inc. P/N 141306, Rev 1 Eventide is a registered trademark of Eventide Inc. AAX and Pro Tools are trademarks of Avid Technology. Names and logos are used with permission. Audio
Exploring the FP-7. Roland Corporation US Exploring the FP-7 page 1
 Exploring the FP-7 1. IT S A PIANO by default (every time you turn it on). a. Touch i. Modeled from grand piano (not vertical) ii. Gravity based system with NO springs iii. Progressively weighted (as a
utworks MidSequer Version , 04 July 2016 Documentation updated 2 October 2016 MidSequer by utworks is a 16-track MIDI sequencer for Android.
 utworks MidSequer Version 0.3.3.1, 04 July 2016 Documentation updated 2 October 2016 MidSequer by utworks is a 16-track MIDI sequencer for Android. utworks MidSequer Page 1 MidSequer Function Overview
Home Concert Xtreme for ios User Guide
 Home Concert Xtreme for ios User Guide Copyright 2014, 2017 TimeWarp Technologies Inc. All rights reserved worldwide. No part of this publication may be reproduced, stored in a retrieval system, or transmitted,
twisted wave twisted wave [an introduction]
![twisted wave twisted wave [an introduction]](/thumbs/86/94307689.jpg "twisted wave twisted wave [an introduction]") twisted wave information www.twistedwave.com $80 free 30 day trial mac only updated frequently 2 versions available (OSX [more powerful] & ios [more portable]) OSX & ios are different purchases [different
twisted wave information www.twistedwave.com $80 free 30 day trial mac only updated frequently 2 versions available (OSX [more powerful] & ios [more portable]) OSX & ios are different purchases [different
Inear Display Lancinantes
 Inear Display Lancinantes User Guide Version 1.0 Table Of Contents Introduction 3 Overview 4 Installation and First Launch 5 Interface Overview 6 Loading and Saving Presets 7 Notes Module 8 Mixer Module
Quick Guide. Read this guide when you re ready to start using the JUNO-Gi.
 Quick Guide Read this guide when you re ready to start using the JUNO-Gi. The JUNO-Gi combines an excellent live performance synthesizer with a digital recorder for creating songs. This guide is divided
Seaboard RISE Creator Manual
 Seaboard RISE Creator Manual 1 Introduction Hello creator, and welcome to the Creator Manual for the Seaboard RISE. We think of the people who buy and use ROLI s products as creators more than customers.
Prophet '08 PlugSE Editor
 Prophet '08 PlugSE Editor SoundTower PlugSE for Prophet 08 Synthesizer VST (PC/Mac) AudioUnits (Mac) SoundEditor, PlugSE, and ipad Products Reach Inside... SoundTower Inc. 2012 www.soundtower.com Special
Sonarworks Reference 4 Headphone Edition User Manual VERSION 1 (SEPTEMBER 2017)
") Sonarworks Reference 4 Headphone Edition User Manual VERSION 1 (SEPTEMBER 2017) 1 Table of Contents 1. Product Overview.... 3 What is Sonarworks Reference system?... 3 1 Headphone plugin.... 3 2 Systemwide...
Sonarworks Reference 4 Headphone Edition User Manual VERSION 1 (SEPTEMBER 2017) 1 Table of Contents 1. Product Overview.... 3 What is Sonarworks Reference system?... 3 1 Headphone plugin.... 3 2 Systemwide...
CHAPTER 1 COPYRIGHTED MATERIAL. Getting to Know AutoCAD. Opening a new drawing. Getting familiar with the AutoCAD and AutoCAD LT Graphics windows
 CHAPTER 1 Getting to Know AutoCAD Opening a new drawing Getting familiar with the AutoCAD and AutoCAD LT Graphics windows Modifying the display Displaying and arranging toolbars COPYRIGHTED MATERIAL 2
How to Make a Movie in imovie How to Make a Movie Trailer in imovie How to Color Correct a Movie in imovie
 How to Make a Movie in imovie How to Make a Movie Trailer in imovie How to Color Correct a Movie in imovie 1. Make sure you are using the Mac. Make a Movie in imovie 2. If your files are on an external
Read This First! Symphonic Instrument Version Update Notes
 Read This First! Symphonic Instrument Version 1.1.2 Update Notes This booklet provides important installation instructions and late-breaking information about version 1.1.2 features in the MOTU Symphonic
Metagrid user manual.
 Metagrid user manual www.metasystem.io Contents HELLO!... 3 FIRST STEPS... 4 VIEWS... 7 SCENES... 10 BUTTONS... 12 ACTIONS... 17 APP-SPECIFIC SETUP... 19 HELLO! -2- Thank you for purchasing Metagrid -
WAVES NS1 NOISE SUPPRESSOR USER GUIDE
 WAVES NS1 NOISE SUPPRESSOR USER GUIDE Table of Contents Chapter 1 Introduction... 3 1.1 Welcome... 3 1.2 Product Overview... 3 1.3 Components... 4 Chapter 2 Quick Start Guide... 5 Chapter 3 Interface and
College of Pharmacy Windows 10
 College of Pharmacy Windows 10 Windows 10 is the version of Microsoft s flagship operating system that follows Windows 8; the OS was released in July 2015. Windows 10 is designed to address common criticisms
COMPUTER DESCRIPTION...
 Conventions used in this document: Keyboard keys that must be pressed will be shown as Enter or Ctrl. Controls to be activated with the mouse will be shown as Start button > Settings > System > About.
Table of contents. 1 P a g e SE- 02e d i t o r u s e r m a n u a l v 1. 4 p l u g - i n
 Table of contents Foreword... 2 Installation of the software and Authorization... 3 New in version 1.4... 4 Recommendation regarding the UI behavior... 5 I - First thing to do following installation...
Contents Introduction... 4
 Contents Introduction... 4 Welcome... 4 What s New in MultiRack v9... 4 Product Overview... 5 Quickstart Guide... 5 Installing Waves Software... 6 Now it s time to authorize your plugins :... 6 Connect
User Guide English. Manual Version 1.0
 User Guide English Manual Version 1.0 Table of Contents Welcome to the MPC... 5 System Requirements and Product Support... 5 About This Manual... 6 Important Notes... 7 Installation... 7 MPC Hardware Overview...
Akai Pro Advance Series and VIP - Setup with Logic Pro X
 Akai Pro Advance Series and VIP - Setup with Logic Pro X Akai Professional's Advance Keyboards are like nothing else you've ever played. Along with the VIP software, the Advance series gives you unprecedented
KARMA Motif Using the Remote Mode S70/S90 XS
 KARMA Motif Using the Remote Mode S70/S90 XS Revision 07-Oct-2014 by Stephen Kay www.karma-lab.com Overview Note: the use of S90 XS in this document refers to either an S70 XS or an S90 XS. The information
STEVEN SLATE DRUMS 5 User Manual
 STEVEN SLATE DRUMS 5 User Manual CONTENTS Introduction Sampler Operation Settings Construct Kit Edit Instrument Articulations Dynamics Microphone Section ADSR Mixer Mixer Routing Mapping Grooves 2 4 5
The Environment. Overview
 Logic-ch6_b.qxd 9/23/02 11:35 AM Page 172 6 The Environment Figure 6.1 Environment objects Overview The Environment is the heart of Logic Audio, and it can seem as complicated as a coronary operation if
Editor/Plug-In Editor Manual
 Editor/Plug-In Editor Manual E Table of Contents Introduction... 1 Main features...1 Please note before use...1 M50 Editor and M50 Plug-In Editor operating requirements...1 Installation... Installation
Outlook Web Access. In the next step, enter your address and password to gain access to your Outlook Web Access account.
 Outlook Web Access To access your mail, open Internet Explorer and type in the address http://www.scs.sk.ca/exchange as seen below. (Other browsers will work but there is some loss of functionality) In