Sfera Keypad Module. Installer manual 07/12-01 PC
|
|
|
- Caroline Millicent Bradford
- 5 years ago
- Views:
Transcription


1 Sfera Keypad Module Installer manual 07/12-01 PC
2 2
3 Contents Sfera Keypad Module Installer manual 1 Introduction Warnings and recommendations 4 2 Description Main functions Front view Back view 7 3 Configuration Master code New master code Deleting master codes Passepartout code New passepartout code Deleting passepartout codes Replacing the passepartout code Resident code New resident code Deleting the resident code Replacing the resident code 20 4 Advanced configuration Connection to the PC Door lock control Reset 24 5 Appendix Technical data 25 3


4 1.1 Warnings and recommendations 1 Introduction Before proceeding with the installation we recommend that you read the content of this manual very carefully. The warranty will automatically become void in case of negligence, improper use, and tampering by unauthorised personnel. The Sfera Keypad Module must only be used with BTicino 2 wire digital systems. Front covers that may be used with the Sfera BTicino Keypad Module: Front cover Front cover /02/03 4
5 2 Description 2.1 Main functions Sfera Keypad Module The BTicino Sfera Keypad Module can be used by residents to open a door lock using previously stored numerical codes. The device consists of a backlit pushbutton panel with 12 keys and luminous indicators, for controlling that the code has been entered correctly. Installer manual If installing the Sfera Keypad Module in conjunction with the display module (352500) refer to its manual. Programming can be performed in two ways: - using the TiSferaDesign software supplied with the product (chapter 4); - following specific procedures, performed directly on the keypad (chapter 3). In order to configure the master codes remove the front cover and press the programming pushbutton indicated in the legend (chapter 2.2). The secret code must consist of minimum 4 and maximum 9 digits. Three different types of codes may be programmed: - MASTER Code providing access to the programming of other codes. It can only be used for programming, not for access.. - Passepartout It can be used to open the door lock the entrance panel is associated to. It s not linked with any apartments. It can only be used for access, not for programming. - RESIDENT It can be used to open the door lock the entrance panel is associated to. It s linked to an apartment of the system. It can only be used for access, not for programming. 5
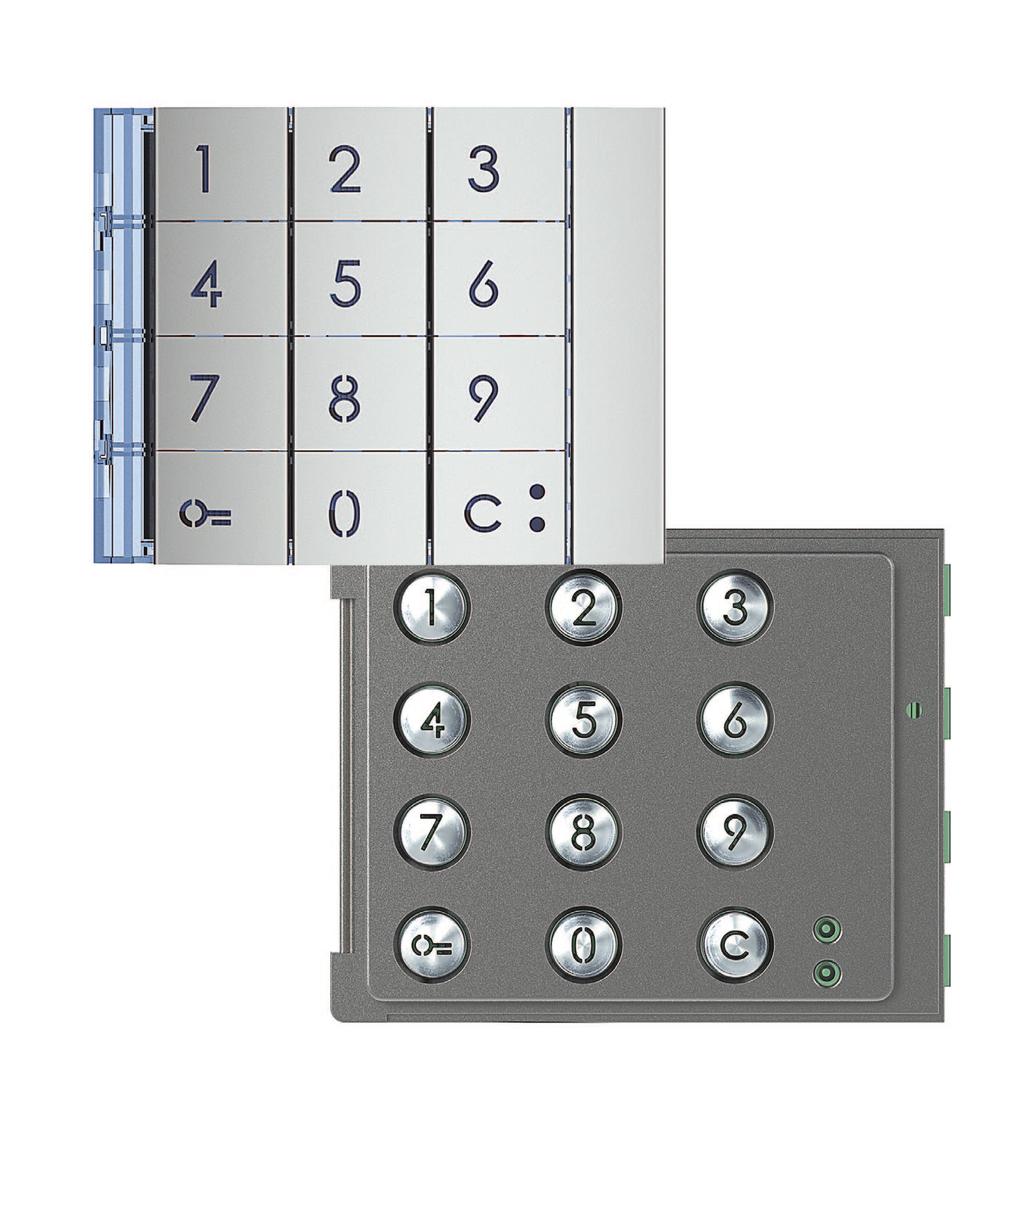
6 2 Description 2.2 Front view Digital keypad + key illumination LED. key for the selection of the door lock release code. key for the replacement of the codes. 2 - Mini-USB programming connector. 3 - Programming pushbutton. 4 - Red LED on steady: access denied, or programming error. 5 - Green LED on steady: access granted, or programming successful. 6
7 2.3 Back view Sfera Keypad Module Installer manual Connection of door lock pushbutton (CP-P1) and tamper (CP-P2 future application). 2 - Local relay contacts. 3 - Connection to the BUS. 4 - Connector for the connection to subsequent modules. 5 - Connector for the connection to previous modules. 6 - Configurator sockets. 7
8 3 Configuration 3.1 Master code For safety reasons, the system gives the installer the possibility of programming a MASTER code. This can be used to access the programming of the other codes (passepartout and resident codes). To access programming mode, a master code must be assigned to the device.; up to 20 master codes may be saved. The keypad module will indicate that the code has been accepted or deleted by means of audible signals and the switching on of the green LED. If an unrecognised code is entered, programming will stop. This interruption is confirmed by a long beep, and the red LED coming on New master code 1 Press the programming pushbutton until the green LED flashes and a confirmation beep is heard. 2 Press the key. 3 Enter the code (4 4 Press the key. to 9 digits). A short beep confirms the programming of the new master code 8
9 Sfera Keypad Module Installer manual 5 Re-enter the code to confirm. OK NO Correct code: green LED on and short beep. Wrong code: red LED on and long beep If the procedure has been successful, the green LED stays on for approximately 1 second before starting to flash again. Enter another code, or finish. 6 Press the programming pushbutton, or wait 30 seconds to exit the procedure. A short beep and the LEDs switching off indicate that the programming procedure has been terminated. The Sfera Keypad Module is now ready for normal operation. During programming, some rules must be followed: - keys must be pressed consecutively (maximum 2 seconds between pressures); - the programming sequence must be started within 30 seconds from the moment the programming pushbutton has been pressed and must be completed in one stage. 9
10 3 Configuration Deleting master codes 1 Press and hold down the programming pushbutton; the green LED flashes. 2 Continue holding down the pushbutton; the device emits 1 beep per second, and a long beep after ten seconds 3 The red LED flashes and then switches off to confirm that the deletion has been performed. - The procedure will delete all the stored Master codes. - During the procedure press the programming pushbutton. - To stop the deletion procedure release the programming pushbutton. - To only delete a specific code use the TiSferaDesign software. 10
11 3.2 Passepartout code Sfera Keypad Module Installer manual To access the programming of a Passepartout code, a master code is necessary. up to 20 passepartout codes may be saved. The keypad module will indicate that the code has been accepted or deleted by means of audible signals and the switching on of the green LED. If an unrecognised code is entered, programming will stop. This interruption is confirmed by a long beep, and the red LED coming on New passepartout code 1 Enter the master code. The device emits a beep, and the green LED starts flashing. The programming procedure starts. 2 Press the key. 3 Enter the 4 Press the key; passepartout code (4 to 9 digits). a short beep confirms the programming of the new passepartout code. 11
12 3 Configuration 5 Re-enter the code to confirm. OK NO Correct code: green LED on and short beep. Wrong code: Red LED on and long beep. If the procedure has been successful the green LED stays on for approximately 1 second, before starting to flash again. Enter another code, or finish. 6 Press the pushbutton, or wait 30 seconds to exit the procedure. A short beep and the LEDs switching off indicate that the programming procedure has been terminated. The Sfera Keypad Module is now ready for normal operation. During programming, some rules must be followed: - keys must be pressed consecutively (maximum 2 seconds between pressures); - the programming sequence must be started within 30 seconds from the moment the programming pushbutton has been pressed and must be completed in one stage. 12
13 Sfera Keypad Module Installer manual Deleting passepartout codes 1 Enter the master codes three times in succession. Three times 2 The device emits a long confirmation beep. 3 The red LED flashes and then switches off to confirm that the deletion has been performed. - The procedure will delete all the stored Passepartout codes. - To only delete a specific code use the TiSferaDesign software. 13
14 3 Configuration Replacing the passepartout code 1 Press the key until the green LED starts flashing. 2 The green LED flashes. 3 Enter the passepartout code. 4 Press the key. 5 Enter the new code. 6 Press the key. A short beep confirms the programming of the new passepartout code. 14
15 Sfera Keypad Module Installer manual 7 Re-enter the code to confirm. 8 The device emits a long confirmation beep. 9 If the procedure has been successful the green LED stays on for approximately 1 second before switching off. During programming, some rules must be followed: - keys must be pressed consecutively (maximum 2 seconds between pressures); - the programming sequence must be started within 30 seconds from the moment the programming pushbutton has been pressed and must be completed in one stage. 15
16 3 Configuration 3.3 Resident code To access the programming of a RESIDENT code a master code is necessary. Up to 4000 codes may be saved, one for each apartment. The keypad module will indicate that the code has been accepted or deleted by means of audible signals and the switching on of the green LED. If an unrecognised code is entered, programming will stop. This interruption is confirmed by a long beep, and the red LED coming on. If installing the Sfera Keypad Module in conjunction with the display module (352500) refer to its manual New resident code 1 Enter the master code. The device emits a beep, and the green LED starts flashing. The programming procedure starts. Apartment 1 Apartment 2 Apartment 3 2 Use the pushbutton module (352041,42,43) to select the apartment the resident code must be associated to. Apartment /42/43 16
17 Sfera Keypad Module Installer manual 3 Press the key. 4 Enter the resident code (4 to 9 digits). 5 Press the key; a short beep confirms the programming of the new resident code. 6 Re-enter the code to confirm. OK NO Correct code: green LED on and short beep. Wrong code: red LED on and long beep. 17
18 3 Configuration If the procedure has been successful the green LED stays on for approximately 1 second before switching off. A short beep and the LEDs switching off indicate that the programming procedure has been terminated. The Sfera Keypad Module is now ready for normal operation. During programming, some rules must be followed: - keys must be pressed consecutively (maximum 2 seconds between pressures); - the programming sequence must be started within 30 seconds from the moment the programming pushbutton has been pressed and must be completed in one stage. 18
19 Sfera Keypad Module Installer manual Deleting the resident code 1 Enter the master code. The device emits a beep, and the green LED starts flashing. The programming procedure starts. Apartment 1 Apartment 2 2 Use the pushbutton module (352041,42,43) to select the apartment for which the resident code must be deleted. Apartment 3 Apartment /42/43 3 Re-enter the master code. 4 The device emits a long confirmation beep. 5 The red LED flashes and then switches off to confirm that the deletion has been performed. 19
20 3 Configuration Replacing the resident code 1 Press the key until the green LED starts flashing 2 The green LED flashes. 3 Enter the resident code. 4 Press the key. 5 Enter the new code. 6 Press the key; a short beep confirms the programming of the new resident code. 20
21 Sfera Keypad Module Installer manual 7 Re-enter the code to confirm. 8 The device emits a long confirmation beep. 9 If the procedure has been successful the green LED stays on for approximately 1 second before switching off. During programming, some rules must be followed: - keys must be pressed consecutively (maximum 2 seconds between pressures); - the programming sequence must be started within 30 seconds from the moment the programming pushbutton has been pressed and must be completed in one stage. 21
22 4.1 Connection to the PC 4 Advanced configuration To transfer the configuration performed using the TiSferaDesign software, or to update the firmware, connect the Sfera Keypad Module to the PC using a USB-miniUSB cable. mini USB - USB BUS When updating the software the device must be powered. The Sfera Keypad Module connected using a USB cable is recognised by the PC as a virtual port (VIR- TUAL COM). 22
23 4.2 Door lock control Sfera Keypad Module Installer manual The TiSferaDesign software may be used to set the maximum number of digits to use when composing the code (4 to 9 digits). If the length of the code, selected during manual programming, is less than the length set by the software, in order to open the door lock the following must be entered: or to open the door lock using a code with the same length as the maximum length set enter: 23
24 4.3 Reset 4 Advanced configuration It is also possible to reset the Sfera Keypad Module and delete all the previously set codes; this will bring the module back to all the default settings. OFF ON 1 Disconnect the power supply (BUS), press and hold down the programming pushbutton and reconnect the power supply. 2 Holding down the pushbutton until an extended beep is heard. 3 The red LED comes on for 4 seconds and then switches back off. In entrance panels with keypad and speaker module, wait one minute after the reset procedure before starting the programming procedure again. 24
25 5 Appendix 5.1 Technical data Sfera Keypad Module Installer manual Power supply from BUS Vdc 10 Ma (Stand-by with LEDs off) Absorption 20 Ma (Stand-by with LEDs on) 45Ma (max in operation) 8 A, 30 Vdc Load of local relay contacts 8 A, 30 Vac cosφ = 1 3,5 A, 30 Vac cosφ = 0,4 Operating temperature (-25) (+70) C Technical After-Sales Service BTicino only accepts responsibility for perfect device operation if it is installed to the state of the art respecting the indications of the product installation manual. 25
26 26
27 Sfera Keypad Module Installer manual 27
28 BTicino SpA Via Messina, Milano - Italy BTicino SpA reserves at any time the right to modify the contents of this booklet and to communicate in any form and modality, the changes brought to the same.
05/16-01 PC Monobloc Audio Digital Entrance Panel. Installer manual
 05/16-01 PC 343100 Monobloc Audio Digital Entrance Panel Installer manual 2 Contents Monobloc Audio Digital Entrance Panel 1 Introduction 4 1.1 Warnings and recommendations 4 2 Description 5 2.1 Main functions
Sfera Display Module. Installer manual 05/16-01 PC
 352500 Sfera Display Module Installer manual 05/16-01 PC 2 Contents Sfera Display Module Installer manual 1 Introduction 4 1.1 Warnings and recommendations 4 2 Description 5 2.1 Front view 5 2.2 Back view
Vandal-resistant entrance panel. Installer manual RA00054AA_I_EN01PC-12W16
 308040 Vandal-resistant entrance panel Installer manual RA00054AA_I_EN01PC-12W16 2 Contents Vandal-resistant entrance panel 1 Introduction 4 1.1 Warnings and recommendations 4 1.2 What s in your box 4
Vandal-resistant entrance panel
 308040 LE05231AC-01PC-17W41 www.bticino.com Contents Vandal-resistant entrance panel Introduction 5 Warnings and recommendations 5 What s in your box 5 Description 6 Front view 6 Back view 7 Installation
Video Display Eteris. Installation manual 01GF-28W10
 349340 Video Display Eteris Installation manual 01GF-28W10 2 Video Display Eteris Contents 1 Introduction 4 1.1 Warnings and tips 4 1.2 Package content 4 Installation manual 2 Description 5 2.1 Main functions
TiSferaDesign. Instructions for use.
 www.homesystems-legrandgroup.com Contents Software update 4 Fundamental concepts 4 Start screen and pushbuttons/menus for the selection of the functions 5 Connecting the devices to the PC 6 Update the
L4561N Stereo Control. Installation manual.
 L4561N Stereo Control www.legrand.com Stereo Control Contents Stereo Control 1 Introduction 4 1.1 Warnings and tips 4 1.2 General description 4 2 Installation 5 2.1 Wiring diagram 5 3 Configuration 7 3.1
F Basic gateway. Installation Manual.
 F455-0 035 94 Basic gateway www.homesystems-legrandgroup.com Contents Description 4 Warnings and recommendations 4 Main functions 4 Legend 4 Connection 5 Wiring diagrams 5 Configuration 6 Procedure with
F Installation manual.
 F459 003549 Installation manual www.homesystems-legrandgroup.com Index General information 4 Warnings and recommendations 4 Main functions 4 Description 4 Connections 5 Driver manager 6 Authentication
2 WIRE video door entry system
 CLASSE 00 AM Audio handset with additional keys WIRE video door entry system 7 Description WIRE audio handset for wall mounted or table-top installation (with specific support to be purchased separately).
TiMonoblocEntrancePanel
 TiMonoblocEntrancePanel Instructions for use 04/14-01 PC 2 TiMonoblockEntrancePanel Instructions for use Index 1. Hardware and Software Requirements 4 1.1 Hardware Requirements 4 1.2 Software Requirements
D45 System. Digital colour entrance panel with addresses list
 D45 System Digital colour entrance panel Description Front view D45 System entrance panel with colour camera and backlighted alphanumeric keyboard equipped with pushbutton to direct calls to the porter
item Instruction sheet PART. T6101D - 05/05-01 PC
 item 342630 Instruction sheet PART. T6101D - 05/05-01 PC CONTENTS Sommario INTRODUCTION 4 Warnings and tips 4 General description 4 Graphic display 5 Pushbuttons and their functions 5 Factory configuration
Temperature control unit
 Temperature control unit 5739 18/19 Installation manual Part. U3582A - 12/08-01 PC Contents 1 - Introduction 5 1.1 - Warnings and tips 5 1.2 - Contents of package 5 2 - Description of the Control unit
D45 System. 3.5 Colour handsfree internal unit. Front view
 D45 System Description D45 System entry level colour handsfree internal unit with 3.5 LCD backlit display. Complete door entry functions. Direct call to switchboard function. 12 ring tones selectable for
AS Keypad User Manual
 AS Keypad User Manual Specifications Operating Voltage: 12~24 VAC/DC Current Draw: TBA Input: request-to-exit (for Relay 1) time out reed switch contact (for Relay 1) Output: Relay 1: N.O./N.C./Com. Output
TiSecurityPolyx user manual
 Version 1.0 06/08 - CT TiSecurityPolyx user manual Software for the configuration of the 3485 Burglar Alarm Unit CONTENTS 1. Hardware and Software requirements 4 2. Installation 4 3. Basic concepts 8
2 WIRE Video Door Entry system
 WIRE Video Door Entry system Description LINEA 300, vandal-resistant WIRE digital call video pushbutton panel (in stainless steel), flush mounted or wall mounted installation (with specific box item 30806
Front view. Internal view. Legend
 SWING audio handset 7 Description WIRE audio handset for wall mounted installation. It s fitted with keys for: door lock release, and programmable keys (---), which operating mode is set through the configuration.
RFID/Digital Access Control Keypad
 R Luminous/ RFID/Digital Access Control Keypad Model:YK-368L-R Germany EMC tested FEATURES AND FUNCTIONS Simple Programming, Easy Operation 3-Operation Mode: ID Card Operation, User Code Operation, ID
BMSO1001. Virtual Configurator. User guide 01/10-01 PC
 BMSO1001 Virtual Configurator User guide 01/10-01 PC 2 Virtual Configurator User guide Content 1. Hardware and Software requirements 4 1.1 Hardware requirements 4 1.2 Software requirements 4 2. Fundamental
HOMETOUCH HOMETOUCH flush mounted box Additional power supply. Rear view
 Description Front view 7 Touch Screen for the management of all MyHOME_Up functions, that can be integrated with the video door entry system, to be used as connected internal unit. To use the home automation
F450. Gateway OpenBacnet. Software Manual.
 F450 Gateway OpenBacnet www.homesystems-legrandgroup.com Contents Start 4 Interaction with the device 4 Device configuration 5 Configure Menu 5 Send the configuration 7 Receive the configuration 8 Firmware
CLASSE 300 THE CONNECTED VIDEO INTERNAL UNIT
 THE CONNECTED VIDEO INTERNAL UNIT The X13E video internal unit allows you to transform every home into a connected home, which can be easily controlled in the home and at a distance using a smartphone.
DG-800 Stand-Alone Proximity Reader Instruction Manual
 DG-800 Stand-Alone Proximity Reader Instruction Manual I. Features 1. Memory volume up to 1000+10 proximity cards/tokens and PINs with the programming time up to 0.5 seconds. 2. Access modes: a. Only Proximity
Video Display Eteris User guide 01GF-28W10
 349340 Video Display Eteris User guide 01GF-28W10 2 Contents 1 Introduction and basic functions 5 1.1 General information 6 1.2 Your Video Display: use it now! 6 1.2.1 Video door entry function keys 7
MH201. Software Manual.
 www.homesystems-legrandgroup.com Contents Start Interaction with the device Device configuration Send the configuration 8 Receive the configuration 9 Firmware update 0 Request device info 0 Home page
AUDIO AND VIDEO DOOR ENTRY SYSTEM WITH NEXA CODED PANEL
 AUDIO AND VIDEO DOOR ENTRY SYSTEM WITH NEXA CODED PANEL 2 INTRODUCTION First and foremost we would like to thank you for purchasing this product. Our commitment to satisfying our customers can be seen
D45 System. 7 touch screen handsfree internal unit. Front & side views
 D45 System Description Front & side views 10 D45 System 7 touch screen video internal unit. Complete door entry functions with alarm managements. International standard SOS pushbutton, intercom function,
RELAY MODULE A/B INSTALLATION/USE INSTRUCTIONS
 RELAY MODULE 9974 INSTALLATION/USE INSTRUCTIONS All connections MUST be made with the electrical supply switched off and the batteries disconnected. GENERAL WARNINGS This manual is intended for technically
TiLocalDisplayNew. Software Manual 07/12-01 PC
 TiLocalDisplayNew Software Manual 07/12-01 PC 2 TiLocalDisplayNew Software Manual Contents 1. Hardware and Software requirements 4 2. Software update 4 3. Fundamental concepts 4 3.1 Function menus and
GUARD CENTURION OPERATING INSTRUCTIONS THE AUTOMATIC CHOICE
 GUARD CENTURION THE AUTOMATIC CHOICE OPERATING INSTRUCTIONS 0 In a In hurry? a hurry? The following KwikLearn procedure and connection diagram will enable you to start using your SmartGUARD system right
Pulse PRO. High security lock for safes USER INSTRUCTIONS
 Pulse PRO High security lock for safes USER INSTRUCTIONS Contents Information about Pulse PRO... 4 Before use... 8 Pre-setup mode... 8 How to select a configuration... 8 Open the lock with a standard
VIDEO DOOR ENTRY SYSTEM OFFER
 VIDEO DOOR ENTRY SYSTEM OFFER CATALOGUE 2013 BTICINO Specialists in Video Door Entry Systems BTicino, introduces a complete range of products and systems capable of meeting all application and building
3001D Smart Safe Manual
 3001D Smart Safe Manual For 3001D-1HL/3001D-3HL/3001D-5HL SUMMARY Thank you for using our company s smart safe. Before you use this product, please read this manual carefully, it will help you to use the
User s manual Primor 1000 / 3000 / 3010/ Level 5
 User s manual Primor 1000 / 3000 / 3010/ Level 5 Content 1 General instructions 2 1.1 Liability notes 2 1.2 Operating notes 2 1.3 Notes on safety 2 1.3.1 Security notes emergency lock 2 2 Visual and acoustic
INSTALLATION INSTRUCTIONS 921P EntryCheck TM
 80 Avenida Acaso, Camarillo, Ca. 90 (805) 494-06 www.sdcsecurity.com E-mail: service@sdcsecurity.com INSTALLATION INSTRUCTIONS 9P EntryCheck TM The EntryCheck 9P Indoor/Outdoor Keypad is a surface mount
PROGRAMMING AND USE INSTRUCTIONS FOR THE OVATION SYSTEM
 Doc. 6001012 Rev B PROGRAMMING AND USE INSTRUCTIONS FOR THE OVATION SYSTEM ALPHA COMMUNICATIONS 42 Central Drive Farmingdale NY 11735-1202 Phone: 631-777-5500 - Fax: 631-777-5599 IMPORTANT NOTICE If the
Digital Keypad Introduction
 K2 Digital Keypad Introduction The K02 uses the latest microprocessor technology to operate door strikes and security systems that require a momentary (timed) or latching dry contact closure. All programming
XP-KIT. Programming & Operations. Programming Starter Kit for Aiphone -XP Series Proximity Reader Stations
 9800 XP-KIT Programming Starter Kit for Aiphone -XP Series Proximity Reader Stations Programming & Operations Manual KIT CONTENTS: Programming Keypad Programming Master Card Pack 0 Blank Proximity Cards
MULTI-PURPOSE SELF-CONTAINED DIGITAL ACCESS CONTROL KEYPAD
 MULTI-PURPOSE SELF-CONTAINED DIGITAL ACCESS CONTROL PAD Programming & Installation Manual An Innovative Product Developed By: PROTECT - ON SYSTEMS LTD. MANUFACTURED BY: 20 R SINCE 1979 ADVANCED ELECTRONICS
D45. High performance door entry system CATALOGUE A Group Brand
 D45 CATALOGUE 2011 High performance door entry system A Group Brand 2 INDEX General features 4 Devices 10 Software 18-19 Solution for multi-storey buildings 20 Solution for a building complex 21-22 Compatibility
AC-Q4x Family. Instruction Manual. Vandal Resistant Stand-Alone controllers. Models: AC-Q41H/HB AC-Q41SB AC-Q42H/HB AC-Q42SB AC-Q44
 AC-Q4x Family Vandal Resistant Stand-Alone controllers Instruction Manual ls: AC-Q41H/HB AC-Q41SB AC-Q42H/HB AC-Q42SB AC-Q44 December 2006 Table of Contents Table of Contents 1. General Information...
CLASS I CLASS I AUTONOMOUS PROXIMITY READER INSTALLATION MANUAL AUTONOMOUS PROXIMITY READER INSTALLATION MANUAL ENGLISH ENGLISH
 CLASS I AUTOMOUS PROXIMITY READER PROXIMITY ACCESS CTROL INSTALLATI MANUAL ENGLISH CLASS I AUTOMOUS PROXIMITY READER PROXIMITY ACCESS CTROL INSTALLATI MANUAL ENGLISH CGRATULATIS YOUR PURCHASE OF THIS QUALITY
D1265. Installation Guide. Touchscreen Keypad
 D1265 EN Installation Guide Touchscreen Keypad D1265 Installation Guide 1.0 Introduction Contents 1.0 Introduction...3 1.1 Overview...3 1.2 Graphical Buttons...3 1.3 Audible Tones...4 1.4 Supervision...4
EN TECHNICAL MANUAL. Audio module Art and Art. 1622L
 EN TECHNICAL MANUAL Audio module Art. 1622 and Art. 1622L Warning Install the equipment by carefully following the instructions given by the manufacturer and in compliance with the standards in force.
212iL Rev. 1.1
 212iL 1 International Electronics, Inc. 427 Turnpike Street Canton, Massachusetts 02021 212iL (illuminated Luxury) Keypad Single Unit Keypad- Control Installation Manual Features: 120 User Capability Illuminated
BIO-PRO Standalone / Weigand fingerprint reader
 BIO-PRO Standalone / Weigand fingerprint reader www.locksonline.co.uk Tel 0845 30 0 0 v 4 x Master Card x0 User Card IP5 DEEE -0 C to +50 C The BIOSYS product complies with Directive 999/5/CE REMINDERS
8-wire Digital. Audio/Video Intercom Systems. Catalogue
 8-wire Digital Audio/Video Intercom Systems Catalogue Quality Certification BTicino has always been aware of and attentive to the highest standards for production and management systems. BTicino has formalised
Updating Reader Firmware
 SWH-xxxx Readers Updating Reader Firmware Version C0 Document Part Number UM-096 July 2012 OVERVIEW This document describes how to download new firmware to Software House SWH-4xxx readers. The procedure
INSTALLATION INSTRUCTIONS 920 EntryCheck TM
 801 Avenida Acaso, Camarillo, Ca. 93012 (805) 494-0622 www.sdcsecurity.com E-mail: service@sdcsecurity.com INSTALLATION INSTRUCTIONS 920 EntryCheck TM The EntryCheck 920 Indoor/Outdoor Keypad is a surface-mount
SL2000E. Status Output. Electronic Code Lock. Features. Input. Exit Button Input. Introduction. Door Contact Input. Functional Description.
 SL2000E Electronic Code Lock Features Door Relay output Status transistor output Aux transistor output Door Contact input Exit Button input INSTALLER code for programming MASTER code for arming/disarming
3001D Smart Safe Manual
 3001D Smart Safe Manual For 3001D-1GL/3001D-3GL/3001D-5GL SUMMARY Thank you for using our company s smart safe. Before you use this product, please read this manual carefully, it will help you to use the
User Manual. PCKeypad Wireless Keypad
 User Manual PCKeypad Wireless Keypad Description The PCKeypad is a wireless keypad with a PentaCODE transmitter built-in. It works with all of Elsema s PCR series receivers. The installer has the option
Indoor/Outdoor Proximity Reader and Keypad with 10cm (4in) Read Range
 Read Range") Indoor/Outdoor Proximity Reader and Keypad with 10cm (4in) Read Range Stand alone CR-R885-SB Installation and Operating Instructions V1.1 TABLE OF CONTENTS Installation... 2 Mounting and Wiring... 2 Mounting
Indoor/Outdoor Proximity Reader and Keypad with 10cm (4in) Read Range Stand alone CR-R885-SB Installation and Operating Instructions V1.1 TABLE OF CONTENTS Installation... 2 Mounting and Wiring... 2 Mounting
Lens of the access control (Optional) Camera: pick up the image. PP NN TS : configurator. ISP: entrance panel software upgrade connector
 Camera: pick up the image. PP NN TS : configurator. ISP: entrance panel software upgrade connector") 322011 LE06448AA01CN-13W17 Description 12 1 11 10 9 23 13 14 2 22 15 16 8 21 17 7 3 20 6 4 5 19 18 1. Compensation Lamp 10. Lens of the access control (Optional) 18. Targe BUS use CAT5 table connect to
322011 LE06448AA01CN-13W17 Description 12 1 11 10 9 23 13 14 2 22 15 16 8 21 17 7 3 20 6 4 5 19 18 1. Compensation Lamp 10. Lens of the access control (Optional) 18. Targe BUS use CAT5 table connect to
User s manual Primor 1000 / 3000 / 3010 / Level 15
 User s manual Primor 1000 / 3000 / 3010 / Level 15 Content 1 General instructions 2 1.1 Liability notes 2 1.2 Operating notes 2 1.3 Notes on safety 2 1.3.1 Sicherheitshinweise Notschloss 2 2 Visual and
INSTALLATION INSTRUCTIONS 920P EntryCheck TM
 801 Avenida Acaso, Camarillo, Ca. 93012 (805) 494-0622 www.sdcsecurity.com E-mail: service@sdcsecurity.com INSTALLATION INSTRUCTIONS 920P EntryCheck TM The EntryCheck 920P Indoor/Outdoor Keypad is a surface-mount
KP2000E/EM Series Style Keypad
 23852973 KP2000E/EM Series Style Keypad Installation and Programming Instructions Models KP2000EXX and KP2000EMXX Specifications Parameter Voltage Requirements Keypad Current Requirements (Max) Relay Contact
UNIVERSAL EXPANDER FOR CARD / CHIP READERS INT-R. 1. Features. 2. Installation and start-up
 UNIVERSAL EXPANDER FOR CARD / CHIP READERS INT-R int-r_en 09/11 The INT-R expander interfaces with the INTEGRA and CA-64 alarm control panels, replacing the previously offered CA-64 SR and CA-64 DR expanders.
180 Series Keypad. Handbook. Revision 2.1
 180 Series Keypad Handbook Revision 2.1 Revision History Revision 1.0 Initial release Revision 2.0 Major update with addition of 180-40 Added 180-40 to document and various headings Note regarding unique
SK-3133-PPQ Heavy-Duty Outdoor Access Control Keypad with Proximity Reader
 SK-3133-PPQ Heavy-Duty Outdoor Access Control Keypad with Proximity Reader Features: Rugged construction heavy-duty stainless steel faceplate with coated steel housing Built-in proximity card reader 12~24
SK-1011-SDQ Access Control Keypad. Manual
 SK-1011-SDQ Access Control Keypad Manual Quick Installation Guide: This page is for installers looking to do a basic installation and programming of the keypad. For more in-depth installation and programming
YourBell INEXPENSIVE, RELIABLE USB PRODUCTS.
 YourBell INEXPENSIVE, RELIABLE USB PRODUCTS www.bcsideas.com 1 Table of Contents General Information...3 Installation...3 Software...3 USB Driver...3 Hardware...5 Figure 1 Hardware Over View 6 Figure 2
Synergis Master Controller 2.2 Integration Guide for Axis Interface Modules
 Synergis Master Controller 2.2 Integration Guide for Axis Interface Modules This guide supplements the Synergis Master Controller Configuration Guide and explains how to configure Axis interface modules
DYB2200 INEXPENSIVE, RELIABLE USB PRODUCTS.
 DYB2200 INEXPENSIVE, RELIABLE USB PRODUCTS www.bcsideas.com 1 Table of Contents General Information...3 Installation...3 Software...3 USB Driver...4 Hardware...5 Figure 1 Hardware Overview Front 5 Figure
VIDEO DOOR ENTRY SYSTEM OFFER
 VIDEO DOOR ENTRY SYSTEM OFFER CA 2 Index Offer overview Different solutions for different applications 4 Basic kits Basic kit catalogue 8 4 wire kits overview 10 Expandable kits Expandable kit catalogue
NX-588E USB Flash Programmer Instructions v1.1
 NX-588E USB Flash Programmer Instructions v1.1 Installing the NX-588E on a computer This process should take 5-10 min. 6. The following screen will appear: It is essential you carry out this step from
EL-ST100 KEYPAD CONTROLLER
 WIRING DIAGRAM EL-ST100 KEYPAD CONTROLLER WEATHER-PROOF STANDALONE ACCESS CONTROLLER WITH KEYPAD & PROXIMITY TECHNOLOGY Programming and Installation Manual NOTE: www.elock2u.com ICT at work! Version 3.6
EN TECHNICAL MANUAL. ViP Mini hands-free monitor art. 6721W. Passion.Technology.Design.
 EN TECHNICAL MANUAL ViP Mini hands-free monitor art. 6721W Passion.Technology.Design. Table of contents Warning Monitor description... 3 Soft-touch key description...4 Indicator LED description...4 Technical
NX1700EIB02 (Supercedes NX1700EIA02) NetworX Series. NX-1700E Proximity Card Reader Installation and Startup
 NetworX Series. NX-1700E Proximity Card Reader Installation and Startup") NX1700EIB02 (Supercedes NX1700EIA02) NetworX Series NX-1700E Proximity Card Reader Installation and Startup 2002 GE Interlogix All rights reserved. Printed in the United States of America. These instructions
NX1700EIB02 (Supercedes NX1700EIA02) NetworX Series NX-1700E Proximity Card Reader Installation and Startup 2002 GE Interlogix All rights reserved. Printed in the United States of America. These instructions
K44 Code lock. Technical manual
 K44 Code lock GB Technical manual Copyright 2002 Bewator AB, Solna, Sweden. Material from the K44 Technical manual may only be copied with the consent in writing of Bewator. Bewator reserves the right
EN FULL DETAILS SKB. Vandal Resistant keypad - Full Details
 EN FULL DETAILS SKB Vandal Resistant keypad - Full Details WARNINGS Carry out the installation by carefully following the instructions provided by the manufacturer in accordance with the current standards.
YourBell INEXPENSIVE, RELIABLE USB PRODUCTS. 1
 YourBell INEXPENSIVE, RELIABLE USB PRODUCTS www.bcsideas.com 1 Table of Contents General Information...3 Installation...3 Software...3 USB Driver...3 Hardware...5 Figure 1 Hardware Over View 5 Figure 2
Keypad Lock. Operation and Service Manual. Order parts online
 Keypad Lock Order parts online www.follettice.com Operation and Service Manual 801 Church Lane Easton, PA 18040, USA Toll free (800) 523-9361 (610) 252-7301 Fax (610) 250-0696 www.follettice.com 00163345R00
Compact Keypad. ins /02/2010. Exit button (push to make) 12V DC release current rating must be less than 1A.
 12V DC release current rating must be less than 1A.") Compact Keypad Grey Exit button (push to make) 1V DC White Black 115V DC (fuse rating 1A) 1V DC release current rating must be less than 1A. The diode current rating must be equal to or greater than the
Compact Keypad Grey Exit button (push to make) 1V DC White Black 115V DC (fuse rating 1A) 1V DC release current rating must be less than 1A. The diode current rating must be equal to or greater than the
INSTALLATION INSTRUCTIONS. lighted and acoustic feedback. capacity to manage up to 200 users. does not require a remote unit. backlit touch keypad
 DIGITO MATRIX Stand Alone Access Control with numerical codes Stand Alone Access Control with numerical codes and transponder reader lighted and acoustic feedback capacity to manage up to 200 users does
M A C 3 Wind Speed Alarm & Controller
 M A C 3 Wind Speed Alarm & Controller Installation Instructions Thank you for purchasing the MAC3 wind speed alarm and controller. This manual is designed to lead you through a step-by-step process to
SK-1131-SPQ Access Control Keypad with Proximity Card Reader. Manual
 SK-1131-SPQ Access Control Keypad with Proximity Card Reader Manual Quick Installation Guide: This page is for installers looking to do a basic installation and programming of the keypad. For more in-depth
39E Electronic Combination Lock SETUP INSTRUCTIONS
 The ComboGard Pro Lock has three states of operation: Factory Default, Manual Setup, and Active. ComboGard Pro locks are shipped from LA GARD in Factory Default state without Users or features enabled.
2000 Series e/em Style Keypad Installation and Programming Manual
 2000 Series e/em Style Keypad Installation and Programming Manual Document Number: 6054022 Revision: 0 Date: 12/21/06 Table of Contents Table of Contents Section 1: Introduction... 6 1 Product Description...6
Single Door Standalone Access Control User Manual
 Single Door Standalone Access Control User Manual Reading this manual carefully before install and use the device 1. Packing List Name Quantity Remarks Keypad User manual Screw driver Rubber plug Self
EN TECHNICAL MANUAL. Handsfree door entry phone Mini 6750W, Mini 6751W. Passion.Technology.Design.
 EN TECHNICA MANUA Handsfree door entry phone Mini 6750W, Mini 6751W Passion.Technology.Design. Table of contents Warning Description... 3 Art. 6750W...3 Art. 6751W...4 Technical characteristics... 5 Wall-mounted...
Proximity Card and Pin Reader Installation Manual
 Multi Prox Proximity Card and Pin Reader Installation Manual PUBLICATION INFORMATION 60A9 - Draft Release Version 0.1.2 71D0 - Version 1.0.5 CONTENTS Introduction... 1 Legend... 2 Terminology... 2 Mounting...
Partizan PAB-FC2. Fingerprint scan time Fingerprint identification time. <0.5 s < % <0.0198% Ingress protection rating
 1. Features & Technical Parameters 1.1 Features: Partizan PAB-FC2 Metal vandalproof housing Secure and reliable biometric fingerprint recognition Simple for using, wiring can be done by a user without
ADVANTAGE DKE QUICK START GUIDE. 2 Make sure you have everything shown here. 3. What s what? All important internal components labeled for you
 1 of 6 START HERE 1 Carefully unpack box. 2 Make sure you have everything shown here. 3 Unlock and remove front panel of keypad unit, then using carriage bolts and hex nuts, attach unit to pedestal as
MODEL KP-100 ACCESS CONTROL DIGITAL KEYPAD OPERATING INSTRUCTIONS
 MODEL KP-100 ACCESS CONTROL DIGITAL KEYPAD OPERATING INSTRUCTIONS Model KP-100 is a self-contained digital keypad. This keypad is suitable for residential, industrial, and commercial installations. It
Tel Fax: Toll free:
 ELECTRONIC CONTROL UNIT (cod. 2302B Series) for swing gates automation (Mini Tank Series) C5 Accessories power supply: 24V dc Max 200 ma T1 Trimmer regulation: Operating times Open pause time Leaf delay
CV-550SPK V2 Waterproof Keypad/Reader/Controller Installation Instructions
 CV-550SPK V2 Waterproof Keypad/Reader/Controller Installation Instructions Packing List NAME MODEL/SIZE QTY Self tapping screw 0.15 x 1.06 (4mm 27 mm) Rubber plug 0.23 x 1.2 (6mm 30 mm) Star screw driver
INSTRUCTION MANUAL DIGI-LOCK. Keyless Entry System. Installation. Programming. Troubleshooting. BASE Industries
 INSTRUCTION MANUAL DIGI-LOCK Keyless Entry System Installation Programming Troubleshooting BASE Industries 45 Pomona Rd. Corona, CA. 9880 Revision F TABLE OF CONTENTS OWNER REGISTRATION CARD INTRODUCTION
EN TECHNICAL MANUAL. Door-entry phone art. 2738W
 EN TECHNICA MANUA Door-entry phone art. 78W Warning Intended use This Comelit product was designed for use in the creation of audio and video communication systems in residential, commercial or industrial
EntraGuard Bronze. Quick Start Guide. Telephone Entry. 1.0 Specifications. 2.0 Unit Installation
 The EntraGuard Bronze is a residential telephone keypad entry system which allows a homeowner to communicate directly with visitors and provide access by using any phone extension in the home. Because
INSTALLATION INSTRUCTIONS FOR THE MINI-KEY SYSTEM. Doc Rev B
 INSTALLATION INSTRUCTIONS FOR THE MINI-KEY SYSTEM Doc. 6001051 Rev B Page 2 of 7 Doc 6001051 Rev B IMPORTANT NOTICES The Mini-Key system is a very reliable and easy to use system. However, damage could
SK-1011-SQ Digital Access Keypad with 5A Relay Output
 User Operation for the SK--SQ. Using the User Codes: A. User codes operate the door (4-8 digits long). Press u u u u B. The key must also be pressed if the keypad is in manual-entry mode. Press u u u u
Outdoor Stand-Alone Weatherproof Keypads
 Outdo Stand-Alone Weatherproof Keypads Manual (SK-2323-SDQ shown) (SK-1323-SPQ shown) Model Number 2 Relay Outputs Mullion-Style Keypads Backlit Keys Proximity Reader SK-2323-SDQ SK-2323-SPQ Sealed-Environment
EAR 1000 / ADRA 1000 / Installation and Programming Manual
 EAR 1000 / 2 000 ADRA 1000 / 2000 Installation and Programming Manual EAR 1000/2000 and ADRA 1000/2000 Installation and Programming Manual Release 3 Version 3 February 2004 NOTICE This publication refers
CATALOGUE D45 High performance door entry system
 CATALOGUE 2011 D45 High performance door entry system 2 INDEX General features 4 Devices 10 Software 18-19 Solution for multi-storey buildings 20 Solution for a building complex 21-22 Compatibility with
Setup Instructions. LA GARD ComboGard Pro 39E Electronic Lock
 Setup Instructions LA GARD ComboGard Pro 39E Electronic Lock P/N 731.018 Rev I - 05/2018 ComboGard Pro locks can either be configured using the ComboGard Pro Setup software or through a series of keypad
Carefree-Security. Installation and programming instructions 1050A. Owner s Manual
 Carefree-Security Heavy Duty Commercial - Industrial Fully Sealed Digital Access Keypad Specially Designed for Gate Operators, Overhead Doors, Specialty Doors & Electric Door Locking Devices SINGLE OR
MAC3 Wind Speed Alarm & Controller. Installation Instructions
 MAC3 Wind Speed Alarm & Controller Installation Instructions Table of Contents Overview... 3 Installation... 3 Optional Equipment... 10 Dual Sensor Operation... 10 Other Optional Equipment... 10 Operation